


When a user is registering, the last thing you want to do is get in their way or confuse them. In this tutorial, you’ll improve an advanced registration form’s display by modifying a theme.
Previously, we built a self service registration form for a real estate webapp and used FusionAuth as the auth server. It was a two step form which captured information about their home buying needs. However, the form had a few rough elements. In particular, it wasn’t clear which data someone was supposed to enter into which form field.
This tutorial builds on the previous one and walks through changing the theme. While this tutorial will reference the previous form, feel free to apply it to any form you’ve created as well.
This is part of a three part series. Here are all the posts:
- How to use FusionAuth’s advanced registration forms
- How to theme FusionAuth’s advanced registration forms (this one)
- Building a user profile portal with Flask, OAuth, and APIs
FusionAuth setup
Go to “Settings” and then create an API key by going to “API Keys”. We’ll be using this key to script some of our theme management, which means we need permission for this endpoint:
/api/theme: all methods
You may also check no endpoints or methods. This creates a super-user key, able to do anything. Well, at least able to access all of the FusionAuth API. This is fine for a tutorial, but for production, please limit access.
Creating a custom theme for a single or multi-tenant configuration
The next step is to create a new theme. You will be changing some of the messages to improve the user experience, and the default theme is read-only. Themes are assigned on a tenant by tenant basis, so you can either change the theme for the default tenant (what this tutorial does) or create a new tenant and assign a new theme to it. FusionAuth supports multiple tenants out of the box, so either way works.
This is the theme you’ll modify throughout the rest of this blog post.
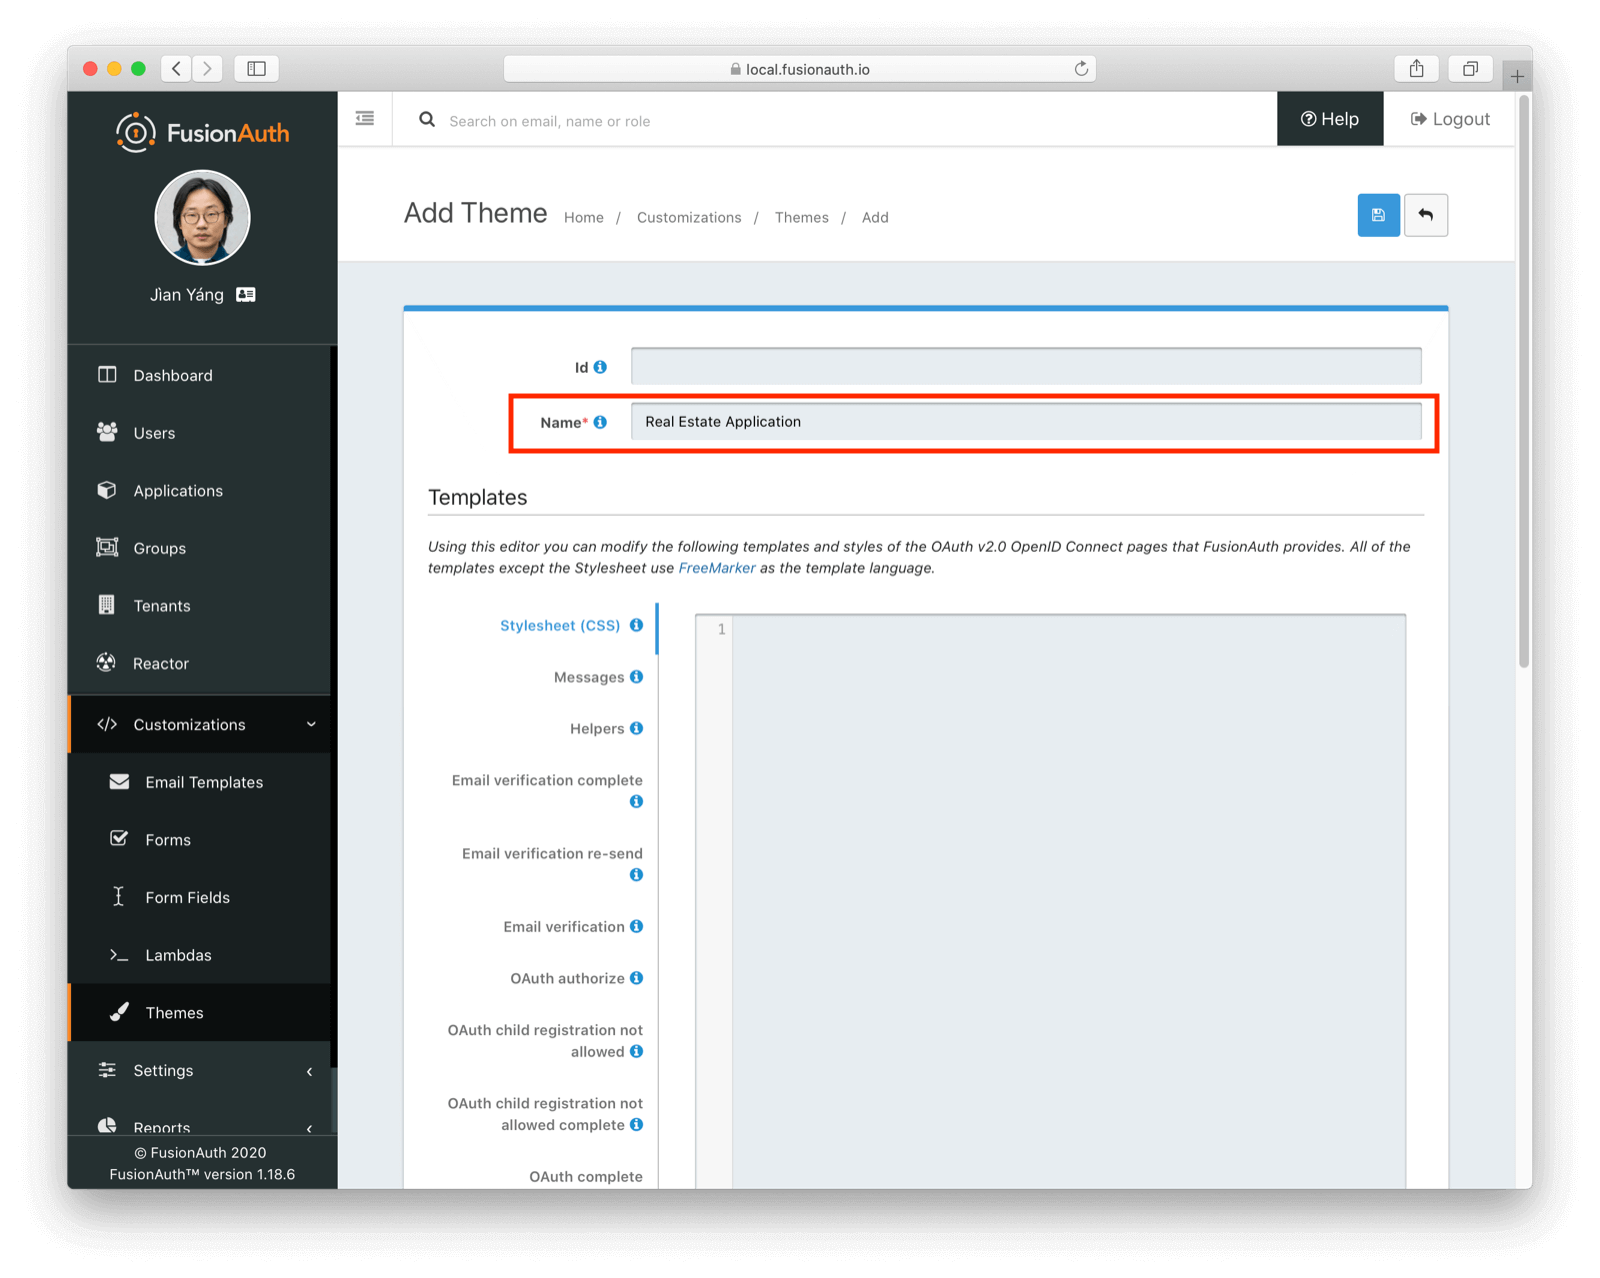
Navigate to Customizations -> Themes . Duplicate the existing “FusionAuth” theme. Rename your theme to something meaningful, such as “Real Estate Application”. Before you save it by clicking the blue icon, it should look like this:
Navigate to Tenants and then edit the “Default” tenant. Go to the General tab and update the Login theme setting to the new theme. Save the configuration when the screen looks like:

Customizing our theme
Customizing the theme gives you full control over what the user sees. As a reminder, here’s what the first step of the registration flow looked like at the end of the form creation post:
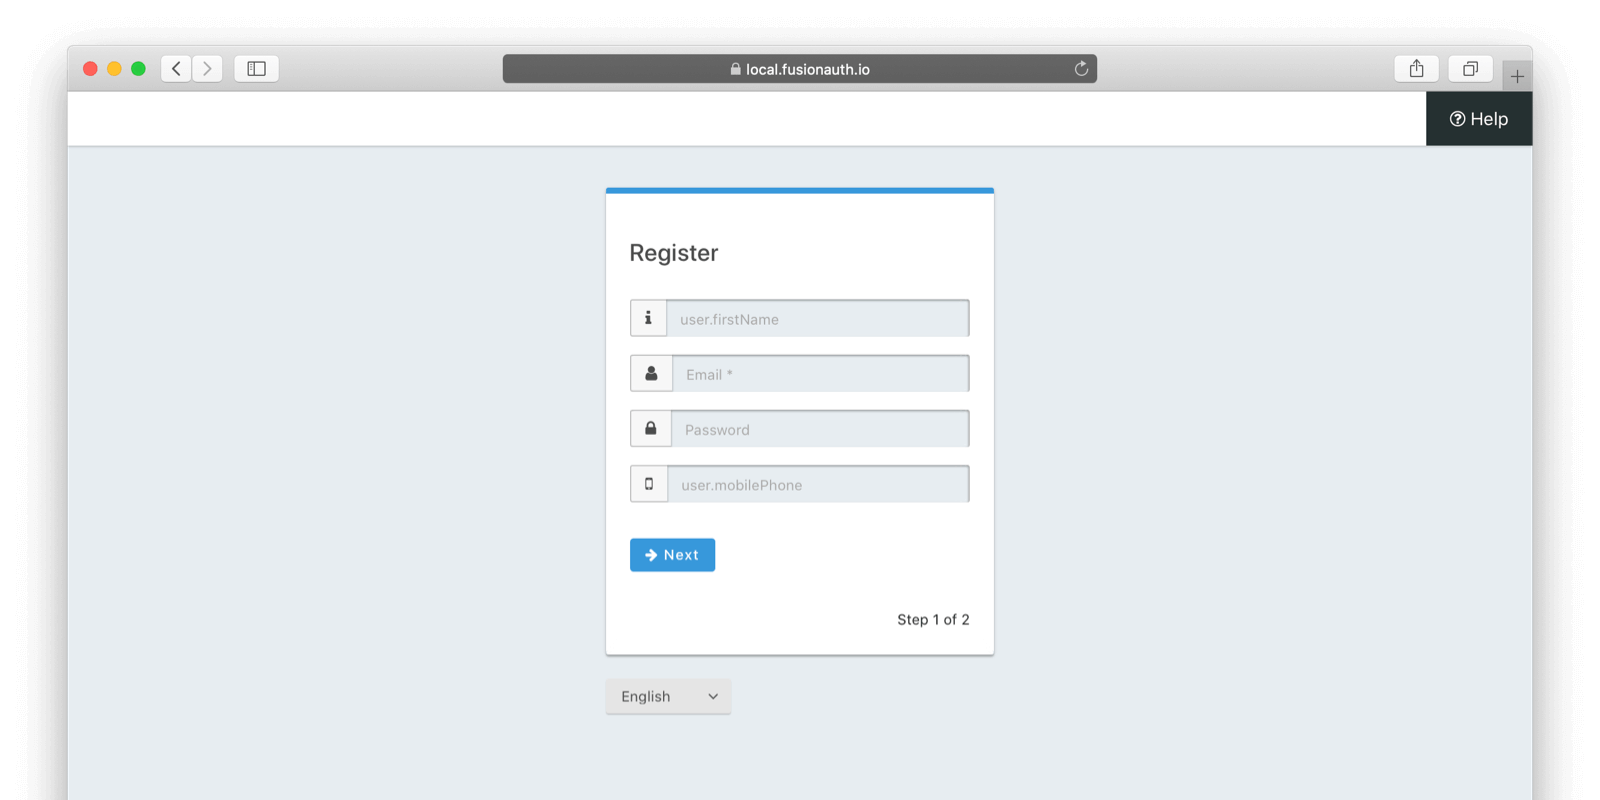
We’re going to add in understandable placeholders and labels, but there’s a lot more you can do; check out the theming documentation for more.
To begin, in the administrative user interface, navigate to Customizations -> Themes . Find the theme you created above and copy its id; mine is de03191a-9369-4732-a9c4-0467d1f26482.
Modifying a theme via API
To change the hints and validation messages, you must edit a file containing messages. This is a Java properties file, and can be changed via the administrative user interface or the API. In this post, you’re going to use the API to make the changes. This will show the power of the API first approach that FusionAuth takes, as well as providing a way to version control the file, should you so desire.
These scripts assume you are running FusionAuth at http://localhost:9011; if not, adjust accordingly. These scripts are also available on GitHub. They also require you to have jq and python3 installed locally.
Retrieving a theme file for local editing
First, retrieve the messages. You want them in a text file for easy editing. Below is a shell script which converts the JSON into a newline delimited file:
API_KEY=<your api key>
THEME_ID=<your theme id>

curl -H "Authorization: $API_KEY" 'http://localhost:9011/api/theme/'$THEME_ID|jq '.theme.defaultMessages' |sed 's/^"//' |sed 's/"$//' |python3 convert.py > defaultmessages.txt
The convert.py script turns embedded newlines into real ones:
import sys

OUTPUT = sys.stdin.read()
formatted_output = OUTPUT.replace('\\n', '\n')
print(formatted_output)
While this script only works for the messages file, it can be tweaked to handle other parts of a theme, such as the HTML template files. This is left as an exercise for the reader; pull requests are welcome.
Modifying the messages file
Add your API key and theme ID, then run the script. You’ll end up with a defaultmessages.txt file in the current directory:
#
# Copyright (c) 2019-2020, FusionAuth, All Rights Reserved
#
# Licensed under the Apache License, Version 2.0 (the \"License\");
# you may not use this file except in compliance with the License.
# You may obtain a copy of the License at
#
#   http://www.apache.org/licenses/LICENSE-2.0

# ...

# Webhook transaction failure
[WebhookTransactionException]=One or more webhooks returned an invalid response or were unreachable. Based on your transaction configuration, your action cannot be completed.
It’s about 200 lines; the above is an excerpt. Open it in your favorite text editor.
If you are interested in localized messages, check out the
fusionauth-localizationproject.
To improve the registration form, add values to the Custom Registration section. Maintaining sections in this property file isn’t enforced (it’s not a .ini file) but it’s a good idea to change only what is needed. Upgrades to FusionAuth may change the properties file and you will have to merge the changes, so simpler is better. Here is the section to which you’re going to add lines:
# ...
#
# Custom Registration forms. These must match the domain names.
#
user.email=Email
user.password=Password
user.birthDate=Birthdate

#
# Custom Registration form validation errors.
#
[confirm]user.password=Confirm password
# ...
The keys of the messages file match the field keys for the registration form. Here’s what you’d add to set up placeholders for the real estate application registration form:
user.firstName=Your first name
user.mobilePhone=Your mobile phone num
registration.data.minprice=Minimum home price
registration.data.maxprice=Maximum home price
registration.data.geographicarea=Where are you looking?
You aren’t limited to placeholders, either. You can add validation messages to the section starting with: # Custom Registration form validation errors. You can examine the Default validation errors section for examples of all the errors available.
Append the key to provide specific errors for a given form field. For example, to display a user friendly error message when price range information is omitted, add these properties:
[invalid]registration.data.minprice=Minimum home price required
[invalid]registration.data.maxprice=Maximum home price required
If any of the values you add to defaultmessages.txt have a double quote in them, escape it: \". This prevents issues when this file is converted back into JSON, which must happen before the changes are reflected in FusionAuth.
Updating the theme in FusionAuth
After you’ve made all your changes to defaultmessages.txt, you need to turn it back into the JSON format the API expects. You must also add the keys and quotes previously stripped off. Finally, you have to make the update request to FusionAuth. For the update, use the PATCH method, which only updates the elements of an object provided.
This script performs all the above actions on the defaultmessages.txt file:
API_KEY=<your api key>
THEME_ID=<your theme id>

FILE_NAME=out.json$$

awk '{printf "%s", $0"\\n"}' defaultmessages.txt |sed 's/^/{ "theme": { "defaultMessages": "/' | sed 's/$/"}}/' > $FILE_NAME

STATUS_CODE=`curl -XPATCH -H 'Content-type: application/json' -H "Authorization: $API_KEY" 'http://localhost:9011/api/theme/'$THEME_ID -d @$FILE_NAME -o /dev/null -w '%{http_code}' -s`

if [ $STATUS_CODE -ne 200 ]; then
  echo "Error with patch, exited with status code: "$STATUS_CODE
  exit 1
fi

rm $FILE_NAME
Run this script with the modified defaultMessages.txt file. This will apply the changes to your theme.
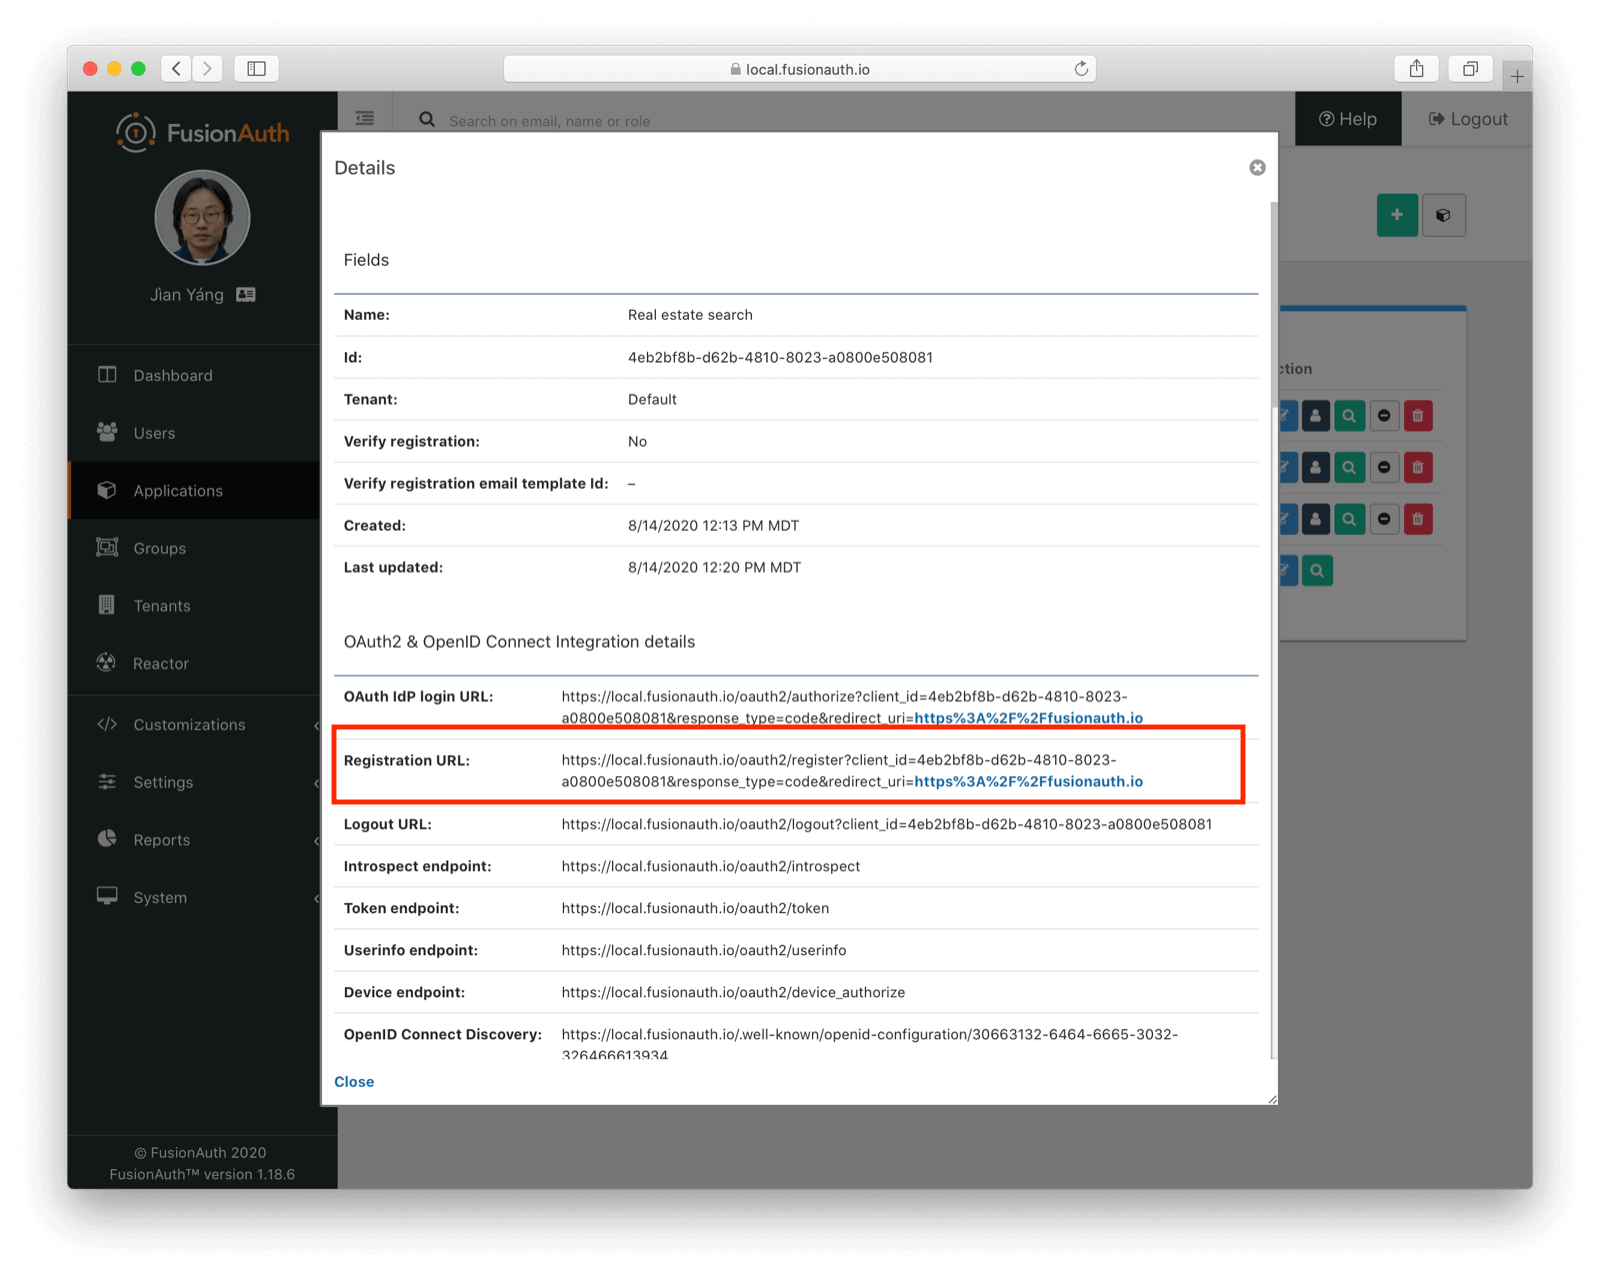
To view the changes, find the registration URL by going to the Application tab in the FusionAuth administrative user interface. View your application and copy the registration URL:
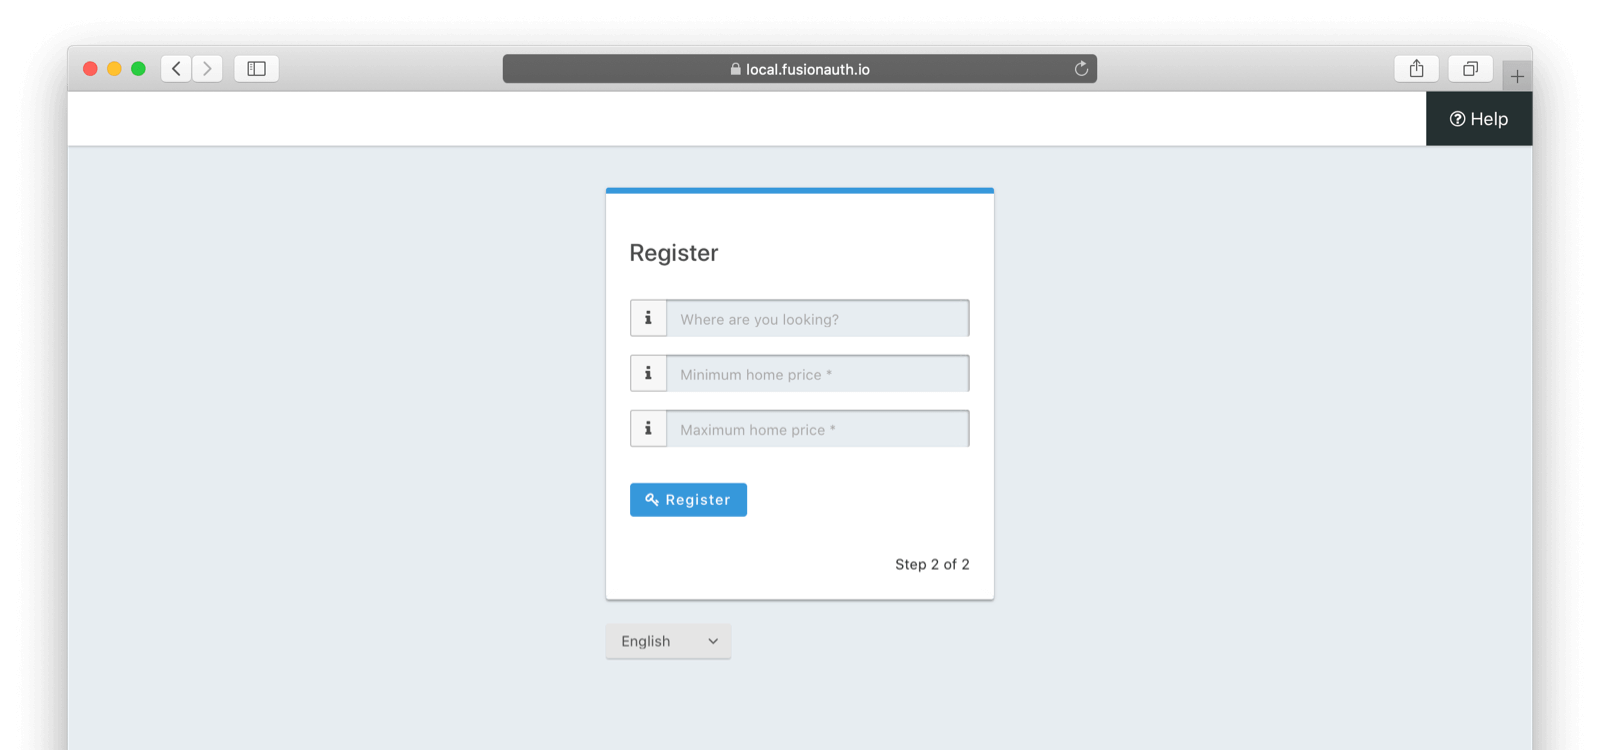
Open an incognito window and visit this URL. You should see your shiny new placeholders on the first page:

If you fill out the first step, you’ll see the second page with the correct hints as well:
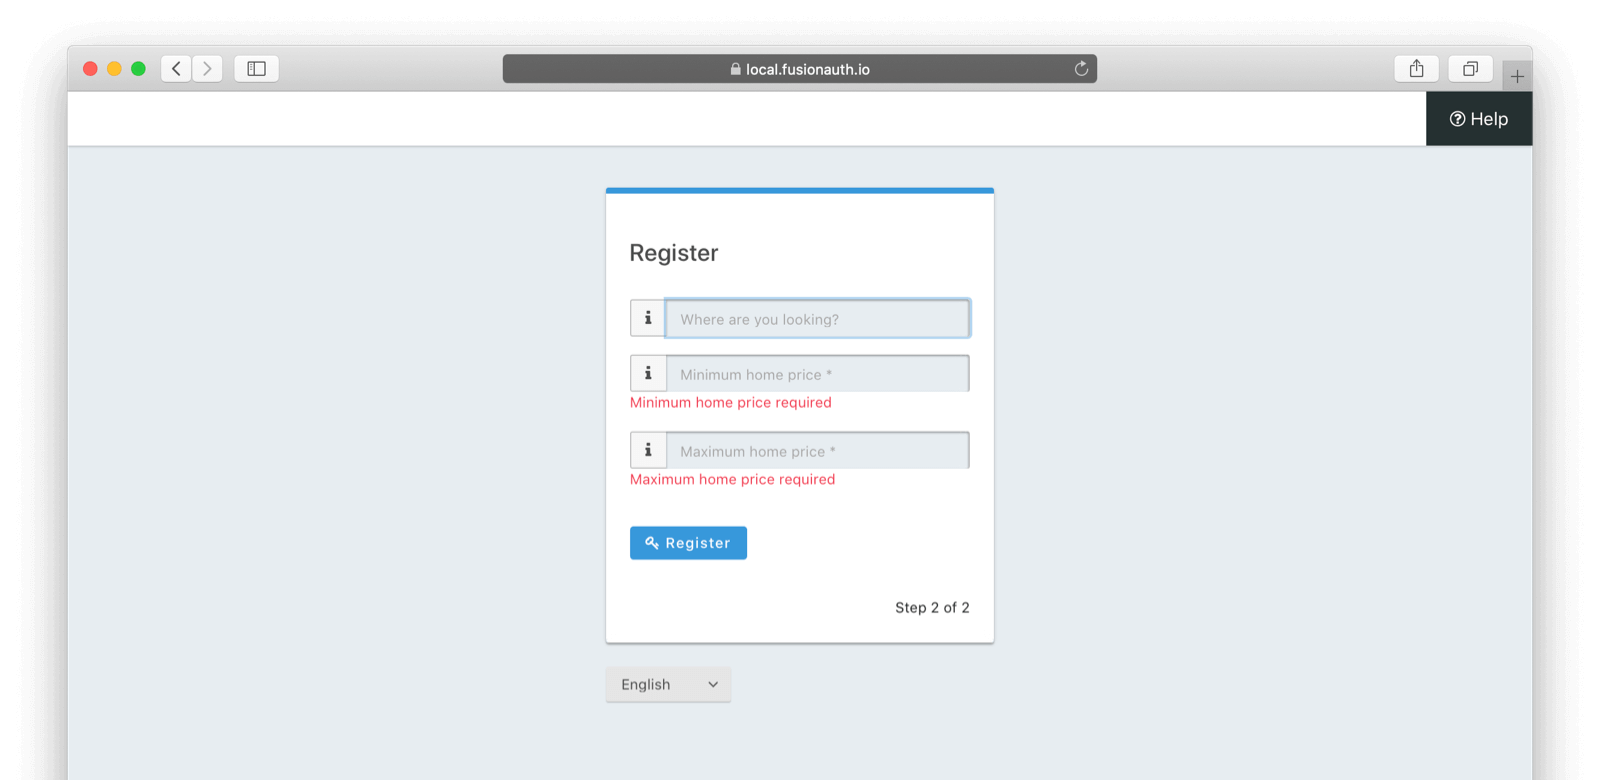
Validation and theming
On the second screen, if you submit the registration form without providing a price range, you’re shown the error messages added above:
Adding form labels
You can customize your field display more extensively by modifying the customField macro. This is in the Helpers section of your theme. Rather than use the API to do this, let’s edit it directly in the administrative user interface.
Navigate to Themes and edit your theme. Click on Helpers and scroll to the bottom. You’ll be modifying the customField macro. Here’s the default implementation for this FreeMarker macro:
[#macro customField field key autofocus=false placeholder=""]
  [#assign fieldId = field.key?replace(".", "_") /]
  [#local leftAddon = field.data.leftAddon!'info' /]
  [#if field.control == "checkbox"]
    [#if field.options?has_content]
      [@checkbox_list field=field id="${fieldId}" name="${key}" required=field.required autofocus=autofocus options=field.options /]
    [#else]
      [@checkbox field=field id="${fieldId}" name="${key}" required=field.required autofocus=autofocus /]
    [/#if]
  [#elseif field.control == "number"]
    [@input id="${fieldId}" type="number" name="${key}" leftAddon="${leftAddon}" required=field.required autofocus=autofocus placeholder=theme.optionalMessage(placeholder) /]
  [#elseif field.control == "password"]
    [@input id="${fieldId}" type="password" name="${key}" leftAddon="lock" autocomplete="new-password" autofocus=autofocus placeholder=theme.optionalMessage(placeholder)/]
  [#elseif field.control == "radio"]
    [@radio_list field=field id="${fieldId}" name="${key}" required=field.required autofocus=autofocus options=field.options /]
  [#elseif field.control == "select"]
    [@select id="${fieldId}" name="${key}" required=field.required autofocus=autofocus options=field.options /]
  [#elseif field.control == "textarea"]
    [@textarea id="${fieldId}" name="${key}" required=field.required autofocus=autofocus placeholder=theme.optionalMessage(placeholder) /]
  [#elseif field.control == "text"]
    [#if field.type == "date"]
      [@input id="${fieldId}" type="text" name="${key}" leftAddon="${leftAddon}" required=field.required autofocus=autofocus placeholder=theme.optionalMessage(placeholder) class="date-picker" dateTimeFormat="yyyy-MM-dd" /]
    [#else]
      [@input id="${fieldId}" type="text" name="${key}" leftAddon="${leftAddon}" required=field.required autofocus=autofocus placeholder=theme.optionalMessage(placeholder) /]
    [/#if]
  [/#if]
[/#macro]
It looks a little wonky if you aren’t used to it, but this is a series of if/then statements which get executed against every custom field as the user interface is being generated. The macro looks at each field definition and creates the correct HTML element. Well, technically, it calls another macro such as input or select, but you get what I mean. For instance, a password field will be rendered as an HTML input field with the type password.
Let’s add a label to each field. Right after [#assign fieldId = field.key?replace(".", "_") /], add this:
<label for="${fieldId}">${theme.optionalMessage(field.key)}:</label>Open an incognito window and go through the registration flow again. You should see labels for both steps. These label values will be pulled from your message bundles, so can be localized in the same way as any of the other messages. As a bonus, because you used the label HTML element, you can now click on the text label and the browser will put the cursor into the text input field. User experience win!
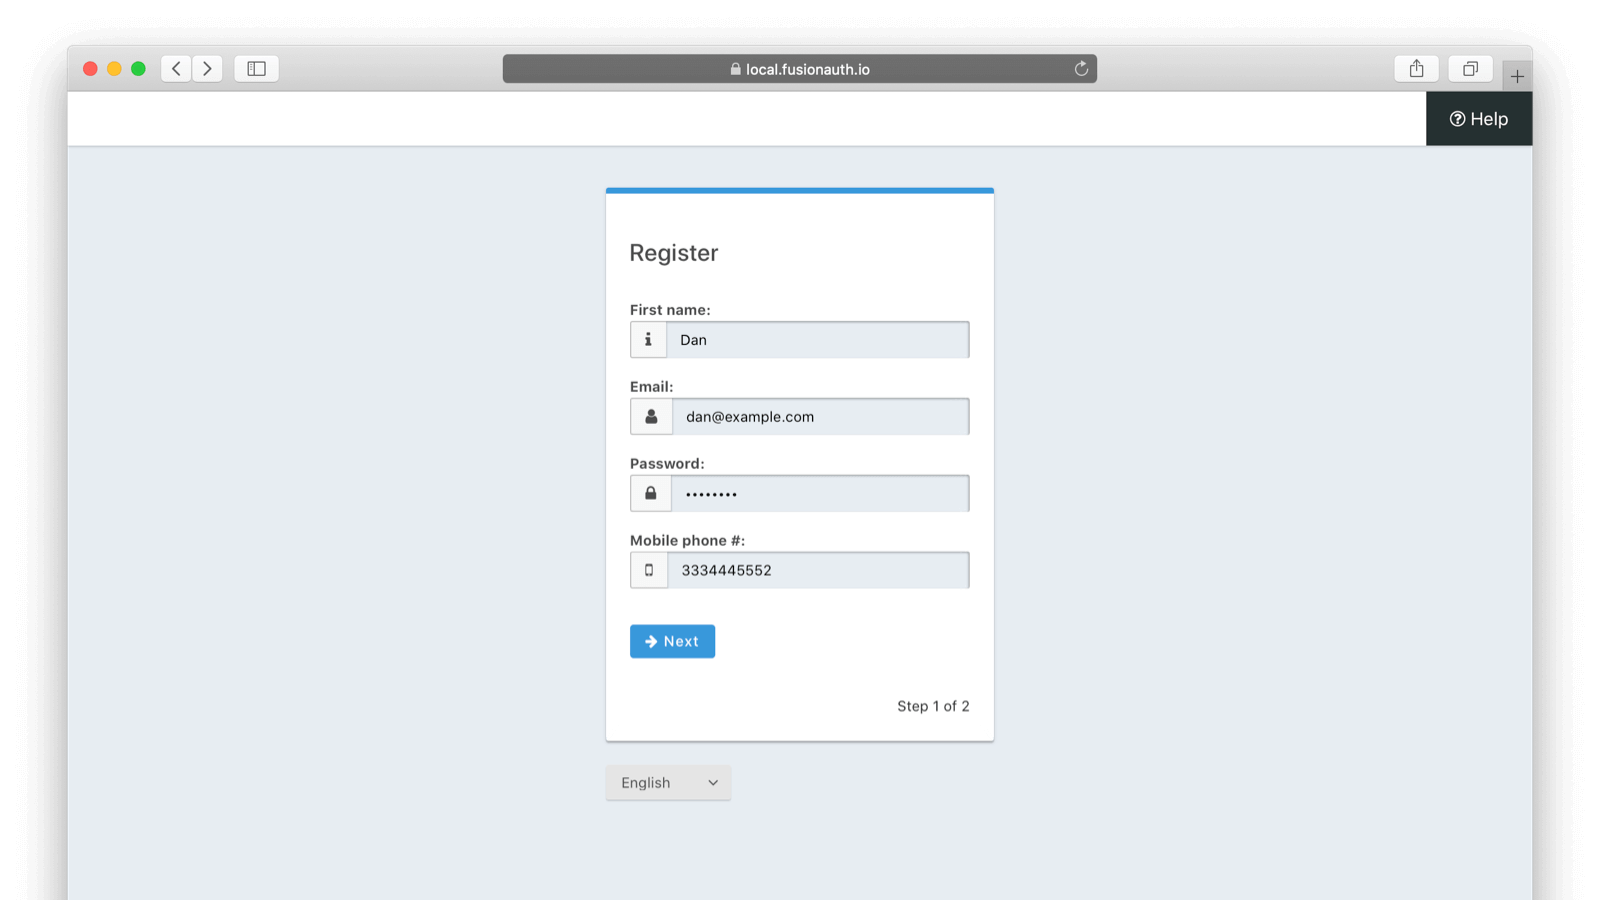
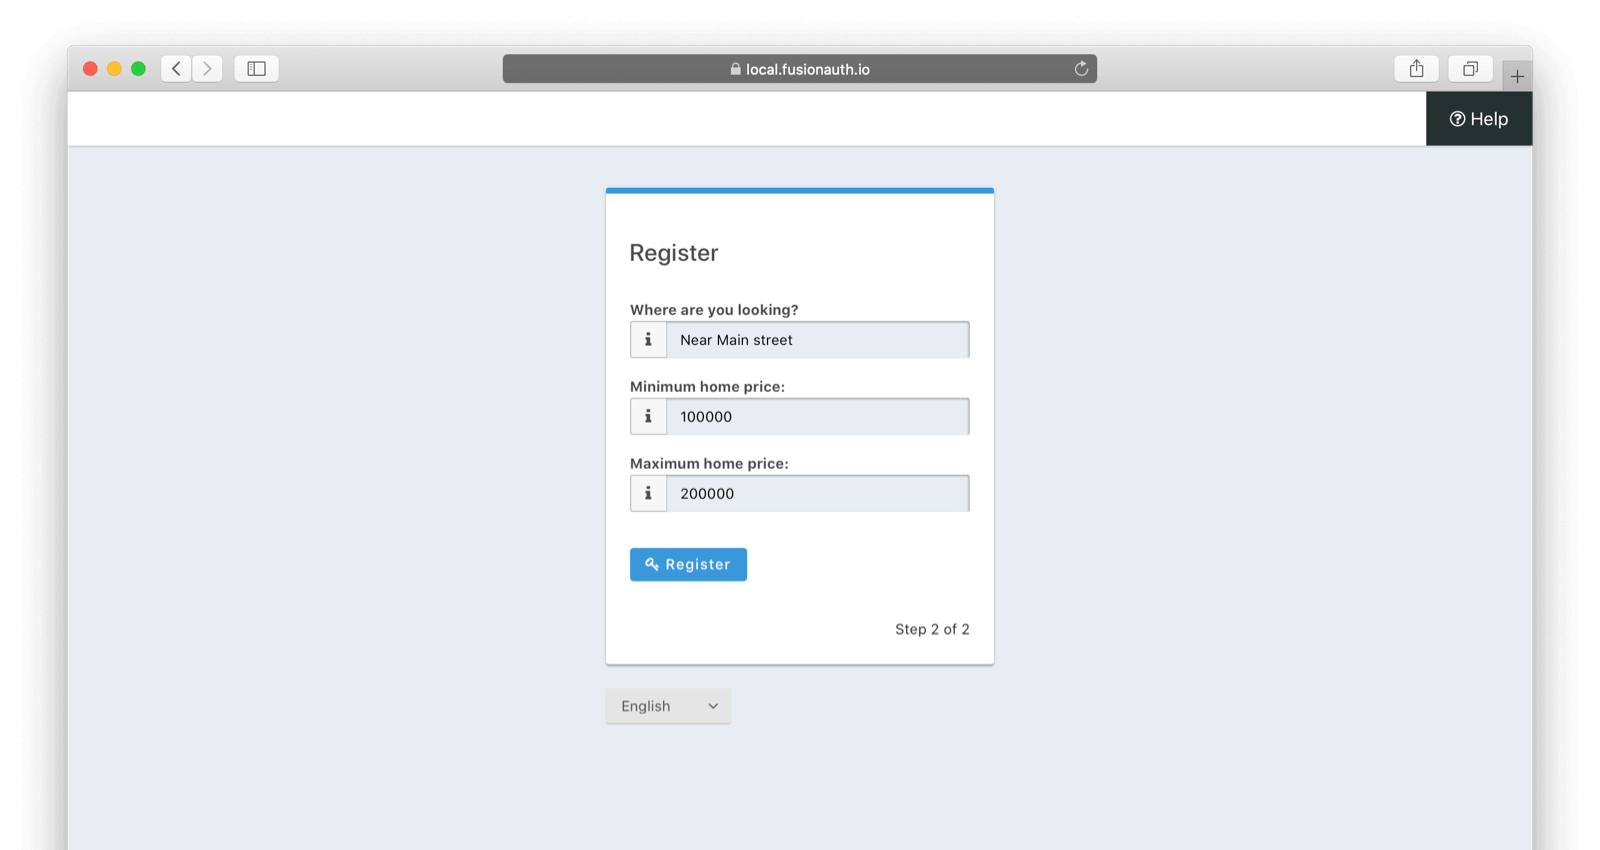
If you complete the first step, you can see labels are present on the second step as well:
Previewing a theme
It is generally a good idea to review a theme in an incognito window because this will give a feel for the user registration experience. However, at times, you may need to make changes in your theme that you want to view without going through an entire registration process. You can easily do so by previewing the theme.
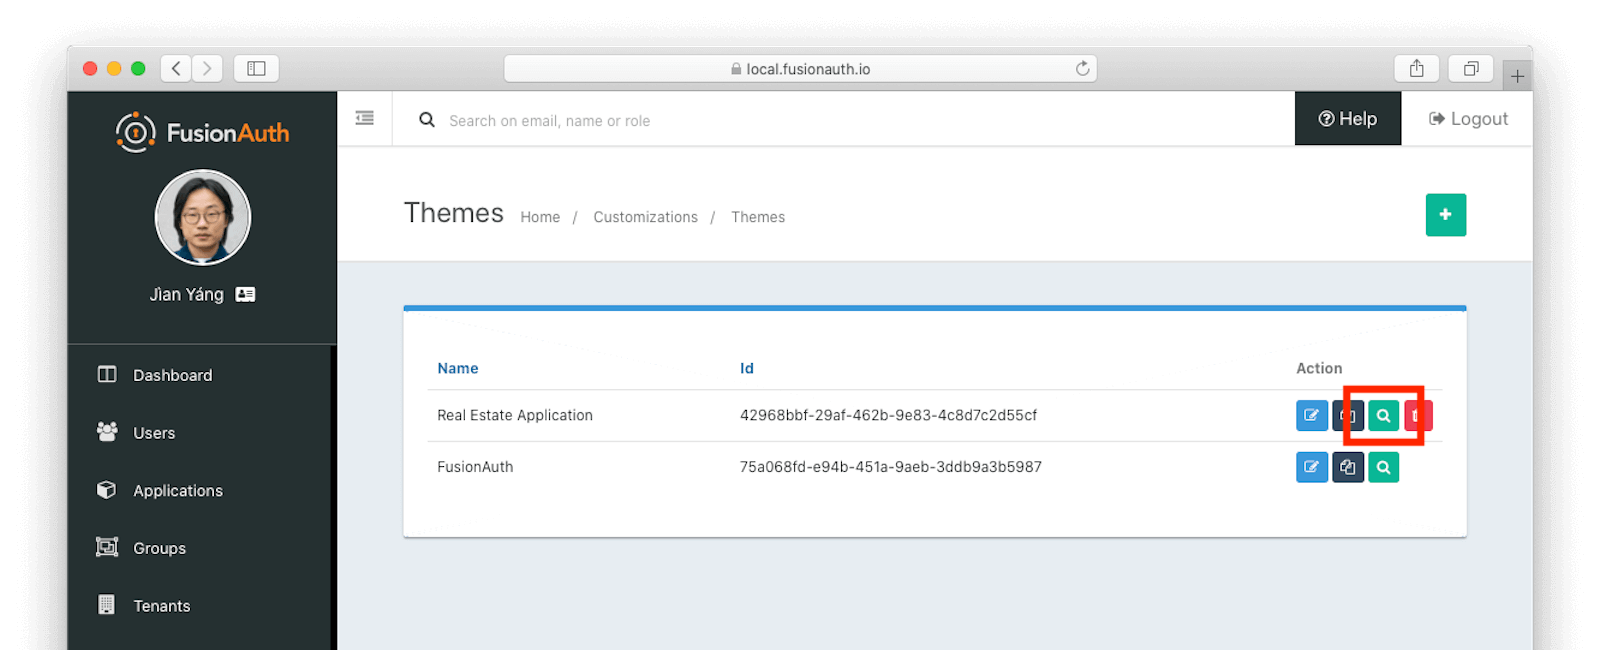
Navigate to Customizations -> Themes . Choose your theme, then click the preview link (the green magnifying glass):
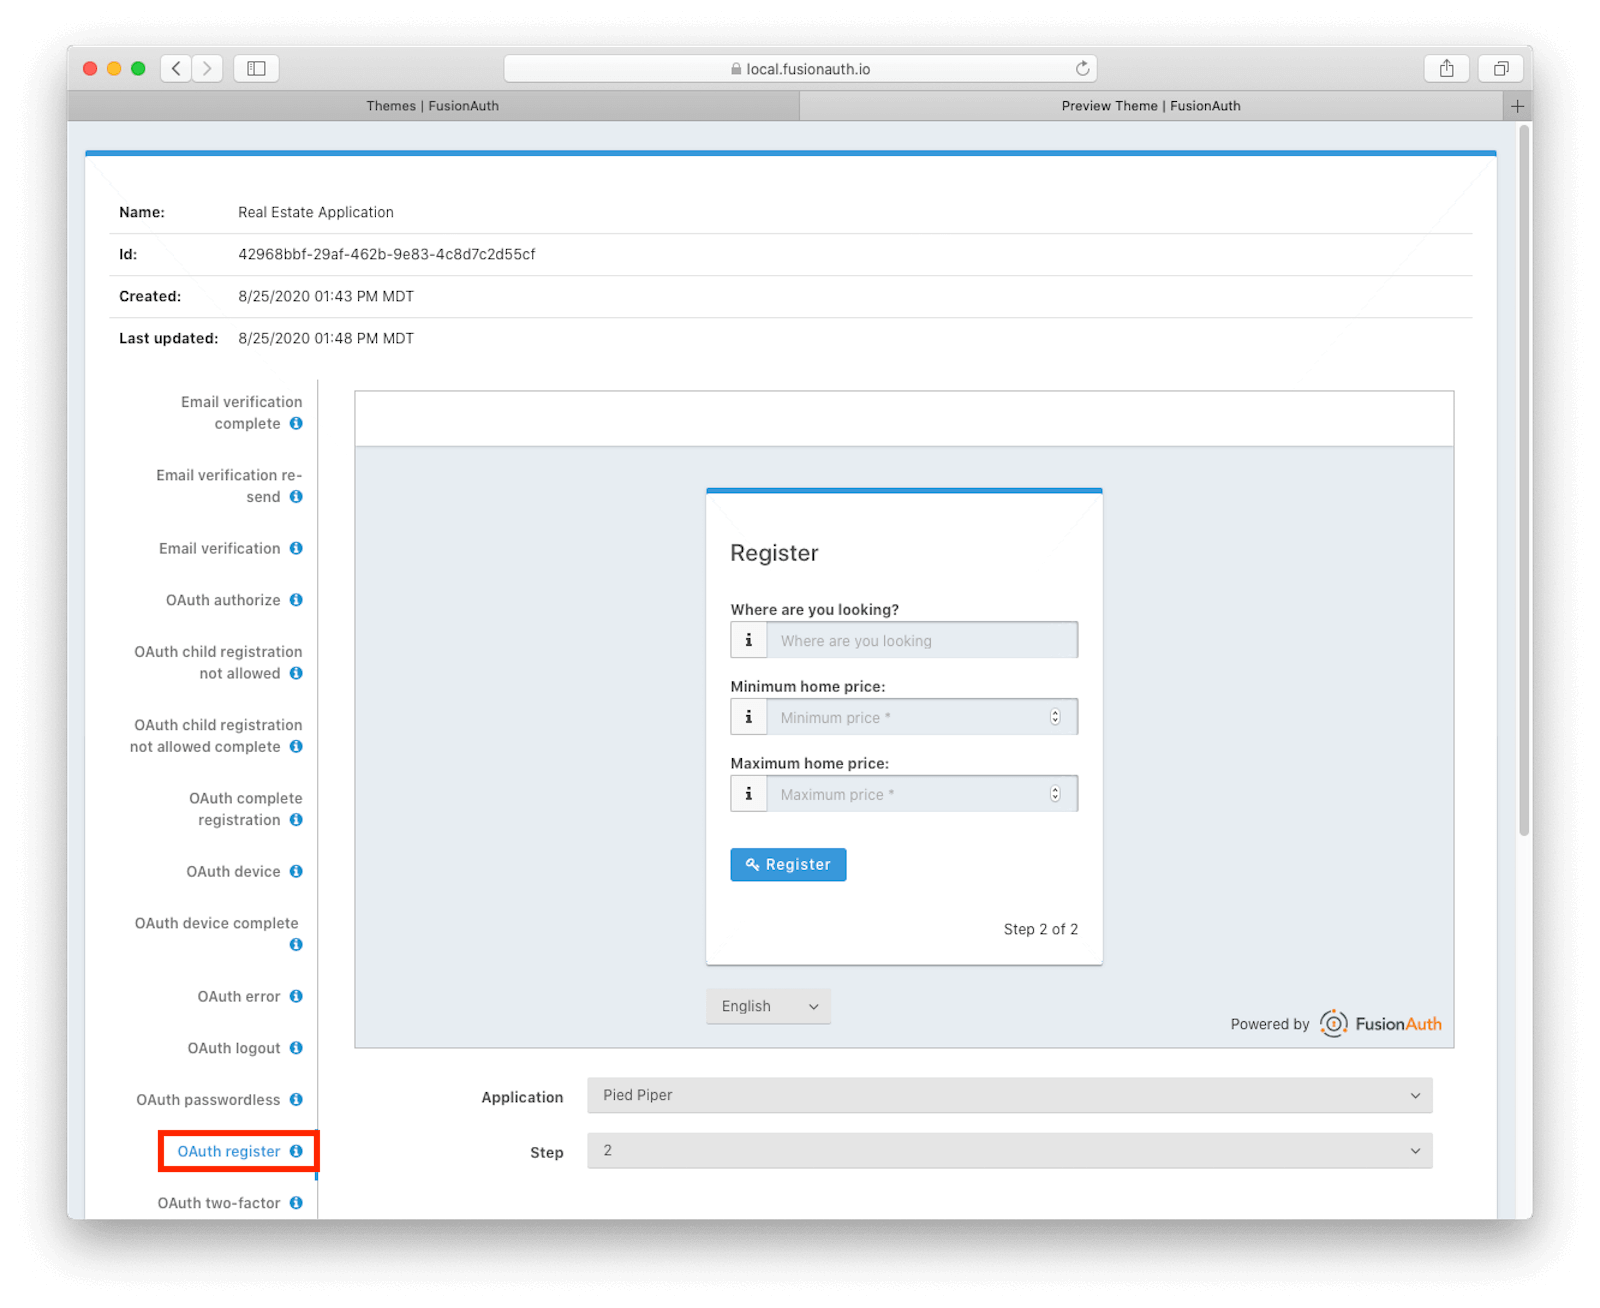
Doing this will open a new tab. Click OAuth register in the left hand navigation and you’ll see the theme as it would be rendered. You can even switch between steps. Below is the preview for the second step:
Conclusion
This post gives you a glimpse of the full flexibility of FusionAuth themes. You can use the power of Apache FreeMarker, ResourceBundles, CSS, and JavaScript to customize and localize these pages. As mentioned previously, it’s also worth checking out the theme documentation.
If you are using FusionAuth registration forms, be sure to customize the default templates to improve users’ experience. FusionAuth’s themes can be manipulated both in the administrative user interface and by API calls.
But what about after the registration? This information is available via the FusionAuth APIs, in the user.data and registration.data fields. It is also available for viewing, but not editing, in the administrative user interface.
Let’s build a small portal page for the user to see their data. You can retrieve and modify user data using the APIs and in a future blog post we’ll see exactly how to do that.