In this tutorial, we will walk through setting up a basic Ruby on Rails app to securely authenticate with an OAuth2 server using the authorization code grant.
Many Rails applications traditionally handle authentication, authorization, and user management within the framework itself. There are many strategies for implementing, including using a handy gem like devise. With FusionAuth however, we are able to separate our auth concerns from our application. Right away, we can scale our user base independently of our main application. As we build new applications or integrate with other platforms, we now have one centralized place to handle our authentication and authorization needs.
Why does that matter? Imagine that my company already has an existing identity provider and that I need to integrate my new application with it. Perhaps I have many applications that I need to integrate with my identity provider. Maybe I am a startup and want to offload all user management including the functionality and security concerns. By having all of our user management concerns handled in one place, we can focus on the requirements of our application independently.
With a customer identity and access management platform like FusionAuth, we get the benefit of a complete identity solution capable of satisfying most auth requirements such as SSO, MFA, and social-login.
At the end of this tutorial, you will have a working Ruby on Rails application that completes the OAuth 2.0 authorization code flow leveraging FusionAuth to authenticate users.
The code is available under an Apache2 license on Github.
In a previous post, we demonstrated how to encode, decode, and verify the authenticity of a JWT to secure a Ruby on Rails API. In this post, we will leverage those same concepts with FusionAuth being the authentication provider issuing the token.
Prerequisites
- Rails 6
- Docker (optional but preferred for installing FusionAuth)
Setting up FusionAuth
In this tutorial we will use Docker for quick setup:
curl -o docker-compose.yml https://raw.githubusercontent.com/FusionAuth/fusionauth-containers/master/docker/fusionauth/docker-compose.yml
curl -o .env https://raw.githubusercontent.com/FusionAuth/fusionauth-containers/master/docker/fusionauth/.env
docker compose up
If you prefer to install FusionAuth locally, see the 5-Minute Setup Guide to get up and running.
Once you have FusionAuth installed, it should be running at localhost:9011. Navigate there and finish the setup steps. When those are completed, login as the administrator that you just created. Now we are ready to rock!
A FusionAuth Application is simply something a user can log in to. As such, we want to create a new application in FusionAuth for our Rails app.
Create an application
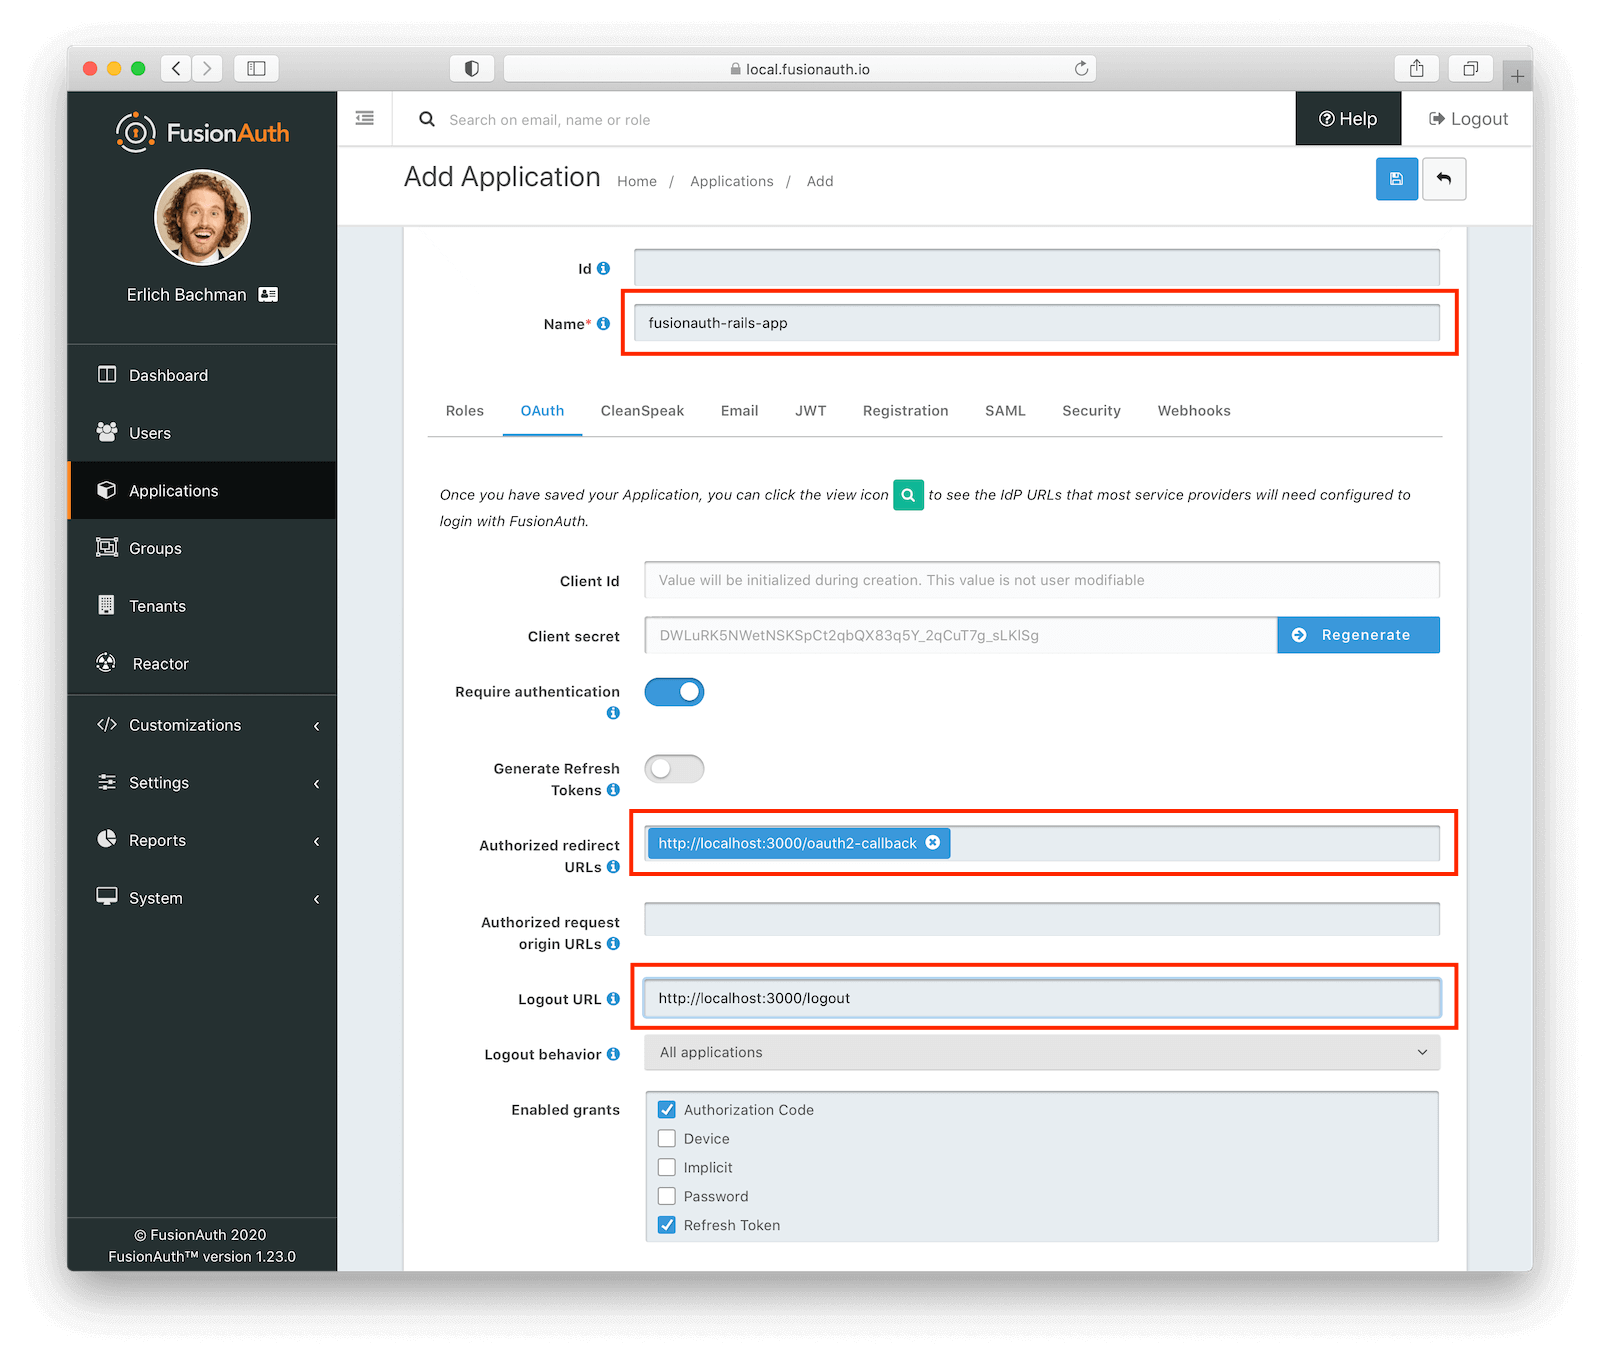
Select “Applications” from the left nav bar. Then click the green plus sign in the upper-right hand corner to add a new application. We will want to configure a few pieces of important information:
- Name (Required): A display name for our application. Enter
fusionauth-rails-app. - Authorized redirect URLs: Found under the “OAuth” tab. This URL tells FusionAuth where to redirect to after a user successfully authenticates.
- Logout URL: Also found under the “OAuth” tab. This URL tells FusionAuth where to redirect to when a user logs out.
This application is created in the default tenant. FusionAuth supports unlimited tenants, but for this example application we can leave everything in the default one.
Create a user
For this example, we will manually create a user. Click on “Users” in the left-nav bar and then click the green plus sign in the upper-right hand corner to add a new user.
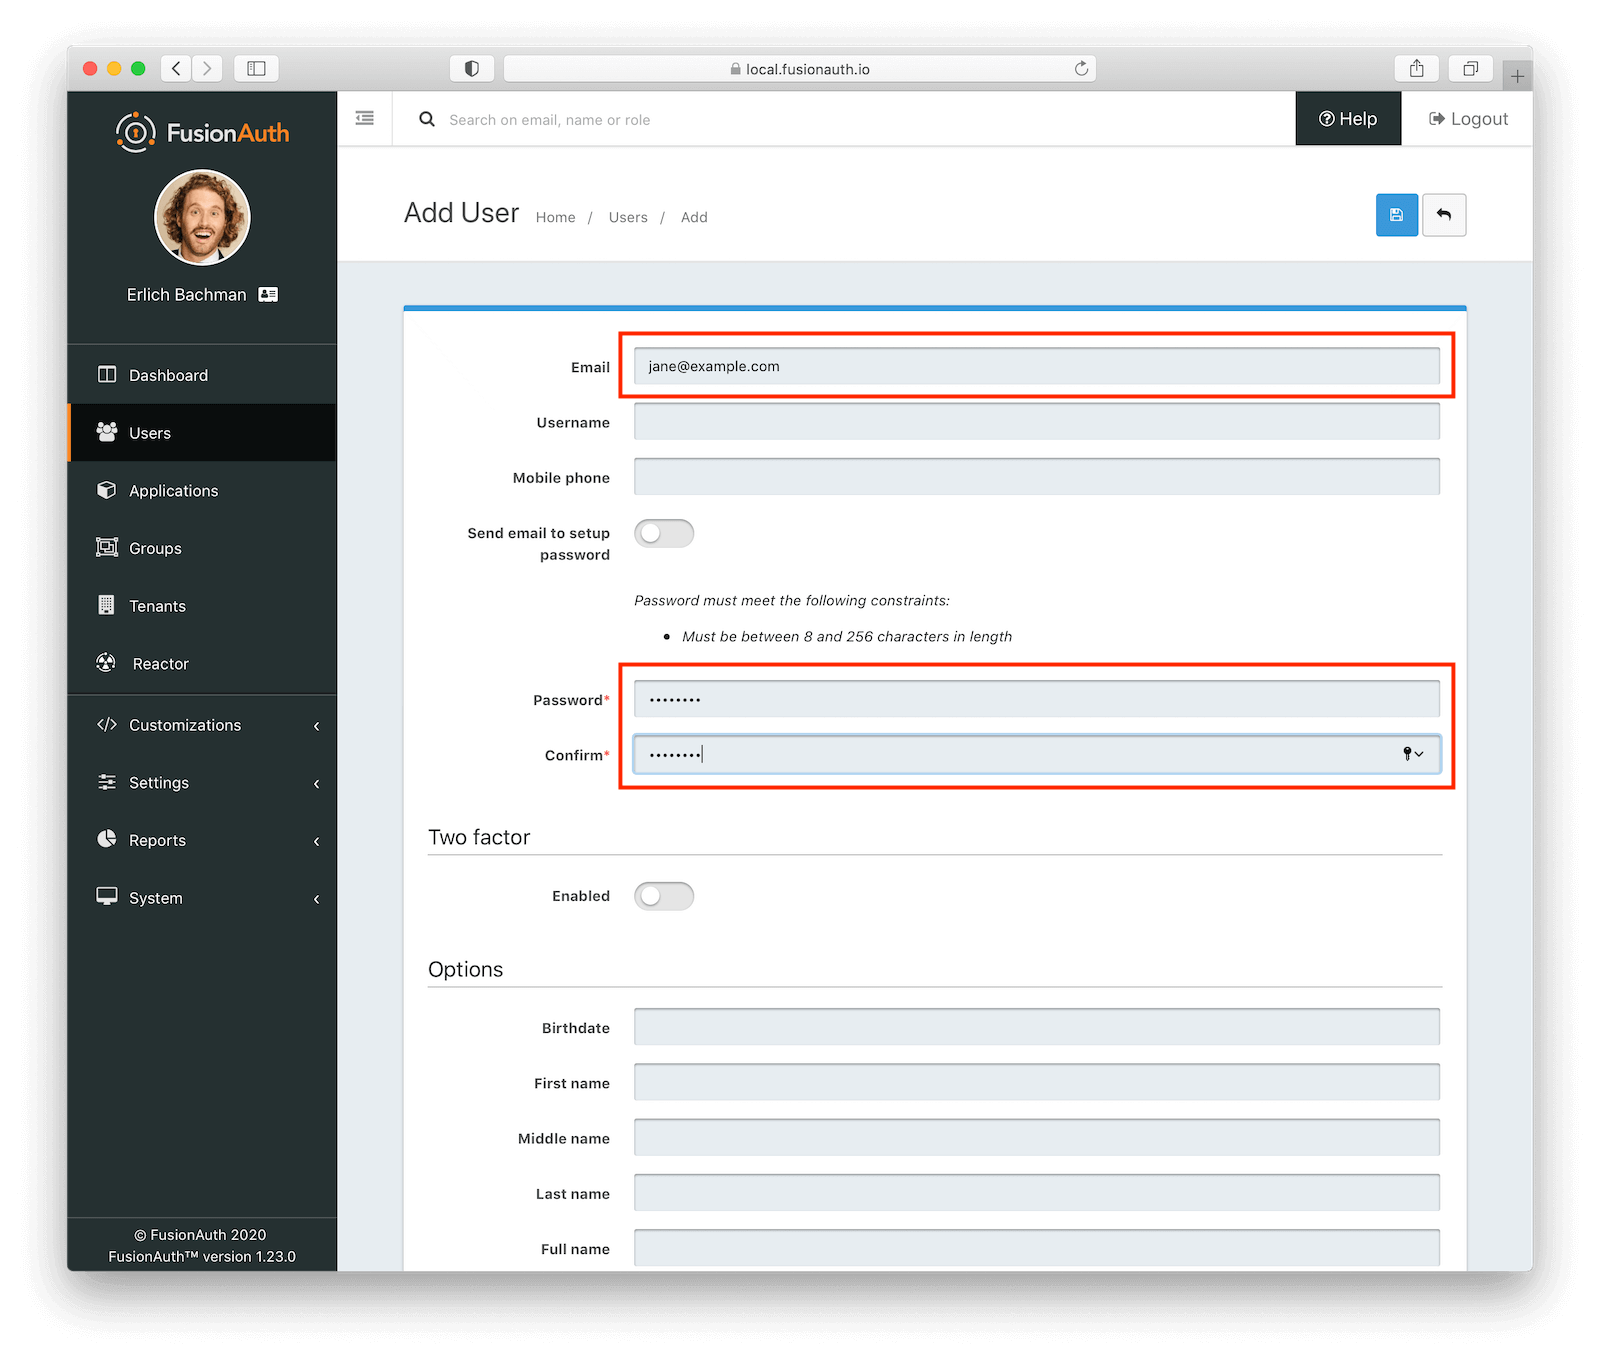
Configure the following attributes and then save the new user:
- Password and Confirm: Toggle “Send email to setup password” to off and manually enter a password for the user.
Register the user
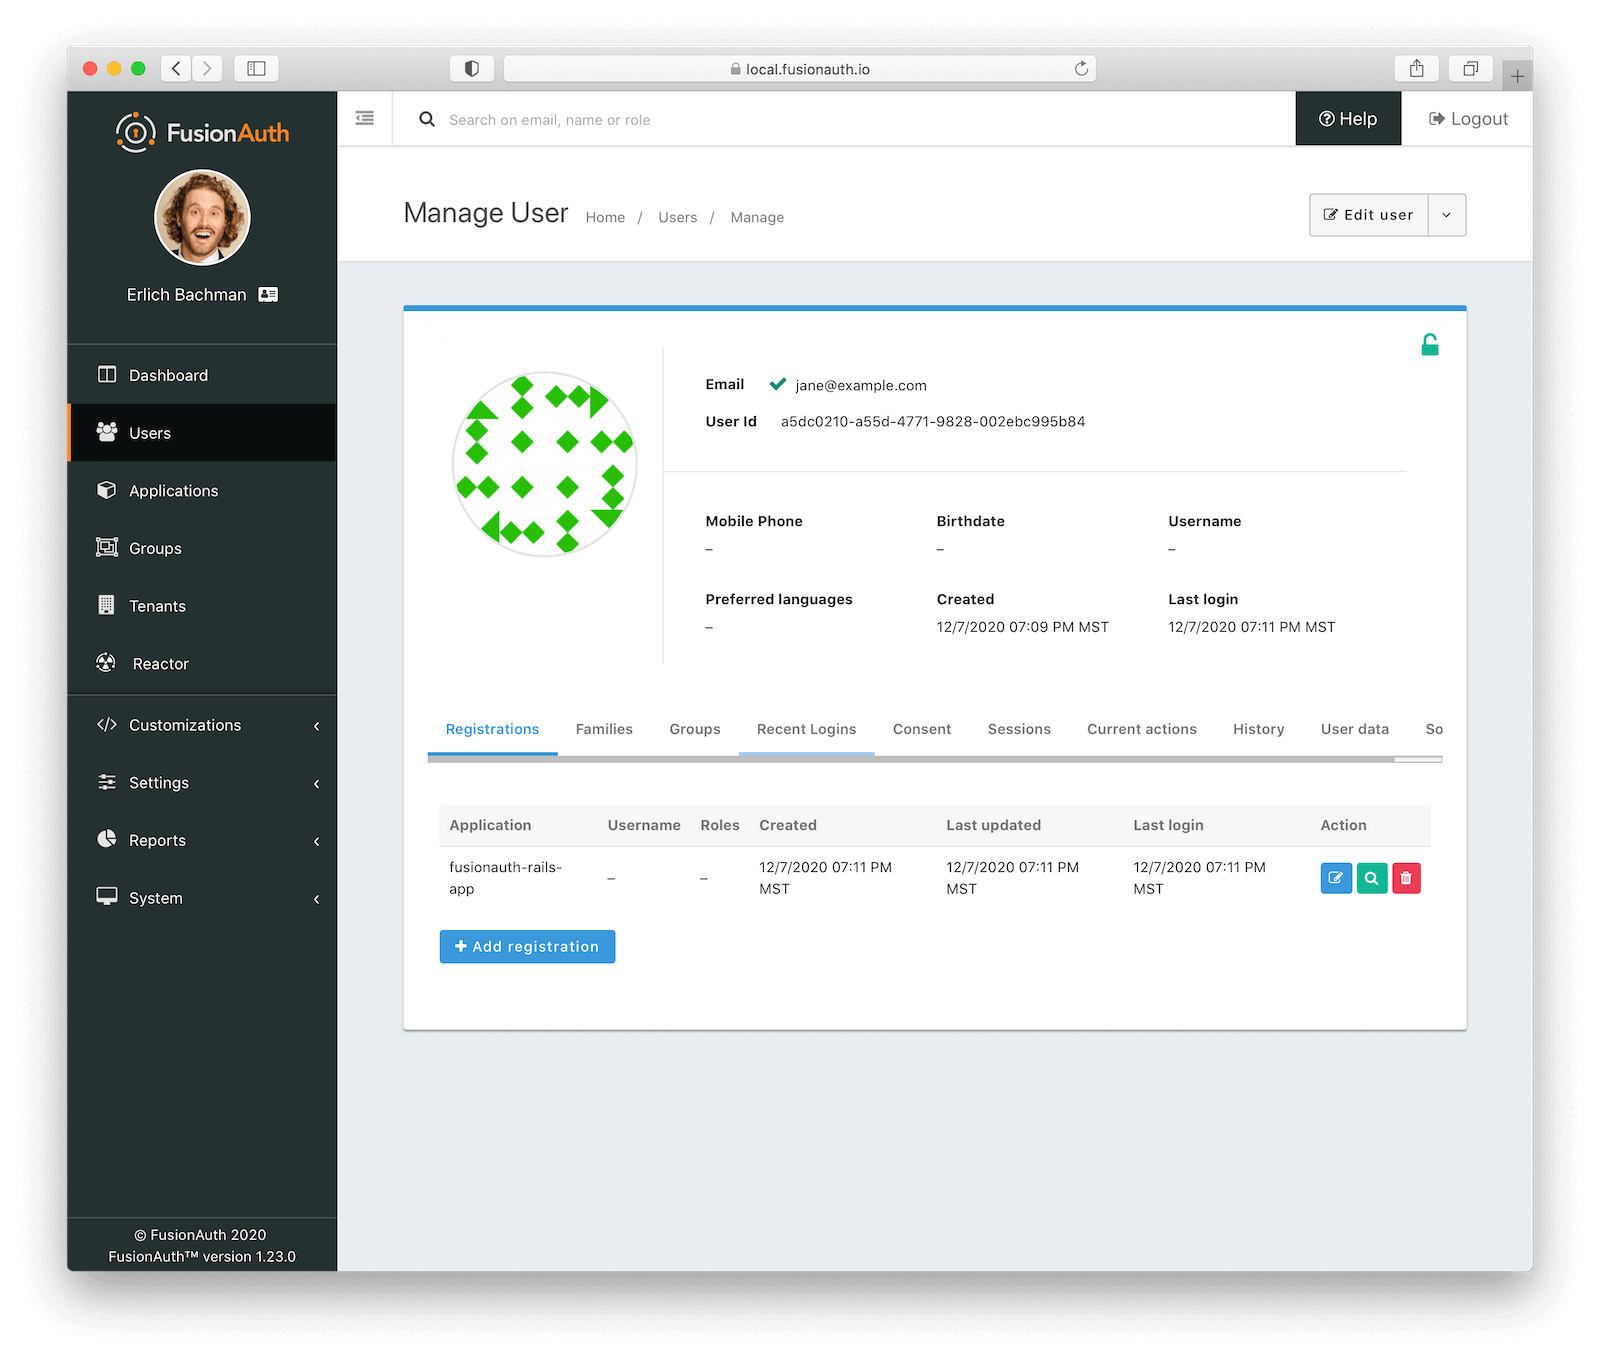
Looking good! Now we have our new application and a user. The last thing we want to do is register the user with our application. Navigate to “Users -> Manage” for our newly created user.
Click on the “Add Registration” button, select the Rails application we created, and then click on the “Save” button.
Issuer and Signing Key
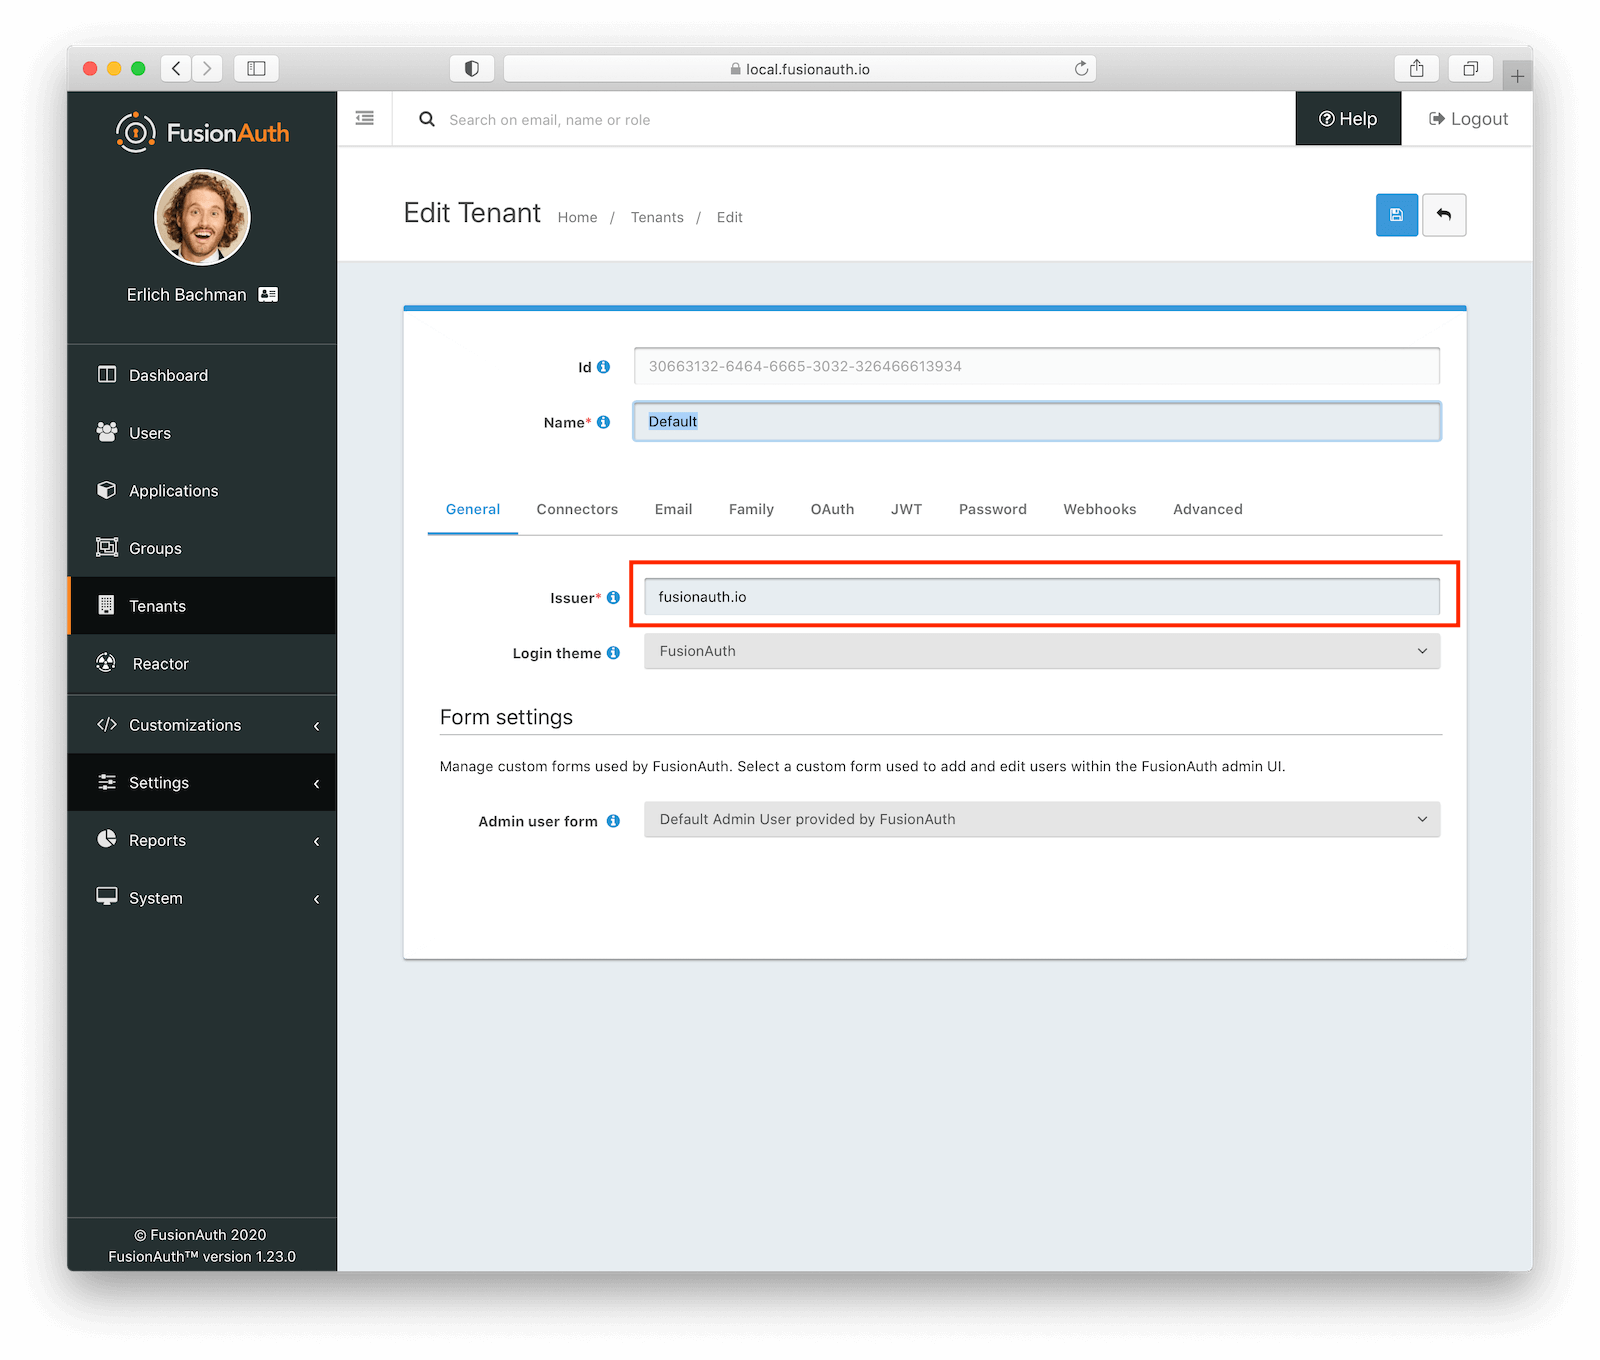
There are two more attributes we want to configure in FusionAuth. The first attribute is the named issuer value used to sign tokens. We will use this value when
verifying the access token during login. To do this, navigate to “Tenants” on the left-nav bar and then click the “Edit” button that corresponds
to the “Default” tenant. Set the “Issuer” field under the “General” tab. The value of the issuer is typically the hostname of the identity provider. Since this is a demo, we’ll use the value fusionauth.io.
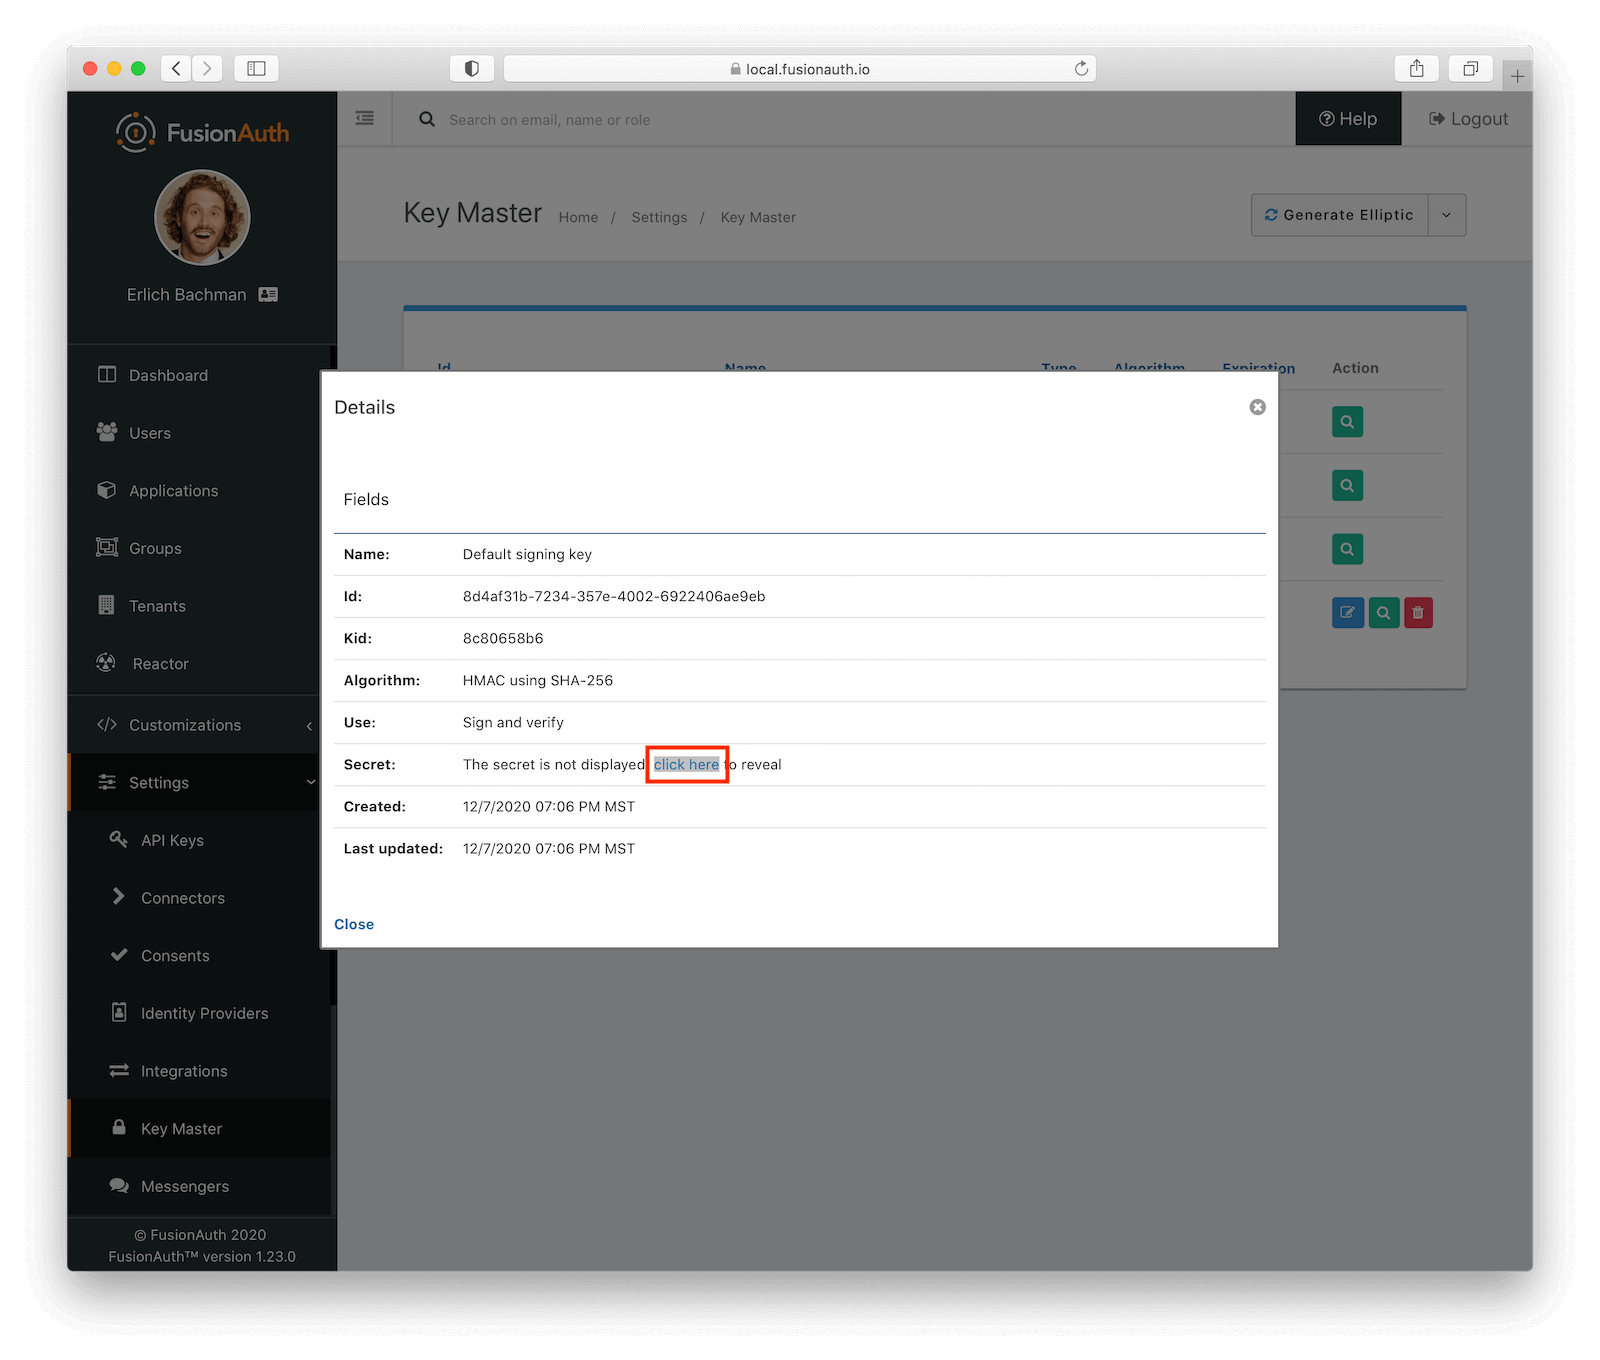
The second attribute is the HMAC signing key that is used to encode the token. Navigate to “Settings” and then “Key Master” from the left navigation bar.
Then click on the “View” button that corresponds to the Default Signing Key. From here, “click to reveal” the key and copy it to a safe location.
We will need this value to successfully decode the token in our application.
Build the Rails application
Let’s get started building a very basic Rails application to demonstrate authentication with FusionAuth. If you would like to jump straight to checking out the code, see our Github repo here.
Create a new Rails application.
rails new rails-fusionauth-appOur Gemfile will use a few additional dependencies so go ahead and add them before we get started.
gem 'jwt'
gem 'oauth2'
Install our dependencies
bundle installConfiguration
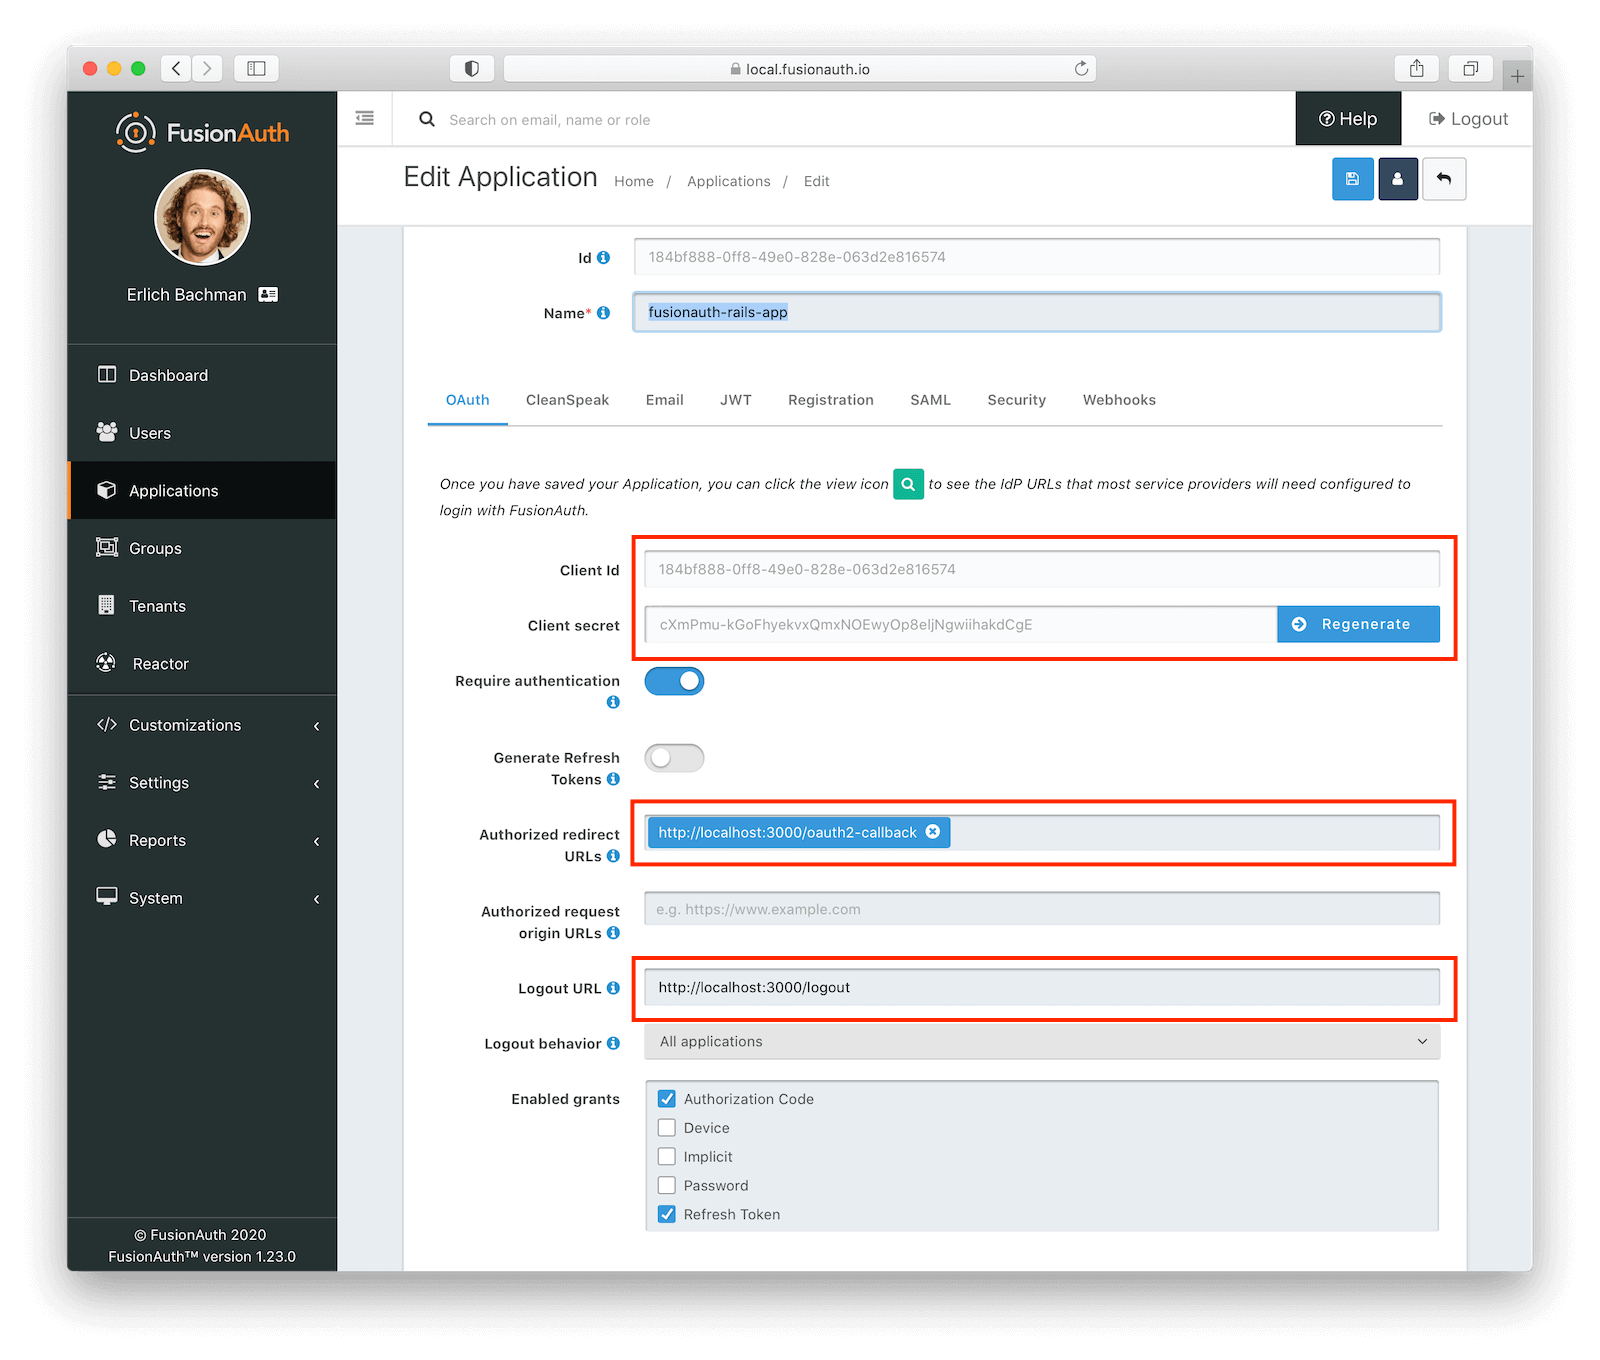
Before we go any further, there are some critical application attributes we will need from our FusionAuth configuration so that our Rails app knows how to successfully communicate with it. Specifically:
- Client Id
- Client secret
- Authorized redirect URLs
- Logout URL
You can recall, these can be found under the “OAuth” tab when modifying an application in FusionAuth.
Let’s set client_id, client_secret, idp_url (identity provider url), and redirect_uri values using development.rb.
I chose to set these values here as they will likely change in staging or production environments, but feel free to set them based on your own standards.
We will also initialize an environment variable that contains our “HMAC secret” that will be used to decode the token received in the authentication process.
We want to keep this as secure as possible and therefore we will set it at run-time.
  # OAuth configuration
  config.x.oauth.client_id = "my-client-id"
  config.x.oauth.client_secret = "my-super-secret-oauth-secret"
  config.x.oauth.idp_url = "http://localhost:9011/"
  config.x.oauth.redirect_uri = "http://localhost:3000/oauth2-callback"
  config.x.oauth.hmac = ENV['HMAC_SECRET']
Authenticating with FusionAuth
Before we get into the code, let’s take a look at the Authentication Code grant flow as it applies to our Rails app, the user, and FusionAuth:
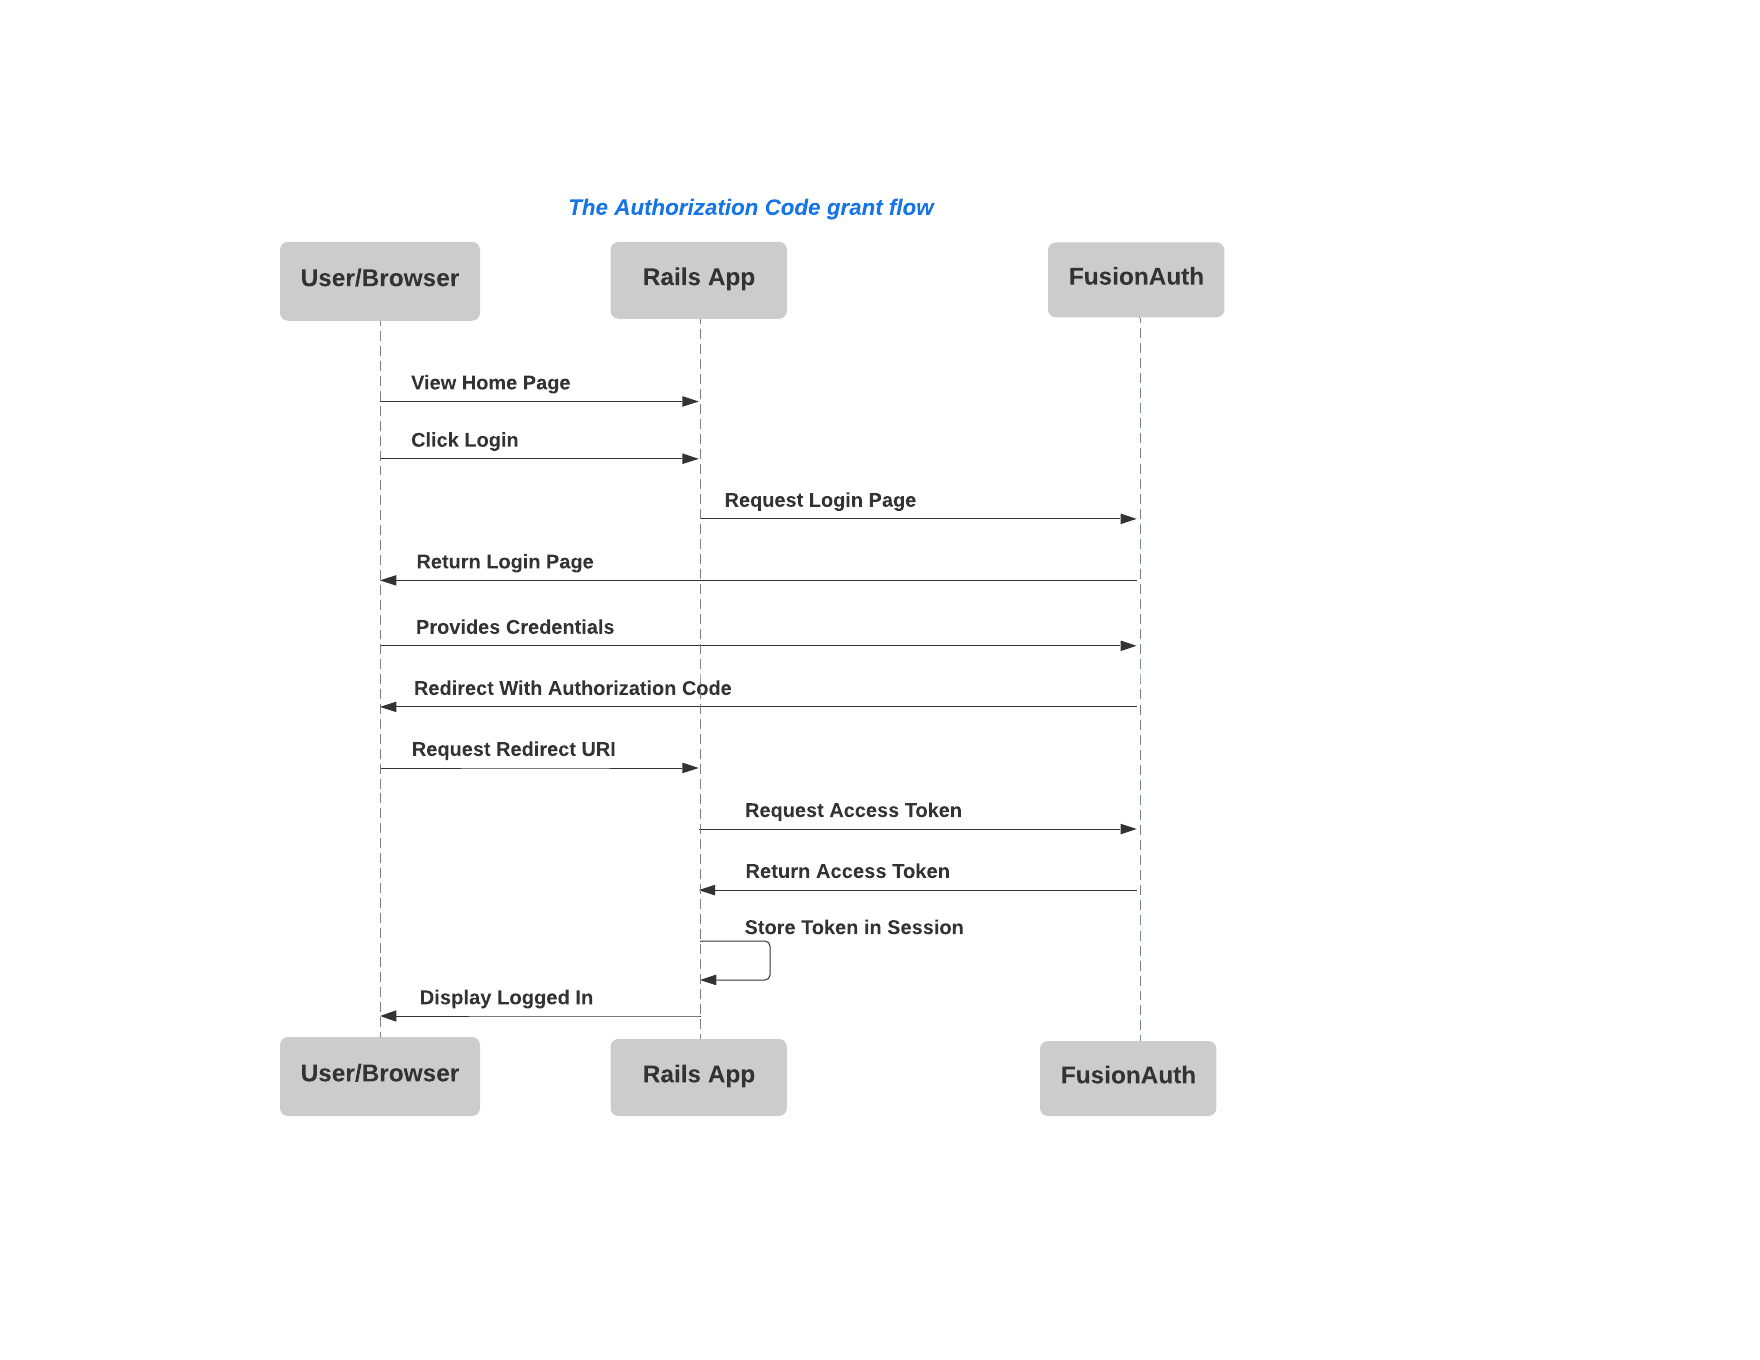
This gives insight into the routes that we will need to define in our Rails app.
Routes
For this app, we are going to set up four routes:
- Welcome page: Our root page.
- Login endpoint: Makes a request for the FusionAuth login page when a user clicks on the login link.
- OAuth callback endpoint: Receiver of the redirect from FusionAuth when the authorization code is granted.
- Logout endpoint: Receiver of the redirect from FusionAuth when successfully logging out.
Rails.application.routes.draw do
  root to: 'welcome#index'
  get '/oauth2-callback', to: 'o_auth#oauth_callback'
  get '/logout', to: 'o_auth#logout'
  get '/login', to: 'o_auth#login'
end
The Welcome page
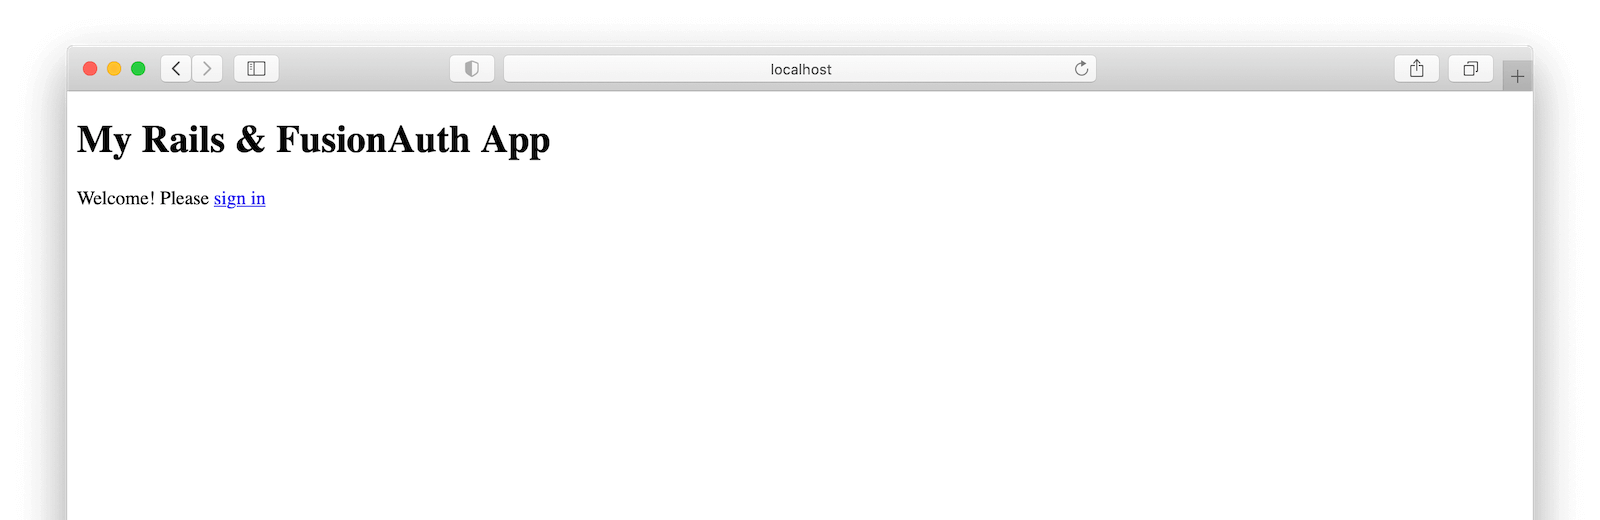
Let’s start off with a very basic welcome view that contains a link for a user to login to the application. This page will serve as the root page for our application.
# app/views/welcome/index.html.erb

<p>Welcome! Please <%= link_to 'sign in', controller: 'o_auth', action: :login %> </p>
It should look something like this when rendered.
OAuthController
The “OAuthController” will handle each of the remaining routes needed to complete the authorization code grant flow. Because we want to map to the filesystem properly, put this code in app/controllers/o_auth_controller.rb. That allows us to name it OAuthController rather than OauthController with a little a.
Here is what it will look like when we are finished:
class OAuthController < ApplicationController
  def initialize
    @oauth_client = OAuth2::Client.new(Rails.configuration.x.oauth.client_id,
                                       Rails.configuration.x.oauth.client_secret,
                                       authorize_url: '/oauth2/authorize',
                                       site: Rails.configuration.x.oauth.idp_url,
                                       token_url: '/oauth2/token',
                                       redirect_uri: Rails.configuration.x.oauth.redirect_uri)
  end

  # The OAuth callback
  def oauth_callback
    # Make a call to exchange the authorization_code for an access_token
    response = @oauth_client.auth_code.get_token(params[:code])

    # Extract the access token from the response
    token = response.to_hash[:access_token]

    # Decode the token
    begin
      decoded = TokenDecoder.new(token, @oauth_client.id).decode
    rescue Exception => error
      "An unexpected exception occurred: #{error.inspect}"
      head :forbidden
      return
    end

    # Set the token on the user session
    session[:user_jwt] = {value: decoded, httponly: true}

    redirect_to root_path
  end

  def logout
    # Invalidate session with FusionAuth
    @oauth_client.request(:get, 'oauth2/logout')

    # Reset Rails session
    reset_session

    redirect_to root_path
  end

  def login
    redirect_to @oauth_client.auth_code.authorize_url
  end
end
First, we will set up our client using the oauth2 gem. This provides us with a REST client wrapper for the OAuth 2.0 specification.
# ...
def initialize
  @oauth_client = OAuth2::Client.new(Rails.configuration.x.oauth.client_id,
                                     Rails.configuration.x.oauth.client_secret,
                                     authorize_url: '/oauth2/authorize',
                                     site: Rails.configuration.x.oauth.idp_url,
                                     token_url: '/oauth2/token',
                                     redirect_uri: Rails.configuration.x.oauth.redirect_uri)
end
# ...
The login process begins when the user clicks on the “sign in” link we created. As seen in the sequence diagram above, we will want to direct this request to FusionAuth which is in charge of validating user credentials. In turn, the user will be presented with a default login page including username and password fields. FusionAuth provides the flexibility to customize the style of this form via themes but for this tutorial, we will stick with the default.
The following method uses the “OAuth2” client to construct the “authorize_url” and redirects the request accordingly.
# ...
def login
  redirect_to @oauth_client.auth_code.authorize_url
end
# ...
A successful response will yield the login page:
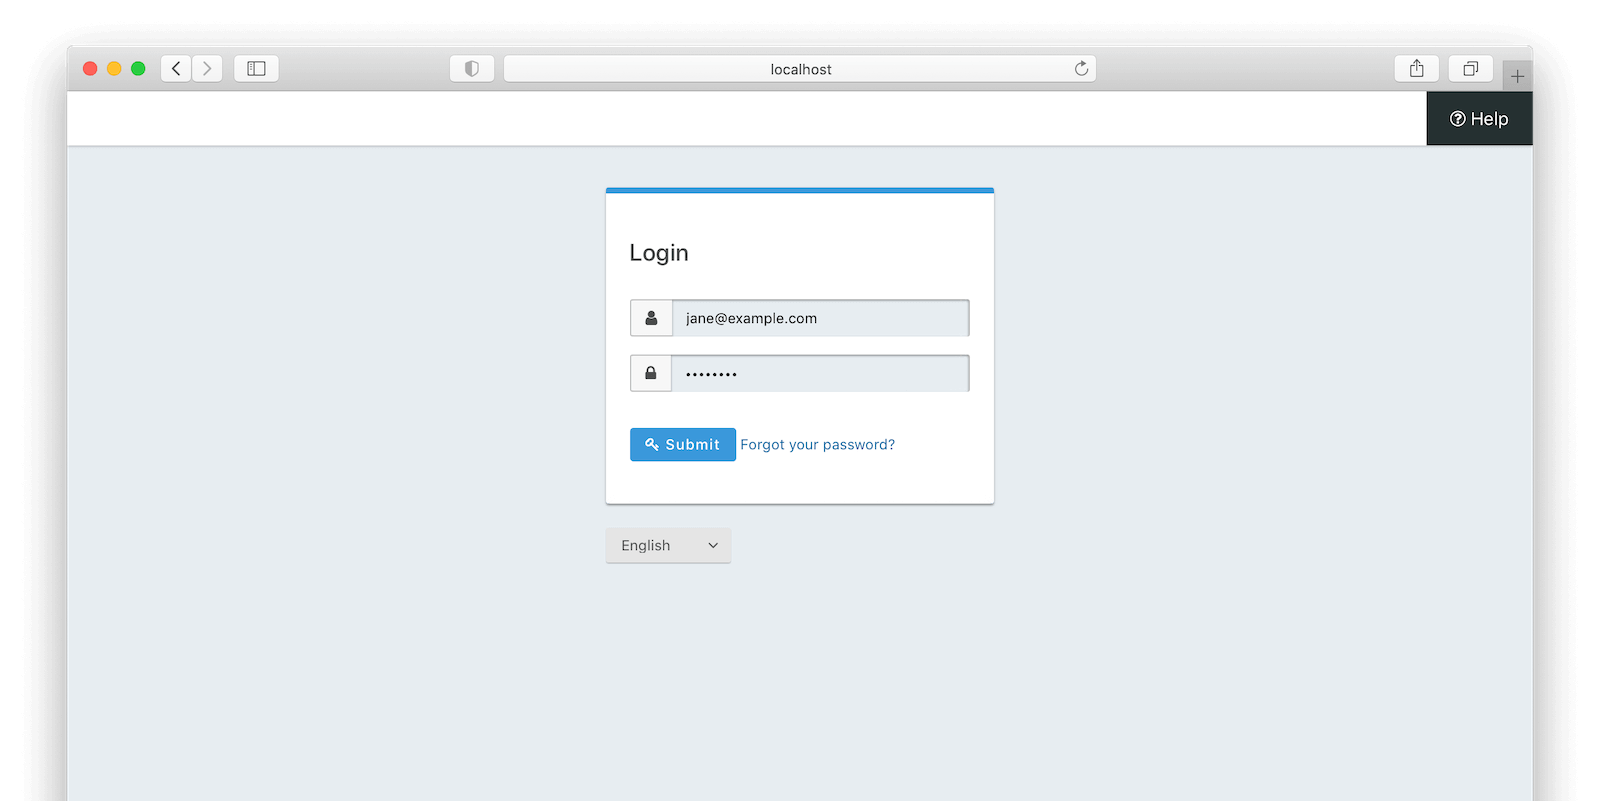
Upon successful authentication, FusionAuth redirects to the Rails app along with the “authorization code” using the “redirect_uri”.
This value tells FusionAuth where to redirect upon successful authentication which corresponds with our oauth_callback route.
We also added it to FusionAuth because every “redirect_uri” for a given application must exist as an “Authorized redirect URL”. Think security!
In summary, oauth_callback in our app does a few things:
- Handles the redirect from FusionAuth following authentication and being granted an authorization code.
- Executes a request back to FusionAuth to exchange the authorization code for an access token.
- Decodes and validates the claims on the received access token.
- Saves the access token/JWT on the session to indicate that the user has successfully authenticated.
The next step in the OAuth flow will be to exchange our authorization code for an access token. For that, we will make an additional code exchange request. Using the oauth2 gem, we construct a client and then make the request passing the authorization code and redirect URI.
# ...
# Make a call to exchange the authorization_code for an access_token
response = @oauth_client.auth_code.get_token(params[:code])

# Extract the access token from the response
token = response.to_hash[:access_token]
# ...
We receive the access token encoded as a JWT.
We now want to decode the JWT and verify claims. For this example, we validate the aud and iss claims that
reflect the application client_id and token issuer respectively. Recall that we configured the issuer value earlier in FusionAuth.
# ...
# Decode the token
begin
  decoded = TokenDecoder.new(token, client_id).decode
rescue Exception => error
  "An unexpected exception occurred: #{error.inspect}"
  head :forbidden
  return
end
# ...
The TokenDecoder class decodes the JWT, verifies the HMAC secret, and validates claims.
class TokenDecoder

  def initialize(token, aud)
    @token = token
    @aud = aud
    @iss = 'fusionauth.io'
  end

  def decode
    begin
      JWT.decode(
        @token,
        Rails.configuration.x.oauth.hmac,
        true,
        {
          verify_iss: true,
          iss: @iss,
          verify_aud: true,
          aud: @aud,
          algorithm: 'HS256'})
    rescue JWT::VerificationError
      puts "verification error"
      raise
    rescue JWT::DecodeError
      puts "bad stuff happened"
      raise
    end
  end
end
Finally, we set the token on the user session and redirect back to our Welcome page concluding our oauth_callback method.
# ...
# Set the token on the user session
# httponly to prevent XSS attacks
session[:user_jwt] = {value: decoded, httponly: true}

redirect_to root_path
# ...
When a user logs out, we want to invalidate their session on both FusionAuth and our app.
Similar to oauth_callback in the way that it receives the authorize redirect, our destroy method receives the logout redirect.
Receiving the redirect tells us that the user has been logged out of FusionAuth and we are safe to clear the user’s session in Rails.
# ...
def logout
  # Invalidate session with FusionAuth
  @oauth_client.request(:get, 'oauth2/logout')

  # Reset Rails session
  reset_session

  redirect_to root_path
end
# ...
Polishing up our Rails session
Now that we have the functionality to authenticate users as well as log them out of FusionAuth, we will want to complete the same cycle on our Rails app.
There are numerous ways to handle user sessions in Rails, but for this example, I decided to create helper methods accessible to all sub-classes of ApplicationController.
current_user looks for a user JWT on the session. If it exists and the email has been verified, it retrieves the user’s email address from the JWT.
If it does not exist, this means the user has logged out or their session has expired.
# app/controllers/application_controller.rb

class ApplicationController < ActionController::Base
  helper_method :current_user
  helper_method :logged_in?

  def current_user
    if session[:user_jwt]
      token = session[:user_jwt][:value].first

      if token && token["email_verified"]
        @email = token["email"]
      else
        head :forbidden
        return
      end
    end
  end

  def logged_in?
    current_user.present?
  end

end
Putting it all together
It’s time to make our Ruby on Rails OAuth flow a reality by walking through an example login.
Before starting up the Rails server, be sure to set HMAC_SECRET with the “default signing key” value in your environment making it accessible to our development configuration.
Kick the tires and light the fires!
rails sNavigate to http://localhost:3000. Substitute the corresponding port if you are using something other than 3000.
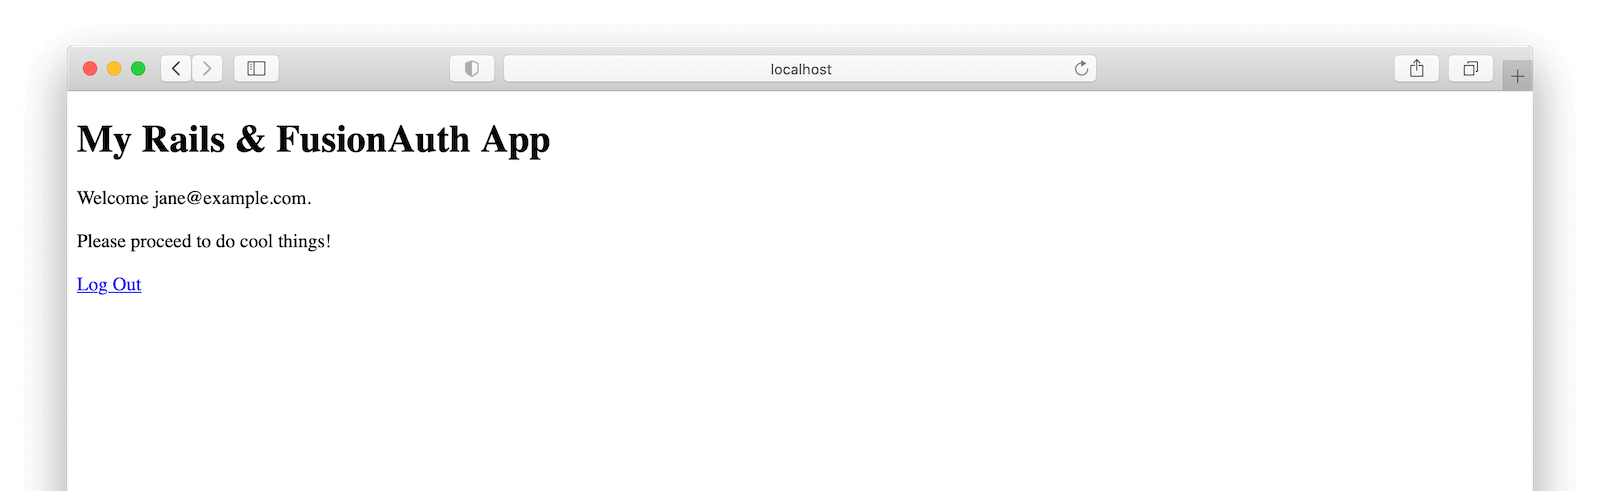
Log in to the application with the user we created and registered in FusionAuth.
We made it! We are logged in and our application knows who we are.
Let us now assume that we are now done interacting with the application and are ready to log out by navigating to the corresponding URL.
Next steps
Now that we have the OAuth flow working, our foundation is set to expand as needed. Here are a few ideas to tackle next:
- Add and assign user roles such that functionality in our Rails application can be shown or hidden accordingly.
- Customize the FusionAuth login page with a look and feel of our application using themes.
- Use Identity Providers to add “Login with Google” or “Login with Facebook” social login buttons.
What did we learn?
Using the Authorization Code grant in Rails lets you use any OAuth compatible identity provider to secure your application. The example code can be found on Github here.
Happy coding!