Authenticate with our APIs
The FusionAuth APIs are primarily secured using API keys. A few APIs may use alternate credentials, such as a JWT, basic authentication. Certain APIs are accessible with no authentication. All secured APIs will return an 401 Unauthorized response if improper credentials are provided.
Each API endpoint is marked with an icon describing supported authentication methods:
 API Key Authentication
 Global API Key Authentication
 Basic Authentication using an API Key
 Client Credentials
 JWT Authentication
 No Authentication Required
 Localhost Authentication Bypass
You can also learn about:
Below you will find a detailed explanation of each type of authentication used in the API documentation.
API Key Authentication#
When an API is marked with a yellow lock icon such as ![]() it means you can use any type of API Key (global or tenant-scoped).
it means you can use any type of API Key (global or tenant-scoped).
To enable access to a secured API, create one or more API keys. The API key is then supplied in the HTTP request using the Authorization header. See Managing API Keys for more information on adding additional keys.
The following example demonstrates the HTTP Authorization header with an API key of: 7DUrRlA75b5LBRARYoTmScCTk6G6U1nG8R9mr7MGnvzA7AMxEXAMPLE
Authorization: 7DUrRlA75b5LBRARYoTmScCTk6G6U1nG8R9mr7MGnvzA7AMxEXAMPLEThe following is a curl example using the Authorization header using the above API key to retrieve a user. The line breaks and spaces are for readability.
curl -H 'Authorization: 7DUrRlA75b5LBRARYoTmScCTk6G6U1nG8R9mr7MGnvzA7AMxEXAMPLE' \
     'https://local.fusionauth.io/api/user?email=richard@piedpiper.com'
See the API Endpoints reference for a complete list of endpoints that use this authentication type.
Here's a brief video covering some aspects of API keys:
Global API Key Authentication#
This authentication method has been available since 1.65.0
When an API is marked with a red lock icon such as ![]() , use a global API key. Attempts with a tenant-scoped API key fail.
, use a global API key. Attempts with a tenant-scoped API key fail.
In addition if an X-FusionAuth-TenantId header is provided to this endpoint, the request will fail with a 401.
Basic Authentication using an API Key#
This authentication method has been available since 1.27.0
When an API endpoint is marked with a shield such as ![]() it means you call this API and authenticate using HTTP basic authentication. HTTP basic authentication is a simple, standards based, authentication method. A username and password are supplied, separated by a
it means you call this API and authenticate using HTTP basic authentication. HTTP basic authentication is a simple, standards based, authentication method. A username and password are supplied, separated by a :. It must be prefaced by the string Basic and a space. The username:password string is base64 encoded.
When using this authentication method in FusionAuth for an API, the username must be the string apikey in lowercase. The password may be any API key with the appropriate permission for the endpoint being called.
Basic authentication using an API key is only utilized by a select few FusionAuth APIs. These are typically integrated with other software packages which expect such an authentication method.
Authorization Header Examples#
The following example demonstrates the HTTP Basic Authorization header.
Authorization: Basic YXBpa2V5OjY5Y1dxVW8wNGhpNFdMdUdBT2IzMmRXZXQwalpkVzBtSkNjOU9yLUxEamNIUXFMSzJnR29mS3plZg==The following is a curl example using the HTTP Basic Authorization header with a line break and spaces for readability.
curl -X GET  \
-H 'Authorization: Basic YXBpa2V5OjY5Y1dxVW8wNGhpNFdMdUdBT2IzMmRXZXQwalpkVzBtSkNjOU9yLUxEamNIUXFMSzJnR29mS3plZg==' \
'https://local.fusionauth.io/api/prometheus/metrics'
Client Credentials#
When an API is marked with a blue passport icon such as ![]() , the authorization becomes a two step process. To complete the process and generate a token you must:
, the authorization becomes a two step process. To complete the process and generate a token you must:
- Use the
client_credentialsgrant to obtain a JSON Web Token (JWT). The requester should be granted the appropriate permissions on the target entity. - Make a request of the API with the JWT in the
Authorizationheader using theBearerscheme.
If the JWT is expired or incorrect, the request will fail.
The requesting and target entities, as well as permissions, are all managed using Entities.
Client Credentials Examples#
Here is an example client credentials grant using Entities.
Here's another example. First, you get the token:
Curl example to retrieve JWT
curl -u "eb6fce6a-4ed8-4010-8091-1709fc823329:_7bz1Ct1Sode-zIyevcQFSyzW9w3TkfKSWuS-Ls8vQQ" \
  https://local.fusionauth.io/oauth2/token \
  -d 'grant_type=client_credentials&scope=target-entity:a647e989-1c7e-4386-9ec6-fa4fe6908906:scim:user:read'
Here's an example JWT that might be returned:
SCIM request example Authorization header
Authorization: Bearer eyJhbGciOiJIUzI1NiIsInR5cCI6IkpXVCIsImd0eSI6WyJjbGllbnRfY3JlZGVudGlhbHMiXSwia2lkIjoiMDUzYWE1Y2QxIiwidXNlIjoic2NpbV9zZXJ2ZXIifQ.eyJhdWQiOiJhNjQ3ZTk4OS0xYzdlLTQzODYtOWVjNi1mYTRmZTY5MDg5MDYiLCJleHAiOjE2NTU3NjExNzAsImlhdCI6MTY1NTc1NzU3MCwiaXNzIjoiYWNtZS5jb20iLCJzdWIiOiJlYjZmY2U2YS00ZWQ4LTQwMTAtODA5MS0xNzA5ZmM4MjMzMjkiLCJqdGkiOiJjMTMxYThiZi0yN2E5LTQ2MGUtOTFiYi0xOTI5NmE2MDFlMTEiLCJzY29wZSI6InRhcmdldC1lbnRpdHk6YTY0N2U5ODktMWM3ZS00Mzg2LTllYzYtZmE0ZmU2OTA4OTA2OnNjaW06dXNlcjpyZWFkIiwidGlkIjoiNTc5NzA5ZjQtMWYyMi1jMTMxLWRlMjYtZTc3MGUwNGJhMTJkIiwicGVybWlzc2lvbnMiOnsiYTY0N2U5ODktMWM3ZS00Mzg2LTllYzYtZmE0ZmU2OTA4OTA2IjpbInNjaW06dXNlcjpyZWFkIl19fQ.XNLUF-8IT5Mh411uD0jOb_3aaT5YJrbM6q4PZrOxfbQAfter retrieving the JWT, place it in the Authorization header with a prefix of Bearer . Then you call the API endpoint:
Curl example to call API
curl -XGET -H "Authorization: Bearer eyJhbG..." 'https://local.fusionauth.io/api/scim/resource/v2/Users'JWT Authentication#
When an API is marked with a red key icon such as ![]() it means you may call this API without
an API key. Instead, provide a JSON Web Token (JWT). A JWT is obtained from the Login API or an OAuth grant. The token will also be provided as an HTTP Only Session cookie. If cookies are being managed for you by the browser or some
other RESTful client, the JWT cookie will automatically be sent to FusionAuth on your behalf. In this case, you may omit the
it means you may call this API without
an API key. Instead, provide a JSON Web Token (JWT). A JWT is obtained from the Login API or an OAuth grant. The token will also be provided as an HTTP Only Session cookie. If cookies are being managed for you by the browser or some
other RESTful client, the JWT cookie will automatically be sent to FusionAuth on your behalf. In this case, you may omit the Authorization header.
Authorization Header Examples#
The following example demonstrates the HTTP Authorization header using the Bearer scheme.
Authorization: Bearer eyJhbGciOiJIUzI1NiIsInR5cCI6IkpXVCJ9.eyJleHAiOjE0ODUxNDA5ODQsImlhdCI6MTQ4NTEzNzM4NCwiaXNzIjoiYWNtZS5jb20iLCJzdWIiOiIyOWFjMGMxOC0wYjRhLTQyY2YtODJmYy0wM2Q1NzAzMThhMWQiLCJhcHBsaWNhdGlvbklkIjoiNzkxMDM3MzQtOTdhYi00ZDFhLWFmMzctZTAwNmQwNWQyOTUyIiwicm9sZXMiOltdfQ.Mp0Pcwsz5VECK11Kf2ZZNF_SMKu5CgBeLN9ZOP04kZoThe following is a curl example using the HTTP Authorization header using the Bearer scheme with a line break and spaces for readability.
curl -H 'Authorization: Bearer eyJhbGciOiJIUzI1NiIsInR5cCI6IkpXVCJ9.eyJleHAiOjE0ODUxNDA5ODQsImlhdCI6MTQ4NTEzNzM4NCwiaXNzIjoiYWNtZS5jb20iLCJzdWIiOiIyOWFjMGMxOC0wYjRhLTQyY2YtODJmYy0wM2Q1NzAzMThhMWQiLCJhcHBsaWNhdGlvbklkIjoiNzkxMDM3MzQtOTdhYi00ZDFhLWFmMzctZTAwNmQwNWQyOTUyIiwicm9sZXMiOltdfQ.Mp0Pcwsz5VECK11Kf2ZZNF_SMKu5CgBeLN9ZOP04kZo' \
https://example.fusionauth.io/api/userDPoP bound JWTs have been available since 1.63.0
This feature is only available in the Enterprise plan. Please visit our pricing page to learn more.
The following example demonstrates the HTTP Authorization header using the DPoP scheme.
DPoP: eyJhbGciOiJFZDI1NTE5IiwidHlwIjoiZHBvcCtqd3QiLCJqd2siOnsiYWxnIjoiRWQyNTUxOSIsImNydiI6IkVkMjU1MTkiLCJrdHkiOiJPS1AiLCJ1c2UiOiJzaWciLCJ4IjoiUzZ1M2ZrY3d1bkxfNU5OeG8yXzB4NENpMVVGUlJqX1Jvd2tDbW1RUy1tVSJ9fQ.eyJleHAiOjE3NzE3ODMwMzUsImlhdCI6MTc3MTc4MzAwNSwianRpIjoiOGQ0ZDQ3N2EtMzNlZC00Yjc4LWI0OWEtNzliZmNkNzc2NGYzIiwiYXRoIjoieXlPc184MUNwZWJGNWlMamNaQkxtZyIsImh0bSI6IkdFVCIsImh0dSI6Imh0dHA6Ly9sb2NhbGhvc3Q6MTAwMDAvb2F1dGgyL3VzZXJpbmZvIn0.uLyqu--gG83WcYWZBRqQRYW0S8FF7eWd-NVp55UO3f91sRO9h6rFC6FmOYqNVlwMm-dARxelJ6y87JrCEUD2Cw
Authorization: DPoP eyJhbGciOiJIUzI1NiIsInR5cCI6IkpXVCIsImtpZCI6IlI2RE9PZzZTVEN3Y09lM3p5SUkzeF9fRHRxTHEySGtiIn0.eyJhdWQiOiIwMDAwMDAwMC0wMDAwLTAwMDAtMDAwMC0wMDAwMDAwMDAwMDAiLCJleHAiOjE3NzE3ODY2MDUsImlhdCI6MTc3MTc4MzAwNSwiaXNzIjoiZnVzaW9uYXV0aC5pbyIsInN1YiI6IjAwMDAwMDAwLTAwMDAtMDAwMS0wMDAwLTAwMDAwMDAwMDAwMCIsImp0aSI6ImQ2MzFmNmY1LTVmZGMtNGIxOS04NjYwLTQzOGExNjhmOWIxYSIsImF1dGhlbnRpY2F0aW9uVHlwZSI6IlBBU1NXT1JEIiwidHR5IjoiYXQiLCJzY29wZSI6Im9wZW5pZCIsImNuZiI6eyJqa3QiOiJzZnNtLU50cHUxQ19BTXhGUnhsVjIzU05XNFZfLUc1bWs1djJFWjF6c3FJIn0sImF1dGhfdGltZSI6MTc3MTc4MzAwNSwidGlkIjoiZDdkMDk1MTMtYTNmNS00MDFjLTk2ODUtMzRhYjZjNTUyNDUzIiwiZ3R5IjpbImF1dGhvcml6YXRpb25fY29kZSJdfQ.2ZtQH0quZEb9CeH257AeJub9jfL4YVsgoGO11IpoFhM
Cookie Example#
If a cookie is provided on a request to an endpoint which accepts an API key or an JWT, the API key will be preferred.
The following is an HTTP GET request with the JWT Access Token provided as a cookie.
GET /api/user HTTP/1.1
Cookie: access_token=eyJhbGciOiJIUzI1NiIsInR5cCI6IkpXVCJ9.eyJleHAiOjE0ODUxNDA5ODQsImlhdCI6MTQ4NTEzNzM4NCwiaXNzIjoiYWNtZS5jb20iLCJzdWIiOiIyOWFjMGMxOC0wYjRhLTQyY2YtODJmYy0wM2Q1NzAzMThhMWQiLCJhcHBsaWNhdGlvbklkIjoiNzkxMDM3MzQtOTdhYi00ZDFhLWFmMzctZTAwNmQwNWQyOTUyIiwicm9sZXMiOltdfQ.Mp0Pcwsz5VECK11Kf2ZZNF_SMKu5CgBeLN9ZOP04kZo
No Authentication Required#
When an API that is marked with a green unlocked icon such as ![]() it means that you are not required to provide an
it means that you are not required to provide an Authorization header as part of the request. The API is either designed to be publicly accessible or the request may take a parameter that is in itself secure.
Localhost Authentication Bypass#
Some APIs may be authenticated by the source IP address of the request. For example, if fusionauth-app.local-metrics.enabled is set to true, /api/prometheus/metrics and /api/status will accept requests from localhost without any other form of authentication.
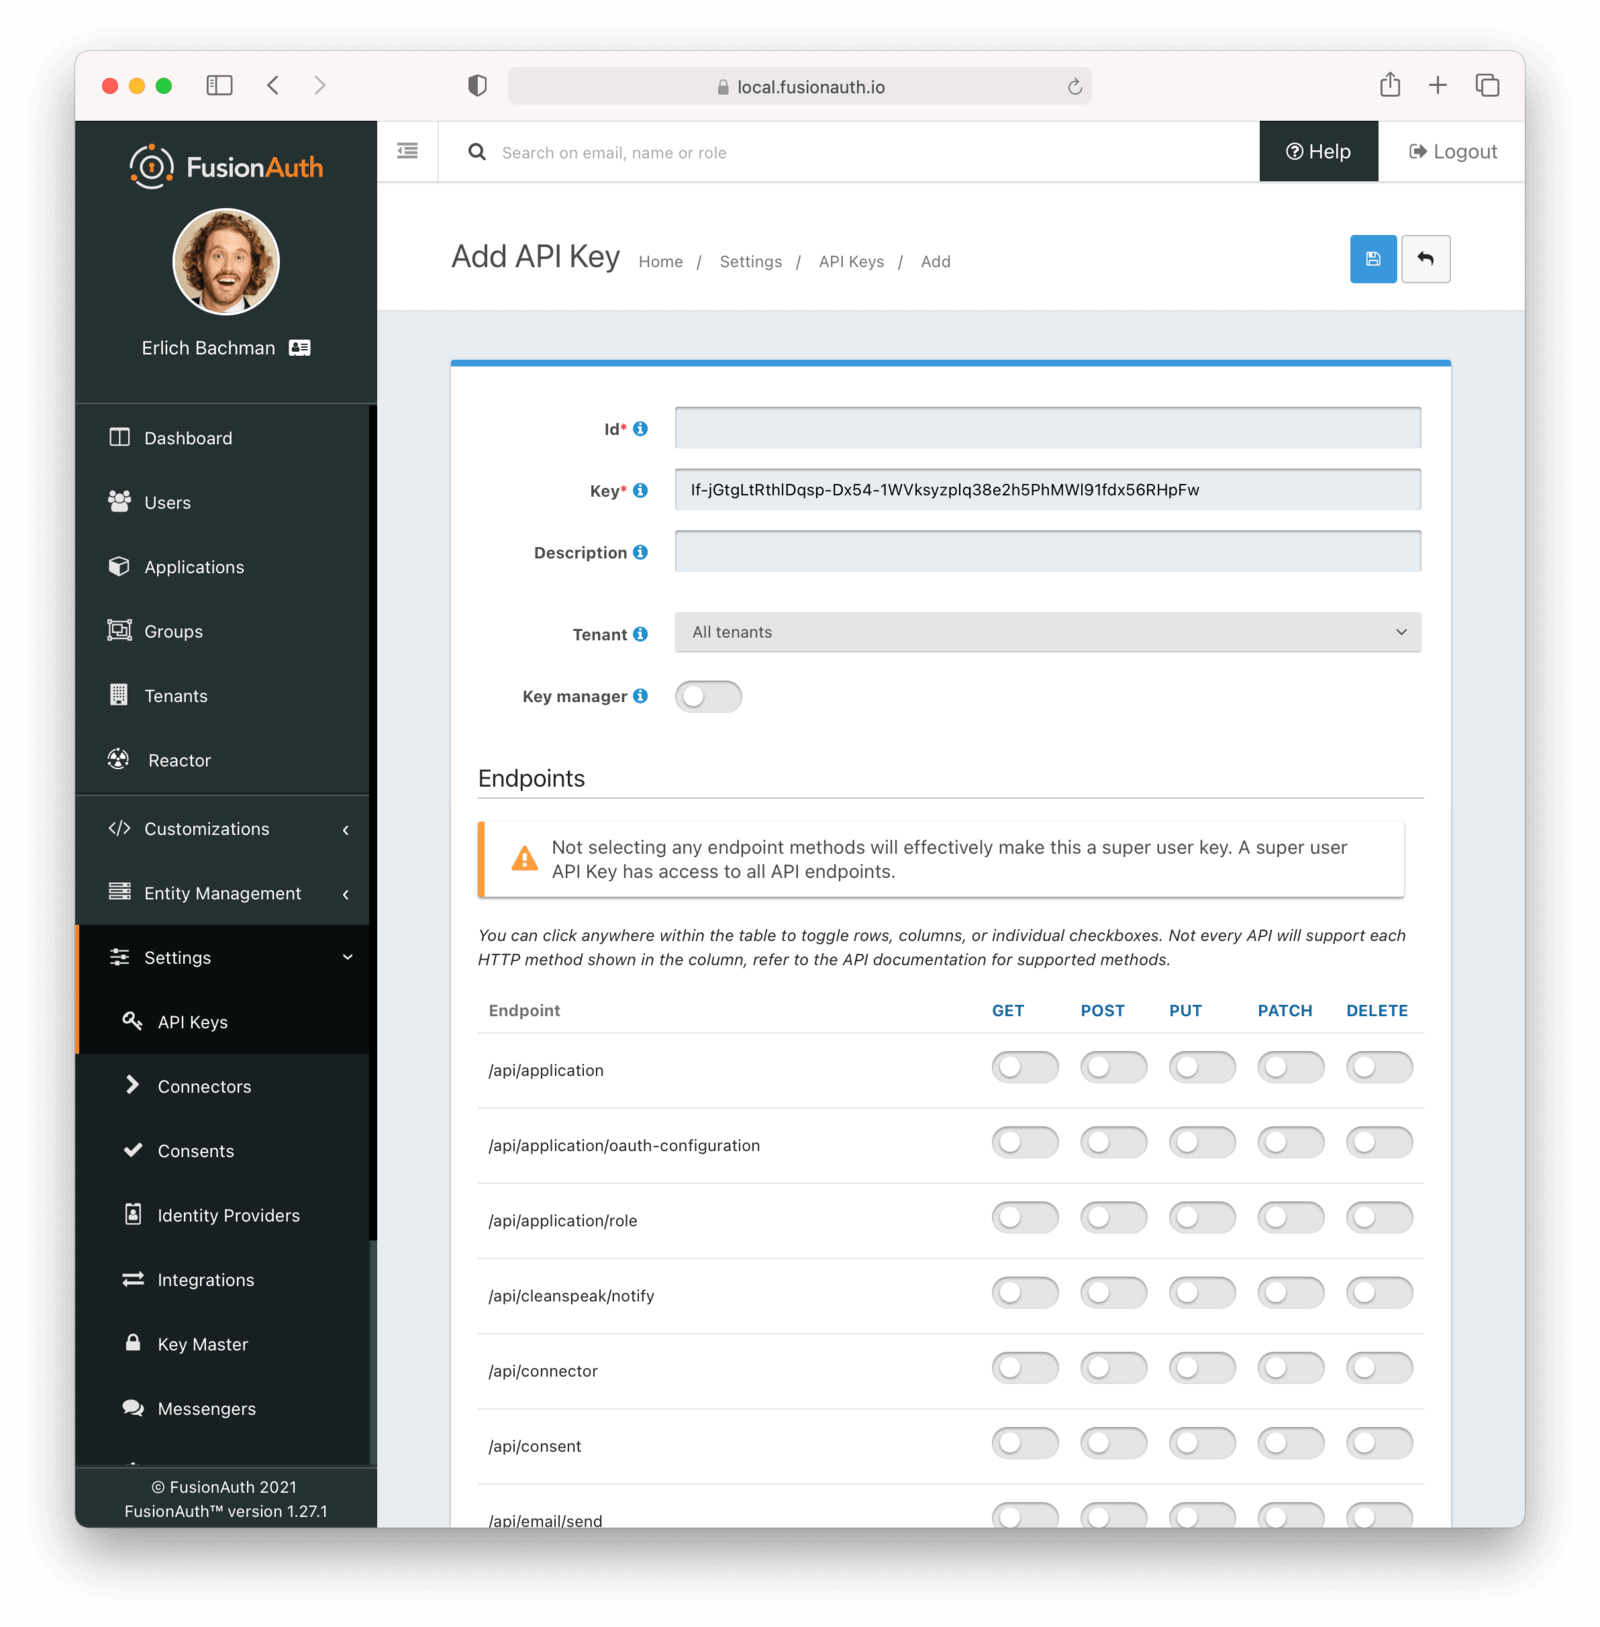
Managing API Keys#
Navigate to Settings -> API Keys to manage API keys.
Create as many API keys as you like, each one may be optionally limited in ability to minimize security risk.
For example, the User API /api/user has five HTTP methods, GET, POST, PUT, PATCH and DELETE. While each API may have different semantics, in a general sense you can think of these HTTP methods as being retrieve, create, update, partial update, and delete respectively. With that in mind, if you'd like to create an API key that can only retrieve users, limit the API key to the GET method on the /api/user API.
When you create an API key, the key value is defaulted to a secure random value. However, the API key is a string, so you may set it to super-secret-key, a UUID such as 02e56c92-f5e1-4b0f-8298-b5103bc7add7, or any other string value that you'd like. A long and random value makes a good API key because it is unique and difficult to guess, so allowing FusionAuth to create the key value is recommended.
Managing API Keys via the API#
Prior to version 1.26.0, the FusionAuth administrative user interface was the only way to create API keys. This functionality was not available through an API. Starting from version 1.26.0, API keys may be created using an API. Please refer to the API Key API for more information.
Create an API Key#
Form Fields#
IdThe unique Id of this API key.
KeyThe unique string representing the API key. This is what is presented in the Authorization header for requests to FusionAuth.
NameThe name of this API key. If the Retrievable selector is set to Not Retrievable, this field is required.
DescriptionAn optional description of this API key.
RetrievableThis selector allows you to determine whether or not an API key can be retrieved after it is created.
The possible values are:
Retrievable- The API key can be retrieved after it is created. This is the default setting.Not Retrievable- The API key cannot be retrieved after it is created. So keep it safe!
If a key is Not Retrievable then a Name is required.
TenantThe optional tenant to which this API key will be assigned. This value cannot be changed once the API key is created.
Once a tenant is assigned to an API Key it will no longer be considered global and the set of endpoints it can call will be limited.
See the API Endpoints reference for a complete list of endpoints that use this authentication type.
Tenant-scoped keys have read-only access to entities that are shared between tenants. You can further limit these API keys by specifying required endpoints, permissions, and a tenant.
EndpointsOne or more endpoints this API key will be authorized to access.
Selecting no endpoints will authorize this key for all API endpoints.
Key ManagerEnable to have this key be a key manager. When a key is a key manager, it can be used to call the API keys APIs.
Being able to create other API keys via the API is a privileged operation. Use it wisely.
Any attempt to call the API Keys API with a non-manager key (keyManager set to false) will return a HTTP response status code 401.
Access Control ListThe optional IP Access Control List for restricting the usage of this API key by network address.
This feature is only available in the Enterprise plan. Please visit our pricing page to learn more.
ExpirationThe optional date and time at which this API key will expire and no longer be usable for API authentication.
Any attempt to call an API with an expired key will result in a 401 response code.
Making an API Request Using a Tenant Id#
Some resources in FusionAuth are scoped to Tenants such as Users, Groups and Applications. When more than one tenant exists, APIs managing these entities may require a Tenant Id to ensure the request is not ambiguous.
For example, once more than one tenant exists, you may no longer retrieve a user by email address without specifying the Tenant Id because a user's email address is not unique across all tenants.
In many cases FusionAuth can detect the intended Tenant Id by inferring this value from other unique identifiers. For example, if you update a User by the unique User Id, the Tenant Id is not required. The User Id is unique across all tenants and FusionAuth can resolve the Tenant Id on your behalf.
When a request may be ambiguous without the Tenant Id, such as the email address search described above, or if you want to scope a request to a single tenant for security purposes, there are two supported methods to provide the tenant Id to FusionAuth during the API request. The first is by using an HTTP header, and the other is using an API key that has been assigned to a specific tenant.
Using an HTTP Header#
The following example demonstrates an API request to an API endpoint requiring tenantId, using the X-FusionAuth-TenantId HTTP header and a bearer token scoped to all tenants.
curl -v -X POST \
    -H 'Authorization: bf69486b-4733-4470-a592-f1bfce7af580' \
    -H 'X-FusionAuth-TenantId: 6c9e9669-9670-4f85-9f16-8396c2206f7f' \
    -H 'Content-Type: application/json' \
    -d '{"group": {"name": "Admin"}}' \
    "http://localhost:9011/api/group"
Using A Tenant Scoped API key#
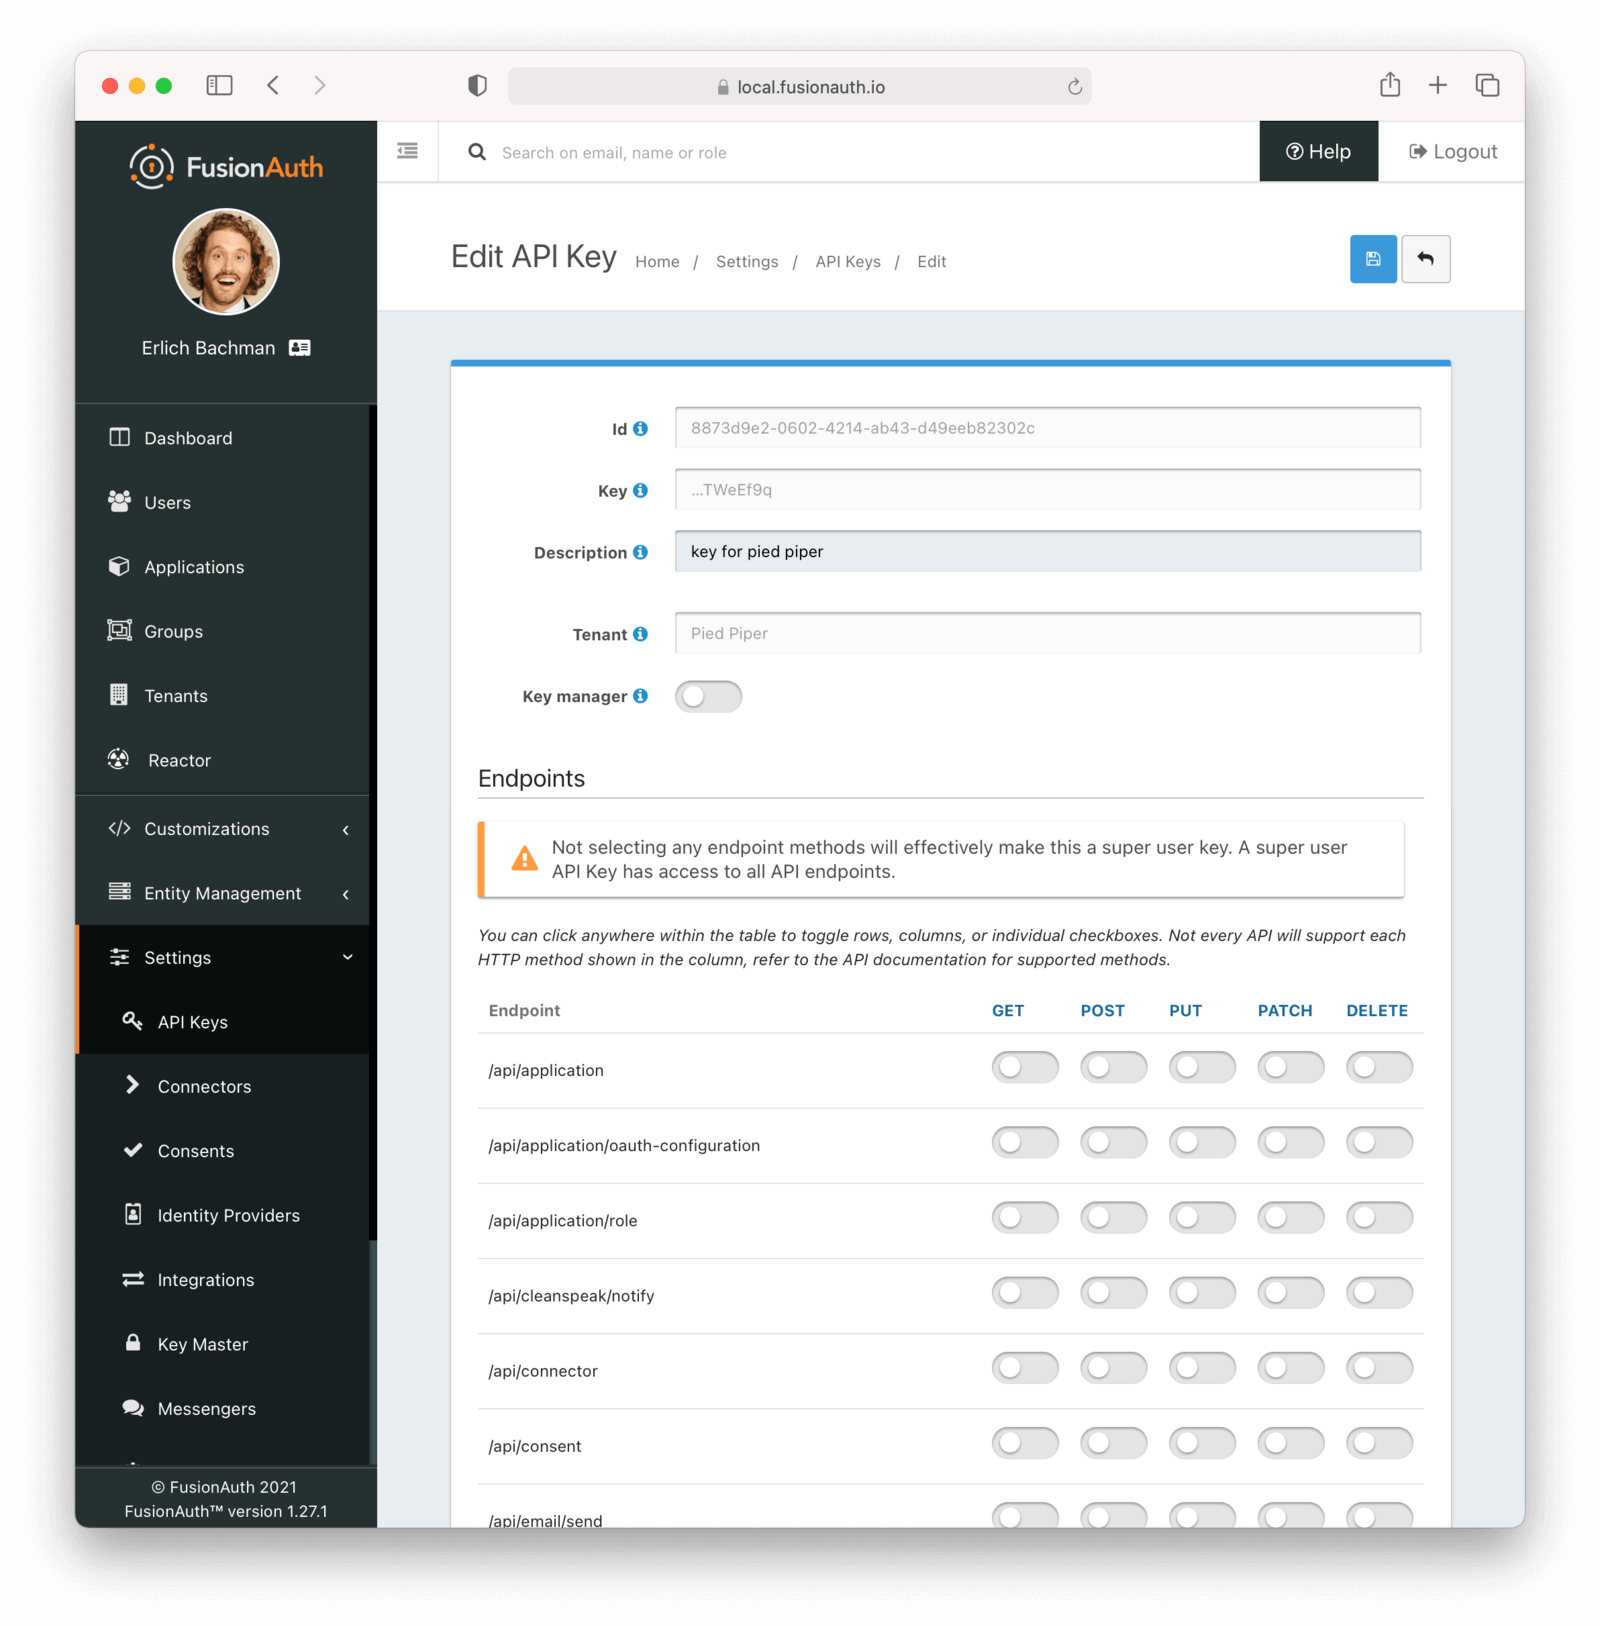
You may optionally create an API key scoped to a particular tenant.
Tenant-scoped keys have read-only access to entities that are shared between tenants. You can further limit these API keys by specifying required endpoints, permissions, and a tenant.
Tenant-scoped keys have a smaller set of endpoints available to them. When using a tenant-scoped key with the X-FusionAuth-TenantId header, the tenant Id provided in the header must be the same as the Id of the tenant the key is associated with.
Below, we have selected the Pied Piper tenant for this API key. Only Users, Groups and Applications belonging to the Pied Piper tenant will be visible to this API.
The following example demonstrates an API request to an API endpoint requiring tenantId, using the tenant-scoped API key.
curl -X POST \
    -H 'Authorization: oa06-d9uxCHTorBOkVdh_QzsX_iEEYARGv8udnMMLJ8' \
    -H 'Content-Type: application/json' \
    -d '{"group": {"name": "Admin"}}' \
    "http://localhost:9011/api/group"
Tenant Errors#
If you make an API request when the Tenant Id is required, you will receive a 400 response code with the following response body.
Tenant Required Error
{
  "generalErrors" : [ {
    "code" : "[TenantIdRequired]",
    "message" : "A Tenant Id is required to complete this request. To complete this request, you may assign a Tenant to your API key, or add the X-FusionAuth-TenantId HTTP request header with the Tenant Id."
  } ]
}
You could make a request to retrieve a User or Application by Id but provide the incorrect Tenant Id. If the Tenant Id provided does not correspond to the Tenant in which the User or Application exists, the API will return an error indicating the object could not be found, either by returning a 404 status code, or some sort of validation error.
API Key Permissions#
Each API Key can be granted zero or more endpoint permissions. Each permission corresponds to an endpoint and an HTTP method. API keys are limited to the allowed endpoints and HTTP methods.
If you do not grant any endpoint permissions to an API key, the key has access to all endpoints and is essentially a 'super user' key. However, if you associate a tenant with a key, this is not the case. Tenant-scoped keys are, by default, only granted a subset of permissions.
These permissions are managed via the API Key API or in the administrative user interface under the Endpoints section. When using the administrative user interface, you may click on the HTTP method column or the endpoint row. Either will toggle all the settings for the column or row, respectively.
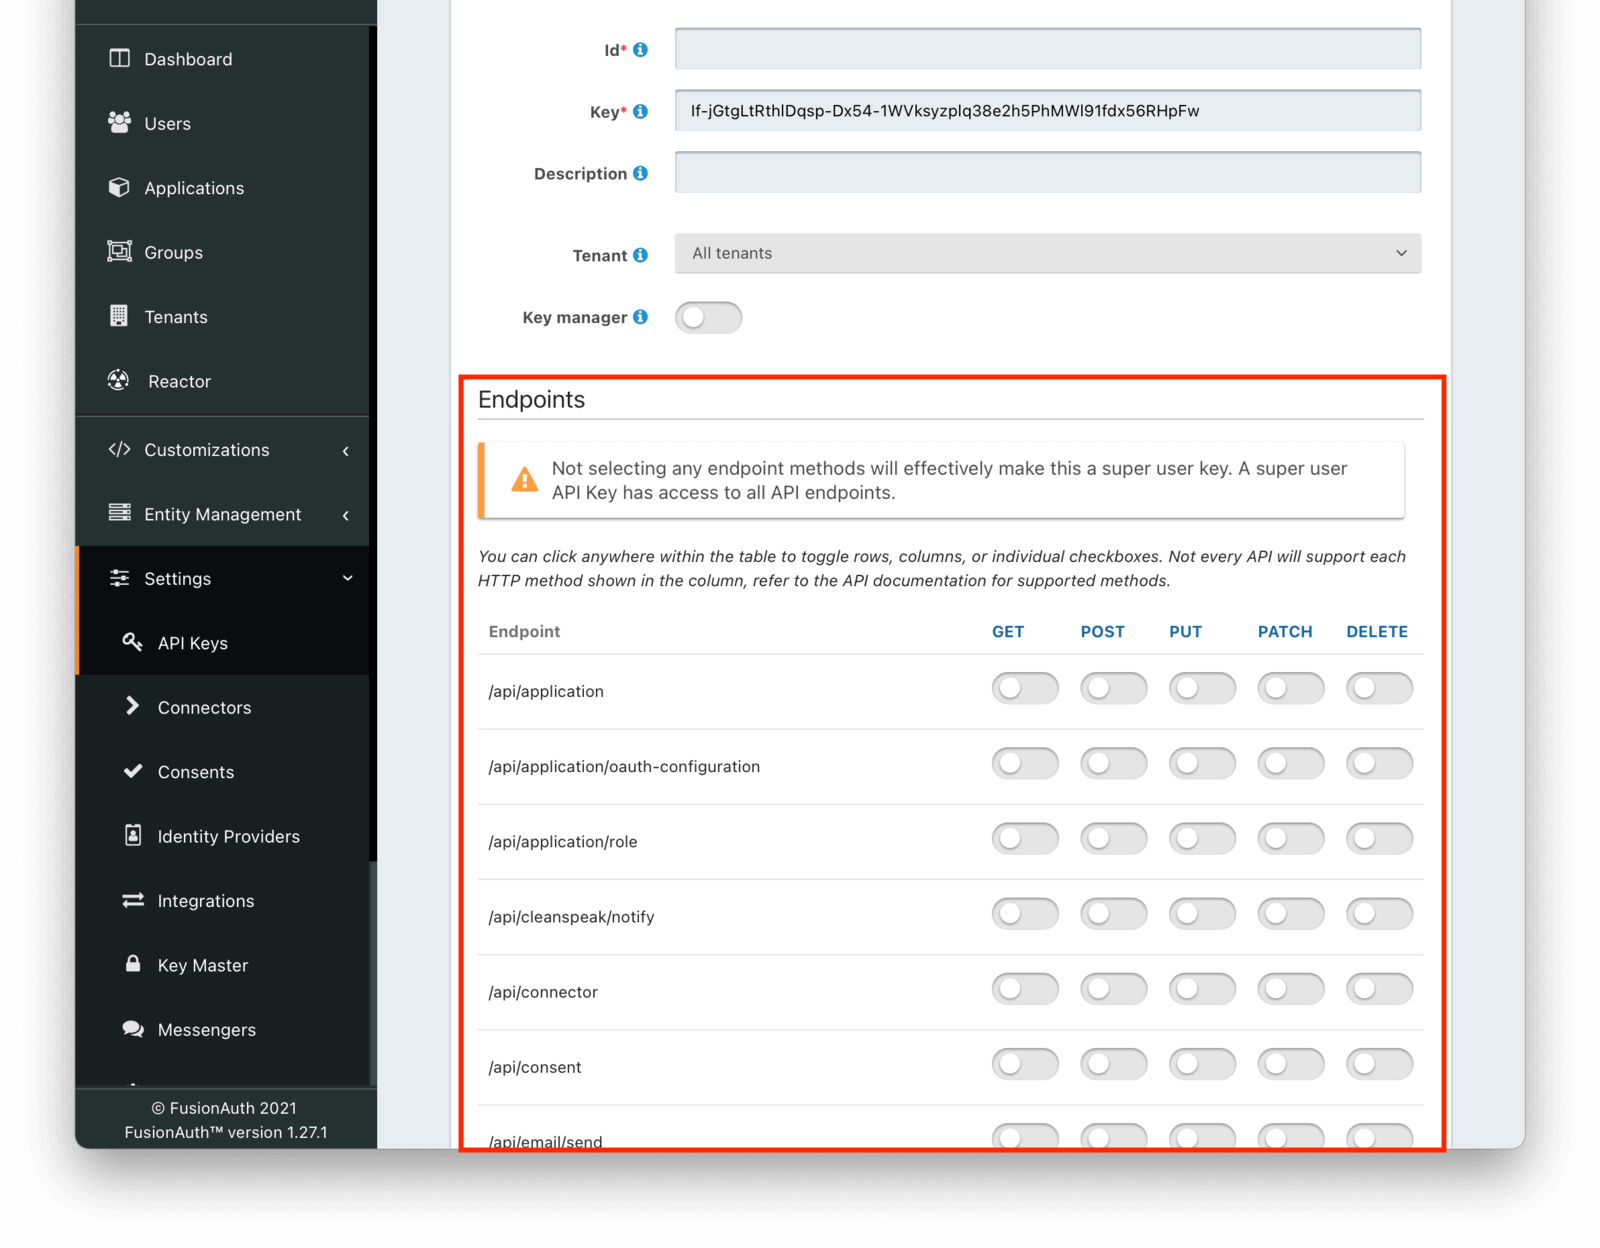
For example, if you were to grant an API key POST permissions on /api/user, the API key would be able to create users in FusionAuth.
Any calls with this API key would be denied access to any other functionality, including listing users, creating applications, and deleting registrations.
Calling other endpoints would result in a 401 response code.
Tenant Scoped API Keys#
When you assign an API key to a tenant, any requests made with this key will only be able to operate on users, applications, groups, and other entities in the selected tenant. Tenant-scoped keys will not be able to call global endpoints.
Tenant-scoped keys have read-only access to entities that are shared between tenants. You can further limit these API keys by specifying required endpoints, permissions, and a tenant.
Protect such API keys in the same way you would any other API key.
Client Side API Keys#
When interacting with FusionAuth from a client side application, such as a React or Angular front end, you have a few options.
If you are authenticating the user, use the standard OAuth Authorization Code grant. You can either forward the browser or webview to FusionAuth or use an iframe.
If you are using one of the APIs which does not require an API key, such as the change password API, you can interact directly with the API. These APIs tend to be more limited in functionality when no API key is presented, but may suit your needs.
If you need to use an API requiring authentication from client code, such as the registration API, you have two options:
- Use a server side component which can securely hold the API key and monitor access for abuse. This can be in any server side language or framework. The client code then sends requests to the server side component, and the server side code makes requests of FusionAuth. This is the recommended option.
- Create an API key with extremely limited permissions and distribute it. Since stealing the key when used on the client side is trivial--all an attacker has to do is 'view source'--make sure you have carefully considered the risk and result of someone stealing and using the key outside of your application. You can also monitor FusionAuth usage with webhooks, use IP ACLs to limit where the API key can be used from, or place an HTTP proxy in front of FusionAuth to further limit access. Plan to rotate the key regularly to limit the impact.
Troubleshooting#
FusionAuth caches API keys for a faster lookup. There is an internal distributed cache and notification policy for multi-node deployments. When you create a new key, it will take time for the API key to be usable. Usually this less than one second. In rare cases where node communication fails, it may take up to 60 seconds.
This means that if you create a new API key using the API Key API and use it immediately, you may receive a 401 status code. This typically indicates you didn't supply a valid API key, but in this case means that the new key is not yet usable.
The workaround to wait for a period, using exponential backoff and then retry the request.