What Is WebAuthn and How Does It Work? | FusionAuth
By Niel Thiart
Think passwordless authentication seems too good to be true? Take a look under the hood to see how and why passkeys work.
Before we jump into the deep end, it's worth taking some time to define the terms that we'll use in this article:
WebAuthn- WebAuthn is a web standard, the goal of which is to standardize an interface for user authentication to web-based applications. It was published by the World Wide Web Consortium (W3C), as one of the core components of the FIDO2 Project.
Passkeys - A passkey is a FIDO credential, stored in two parts, used to log in to a web service. The private key exists on a computer or phone or physical security key. The public key lives on a web server.
The security world seems to have landed on using "passkeys" as a blanket term to describe biometric logins using the WebAuthn standard. With that in mind, we'll use the word passkeys liberally in this article.
With all that being said, now we can dive in. My first brush with passkeys came as an end user. Here's how it went:
I added passkeys to a handful of online services — while registration had some usability issues, the authentication experience has been nothing short of sublime. Tapping the Touch ID button on my Mac to log in to GitHub, for example, is as simple as it gets. No dongles, no need to enter a username, no backup codes, no authentication apps on my phone, and, most importantly, no password.
If anything seems too good to be true, it probably is. The first issue came up when I later tried to log in to GitHub from my Android phone. This is how I learned that a passkey generated and saved with iCloud Keychain via Safari (obviously, in hindsight) does not work on Android.
In this case, the solution was easy: I logged in to GitHub on Android using my trusty old password and generated a new passkey, this time using my Google account's password manager. Surely, this would allow me to log in using my Google profile in Chrome on Linux too. Turns out that didn't work.
I've since found a solution to cross-platform passwordless authentication in the form of a password manager, but I'll discuss that later on in strategies to deal with passkeys as a user.
This speed bump prompted questions. What if my Android device is lost or stolen? Could this marvel of convenience be compromised? How do I ensure I remember which device I created a passkey on? And my burning question was: How do passkeys even work?
Complacency and digital security don't mix. I set out to understand the nuances of passkeys with two goals: as a responsible consumer, assess the true cost of this convenience, and as a developer, are passkeys something I should add to my product? Ignorance, in this context, isn't bliss — it's a liability.
Here's what I found.
Why we need Passkeys#
Passkeys are an attempt to make strong authentication more convenient than passwords.
The problem with passwords#
Passwords are infamous for their vulnerability: they're typically weak, predictable, and magnetically attracted to sticky notes. As a user, you've juggled dozens, fought with caps lock, and groaned at the umpteenth "time to update your password" prompt.
You may have guided many a user through the ritual of password resets, only to watch them stumble again next week.
You've witnessed family members enter their Google account password on a phishing site that has the logos of four different tech companies in stretched aspect ratios and a big green padlock.
Multi-factor Authentication#
While Multi-factor Authentication (MFA) has put up a good fight, patching some holes in the password paradigm, it's often the last pick during the cybersecurity kickball game. It is an absolute chore. Users dread that extra step almost as much as changing passwords, leaving MFA adoption to be driven more by mandate than by choice. When left to their own devices (ugh) users typically won't bother with MFA, even though it can be the one thing standing between them and someone taking over their Gmail to buy high-end umbrellas in London using someone else's stolen credit card. Yes, this is a real example.
The digital threat landscape#
Cyberattacks are now a daily drama on a global scale, with compromised credentials as the opening act. Stolen passwords give hackers the keys they need to set off a cascade of often terrible events. It's not just big corporations at risk. Small businesses, children's hospitals, and even small towns have all fallen victim lately.
Passkeys can help us here#
Passkeys aim to decrease our reliance on passwords, streamline authentication processes, and sharply reduce opportunities for phishing and breaches. By integrating biometrics and hardware tokens, passkeys can make logging in both more secure and more convenient — potentially even rendering traditional passwords and MFA obsolete.
What is WebAuthn?#
WebAuthn, short for Web Authentication, is a web standard that enables online users to perform authentication through cryptographic proof, using credentials generated by their devices. This authentication process doesn't require a password and instead verifies the user through biometrics or a fallback PIN.
The FIDO Alliance#
The FIDO (Fast IDentity Online) Alliance is an open industry association focused on (in their words) "reducing the world's over-reliance on passwords" through standardized, secure, and passwordless authentication protocols. WebAuthn is a cornerstone of the FIDO2 project, championed by the Alliance. WebAuthn is a technical specification, while FIDO2 is the larger suite of technologies that includes WebAuthn and another component called FIDO Client to Authenticator Protocol (CTAP). The FIDO Alliance's mission is clear: create a seamless authentication experience across devices and platforms, bolster security, and simplify the login process without passwords.
The WebAuthn specification#
The WebAuthn specification is maintained by the Web Authentication Working Group, created by the World Wide Web Consortium (W3C), the same stewards who oversee the standards for HTML and CSS.
Changes to the WebAuthn specification happen through an established process that includes regular public discussions, careful drafting, and, ultimately, a formal consensus. Current editors of the draft level 3 specification include representatives from Google, Mozilla, Microsoft, and Yubico.
How browsers implement the API#
Just as with HTML and CSS, each web browser may choose to support WebAuthn features at its own pace, but there's a strong incentive to stay current: users and developers demand the balanced diet of convenience and security afforded by passkeys. Modern browsers are typically quick to implement updates, to make sure users get the latest while the specification evolves.
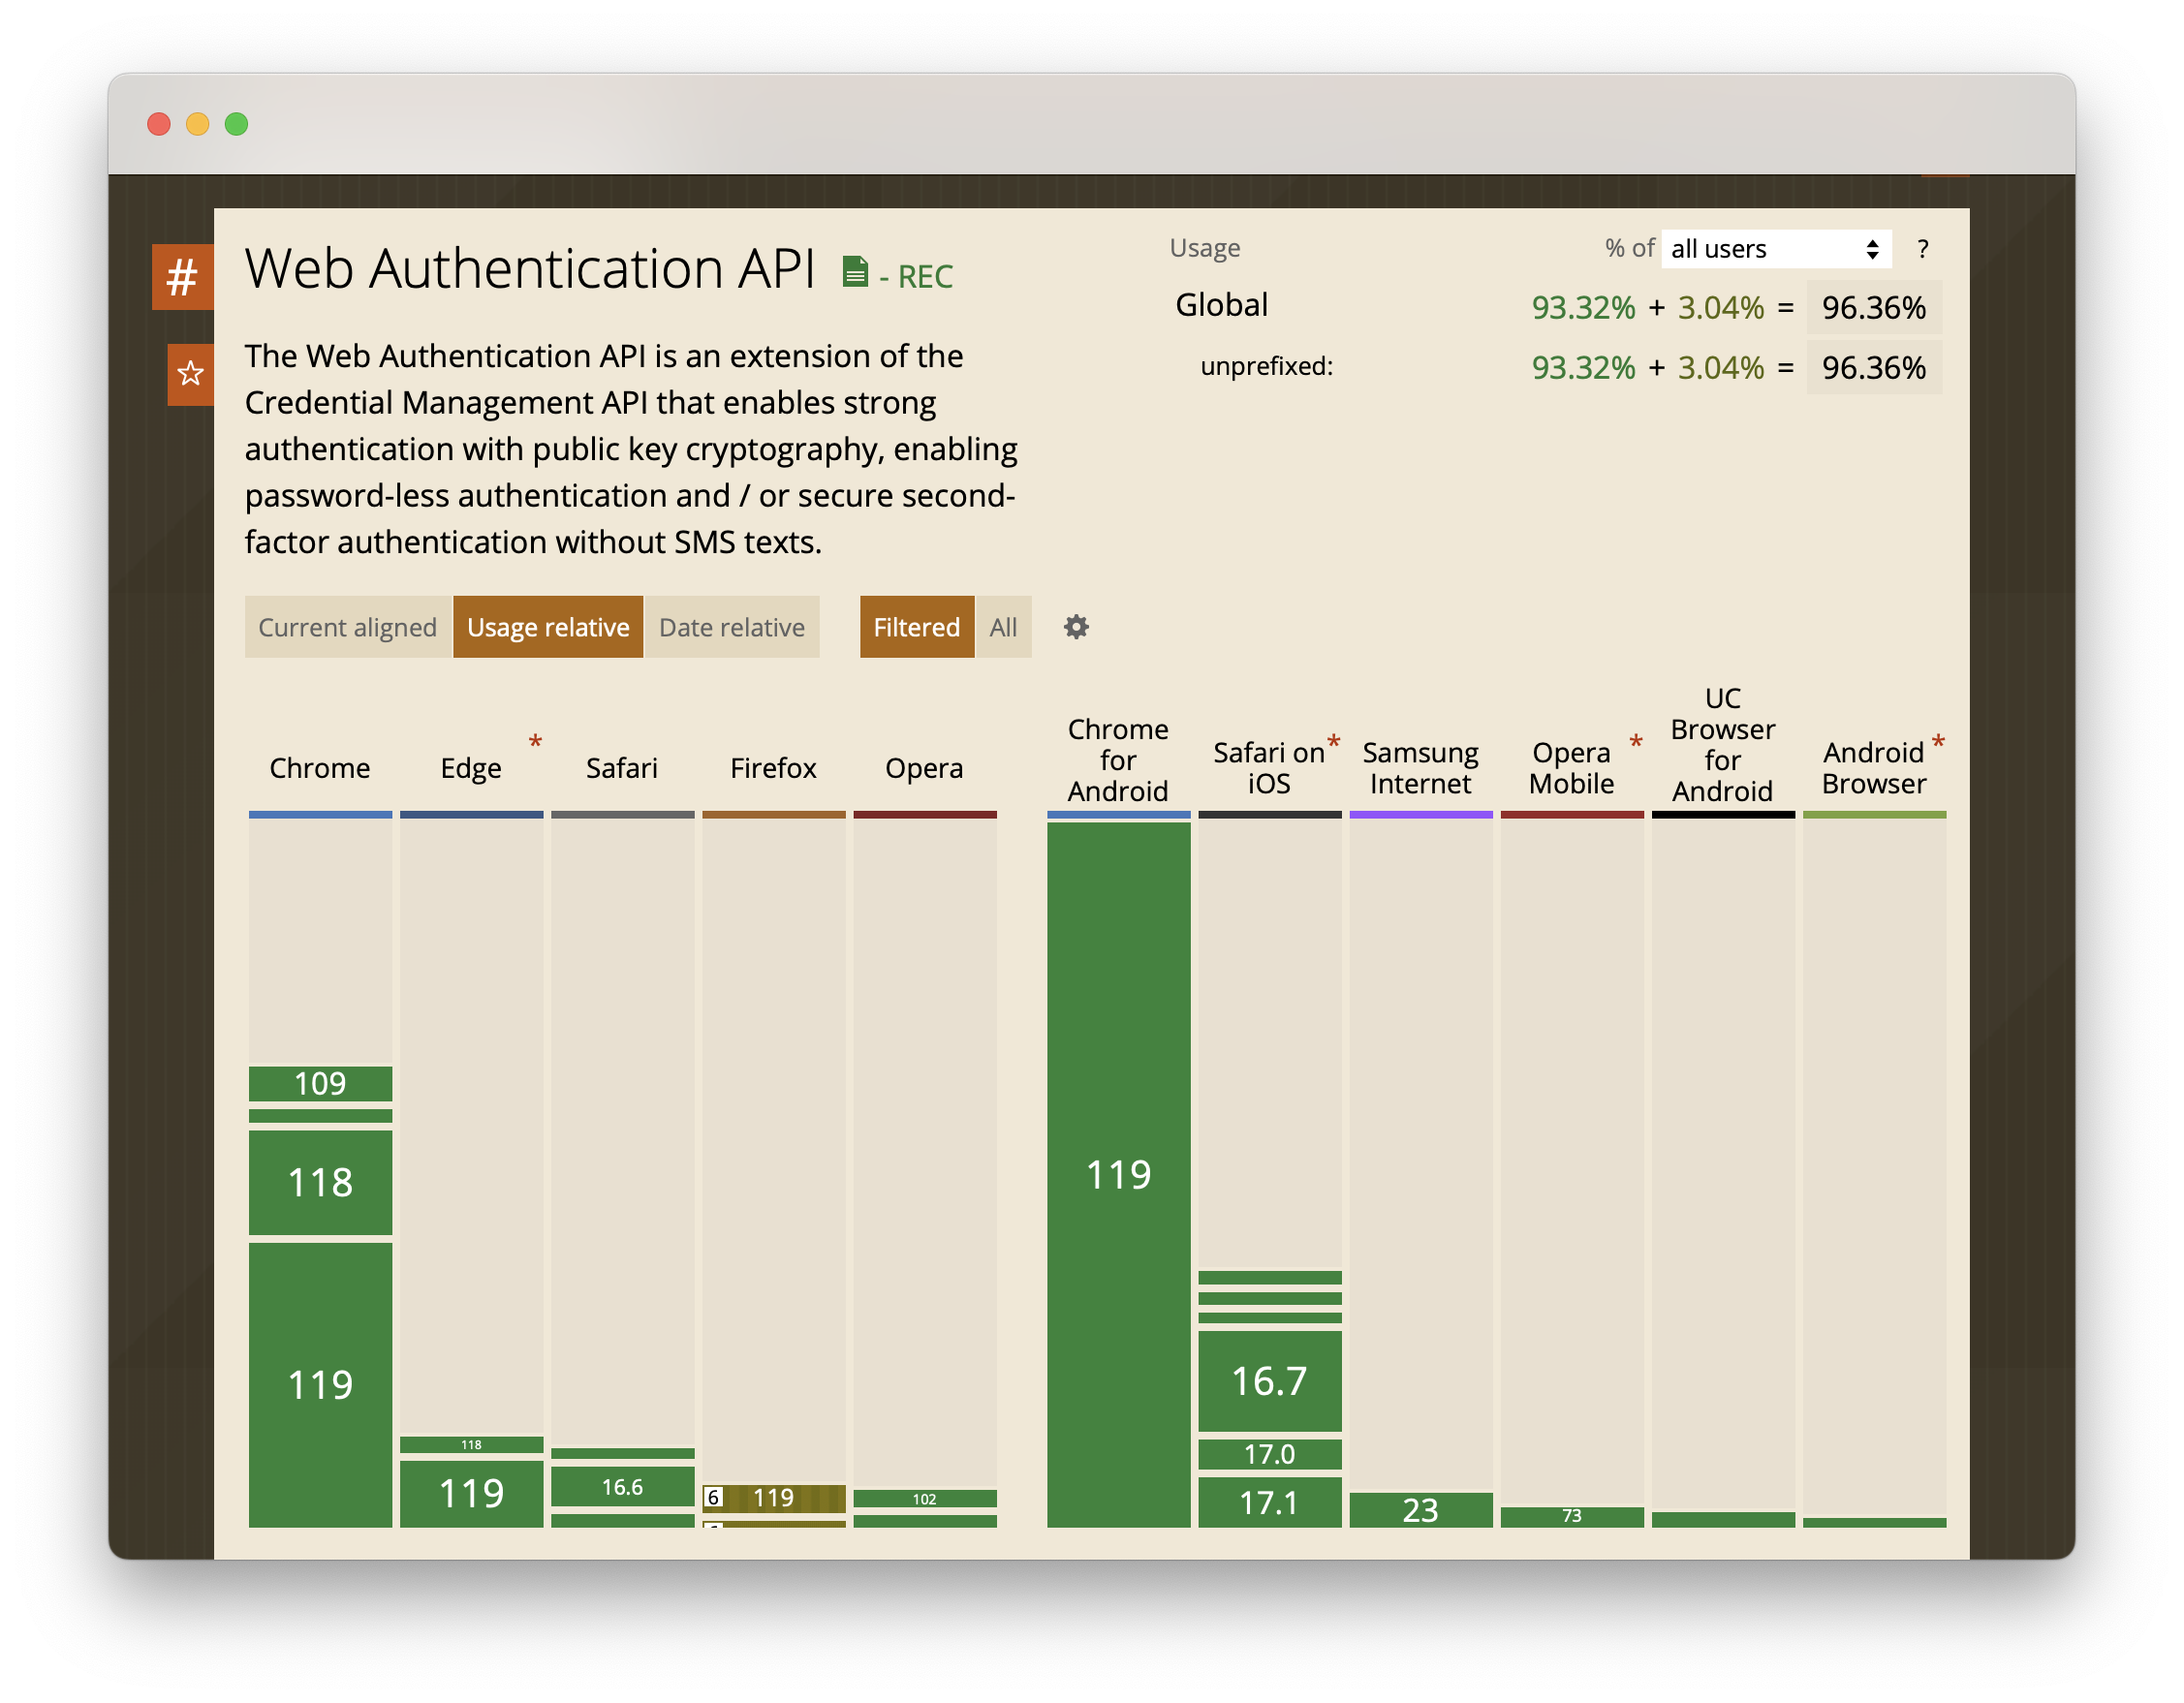
As of early 2024, passkeys are supported by browsers for 96.36% of all users.
The core components of WebAuthn, Passkeys, and FIDO2#
Passkeys are built upon three core components that work together to enable passwordless authentication:
- Authenticators: Devices or software like phones, security keys, or password managers that generate and store cryptographic credentials securely.
- Relying Parties: Services or applications like online banking or social media platforms that verify authentication data provided by the authenticator. Called the relying party because it relies on the passkey process to confirm that the user is who they claim to be.
- Clients: Browsers and operating systems such as Google Chrome or macOS that facilitate communication between authenticators and relying parties.
Public-key cryptography#
Public-key cryptography is the base on which WebAuthn and passkeys are built. A detailed overview of public key cryptography is beyond the scope of this article, but rest assured that it is a solid, well-tested, and widely used technology. It's the same technology that secures HTTPS connections, for example.
There are two kinds of cryptographic keys involved: the private key and the public key. They do exactly what their names suggest: the private key is kept secret, while the public key is openly accessible.
In the context of passkeys, the private key is stored on the authenticator, while the public key is shared with the relying party. The authenticator uses the private key to generate a digital signature that proves the user's identity to the relying party, without revealing the private key itself.
Even if malicious actors get their hands on your public key, without the corresponding private key, it is essentially harmless and pointless for them.
The role of web browsers#
Web browsers act as the facilitators for the passkey authentication process, but they don't store any of the user's credentials. Instead, they act as the middleman between the authenticator and the relying party. The browser's role is to pass messages between the two and to ensure that the user is aware of what's happening.
The processes of Passkeys#
The WebAuthn specification distinguishes two main processes: Registration and Authentication. While it might seem a bit dramatic to call them "ceremonies," that's the term the standard uses, and it helps underline the formality and importance of the steps involved. Registration is where a new credential is created and tied to a particular user and device, while Authentication is how that credential is used to confirm the user's identity on subsequent visits.
Let's take a look at each of these processes in more detail.
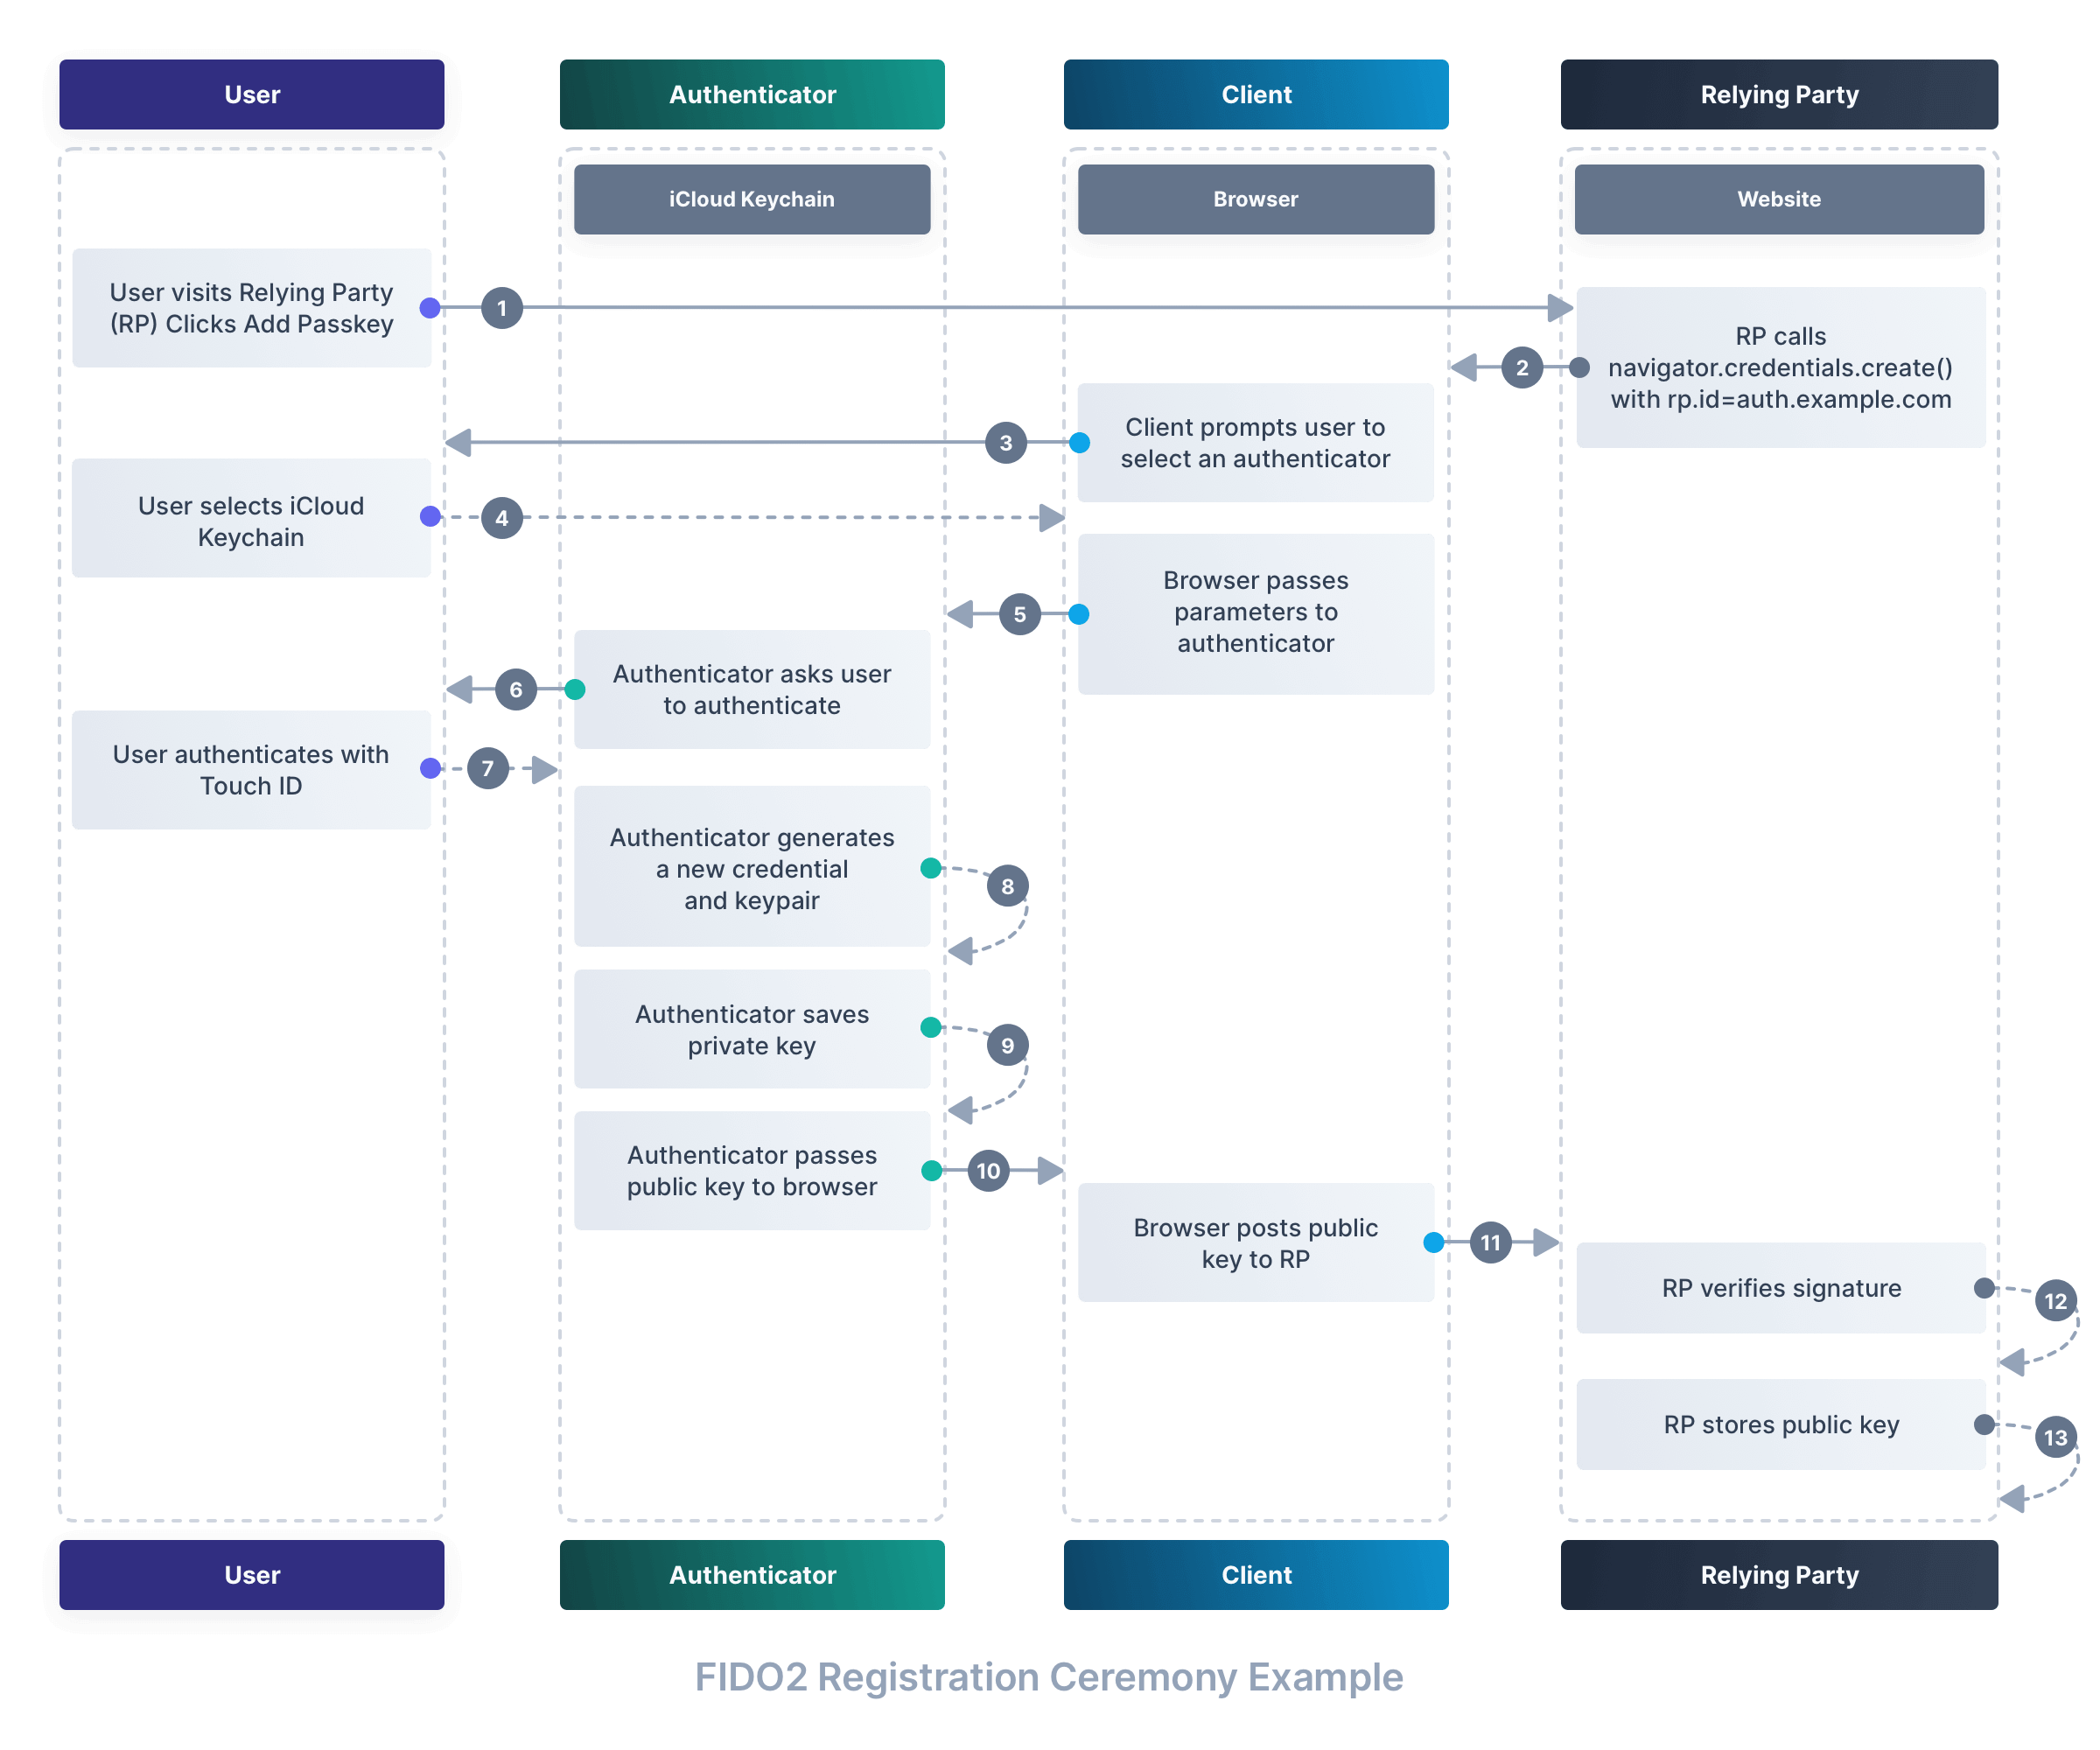
The registration ceremony#
The WebAuthn registration ceremony is the initial step where your device creates a new credential for a website. It's a bit like getting a new electronic ID card issued. Here's how it works.
Registration step one: Visiting a website#
We start by visiting a website that supports passkeys. Let's say we're registering on https://auth.example.com:8080. At this point, the website is called the relying party. The relying party is the website that wants to authenticate you, and it's the website that will store your public key and attestation. You may already be logged in to the website, or you may be asked to log in using a password or other means.
Registration step two: Initiating the registration ceremony#
After you click the add passkey button, the relying party asks you to initiate the registration process.
This kicks off a process that ultimately calls the navigator.credentials.create() method that's part of the WebAuthn API. This method is responsible for initiating the registration ceremony.
Parameters passed to the navigator.credentials.create() method include the following:
publicKey: This is a JSON object that contains information about the relying party, such as its name and ID.challenge: A random string generated by the relying party. The authenticator will use this string to generate a digital signature later on.attestation: (Optional) A string that tells the authenticator what the relying party expects from it. It's a bit like a set of instructions for the authenticator.user: A JSON object that contains information about the user, such as their name and ID:id: A random string that uniquely identifies the user. Not meant to be human-readable.name: The user's human-readable identifier, such as their username or email address.displayName: The user's human-readable name, such as their full name.
rp: A JSON object that contains information about the relying party, such as its name and ID.id: The origin of the relying party, For example, when registering onhttps://auth.example.com:8080,auth.example.comorexample.comare valid. This value defaults to the current origin if omitted.name: The human-readable name of the relying party, such asGitHuborFacebook.
Registration step two: Select an authenticator#
If you have multiple authenticators (say a YubiKey, a security key, and a password manager) connected to your device, you'll be asked to select which one you want to use.
Registration step three: User consent#
Your browser will pass the parameters to the authenticator, which will then ask you to confirm that you wish to register with the relying party.
Registration step four: User verification#
The authenticator will now ask you to verify your identity. This is typically done through biometrics, such as Touch ID or Face ID.
Registration step five: Create a new credential#
If you're successfully verified, the authenticator will generate a new set of keys for this website. The private key will be stored on the authenticator, while the public key will be shared with the relying party.
The authenticator will also generate a digital signature using the private key, and send it to the relying party. This signature is called the attestation. It's a bit like the authenticator signing a document that says "I, the authenticator, have verified that this person is who they claim to be."
Registration step six: Store the credential#
The website now verifies and stores the public key and attestation, linking it to your account.
Registration step seven: Registration complete#
The registration ceremony is now complete. You can now use your new credential to log in to the website.
Registration ceremony diagram#
The following diagram illustrates the registration ceremony:
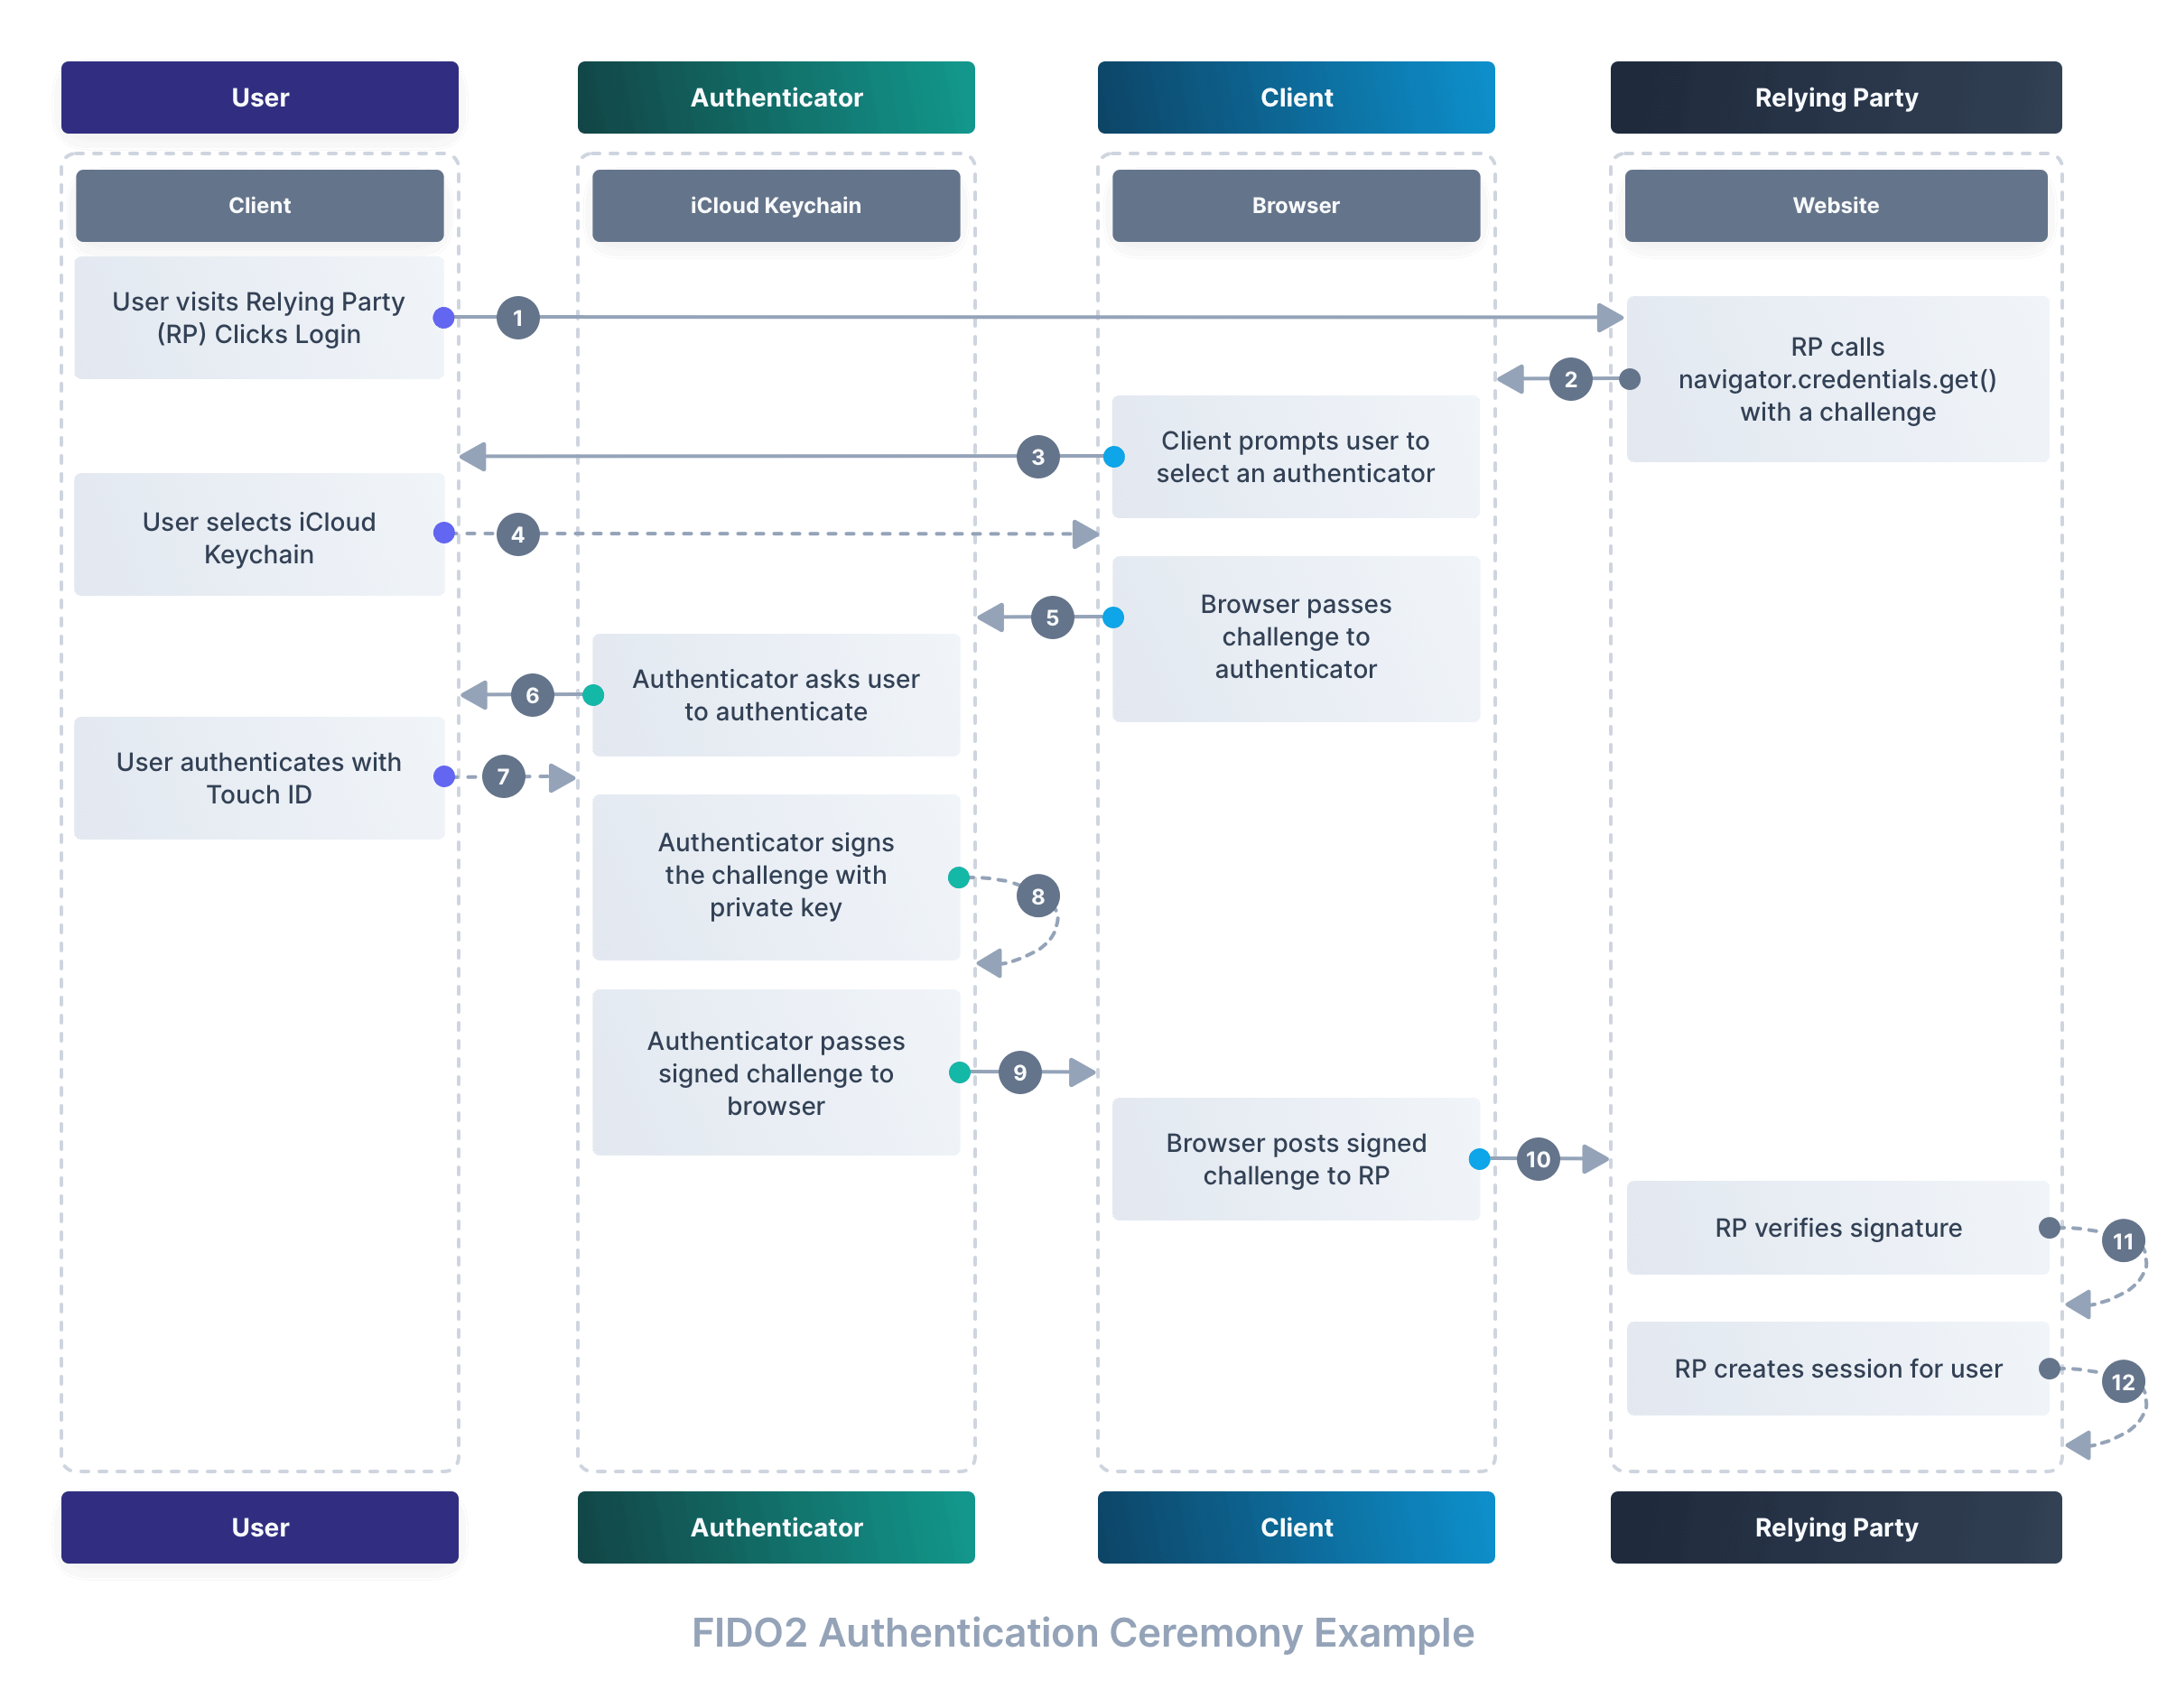
The authentication ceremony#
The WebAuthn authentication ceremony begins when you try to access a resource or log in to a service that requires you to prove your identity.
This step is analogous to showing your ID card when you enter a secure building. Here's what happens during the authentication process:
Step one: Initiate authentication#
When you attempt to log in, the relying party (the service you're trying to access) prepares an authentication challenge. The relying party then sends this challenge to your browser.
The challenge is a random string that is unique to this authentication attempt, and is passed to the navigator.credentials.get() method, which is part of the WebAuthn API. This method is responsible for initiating the authentication ceremony.
Parameters passed to the navigator.credentials.get() method include the following:
publicKey: This is a JSON object that contains information about the relying party, such as its name and ID.challenge: A random string generated by the relying party. The authenticator will use this string to generate a digital signature later on.allowCredentials: (Optional) A list of credentials that the relying party will accept. This list is typically generated by the relying party when you register with them, and stored in your account. It's a bit like a list of approved ID cards that the security guard will accept.userVerification: (Optional) A string that tells the authenticator whether it should verify the user's identity. It is up to the authenticator to decide whether it will honor this request.
Step two: Prompt user for gesture#
Your browser then prompts you for a gesture, such as a password, PIN, fingerprint scan, or facial recognition, depending on the capabilities and policies of your authenticator. This step ensures user presence and optionally user verification.
Step three: Authenticator response#
Once you have provided the required gesture, your authenticator finds the correct credential, uses its private key to sign the challenge, and sends a response back to your browser.
Step four: Browser relays information#
The browser takes this signed response — you can think of it as a cryptographically authenticated timestamp — and sends it back to the relying party's server.
Step five: Verification#
The relying party verifies the signed challenge using the stored public key that corresponds to the user's credential.
Step six: Access granted#
If the signature is verified, the relying party grants access to the user. Usually, this causes the browser to save a session cookie so that you don't have to go through the authentication ceremony again for a while.
Authentication ceremony diagram#
Here is a simplified visualization of the WebAuthn authentication ceremony:
Why passkeys are secure#
Now that we know how it works, let's discuss why this is secure.
Biometrics and the proof of presence#
Biometric authentication adds a critical layer of security to the WebAuthn protocol. Features like Touch ID and Face ID translate something unique about the user into a digital proof of presence.
This ensures the person attempting to authenticate is physically present.
It also means that even if someone steals your device, they won't be able to log in to your accounts without your biometric data.
Asymmetric authentication limits the role of relying parties#
In WebAuthn, "relying parties" are the websites or services that use WebAuthn for user authentication. They rely on the protocol to confirm users' identities without ever seeing their private keys, which remain securely stored on users' devices.
This system limits their role in the authentication process, enhancing security and reducing the risk of credential exposure during data breaches.
Passkey credentials are strong, attested, and scoped#
Passkey credentials offer three significant security features: attestation, a unique credential ID, and scoped authentication.
Attestation acts as a certificate of legitimacy for a public key, allowing a relying party to verify that the public key comes from a genuine source — the user's authenticator — without ever seeing the private key.
Each WebAuthn credential is also bound to a unique identifier, making it nearly impossible to forge. This credential ID is specific to both the user and the website, ensuring that even if it is somehow intercepted, it cannot be reused on any other site.
Lastly, credential scoping ensures that the authentication process is tightly bound to the entity initiating it. To put it simply, credentials created for one website can't be used on a different website.
How passkeys prevent phishing and limits damage from data breaches#
Because the credentials are unique to each website, users can't be tricked into using them on a phishing site. Even if a user is fooled into entering their credentials on a fake site, the credentials won't work on the real site.
Passkeys in practice#
Let's take a look at how passkeys are used in the real world today.
Passkeys at Microsoft#
Passkeys have been embraced by major players in the tech industry due to its promise of a more secure, passwordless future. Microsoft, for instance, has integrated passkey authentication across its services. Users of Windows 11 and above can use the operating system's native features, such as Windows Hello, to authenticate themselves using facial recognition, a fingerprint, or a PIN instead of traditional passwords.
Microsoft Entra ID (formerly Azure Active Directory), for example, already offers passwordless authentication through passkeys.
Moreover, the tech giant has enabled WebAuthn support for its browser, Microsoft Edge.
How to enable your employees to use Passkeys#
Equipping your employees with passkey-enabled devices is a great way to ensure that they can use passkeys to log in to your company's services. This is especially true if you're using a password manager that supports passkeys, such as 1Password.
An alternative strategy is to provide your employees with security keys, such as the YubiKey. These devices can be used to store their credentials and can be used to log in to any service that supports passkeys.
Regardless of which strategy you choose, it's important to educate your employees about the benefits and especially the risks of passkeys.
How passkeys can benefit web applications and platforms today#
Passkeys have already found traction in many web applications, offering improved security profiles and a smoother user experience.
I've added passkeys to my GitHub account, for example, and I'm using them to log in to GitHub on my Mac. I've also added passkeys to my Google account, and I'm using them to log in to Google services on my Android phone.
These services benefit from the improved security profile of WebAuthn, and I benefit from the improved user experience.
The challenges we'll face#
As the adoption of passkeys grows, so too will the challenges encountered by both users and organizations.
A critical issue lurking behind the newfound convenience is the heavy reliance on specific devices: a smartphone, tablet, or security key holds the keys to one's digital life. If devices are lost, damaged, or replaced without a proper backup strategy, users could find themselves locked out of their accounts.
There's also a concern over vendor lock-in, especially with platform-specific implementations that don't play nicely across different ecosystems. Moving seamlessly from an iPhone to an Android device, for instance, requires careful planning to ensure users don't lock themselves out.
The reliance on biometrics is another potential pitfall. While biometric authentication is convenient, it might prove difficult for users with disabilities or for users who share devices with others — as is often the case in households with children.
What lies ahead#
It remains to be seen whether passkeys will gain widespread adoption and reach critical mass. Users tend to use the path of least resistance, and WebAuthn's registration flow is still a bit clunky. The authentication flow, however, is a joy to use.
Either way, I don't think passkeys will replace passwords anytime soon. Instead, I think it will be used in conjunction with passwords, and other authentication methods, such as MFA.
When used alongside passwords, I'm doubtful that WebAuthn will have a significant impact on the damage caused by data breaches. If a hacker can steal your password, they might not need your passkey credentials to log in to your account.
Users might also still be tricked into using phishing sites with their passwords. If they do, the hacker might be able to use the stolen password to log in to real accounts.
Conclusion#
With the usability and education issues ironed out, passkeys have the potential to greatly improve online security for users and organizations alike. It's a promising step towards a passwordless future, but it's not a silver bullet. For now, I'll treat it as a welcome addition to my security arsenal, but I'll keep my password manager close at hand.
If you're curious about the shift towards a passwordless future, why not dip your toes in the water and give WebAuthn a test drive? Experiencing its potential firsthand might just make you a believer in a world less dependent on passwords. Several demos are available online where you can safely experiment with the registration and authentication processes. One such example is the WebAuthn.io demo developed by Duo Security, which is a user-friendly way to understand the mechanics of WebAuthn in a controlled, educational environment. As with any new technology, there's no substitute for hands-on experience, and I encourage you to explore these demos and consider the possibilities for your web applications.
We've written a lot about WebAuthn and passwordless authentication. If you're interested in learning more, check out our open-source WebAuthn.wtf site, where we explore the history, mechanics, and future of WebAuthn.
Finally, I recommend consulting the WebAuthn specification if you're looking to learn more about specific technical details of passkeys. Taken as a whole the specification is daunting, but it is easy to find specific explanations and examples for each step of the process.