How to Implement Time Based One Time Passwords in FusionAuth
By Manish Hatwalne
Time-based one-time passwords (TOTPs) are temporary passwords that change automatically at fixed intervals. Like normal one-time passwords (OTPs), they're used for two-factor authentication (2FA) to mitigate issues with using only regular, static passwords.
Unlike normal OTPs that are generated by the server and sent to the user's device via SMS, TOTPs are generated independently by a dedicated app (authenticator). This means your solution is not dependent on SMS, avoiding issues like cellular network dependency, network delays, and unencrypted message transmission non-encryption. Additionally, it eliminates problems associated with email delivery, such as spam filtering or bouncing emails.
In this article, you'll learn how to implement TOTPs using FusionAuth---an identity management and access management platform that gives developers the flexibility to deploy and support a range of authentication methods---with a simple Python Flask application.
Understanding TOTP#
TOTP works by generating temporary, one-time codes that are valid for a short period, typically thirty seconds.
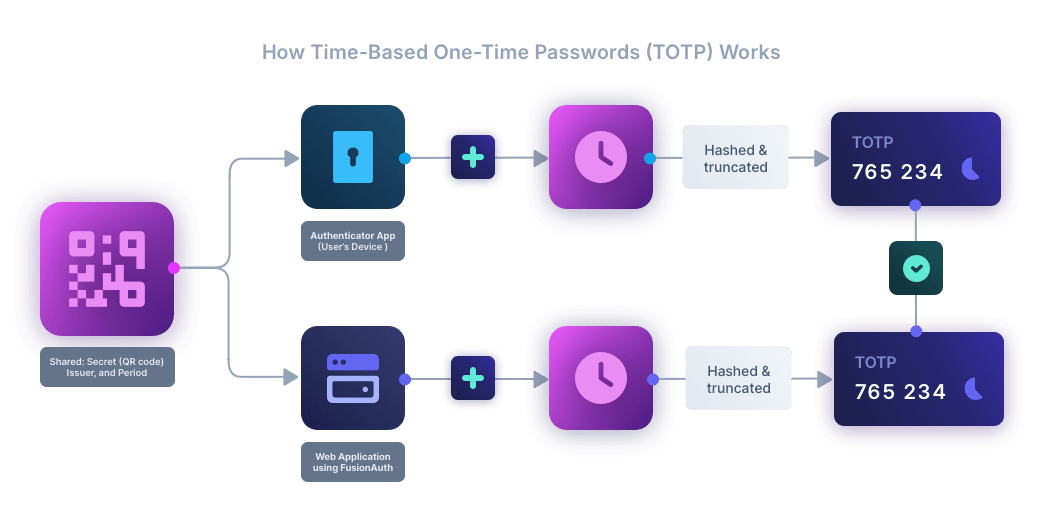
The TOTP process involves the following steps:
-
Initialization: A user sets up TOTP by linking their account with a TOTP-enabled app (such as Google Authenticator or Authy). During this setup, a secret key is shared between the app and the authentication server, often accomplished by scanning a server-generated QR code using the app. The user device and the authentication server synchronize time using methods such as Network Time Protocol (NTP).
-
Code generation: The authenticator app uses the shared secret key and the current time to generate a time-dependent OTP. The algorithm (such as HMAC) typically involves hashing the secret key and a timestamp.
-
User input: During login, the user enters their regular password along with the latest TOTP generated by the authenticator app.
-
Validation: The authentication server independently calculates the expected TOTP using the stored secret key and checks if it matches the TOTP entered by the user. If they match, access is granted.
FusionAuth provides native support for TOTP, and its Docker-based deployment makes implementing TOTP very simple, as you'll see in the tutorial below.
Implementing TOTP with FusionAuth#
Implementing TOTP with FusionAuth involves three steps:
1. Setting up a FusionAuth instance with Docker
2. Configuring TOTP in FusionAuth
3. Integrating FusionAuth's TOTP authentication in your application
Prerequisites#
You'll need Docker and Python 3.8 or higher to follow along.
You'll also need an authenticator app on your smartphone, such as Google Authenticator or Authy.
Set Up a FusionAuth Instance with Docker#
You need to get FusionAuth up and running before you can integrate it into your application.
First, clone the quickstart code for a Python Flask web app from FusionAuth's GitHub repository to a suitable directory, then change to the directory that contains the code:
git clone https://github.com/FusionAuth/fusionauth-quickstart-python-flask-web.git
cd fusionauth-quickstart-python-flask-web
You'll find two important files in this directory: a Docker Compose file named docker-compose.yml and the configuration file for environment variables named .env. This repo also includes the complete-application directory, featuring a sample Flask application that will be discussed later.
Start FusionAuth by running the following command:
docker compose up -dIt will start three containers, one each for Postgres, Elastic, and FusionAuth itself. The initial configuration of FusionAuth provides the following settings:
-
Client ID:
e9fdb985-9173-4e01-9d73-ac2d60d1dc8e -
Client secret:
super-secret-secret-that-should-be-regenerated-for-production -
Example user:
richard@example.com, password:password -
Admin user:
admin@example.com, password:password -
FusionAuth base URL:
http://localhost:9011/
You can now log into the local FusionAuth admin interface (http://localhost:9011/admin).
Configure TOTP in FusionAuth#
To configure TOTP in FusionAuth, click on the Tenants section on the left-hand panel of the admin interface and click Edit for the Default tenant.
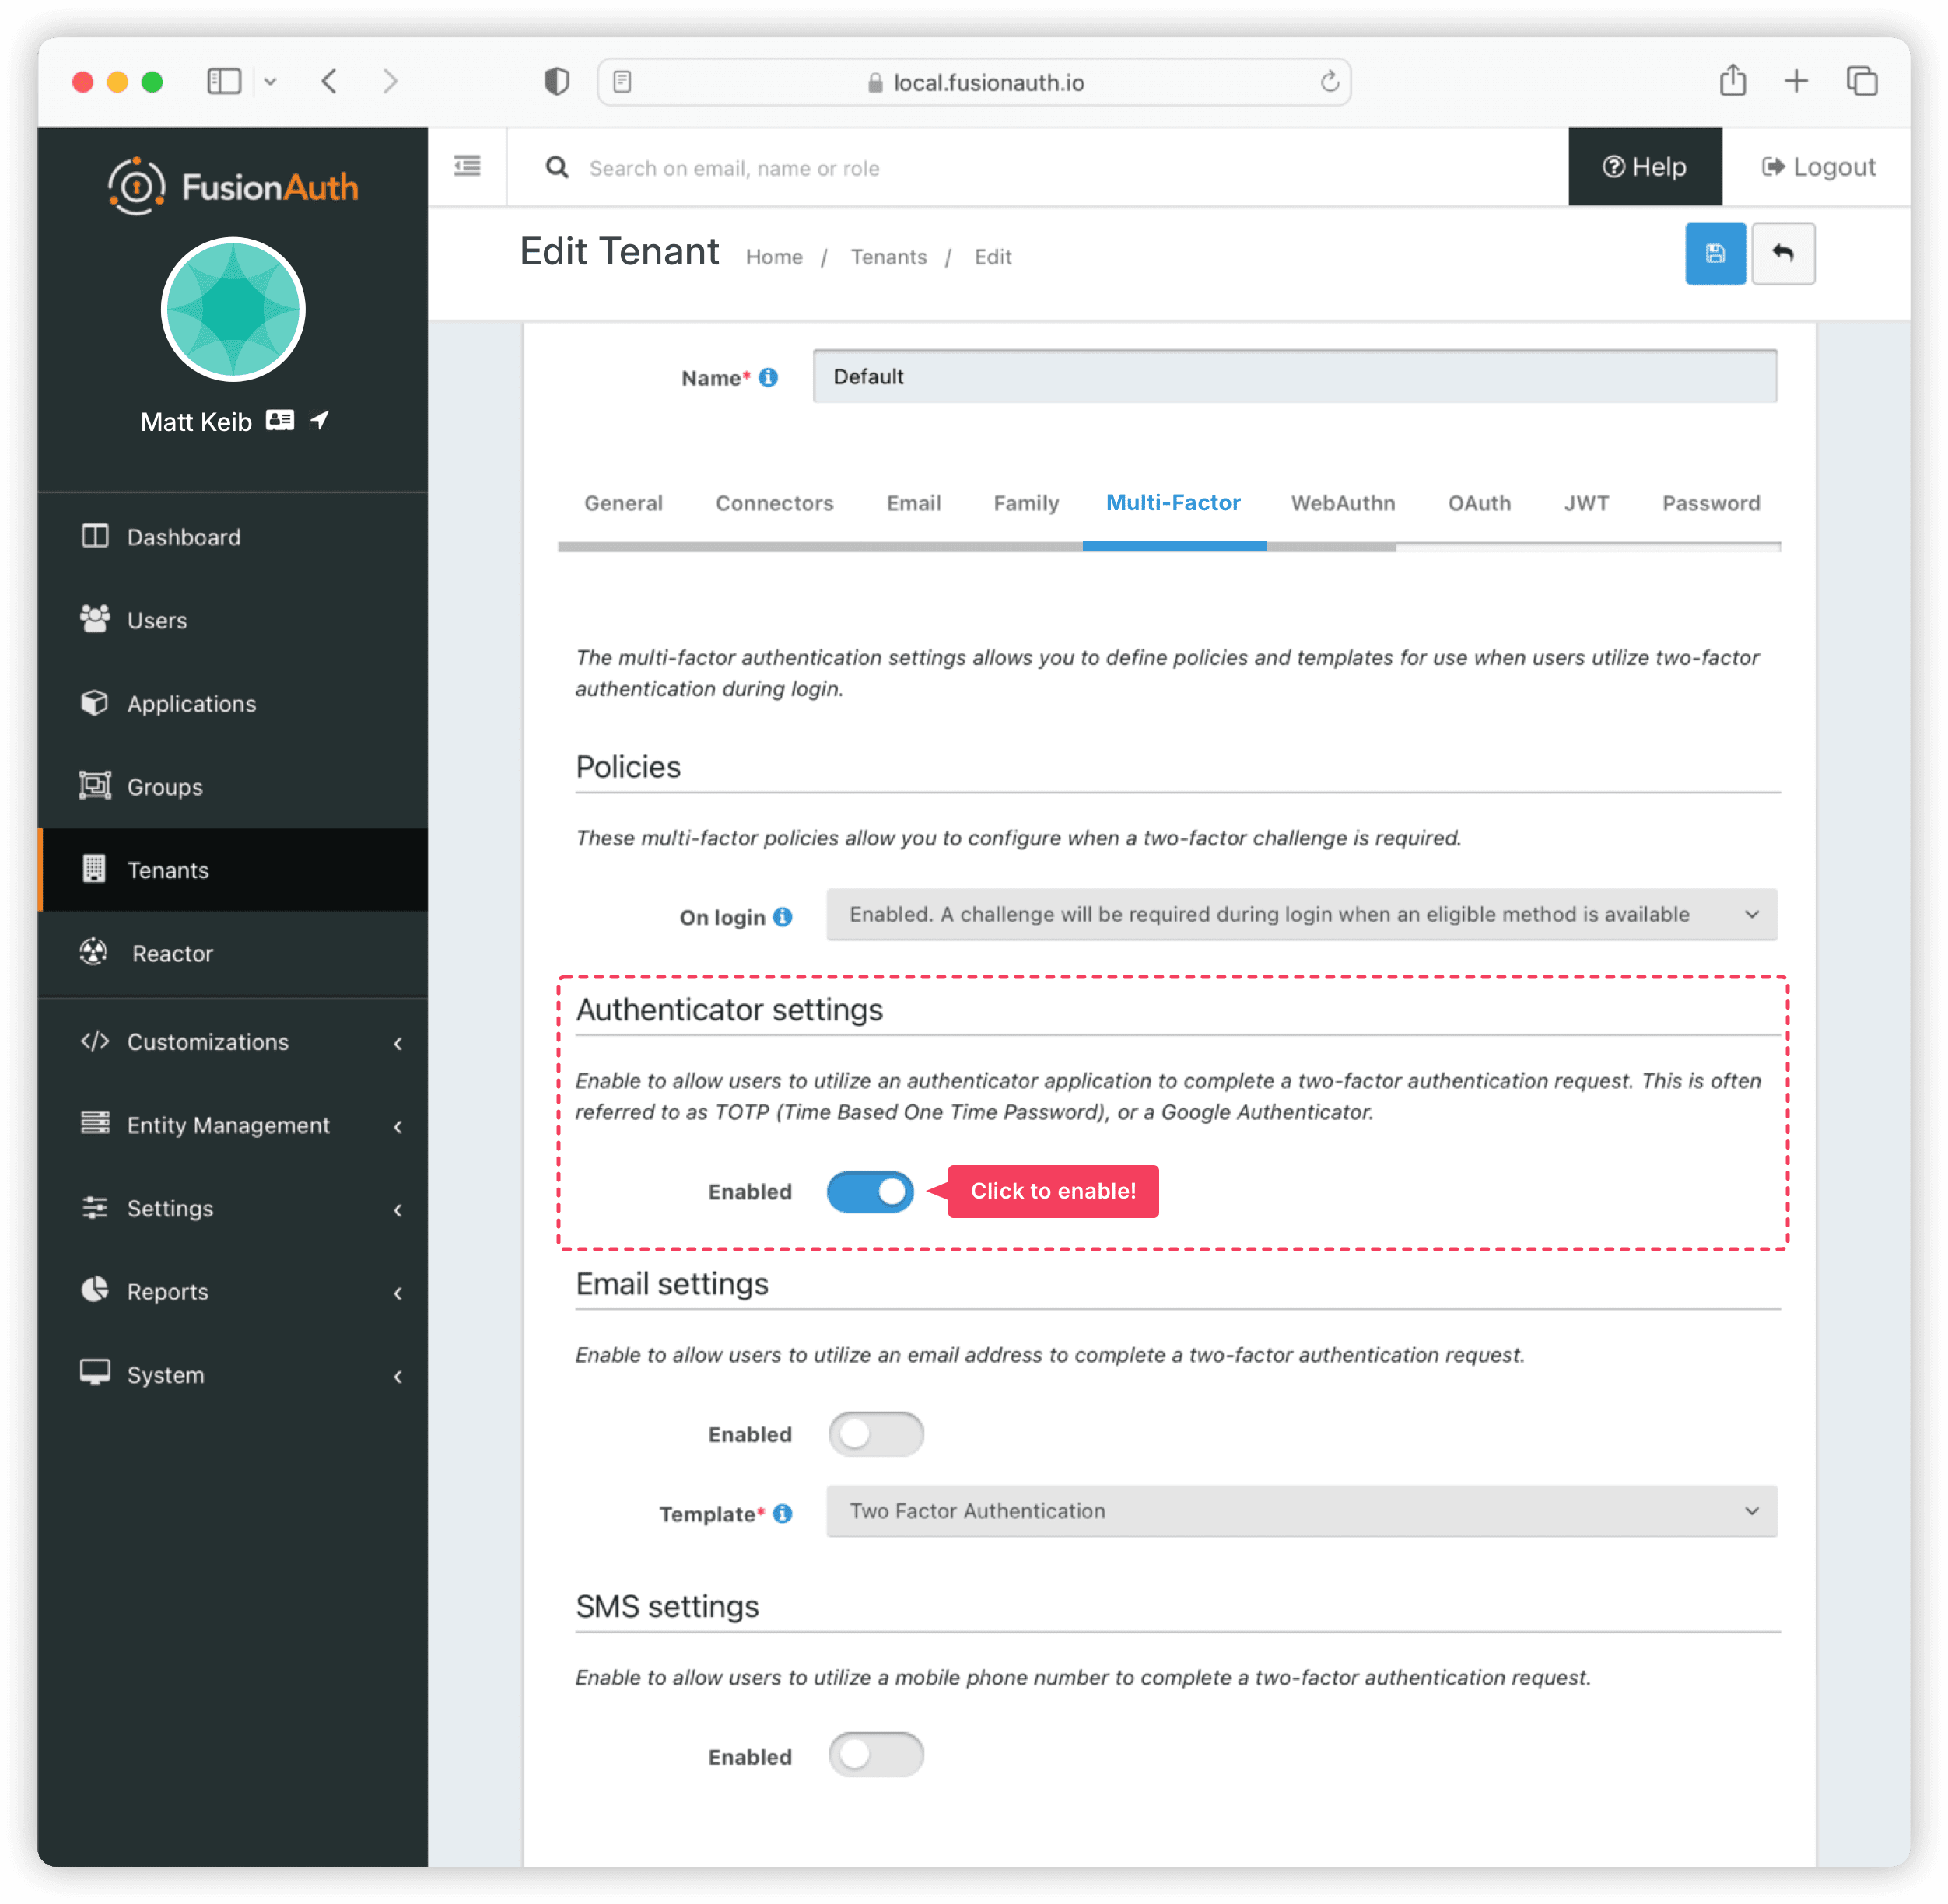
Navigate to the Multi-Factor tab. The authenticator should be enabled by default at the tenant level, which grants all users under the Default tenant the ability to use TOTP with their authenticator apps. If it's not enabled, you can enable it in the Authenticator settings .
Even though you can now configure 2FA for any user, administrators cannot configure TOTP for other users on the FusionAuth admin interface since configuration requires sharing secrets and configuring an app on the user's device. Users must configure their own authenticator.
For this tutorial, you'll configure TOTP for the sample user <richard@example.com>.
Note: You must be on a premium plan for the users to be able to configure TOTP using the pre-built account pages. If you are using the Community plan, you can set up TOTP for the admin and other users (after assigning appropriate privileges), but you'll do so from the admin interface, not the account interface, so the steps will be slightly different from the steps explained below.
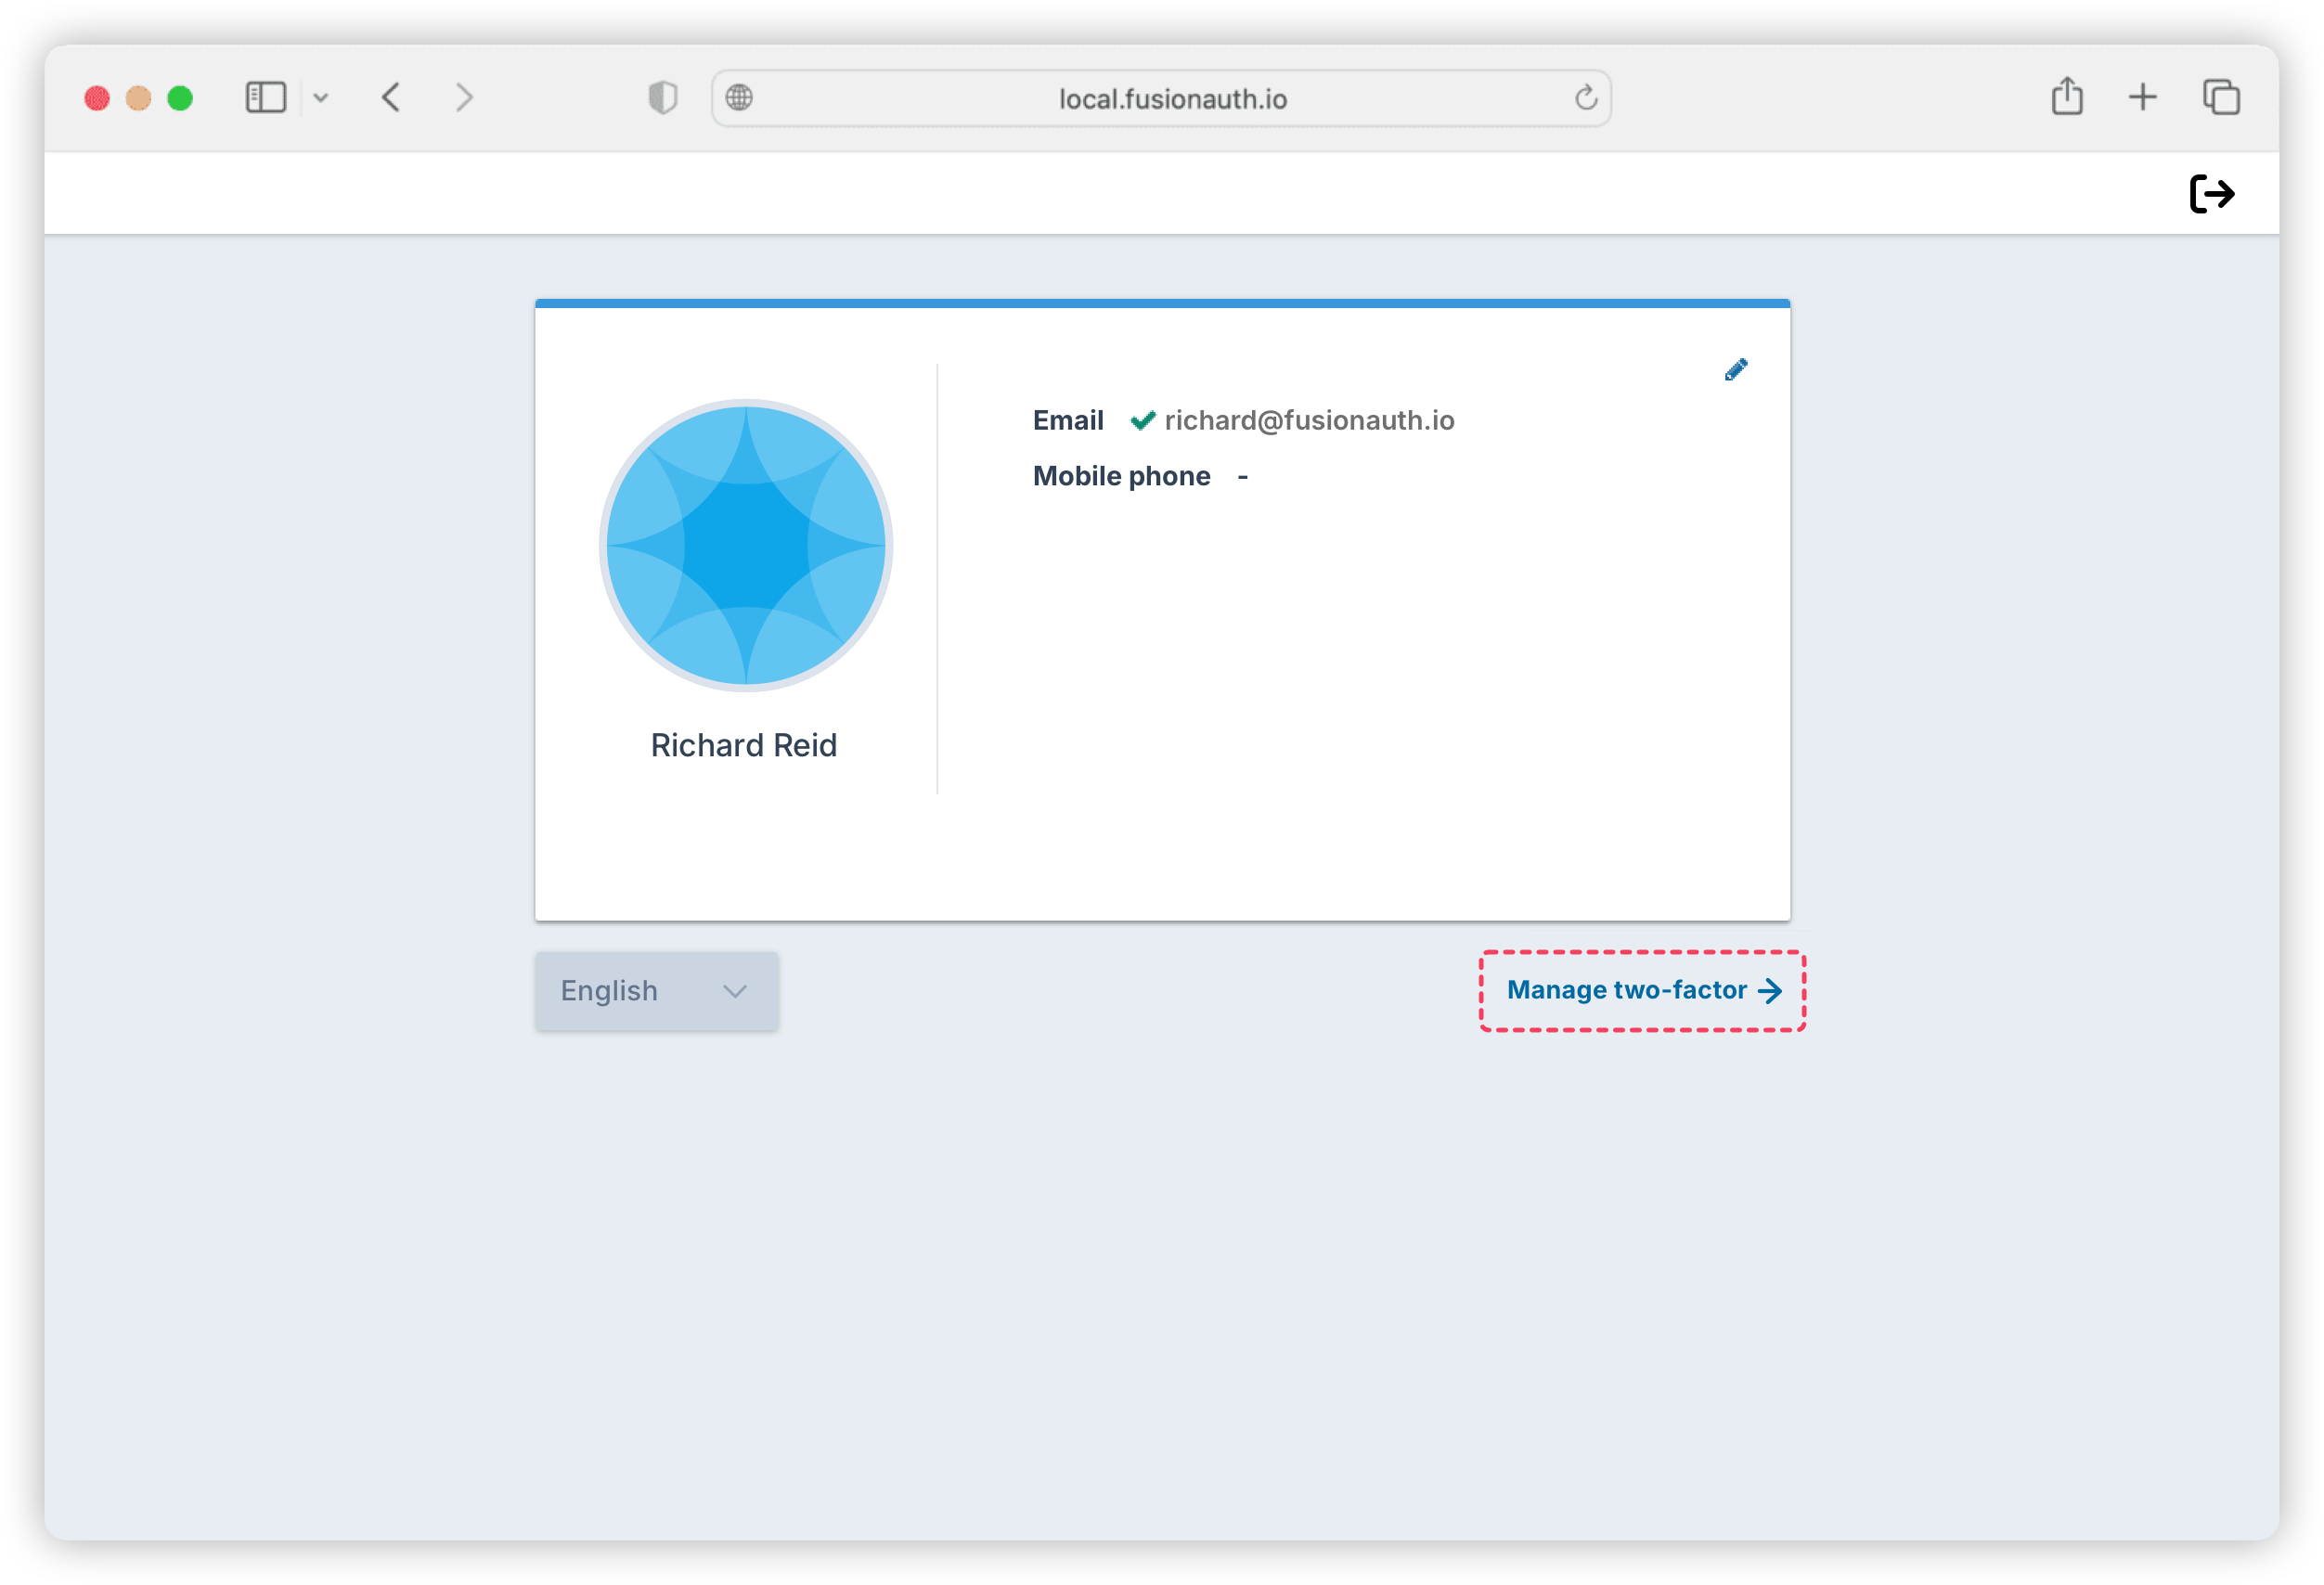
To configure TOTP for the sample user, log in to FusionAuth and visit the Account page, typically accessed through a URL like http://<FusionAuth-host>/account/?client_id=<client-id>.
For this tutorial, it would be <http://localhost:9011/account/?client_id=e9fdb985-9173-4e01-9d73-ac2d60d1dc8e> since FusionAuth docker instance runs at [http://localhost:9011/](http://localhost:9011/account/?client_id=e9fdb985-9173-4e01-9d73-ac2d60d1dc8e).
Click on the Manage two-factor link beneath the user details, as shown below, to bring up the two-factor authentication page.
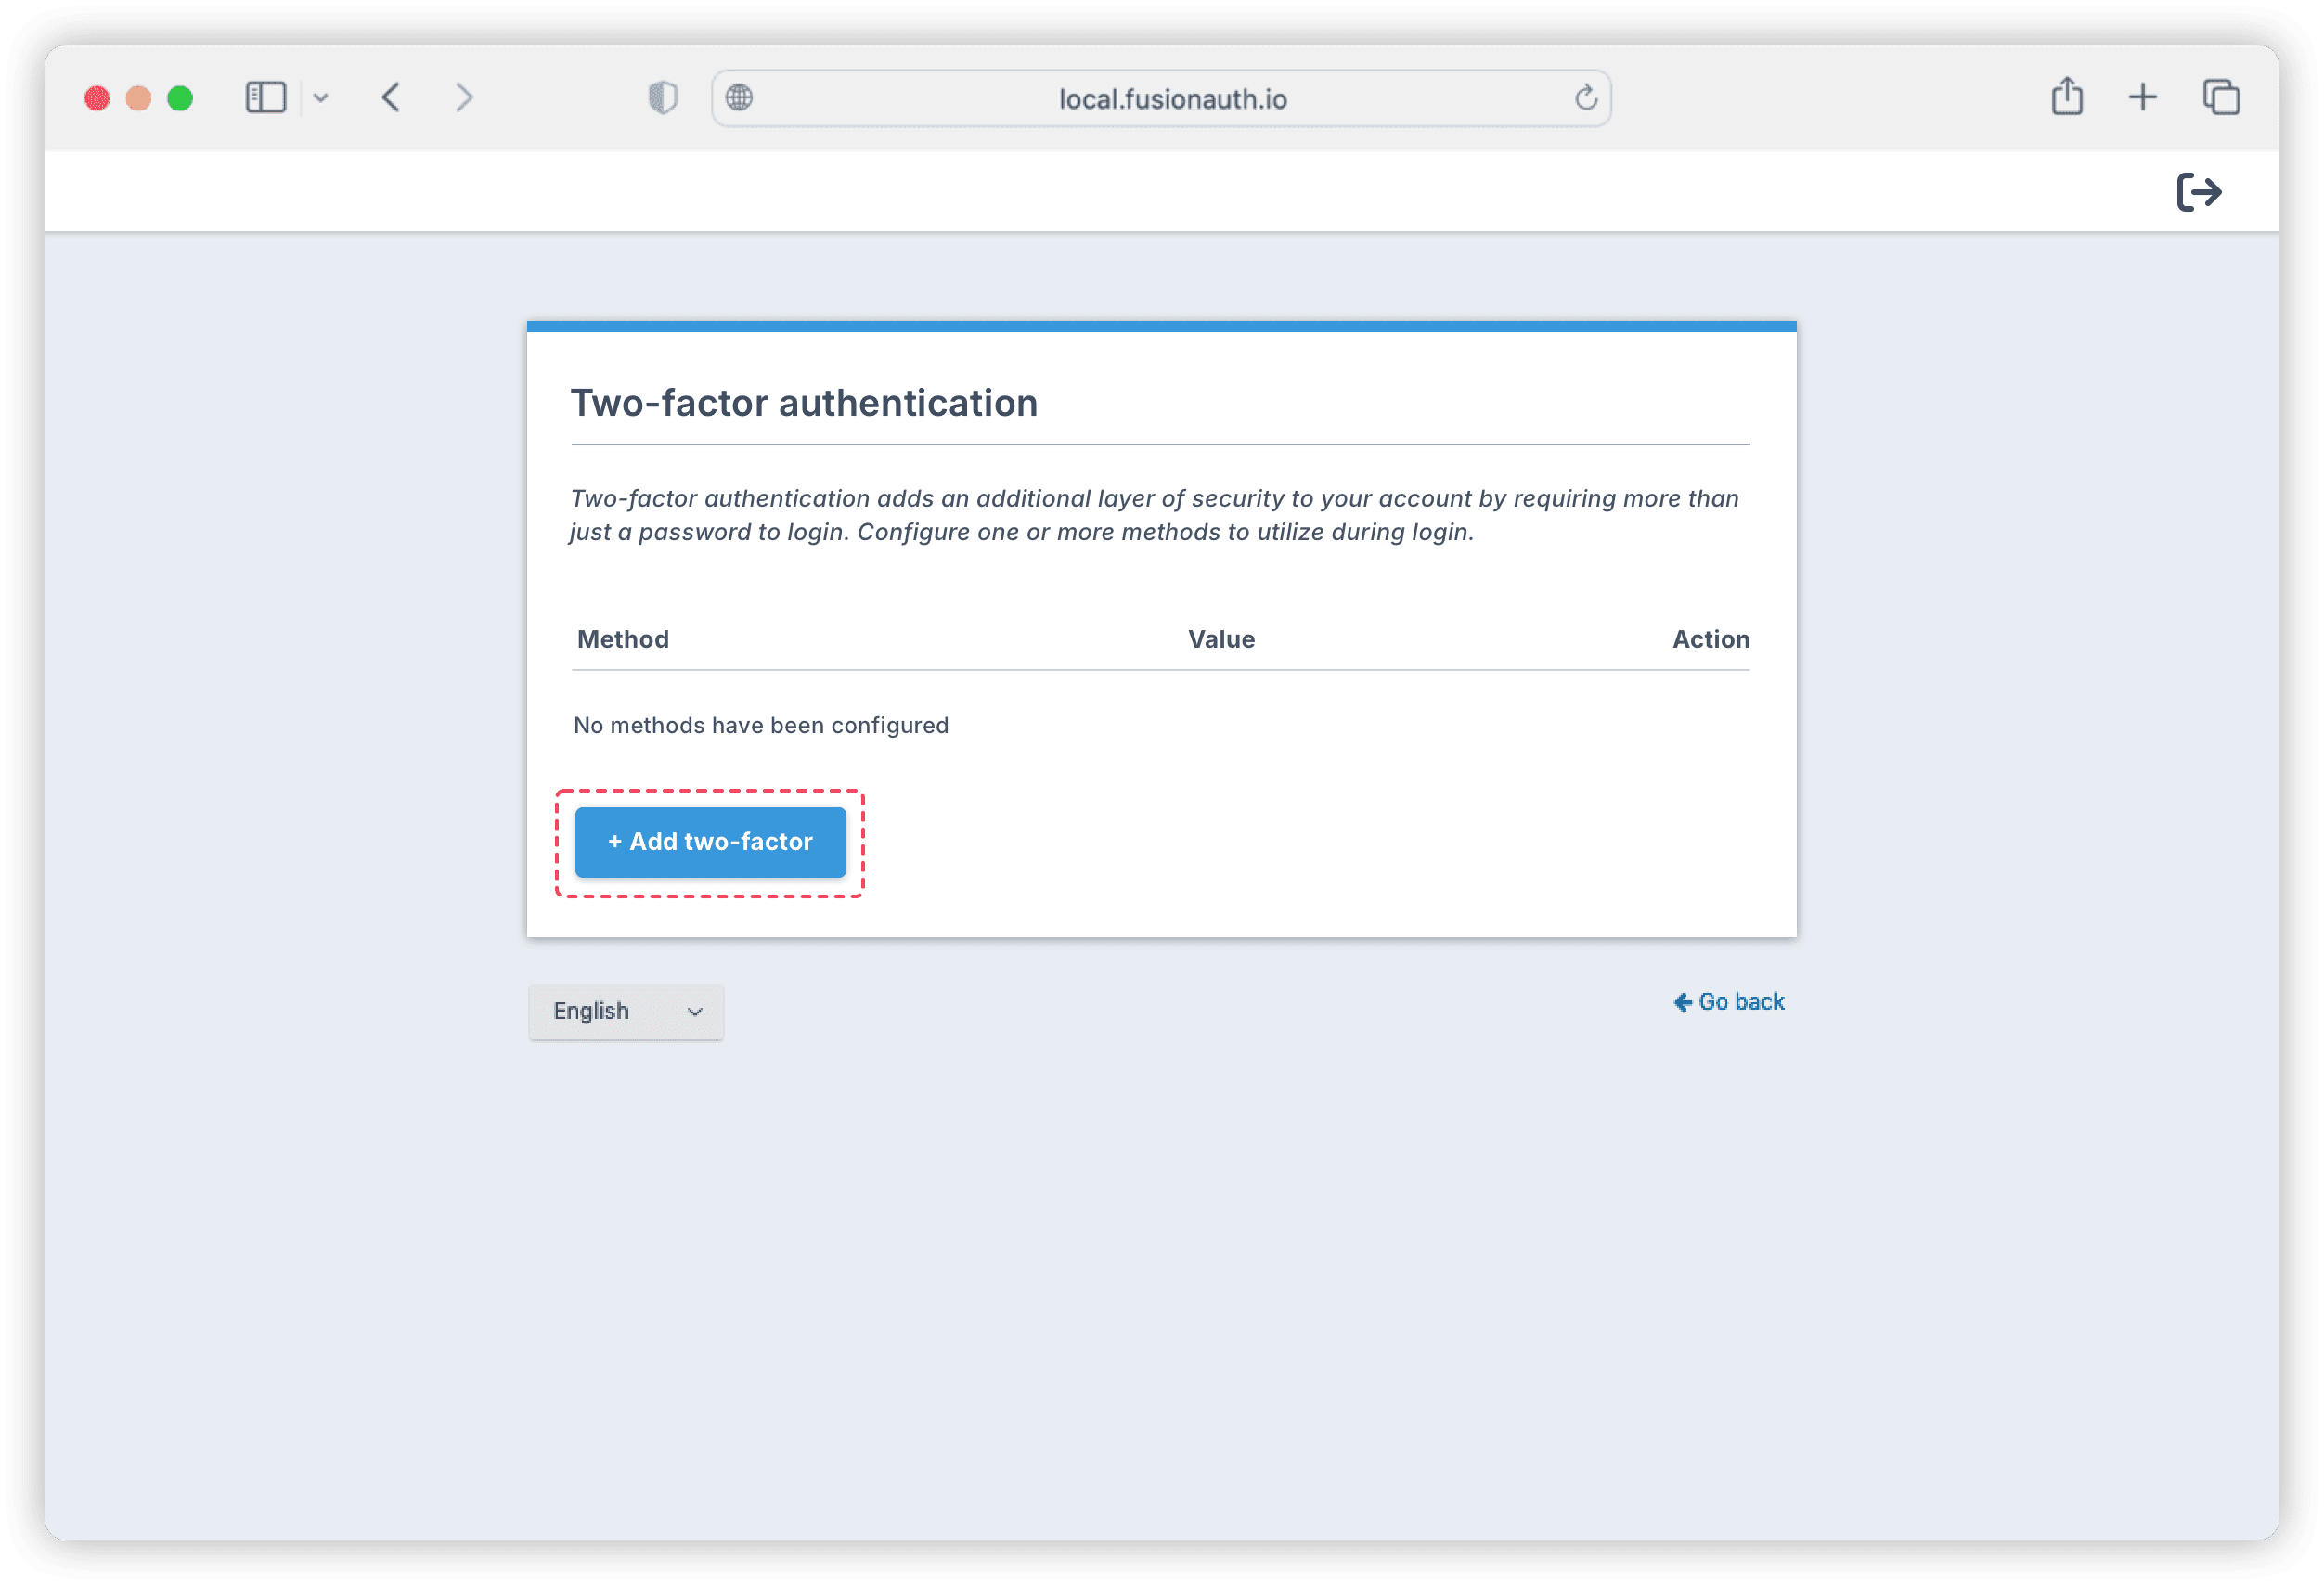
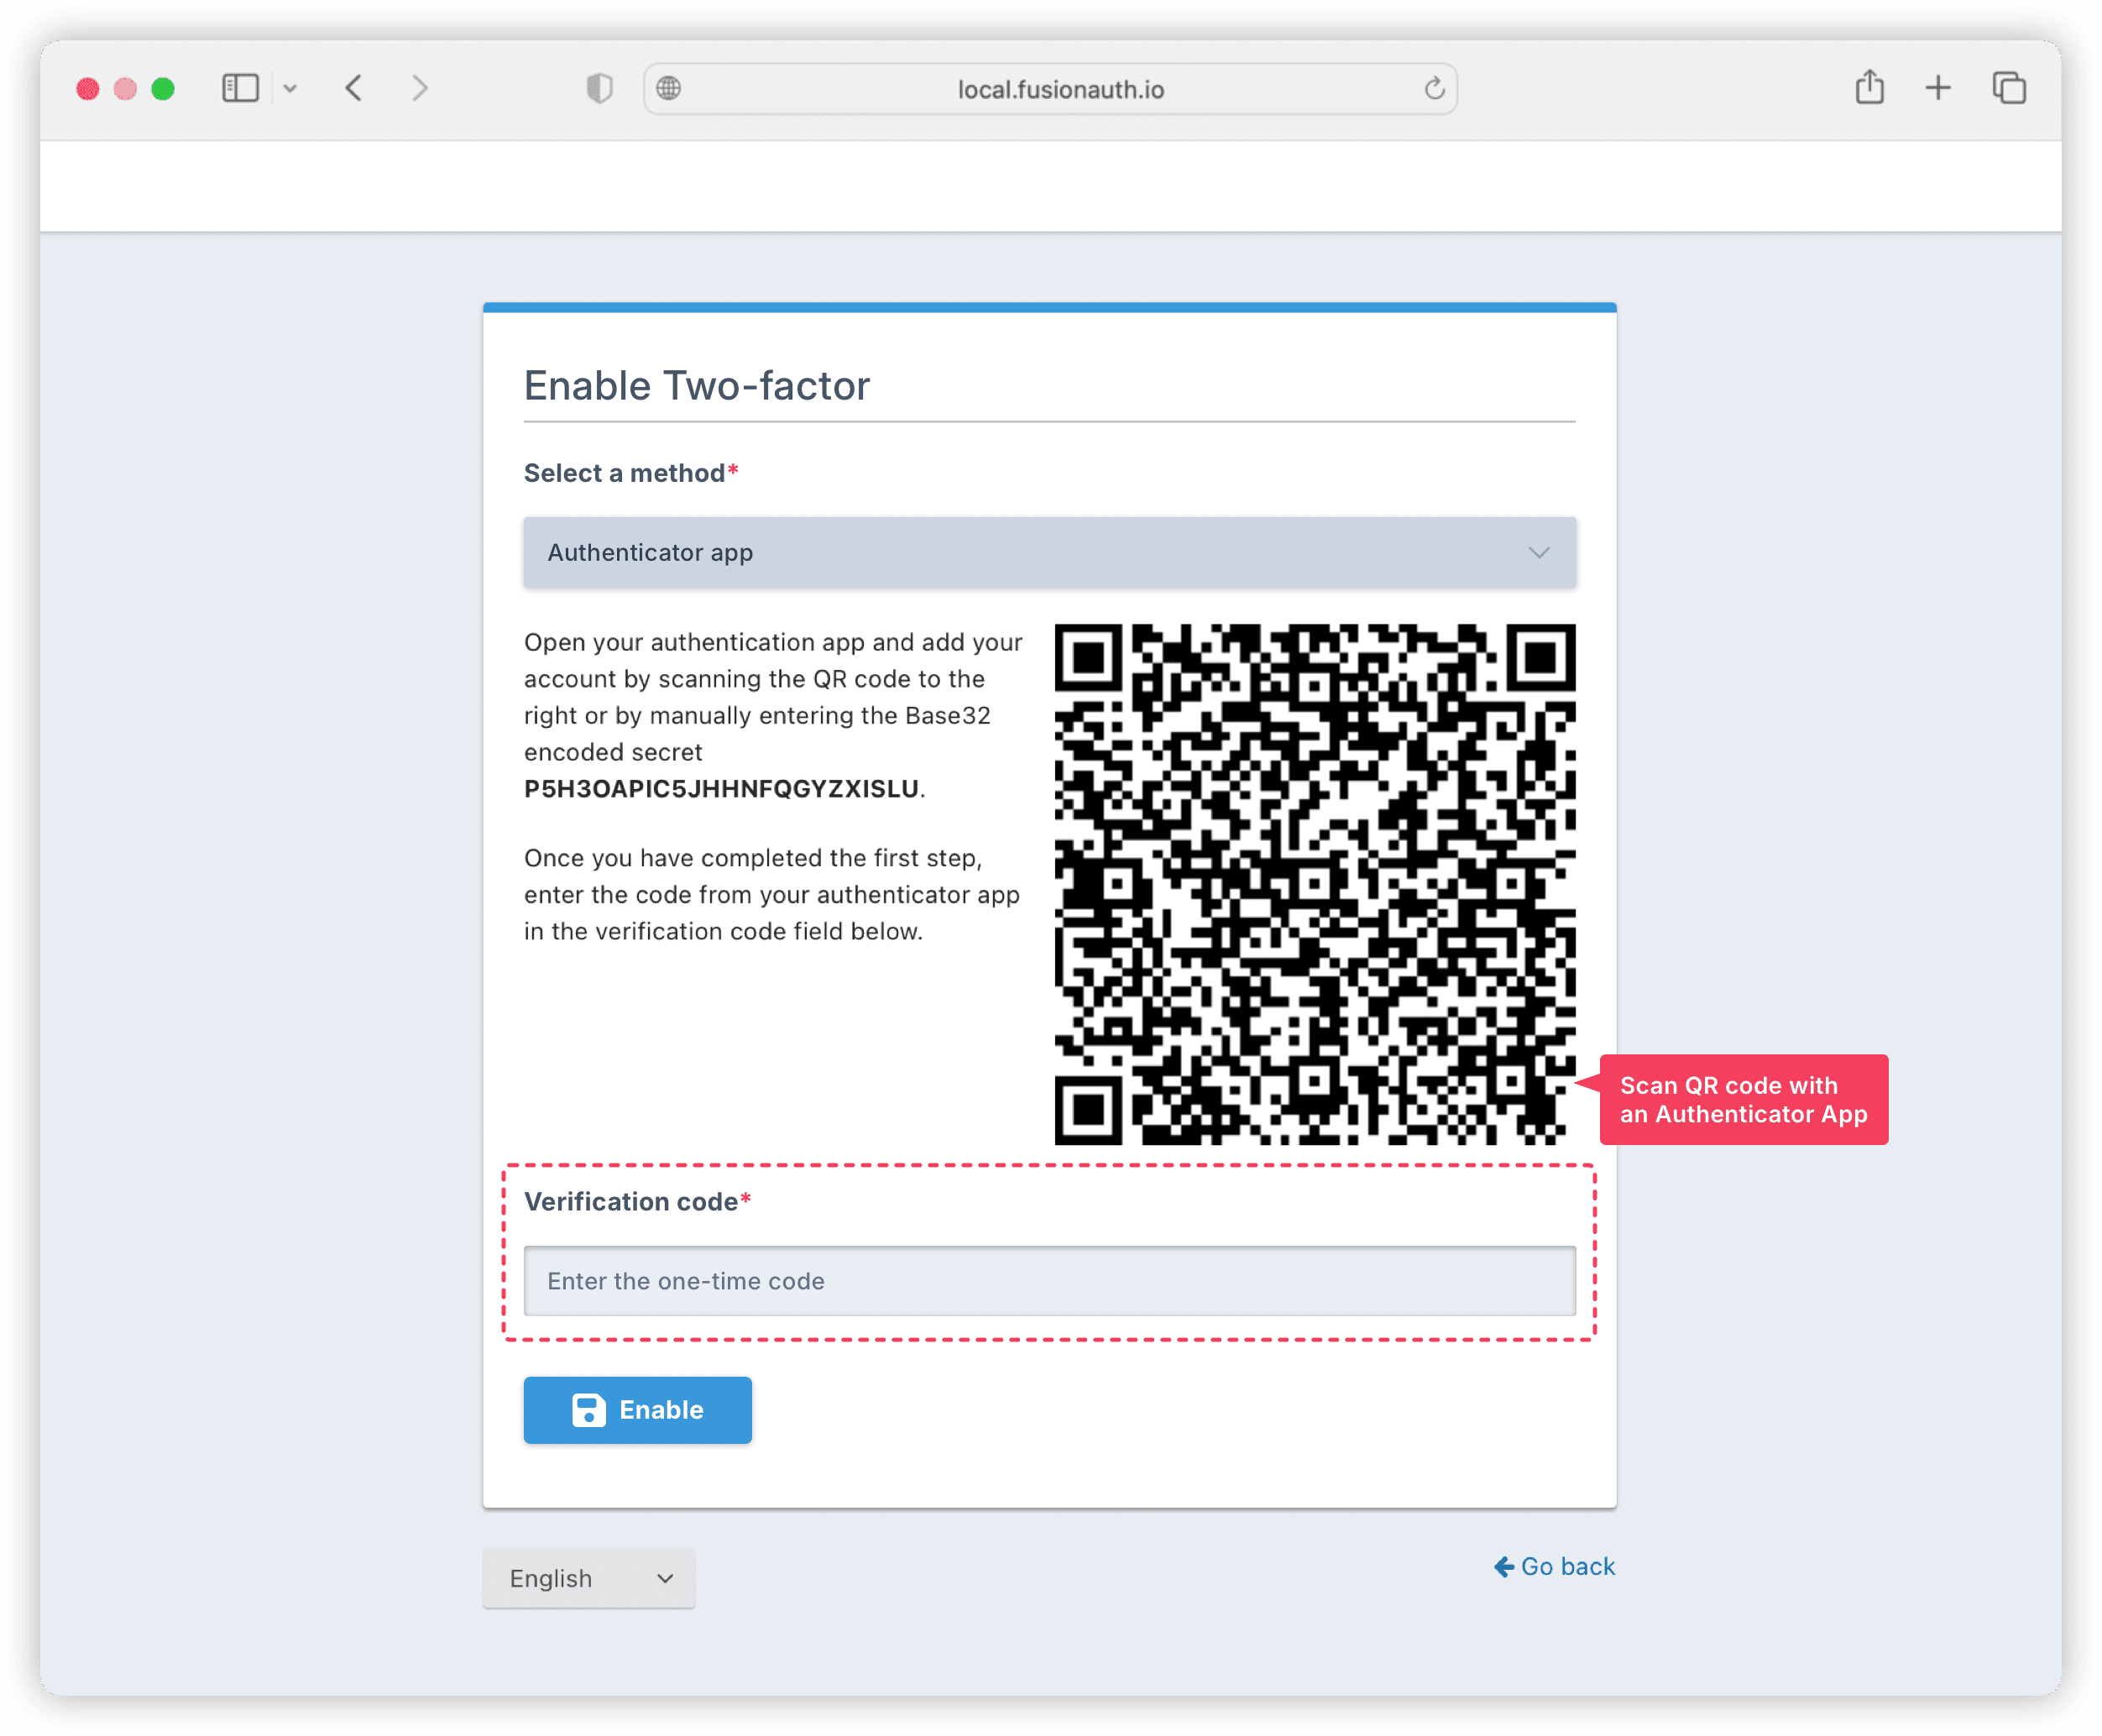
Click on the Add two-factor button on that page to display a QR code page for configuring the user's authenticator app.
Note: The self-service account management page is only available under FusionAuth's paid plan.
The user can scan the QR code using any authenticator app on their device, like Google Authenticator or Authy. For this tutorial, scan the QR code with the authenticator app on your device, and enter the TOTP generated by the app into the Verification code input, and click Enable .
When the authenticator app is successfully configured, FusionAuth will provide recovery codes for 2FA. Save these codes because they act as a backup for completing a two-factor login when you cannot access your authenticator app. These codes are also useful for disabling two-factor authentication if needed.
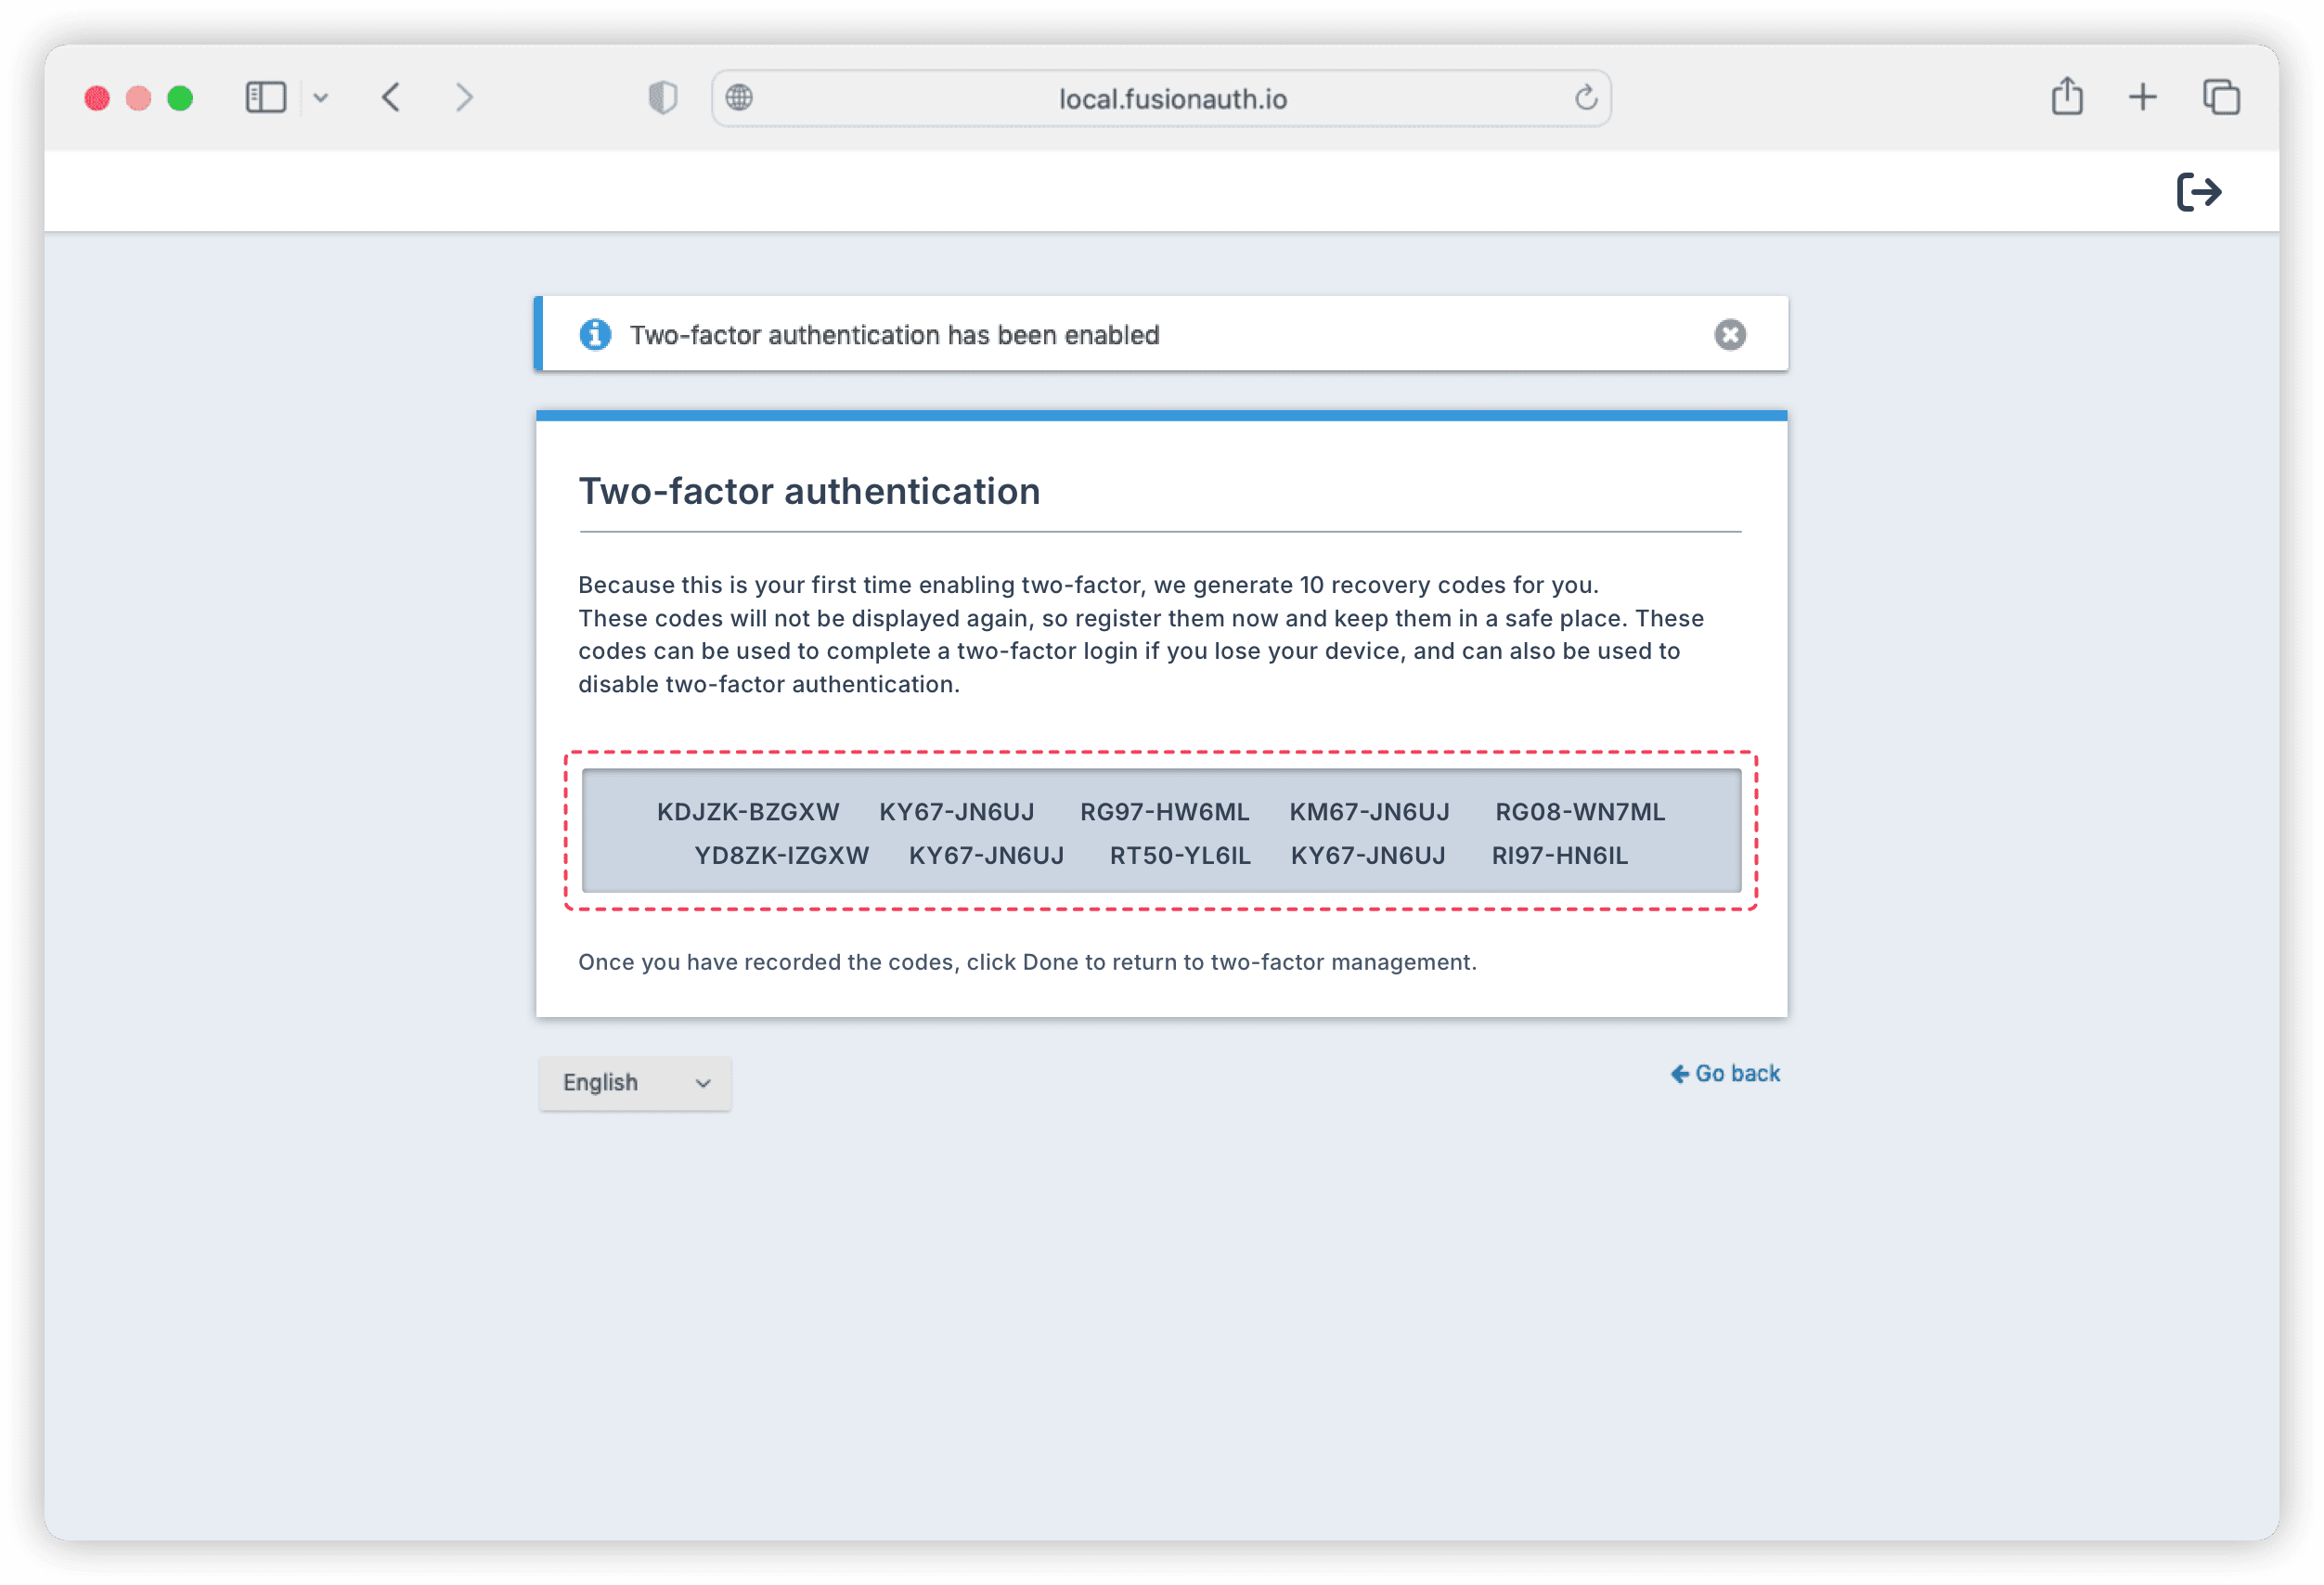
Click Done to complete your 2FA setup.
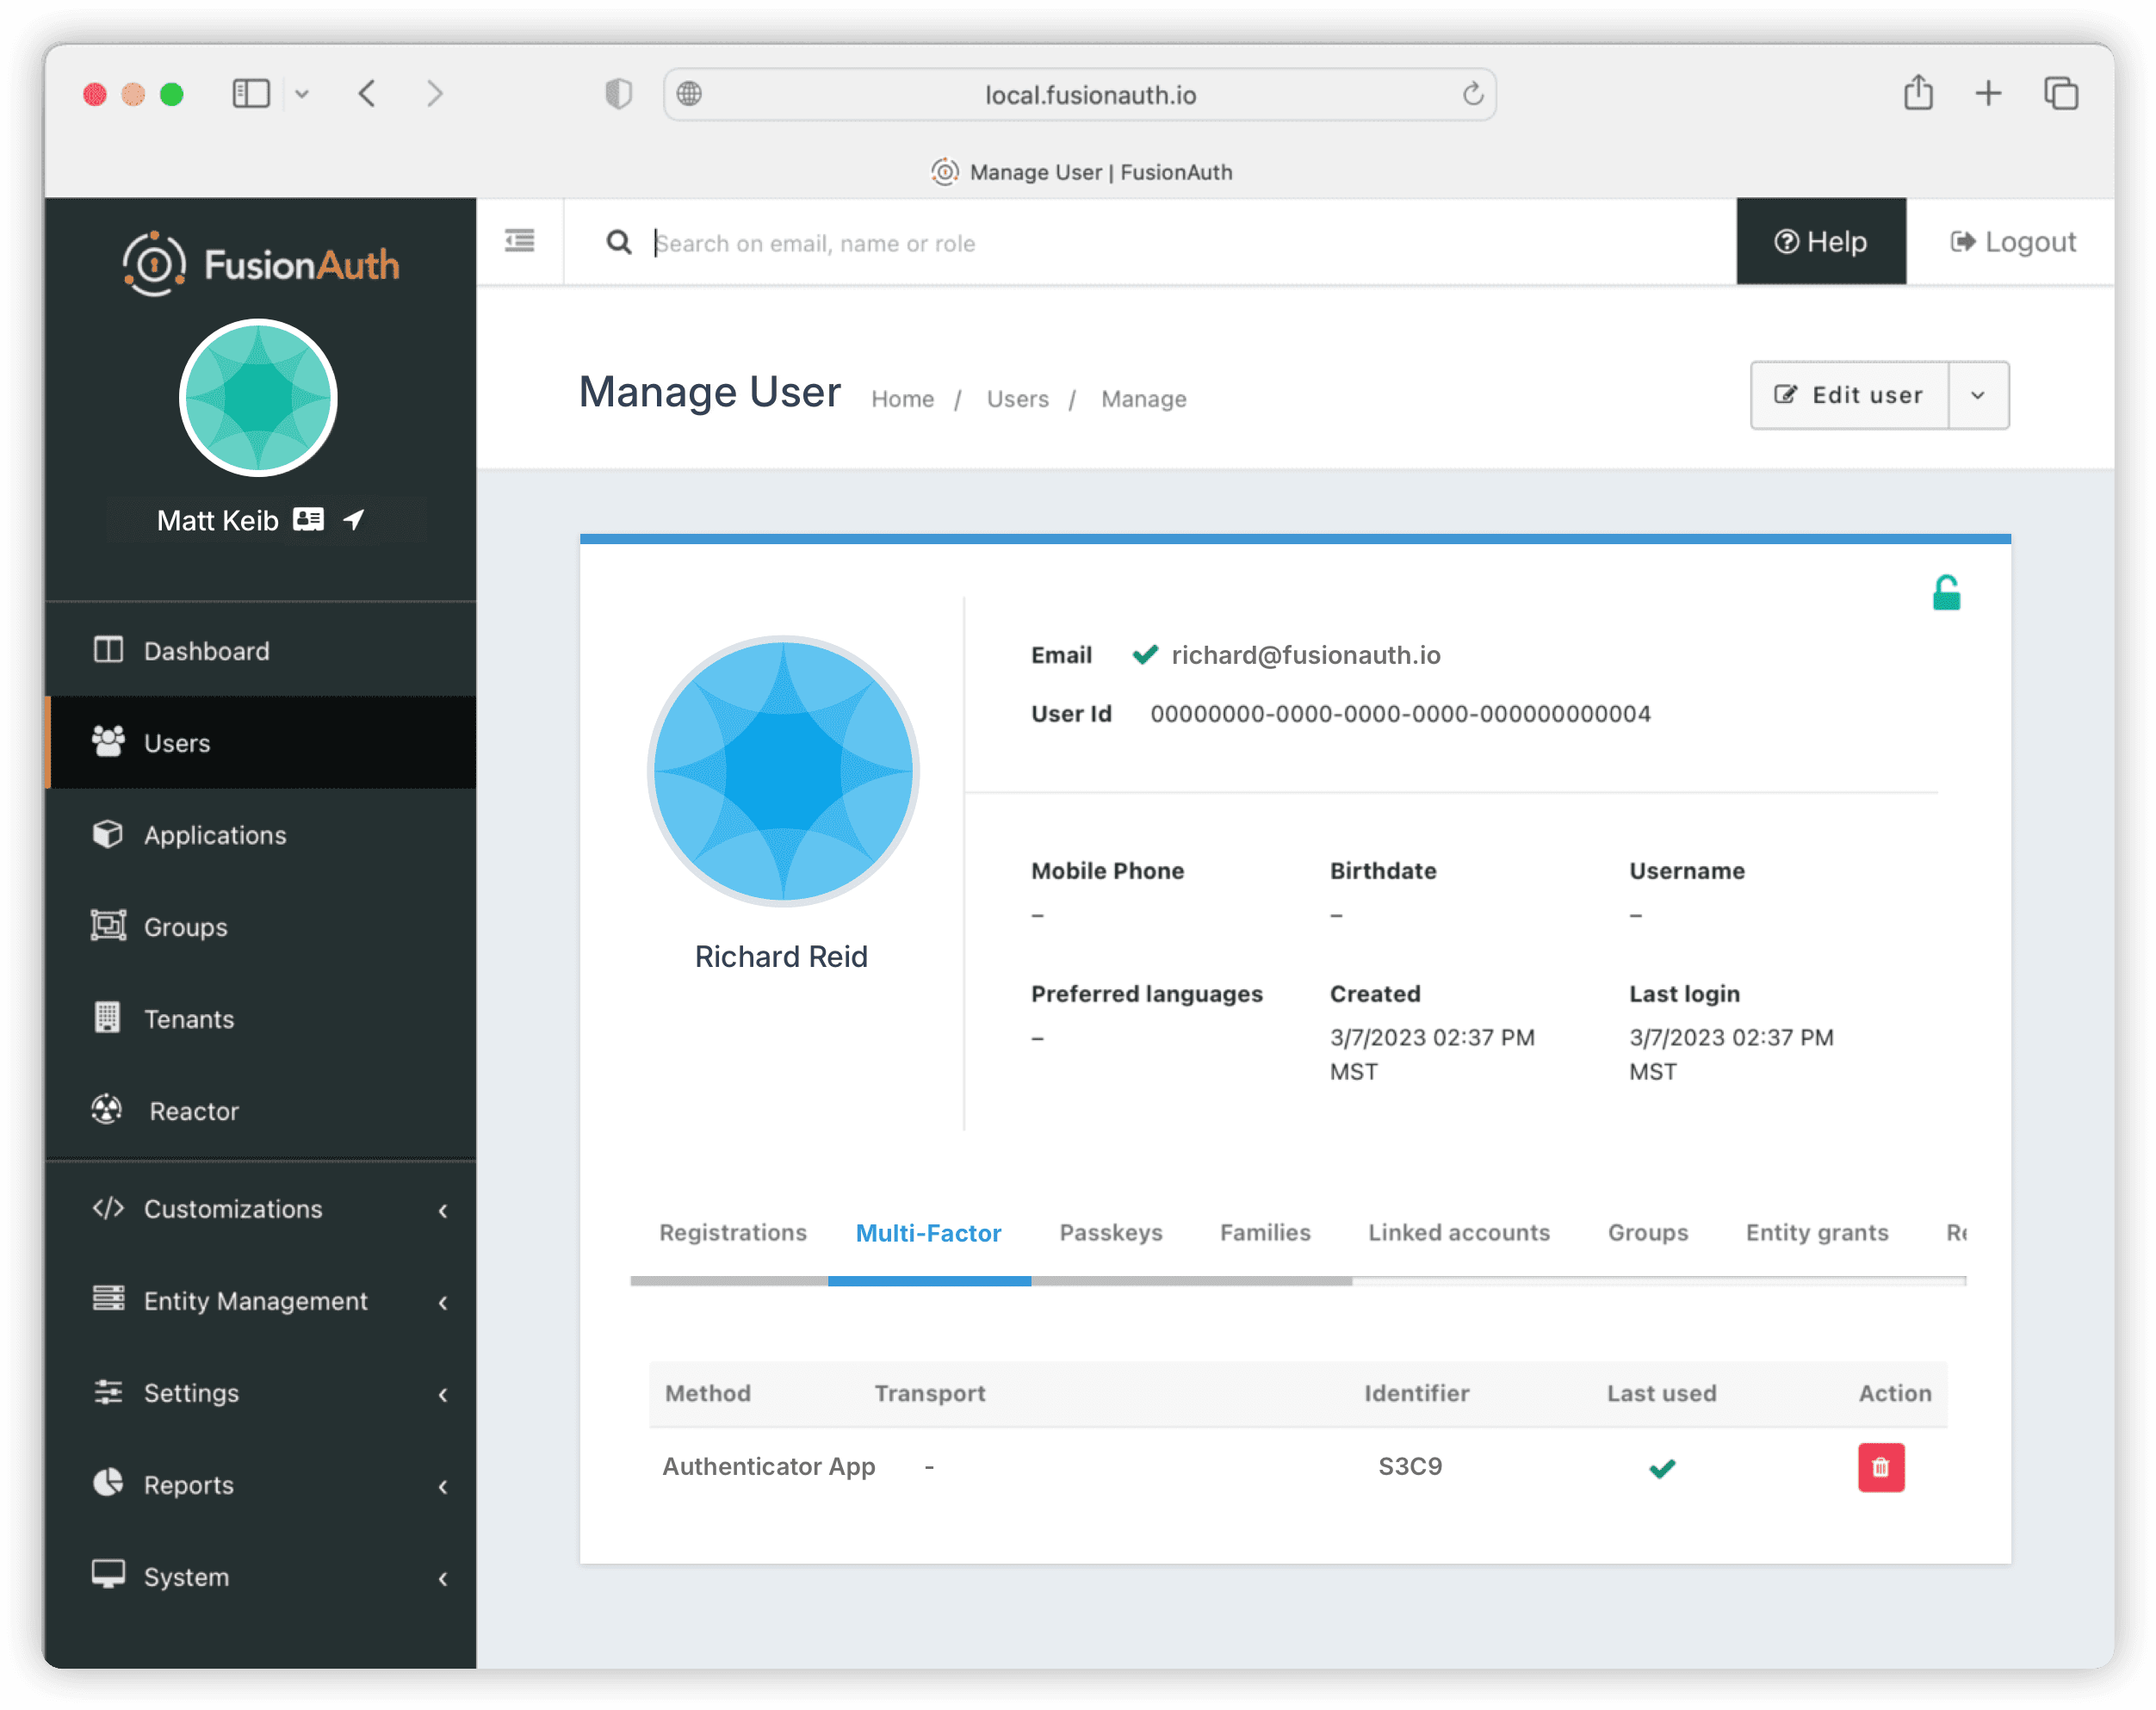
In the admin interface, you'll now find Authenticator app listed for this user under the Multi-Factor tab.
Integrate FusionAuth's TOTP Authentication in Your Application#
After successfully configuring TOTP, integrating it into your application is straightforward. Essentially, if you incorporate FusionAuth authentication into your application, the login process will automatically prompt application users who have set up 2FA to use TOTP.
The steps below show you how to create a basic Flask application implementing FusionAuth's TOTP authentication. The code is accessible in the complete-application directory in the repository you downloaded, or you can find it here.
Set Up a Virtual Environment#
In a suitable directory, create a new virtual environment called fa_env and activate it before installing these Python libraries:
python3 -m venv fa_env && source fa_env/bin/activateThis allows you to isolate your project and avoid any dependency conflicts.
Next, create the file requirements.txt file to include the following project dependencies:
Authlib==1.2.0
Flask==2.3.2
python-dotenv==1.0.0
requests==2.31.0
Install these dependencies in your virtual environment with this command:
pip install -r requirements.txtCreate a Flask Application#
Now, you'll create your Flask application.
Begin by creating an environment file named .env, and add the following key-value pairs to it:
CLIENT_ID=e9fdb985-9173-4e01-9d73-ac2d60d1dc8e
CLIENT_SECRET=super-secret-secret-that-should-be-regenerated-for-production
ISSUER=http://localhost:9011
APP_SECRET_KEY=0386ffa9-3bff-4c75-932a-48d6a763ce77
Note: CLIENT_ID and CLIENT_SECRET must match the configuration used by the FusionAuth installation discussed in step one. This ensures that your application can communicate properly with the FusionAuth authentication system. ISSUER points to the running FusionAuth instance. APP_SECRET_KEY is a standard Flask application's secret key for secure cookies, data, and the like.
Now, create the file server.py, include necessary imports, define constants for cookie names, and initialize the OAuth library, as shown in the code snippet below:
import json
import math
from os import environ as env
from urllib.parse import quote_plus, urlencode
from authlib.integrations.flask_client import OAuth
from dotenv import find_dotenv, load_dotenv
from flask import Flask, redirect, render_template, session, url_for, request, make_response
ACCESS_TOKEN_COOKIE_NAME = "cb_access_token"
REFRESH_TOKEN_COOKIE_NAME = "cb_refresh_token"
USERINFO_COOKIE_NAME = "cb_userinfo"
ENV_FILE = find_dotenv()
if ENV_FILE:
  load_dotenv(ENV_FILE)
app = Flask(__name__)
app.secret_key = env.get("APP_SECRET_KEY")
oauth = OAuth(app)
oauth.register(
  "FusionAuth",
  client_id=env.get("CLIENT_ID"),
  client_secret=env.get("CLIENT_SECRET"),
  client_kwargs={
"scope": "openid offline_access",
'code_challenge_method': 'S256' # This enables PKCE
  },
  server_metadata_url=f'{env.get("ISSUER")}/.well-known/openid-configuration'
)
if __name__ == "__main__":
  app.run(host="0.0.0.0", port=env.get("PORT", 5000))
Add OAuth Authentication Routes#
Next, you'll integrate essential authentication features into your Flask application.
For this, you need to add a /login route that uses authlib to take the user to FusionAuth's OAuth2 authorize endpoint and a /callback route that FusionAuth will redirect the user back to after a successful login.
You also need a /logout route to facilitate user logout, along with the helper function get_logout_url(), which provides the logout URL for FusionAuth.
Add these routes and the helper function to your server.py file:
@app.route("/login")
def login():
  return oauth.FusionAuth.authorize_redirect
redirect_uri=url_for("callback", _external=True)
  )
@app.route("/callback")
def callback():
token = oauth.FusionAuth.authorize_access_token()
resp = make_response(redirect("/"))  # add your route for existing applications
resp.set_cookie(ACCESS_TOKEN_COOKIE_NAME, token["access_token"], max_age=token["expires_in"], httponly=True, samesite="Lax")
resp.set_cookie(REFRESH_TOKEN_COOKIE_NAME, token["refresh_token"], max_age=token["expires_in"], httponly=True, samesite="Lax")
resp.set_cookie(USERINFO_COOKIE_NAME, json.dumps(token["userinfo"]), max_age=token["expires_in"], httponly=False, samesite="Lax")
session["user"] = token["userinfo"]
return resp
@app.route("/logout")
def logout():
session.clear()
resp = make_response(redirect("/"))
resp.delete_cookie(ACCESS_TOKEN_COOKIE_NAME)
resp.delete_cookie(REFRESH_TOKEN_COOKIE_NAME)
resp.delete_cookie(USERINFO_COOKIE_NAME)
return resp
def get_logout_url():
return env.get("ISSUER") + "/oauth2/logout?" + urlencode({"client_id": env.get("CLIENT_ID")},quote_via=quote_plus)
FusionAuth will embed an authorization code in the redirect to /callback. The callback function will then execute a server-to-server call to FusionAuth, exchanging the authorization code for an access token, refresh token, and userinfo object. This entire process takes place in oauth.FusionAuth.authorize_access_token(). This sequence of redirects and backend calls is known as an OAuth Authorization Code Grant flow.
After obtaining tokens and the userinfo object from FusionAuth, the /callback route code writes them as HTTP-only cookies. This ensures they're sent back to the Flask application in subsequent requests but aren't readable by code running in the browser.
Additionally, the userinfo object is stored in the Flask session, where it's easily accessible for other application routes via session["user"].
As for logout, when a user initiates a logout from your application, the application must first call FusionAuth's /oauth2/logout endpoint (provided by get_logout_url()). After logging the user out, FusionAuth redirects the user to the application's /logout route. As illustrated in the code snippet above, this /logout route is responsible for deleting any cookies created by your application and clearing the Flask session.
Add Home and Account in Your Flask Application#
If you're integrating FusionAuth's TOTP authentication in your existing application, the steps above are all you need.
This section provides sample pages to give you insight into how access tokens are used in secured routes in your application.
You'll need a basic home page and a user-account page in your sample Flask application. The user-account page should be secured so that only logged-in users can access it. To achieve this, include / and /account routes in your server.py file:
@app.route("/")
def home():
  if request.cookies.get(ACCESS_TOKEN_COOKIE_NAME, None) is not None:
# In a real application, we would validate the token signature and expiration
return redirect("/account")
  return render_template("home.html")
@app.route("/account")
def account():
access_token = request.cookies.get(ACCESS_TOKEN_COOKIE_NAME, None)
refresh_token = request.cookies.get(REFRESH_TOKEN_COOKIE_NAME, None)
if access_token is None:
      return redirect(get_logout_url())
return render_template(
      "account.html",
      session=json.loads(request.cookies.get(USERINFO_COOKIE_NAME, None)),
      logoutUrl=get_logout_url())
You'll also require corresponding templates---home.html and account.html---with the relevant stylesheet and images to ensure that these routes work correctly. Create directories called templates, static/css, and static/img. Fetch the necessary files from the FusionAuth repository by running these commands:
mkdir -p templates static/css static/img
wget -O templates/home.html https://raw.githubusercontent.com/FusionAuth/fusionauth-quickstart-python-flask-web/main/complete-application/templates/home.html
wget -O templates/account.html https://raw.githubusercontent.com/FusionAuth/fusionauth-quickstart-python-flask-web/main/complete-application/templates/account.html
wget -O static/css/changebank.css https://raw.githubusercontent.com/FusionAuth/fusionauth-quickstart-python-flask-web/main/complete-application/static/css/changebank.css
wget -O static/img/money.jpg https://raw.githubusercontent.com/FusionAuth/fusionauth-quickstart-python-flask-web/main/complete-application/static/img/money.jpg
The code within the / route for the home page tries to retrieve an access token from the cookie. This cookie is generated upon successful authentication by the /callback route mentioned earlier. If the user is authenticated, they are redirected to the secured /account page. If the user is not authenticated, the home page is displayed.
The code in the secured /account route verifies the presence of an access token in the cookie. If none is found, it triggers a logout in FusionAuth. Conversely, if an access token is present, it renders the account.html page that features a personalized header displaying the user's email with a Logout button.
Feel free to explore home.html and account.html in more detail to understand the information they display.
Run the Demo Application#
Launch your Flask application using the following command:
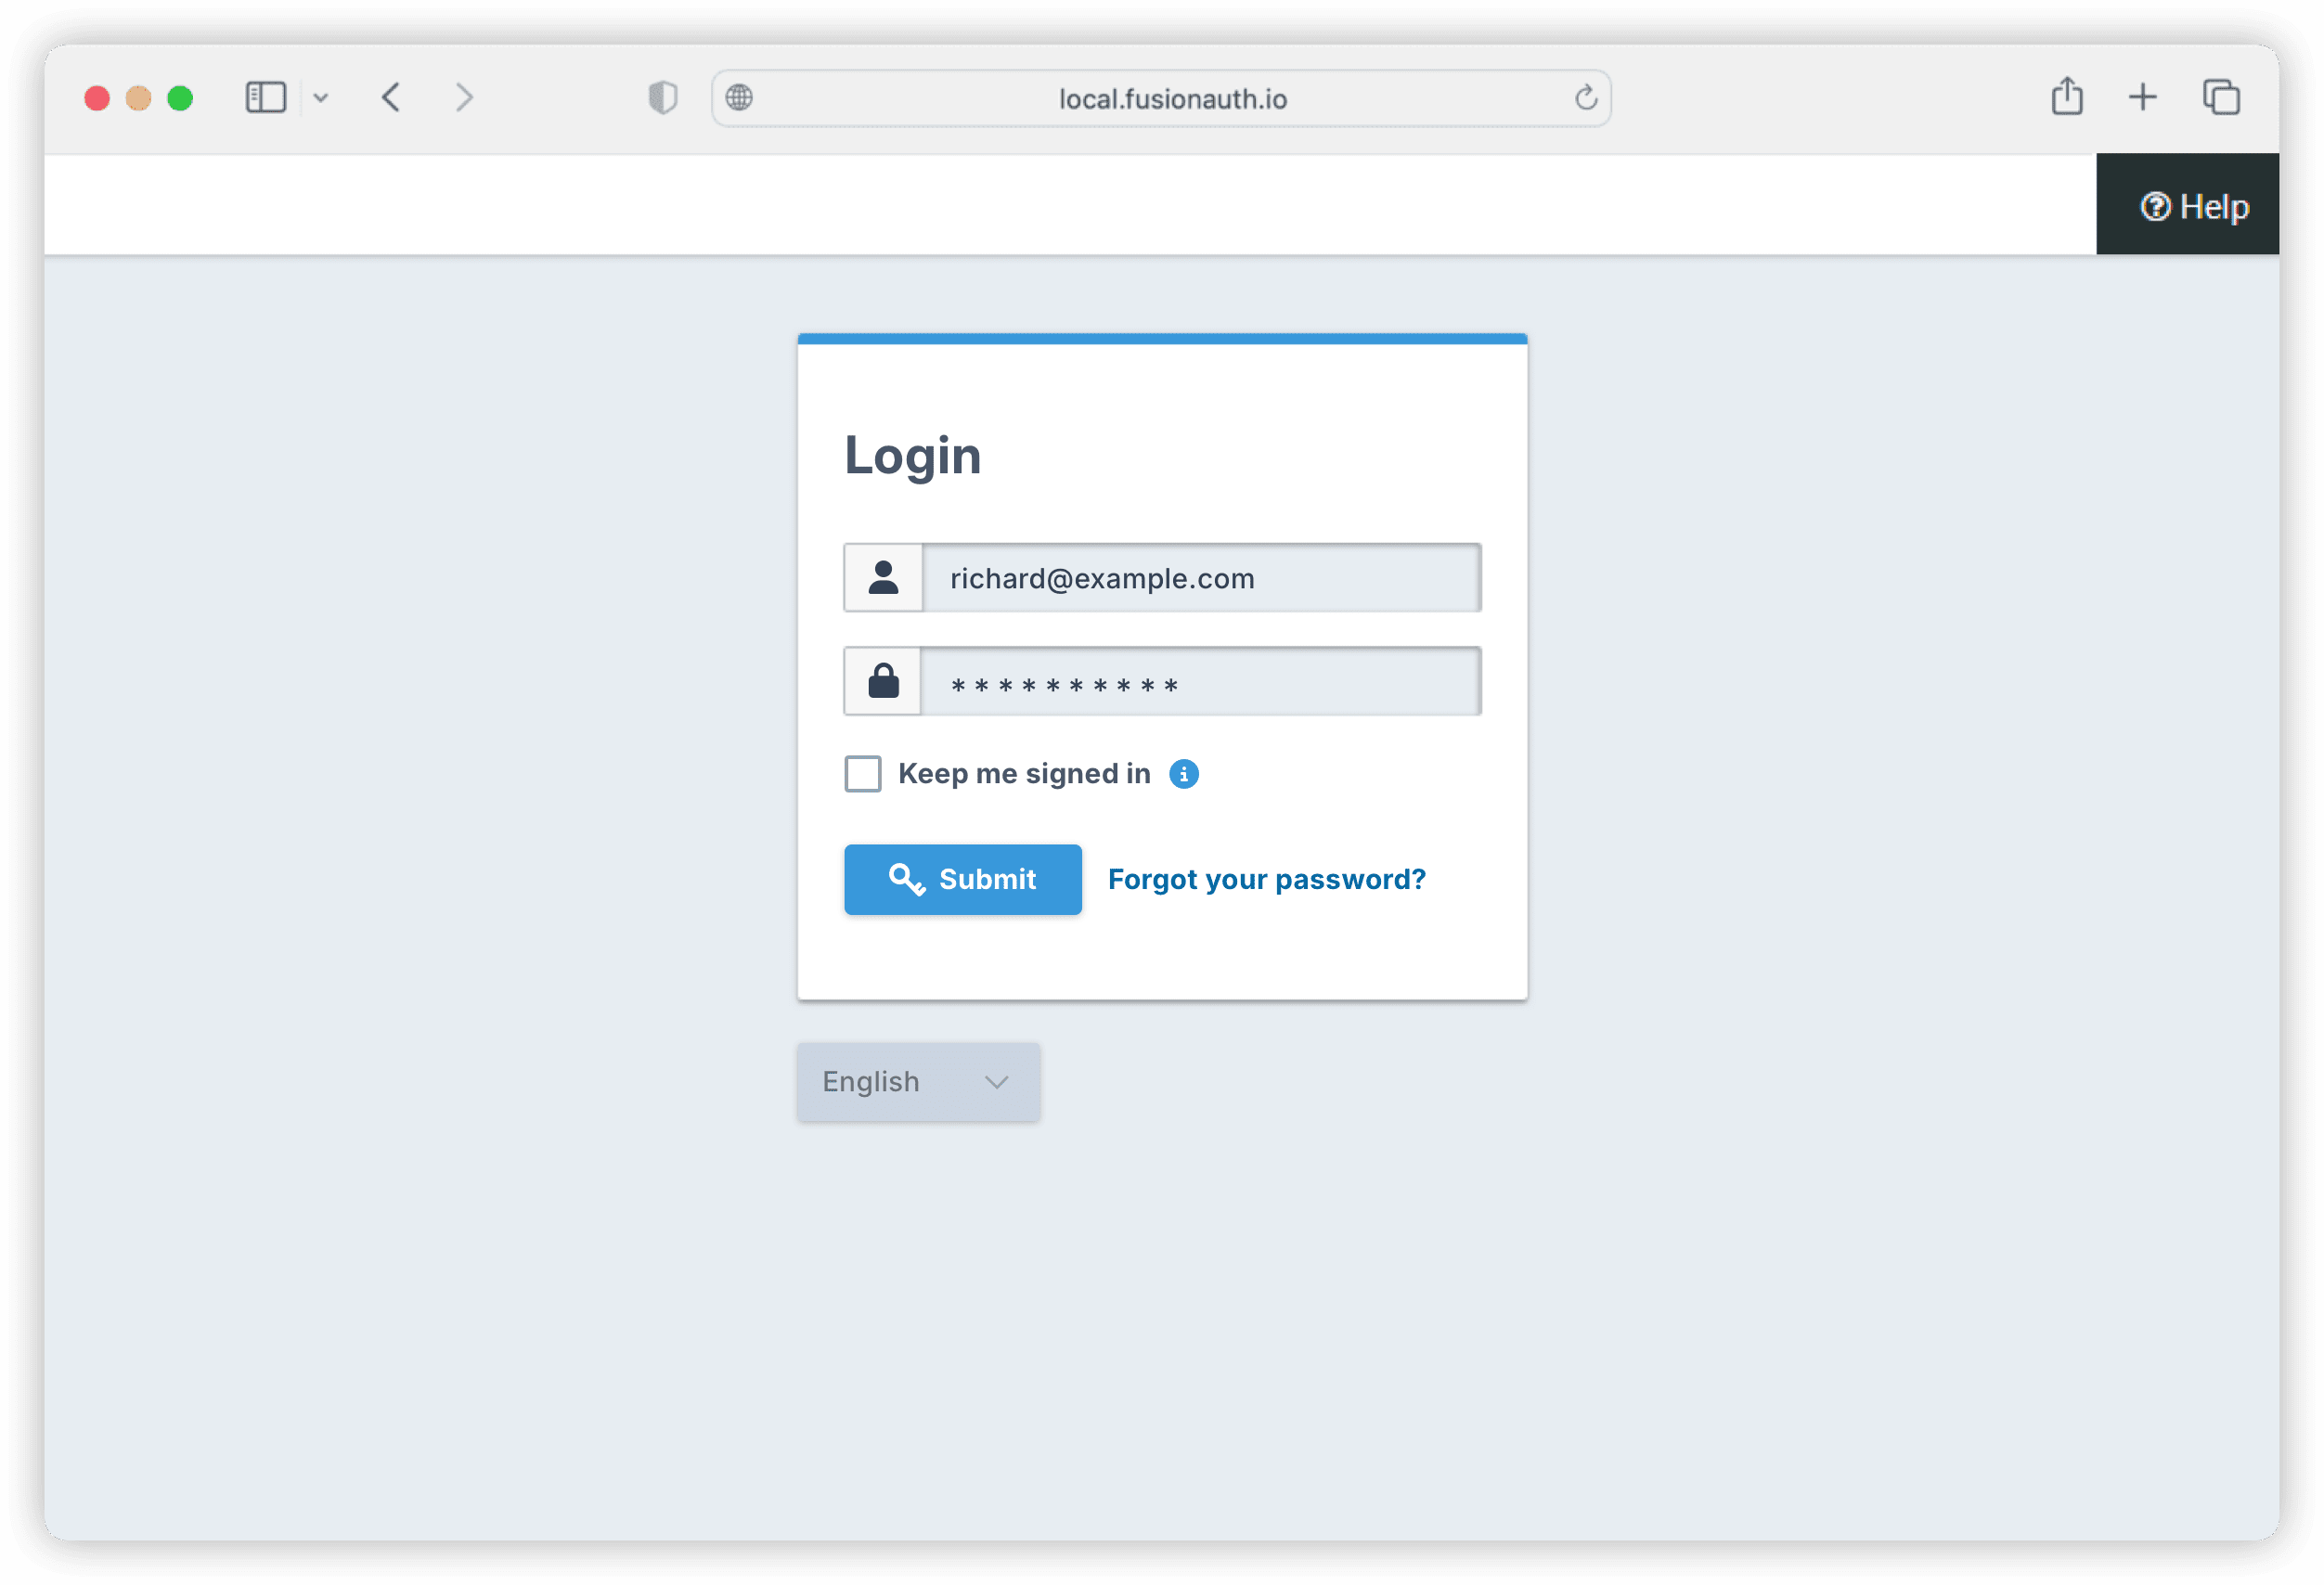
flask --app server.py --debug runYour application will now be accessible at http://localhost:5000. Click the Login button in the header, and try to log in using these credentials:
-
Email
richard@example.com -
Password
password
After submitting your login credentials, you'll be redirected to the page shown below, where you can enter your TOTP. Input the TOTP generated from your authenticator app into the designated field and click Verify .
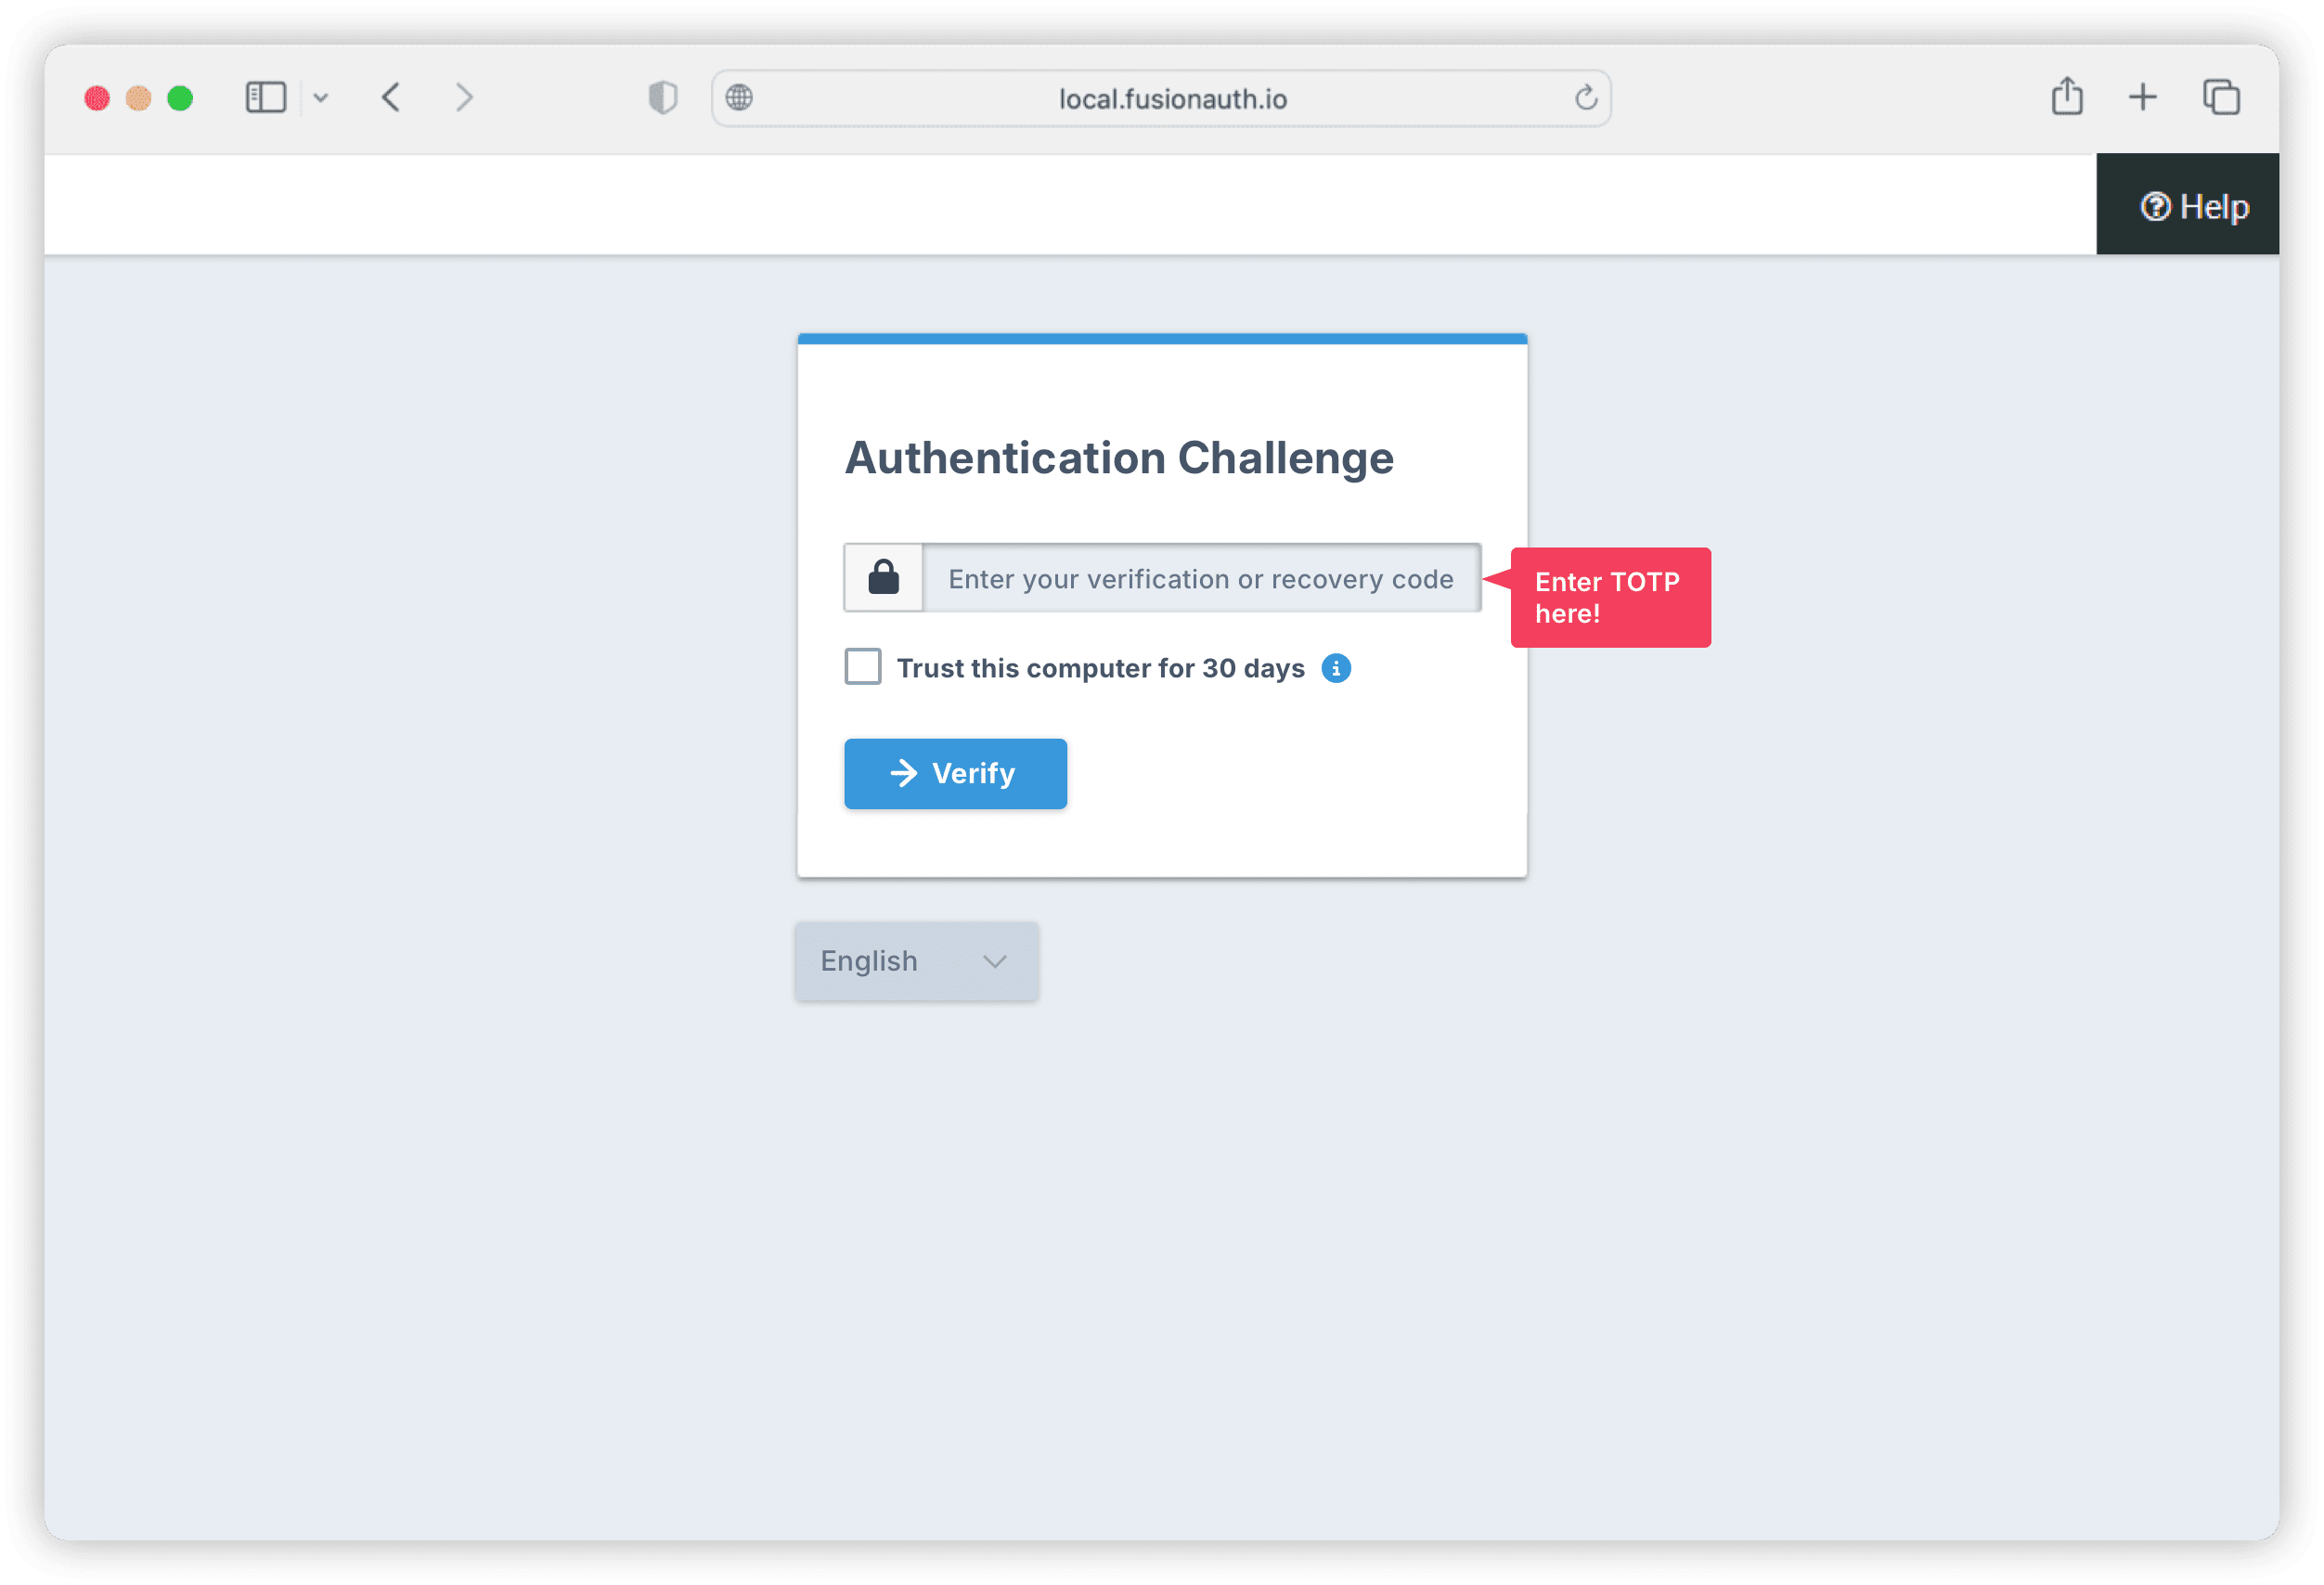
Note: Users who haven't configured an authenticator app for 2FA won't see this TOTP verification page.
When FusionAuth has successfully verified the TOTP by FusionAuth, you'll be redirected to the /account page that you have previously added to your demo application.
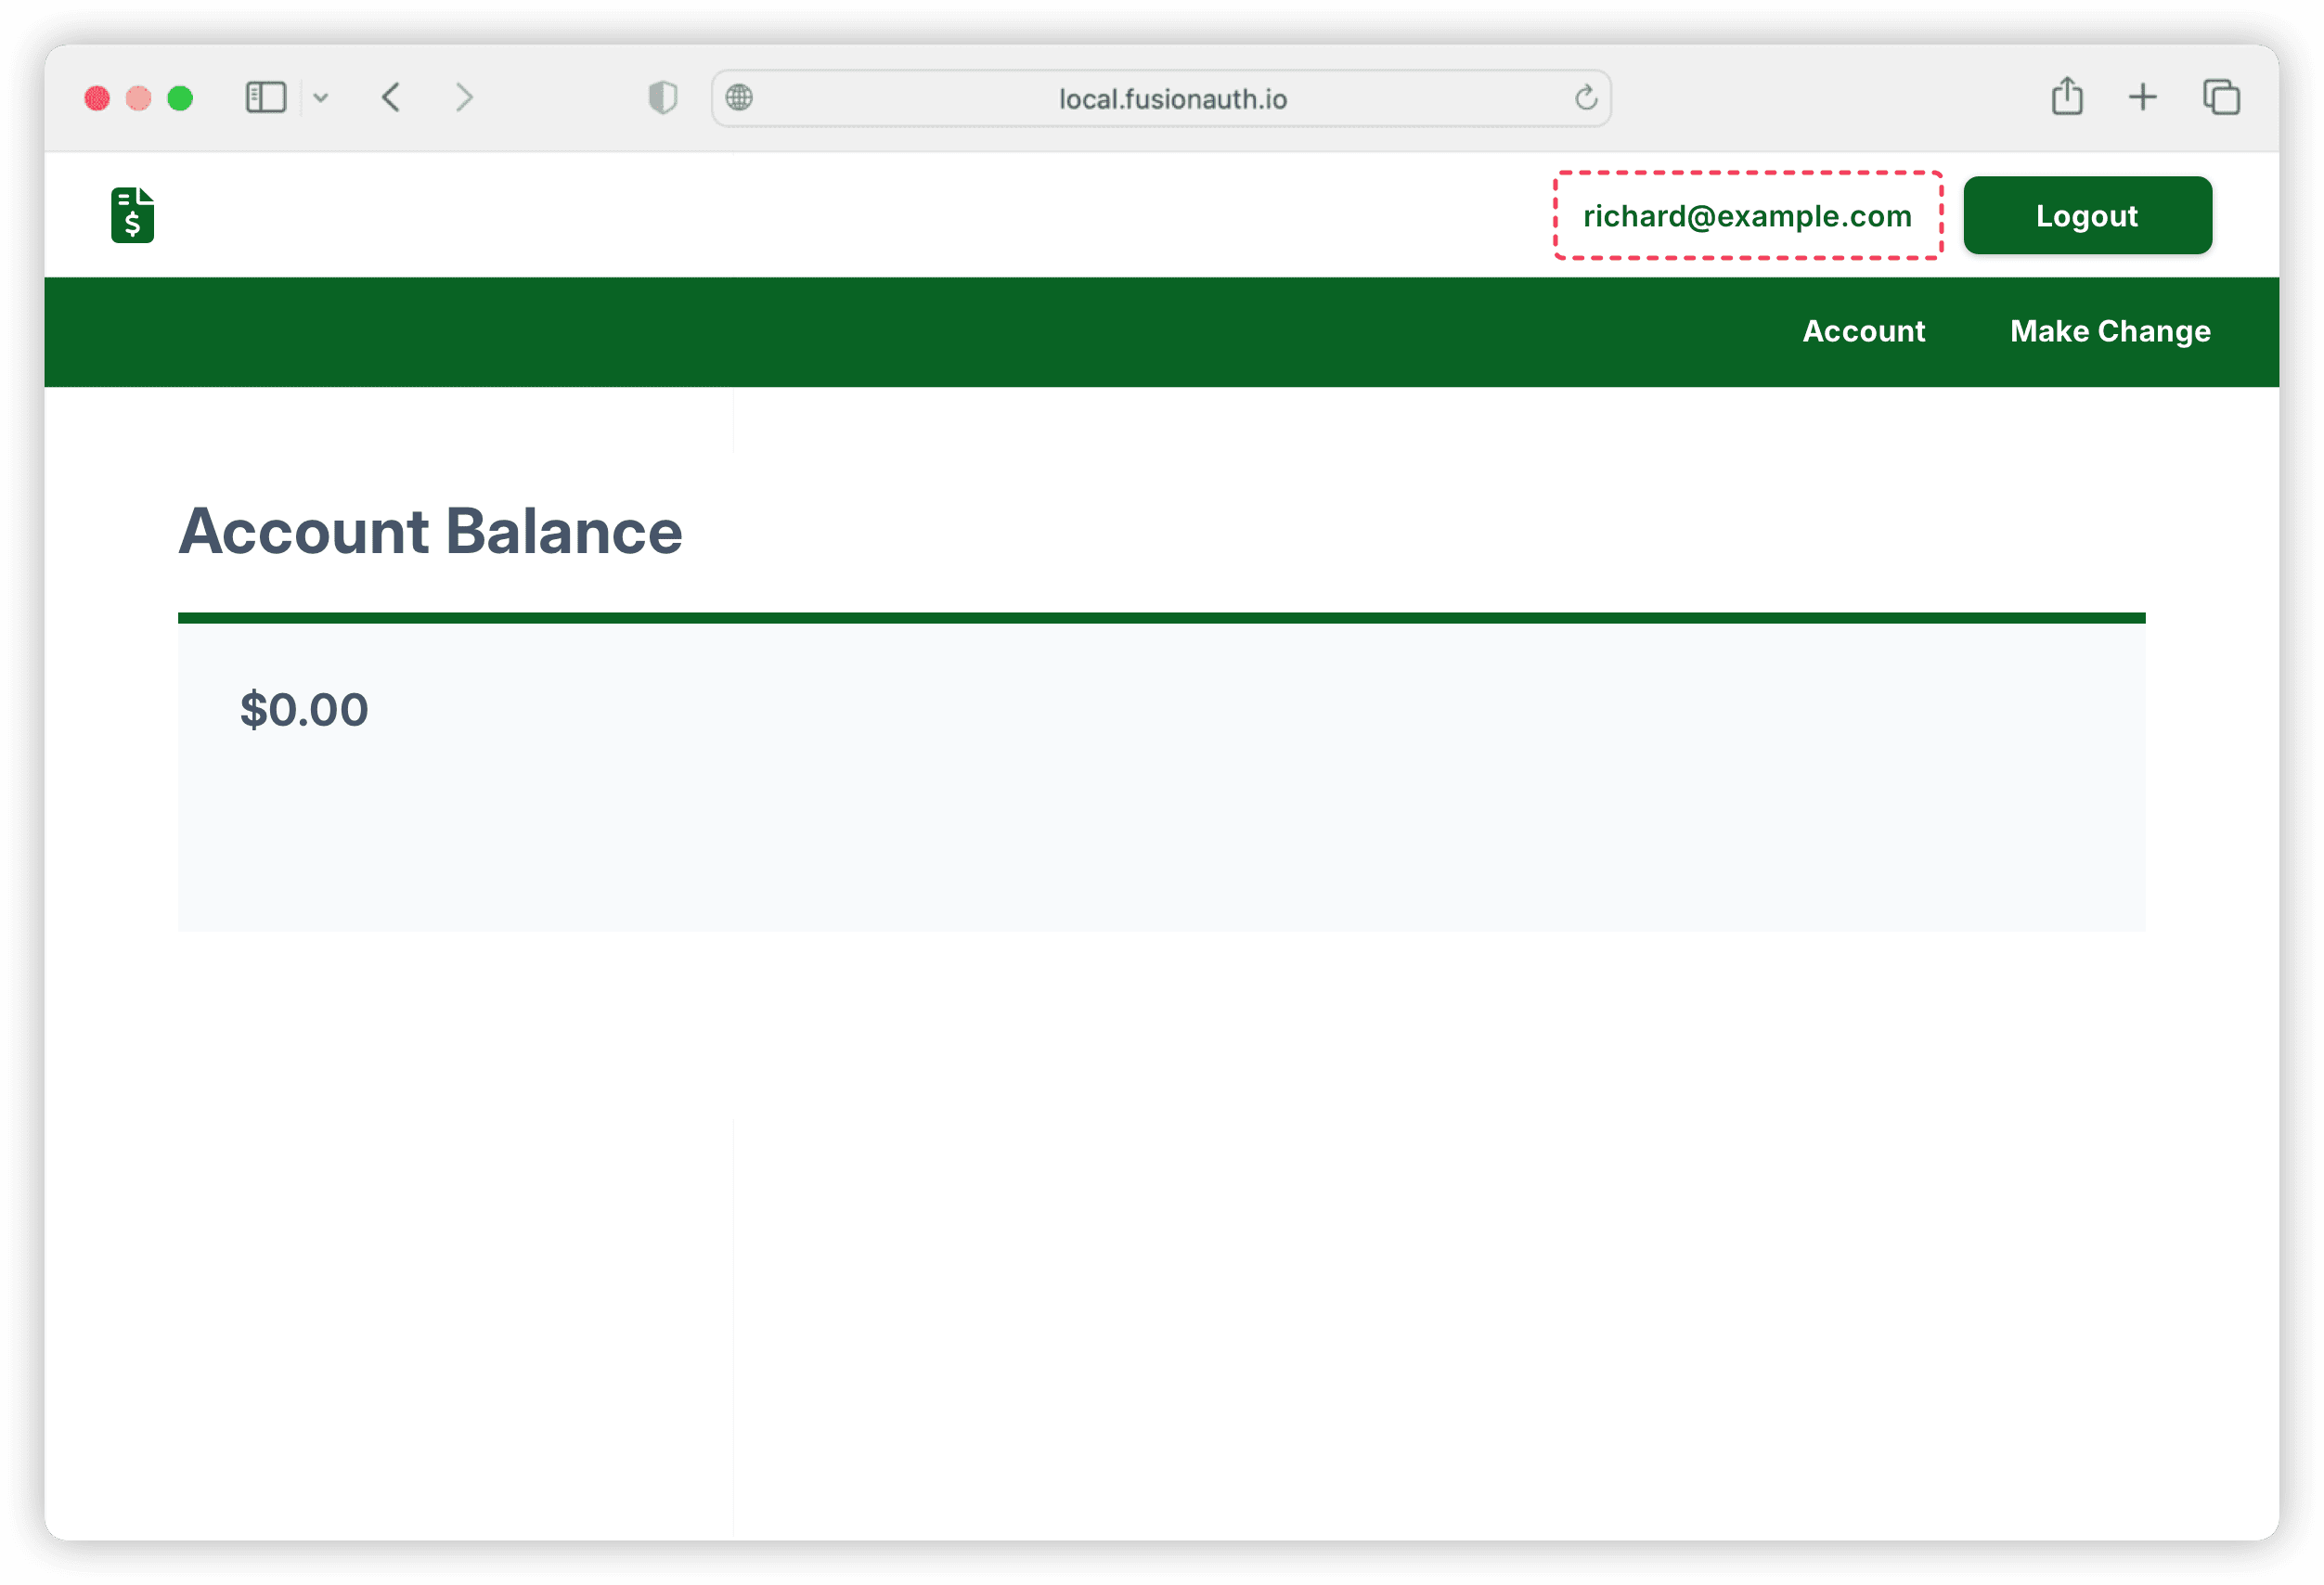
You'll notice that the email of the logged-in user is displayed next to the Logout button in the header.
Note: Make Change in the screenshot above is a default route provided with FusionAuth's sample Flask application. It's not relevant to the TOTP integration discussed here.
Congratulations! You've now successfully integrated FusionAuth's TOTP into your application.
Conclusion#
Traditional passwords are static and susceptible to leaks. Time-based one-time passwords (TOTPs) provide dynamic, temporary codes for authentication that mitigate the risks associated with password-based authentication without relying on SMS or email like normal OTPs.
FusionAuth provides a comprehensive authentication solution with built-in TOTP features that allow you to focus on core product development. FusionAuth supports various programming languages and provides a developer API. Its authentication pages, including login and TOTP verification, are customizable to match your application's look and feel, and FusionAuth offers you the flexibility of self-hosting or using their cloud-based service.