Tokens
Tokens At The Microservices Context Boundary
By Dan Moore
When you are using JWTs as part of your authorization solution in a microservices or Kubernetes based environment, you need to determine where to process them and how fine grained to make them.
Consider this simple microservices based system.
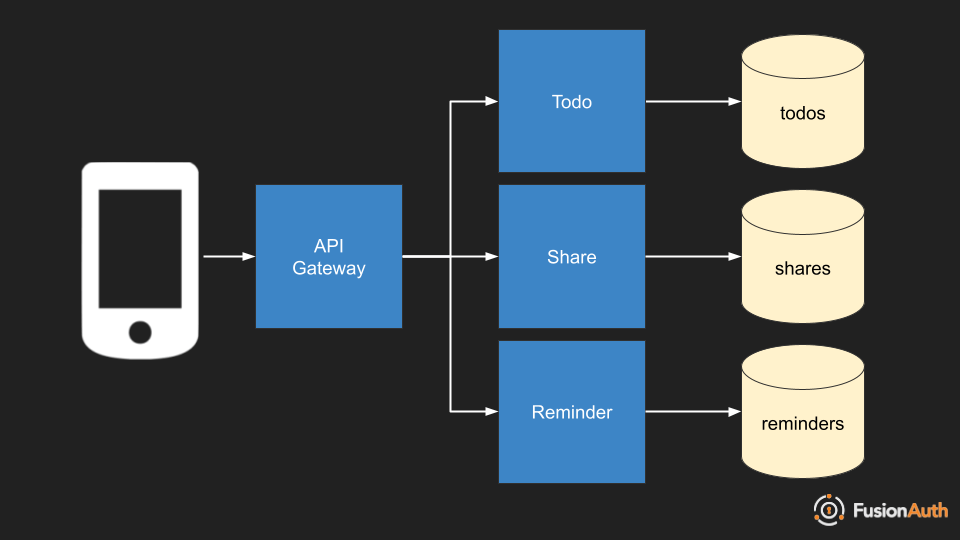
We have three different services, all protected by an API gateway. This API gateway could be running nginx, Apache, or some other open source system. It could be a commercial package such as HAProxy or Kong. It could also be a cloud vendor managed API gateway, such as an AWS Application Load Balancer or a Google Cloud Load Balancer.
When a request comes in, it will contain an access token. Getting this access token is beyond the scope of this article, but is documented in the Modern Guide to OAuth. This access token is often a JSON Web Token (JWT), which has intrinsic structure and can be signed and validated.
This article will assume that the access token is a JWT, but similar concepts apply to any kind of token. It further assumes that the token is signed by a private key and that the API gateway has access to the corresponding private key to verify the signature is valid.
At the application gateway, two actions must be taken:
- The token’s signature is validated. Therefore the token was signed by a trusted party (often an OAuth server).
- The token’s claims are examined. Therefore the API gateway knows who the token was created for (the
audclaim), that it has not expired (the current time is before theexpclaim and after thenbfclaim), and more.
But what happens after this? There are four scenarios:
- There is no authorization process within the system. Any request that has been validated by the API gateway is forwarded on. The token is passed on as well and data may be extracted from it, but it is trusted and not validated again.
- The token is passed through. Any request that has been validated by the API gateway is forwarded on. The token may be passed through and validated by each of the microservices. They can extract data from the JWT after the validation.
- The token is re-issued. The token may be parsed apart and re-issued. The data may be the same or sanitized. The signing algorithm, the lifetime and other attributes of the token can be modified. When the token arrives at the microservice, it can be validated and user data can be extracted.
- The token data is completely extracted. Claims are pulled off the token and put into a headers or the body of the request. The API gateway provides an API key which is validated by the microservices.
All of these scenarios have different tradeoffs. Let’s look at each one in more detail, with an example request made by a client to retrieve a user’s todos.
Trust With No Validation
In this case, the API gateway’s stamp of approval is enough for each microservice to trust the tokens provided. There may be additional authorization checks to ensure the request is legitimate, such as mutual TLS provided by a service mesh, but there is no validation of the token signature by the microservice.
The token is provided to the microservice which can decode the payload and examine the claims without worrying about the signature.
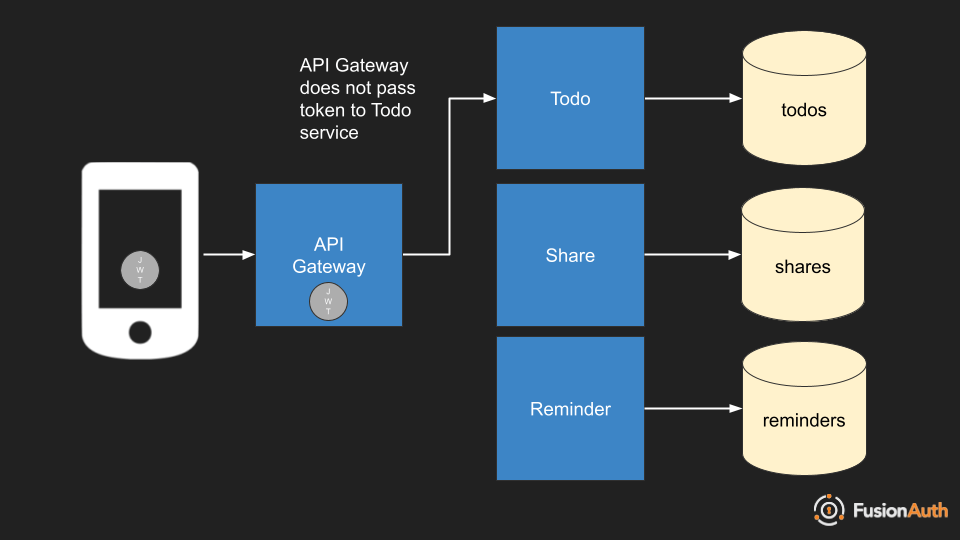
The benefits of this approach are simplicity of microservices implementation. They don’t have to worry about JWT validation at all. They may have to decode the payload, but that can be done with the golang base64 package or other similar packages. In addition, no external network access is required (to retrieve the public keys for signature validation). Because there is no signature validation, processing will be faster.
However, this approach relies on lower layers of the authorization system being correctly implemented. It also foregoes a defense in depth strategy.
Passthrough
Here the token is provided to the microservices and they each validate the signature and the claims independently of the API gateway.
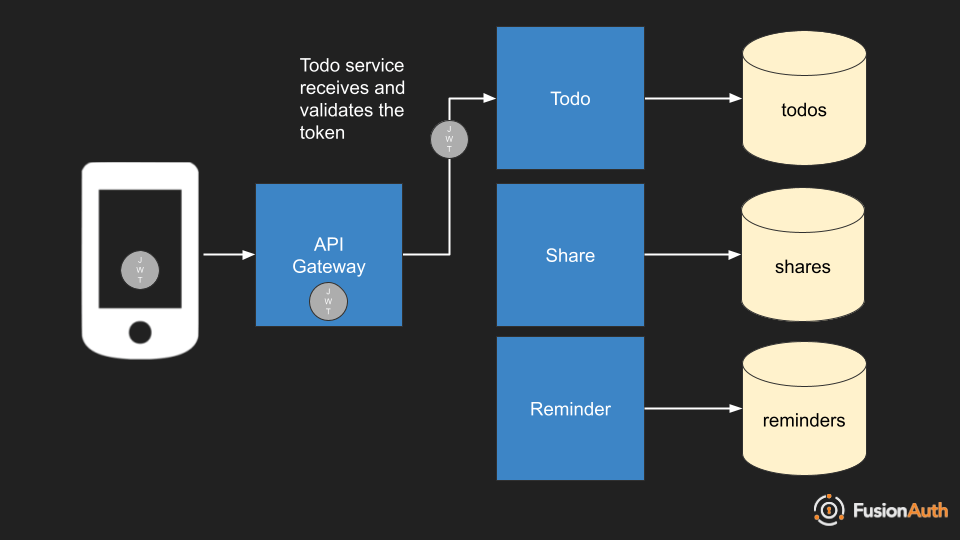
You’ll typically handle this with, in increasing order of effort and customizability:
- a service mesh such as Linkerd or Istio
- an ambassador container running nginx plus an token processing nginx library or a similar proxy like airbag
- the code embedded in a library in your microservice which can then validate the signature and claims
For example, if using Istio, you’d apply this command to create a request authentication policy, which confirms information about who created the JWT and validates the signature of the JWT.
This assumes you have a workload in the development namespace named todos. The JWT is present in the Authorization header, as either it was put there in the initial request or the API gateway has placed it there. Additionally, the below configuration assumes there is a prefix of Bearer, so the header looks like: Authorization: Bearer eyJhbGciOiJIUzI1NiIsInR5cCI6IkpX...
apiVersion: security.istio.io/v1beta1
kind: RequestAuthentication
metadata:
  name: "jwt-auth"
  namespace: development
spec:
  selector:
    matchLabels:
      app: todos
  jwtRules:
  - issuer: "https://example.fusionauth.io"
    jwksUri: "https://example.fusionauth.io/.well-known/jwks.json"
    outputPayloadToHeader: "X-payload"
  jwtHeader:
  - name: "Authorization"
    prefix: "Bearer "
This approach also passes the payload to the microservice so that it can examine claims, such as the sub claim, and retrieve data or otherwise process the request based on that information. Istio fails when the jwksUri is not accessible or empty. Also, ensure the headers from jwtHeader are passed through to all services that need to access them.
Apply these commands to create a request authorization policy, which examines additional claims in the JWT and allows or denies access based on them.
This authorization policy allows all requests to the todos workspace for anyone with the admin role:
apiVersion: security.istio.io/v1beta1
kind: AuthorizationPolicy
metadata:
  name: "jwt-authz"
  namespace: default
spec:
  selector:
    matchLabels:
      app: todos
  action: ALLOW
  rules:
  - when:
    - key: request.auth.claims[iss]
      values: ["https://example.fusionauth.io"]
    - key: request.auth.claims[roles]
      values: ["admin"]
This policy denies access to all other requests with a token from the same issuer.
apiVersion: security.istio.io/v1beta1
kind: AuthorizationPolicy
metadata:
  name: "jwt-authz-deny"
  namespace: default
spec:
  selector:
    matchLabels:
      app: todos
  action: DENY
  rules:
  - when:
    - key: request.auth.claims[iss]
      values: ["https://example.fusionauth.io"]
    - key: request.auth.claims[roles]
      notValues: ["admin"]
When setting these rules up in Istio, some debugging commands can be helpful:
First, view the logs of the istiod service:
kubectl -n istio-system logs --since=1h istiod-<id> -fThis shows you errors similar to:
Internal:Error adding/updating listener(s) virtualInbound: Provider 'origins-0' in jwt_authn config has invalid local jwks: Jwks doesn't have any valid public keySuch errors indicate your JWKS endpoint which contains the public keys used to verify the signature of the token are invalid or inaccessible.
Second, look at the listener configurations for your pods:
istioctl proxy-config listener -n default todos-v3-<id> -o jsonThis shows all of the listeners running against a given service. The output will include filters with names like envoy.filters.http.jwt_authn and envoy.filters.http.rbac. It provides a long JSON output useful for debugging rules.
You can learn more about these commands in the Istio documentation and the troubleshooting documentation
This approach pushes more authentication and business logic to your microservices, though by using a service mesh or ambassador you may be able to keep the microservice relatively ignorant of the implementation. The service still has to have access to the JWKS endpoint for signature validation, which requires external network access or a proxy.
The API gateway remains relatively simple. It still performs validation, but doesn’t have to do anything to the token beyond forwarding it. You also gain the benefits of token checking at both layers, so if something is in your network and presents an invalid token, the request will fail.
Re-Issue
In this case, the token is processed at the API gateway. With Kubernetes, you can add an adapter to your ingress, process the request and modify the token.
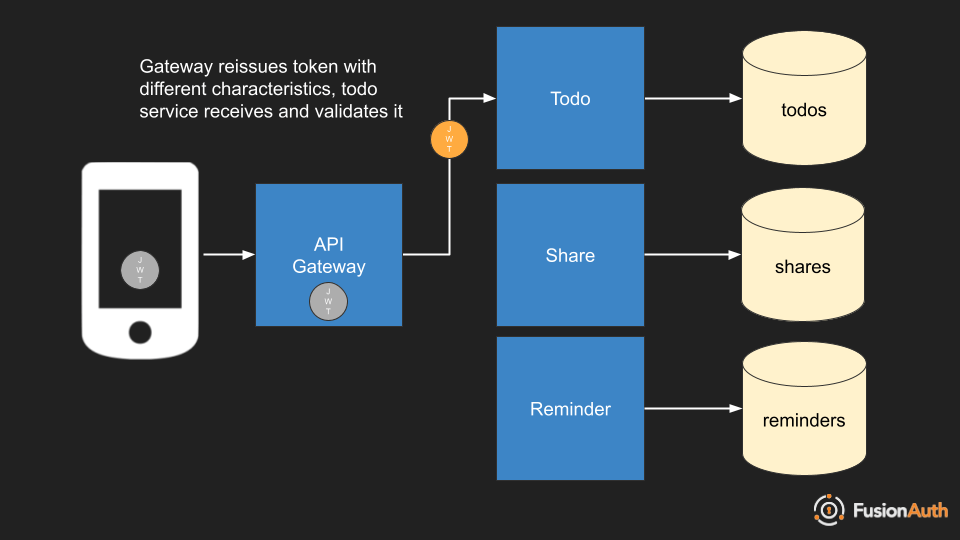
Common ways to modify the token include:
- Removing unneeded information
- Shortening the lifetime
- Using a different signing key
You might want to remove unneeded information that is generated by an external token provider. Such tokens might include extra information which doesn’t make sense to the services behind the API gateway. You might modify the aud claim to make it more specific as well.
Shortening the lifetime can help improve security. You can shorten the lifetime to between one and five seconds, essentially making this a one-time use token. Therefore, even if the token is somehow exfiltrated, it will be expired.
Finally, using a different signing key is advantageous in a number of ways. This allows you to use an internally managed signing key, and allows you to rotate and revoke it without affecting any system outside of your current environment. You can choose a different, more performant algorithm. You might receive a token signed with RSA and re-issue it with an HMAC signature. While HMAC requires a shared secret which can be problematic to share between systems, within a trusted system it is acceptable. It also is far faster to verify.
Here’s code which takes an RSA signed JWT and re-signs it with an HMAC secret. You’ll want to make sure the HMAC secret is stored securely, either within an internal token generating service or using Kubernetes Secrets.
package main

import (
	"crypto/rand"
	"crypto/rsa"
	"fmt"
	"github.com/golang-jwt/jwt"
	"time"
)

func main() {

	privateKey, _ := rsa.GenerateKey(rand.Reader, 1024)
	publicKey := privateKey.PublicKey // more probably going to be pulled from JWKS

	// receive token at the API gateway, validate the signature
	decodedToken, err := jwt.Parse(tokenString, func(token *jwt.Token) (interface{}, error) {
		if _, ok := token.Method.(*jwt.SigningMethodRSA); !ok {
			return nil, fmt.Errorf("unexpected signing method: %v", token.Header["alg"])
		}
		return &publicKey, nil
	})

	// validate the claims from decodedToken

	if err != nil {
		fmt.Printf("Something Went Wrong: %s", err.Error())
	}

	// typically, you'll pull this from a secrets manager
	var mySigningKey = []byte("hello gophers!!!")

	hmacToken := jwt.New(jwt.SigningMethodHS256)
	hmacClaims := hmacToken.Claims.(jwt.MapClaims)
	for key, element := range decodedToken.Claims.(jwt.MapClaims) {
		hmacClaims[key] = element
	}

	// modify claims here if needed
	hmacClaims["exp"] = time.Now().Add(time.Second * 5).Unix()

	// sign JWT
	hmacTokenString, err := hmacToken.SignedString(mySigningKey)

	if err != nil {
		fmt.Println(fmt.Errorf("Something Went Wrong: %s", err.Error()))
	}

	// put hmacTokenString into the Authorization header for the future requests
}
You’ll want to do key validation in the microservices, either with an ambassador or in the code.
While this requires more custom code, the benefits of re-issuing the token mean that the microservices have less to deal with, the risk of a token being stolen have decreased, and you have more flexibility around performance and algorithm choice.
Full Extraction
Finally, the API gateway can extract the contents of the token entirely and turn it into a header or body parameter rather than re-issuing the token.
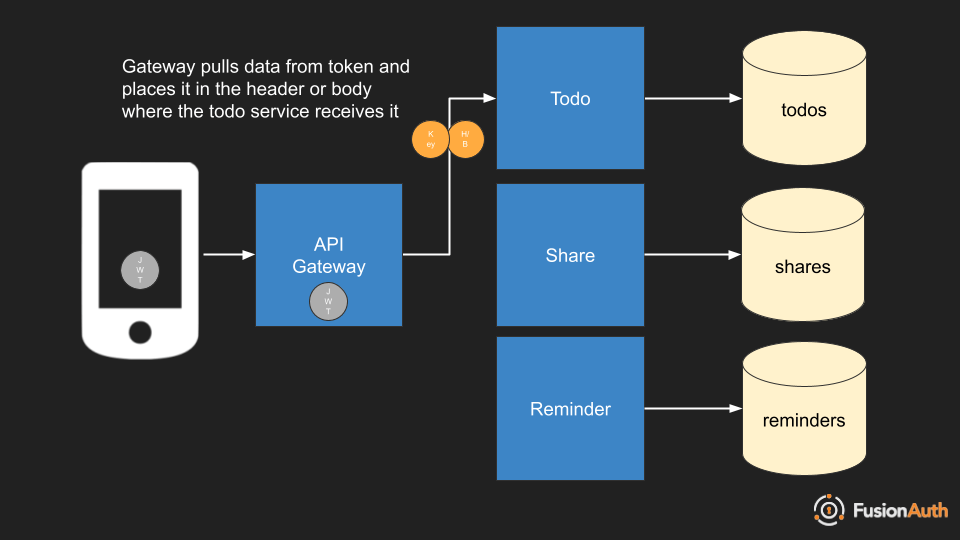
This is helpful for situations where you are bolting on token based authentication, but the service expects values to be in normal HTTP headers or the body and it isn’t worth it to upgrade it to process tokens. This could happen either right after the API gateway forwards the request or right before the container receives it.
In this case, make sure you don’t just pass the extracted headers, but that you also pass an API key or other secret. That will allow the microservice to be sure that the request is coming from a valid source, the API gateway.
You might append the following values to the forwarded request using something like the ReverseProxy or other proxy middleware.
http.Handle("/", &httputil.ReverseProxy{
    Director: func(r *http.Request) {
        r.URL.Scheme = "https"
        r.URL.Host = "microservice.url"
        r.Host = r.URL.Host
        r.Header.Set("X-API-key", "...") // known value to assure the microservice of the request authenticity
        r.Header.Set("X-user-id", "...") // extracted from the token
        r.Header.Set("X-roles", "...") // extracted from the token
    },
})
The costs of this approach are that you have to build the token processor and extract out needed data. The benefits are that you can avoid modifying the microservice or using an ambassador container to proxy requests to it.
What about TLS?
Underlying each of these approaches is an understanding that traffic over the internal network (pod-to-pod) should use TLS unless there’s a good reason not to. By using a service mesh, you can avoid a nightmare of certificate renewals and transparently use TLS.
Using TLS between the different services lets you protect traffic in flight. With mutual TLS (client certificates) you can know that one service is allowed to call another, but you don’t have the granularity that a token provides. As exhibited above, you can limit services or resources within a service to holders of tokens with certain claims, allowing for more fine grained security and control.
Conclusion
These four approaches to handling token based authentication allow you to protect your system components with tokens which are often in a format dictated by an external provider. The ability to pass through tokens, completely ignore them, re-issue them into a different algorithm, or extract the payload and transmute it to a different format, give you flexibility in meeting your security and performance needs.

