


If your inbox looks anything like mine, you've seen hundreds of messages from companies updating their privacy policies and terms of service. This is mainly due to the European Union's General Data Protection Regulation or GDPR, which went into effect on May 25, 2018. The GDPR grants a set of "digital rights" to EU citizens, including a "right to erasure." Basically, this means a user can request that their data be deleted, and there can be substantial fines if a company is not able to honor these requests.
In this post, we'll show how to set up webhooks in FusionAuth to delete all of a user's data when they delete their account. In FusionAuth, webhooks are used to subscribe or listen to events in the system, so we'll create a webhook that listens to the user.delete event.
What is a Webhook?#
In case you are not familiar with webhooks in FusionAuth and other platforms, they are an effective component of interactive user experiences on websites and applications. In the most basic terms, webhooks are simple event notifications that send a message to the application that something happened. Upon receiving that message, the application can react. It may trigger a change in the user's interface, or it can initiate more complex processes within the application. The options are endless and developers are taking advantage of this technique to make more engaging experiences. For more information, there's a useful introduction to webhooks here.
Creating Webhooks in FusionAuth#
There are two ways to create webhooks in FusionAuth. The first is to use the FusionAuth UI and it is pretty straight-forward. The second is to programatically create a Webhook using the Webhook API.
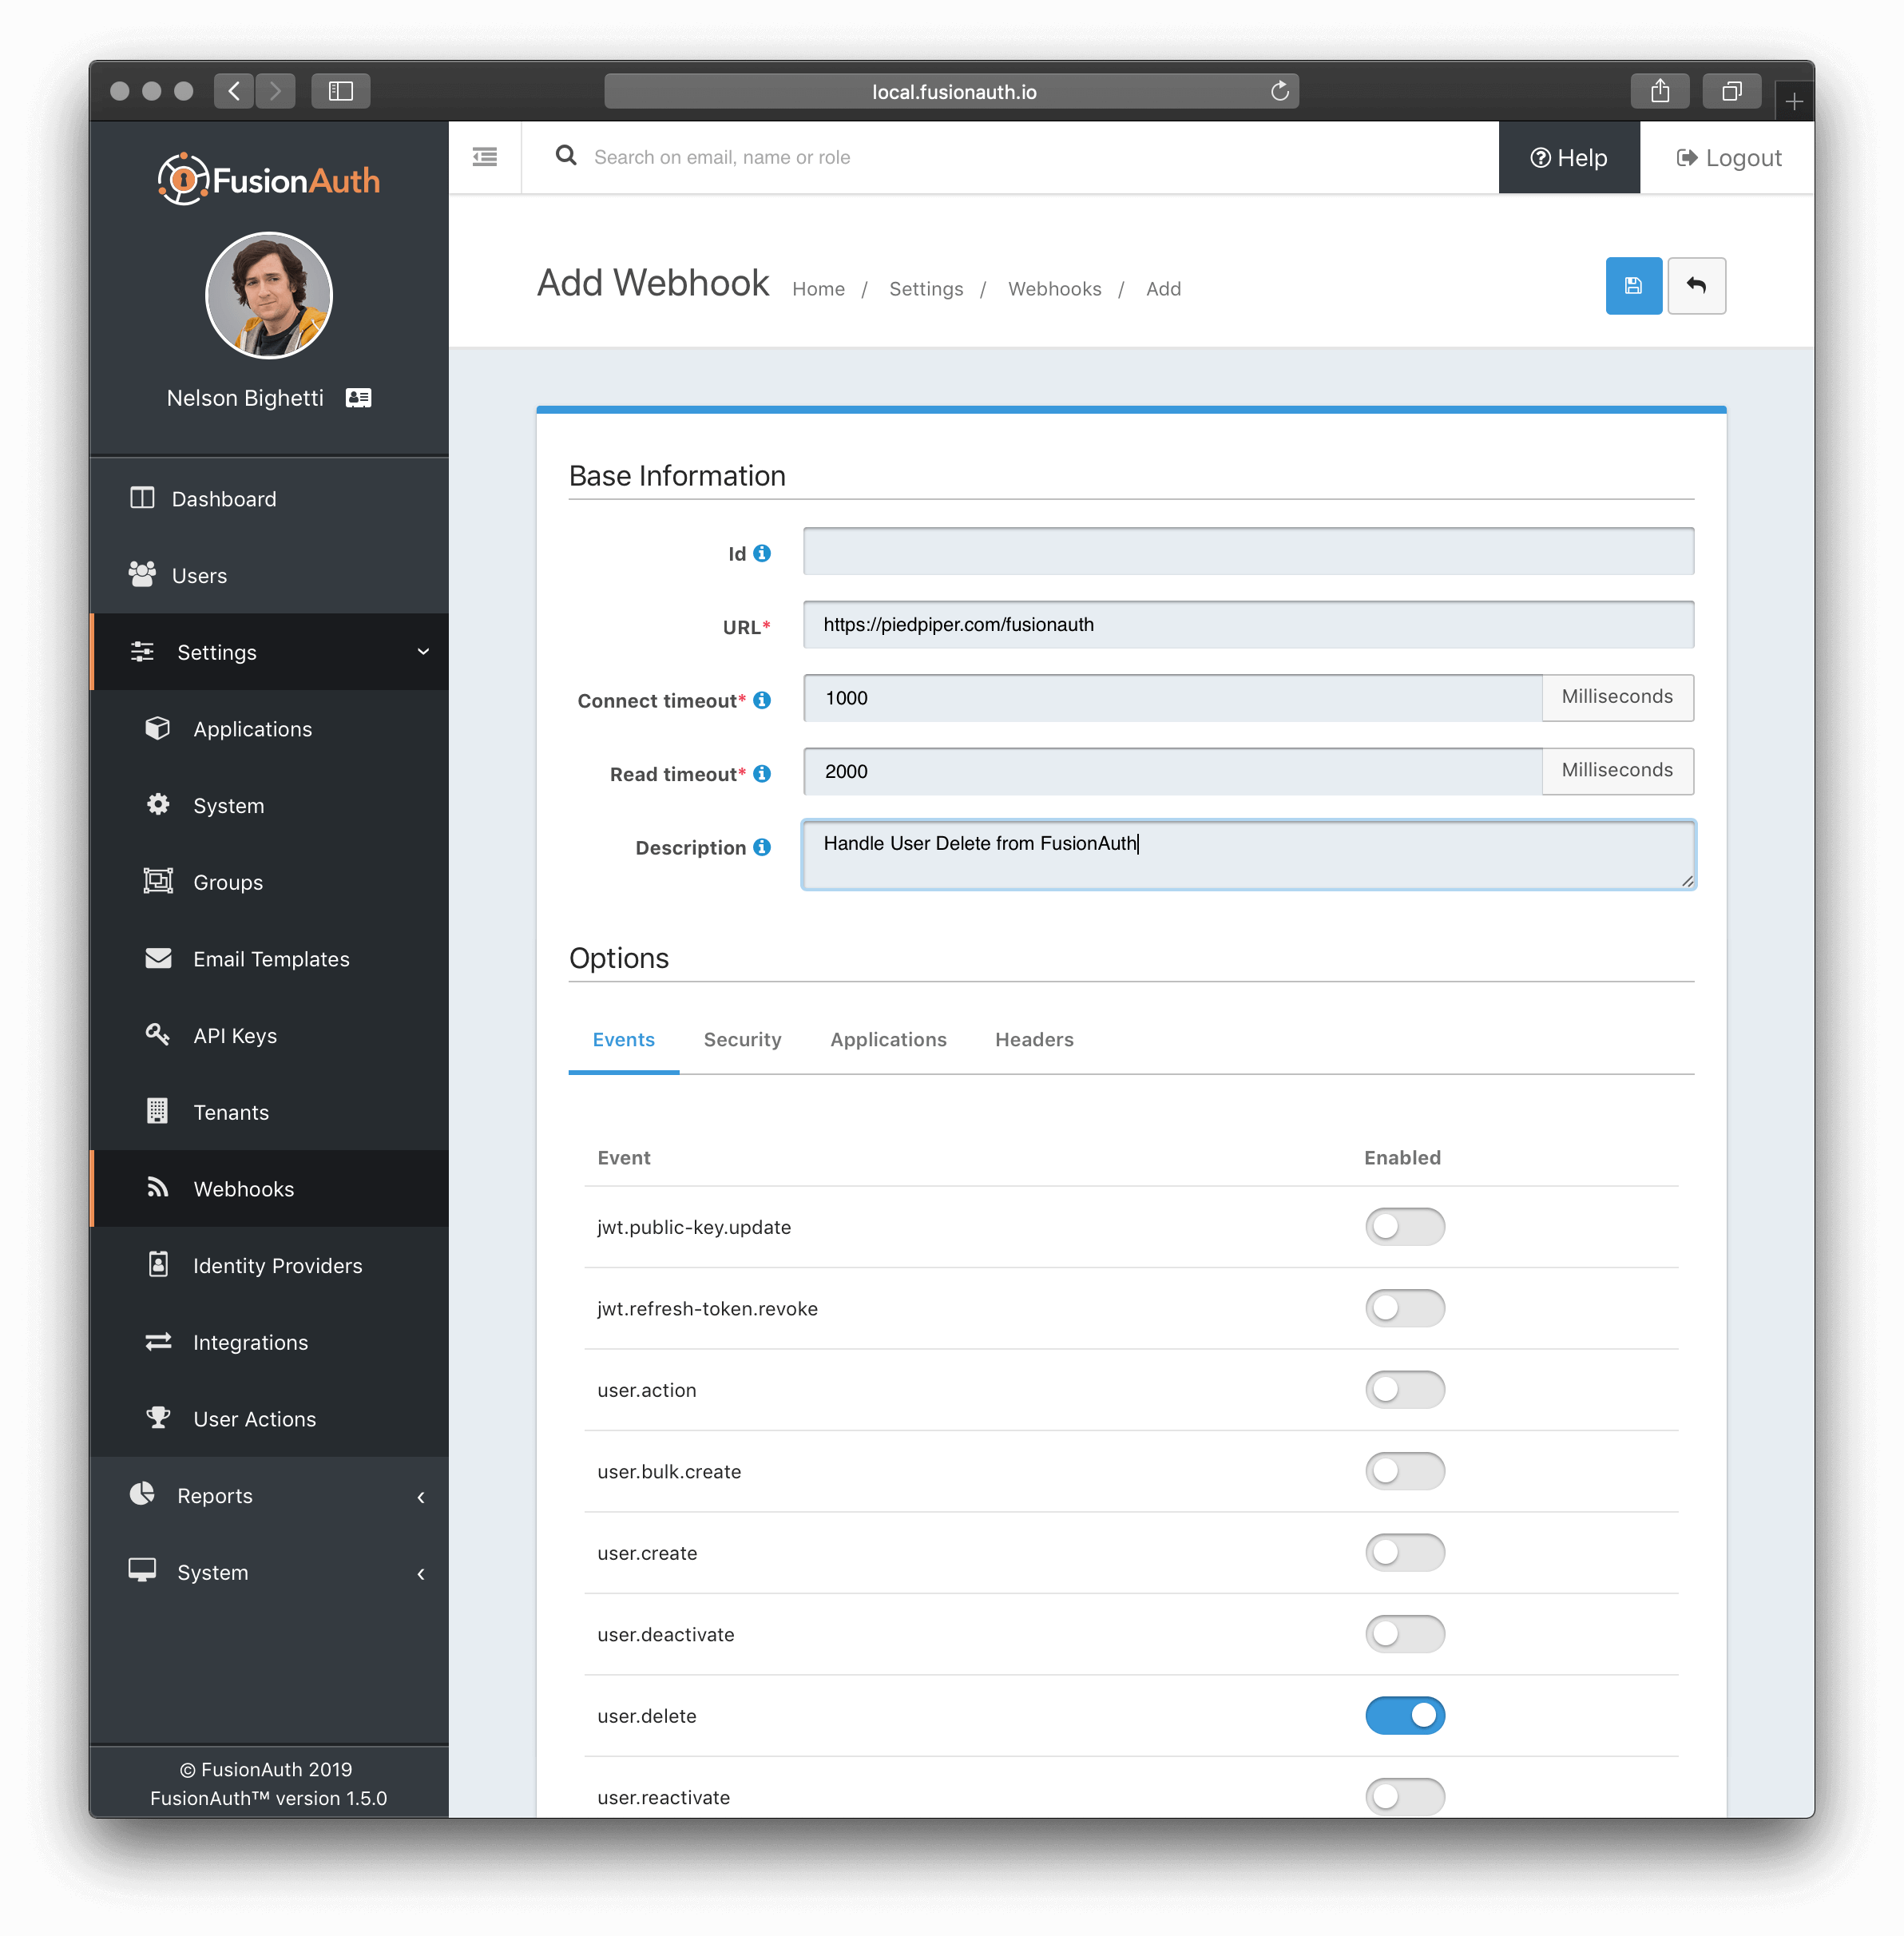
We will be using the FusionAuth UI to create our webhook. Once you have logged into the FusionAuth UI, navigate to Settings -> Webhook . In the following screenshot we are adding a new Webhook and have only subscribed to user.delete event. This means that FusionAuth will only send the user.delete event to this webhook. The URL in the screenshot will be different on your system, in this example we will be sending the event to the fusionauth endpoint at https://piedpiper.com.
Once you have created your webhook, you will want to ensure the event is enabled and verify the transaction setting is acceptable for your implementation. To complete this step, navigate to Settings -> System -> Webhooks tab. On this tab you will be able to enable the user.delete event and optionally modify the transaction setting. The default setting is No Webhooks are required to succeed. This default setting means that FusionAuth will send the event but if the endpoint does not respond with a 200 or the endpoint is not available for some reason, FusionAuth will proceed with the User delete.

For the purpose of this example, we are deleting user data and we want to be sure this is complete before we remove the User from FusionAuth. For this reason we will modify the default Transaction setting to All the Webhooks must succeed. This setting means that all webhooks subscribed to the user.delete event must receive the message and respond with a 200 status code. If any of the configured webhooks do not respond with a 200 status code, FusionAuth will fail the user delete.
To account for the possibility that the user delete will be retried, your webhook must be designed to receive an event more than once.
Event JSON Example#
Once you have the webhook configured, FusionAuth will post JSON data to the URL when a matching event occurs. Our webhook is subscribed to the user.delete event. The following is an example JSON body sent to the webhook.
{
  "event": {
    "type": "user.delete",
    "createInstant": 1505762615056,
    "id": "e502168a-b469-45d9-a079-fd45f83e0406",
    "user": {
      "active": true,
      "birthDate": "1986-03-15",
      "data": {
        "screenName": "Hope15"
      },
      "email": "hope15@email.com",
      "expiry": 1571786483322,
      "firstName": "Hope",
      "fullName": "Hope Pierce",
      "id": "61817710-78f7-4456-a9e2-aafaa0d39cff",
      "lastLoginInstant": 1471786483322,
      "lastName": "Pierce",
      "middleName": "Julia",
      "passwordChangeRequired": false,
      "passwordLastUpdateInstant": 1471786483322,
      "registrations": [
        {
          "applicationId": "10000000-0000-0002-0000-000000000001",
          "data": {
            "displayName": "Hope",
            "subscribedCategories": [
              "News",
              "Technology",
              "Weather",
              "Entertainment",
              "Sports"
            ]
          },
          "id": "00000000-0000-0002-0000-000000000000",
          "insertInstant": 1446064706250,
          "lastLoginInstant": 1456064601291,
          "roles": [
            "user"
          ],
          "preferredLanguages": [
            "en"
          ],
          "username": "Hope15",
          "usernameStatus": "ACTIVE"
        }
      ],
      "timezone": "America/Denver",
      "twoFactorEnabled": false,
      "usernameStatus": "ACTIVE",
      "username": "Hope15",
      "verified": true
    }
  }
}
Depending upon your use case, you may only need to pay attention to a few fields in the event body. For example, if you utilize the FusionAuth userId as a foreign key, you may only need to read the event.user.id out of the message body which is equal to 61817710-78f7-4456-a9e2-aafaa0d39cff.
An Example Webhook#
We'll be writing our webhook using Node.js and Express. This webhook will consume the JSON event from FusionAuth, check the event type and extract the event.user.id.
You'll notice that we are reading the Authorization HTTP header to ensure we trust the sender. If you do require an API key to call your webhook, you can add additional HTTP headers to the webhook configuration in FusionAuth under the Headers tab.
router.route('/fusionauth').post((req, res) => {
  const authorization = req.header('Authorization');
  if (authorization !== 'config.apiKey') {
    res.status(401).send({
      'errors': [{
        'code': '[notAuthorized]'
      }]
    });
    return;
  }

  const request = req.body;
  if (request.event.type === 'user.delete') {
    savedItems.deleteAll(request.event.user.id)
        .then(() => {
          res.sendStatus(200);
        })
        .catch(function(err) {
          _handleDatabaseError(res, err);
        });
  }
});
This code sets up a route to handle the URL for our webhook. The first bit of code checks that the Authorization header contains the correct API key. (This key would be stored in the Express app.)
The line savedItems.deleteAll(request.event.user.id) is a call to delete the user's data. Once the data has been deleted, our webhook will respond with a status code of 200. With the webhook attached, FusionAuth will wait to delete the user until it gets a success code back from the webhook. By deleting the user's saved data in response to the user.delete event we are in effect keeping our application database in sync with the FusionAuth user database.
Wrapping Up#
This post shows the power and simplicity of using webhooks in FusionAuth. By subscribing to events, your application can easily respond to changes in user data. This publish and subscribe pattern is a core feature of FusionAuth's architecture. If you have any questions or problems, let us know on our community forum and we'll be happy to help.
Learn More About FusionAuth#
FusionAuth is designed to be the most flexible and secure Customer Identity and Access Management solution available at the best price. We provide registration, login, SSO, MFA, data search, social login, user management and more, 100% free for unlimited users.
Find out more about FusionAuth and download it today.