


In this post, we'll walk step-by-step through implementing the OAuth Authorization Code Grant in a React app. This is the most secure way to implement OAuth and often overlooked for single-page applications that use technologies like React. We'll use FusionAuth as the IdP and also show you how to configure FusionAuth for this workflow.
This blog post walks through low-level details of OAuth in React. If you want to add login, logout, and registration buttons to your React application, using pre-built buttons, hooks, or higher-order components, you should take a look at our React SDK. You can also work through a tutorial using the SDK.
Our app will be able to:
- log users in
- log users out
- read user data from FusionAuth
- write user data to FusionAuth
In addition to React, we'll use a Node.js backend. One major benefit of using a backend server is that we can safely store and use a Client Secret, which is the most secure way to integrate OAuth 2.0 Authorization Code Flow with our React app.
If you're in-the-know on OAuth, you're probably aware that some people use PKCE or the rightfully deprecated Implicit Flow to get around the Client Secret constraint. We're sticking to Authorization Code Flow, because setting up a server is the most secure solution for the majority of cases and quite simple once you know how. Don't know what any of that means? Don't worry about it — you don't need to know anything about OAuth to follow this example.
What do you need to know? Well, this example app will be much easier to follow if you have at least some knowledge of:
- React
- components
- state and props
- binding
- Node.js/Express
- packages and modules
- routing
- HTTP requests (like
GETandPOST)
The general idea of this app is that the Express server acts as a middleman between the React client and FusionAuth. The React client will make requests to the Express server, which will make requests to FusionAuth before sending information back to the React client. Other than FusionAuth's login form, the user will only ever see React-rendered pages.
Conceptually, our app will look like this:
React client <-> Express server <-> FusionAuth
(mostly UI)      (our code)         (pre-made auth)
Literally, it might look something like this:
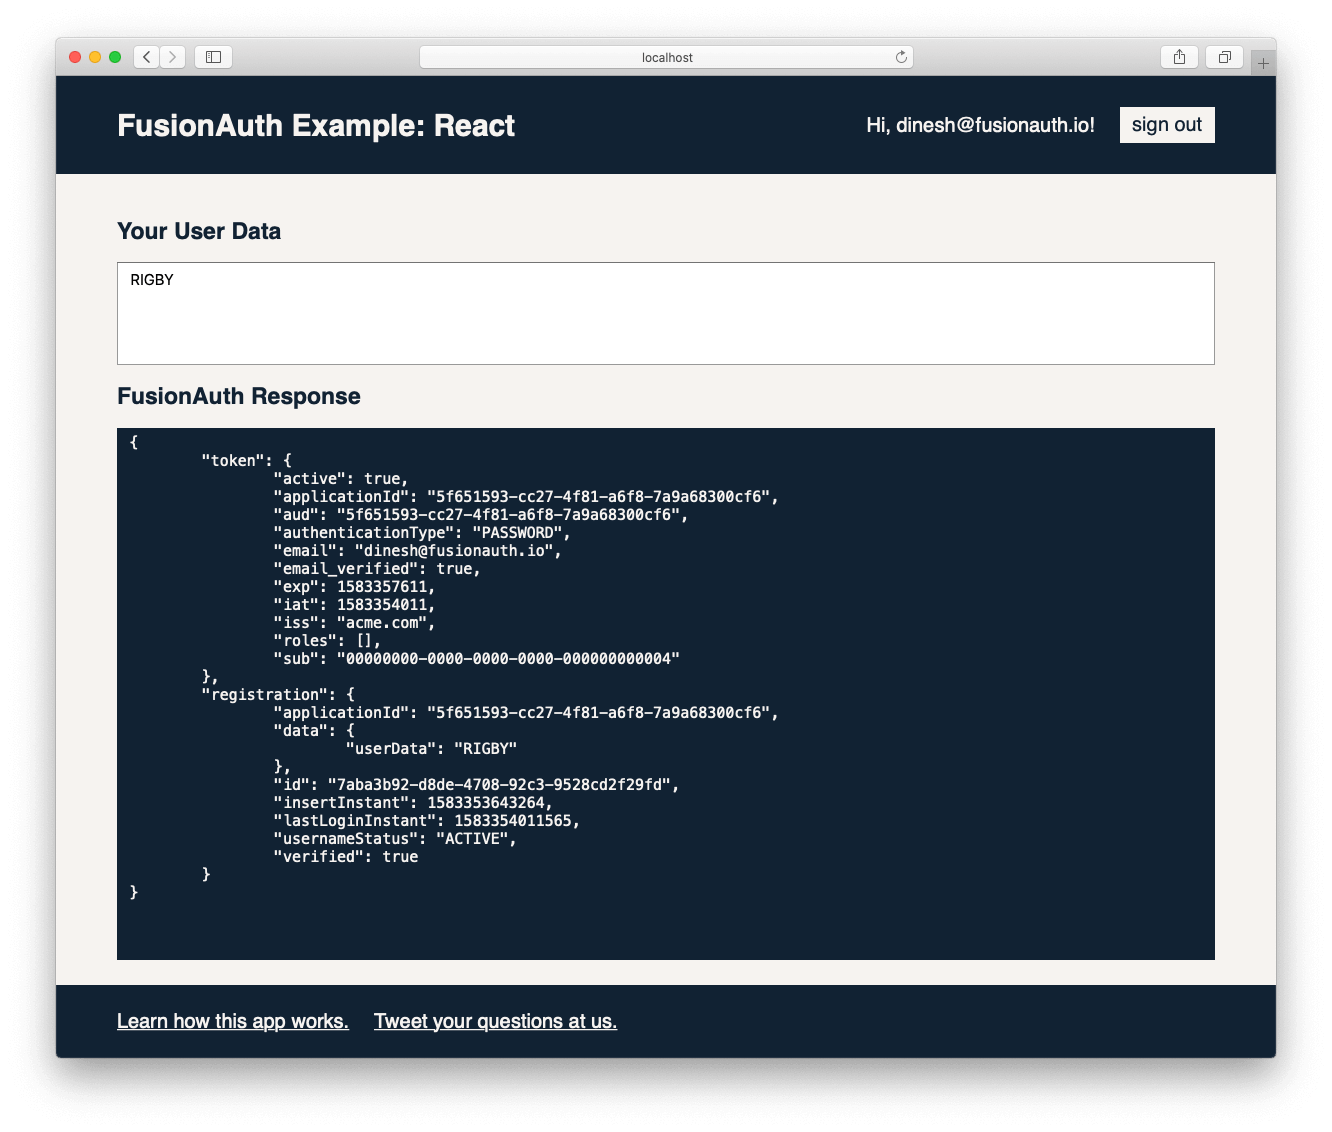
(Although, you're on your own for CSS.)
If you want to peek at the source code for the exact app pictured above, you can grab it from its GitHub respository. You can follow along with that code or use it as a jumping-off point for your app.
Also, we put together a complete workflow diagram for the Authorization Code Grant with a single-page application that can help further explain how this process works. You can review that workflow to get a better understanding of how SPAs can leverage OAuth.
0. Setup#
I know you're eager, but we need to set up our FusionAuth installation, directory structure, and Node packages. This seriously only takes a few minutes.
FusionAuth#
If you don't already have FusionAuth installed, I recommend the Docker Compose option for the quickest setup:
curl -o docker-compose.yml https://raw.githubusercontent.com/FusionAuth/fusionauth-containers/main/docker/fusionauth/docker-compose.yml
curl -o .env https://raw.githubusercontent.com/FusionAuth/fusionauth-containers/main/docker/fusionauth/.env
docker compose up
(Check out the Download FusionAuth page for other installation options.)
Once FusionAuth is running (by default at localhost:9011), create a new Application. The only configurations you need to change are Authorized redirect URLs and Logout URL on the OAuth tab. These are basically links used by FusionAuth during the only two times we redirect off our app entirely: login and logout. After a user logs in, FusionAuth will redirect them back to our app on one of the Authorized Redirect URLs. After a user logs out, FusionAuth will redirect them to the Logout URL.
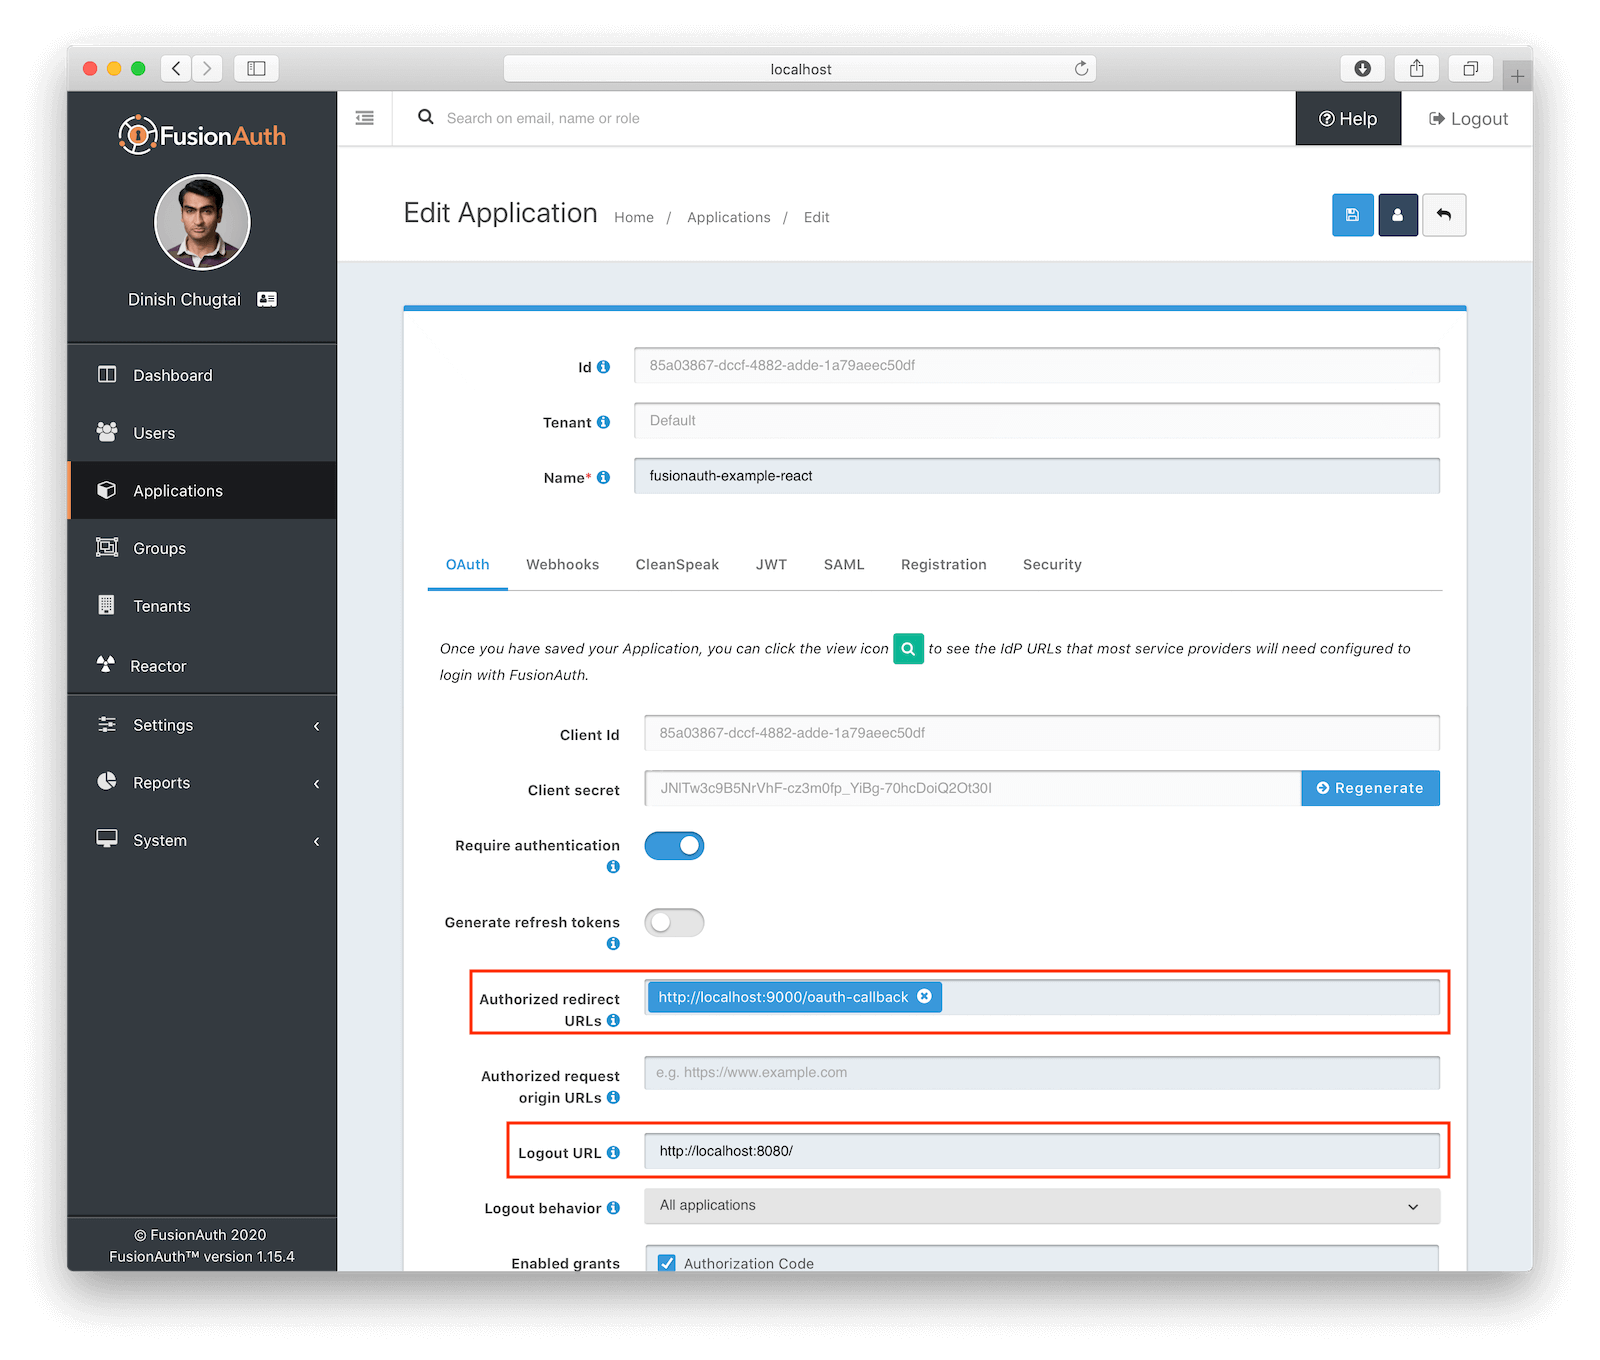
We'll talk later about why we use these particular URLs. For now, enter http://localhost:9000/oauth-callback for the Authorized Redirect URL (a point on our Express server) and http://localhost:8080 for the Logout URL (the only endpoint on our single page React client). Click the blue Save button in the top-right to finish the configuration.
A login feature isn't very useful with zero users. It's possible to register users from your app or using FusionAuth's self-service registration feature, but we'll manually add a user for this example. Select Users from the menu. You should see your own account; it's already registered to FusionAuth, which is why you can use it to log into the admin panel.
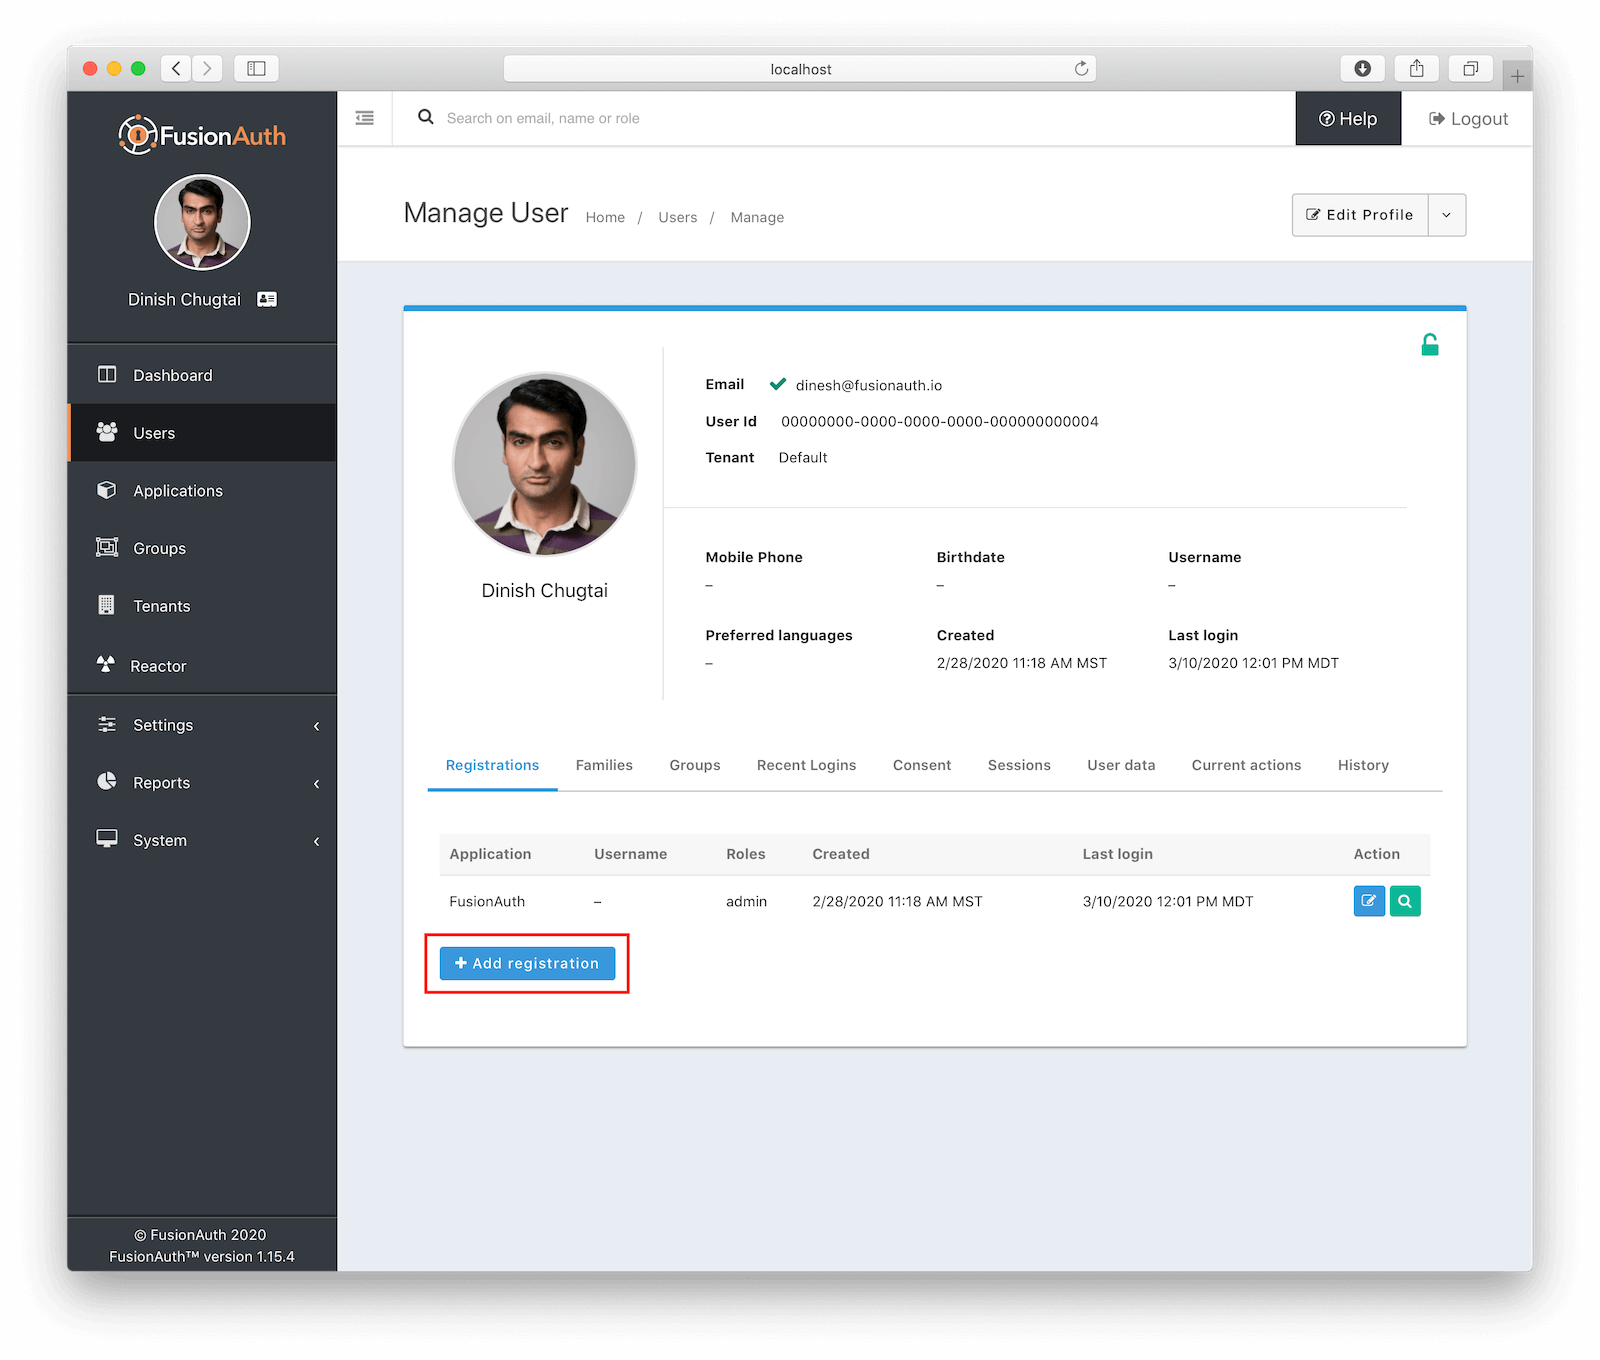
Select Manage and go to the Registrations tab. Click on Add Registration , pick your new application, and then Save to register yourself.
FusionAuth configuration: DONE.
Leave this tab open, though; we'll be copy/pasting some key values out of it in a minute.
Directory Structure#
The last step before digging into some JavaScript is creating the skeleton of our Express server and React client. These will be completely separate Node apps and they will communicate over HTTP using standard browser requests and API calls via AJAX.
You can choose to organize and name your files however you see fit. Just keep in mind that this article will probably be easier to follow if you follow my setup.
My project looks like this:
fusionauth-example-react
├─client
├─server
└─config.jsclientis the directory for the React clientserveris the directory for the Express serverconfig.jsis where we'll store constants needed by bothclientandserver
React#
A popular way to create a new React app is the creatively named create-react-app. This basically handles everything for you and drops in plenty of boilerplate. If you use this tool, run it from the fusionauth-example-react root folder, because it creates its own directory.
npx create-react-app clientIf you don't want the bloat, or if you're just stubborn and like to do everything yourself, I recommend the awesome Create React Project without create-react-app by dev.to user Vishang.
Express#
Our server will use Express. If you haven't used it before, it's a super common Node framework that makes our lives a lot easier. I think a lot of devs who say they work in Node actually mean they work in Express.
Install it like this:
cd server
npm init -y
npm install cors express express-session request
Wait, what are those other things you just installed?
corslets us make cross-origin requests without annoying errors telling us we're not allowed toexpress-sessionhelps us save data in a server-side sessionrequestmakes formatting HTTP requests totally painless (and neatly organized)
It's hard-mode without these packages, but you do you.
Config#
Finally, we need some constants across both Node apps:
module.exports = {
  // OAuth info (copied from the FusionAuth admin panel)
  clientID: '85a03867-dccf-4882-adde-1a79aeec50df',
  clientSecret: 'JNlTw3c9B5NrVhF-cz3m0fp_YiBg-70hcDoiQ2Ot30I',
  redirectURI: 'http://localhost:9000/oauth-callback',
  applicationID: '85a03867-dccf-4882-adde-1a79aeec50df',

  // our FusionAuth api key
  apiKey: 'o9WngMh2AAp3zH7gvMYtML9sGG31A9xVY1bi3Oui-_Y',

  // ports
  clientPort: 8080,
  serverPort: 9000,
  fusionAuthPort: 9011
};
File: config.js
Storing configuration this way saves us from a lot of CMD-F pain when changing things, especially if we're going to re-use this example as the base of a new single-page app.
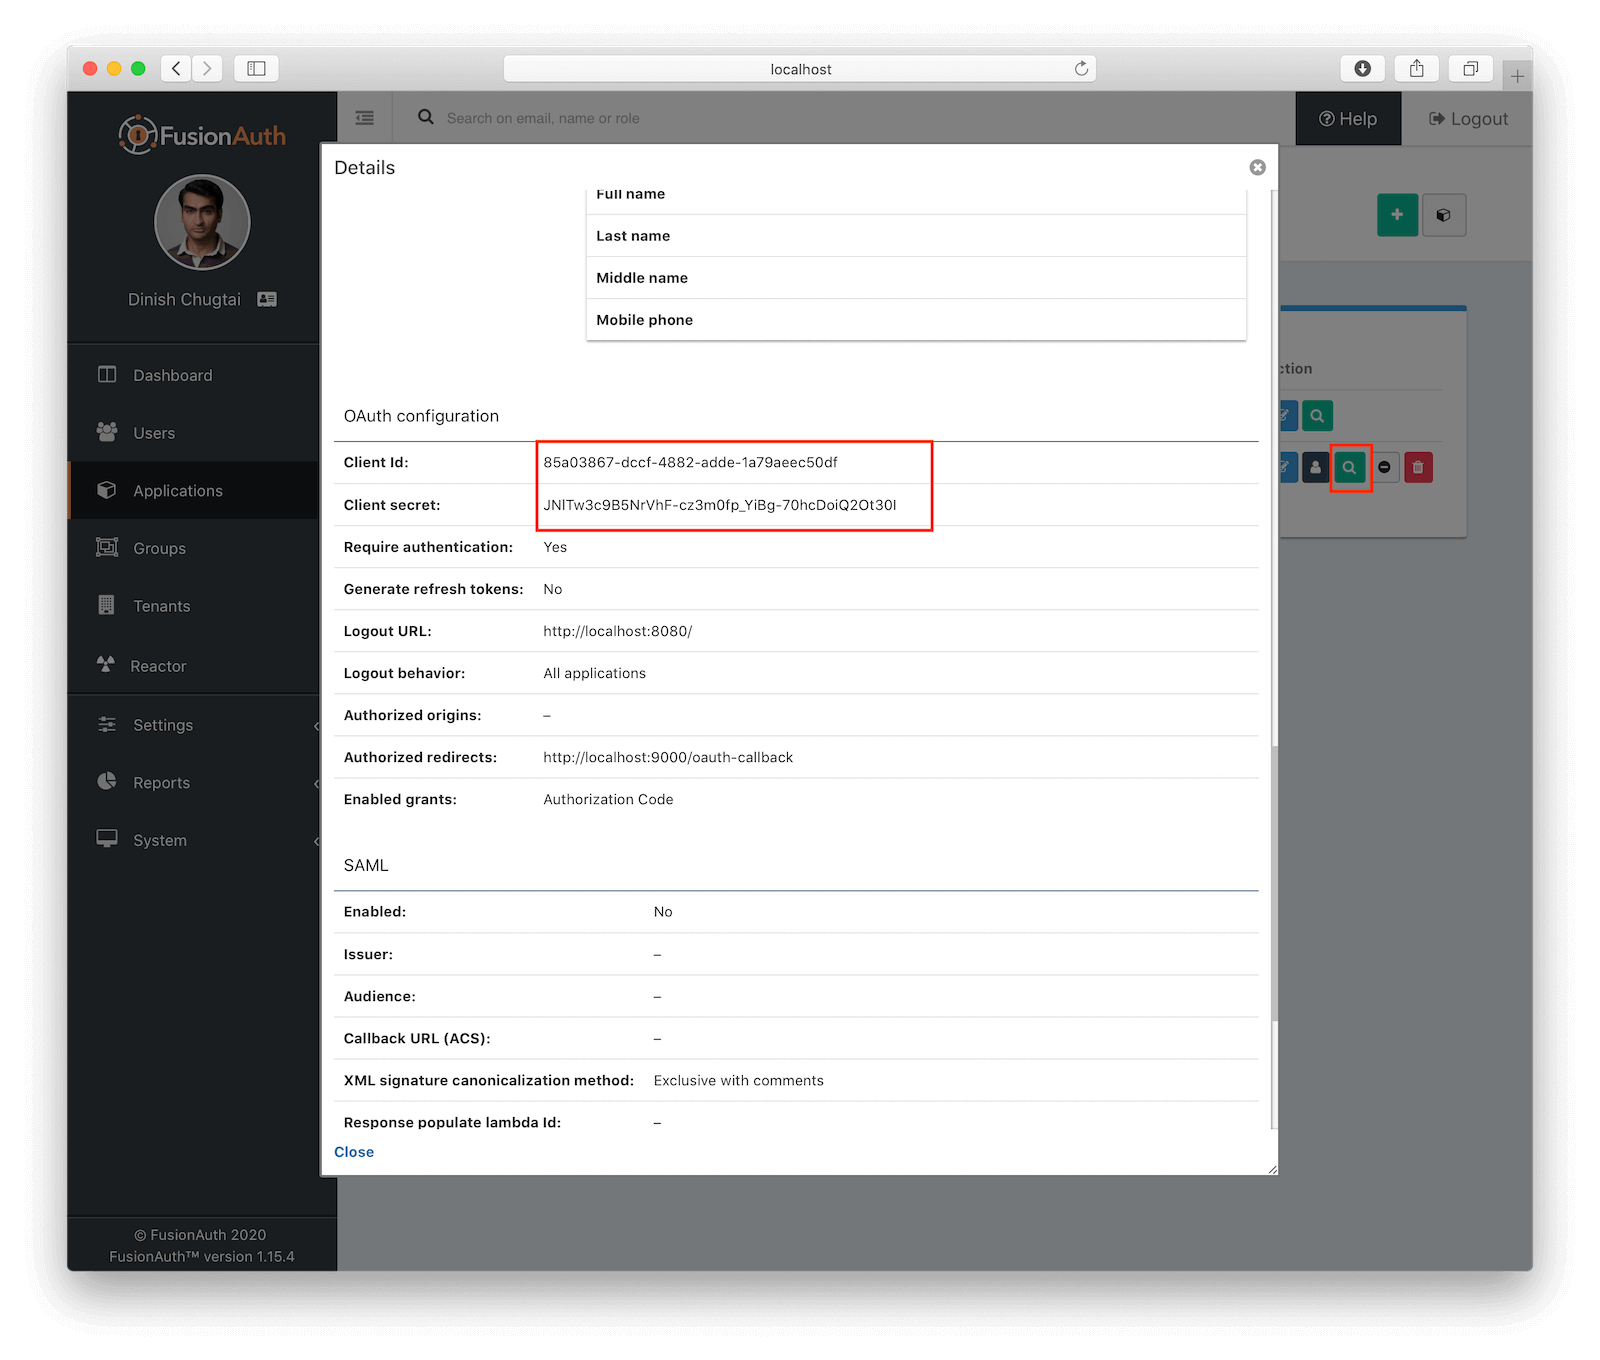
The OAuth and FusionAuth configuration above will not match your application. I copied it out of my FusionAuth admin panel. This is the only code in the whole article you can't just copy/paste, seriously. The best place to find your values is this View button in the Applications page:
(Also, if you do want to copy/paste everything, just clone the GitHub repo with everything already in it. You'll still have to change this config file, though. No way around that).
One thing we don't cover here is creating an API key in FusionAuth and copying it over to our config.js file. This process is simple and you can read our API Authentication documentation to learn more.
Alright, we're ready to start coding! You can keep FusionAuth and React running, but you'll need to restart Node/Express every time you make a change.
1. Working Between React and Express#
The first step to getting our application working is to setup the communication between our React front-end and our Node/Express backend. The best way to start is to set up our React front-end.
Changing Content for the Logged-In User#
We'll start with a pretty standard React app:
client
└─app
  └─index.js*
import React from 'react';
import ReactDOM from 'react-dom';
import './index.css';
const config = require('../../config');
class App extends React.Component {
constructor(props) {
super(props);
this.state = {
};
}
render() {
return (
<div id='App'>
<header>
<h1>FusionAuth Example: React</h1>
</header>
</div>
);
}
}
ReactDOM.render(<App/>, document.querySelector('#Container'));
File: client/index.js
If you need a refresher on React basics, check out the official docs.
Load up localhost:8080 to make sure React is working as expected.
Now, we're going to want to show different things based on whether or not a user is logged in. For example, a greeting that says Welcome, dinesh@fusionauth.io is only going to make sense if the user dinesh@fusionauth.io is logged in.
In a bit, we're going to get information about the current user (like their email address) by sending a request to our Express server. For now, we'll just pretend a user is logged in and set the user's email address in state.
client
└─app
  ├─components
  │ └─Greeting.js*
  └─index.js
// ...
import Greeting from './components/Greeting.js';
class App extends React.Component {
constructor(props) {
super(props);
this.state = {
email: 'dinesh@fusionauth.io'
};
}
render() {
return (
<div id='App'>
<header>
<h1>FusionAuth Example: React</h1>
<Greeting email={this.state.email}/>
</header>
</div>
);
}
}
// ...
File: client/index.js
The logic in <Greeting> doesn't need to be complicated: Is there an email address? Then there's a user logged in. Otherwise, there's not.
import React from 'react';

export default class Greeting extends React.Component {
  constructor(props) {
    super(props);
  }

  render() {
    let message = (this.props.email)
      ? `Hi, ${this.props.email}!`
      : "You're not logged in.";

    return (
      <span>{message}</span>
    );
  }
}
File: client/components/greeting.js
Try it out. Load up localhost:8080 and you should see Welcome, dinesh@fusionauth.io (or whatever email address you typed in state). Comment out the email object to simulate logging out:
this.state = {
  // email: 'dinesh@fusionauth.io'
};
File: client/index.js
Next, we'll set state based on a call to our server.
Getting User Info From the Express Server#
To make a call to a server, we first need to get our server up and running.
The heart of an Express app is your index.js. The React side of our application will also have an index.js file, so keep that in mind as you'll likely share my headache of constantly opening the wrong one.
server
└─index.js*
The following Express index is pretty standard, so I'm not going to go too deep on how it works; the official Express docs do a better job of explaining it than I would, anyway.
We'll initialize app, set up a /user route (for our React client to get user info from), and start the server on localhost:9000:
const express = require('express');
const config = require('../config');

// configure Express app and install the JSON middleware for parsing JSON bodies
const app = express();
app.use(express.json());

// use routes
app.use('/user', require('./routes/user'));

// start server
app.listen(config.serverPort, () => console.log(`FusionAuth example app listening on port ${config.serverPort}.`));
File: server/index.js
When our React client sends a request to localhost:9000/user, it will get a response based on whatever we send back in server/routes/user.js. We can move the pretend user email from React's state to the server code, like this:
const express = require('express');
const router = express.Router();
const config = require('../../config');

router.get('/', (req, res) => {
  res.send({
    user: {
      email: 'dinesh@fusionauth.io'
    }
  });
});

module.exports = router;
File: server/routes/user.js
Note that I've wrapped email in a user object. That's because the User object is ultimately what we'll get back from FusionAuth when a user actually logs in. The email property is one of the User's included values (also known as claims), so we'll be good to go if we set it up like this ahead of time.
Of course, we'll need to tweak the React app:
// ...

constructor(props) {
  super(props);
  this.state = {
    body: {} // this is the body from /user
  };
}

render() {
  return (
    <div id='App'>
      <header>
        <h1>FusionAuth Example: React</h1>
        <Greeting body={this.state.body}/>
      </header>
    </div>
  );
}

// ...
File: client/index.js
// ...

let message = (this.props.body.user)
  ? `Hi, ${this.props.body.user.email}!`
  : "You're not logged in.";

// ...
File: client/components/greeting.js
Note that we're now using the existence of user to determine whether or not a user is logged in. We can use this for every future component: send body, check for user, use the values inside user.
Remember, a real User object returned from FusionAuth will have more properties than just an email address. It will look something like this:
{
  "active": true,
  "applicationId": "5f651593-cc27-4f81-a6f8-7a9a68300cf6",
  "aud": "5f651593-cc27-4f81-a6f8-7a9a68300cf6",
  "authenticationType": "PASSWORD",
  "email": "dinesh@fusionauth.io",
  "email_verified": true,
  "exp": 1583357477,
  "iat": 1583353877,
  "iss": "acme.com",
  "roles": [],
  "sub": "00000000-0000-0000-0000-000000000004"
}
In the next section, we'll replace our fake user with a real one. Before we do that, let's set up our React app to fetch the user from /user whenever the page loads (or "when the component mounts" in React lingo):
// ...

componentDidMount() {
  fetch(`http://localhost:${config.serverPort}/user`, {
    credentials: 'include' // fetch won't send cookies unless you set credentials
  })
  .then(response => response.json())
  .then(response => this.setState(
    {
      body: response
    })
  );
}

// ...
File: client/app/index.js
One thing to note about our code above is that we need to specify the credentials: 'include' option to the fetch function. This is required since eventually we will be hooking up to a server-side session and without this setting the browser won't send over the cookie that Express uses for server-side sessions.
Now you can try the React client again. Depending on your setup, you might have gotten a CORS error; check the browser console. If you want to know why this happens, check out the helpful MDN doc on Cross-Origin Resource Sharing. Fortunately, we thought of this, and installed the cors package. Activate its power like this:
const express = require('express');
const cors = require('cors');
const config = require('../config');

// configure Express app and install the JSON middleware for parsing JSON bodies
const app = express();
app.use(express.json());

// configure CORS
app.use(cors({
  origin: true,
  credentials: true
}));

// ...
File: server/index.js
Boom. Goodbye, annoying CORS error.
The React page should now look like you are "logged in" since our Express server is sending back our fake User object. You can simulate logging out by commenting out the user in the Express code like this:
res.send({
  // user: {
  //   email: 'dinesh@fusionauth.io'
  // }
});
File: server/routes/user.js
Next, we'll replace that fake user with a real one from FusionAuth. Our React client will indirectly retrieve the information from FusionAuth by using Express as a middleman.
2. Logging In#
User sign-in is one of the key features of FusionAuth. (Isn't that why you're following this example?) Let's see how it works.
Redirecting to FusionAuth#
First thing's first: we need a log in button in the React client:
client
└─app
  ├─components
  │ ├─Greeting.js
  │ └─LogInOut.js*
  └─index.js
Just like we did in Greeting, we'll use this.props.body.user to determine whether or not the user is logged in. We can use this to make a link to either localhost:9000/login or localhost:9000/logout, the former of which we'll set up in just a second.
// ...

import LogInOut from './components/LogInOut.js';

// ...


<header>
  <h1>FusionAuth Example: React</h1>
  <Greeting body={this.state.body}/>
  <LogInOut body={this.state.body} uri={`http://localhost:${config.serverPort}`}/>
</header>

// ...
File: client/index.js
import React from 'react';

export default class LogInOut extends React.Component {
  constructor(props) {
    super(props);
  }

  render() {
    let message = (this.props.body.user)
      ? 'sign out'
      : 'sign in';

    let path = (this.props.body.user)
      ? '/logout'
      : '/login';

    return (
      <a href={this.props.uri + path}>{message}</a>
    );
  }
}
File: client/app/components/LogInOut.js
Why am I using a normal <a> link here instead of a fetch request, like we did for /user? In order to leverage FusionAuth's OAuth system with the Authorization Code Grant, we have to redirect the browser over to FusionAuth. While you might want to avoid redirecting away from the React app, this workflow adds a lot of security and also provides an ideal separation of concerns. Plus, you can style the FusionAuth login page to look like your application, which means the user won't even realize they've been redirected.
We could write a link directly to FusionAuth, but I think it's cleaner to go through the Express app, because the FusionAuth OAuth workflow requires a somewhat complex URL to start. Remember the structure we detailed earlier:
React client <-> Express server <-> FusionAuth
(mostly UI)      (our code)         (pre-made auth)
We'll use this principle and add in another Route to our Express application to start the login process and redirect the browser over to FusionAuth. We'll add our new login route to handle this:
server
├─routes
│ ├─login.js*
│ └─user.js
└─index.js
Whenever we add a new route, we need to let server/index.js know, just like we did with /user:
// ...

// use routes
app.use('/user', require('./routes/user'));
app.use('/login', require('./routes/login'));

// ...
File: server/index.js
When a user goes to /login, we actually want to redirect them off of the Express sever and onto FusionAuth's login page. Remember, we installed FusionAuth so that we don't have to handle the login process at all!
const express = require('express');
const router = express.Router();
const config = require('../../config');

router.get('/', (req, res) => {
  res.redirect(`http://localhost:${config.fusionAuthPort}/oauth2/authorize?client_id=${config.clientID}&redirect_uri=${config.redirectURI}&response_type=code`);
});

module.exports = router;
File: server/routes/login.js
If that URI looks a bit messy, it's because of the additional query parameters, which FusionAuth needs to process our request:
client_idtells FusionAuth which app is making the requestredirect_uritells FusionAuth where to redirect the user to after loginresponse_typetells FusionAuth which OAuth flow we're using (Authorization Code in this example)
This is all standard OAuth flow but it is a little verbose.
Try navigating to localhost:9000/login. You should see a FusionAuth login form:
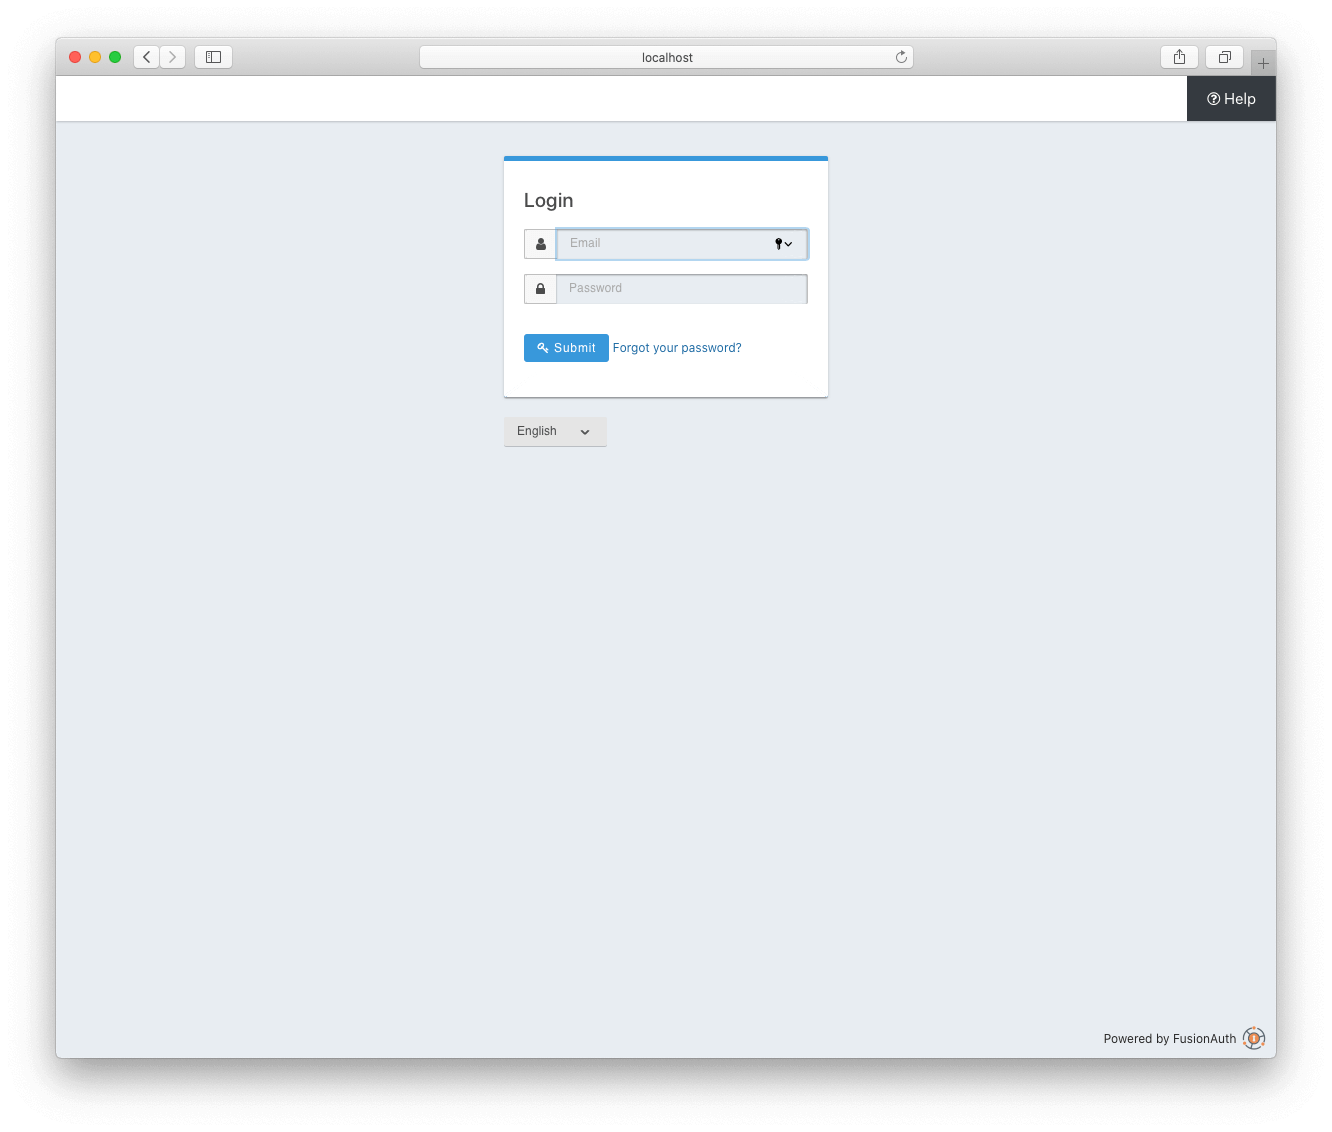
When you successfully authenticate, you'll just see Cannot GET /oauth-callback, because /oauth-callback doesn't exist, yet. Remember, we added that as an Authorized redirect URL in the FusionAuth admin panel and as our redirectURI in config.js. This is the location that where FusionAuth redirects the browser back to after authentication in order to complete the OAuth workflow.
Code Exchange#
Alright, time to add the /oauth-callback route:
server
├─routes
│ ├─login.js
│ ├─oauth-callback.js*
│ └─user.js
└─index.js
// ...
// use routes
app.use('/user', require('./routes/user'));
app.use('/login', require('./routes/login'));
app.use('/oauth-callback', require('./routes/oauth-callback'));
// ...
File: server/index.js
/oauth-callback will receive an Authorization Code from FusionAuth as a URL parameter during the redirect. If you inspect your browser's location, you'll see that there's a code parameter in the URL:
http://localhost:9000/oauth-callback?
  code=14CJG_fDl31E5U-1VHOBedsLESZQr3sgt63BcVrGoTU&
  locale=en_US&
  userState=Authenticated
An Authorization Code isn't enough to access the user's resources, though. For that, we need an Access Token. Again, this is standard OAuth, not something unique to FusionAuth. This step is called the Code Exchange, because we send the code to FusionAuth's /token endpoint and receive an access_token in exchange.
The exchange takes the form of a POST request:
const express = require('express');
const router = express.Router();
const request = require('request');
const config = require('../../config');

router.get('/', (req, res) => {
  request(
    // POST request to /token endpoint
    {
      method: 'POST',
      uri: `http://localhost:${config.fusionAuthPort}/oauth2/token`,
      form: {
        'client_id': config.clientID,
        'client_secret': config.clientSecret,
        'code': req.query.code,
        'grant_type': 'authorization_code',
        'redirect_uri': config.redirectURI
      }
    },

    // callback
    (error, response, body) => {
      // save token to session
      req.session.token = JSON.parse(body).access_token;

      // redirect to the React app
      res.redirect(`http://localhost:${config.clientPort}`);
    }
  );
});

module.exports = router;
File: server/routes/oauth-callback.js
The most important parts of the request are uri (which is where the request will get sent to) and form (which is the set of parameters FusionAuth expects). The OAuth token endpoint only access form encoded data, which is why we are using the form option in our request call. You can check the FusionAuth docs to see what every endpoint expects to be sent, but here's the gist of this request:
client_idandclient_secretidentify and authenticate our app, like a username and passwordcodeis the Authorization Code we got from FusionAuthgrant_typetells FusionAuth we're using the Authorization Code Flowredirect_uriin this case is the URL we're making the request from (http://localhost:9000/oauth-callback)
The callback lambda is invoked after FusionAuth receives our request and responds. We're expecting to receive an access_token, which will come through in that body argument. We'll save the access_token to session storage and redirect back to the React client.
Remember that request-followed-by-callback structure, because we'll be using it again.
We're almost done! The only thing left is to set up the server-side session storage for our Access Token. In order to do this, we need to configure express-session. The following settings work great for local testing, but you'll probably want to check the express-session docs before moving to production.
// ...

// configure Express app and install the JSON middleware for parsing JSON bodies
const app = express();
app.use(express.json());

// configure sessions
app.use(session(
  {
    secret: '1234567890',
    resave: false,
    saveUninitialized: false,
    cookie: {
      secure: 'auto',
      httpOnly: true,
      maxAge: 3600000
    }
  })
);

// ...
File: server/index.js
Introspect and Registration#
Remember that our React app looks for a user in /user. The Access Token isn't human-readable, but we can pass it to FusionAuth's /introspect endpoint to get a User Object (JSON like we showed earlier) from it. We can get additional user-specific info from /registration as well.
If there's a token in session storage, we'll call /introspect to get info out of that token. Part of the info returned from /introspect is the boolean property active, which is true until the Access Token expires (you can configure how long Access Tokens live in the FusionAuth admin panel). If the token is still good, we'll call /registration and return the JSON from both requests.
If there's no token in session storage, or if the token has expired, we'll return an empty object. Our React components use the existence of this.props.body.user to determine whether a user is logged in, so an empty body means there's no active user.
Below is our new and improved /user; it's a lot like /oauth-callback, but with a layer of nesting. It looks like a lot, but we'll break it up piece-by-piece.
const express = require('express');
const router = express.Router();
const request = require('request');
const config = require('../../config');

router.get('/', (req, res) => {
  // token in session -> get user data and send it back to the react app
  if (req.session.token) {
    request(
      // POST request to /introspect endpoint
      {
        method: 'POST',
        uri: `http://localhost:${config.fusionAuthPort}/oauth2/introspect`,
        form: {
          'client_id': config.clientID,
          'token': req.session.token
        }
      },

      // callback
      (error, response, body) => {
        let introspectResponse = JSON.parse(body);

        // valid token -> get more user data and send it back to the react app
        if (introspectResponse.active) {
          request(
            // GET request to /registration endpoint
            {
              method: 'GET',
              uri: `http://localhost:${config.fusionAuthPort}/api/user/registration/${introspectResponse.sub}/${config.applicationID}`,
              json: true,
              headers: {
                'Authorization': config.apiKey
              }
            },

            // callback
            (error, response, body) => {
              res.send(
                {
                  token: {
                    ...introspectResponse,
                  },
                  ...body
                }
              );
            }
          );
        }

        // expired token -> send nothing
        else {
          req.session.destroy();
          res.send({});
        }
      }
    );
  }

  // no token -> send nothing
  else {
    res.send({});
  }
});

module.exports = router;
File: server/routes/user.js
First, the POST request to /introspect: this endpoint requires our Client ID and, of course, the Access Token we want to decode. Just like the token endpoint, this endpoint access form encoded data, so we are using the form option.
In the callback from that request, we'll parse the body into usable JSON and check that active value. If it's good, we'll go ahead and make the /registration request, which requires a User ID ("subscriber" or sub in OAuth jargon) and our Client ID—we need both, because one user can have different data in each FusionAuth application.
Note that this step doesn't actually require an Access Token. The data from FusionAuth's /api/user/registration API can be retrieved for any user, including one that isn't logged in. You could use this endpoint to show info on a user's profile or other public page. This API in FusionAuth is not part of the OAuth specification but we added it to our example to show a more complete user data interaction. Also, this API requires that you pass in a FusionAuth API key in the Authorization header. Our example is pulling the FusionAuth API key from our global config.js file.
Finally, in the registration callback, we'll parse the body returned from /registration and res.send everything back to the React client.
Now, go through the login process, and you should see "Welcome, [your email address]!".
That's login sorted. The next thing you'll probably want to tackle is logout.
3. Logging Out#
Just like /login, we'll create a /logout route to make logging out easily accessible anywhere in our React client:
server
├─routes
│ ├─login.js
│ ├─logout.js*
│ ├─oauth-callback.js
│ └─user.js
└─index.js
// ...
// use routes
app.use('/user', require('./routes/user'));
app.use('/login', require('./routes/login'));
app.use('/oauth-callback', require('./routes/oauth-callback'));
app.use('/logout', require('./routes/logout'));
// ...
File: server/index.js
Our /logout route will wipe the user's saved login by deleting:
- A browser cookie that connects the browser to the server-side session
- Our Express server-side session (and the
tokenwe store there) - FusionAuth's OAuth session for that user
The first two are accomplished by calling the function req.session.destroy(). The last is done by redirecting the user to FusionAuth's /ouath2/logout endpoint.
const express = require('express');
const router = express.Router();
const config = require('../../config');

router.get('/', (req, res) => {
  // delete the session
  req.session.destroy();

  // end FusionAuth session
  res.redirect(`http://localhost:${config.fusionAuthPort}/oauth2/logout?client_id=${config.clientID}`);
});

module.exports = router;
File: server/routes/logout.js
After cleaning up, FusionAuth will redirect to the React app, because we configured the main entry point of our React app as the Logout URL in FusionAuth.
Try it out. You can also watch cookies in your browser's developer tools to see it working.
Next, we'll show how you can modify a user's registration data from your app (the same data we grab from /registration).
4. Changing User Info#
This last section is not technically part of the OAuth specification or part of the login process. However, I want to illustrate how simple it is to manage user data in FusionAuth.
FusionAuth allows us to modify everything about a user's registration (such as their username and assigned roles) by making requests to the /api/user/registration API. In order to connect our app to FusionAuth's API, we can use a /registration endpoint in our Express server that is similar to our /user endpoint. The only difference is that we'll use PUT or PATCH to update information instead of retrieve information from FusionAuth.
Setting User Data from Express#
The last route we'll make for this example is /set-user-data:
server
├─routes
│ ├─login.js
│ ├─logout.js
│ ├─oauth-callback.js
│ ├─set-user-data.js*
│ └─user.js
└─index.js
// ...
// use routes
app.use('/user', require('./routes/user'));
app.use('/login', require('./routes/login'));
app.use('/oauth-callback', require('./routes/oauth-callback'));
app.use('/logout', require('./routes/logout'));
app.use('/set-user-data', require('./routes/set-user-data'));
// ...
File: server/index.js
In this route, we'll send the registration JSON object back to FusionAuth. We'll use PATCH instead of PUT, which allows us to send only the parts we want to update, instead of the entire registration object.
const express = require('express');
const router = express.Router();
const request = require('request');
const config = require('../../config');

router.post('/', (req, res) => {
  // fetch the user using the token in the session so that we have their ID
  request(
    // POST request to /introspect endpoint
    {
      method: 'POST',
      uri: `http://localhost:${config.fusionAuthPort}/oauth2/introspect`,
      form: {
        'client_id': config.clientID,
        'token': req.session.token
      }
    },

    // callback
    (error, response, body) => {
      let introspectResponse = JSON.parse(body);

      request(
        // PATCH request to /registration endpoint
        {
          method: 'PATCH',
          uri: `http://localhost:${config.fusionAuthPort}/api/user/registration/${introspectResponse.sub}/${config.applicationID}`,
          headers: {
            'Authorization': config.apiKey
          },
          json: true,
          body: {
            'registration': {
              'data': req.body
            }
          }
        }
      );
    }
  );
});

module.exports = router;
File: server/routes/set-user-data.js
In order to ensure that we are updating the user that is currently logged in, we extract the token from the Express session and use it to lookup the User object from FusionAuth. This code is very similar to the code in our /user route. Once the call to the /oauth2/introspect endpoint in FusionAuth returns, we can call the /api/user/registration API to update the user's registration data.
The data is stored on the registration object under the property registration.data, which is an object FusionAuth provides for storing arbitrary data related to a user's registration in an application. In our case, we are sending the user data from our React app to our Express server via JSON in the body of a POST HTTP message. You'll see that this code is passing the req.body through to FusionAuth as the registration.data property.
Setting User Data from React#
To connect our new Express route to our React app, we'll add a <textarea> to the React client for editing registration.data.userData. This component will need a method that allows it to setState within App. This is where body (and therefore registration) is stored in our React client. This means we'll need add the method to App and bind it before passing it down as a prop to the <textarea> component.
// ...

constructor(props) {
  // ...

  this.handleTextInput = this.handleTextInput.bind(this);
}

handleTextInput(event) {
  // update this.state.body.registration.data.userData
  // save the change in FusionAuth
}

render() {
  return (
    <div id='App'>
      <header>
        <h1>FusionAuth Example: React</h1>
        <Greeting body={this.state.body}/>
        <LogInOut body={this.state.body} uri={`http://localhost:${config.serverPort}`}/>
      </header>
      <main>
        <UserData body={this.state.body} handleTextInput={this.handleTextInput}/>
      </main>
    </div>
  );
}

// ...
File: client/app/index.js
The method itself is simple: event.target.value will be the contents of the <textarea>. We apply that value to registration.data and use setState to update the value in React. We also have to update it on the FusionAuth side, so we can retrieve it with /user, hence our Express route at /set-user-data.
// ...

handleTextInput(event) {
    // update this.state.body.registration.data.userData
    let body = this.state.body;
    body.registration.data = {userData: event.target.value};
    this.setState(
      {
        body: body
      });

    // save the change in FusionAuth
    fetch(`http://localhost:${config.serverPort}/set-user-data`,
          {
            credentials: 'include',
            method: 'POST',
            headers: {
              'Content-Type': 'application/json'
            },
            body: JSON.stringify(
              {
                userData: event.target.value
              })
          });
}

// ...
File: client/app/index.js
The last thing to do is add the UserData component, which will be a <textarea>. We can lock it using the readonly attribute when there's no user logged in, and we can apply our handleTextInput method to the onChange event.
client
└─app
  ├─components
  │ ├─Greeting.js
  │ ├─LogInOut.js
  │ └─UserData.js*
  └─index.js
import React from 'react';
export default class LogInOut extends React.Component {
constructor(props) {
super(props);
}
render() {
// placeholder text for the textarea
let placeholder = 'Anything you type in here will be saved to your FusionAuth user data.';
// textarea (locked if user not logged in)
let input = (this.props.body.user)
? <textarea placeholder={placeholder} onChange={this.props.handleTextInput}></textarea>
: <textarea placeholder={placeholder} readOnly></textarea>;
// JSX return
return (
<div id='UserData'>
{input}
</div>
);
}
}
File: client/app/components/UserData.js
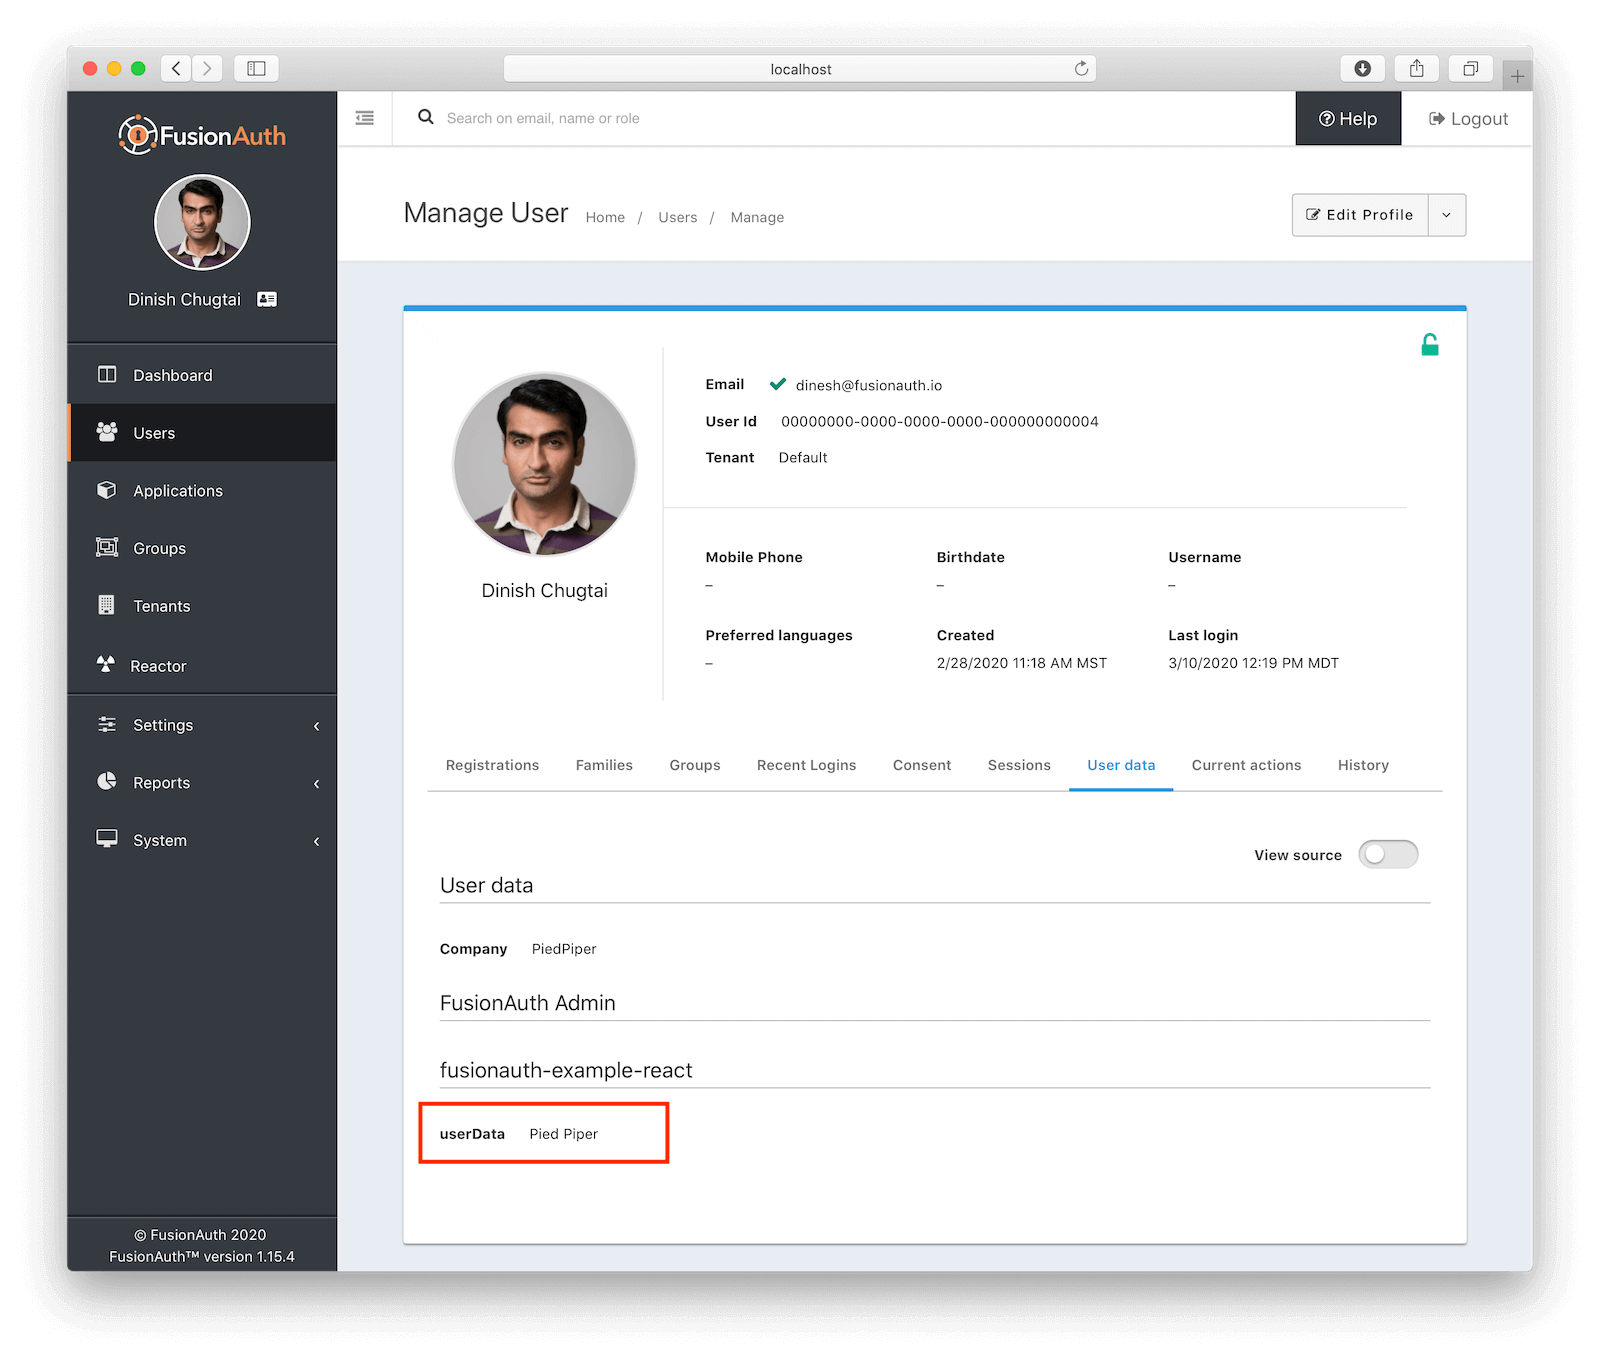
Once everything is hooked up, you can test it out by typing something into the <textarea> in the React app and then verifying that the data is updated in FusionAuth. The user data is displayed in FusionAuth on the Manage page for the user under the User data tab:
However, it's a good idea to set the <textarea>'s defaultValue to the userData. This has two advantages: first, it allows us to inspect userData and confirm that it's maintained; second, it allows the user to edit the userData, rather than overwrite it each time.
// ...

// the user's data.userData (or an empty string if uninitialized)
let userData = (this.props.body.registration && this.props.body.registration.data)
  ? this.props.body.registration.data.userData
  : '';

// textarea (locked if user not logged in)
let input = (this.props.body.user)
  ? <textarea placeholder={placeholder} onChange={this.props.handleTextInput} defaultValue={userData}></textarea>
  : <textarea placeholder={placeholder} readOnly></textarea>;

// ...
File: client/app/components/UserData.js
Type in whatever you want and watch the value change. You can log in and out as much as you want, and FusionAuth will maintain the user's data.
5. What Next?#
Our React app can log in, log out, and modify user data. You might be wondering what's next. Here are a few next steps you can take:
- You'll probably want to let users register from the app itself, instead of manually adding them via the admin panel.
- Maybe you want to change how the FusionAuth login form looks.
- For extra security, you can enable and send two-factor codes.
- You can even let users log in via a third-party, like Facebook or Google.
In all of these cases, remember what you learned from this example:
- Create a new routes in Express
- Make requests to the relevant FusionAuth endpoints (including any parameters listed in the docs) and send data to React with
res.send - Use
fetchto call your Express routes from React, and save the response usingsetState
Check out the FusionAuth APIs for even more options.
Happy coding!