


FusionAuth is a ubiquitous authentication, authorization, and user management solution that can be deployed on any platform and integrated with any programming language. In this tutorial, we're going to demonstrate how to integrate FusionAuth with PHP.
We're going to use the FusionAuth PHP client library to speed up our development time when integrating FusionAuth with our PHP application.
By the end of this tutorial, you will have learned how to create your first functional PHP application with FusionAuth and accomplish various tasks programmatically, such as registering a user, retrieving a user's profile details, and deleting a user.
What we'll cover#
- Installing and setting up FusionAuth
- Installing and setting up Composer
- Using Composer to integrate FusionAuth with PHP
- Registering a user
- Retrieving a user's profile details
- Changing a user's password
- Retrieving a user's login report
- Deleting a user
- Conclusion
What you'll need#
- FusionAuth
- PHP (preferably PHP 7+)
- Packagist and Composer
- PHP development environment
- Web browser
Ready?
Let's start getting our hands dirty…
Installing and setting up FusionAuth#
FusionAuth can be downloaded and installed using several options. For your favorite platform, you can get the installation instructions here.
Next, to set up FusionAuth on your platform and create and API key and an Application, which we'll use in this tutorial, you can follow the instructions on the 5-minute guide here (for this tutorial, there'll be no need to configure the OAuth settings).
After creating an API key and Application, we can move to the next step. Keep in mind that we'll need the Application's ID later in this tutorial.
Installing and setting up Composer#
The FusionAuth PHP client library is accessed from Packagist, which is a popular PHP package repository. Packagist is the main and default repository for Composer, which is a dependency management tool for accelerating the development of PHP projects by allowing developers to integrate third-party libraries without having to manually download and install them.
To download and set up Composer on your favorite platform, you can follow the instructions here.
Using Composer to integrate FusionAuth with PHP#
After installing Composer, navigate to your project's directory on the terminal and run the following command:
composer require fusionauth/fusionauth-clientThe above command will download and install the latest stable version of the FusionAuth PHP client in your project's directory. It also installs the packages that FusionAuth depends on as well as produces an autoload file.
Once the installation process is complete, you'll see a brand new vendor directory, which contains the FusionAuth PHP client library and all the related packages that Composer installed.
In the composer.json file, you'll see the data that Composer requires to run with as well as manage all the installed packages.
Here's the file:
{
  "require": {
    "fusionauth/fusionauth-client": "^1.14"
  }
}
To include the FusionAuth PHP client in our project, let's create an index.php file and use the require_once() statement to specify its path.
Here's the code:
require_once('vendor\fusionauth\fusionauth-client\src\FusionAuth\FusionAuthClient.php'); After using Composer to include the FusionAuth PHP client in our project, let's now see how we can use it to carry out various user actions programmatically.
Registering a user#
When using the FusionAuth API, you can implement user registration in two ways:
- You can create the user then register them for the application in two separate API calls
- You can use a single step process that creates the user and registers them simultaneously
In this tutorial, we'll use method #2 using the user registration in a single POST request.
Here's the PHP code in the index**.php file for registering a new user on a FusionAuth application:
<?php

//including FusionAuth in the project
require_once('vendor\fusionauth\fusionauth-client\src\FusionAuth\FusionAuthClient.php');

//creating the client
$client = new FusionAuth\FusionAuthClient("Z77y_yshOSAIfF3sd370Ns6m4VkKcAOqFpyyzSGfnF4", "http://localhost:9011");

//specifying user's registration data
$request = array(
  'registration' =>
    array(
      'applicationId' => '3c219e58-ed0e-4b18-ad48-f4f92793ae32',
      'data' =>
        array(
          'displayName' => 'Peter',
          'favoriteSports' =>
            array(
              0 => 'Cricket',
              1 => 'Baseball',
            ),
        ),
      'preferredLanguages' =>
        array(
          0 => 'en',
          1 => 'fr',
        ),
      'timezone' => 'America/Chicago',
      'username' => 'Peter_PHP',
      'usernameStatus' => 'ACTIVE',
    ),
  'sendSetPasswordEmail' => false,
  'skipVerification' => false,
  'user' =>
    array(
      'password' => 'password12345',
      'birthDate' => '1986-04-17',
      'data' =>
        array(
          'displayName' => 'Peter',
          'favoriteColors' =>
            array(
              0 => 'Yellow',
              1 => 'Violet',
            ),
        ),
      'email' => 'php@fusionauth.io',
      'firstName' => 'Peter',
      'fullName' => 'Peter Barack James',
      'lastName' => 'James',
      'middleName' => 'Barack',
      'mobilePhone' => '973-535-1234',
      'passwordChangeRequired' => false,
      'preferredLanguages' =>
        array(
          0 => 'en',
          1 => 'fr',
        ),
      'timezone' => 'America/Denver',
      'twoFactorEnabled' => false,
      'usernameStatus' => 'ACTIVE',
      'username' => 'Peter_PHP',
    ),
);

//posting the registration request data
$result = $client->register(null, $request);

//handling any errors

if (!$result->wasSuccessful()) {
  $error = json_encode($result->errorResponse);
  echo $error;
}
?>
As you can see in the code above, we started by including FusionAuth in the project then creating the client by providing the API key and specifying the web address that points to our running FusionAuth application. Remember that you can provide your own unique values for these parameters.
Next, we provided a PHP array that contains data about the user we need registered. Notice that we specified the Application's ID, which we retrieved when setting up FusionAuth. The application ID is a mandatory parameter when registering a user to an application. Most of the other parameters are optional.
Then, to carry out full registration in a single request, we called the register() function that comes with the FusionAuth PHP client library. Notice that to enable FusionAuth to generate a random UUID for this new user, we passed null as the first parameter in the register() function.
Furthermore, since the client handles the JSON encoding automatically, there is no need to use the json_encode() function to convert the array of registration request data into JSON formatted string. Converting the request data into JSON representation is important for posting the information in the required format to the FusionAuth application.
Lastly, we incorporated error handling to let us see any errors encountered during the user registration process.
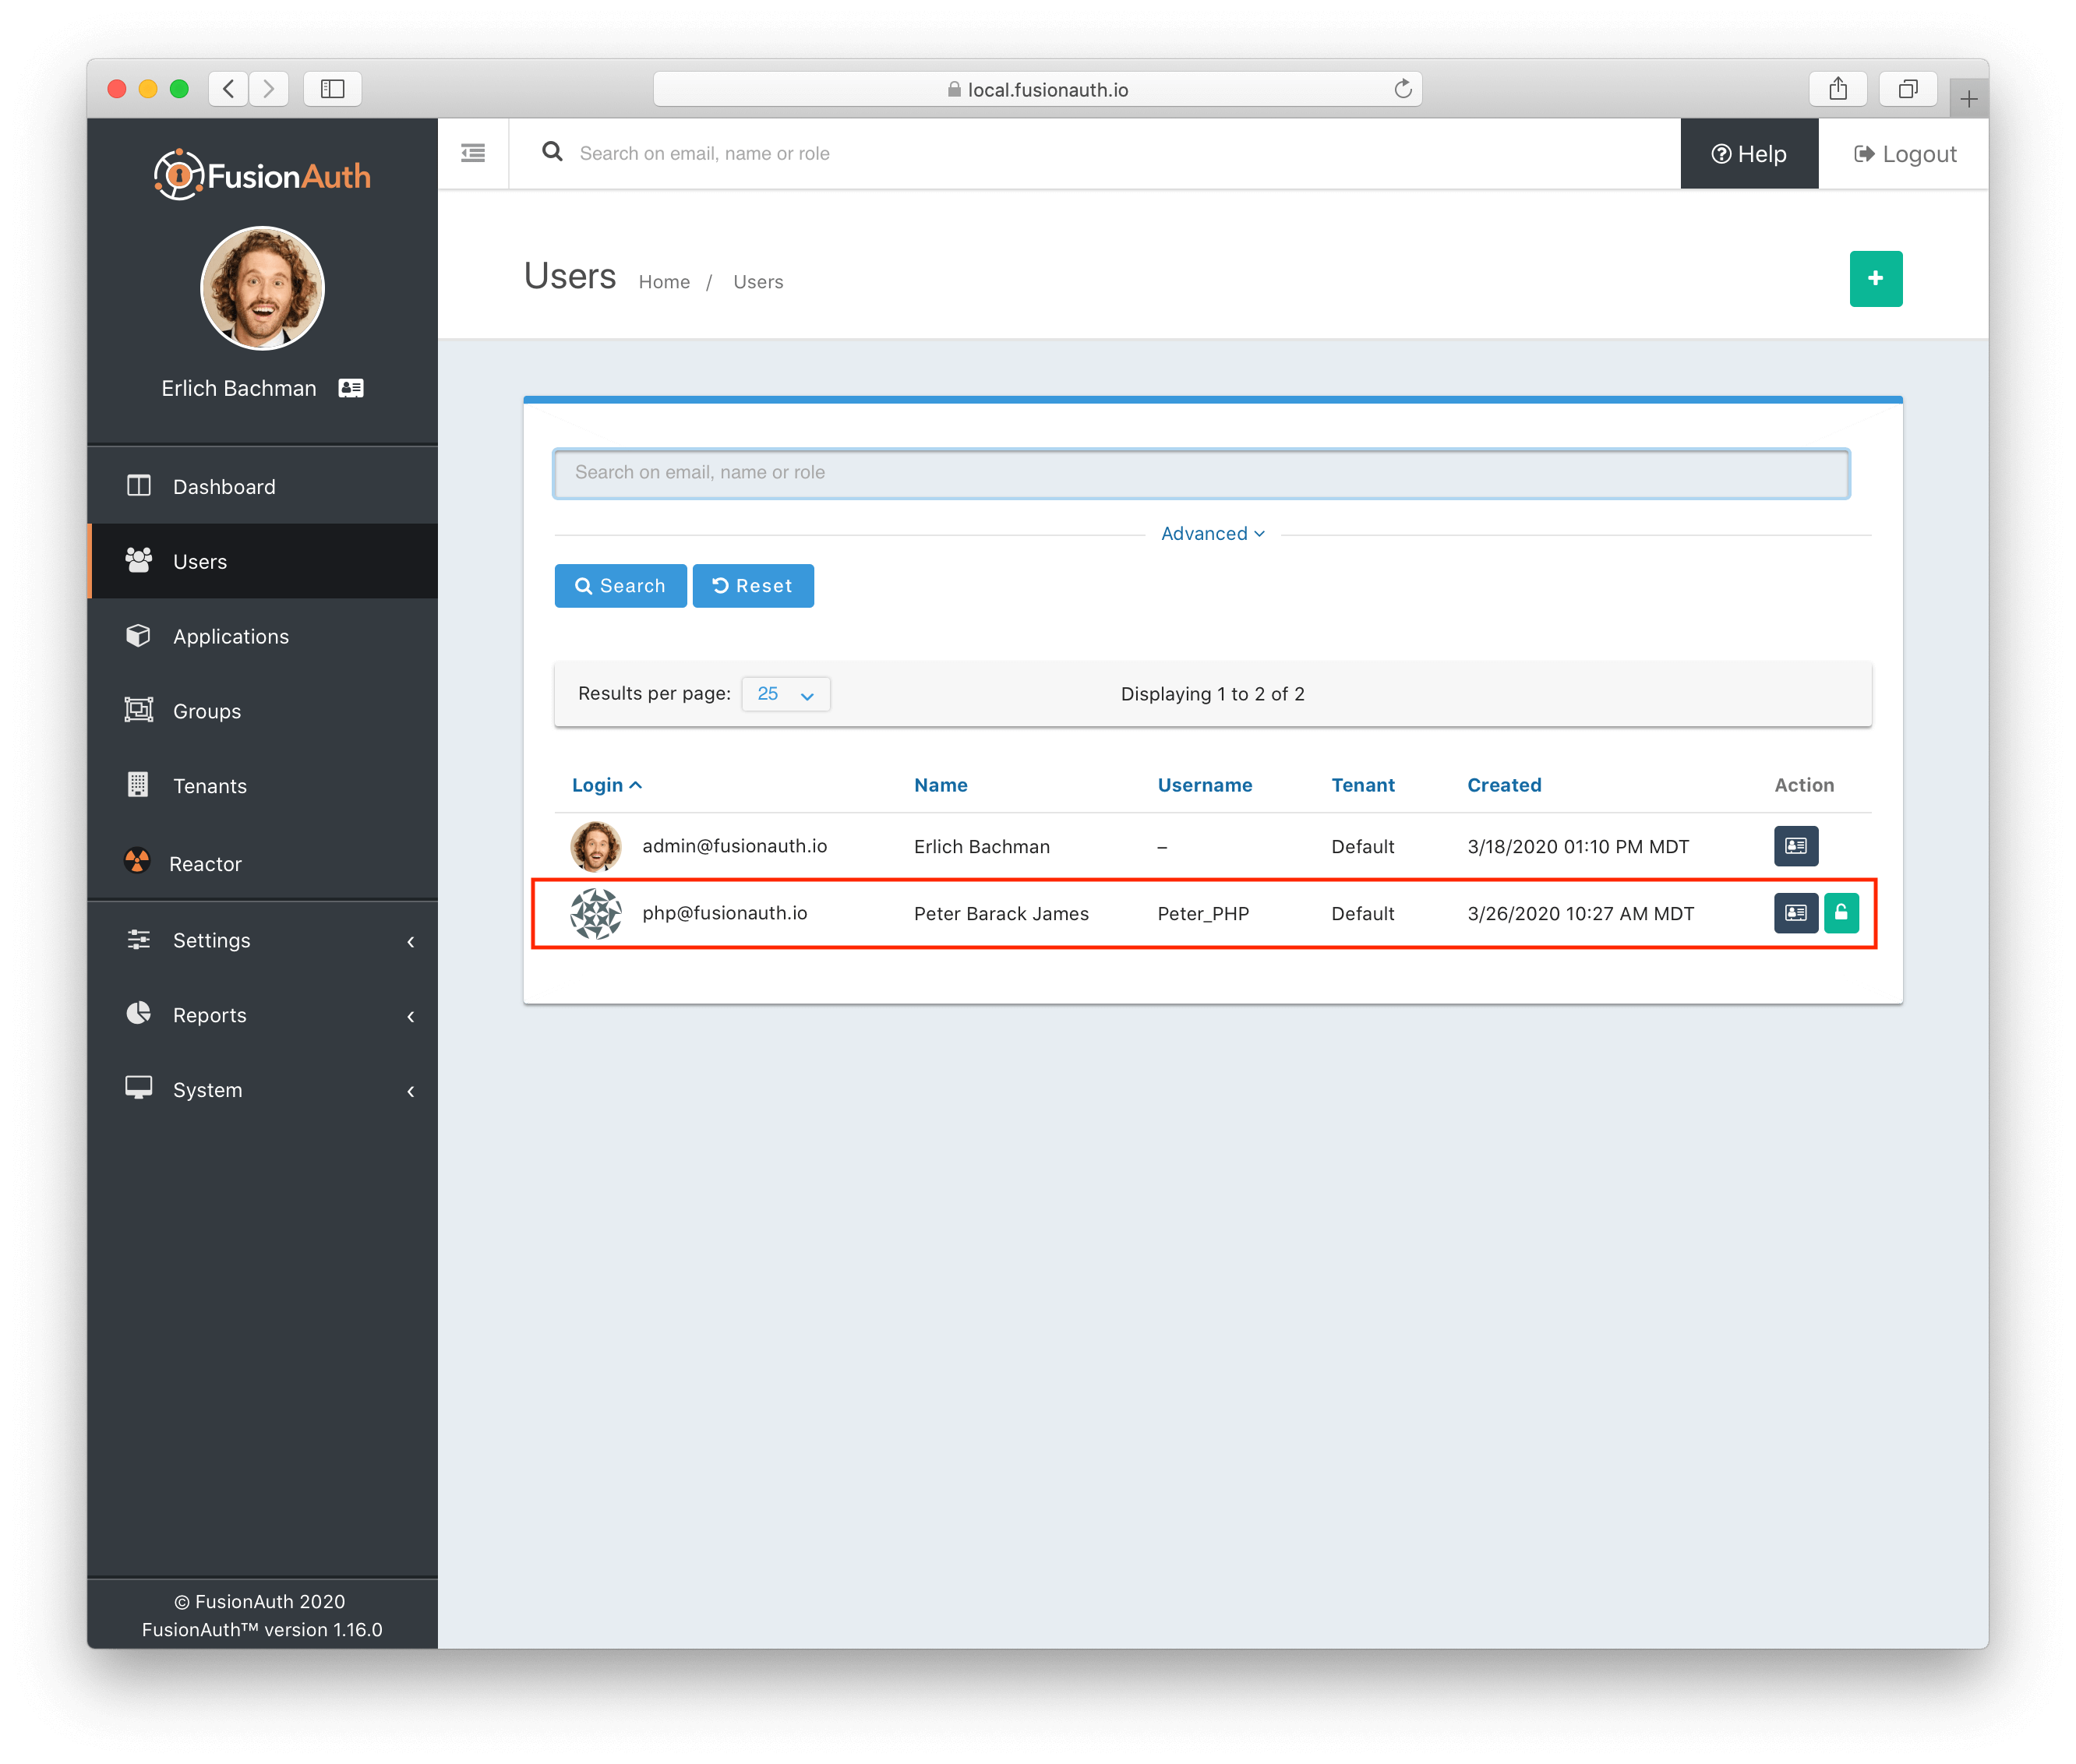
If we run the index.php file and navigate to our FusionAuth UI, we can see that the user has been registered successfully under the users' section.
On the other hand, if we try posting the same registration request again, we get a series of duplicate errors on the web browser, showing that the user already exists. Logging such API errors can assist you in debugging when integrating FusionAuth with PHP.
Here are the errors we got:
{
  "fieldErrors": {
    "user.email": [
      {
        "code":"[duplicate]user.email",
        "message":"A User with email = [php@fusionauth.io] already exists."
      }
    ],
    "user.username": [
      {
        "code":"[duplicate]user.username",
        "message":"A User with username = [Peter_PHP] already exists."
      }
    ]
  }
}
Retrieving a user's profile details#
After registering the user, let's see if we can retrieve his profile details on the FusionAuth application. The FusionAuth API allows us to make a GET request and retrieve the profile details of a single user by specifying the user's email address, username, or ID.
For this tutorial, we'll use the retrieveUserByUsername() function that the FusionAuth PHP client library offers to get the user's profile details.
Here's the code:
<?php
 //including FusionAuth in the project
require_once('vendor\fusionauth\fusionauth-client\src\FusionAuth\FusionAuthClient.php');

//creating the client
$client = new FusionAuth\FusionAuthClient("Z77y_yshOSAIfF3sd370Ns6m4VkKcAOqFpyyzSGfnF4", "http://localhost:9011");

//retrieving user data by username
$response = $client->retrieveUserByUsername("Peter_PHP");

//handling the response data and errors
if ($response->wasSuccessful()){
  $user = $response->successResponse->user;
  echo json_encode($user);
} else {
  $error = $response->errorResponse;
  echo json_encode($error);
}
?>
As you can see on the code above, we started by including FusionAuth in our project and creating the client, just like in the previous example. Then, we used the retrieveUserByUsername() function to retrieve the user's profile data.
If we run the code, here's the output we get on a web browser:
{
  "active": true,
  "birthDate": "1986-04-17",
  "data": {
    "displayName": "Peter",
    "favoriteColors": [
      "Yellow",
      "Violet"
    ]
  },
  "email": "php@fusionauth.io",
  "firstName": "Peter",
  "fullName": "Peter Barack James",
  "id": "da008c8f-4b0a-45e5-a214-d0755ed6e375",
  "insertInstant": 1581373552533,
  "lastName": "James",
  "middleName": "Barack",
  "mobilePhone": "973-535-1234",
  "passwordChangeRequired": false,
  "passwordLastUpdateInstant": 1581373552642,
  "preferredLanguages": [
    "en",
    "fr"
  ],
  "registrations": [
    {
      "applicationId": "3c219e58-ed0e-4b18-ad48-f4f92793ae32",
      "data": {
        "displayName": "Peter",
        "favoriteSports": [
          "Cricket",
          "Baseball"
        ]
      },
      "id": "b00b34a3-ee28-4967-b812-af0c4147dd75",
      "insertInstant": 1581373554782,
      "preferredLanguages": [
        "en",
        "fr"
      ],
      "timezone": "America\/Chicago",
      "username": "Peter_PHP",
      "usernameStatus": "ACTIVE",
      "verified": true
    }
  ],
  "tenantId": "31626538-3731-3762-3664-303931343339",
  "timezone": "America\/Denver",
  "twoFactorDelivery": "None",
  "twoFactorEnabled": false,
  "username": "Peter_PHP",
  "usernameStatus": "ACTIVE",
  "verified": true
}
As you can see above, we managed to retrieve the profile data of the user we registered previously. Notice that the data is returned in JSON format.
Changing a user's password#
Next, let's see if we can change the user's password using the FusionAuth PHP client library. In this case, we'll use the changePasswordByIdentity() function to make a POST request for changing the password.
Here's the code:
<?php
//including FusionAuth in the project
require_once('vendor\fusionauth\fusionauth-client\src\FusionAuth\FusionAuthClient.php');

//creating the client
$client = new FusionAuth\FusionAuthClient("Z77y_yshOSAIfF3sd370Ns6m4VkKcAOqFpyyzSGfnF4", "http://localhost:9011");

//data for changing password
$request = array(
  'currentPassword' => 'password12345',
  'loginId' => 'php@fusionauth.io',
  'password' => 'mypassphp99',
);

//changing user's password
$result = $client->changePasswordByIdentity($request);

//handling any errors
if (!$result->wasSuccessful()) {
  $error = json_encode($result->errorResponse);
  echo $error;
}
?>
As you can see in the code above, we used the user's identity information (login ID and password) to change the password directly. Consequently, the user can now log into the FusionAuth application using the changed password.
Retrieving a user's login report#
Next, let's use the retrieveUserLoginReportByLoginId() function to generate the user's login report for a specified date range.
The retrieveUserLoginReportByLoginId() function accepts four parameters: the application's id, the user's login Id, the start date instant, and the end date instant.
FusionAuth records all time references as the number of milliseconds since Epoch time (January 1st, 1970 UTC). Therefore, to send the date instant as an input parameter, you should first convert it to the number of UTC milliseconds since Epoch. You can use this website to convert your date time to milliseconds easily.
Here's the code:
<?php
//including FusionAuth in the project
require_once('vendor\fusionauth\fusionauth-client\src\FusionAuth\FusionAuthClient.php');

//creating the client
$client = new FusionAuth\FusionAuthClient("Z77y_yshOSAIfF3sd370Ns6m4VkKcAOqFpyyzSGfnF4", "http://localhost:9011");

//specifying query parameters
$applicationId = "3c219e58-ed0e-4b18-ad48-f4f92793ae32";
$loginId = "php@fusionauth.io";
$start = "1581282000000";
$end = "1581421628204";

//retrieving a user's login report
$response = $client->retrieveUserLoginReportByLoginId($applicationId, $loginId, $start, $end);

//handling the response data and errors
if ($response->wasSuccessful()) {
  $loginData = $response->successResponse;
  echo json_encode($loginData);
} else {
  $error = $response->errorResponse;
  echo json_encode($error);
}
?>
If we run the code, here's the output we get on a web browser:
{
  "hourlyCounts": [
    {
      "count": 3,
      "interval": 439282
    },
    {
      "count": 2,
      "interval": 439283
    }
  ],
  "total": 5
}
As you can see from the results above, the generated report gives the hourly counts of the user's successful logins. Additionally, the report contains the number of logins for each interval, the interval values (which are the number of hours since Epoch), and the total number of logins for each count across the query range.
Deleting a user#
Lastly, let's use the FusionAuth PHP client library to delete a user. We'll use the deleteUser() function to permanently delete all the data, reports, and metrics associated with the user. The function only requires the user ID parameter to be specified.
Here's the code:
<?php
//including FusionAuth in the project
require_once('vendor\fusionauth\fusionauth-client\src\FusionAuth\FusionAuthClient.php');

//creating the client
$client = new FusionAuth\FusionAuthClient("Z77y_yshOSAIfF3sd370Ns6m4VkKcAOqFpyyzSGfnF4", "http://localhost:9011");

//deleting a user
$response = $client->deleteUser("da008c8f-4b0a-45e5-a214-d0755ed6e375");

//handling the response data and errors
if (!$response->wasSuccessful()) {

  $error = $response->errorResponse;
  echo json_encode($error);
}
?>
And, just like that, we've deleted the user registered on FusionAuth earlier!
Conclusion#
That's how you can integrate FusionAuth with PHP and take your identity and user management efforts to the next level.
Of course, we just scratched the surface about what you can accomplish with the FusionAuth PHP client library. You can go to its documentation and see other amazing capabilities of this library.
Do you have any comments or questions?
Please post them below.
Happy coding!


