


In this post, we'll build a command line client for FusionAuth with C# and the .NET Core libraries. We'll set up FusionAuth and then add a user to an application from the command line interface (CLI) tool we've built.
At the end of this tutorial, you will have a working .NET Core application which will allow you to add users to your FusionAuth user database.
This would be a useful tool if you had customer service folks, who were comfortable with the CLI, and needed to add users or otherwise update user information in the FusionAuth identity server.
In the second part of this tutorial, we will use the Authorization Code grant to protect pages in an ASP.NET web application. But for now, we'll only be adding users.
Prerequisites#
We'll be using the following software versions:
- .NET Core 3.1.201
- FusionAuth 1.15.5
I built this tutorial on Windows but .NET Core is cross-platform.
You need to have the following software installed before you begin:
- Docker (optional, but preferred for installing FusionAuth)
- .NET Core (download it here if needed)
You'll also want to double check to make sure your system meets the memory, storage and CPU requirements for FusionAuth.
Architecture#
This application has two main components.
The first is the .NET Core CLI tool. This will create a user by calling the FusionAuth APIs.
And then there is the FusionAuth identity server, which is a standalone application accessible at http://localhost:9011. This will be accessed by you, during configuration and also via API calls.
APIs and client libraries#
FusionAuth has a full-featured and well-documented API which allows you to create and manage users, applications, and groups. Using this API allows you to extend FusionAuth for purposes never contemplated by the FusionAuth team. You can also integrate it with other data sources and pieces of software unknown to us. If your software can speak JSON and reach FusionAuth over a network connection, you can integrate.
However, we realize that not everyone wants to write raw JSON. (Wimps.) This is why we have created client libraries to make using the API a snap. These are available under the Apache 2.0 license and can be embedded in your applications as you see fit.
In this post, I'll be using the .NET Core client library.
Setting up FusionAuth#
FusionAuth will be our identity server for this tutorial. All user data will be persisted there. Using a central identity server such as FusionAuth means we can manage users across any number of custom or off the shelf applications in one place.
If you don't already have FusionAuth installed, we recommend the Docker Compose option for the quickest setup:
curl -o docker-compose.yml https://raw.githubusercontent.com/FusionAuth/fusionauth-containers/main/docker/fusionauth/docker-compose.yml
curl -o .env https://raw.githubusercontent.com/FusionAuth/fusionauth-containers/main/docker/fusionauth/.env
docker compose up
Now FusionAuth should be running at http://localhost:9011.
Check out the Download FusionAuth page for other installation options (rpm, deb, etc) if you don't have Docker installed.
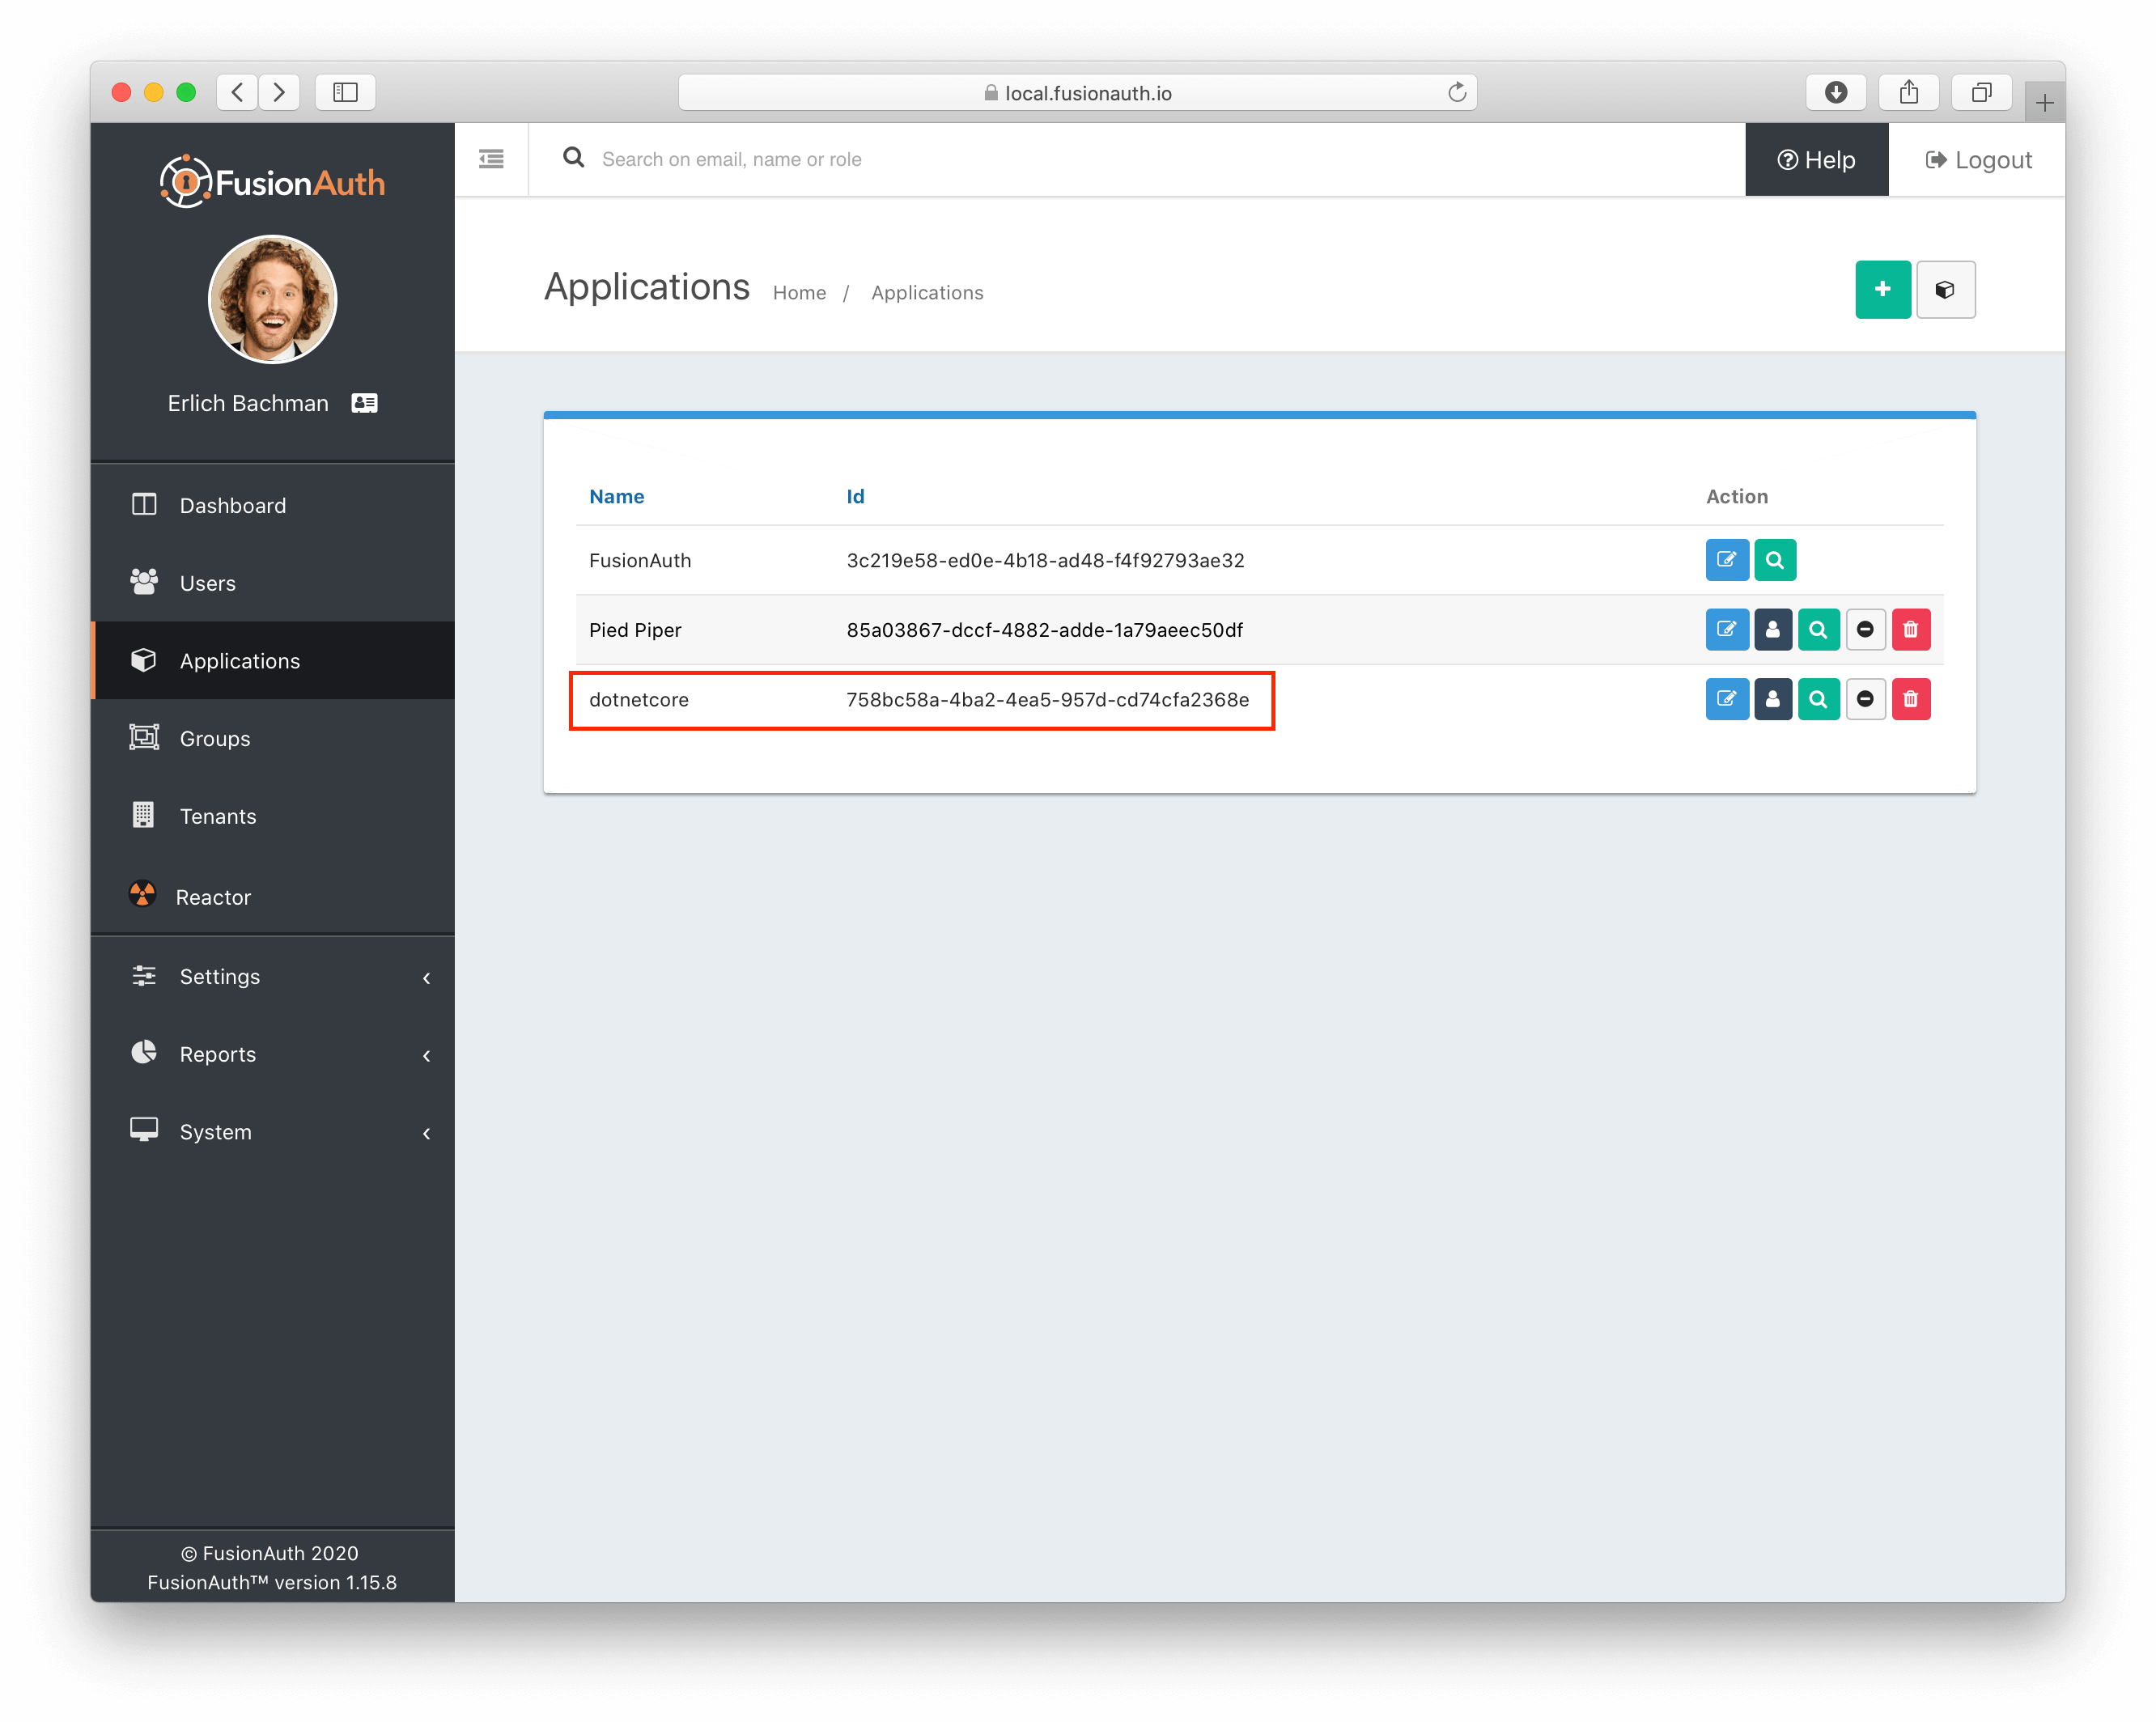
Sign in as a FusionAuth administrator and create a new application. I creatively named mine 'dotnetcore', and will refer to this application throughout the tutorial. No need to tweak any defaults, but do note the "Id", which we'll use later.
Then go to the APIs section. We'll need to create an API key for our CLI client. Head to "Settings" and then to "API Keys" in the UI. Create a new key, and set the permissions.
Following the principle of least privilege, we'll allow POSTs to /api/user and /api/user/registration and nothing else. These privileges will let the owner of this key create users and user registrations.
Note the key value (it looks something like J9NXRWmkLVqt2hLc670s-i5iWzdPpgT_uXLuJcnMaFO), as we'll need it later.
The command line client#
This CLI tool will take a user's email, password and favorite color values and create a user in FusionAuth.
The full source code is of course available. You can download it and skip ahead to 'Running the command line client' if you'd like. I won't mind.
Set up the project#
Set up a .NET Core console project like so:
dotnet new console --output usermanagerThen go into that directory:
cd usermanagerWe're going to import a few NuGet packages we'll need:
dotnet add package JSON.Net # for debugging
dotnet add package FusionAuth.Client # for our client access
This will update our usermanager.csproj file with needed dependencies.
The code#
Now we need to write the program to interact with the APIs. Here's the full source code.
using System;
using io.fusionauth;
using io.fusionauth.domain;
using io.fusionauth.domain.api;
using io.fusionauth.domain.api.user;
using System.Collections.Generic;
using Newtonsoft.Json;

namespace usermanager
{
    class Program
    {
        private static readonly string apiKey = Environment.GetEnvironmentVariable("fusionauth_api_key");
        private static readonly string fusionauthURL = "http://localhost:9011";

	private static readonly string tenantId = "66636432-3932-3836-6630-656464383862";
	private static readonly string applicationId = "4243b56f-0b45-4882-aa23-ac75eea22d22";

        static void Main(string[] args)
        {
	    if (args.Length != 3) {
                Console.WriteLine("Please provide email, password and favorite color.");
		Environment.Exit(1);
	    }
            string email= args[0];
            string password = args[1];
            string favoriteColor = args[2];

            FusionAuthSyncClient client = new FusionAuthSyncClient(apiKey, fusionauthURL, tenantId);

	    var userRequest = buildUserRequest(email, password, favoriteColor);
            var response = client.CreateUser(null, userRequest);
	    // debugging
	    //string json = JsonConvert.SerializeObject(response);
            //Console.WriteLine(json);

            if (response.WasSuccessful())
            {
                var user = response.successResponse.user;
		var registrationResponse = register(client, user);
		if (registrationResponse.WasSuccessful()) {
                    Console.WriteLine("created user with email: "+user.email);
		}
                else if (registrationResponse.statusCode != 200)
                {
                    var statusCode = registrationResponse.statusCode;
                    Console.WriteLine("failed with status "+statusCode);
	            string json = JsonConvert.SerializeObject(response);
                    Console.WriteLine(json);
                }
            }
            else if (response.statusCode != 200)
            {
                var statusCode = response.statusCode;
                Console.WriteLine("failed with status "+statusCode);
	        string json = JsonConvert.SerializeObject(response);
                Console.WriteLine(json);
            }
        }

        static UserRequest buildUserRequest(string email, string password, string favoriteColor)
	{
	    User userToCreate = new User();
	    userToCreate.email = email;
	    userToCreate.password = password;
	    Dictionary<string, object> data = new Dictionary<string, object>();
	    data.Add("favoriteColor", favoriteColor);
	    userToCreate.data = data;

	    UserRequest userRequest = new UserRequest();
	    userRequest.sendSetPasswordEmail = false;
	    userRequest.user = userToCreate;
	    return userRequest;
	}

        static ClientResponse<RegistrationResponse> register(FusionAuthSyncClient client, User user)
        {
	    RegistrationRequest registrationRequest = new RegistrationRequest();
	    UserRegistration registration = new UserRegistration();
	    registration.applicationId = Guid.Parse(applicationId);
	    registrationRequest.sendSetPasswordEmail = false;
	    registrationRequest.skipRegistrationVerification = true;
	    registrationRequest.skipVerification = true;
	    registrationRequest.registration = registration;
            return client.Register(user.id, registrationRequest);
        }
    }
}
I'm not going to review every line but will highlight a few interesting points.
Near the top are configuration values. We hardcode some of these, but the API key we pull from the environment (checking in API keys being a big no-no). Make sure you update these values to point to the correct FusionAuth URL and the application you created in the UI. The tenantId is optional, unless you have more than one tenant, but it's good practice to use it.
// ...
        private static readonly string apiKey = Environment.GetEnvironmentVariable("fusionauth_api_key");
        private static readonly string fusionauthURL = "http://localhost:9011";

	private static readonly string tenantId = "66636432-3932-3836-6630-656464383862";
	private static readonly string applicationId = "4243b56f-0b45-4882-aa23-ac75eea22d22";
// ...
We build the user request object first. This includes basic information, such as the email and password. The password will be encrypted at rest using the tenant default encryption settings. If this weren't a tutorial, you'd also be connecting to FusionAuth over TLS, encrypting the password in transit.
// ...
	    var userRequest = buildUserRequest(email, password, favoriteColor);
            var response = client.CreateUser(null, userRequest);
// ...
If we successfully create the user, we'll then create the registration; more on that below. Otherwise we punt and complain to the person running the client.
// ...
            if (response.WasSuccessful())
            {
                var user = response.successResponse.user;
		var registrationResponse = register(client, user);
		if (registrationResponse.WasSuccessful()) {
                    Console.WriteLine("created user with email: "+user.email);
		}
            }
// ...
We can store arbitrary key value pairs in the data field. This lets us associate any application specific values with our users.
// ...
	    Dictionary<string, object> data = new Dictionary<string, object>();
	    data.Add("favoriteColor", favoriteColor);
	    userToCreate.data = data;
// ...
A bit more about the registration. The registration field is what ties the user to the application you created. Applications are simply something a user can log in to. Each user can be associated with zero to many applications. See this forum post for more information.
// ...
        static ClientResponse<RegistrationResponse> register(FusionAuthSyncClient client, User user)
        {
	    RegistrationRequest registrationRequest = new RegistrationRequest();
	    UserRegistration registration = new UserRegistration();
	    registration.applicationId = Guid.Parse(applicationId);
	    registrationRequest.sendSetPasswordEmail = false;
	    registrationRequest.skipRegistrationVerification = true;
	    registrationRequest.skipVerification = true;
	    registrationRequest.registration = registration;
            return client.Register(user.id, registrationRequest);
        }
// ...
A note about the API choice. We used the "Create a User" API in this tutorial. This API works well for creating one user at a time; this is what an onboarding tool might use. However, if you want to import a large number of users into FusionAuth, you'll want to explore the Bulk Import API. Actually, you can do one better and just read the "Migrate Users" tutorial which will walk you through how to, well, migrate users to FusionAuth.
Running the command line client#
To run the client:
fusionauth_api_key=<api key> dotnet.exe run -- <email> <password> <favorite color>For example:
fusionauth_api_key=APIKEY dotnet.exe run --  newuser2@example.com 123pass123 blue
created user with email: newuser2@example.com
If you try to create the same user again, you'll receive an error message:
fusionauth_api_key=APIKEY dotnet.exe run -- newuser2@example.com 123pass123 blue
failed with status 400
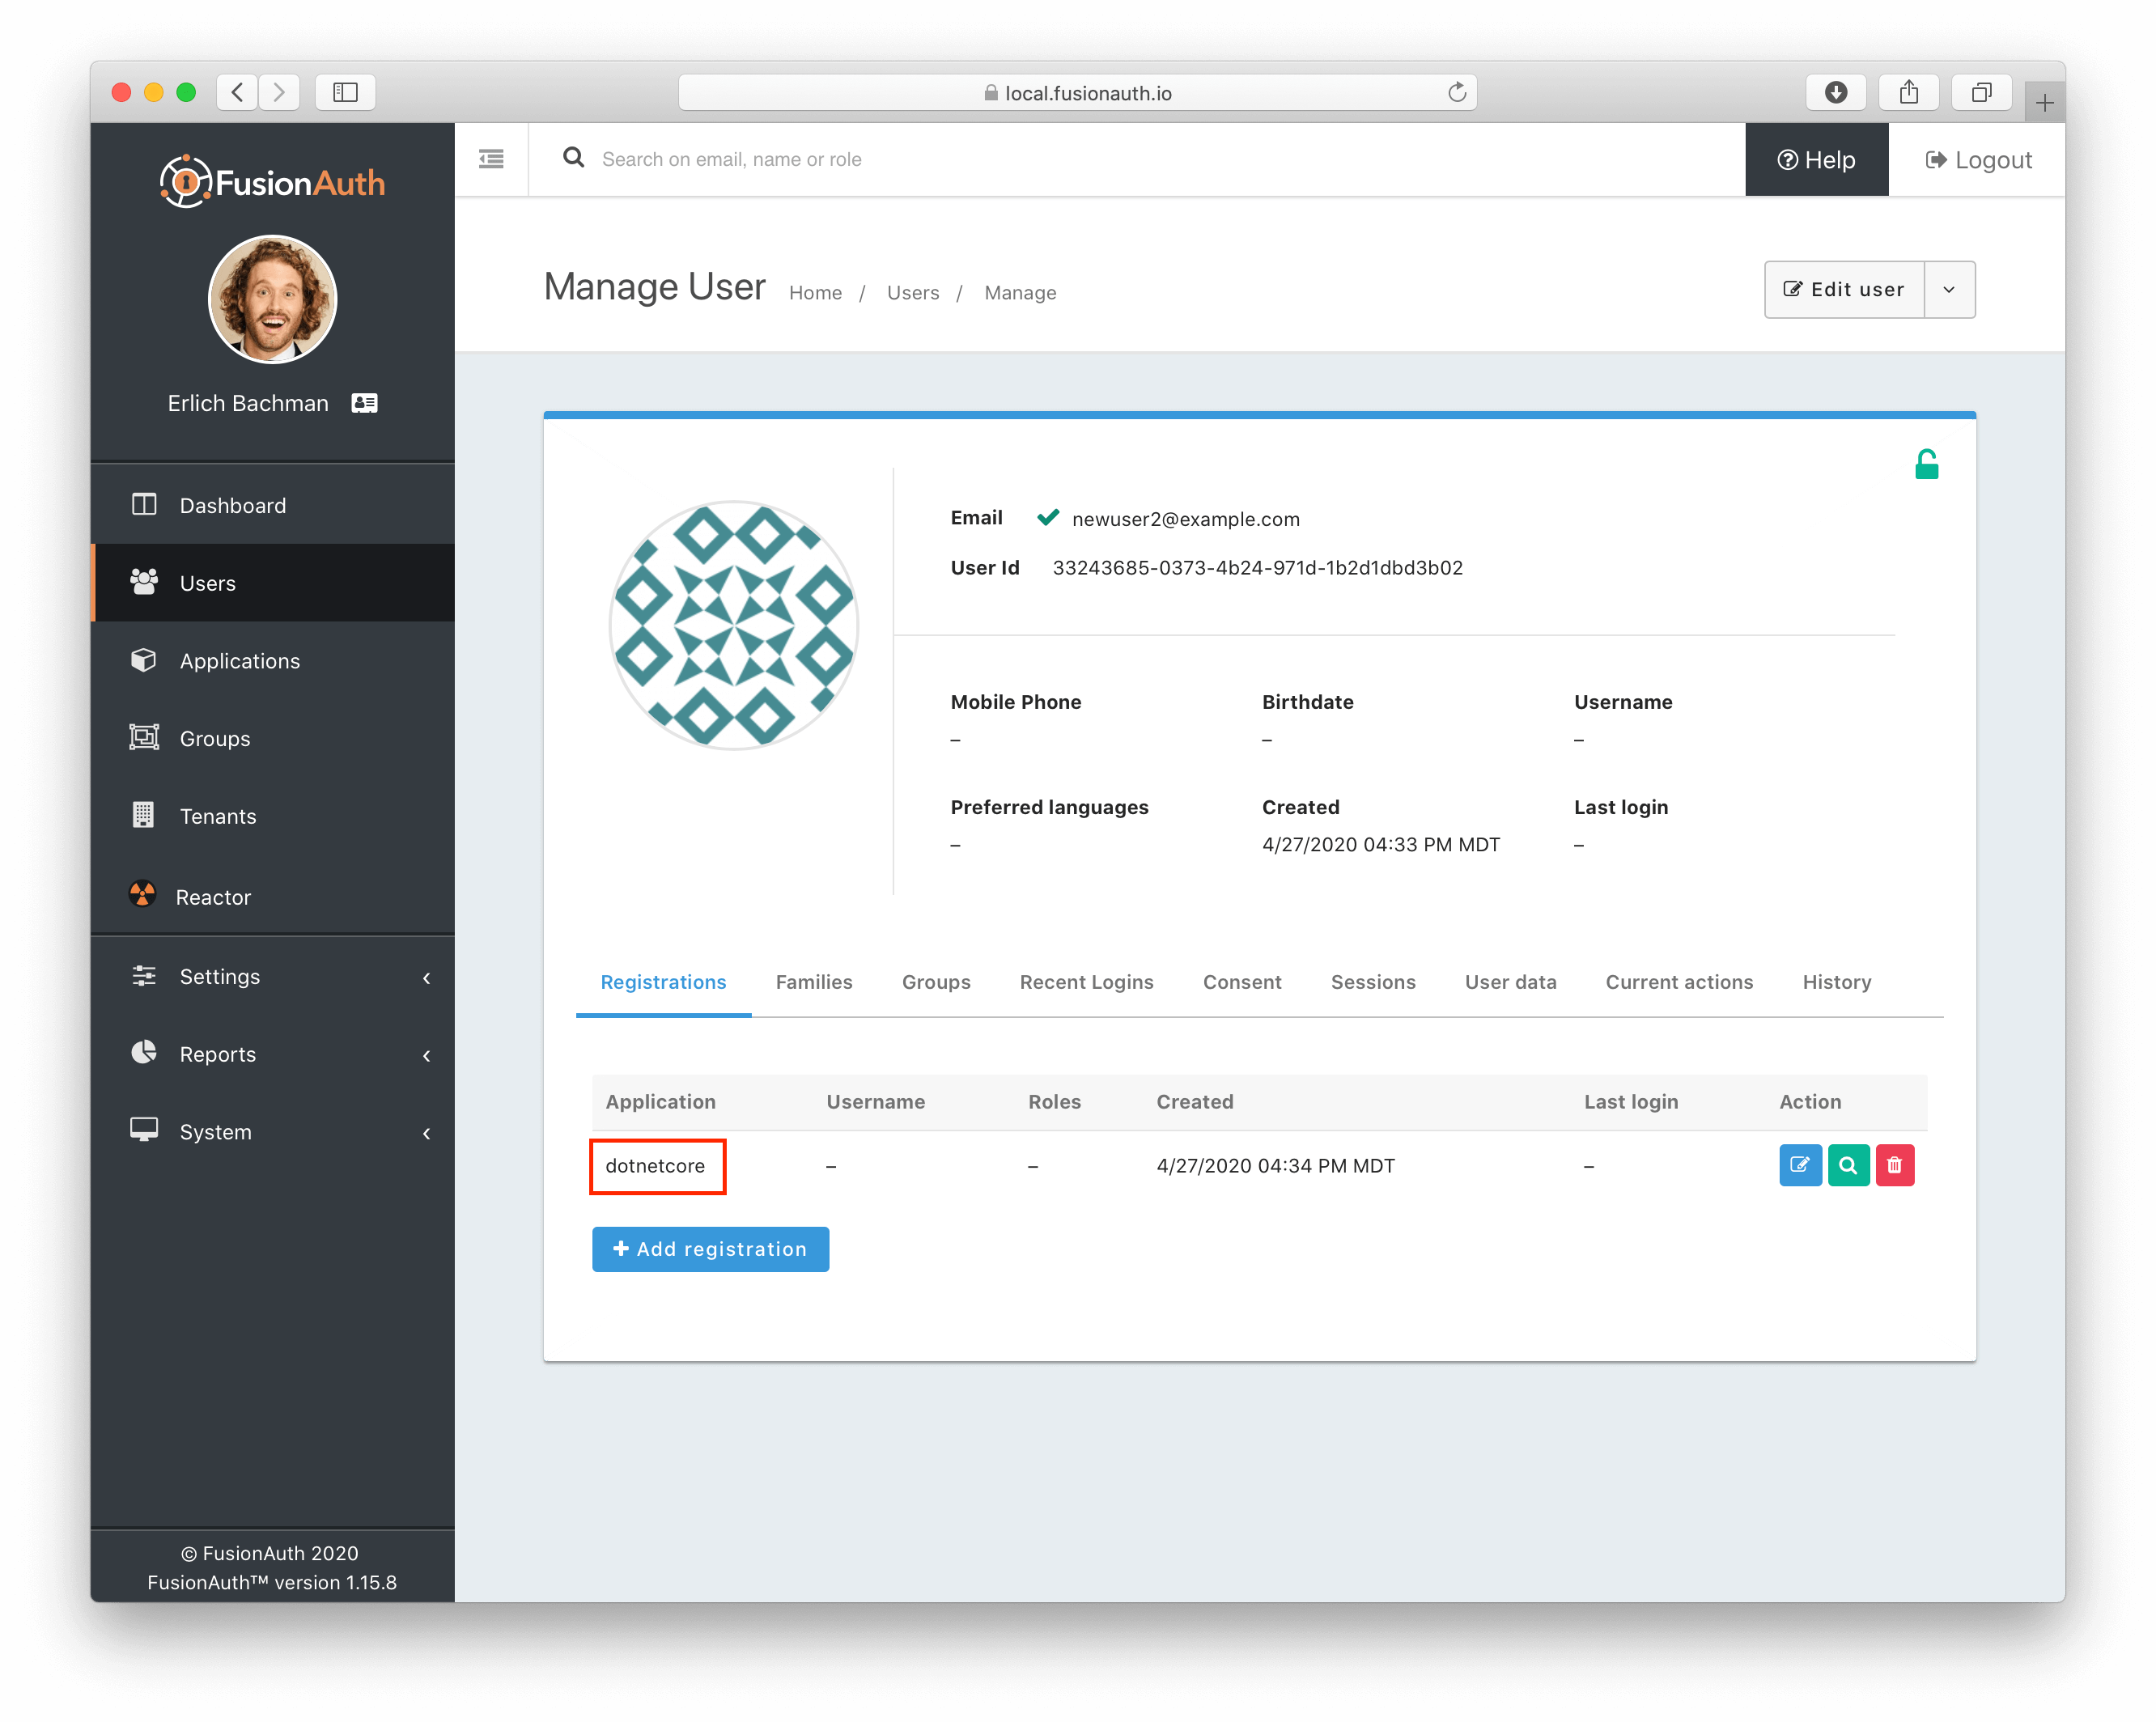
{"statusCode":400,"errorResponse":{"fieldErrors":{"user.email":[{"code":"[duplicate]user.email","message":"A User with email = [newuser2@example.com] already exists."}]}}}If you look at the Users page of the FusionAuth UI, you will see "newuser2@example.com". If you view that user, you can see they are associated with the "dotnetcore" application.
If you want to build an executable to distribute to any user or server with the .NET Core runtime available, run dotnet build and you'll see an executable at bin/Debug/netcoreapp3.1/usermanager.exe. You can also look at the various deployment options.
Conclusion#
While APIs are great, client libraries are even better. Even though the team at FusionAuth is good, they haven't anticipated all of your user management needs. That's why they've built out over ten client libraries available for the most popular languages.
Right now poor newuser2@example.com can't do much. Next, we'll create a web application that they can log in to.


