


In this tutorial, we’re going to illustrate how to use Java to accomplish various tasks with FusionAuth, programmatically. In order to speed up our development time, we’ll use the FusionAuth Java client library, which comes with already-built methods that we’ll use instead of building things from scratch.
FusionAuth allows developers to simplify authentication, authorization, and user management tasks in their applications. One of the greatest benefits of this innovative identity solution is that it can be integrated with any programming language, platform, or anything else.
So, if your preferred language is Python, Node.js, PHP, or anything else, you can use FusionAuth to take your authentication capabilities to the next level.
What we'll cover#
- Setting up FusionAuth
- Setting up Maven dependency
- Creating an application
- Creating a user
- Retrieving a user’s profile details
- Logging in a user
- Changing a user’s password
- Deactivating a user
- Reactivating a user
- Deleting a user
- Deactivating an application
- Reactivating an application
- Deleting an application
What you'll need#
- FusionAuth (you can see the FusionAuth system requirements here)
- The FusionAuth Maven dependency
- Java development environment
- A web browser
Ready?
Let's get going...
Setting up FusionAuth#
FusionAuth can be deployed on nearly any platform. Depending on the platform you're using, you can get the installation instructions from here.
Once FusionAuth is installed on your platform, you can follow this simple 5-minute guide to set it up and ensure it's running properly. That guide uses Node for the integration, but you can skip that part if you prefer to use Java.
Then, go to the FusionAuth UI and create an API key. We’ll use this key to access the FusionAuth application programmatically. Make sure you scope it to only allow access to the application, user, and user/change-password APIs to follow the principle of least privilege.
After completing the FusionAuth setup, and grabbing the API key, we can move to the next step.
Shall we?
Setting up the Maven dependency#
To set up the dependencies needed for this project, let's create a Maven utility project and add the FusionAuth Java client library to the pom.xml file. We'll use version 1.15.4 of the FusionAuth Maven dependency:
<dependency>
  <groupId>io.fusionauth</groupId>
  <artifactId>fusionauth-java-client</artifactId>
  <version>1.15.4</version>
</dependency>
You can also download all the code from the GitHub repository--note that if you do that you'll need to update some of the ids.
Setup#
The API key and location of the FusionAuth server are stored in a properties file called application.properties. Many Java application environments provide secrets management, but for this tutorial, we'll just load the properties file into a class. Make sure you update your application.properties file with the correct values.
package io.fusionauth.example;

import java.io.IOException;
import java.io.InputStream;
import java.util.Properties;

public class ApplicationProperties {
  private static String apiKey;
  private static String fusionAuthURL;

  public static String getApiKey() {
    return apiKey;
  }

  public static String getFusionAuthURL() {
    return fusionAuthURL;
  }

  public static void setupProperties() {
    try (InputStream input = ApplicationProperties.class.getResourceAsStream("/application.properties")) {
      Properties prop = new Properties();

      // load a properties file
      prop.load(input);
      fusionAuthURL = prop.getProperty("fusionAuthURL");
      apiKey = prop.getProperty("apiKey");
    } catch (IOException ex) {
      ex.printStackTrace();
    }
  }
}
Creating an application#
In FusionAuth, an application refers to a place where a user can log into. Before you begin integrating authentication capabilities with FusionAuth, you’ll need to create at least one application.
For example, if you want to manage the activities of users accessing your Todo application, you can create an application in FusionAuth and use it to register users, manage users' roles, monitor users' activities, and more.
So, we’ll start by using the FusionAuth Java client to create an application. As earlier mentioned, the Java library comes with already-built methods that allow for easy integration of the FusionAuth REST API in Java environments.
If you go to this GitHub page, you can see the various methods alongside their definitions. For example, to create an application, we’ll use the createApplication method. If you check the method definition, you’ll find that it only requires two parameters: the ID of the application and the request object that contains all the information used for creating the application.
That’s a simple way of consuming the FusionAuth REST API. Isn't it?
Here is the code for using the createApplication method to create an application in FusionAuth:
package io.fusionauth.example;

import com.inversoft.error.Errors;
import com.inversoft.rest.ClientResponse;
import io.fusionauth.client.FusionAuthClient;
import io.fusionauth.domain.Application;
import io.fusionauth.domain.api.ApplicationRequest;
import io.fusionauth.domain.api.ApplicationResponse;

public class CreateApplication {
  public static void main(String[] args) {
    ApplicationProperties.setupProperties();

    // Instantiate the client
    FusionAuthClient client = new FusionAuthClient(ApplicationProperties.getApiKey(),
        ApplicationProperties.getFusionAuthURL());

    // Instantiate the application with a name (using the FusionAuth builder pattern)
    Application app = new Application().with(a -> a.name = "Todo");

    // Creating the request object
    ApplicationRequest request = new ApplicationRequest(app, null);

    // Use the returned ClientResponse object
    ClientResponse<ApplicationResponse, Errors> response = client.createApplication(null, request);

    if (response.wasSuccessful()) {
      System.out.println("Application creation successful");
    } else {
      // Handle errors
      System.out.println(response.exception);
    }
  }
}
As you can see from the code above, when instantiating the FusionAuth client, we specified the API key and the web address that points to our running FusionAuth server. You will need to provide your own unique values for these parameters.
Then, we created an variable named app that is an instance of the Application class and set the name of the application. We then passed this object to the constructor of the ApplicationRequest class.
Notice that the Java client returns a ClientResponse object that contains everything that happened while communicating with the FusionAuth server.
Also, we passed the value of the first parameter of the createApplication method as null. This will allow FusionAuth to generate a secure random UUID for the newly created application.
Finally, we handle any errors experienced when creating the application on FusionAuth.
If we run the above code, and go to the FusionAuth UI, we see that the todo application has been created successfully:
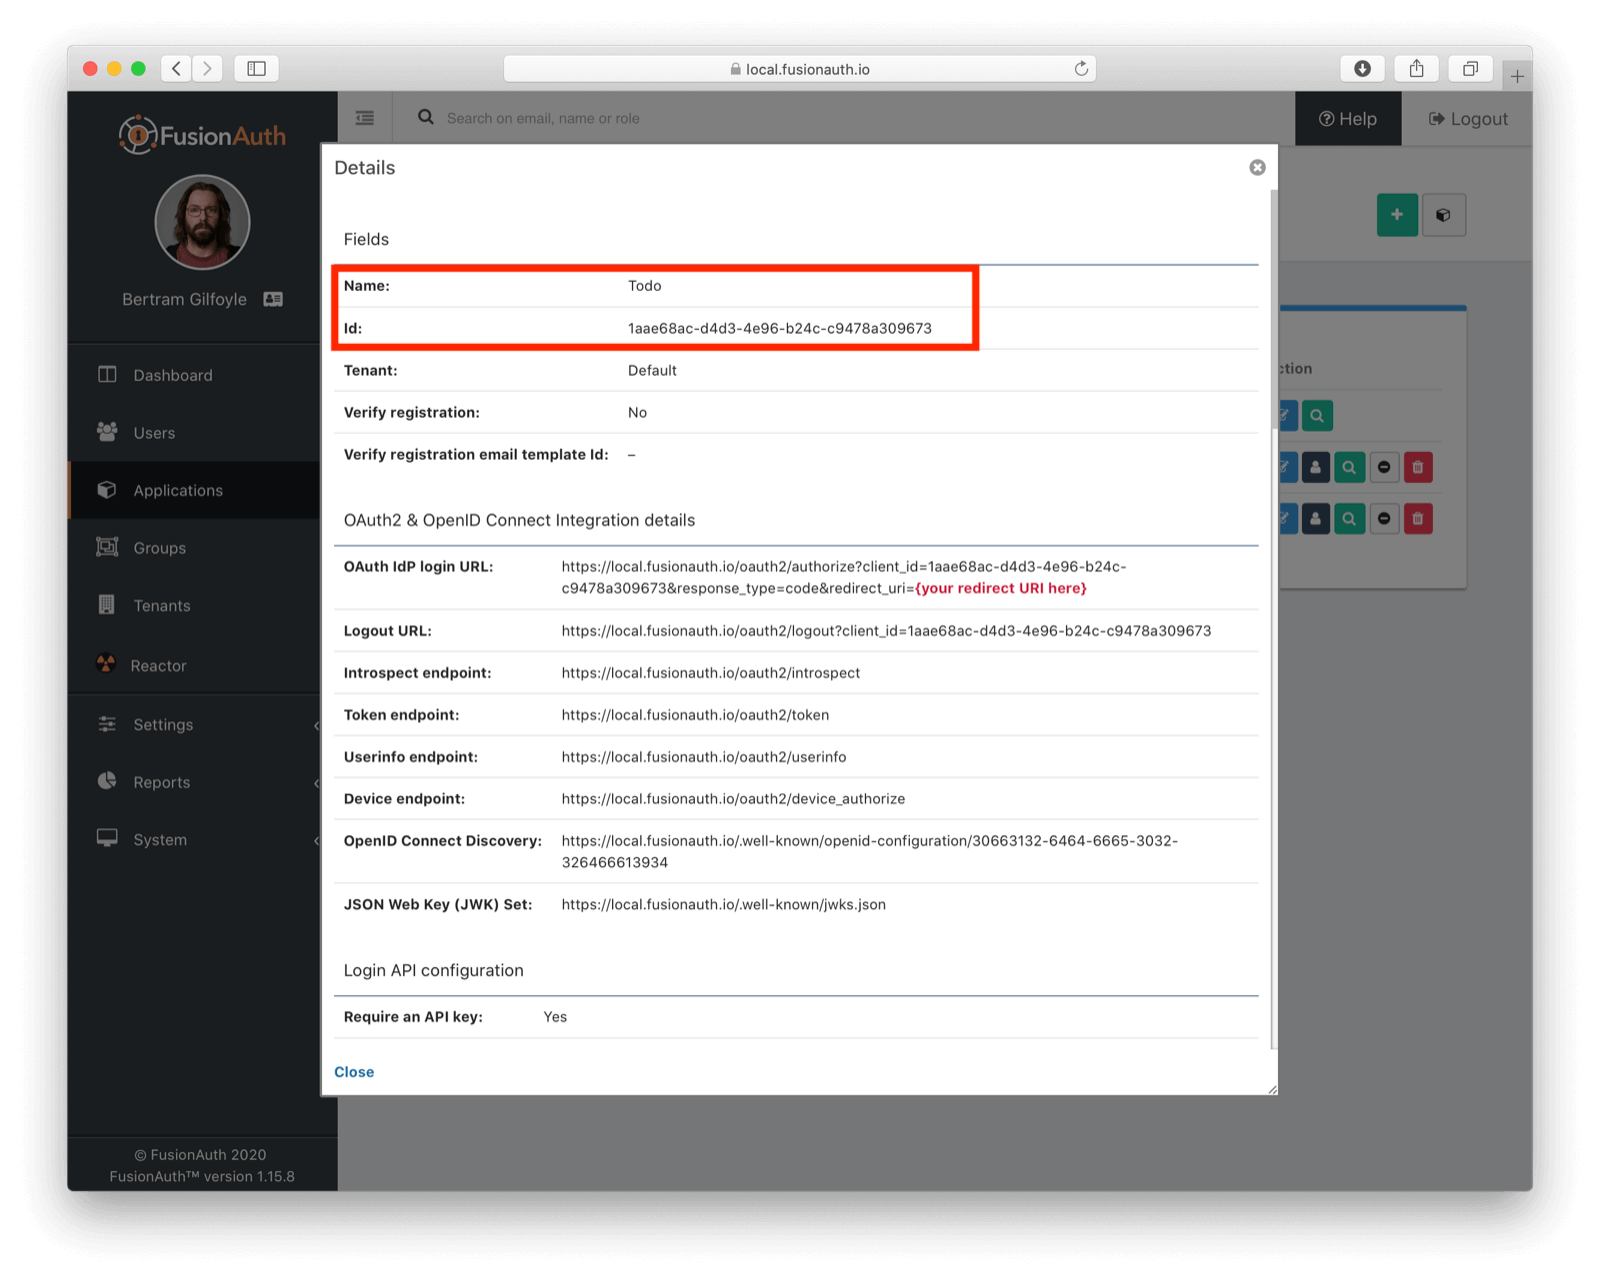
Notice from the image above that the application’s ID has been created for us. We’ll use this ID in the subsequent sections of this tutorial.
Also, if we run the code again, we get the following error, indicating that the application has already been created:
{
  "fieldErrors" : {
	"application.name" : [ {
  	"code" : "[duplicate]application.name",
  	"message" : "An Application with name = [Todo] already exists."
	} ]
  },
  "generalErrors" : [ ]
}
Creating a user#
Applications are no good without users. In FusionAuth, a user refers to someone that has been granted the right to use your FusionAuth application -- such as an employee, client, or an end-user. So, let’s see how you can create a user and also carry out various user management tasks for the Todo app.
We’ll do what is called Full Registration. In this case, we’ll create a user and register them for the application we’d created previously. These two actions will take place simultaneously in a single transaction. If you'd rather not do that, you can create a user and then add them to an application -- the choice is yours.
To do this, we’ll use the register method, which comes with the Java client library. This method requires two parameters: the userId, which should be supplied as a UUID string, and the UserRegistration request object.
Here is the code for creating a user:
package io.fusionauth.example;

import java.util.UUID;
import com.inversoft.error.Errors;
import io.fusionauth.client.FusionAuthClient;
import io.fusionauth.domain.User;
import io.fusionauth.domain.UserRegistration;
import io.fusionauth.domain.api.user.RegistrationRequest;
import io.fusionauth.domain.api.user.RegistrationResponse;
import com.inversoft.rest.ClientResponse;

public class CreateUser {
  public static void main(String[] args) {
    ApplicationProperties.setupProperties();

    // Instantiate the client
    FusionAuthClient client = new FusionAuthClient(ApplicationProperties.getApiKey(),
        ApplicationProperties.getFusionAuthURL());

    // Instantiate the user and provide login details
    User user = new User().with(u -> u.email = "fusionjava@example.com")
                          .with(u -> u.password = "mypassword101");

    // Instantiate the user registration and request object
    UserRegistration registration = new UserRegistration();
    registration.applicationId = UUID.fromString("1aae68ac-d4d3-4e96-b24c-c9478a309673");

    RegistrationRequest request = new RegistrationRequest(user, registration);

    // Use the returned ClientResponse object
    ClientResponse<RegistrationResponse, Errors> response = client.register(null, request);

    if (response.wasSuccessful()) {
      System.out.println("Registration successful");

    } else {
      // Handle errors
      System.out.println(response.errorResponse);
    }
  }
}
Notice that we specified the ID of the application we created earlier. This is one way to register the user to the application.
Also, we did not specify the ID of the user. This lets FusionAuth to create one for us automatically.
If we run the above code, and go to the FusionAuth UI, we see that the user has been created successfully:
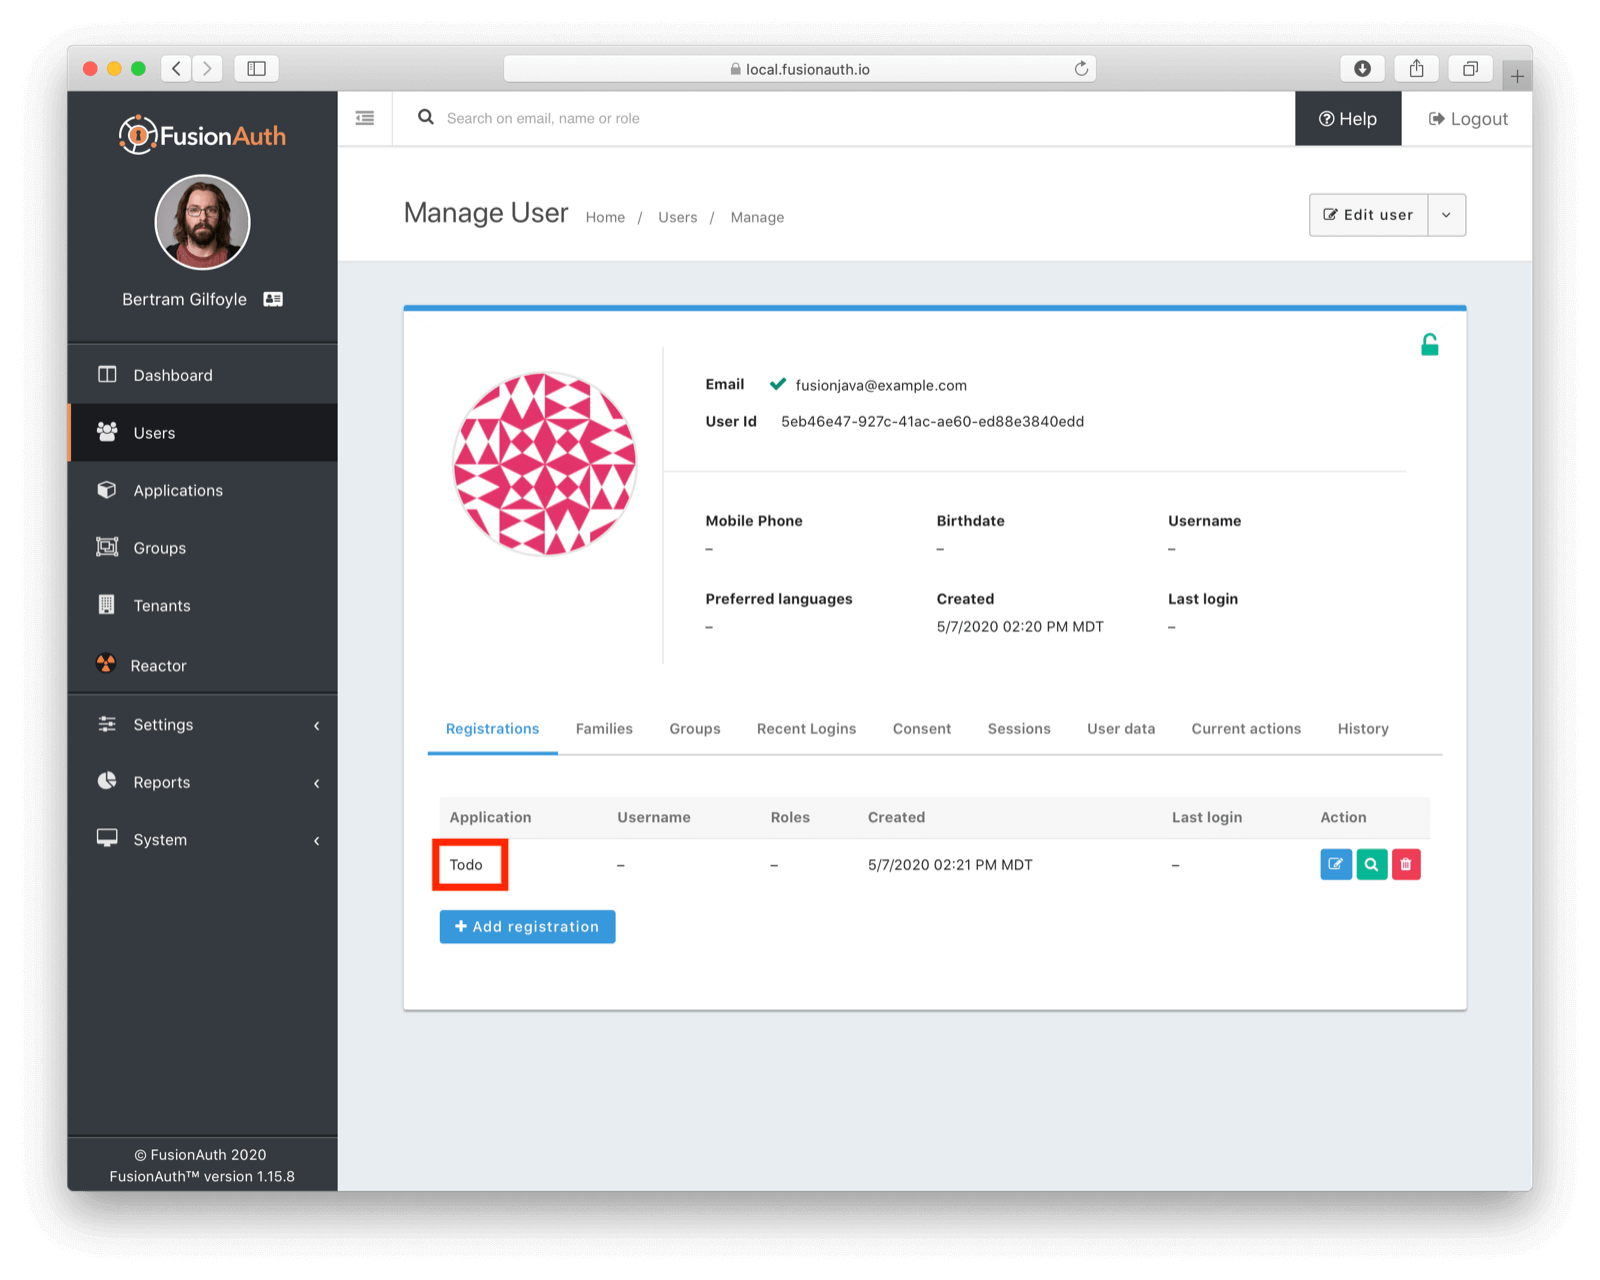
Notice from the image above that the user’s ID has been created for us. We’ll use this ID in the subsequent sections of this tutorial. Also, the user has been registered to the Todo application we created earlier.
Retrieving a user's profile details#
Now, let’s see how to retrieve the profile details of the user we created previously. To do this, we’ll use the retrieveUser method.
If you check the method definition, you’ll find that it only requires the userId parameter, which should be supplied as a java.util.UUID. We just need to provide the userId and we’ll get the specified user’s profile details. Here is the code for using the retrieveUser method to retrieve a user’s registered information:
package io.fusionauth.example;

import java.util.UUID;
import com.inversoft.error.Errors;
import io.fusionauth.client.FusionAuthClient;
import io.fusionauth.domain.api.UserResponse;
import com.inversoft.rest.ClientResponse;

public class RetrieveUserInfo {
  public static void main(String[] args) {
    ApplicationProperties.setupProperties();

    // Instantiate the client
    FusionAuthClient client = new FusionAuthClient(ApplicationProperties.getApiKey(),
        ApplicationProperties.getFusionAuthURL());

    UUID userId = UUID.fromString("5eb46e47-927c-41ac-ae60-ed88e3840edd");

    // Use the returned ClientResponse object
    ClientResponse<UserResponse, Errors> response = client.retrieveUser(userId);

    if (response.wasSuccessful()) {
      // Output the user's profile details
      System.out.println(response.successResponse.user);

    } else {
      // Handle errors
      System.out.println(response.errorResponse);
    }
  }
}
If you run the above code, here's the result you should see on the console:
{
  "encryptionScheme" : null,
  "factor" : null,
  "id" : "812478d4-c99d-4e55-9606-9e58e83938d3",
  "password" : null,
  "passwordChangeRequired" : false,
  "passwordLastUpdateInstant" : 1587287741465,
  "salt" : null,
  "verified" : true,
  "preferredLanguages" : [ ],
  "memberships" : [ ],
  "registrations" : [ {
    "data" : { },
    "preferredLanguages" : [ ],
    "tokens" : { },
    "applicationId" : "3c219e58-ed0e-4b18-ad48-f4f92793ae32",
    "authenticationToken" : null,
    "cleanSpeakId" : null,
    "id" : "7c105c78-c49d-40c1-a5a1-fcff013fd4eb",
    "insertInstant" : 1587299377006,
    "lastLoginInstant" : null,
    "roles" : [ "admin" ],
    "timezone" : null,
    "username" : null,
    "usernameStatus" : "ACTIVE",
    "verified" : true
  } ],
  "active" : true,
  "birthDate" : null,
  "cleanSpeakId" : null,
  "data" : { },
  "email" : "fusionjava@gmail.com",
  "expiry" : null,
  "firstName" : null,
  "fullName" : null,
  "imageUrl" : null,
  "insertInstant" : 1587287741325,
  "lastLoginInstant" : null,
  "lastName" : null,
  "middleName" : null,
  "mobilePhone" : null,
  "parentEmail" : null,
  "tenantId" : "31626538-3731-3762-3664-303931343339",
  "timezone" : null,
  "twoFactorDelivery" : "None",
  "twoFactorEnabled" : false,
  "twoFactorSecret" : null,
  "username" : "fusionjava",
  "usernameStatus" : "ACTIVE"
}
This would be useful for displaying on their profile page in the Todo application, for example.
Log in a user#
Let’s say we want to use the FusionAuth Java client to log in the user we created. We'd do this if we wanted to log a user in from our own application, rather than using FusionAuth's OAuth capabilities and the Authorization Code grant. You might do this if you were building a command line tool to add Todos or a mobile application.
We can do this by using the login method. This method allows us to log in a user programmatically using their stored credentials. We’ll also provide the ID of our Todo application.
To log the user in, we’ll use the LoginRequest class. It’s this object which we’ll pass as an argument to the login method. The LoginRequest class requires three string parameters: the ID of the application (as UUID), the user’s email/username, and their password. We’ll use the credentials we created earlier in this tutorial along with the ID of our Todo application.
Here is the code:
package io.fusionauth.example;

import java.util.UUID;
import com.inversoft.error.Errors;
import io.fusionauth.client.FusionAuthClient;
import io.fusionauth.domain.api.LoginRequest;
import io.fusionauth.domain.api.LoginResponse;
import com.inversoft.rest.ClientResponse;

public class UserLogin {
  public static void main(String[] args) {
    ApplicationProperties.setupProperties();

    // Instantiate the client
    FusionAuthClient client = new FusionAuthClient(ApplicationProperties.getApiKey(),
        ApplicationProperties.getFusionAuthURL());

    UUID appId = UUID.fromString("1aae68ac-d4d3-4e96-b24c-c9478a309673");

    // Create the request object
    LoginRequest request = new LoginRequest(appId, "fusionjava@example.com", "mypassword101");

    // Use the returned ClientResponse object
    ClientResponse<LoginResponse, Errors> response = client.login(request);

    if (response.wasSuccessful()) {
      System.out.println("Login successful");

    } else {
      // Handle errors
      System.out.println(response.errorResponse);
    }
  }

}
Changing a user's password#
To change a user's password, we'll use the changePasswordByIdentity method. This method allows us to change a user's password using their identity -- login ID and current password. This means we can let our users change their password in our Todo application. Note that doing this will change their password across all FusionAuth applications running within this tenant.
We'll use the ChangePasswordRequest class, which we'll pass as an argument to the changePasswordByIdentity method. ChangePasswordRequest requires three string parameters -- the login ID, the current password, and the new password.
Here is the code:
package io.fusionauth.example;

import com.inversoft.error.Errors;
import io.fusionauth.client.FusionAuthClient;
import io.fusionauth.domain.api.user.ChangePasswordRequest;

import com.inversoft.rest.ClientResponse;

public class ChangePassword {
  public static void main(String[] args) {
    ApplicationProperties.setupProperties();

    // Instantiate the client
    FusionAuthClient client = new FusionAuthClient(ApplicationProperties.getApiKey(),
        ApplicationProperties.getFusionAuthURL());

    // Creating the request object
    ChangePasswordRequest request = new ChangePasswordRequest("fusionjava@gmail.com", "oldpassword", "newpassword");

    // Use the returned ClientResponse object
    ClientResponse<Void, Errors> response = client.changePasswordByIdentity(request);

    if (response.wasSuccessful()) {
      System.out.println("Password change successful");

    } else {
      // Handle errors
      System.out.println(response.errorResponse);
    }
  }
}
Deactivating a user#
To deactivate a user, we'll use the deactivateUser method. We'll provide the ID of the user we are deactivating to this method. Deactivation means they cannot log in, which might happen if the credit card they used to sign up for the Todo app was declined.
Here is the code:
package io.fusionauth.example;
import java.util.UUID;
import com.inversoft.error.Errors;
import io.fusionauth.client.FusionAuthClient;
import com.inversoft.rest.ClientResponse;
public class DeactivateUser {
public static void main(String[] args) {
ApplicationProperties.setupProperties();
// Instantiate the client
FusionAuthClient client = new FusionAuthClient(ApplicationProperties.getApiKey(),
ApplicationProperties.getFusionAuthURL());
UUID userId = UUID.fromString("5eb46e47-927c-41ac-ae60-ed88e3840edd");
// Use the returned ClientResponse object
ClientResponse<Void, Errors> response = client.deactivateUser(userId);
if (response.wasSuccessful()) {
System.out.println("User deactivated successfully");
} else {
// Handle errors
System.out.println(response.errorResponse);
}
}
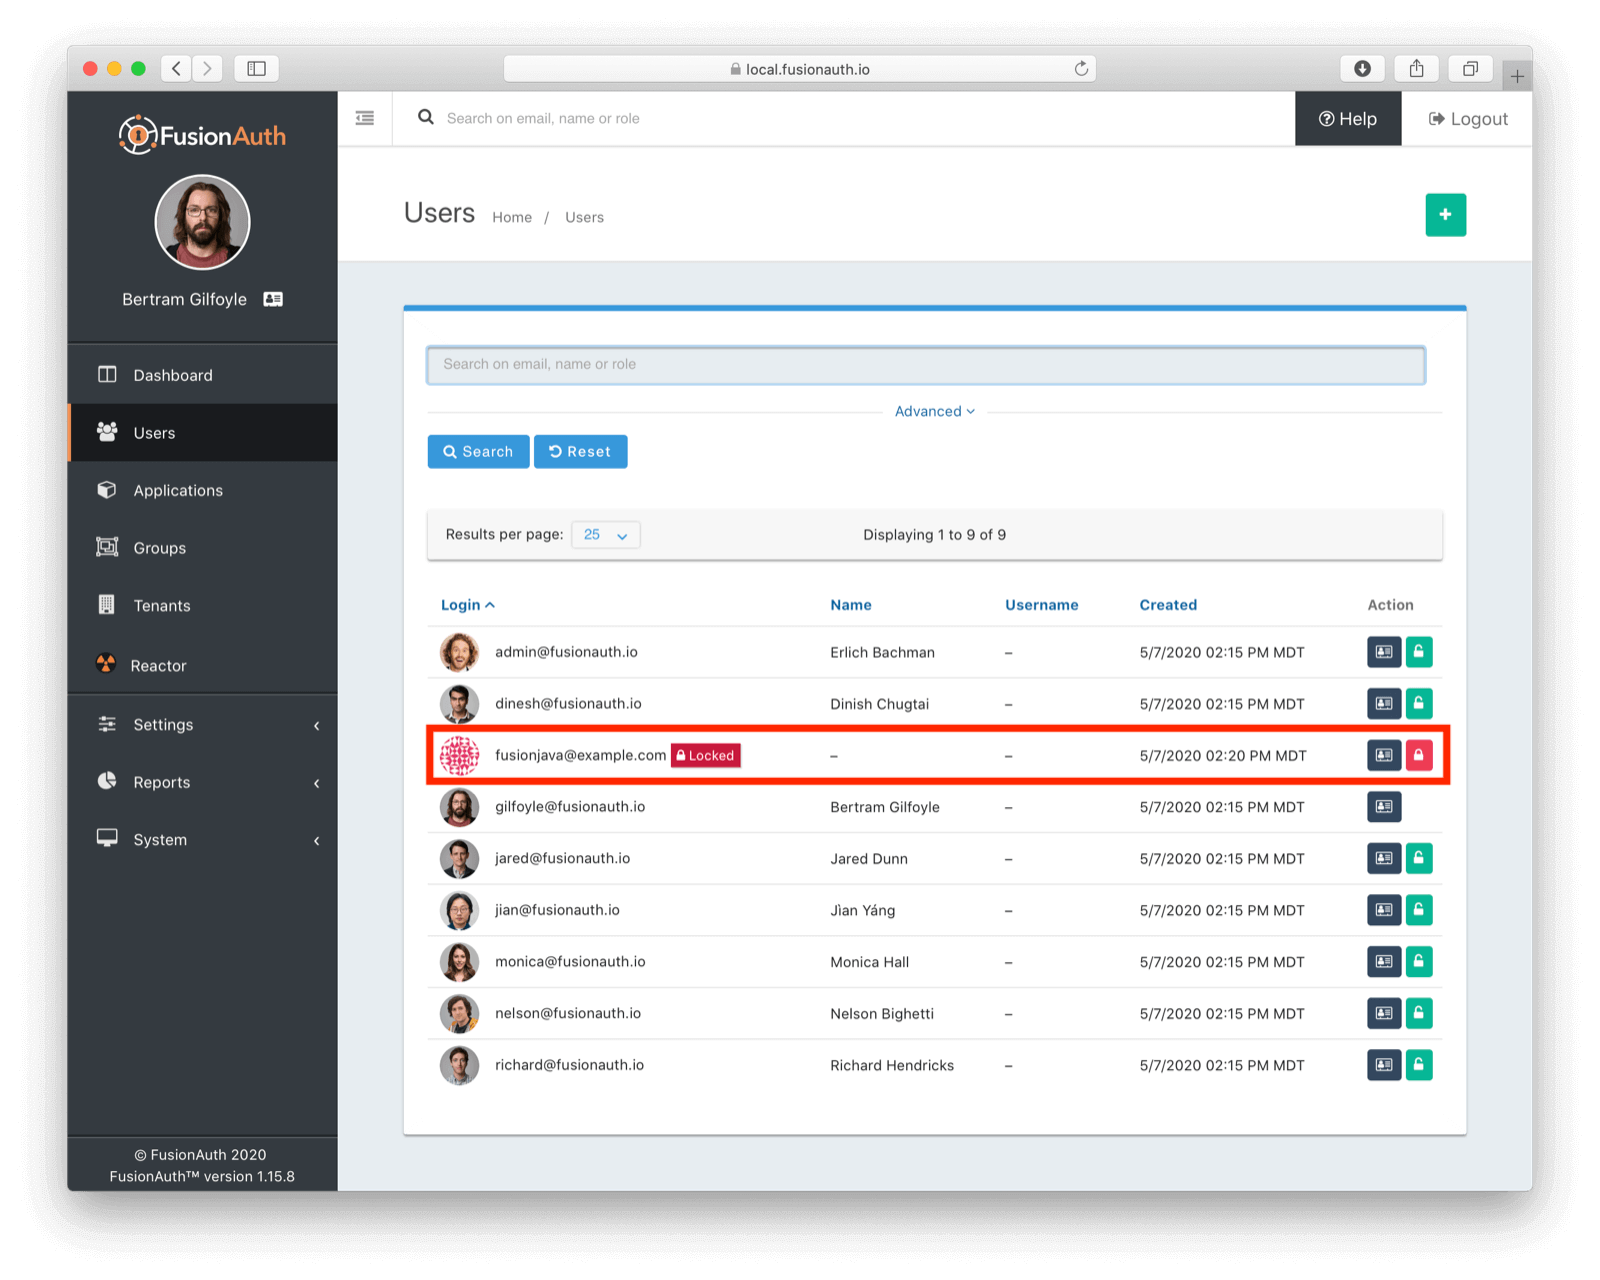
}Here's how the user will look in the admin interface when they've been deactivated:
Reactivating a user#
Next, to reactivate the user we just deactivated (perhaps they paid their bill and are now itching to add some todos), let's use the reactivateUser method and provide the ID of the user as its parameter.
Here is the code:
package io.fusionauth.example;

import java.util.UUID;
import com.inversoft.error.Errors;
import io.fusionauth.client.FusionAuthClient;
import io.fusionauth.domain.api.UserResponse;

import com.inversoft.rest.ClientResponse;

public class ReactivateUser {
  public static void main(String[] args) {
    ApplicationProperties.setupProperties();

    // Instantiate the client
    FusionAuthClient client = new FusionAuthClient(ApplicationProperties.getApiKey(),
        ApplicationProperties.getFusionAuthURL());

    UUID userId = UUID.fromString("5eb46e47-927c-41ac-ae60-ed88e3840edd");

    // Use the returned ClientResponse object
    ClientResponse<UserResponse, Errors> response = client.reactivateUser(userId);

    if (response.wasSuccessful()) {
      // Outputting the user's profile details
      System.out.println(response.successResponse.user);

    } else {
      // Handle errors
      System.out.println(response.errorResponse);
    }
  }
}
If you run the above code, and the request is successful, it'll reactivate the user and output their profile information on the console.
Deleting a user#
Finally, let's see how to delete a user from the FusionAuth server. To do this, we'll use the deleteUser method and provide the ID of the user as its parameter. You might do this if a user cancels their Todo app membership.
Remember that this method permanently deletes all the user information from your application. So, use it cautiously.
Here is the code:
package io.fusionauth.example;

import java.util.UUID;
import com.inversoft.error.Errors;
import io.fusionauth.client.FusionAuthClient;
import com.inversoft.rest.ClientResponse;

public class DeleteUser {
  public static void main(String[] args) {
    ApplicationProperties.setupProperties();

    // Instantiate the client
    FusionAuthClient client = new FusionAuthClient(ApplicationProperties.getApiKey(),
        ApplicationProperties.getFusionAuthURL());

    UUID userId = UUID.fromString("5eb46e47-927c-41ac-ae60-ed88e3840edd");

    // Use the returned ClientResponse object
    ClientResponse<Void, Errors> response = client.deleteUser(userId);

    if (response.wasSuccessful()) {
      System.out.println("Deleted!");

    } else {
      // Handle errors
      System.out.println(response.errorResponse);
    }
  }
}
If you run the above code, and the request is successful, you'll get a response of Deleted!, indicating that the user has been deleted from FusionAuth.
Deactivating an application#
To deactivate an application, we'll use the deactivateApplication method and provide the ID of the application as its parameter. This disables the application but does not delete all the data. You might do this if you need to disable logins for all users due for system maintenance.
Here is the code:
package io.fusionauth.example;

import java.util.UUID;
import io.fusionauth.client.FusionAuthClient;
import com.inversoft.error.Errors;
import com.inversoft.rest.ClientResponse;

public class DeactivateApplication {
  public static void main(String[] args) {
    ApplicationProperties.setupProperties();

    // Instantiate the client
    FusionAuthClient client = new FusionAuthClient(ApplicationProperties.getApiKey(),
        ApplicationProperties.getFusionAuthURL());

    UUID appId = UUID.fromString("991001b4-d196-4204-b483-a0ed5dbf7666");

    // Use the returned ClientResponse object
    ClientResponse<Void, Errors> response = client.deactivateApplication(appId);

    if (response.wasSuccessful()) {
      System.out.println("Application deactivated successfully");

    } else {
      // Handle errors
      System.out.println(response.errorResponse);
    }
  }
}
Reactivating an application#
To reactivate the application we just deactivated, because the system maintenance is done, let's use the reactivateApplication method and provide the ID of the application as its parameter.
Here is the code:
package io.fusionauth.example;

import java.util.UUID;
import io.fusionauth.client.FusionAuthClient;
import io.fusionauth.domain.api.ApplicationResponse;

import com.inversoft.error.Errors;
import com.inversoft.rest.ClientResponse;

public class ReactivateApplication {
  public static void main(String[] args) {
    ApplicationProperties.setupProperties();

    // Instantiate the client
    FusionAuthClient client = new FusionAuthClient(ApplicationProperties.getApiKey(),
        ApplicationProperties.getFusionAuthURL());

    UUID appId = UUID.fromString("991001b4-d196-4204-b483-a0ed5dbf7666");

    // Use the returned ClientResponse object
    ClientResponse<ApplicationResponse, Errors> response = client.reactivateApplication(appId);

    if (response.wasSuccessful()) {
      // Output the application's details
      System.out.println(response.successResponse.application);

    } else {
      // Handle errors
      System.out.println(response.errorResponse);
    }
  }
}
If you run the above code, and the request is successful, it'll reactivate the application. You'll also get the bonus of printing out the application's details on the console.
Deleting an application#
Lastly, let's see how to delete an application from FusionAuth. To do this, we'll use the deleteApplication method and provide the ID of the application as its parameter.
Remember, this method permanently deletes the application from FusionAuth. So, you need to use it cautiously. Most of the time the better choice is to deactivate the application. But maybe you are no longer in the Todo app business and want to remove it from your servers.
Here is the code:
package io.fusionauth.example;

import java.util.UUID;
import io.fusionauth.client.FusionAuthClient;

import com.inversoft.error.Errors;
import com.inversoft.rest.ClientResponse;

public class DeleteApplication {
  public static void main(String[] args) {
    ApplicationProperties.setupProperties();

    // Instantiate the client
    FusionAuthClient client = new FusionAuthClient(ApplicationProperties.getApiKey(),
        ApplicationProperties.getFusionAuthURL());

    UUID appId = UUID.fromString("991001b4-d196-4204-b483-a0ed5dbf7666");

    // Use the returned ClientResponse object
    ClientResponse<Void, Errors> response = client.deleteApplication(appId);

    if (response.wasSuccessful()) {
      // Output the application's details
      System.out.println("Deleted!");

    } else {
      // Handle errors
      System.out.println(response.errorResponse);
    }
  }
}
If you run the above code, and the request is successful, you'll get a response of Deleted!, indicating that the application has been deleted from FusionAuth.
Conclusion#
Throughout this article, you've seen how it is easy to integrate FusionAuth with Java using the client library. The library provides an easy-to-use native Java binding to the FusionAuth REST API, which allows you to quickly complete your identity and user management tasks.
Of course, we've just scratched the surface of the things you can achieve with the FusionAuth Java client. You can head over to the documentation and discover its other awesome capabilities.
Next steps you might want to take to further explore the FusionAuth Java client library:
- Add a user to a group
- Retrieve all the users in a group
- Log a user out