


In this tutorial, we will set up a React Native application to work with OAuth. We’ll use FusionAuth for auth, but the React Native code should work with any OAuth compliant server.
First, we’ll be installing and configuring FusionAuth. Then we’ll set up a React Native project. We’ll then perform an Authorization Code grant from within the React Native app. Finally, we’ll request information from an OIDC endpoint. With that data, we’ll display the user’s email in the React Native application.

This is a lot, but the ride will be fun. Ready to get going?
Requirements
Here’s what you need to get started:
- Node.js version >= 18.0
- VSCode or any other text editor
gitnpx- Xcode, if building for iOS
- Homebrew (optional)
What you need to know about OAuth
If you are a web developer, you may be familiar with OAuth. With web development, we have three players:
The browser -> The server -> The OAuth serverThe browser talks to the server, which talks to the OAuth server. The OAuth server generates access tokens which are given to the server. The server stores them securely in the session, and when needed, passes them to other APIs for authorization.
However, with a mobile device, things change a bit. A corresponding scenario might be like this:
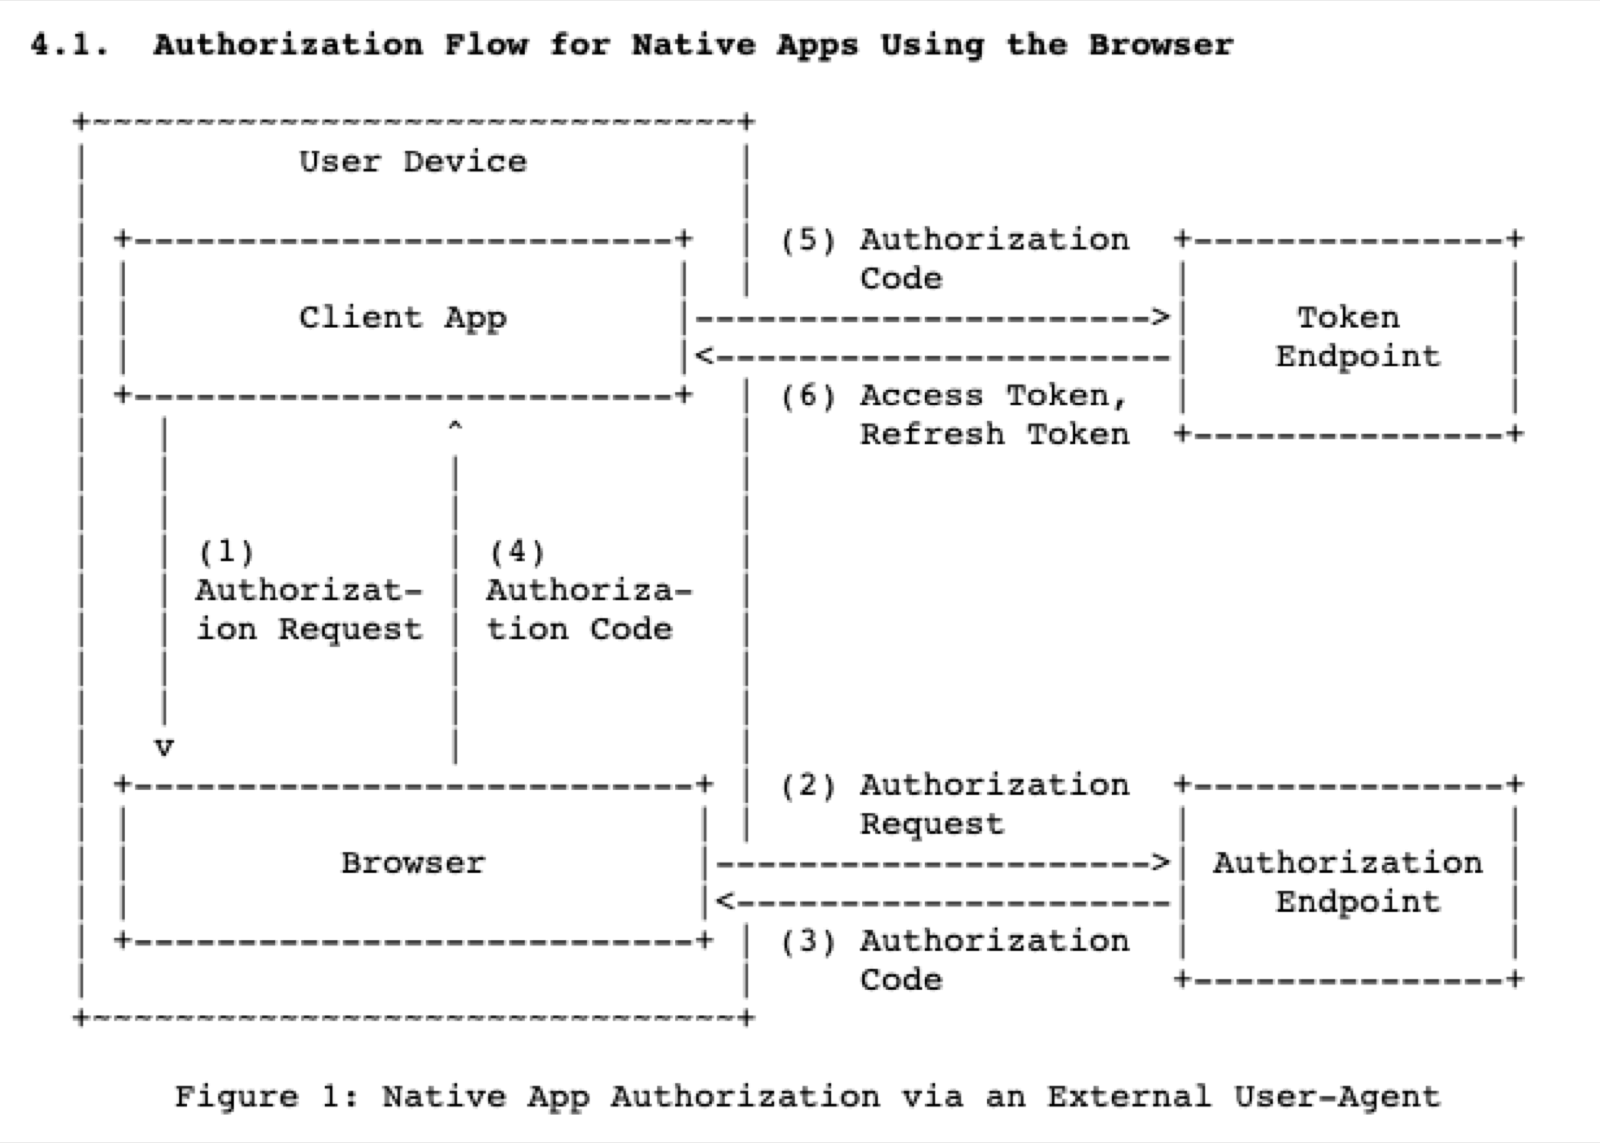
The mobile device -> The server -> The OAuth serverHowever, this architecture can be simplified. The server can be removed; the mobile device can handle the callbacks directly from the OAuth server. In this tutorial, we’ll use the Authorization Code grant with the PKCE extension. Below is a suggested flow from RFC 8252, and this is what we’ll be implementing.
Next up, let’s configure the OAuth server and set up our coding environment.
Setting up FusionAuth as your auth provider
If you already have a FusionAuth Cloud instance, you can use that, but for the sake of simplicity, this tutorial will assume you are using a locally hosted instance. There are detailed setup guides in the documentation, but the short version is that once you have Docker and Docker Compose set up and installed correctly, you can run the following command in a new directory to download and execute the necessary files.
curl -o docker-compose.yml https://raw.githubusercontent.com/FusionAuth/fusionauth-containers/main/docker/fusionauth/docker-compose.yml
curl -o .env https://raw.githubusercontent.com/FusionAuth/fusionauth-containers/main/docker/fusionauth/.env
docker compose up
Configure the FusionAuth application
In this step, we are going to configure a FusionAuth Application. This is different from the FusionAuth server instance or the React Native application.
In FusionAuth, an Application is anything a user might log in to. To configure this, sign in to the FusionAuth administrative interface and navigate to Applications .
From there, create a new application.
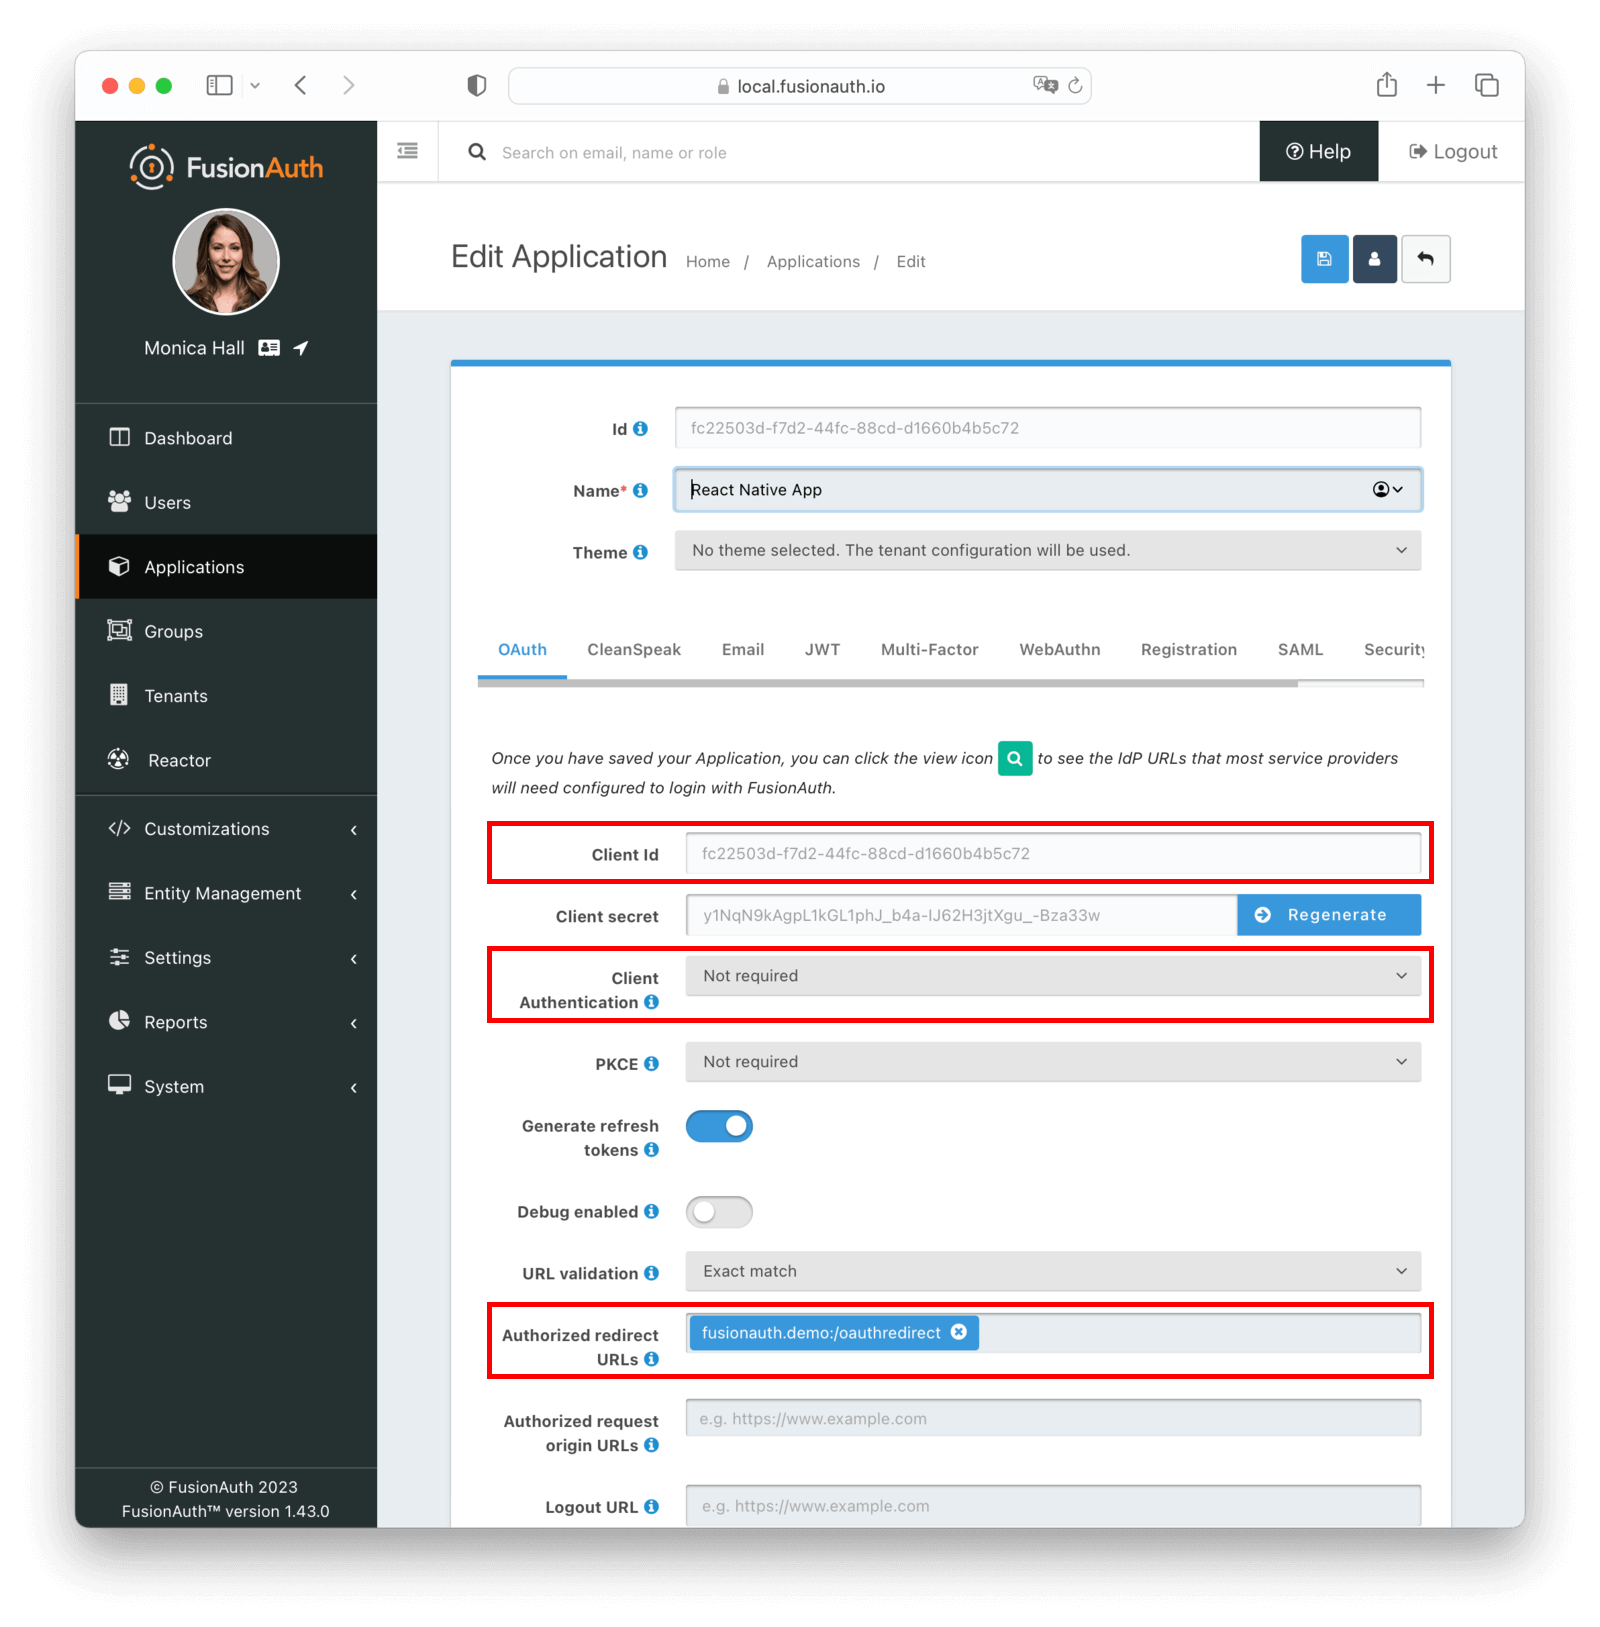
Once you’ve done that, navigate to the OAuth tab, set “Client Authentication” to Not required, and add fusionauth.demo:/oauthredirect to the “Authorized Redirect URLs”. We’ll use this redirect URL in our React Native application later.
Also, note the value of “Client Id”; we’ll need that later too. Click Save, then edit the Application again by clicking the blue Edit button to double check your setup.
When properly configured, the application details screen should look like this:
Make sure to register your user to the new application. Doing so creates a relationship between a user and the newly created application.
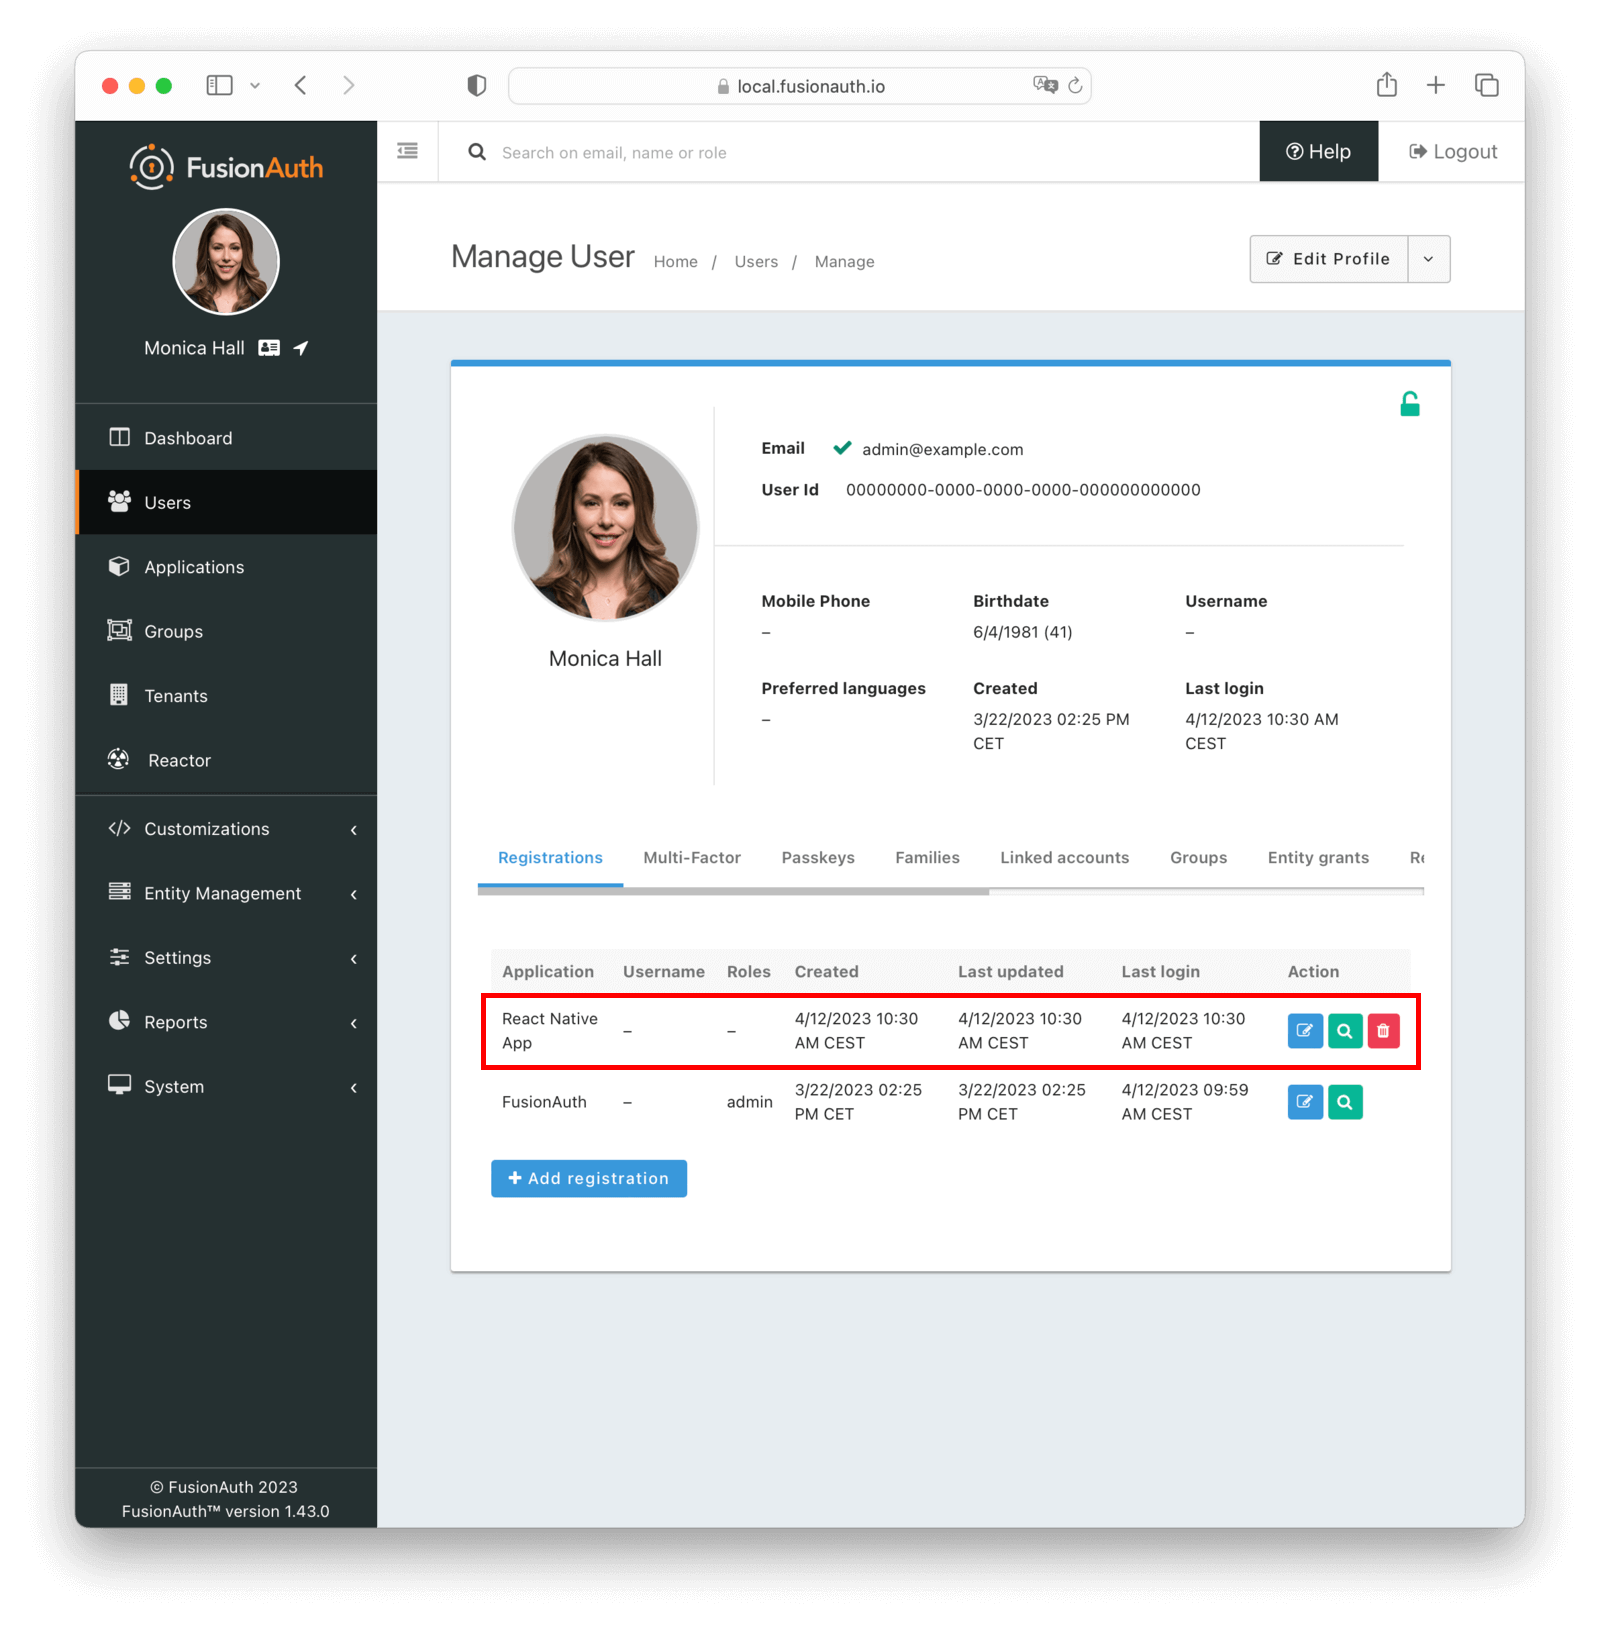
If you want, you can add more users in the Users tab, but make sure to register them with your new application. Now, we move on to setting up the React Native project.
Setting up the React Native development environment
Since we are going to use the React Native command line interface (CLI) for development, we must have the React Native development environment installed. For installation instructions, please follow the official documentation. You’ll also want to make sure you select React Native CLI Quickstart rather than Expo Go Quickstart. These instructions also walk you through starting your application, so if you are new to React Native, make sure you give them a read.
React Native project setup
To create a new React Native project, run this command:
npx react-native@latest init RNfusionauthWe’ll be making additional changes to these files as we build out the application.
If you want to skip to Run the app, grab the Apache2 licensed code from the GitHub repository.
Installing react-native-app-auth to communicate with the OAuth 2.0 and OpenId Connect server
A key dependency of our application is the react-native-app-auth package. This sets up a bridge between the AppAuth-iOS and AppAuth-Android SDKs for communicating with OAuth 2.0 and OpenID Connect providers.
This library should support any server that implements the OAuth2 spec, as FusionAuth does.
This package supports the Authorization Code grant and enables the PKCE extension by default. This is important because a mobile device is not a “confidential client”, and we want to ensure malicious actors can’t intercept our authorization code.
To install react-native-app-auth, run the following in the project directory:
npm i react-native-app-authUsing this library will help us build the OAuth integration quickly and securely. It takes care of many of the steps specified by RFC 8252; we just have to make sure to kick off the process (step 1) and receive and store the access token (step 6). As a reminder, here’s the diagram from the RFC:
Setting up iOS auth
Now, we’ll configure auth for an iOS build of the React Native app. The basics will be covered below, but if you want to learn more about other options, check out the docs.
First, we need to install the cacao pod by running the command shown below:
cd ios ; pod installThen, we need to open the React Native project with Xcode. Edit the ios/RNfusionauth/info.plist file and register the redirect URL scheme as shown below:
<?xml version="1.0" encoding="UTF-8"?>
<!DOCTYPE plist PUBLIC "-//Apple//DTD PLIST 1.0//EN" "http://www.apple.com/DTDs/PropertyList-1.0.dtd">
<plist version="1.0">
<dict>
	<key>CFBundleDevelopmentRegion</key>
	<string>en</string>
	<key>CFBundleDisplayName</key>
	<string>RNfusionauth</string>
	<key>CFBundleExecutable</key>
	<string>$(EXECUTABLE_NAME)</string>
	<key>CFBundleIdentifier</key>
	<string>$(PRODUCT_BUNDLE_IDENTIFIER)</string>
	<key>CFBundleInfoDictionaryVersion</key>
	<string>6.0</string>
	<key>CFBundleName</key>
	<string>$(PRODUCT_NAME)</string>
	<key>CFBundlePackageType</key>
	<string>APPL</string>
	<key>CFBundleShortVersionString</key>
	<string>$(MARKETING_VERSION)</string>
	<key>CFBundleSignature</key>
	<string>????</string>
	<key>CFBundleVersion</key>
	<string>$(CURRENT_PROJECT_VERSION)</string>
	<key>LSRequiresIPhoneOS</key>
	<true/>
	<key>NSAppTransportSecurity</key>
	<dict>
		<key>NSExceptionDomains</key>
		<dict>
			<key>localhost</key>
			<dict>
				<key>NSExceptionAllowsInsecureHTTPLoads</key>
				<true/>
			</dict>
		</dict>
	</dict>
	<key>NSLocationWhenInUseUsageDescription</key>
	<string></string>
	<key>UILaunchStoryboardName</key>
	<string>LaunchScreen</string>
	<key>UIRequiredDeviceCapabilities</key>
	<array>
		<string>armv7</string>
	</array>
	<key>UISupportedInterfaceOrientations</key>
	<array>
		<string>UIInterfaceOrientationPortrait</string>
		<string>UIInterfaceOrientationLandscapeLeft</string>
		<string>UIInterfaceOrientationLandscapeRight</string>
	</array>
	<key>UIViewControllerBasedStatusBarAppearance</key>
	<false/>
	<key>CFBundleURLTypes</key>
	<array>
		<dict>
			<key>CFBundleURLName</key>
			<string>com.your.app.identifier</string>
			<key>CFBundleURLSchemes</key>
			<array>
				<string>fusionauth.demo</string>
			</array>
		</dict>
	</array>
</dict>
</plist>
Here, the CFBundleURLSchemes defines the URL schemes handled by this application. The scheme we are registering, fusionauth.demo, should look familiar, as we configured FusionAuth to redirect to a URL with that scheme in it. If you modify it here, you should modify it there as well.
The last step is to change ios/RNfusionauth/AppDelegate.h and ios/RNfusionauth/AppDelegate.mm to include needed imports and properties:
Here’s the AppDelegate.h file contents:
#import <RCTAppDelegate.h>
#import <UIKit/UIKit.h>
#import "RNAppAuthAuthorizationFlowManager.h"

@interface AppDelegate : RCTAppDelegate <RNAppAuthAuthorizationFlowManager>

@property(nonatomic, weak)id<RNAppAuthAuthorizationFlowManagerDelegate>authorizationFlowManagerDelegate;

@end
Here’s the AppDelegate.mm file contents:
#import "AppDelegate.h"

#import <React/RCTBundleURLProvider.h>
#import <React/RCTLinkingManager.h>

@implementation AppDelegate

- (BOOL)application:(UIApplication *)application didFinishLaunchingWithOptions:(NSDictionary *)launchOptions
{
  self.moduleName = @"RNfusionauth";
  // You can add your custom initial props in the dictionary below.
  // They will be passed down to the ViewController used by React Native.
  self.initialProps = @{};

  return [super application:application didFinishLaunchingWithOptions:launchOptions];
}

- (NSURL *)sourceURLForBridge:(RCTBridge *)bridge
{
#if DEBUG
  return [[RCTBundleURLProvider sharedSettings] jsBundleURLForBundleRoot:@"index"];
#else
  return [[NSBundle mainBundle] URLForResource:@"main" withExtension:@"jsbundle"];
#endif
}

- (BOOL)application:(UIApplication *)app
            openURL:(NSURL *)url
            options:(NSDictionary<NSString *, id> *)options
{
  if ([self.authorizationFlowManagerDelegate resumeExternalUserAgentFlowWithURL:url]) {
    return YES;
  }
  return [RCTLinkingManager application:app openURL:url options:options];
}

/// This method controls whether the `concurrentRoot`feature of React18 is turned on or off.
///
/// @see: https://reactjs.org/blog/2022/03/29/react-v18.html
/// @note: This requires to be rendering on Fabric (i.e. on the New Architecture).
/// @return: `true` if the `concurrentRoot` feature is enabled. Otherwise, it returns `false`.
- (BOOL)concurrentRootEnabled
{
  return true;
}

@end
The changes in AppDelegate.mm allows authentication with Magic Links.
Setting up auth for Android
For Android, we need additional configuration to capture the authorization redirect. Add the following property to the defaultConfig object in the android/app/build.gradle file:
android {
 defaultConfig {
   manifestPlaceholders = [
     appAuthRedirectScheme: 'fusionauth.demo'
   ]
 }
}
Here, the appAuthRedirectScheme, fusionauth.demo, is another scheme definition, the same as with iOS. If you modify it here, you should modify it in the FusionAuth administrative interface and in the iOS configuration as well.
However, a new issue pops up when we start working on the Android application. Developing and debugging an Android app on a Mac is difficult as the emulator is not fully supported. Among other issues, the emulator is slow when compared to the iOS emulator.
A better solution is to use an actual Android mobile device. When you are doing so, how can you connect the FusionAuth server, running on localhost, to the device, which is on a Wi-Fi or cell network? The solution is to use a local tunnel service such as ngrok.
Coding a React Native application to use OAuth and FusionAuth
Finally, the code!
Big picture, we’re going to be building out our logic and views in the App.tsx file. For a bigger project, you’d split this code up into components, but for our tutorial having one file will make things easier. We’ll use libraries to manage authorization and secure storage of our data, however.
Here’s what App.tsx will look like when we are done (don’t worry, it looks like a lot, but we’ll explain most of it):
import React, {useState} from 'react';
import {
  Alert,
  Image,
  Pressable,
  SafeAreaView,
  StatusBar,
  StyleSheet,
  Text,
  useColorScheme,
  View,
} from 'react-native';
import {AuthConfiguration, authorize} from 'react-native-app-auth';
import * as Keychain from 'react-native-keychain';

import {Colors} from 'react-native/Libraries/NewAppScreen';

import Config from 'react-native-config';

const configs: Record<string, AuthConfiguration> = {
  fusionauth: {
    issuer: Config.FUSIONAUTH_SERVER_URL!,
    clientId: Config.FUSIONAUTH_CLIENT_ID!,
    redirectUrl: 'fusionauth.demo:/oauthredirect',
    scopes: ['offline_access'],
  },
};

const defaultAuthState = {
  hasLoggedInOnce: false,
  accessToken: '',
  accessTokenExpirationDate: '',
  refreshToken: '',
};

function UserInfo({
  text,
  value,
}: {
  text: string;
  value?: string | Date;
}): JSX.Element {
  const isDarkMode = useColorScheme() === 'dark';

  return (
    <View style={styles.userInfo}>
      <Text
        style={{
          ...styles.userInfoLabel,
          ...(isDarkMode ? styles.textDark : styles.textLight),
        }}>
        {text}
      </Text>
      <Text
        style={{
          ...styles.userInfoValue,
          ...(isDarkMode ? styles.textDark : styles.textLight),
        }}
        numberOfLines={1}>
        {value?.toString()}
      </Text>
    </View>
  );
}

function App(): JSX.Element {
  const isDarkMode = useColorScheme() === 'dark';

  const backgroundStyle = {
    backgroundColor: isDarkMode ? Colors.darker : Colors.lighter,
    textColor: isDarkMode ? Colors.light : Colors.dark,
  };

  const [authState, setAuthState] = useState(defaultAuthState);

  const handleAuthorize = async () => {
    try {
      const newAuthState = await authorize(configs.fusionauth);

      setAuthState({
        hasLoggedInOnce: true,
        ...newAuthState,
      });

      await Keychain.setGenericPassword(
        'accessToken',
        newAuthState.accessToken,
      );
    } catch (error) {
      Alert.alert(
        'Failed to log in',
        (error as Record<string, never>)?.message,
      );
    }
  };

  const getAccessToken = async (): Promise<string | undefined> => {
    try {
      // Retrieve the credentials
      const credentials = await Keychain.getGenericPassword();
      if (credentials) {
        return credentials.password;
      } else {
        console.log('No credentials stored');
      }
    } catch (error) {
      console.log("Keychain couldn't be accessed!", error);
    }
  };

  const [userInfo, setUserInfo] = useState<Record<string, string> | null>(null);

  const getUser = async () => {
    try {
      const access_token = await getAccessToken();
      if (access_token !== null) {
        fetch(configs.fusionauth.issuer + '/oauth2/userinfo', {
          method: 'GET',
          headers: {
            Authorization: 'Bearer ' + access_token,
          },
        })
          .then(response => response.json())
          .then(json => {
            console.log(json);
            setUserInfo(json);
          })
          .catch(error => {
            console.error(error);
          });
      }
    } catch (e) {
      console.log(e);
    }
  };

  return (
    <SafeAreaView style={{...backgroundStyle, ...styles.safeArea}}>
      <StatusBar
        barStyle={isDarkMode ? 'light-content' : 'dark-content'}
        backgroundColor={backgroundStyle.backgroundColor}
      />
      <View style={styles.header}>
        <Image
          source={
            isDarkMode
              ? require('./fusion_auth_logo_dark.png')
              : require('./fusion_auth_logo.png')
          }
          style={styles.headerImage}
        />
      </View>
      <View style={styles.container}>
        {authState.accessToken ? (
          <View style={styles.userInfoContainer}>
            <UserInfo text={'Access token'} value={authState.accessToken} />
            <UserInfo
              text={'Expiration'}
              value={authState.accessTokenExpirationDate}
            />
            {userInfo ? (
              <View>
                <UserInfo text={'User ID'} value={userInfo.sub} />
                <UserInfo text={'Email'} value={userInfo.email} />
                <UserInfo text={'Given Name'} value={userInfo.given_name} />
                <UserInfo text={'Family Name'} value={userInfo.family_name} />
                {userInfo.picture ? (
                  <Image
                    source={{uri: userInfo.picture}}
                    style={styles.userImage}
                  />
                ) : null}
              </View>
            ) : (
              <Pressable
                onPress={() => getUser()}
                android_ripple={{color: 'white'}}
                style={({pressed}) => [
                  styles.button,
                  pressed ? styles.buttonPressed : null,
                ]}>
                <Text>Get User</Text>
              </Pressable>
            )}
          </View>
        ) : (
          <Pressable
            onPress={() => handleAuthorize()}
            android_ripple={{color: 'white'}}
            style={({pressed}) => [
              styles.button,
              pressed ? styles.buttonPressed : null,
            ]}>
            <Text>Login with FusionAuth</Text>
          </Pressable>
        )}
      </View>
    </SafeAreaView>
  );
}

const styles = StyleSheet.create({
  safeArea: {
    flex: 1,
  },
  header: {
    paddingHorizontal: 40,
  },
  headerImage: {
    width: '100%',
    resizeMode: 'contain',
  },
  container: {
    flex: 1,
    flexDirection: 'column',
    alignItems: 'center',
    justifyContent: 'space-evenly',
  },
  buttonPressed: {
    backgroundColor: '#FF963B',
  },
  button: {
    backgroundColor: '#f58321',
    padding: 20,
  },

  userInfoContainer: {
    padding: 20,
  },
  userInfo: {
    flexDirection: 'row',
    width: '100%',
    justifyContent: 'space-evenly',
    gap: 10,
  },
  userInfoLabel: {
    fontWeight: 'bold',
    color: 'green',
    flex: 0,
  },
  userInfoValue: {
    textAlign: 'right',
    flex: 1,
    overflow: 'hidden',
  },
  userImage: {
    marginTop: 20,
    width: 100,
    height: 100,
    borderRadius: 50,
    alignSelf: 'center',
  },

  textLight: {
    color: Colors.darker,
  },
  textDark: {
    color: Colors.lighter,
  },
});

export default App;
[//]: # (TODO when we move to new blogging platform, have these fragments pulled out instead of hardcoded in here, because they’ll decay if the content of App.tsx changes.)
First, we need to add necessary imports to App.tsx:
//...
import React, { useState, useCallback, useMemo } from 'react';
import { Alert } from 'react-native';
import { authorize, refresh, revoke, prefetchConfiguration } from 'react-native-app-auth';
//...
Next, we need to create a configs object. This will contain details such as the application’s client id:
//...
const configs: Record<string, AuthConfiguration> = {
  fusionauth: {
    issuer: 'https://xyz.ngrok.io',
    clientId: 'fc22503d-f7d2-44fc-88cd-d1660b4b5c72',
    redirectUrl: 'fusionauth.demo:/oauthredirect',
    scopes: ['offline_access'],
  },
};
//...
More on the configuration parameters, as this is something you’ll need to change in your code. The issuer is the URL for the FusionAuth server; you can see that we’ve set it to our ngrok URL. The clientId is the ID that we grabbed from the FusionAuth administrative user interface.
The redirectUrl is the URL that we set up in the FusionAuth application, with the scheme we used in configuring iOS and Android. The value oauthredirect is a callback path defined by the React Native app auth library. Make sure you update the issuer and clientId keys in this object with your configuration values.
We can also add any additional parameters (none, in this case). If you need custom scopes, this is the place to add them as well. We’re requesting the offline_access scope so that the OAuth server will return a refresh_token. Such a token can be used to request additional access tokens should our current one expire.
Next, create a default auth state object in the file. This will be modified as our user first views the React Native app, then authenticates. This contains information like the token values and expiration dates.
//...
const defaultAuthState = {
  hasLoggedInOnce: false,
  accessToken: '',
  accessTokenExpirationDate: '',
  refreshToken: ''
};

const [authState, setAuthState] = useState(defaultAuthState);
//...
Now, we are ready to configure the code which receives the token.
Configuring React Native OAuth authorization
Let’s create the function to get the token; this will use the previously created configs object. It will also use the authorize function from the react-native-app-auth package. It will do all the heavy lifting and connect with the OAuth server. The implementation of the function is below:
//...
const handleAuthorize = async () => {
  try {
    const newAuthState = await authorize(configs.fusionauth);

    setAuthState({
      hasLoggedInOnce: true,
      ...newAuthState,
    });
  } catch (error) {
    Alert.alert(
      'Failed to log in',
      (error as Record<string, never>)?.message,
    );
  }
};
//...
newAuthState is returned from the authorize function, as we can set our auth state to that returned value. Now we have the code to interface with FusionAuth, so we’ll want to give the user a way to invoke the code.
Building the user interface
So, we need to create a user interface (UI). We’ll create a simple UI to begin authentication. After the user has logged in, we’ll display the access token. The access token is what FusionAuth provides once a user has successfully signed in.
Of course, you typically don’t want to simply display or store the access token. You want it because it allows your application to make other API calls, often to gather more information to display to the user. Later in this tutorial, we’ll use an access token to retrieve user information from an OpenID Connect endpoint, and display that in our application. In a real application, you’d present the access token to other APIs to gain, well, access to data and functionality.
You can also provide the token to APIs that let the application send an email, record a todo or place an order. We won’t build those integrations today, however.
To set up the UI, add this to App.tsx:
//...
function UserInfo({text, value,}: { text: string; value?: string | Date; }): JSX.Element {
  const isDarkMode = useColorScheme() === 'dark';

  return (
    <View style={styles.userInfo}>
      <Text
        style={{
          ...styles.userInfoLabel,
          ...(isDarkMode ? styles.textDark : styles.textLight),
        }}>
        {text}
      </Text>
      <Text
        style={{
          ...styles.userInfoValue,
          ...(isDarkMode ? styles.textDark : styles.textLight),
        }}
        numberOfLines={1}>
        {value?.toString()}
      </Text>
    </View>
  );
}
//...
return (
  <SafeAreaView style={{...backgroundStyle, ...styles.safeArea}}>
      <StatusBar
        barStyle={isDarkMode ? 'light-content' : 'dark-content'}
        backgroundColor={backgroundStyle.backgroundColor}
      />
      <View style={styles.header}>
        <Image
          source={
              isDarkMode
                ? require('./fusion_auth_logo_dark.png')
                : require('./fusion_auth_logo.png')
          }
          style={styles.headerImage}
        />
      </View>
      <View style={styles.container}>
        {authState.accessToken ? (
          <View style={styles.userInfoContainer}>
              <UserInfo text={'Access token'} value={authState.accessToken} />
              <UserInfo
                text={'Expiration'}
                value={authState.accessTokenExpirationDate}
              />
          </View>
        ) : (
          <Pressable
              onPress={() => handleAuthorize()}
              android_ripple={{color: 'white'}}
              style={({pressed}) => [
                styles.button,
                pressed ? styles.buttonPressed : null,
              ]}>
              <Text>Login with FusionAuth</Text>
          </Pressable>
        )}
      </View>
  </SafeAreaView>
);
The app will display one of two states, depending on whether we have an accessToken. Now, we can run the app in the iOS simulator by typing npx react-native run-ios in your terminal.
You can improve the look and feel of the application modifying the styles object and adding more CSS, but we’ll leave that as an exercise for the reader. Following best practices, notice that the mobile application opens up a system browser for user authentication, rather than a webview or embedded user-agent.
Securely storing the JWT
Once the user has successfully authenticated, we will have an access token, and possibly a refresh token, which should be stored securely. The access token is a JSON Web Token, also known as a JWT. Storing sensitive data like this JWT in Asyncstorage, the typical React Native client storage option, is bad practice. We can use a third-party package to access the iOS Keychain and Android secure storage, a better choice.
There are many options, but the Formidable team, the creators of the react-native-app-auth package we are using, recommend react-native-keychain. Install it by running the following command:
npm i react-native-keychain
cd ios ; pod install
After you have installed react-native-keychain, you will have to rebuild the application with npx react-native run-ios or npx react-native run-android.
To store the access token after successful authentication, add this to the App.tsx file:
//...
const handleAuthorize = async () => {
  try {
    const newAuthState = await authorize(configs.fusionauth);

    setAuthState({
      hasLoggedInOnce: true,
      ...newAuthState,
    });

    await Keychain.setGenericPassword(
      'accessToken',
      newAuthState.accessToken,
    );
  } catch (error) {
    Alert.alert(
      'Failed to log in',
      (error as Record<string, never>)?.message,
    );
  }
};
//...
Before, we were calling setAuthState to store the JWT in memory, but now we’re storing it securely for future invocations. This is the line we added to do so:
//...
await Keychain.setGenericPassword(
  'accessToken',
  newAuthState.accessToken,
);
//...
The flip side of storing the token in this manner is that we must create a function to check for credentials before returning the key. If it’s not there, we’ll return null:
//...
const getAccessToken = async () => {
  try {
    // Retrieve the credentials
    const credentials = await Keychain.getGenericPassword();
    if (credentials) {
      return credentials.password
    } else {
      console.log('No credentials stored');
    }
  } catch (error) {
    console.log("Keychain couldn't be accessed!", error);
  }
}
//...
Now we can, when handed an access token, securely store and retrieve the JWT. Next, let’s look at what we can do with the token.
Retrieving more information about the authenticated user
Since we have the access token, we can now retrieve user data from FusionAuth. Of course, as mentioned above, you could also use the access token to call other services or APIs, but that’s beyond the scope of this tutorial.
To retrieve user information, create a new function called getUser in the App.tsx file. In it, we’ll construct a URL and retrieve the access token from storage, then we’ll make a call to an endpoint for user information.
//...
const [userInfo, setUserInfo] = useState<Record<string, string> | null>(null);

const getUser = async () => {
  try {
    const access_token = await getAccessToken();
    if (access_token !== null) {
      fetch(configs.fusionauth.issuer + '/oauth2/userinfo', {
        method: 'GET',
        headers: {
          Authorization: 'Bearer ' + access_token,
        },
      })
        .then(response => response.json())
        .then(json => {
          console.log(json);
          setUserInfo(json);
        })
        .catch(error => {
          console.error(error);
        });
    }
  } catch (e) {
    console.log(e);
  }
};
//...
Of course, it’s not much fun to get the data without displaying it. Let’s update the UI to show what we’ve learned about our user:
//...
{userInfo ? (
  <View>
    <UserInfo text={'User ID'} value={userInfo.sub} />
    <UserInfo text={'Email'} value={userInfo.email} />
    <UserInfo text={'Given Name'} value={userInfo.given_name} />
    <UserInfo text={'Family Name'} value={userInfo.family_name} />
    {userInfo.picture ? (
      <Image
        source={{uri: userInfo.picture}}
        style={styles.userImage}
      />
    ) : null}
  </View>
) : (
  <Pressable
    onPress={() => getUser()}
    android_ripple={{color: 'white'}}
    style={({pressed}) => [
      styles.button,
      pressed ? styles.buttonPressed : null,
    ]}>
    <Text>Get User</Text>
  </Pressable>
)}
//...
In this UI snippet, we’re checking if we have userInfo. If so, we’ll display some of the user’s information; this data is retrieved from FusionAuth.
Run the app
There you have it. You have successfully configured a React Native application to interact with FusionAuth. We have authenticated a user, stored their access token securely, and displayed information from that user.
To run the application, you can use one of the following commands:
npx react-native run-ios
npx react-native run-android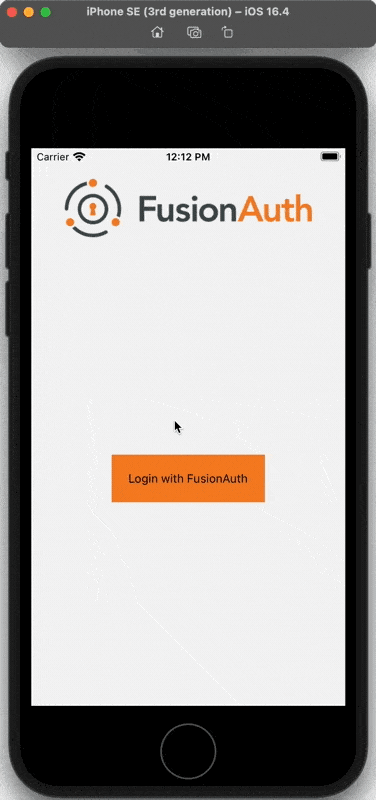
Conclusion
This tutorial has been a roller coaster of information about mobile authentication. We were able to perform authorization and get user data from an OAuth server. As a reminder, the code for the React Native project is available on GitHub.
I hope you enjoyed this tutorial. Do you have any comments or questions? Please post them below.
Happy coding!