In a recent article, we set up an API gateway with microservices for an eCommerce enterprise. FusionAuth handled our centralized authentication and then we passed user details for authorization to the microservices.
In this article, we’ll build on the example project from that article, focusing on tightening up security by implementing JSON Web Token (JWT) authorization. This is a critical security concern because we don’t want to allow just any application to call our microservices. You may want to re-read the Centralized Authentication with a Microservices Gateway post to refresh your memory. And we’ve created a new open source sample project with updated JavaScript source code based on this article. (We’re not going to implement authentication in this post, as it was handled in the previous one.)
As a reminder, microservice architectures generally have a different approach to authorization than a monolith, because components in a monolith can access user data directly, without any network access. Microservices architectures fronted by an API gateway that controls and directs traffic and auth decisions are a common pattern. DAN different development teams can manage each microservice.
Even though we’re allowing public access to the Product Catalog, we still want that traffic to come through our gateway application. That will ensure centralized access to our Product Catalog, and our microservices will be more protected.
So here’s what we’ll do:
- Add the
jsonwebtokenpackage to our gateway and microservices. - Utilize FusionAuth’s HMAC default signing key to create signed JWTs for the gateway to pass to the microservices.
- Add roles to this JWT if the user is present. These roles will be used to determine permissions for this request.
- Decode that JWT in each of the microservices, using the same signing key, to verif the request.
This JWT will take the place of the API key used to ensure only the gateway accesses these services. Because it is a JWT, it can contain additional information for the microservices.
Note that the JWT generated by this process differs from any access token generated by an OAuth grant. While an OAuth grant is a common source of JWTs, in this case, we’re using the JWT as a time bound credential, with encoded access control information, rather than a token generated through user action.
Schedule a demo to explore how FusionAuth supports phased, bulk, or login-triggered user migrations to suit your system’s needs.
JWT Authorization
JWTs are a standardized method for securely passing claims between two parties, allowing that information to be verified by the recipient. We’re going to use them for the purpose of authorization (authorizing the gateway to access the microservices) as well as passing information (user claims, such as role membership useful for access control and permissions).
If you are going to make the code changes, clone the example project, otherwise feel free to follow along conceptually.
In your gateway application, install jsonwebtoken, one of our dependencies:
npm install jsonwebtokenNext we’ll head over to FusionAuth to get our key for signing the JWT.
Signing the JWT using FusionAuth’s key
By signing JWTs using FusionAuth’s default signing key, we’re effectively limiting access to applications that have the key, thus allowing private microservices to ensure the incoming message is from a trusted caller: the gateway.
Because we control all the microservices, we’ll use a symmetric signing algorithm, such as HMAC. We could also use a public key/private key signing algorithm, such as RSA, which would be less performant but wouldn’t require us to share a secret between the signer of the JWT and its consumers.
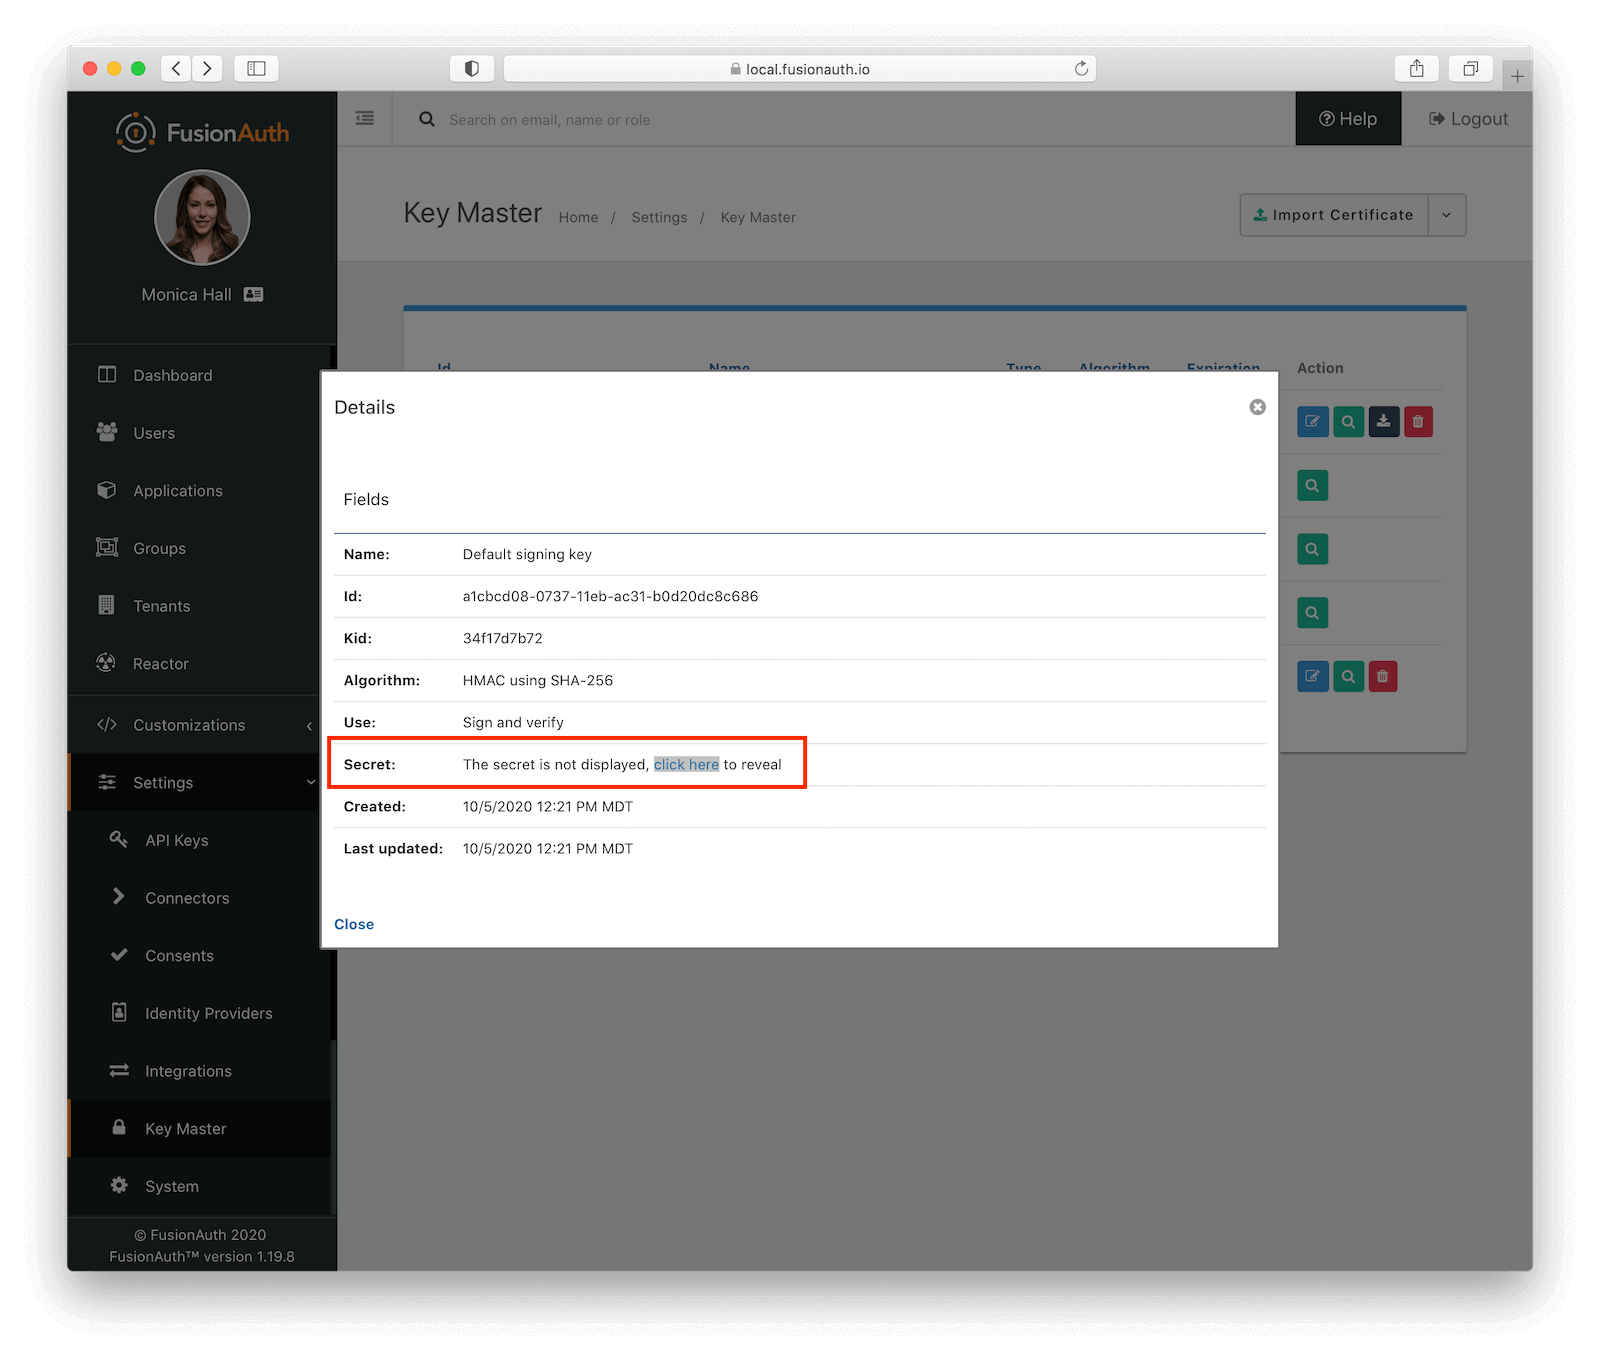
To access your FusionAuth default signing key, go to Settings -> Key Master , click on the magnifying glass next to the key with the name “Default signing key”, then reveal it and copy the value of the “Secret”.

Now we add this value as a variable to the gateway application (in /routes/index.js) and require the jsonwebtoken library.
In production applications, avoid storing secrets in code. Instead, use a separate secrets store and obtain the secret from that store at runtime. Below we illustrate how to pull this value from an environment variable, which is a good option for some deployment environments.
// ...
const jwtSigningKey = '[Default Signing Key]';
const jwt = require('jsonwebtoken');
// ...
Next, we’ll add a function at the end of that file to get the gateway Bearer token which will then be forwarded to the microservices. In this case, we are setting the token to expire in ten minutes. This is a common duration of the JWT, but you may want to reduce it for security concerns, as described in FusionAuth’s article on Revoking JWTs & JWT Expiration.
// ...
function getGatewayBearerToken(req) {
  // Recall that we put the User in the session in the previous post, but they might not be logged in so protect this code
  // from a null User.
  var user = req.session.user;
  var token = jwt.sign({ data: req.url, roles: user !== null ? user.registrations[0].roles : null }, jwtSigningKey, { expiresIn: '10m', subject: 'gateway', issuer: req.get('host') });
  return 'Bearer ' + token;
}
// ...
getGatewayBearerToken() creates a bearer token valid for ten minutes and utilizes our public signing key. It’s how we will provide secure, general access between the gateway and any microservices which don’t require any further authorization. All this JWT is guaranteeing is that the request for the API came through the gateway.
Gateway Router Integration
For the Product Catalog routes, we’ll use getGatewayBearerToken() to prepare the Bearer token and attach it to the authorization header.
router.get('/products', function(req, res, next) {
  const bearerToken = getGatewayBearerToken(req);
  const options = {
    url: `${productUrl}/products`,
    headers: { authorization: bearerToken }
  };
  request(options).pipe(res);
});
Let’s update one other route in the API Gateway. This is the protected route that requires the user to be logged in and authenticated. We will pass a Bearer token that contains roles down to the microservices:
// ...
/* PRODUCT INVENTORY ROUTES */
// The checkAuthentication function was defined in our last post and it ensures that the user is logged in or redirects
// them to FusionAuth to login.
router.get('/branches/:id/products', checkAuthentication, function(req, res, next) {
  const bearerToken = getGatewayBearerToken(req);
  const options = {
    url: `http://localhost:3002/branches/${req.params.id}/products`,
    headers: { authorization: bearerToken }
  };
  request(options).pipe(res);
});
// ...
You can see that this code is nearly identical to the code for /products above. Since both APIs in the Gateway create a JWT and pass it down to the Microservices, they use the same method to authenticate and authorize API calls. Having everything be the same in the API Gateway is definitely a good thing and we could even extract the JWT creation code out to a middleware at some point.
Microservice JWT Integration
We’re now ready for the microservices to handle the Bearer token passed in the header. As each microservice will need to handle the tokens in the same way, it makes sense to create a package utility that can be shared by each microservice. For example, here’s the flow of a request to the Product Catalog:
sequenceDiagram

participant api as API client
participant Gateway
participant Products
api ->> Gateway : Request products/1
Gateway ->> Gateway : Generate JWT adding in roles
Gateway ->> Products : Request products/1 + JWT
Products ->> Products : Verify JWT via middleware
Products ->> Products : Check roles
Products -->> Gateway : products/1 data
Gateway -->> api : products/1 data
Retrieving the Product Catalog.
Authorization Middleware
Here we’ll just cover the contents of the utility, as the package creation is a little out of scope for this article. For convenience, we’ve included this in a shared folder in the sample project.
const jwt = require('jsonwebtoken');

module.exports = function(options) {
  return function(req, res, next) {
    try {
      const authorization = req.headers.authorization;
      if (!authorization) {
        console.log('Authorization header missing. Denying request.')
        handleUnauthorized(res, options);
        return;
      }

      const bearer = authorization.split(' ');
      if (!bearer || bearer.length != 2) {
        console.log('Bearer header value malformed. Denying request.')
        handleUnauthorized(res, options);
        return;
      }

      token = bearer[1];
      if (!token) {
        console.log('Token not provided. Denying request.')
        handleUnauthorized(res, options);
        return;
      }

      const decoded_token = jwt.verify(token, options.jwtSigningKey);
      req.roles = decoded_token.roles; // These could be null if the user isn't logged in

    } catch(err) {
      console.error(err);
      handleUnauthorized(res, options);
      return;
    }

    next();
  }
};

function handleUnauthorized(res, options) {
  if (options.loginRedirectUrl) {
    res.redirect(options.loginRedirectUrl)
  }
  else {
    res.status(401).json({
      status: 401,
      message: 'UNAUTHORIZED'
    })
  }
}
We’re exporting a function that looks for the Authorization header key coming from the gateway. It goes through the following steps:
- Find the
authorizationheader - Split the value it finds (giving us
Bearerand the token) - Grab the token portion
- Verify and decode the token using the
jwtSigningKey
If all those steps are successful, we’ll end up with a decoded token. And if there were roles included, they will be added to req. For any errors in the process, the handleUnauthorized function will redirect to the login page and/or respond with a 401: UNAUTHORIZED.
Why do we care about roles? For correct authorization in the Product Inventory service, we want to ensure a request is made with the correct role. This middleware is essentially acting as our authorization service. We’ll explore that after we examine the Product Catalog integration.
Product Catalog Integration
We have our authorizationMiddleware in place, and it’s pretty simple to integrate it into the Product Catalog microservice in our backend (in app.js):
const { JWT_SIGNING_KEY, LOGIN_REDIRECT_URL } = process.env;
var authorizationMiddleware = require('authorization-middleware'); // assuming it's packaged under that name

// ...
app.use(authorizationMiddleware({ jwtSigningKey: JWT_SIGNING_KEY, loginRedirectUrl: LOGIN_REDIRECT_URL }));
app.use('/', indexRouter);
//...
Note that we’re using the authorizationMiddleware prior to the indexRouter, which will ensure the middleware is applied to all our routes.
Remember that we’re using the jwtSigningKey to verify the JWT has been signed with the FusionAuth default signing key. Above, we manually pasted the string in, but here we’ve implemented it as an environment variable. This is better than hard-coding the key in code.
In your local environment, you can add your JWT_SIGNING_KEY to your bash_profile or export it to your environment:
export JWT_SIGNING_KEY=[Default Signing Key]Make sure you restart your microservices after you’ve set this environment variable.
Product Inventory Integration
The Product Inventory service endpoint, /branches/:id/product has role-based access. Previously we were pulling that from a FusionAuth generated JWT, but let’s pull it from the JWT created in the gateway now. Here’s the flow of a request to the Product Inventory.
sequenceDiagram

participant api as API client
participant Gateway
participant Products
api ->> Gateway : Request branches/1/products
Gateway ->> Gateway : Generate JWT
Gateway ->> Products : Request branches/1/products + JWT
Products ->> Products : Verify JWT via middleware
Products -->> Gateway : branches/1/products data
Gateway -->> api : branches/1/products data
Retrieving the Product Inventory.
Authorization Middleware
Follow the same steps above for adding the authorizationMiddleware to app.js, but do so in the Product Inventory service. Then we’ll just need to slightly modify the routes/index.js file:
//...
router.get('/branches/:id/products', function(req, res, next) {
  const roles = req.roles; // this used to be req.headers.roles

  if (roles && roles.includes('admin')) {
    res.json(`Products for branch #${req.params.id}`);
  } else {
    res.redirect(403, 'http://localhost:3000');
    return;
  }
});
//...
We’re making this change, in getting roles from req.headers.roles to req.roles, because our authorizationMiddleware takes the decoded token and puts the roles object onto req. That’s all we need to do in the Product Inventory service.
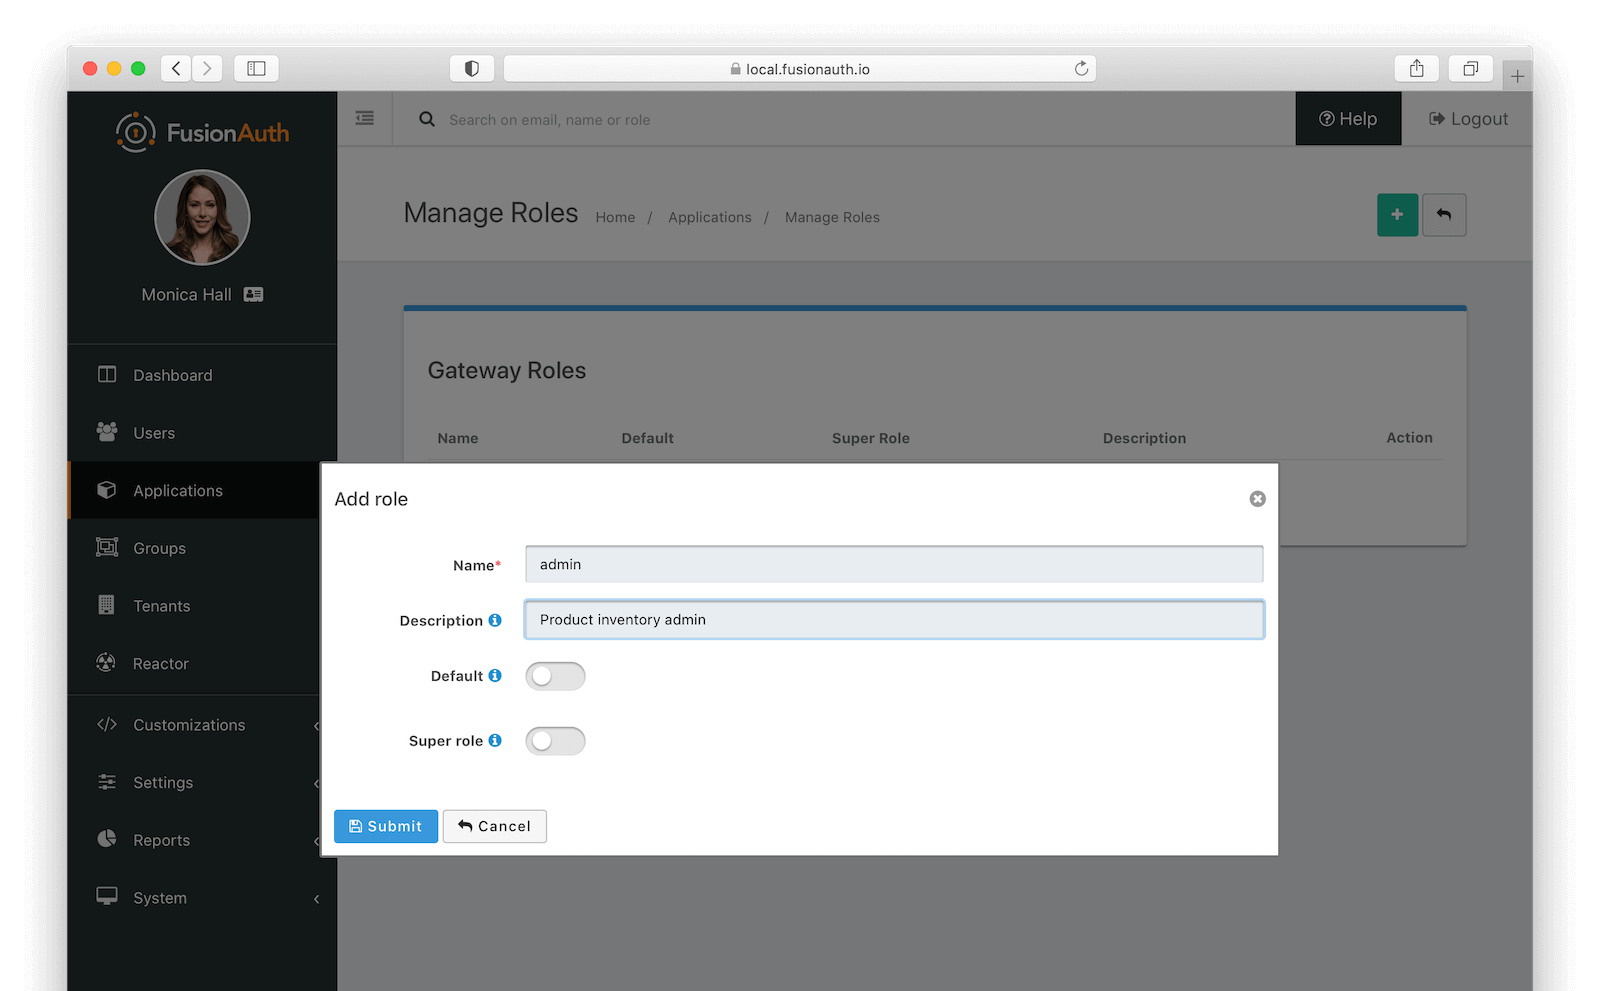
We’ll need to complete one more step in order to allow admin access to the Product Inventory route. We need to modify the user information. In FusionAuth, click on Applications , then the Manage Roles icon on the Gateway application. Add a new role called “admin”.

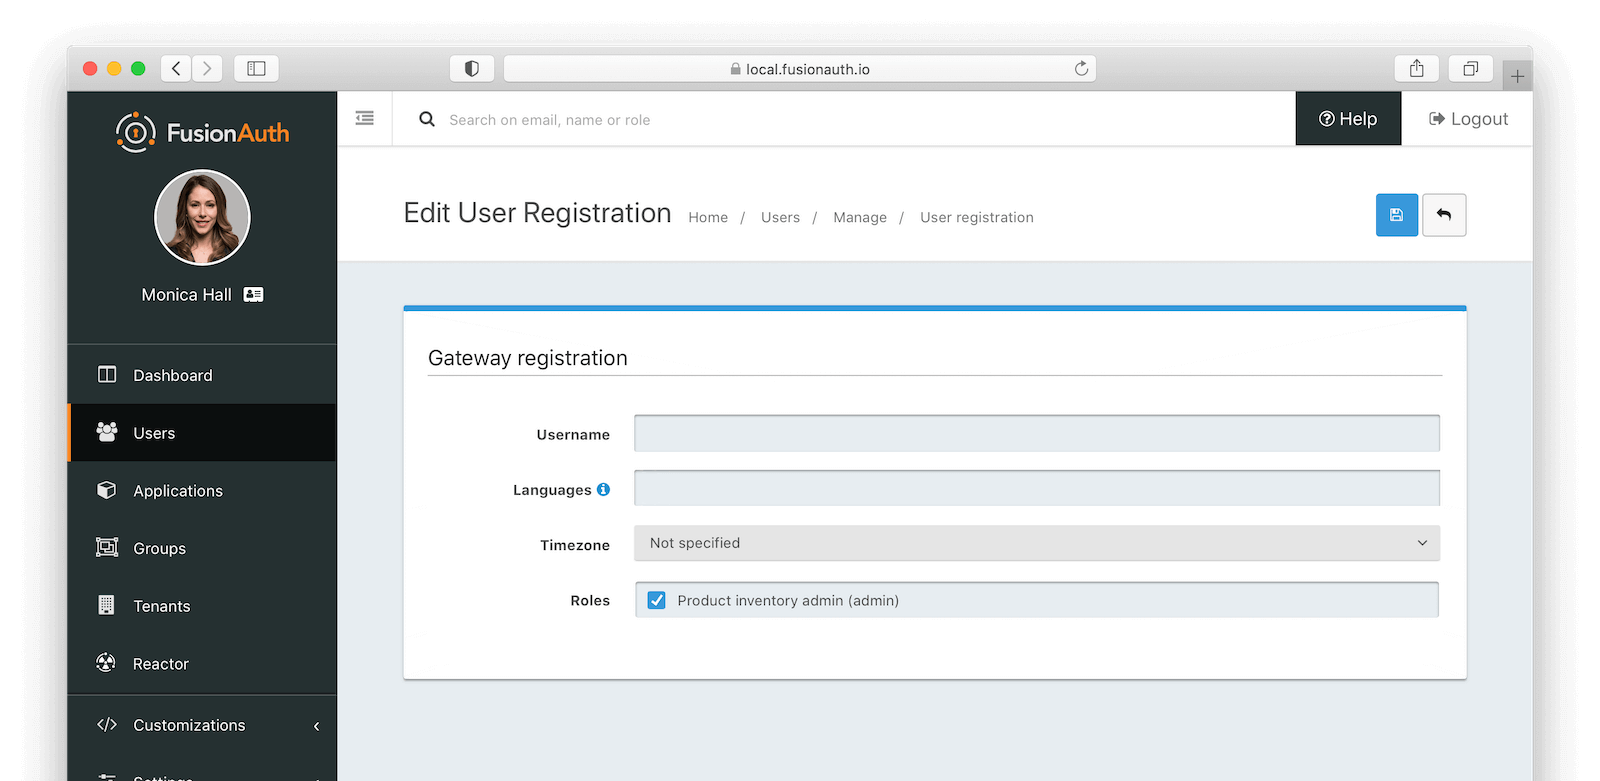
Then click on “Users”, find the user you created, and under the Registrations tab, click the Edit icon on the Gateway application. Check the box next to “admin” and save. This grants the “admin” role to this user.

The next time you log in to FusionAuth and access the /branches/:id/products route, you will be authorized and receive the expected response from the Product Inventory service.
If we needed to have multiple tenants, each with a different set of users, we’d want to add a tenant under the Tenants tab and create an application within that tenant. However, for this example, let’s keep everything in a single tenant.
Go further
While this tutorial explains how to integrate JWT based authorization into your microservices environment, there are additional steps you could take to make the application better.
- Extract all secrets to environment variables or a secrets manager.
- Instead of using the shared HMAC secret, use a public/private key pair with the RSA algorithm to ensure you don’t need to share any secrets. In this case, you’ll want to have FusionAuth generate all the JWTs, so set up an anonymous user to allow access for the public APIs.
- Benchmark the difference for multiple invocations with JWT auth and the API key used previously to understand the performance implications.
Conclusion
We’ve successfully implemented JWT authorization. Every microservice is stateless and uses a JWT to ensure access is authorized. This is more complex but more flexible than the previous posts use of API keys. FusionAuth’s default signing key and the simplicity of working with JWTs made this a pretty straightforward means by which to add a layer of security to our gateway and microservices.
Happy coding!


