


Whenever you build a website that allows a user to create their own account, secure authentication and authorization is a must-have. The problem is that most handmade authentication and authorization solutions are not robust enough to keep up with the most current and secure workflows. What's more, since security is not always seen as a business priority, in-house authorization solutions can quickly become an internal tool that is not often touched, prone to disrepair and exploitation by bad actors.
This blog post walks through low-level details of OAuth in React. If you want to add login, logout, and registration buttons to your React application, using pre-built buttons, hooks, or higher-order components, you should take a look at our React SDK. You can also work through a tutorial using the SDK.
In this tutorial, you will learn how to integrate a React app with FusionAuth to implement an OAuth 2.0 compliant Authorization Code grant. This abstracts all of the problems of making and maintaining an auth solution away from you and onto FusionAuth.
We'll start with downloading and configuring FusionAuth, then create a login/logout React component, then finish by building login/logout functionality with our Express server and React in tandem. If you'd rather clone down a completed project and take a look around yourself, you can find the finished code in a GitHub repository here.
Please Note: This tutorial reworks an earlier tutorial on implementing OAuth in React, which can be found here.
What Is Authentication?#
You use authentication every day, whether you realize it or not. Every time you log in to a website, you have authenticated. Every time you use Facebook or Google to sign on to another service, you have used authentication. As a React developer, you most likely write web apps with a login or sign up feature. Then you display certain data based on the user's credentials. All of this functionality makes heavy use of authentication. But what exactly is authentication?
In short, authentication is the process of a client proving that they are who they say they are to an external server so that they can access resources specific to them. Think of it like showing a passport to a customs agent to visit another country. In order to enter, you must present valid proof from your country’s government that verifies you are who you say you are. Standards such as OAuth 2.0 and OIDC give you a digital passport. Components of this system include tokens, which are passed around, authorization servers, and resource servers. Only once that user is verified are they allowed to access the resource they want, such as an online bank account, social media homepage, or email.
What Is Authorization?#
While authentication is proving you are who you say you are, authorization is the process of allowing a user to access only certain things. Back to the passport analogy: a traveler may present a passport to a customs agent that proves they are who they say they are, and they may have an extra stamp in their passport that proves they are a diplomat or a journalist. Because of those certain stamps, they can now enter zones that are off-limits to regular travelers, such as conflict areas or diplomatic buildings. In a similar fashion, if a user is an admin, they can access certain parts of that website that a regular user cannot. An auth server, such as FusionAuth, is a server that can both authenticate and authorize users.
While it is possible to write your own solution, it is often best to use an open source tool or external service like FusionAuth, as this component is surprisingly complex and requires a decent amount of maintenance. If you are not able to dedicate a good amount of developer hours and knowledge to maintaining your auth workflows, they can be exploited with resulting data loss. You can also use an external 'identity provider', which is a way of authenticating users with an external trusted service such as Facebook, Google, or Spotify. However, setting up such a connection is outside the scope of this tutorial.
What Is The OAuth 2.0 Authorization Code grant?#
This is the grant we are going to use to authenticate our users. In this particular grant, FusionAuth generates and passes validated access tokens to the React app, which then presents those tokens to the Express backend to gain access to the requested resources. The tokens are never stored on the browser, but are instead stored on the server. This is called the "backend for frontend" pattern, or BFF. If you want to learn more, take a look at our Modern Guide to OAuth
Using an Authorization Code grant has many advantages, including being more secure than alternatives such as the Implicit grant. Whereas an Implicit grant authenticates against FusionAuth but exposes the resulting Access Token in the URL, the Authorization Code grant adds an extra layer of security by exchanging an Authorization Code for an Access Token before the user can gain access to their resources. To see a deep dive into this grant that is language-agnostic, take a look at our example Authorization Code grant.
What Is FusionAuth?#
FusionAuth is a complete auth platform that saves your team time and resources by handling everything to do with authentication and identity access management. It allows you to quickly implement complex standards like OAuth, OpenID Connect, and SAML and build out additional login features to meet compliance requirements.
FusionAuth is built by devs, for devs. With an API-first architecture, great documentation, and fantastic support, it takes auth off your plate so you can get back to building something awesome.
Enhance your React app's security with FusionAuth's OAuth capabilities. Request a demo today.
Before You Begin#
There are a few things that you need to have in place before you get started:
- You need to have either a FusionAuth Cloud account or install a self-hosted version, available for free. Follow the FusionAuth 5-Minute Setup Guide to get started with your installation.
- Your Node version should be at least 14.17.6. We use this version in this tutorial.
- We use React 17.0.2 and suggest you use the same or most recent stable build.
Once you have installed all the required components, log into your FusionAuth instance by visiting localhost:9011.
We will do the following in this tutorial:
- Configure FusionAuth
- Create a basic React UI
- Create an Express backend server
- Log a user in
- Exchange an Authorization Code for an Access Token
- Display a User's data
- Log a user out
All of this is going to happen using the OAuth 2.0 Authorization Code grant.
Configuring FusionAuth#
You have two options to configure FusionAuth, either manually or with Kickstart.
Use Kickstart#
Instead of manually setting up FusionAuth using the admin UI, you can use Kickstart. This tool allows you to get going quickly if you have a fresh installation of FusionAuth. Learn more about how to use Kickstart. Here's an example Kickstart file which sets up FusionAuth for this tutorial.
You'll need to edit that Kickstart file and update the application name, API Key, and redirect URLs with your specific app's data.
Manual Configuration#
If you choose not to use kickstart, you must configure an application in FusionAuth as well as link the user account with which you’ll log in.
"But wait a minute!" you may ask. "Why do I have to make another app in FusionAuth? Don't I already have a React App? I thought I could just import FusionAuth functionality into my React app?"
You can't directly import FusionAuth functionality into your JavaScript or React projects. Instead, FusionAuth is a separate server that developers can interact with via API calls. So, instead of being something like a JavaScript library that you include into your own JavaScript projects and pull functionality from, FusionAuth actually is an entire application that you configure to work with your React app and server of your choosing via API calls. (Those API calls can be made by a library such as passport.js, however.) Think of it like a MongoDB or Postgres database, but which handles auth, rather than storing data. This does have some benefits, however, such as far more layers of security, and more control over using FusionAuth as a user data store. You can learn more from our expert advice.
- Navigate to the administrative user interface, and go to "Applications".
- Click the green + button to add a new application to your FusionAuth instance.
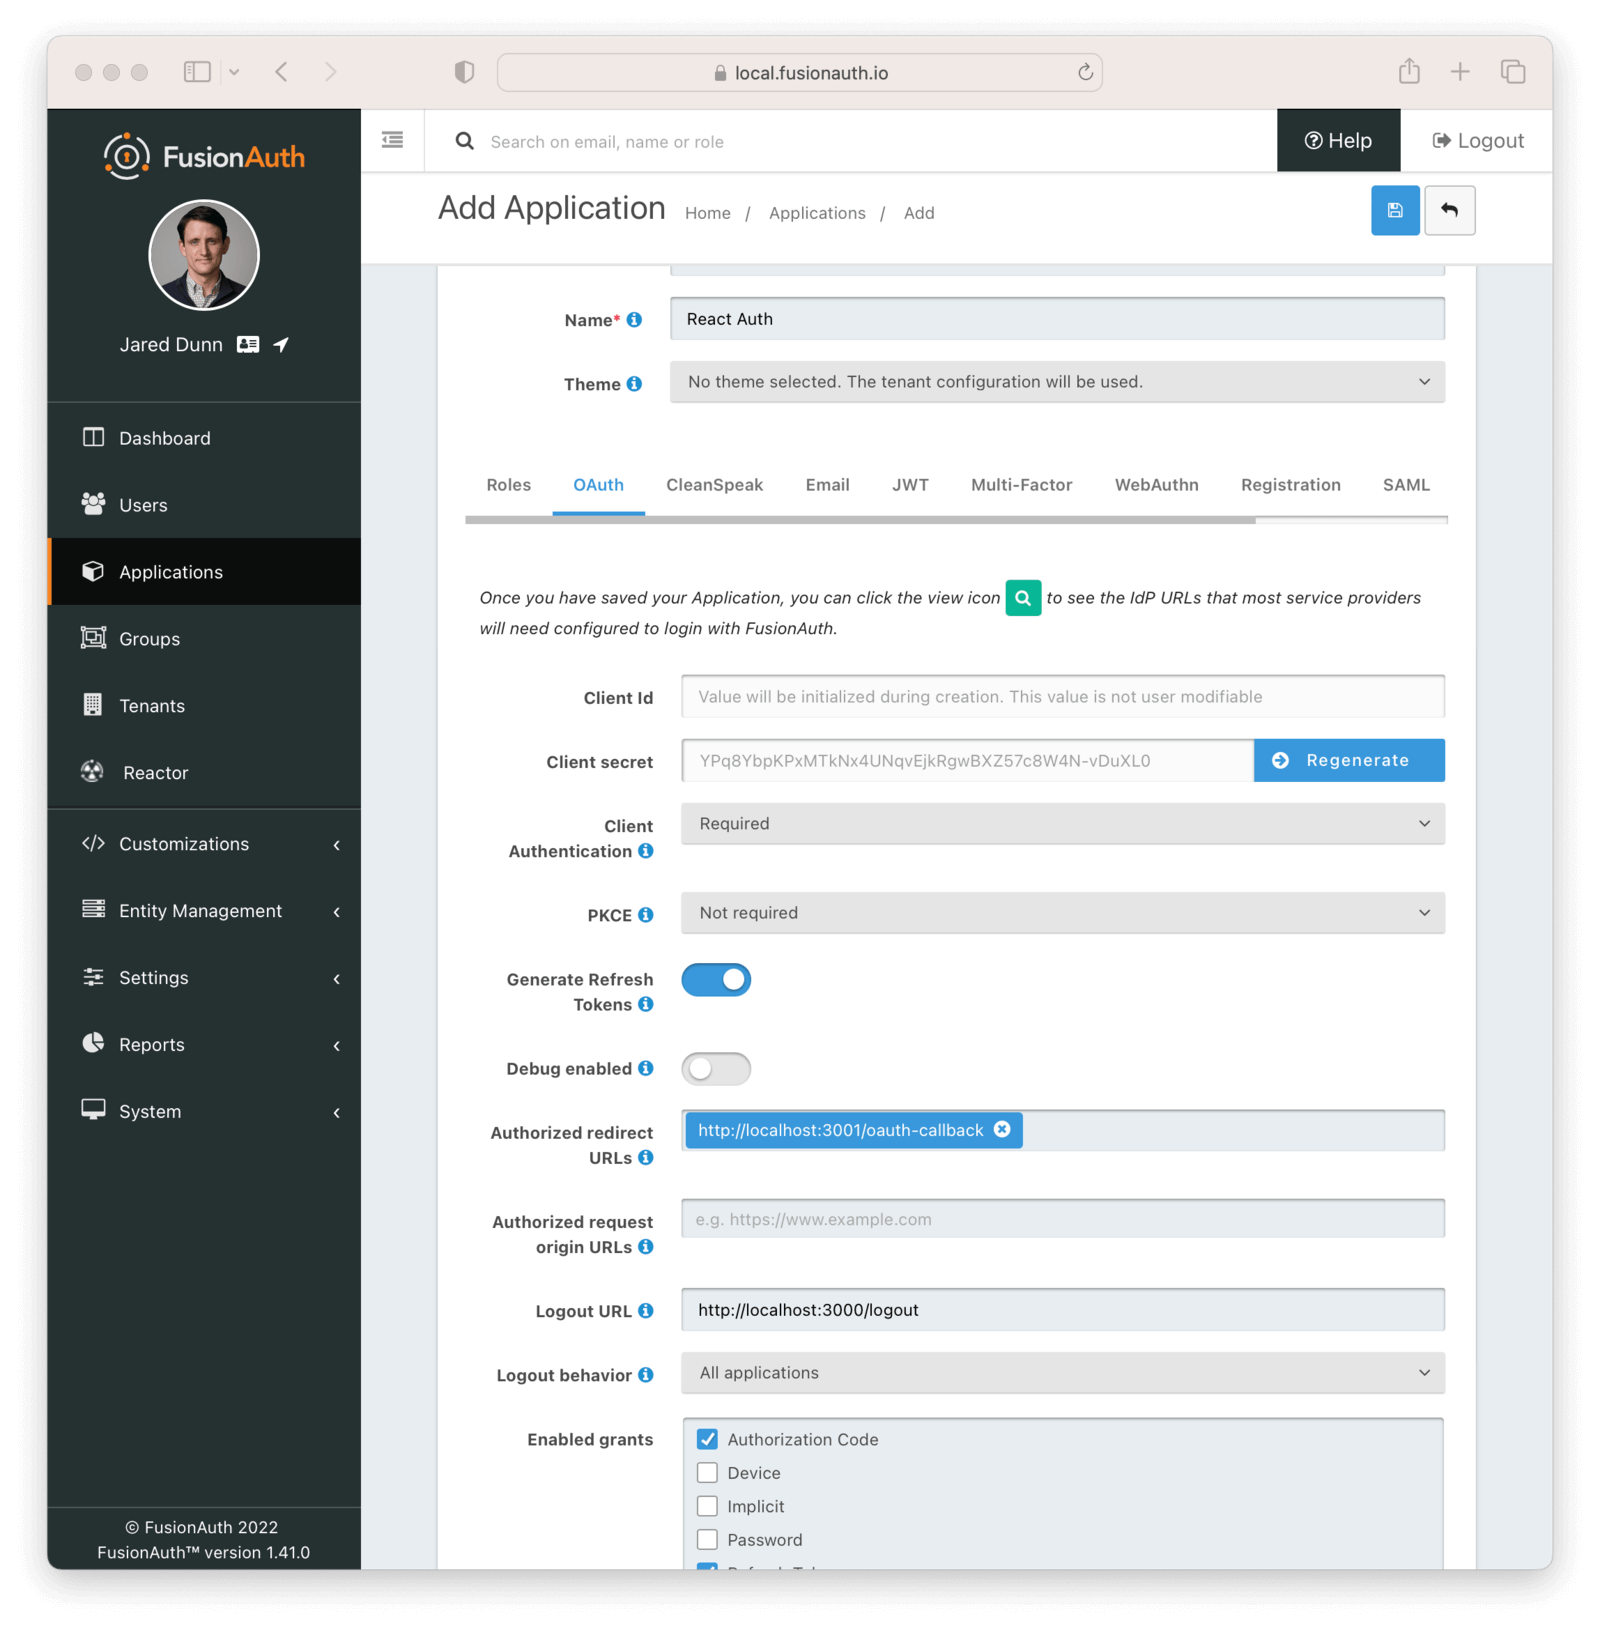
- Add a name for your application. I'm calling mine "React Auth".
- Under the OAuth tab, configure the “Authorized redirect URL”. This is where you want FusionAuth to redirect the browser with the authorization code after a user successfully authenticates. We are redirecting to your app's Express backend, which will be on port 3001. You need to configure this for two reasons:
- If you don't and a hacker later steals your Authorization Code by providing their own redirect URL, they can exchange that for a token and act on your behalf.
- FusionAuth requires a redirect URL, as does the OAuth standard.
So, to avoid that mess, enter
http://localhost:3001/oauth-callback. We'll build this route later.
- Under the same OAuth tab, configure the “Logout URL” to where FusionAuth should send the user after they (surprise!) log out. Enter in
http://localhost:3000/logout. This will ultimately send the user to your React frontend, which will be on port 3000, when they are logged out. - Click the blue save button in the top-right to finish the configuration.
This is what your configuration might look like:
Congratulations! You have configured FusionAuth to work with your React app. Now, let's set up the user who will actually log in.
Create A User And Register Them#
For the next step, we will link a user to your brand-new FusionAuth app, "React Auth", via the dashboard. This is where another useful feature of FusionAuth comes into play, as a "User Data Store". This is a centralized location where you can manage all the users of your app in a friendly UI environment. Of course, you can register users with FusionAuth from your React app if you want to build that functionality later on, but that is beyond this tutorial's scope.
To create a user:
- Select "Users" from the left-hand side menu.
- Select the green plus sign on the top left to add a user.
- Give your user an email. I used "test@fusionauth.io"
- Give the user a dummy email and deselect "send email to setup password".
- Give the user a simple password. May I suggest "password"?
- Click the Save icon on the top right.
- Go back to Users .
- Select Manage under the action tab for your new user.
- Select "Add registration".
- In the dropdown menu, select "React Auth". If you don't see it, double check that you remembered to push "Save" when you created your application.
- Click Save.
Well done! You now have at least one user that is registered to your "React Auth" app. Not bad for your app being in development.
Create The React UI#
Set up the project folders and configuration#
We're going to use both Express and React for this application, so let's start with our folder structure. From the command line, run the following commands:
Make a parent folder called reactauthapp:
mkdir reactauthappThis folder will hold both the front and back end files.
cd into that parent folder, and then run:
npx create-react-app clientThis creates a React app inside the parent directory. npx ships with Node, so don't worry about needing to run anything else to install it.
Now, create a server folder in the parent reactauthapp directory to hold our Express server.
mkdir serverChange into that server directory and create an index.js file inside of it.
cd server
touch index.js
This file will hold our Express server.
Lastly, change back into the parent reactauthapp folder, and run:
npm init -yConfirm that a package.json was created in the root reactauthapp folder.
At the end, your folder structure should look like this:
reactauthapp
  client
  - public
  - src
  ... // all extra folders inside of your React app
  server
  - index.js
  package.json
You will need to cd into the client folder. Copy this code and paste it into the package.json file in the client folder:
{
 "name": "client",
 "version": "0.1.0",
 "private": true,
 "dependencies": {
   "@testing-library/jest-dom": "^5.14.1",
   "@testing-library/react": "^11.2.7",
   "@testing-library/user-event": "^12.8.3",
   "react": "^17.0.2",
   "react-dom": "^17.0.2",
   "react-scripts": "4.0.3",
   "web-vitals": "^1.1.2"
 },
 "scripts": {
   "start": "react-scripts start",
   "build": "react-scripts build",
   "test": "react-scripts test",
   "eject": "react-scripts eject"
 },
 "eslintConfig": {
   "extends": [
     "react-app",
     "react-app/jest"
   ]
 },
 "browserslist": {
   "production": [
     ">0.2%",
     "not dead",
     "not op_mini all"
   ],
   "development": [
     "last 1 chrome version",
     "last 1 firefox version",
     "last 1 safari version"
   ]
 }
}
Once your file looks like that, run:
npm installand then:
npm startIf your React app automatically boots up in the browser at localhost:3000, then everything is working properly.
Lastly, it is useful to create a config file in your client/src directory. In your client/src folder, create a config.js like so:
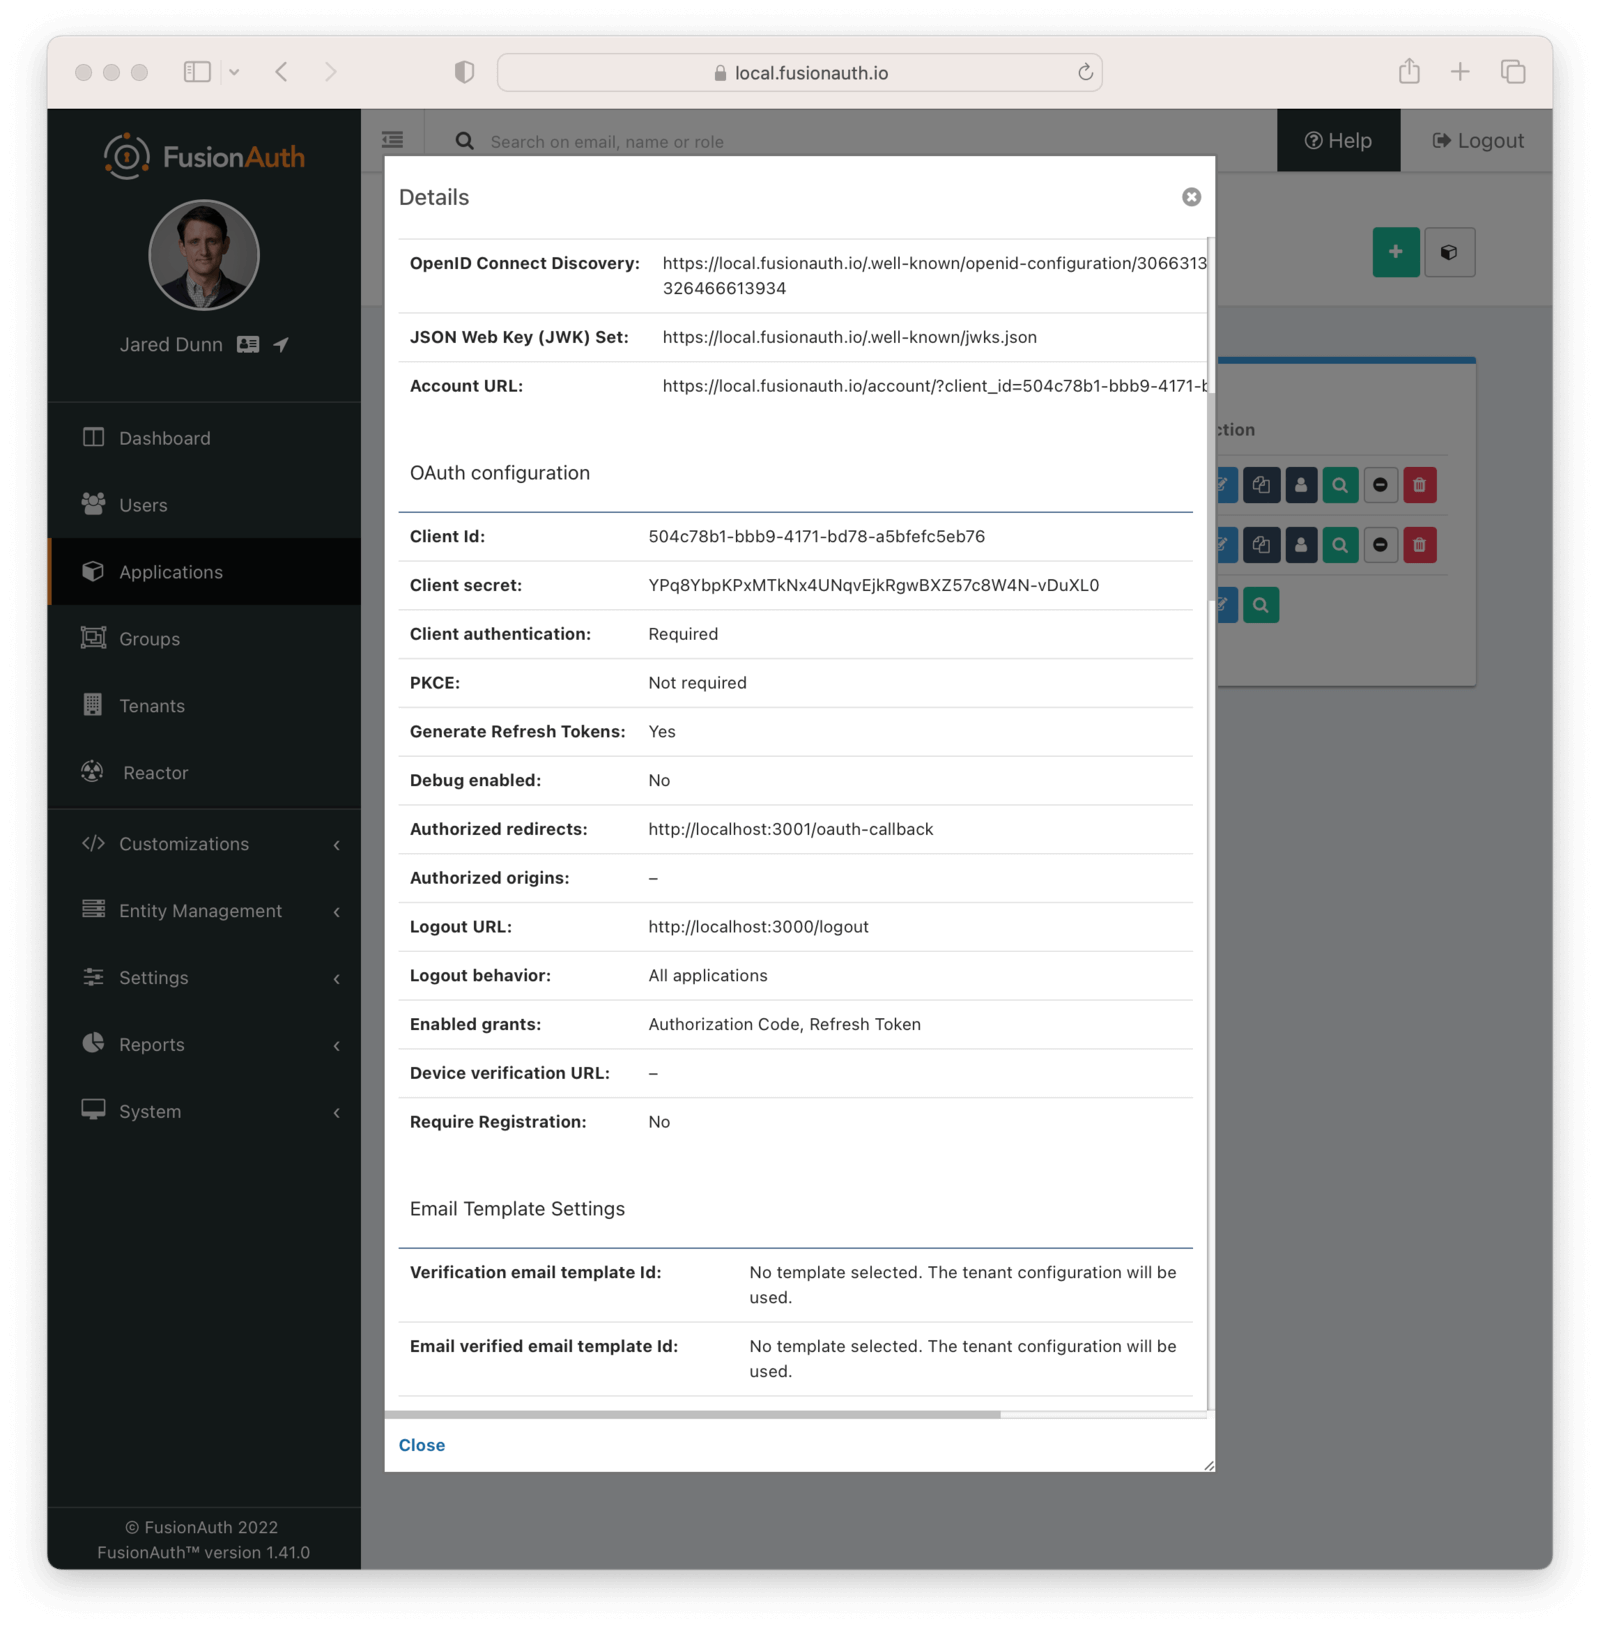
touch config.jsInside of that config file, you are going to copy the OAuth info from the FusionAuth admin panel of your application, React Auth. To do so, on localhost:9011, navigate to Applications , then the React Auth configuration, then click the View button.
You must copy in your unique values of the following:
- clientID
- clientSecret
- redirectURI
- applicationID
Here is what the page you will get this info from looks like:
Generate An API Key#
You also will need to generate an API key. To do so, navigate to Settings -> API Keys and click the green + button to add an API key. You can leave the Id field blank, FusionAuth will auto-generate an Id for you. For now, don't select any endpoint methods to create this as a super user key, which has access to all endpoints. Then click on the green view (spyglass) button and copy your API key into your config.js file as well.
Complete The Config File#
Here's a completed config file you can use as a template. But remember, you must paste in your own application's unique values!
module.exports = {
  // OAuth info (copied from the FusionAuth admin panel)
  clientID: 'a87f2a65-db1c-48b8-b9d2-65e7e5bc209e',
  clientSecret: 'Q4yAnMrqowHcYUPGF0-fF-JcEoq7-mGKl8FxBym6i9o',
  redirectURI: 'http://localhost:3001/oauth-callback',
  applicationID: 'a87f2a65-db1c-48b8-b9d2-65e7e5bc209e',

  // our FusionAuth api key
  apiKey: 'iV9ImbuJwRmXL68Mw2luaLMtvVCSbeQ1SrOxHWAuubn_tOtju_ea8HRK',

  // ports
  clientPort: 3000,
  serverPort: 3001,
  fusionAuthPort: 9011
};
Write The React Application#
Now, we're going to write the React frontend.
First off, let's get React to display a simple greeting. Inside of client/src/index.jsx:
import React from 'react';
import ReactDOM from 'react-dom';
const config = require('./config');

class App extends React.Component {
  constructor(props) {
    super(props);
    this.state = {
    };
  }

  render() {
    return (
      <div id='App'>
        <header>
          <h1>FusionAuth Example: React</h1>
        </header>
      </div>
    );
  }
}

ReactDOM.render(<App/>, document.querySelector('#root'));
Navigate to localhost:3000 and confirm that everything is working properly, meaning, you can see a page that says "FusionAuth Example: React".

React automatically re-renders based on changes you have made, so there is no need to start or restart your server as long as you have kept it running from earlier. If you are not seeing a re-render, check your console for any errors, or confirm that your react server is still running with npm start inside of your client directory. Also, be sure that the HTML container in client/public/index.html is set to the id of root! (This ships automatically with create-react-app)
Now we will work on some conditional rendering, to make sure our state is updating properly. If a user is logged in, we are going to display their email with a greeting. We won't send a request to the Express server quite yet, we will just mock this at first to create the necessary components.
Let's make a components folder, and inside of it, a Greeting component.
First, in client/src:
mkdir componentsAnd in client/src/components, create a new Greeting component.
touch client/src/components/Greeting.jsxGo into the Greeting component and add the following:
import React from 'react';

export default class Greeting extends React.Component {
  constructor(props) {
    super(props);
  }

  render() {
    let message = (this.props.email)
      ? `Hi, ${this.props.email}!`
      : "You're not logged in.";

    return (
      <span> {message} </span>
    );
  }
}
Now, update index.jsx:
import React from 'react';
import ReactDOM from 'react-dom';
import Greeting from './components/Greeting.js'
const config = require('./config');

class App extends React.Component {
  constructor(props) {
    super(props);
    this.state = {
      email: 'test@fusionauth.io'
    };
  }

  render() {
    return (
      <div id='App'>
        <header>
          <h1>FusionAuth Example: React</h1>
          <Greeting email={this.state.email}/>
        </header>
      </div>
    );
  }
}

ReactDOM.render(<App/>, document.querySelector('#root'));
If the user is logged in, a welcome message displays.

Let's make sure a user gets a "you're not logged in" message if they are not logged in. To do so, comment out email: 'test@fusionauth.io'.
Next, confirm a 'You're not logged in' message appears.

Fantastic! We've confirmed a user can have a message displayed to them based on if they are "logged in" or not. Let's make this more realistic now, and set the state of this email based on a call to our Express server.
First, we need to set up that server!
Create The Express Server#
"Wait", you may say, "remind me, why do I need an Express server? This is a SPA, after all..."
You need an Express server because of how we are handling authentication, with the Authorization Code grant. This grant relies on a user interacting with a browser, but still needs a server-side component to handle passing tokens and authorization codes to and from the authorization server, aka FusionAuth. This keeps all of your sensitive access objects on the server-side of your app, and makes them far less likely to be intercepted and hacked. If you want to learn more about the nuts and bolts of how the Authorization Code grant works, check out the Modern Guide to OAuth.
Configure The Folders And Packages#
Now, you need to add a package.json in your server folder. Do that by navigating to the server folder and running:
npm init -y
In your server/package.json, add a rule that tells our app where to find our Express server.
...
"scripts": {
  "start": "node index.js"
},
...
Then, install your dependencies.
npm install express cors express-session request cryptoWhat did you just install?
cors, so that you can avoid CORS errors.express, so that you can use the Express package.express-session, so that you can save data in a server-side session.request, so that you can format HTTP requests in an organized fashioncrypto, so that you can encode a random string to use for CSRF protection
Your completed package.json should look like this:
{
  "name": "server",
  "version": "1.0.0",
  "description": "",
  "main": "index.js",
  "scripts": {
    "start": "node index.js"
  },
  "keywords": [],
  "author": "",
  "license": "ISC",
  "dependencies": {
    "cors": "^2.8.5",
    "crypto": "^1.0.1",
    "express": "^4.17.1",
    "express-session": "^1.17.2",
    "request": "^2.88.2"
  }
}
You will then want to start your server:
npm startWrite The Express Server#
We need to create some routes for our Express server to use.
Create a routes folder in reactauthapp/server
mkdir reactauthapp/server/routesCreate a file called user.js in that folder
touch reactauthapp/server/routes/user.jsNow, open that new file and create a user route in server/routes/user.js:
// server/routes/user.js

const express = require('express');
const router = express.Router();
const config = require('../../client/src/config');

router.get('/', (req, res) => {
  res.send({
    user: {
      email: 'test@fusionauth.io'
    }
  });
});

module.exports = router;
Why is this in an object? The reason is FusionAuth will ultimately send us the user object when a user logs in. We are starting out by using mock data. Our server will send the email address, and then our react application can display it.
- A note about the user object: the user object has several properties that are typically present. Email is one of them. For more information on what sorts of data you can get on a user, check out our user API docs.
Next, in server/index.js let's import & use express with const app = express(), define our first route, /user, and then start our server. Remember, you're using port 3001 because port 3000 has been automatically taken by create-react-app. We will add cors a little later on after we discover why we need it!
const express = require('express');
const PORT = process.env.PORT || 3001;
const config = require('../client/src/config');

// configure Express app and install the JSON middleware for parsing JSON bodies
const app = express();
app.use(express.json());

// use routes
app.use('/user', require('./routes/user'));

// start server
app.listen(config.serverPort, () => console.log(`FusionAuth example app listening on port ${config.serverPort}.`));
When our React client sends a request to localhost:3001/user, it will get a response based on whatever we send back in server/routes/user.js. So what about that mock email we made in our React UI? Well, we've moved that email from React's state to our server component, wrapped in a user object.
Next, let's update our React UI so that we are not using the mock user email anymore, but from our Express server:
client/src/index.jsx
  // ...

constructor(props) {
  super(props);
  this.state = {
    body: {} // this is the body from /user
  };
}

render() {
  return (
    <div id='App'>
      <header>
        <h1>FusionAuth Example: React</h1>
        <Greeting body={this.state.body}/>
      </header>
    </div>
  );
}

// ...
client/components/Greeting.js
import React from 'react';

export default class Greeting extends React.Component {
  constructor(props) {
    super(props);
  }

  render() {
    let message = (this.props.body.user)
      ? `Hi, ${this.props.user.email}!`
      : 'You\'re not logged in.';

    return (
      <span> {message} </span>
    );
  }
}
If you navigate to localhost:3000 now, you'll see an undefined error in regard to the user object. Let's fix that by replacing our fake user with a real one. Before we do that, let’s set up our React app to fetch the user from /user whenever the page loads (or “when the component mounts” in React lingo):
In client/src/index.jsx:
// ...

componentDidMount() {
  fetch(`http://localhost:${config.serverPort}/user`, {
    credentials: 'include' // fetch won't send cookies unless you set credentials
  })
  .then(response => response.json())
  .then(response => this.setState(
    {
      body: response
    })
  );
}

// ...
One thing to note about our code above is that we need to specify credentials: 'include' option to fetch. This is required since eventually you will be hooking up to a server-side session and without this setting, the browser won’t send over the cookie that Express uses for server-side sessions.
Now you can try the React client again. Don't see anything? Check the console, you might have an infamous CORS error!
Now, to fix this, it's time to use your cors package! Use it in your server/index.js by updating the first lines of your file like so:
const userRoute = (require('./routes/user'));
const loginRoute = (require('./routes/login'));
const oauthCallbackRoute = (require('./routes/oauth-callback'));
const express = require('express');
const cors = require('cors');
const config = require('../client/src/config');
const PORT = process.env.PORT || 3001;

// configure Express app and install the JSON middleware for parsing JSON bodies
const app = express();
app.use(express.json());

// configure CORS
app.use(cors({
  origin: true,
  credentials: true
}));

// ...
Awesome! So if you go to localhost:3000, you should see the user displayed! Now let's make it dynamic with an actual login/logout!
Logging In#
User sign-in is one of the key features of FusionAuth. Let’s see how it works.
First things first: we need a “login” button in the React client:
client
└─app
  ├─components
  │ ├─Greeting.jsx
  │ └─LogInOut.jsx*
  └─index.jsx
Just like we did in Greeting, we’ll use this.props.body.user to determine whether or not the user is logged in. We can use this to make a link to either localhost:3001/login or localhost:3001/logout, the former of which we’ll set up momentarily.
Let's create the LogInOut component to start.
Make a new file in client/src/components.
touch client/src/components/LogInOut.jsxThen, create a simple login and logout component in this new file:
import React from 'react';

export default class LogInOut extends React.Component {
  constructor(props) {
    super(props);
  }

  render() {
    let message = (this.props.body.user)
      ? 'sign in'
      : 'sign out';

    let path = (this.props.body.user)
      ? '/login'
      : '/logout';

    return (
      <a href={this.props.uri + path}>{message}</a>
    );
  }
}
Wait a minute! you may ask. Why are you using an >a> tag? What about fetch requests??
Good question. This has to do with the magic of OAuth and FusionAuth.
In order to leverage FusionAuth’s OAuth system with the Authorization Code Grant, we have to redirect the browser over to FusionAuth. While you might want to avoid redirecting away from the React app, this workflow is easy to understand, works no matter the browser's security settings, and separates the concerns. You can style the FusionAuth login page to look like your application, which means the user won’t even realize they’ve been redirected.
We could write a link directly to FusionAuth, but it’s cleaner to go through the Express app, because the FusionAuth OAuth grant requires a somewhat complex URL to start.
Next, import LogInOut in your client/index.jsx:
// ...

import LogInOut from './components/LogInOut.jsx';

// ...
Also update your client/index.jsx like so:
<header>
  <h1>FusionAuth Example: React</h1>
  <Greeting body={this.state.body}/>
  <LogInOut body={this.state.body} uri={`http://localhost:${config.serverPort}`}/>
</header>

// ...
Your full src/index.jsx should look like this:
 import React from 'react';
import ReactDOM from 'react-dom';
import Greeting from './components/Greeting.js';
import LogInOut from './components/LogInOut.js';
const config = require('./config');

class App extends React.Component {
 constructor(props) {
   super(props);
   this.state = {
     body: {} // this is the body from /user
   };
 }

 componentDidMount() {
   fetch(`http://localhost:${config.serverPort}/user`, {
     credentials: 'include' // fetch won't send cookies unless you set credentials
   })
     .then(response => response.json())
     .then(response => this.setState(
       {
         body: response
       })
     );
 }

 render() {
   return (
     <div id='App'>
       <header>
         <h1>FusionAuth Example: React</h1>
         <Greeting body={this.state.body}/>
         <LogInOut body={this.state.body} uri={`http://localhost:${config.serverPort}`}/>
       </header>
       <footer>
         <a href='https://fusionauth.io/docs/'>Learn how this app works.</a>
         <a href='https://twitter.com/fusionauth'>Tweet your questions at us.</a>
       </footer>
     </div>
   );
 }
}

ReactDOM.render(<App/>, document.querySelector('#root'));
During the login process, we add a route to our Express server that redirects the browser over to FusionAuth. We do this on the server side because it is easier and makes the client code less tied to FusionAuth. If any configuration changes were required to the login URL, such as adding PKCE or a state parameter, the client would remain unchanged.
We’ll add our new login route to handle this:
touch server/routes/login.jsserver
├─routes
│ ├─login.js*
│ └─user.js
└─index.jsWhenever we add a new route, we need to let server/index.js know, just like we did with /user. In server/index.js:
// ...

// use routes
var userRoute = (require('./routes/user'));
var loginRoute = (require('./routes/login'));

// ...
Your entire server/index.js file should look like this:
var userRoute = (require('./routes/user'));
var loginRoute = (require('./routes/login'));
const express = require('express');
const cors = require('cors');
const config = require('../client/src/config');
const PORT = process.env.PORT || 3001;


// configure Express app and install the JSON middleware for parsing JSON bodies
const app = express();
app.use(express.json());

app.use(cors({
  origin: true,
  credentials: true
}));

// use routes
app.use('/user', userRoute);
app.use('/login', loginRoute);

// start server
app.listen(config.serverPort, () => console.log(`FusionAuth example app listening on port ${config.serverPort}.`));
When a user goes to /login, we redirect them from the Express sever to FusionAuth’s login page. One of the main reasons we installed FusionAuth is so that we don’t have to handle the login process at all!
Note: there is a way to access the FusionAuth pages in an iframe so that the user doesn't have to be redirected, but that is outside the scope of this tutorial.
Now, lets configure our server/routes/login.js file to do just that:
const express = require('express');
const router = express.Router();
const config = require('../../client/src/config');
const crypto = require('crypto');

router.base64URLEncode = function (str) {
  return str.toString('base64')
    .replace(/\+/g, '-')
    .replace(/\//g, '_')
    .replace(/=/g, '');
}

router.get('/', (req, res) => {
  const state = router.base64URLEncode(crypto.randomBytes(64));
  req.session.oauthState = state;
  res.redirect(`http://localhost:${config.fusionAuthPort}/oauth2/authorize?client_id=${config.clientID}&redirect_uri=${config.redirectURI}&response_type=code&state=${state}`);

});
//
router.get('/oauth-callback', (req, res, next) => {
 // Verify the state
 const reqState = req.query.state;
 const state = req.session.oauthState;
 if (reqState !== state) {
   res.redirect('/', 302); // Start over
   return;
 }
});


module.exports = router;
If that URI looks a bit messy, it’s because of the additional query parameters, which FusionAuth needs to process our request:
- "client_id" tells FusionAuth which app is making the request.
- "redirect_uri" tells FusionAuth where to redirect the user to after login.
- "response_type" tells FusionAuth which OAuth grant we’re using (Authorization Code in this example).
- "state" is there for CSRF protection. This parameter is encoded, sent along with the initial request, and then echoed back to your application by the OAuth server.
This is all part of the standard OAuth Authorization Code grant.
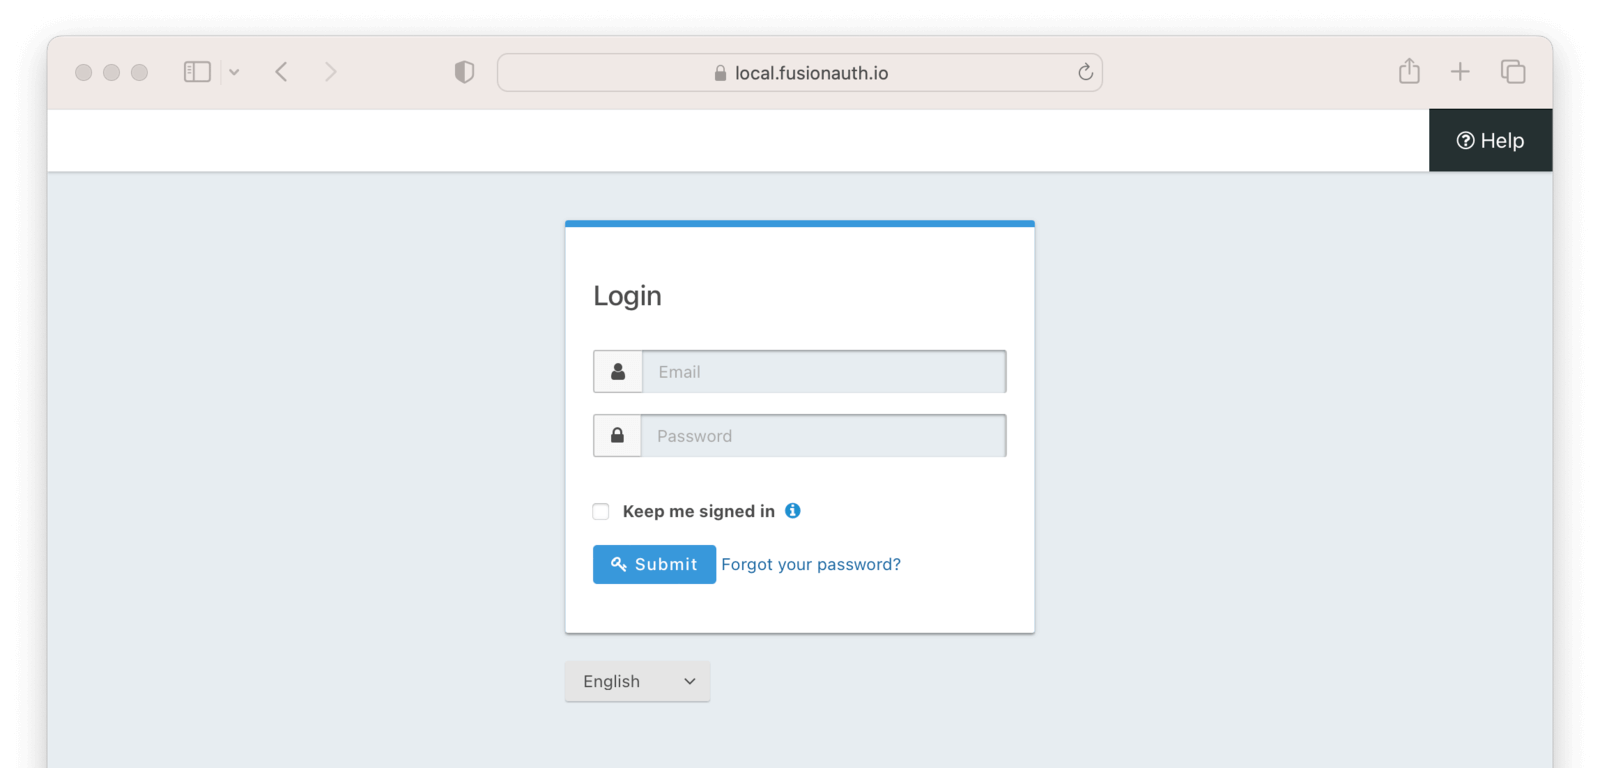
Try navigating to localhost:3001/login. If you see a FusionAuth login form, you're all set!
When you successfully authenticate, you’ll just see Cannot GET /oauth-callback, because the /oauth-callback route doesn’t exist yet. Remember you added localhost:3001/oauth-callback as an "Authorized redirect URL" in the FusionAuth admin panel, and as our redirectURI in config.js. This is the location where FusionAuth redirects the browser back to after authentication in order to complete the OAuth grant.
But why specify this? Because without specifying where to send the app after authenticating, a bad actor could put in their own redirect URL, sending the browser to their malicious server and gaining access to a token that could be used to view resources as a user. That would be no good!
Exchange The Authorization Code For An Access Token#
An Authorization Code isn’t enough to access the user’s resources, though. For that, we need an Access Token. This is standard OAuth, not something unique to FusionAuth. This step is called the Code Exchange, because we send the auth code to FusionAuth’s /token endpoint and receive an Access Token in exchange. Then that Access Token is passed to the resource server in exchange for the desired resources.
Add the /oauth-callback route file:
touch server/routes/oauth-callback.jsFor reference, your file tree in server should look like this:
server
├─routes
│ ├─login.js
│ ├─oauth-callback.js*
│ └─user.js
└─index.js
In server.js/index.js...
// ...
const oauthCallbackRoute = (require('./routes/oauth-callback'));

// use routes
app.use('/user', require('./routes/user'));
app.use('/login', require('./routes/login'));
app.use('/oauth-callback', require('./routes/oauth-callback'));

// ...
/oauth-callback receives an Authorization Code from FusionAuth as a URL parameter during the redirect. If you inspect your browser’s location, you’ll see that there’s a code parameter in the URL:
http://localhost:3001/oauth-callback?
  code=14CJG_fDl31E5U-1VHOBedsLESZQr3sgt63BcVrGoTU&
  locale=en_US&
  userState=Authenticated
Make a new file in server/routes called oauth-callback.js and put in the following:
The exchange takes the form of a POST request:
const express = require('express');
const router = express.Router();
const request = require('request');
const config = require('../../config');

router.get('/', (req, res) => {
  request(
    // POST request to /token endpoint
    {
      method: 'POST',
      uri: `http://localhost:${config.fusionAuthPort}/oauth2/token`,
      form: {
        'client_id': config.clientID,
        'client_secret': config.clientSecret,
        'code': req.query.code,
        'grant_type': 'authorization_code',
        'redirect_uri': config.redirectURI
      }
    },

    // callback lambda
    (error, response, body) => {
      // save token to session
      req.session.token = JSON.parse(body).access_token;

      // redirect to the React app
      res.redirect(`http://localhost:${config.clientPort}`);
    }
  );
});

module.exports = router;
There are two important things to call out here:
- The
redirect_uriwhich is the express server route that you configured as an authorized redirect URI initially. This is present because we track it throughout the process. If it ever differs from what we expect, it's an error condition. form, which is the set of parameters FusionAuth expects.
The OAuth token endpoint requires form encoded data, which is why we are using the form option in our request call.
You can check the FusionAuth docs to see what every endpoint expects to be sent, but here’s the gist of this request:
- The
client_idandclient_secretidentify and authenticate our app, like a username and password. They are drawn from the FusionAuth configuration and ensure that only code that FusionAuth knows about can obtain a token. - The
codeis the Authorization Code we got from FusionAuth. - The
grant_typetells FusionAuth we’re using the OAuth Authorization Code Grant (as opposed to an Implicit Grant or any other grant). - The
redirect_uriis a value from the "Authorized Redirect URLs" configuration. Requiring this is another way for FusionAuth to know that this request came from the server it expected (our express server). - The callback lambda is invoked after FusionAuth receives our request and responds. We’re expecting to receive an
access_token, which will come through in thatbodyargument. We’ll save theaccess_tokento session storage and redirect back to the React client.
We’re almost done! The only thing left is to set up the server-side session storage for our Access Token. In order to do this, we need to configure express-session. The following settings work great for local testing, but you’ll probably want to check the express-session docs before moving to production.
Add this to server/index.js
// ...

// configure Express app and install the JSON middleware for parsing JSON bodies
const app = express();
app.use(express.json());

// configure sessions
app.use(session(
  {
    secret: '1234567890',
    resave: false,
    saveUninitialized: false,
    cookie: {
      secure: 'auto',
      httpOnly: true,
      maxAge: 3600000
    }
  })
);
Displaying User Data#
Our React app looks for a user in /user. The Access Token that is granted to our Express server from FusionAuth isn’t human-readable, but we can pass it to FusionAuth’s /introspect endpoint to get a User Object (JSON like we showed earlier) from it. It's like saying 'Hey FusionAuth, you gave us this access token and so we can use that to access a user's data from you, because you trust your own access tokens.'
We can get additional user-specific info from the /api/user/registration endpoint as well, which is a FusionAuth specific API. Then we can display whatever we want to the end user based on that user object (well, anything that the object gives us access to) which is what we are going to do now.
If there’s a token in session storage, we’ll call /introspect to get info out of that token. Part of the info returned from /introspect is the boolean property active, which is true until the Access Token expires (you can configure how long Access Tokens live in the FusionAuth admin panel). If the token is still good, we’ll call /api/user/registration and return the JSON from both requests. Keep in mind, /introspect is standard OAuth, and /api/user/registration is a FusionAuth API endpoint.
If there’s no token in session storage, or if the token has expired, we’ll return an empty object. Our React components use the existence of this.props.body.user to determine whether a user is logged in, so an empty body means there’s no active user.
Note that this step doesn’t actually require an Access Token. The data from FusionAuth’s /api/user/registration API can be retrieved for any user, including one that isn’t logged in. You could use this endpoint to show info on a user’s profile or other public page. This API in FusionAuth is not part of the OAuth specification but we added it to our example to show a more complete user data interaction. Also, this API requires that you pass in a FusionAuth API key in the Authorization header. Our example is pulling the FusionAuth API key from our global config.js file.
Below is our new and improved /user route; it’s a lot like /oauth-callback, but with a layer of nesting. It looks like a lot, but we’ll break it up piece-by-piece.
In server/routes/user.js:
const express = require('express');
const router = express.Router();
const request = require('request');
const config = require('../../client/src/config');

router.get('/', (req, res) => {
  // token in session -> get user data and send it back to the react app
  if (req.session.token) {
    request(
      // POST request to /introspect endpoint
      {
        method: 'POST',
        uri: `http://localhost:${config.fusionAuthPort}/oauth2/introspect`,
        form: {
          'client_id': config.clientID,
          'token': req.session.token
        }
      },

      // callback
      (error, response, body) => {
        let introspectResponse = JSON.parse(body);

        // valid token -> get more user data and send it back to the react app
        if (introspectResponse.active) {
          request(
            // GET request to /registration endpoint
            {
              method: 'GET',
              uri: `http://localhost:${config.fusionAuthPort}/api/user/registration/${introspectResponse.sub}/${config.applicationID}`,
              json: true,
              headers: {
                'Authorization': config.apiKey
              }
            },

            // callback
            (error, response, body) => {
              res.send(
                {
                  token: {
                    ...introspectResponse,
                  },
                  ...body
                }
              );
            }
          );
        }

        // expired token -> send nothing
        else {
          req.session.destroy();
          res.send({});
        }
      }
    );
  }

  // no token -> send nothing
  else {
    res.send({});
  }
});

module.exports = router;
First, the POST request to /introspect: this endpoint requires our Client Id and, of course, the access_token. Just like the token endpoint, this endpoint accesses form encoded data, so we are using the form option.
In the callback from that request, we’ll parse the body into usable JSON and check that active value. If it’s good, we’ll go ahead and make the /api/user/registration/ request, which requires a User Id (“subscriber” or sub in OAuth jargon) and our Application Id—we need both, because one user can have different data in each FusionAuth application.
Finally, in the registration callback, we’ll parse the body returned from /api/user/registration and res.send everything back to the React client.
Now, go through the login process, and you should see “Welcome, (your email address)!”.
That’s login sorted. The next thing you’ll probably want to tackle is logout.
Logging out#
Just like /login, we’ll create a /logout route to make logging out easily accessible anywhere in our React client.
touch server/routes/logout.jsHere is how your file tree should look so far for your server directory:
server
├─routes
│ ├─login.js
│ ├─logout.js
│ ├─oauth-callback.js
│ └─user.js
└─index.js
In server/index.js:
// ...
const logoutRoute = (require('./routes/logout'));
// ...
// use routes
app.use('/user', userRoute);
app.use('/login', loginRoute);
app.use('/oauth-callback', oauthCallbackRoute);
app.use('/logout', logoutRoute);

// ...
Our /logout route will wipe the user’s saved login by deleting:
- A browser cookie that connects the browser to the server-side session
- Our Express server-side session (and the token we store there)
- FusionAuth’s OAuth session for that user
The first two are accomplished by calling the function req.session.destroy(). The last is done by redirecting the user to FusionAuth’s /oauth2/logout endpoint.
In server/routes/logout.js:
const express = require('express');
const router = express.Router();
const config = require('../../client/src/config');

router.get('/', (req, res) => {
  // delete the session
  req.session.destroy();

  // end FusionAuth session
  res.redirect(`http://localhost:${config.fusionAuthPort}/oauth2/logout?client_id=${config.clientID}`);
});

module.exports = router;
After cleaning up, FusionAuth will redirect to the React app, because we configured the main entry point of our React app as the "Logout URL" in the FusionAuth application configuration.
Try it out. You can also watch cookies in your browser’s developer tools to see it working.
Troubleshooting#
FusionAuth has made troubleshooting easy. If you’ve missed a setting in your OAuth configuration, you will most likely see an error message come back telling you what you’ve missed. Check back through the settings above to make sure you have copied the correct information over from FusionAuth, and that you have saved both the OAuth settings as well as the Attribute Mapping in the miniOrange OAuth Client.
You might find that after a restart or a long time between logins, your FusionAuth instance will log out. When that happens, clicking the login on your login form will add an additional step for you to log into your FusionAuth instance again so that it can access the needed credentials.
Take It Further#
Some areas that you may want explore further::
- Using PKCE (pronounced 'Pixie') to give an additional layer of security to your React app's login workflows.
- Exploring roles and self-registration.
- Using an iframe to have a custom login screen with no redirects.
Now you know how to integrate a React application with an OAuth server like FusionAuth. By delegating authentication to such a server, your react application can focus on building features, not auth.
Enhance your React app's security with FusionAuth's OAuth capabilities. Request a demo today.