


User authentication is one of the most important parts of building any application, and almost every application features some sort of authentication. However, it quickly gets difficult to manage authentication when you have multiple related but independent applications to maintain.
This blog post walks through single sign-on with Wordpress and FusionAuth. You can also work through a hands-on quickstart.
Let's say you are building a photo-sharing application that lets a user sign up with a username and password to share their pictures. Your team might later decide to create a forum using WordPress to help answer your users' questions, but this new project isn't tied to your original application. It uses an entirely different tech stack, database, and hosting setup.
This means your users need to sign up again on this second website and remember another set of usernames and passwords. Giving users two entirely different sets of credentials is not ideal, so that's where Single Sign-On comes in.
Single Sign-On, commonly known as SSO, is an authentication mechanism that enables users to use a single set of credentials to log in to multiple different applications or websites. In a typical SSO setup, you have a service provider-the application the user is trying to log in to-and an identity provider like FusionAuth, which handles the authentication. This means your users need only one set of credentials to log into all of your applications.
Using FusionAuth for SSO#
To use SSO, you need to choose an Identity provider which will handle the authentication for you. FusionAuth is one such identity provider. FusionAuth provides libraries for most major programming languages and frameworks, including PHP, Ruby, Python, Java, Go, and .NET.
FusionAuth is fully customizable and is available as a stand-alone package for Linux, Mac, and Windows, so you can self-host FusionAuth on any server. You can even get started for free, so there's no need to enter your credit card number to follow along with this tutorial.
If you are building a website with WordPress and you need to incorporate user management, you can leverage SSO. It provides a more flexible solution for users and saves them from managing multiple credentials. Continuing the example above, with SSO a user can sign into the photo-sharing application and the forum application with the same username and password.
In this tutorial, you'll learn how to set up Single Sign-On in WordPress using FusionAuth with the help of an OpenID Connect WordPress plugin.
Prerequisites#
To integrate FusionAuth with WordPress, you need two things: a WordPress instance with admin permissions and a FusionAuth account. If you'd like to run FusionAuth yourself, you can download it for free.
If you want to follow along with this tutorial and do not want to bother about launching a WordPress instance or a FusionAuth instance, you can use the Docker Compose script here to quickly set up a WordPress and FusionAuth instance. If you already have a WordPress instance and FusionAuth account, you can skip to Adding FusionAuth to WordPress.
Before you get started, be sure to have Docker installed and running on your computer and Docker Compose installed. You can find the installation guides for Docker here and the guides for Docker Compose here.
Configuring WordPress and FusionAuth#
Once you have Docker running and a FusionAuth account, run the following commands in your terminal:
git clone https://github.com/FusionAuth/fusionauth-example-wordpress-sso.git
cd fusionauth-example-wordpress-sso
docker compose up -d
This will start a WordPress instance on port 8030 and a FusionAuth instance on port 9011. Now, finish the installation of WordPress by opening up a browser window and navigating to the following address.
localhost:8030
You should be greeted with this screen:
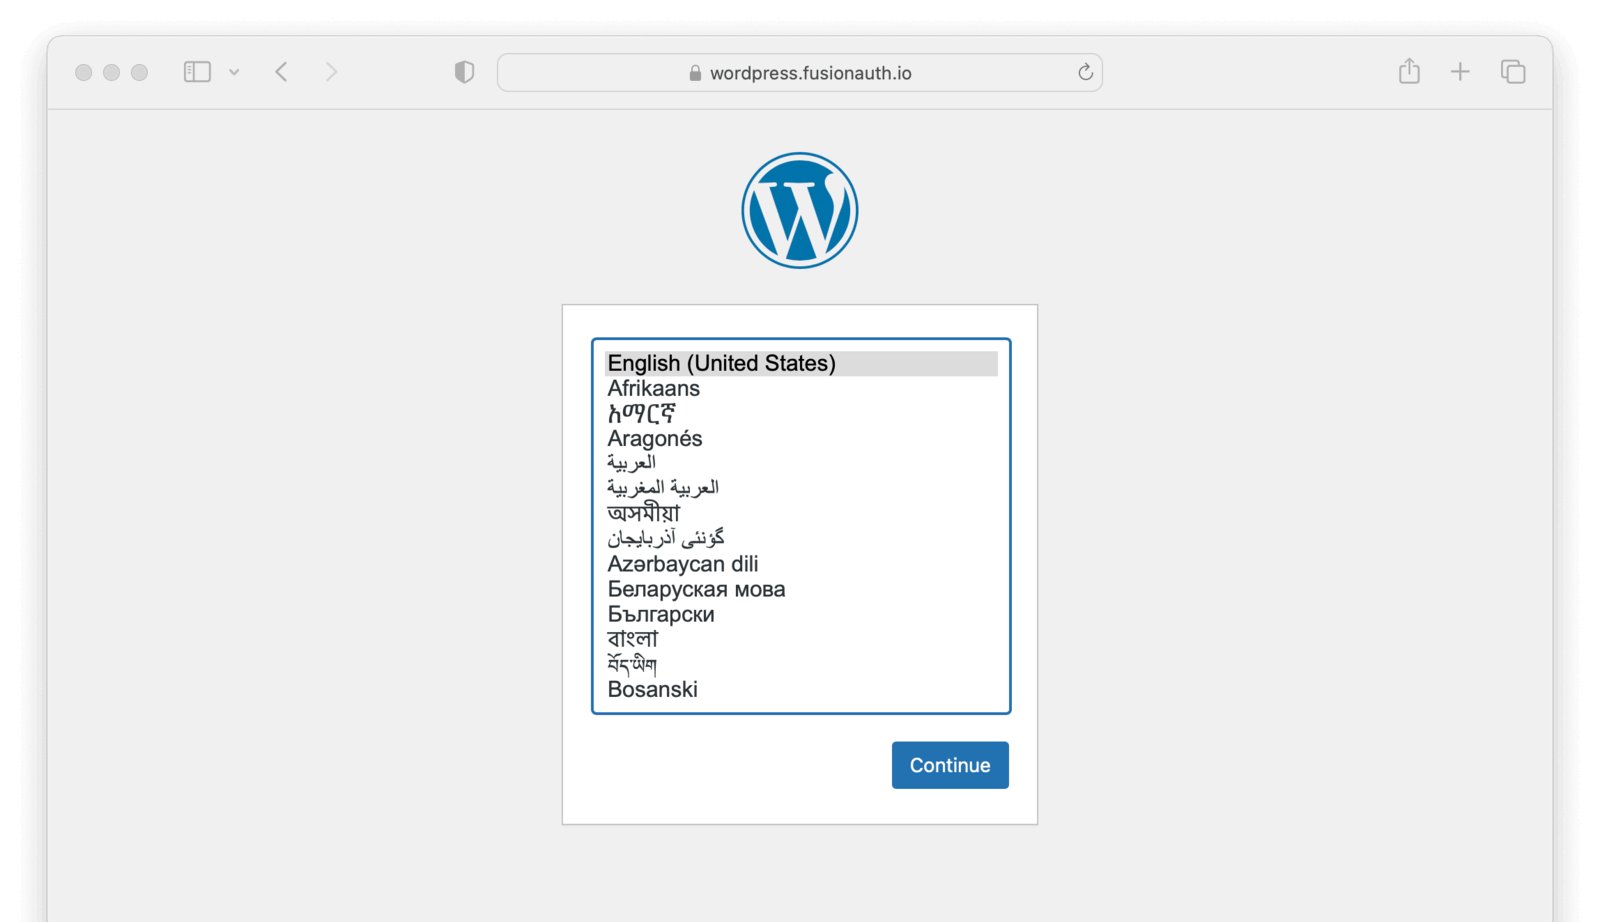
Choose your preferred language and click "Continue”.
On the next page, enter the site title and create an admin account by providing a username, email, and password.
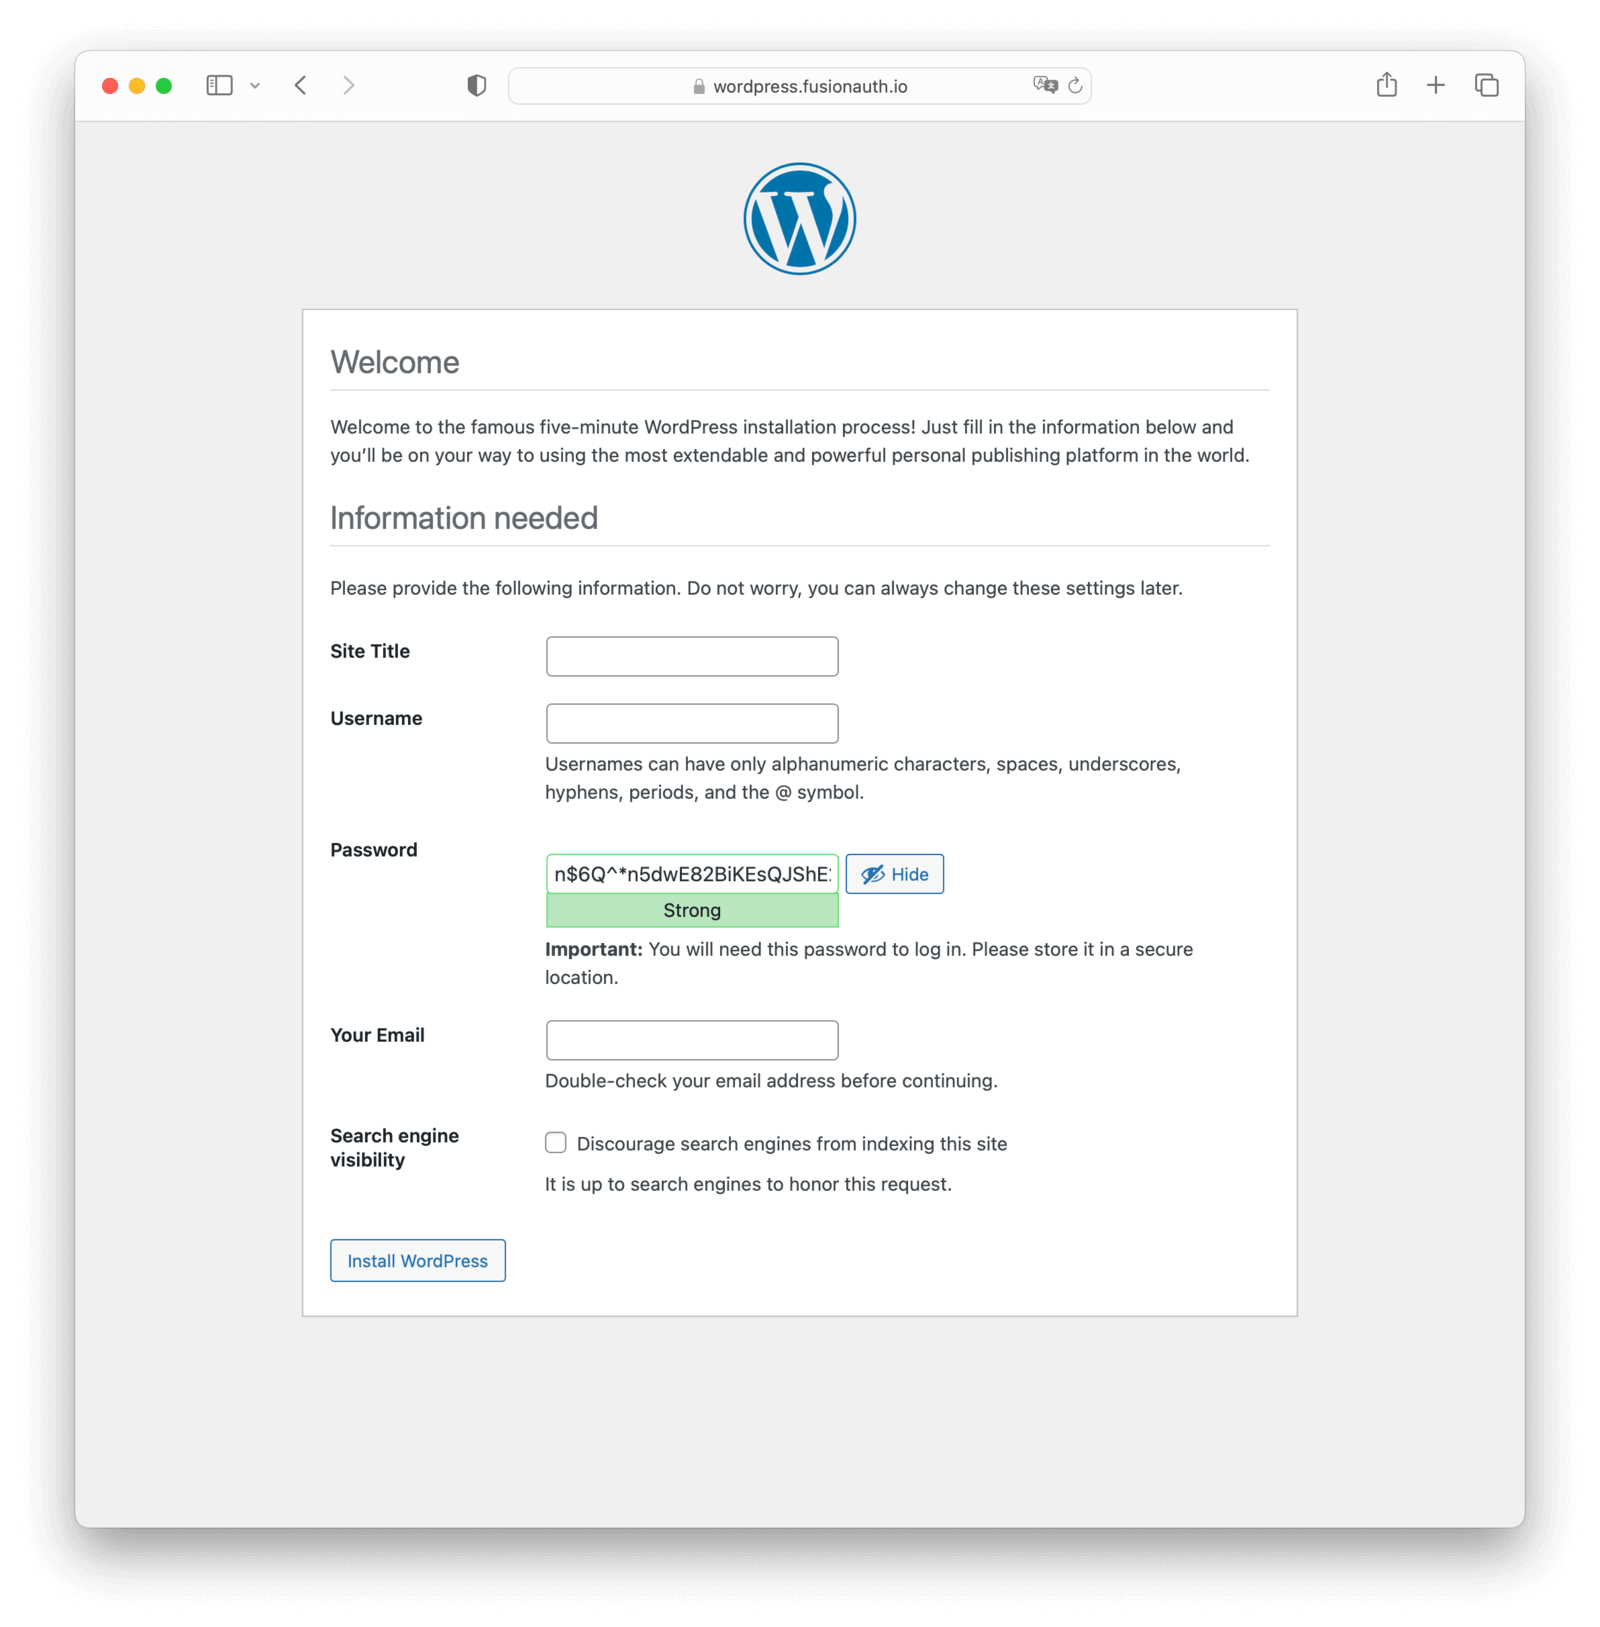
Press "Install WordPress" to finish the installation. Log in with your new username and password when it's finished.
Configuring FusionAuth#
Now let's set up FusionAuth. Navigate to localhost:9011 and you should see the FusionAuth setup screen.

Enter your first name, last name, email, and password. Once done, click on "Submit" to finish the installation.
Adding FusionAuth SSO to WordPress#
Once FusionAuth and WordPress have been installed, you can proceed with adding FusionAuth SSO to your WordPress instance. In this section, you will install an OAuth Single Sign-On plugin and configure it to communicate with your local FusionAuth instance.
Installing the plugin#
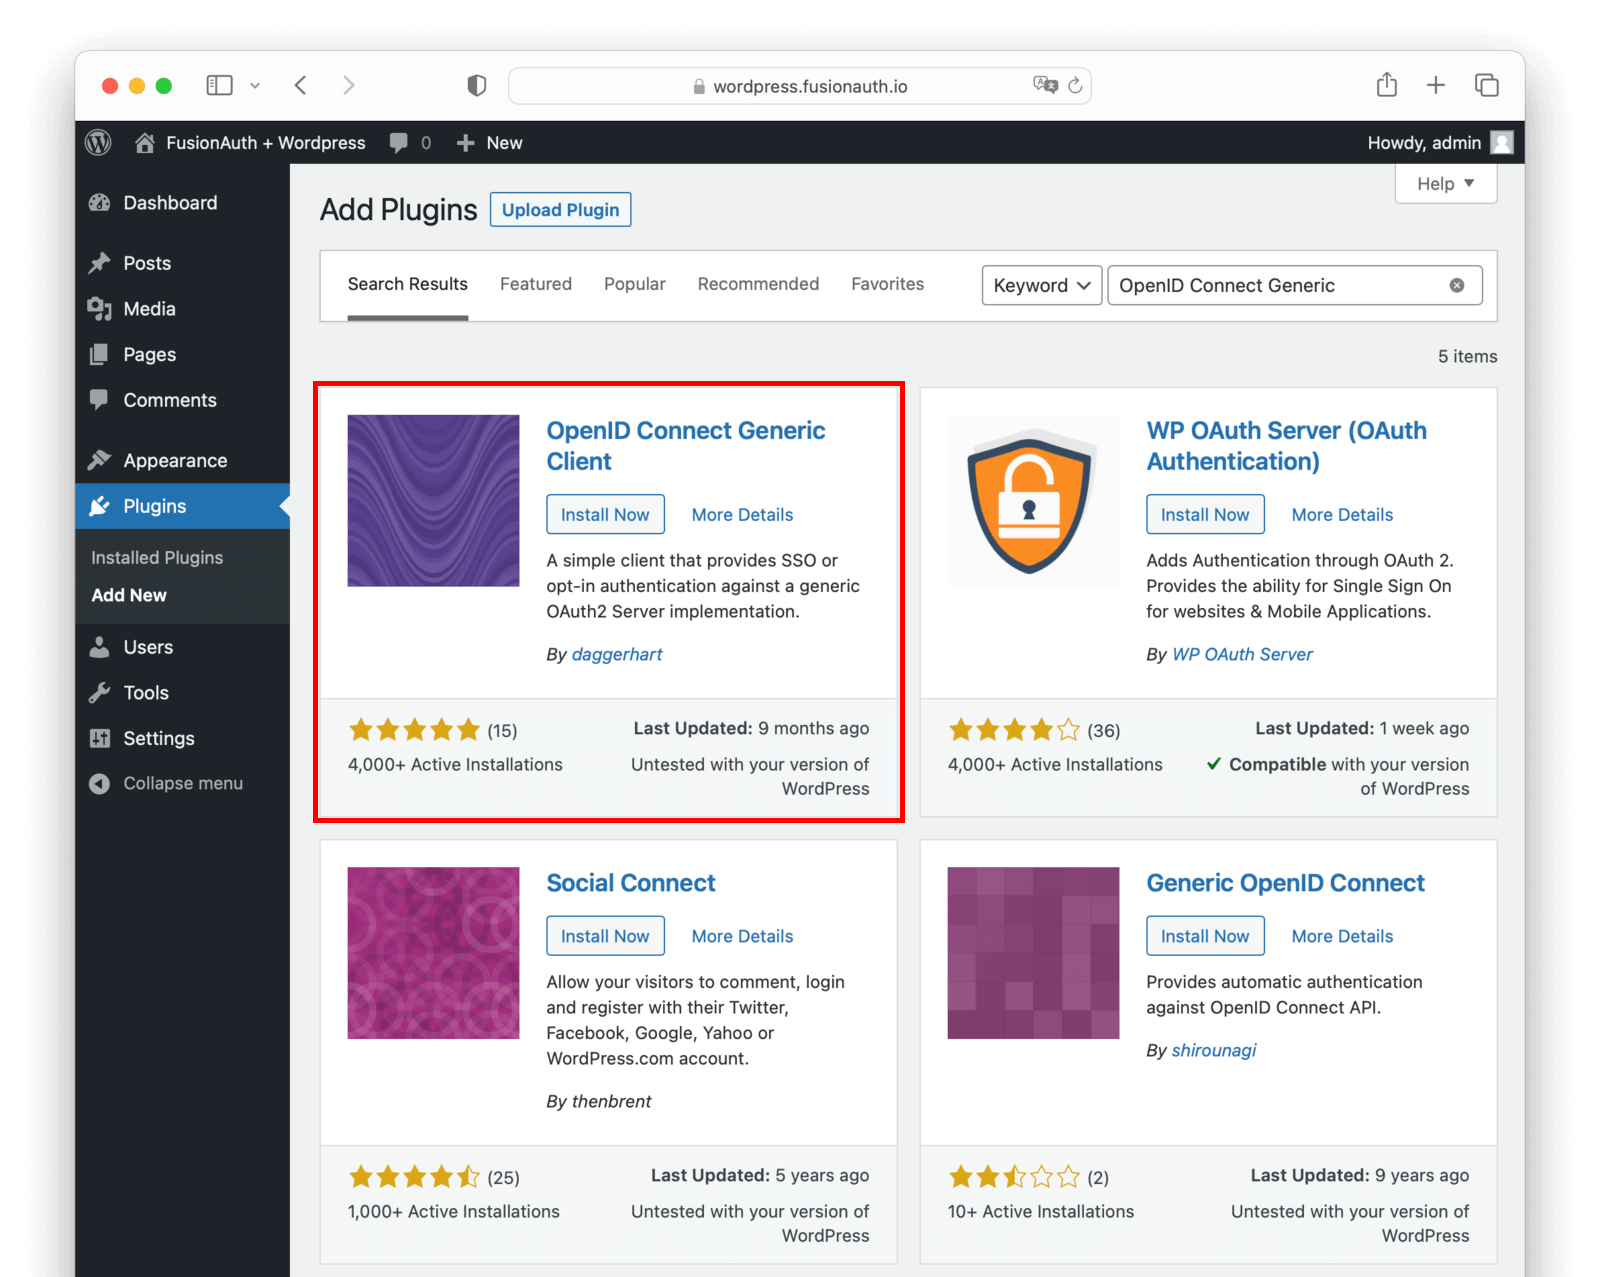
For this tutorial, you will use the OpenID Connect Generic plugin.
Go to your WordPress Admin Dashboard at localhost:8030/wp-admin and click on the Plugins page from the sidebar. Click on the Add New button, and on the next page, search for "OpenID Connect Generic".
The plugin should be the first one in the search results. You want the one by daggerhart. Install and activate the plugin.
Once the plugin is activated, choose Settings -> OpenID Connect Client from the left menu. This is where you will be able to configure the plugin to work with FusionAuth.
But first, let's set up FusionAuth. After you do that, you'll return to finish configuring this WordPress plugin.
Configuring FusionAuth#
To get started with SSO, you need to create an application in FusionAuth. An application represents the resource where users will log in to, in your case, the WordPress site. Each website, mobile app, or any other application should be created as an application in FusionAuth. Users can use the same username and password to log in to all such applications managed by FusionAuth.
We aren't going to build a photo-sharing application in this tutorial; that is left as an exercise for you, dear reader. Let's assume you have an existing photo-sharing application and want to add SSO into a WordPress application, like the forum mentioned above.
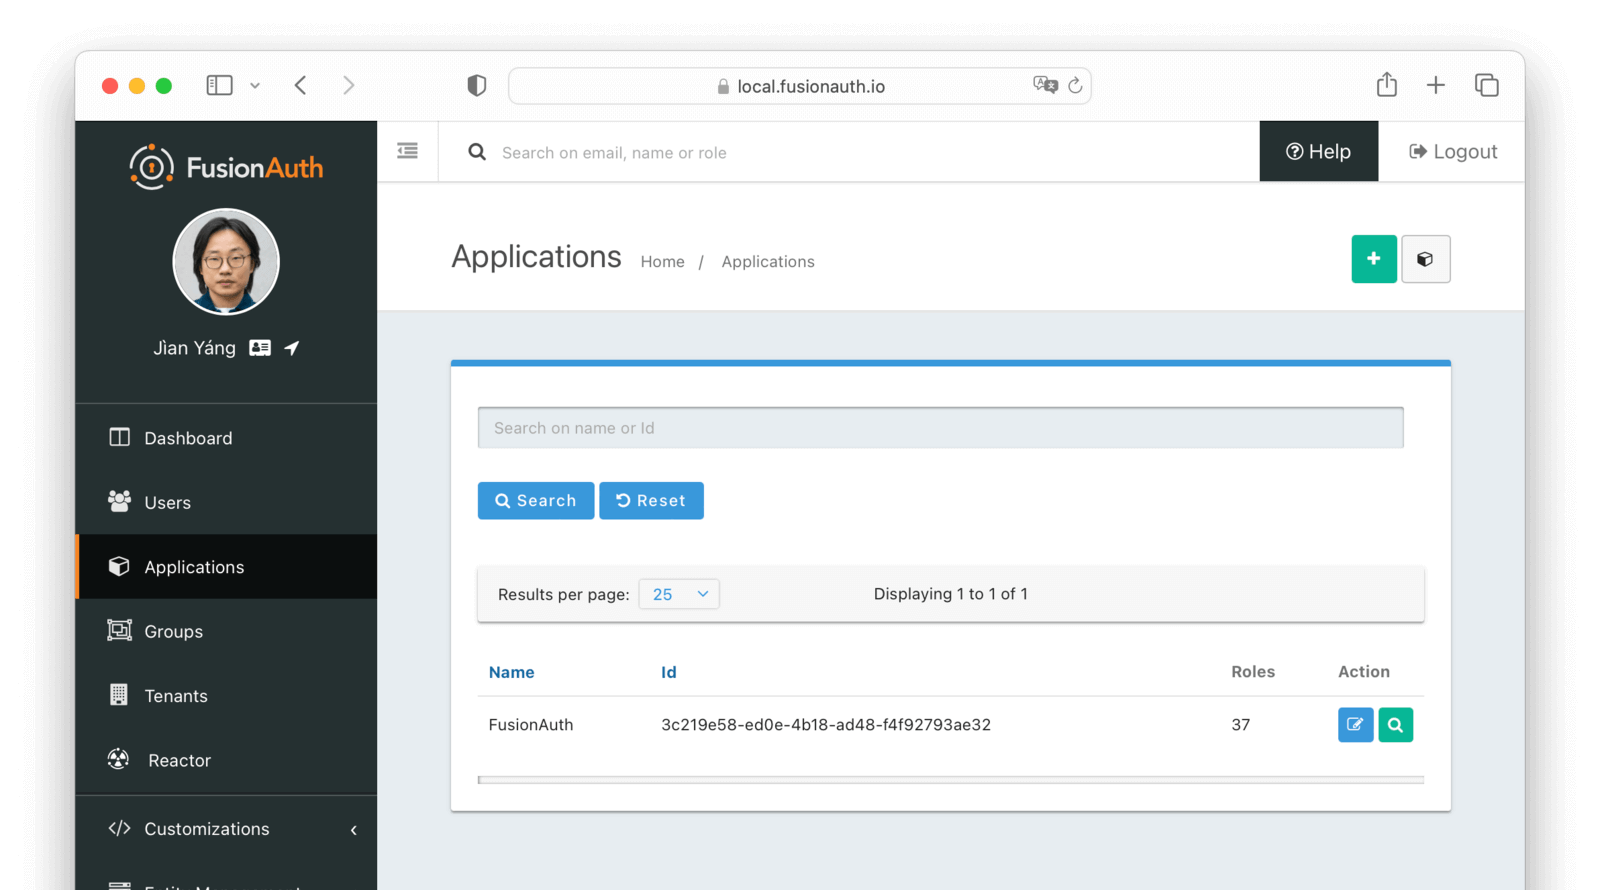
Click on the "Applications" menu from the sidebar and then the green plus + button in the top-right corner.
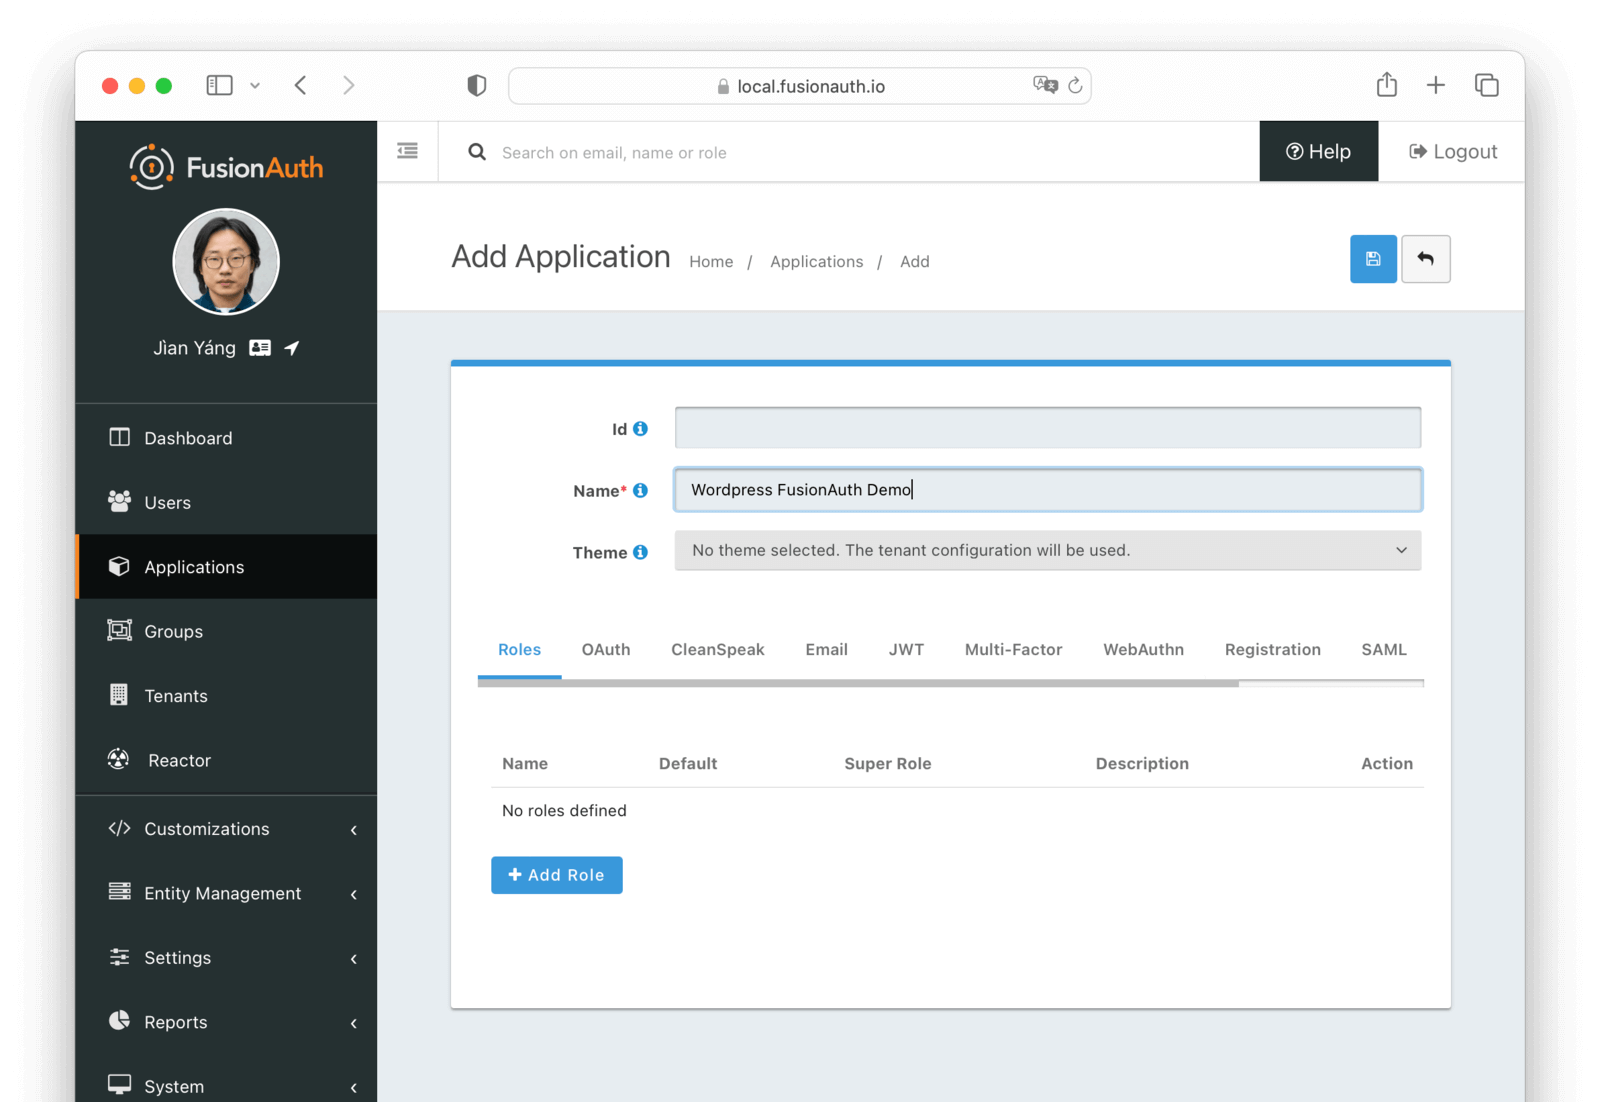
In the "Add Application" screen, provide a name for your app. This is just for display purposes so that you can distinguish your apps.
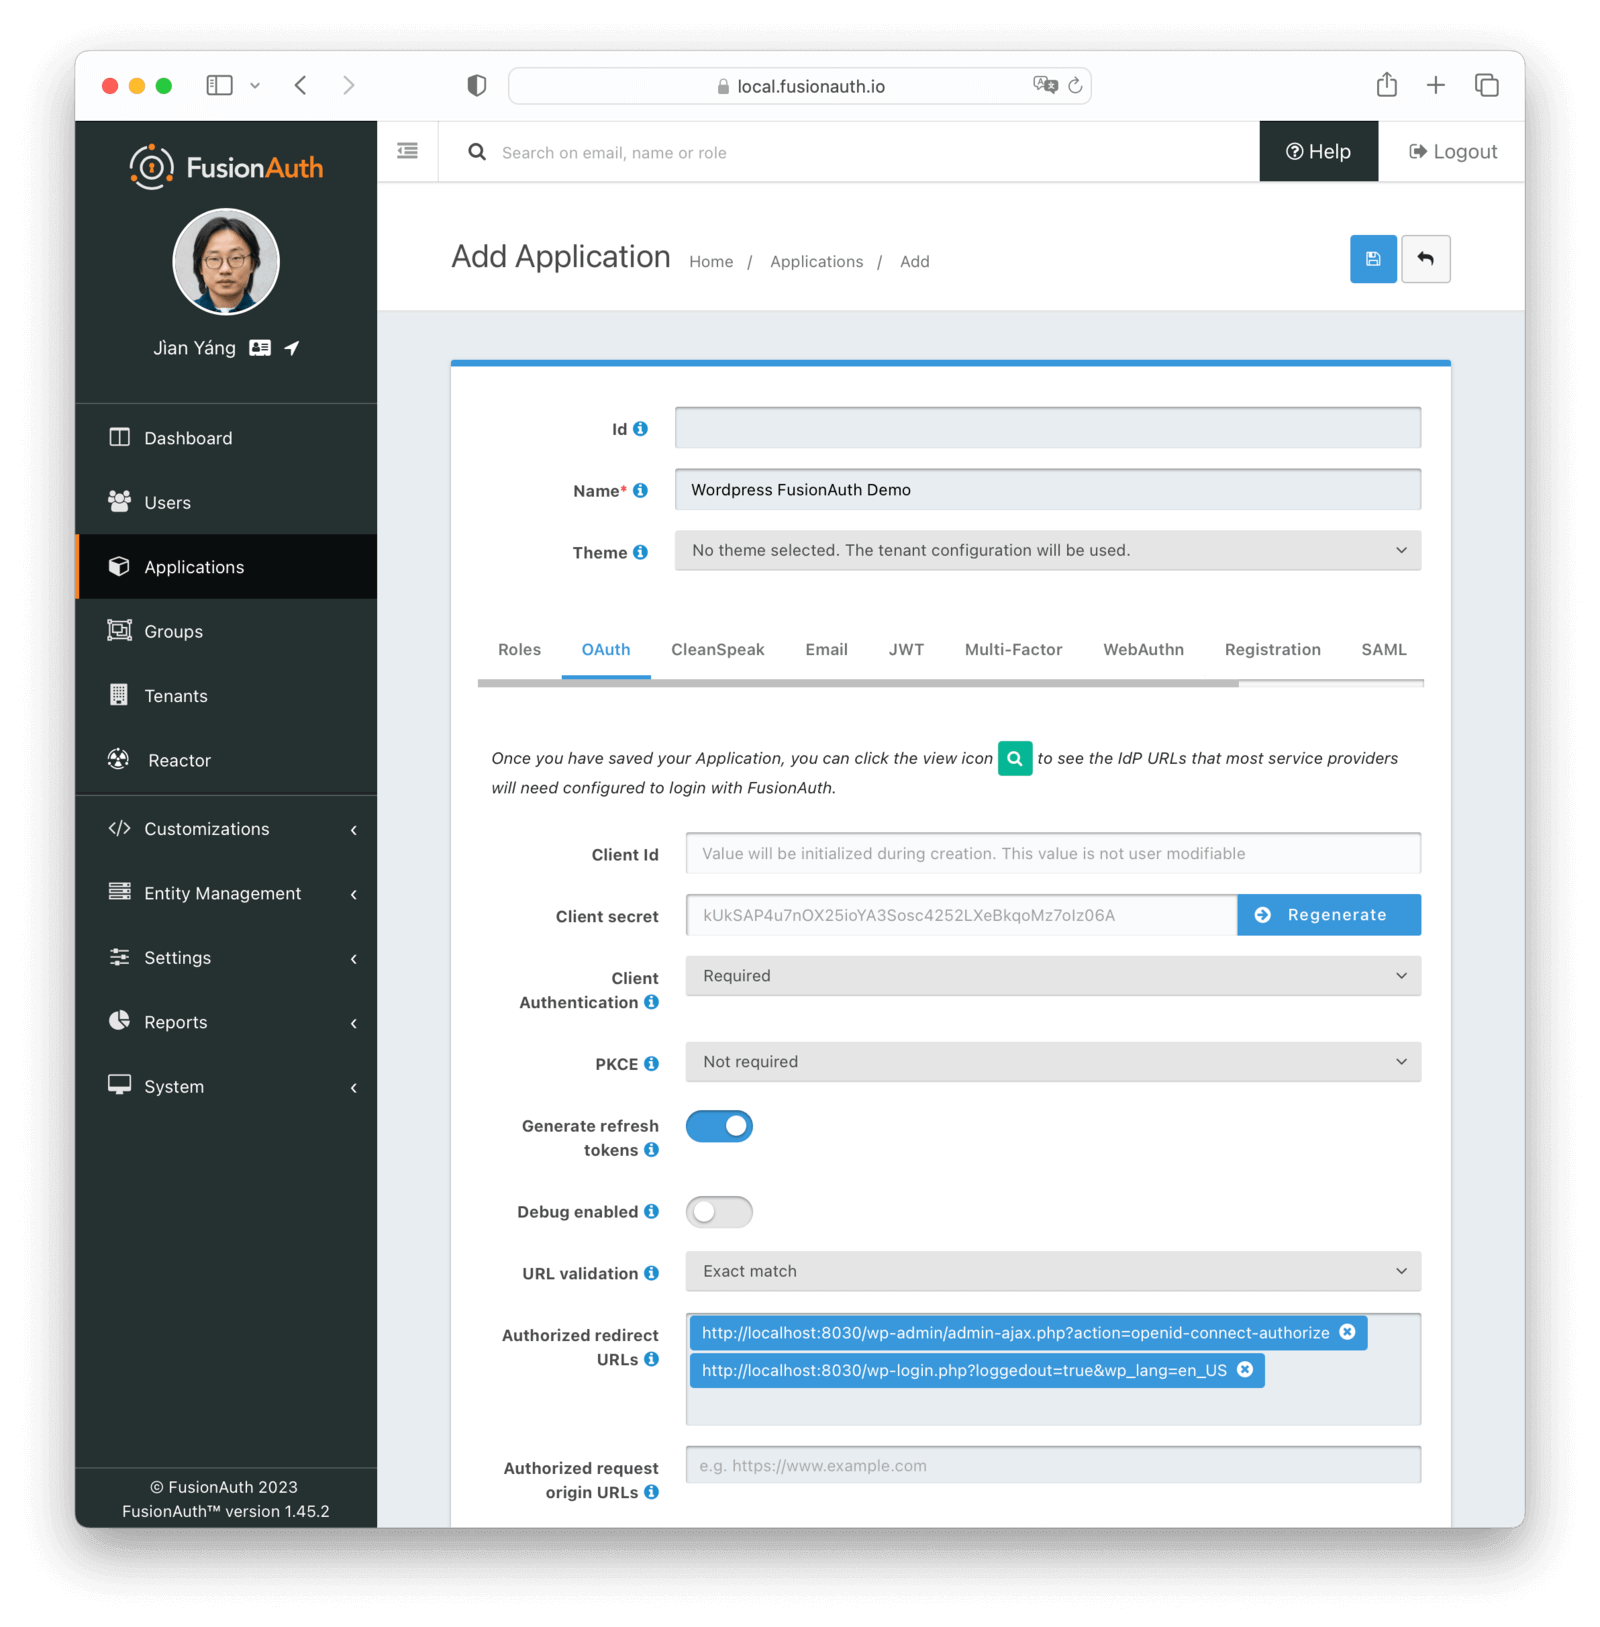
Now, click on the OAuth tab. The default settings should suffice. The only thing you need to provide is the Authorized redirect URLs value. These are the URLs where users will be redirected after they're authenticated. In this case, both URLs are provided and handled by the plugin. Enter these two URLs:
http://localhost:8030/wp-admin/admin-ajax.php?action=openid-connect-authorize
This is the URL FusionAuth will redirect to after the user has logged in.http://localhost:8030/wp-login.php?loggedout=true&wp_lang=en_US
This is the URL FusionAuth will redirect to after the user has logged out.
Your wp_lang value may vary if you use a different locale.
Once you move this application into production, be sure to update the authorized redirect URLs with the real hostnames. If your WordPress site lives at forum.photosharing.com, the URLs would be:
https://forum.photosharing.com/wp-admin/admin-ajax.php?action=openid-connect-authorizehttps://forum.photosharing.com/wp-login.php?loggedout=true&wp_lang=en_US
This is what the OAuth tab should look like after you are done:
By default, FusionAuth provides login functionality. You will need to manually create new users through the admin panel or via API. This is useful if you are building an internal site where you don't want users to register themselves, but in this tutorial, users should be able to create an account.
To enable user registration, click on the Registration tab and turn on Self service registration . Keep the default settings unchanged.
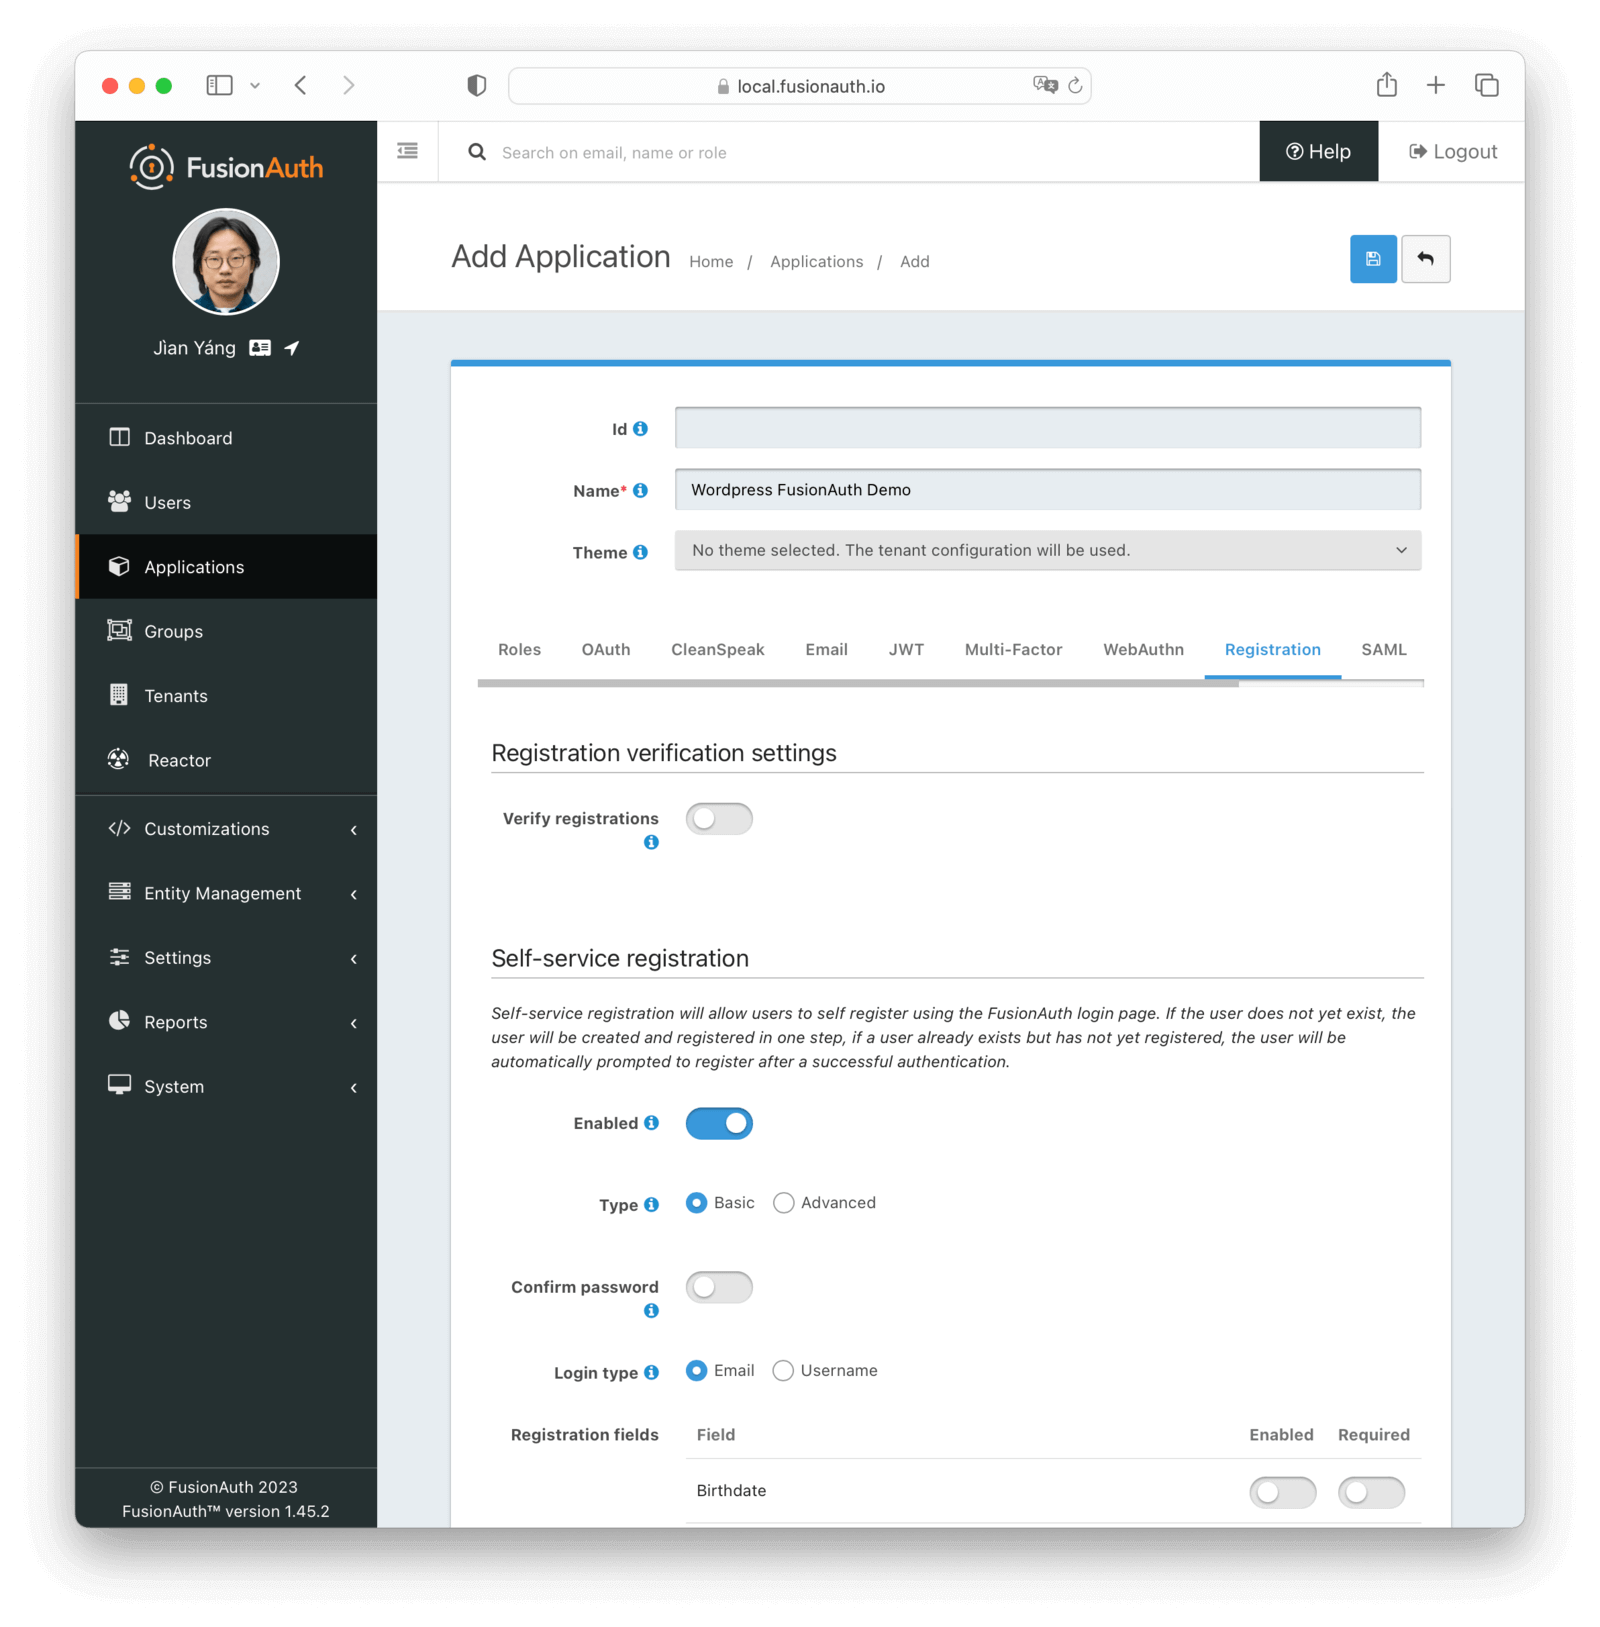
When you are done, click on the blue save button in the top right corner:

You will now be presented with a list of your applications. Click on the view button (the green looking glass) next to the application you just created:
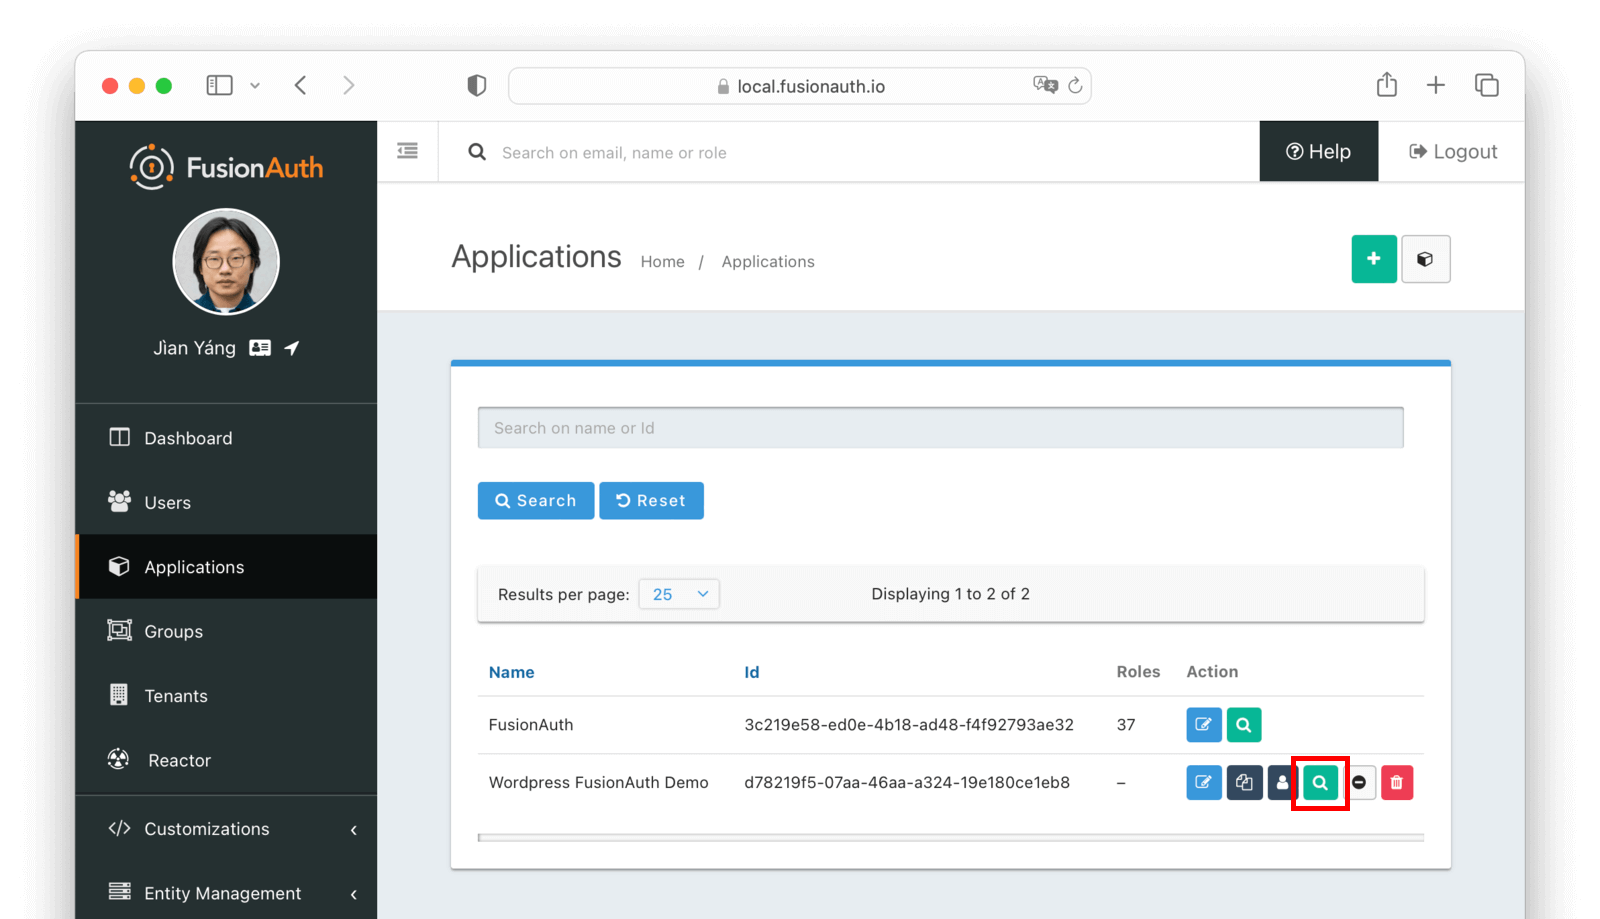
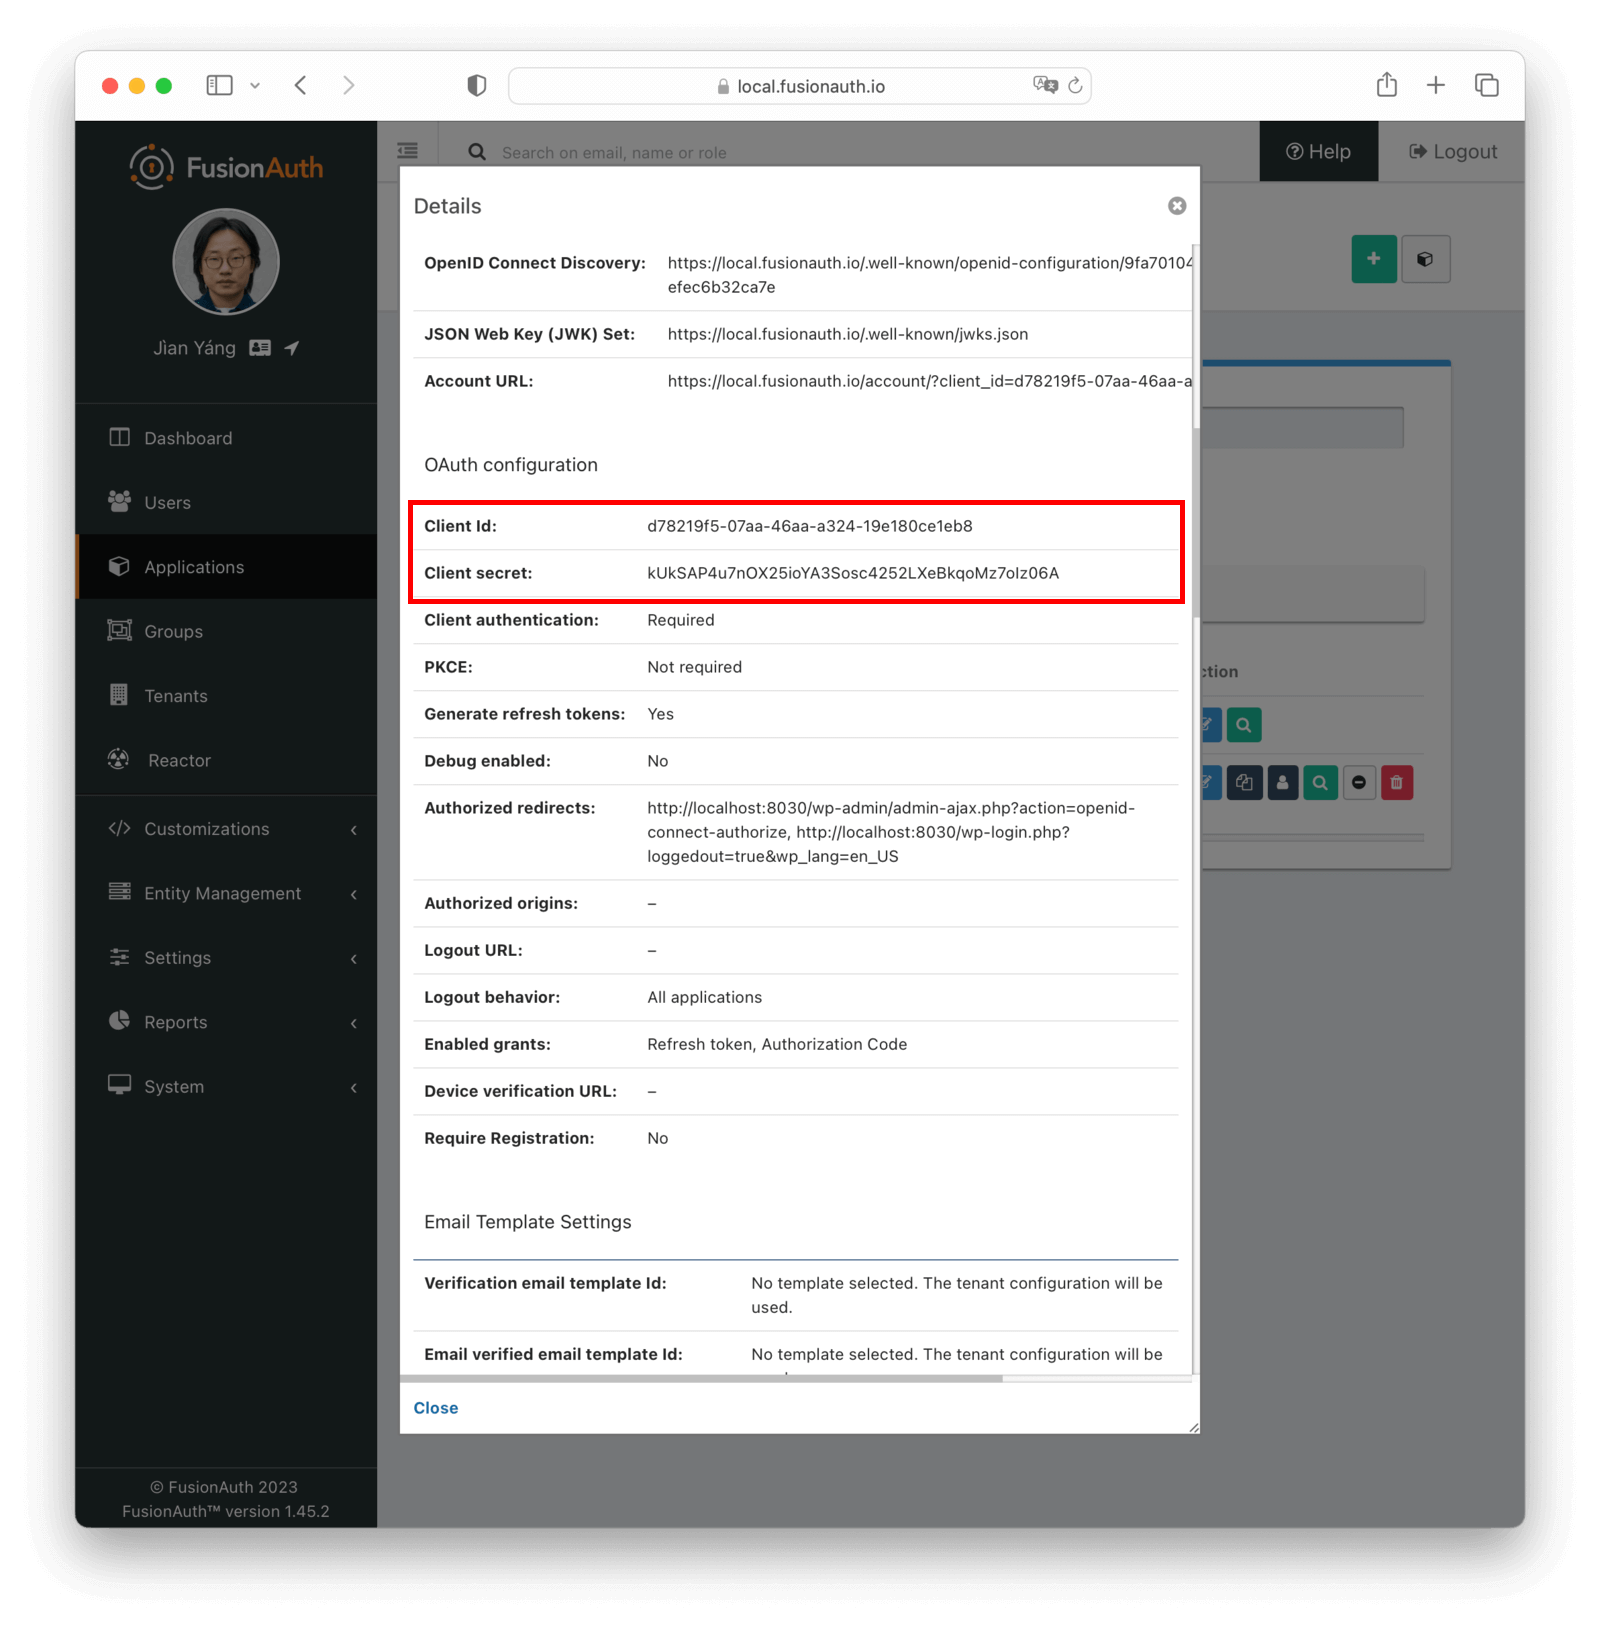
A popup will open with the details about your application.
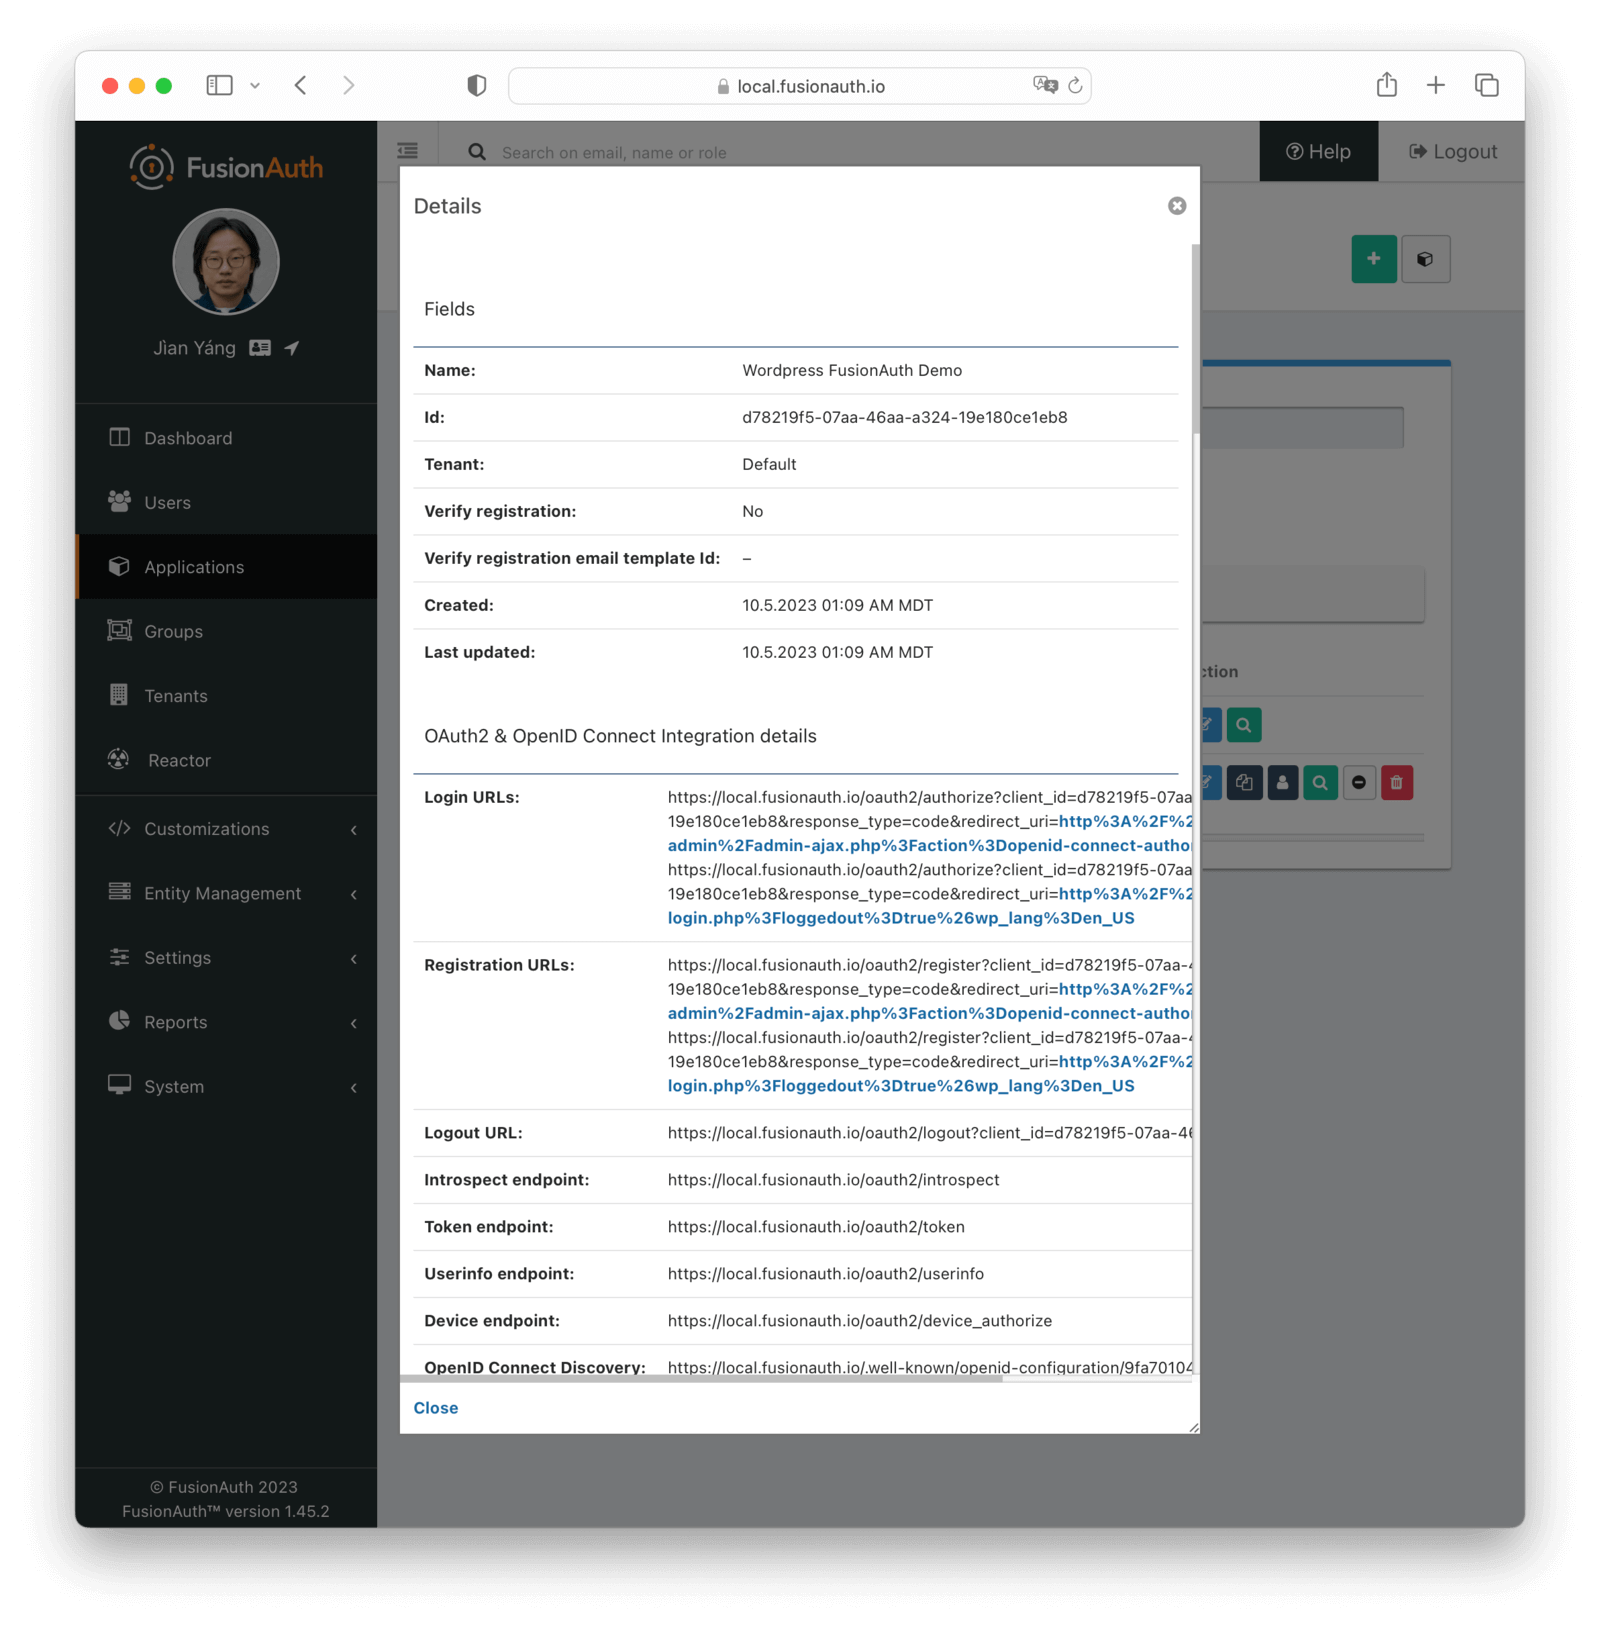
Look for the OAuth configuration section. You may need to scroll down a bit:
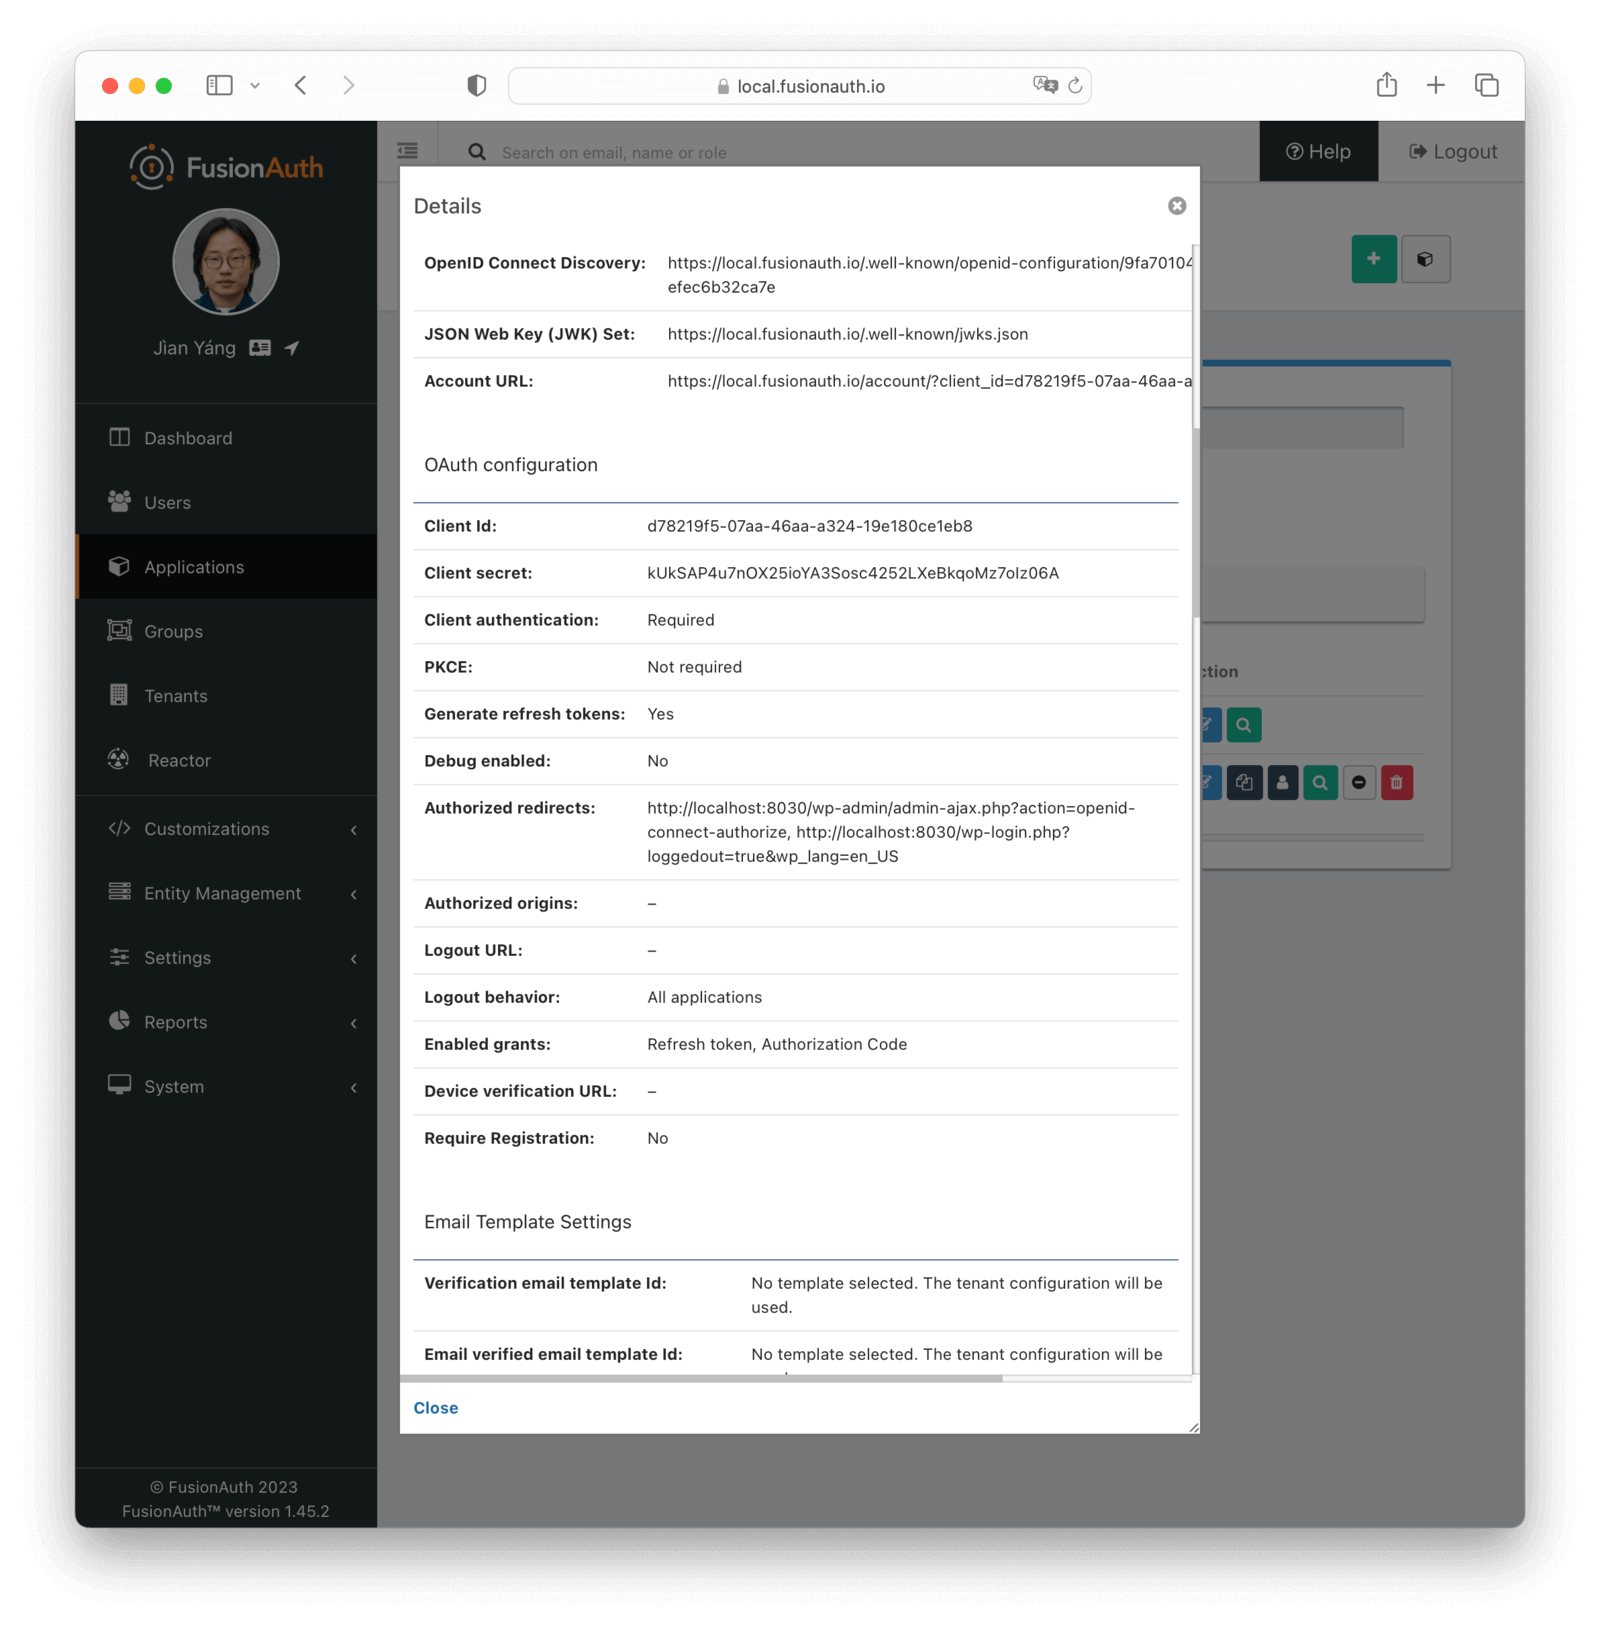
Keep this window open as you'll need to do a bit of copy-pasting from here in the next step.
Configuring the plugin#
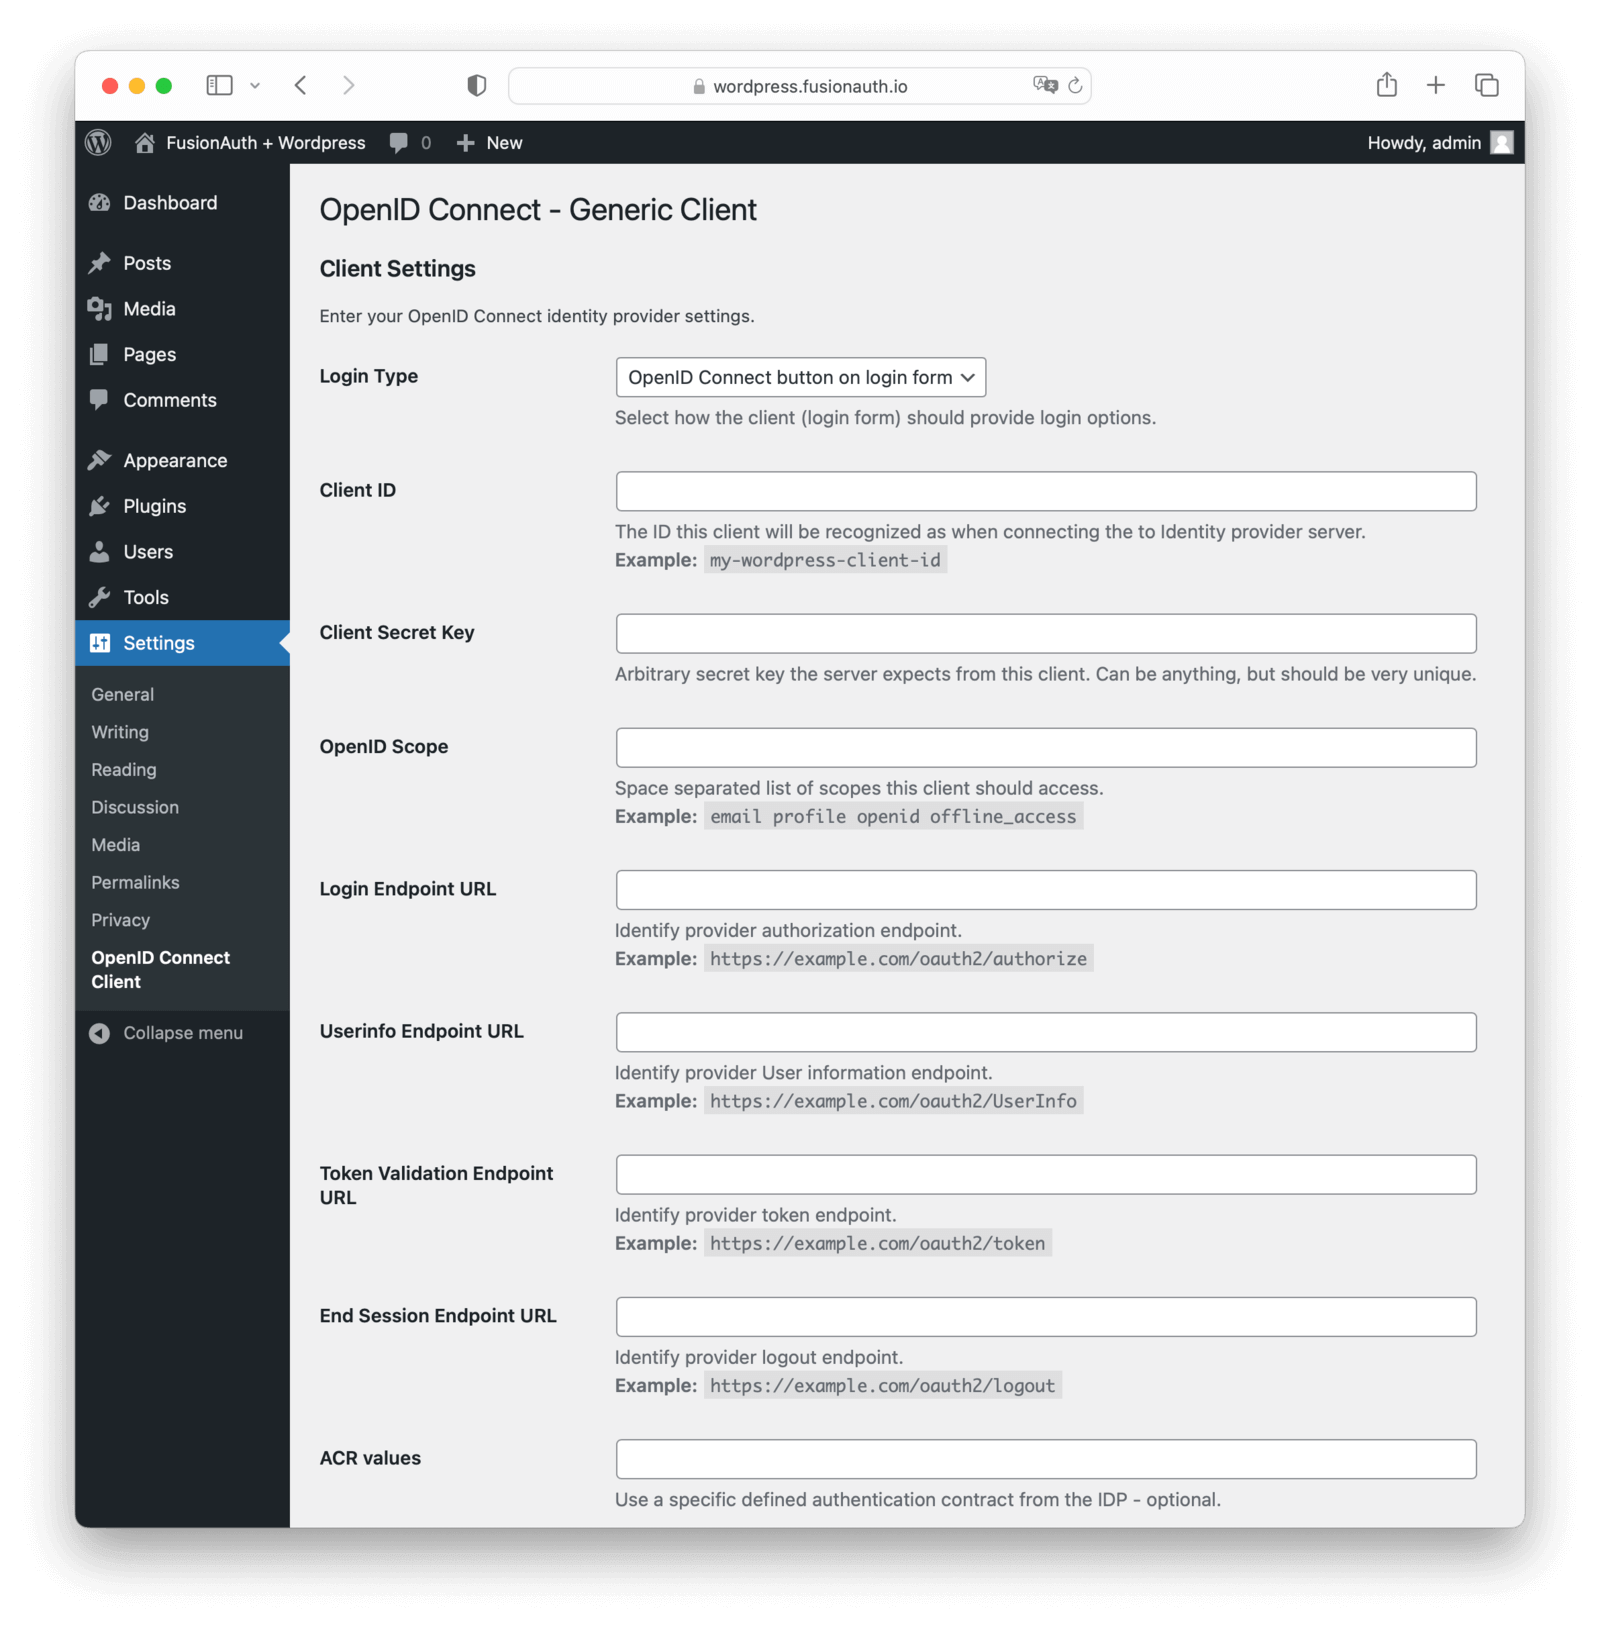
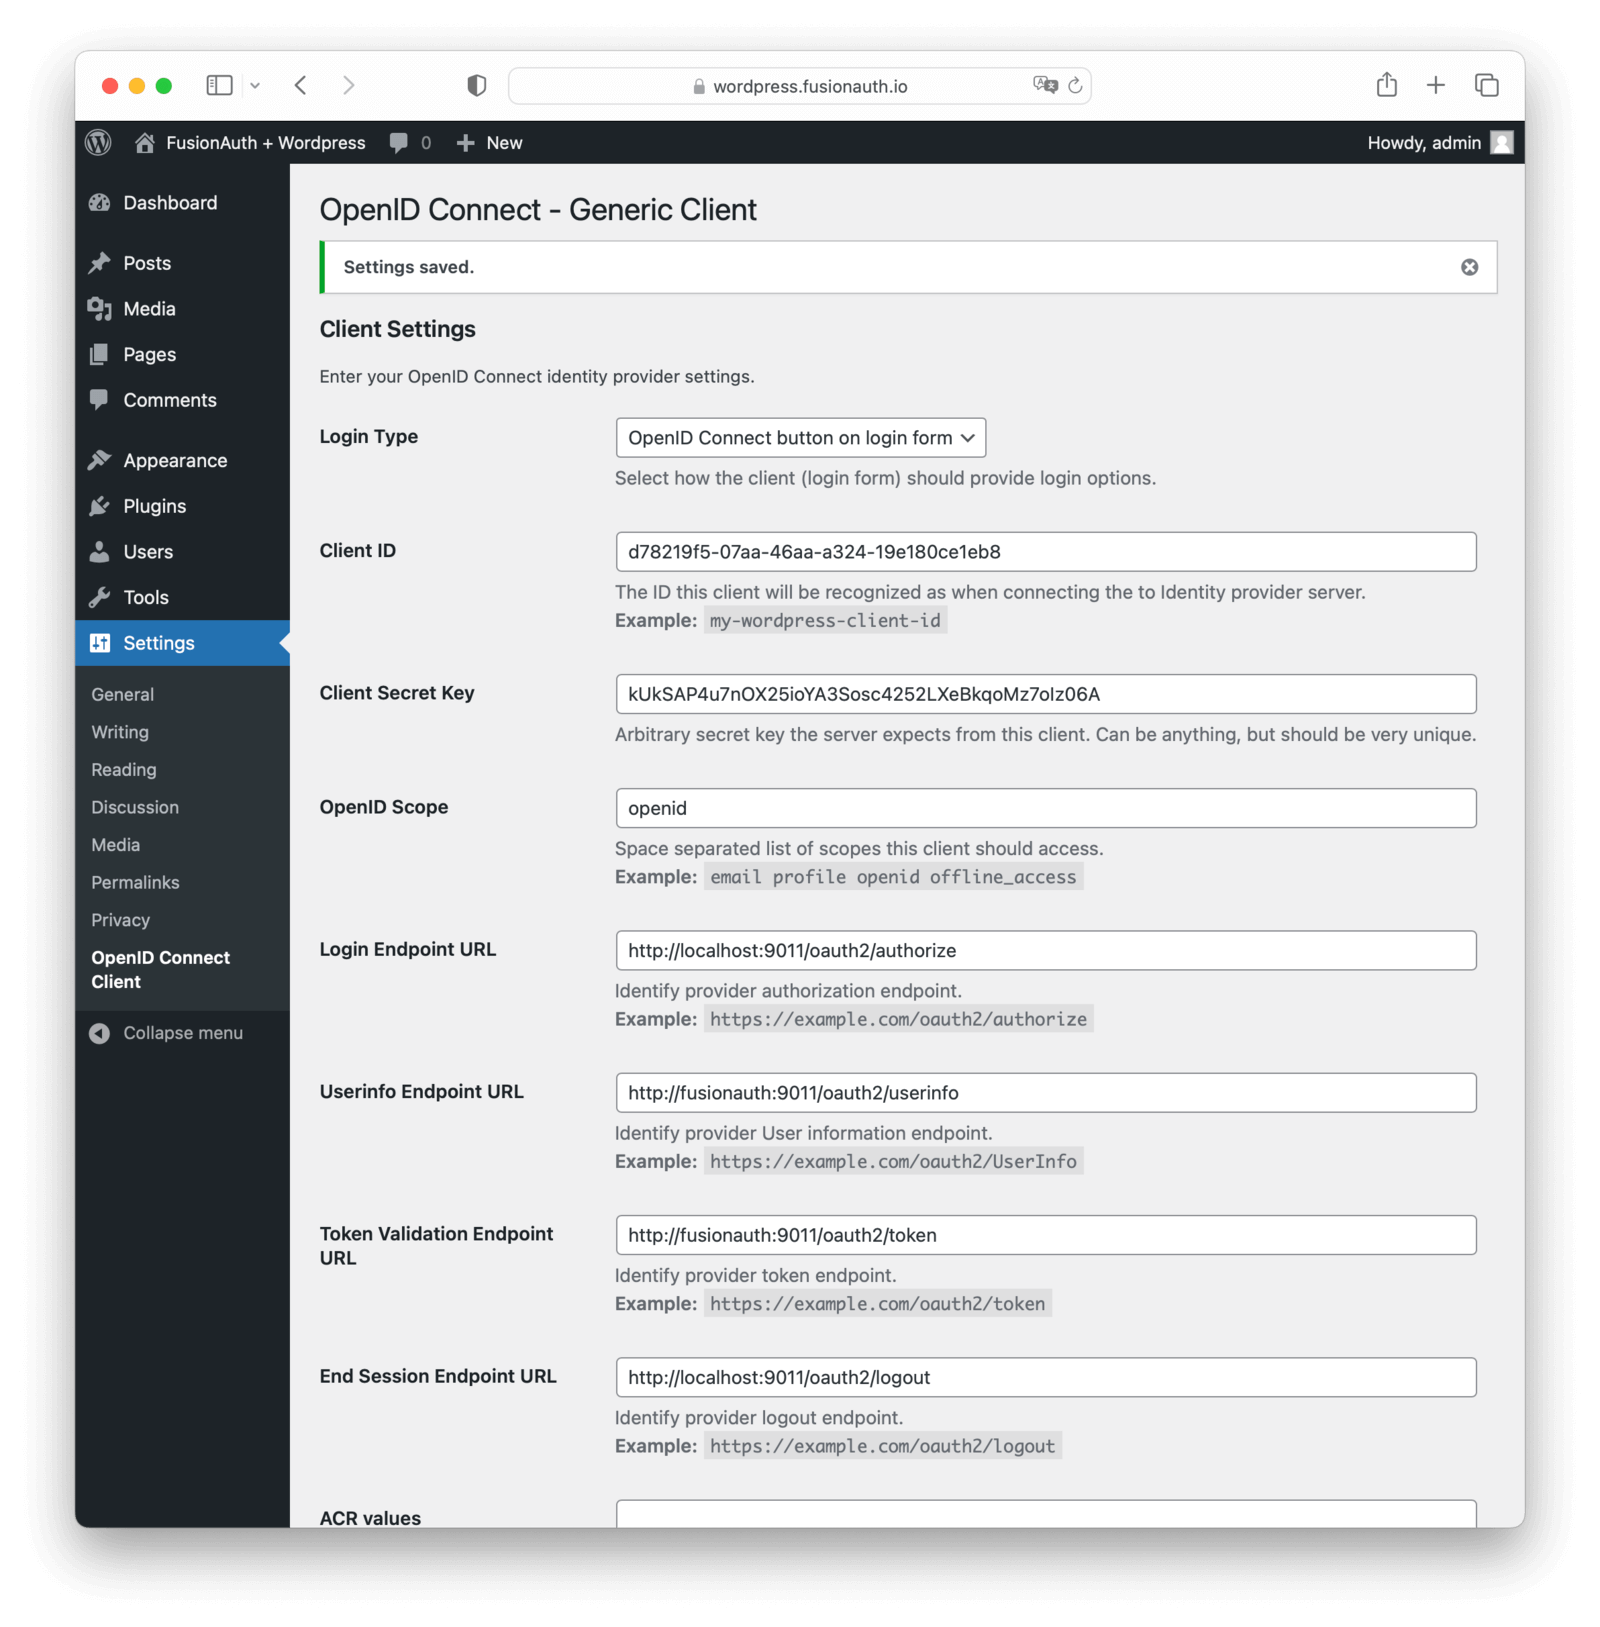
Return to your WordPress admin dashboard where you had the WordPress plugin information stored.
You should see this configuration screen:
Go back to the FusionAuth screen and copy the Client Id and Client Secret from the popup window (you might have to scroll down a bit).
Now, flip back to the WordPress plugin configuration screen and begin entering values.
- Paste the values Client Id and Client Secret fields in the configuration form.
- Put
openidin the OpenID Scope field. - In the Login Endpoint URL field, put
<your-fusionauth-domain>/oauth2/authorize.
In our case, it will be:http://localhost:9011/oauth2/authorize - In the Userinfo Endpoint URL field, put
http://your-fusionauth-domain/oauth2/userinfo. However since we're running in a Docker container, WordPress can't reach FusionAuth throughlocalhost, so the URL should be:http://fusionauth:9011/oauth2/userinfo
Docker is taking care of the local DNS resolution. Inside the Docker network service names will be available as domain names. Therefore fusionauth can be used in the URL for the communication between the FusionAuth instance and Wordpress as they both are in the same Docker network.
- In the Token Validation Endpoint URL field, put
<your-fusionauth-domain>/oauth2/token.
In our case, for the same reason, it will be:http://fusionauth:9011/oauth2/token - In the End Session Endpoint URL field, put
<your-fusionauth-domain>/oauth2/logout.
In our case, it will be:http://localhost:9011/oauth2/logout - Check Disable SSL Verify since none of our docker instances are running HTTPS.
- Change the Identity Key and Nickname Key values to
sub. This is what WordPress will use as Ids internally. - Change the Display Name Formatting to
{email}. This is what will be displayed to the user in the WordPress admin screen. - Check Link Existing Users if users in your local WordPress database have the same emails as users in your FusionAuth database; otherwise you'll see an error when those users try to log in.
Note that the Authorize Endpoint need not be changed since that will be opened in the browser. As mentioned above, for URLs like the "Token Validation Endpoint URL", if you are using Docker, you will need to use a docker resolvable hostname like fusionauth. If you are not using Docker, you should keep all the URLs pointed at localhost.
Finally click on the Save Changes button. Here's what a filled out form will look like after you've filled it out:
Testing#
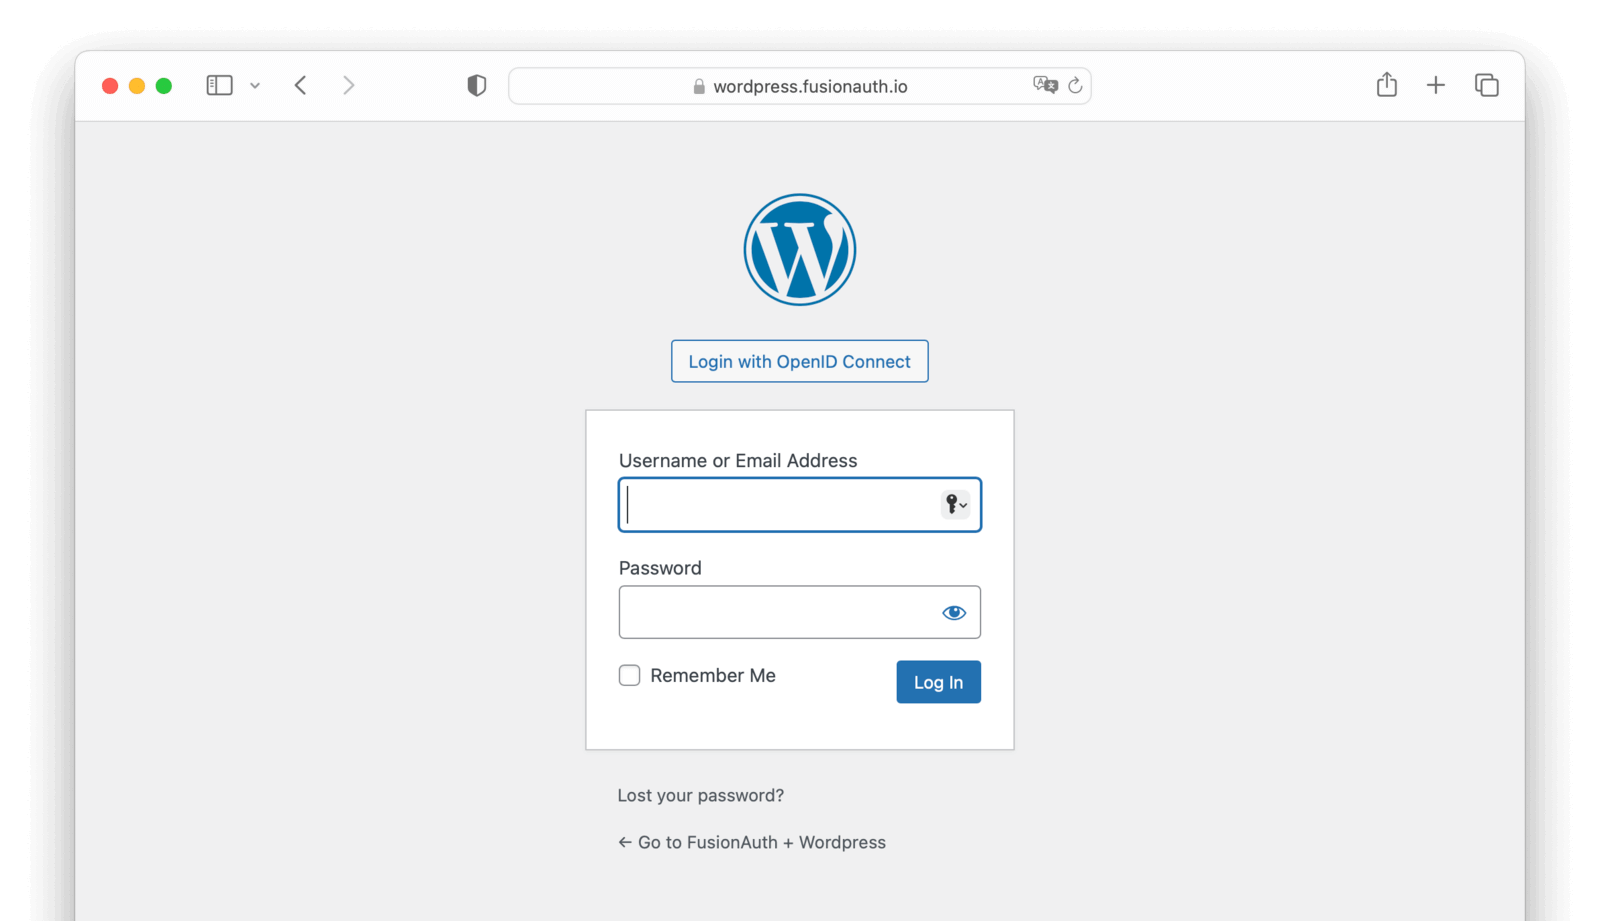
To test the whole login flow, log out of the WordPress dashboard or use an incognito window. Navigate to the WordPress login page http://localhost:8030/wp-login.php and you should see a Login with OpenID Connect button above the usual login fields.
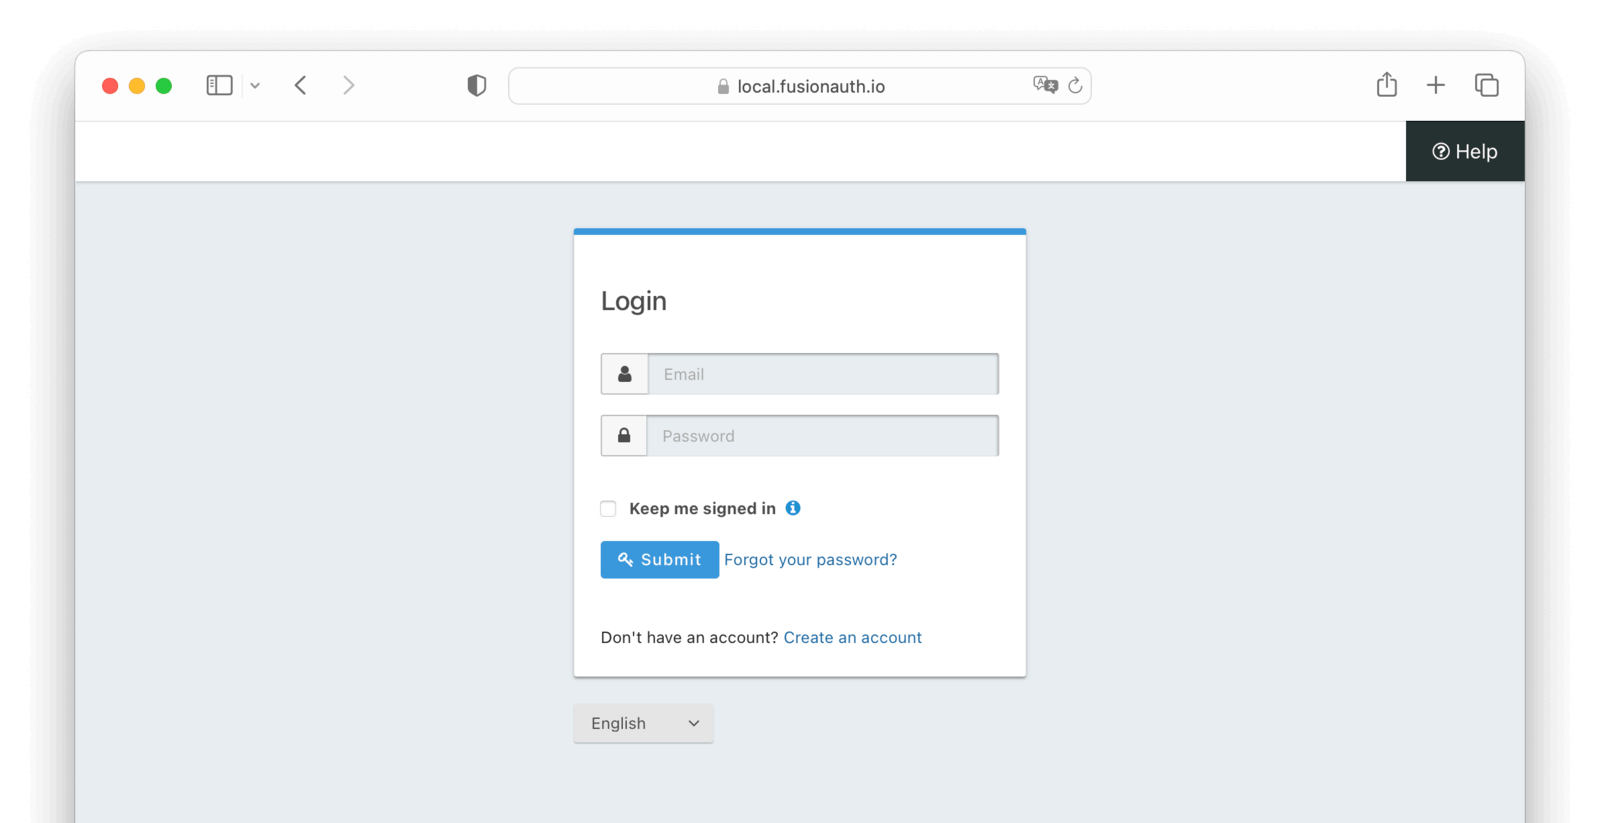
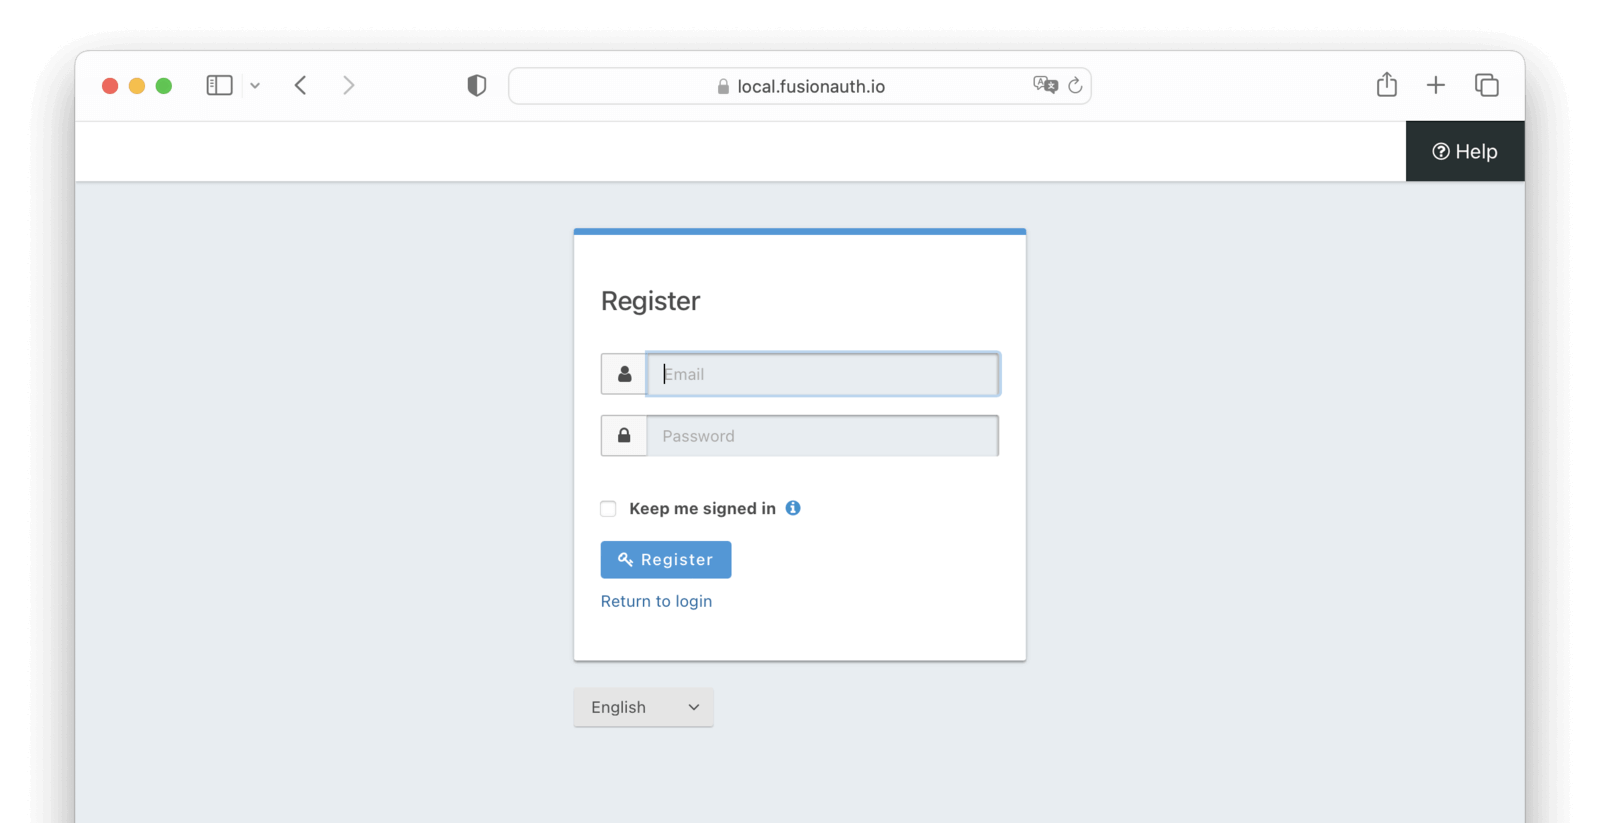
Clicking on that button will take you to the FusionAuth login page. You can login with your FusionAuth credentials, for instance the user you first created.
You can also click the Create an account link and register a new user.
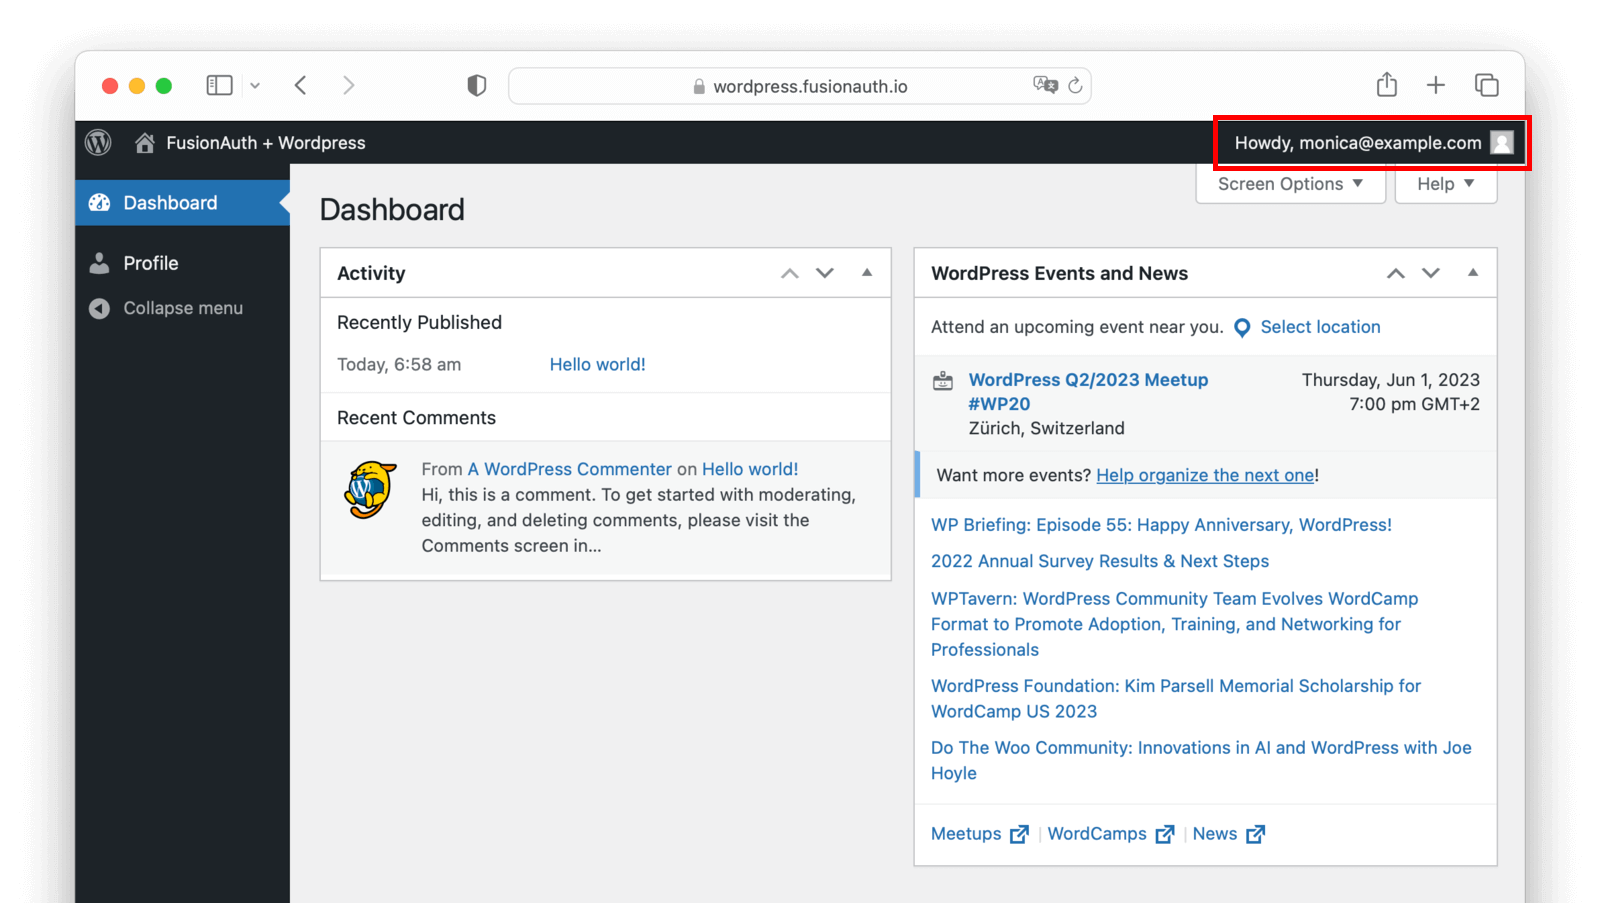
Once successfully authenticated, you will be redirected back to the WordPress site's admin homepage.
All FusionAuth user facing pages can be themed to look like the other application pages. Learn more here.
You can confirm that this is indeed the user you logged in with by looking at the display name, which should be the email of your FusionAuth user.
Congratulations, you've successfully implemented SSO with FusionAuth in your WordPress site. Users can successfully sign up and log in.
Conclusion#
In this tutorial, you learned how SSO can make the lives of your WordPress users easier by allowing them to use a single set of credentials to log into all your applications. You learned how FusionAuth can serve as your identity provider and how to integrate it with WordPress by leveraging an SSO plugin.


