


Role-based access control (RBAC) is an authorization protocol that restricts system access based on the roles of a user within an organization. In RBAC, permissions are assigned to roles and roles are assigned to users so that no user is directly assigned a permission. A user is then granted the permissions available to the role(s) they have been assigned.
RBAC can also be applied in the context of Kubernetes. If you want to restrict access to the various resources (pods, services, etc.) in your Kubernetes cluster, you can employ RBAC. The Kubernetes API server supports RBAC natively by making use of Roles and ClusterRoles.
In this tutorial, you'll implement RBAC in Kubernetes using FusionAuth. However, these instructions will work with any OIDC compliant auth server.
What is RBAC?#
When you're working with multiple users, you need some kind of authorization system in place that restricts or grants users access to different parts of the system. A developer in your organization should not be able to access the billing section, and similarly, an accountant shouldn't have access to your project's source code.
If you have a small number of users, it's tempting to attach the permissions directly to the user. You might create a table in your database and store the user-permission assignments there. However, as the number of users grows, you'll quickly start to see repetitions. For instance, you might have several users who require the same set of administrative permissions. Keeping track of all these permissions can become challenging and tedious.
RBAC addresses this problem by assigning permissions to roles. As an example, suppose you have "Admin" and "Viewer" roles for a project. The Admin role has access to all the resources in the project and the ability to create, update, or delete any resource. The Viewer role, however, can only view resources and cannot modify or create resources. With RBAC, you can assign the Admin role to users who need administrative access, and the Viewer role to users who only need read-level access. Now, you don't have repetitions and it's easier to update permissions for a role.
A Kubernetes cluster has many different resources that need to work in sync with each other in order to properly function. Using RBAC, you can employ a proper authorization policy for your cluster. For example, you can guarantee that a developer of one project cannot accidentally make changes to another project, nor delete a pod or service and bring the entire system down.
This article uses the OpenID Connect (OIDC) protocol to communicate with FusionAuth to implement RBAC in Kubernetes.
When a client like kubectl wants to connect to the Kubernetes API, it will use the Authorization Code grant to get an access and refresh token from FusionAuth. This token will be used to authenticate with the Kubernetes API. Then the API server will talk to FusionAuth to verify that the client-provided token is valid. Finally, it will use the roles of the authenticated user to validate whether the client is allowed to perform the operation or not.

What is FusionAuth?#
FusionAuth is a complete auth platform that saves your team time and resources by handling everything to do with authentication and identity access management. It allows you to quickly implement complex standards like OAuth, OpenID Connect, and SAML and build out additional login features to meet compliance requirements.
FusionAuth is built by devs, for devs. With an API-first architecture, great documentation, and fantastic support, it takes auth off your plate so you can get back to building something awesome.
Schedule a demo to see how FusionAuth simplifies secure role-based access control in Kubernetes environments.
Implementing RBAC in Kubernetes#
Before you get started, there are a few prerequisites. First, you'll need a Kubernetes cluster with kubectl configured. This article uses minikube and some minikube-specific features. However, it's easy to adapt the steps for your Kubernetes cluster of choice.
If you are using minikube, you'll also need to install VirtualBox since you'll be using the VirtualBox driver for minikube.
cfssl and cfssljson will also need to be installed to generate SSL certificates for the FusionAuth installation.
Finally, Helm is required for installing the required software packages, such as FusionAuth, Elasticsearch and PostgreSQL.
This tutorial was tested with FusionAuth 1.32.1 and Kubernetes 1.23.
Deploying FusionAuth to Kubernetes#
The first step of implementing RBAC in Kubernetes is to deploy FusionAuth to Kubernetes.
To begin, start the minikube cluster. You'll use the VirtualBox driver to make modifying the virtual machine (VM) easier in future steps.
minikube start --cpus 4 --memory 5g --driver=virtualboxDeploy PostgreSQL to the cluster using Helm:
helm repo add bitnami https://charts.bitnami.com/bitnami
helm install pg-minikube bitnami/postgresql \
  --set postgresqlPassword=password
This command deploys PostgreSQL to the minikube cluster and creates a user named postgres with password password. To update the password, you can change the postgresqlPassword value.
List all the pods and make sure the PostgreSQL pod is ready:
kubectl get pods -n default -o wideThe output should be similar to the following:
NAME                       READY   STATUS    RESTARTS   AGE   IP           NODE       NOMINATED NODE   READINESS GATES
pg-minikube-postgresql-0   1/1     Running   0          82s   172.17.0.3   minikube   <none>           <none>
If it doesn't show 1/1 in the Ready column, wait a bit longer for it to start.
The next step is to deploy Elasticsearch using Helm. First, add the repo:
helm repo add elastic https://helm.elastic.coDownload the recommended configuration using curl:
curl -O https://raw.githubusercontent.com/elastic/Helm-charts/master/elasticsearch/examples/minikube/values.yamlFinally, install Elasticsearch:
helm install es-minikube elastic/elasticsearch -f values.yamlJust like you did previously, list the pods:
kubectl get pods -n default -o wideYou should now see three Elasticsearch pods. Make sure they are ready before continuing:
NAME                       READY   STATUS    RESTARTS   AGE     IP           NODE       NOMINATED NODE   READINESS GATES
elasticsearch-master-0     1/1     Running   0          118s    172.17.0.5   minikube   <none>           <none>
elasticsearch-master-1     1/1     Running   0          118s    172.17.0.6   minikube   <none>           <none>
elasticsearch-master-2     1/1     Running   0          118s    172.17.0.4   minikube   <none>           <none>
pg-minikube-postgresql-0   1/1     Running   0          5m48s   172.17.0.3   minikube   <none>           <none>
Finally, it's time to deploy FusionAuth. First, add the Helm repo:
helm repo add fusionauth https://fusionauth.github.io/chartsDownload the configuration file:
curl -o values.yaml https://raw.githubusercontent.com/FusionAuth/charts/main/chart/values.yamlNow, edit values.yaml and set the following values:
- database.host:
pg-minikube-postgresql.default.svc.cluster.local - database.user and database.root.user:
postgres - database.password and database.root.password: your PostgreSQL password (if you copied the installation command above and ran it unmodified, this is
password) - search.host:
elasticsearch-master.default.svc.cluster.local
Now install FusionAuth with the following command:
helm install my-release fusionauth/fusionauth -f values.yamlList all the deployments and ensure the my-release-fusionauth deployment is ready.
kubectl get deployments -o wideYou should see something like this:
NAME                    READY   UP-TO-DATE   AVAILABLE   AGE   CONTAINERS   IMAGES                             SELECTOR
my-release-fusionauth   1/1     1            1           42s   fusionauth   fusionauth/fusionauth-app:1.30.1   app.kubernetes.io/instance=my-release,app.kubernetes.io/name=fusionauth
Adding an SSL ingress#
Next, you need an ingress to expose the FusionAuth deployment so that you can access it with the browser on your host machine.
For that, enable the ingress add-on:
minikube addons enable ingressBefore you can access FusionAuth, create SSL certificates so that it can be accessed over HTTPS. This is necessary to get OIDC working.
First, create a file named ca-config.json with the following content:
{
  "signing": {
    "default": {
      "expiry": "43800h"
    },
    "profiles": {
      "server": {
        "expiry": "43800h",
        "usages": [
          "signing",
          "key encipherment",
          "server auth",
          "client auth"
        ]
      }
    }
  }
}
Create another file named ca-csr.json with this code:
{
    "CN": "fusionauthca",
    "key": {
        "algo": "rsa",
        "size": 2048
    }
}
Finally, another file named fusionauth.json needs to be created:
{
    "CN": "fusionauth",
    "hosts": ["fusionauth.local"],
    "key": {
        "algo": "ecdsa",
        "size": 256
    }
}
Run the following commands to generate the certificates:
mkdir -p ssl
cfssl gencert -initca "ca-csr.json" | cfssljson -bare "ssl/fusionauth-ca" -
cfssl gencert \
    -ca="ssl/fusionauth-ca.pem" \
    -ca-key="ssl/fusionauth-ca-key.pem" \
    -config="ca-config.json" \
    -profile=server \
    "fusionauth.json" | cfssljson -bare "ssl/fusionauth"
If you see any errors with this command, make sure you named all the JSON files as specified above.
Once the command finishes, you should see an ssl directory with the necessary SSL certificates and keyfiles.
You should see six files:
fusionauth-ca-key.pem
fusionauth-ca.csr
fusionauth-ca.pem
fusionauth-key.pem
fusionauth.csr
fusionauth.pem
The next step is to upload the certificates to the cluster:
 tar -c -C ssl fusionauth-ca.pem | ssh -t -q -o StrictHostKeyChecking=no \
    -i "$(minikube ssh-key)" "docker@$(minikube ip)" 'sudo tar -x --no-same-owner -C /var/lib/minikube/certs'
Create a Kubernetes secret using the certificates:
kubectl create secret tls fusionauth-cert --cert="ssl/fusionauth.pem" --key="ssl/fusionauth-key.pem"Now that you have the SSL certs, it's time to create the ingress. Save the following in ingress.yaml:
apiVersion: networking.k8s.io/v1
kind: Ingress
metadata:
  name: my-release-fusionauth
  labels:
    app.kubernetes.io/name: fusionauth
    app.kubernetes.io/instance: my-release-fusionauth
  annotations:
    kubernetes.io/ingress.class: nginx
spec:
  rules:
  - http:
      paths:
      - backend:
          service:
            name: my-release-fusionauth
            port:
              number: 9011
        path: /
        pathType: Prefix
    host: fusionauth.local
  tls:
    - hosts:
        - fusionauth.local
      secretName: fusionauth-cert
Create the ingress:
kubectl create -f ingress.yamlSet up /etc/hosts#
Next, let's give our ingress a nice domain name, accessible from our host machine.
Run the following command to get the IP of the minikube cluster:
minikube ipThe output should look something like this:
192.168.59.101Edit /etc/hosts. If you are using Windows, edit the c:\windows\system32\drivers\etc\hosts file. Add the following entry:
192.168.59.101 fusionauth.localMake sure to use the actual IP address of your cluster. This ensures that the hostname fusionauth.local resolves to the cluster IP address.
Visiting https://fusionauth.local should now take you to the FusionAuth setup page. You'll find a certificate error because of the self-signed certificate, but you can safely ignore it. Accept the warning and you'll see the FusionAuth setup page.
Configure FusionAuth#
On the FusionAuth setup page, create a user account to access the dashboard. For more on the setup wizard, see this tutorial.
After you create the user, you'll be at the dashboard.
Before setting up OIDC with Kubernetes, you'll need to change a few default settings.
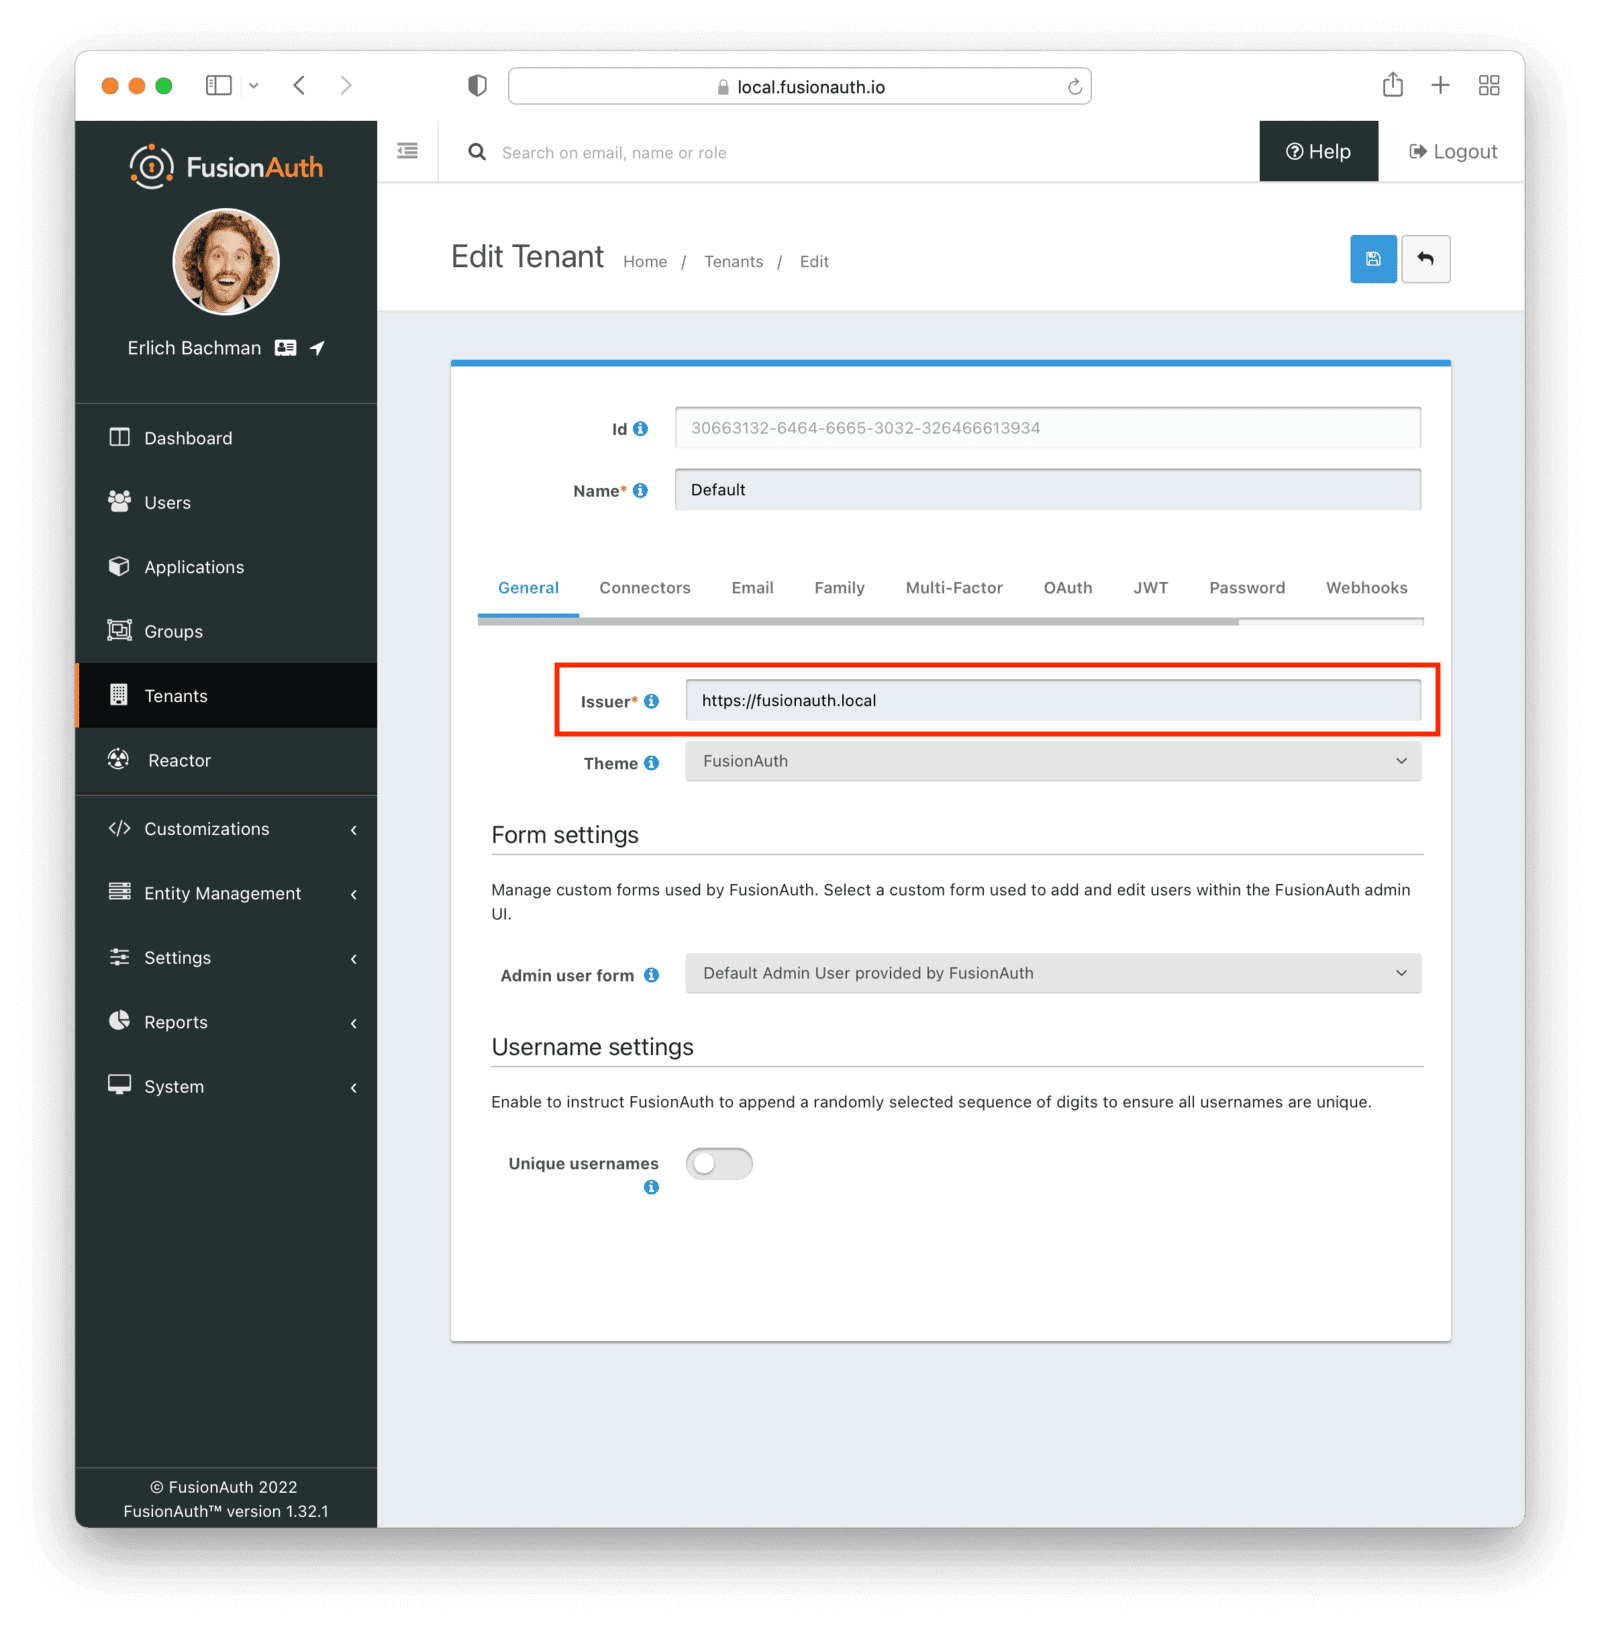
First, visit the Tenants page from the sidebar and edit the Default tenant. Change the Issuer field from the default value of acme.com to https://fusionauth.local and save the changes. Kubernetes will validate the Issuer field during authentication, so it's vital that this is the same as the FusionAuth domain.
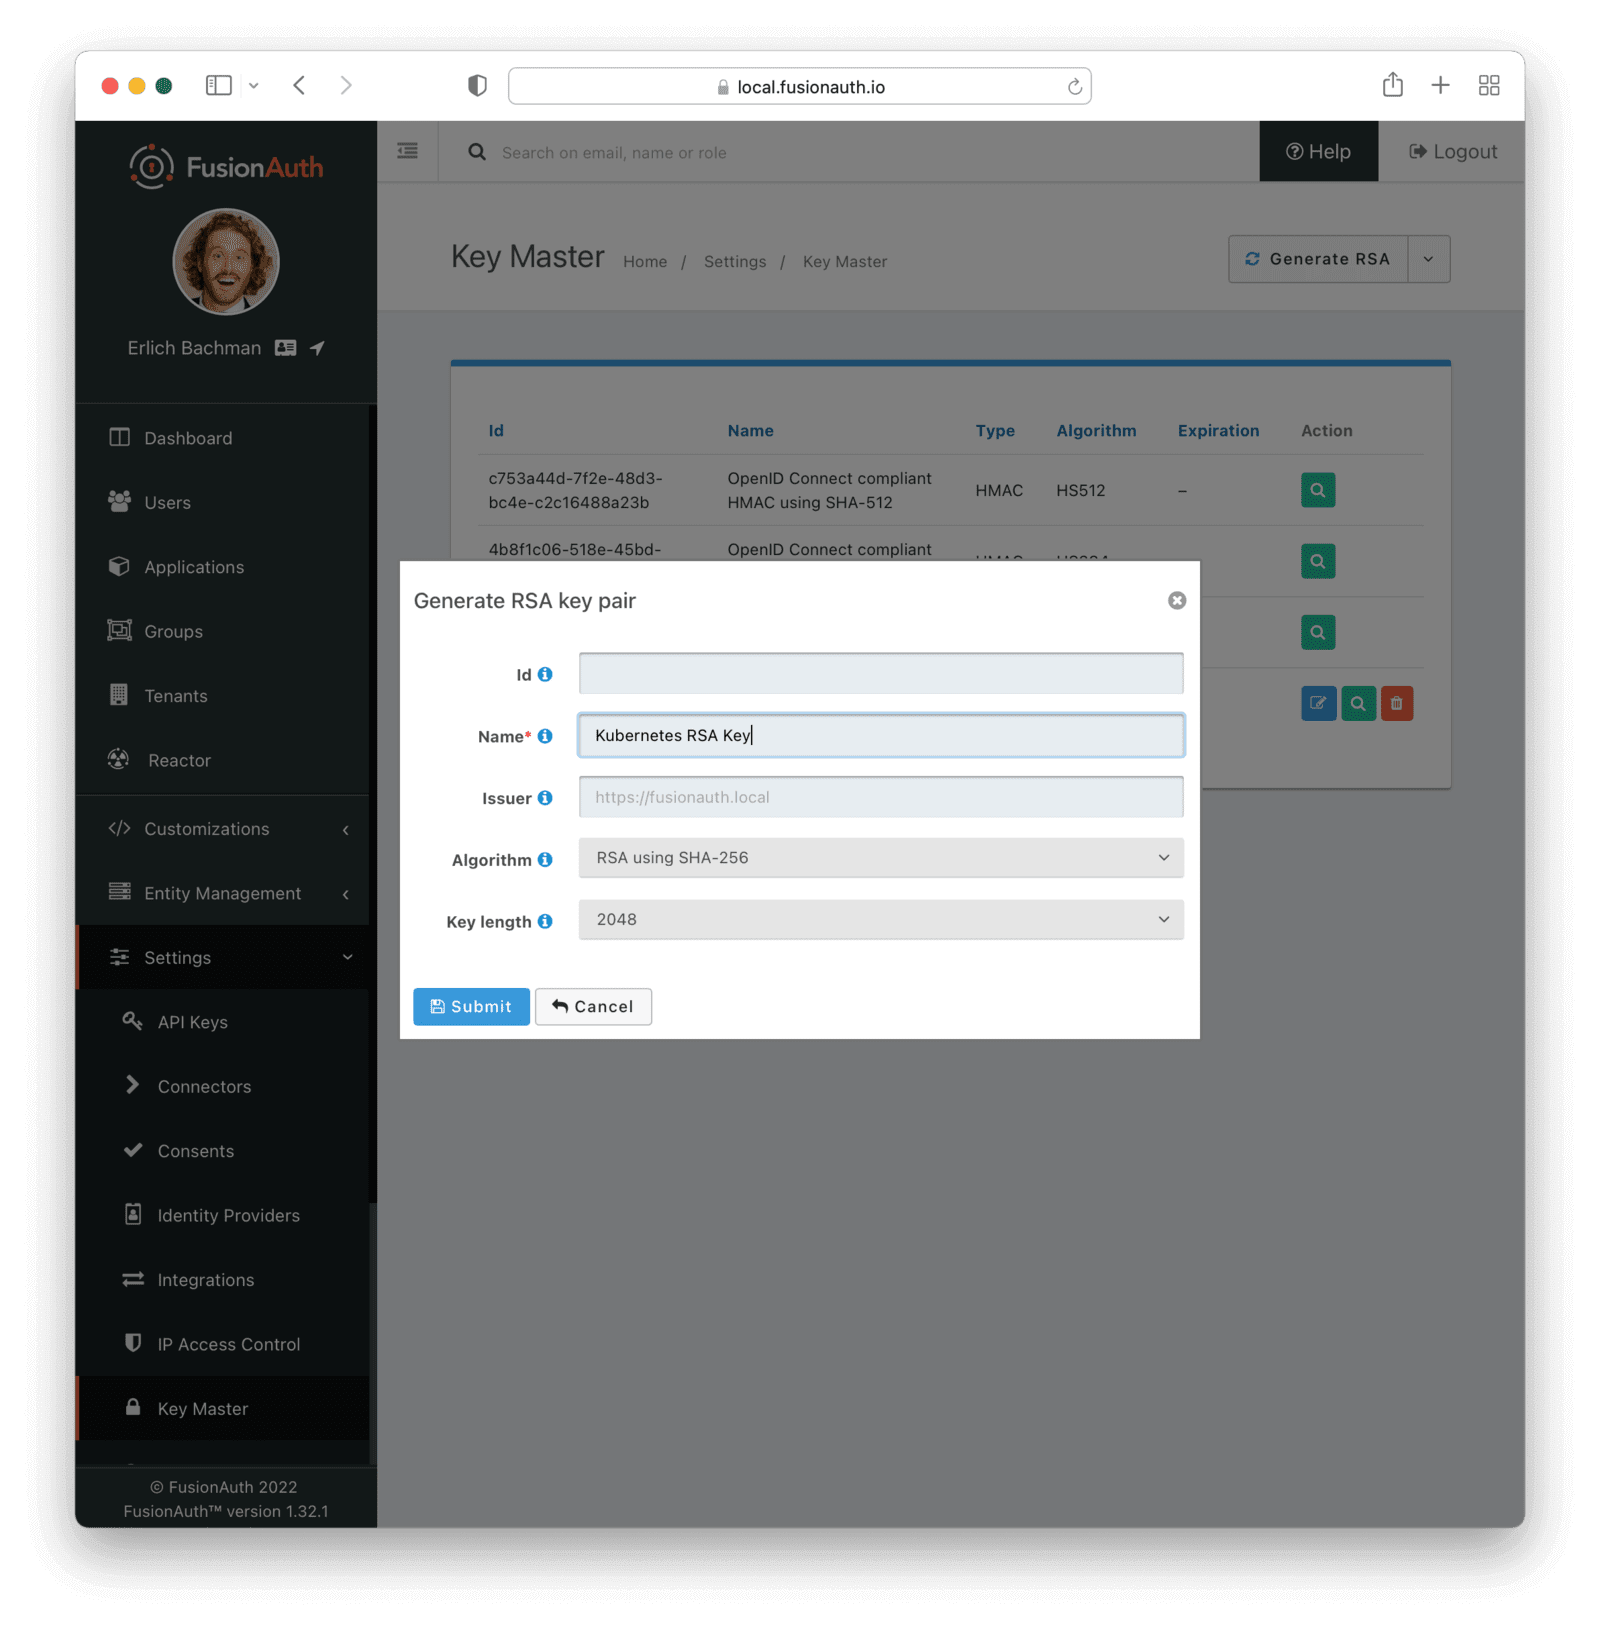
The default JWT signing of FusionAuth uses the HS256 algorithm. However, the Kubernetes plugin you'll use to authenticate expects the RS256 algorithm. So let's create an RS256 key. Visit "Settings", then "Key Master" and select "Generate RSA" from the dropdown on the top-right.
Give it a name such as Kubernetes RSA Key, and click Submit . The other default settings can remain the same.
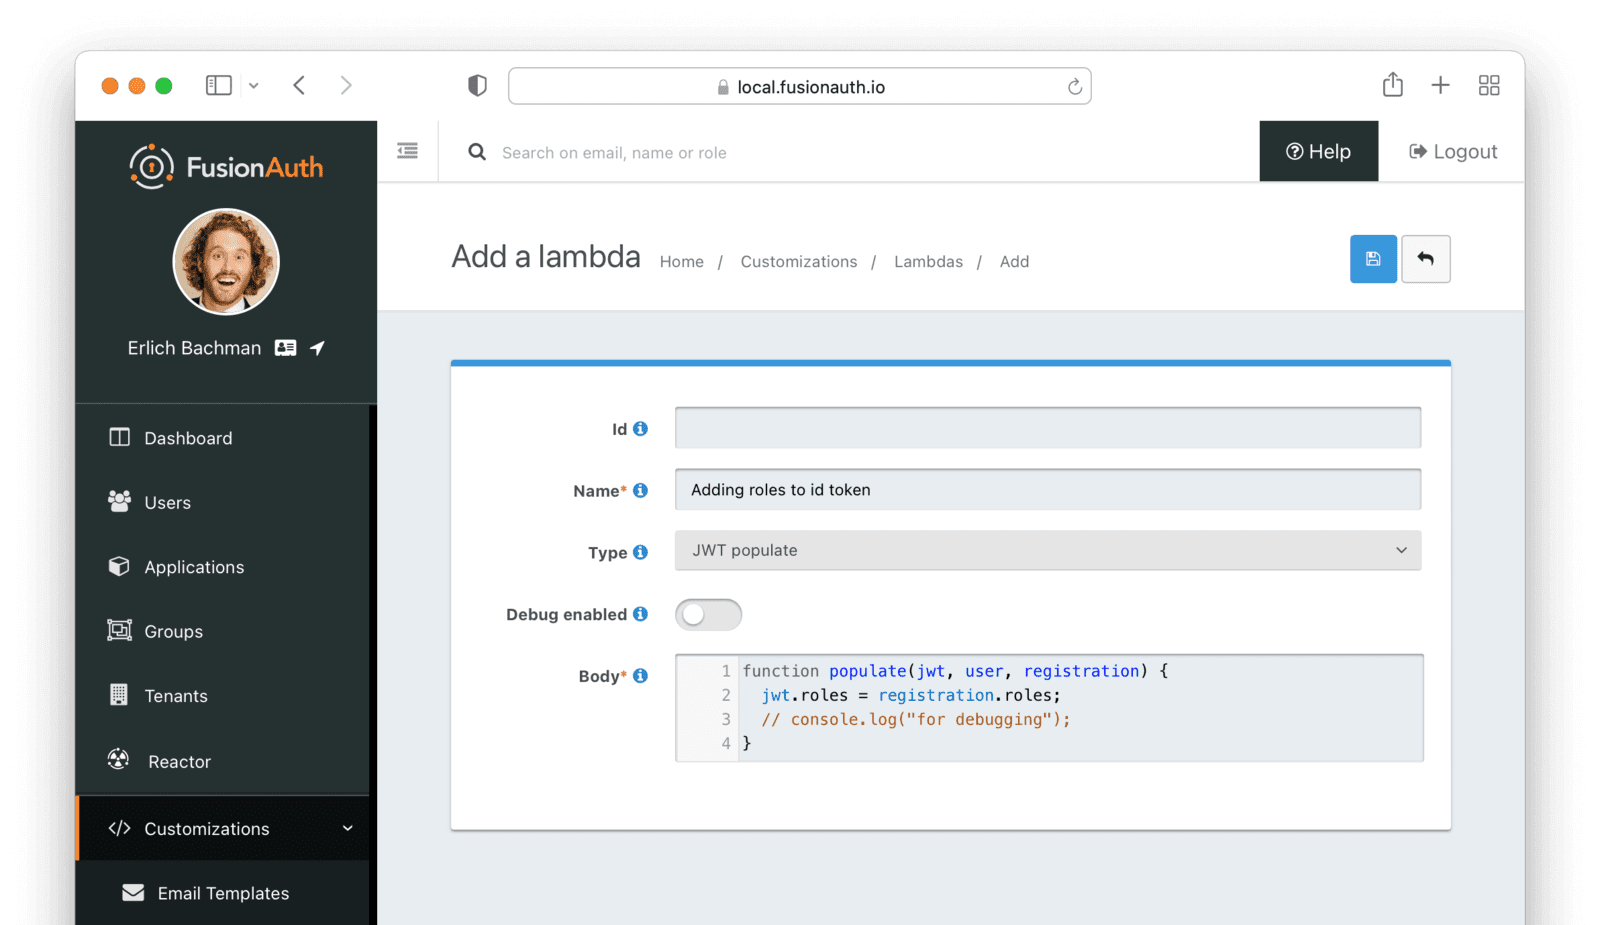
The Kubernetes API server uses the Id token to authenticate users, so you need to add the roles claim to the ID token using a lambda. Navigate to Customizations -> Lambdas and create a new lambda. Give it a name, select JWT populate as the "Type", enter the following code in the Body field, then save it:
function populate(jwt, user, registration) {
  jwt.roles = registration.roles;
  // console.log("for debugging");
}
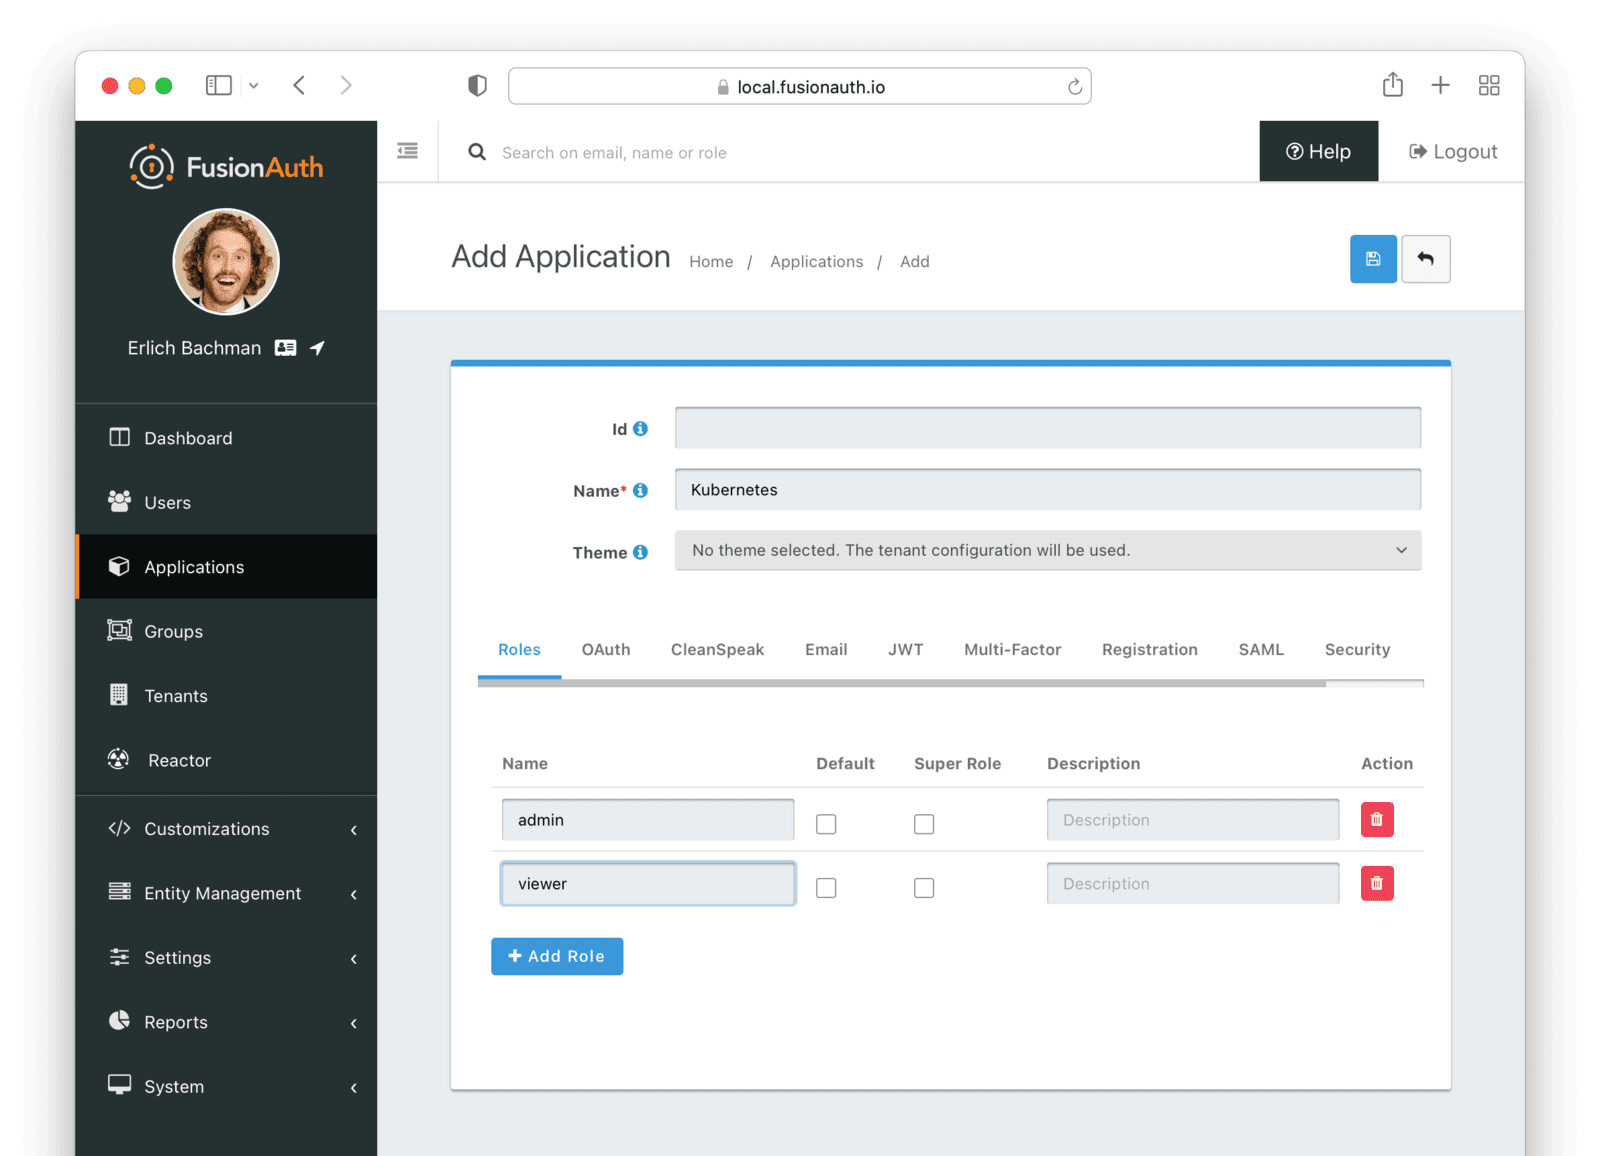
The final step in configuring FusionAuth is to create an application. Navigate to Applications and create a new application. Give it a descriptive name, for example Kubernetes.
The Roles tab is where you can create new roles for this application. Go ahead and create two roles, admin and viewer. Later, you'll map these roles to Kubernetes roles to enable RBAC.
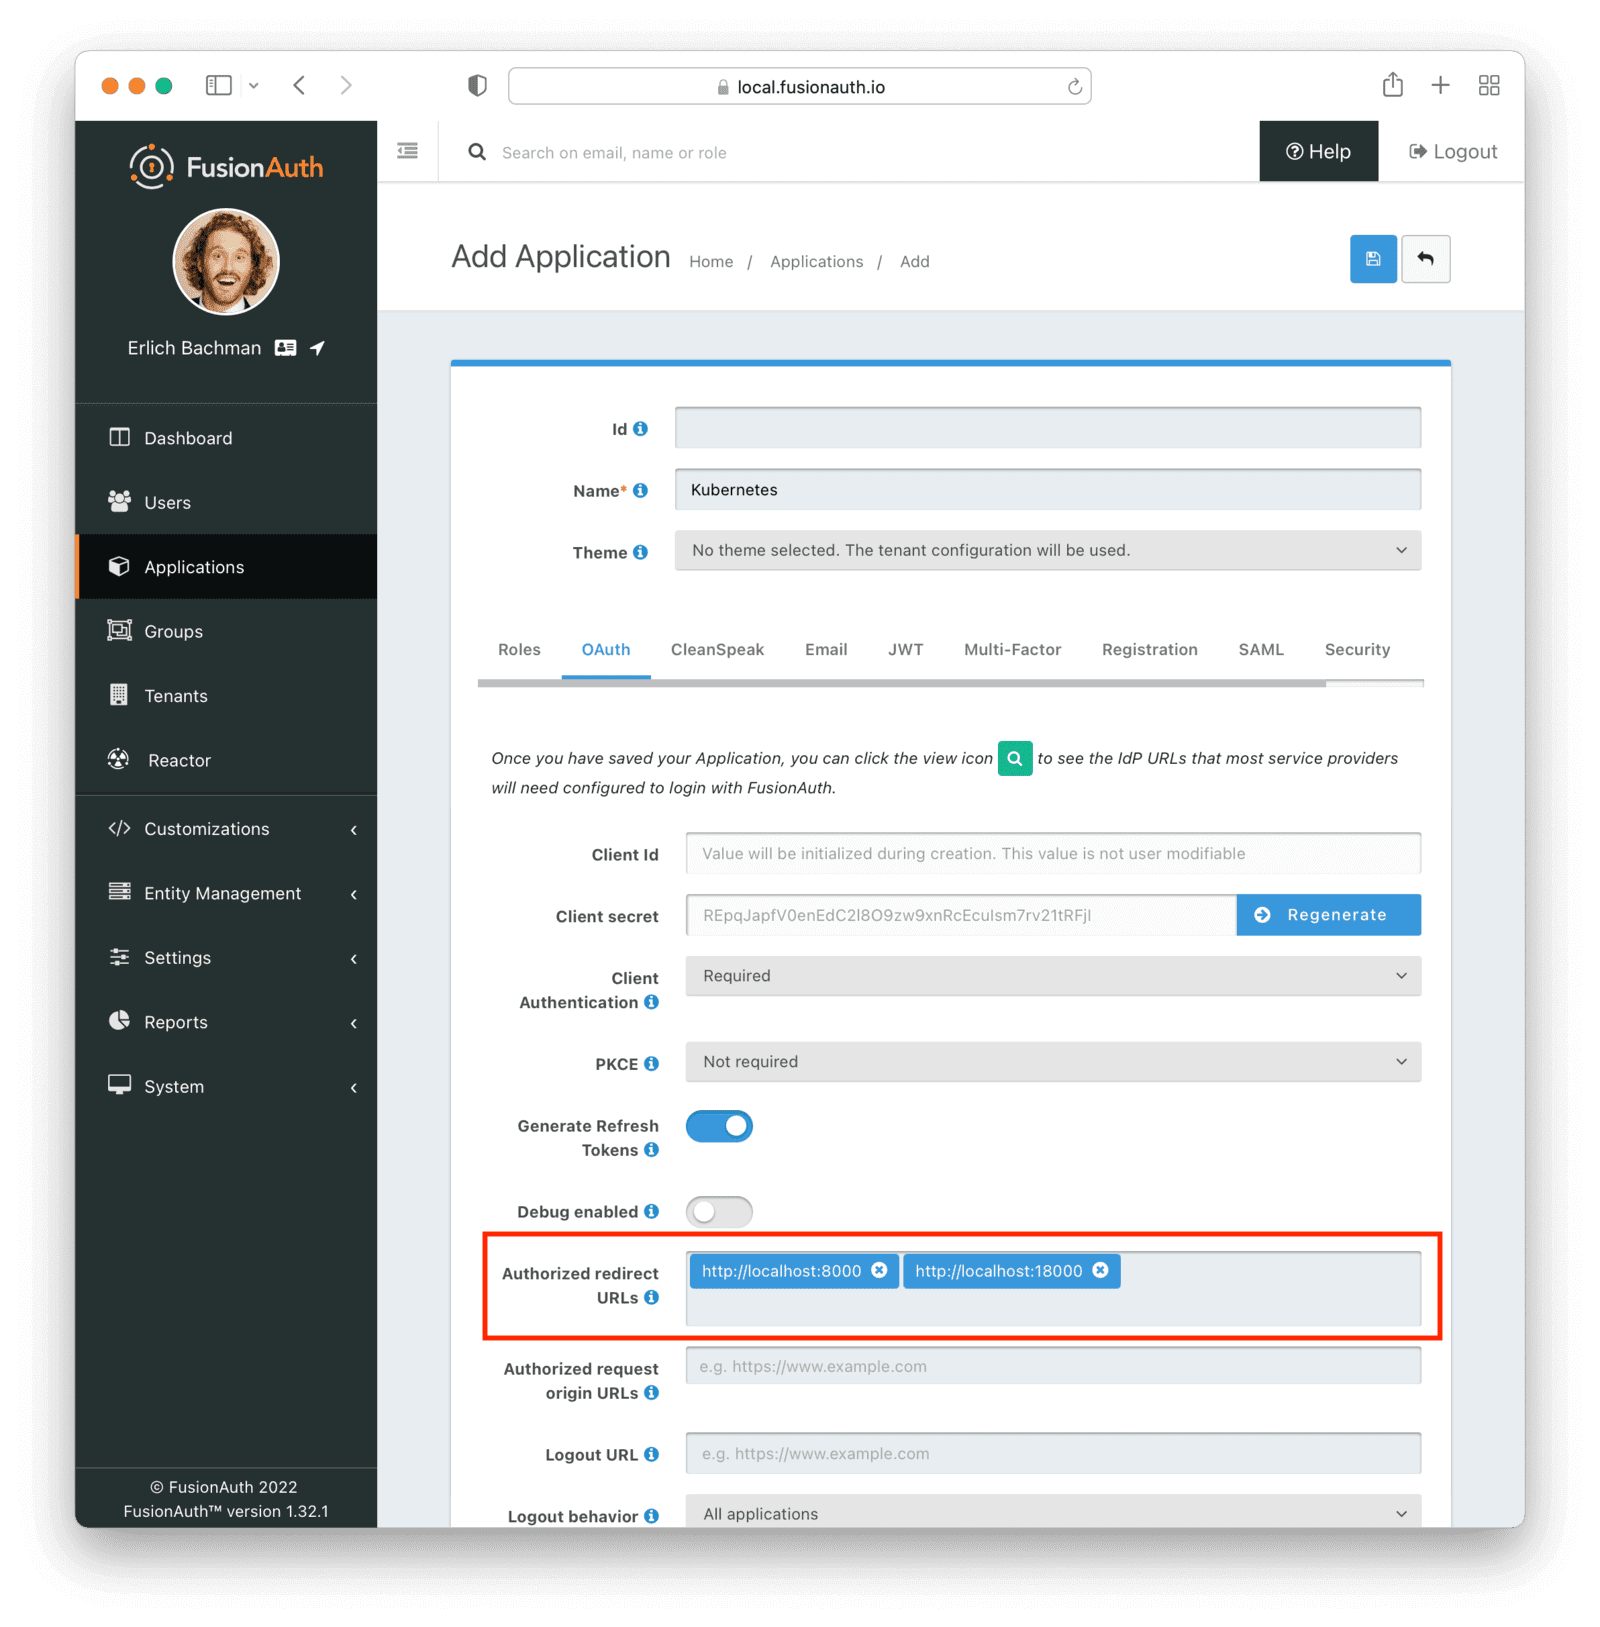
In the OAuth tab, add http://localhost:8000 and http://localhost:18000 in the Authorized redirect URLs field. These URLs are used by the oidc-login Kubernetes plugin to redirect the user after authentication.
In the JWT tab, first enable JWT creation by toggling the switch. In the "Id Token signing key" dropdown, select the RS256 key you created above. In the "Id Token populate lambda" dropdown, select the lambda you created earlier.

Finally, save the application.
For demonstration, let's create two users. One will be given the admin role, and another will be assigned the viewer role.
Visit the Users page, and add a new user. Enter admin@fusionauth.local in the email field and disable "Send email to setup password" Enter a password for this new user and save it.

Click the Add registration button, select the Kubernetes application and the admin role, and save the registration.

Repeat the above process to create another user. Use viewer@fusionauth.local as the email and assign this user the viewer role.
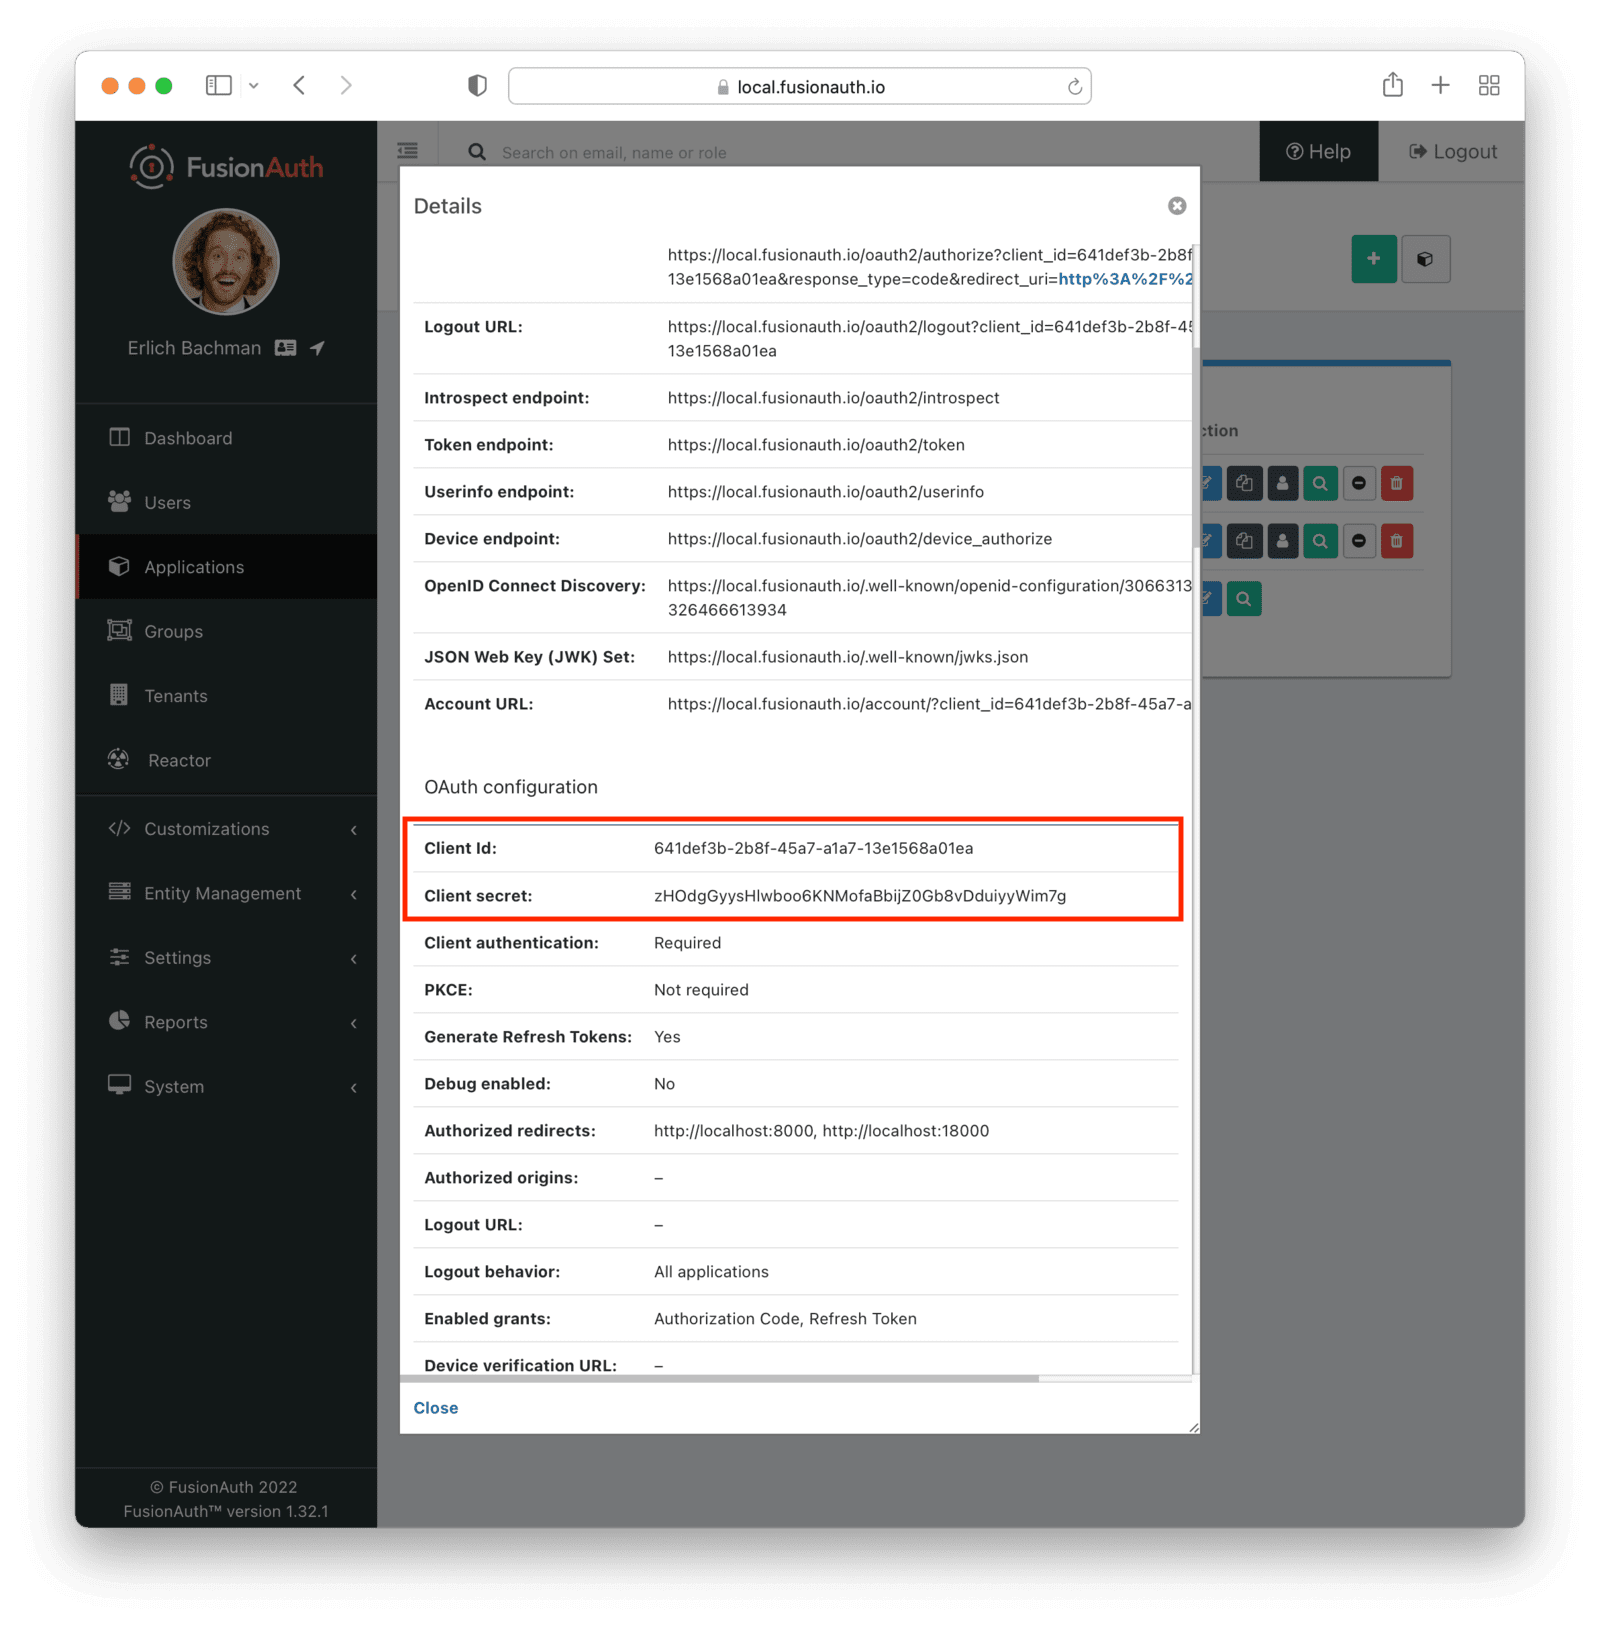
Finally, click the view icon next to the Kubernetes application on the applications page and write down the Client Id and Client secret.
Setting up the OIDC mapping in Kubernetes#
To set up Kubernetes correctly, first stop the minikube cluster:
minikube stopThen, turn on natdnshostresolver on the minikube VM:
VBoxManage modifyvm minikube --natdnshostresolver1 onRestart the minikube cluster with additional API server flags. Replace <YOUR_CLIENT_ID> with the client Id of the application you obtained from FusionAuth above.
 minikube start --driver=virtualbox \
            --extra-config=apiserver.oidc-issuer-url=https://fusionauth.local \
            --extra-config=apiserver.oidc-client-id=<YOUR_CLIENT_ID> \
            --extra-config=apiserver.oidc-username-claim=email \
            --extra-config=apiserver.oidc-username-prefix="oidc:" \
            --extra-config=apiserver.oidc-groups-claim=roles \
            --extra-config=apiserver.oidc-groups-prefix="oidc:" \
            --extra-config=apiserver.oidc-ca-file=/var/lib/minikube/certs/fusionauth-ca.pem \
            --extra-config=apiserver.authorization-mode=Node,RBAC
Using the --extra-config flags, the new configurations will be passed to the cluster.
Here are explanations of each of the flags used:
--oidc-issuer-url: sets the OIDC issuer URL (https://fusionauth.local)--oidc-client-id: the application's client Id; provide the client Id copied in the previous step--oidc-username-claim: tells the API server which claim in theid_tokenis the username (in this case, it'semail)--oidc-username-prefix: is used to set a prefix (oidc:in this case) to usernames coming from FusionAuth; this prevents possible collisions with already existing Kubernetes users--oidc-groups-claim: tells the API server which claim in theid_tokenis the users' groups or roles (in this case, it's therolesclaim which is an array of strings)--oidc-groups-prefix: similar to--oidc-username-prefix, it sets a prefix to roles coming from FusionAuth to avoid collisions--oidc-ca-file: the certificate authority file which is used to validate the SSL certificate of the issuer--authorization-mode: enables RBAC authorization mode; theNodemode is also specified so that internal authorization is not hampered
Set up Kubernetes cluster roles#
Let's create the ClusterRoleBindings for the roles admin and viewer. These cluster roles will control what a user can do in the Kubernetes cluster and will be assumed by users that are authenticated with FusionAuth.
Save the following in crb-admin.yaml:
apiVersion: rbac.authorization.k8s.io/v1
kind: ClusterRoleBinding
metadata:
  name: fusionauth-cluster-admin
roleRef:
  apiGroup: rbac.authorization.k8s.io
  kind: ClusterRole
  name: cluster-admin
subjects:
- apiGroup: rbac.authorization.k8s.io
  kind: Group
  name: oidc:admin
As you can see from the subjects.name field, the admin role from FusionAuth is prefixed with oidc: and is bound to the cluster-admin ClusterRole in the roleRef.name field. This gives users in the admin FusionAuth-managed role cluster-admin permissions in Kubernetes.
Similarly, Create crb-viewer.yaml for the viewer role:
apiVersion: rbac.authorization.k8s.io/v1
kind: ClusterRoleBinding
metadata:
  name: fusionauth-cluster-viewers
roleRef:
  apiGroup: rbac.authorization.k8s.io
  kind: ClusterRole
  name: view
subjects:
- apiGroup: rbac.authorization.k8s.io
  kind: Group
  name: oidc:viewer
This uses the view ClusterRole and gives the FusionAuth-managed viewer role only view access to the cluster resources. You could of course create more cluster roles and FusionAuth roles should you need more granularity.
Next, create the two ClusterRoleBindings:
kubectl create -f crb-admin.yaml
kubectl create -f crb-viewer.yaml
Getting the Id token to Kubernetes#
The Kubernetes API server processes the Id token to authenticate users from the OIDC providers. There are mainly two ways you can get the Id token:
- Manually using the Authorization Code grant. This is a cumbersome process, and since the API server can't perform a token refresh, you must manually refresh the token when it's expired.
- Using a CLI or web-based helper like
kubelogin.kubeloginuses a web-based application to perform the authorization code flow and automatically refresh the token once it's expired.
The latter approach is what you'll be using today.
First, install Krew following the instructions in the docs, then install the kubelogin plugin:
kubectl krew install oidc-loginWhen you run the following command, a new browser window will open and take you to the FusionAuth login page. Use the admin@fusionauth.local user to log in. Remember to substitute <YOUR_CLIENT_ID> and <YOUR_CLIENT_SECRET> when running the command below.
 kubectl oidc-login setup \
         --oidc-issuer-url=https://fusionauth.local \
         --oidc-client-id=<YOUR_CLIENT_ID> \
         --oidc-client-secret=<YOUR_CLIENT_SECRET> \
       --insecure-skip-tls-verify
Once you're logged in, the browser tab will automatically close. You'll see the Id token logged to the console (there's a lot of output, so you may need to search for it). It'll look something like this:
{
  "aud": "b2676ddc-b628-4e52-b7c0-98a45141e5f1",
  "exp": 1639072669,
  "iat": 1639069069,
  "iss": "https://fusionauth.local",
  "sub": "3efe953b-a3b5-42ab-83c9-a492ddf4d933",
  "jti": "b3b4d0ed-43f3-484b-91ee-6a55c9317287",
  "authenticationType": "PASSWORD",
  "email": "admin@fusionauth.local",
  "email_verified": true,
  "at_hash": "mDohX5aBtnehWjIiO5AtZQ",
  "c_hash": "veRYp54qq8nmUhItkELJSg",
  "scope": "openid",
  "nonce": "NSvkZLWU_AH8bBHFmzJwIH8Zf0cSYgRzwk40yA8WPLI",
  "sid": "5d06e4ef-d9bd-42fa-93c3-9521cc0addca",
  "roles": [
    "admin"
  ]
}
Verify that the email field is correct, and that the roles array contains the admin role.
Finally, set up the kubeconfig with the following command. Make sure to replace <YOUR_CLIENT_ID> and <YOUR_CLIENT_SECRET>.
kubectl config set-credentials oidc \
          --exec-api-version=client.authentication.k8s.io/v1beta1 \
          --exec-command=kubectl \
          --exec-arg=oidc-login \
          --exec-arg=get-token \
          --exec-arg=--oidc-issuer-url=https://fusionauth.local \
          --exec-arg=--oidc-client-id=<YOUR_CLIENT_ID> \
          --exec-arg=--oidc-client-secret=<YOUR_CLIENT_SECRET> \
          --exec-arg=--insecure-skip-tls-verify
Now you can use this context to run kubectl commands. Let's go big, by deleting one of the Elasticsearch cluster nodes:
kubectl --user=oidc delete po elasticsearch-master-0Use the admin@fusionauth.local account to log in.
The pod will be deleted. You can test with this command if you'd like.
kubectl get pods -n default -o wideDon't worry about the pod! It will come back since it's part of a replica. If the pod is already back, take a look at the AGE column.
Let's try the other user, with only view privileges. First, log yourself out by deleting the cache:
rm -rf ~/.kube/cache/oidc-loginThen rerun the command which sets up the credentials.
kubectl config set-credentials oidc \
          --exec-api-version=client.authentication.k8s.io/v1beta1 \
          --exec-command=kubectl \
          --exec-arg=oidc-login \
          --exec-arg=get-token \
          --exec-arg=--oidc-issuer-url=https://fusionauth.local \
          --exec-arg=--oidc-client-id=<YOUR_CLIENT_ID> \
          --exec-arg=--oidc-client-secret=<YOUR_CLIENT_SECRET> \
          --exec-arg=--insecure-skip-tls-verify
Try to delete the same Elasticsearch pod:
kubectl --user=oidc delete po elasticsearch-master-0Use viewer@fusionauth.local to log in. This time, you should get an error:
Error from server (Forbidden): pods "elasticsearch-master-0" is forbidden: User "oidc:viewer@fusionauth.local" cannot delete resource "pods" in API group "" in the namespace "default"Voila! RBAC is working as intended. If you feel confident with the RBAC implementation, you can set the oidc context as default:
kubectl config set-context --current --user=oidcNow, you can run kubectl commands without specifying the --user=oidc flag, and it will always authenticate with FusionAuth.
Conclusion#
RBAC is an excellent authorization mechanism for Kubernetes. It makes permission management easy and flexible. With an OIDC server, you can have one central location for authentication and authorization information across both your Kubernetes cluster and applications running on it.
Using FusionAuth as the identity provider makes implementing RBAC extremely straightforward and simple.
Happy RBACing!
Schedule a demo to see how FusionAuth simplifies secure role-based access control in Kubernetes environments.


