


In this tutorial, we'll build a basic Java and Spring web application that does user registration and authentication. You'll use FusionAuth to provide this functionality.
The application itself is very simple: It will let users sign up via FusionAuth and give them access to a "secret" area where their FusionAuth profile is displayed to them via OpenID Connect (OIDC). With these basics in place, you'll see how FusionAuth works and how it can extend the application to do whatever you need. Since we're using the OIDC standard, you can swap out any other OIDC compliant server, but this tutorial will use FusionAuth.
You can, as always, skip ahead and view/run the code.
Prerequisites#
We'll explain nearly everything that we use, but we expect you to have:
- Basic Java knowledge and a Java 17 environment set up.
- Preferably basic Spring knowledge (or knowledge of a similar web framework).
- Docker and Docker Compose set up as we'll set up FusionAuth using these.
It'll also help if you know the basics of OAuth or authentication in general.
Why FusionAuth instead of local Spring Security?#
Spring Security is one of the commonly used authentication and access control packages for Java web apps. It is very powerful and allows you to hook into social providers, OpenID and OAuth providers, or use a local authentication strategy. This sounds like everything you'll ever need, but there are still a few missing pieces. For example, you still need to construct your own login page and other account functionality, such as resetting passwords, forgotten password resets, 2FA, email verification, account protection, username sanitization, and more. You'd also typically need to do this for each app that you write. It gets boring after a few times. Setting up custom web app authentication is also always more complicated than it seems.
The great news is that combining Spring Security with FusionAuth makes a complete system that takes care of all aspects of authentication. It also means that much of your app's authentication capability can be configured through FusionAuth rather than by writing code and modifying your app. For example, you can easily add social login providers whenever you need to without changing code or redeploying your app.
With this setup, authentication concerns are taken care of entirely by FusionAuth.
The image below shows how this works.

Your application logic and all public information can be handled by Java and Spring. Anything sensitive, such as personally identifiable information (PII), is handled by FusionAuth.
This allows you to focus your security efforts on the FusionAuth installation. And if you create more applications, they can piggyback on your centralized authentication—you won't have to re-implement authentication for every application you build.
You can create a multi-tenant configuration that allows for logically separate environments for different clients and any integrations you set up with other providers (e.g. Apple sign-in) can be done once, instead of per application.
Installing and configuring FusionAuth with Docker Compose#
There are various ways to install FusionAuth depending on your system, but the easiest way is to use Docker and Docker Compose. Instructions are here. Currently, if you have Docker installed, you can run the following commands to install and run FusionAuth:
curl -o docker-compose.yml https://raw.githubusercontent.com/FusionAuth/fusionauth-containers/main/docker/fusionauth/docker-compose.yml
https://raw.githubusercontent.com/FusionAuth/fusionauth-containers/main/docker/fusionauth/docker-compose.override.yml
curl -o .env https://raw.githubusercontent.com/FusionAuth/fusionauth-containers/main/docker/fusionauth/.env
docker compose up
Note that here we use a public .env file containing hard-coded database passwords—this is not suitable for production use.
Configuring FusionAuth#
FusionAuth should now be running and reachable on your chosen URL or http://localhost:9011 if you've installed it locally. The first time you visit, you'll be prompted to set up an admin user and password. Once you've done this, you'll be prompted to complete three more set-up steps, as shown below.
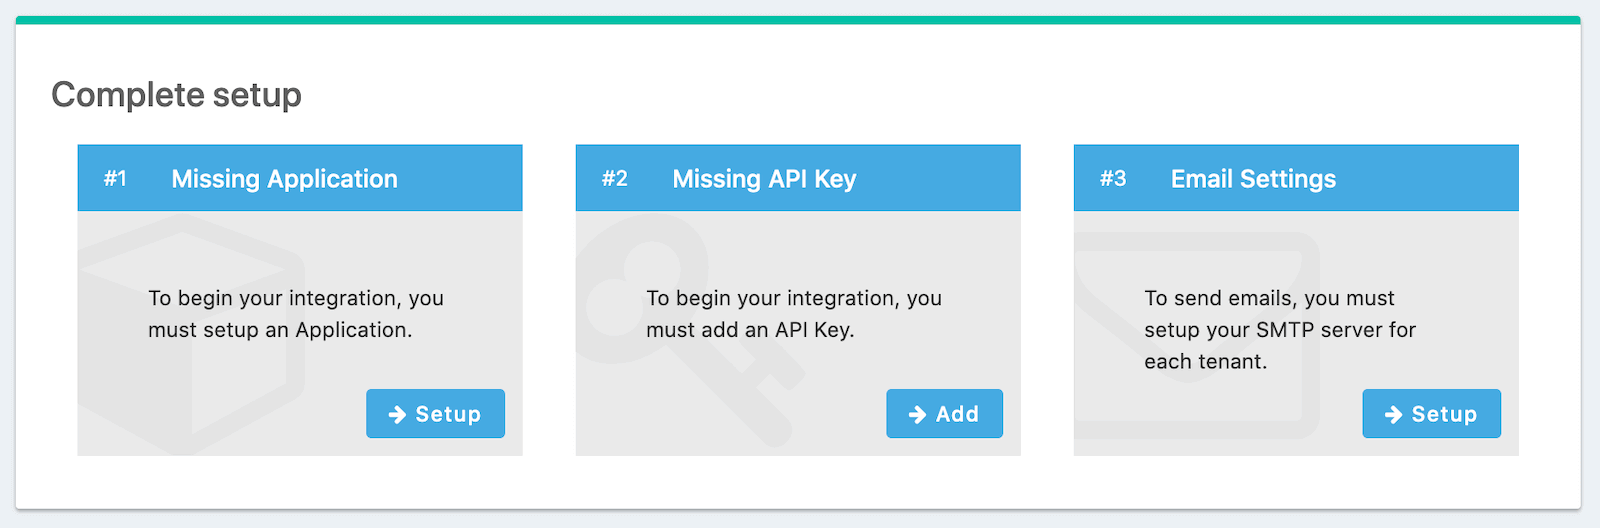
We'll skip step #3 in this tutorial, but sending emails (to verify email addresses and do password resets) is a vital part of FusionAuth running in production, so you'll want to do that.
Creating an application#
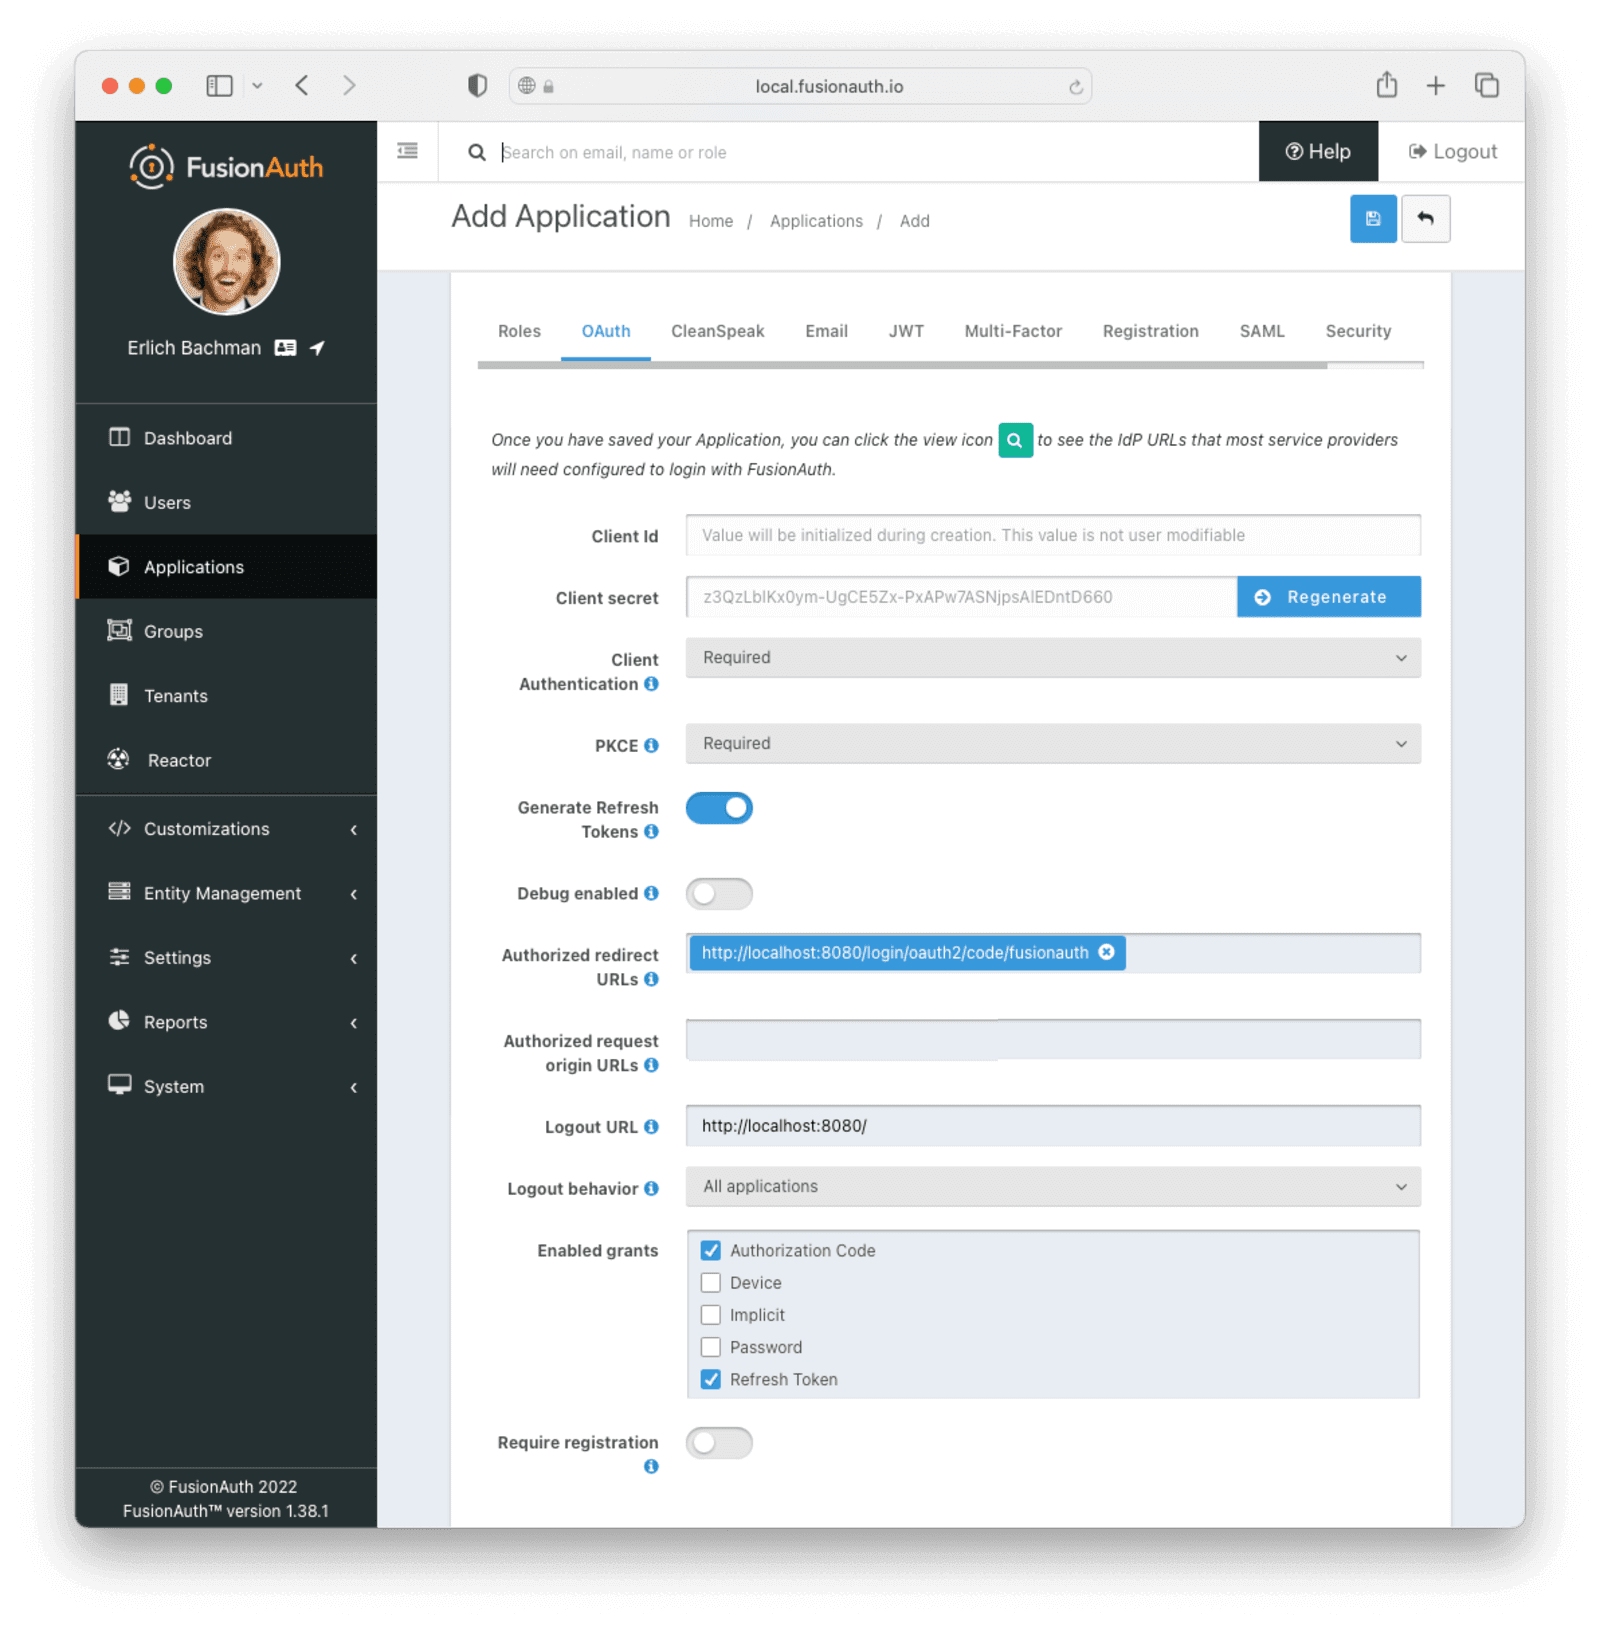
Click Setup under "Missing Application" and call your new app "Spring Example" or another name of your choice. It'll get a Client Id and Client Secret automatically—save these, as we'll use them in the code. Later, we'll set up a Java and Spring application that will run on http://localhost:8080, so configure the Authorized URLs accordingly. You should add:
http://localhost:8080/login/oauth2/code/fusionauthto the Authorized redirect URLs.http://localhost:8080/logoutto the Logout URL.
To enable self-service registrations, select the Registration tab. Scroll down to Self-service registration, and switch Enabled on. Choose Basic as the registration type. You can choose the login type as either Email or Username - we've used Email for this tutorial. Ensure you enable Full name. You may even want to require it, as the Spring code further on expects this field to be present on your user.
You can also select any other fields you'd like to capture on registration - we've left them off. Your setup should look similar to this:
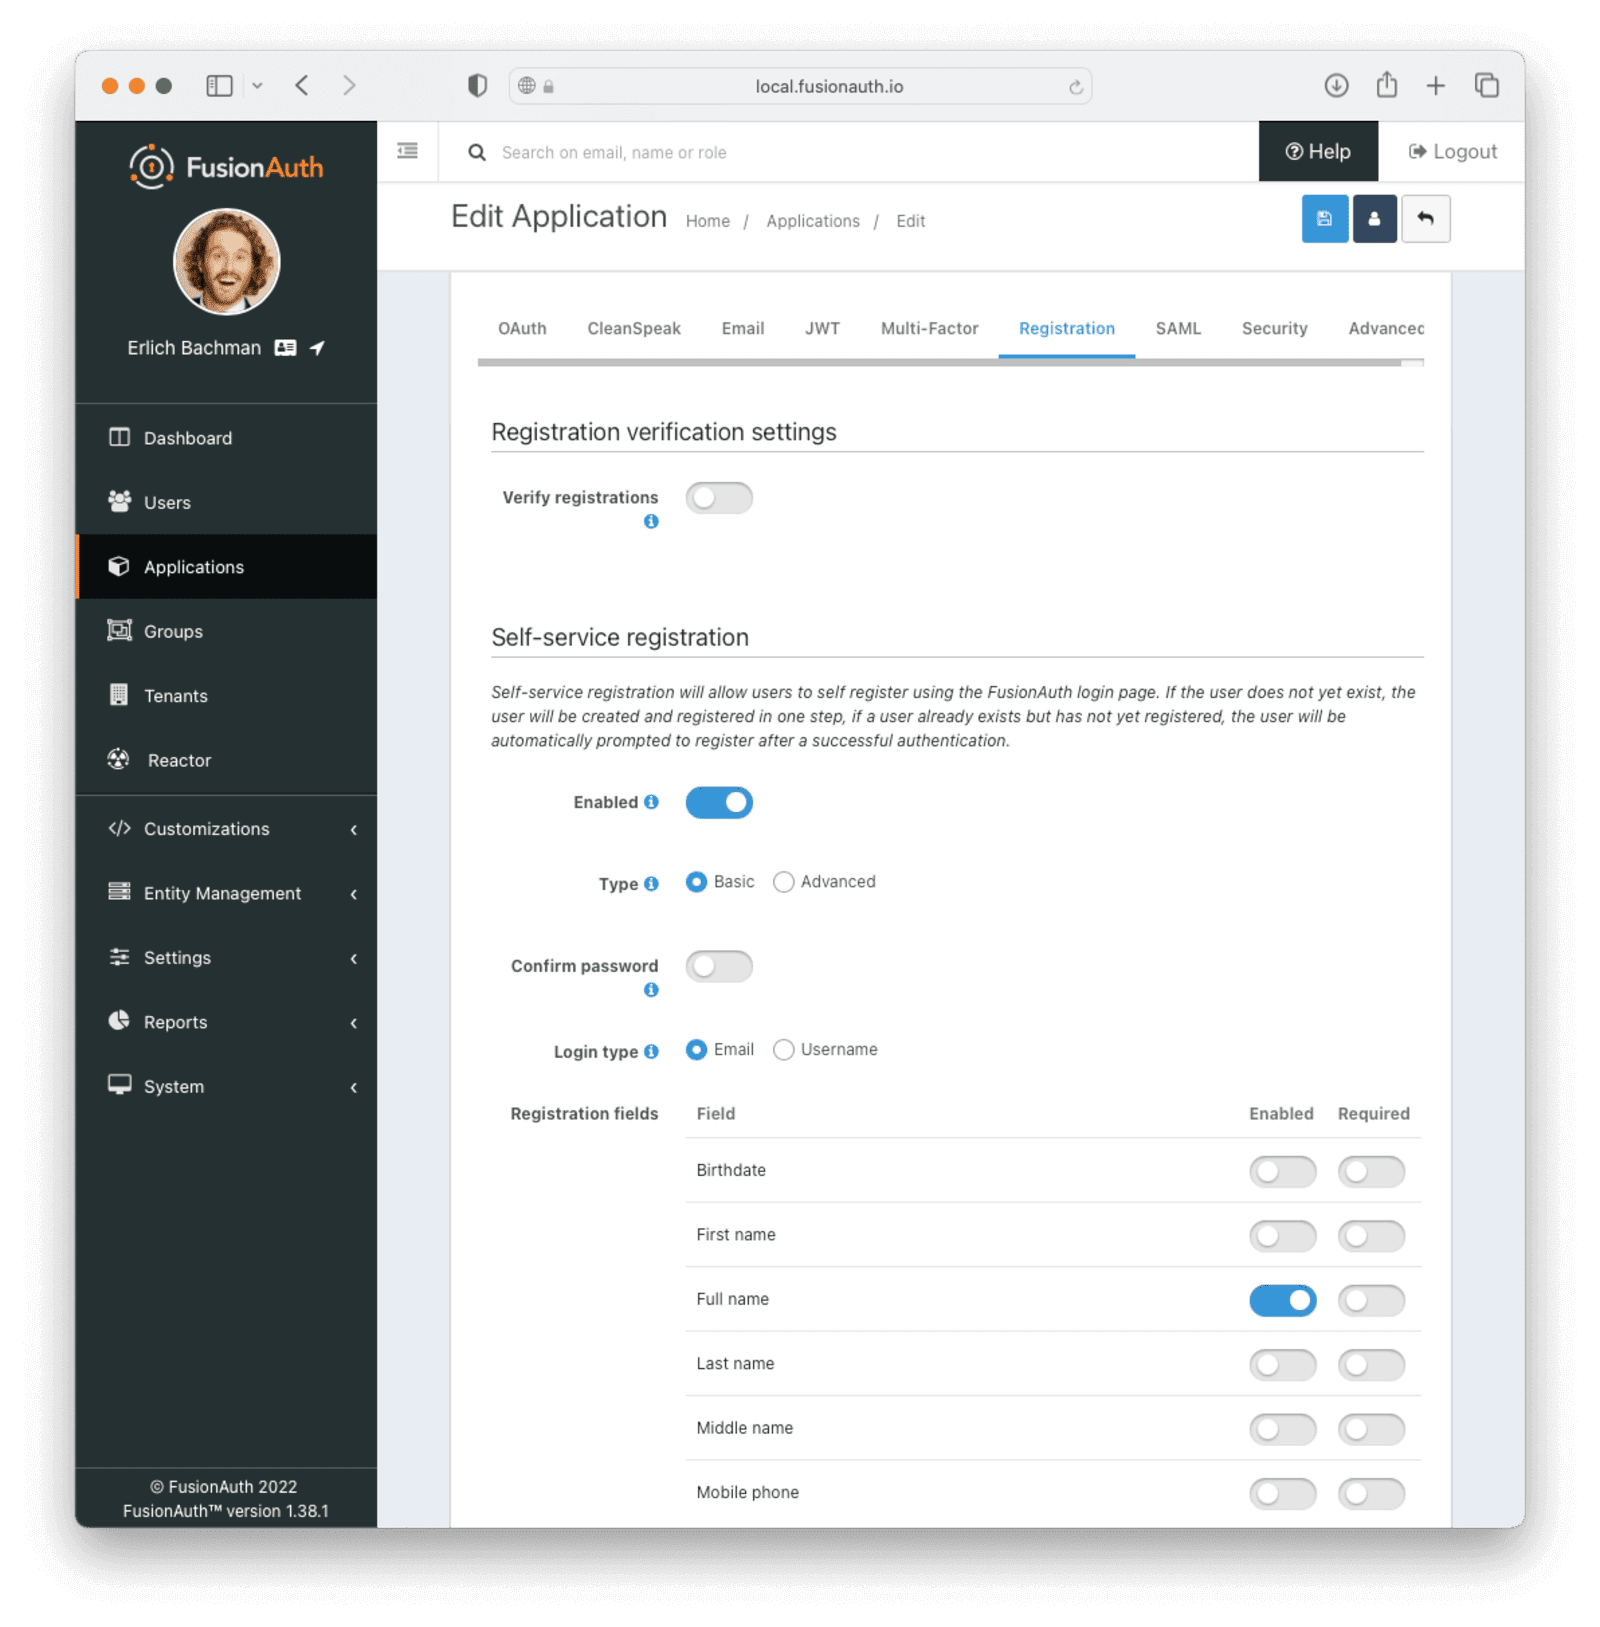
Click the Save button at the top right for your changes to take effect.
Setting up OpenID Connect (OIDC)#
Once the user has logged in via the FusionAuth application, we can retrieve their FusionAuth profile using the OIDC functionality provided by FusionAuth.
To configure this to work properly with Spring, we need to set a couple JWT parameters in FusionAuth.
First, head to your Tenant configuration in FusionAuth. If you haven't made and linked a custom Tenant for your application, you can edit the default Tenant. Under the General tab in your Tenant settings, set the Issuer field to a URL representing your domain. Note that it must be a fully qualified URL for Spring to process it correctly (i.e. include the protocol). This issuer field is used in the JWT created by FusionAuth when logging in.

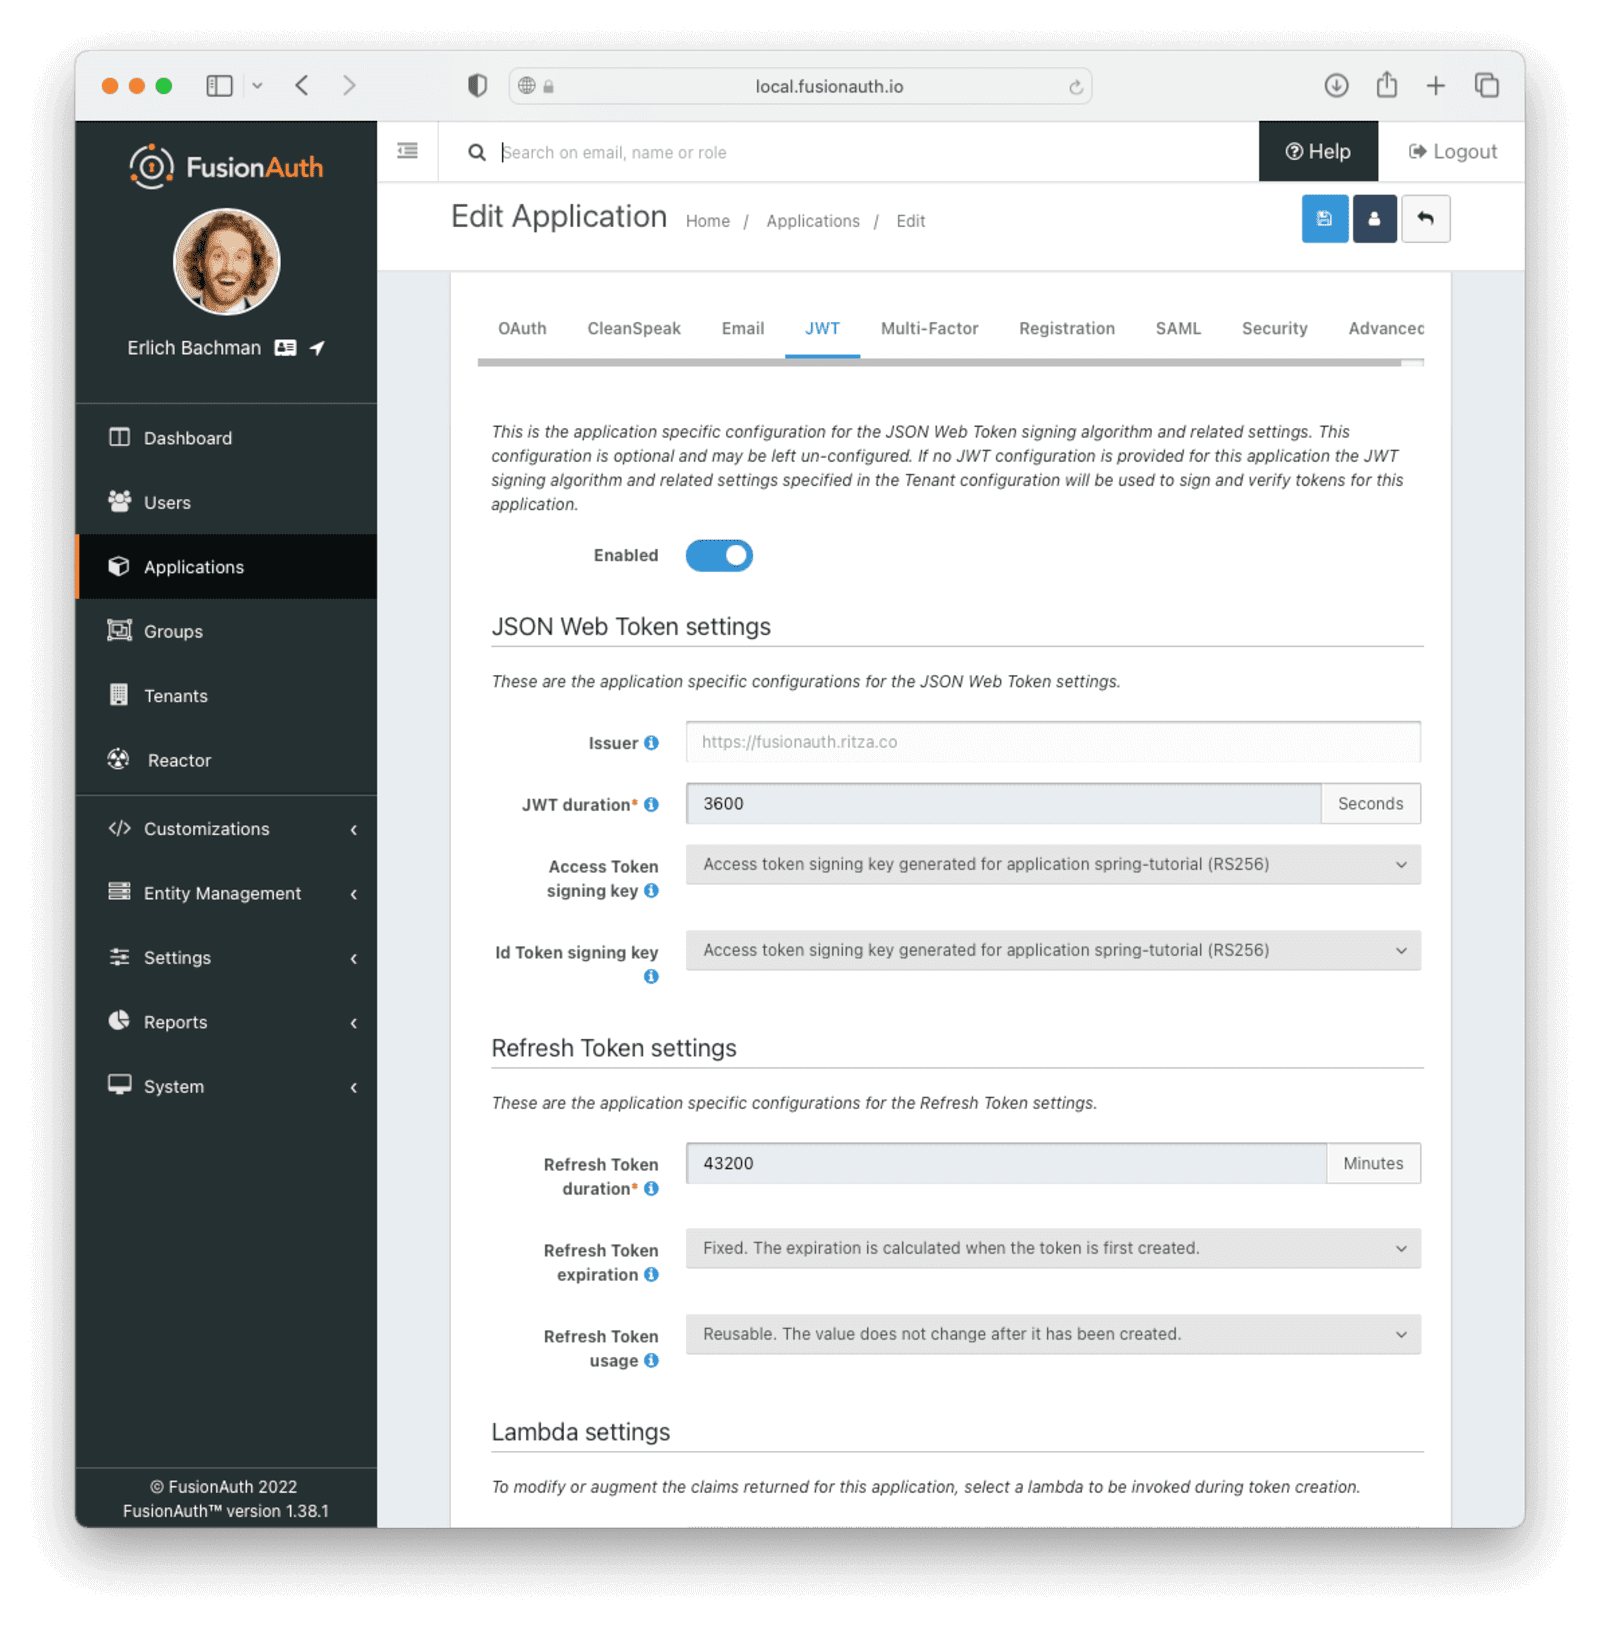
Then head over to your FusionAuth application and edit it. Choose the JWT tab on the settings page, and enable JWT by setting the toggle to on. Then configure the JSON web tokens with the following values:
- "JWT duration": 3600
- "Access Token signing key": Access token signing key generated for application <name> (RS256)
- "Id Token signing key": Access token signing key generated for application <name> (RS256)
Click the Save button in the top right to save these changes. Your setup should look similar to this:
Setting up PKCE#
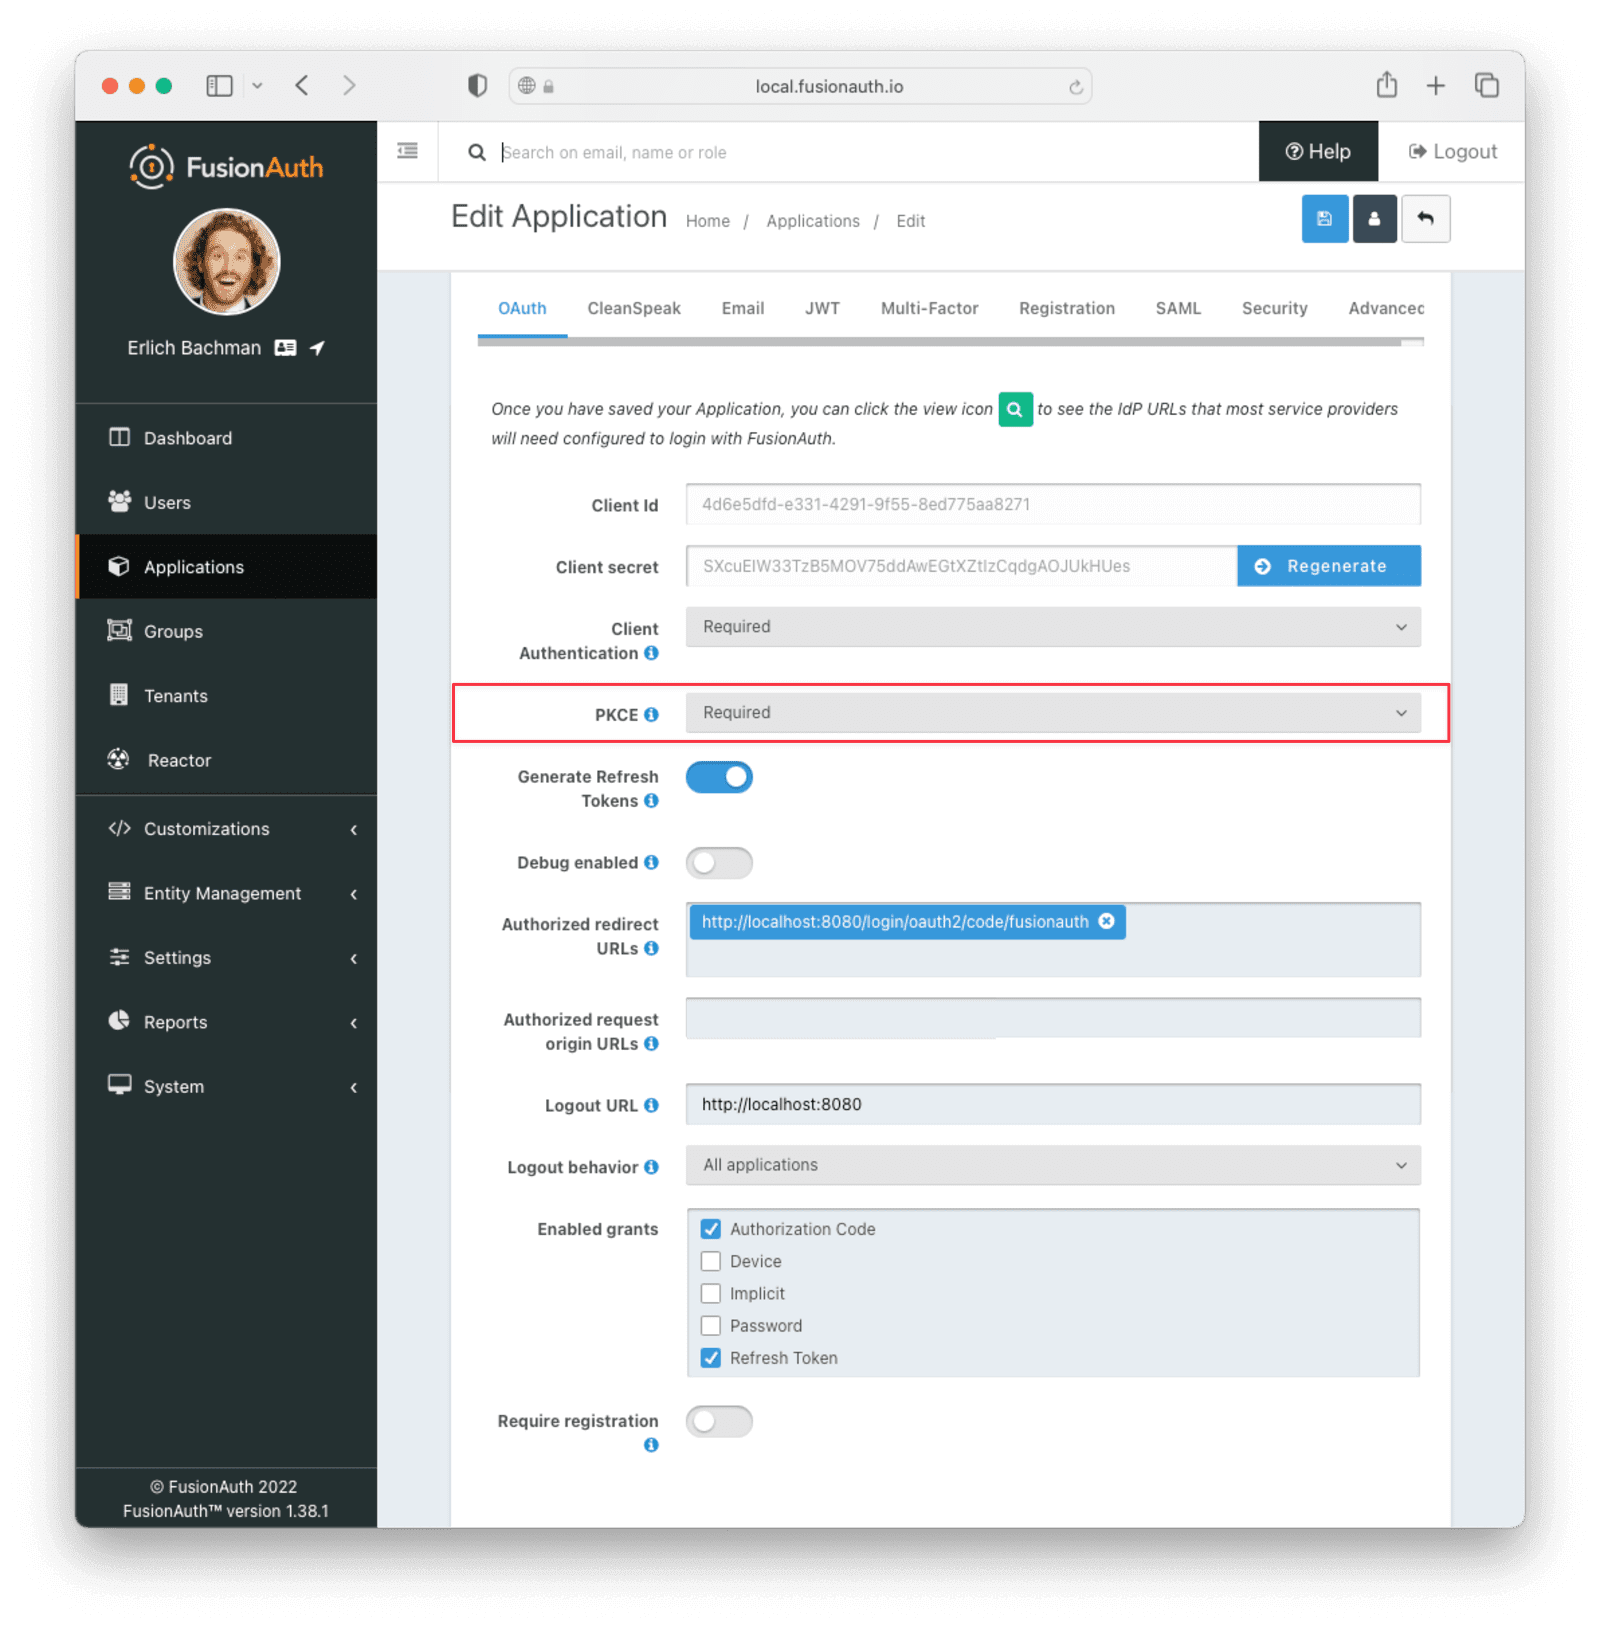
Proof Key for Code Exchange (PKCE) was originally intended for public clients like native mobile or desktop apps that couldn't safely store a client secret. Now it is recommended even on confidential clients like web apps where the Client Secret is under secure control to protect against authorization code injection attacks.
PKCE is enabled by default in FusionAuth for public clients. To enable PKCE for your confidential app, set the PKCE dropdown in your app's settings to "Required".
Setting up Spring#
Navigate to Spring Initializr, and create a new Spring Boot project with the following options set:
- You can choose either Gradle or Maven as your package manager—we've used Maven for this example
- Spring Boot 2.7.x
- Name the app, group and artifact as you wish, to generate a package name. We've used
io.fusionauth.example.springfor the full package name. - Choose the following dependencies:
- Spring Web
- OAuth 2.0 client
- Thymeleaf
- "Jar" as the packaging
- Java 17
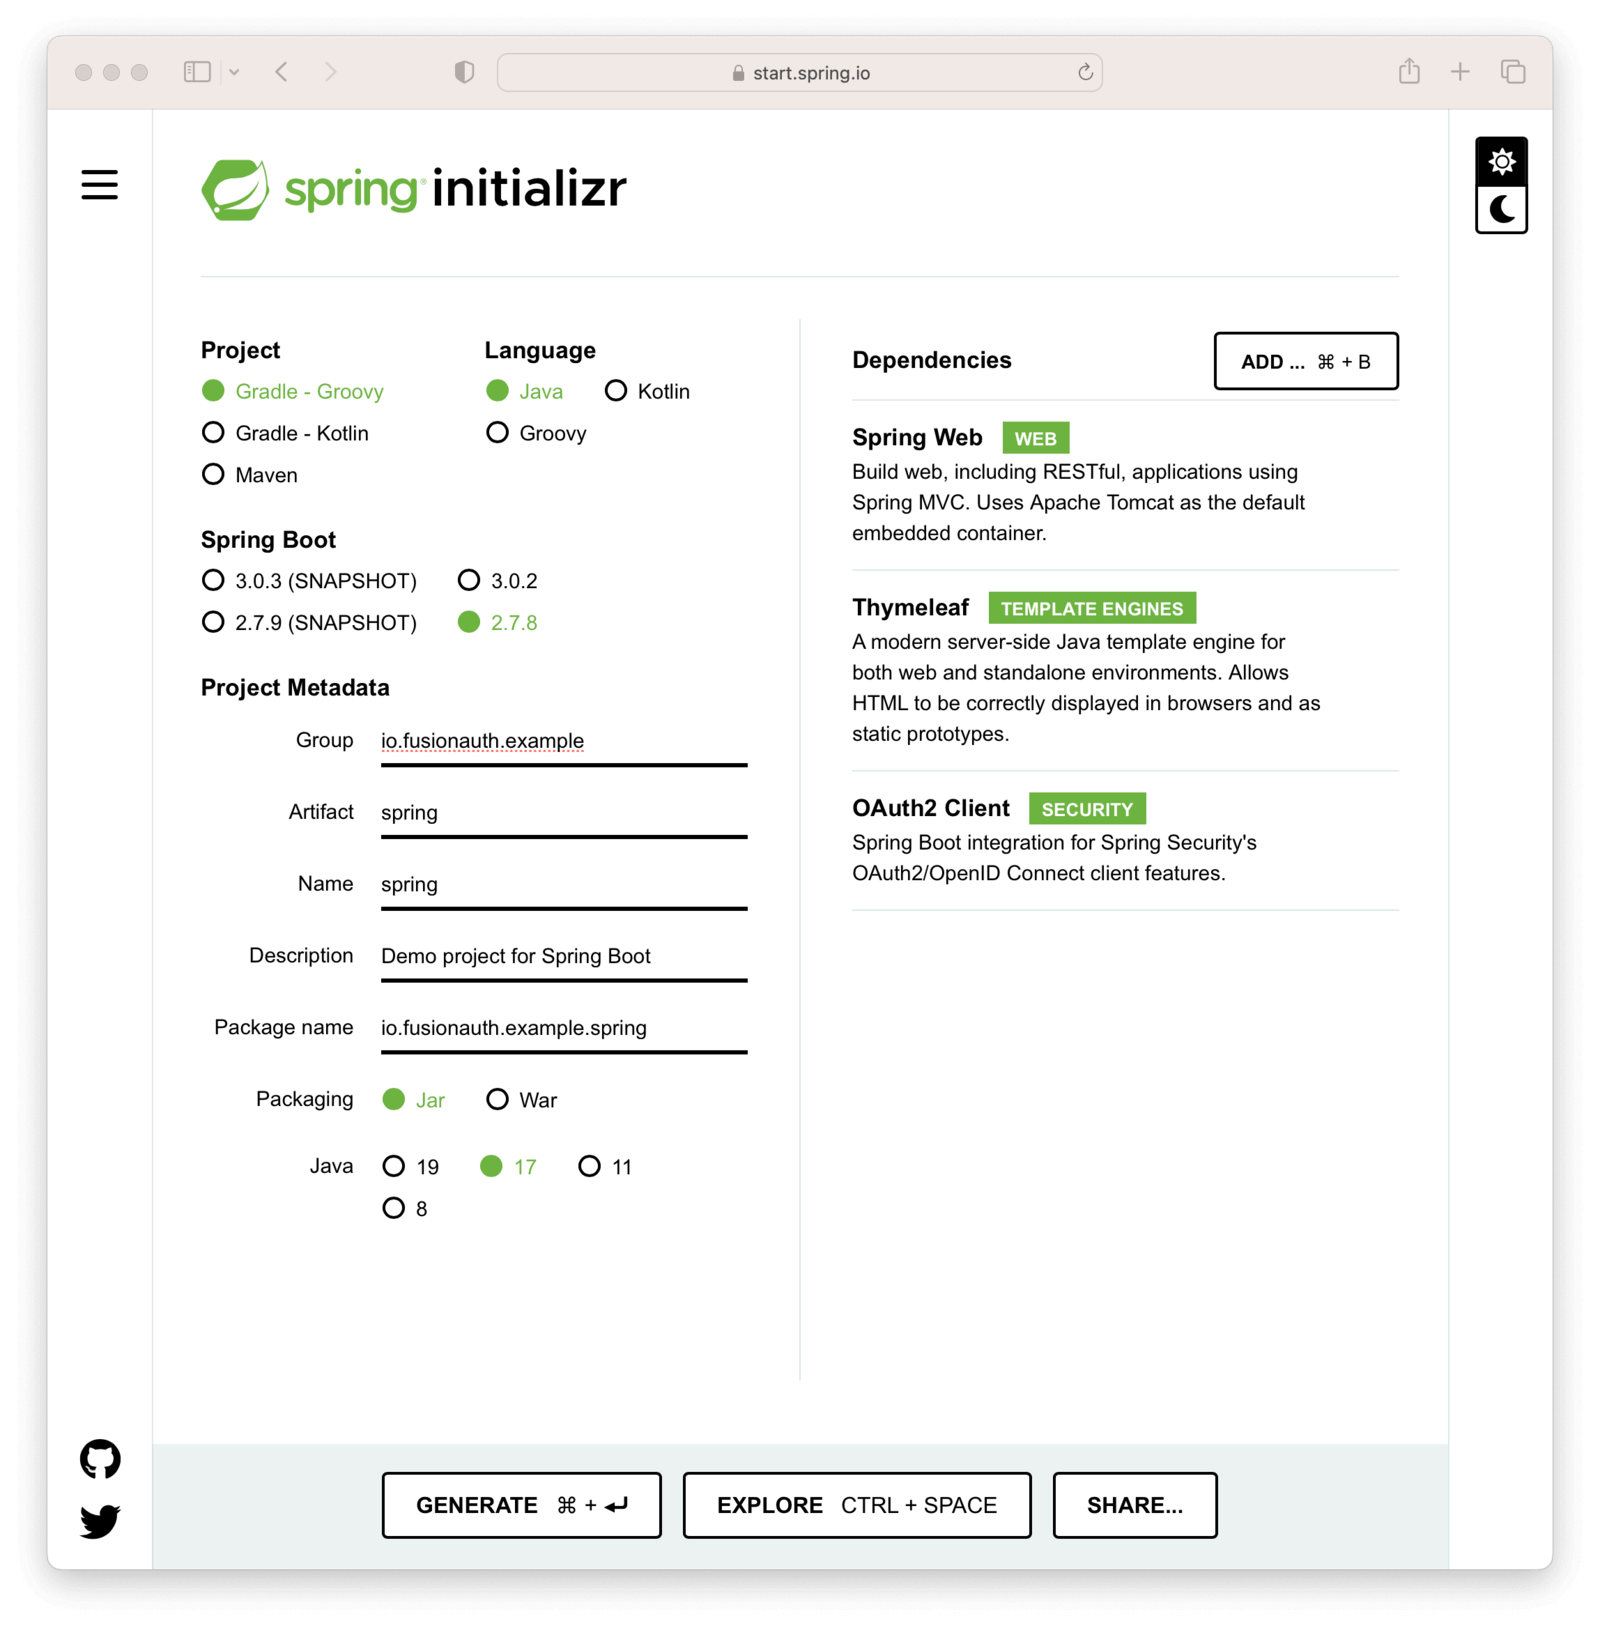
Click Generate . A zip file of the project should automatically be downloaded to your local machine. Copy and unzip it to a folder.
Building the application#
Our application will only have three pages, including the FusionAuth login page.
- A home page — a public page inviting users to log in.
- The login or sign-up page (redirected to FusionAuth) with options to use a username and password.
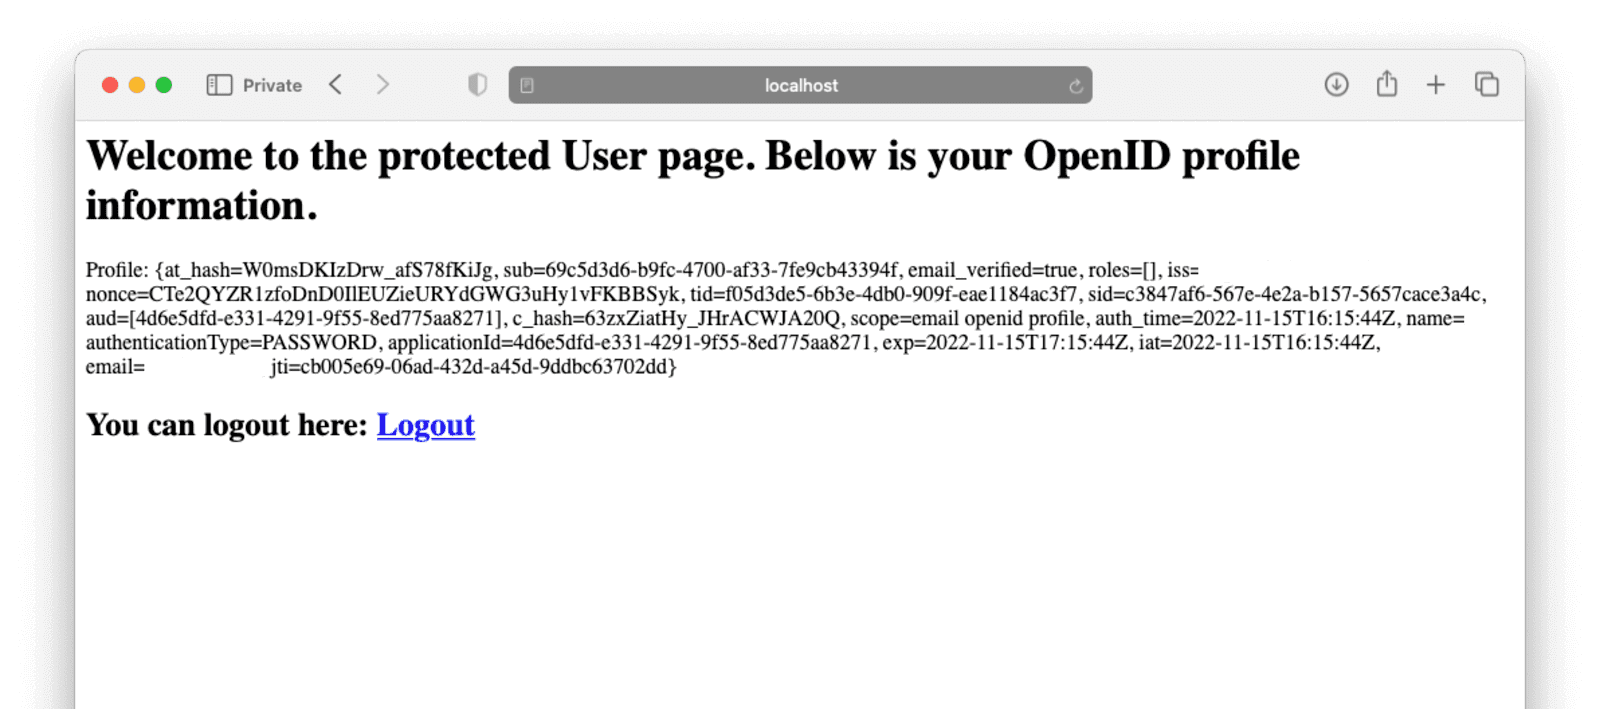
- A logged-in private "Member's Only" page. This will display the user's profile retrieved from FusionAuth via OIDC.
Setting up Spring Boot OAuth 2.0 properties#
Spring Boot OAuth 2.0 Client has various configuration options through the application.properties file and through Spring Beans.
Update the application.properties file in the resources directory under the main source path to read as follows:
Replace the values:
9fdb985-9173-4e01-9d73-ac2d60d1dc8ewith the client ID from the FusionAuth app created earlier.super-secret-secret-that-should-be-regenerated-for-productionwith the client secret from the FusionAuth app created earlier.http://locahost:9011with the base URL your FusionAuth instance is running on, if not using a local installation.
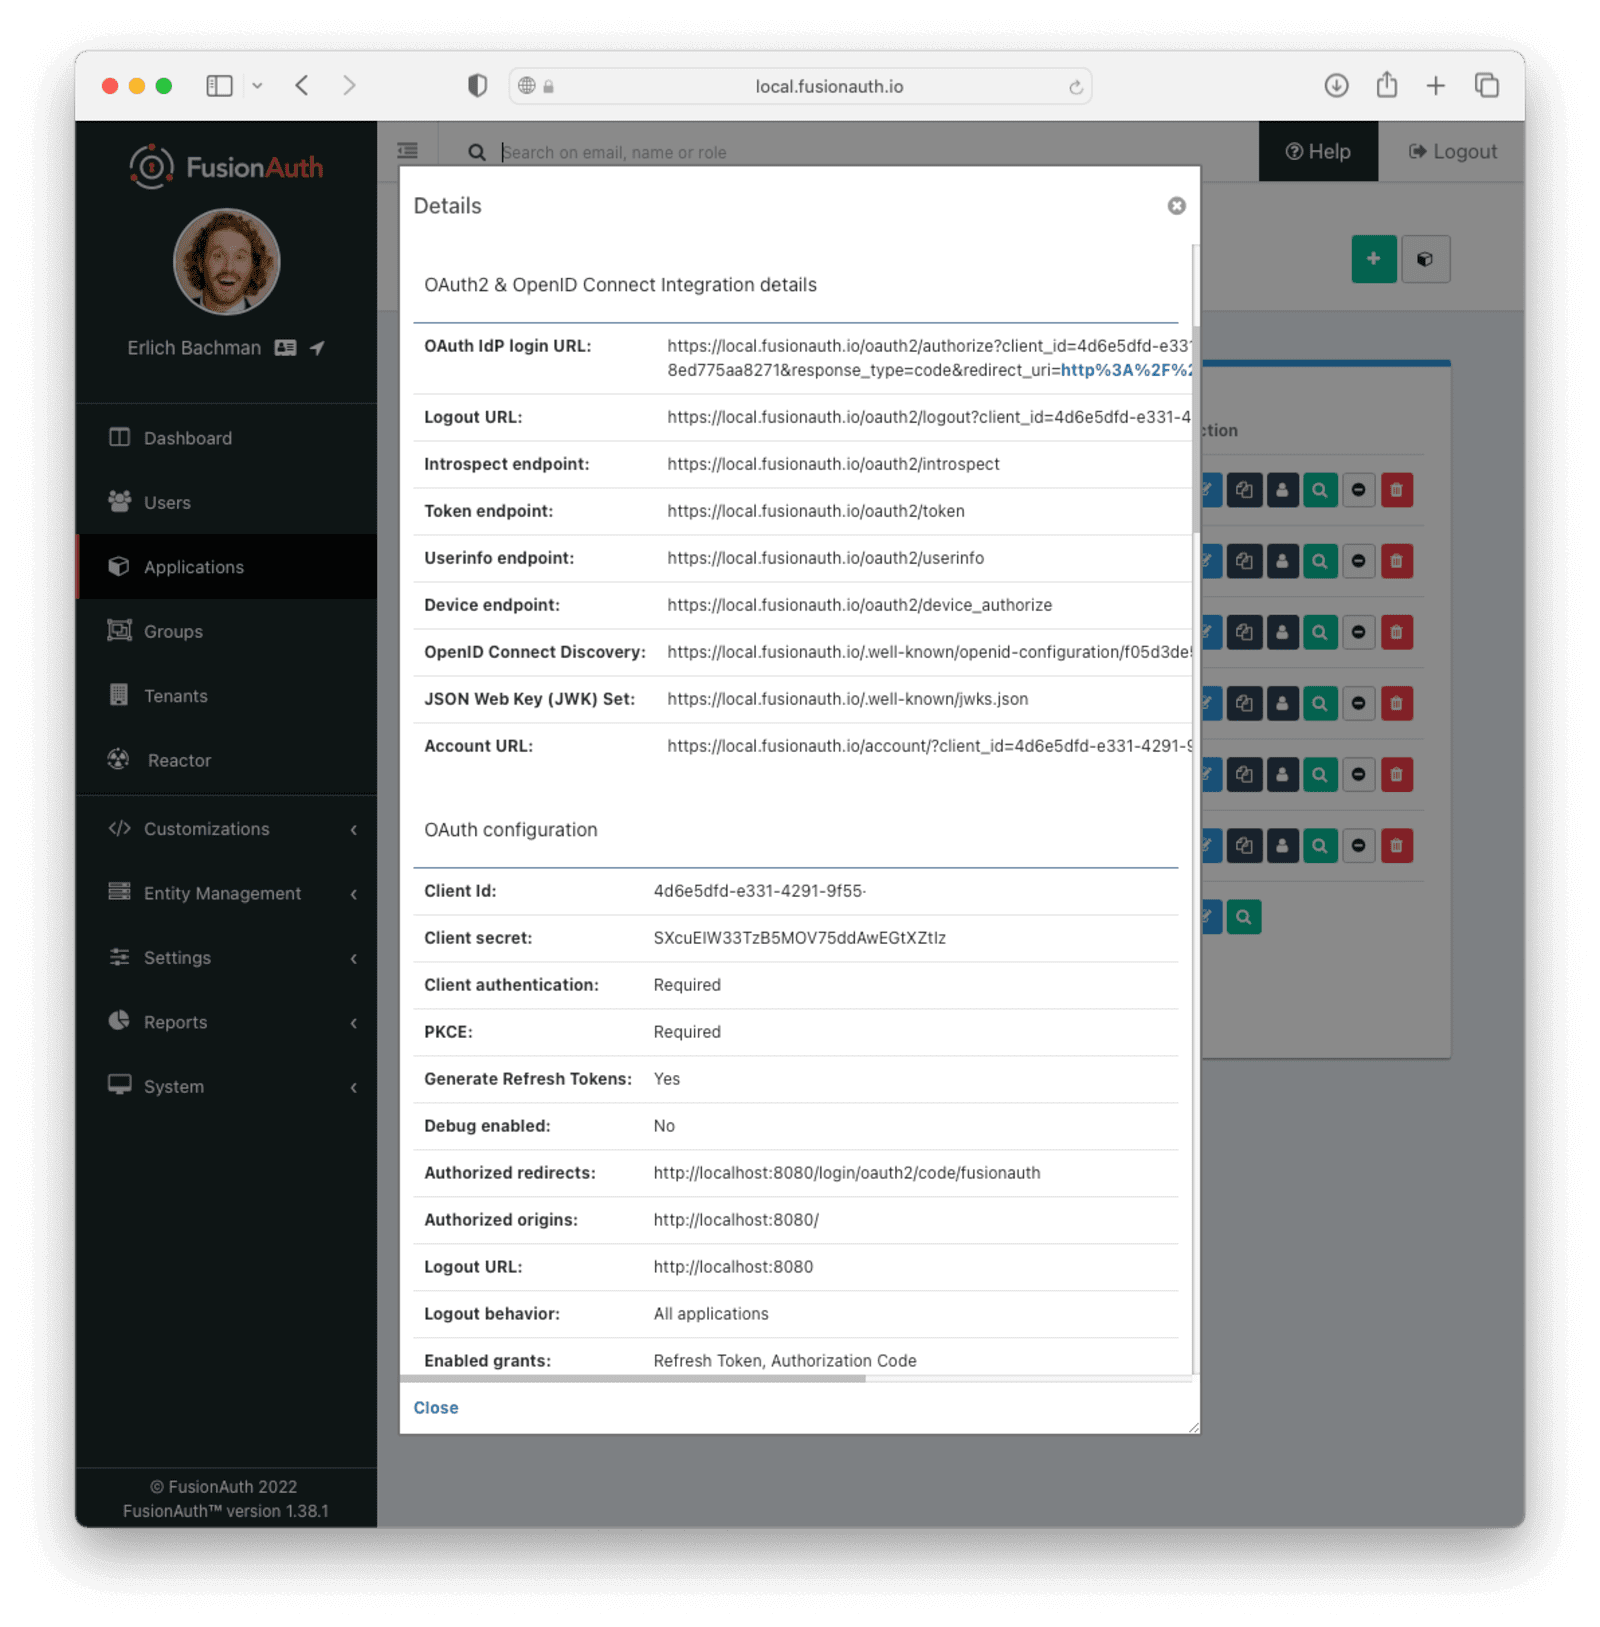
Most of the values can also be found by clicking on the "View" application settings button in FusionAuth:
Setting up Spring Boot OAuth 2.0 code configuration#
Create a config directory under the src/main/java/io/fusionauth/example/spring source directory. Create a new file named SecurityConfiguration.java with the following contents:
This adds a Bean to hook into the Spring security filter chain.
We create a new OAuth request resolver to add PKCE support for any OAuth requests.
Then we add a few things to the HTTP request chain:
- A request authentication test, using
authorizeRequests. This allows public access to the home page at/but requires any other request to first be authenticated (anyRequest().authenticated()). - OAuth 2.0 Login. This will redirect any requests to the built-in Spring Security
/loginendpoint to the OAuth 2.0 provider configured in theapplication.propertiesfile. We also add the customized PKCE resolver to the login endpoint configuration. - A redirect back to the homepage
/after a successful logout event.
Adding the home page and controller#
In the src/main/java/io/fusionauth/example/spring source directory, create a new file named HomeController.java. Add the following contents to this file:
Under the src/main/resources/templates directory, create a new file named home.html. Add the following contents to the file:
Adding the user page and controller#
We set the user-info-uri property in the application.properties file and add the openid and profile scopes to the scope property so that Spring can automatically query FusionAuth for the user's profile and make it available to the app via the AuthenticationPrincipal annotation parameter. We can use this to build a user controller to show the logged-in user their profile on FusionAuth. You can customize the profile fields stored on FusionAuth and requested during registration. Read more about this here.
In the src/main/java/io/fusionauth/example/spring source directory, create a new file named UserController.java. Add the following contents to this file:
Under the src/main/resources/templates directory, create a new file named user.html. Add the following contents to the file:
Replace the values in the logout link in the snippet above:
http://localhost:9011with the base URL your FusionAuth instance is running on, if not using a local installation.e9fdb985-9173-4e01-9d73-ac2d60d1dc8ewith the client Id from the FusionAuth app created earlier.
The logout link redirects to FusionAuth, which logs the user out of the FusionAuth app and then redirects back to the logout URL set earlier in the FusionAuth app configuration, http://localhost:8080/logout. By default, Spring Boot web has logout logic wired at that endpoint to complete the logout process on the application by destroying the local session.
Testing#
You can test the project by running it through an IDE of your choice (we used Visual Studio Code to develop this tutorial). You can also test from the command line by running:
mvn spring-boot:run
If all went well, the server should start successfully and you can visit http://localhost:8080.
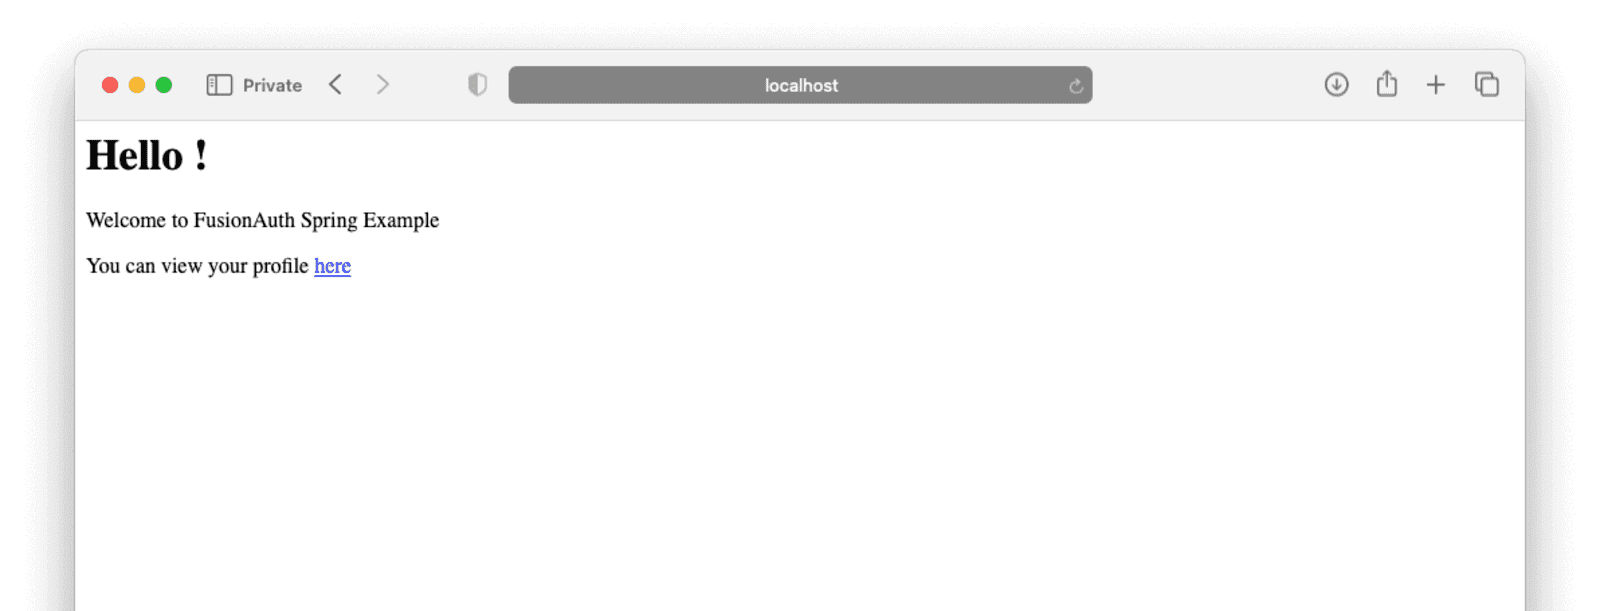
Clicking on "You can view your profile here" should redirect you to your FusionAuth installation with an option to register.
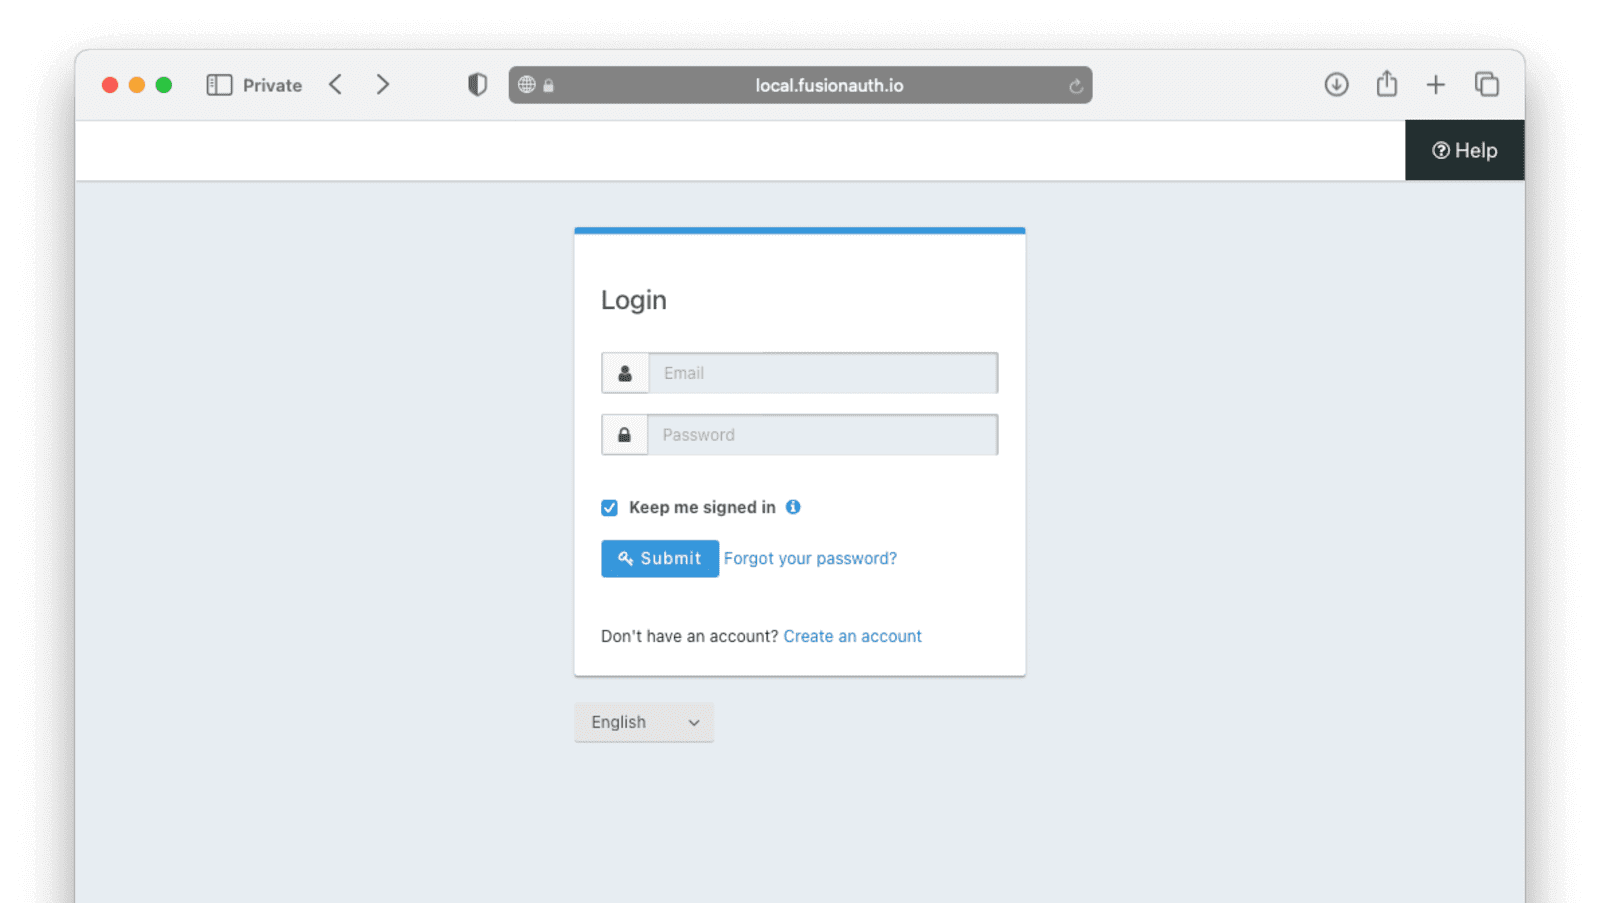
Clicking the Create an account link should direct you to the register page to create an account.
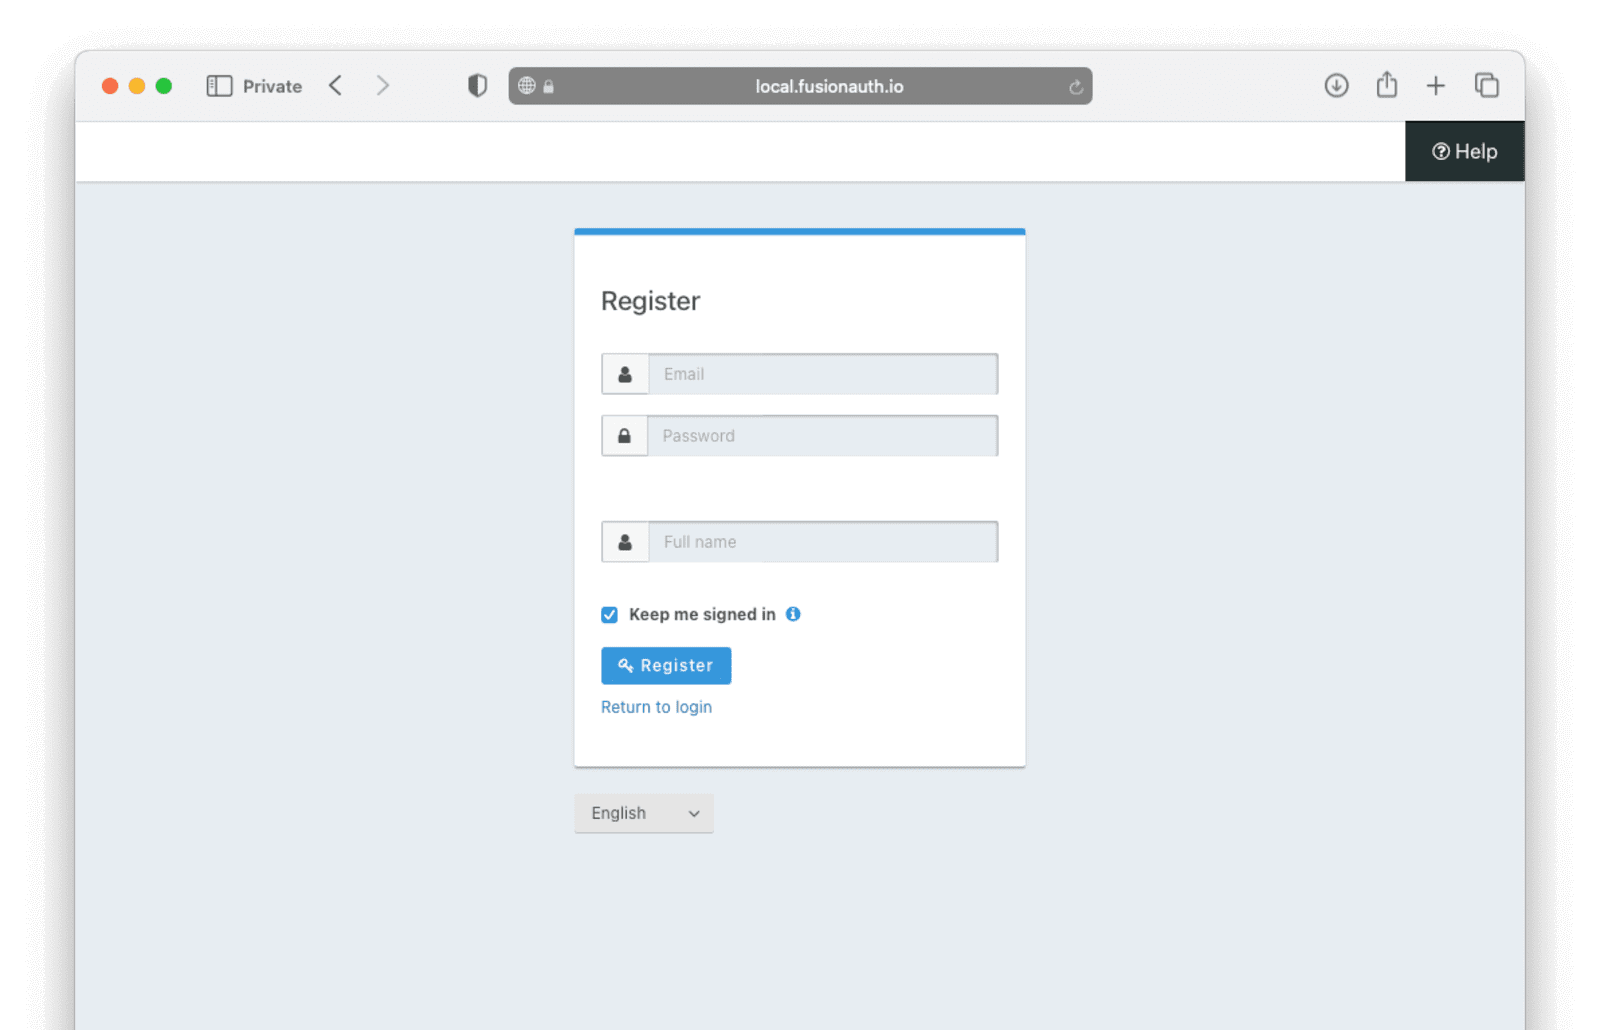
After registering with your email, a password, and name, you should be redirected back to the app and your profile page. You should see a JSON object representing your profile on FusionAuth, fetched using OIDC.
Where to next with Spring and FusionAuth?#
That's the basics of our Spring and FusionAuth app. The app has a fully featured authentication system, without the hassle and possible risks of implementing all of that code ourselves. A complete code example is hosted on GitHub here.
Of course, you would need to add more interesting features to this app for it to be useful. But being able to take care of the authentication, centralized user profiles, and general security with just a little configuration code leaves a lot more time for your application's more useful and critical features.
For a production environment, you would also need to do a bit more work in making sure FusionAuth is safe. In our example, we used the default password provided with Docker for our database, left debug mode on, and ran FusionAuth locally, co-hosted with our Spring application. For a safer setup, you would run FusionAuth on its own infrastructure, physically separate from the Spring app, and take more care around production configuration and deployment. FusionAuth gives you all of the tools to do this easily.


