


In this tutorial, we'll build a basic Node.js and Express web application with advanced user registration and authentication via FusionAuth. We'll create a custom registration form, along with custom consent options for marketing preferences, and set up self-service options for users to update their profile and consent permissions.
The application itself is very simple: it will let users sign up via FusionAuth, allow them to set their permissions for marketing consent, and allow them to update their profile and consents at any time. With these basics in place, you'll see how FusionAuth works and how it can extend the application to do whatever you need. You can also skip ahead and view the code, although much of the application is defined in FusionAuth as detailed in this guide.
Prerequisites#
We'll explain nearly everything that we use, but we expect you to have:
- Basic Node.js knowledge and a Node.js environment set up.
- Preferably basic Express knowledge (or knowledge of a similar web framework or the middleware concept).
- Docker and Docker Compose set up as we'll set up FusionAuth using these.
It'll also help if you know the basics of OAuth or authentication in general.
Why FusionAuth instead of plain Passport?#
Passport is one of the commonly used authentication systems in Express apps. It is very powerful and allows you to hook into social providers, OpenID and OAuth providers, or use a local authentication strategy. This sounds like everything you'll ever need, but there are still a few missing pieces. For example, you still need to construct your own login page and other account functionality such as changing passwords, forgotten password resets, 2FA, email verification, account protection, and more. Setting up custom web app authentication is always more complicated than it seems.
You would also need to implement functionality to allow users to update their profile information. Part of users' profile and account data is inevitably consent permissions. Most apps will need to gather users' consent for activities such as sending marketing updates or sharing users' data with affiliates and other third parties. This would normally require coding, storing, and maintenance with custom solutions. However, since it is an integral part of user identity, FusionAuth has consent management built in.
The great news is that combining Passport with FusionAuth makes a complete system that takes care of all aspects of authentication and identity. It also means that much of your app's authentication capability can be configured through FusionAuth rather than writing code and modifying your app. For example, you can easily add registration form fields whenever you need to, without changing code or redeploying your app.
With this setup, authentication, identity, and consent concerns are taken care of entirely by FusionAuth.
The image below shows how this works.
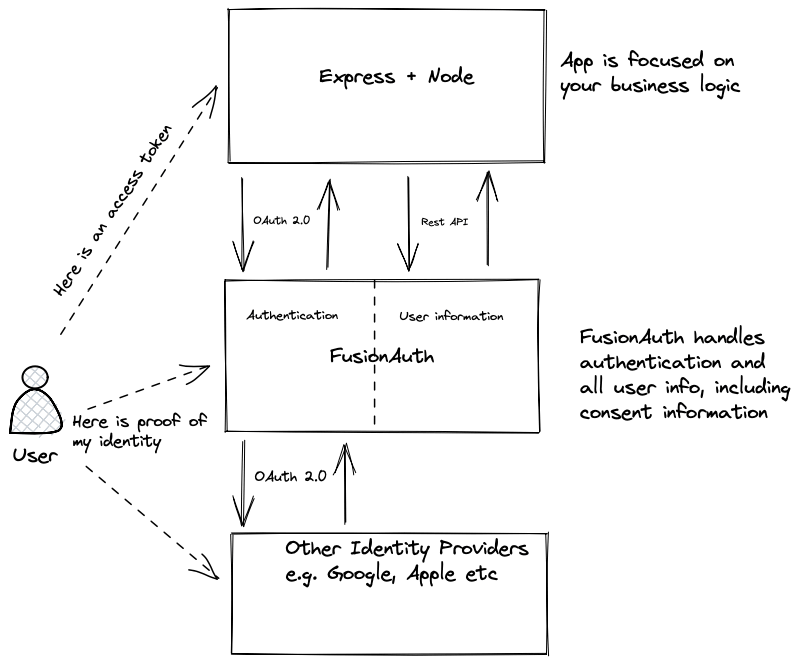
Your application logic and all public information can be handled by Express. Anything sensitive, such as personally identifiable information (PII), passwords, and consent permissions, is handled by FusionAuth.
This allows you to focus your security efforts on the FusionAuth installation. It also means that if you create more applications, they can piggyback on your centralized authentication and you don't need to re-implement authentication each time. You can also create a multi-tenant configuration, allowing you to easily have logically separate environments for different clients.
Also, any integrations you set up with other providers (for example, Twitter, Google, Apple sign-in) can be done once instead of per application.
Installing and configuring FusionAuth with Docker Compose#
There are various ways to install FusionAuth depending on your system, but the easiest way is to use Docker and Docker Compose. Instructions are here. Currently, if you have Docker installed, to install and run FusionAuth you would run the following commands:
curl -o docker-compose.yml https://raw.githubusercontent.com/FusionAuth/fusionauth-containers/main/docker/fusionauth/docker-compose.yml
https://raw.githubusercontent.com/FusionAuth/fusionauth-containers/main/docker/fusionauth/docker-compose.override.yml
curl -o .env https://raw.githubusercontent.com/FusionAuth/fusionauth-containers/main/docker/fusionauth/.env
docker compose up
Note that this uses a public .env file containing hard-coded database passwords and is not suitable for production use.
Configuring FusionAuth#
FusionAuth should now be running and reachable at http://localhost:9011 if you've installed it locally. The first time you visit, you'll be prompted to set up an admin user and password. Once you've done this, you'll be prompted to complete three more set-up steps, as shown below.

We'll skip step 3 in this tutorial, but sending emails (to verify email addresses and do password resets) is a vital part of FusionAuth running in production, so you'll want to do that when you go live.
Creating an application#
Click Setup under "Missing Application" and call your new app "Consents-App", or another name of your choice. It'll get a Client Id and Client Secret automatically - save these, as we'll use them in the code. Later, we'll set up a Node.js and Express application that will run on http://localhost:3000, so configure the Authorized URLs accordingly. You should add:
http://localhost:3000/auth/callbackto the Authorized redirect URLs.http://localhost:3000/to the Authorized request origin URL.http://localhost:3000/to the Logout URL.
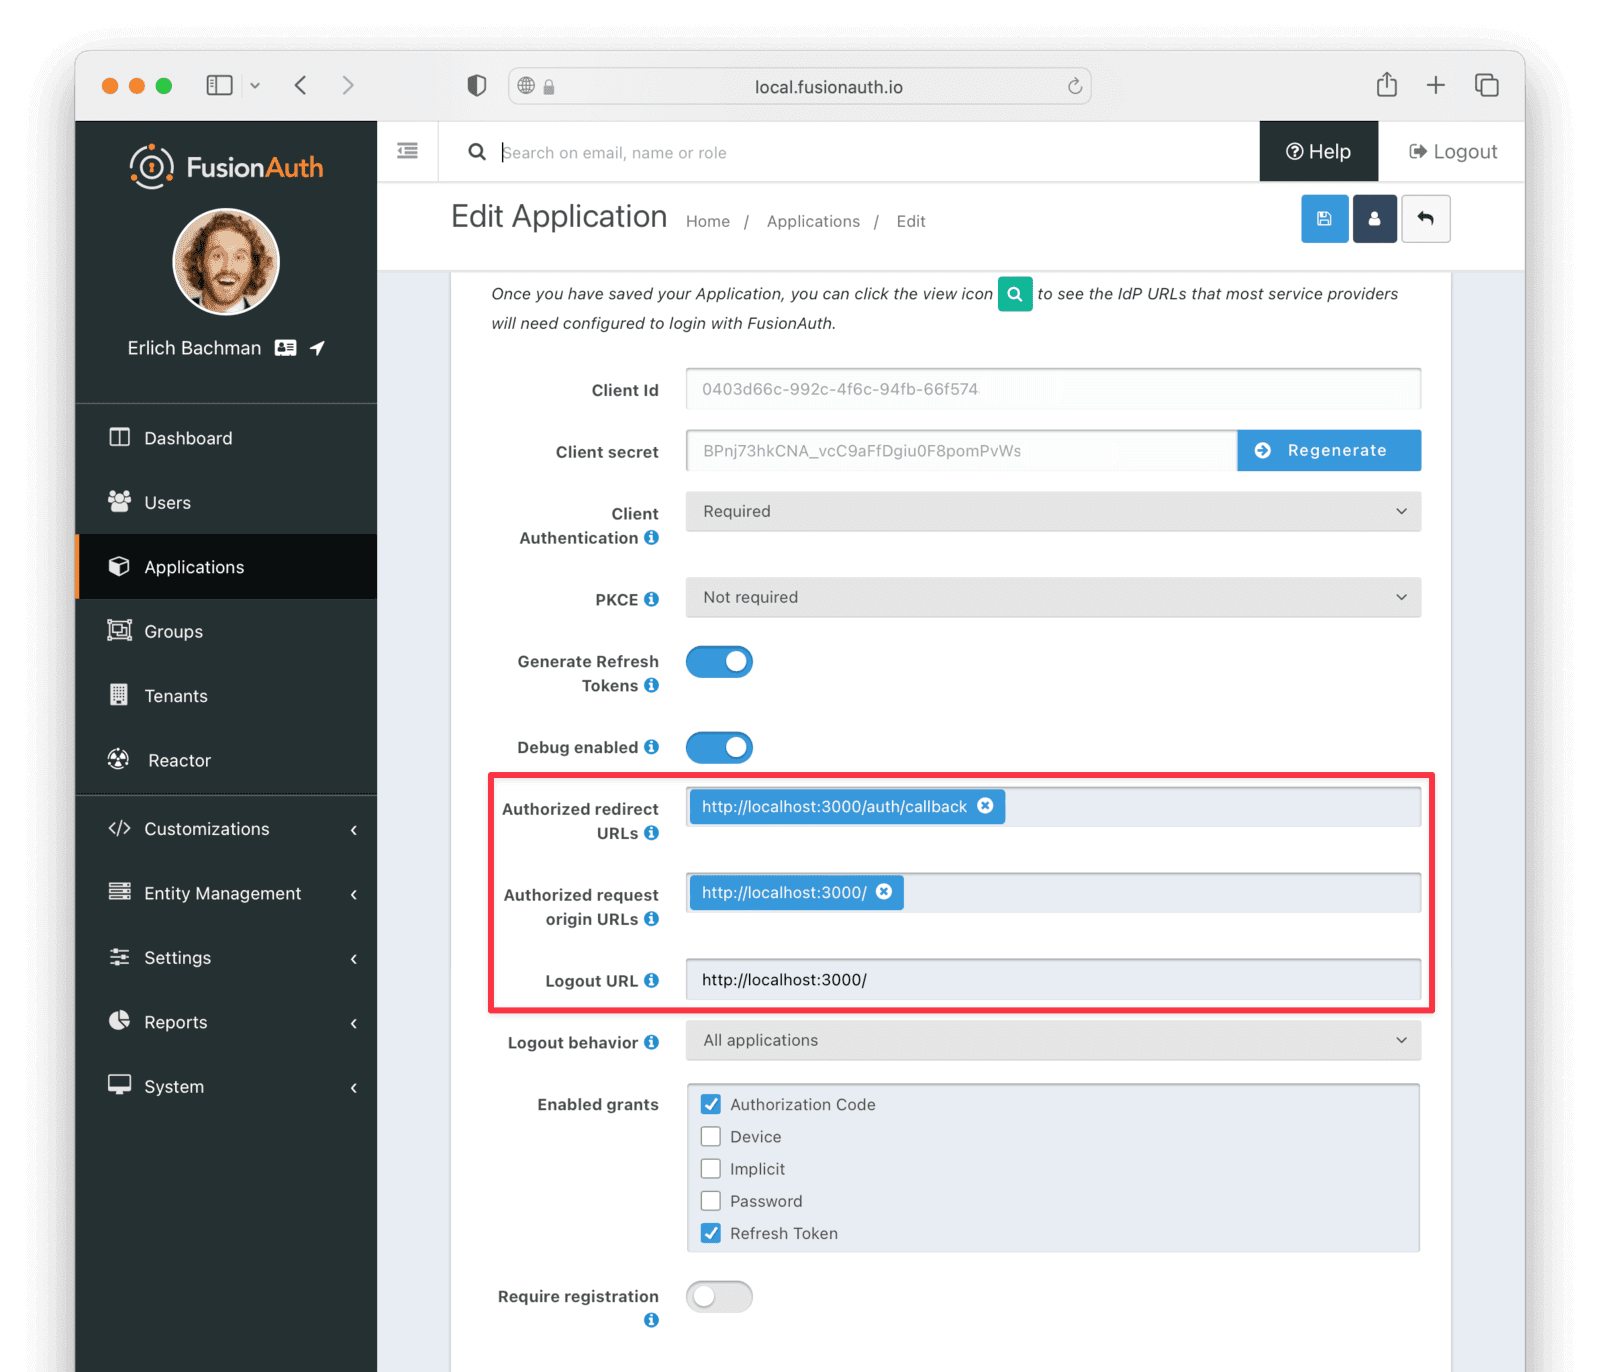
Click the Save button at the top right for your changes to take effect.
Setting up a FusionAuth API key#
Once the user has logged in via the FusionAuth application, we can retrieve their FusionAuth profile and consent permissions using the FusionAuth Typescript module, provided with an API key.
Navigate to Settings -> API Keys , and add a key. Add a name for the key and take note of the generated key value.
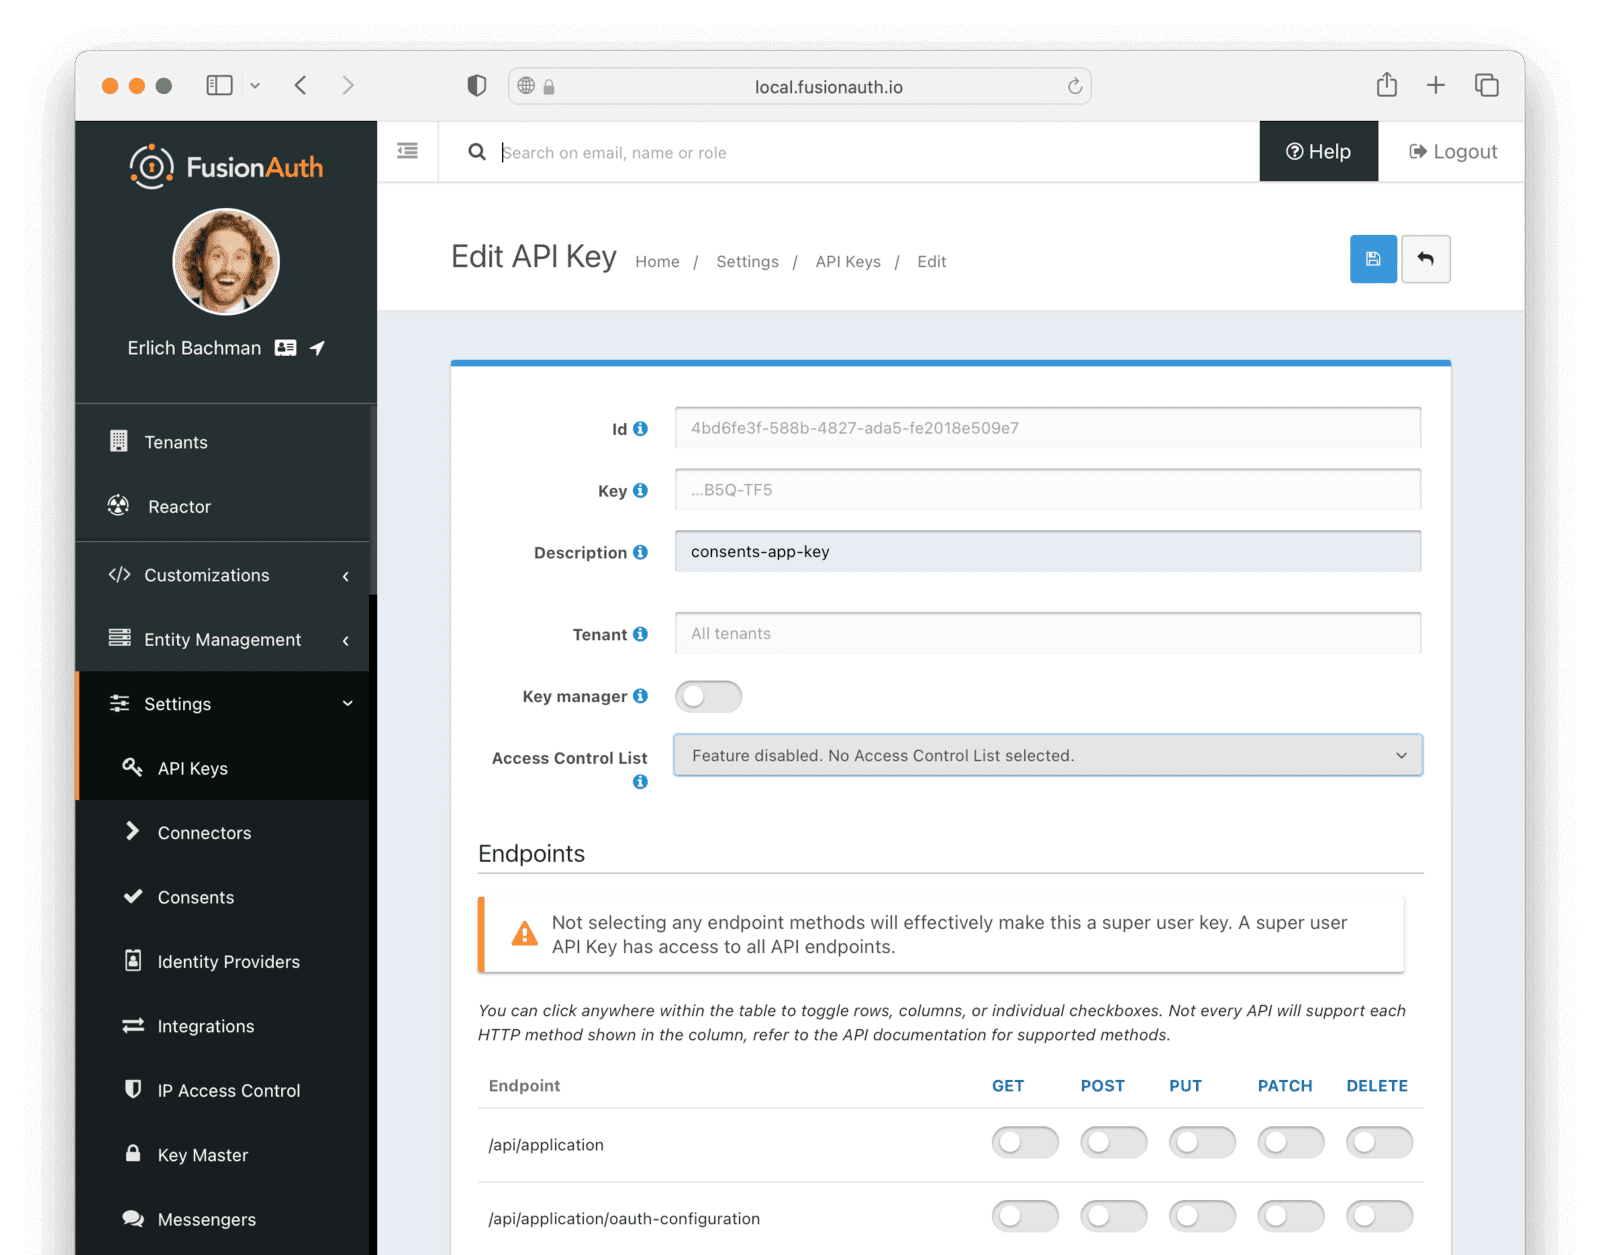
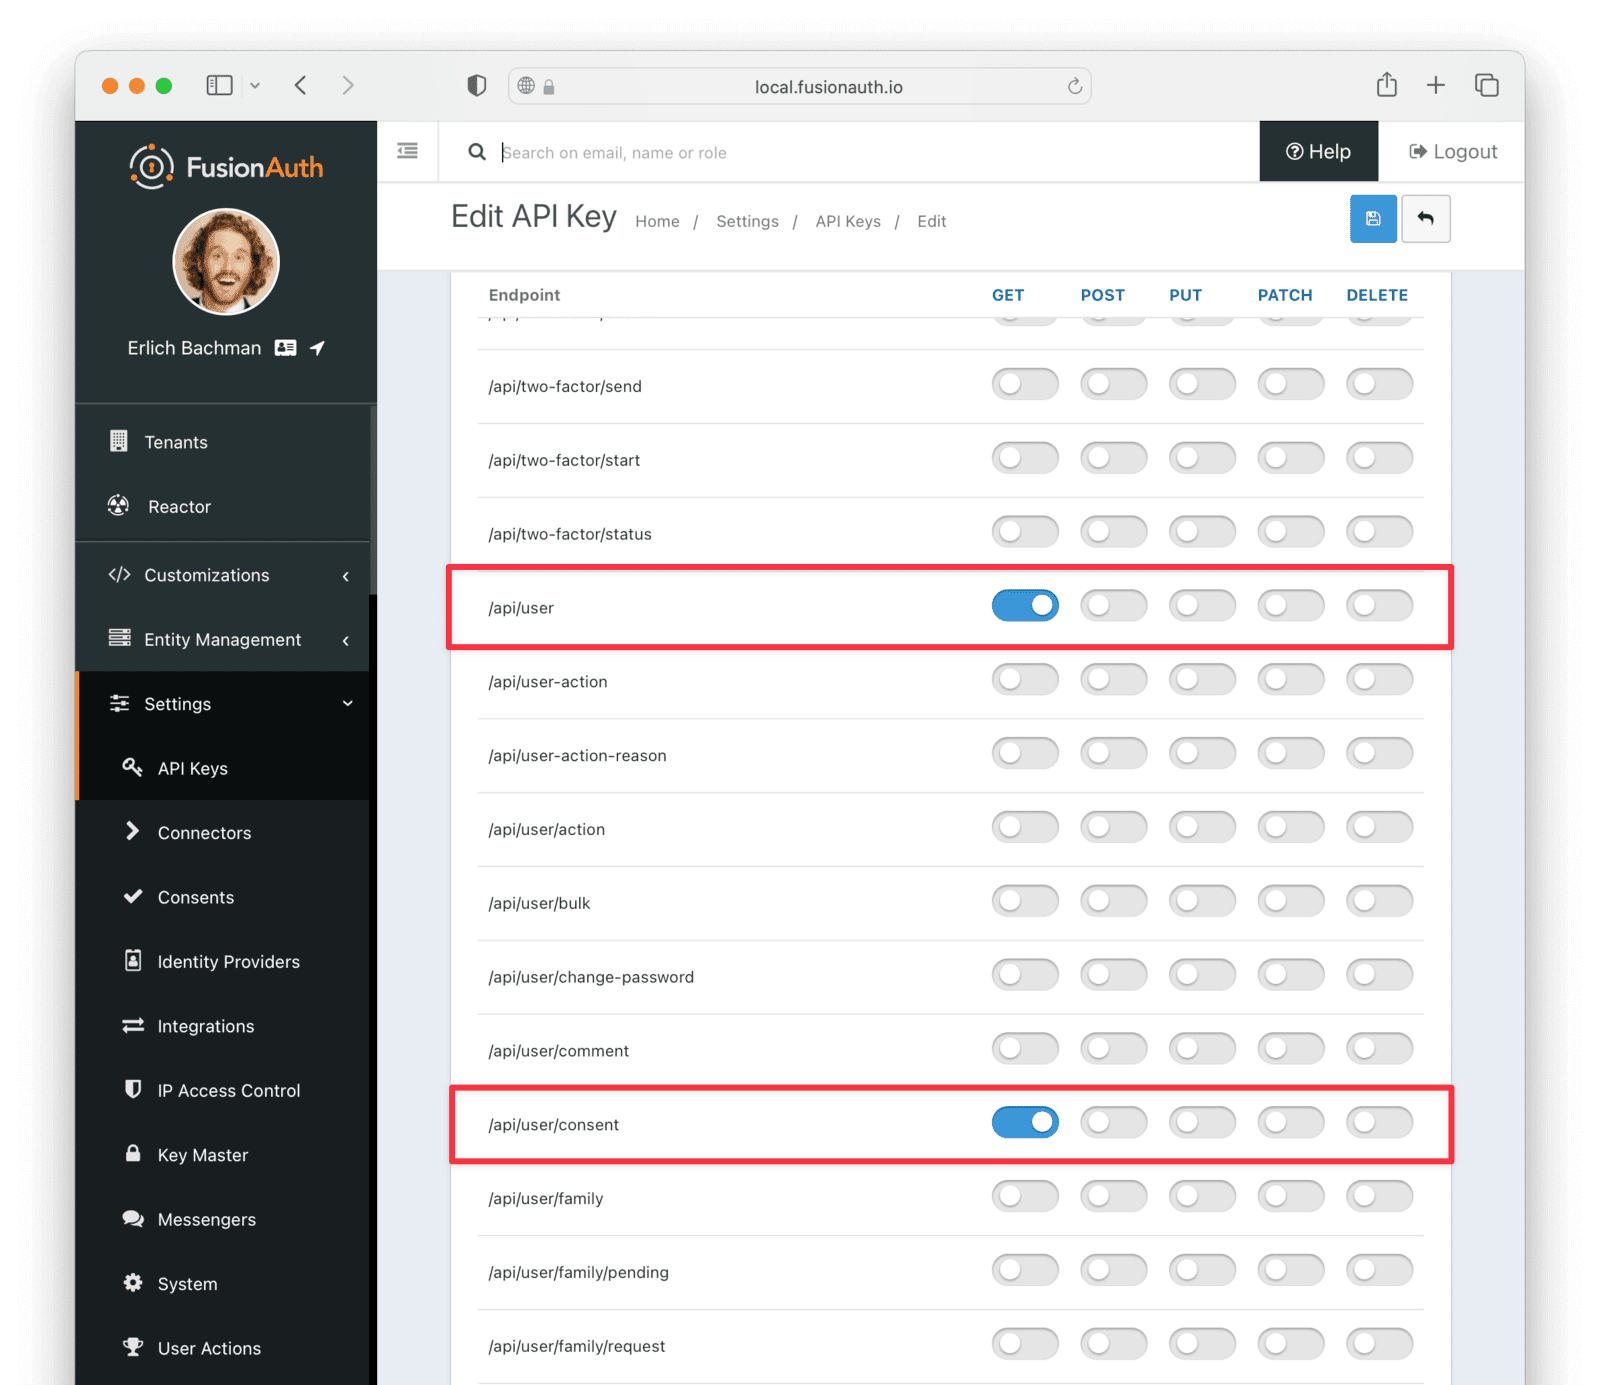
For extra security, you can restrict the permissions for the key. For our app, we only need to enable the get actions for /api/user/ and /api/user/consent that will let the key get basic user information, as well as any consents. If you leave the key with no explicitly assigned permissions, it will be an all-powerful key that can control all aspects of your FusionAuth app. You should avoid doing this!
Creating the custom consents#
For our app, we want users to be able to opt-in, or consent, to different marketing channels:
- Physical mail
- Phone
We'll need to get their permission for each of these options. FusionAuth manages all this under the Consents concept. We can create custom consents for our app.
In the left-hand pane, navigate to Settings -> Consents . Click the green + button to create a new consent. Name the new consent "Email Marketing" and click the Save icon.

Repeat this to create two more consents: "Phone Marketing" and "Physical Mail Marketing".
Creating custom form fields#
During user registration for our app, we want users to be able to set their important profile information as well as their consent permissions. For this, we can create custom form fields that we will be able to use in a custom registration form. FusionAuth also has many built-in form fields, which we will also use.
The custom fields we'll create are:
- Physical Address.
- Form Input for Physical Mail Marketing Consent.
- Form Input for Email Marketing Consent.
- Form Input for Phone Marketing Consent.
In the left-hand pane, navigate to Customizations -> Form Fields . Click the green + button to create a new form field.
First, we'll add the marketing consent fields, starting with the physical mail marketing consent. Choose "Self Consent" as the field type, and set the Name to "Physical Mail Marketing Consent". Select "Physical Mail Marketing" as the Consent. The field setup should look like this:
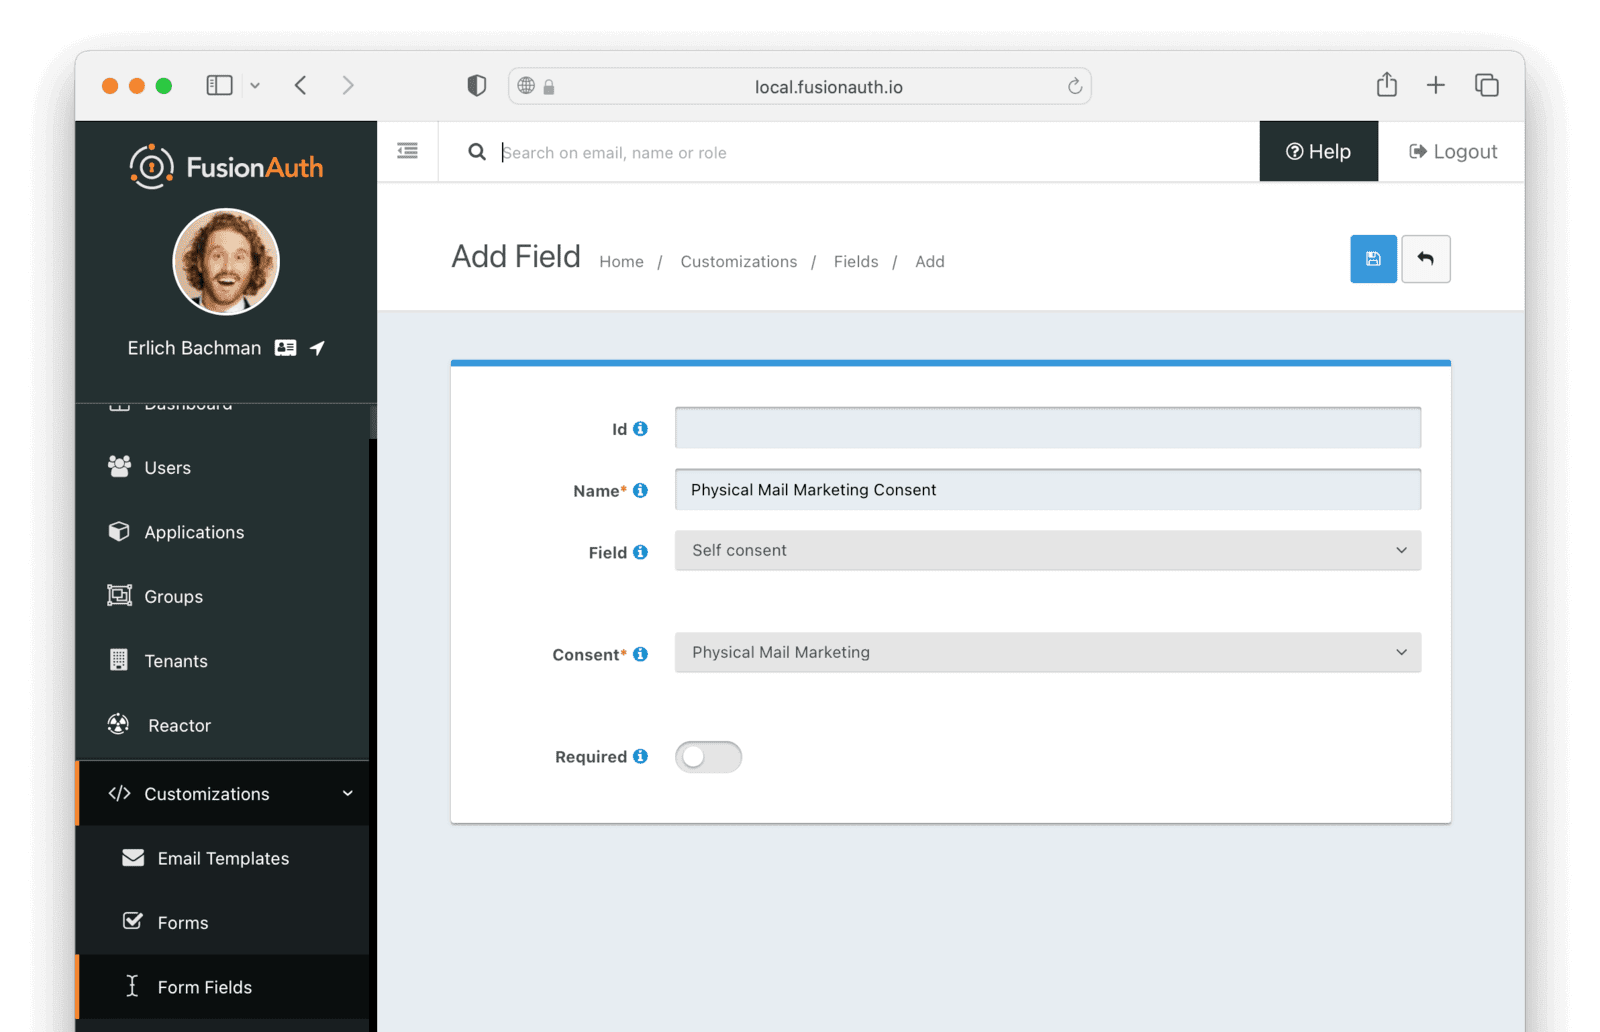
Click the Save button and then repeat this process for the email and phone consents.
We'll also need to add a custom field to capture the user's physical address. We'll create just one field here. In a production app, you might want to break down the address into a few fields, for example, "Address Line 1", "Address Line 2", "City", etc.
Click the green + button to create a new field. Name the new field "Physical Mail Address". For the Field, select "Custom user data (user.data.*)". This will present another input box, starting with "user.data". Type "physicalmailaddress" in this box.
This adds a custom field to the user's "data" object. The "data" object can store extra profile information about the user, typically information you'd want to share across all your apps. If the field is app-specific, then you can use the field type "Custom registration data" instead.
The field setup should look like this:
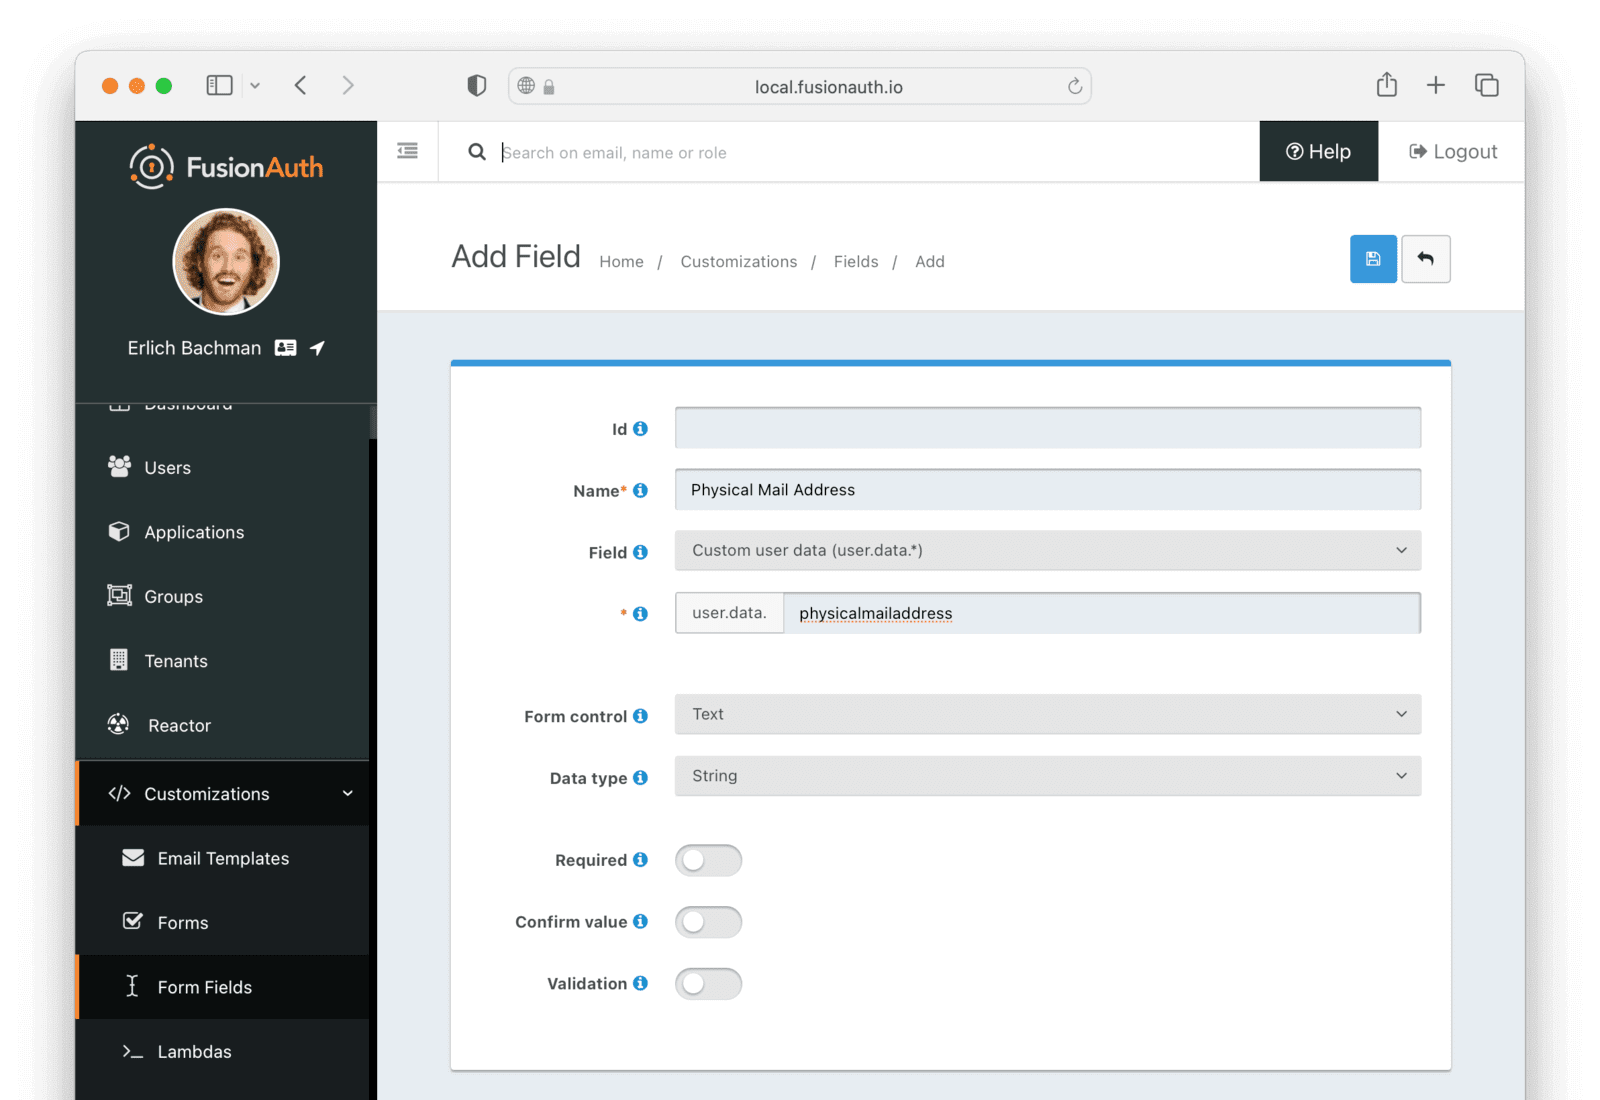
Click Save . We have set up all the custom fields we need.
Create the custom registration form#
Now that we have the custom fields, we can create a custom registration form with them. Navigate to Customizations -> Forms . Click the green + to create a new form.
Name the form something like "Consents Registration Form". Make sure "Registration" is selected as the form's "Type". Then click the Add Step button. A step in a form is like a page of the form. It helps to break up a form into multiple smaller pages so that users are not overwhelmed by a screen full of inputs.
In the Step 1 section, click the Add Field button. Select Email from the Field dropdown, and then click Submit . Then click Add Field again, select Password as the Field, and click Submit . We'll only capture the user's email and password in the first step.
Now click the Add Step button again. In this step, we'll capture the user's alternative contact information. Click Add Field , select Mobile Phone as the field, and click Submit . Repeat for Physical Mail Address.
Click the Add Step button once more for the final registration step. In this step, we'll capture the user's consent permission for each marketing channel. Click Add Field , select Physical Mail Marketing Consent, and then click Submit . Repeat this process for the email and phone marketing consents.
Your final form should look similar to this:
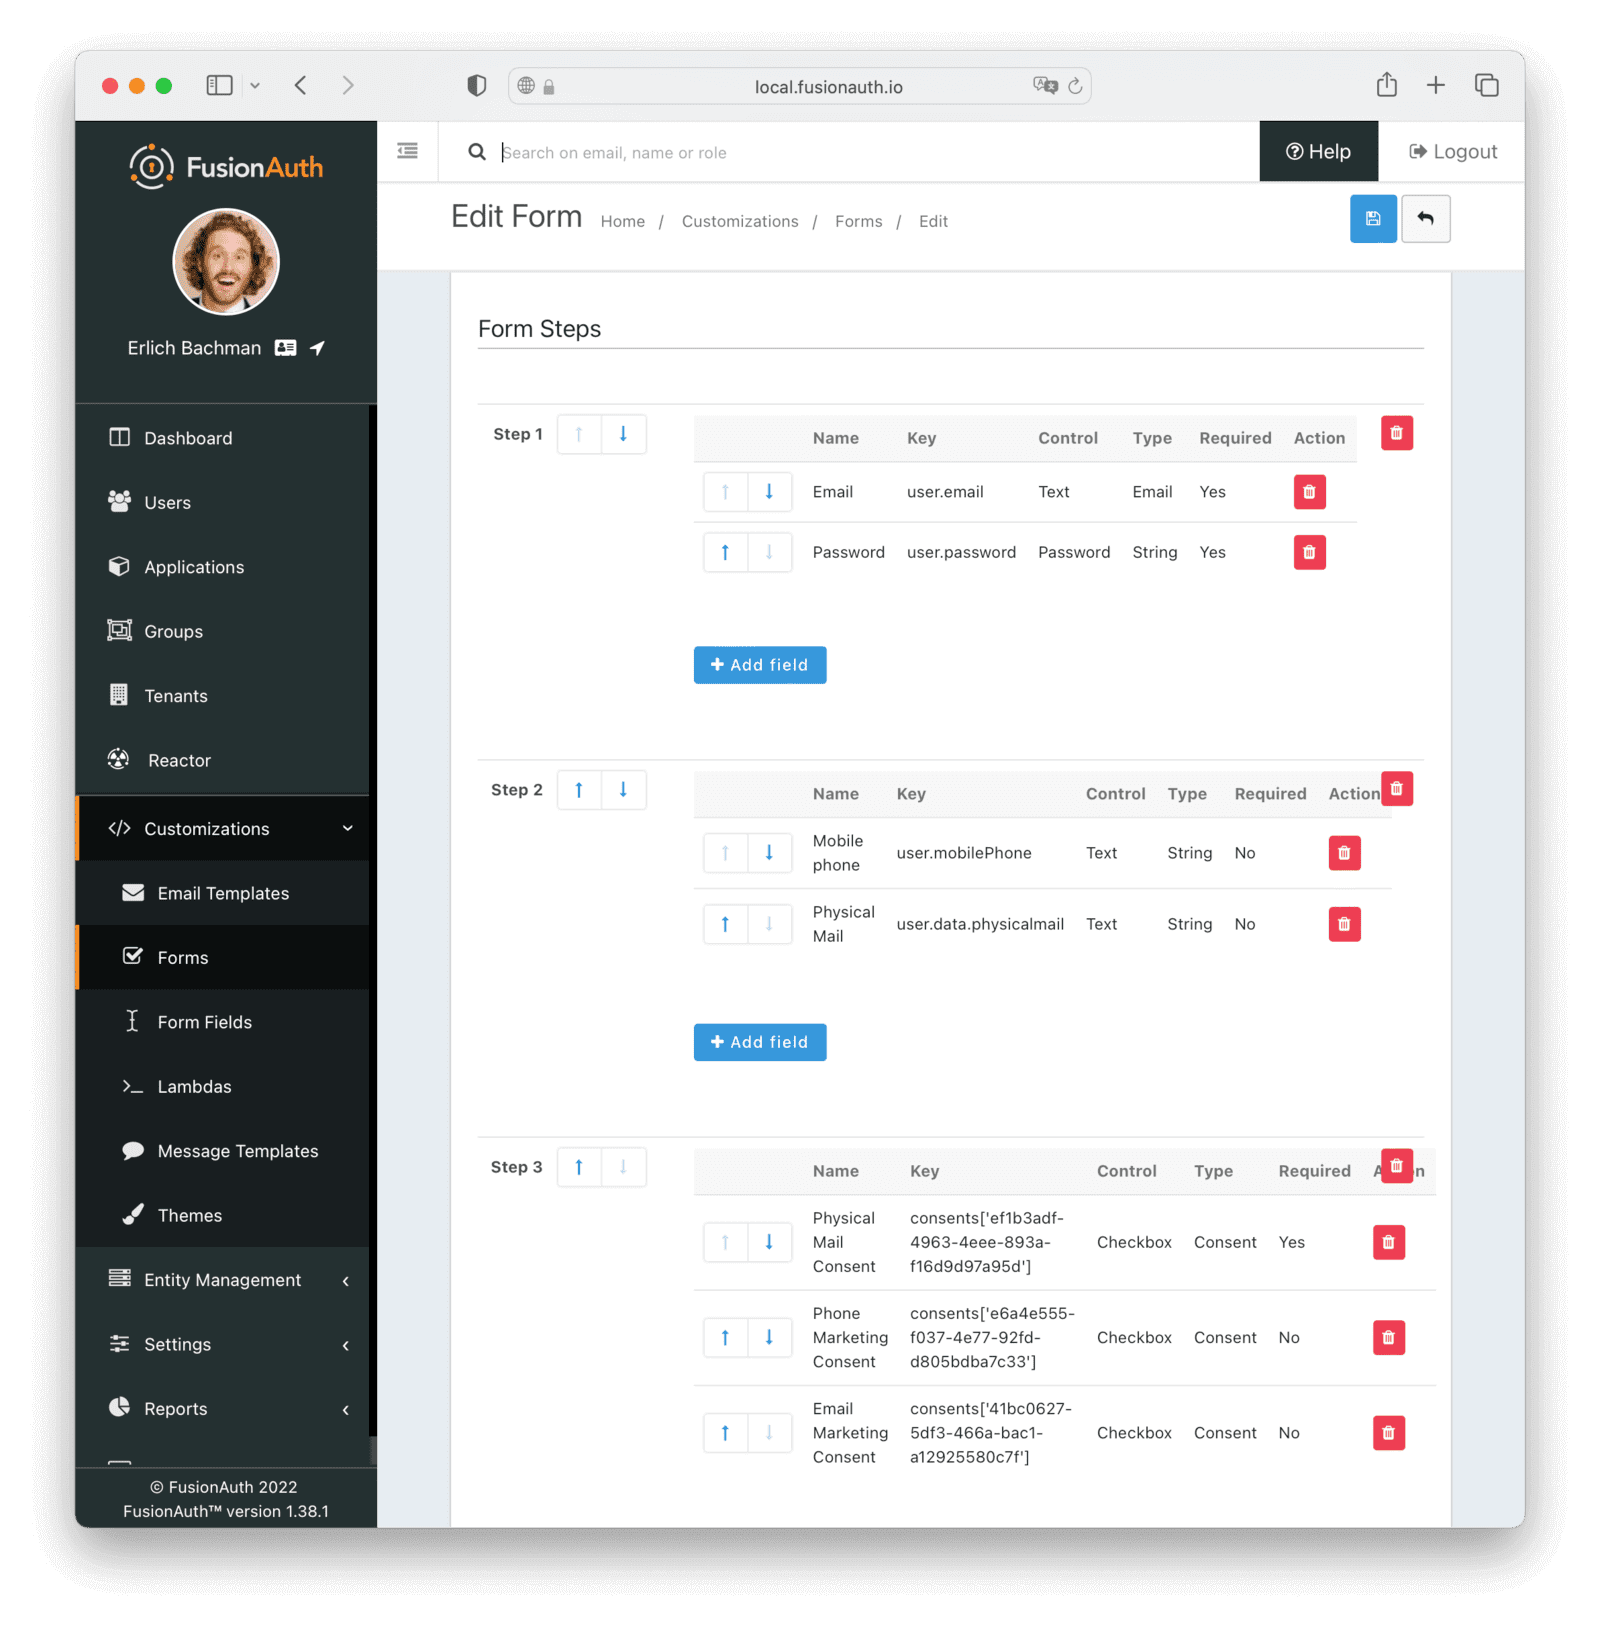
Click Save . The custom registration form is complete.
Adding description for the consent inputs.#
By default, when adding a consent field type to a form, FusionAuth will render just the id of the consent on the form. This would not be helpful to users. We can customize the rendered text of the consent fields by adding lines to the "messages" template of the theme, linking a display name to each consent.
To prepare, navigate to Settings -> Consents . For each of the consents you created, record their Id and Name . We'll use this in the theme messages.
The default theme in FusionAuth cannot be modified, but we can clone the theme and modify our copy.
Navigate to Customizations -> Themes and click the Duplicate button next to the default "FusionAuth" theme. Give this new theme a name, perhaps "Consents App Theme". Click on the "Messages" template and then the "Edit" button next to the default localization. Scroll all the way to the bottom of the template and add a line for each of the consents, like this:
consents['ef1b3adf-4963-4eee-893a-f16d9d97a95d']=I'd like updates via Snail Mail
consents['41bc0627-5df3-466a-bac1-a12925580c7f']=I'd like updates via Email
consents['e6a4e555-f037-4e77-92fd-d805bdba7c33']=I'd like updates via Phone (text)
Replace the UUID in each consent with the Id you recorded earlier. You can make the descriptions whatever you like. Click Submit , and then save the theme.
Now navigate to the application you created earlier. Click Edit to open the application editor, and select your new theme from the "Theme" dropdown. Save the application to reflect this change.
Create the profile update form#
Once a user has registered for your app, they might want to change their profile information, including the permissions given for each of the consents. FusionAuth provides a default Account page out of the box, but we'll need to create a custom one to account for the consent fields and other custom profile information.
Navigate to Customizations -> Forms and click the green + button. Set the Name of the form to something like Consents Self Service. Select Self-Service User from the Type dropdown.
Instead of "Steps" like the registration form, self-service profile forms have "Sections", which are functionally the same. We'll mirror the registration layout here.
Click Add Section and add the fields Email and Password to this section.
Create another section and add the fields Physical Mail Address and Mobile Phone to it.
Now create the last section and add the consent fields Phone Marketing Consent, Email Marketing Consent, and Physical Mail Marketing Consent.
The form configuration should look similar to this:
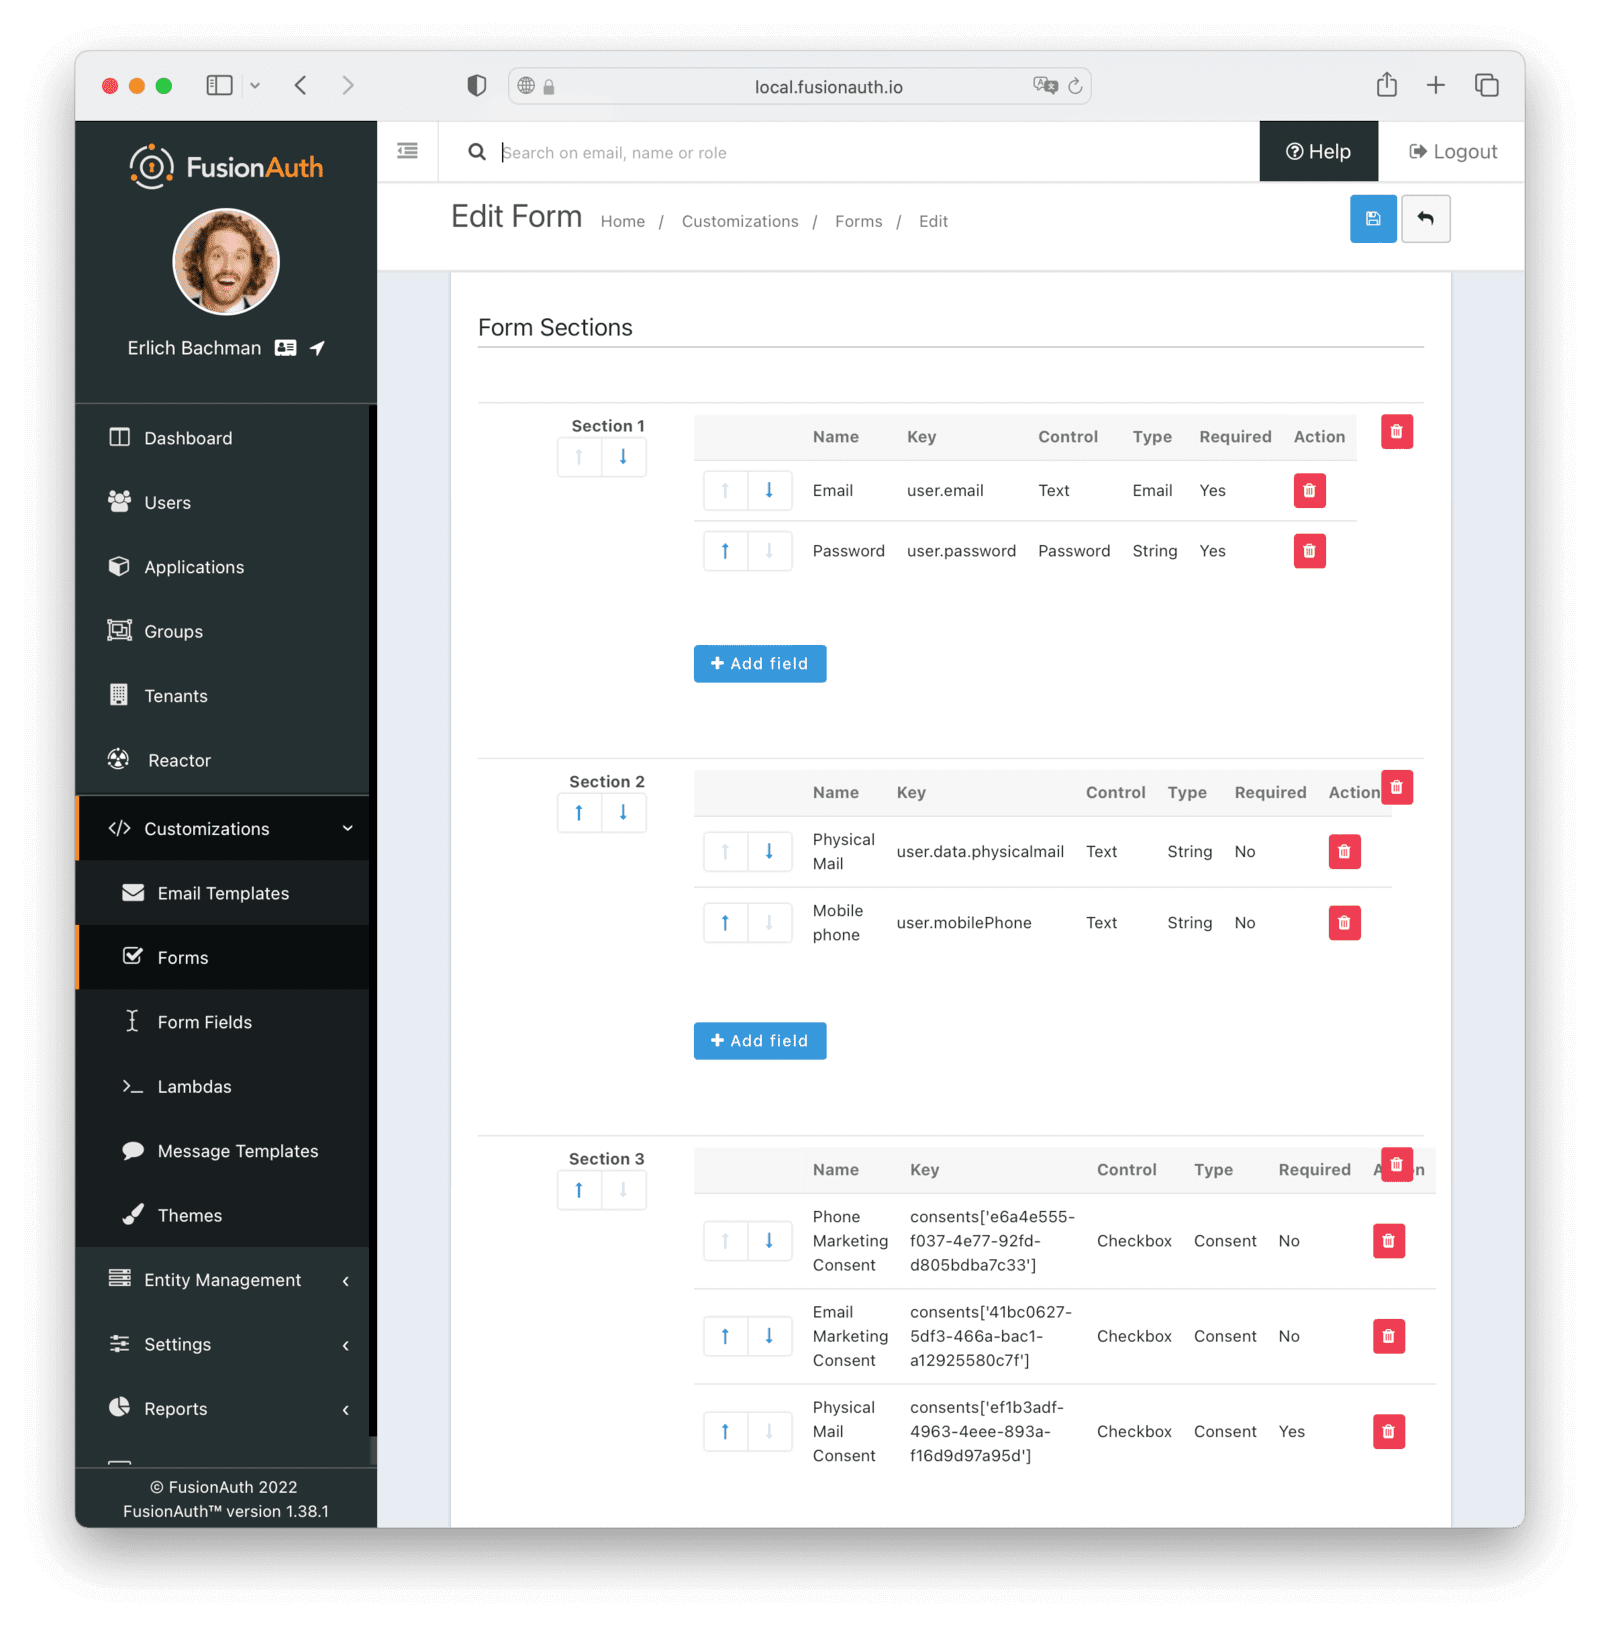
Click Save to finish creating the form.
Linking the new forms to the application#
We've created the forms but we still need to link them to the application so that they are used in place of the defaults. We also need to enable registrations on the application.
Navigate to Applications and click on the Edit button next to the application created earlier. Click on the Registration tab. Under Self-service registration , turn on the Enabled switch. Select Advanced for the Type. Select your custom registration form from the Form dropdown.
Under the Form settings section, select your custom self-service form from the User Self-service dropdown.
Click Save to apply the updates to your application.
The FusionAuth setup is now complete. We can move on to the Express app.
Setting up Express#
To get started, you should:
- Scaffold a new Express application.
- Install the scaffolded dependencies.
- Install Passport and helper libraries, and the FusionAuth Typescript client.
- Start the server to ensure everything is installed and working.
Here are the commands to do it:
npx express-generator --view=hbs fusion-consents
cd fusion-consents
npm install
npm install passport passport-oauth2 connect-ensure-login express-session @fusionauth/typescript-client
npm start
If all went well, the server should start successfully and you can visit http://localhost:3000.
Building the application#
Our application will only have three pages, including the FusionAuth login page.
- A home page - a public page showing how many users our app has and inviting users to log in.
- The registrations page (redirected to FusionAuth) with options to set their marketing consents.
- A logged-in private profile page. This will display the user's profile and consent permissions retrieved from FusionAuth, and allow them to click through to update their profile information, including consent permissions.
Adding and initializing dependencies#
To start, we'll add the references needed for Passport, the passport-oauth2 strategy, and enabling sessions using Express Sessions. We'll also add a reference to the FusionAuth typescript client.
Open the app.js file. Below the line var logger = require('morgan'); add the following:
var passport = require("passport");
var OAuth2Strategy = require("passport-oauth2").Strategy;
var passOAuth = require("passport-oauth2");
var { FusionAuthClient } = require("@fusionauth/typescript-client");
var session = require("express-session");
const { ensureLoggedIn } = require('connect-ensure-login');
Now we can initialize and add Passport and the session handler to the Express pipeline. Add the following just below the app.use(express.static(path.join(__dirname, 'public'))); line:
app.use(session({ secret: "TOPSECRET" }));
app.use(passport.initialize());
app.use(passport.session());
Replace the TOPSECRET value with a long, high entropy, random string of your choice. This secret is used to sign the session information in the cookie. Normally, this is kept secret, as anyone who has access to the secret could construct a session cookie that looks legitimate to the server and gives them access to any account on the server. You can also add an environment variable to store this secret, rather than storing it in the code repo.
We'll also need to initialize the FusionAuth client with the API key created earlier. This will allow us to retrieve the user profile and consents from FusionAuth after a successful login. Add the following code just below the previous code added:
const fusionClient = new FusionAuthClient(
  "<YOUR_FUSION_API_KEY>",
  "https://<YOUR_FUSIONAUTH_URL>"
);
Replace the parameter <YOUR_FUSIONAUTH_URL> with the URL your FusionAuth instance is located at (normally http://localhost:9011 for local Docker installs). Replace <YOUR_FUSION_API_KEY> with the API key created earlier.
Now we can initialize the Passport strategy. We'll be connecting to FusionAuth using OAuth2, so we'll use the passport-oauth2 strategy. Add the following code directly below the code you've just added:
passport.use(
  new OAuth2Strategy(
    {
      authorizationURL: "https://<YOUR_FUSIONAUTH_URL>/oauth2/authorize",
      tokenURL: "https://<YOUR_FUSIONAUTH_URL>/oauth2/token",
      clientID: "<YOUR_FUSIONAUTH_APP_CLIENTID>",
      clientSecret: "<YOUR_FUSIONAUTH_APP_CLIENT_SECRET>",
      callbackURL: "http://localhost:3000/auth/callback",
    },
    function (accessToken, refreshToken, profile, cb) {
      // Get the user profile from Fusion:
      fusionClient
        .retrieveUserUsingJWT(accessToken)
        .then((clientResponse) => {
          return cb(null, clientResponse.response.user);
        })
        .catch((err) => {
          console.error(err);
        });
    }
  )
);
Replace the parameter <YOUR_FUSIONAUTH_URL> with the URL your FusionAuth instance is located at. Replace <YOUR_FUSIONAUTH_APP_CLIENTID> and <YOUR_FUSIONAUTH_APP_CLIENT_SECRET> with the values you saved during the FusionAuth application setup earlier.
This snippet of code sets up the OAuth parameters for the Passport strategy. The strategy has a callback, which is invoked when a successful authorization and token call has been completed to FusionAuth. The FusionAuth client has a handy method to retrieve a user by the JWT returned from the authorization process. We can use this to get the user and return it to the Passport strategy callback. This user will then also be passed to our session handler to save, and added to the req parameter in subsequent middleware handlers as req.user. To enable this, add the following code, below the code you just added:
passport.serializeUser(function (user, done) {
  process.nextTick(function () {
    done(null, user);
  });
});

passport.deserializeUser(function (user, done) {
  process.nextTick(function () {
    done(null, user);
  });
});
Adding Express routes#
We've got the basic framework and authorization code set up. Now we can add some routes. We'll start with the login route to handle the redirect to FusionAuth.
Add this code under the app.use("/", indexRouter); line:
app.get("/login", passport.authenticate("oauth2"));Note that we don't need to add a router or view for the login redirect to FusionAuth to work. Passport will check whether the user needs to be logged in, and if so will send them to FusionAuth for authentication.
After authentication, FusionAuth will redirect to the callback route we provided in the Passport OAuth setup, as well as in the authorized callback route earlier. We can add this route now. Add the following code under the login route:
app.get(
  "/auth/callback",
  passport.authenticate("oauth2", { failureRedirect: "/" }),
  function (req, res) {
    // Successful authentication, redirect home.
    res.redirect("/");
  }
);
On successful authentication or failure, we'll redirect to the homepage. Let's update that now to show the login status and provide a link to the user's profile page. Open the index.js file in the routes folder and update the get route to the following:
router.get('/', function(req, res, next) {
  res.render('index', { title: 'Express', "authenticated": req.isAuthenticated() });
});
Passport adds a function isAuthenticated() to the req object. Querying this function tells us whether the user is logged in. We add this to the keys and values passed to the index view, so that we can show a different message based on the user's authentication status.
Now open the index.hbs file in the views folder, and update the code to the following:
<h1>{{title}}</h1>
<p>Welcome to {{title}}</p>

{{#if authenticated}}
  <p>You are logged in!</p>
  <p>
    You can now visit your <a href="/users/me">profile page</a>
  </p>
{{else}}
  <p>
    <a href="/login">Login Here</a>
  </p>
{{/if}}
This will notify the user if they are logged in or not, and point them to the relevant action.
Adding a members-only area#
Now that we have the basic login and authentication mechanics set up, we can add a restricted route that is only available to users that are logged in. This route will show the user their profile, and a link to update their information.
In the users.js file in the routes folder, replace the code with the following:
var express = require("express");
var router = express.Router();
var { FusionAuthClient } = require("@fusionauth/typescript-client");

const fusionClient = new FusionAuthClient(
  "<YOUR_FUSION_API_KEY>",
  "https://<YOUR_FUSIONAUTH_URL>"
);

/* GET users listing. */
router.get("/me", async function (req, res, next) {
  const user = req.user;
  // Get the user's consent info:
  let userConsents = {};
  try {
    const response = await fusionClient.retrieveUserConsents(user.id);
    userConsents = response.response.userConsents;
  } catch (err) {
    console.log(err);
  }
  res.render("me", {
    profile: JSON.stringify(user, null, "\t"),
    consents: JSON.stringify(userConsents, null, "\t"),
  });
});

module.exports = router;
Replace the parameter <YOUR_FUSIONAUTH_URL> with the URL your FusionAuth instance is located at (normally http://localhost:9011 for local Docker installs). Replace <YOUR_FUSION_API_KEY> with the API key created earlier.
This code sets up a FusionAuth client link so that we can read the user's consent information from the API. It also creates a /users/me route, which is used to retrieve the user's profile information. In the route, we grab the user object from the req parameter. Recall this was added by Passport earlier in the setup. Then we make a call to the FusionAuth API to retrieve the user's consent information, passing in the user's id as the parameter. We stringify the user object and consents and send them to the me handlebars template to render. In a production app, you'd want to display this a bit more nicely and maybe search for the specific fields and consents you want to display. You'd access a user's consents exactly the same way, through the API, when determining what kind of marketing channel they'd prefer. This would typically be called in a background worker process or serverless function.
We need to create the handlebars template for this route. Create a new file in the "views" folder, called me.hbs. Add the following code to the file:
<h1>{{title}}</h1>
<p>Welcome to {{title}}</p>

<p>
  You can update your
  <a target="_blank"
    href="<YOUR_FUSIONAUTH_ACCOUNT_LINK>"
  >profile here</a>
</p>


<h2>Profile Info</h2>
<p>
  {{profile}}
</p>

<h2>Consent Permissions</h2>
<p>
  {{consents}}
</p>
This is a template that has placeholders for the dump of the raw user information and the user consents.
There is also a link for the user to update their information on FusionAuth, using the custom self-service form created earlier. To update the value for <YOUR_FUSIONAUTH_ACCOUNT_LINK>, navigate to Applications in FusionAuth. Click the View button next to your application, and scroll down to the "Account URL" value. Copy the URL and replace <YOUR_FUSIONAUTH_ACCOUNT_LINK> in the code above with it.
Now we need to secure the route to this profile page for users that are authenticated. To help with that, we'll use the connect-ensure-login middleware we installed earlier. Update the users route in the app.js file from:
app.use('/users', usersRouter);to:
app.use('/users', ensureLoggedIn('/login'), usersRouter);The ensureLoggedIn middleware checks if the user is authenticated before proceeding to the router (or following middleware). It redirects to the login page if the user is not logged in.
Testing#
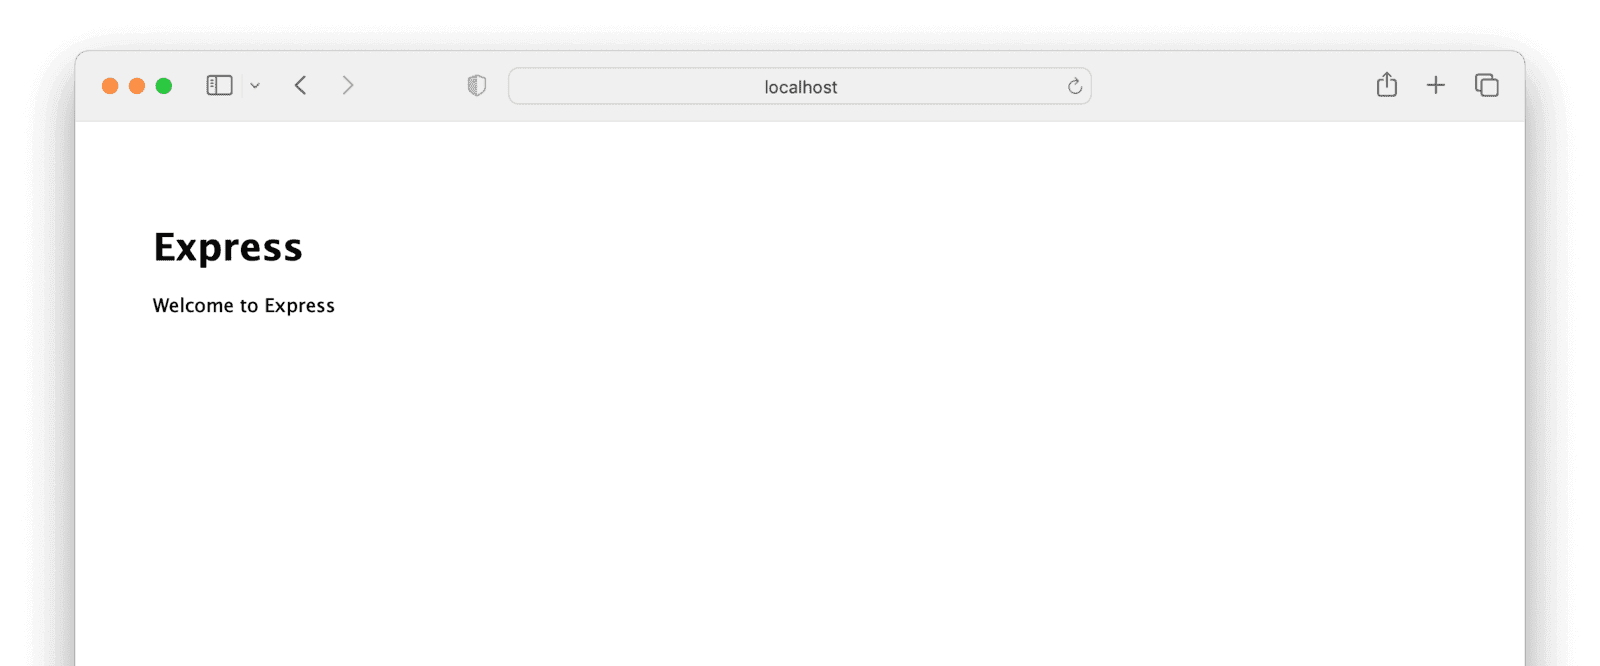
We are done with the coding. Type npm start at the console to start up the server. Then navigate to localhost:3000, preferably in a private tab. This ensures that your main admin login to FusionAuth is not a confounding factor while logging in.
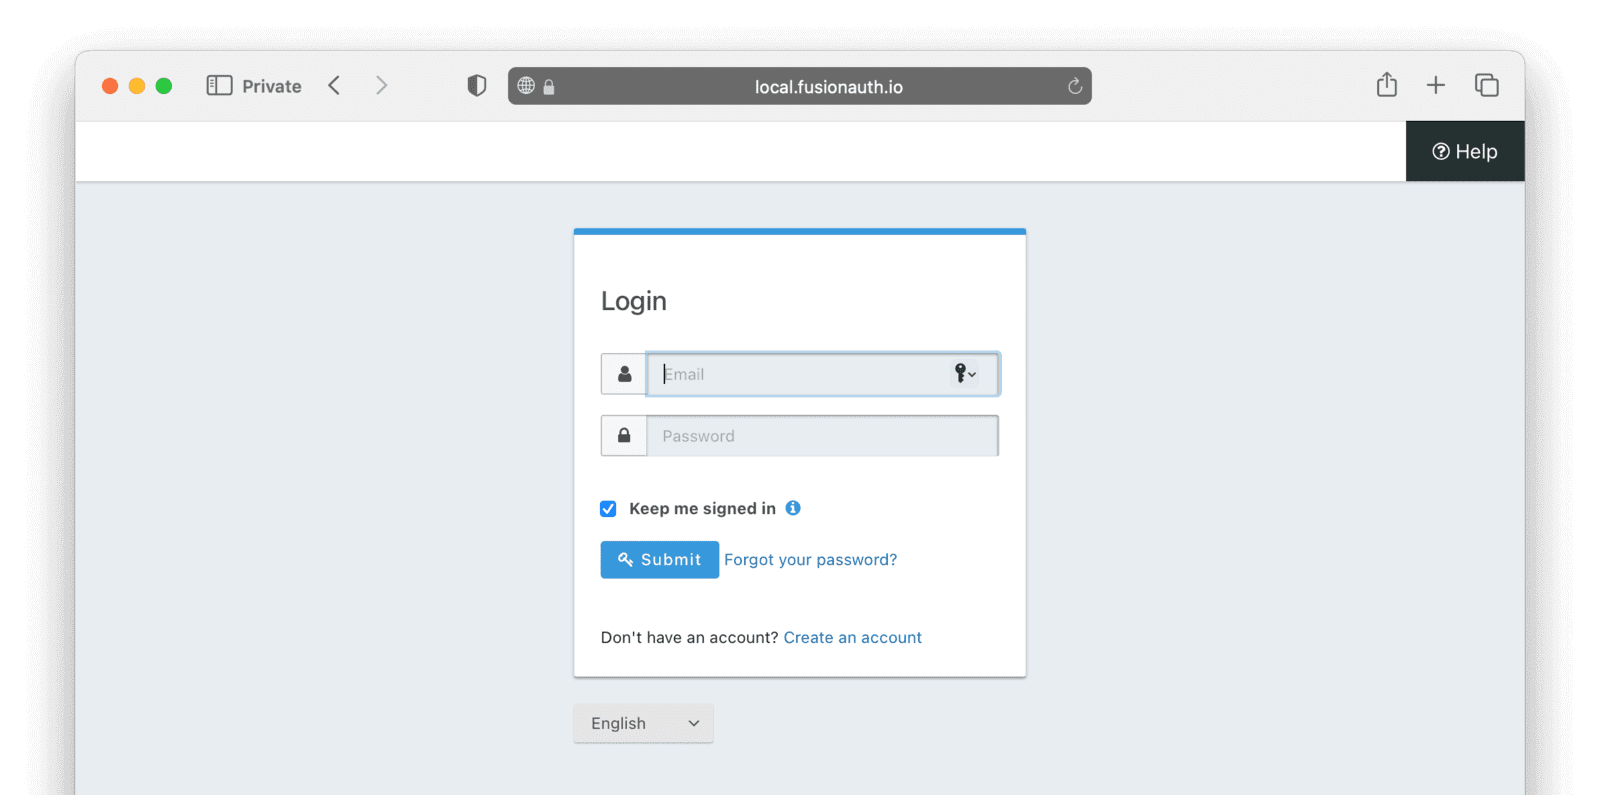
You should see the main page looking something like this:
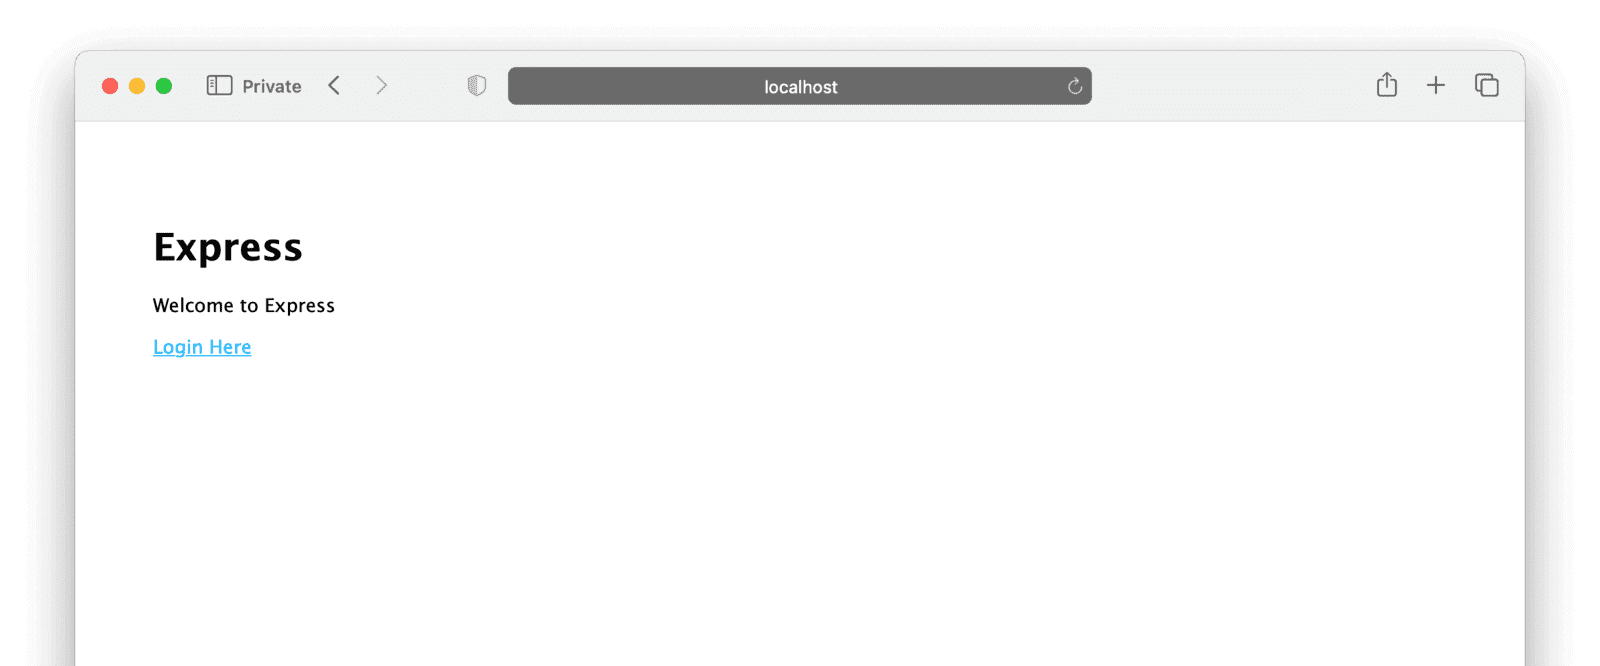
Clicking on "Login Here" should redirect you to your FusionAuth installation.
Clicking the Create an account link should render the custom registration form configured earlier. Notice that it has three steps:
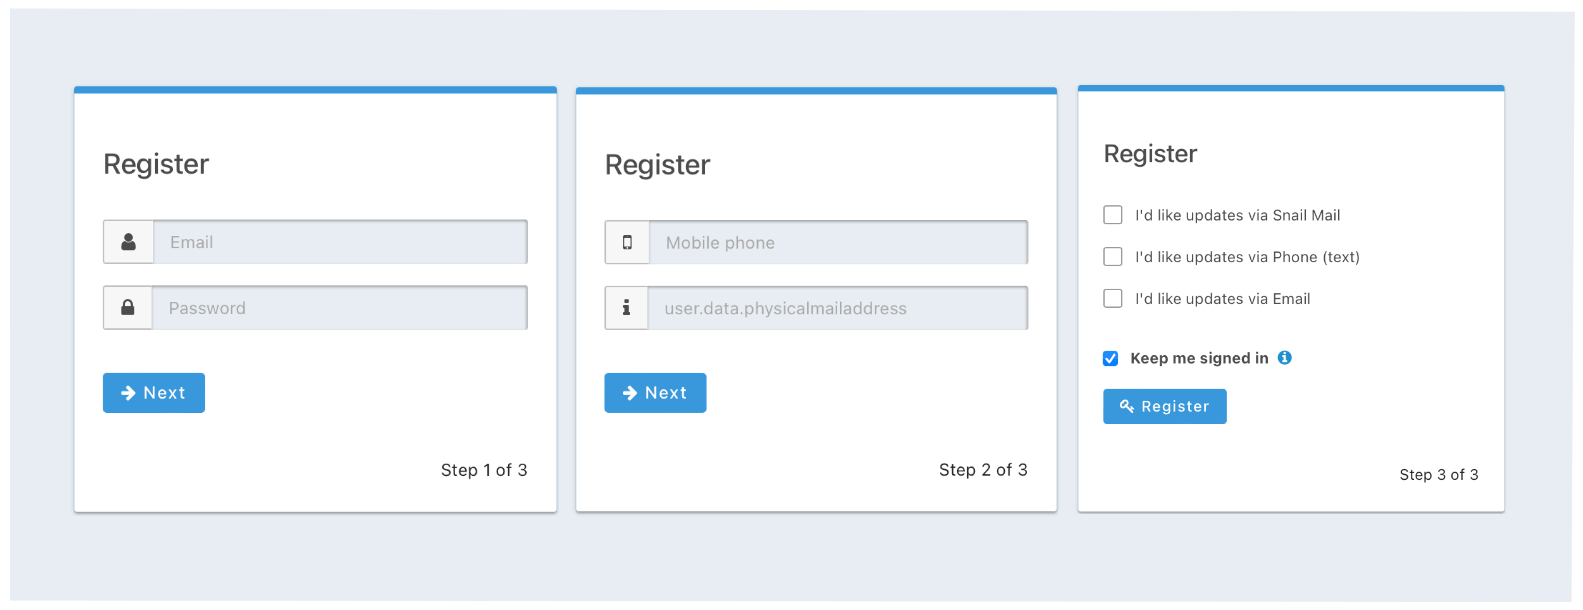
Enter all the information and click Register at the end of the steps. You should be redirected to your Express app, with a new message on the home page:
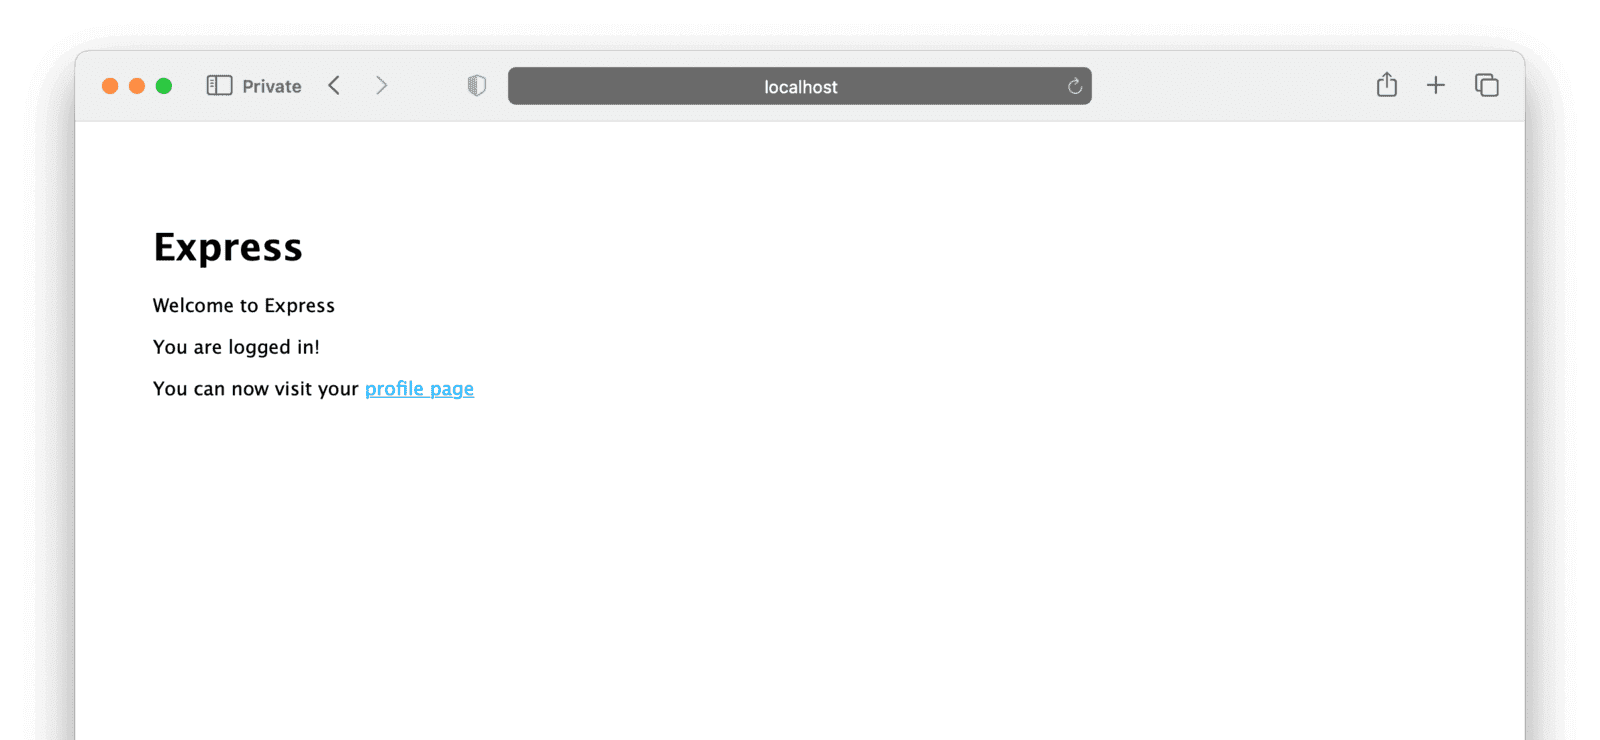
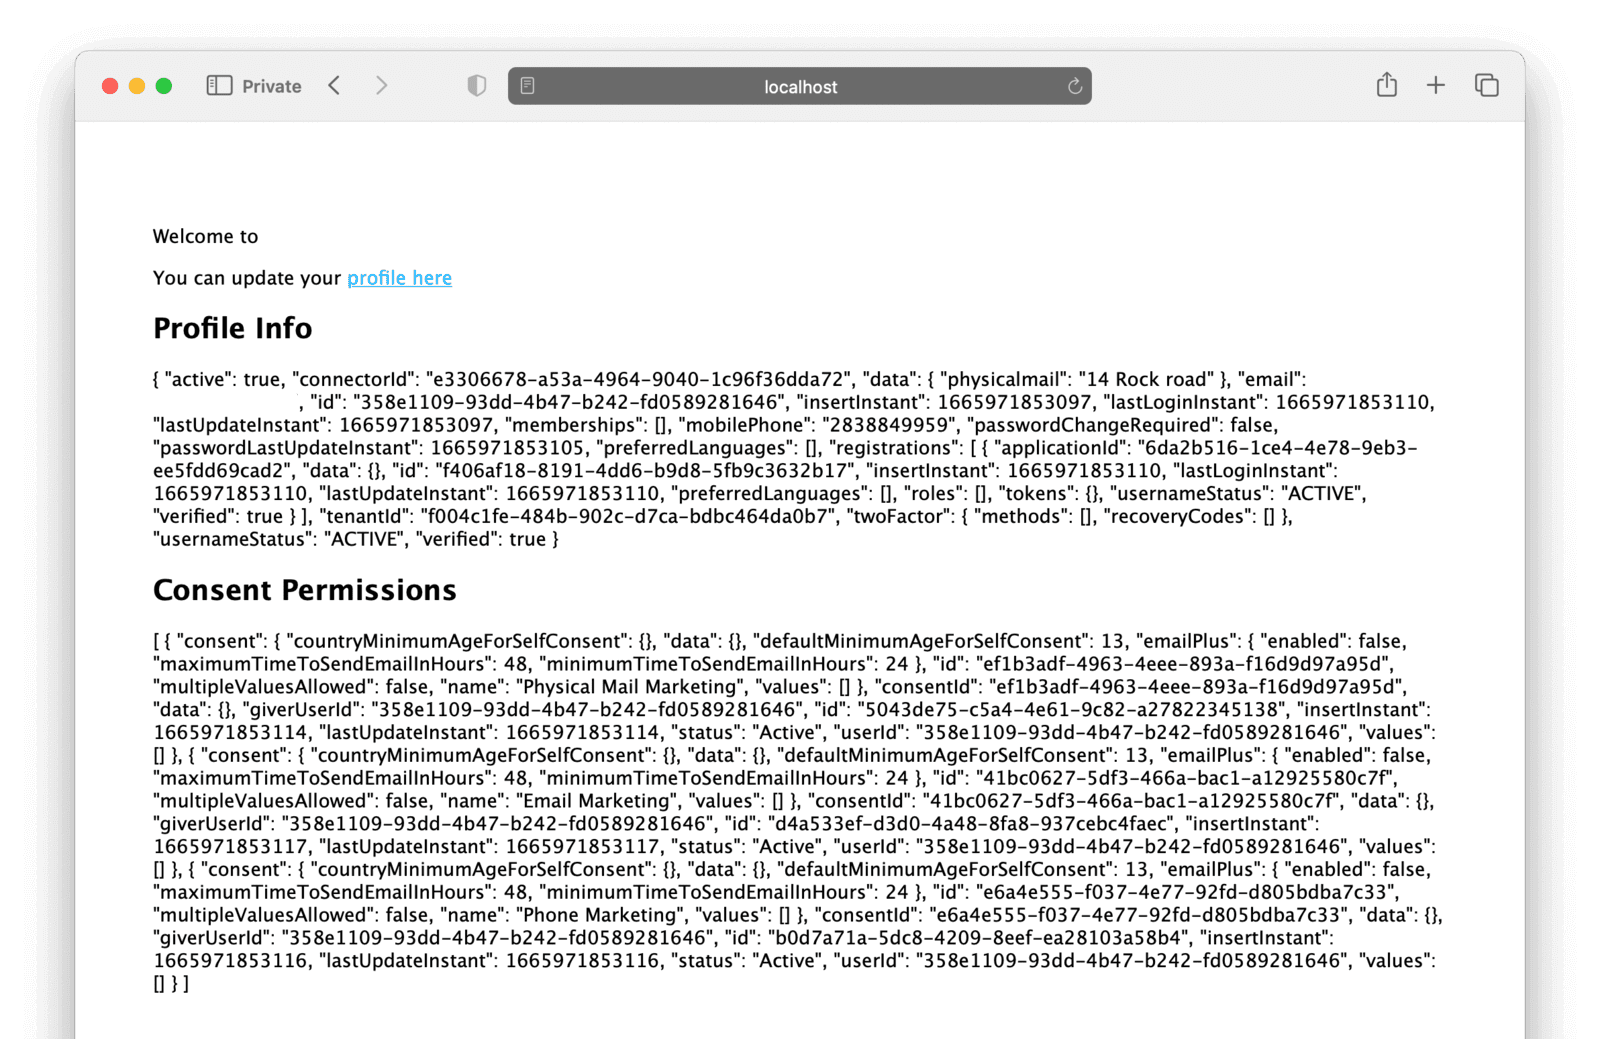
Clicking on the profile page link should take you to users/me, showing two JSON objects representing your profile on FusionAuth, along with the raw data from the consents API. Notice in each consent that there is a property status. This will be either active or revoked. You can use these values when checking to send information to the user through each channel.
Clicking the profile page link will redirect to FusionAuth, where the user can view and update their information and consent permissions via the self-service form created earlier. Once navigated to the FusionAuth-hosted profile page, clicking on the "Edit" pencil icon button in the top right will allow the user to update their profile.
Where to next with Express and FusionAuth?#
That’s the basics of our Express and FusionAuth app. The app has a fully featured authentication system, along with user consents, without the hassle and possible risks of implementing all of that code ourselves. The complete code is hosted on GitHub here.
For a production environment, you would need to do a bit more work to lock down FusionAuth. In our example, we used the default password provided with Docker for our database, left debug mode on, and ran FusionAuth locally, co-hosted with our Express application. For a safer setup, you would run FusionAuth on its own infrastructure, physically separate from the Express app, and take more care around production configuration and deployment.
You would also need to add more interesting features to this app for it to be useful. But being able to take care of the authentication, consents, and general security with just a small amount of configuration code leaves a lot more time for your application's more useful and critical features.
Happy coding!
Explore how to configure custom consents, build self-service flows, and integrate with your apps. Schedule a demo.