This article discusses the dangers of storing OAuth tokens in the browser or on a client-side device – a common pattern in serverless architectures like single-page applications (SPAs) and mobile apps – and explains how to upgrade to using an OAuth proxy server. An OAuth proxy is also known as the token handler pattern or an OAuth backend for frontend (BFF).
What Is BFF?#
The backend for frontend (BFF) design pattern was popularized by SoundCloud in 2015 as a way to make the development of multiple apps in large teams simpler, faster, and more modular.
SoundCloud had a single API that served web, Android, iOS, and desktop applications, as shown in the diagram below.
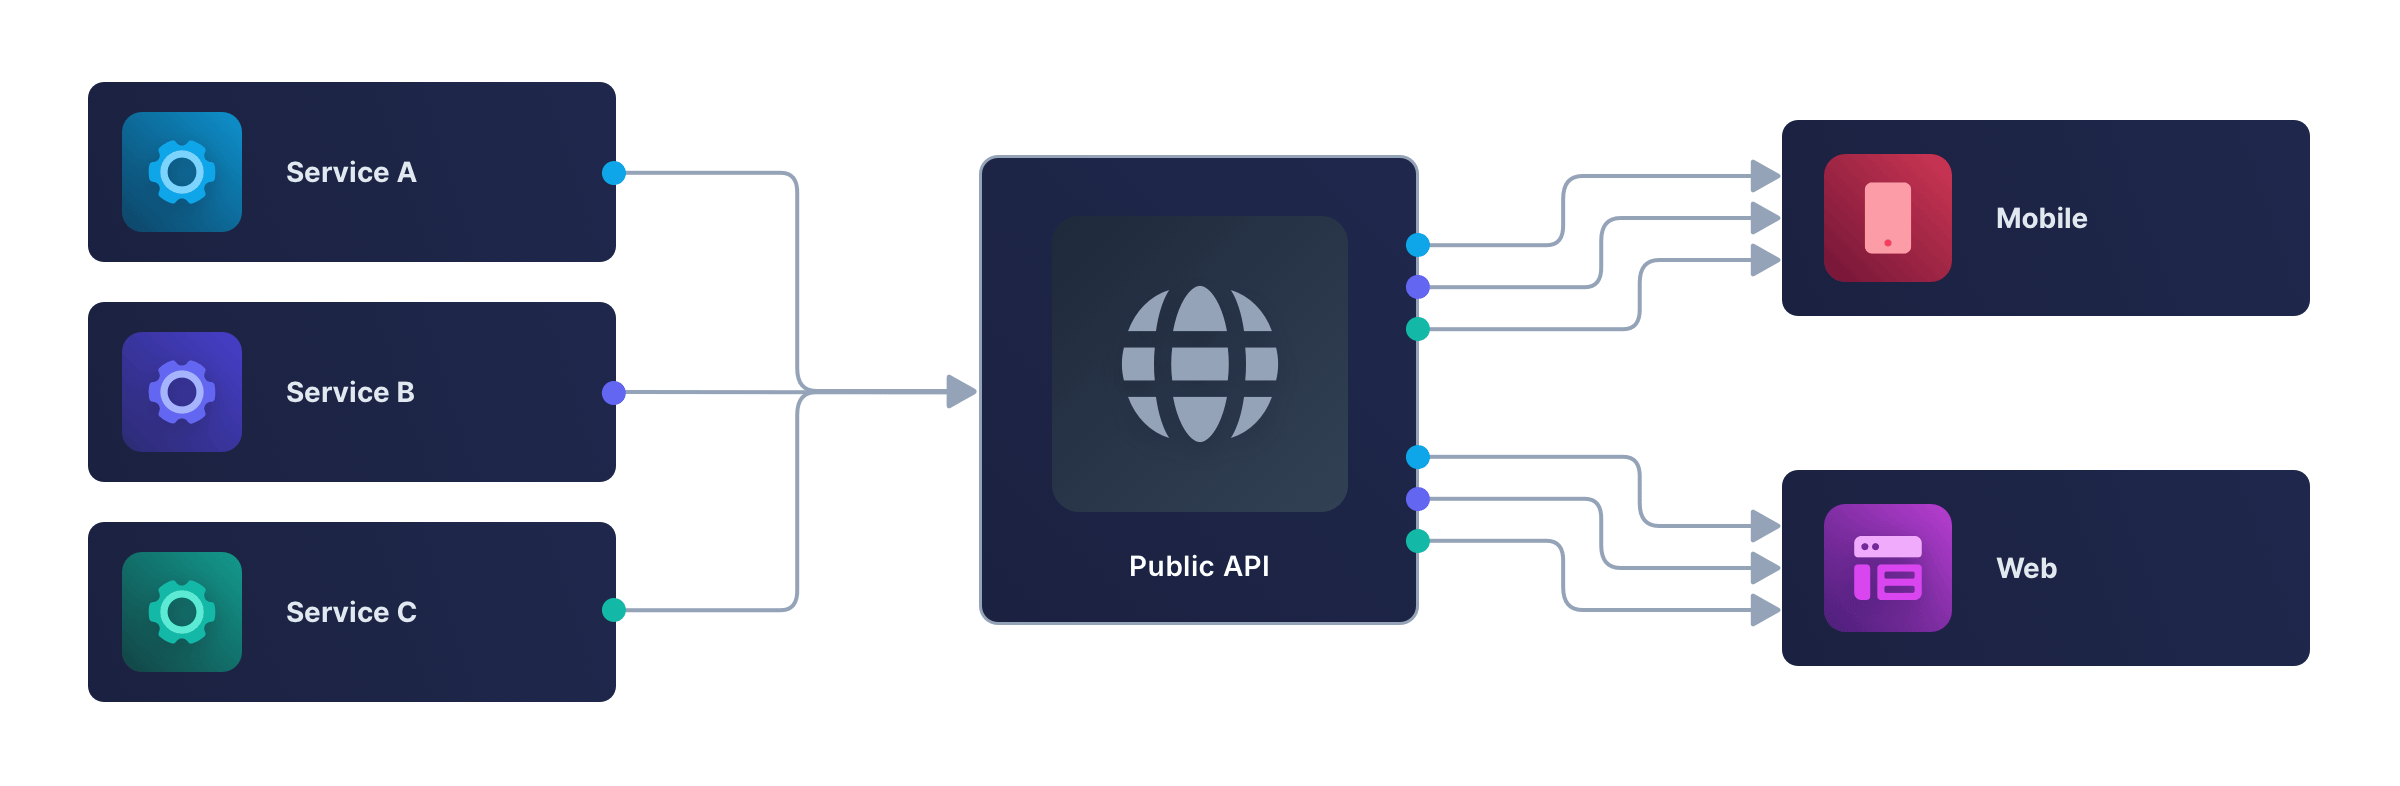
This design has a few problems:
- Each frontend (web, mobile, and desktop) has to convert the API's data into a format it can use to display content. It also has to make multiple API calls and combine the responses to get all the data it needs – extra work for the user's device and higher bandwidth use.
- Any change to an API endpoint or new feature added requires increased collaboration and testing between backend and frontend teams.
- Authorization is tricky when the API is public and may have free and paid features.
The BFF pattern, shown below, solves these problems by splitting the single API server into one API per app.
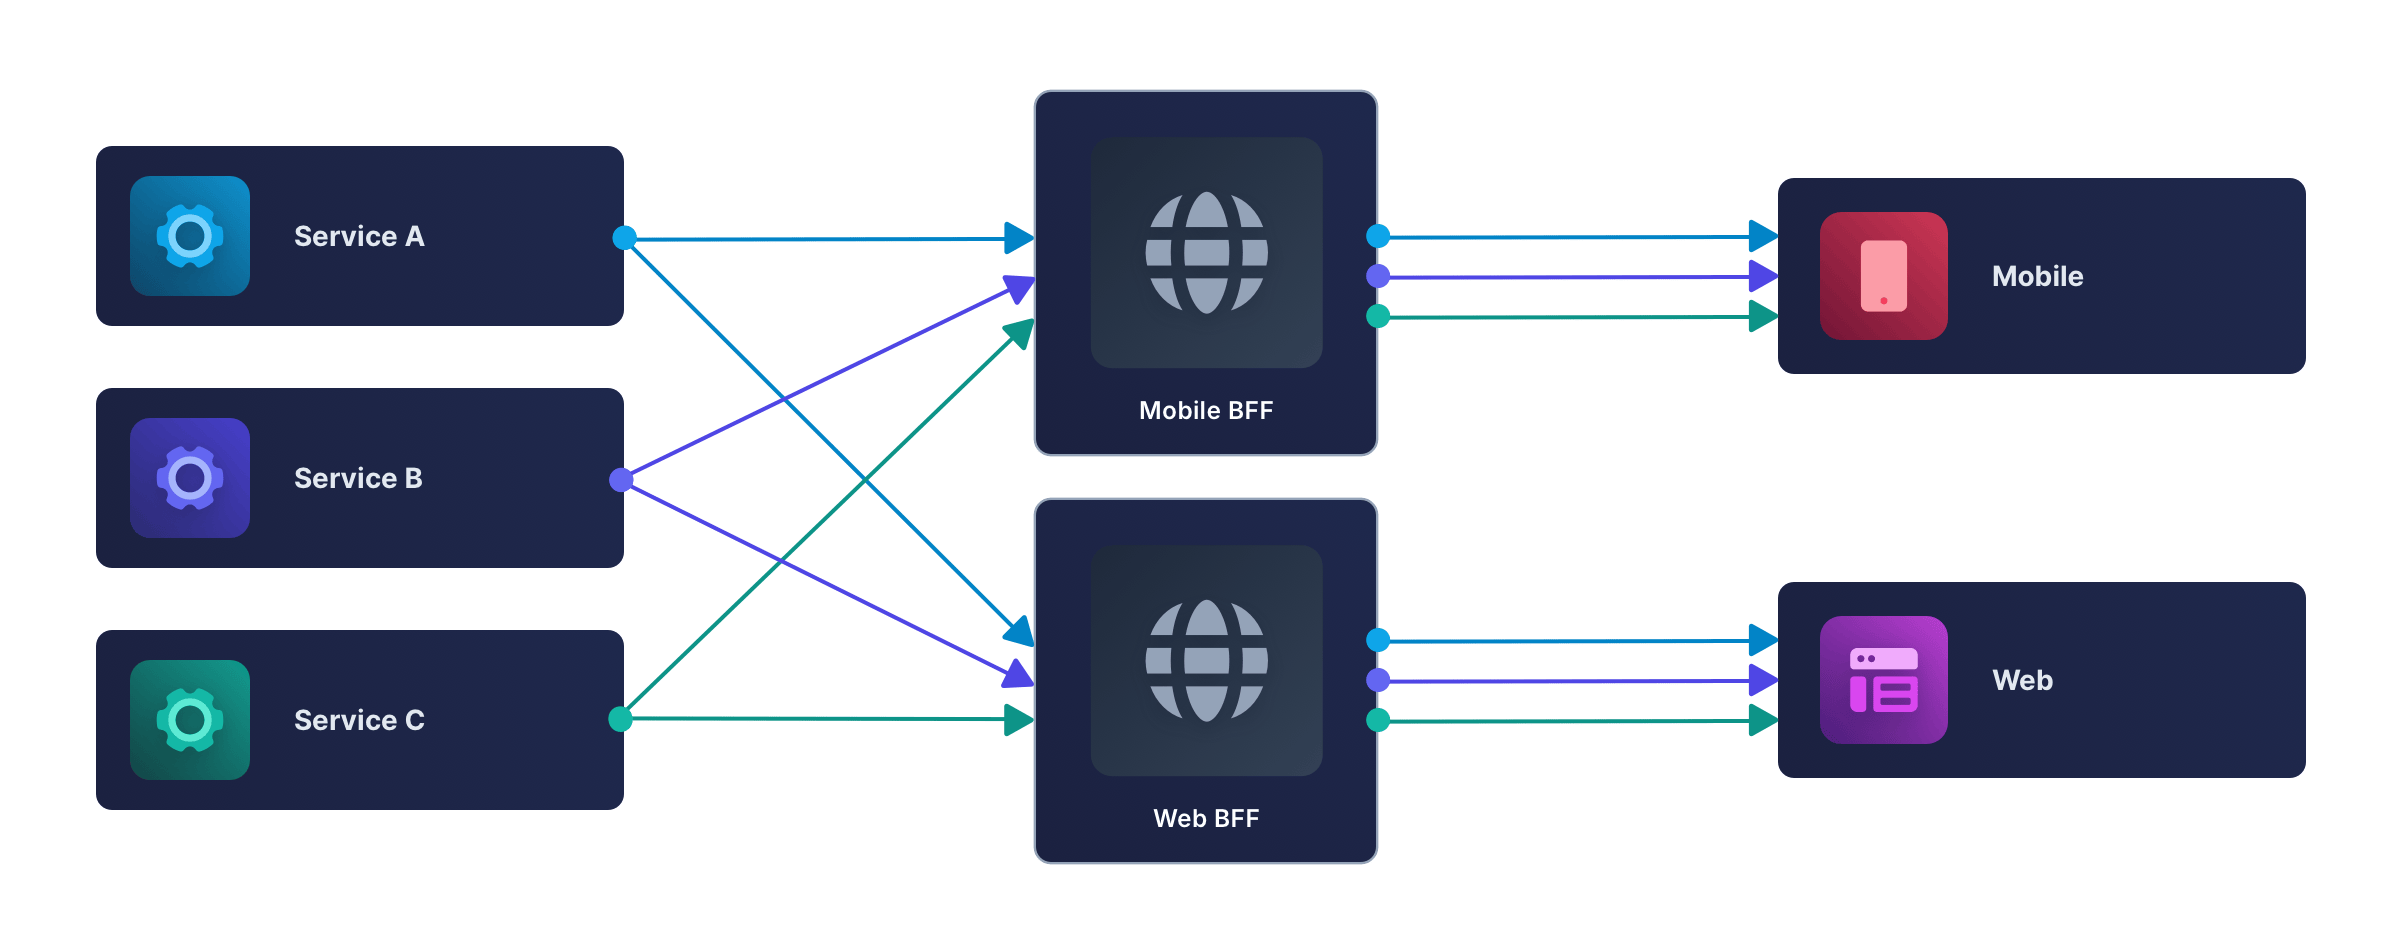
Each backend can now be considered part of its corresponding app. Features can be developed independently within each backend-frontend pair, without affecting other apps.
What Is BFF For Authentication?#
As the SoundCloud example illustrates, BFFs were proposed for developer ease, not for security (authentication and authorization). Most web apps ten years ago had a server (whether it ran PHP, ASP, or Node.js), and most still do today. Even single-page apps (SPAs) that used AJAX (fetch calls) to dynamically update web pages still updated them by calling a server.
It may seem like "BFF" is just another word for a server — and mostly, it is — but in security-focused designs, the distinction matters. If your app doesn't have a server or stores OAuth access tokens in the browser, the BFF pattern serves a specific security purpose, which this article examines.
But first, let's briefly review web development history to understand how web service design became more complex over time to defend against attacks.
Authentication In A Simple Web App#
The diagram below shows the simplest client-server design used by most small web apps (without OAuth or OpenID Connect).
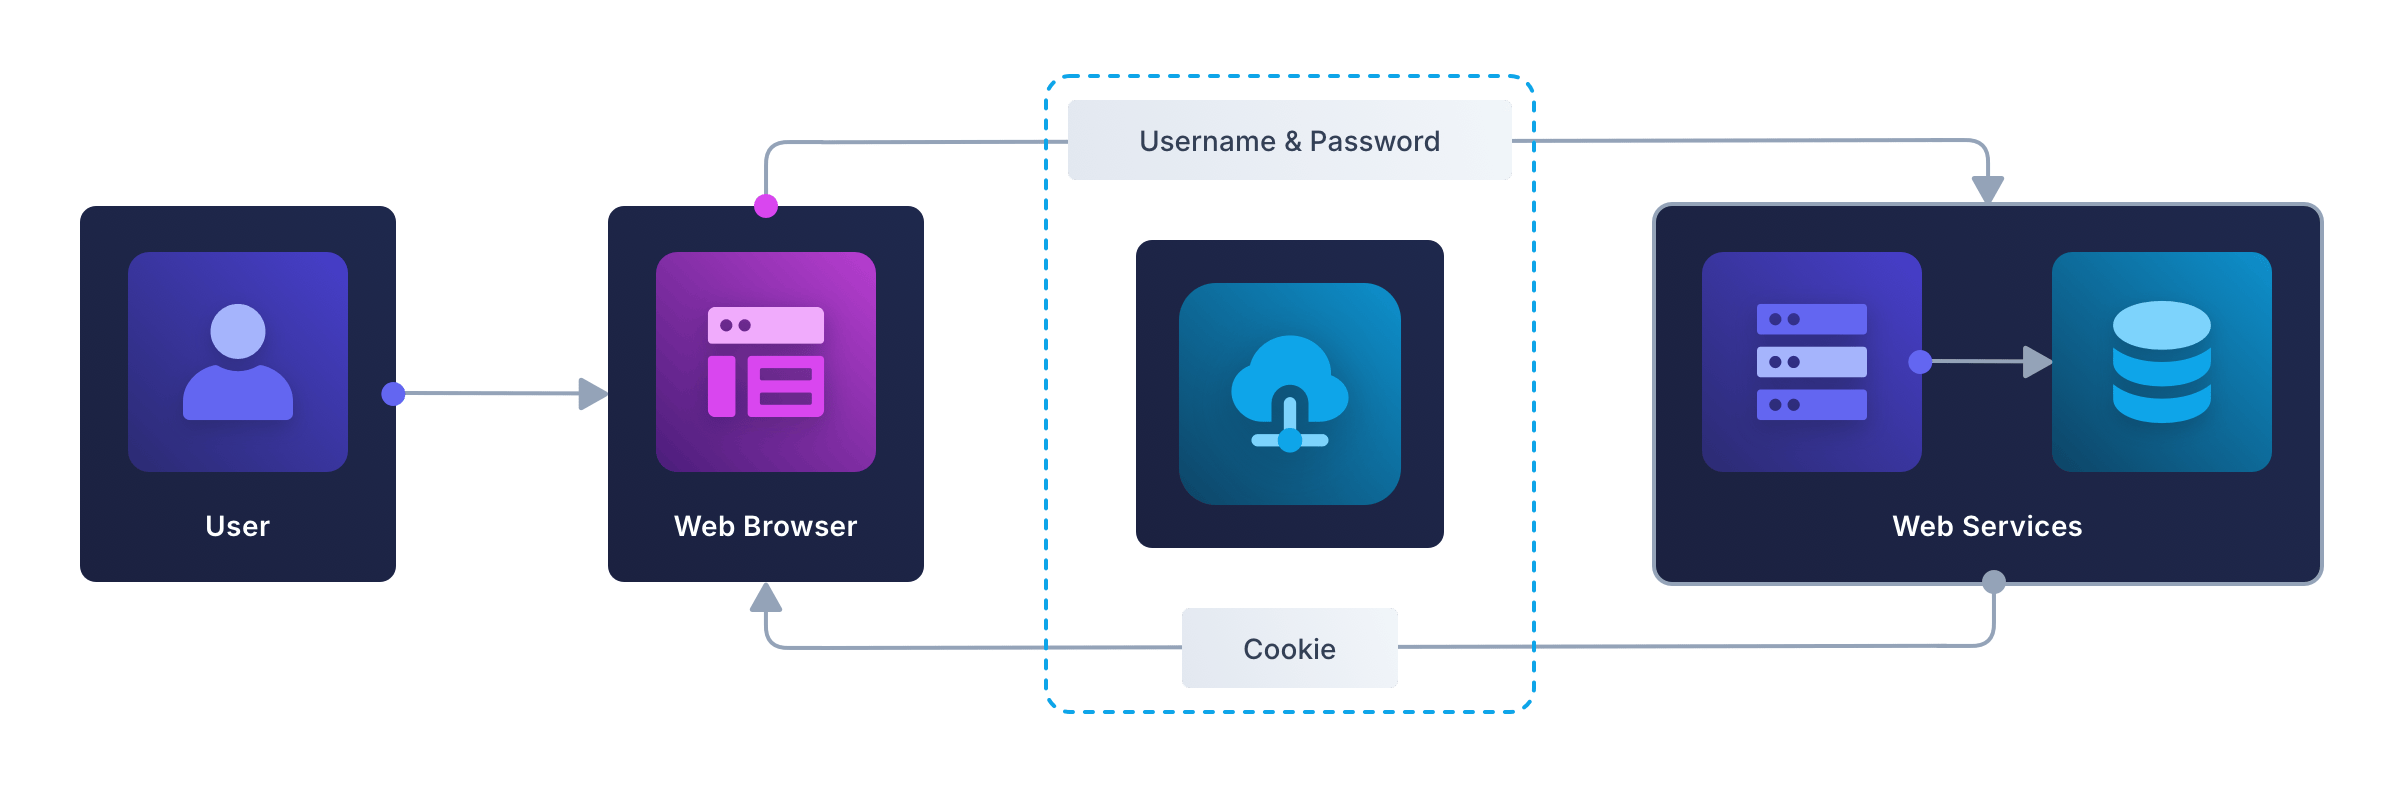
Here, a user logs in to the server by entering a username and password, and the server marks the user as authenticated by storing a cookie in the browser. The browser sends the cookie to the server with subsequent requests, allowing the user to interact with the site securely.
It doesn't matter if the app serves static HTML pages that submit forms to the server – in the old style of PHP or the modern style of HTMX – or is an SPA written entirely in Vue or React that unfolds into an application in the browser. In both cases, the authentication token is a cookie.
In this design, the backend could technically be considered a BFF, since it serves the frontend directly. But in practice, it's usually just referred to as the server.
Why Are Cookies More Secure Than The Web Storage API?#
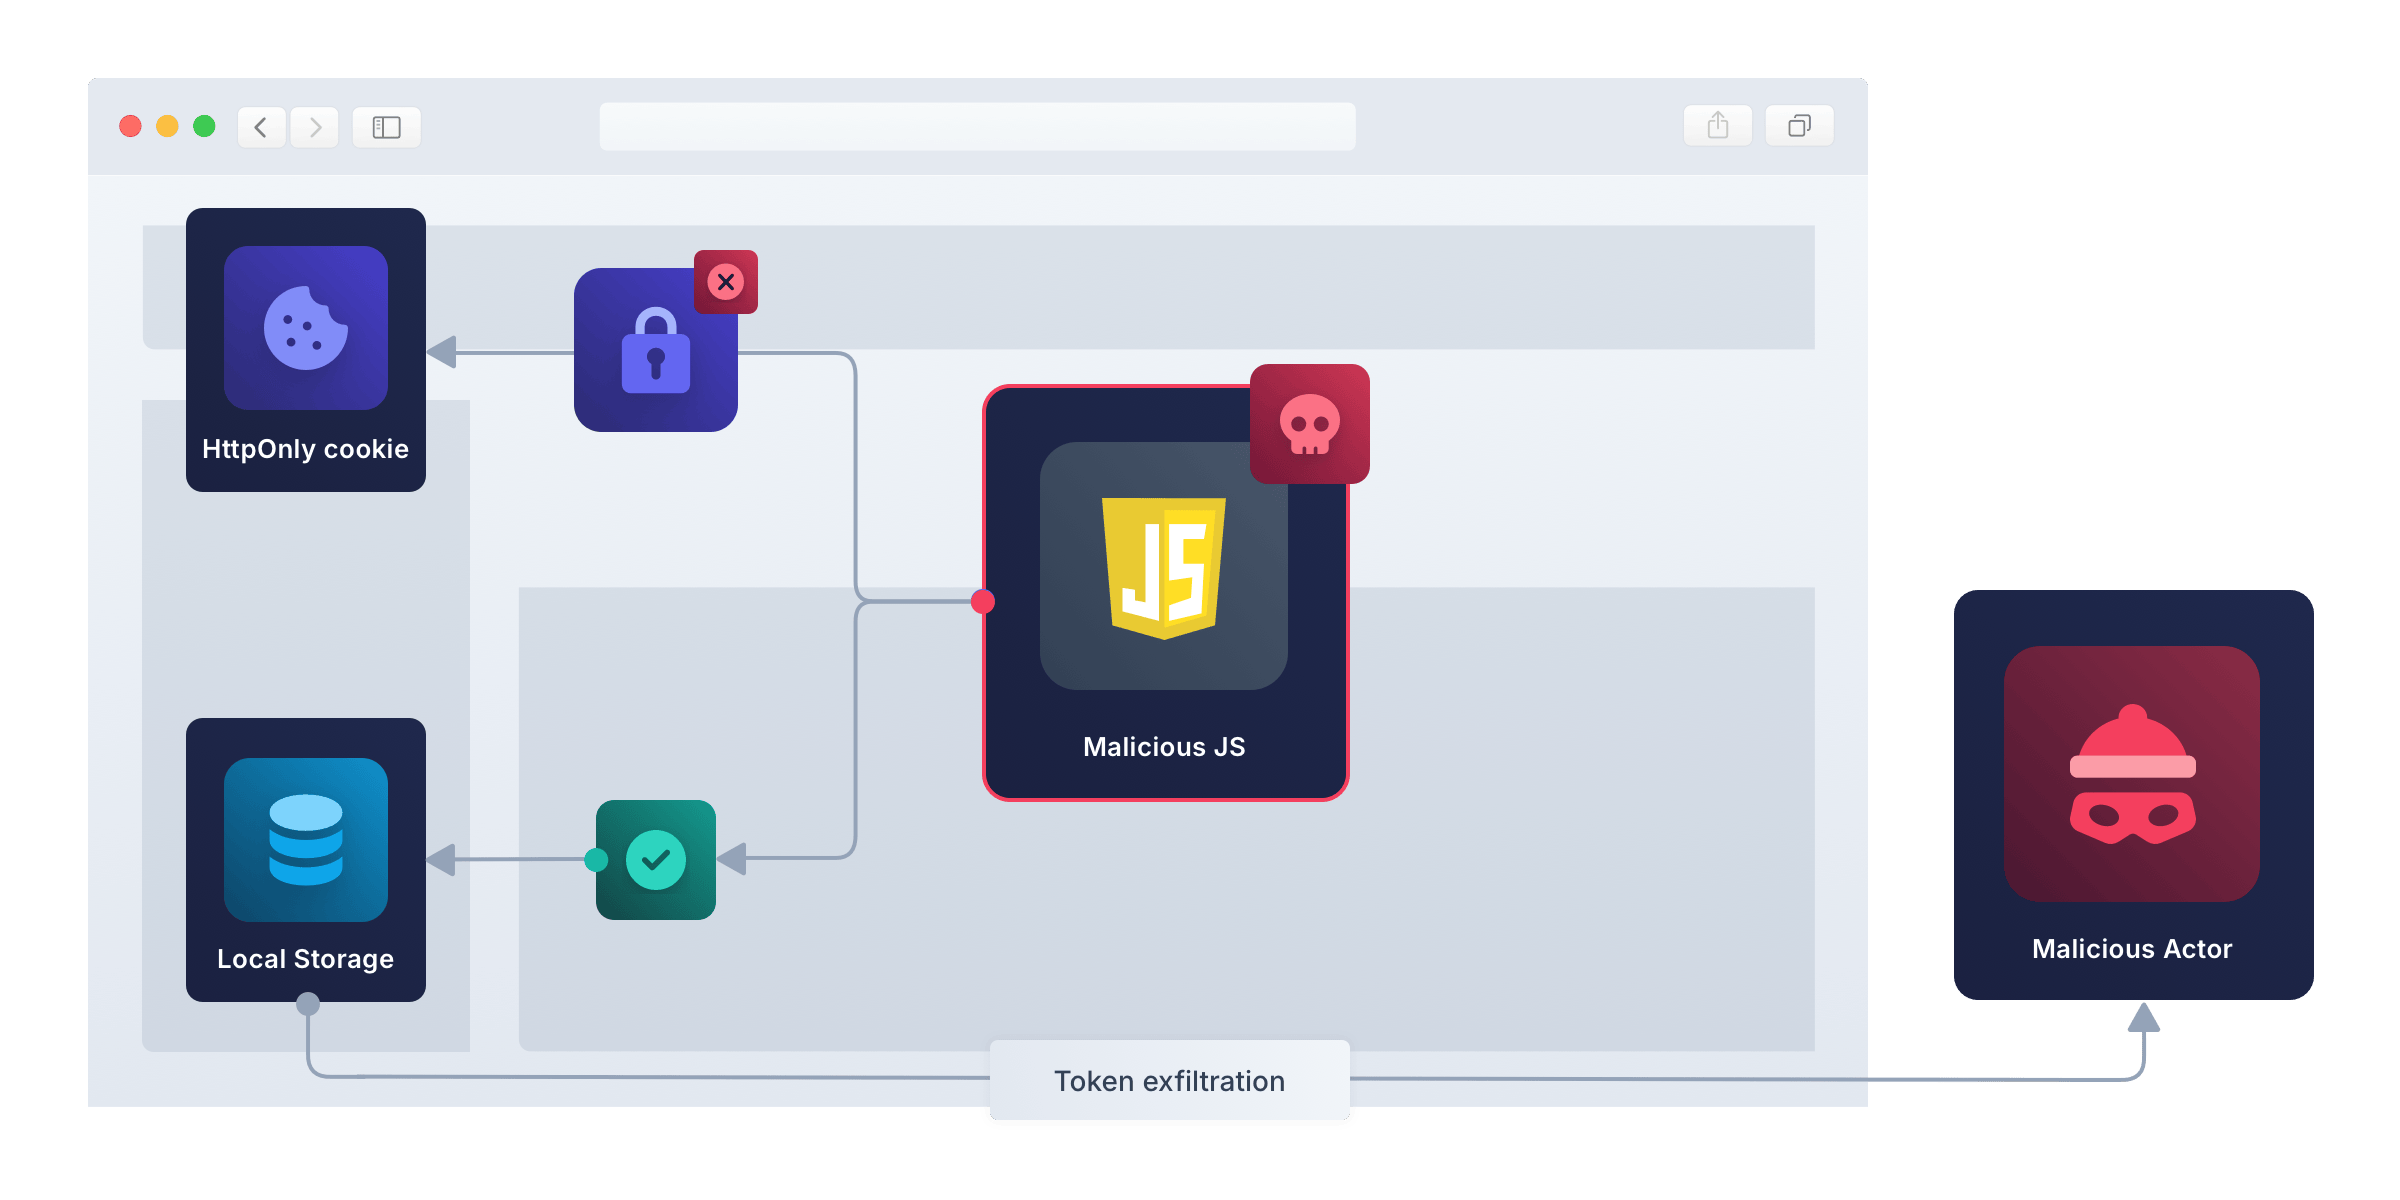
The use of a cookie as the authentication (or authorization) credential in the browser is crucial for security, as opposed to storing the credential in the browser's local or session storage. A cookie can be set to HttpOnly and SameSite=Strict to prevent JavaScript access and ensure the cookie is sent only to the server that created it.
By contrast, data in local and session storage can be accessed by JavaScript, and potentially sent to an attacker's server to be used to impersonate the user later. This type of theft is called token exfiltration – the act of extracting data after a system has been infiltrated.
Common Web Attacks#
The two most common attacks on web apps are cross-site scripting (XSS) and cross-site request forgery (CSRF).
In an XSS attack, the attacker injects malicious JavaScript into a page the user loads. A user can be tricked into executing malicious JavaScript by:
- Clicking a link with a hidden
<script>tag in the search parameters. - Viewing a forum post that includes a hidden script tag executed by the browser.
- Loading an npm package (or one of its dependencies) that contains malicious code.
The first two cases emphasize the importance of sanitizing user input and HTML-encoding output before displaying it to users.
When an attacker has their own code running in the browser, they have full power to act on the user's behalf. Depending on the purpose of the site, the attacker could make requests to add, delete, or edit data; buy or sell items; or send illegal or offensive messages. Once malicious JavaScript can act as the authenticated user, any security measures you have taken – including cookies, server design, or OAuth – become ineffective.
However, XSS code can't send the user's cookie to another web server, because JavaScript can't access HttpOnly cookies. This means the attack persists only as long as the user is actively using the site in their browser.
In a CSRF attack, visiting an attacker's website can trigger a request to another site where the user is logged in, allowing the attacker to act on the user's behalf. If the target site uses strict SameSite cookies, CSRF attacks are practically impossible. If the site uses non-strict cookies (for example, to allow for redirection back to the site after a credit card payment), CSRF attacks can be avoided by using anti-CSRF tokens.
Authentication In An OAuth-Based Web App#
Building on the simple web server model, the next level in complexity is the OAuth authorization code flow, illustrated in the diagram below.

In this design, an authorization server is added to the browser and server components from the previous example.
Authentication is handled by OpenID Connect (OIDC), a layer on top of OAuth, and not by OAuth directly. OIDC specifies how an authorization server can issue Id tokens, whereas OAuth governs authorization of access to resources and does not cover user identification.
FusionAuth (and other similar providers) provide an authorization server that issues both Id and access tokens, thereby implementing both OIDC and OAuth 2.0, respectively, which supports both login and API authorization.
Here's how the authorization code flow handles user login:
- The user clicks Log in in the web app.
- The web server receives the request and redirects the user to the authorization server's website, where they enter their credentials.
- The authorization server redirects the browser to the web service with an authorization code in the URL.
- The web service receives the code and sends it to the authorization server to get Id, access, and (optionally) refresh tokens. (For better security, this exchange does not involve the browser.) The web service stores the tokens, then returns a cookie to the user, marking them as logged in. (Read What Happens To The Tokens After An OAuth Authorization Code Grant? to understand what each token is used for.)
Since the tokens are never sent to the browser, they cannot be stolen by malicious JavaScript on the client side. While the initial authorization code from the authorization server is returned to the browser and is therefore vulnerable to client-side attacks, only the web service can exchange it for access tokens, as the authorization server will reject requests from other URLs.
If you use an authentication gateway like FusionAuth or Keycloak for a web app, this is probably the flow currently in use.
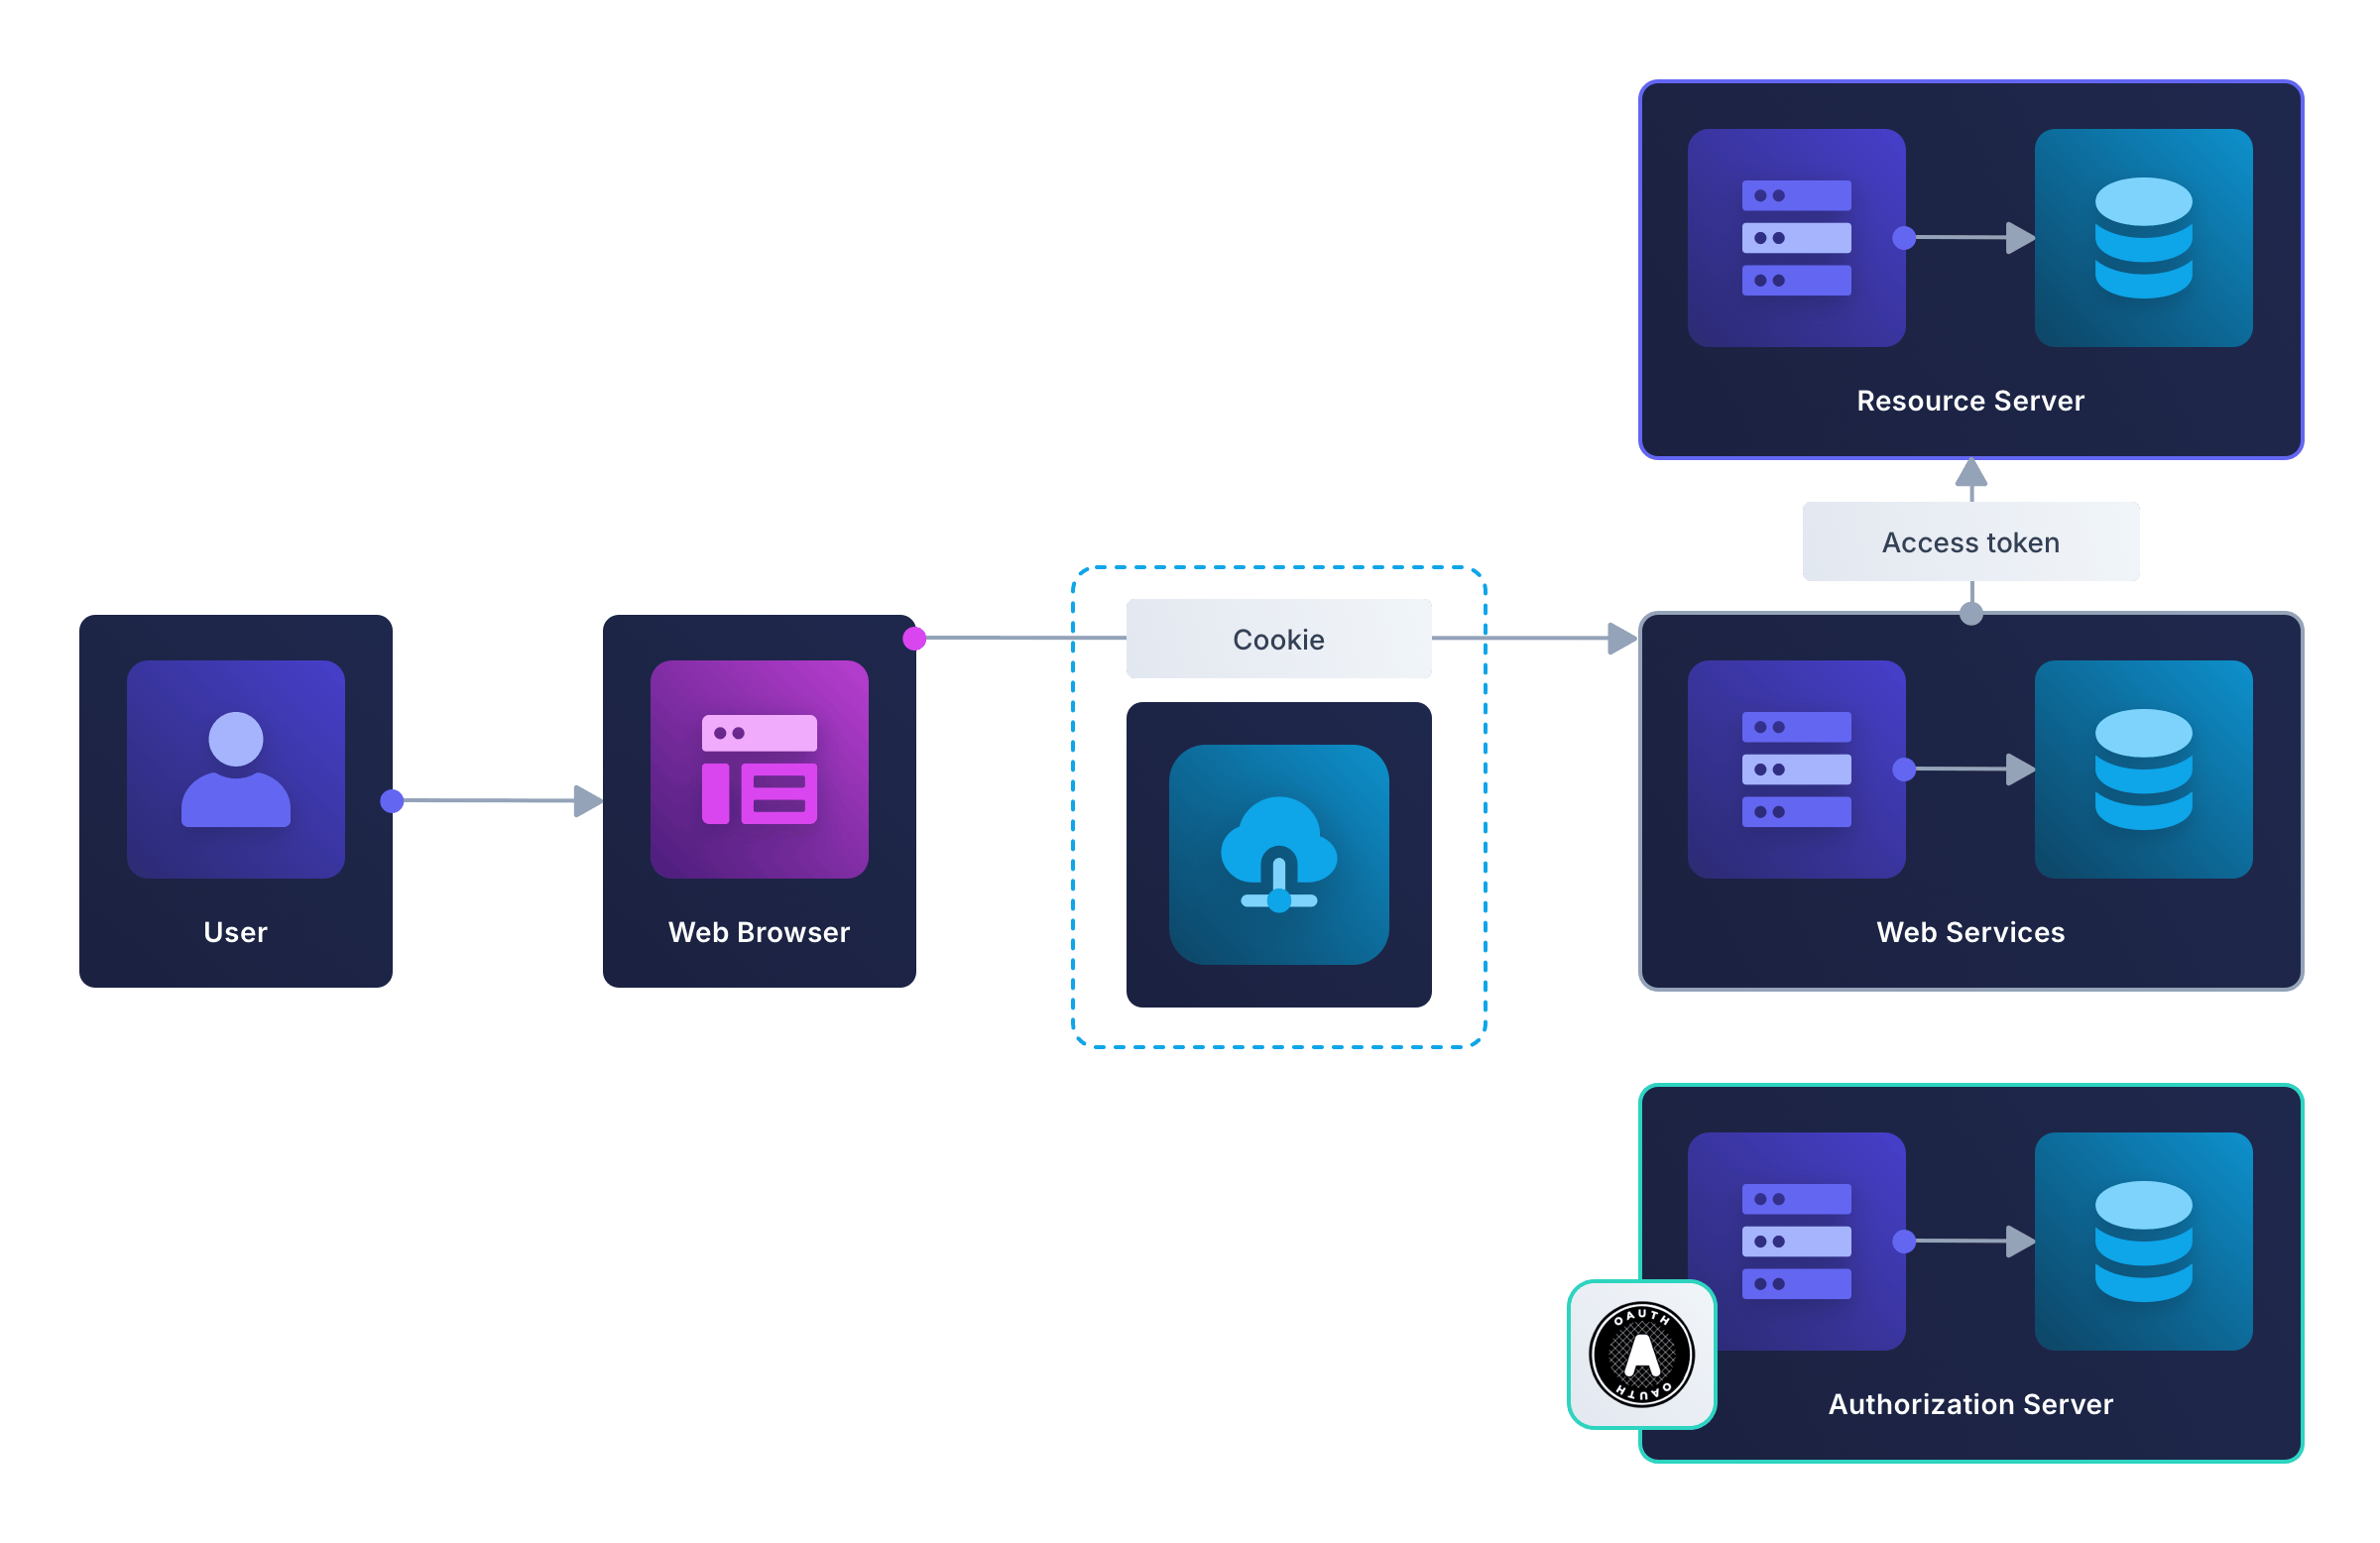
In this design, the authorization code flow is used to authenticate the user on the app's web service, not with an external resource server on the client's behalf.
If the web service were to make requests to an external server, it would send the access token with each request. As before, the token would never be sent to the browser. This design is illustrated in the diagram below.
In the designs discussed so far, the web service technically could be called a BFF, because it is a server serving a client. But calling the server a BFF adds no extra meaning, because the server isn't dedicated to performing the functions Soundcloud was talking about in their multi-app system design. Security practitioners started using the term BFF for a server used specifically as an authentication proxy, instead of storing credentials in the browser. To understand why that's important, in the next section, let's consider making an app without a backend.
Security Vulnerabilities In Serverless Apps#
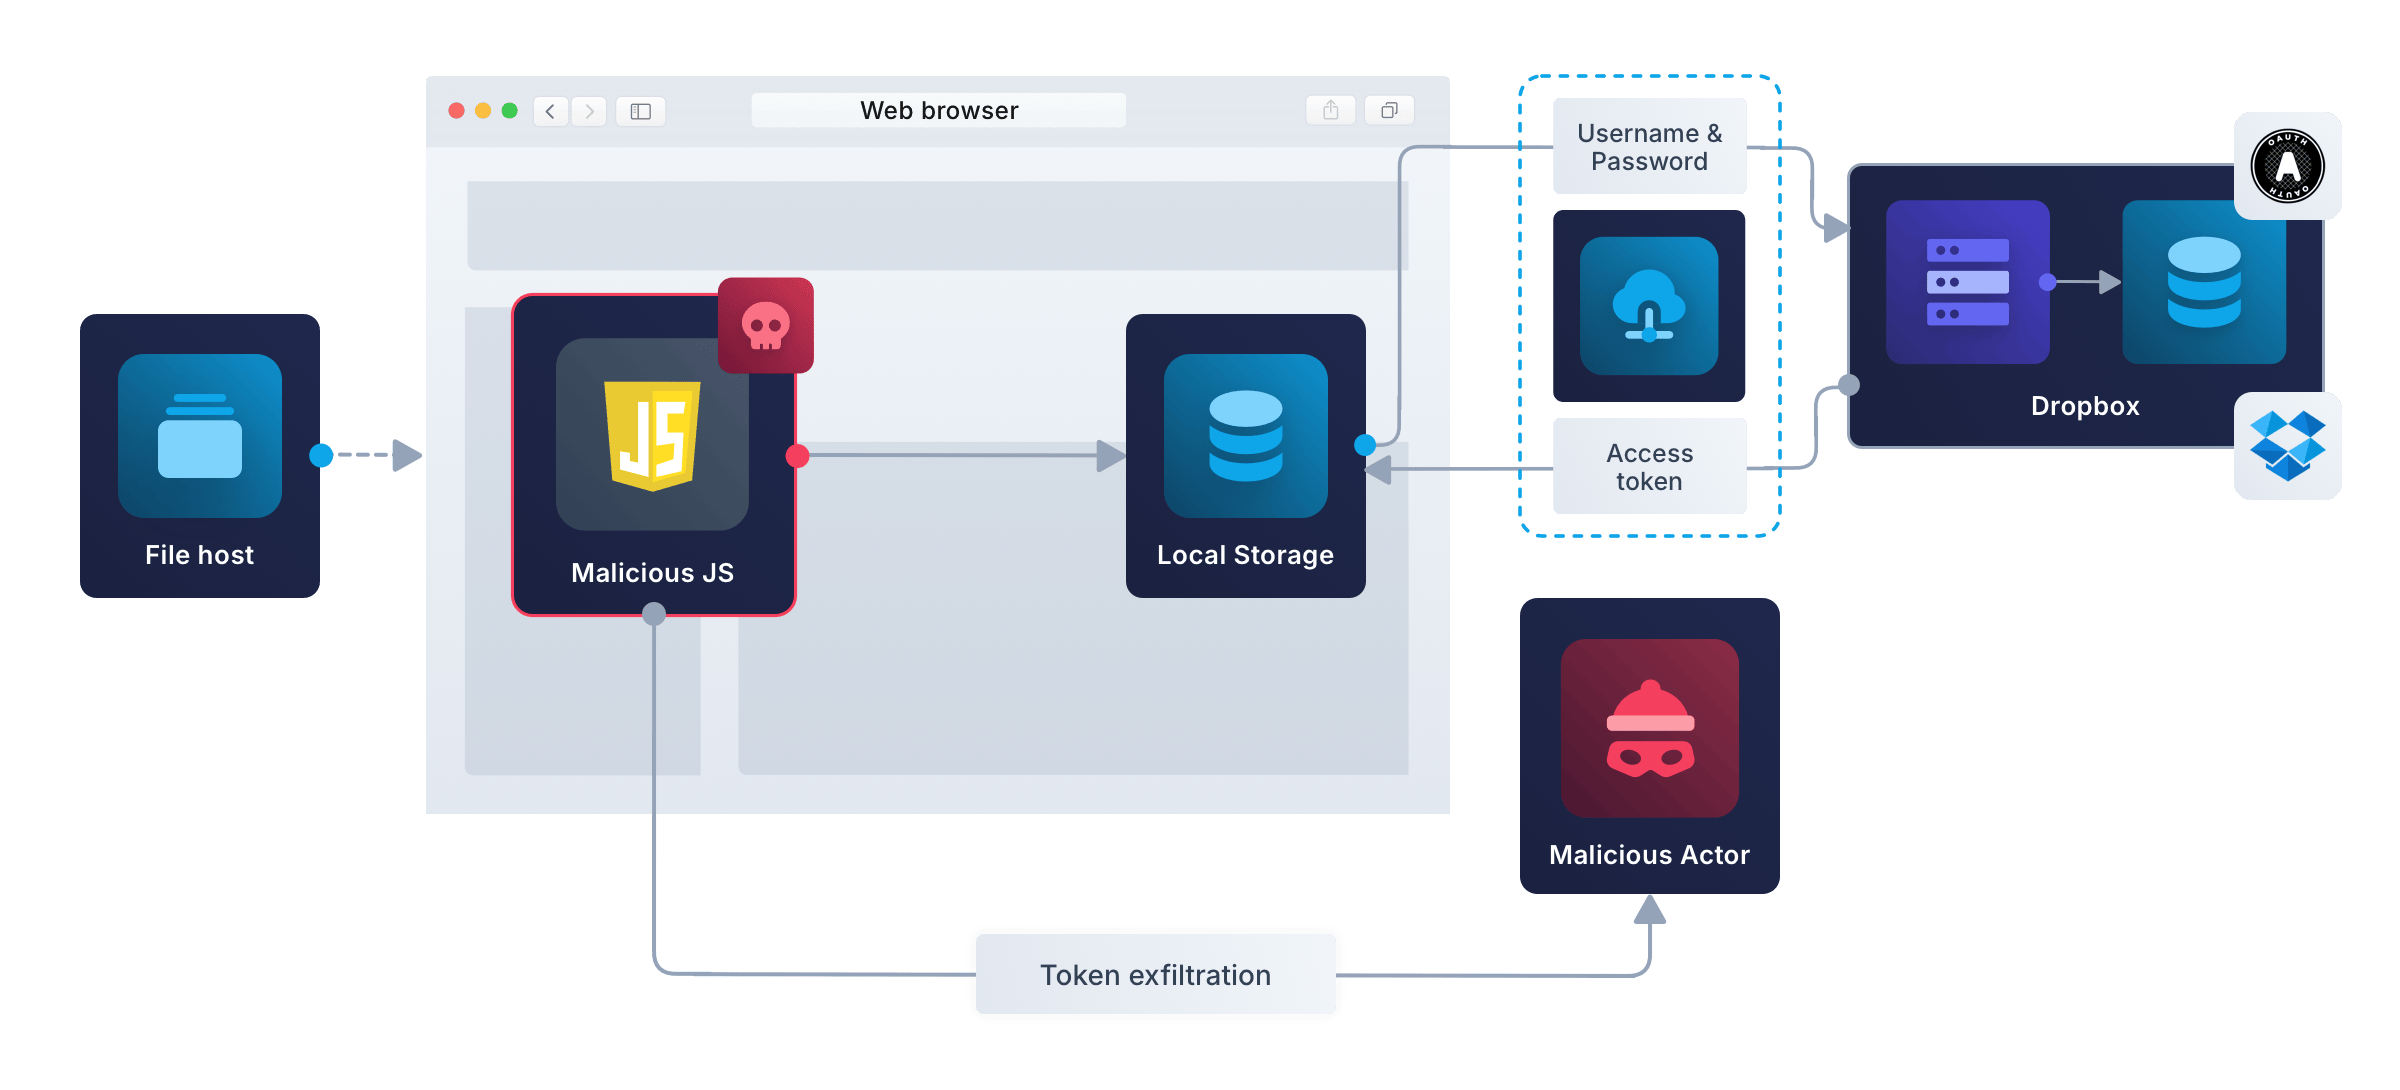
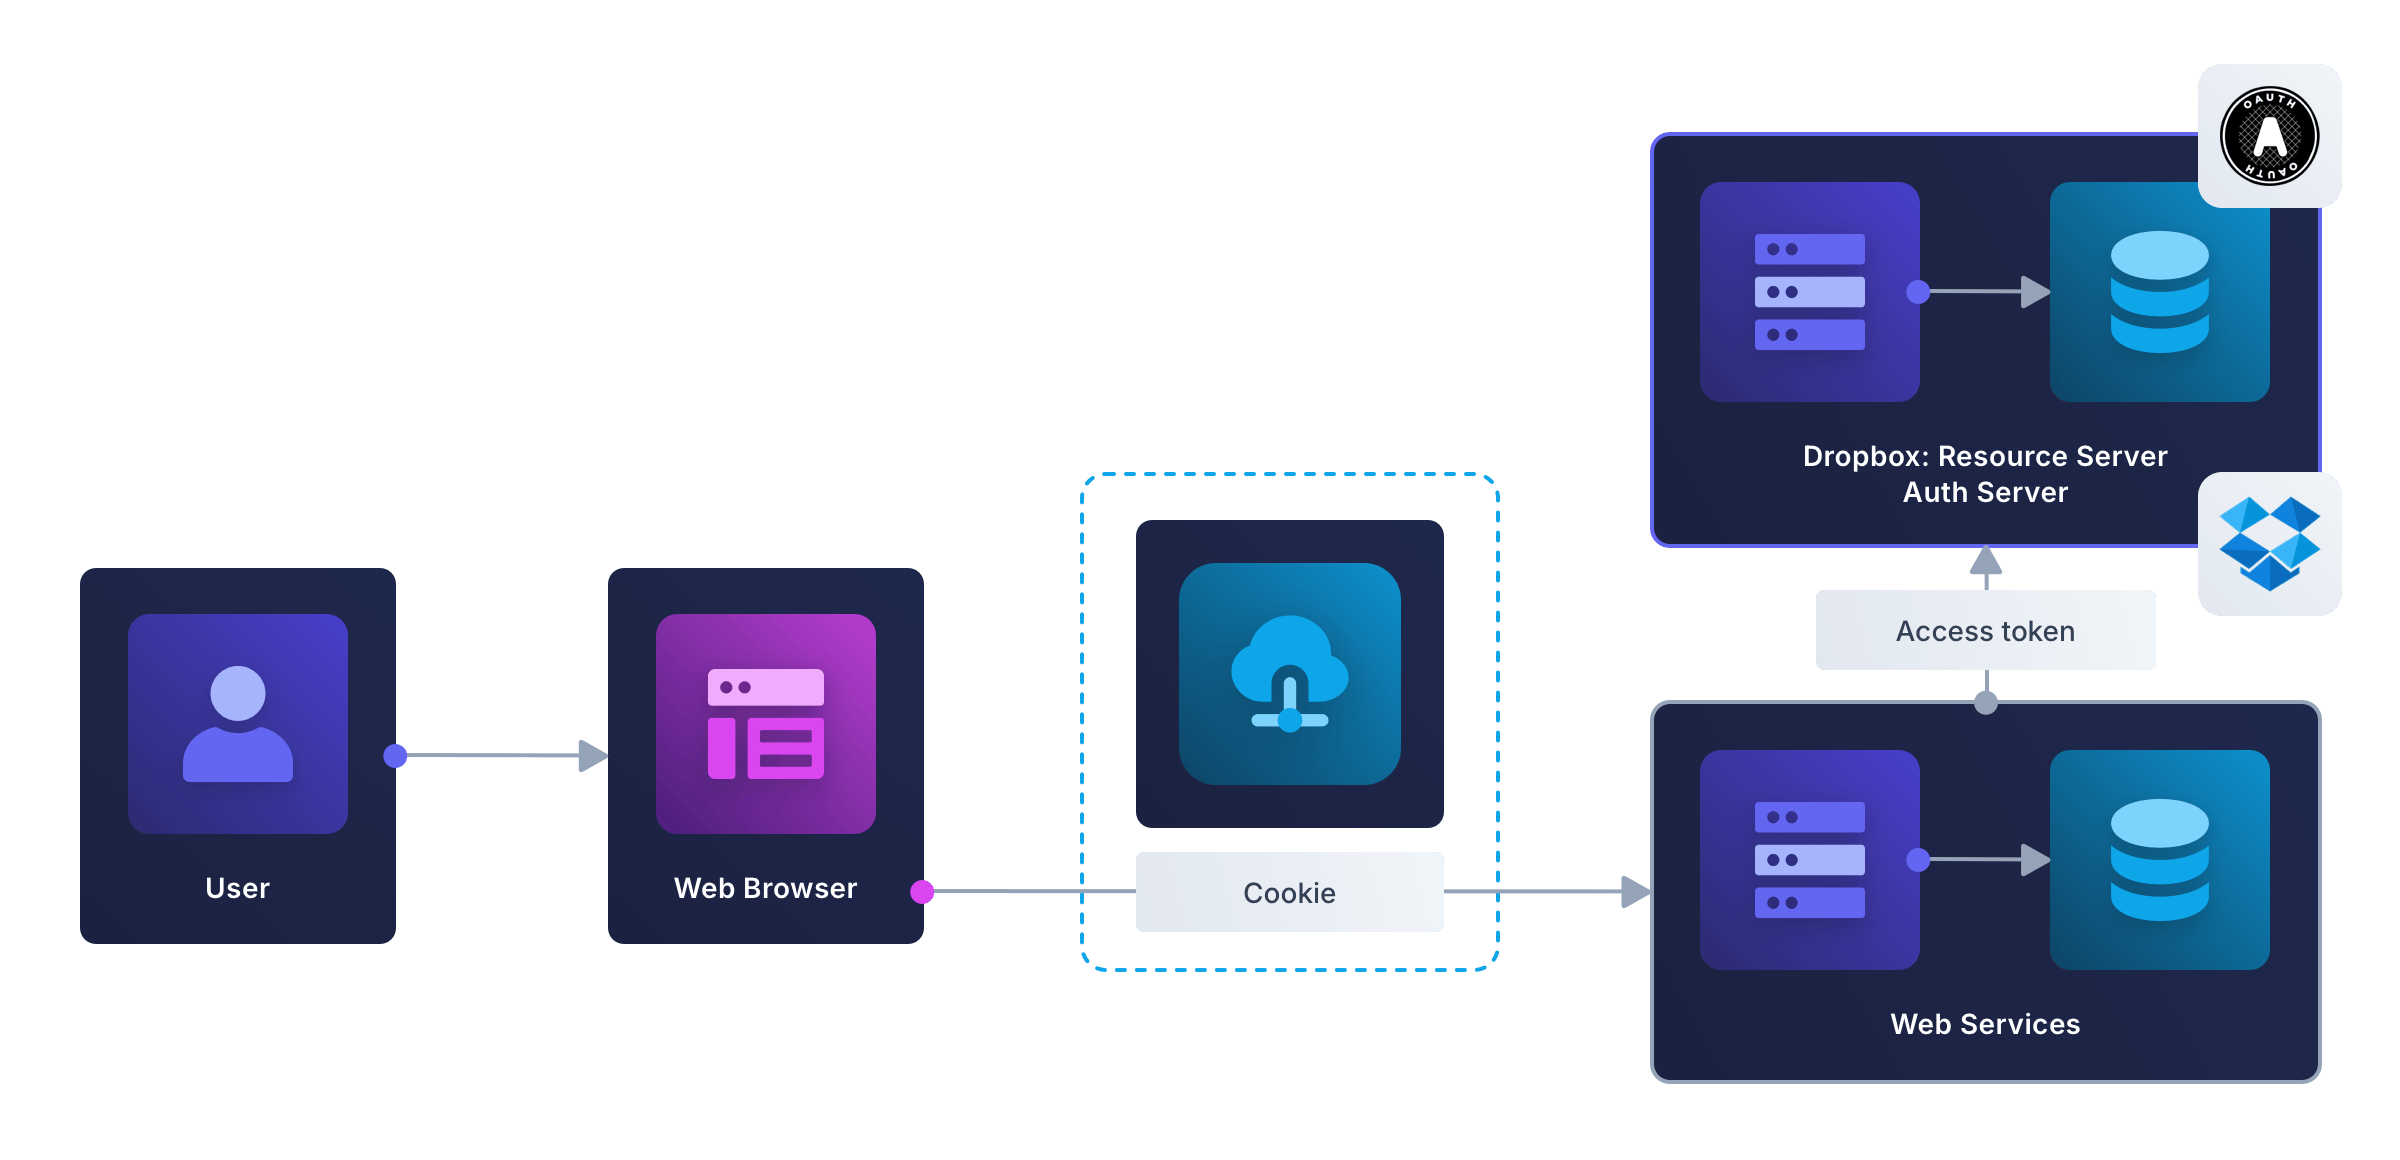
Let's say you build a to-do app to help people keep track of their chores. Instead of paying for a database to store user data, you use the Dropbox file storage API. With this design, your app doesn't need a traditional server – a static host like GitHub Pages or Cloudflare to serve the HTML and JavaScript files will suffice. This design is known as a serverless app, as illustrated below.
PKCE adds the following steps to the authorization code flow:
- When the initial request for an authorization code is sent, the client hashes a secret to create a challenge, which it sends to the authorization server where it is stored.
- When the request for an access token is sent, the client includes not only the authorization code, but also the un-hashed secret. The authorization server hashes the secret to reproduce the challenge, and if the resulting challenge does not match the challenge from the client, the server will not return an access token. The access and refresh tokens are obtained from the authorization server and stored in the app in the browser.
Let's consider possible attacks on this protocol:
- If an attacker can read the browser's address bar, they can see the authorization code returned from the server. However, if the secret or the challenge doesn't match between the client and the authorization server, the attacker can't obtain access tokens.
- If the app has malicious JavaScript, the attacker will be able to exfiltrate the authorization code, refresh token, and access token. The attacker can then wait until the user goes offline, and use the latest refresh token to generate access tokens until the user login timeout expires (which could be days or weeks).
What an attacker can steal depends on how the app stores the tokens and secrets. If the app keeps this sensitive data only as variables in app memory, malicious JavaScript probably won't be able to find it, unless it knows exactly where to look. But if tokens are kept only in app memory, the user will have to log in every single time they open the app. If the secrets are persisted in the browser's session or local storage, the attacker will steal everything. Note that HttpOnly cookies can't be used in this situation, because the app's JavaScript has to be able to read and write the token values.
Serverless design isn't limited to web apps. Desktop apps and mobile apps are also often serverless. Mobile apps that connect your bank account, file storage, or medical record provider probably don't have their own servers. If an attacker gains access to your phone or computer, either through a malicious app or through physical theft, they might gain access to all the tokens on your device.
Authentication In An App Using BFF#
As a frontend developer, you may be reluctant to build a server for your app. That's what all these third-party platforms are for, right?
That's the beauty of the BFF pattern — you don't have to create a complex server. You can create a tiny backend with no database that is merely a proxy server or trusted intermediary, and does nothing but handle tokens. You can still use external services for OAuth, resource servers, and file hosting.
Ignoring the file host (since it's inconsequential), a minimal backend for secure token exchange looks like the diagram below. Notice how similar this diagram is to the earlier OAuth example, with Dropbox acting as both the authorization server and resource server.
Of course, your authorization server and your resource server might be separate servers (for example, you might use Google Accounts for OAuth to request authorization for Gemini as the AI resource). Then the design will look as follows.
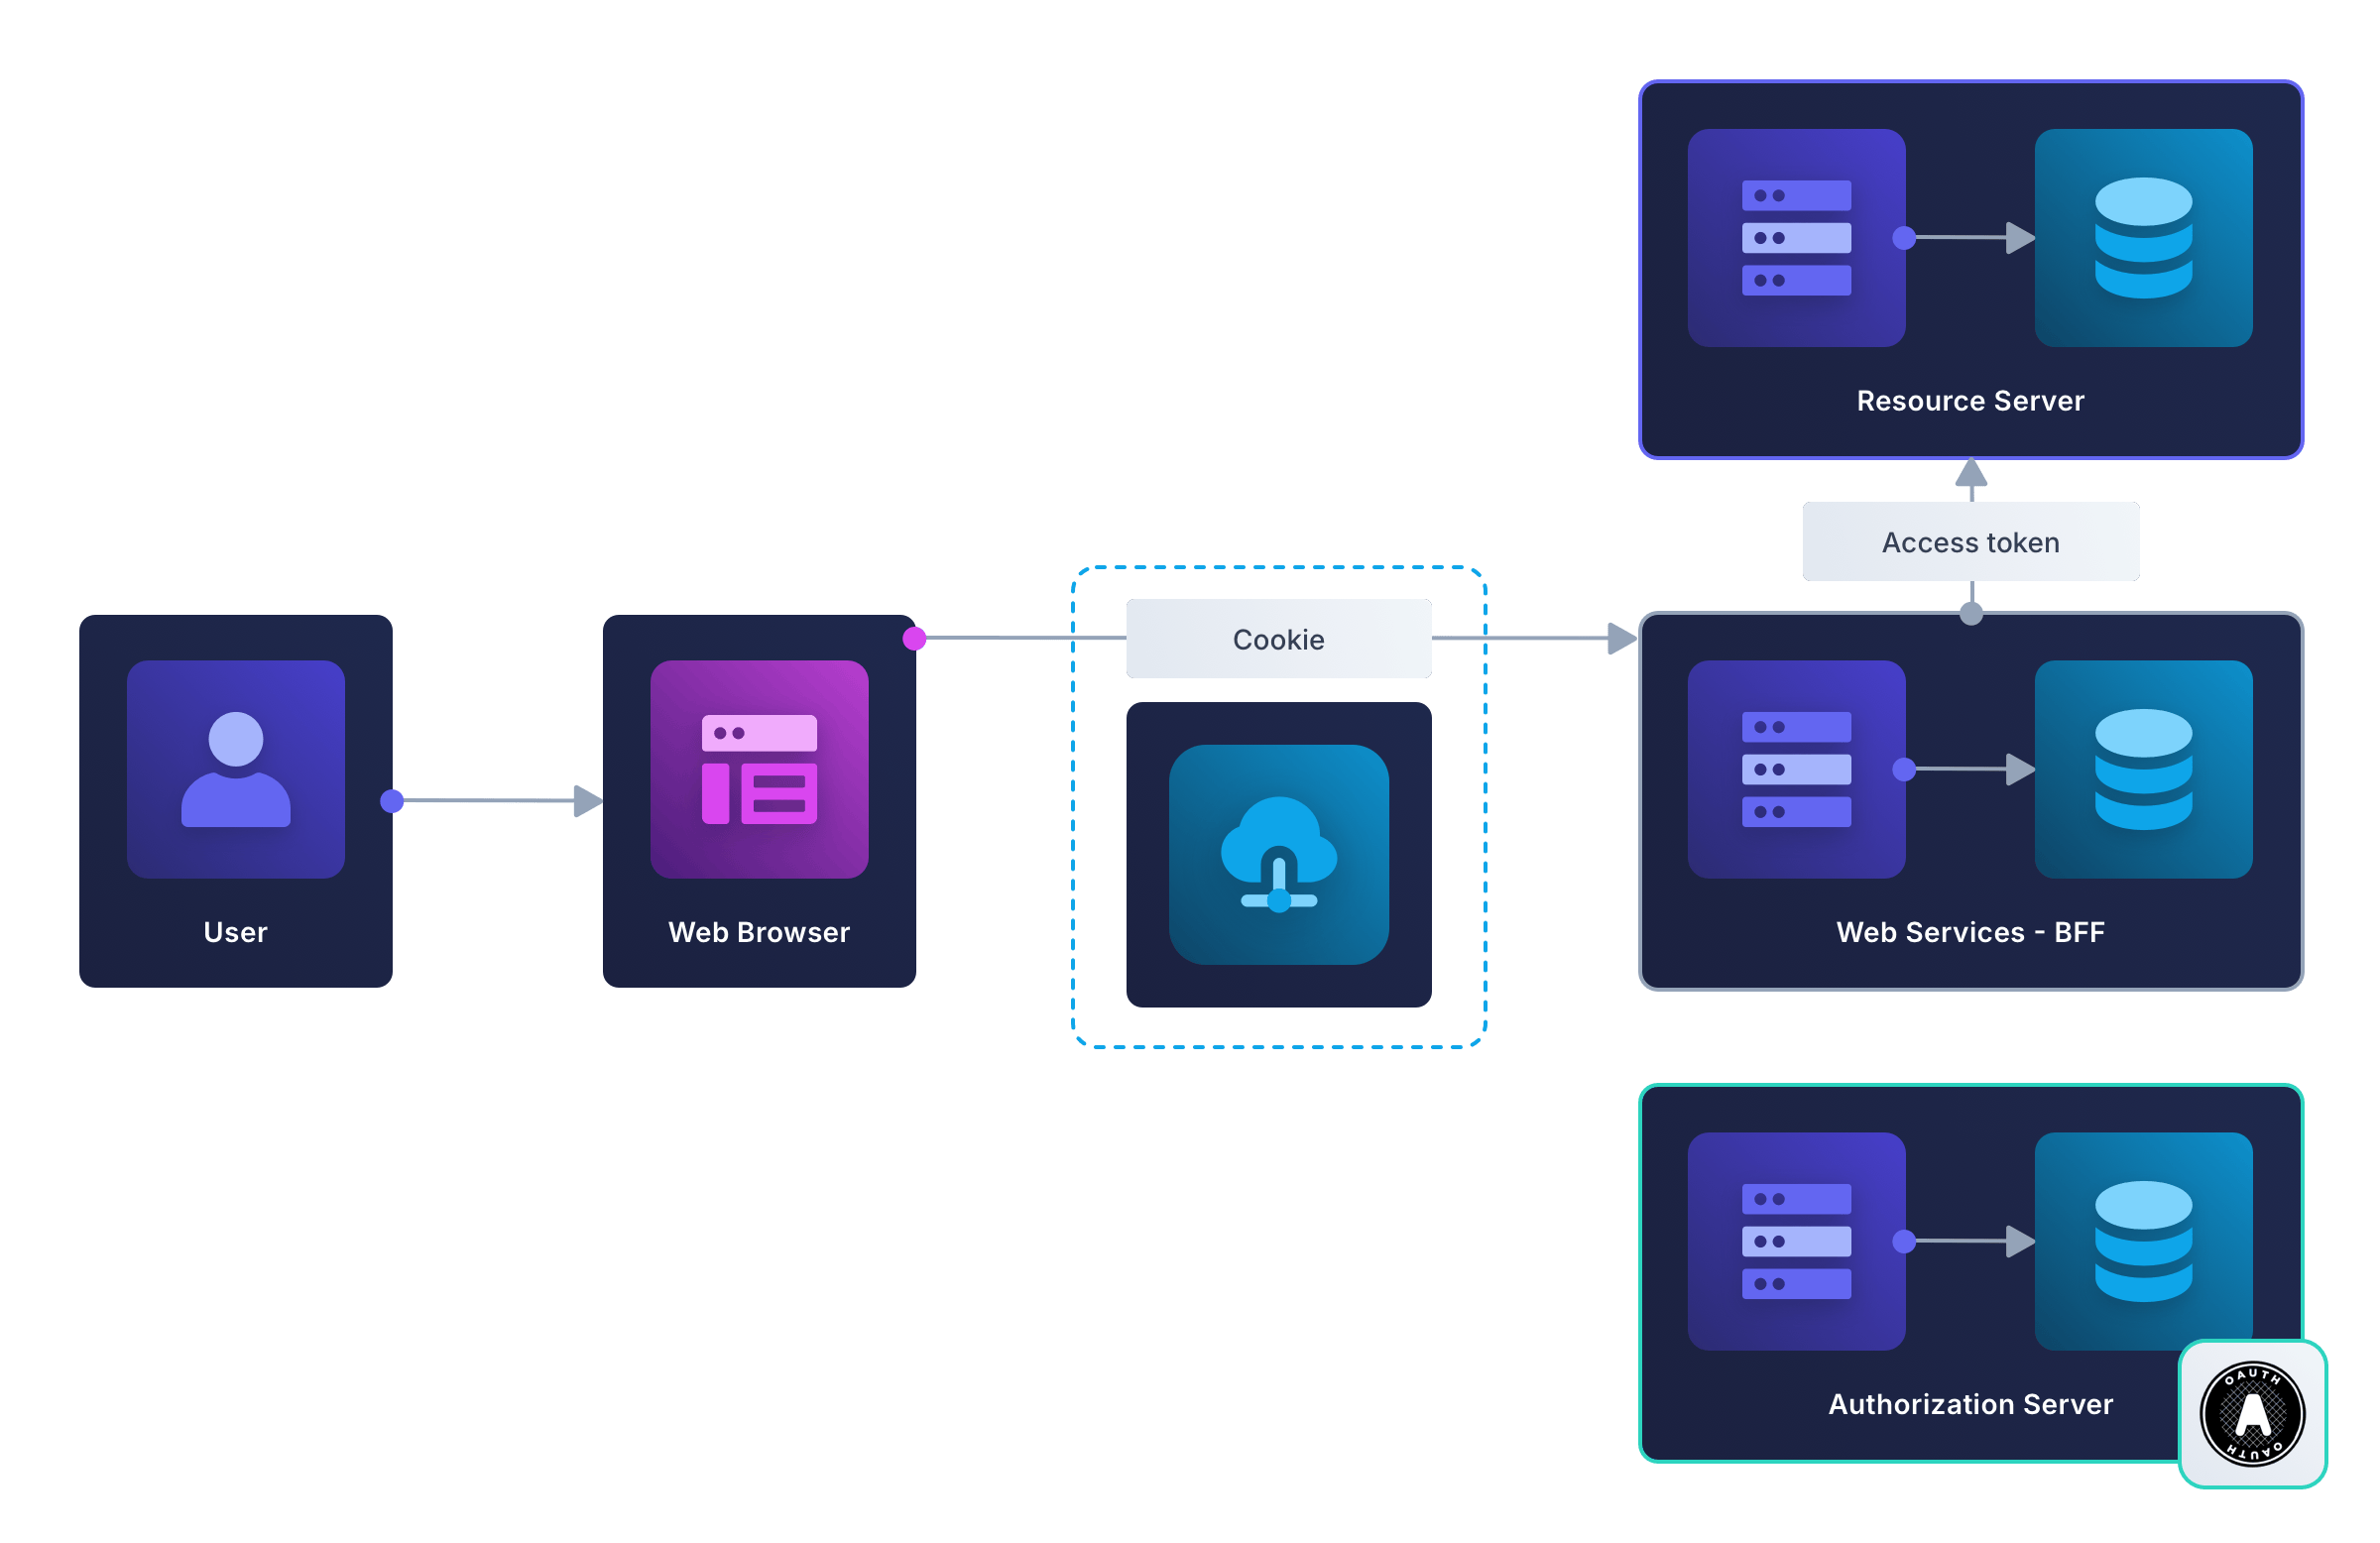
Again, this design closely resembles the earlier traditional web server example. The term BFF applies here because the server is designed exclusively to provide authorization services to the frontend. The business service is provided by the resource server.
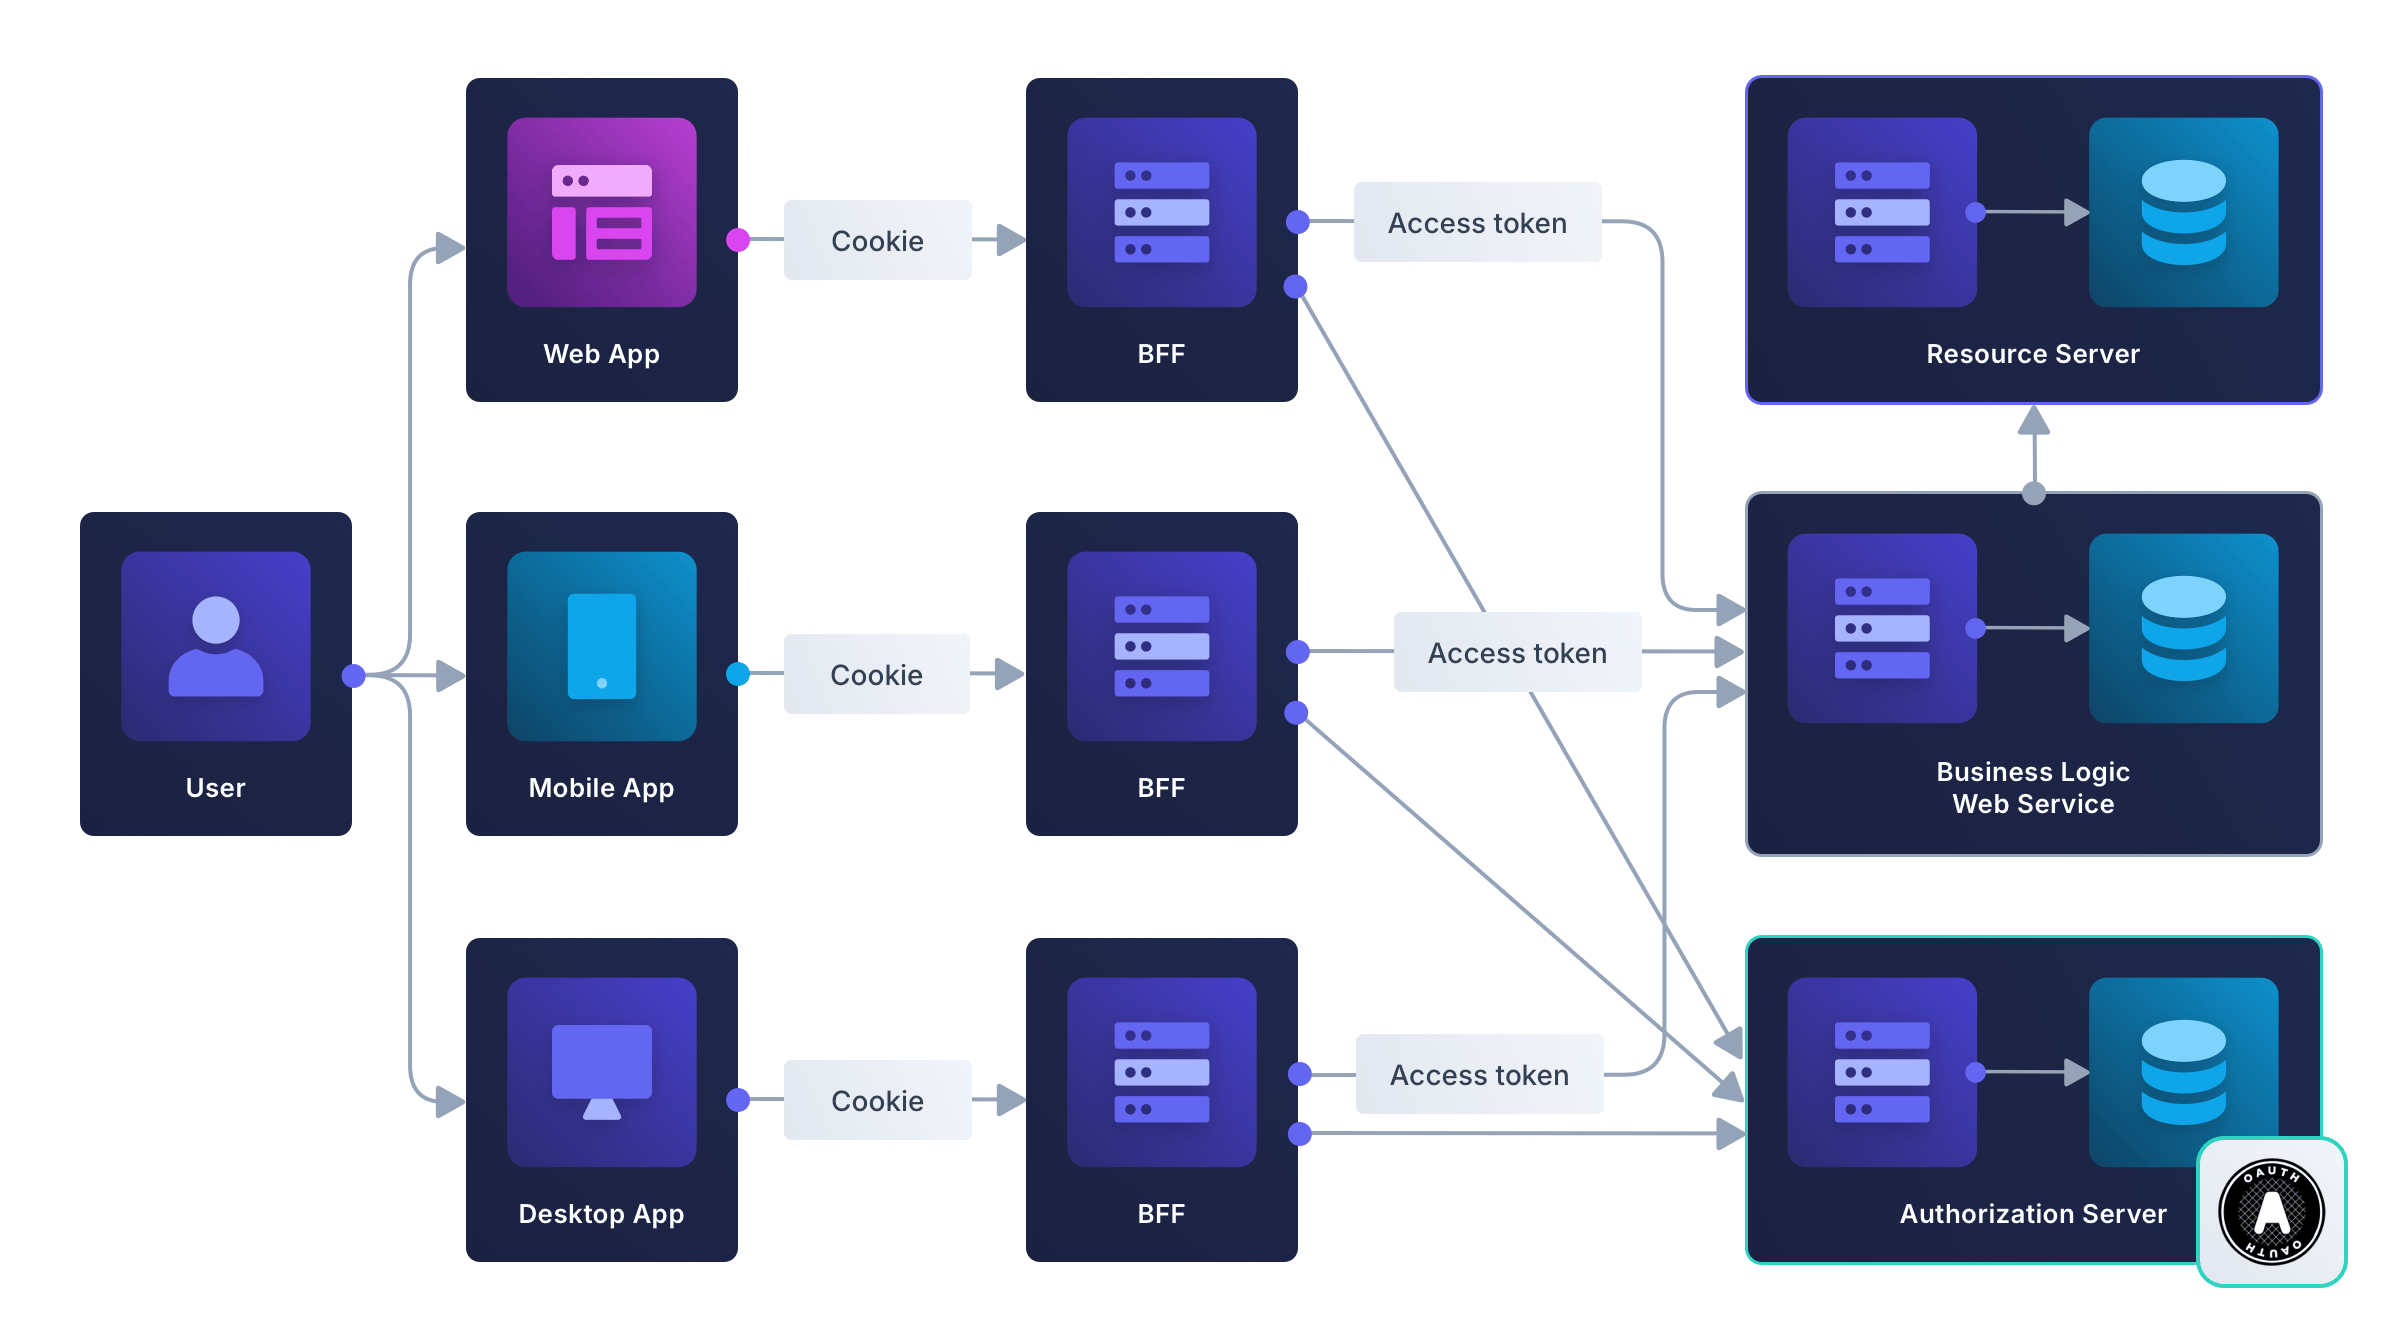
If your business has its own full-featured server for business logic, or a public API, you may still want to use the BFF pattern, keeping separate servers purely for authentication and authorization, so that mobile, web, and desktop apps can each have a dedicated BFF. This design is shown in the diagram below and echoes the Soundcloud design discussed in the introduction.
Are Serverless Apps Really That Risky?#
You might not see the value in all the work to create a BFF for your serverless app. After all, if an attacker already has enough access to a user's browser or device to steal a refresh token, surely it's too late to protect the user? The answer is, it depends:
- For a web app, a BFF is highly valuable: it allows the app to store nothing but a cookie, which attackers can't exfiltrate.
- For a mobile or desktop app, a BFF is less valuable because these apps may not store cookies like browsers do. However, a BFF can still return a short-lived authentication credential, so even if it's stolen, the attacker has limited time to use it. Without a BFF, a stolen refresh token could allow an attacker to impersonate a user for days.
A BFF may also expose fewer endpoints to the frontend, limiting the actions an attacker can take, and detect unusual behavior – blocking suspicious requests before they reach the business server, much like banks check for credit card fraud.
Read more about where to store tokens on different devices.
OAuth Allows Serverless Apps, But Beware Security Risks#
In his 2023 talk on the non-security of serverless OAuth apps, Philippe de Ryck noted that the OAuth organization doesn't discourage programmers from using serverless apps strongly enough. OAuth recommends:
- Using PKCE, which you've seen still allows theft of refresh tokens.
- Changing refresh tokens frequently, which doesn't prevent an attacker from waiting until a user closes the website and then using the latest refresh token to impersonate the user for hours or days.
- Hiding credentials in service workers in the browser, as service workers are less vulnerable to XSS attacks. But service workers are started by JavaScript and so can be stopped by malicious JavaScript.
Philippe's conclusion is that there is ultimately no way to adequately protect a serverless OAuth frontend.
How To Create A BFF For A Serverless App#
Let's look at some code to create a BFF for a currently serverless app – first to see how the app runs and login works, then to see how the code works.
Clone or download the repository from https://github.com/fusionauth/fusionauth-example-hostedbackend.
You will need Docker installed to run the example.
In this example, you'll use the authentication gateway FusionAuth as your OAuth provider. FusionAuth is free for basic usage with unlimited users and applications, and can function either as an identity provider or as a way to connect to identity providers like GitHub and Google.
Open a terminal in the project directory you downloaded and run the command below to start FusionAuth.
docker compose upWait a minute for Kickstarting 🤘 to finish, then browse to http://localhost:9011 and log in with admin@example.com and password. You can browse around FusionAuth to see the example application and users.
In a new terminal, run the commands below to start the Node web app.
cd nodeApp
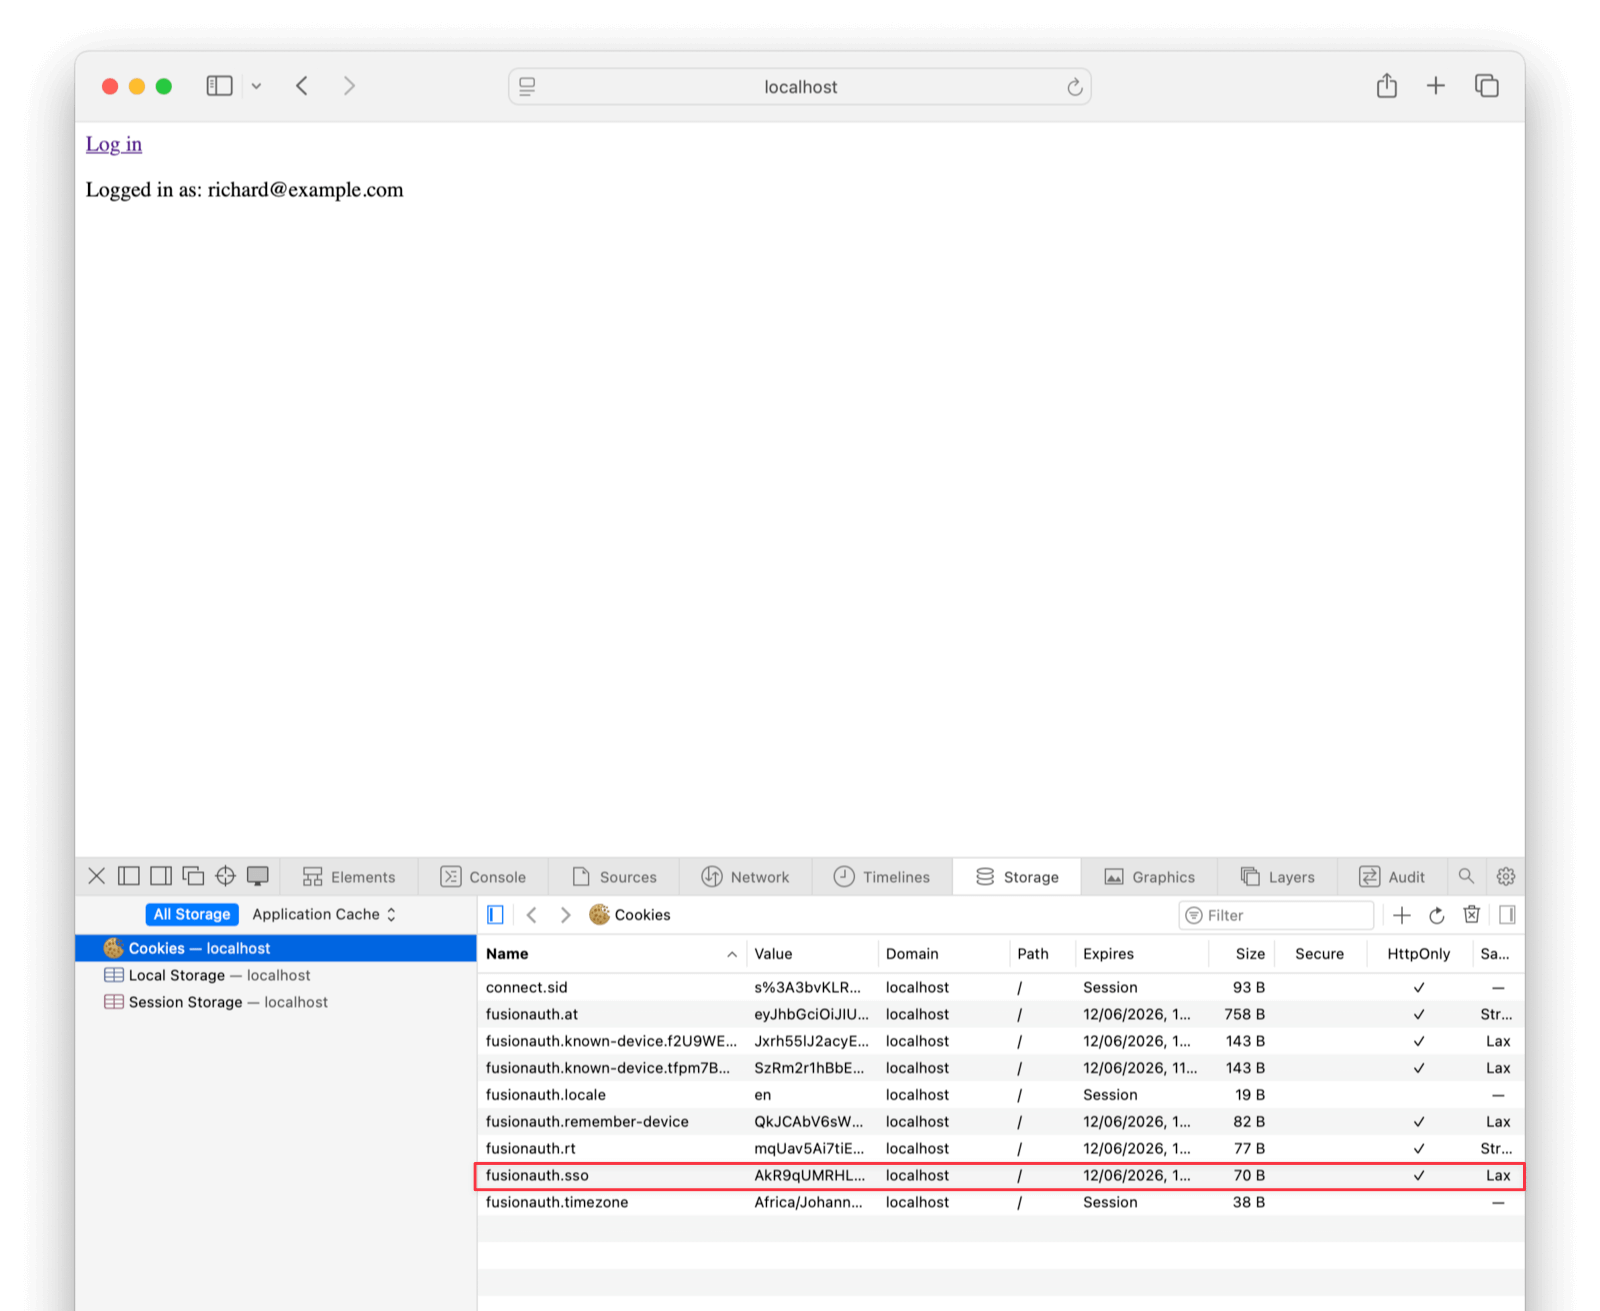
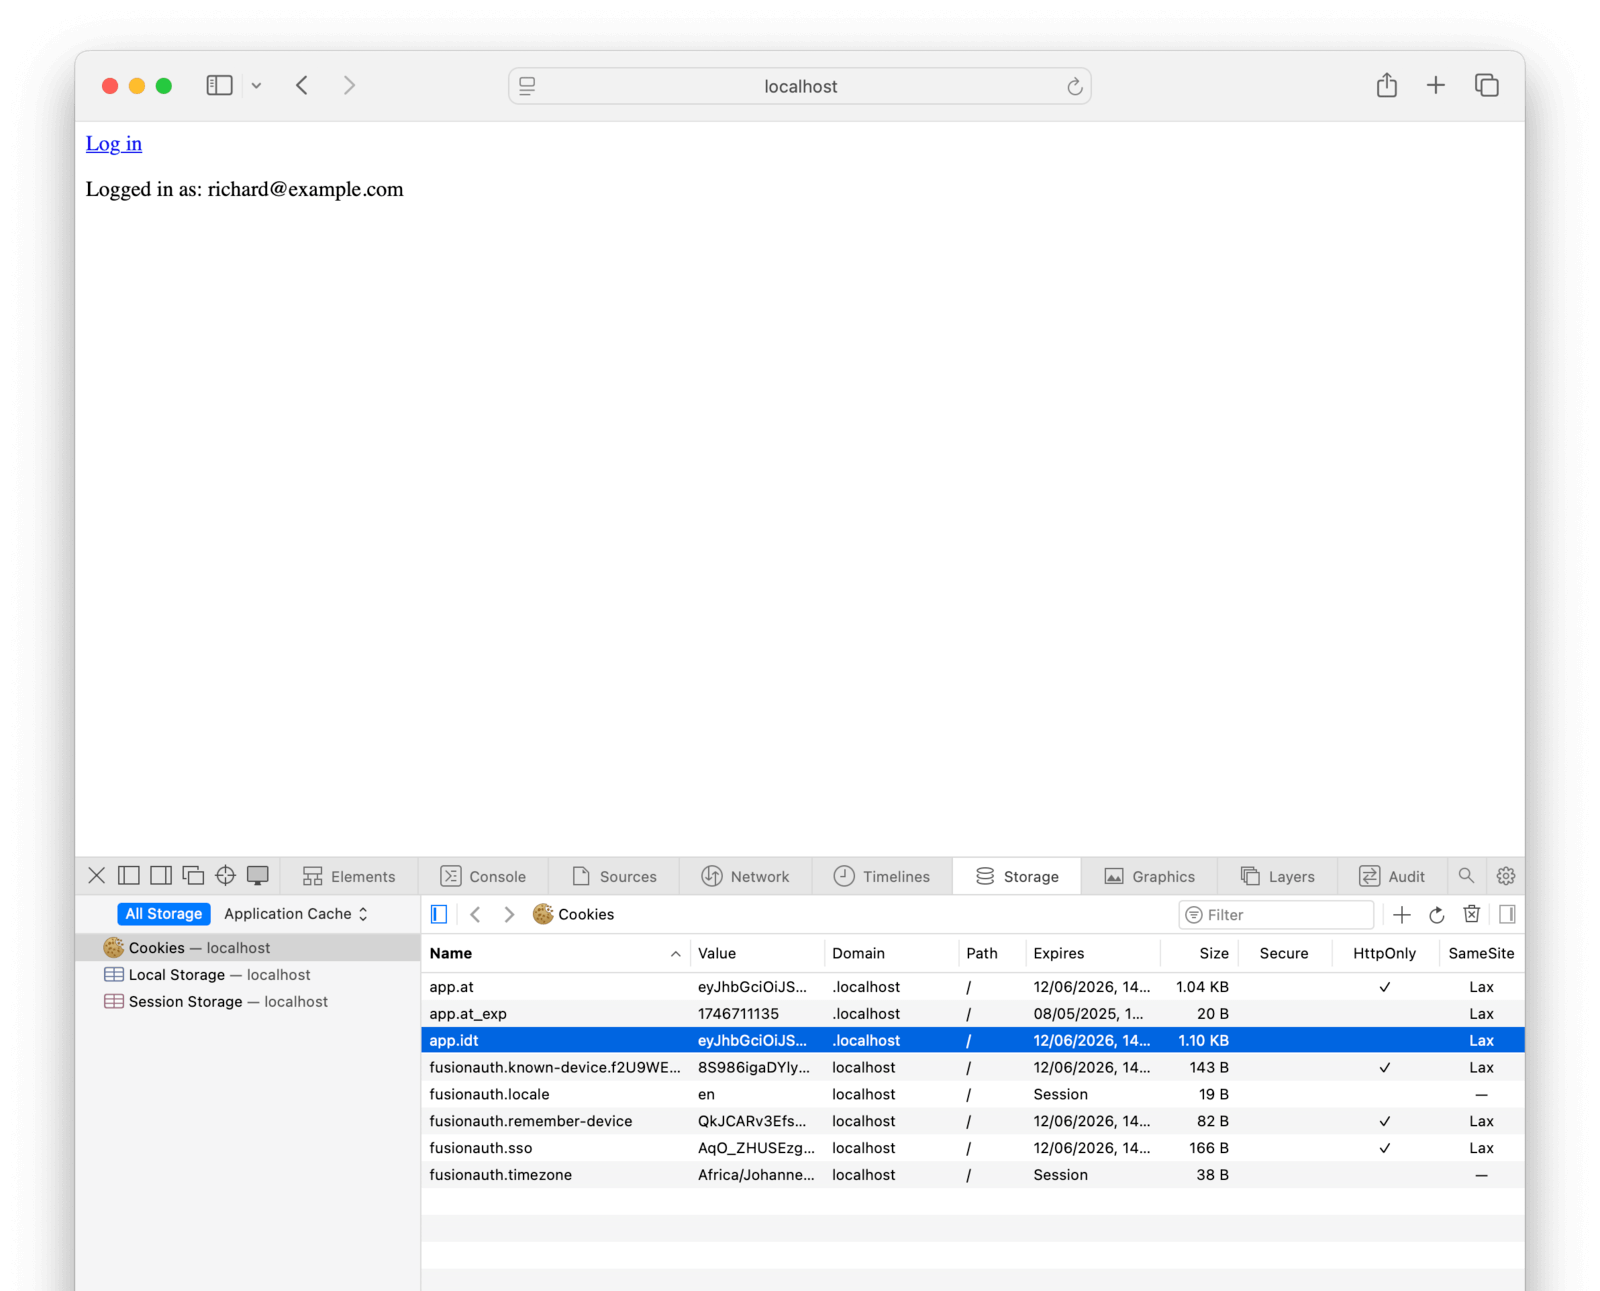
docker run --init -it --rm --name "app" -v ".:/app" -w "/app" -p 3000:3000 --network faNetwork node:23-alpine3.19 sh -c "npm install && node app.js"Browse to http://localhost:3000 to view the app. Click the login link to authenticate with FusionAuth. Use the credentials richard@example.com and password.

FusionAuth redirects you back to the app, which detects you're logged in and displays your username. Note that the only token stored in the browser is the HttpOnly cookie.
The frontend for this app is simple. Look at the file index.html.
<!DOCTYPE html>
<html>
<head><title>Simplest BFF</title></head>
<body><a href="/login">Log in</a></body>
<script>
  async function checkLoggedIn() {
    const response = await fetch('/getUser');
    if (!response.ok) return;
    const username = await response.text();
    if (!username) return;
    document.body.appendChild(Object.assign(document.createElement('p'), { textContent: `Logged in as: ${username}` }));
  }
  checkLoggedIn();
</script>
</html>
The only text on this page is the login link. In reality, the HTML body could contain a full Angular, React, or Vue app – it wouldn't affect the BFF setup. To add BFF support, all you need to do is add a login link somewhere in your app.
The page has a checkLoggedIn() function, which gets the username of the current user from the server if they're logged in. This isn't necessary to make calls to a resource server, as the logged in status is determined by the presence or absence of the fusionauth.sso cookie for the site, but it allows you to see that login worked on the page.
The BFF is the tiniest Express.js server possible. It is in app.js.
const http = require('http');
const express = require('express');
const session = require("express-session");
const passport = require('passport');
const cookieParser = require('cookie-parser');

const app = express();
app.use(express.json());
app.use(cookieParser());
require('./authentication')(app);
app.get('/', function (req, res, next) { res.sendFile('/app/index.html'); });
app.get('/favicon.ico', function (req, res, next) { return res.send(null); });
app.get('/login', passport.authenticate('oauth2'));
app.get('/auth/callback', passport.authenticate('oauth2', {successRedirect: '/', failureRedirect: '/'}));
app.get('/getUser', function (req, res, next) { return res.send(req.user); });
app.set('port', 3000);
const server = http.createServer(app);
server.listen(3000, '0.0.0.0');
The code contains a lot of Node Express boilerplate, including imports of the session and the cookie parser packages. There are only four main routes: the first returns the HTML file, and the others use Passport.js to check the user's authentication status. Passport.js is a JavaScript wrapper to call authorization servers.
The authentication.js file is more complicated.
require("dotenv/config");
const session = require("express-session");
const passport = require("passport");
const oauthStrategy = require("passport-oauth2");
const jwt_decode = require("jwt-decode");

function setupPassport(app) {
  app.use(session({secret: "s3cr3t", resave: false, saveUninitialized: true,}));
  app.use(passport.session());

  const authOptions = {
    clientID: process.env.CLIENT_ID,
    clientSecret: process.env.CLIENT_SECRET,
    authorizationURL: process.env.AUTH_URL,
    tokenURL: process.env.TOKEN_URL,
    callbackURL: process.env.AUTH_CALLBACK_URL,
    scope: "openid email profile offline_access",
  };

  passport.use(
    "oauth2",
    new oauthStrategy.Strategy(authOptions, function (accessToken, refreshToken, params, profile, callback) {
      const token = jwt_decode(accessToken);
      const email = jwt_decode(params.id_token).email;
      const user = { ...token, email };
      callback(null, user);
    }),
  );

  passport.serializeUser((user, callback) => {
    if (!user.email)
      throw new Error("FusionAuth did not return email for user");
    callback(null, user.email);
  });

  passport.deserializeUser((user, callback) => {
    callback(null, user);
  });
}

module.exports = setupPassport;
The code in this file is closely based on the sample application from the Passport website. Passport abstracts away all OAuth complexities. All you need to do is set the correct configuration values to access FusionAuth.
In summary, the frontend does nothing but show a login link and store a cookie. The Node BFF is a thin wrapper around Passport, which handles authentication with FusionAuth.
Use A Premade BFF#
If creating and hosting a server like the one in the previous section is still something you want to avoid, FusionAuth offers an even simpler option. The FusionAuth "hosted backend" (since version 1.45) is a built-in BFF for your frontend app. All you need is FusionAuth, which runs both as an authentication service and as the BFF.
There are two ways to use the hosted backend API:
- With the existing Angular, React or Vue SDK for FusionAuth. FusionAuth provides a tutorial and example repository that show how to integrate authentication into your Angular app, how to integrate authentication into your React app, or how to integrate authentication into your Vue app.
- With your own custom JavaScript code, if you're using a framework other than React, Angular, or Vue, such as Svelte, Preact, or Ember.
Since there is already documentation on how to use React, this section will show you how to code custom calls to the hosted backend. The example uses vanilla JavaScript, so you can use the code in any framework you prefer.
If you haven't already, clone or download the repository from https://github.com/fusionauth/fusionauth-example-hostedbackend. This is the same example used in the previous section. As before, you will need Docker installed to run the example.
Browse to the Applications tab of FusionAuth at http://localhost:9011/admin/application. For the Example App, click Select -> Edit . On the Scopes tab, change Scope handling policy to Compatibility . If you leave this value on Strict , the user's email won't be returned pending resolution of this issue.
If you ran the Node server in the previous section, close it by pushing Ctrl-C, but leave the FusionAuth server running. In a new terminal, run the command below to start the serverless web app.
cd serverlessApp

docker run --init  -it --rm --name "app" -v ".:/app" -w "/app" -p 3000:3000 --network faNetwork node:23-alpine3.19 sh -c  "npm install http-server && npx http-server -d false -a 0.0.0.0 -p 3000 --proxy http://localhost:3000?"
Note that in this example, there is no Node server in the backend. The HTML file is served from the static file host, http-server.
As before, browse to http://localhost:3000 to view the app. Click the login link to authenticate with FusionAuth. Use the credentials richard@example.com and password.
Though this app looks identical to the previous one, it has no server and uses only FusionAuth for all authentication. The entire application is contained in the index.html file in the serverlessApp directory.
<!DOCTYPE html>
<html>
<head><title>Hosted backend app</title></head>
<body><a href="#" id="loginLink">Log in</a></body>
<script src="https://cdn.jsdelivr.net/npm/jwt-decode@3.1.2/build/jwt-decode.min.js"></script>
<script>
  const AUTH_URL="http://localhost:9011/app/login/E9FDB985-9173-4E01-9D73-AC2D60D1DC8E";
  const AUTH_CALLBACK_URL="http://localhost:3000/auth/callback"

  function setupLogin() {
    const state = Math.random().toString(36).substring(2, 15);
    localStorage.setItem('auth_state', state);
    const authorizeUrl = AUTH_URL + `?redirect_uri=${encodeURIComponent(AUTH_CALLBACK_URL)}&state=${state}&scope=openid`;
    document.getElementById('loginLink').addEventListener('click', function(event) {
      event.preventDefault();
      window.location.href = authorizeUrl;
    });
  }

  async function handleCallback() {
    if (window.location.pathname != '/auth/callback') return;
    const urlParams = new URLSearchParams(window.location.search);
    const callbackState = urlParams.get('state');
    const storedState = localStorage.getItem('auth_state');
    localStorage.removeItem('auth_state');
    if (callbackState != storedState)
      return alert("State check returned from authentication server does not match saved state");
    if (!getToken())
      return alert("app.idt cookie not found");
    window.location.href = 'http://localhost:3000';
  }

  function displayEmail() {
    const jwt = getToken();
    if (!jwt) return;
    const email = jwt_decode(jwt).email;
    document.body.appendChild(Object.assign(document.createElement('p'), { textContent: `Logged in as: ${email}` }));
  }

  function getToken() {
    const cookies = document.cookie.split(';');
    let jwt = null;
    for(let i = 0; i < cookies.length && !jwt; i++)
      if (cookies[i].trim().startsWith('app.idt='))
        jwt = cookies[i].trim().substring('app.idt='.length + 1);
    return jwt;
  }

  displayEmail();
  if (window.location.pathname == '/auth/callback')
    handleCallback();
  else
    setupLogin();
</script>
</html>
In a full single-page app, you would probably use a client-side routing framework. However, this example checks for only two cases: either it handles a callback from the authentication server and verifies the challenge code, or it displays the login link for any other route. In either case, if a logged-in user Id cookie is present, the user's email address is displayed on the screen.
The login link merely redirects the user to the FusionAuth hosted backend API endpoint.
When making the request, you need to specify the openid scope, or the user's email address won't be returned in the app.idt token.
As in the previous example, the display of the username is not essential. Since cookies are sent with every page request, the user's logged in status is handled automatically on the server.
In summary, you can add secure authentication to your serverless app by simply running FusionAuth and writing a snippet of JavaScript. This is less work than implementing the PKCE flow manually in the frontend, but more importantly, it's a more secure approach. Although the authentication flow happens on the backend, the hosted backend still implements PKCE for additional security. If you are writing a mobile or desktop app and not a web app, you can also use this secure technology, as long as your HTTP library supports cookies.
Other Hosted BFFs#
By providing a hosted backend, FusionAuth massively simplifies the work you need to do for SPAs and mobile apps. As of early 2025, FusionAuth remains one of the few authentication gateways to offer this feature.
Depending on the provider, this feature might be called an OAuth proxy, BFF, or hosted auth proxy. Curity calls it the token handler pattern.
This example demonstrates the authentication component of the backend for frontend pattern. If you have full control over your backend, you could implement the full BFF pattern that handles authentication, authorization, and all API interactions as well.
If you don't want to use FusionAuth or write your own BFF, open-source projects like OAuth2 Proxy (written in Go) offer cookie and token management, but still require server-side hosting.
The list below outlines the level of OAuth proxy support offered by various authentication gateways:
- Amazon Cognito: Offers an OAuth proxy called "managed login".
- Curity: Provides a downloadable token handler that you host yourself and connect to an API gateway.
- Auth0: Agrees that storing tokens in the browser is dangerous, and recommends storing them in RAM, not local storage. Auth0 doesn't provide a hosted backend. The Auth0 SPA SDK sends the access token directly to the browser.
- Cloudentity: Recommends using an OAuth proxy, but doesn't appear to offer one as part of its service.
- Duende: Offers a self-hosted ASP.NET OAuth Proxy package as part of its IdentityServer.
Based on their documentation, Okta, Ory, and Keycloak don't appear to offer built-in OAuth proxies.
Summary#
This article covers a lot, but the recommendations are straightforward:
- Use
HttpOnlycookies in the browser. Never store secrets in local storage or session storage. - Add a server for any public app that uses OAuth, even mobile and desktop apps if possible, so tokens are never sent to the browser. If your app is currently serverless, add an OAuth proxy to make it safer.
- Choose a simple OAuth proxy approach, such as using the FusionAuth hosted backend or Go Auth2 Proxy, or building on the Passport.js Node sample in this article. (Other languages have OAuth wrappers, too, so you won't have to write your own protocol code.)
- Avoid malicious dependencies by being careful about the packages you build with.
- Consider multifactor authentication for dangerous actions like buying, selling, or accessing private information.
Further Reading#
- Phil Calçado's 2015 post explaining the BFF pattern at SoundCloud
- Dropbox OAuth documentation
- What OAuth tokens are used for
- Token storage locations
- Passport.js and the OAuth 2.0 extension for JavaScript servers
- FusionAuth React tutorial for the hosted backend
- FusionAuth hosted backend API
- FusionAuth OAuth scopes
- Node
http-serverpackage - Go OAuth2 Proxy
- Multifactor authentication in FusionAuth
- OAuth 2.0 for Browser-Based Applications: Backend For Frontend and Token-Mediating Backend