


FusionAuth is one of the most flexible authentication platforms out there. Whether you want FusionAuth to host it for you, download and run it on your own hardware or deploy it in the cloud the choice is yours. Since the FusionAuth Partner Network Launch was recently announced, it seems like a good time to talk about how to set up FusionAuth on one of the partner's platforms. For this post we will be talking about how to deploy FusionAuth on the Google Kubernetes Engine (GKE).
Requirements#
There are a few things that you will need to make sure you have access to and have up and running on your machine
- Google Cloud Platform is a set of computing services offered by Google that allows users to build and run applications and websites.
- gcloud CLI is a command line interface used to manage resources in Google Cloud.
- kuebctl is another command line tool that will allow you to run commands against a Kubernetes cluster.
- helm is a package manager used for installing and managing Kubernetes applications.
Experience seamless authentication integration with FusionAuth on GKE. Schedule a demo to see it in action.
Project Setup#
Once you have the prerequisites, you will need to set up a project within Google.
Each of these commands can take up to a few minutes to complete and appear ready in the Google Cloud Console, please be patient. This is just some of the fun you get to experience when working in the cloud.
Open a new terminal window and perform the following steps.
Authorize Gcloud#
Authorize gcloud
gcloud auth loginCreate A New Project And Set As Default#
Create a project
gcloud projects create fusionauth-gke-example \
  --name="FusionAuth GKE example"
It is important to note that Google Project Ids must be unique. If you receive a message stating that the project creation failed but the project Id you specified is already in use, you will need to add an unique Id. Something along the lines of fusionauth-gke-example-0302, where 0302 is a number unique to you, should do the trick. Be sure to write it down as you will need that unique project Id throughout this tutorial.
You should receive a message when the action is complete and the project has been created. Be sure you are using your unique Id.
Set the default project
gcloud config set project fusionauth-gke-exampleEnable Billing For The Project#
Once you have created the project, you will need to enable billing for it.
- In a web browser, navigate to the GCP Console.
- Ensure you select the project created in the previous steps.
- Select Billing .
- Link a Billing Account to the project. If you do not have an existing Billing Account, you may have to create one.
Enable Required APIs#
You will use gcloud to enable the needed services and apis for the project.
Enable the Kubernetes Engine API. This will allow you to make a service request to the API to create your GKE cluster:
Enable Kubernetes Engine API
gcloud services enable container.googleapis.comYou will need to enable the Cloud SQL API in order to create a PostgreSQL database. Run the following command to do this:
Enable Cloud SQL API
gcloud services enable sqladmin.googleapis.comIn order for our GKE cluster to communicate with PostgreSQL and Elasticsearch on internal IP addresses, the Service Networking API must be enabled:
Enable Cloud SQL API
gcloud services enable servicenetworking.googleapis.com \
    --project=fusionauth-gke-example
Configure the Network#
Now that you have the project set up and APIs enabled, it is time to set up the virtual network that will allow FusionAuth to run on GKE.
Allocate an IP address range for private communication on your Virtual Private Cloud (VPC):
Create a private IP address range
gcloud compute addresses create fusionauth-private-range \
  --global \
  --purpose=VPC_PEERING \
  --addresses=192.168.0.0 \
  --prefix-length=16 \
  --description="Fusionauth private IP range for GKE and SQL" \
  --network=default
In order for GKE to communicate with Cloud SQL over a private network you need to create a private connection from your VPC network to the underlying service producer network.
Create a private connection
gcloud services vpc-peerings connect \
  --service=servicenetworking.googleapis.com \
  --ranges=fusionauth-private-range \
  --network=default \
--project=fusionauth-gke-exampleCreate a GKE Cluster#
With your project configured, billing enabled, and the Kubernetes Engine API enabled, you can proceed to create your GKE cluster. If the work cluster scares you a bit, don't worry. It is just a group of computing nodes that work together to run containerized applications. It is managed by a control plane that automates the deployment of containers across the cluster. The control plane also manages the overall state of the cluster and handles things like scheduling workloads and ensuring the desired state of the cluster is maintained.
To create a new cluster in the us-west1 region with one node, execute the following.
Create GKE cluster
gcloud container clusters create fusionauth-cluster \
  --num-nodes=1 \
  --region=us-west1 \
  --enable-ip-alias \
  --cluster-version=1.30.9-gke.1009000 \
  --cluster-ipv4-cidr=10.44.0.0/14 \
  --services-ipv4-cidr=10.48.0.0/20 \
--labels=goog-partner-solution=isol_plb32_001kf000012eawziay_hgq452iixrlzpeddhfr5gp4uxglz5lvnThis can take several minutes to complete and the terminal should keep you updated on the progress. If you receive an error message stating "Master version '1.30.9-gke.1009000' is unsupported.", please see the Google documentation for currently supported versions. Replace the value for --cluster-version with a value that is supported.
Update Kubernetes Configuration#
If the create operation completed successfully, the last thing it will do is update your local ~/.kube configuration. If that didn't happen for whatever reason, gcloud provides the following to update your configuration and set the newly created cluster as the active context. This will let you use kubectl to access your cluster.
Get and update Kubeconfig
gcloud container clusters get-credentials fusionauth-clusterVerify Cluster Configuration#
Execute the list command to see GKE clusters that have been configured.
Get cluster information
gcloud container clusters listCluster list results
NAME                LOCATION  MASTER_VERSION      MASTER_IP       MACHINE_TYPE  NODE_VERSION        NUM_NODES  STATUS
fusionauth-cluster  us-west1  1.30.9-gke.1009000  35.203.129.221  e2-medium     1.30.9-gke.1009000  3          RUNNING
Create a Database#
Create a SQL Cloud PostgreSQL instance required for FusionAuth installation.
Create Cloud SQL for PostgreSQL instance
gcloud beta sql instances create fusionauth-test-db \
  --project=fusionauth-gke-example \
  --database-version=POSTGRES_12 \
  --tier=db-g1-small  \
  --region=us-west1 \
  --network=default \
--no-assign-ipConfigure the Default User#
Google cloud SQL requires that you execute the following to configure the postgres user.
Set admin user password
gcloud sql users set-password postgres \
  --instance=fusionauth-test-db \
  --password=changeMeToSomethingMoreSecure
Verify Database Creation#
Get list of Cloud SQL instances in the current project
gcloud sql instances listList Cloud SQL instances results
NAME                 DATABASE_VERSION  LOCATION    TIER               PRIMARY_ADDRESS  PRIVATE_ADDRESS  STATUS
fusionauth-test-db3  POSTGRES_12       us-west1-a  db-g1-small        -                10.50.144.5      RUNNABLE
Take a Break#
You now are running all the necessary infrastructure to deploy a containerized application to GKE. Awesome! Time to take a breather or bio-break if you need one. Once you are refreshed, you can continue.

Adding the Helm Chart Repository#
For this blog, you are going to use Helm. The first thing to do is add the FusionAuth Helm Chart repository. This can be done with the following.
Add a chart repository
helm repo add fusionauth https://fusionauth.github.io/chartsHelm Chart Configuration#
Before you install, configure the values.yaml file contents used by the Helm Chart. The majority of the values for this chart have defaults. There will be a few you update for this tutorial.
To update this file, first download it:
Download chart values
curl -o values.yaml https://raw.githubusercontent.com/FusionAuth/charts/main/chart/values.yamlOpen values.yaml with your favorite text editor and modify it.
Docker Image#
You will be using the latest release of FusionAuth.
Image configuration example
image:
  # image.repository -- The name of the docker repository for fusionauth-app
  repository: fusionauth/fusionauth-app
  # image.repository -- The docker tag to pull for fusionauth-app
  tag: latest
Database Configuration#
Now, configure the database connection. You will need to update the section with information from the database you created above.
The following is an example of the database configuration section in values.yaml. Notice the host, user, password, root:user, root:password will need to be updated with information for the database you created previously.
Database example configuration
database:
  # database.protocol -- Should either be postgresql or mysql. Protocol for jdbc connection to database
  protocol: postgresql
  # database.host -- Hostname or ip of the database instance
  host: "192.168.0.3"
  # database.host -- Port of the database instance
  port: 5432
  # database.tls -- Configures whether or not to use tls when connecting to the database
  tls: false
  # database.tlsMode -- If tls is enabled, this configures the mode
  tlsMode: require
  # database.name -- Name of the fusionauth database
  name: fusionauth

  # To use an existing secret, set `existingSecret` to the name of the secret. We expect at most two keys: `password` is required. `rootpassword` is only required if `database.root.user` is set.
  # database.existingSecret -- The name of an existing secret that contains the database passwords
  existingSecret: ""
  # database.user -- Database username for fusionauth to use in normal operation
  user: "postgres"
  # database.password -- Database password for fusionauth to use in normal operation - not required if database.existingSecret is configured
  password: "changeMeToSomethingMoreSecure"
  # These credentials are used for bootstrapping the database and creating it if needed. This can be useful for ephemeral clusters used for testing and dev.
  root:
    # database.root.user -- Database username for fusionauth to use during initial bootstrap - not required if you have manually bootstrapped your database
    user: "postgres"
    # database.root.password -- Database password for fusionauth to use during initial bootstrap - not required if database.existingSecret is configured
    password: "changeMeToSomethingMoreSecure"
Search Configuration#
There are two options available to configure search in FusionAuth. The first is a simple search through the database search engine and the second is the Elasticsearch engine. For more details on the differences, please see Search And FusionAuth. For this example, you will use the database search. You will need to update the search section of the values.yaml file.
search:
  # search.engine -- Defines backend for fusionauth search capabilities. Valid values for engine are 'elasticsearch' or 'database'.
  engine: database
Pod Configuration#
You will need to update an additional section of the values.yaml file. This will identify FusionAuth as a Google Partner Solution. You will need to find the section for the podLabels and replace it with the text below. The key and value will be the same for everyone.
Additional podLabels configuration
podLabels: {
   goog-partner-solution: isol_plb32_001kf000012eawziay_hgq452iixrlzpeddhfr5gp4uxglz5lvn
}
Deploy FusionAuth To the Cluster#
Now that values.yaml is updated, it is time to install the chart on the cluster. The helm install command is used to install a chart by name and can be applied using the syntax:
Helm install format
helm install [CHART NAME] [CHART] [flags]Here you will install a chart including the -f flag to override the default values.
Install the FusionAuth chart
helm install my-release fusionauth/fusionauth -f values.yamlAccess FusionAuth#
If the previous command was successful, you should see output similar to the following:
Example output
NAME: my-release
LAST DEPLOYED: Sun Oct 10 19:23:41 2021
NAMESPACE: default
STATUS: deployed
REVISION: 1
NOTES:
1. Get the application URL by running these commands:
  export SVC_NAME=$(kubectl get svc --namespace default -l "app.kubernetes.io/name=fusionauth,app.kubernetes.io/instance=my-release" -o jsonpath="{.items[0].metadata.name}")
  echo "Visit http://127.0.0.1:9011 to use your application"
  kubectl port-forward svc/$SVC_NAME 9011:9011
As instructed by the success message output above, you can create a proxy enabling you to connect to the cluster from localhost:
Setup port-forwarding proxy
export SVC_NAME=$(kubectl get svc --namespace default -l "app.kubernetes.io/name=fusionauth,app.kubernetes.io/instance=my-release" -o jsonpath="{.items[0].metadata.name}")
  echo "Visit http://127.0.0.1:9011 to use your application"
  kubectl port-forward svc/$SVC_NAME 9011:9011
Example output of kubectl proxying command
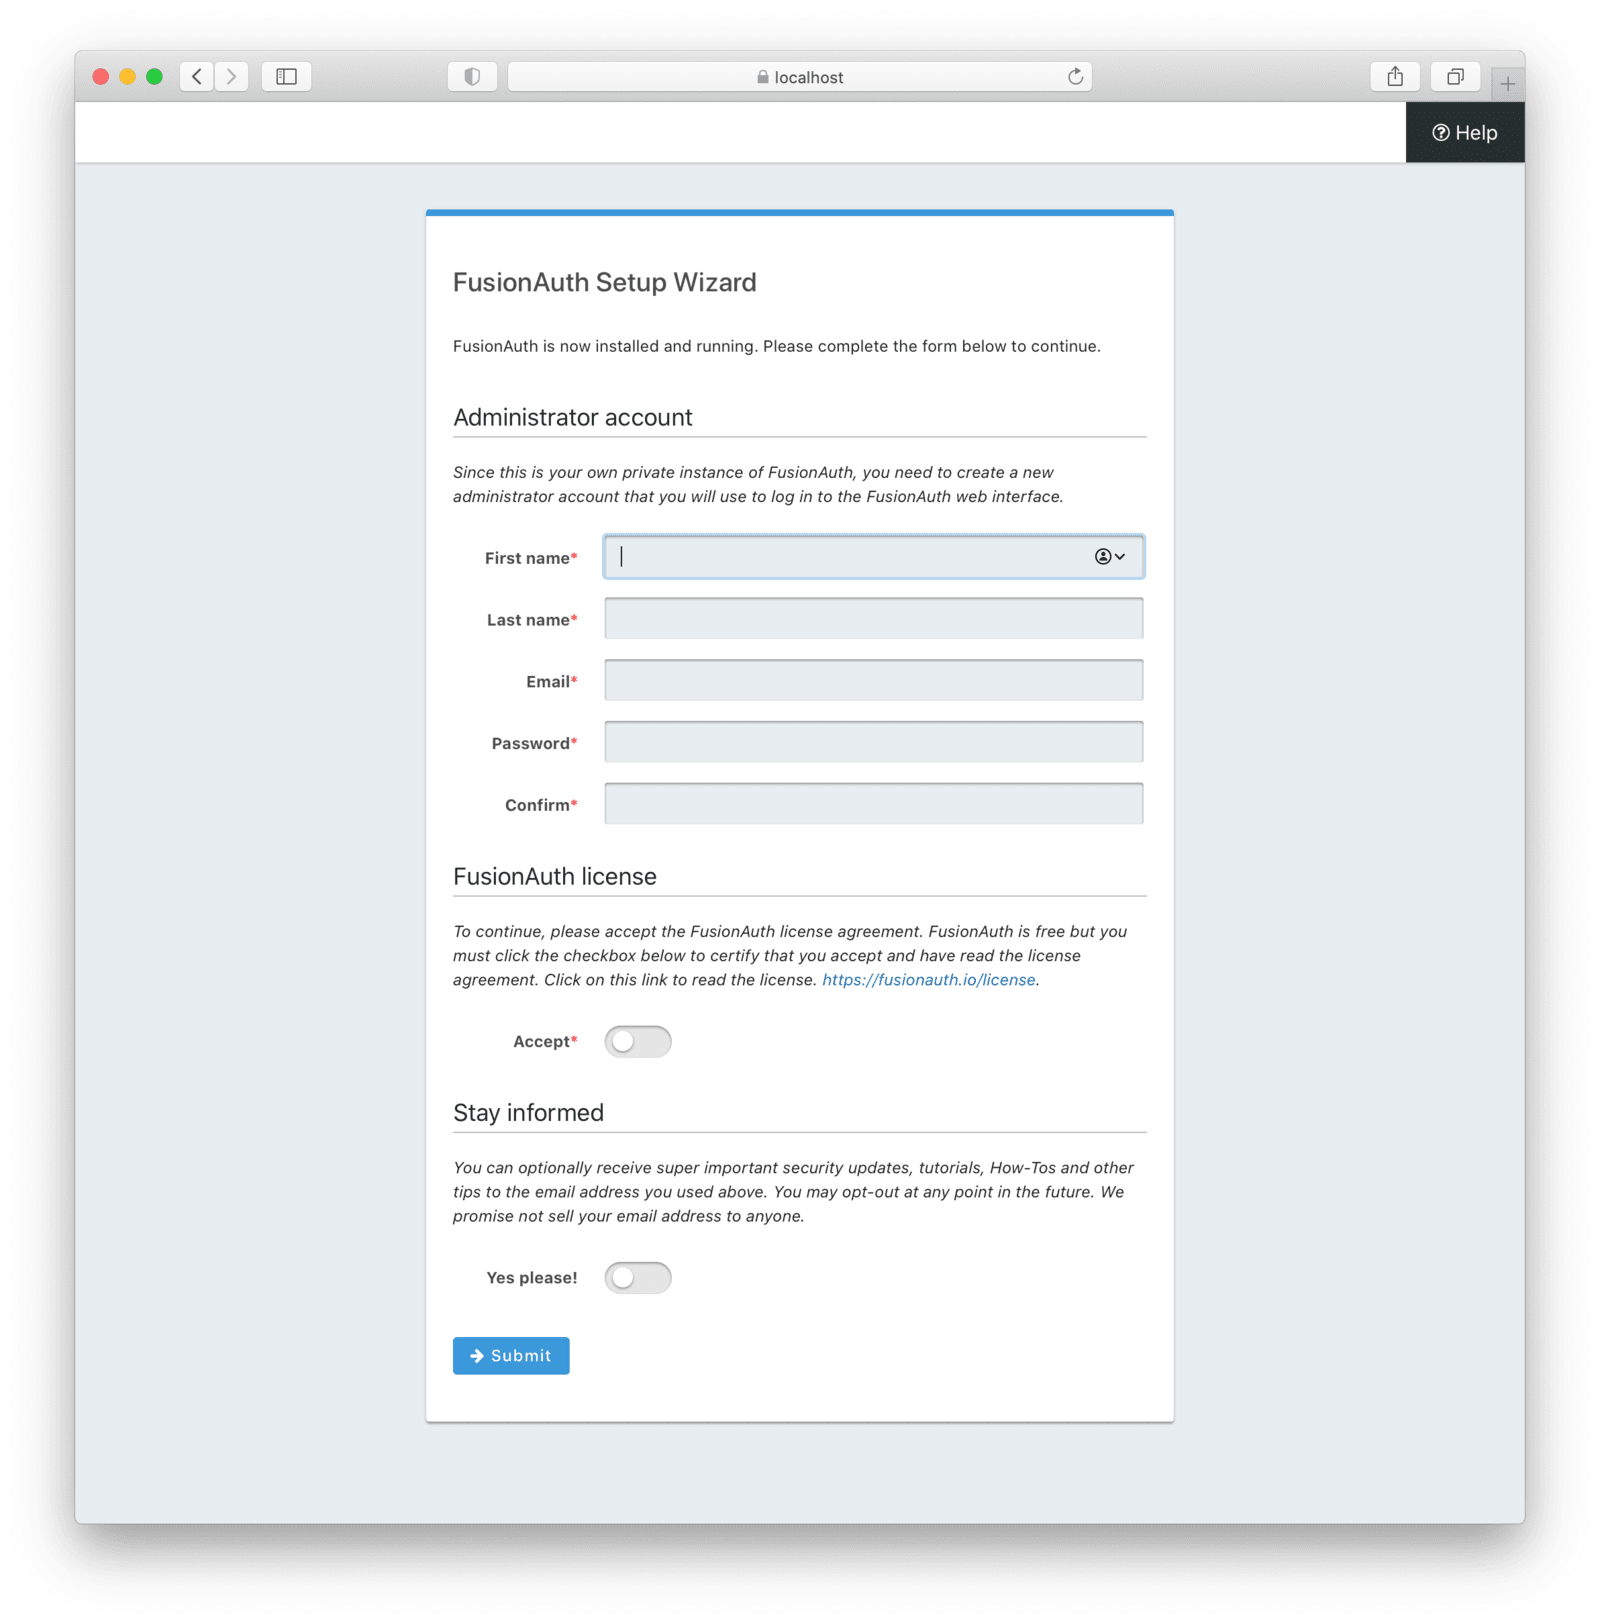
Forwarding from 127.0.0.1:9011 -> 9011Navigate to http://localhost:9011 and you will land on the FusionAuth Setup Wizard.
Next Steps#
If you choose to, complete the tutorial walking you through the initial FusionAuth configuration, see Setup Wizard & First Login.
This is a simplified tutorial to get FusionAuth up and running on the Google Kubernetes Engine. For more detail on deploying FusionAuth on Kubernetes, please see the documentation on how Deploy FusionAuth to a Kubernetes Cluster. While some of the information is the same as this blog, it goes into greater detail and show you how to do things like expose the instance you created to the outside world using an Ingress.
Experience seamless authentication integration with FusionAuth on GKE. Schedule a demo to see it in action.