> For the complete documentation index, see [llms.txt](https://fusionauth.io/docs/llms.txt)
# Securing a Flutter App with OAuth
How can you use Flutter, OAuth and OIDC together?
Today, Flutter has become one of the most talked about cross-platform mobile development frameworks. It competes with React Native in the number of GitHub stars. Most developers who have experienced Flutter development enjoy how one can configure and build beautiful user interfaces. There is no doubt Flutter is among the top contenders for developers when picking a mobile development framework for a new project.
tip
This blog post has been [superseded by a newer Flutter tutorial](https://fusionauth.io/docs/get-started/quickstarts/app/quickstart-flutter-native.md).
In this tutorial, we will implement one of the most essential features for any application: authentication. We'll use OAuth and OIDC. These standards let you interact with a wide variety of identity providers. In this case, we are going to use FusionAuth to run our own Auth server and develop this authentication integration.
If you want to go straight to the code, check out the [GitHub repo](https://github.com/FusionAuth/fusionauth-example-flutter-dart/).
So, let's get started!
## Requirements
Some tools you need to have before starting this tutorial:
* VSCode or any other Text Editor
* Git
* Xcode, for iOS
* iPhone simulator or real iOS device
* iPhone development environment
* Android emulator or real Android device
* Android development environment
* Familiarity with ngrok (optional, useful if you want to test on a device)
## Setting up FusionAuth as your auth provider
In order to set up FusionAuth, follow the [5 minute setup guide](https://fusionauth.io/docs/get-started/start-here/step-1.md). It is simple and quick. By default, the FusionAuth instance will run at the address `http://localhost:9011`.
We'll also run through some of the most important setup steps below:
*Ready to simplify OAuth in your Flutter apps? [Schedule a demo](https://fusionauth.io/contact.md) to see how FusionAuth can streamline your mobile authentication.*
### Configure a FusionAuth application
In this step, we are going to configure a FusionAuth application. This is different from the FusionAuth server instance or the Flutter application. In FusionAuth, an application is anything a user might log in to. To configure an application, sign into the FusionAuth administrative user interface and navigate to Applications . From there, create a new application by clicking the green + button.
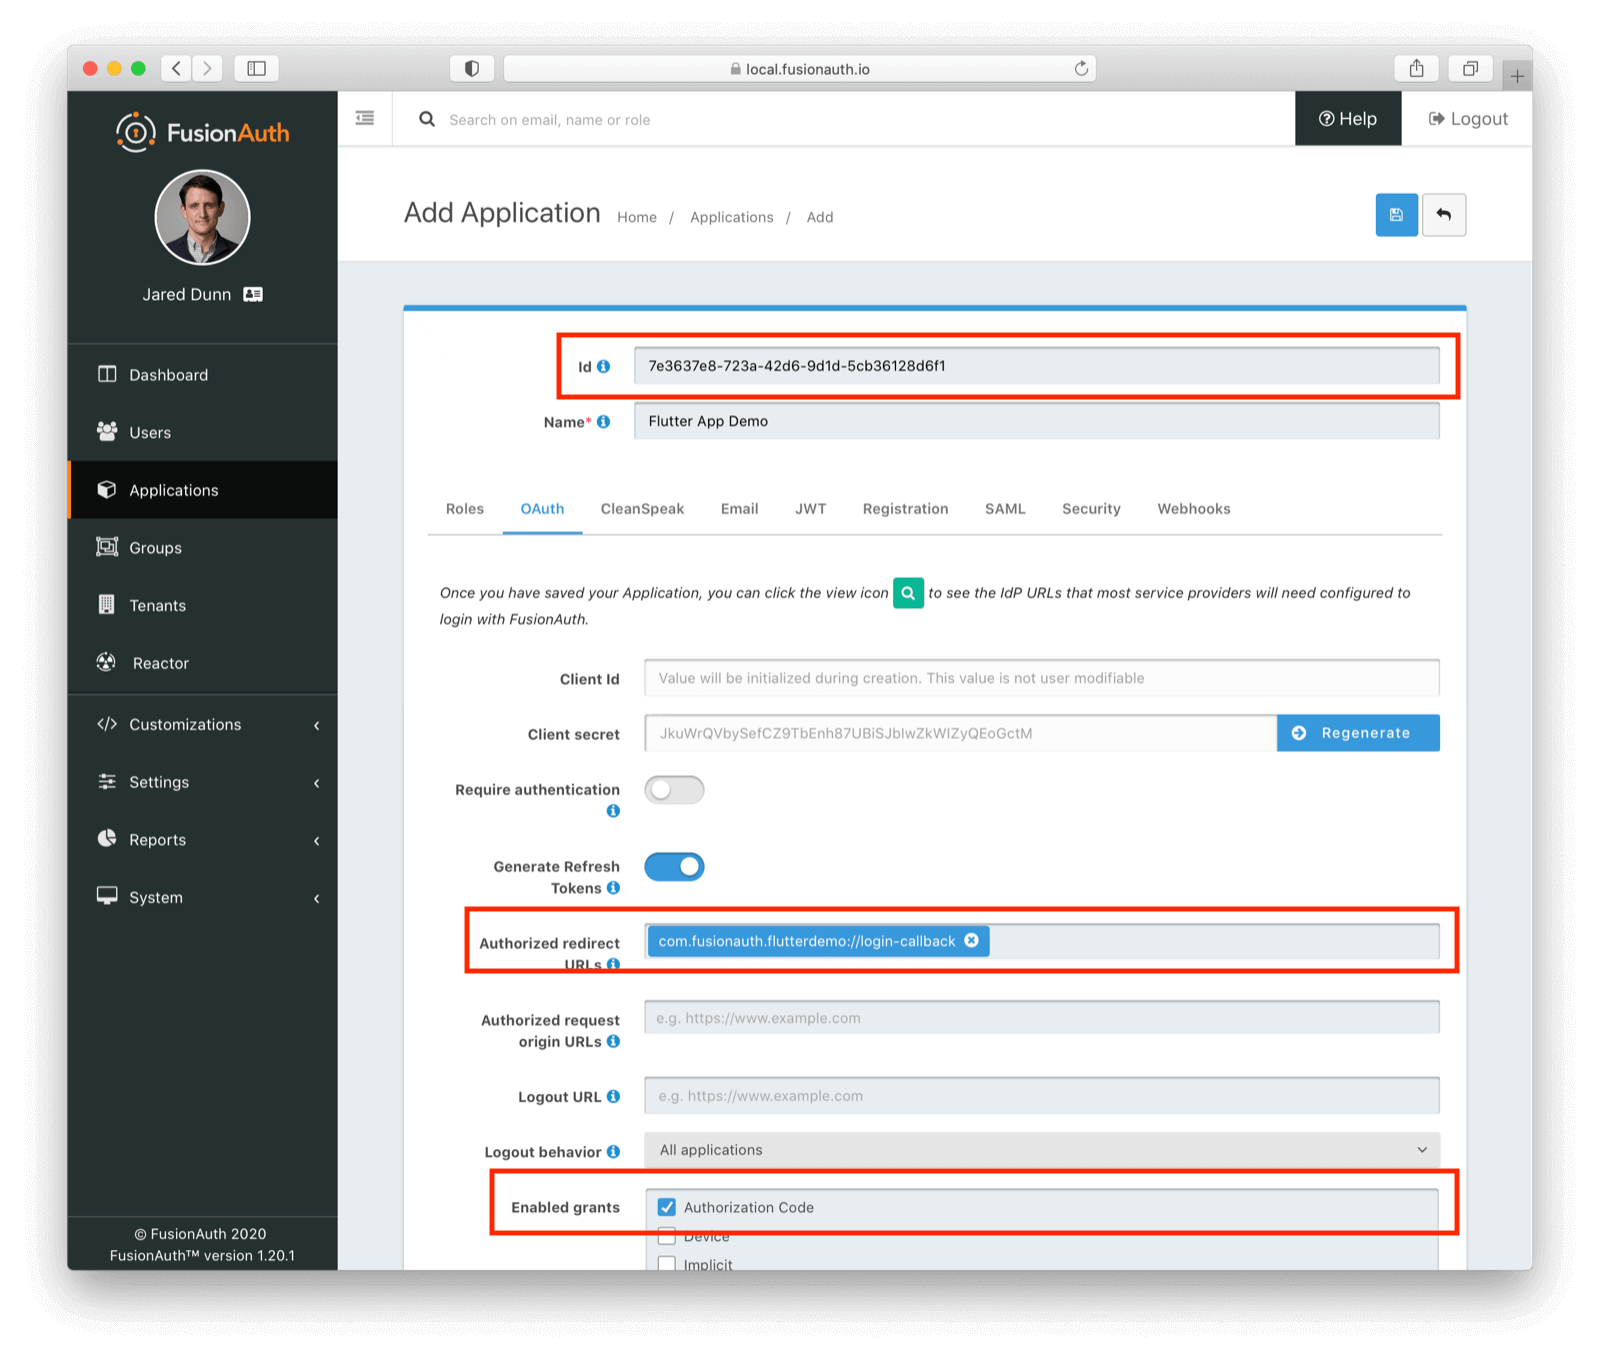
Then navigate to the OAuth tab and add in a redirect URI of `com.fusionauth.flutterdemo://login-callback`. We'll use this redirect URL in our Flutter application later. Make sure the "Require authentication" checkbox is set to off. Since the Flutter application is a native app, it's not considered a "confidential client" and a client secret isn't safe. It could be found by decompiling the application. The library we will use implements another method of securing access: proof of key code exchange, or PKCE (often pronounced "pixie").
Ensure that the authorization code grant is enabled as well. Add the value of `7e3637e8-723a-42d6-9d1d-5cb36128d6f1` into the **Id** field. If you don't provide one, it will be generated for you. The Id of the application is also the "Client Id"; we'll need that later in the configuration process.
Then, we need to click Save . When properly configured, the application details screen should look like this:
We need to make sure that we register our users to the new FusionAuth application. Doing so creates a relationship between a user and the newly created application as shown in the screenshot below:

If we want, we can add more users to the "Users" and register them to this application. But you can work through this tutorial with just one registered user.
If you want to test with a real device, you should also set up ngrok to point to the local FusionAuth server, so that devices can access `http://localhost:9011`. While beyond the scope of this tutorial, here's [ngrok documentation](https://ngrok.com/docs#getting-started-expose) on how to do so.
Next, we move on to setting up the Flutter app project.
## Setting up the Flutter project
Setting up the Flutter project is simple and easy for every OS. We can follow the instructions in the [Flutter documentation](https://flutter.dev/docs/get-started/install). But to make things easier, a quick outline of the setup steps is provided below.
First, we need to clone the Flutter SDK from GitHub by running the following command in our device terminal:
```shell
cd $HOME/dev
git clone https://github.com/flutter/flutter.git
```
Note that we need to choose an appropriate directory in which to clone the SDK. We choose `~/dev` above.
Next, we need to add the flutter tool to our path by running the following command in the terminal (and if you are doing this more than once, perhaps to your `.bashrc` or `.zshrc`):
```shell
export PATH="$PATH:$HOME/dev/flutter/bin"
```
We can check if everything is configured properly by running the following command in our terminal window:
```shell
flutter doctor
```
If everything is configured properly, we will see the following result in our terminal window:
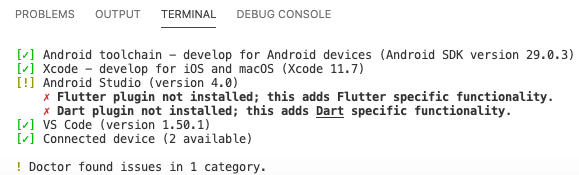
If you didn't see the above messages, please review the [more detailed installation instructions](https://flutter.dev/docs/get-started/install) on the Flutter site.
Note that Flutter depends on iOS and/or Android development environments being installed. Doing so is beyond the scope of this tutorial, however. If you need to do that, please consult the platform installation instructions for Android or iOS as appropriate.
## Creating a new Flutter app
In order to create and set up the new flutter app, run the following command. You'll want to be in a directory where the project should live.
```shell
cd $HOME/dev
flutter create fusionauth_demo
```
After the installation process completes, we will see that the `fusionauth_demo` directory contains all the flutter starter app configuration. We can open the project directory with VSCode by running the following command:
```shell
code fusionauth_demo
```
If you don't have VSCode, open the files in whatever text editor you'd prefer; we're not picky!
We can run our new project in the actual device or an emulator to confirm everything is working before we customize any code. Do so by running the following command in the project directory:
```shell
cd $HOME/dev/fusionauth_demo
flutter run
```
After running this, we will get the list of emulators or devices in which we want to run the project. We can simply choose the one in which we want our code to run. We'll assume you remain in this directory for the rest of this tutorial.
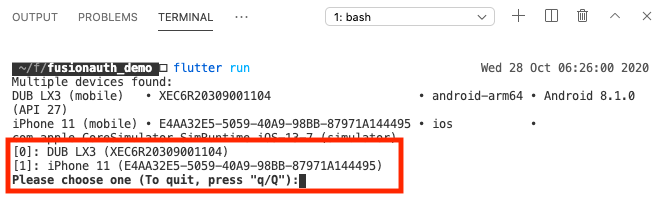
However, to run the project on both iOS and Android together, we can use the following command:
```shell
flutter run -d all
```
The build process always takes a while the first time an app is built. After the successful build, we will get the boilerplate flutter app in our emulators as displayed in the emulator screenshots below:
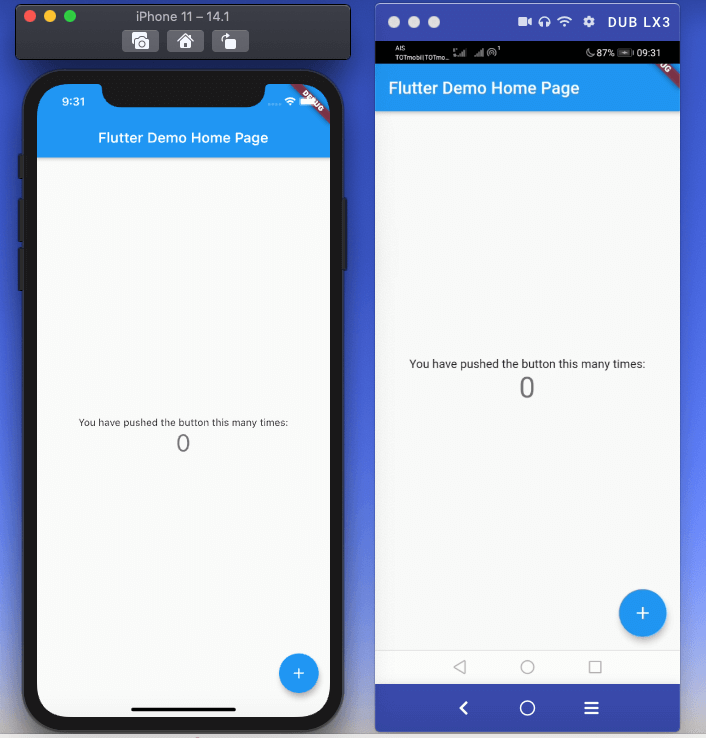
Now that we have a basic working application running, let's jump into the fun stuff: adding auth!
## Integrating AppAuth
[AppAuth](https://appauth.io/) is a popular OAuth package that can be used in both native and cross-platform mobile applications. In this project, we will be storing the access token using the secure storage package. Since such tokens allow our application to access protected resources such as APIs, we need to take care they are stored as securely as possible.
Therefore, we need to install some dependencies to our project. For that, we need to open the `pubspec.yml` file in our project and add these dependencies:
```yaml
dependencies:
flutter:
sdk: flutter
http: ^0.12.1
flutter_appauth: ^0.9.1
flutter_secure_storage: ^3.3.3
simple_gravatar: ^1.0.5
cupertino_icons: ^1.0.0
```
## Setting up AppAuth
Now that we have installed our libraries, we need to configure and add our previously configured callback URL to native configuration in both the Android and iOS directories.
Let's look at Android first.
### Android setup
In our editor, we need to go to the `android/app/build.gradle` file for our Android app. We'll specify the custom scheme. There should be a section in the file that looks similar to the below code block, but you'll need to add the FusionAuth URL: `com.fusionauth.flutterdemo://login-callback`.
At the end of your editing, make sure the `appAuthRedirectScheme` section looks similar to this:
```groovy
// ...
android {
//...
defaultConfig {
// ...
manifestPlaceholders = [
'appAuthRedirectScheme': 'com.fusionauth.flutterdemo://login-callback'
]
}
}
```
### iOS setup
We need to edit the `Info.plist` file in our iOS app to specify the custom scheme. There should be a section in it that looks similar to the following, but you'll need to add the FusionAuth URL: `com.fusionauth.flutterdemo://login-callback`.
At the end of your editing, make sure the `CFBundleURLSchemes` section looks similar to this:
```xml
CFBundleURLTypes
CFBundleTypeRole
Editor
CFBundleURLSchemes
com.fusionauth.flutterdemo://login-callback
```
Enough configuration! Let's look at some code.
## Dive into the code
We need to open the `main.dart` file present inside the `./lib` directory of our project. Below is the entirety of the `main.dart` file, as it should be when fully finished. Don't worry, we'll go over each section individually!
Putting all your logic in one file makes sense for a tutorial, but for a larger application you'll probably want to split it up.
```dart
import 'dart:convert';
import 'dart:developer';
import 'package:flutter/material.dart';
import 'package:simple_gravatar/simple_gravatar.dart';
import 'package:http/http.dart' as http;
import 'package:flutter_appauth/flutter_appauth.dart';
import 'package:flutter_secure_storage/flutter_secure_storage.dart';
final FlutterAppAuth appAuth = FlutterAppAuth();
const FlutterSecureStorage secureStorage = FlutterSecureStorage();
const String FUSION_AUTH_DOMAIN = '1a5321098cb0.ngrok.io';
const String FUSION_AUTH_CLIENT_ID = '7e3637e8-723a-42d6-9d1d-5cb36128d6f1';
const String FUSION_AUTH_REDIRECT_URI =
'com.fusionauth.flutterdemo://login-callback';
const String FUSION_AUTH_ISSUER = 'https://$FUSION_AUTH_DOMAIN';
void main() {
runApp(MyApp());
}
class MyApp extends StatefulWidget {
const MyApp({Key key}) : super(key: key);
@override
_MyAppState createState() => _MyAppState();
}
class _MyAppState extends State {
bool isBusy = false;
bool isLoggedIn = false;
String errorMessage;
String name;
String picture;
@override
Widget build(BuildContext context) {
return MaterialApp(
title: 'FusionAuth on Flutter ',
home: Scaffold(
appBar: AppBar(
title: const Text('FusionAuth on Flutter Demo'),
),
body: Center(
child: isBusy
? const CircularProgressIndicator()
: isLoggedIn
? Profile(logoutAction, name, picture)
: Login(loginAction, errorMessage),
),
),
);
}
Future> getUserDetails(String accessToken) async {
const String url = 'https://$FUSION_AUTH_DOMAIN/oauth2/userinfo';
final http.Response response = await http.get(
url,
headers: {'Authorization': 'Bearer $accessToken'},
);
if (response.statusCode == 200) {
return jsonDecode(response.body);
} else {
throw Exception('Failed to get user details');
}
}
Future loginAction() async {
setState(() {
isBusy = true;
errorMessage = '';
});
try {
final AuthorizationTokenResponse result =
await appAuth.authorizeAndExchangeCode(
AuthorizationTokenRequest(
FUSION_AUTH_CLIENT_ID,
FUSION_AUTH_REDIRECT_URI,
issuer: 'https://$FUSION_AUTH_DOMAIN',
scopes: ['offline_access'],
),
);
log('data: $result');
final Map profile =
await getUserDetails(result.accessToken);
debugPrint('response: $profile');
await secureStorage.write(
key: 'refresh_token', value: result.refreshToken);
var gravatar = Gravatar(profile['email']);
var url = gravatar.imageUrl(
size: 100,
defaultImage: GravatarImage.retro,
rating: GravatarRating.pg,
fileExtension: true,
);
setState(() {
isBusy = false;
isLoggedIn = true;
name = profile['given_name'];
picture = url;
});
} on Exception catch (e, s) {
debugPrint('login error: $e - stack: $s');
setState(() {
isBusy = false;
isLoggedIn = false;
errorMessage = e.toString();
});
}
}
Future initAction() async {
final String storedRefreshToken =
await secureStorage.read(key: 'refresh_token');
if (storedRefreshToken == null) return;
setState(() {
isBusy = true;
});
try {
final TokenResponse response = await appAuth.token(TokenRequest(
FUSION_AUTH_CLIENT_ID,
FUSION_AUTH_REDIRECT_URI,
issuer: FUSION_AUTH_ISSUER,
refreshToken: storedRefreshToken,
));
final Map profile =
await getUserDetails(response.accessToken);
await secureStorage.write(
key: 'refresh_token', value: response.refreshToken);
var gravatar = Gravatar(profile['email']);
var url = gravatar.imageUrl(
size: 100,
defaultImage: GravatarImage.retro,
rating: GravatarRating.pg,
fileExtension: true,
);
setState(() {
isBusy = false;
isLoggedIn = true;
name = profile['given_name'];
picture = url;
});
} on Exception catch (e, s) {
debugPrint('error on refresh token: $e - stack: $s');
await logoutAction();
}
}
Future logoutAction() async {
await secureStorage.delete(key: 'refresh_token');
setState(() {
isLoggedIn = false;
isBusy = false;
});
}
}
class Login extends StatelessWidget {
final Future Function() loginAction;
final String loginError;
const Login(this.loginAction, this.loginError, {Key key}) : super(key: key);
@override
Widget build(BuildContext context) {
return Column(
mainAxisAlignment: MainAxisAlignment.center,
children: [
RaisedButton(
onPressed: () async {
await loginAction();
},
child: const Text('Login'),
),
Text(loginError ?? ''),
],
);
}
}
class Profile extends StatelessWidget {
final Future Function() logoutAction;
final String name;
final String picture;
const Profile(this.logoutAction, this.name, this.picture, {Key key})
: super(key: key);
@override
Widget build(BuildContext context) {
return Column(
mainAxisAlignment: MainAxisAlignment.center,
children: [
Container(
width: 200,
height: 200,
decoration: BoxDecoration(
border: Border.all(color: Colors.orange, width: 4),
shape: BoxShape.circle,
image: DecorationImage(
fit: BoxFit.fill,
image: NetworkImage(picture ?? ''),
),
),
),
const SizedBox(height: 24),
Text('Name: $name'),
const SizedBox(height: 48),
RaisedButton(
onPressed: () async {
await logoutAction();
},
child: const Text('Logout'),
),
],
);
}
}
```
That's a lot. Let's break it down section by section. First, inside the `main.dart` file, we need to import all necessary packages:
```dart
import 'dart:convert';
import 'dart:developer';
import 'package:flutter/material.dart';
import 'package:simple_gravatar/simple_gravatar.dart';
import 'package:http/http.dart' as http;
import 'package:flutter_appauth/flutter_appauth.dart';
import 'package:flutter_secure_storage/flutter_secure_storage.dart';
//...
```
Then, we can initialize the `FlutterAppAuth` instance and `FlutterSecureStorage` instance by using this code:
```dart
// ...
final FlutterAppAuth appAuth = FlutterAppAuth();
const FlutterSecureStorage secureStorage = FlutterSecureStorage();
// ...
```
Next, we need to define some constants. We're using ngrok.io because we want to have this application run on a real device. If you are only using a simulator, you can set `FUSIONAUTH_AUTH_DOMAIN` to `localhost:9011`.
```dart
//...
const String FUSION_AUTH_DOMAIN = 'b47a7e1e6e7d.ngrok.io';
const String FUSION_AUTH_CLIENT_ID = '7e3637e8-723a-42d6-9d1d-5cb36128d6f1';
const String FUSION_AUTH_REDIRECT_URI =
'com.fusionauth.flutterdemo://login-callback';
const String FUSION_AUTH_ISSUER = 'https://$FUSION_AUTH_DOMAIN';
// ...
```
Now we are going to create the following classes:
* `Profile`
* `Login`
* `MyApp`
Let's look at each of these in turn.
The `Profile` class extends the `StatelessWidget` class. It holds what is shown after the successful login. The user interface is simple, some user information and a logout button.
```dart
// ...
class Profile extends StatelessWidget {
final Future Function() logoutAction;
final String name;
final String picture;
const Profile(this.logoutAction, this.name, this.picture, {Key key})
: super(key: key);
@override
Widget build(BuildContext context) {
return Column(
mainAxisAlignment: MainAxisAlignment.center,
children: [
Container(
width: 200,
height: 200,
decoration: BoxDecoration(
border: Border.all(color: Colors.orange, width: 4),
shape: BoxShape.circle,
image: DecorationImage(
fit: BoxFit.fill,
image: NetworkImage(picture ?? ''),
),
),
),
const SizedBox(height: 24),
Text('Name: $name'),
const SizedBox(height: 48),
RaisedButton(
onPressed: () async {
await logoutAction();
},
child: const Text('Logout'),
),
],
);
}
}
//...
```
The `Login` class also extends `StatelessWidget`. It displays a simple Login button. When pressed, that will start the `loginAction`, which we'll build out below.
```dart
//...
class Login extends StatelessWidget {
final Future Function() loginAction;
final String loginError;
const Login(this.loginAction, this.loginError, {Key key}) : super(key: key);
@override
Widget build(BuildContext context) {
return Column(
mainAxisAlignment: MainAxisAlignment.center,
children: [
RaisedButton(
onPressed: () async {
await loginAction();
},
child: const Text('Login'),
),
Text(loginError ?? ''),
],
);
}
}
//...
```
`MyApp` is the main class and extends `StatefulWidget`. The `MyApp` object is the main class that runs our app. The whole application is started by the `main` function which calls the `runApp` function which starts up the `MyApp` object.
```dart
//...
void main() => runApp(const MyApp());
class MyApp extends StatefulWidget {
const MyApp({Key key}) : super(key: key);
@override
_MyAppState createState() => _MyAppState();
}
//...
```
However, most of the action takes place in the `_MyAppState` object. In terms of user interface, this object renders the `Profile` or `Login` interfaces based on whether the user is authenticated or not.
```dart
//...
class _MyAppState extends State {
bool isBusy = false;
bool isLoggedIn = false;
String errorMessage;
String name;
String picture;
//...
```
This class houses the implementation of four main functions which set up the user interface and interact with the external OIDC server:
* `initAction`
* `loginAction`
* `getUserDetails`
* `logoutAction`
`initAction` is called inside the `initState` function of the `MyApp` class. This function is executed when the `MyApp` object is initialized. It checks the authentication token and if it is present, retrieves user details and sets the state with those details.
```dart
//...
Future initAction() async {
final String storedRefreshToken =
await secureStorage.read(key: 'refresh_token');
if (storedRefreshToken == null) return;
setState(() {
isBusy = true;
});
try {
final TokenResponse response = await appAuth.token(TokenRequest(
FUSION_AUTH_CLIENT_ID,
FUSION_AUTH_REDIRECT_URI,
issuer: FUSION_AUTH_ISSUER,
refreshToken: storedRefreshToken,
));
final Map profile =
await getUserDetails(response.accessToken);
await secureStorage.write(
key: 'refresh_token', value: response.refreshToken);
var gravatar = Gravatar(profile['email']);
var url = gravatar.imageUrl(
size: 100,
defaultImage: GravatarImage.retro,
rating: GravatarRating.pg,
fileExtension: true,
);
setState(() {
isBusy = false;
isLoggedIn = true;
name = profile['given_name'];
picture = url;
});
} on Exception catch (e, s) {
debugPrint('error on refresh token: $e - stack: $s');
await logoutAction();
}
}
//...
```
The `loginAction` is triggered when we press the login button of the `Login` class. This function retrieves the Authorization Token Response using the `AuthorizationTokenResponse` method returned by the `appAuth.authorizeAndExchangeCode` call. The request needs the client id, redirect URL, issuer, and required scopes to provide the access token. It also uses the aforementioned PKCE process by default, preventing insecure access. The `AppAuth` library takes care of all of these details. Pretty sweet, eh?
After successfully getting the access token, the `getUserDetails` function is called to get user information and set the required state variables, which changes the UI rendered.
The library makes things pretty easy. But you might have a couple of questions. Why not use a form to capture the user credentials? Well, we want to delegate all auth operations to FusionAuth. This means we don't have to worry as much about securing our native app, because credential management happens within the external user management server.
OK, that's fine. But if you run this code, you'll see it pops out to the system browser. Why not use an embedded webview? Well, because a webview is totally controlled by the native application displaying it, the [current mobile best practices](https://tools.ietf.org/html/rfc8252) for OAuth require you to use the system browser, which is not under that control. From section 8.12 of that document:
> This best current practice requires that native apps MUST NOT use embedded user-agents to perform authorization requests and allows that authorization endpoints MAY take steps to detect and block authorization requests in embedded user-agents.
After that digression, here's `loginAction`:
```dart
Future loginAction() async {
setState(() {
isBusy = true;
errorMessage = '';
});
try {
final AuthorizationTokenResponse result =
await appAuth.authorizeAndExchangeCode(
AuthorizationTokenRequest(
FUSION_AUTH_CLIENT_ID,
FUSION_AUTH_REDIRECT_URI,
issuer: 'https://$FUSION_AUTH_DOMAIN',
scopes: ['openid'],
),
);
log('data: $result');
final Map profile =
await getUserDetails(result.accessToken);
debugPrint('response: $profile');
await secureStorage.write(
key: 'refresh_token', value: result.refreshToken);
var gravatar = Gravatar(profile['email']);
var url = gravatar.imageUrl(
size: 100,
defaultImage: GravatarImage.retro,
rating: GravatarRating.pg,
fileExtension: true,
);
setState(() {
isBusy = false;
isLoggedIn = true;
name = profile['given_name'];
picture = url;
});
} on Exception catch (e, s) {
debugPrint('login error: $e - stack: $s');
setState(() {
isBusy = false;
isLoggedIn = false;
errorMessage = e.toString();
});
}
}
// ...
```
As you can see above, `loginAction` called `getUserDetails`. What does this function do? It takes the access token as a parameter and makes the HTTP GET request to the auth server. If successful, it will receive the user details in response. This is a standard OIDC call. This function is called inside the `initAction` function as well.
```dart
// ...
Future> getUserDetails(String accessToken) async {
const String url = 'https://$FUSION_AUTH_DOMAIN/oauth2/userinfo';
final http.Response response = await http.get(
url,
headers: {'Authorization': 'Bearer $accessToken'},
);
if (response.statusCode == 200) {
return jsonDecode(response.body);
} else {
throw Exception('Failed to get user details');
}
}
// ...
```
When you can log in, you want to be able to log out too. In `logoutAction` we do two things:
* Remove the access token from secure storage
* Set the state back to initial values
These are all shown in the code snippet below:
```dart
Future logoutAction() async {
await secureStorage.delete(key: 'refresh_token');
setState(() {
isLoggedIn = false;
isBusy = false;
});
}
```
If you log out and then log in again, the system browser where you were prompted to log in remembers you and you aren't prompted to sign in again. At publishing time, AppAuth has [an open issue](https://github.com/MaikuB/flutter_appauth/issues/48) about this behavior.
After editing `main.dart`, start up your emulators or real devices again.
```shell
flutter run -d all
```
You should see something similar to this demo:
[Play](https://youtube.com/watch?v=EklSdaT0xfw)
## Additional resources
Want to dive in further? Here are some additional resources for understanding auth in Flutter and mobile applications.
* [Flutter AppAuth Plugin](https://pub.dev/packages/flutter_appauth)
* [Auth in Flutter](https://medium.com/@greg.perry/auth-in-flutter-97275b29b550)
* [FusionAuth Dart Client Library](https://github.com/FusionAuth/fusionauth-dart-client)
* [Native app OAuth best practices](https://tools.ietf.org/html/rfc8252)
## Conclusion
With the growing popularity of the Flutter mobile app development framework, you may be building an app in it soon. Here, we talked about integrating Flutter and OAuth using FusionAuth as our example auth provider. First, we set up our Flutter project and ran a barebones app in the respective emulators or devices.
Then, we dove into code showing how to implement the authentication in Flutter, with FusionAuth as our identity provider.
If you need to extend this application to access the FusionAuth API, check out the [FusionAuth Dart client library](https://github.com/FusionAuth/fusionauth-dart-client/). For example, you could add the last login date as a custom data field to the profile UI.
As a final reminder, the [entire working project](https://github.com/FusionAuth/fusionauth-example-flutter-dart/) is available under the Apache2 license on GitHub. Clone it, take a look and experiment.
Until then, keep coding folks!
*Ready to simplify OAuth in your Flutter apps? [Schedule a demo](https://fusionauth.io/contact.md) to see how FusionAuth can streamline your mobile authentication.*