


Discord is a popular instant messaging and VoIP platform that allows users to form communities around common interests. There are a few reasons you might want to use Discord as your SSO identity provider. Discord is often used by hobby communities ranging from programming, gaming, and electronics to less technical things like finance and cooking. If there’s a community, there’s a good chance they have a Discord server. If you’re building a service aimed at one of these communities, using Discord as your SSO provider can make a lot of sense, allowing your users to log in with an account they already have rather than going through yet another registration process.
There are other use cases for SSO with Discord, such as building a bot to automatically respond to and interact with members of your server. Using Discord for SSO also allows you to pull details about the user and their servers into your application, which can be useful if you are building something thematically related to Discord or the communities that use it.
What is SSO with Discord?#
Before diving into the tutorial, it’s important to understand what you’ll be doing. Single sign-on (SSO) is using a single set of credentials to authenticate in multiple places. In this case, it’s using your Discord credentials to authenticate with a different service. There’s a lot that goes on behind the scenes to make this possible, but thanks to authentication providers like FusionAuth and standards like OAuth, it doesn’t have to be a complicated task for developers. By configuring an integration between Discord and FusionAuth, you can use FusionAuth in your applications to allow users to log in with their Discord credentials—or credentials for any other SSO providers you want to configure.
What is FusionAuth?#
FusionAuth is a complete auth platform that saves your team time and resources by handling everything to do with authentication and identity access management. It allows you to quickly implement complex standards like OAuth, OpenID Connect, and SAML and build out additional login features to meet compliance requirements.
FusionAuth is built by devs, for devs. With an API-first architecture, great documentation, and fantastic support, it takes auth off your plate so you can get back to building something awesome.
Schedule a demo to see how easy it is to set up SSO for Discord — or any other app.
Implementing SSO with Discord and FusionAuth#
To get started, you’ll need an account with Discord, a code editor of your choice, and Docker for running the FusionAuth server. It’s possible to run FusionAuth without Docker if you’d prefer, but the Docker approach is the cleanest and easiest to set up. Please refer to the official documentation to install and configure Docker, and make sure you have a recent version of both Docker and Docker Compose installed.
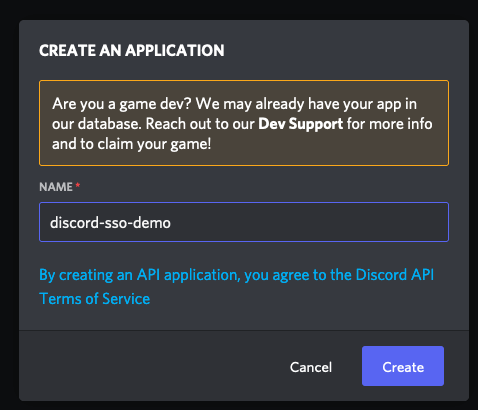
Once you have these prerequisites in place, you need to log in to Discord and navigate to the Developer Portal to register a new application. Do this by selecting the New Application button near the top of the page. You’ll be presented with a dialog asking you to name your application. The name doesn’t matter for this tutorial, so give it any name that makes it easy for you to identify your application in the future.
After entering a name, you’ll be taken to your new application and presented with details about it. From here, navigate to the OAuth2 menu in the sidebar. Here you can see further details such as your Discord Client Id and Secret. Make a note of these values, as you’ll need them to configure your FusionAuth Identity Provider. On this page, there is also an option to add redirect URLs. Add http://localhost:9011/oauth2/callback as your redirect URL. This address will resolve to the FusionAuth instance that you will set up in the next step.
Next, you need to set up a FusionAuth instance. If you already have a FusionAuth Cloud instance, you can use that, but for the sake of simplicity, this tutorial will assume you are using a locally hosted instance. There are detailed setup guides in the documentation, but the short version is that once you have Docker and Docker Compose set up and installed correctly, you can run the following command in a new directory to download and execute the necessary files.
curl -o docker-compose.yml https://raw.githubusercontent.com/FusionAuth/fusionauth-containers/main/docker/fusionauth/docker-compose.yml
curl -o .env https://raw.githubusercontent.com/FusionAuth/fusionauth-containers/main/docker/fusionauth/.env
docker compose up
Next, it's time to configure FusionAuth. If this is your first time logging in to your FusionAuth instance, you need to register an account. Just enter your name, email, password, and click Submit . There's also a tutorial about setting up an instance the first time.
You can also use this sample kickstart file to set up everything if you don't want to do these steps manually. Make sure to review the kickstart file and update the authorized redirect URLs, at a minimum. Learn more about Kickstart here.
Once you’ve created your administrator account, you need to create a new application. Navigate to Applications in the sidebar, and click the Plus button at the top of the screen.
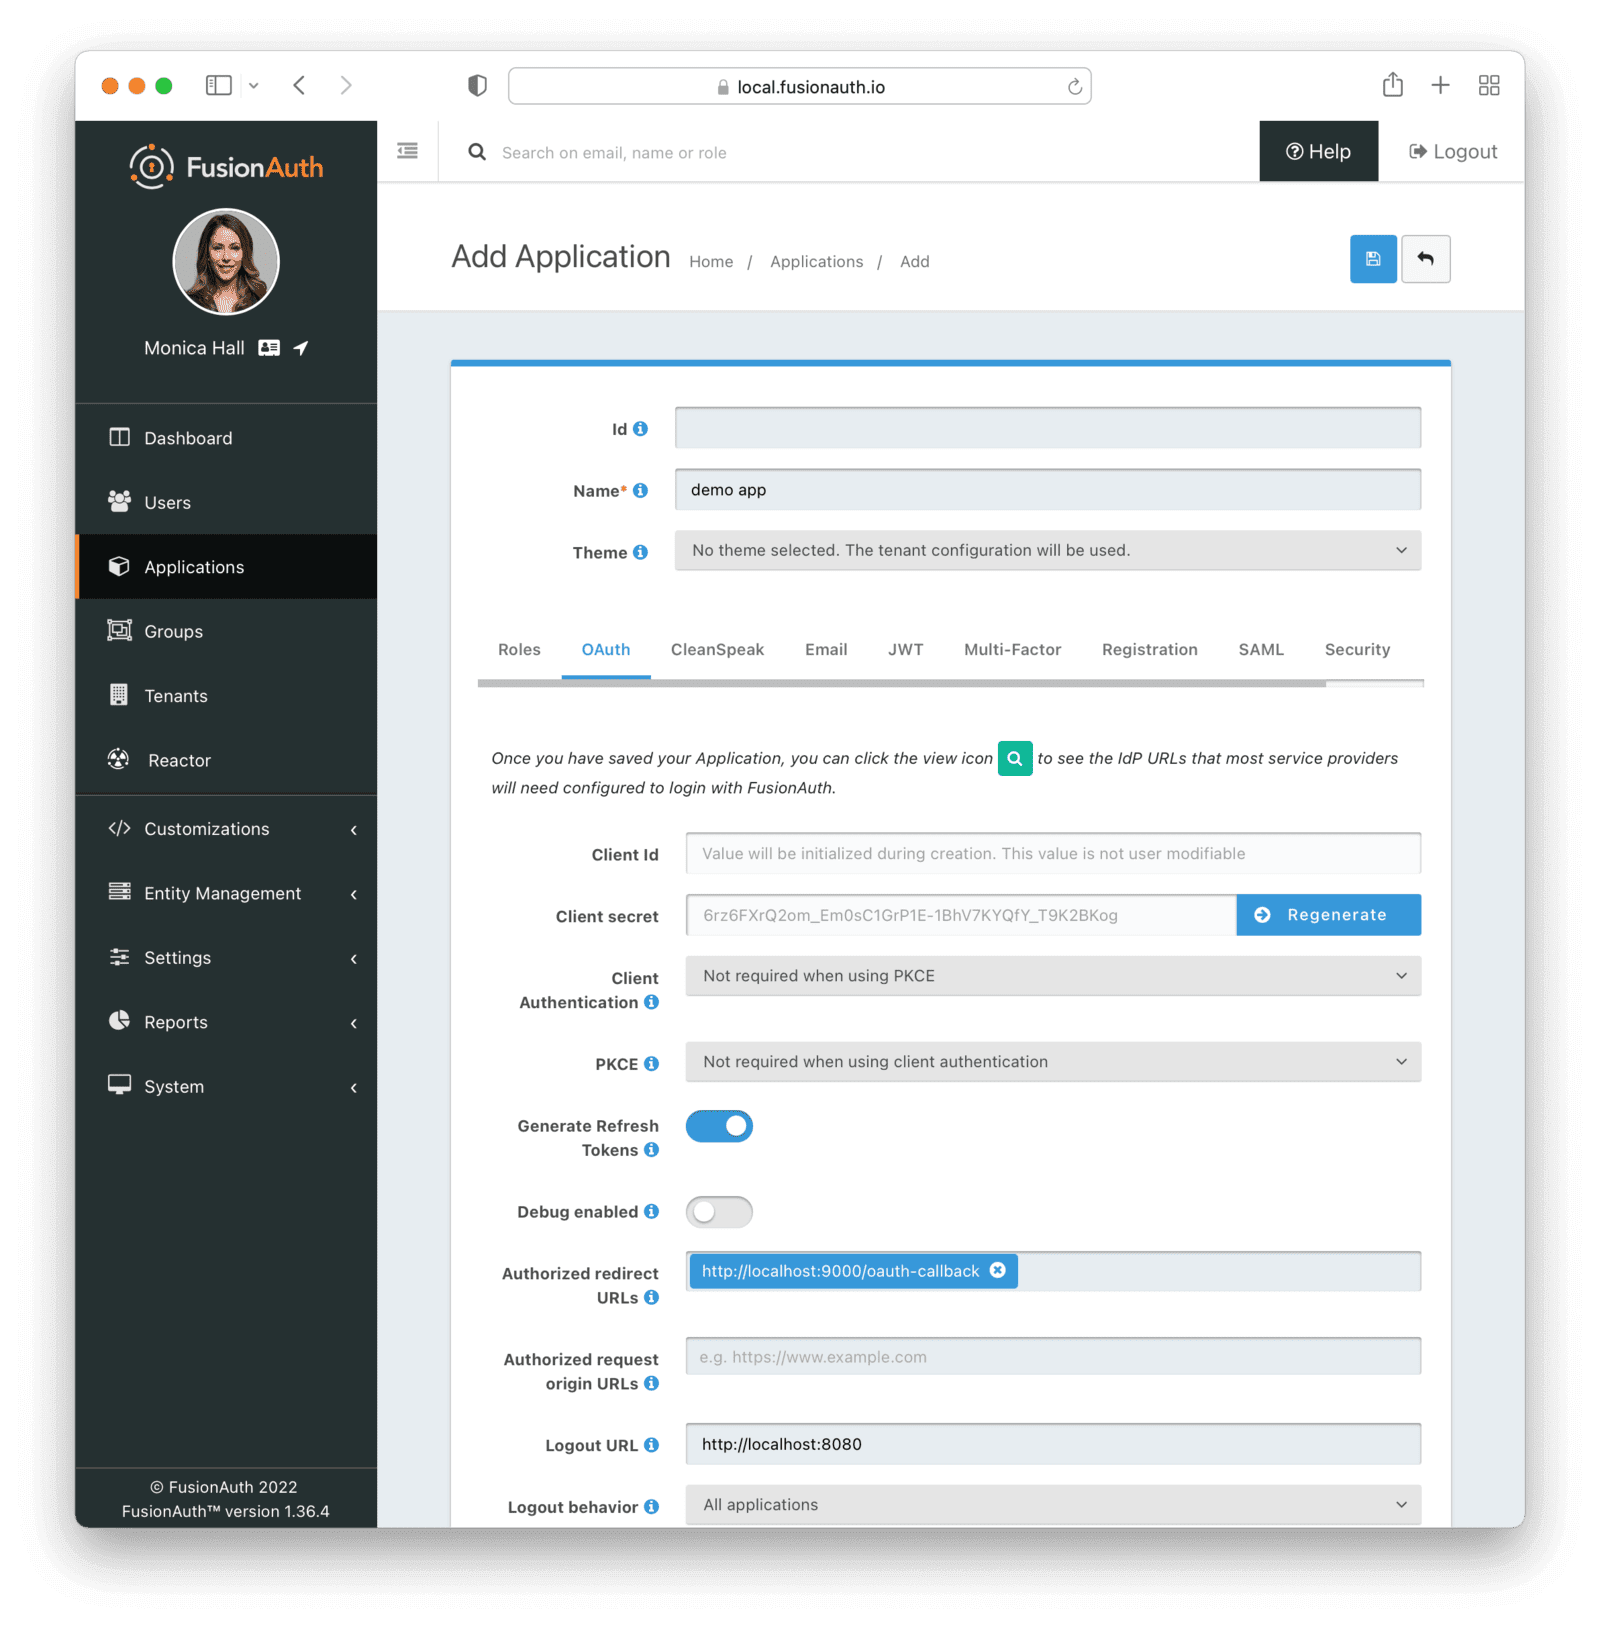
You can leave the “Id” field blank, and it will generate a new universally unique identifier (UUID) for you. Give the application an appropriate name, and then move to the OAuth tab. For this tutorial, change the Client Authentication field to "Not required when using PKCE," and the PKCE field to "Not required when using client authentication."
Add an Authorized Redirect URL with a value of http://localhost:9000/oauth-callback, and set the logout URL as http://localhost:8080. These two URLs will resolve to the sample application, which you will configure shortly.
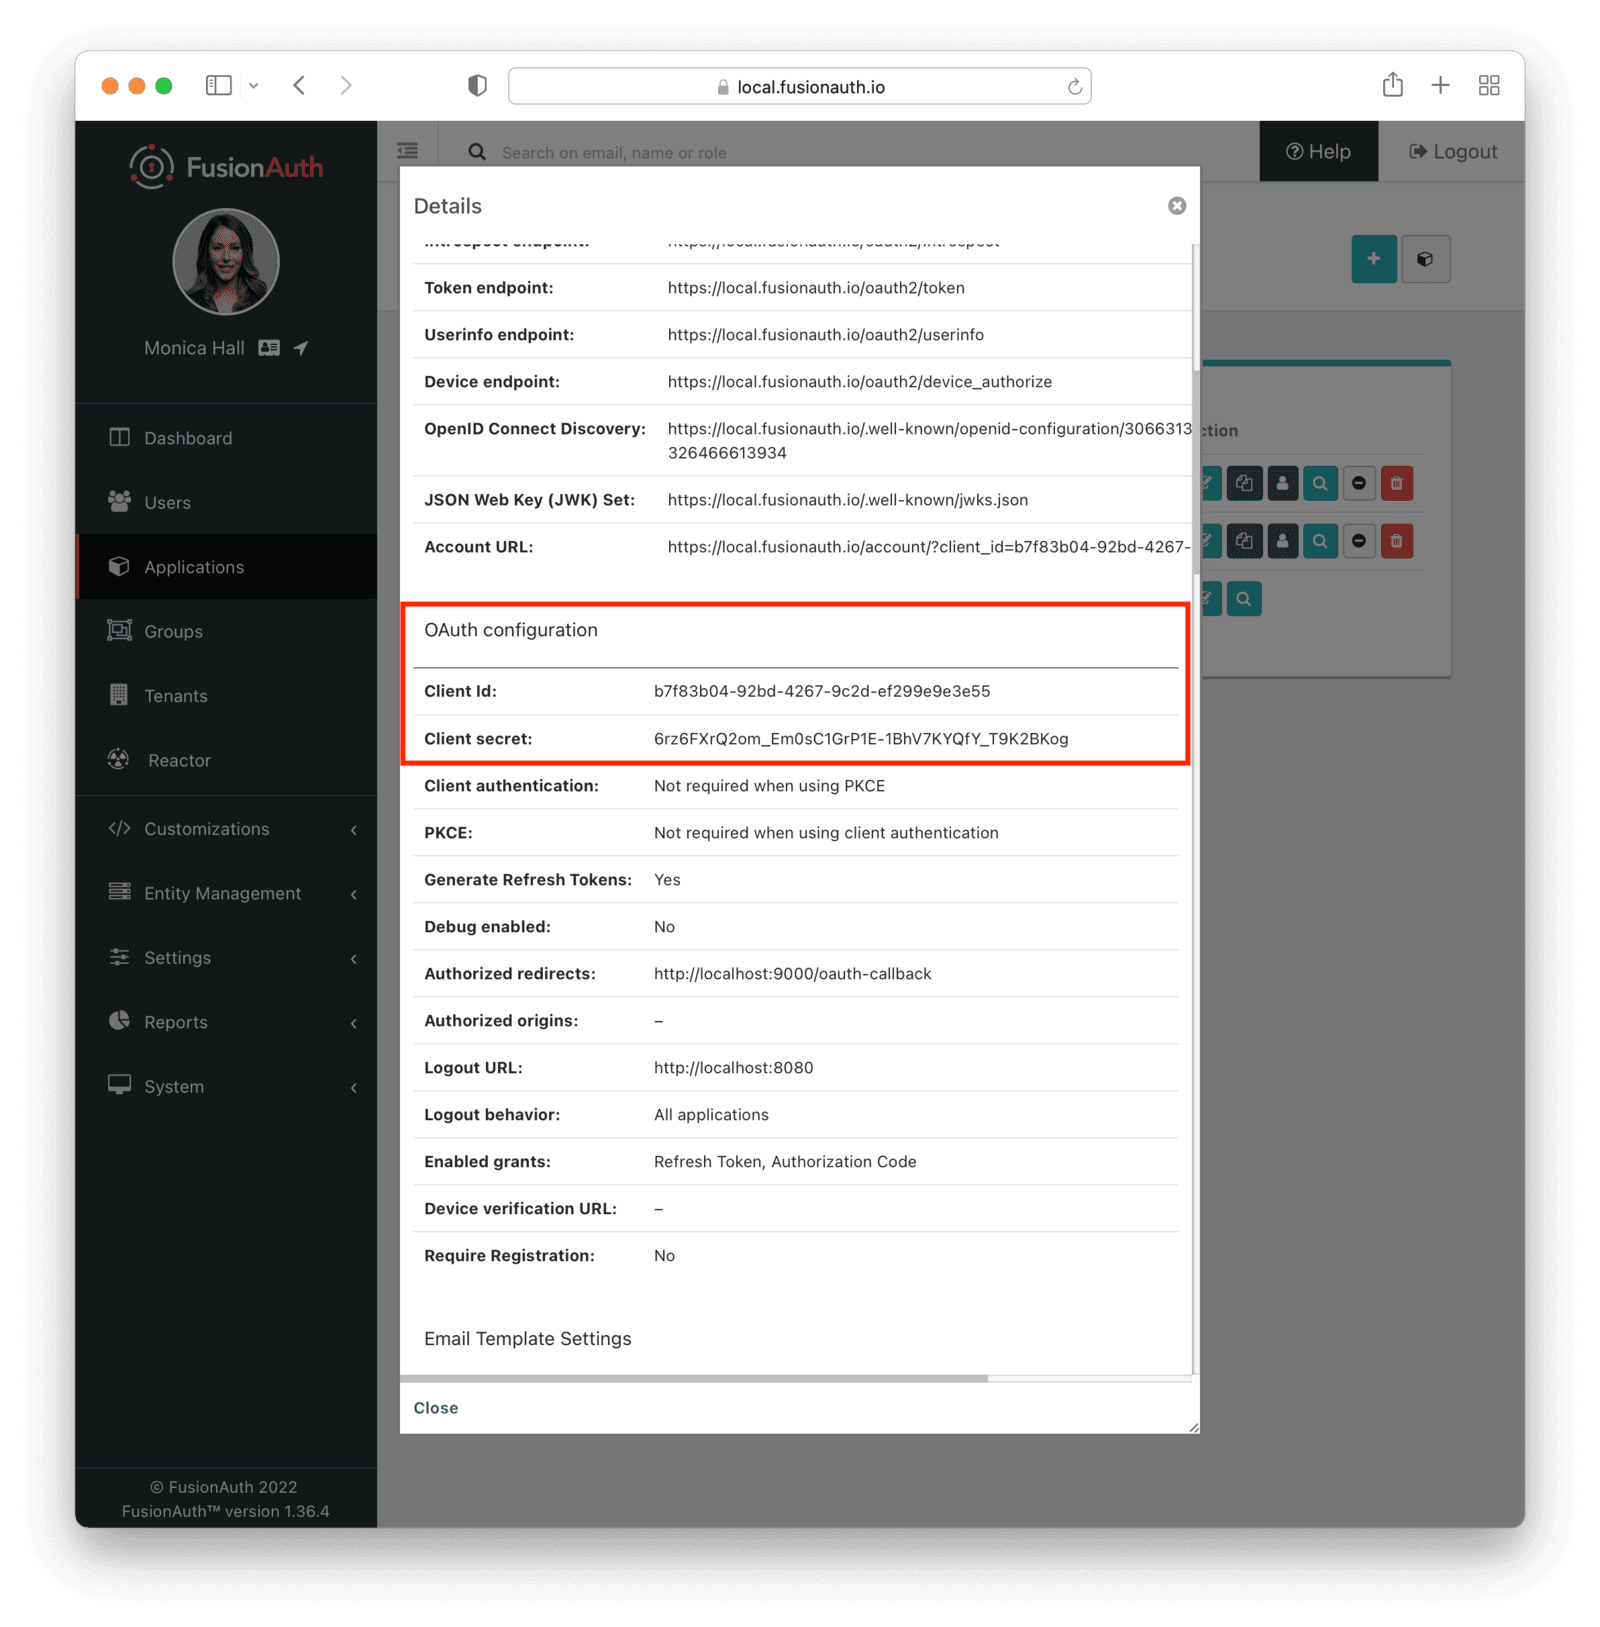
Save your changes, then click the View icon (the magnifying glass) from the list of applications. This will pull up the details screen. Make a note of the Client Id and Secret. Be sure to label them so you don’t get them mixed up with the Discord Client Id and Secret.
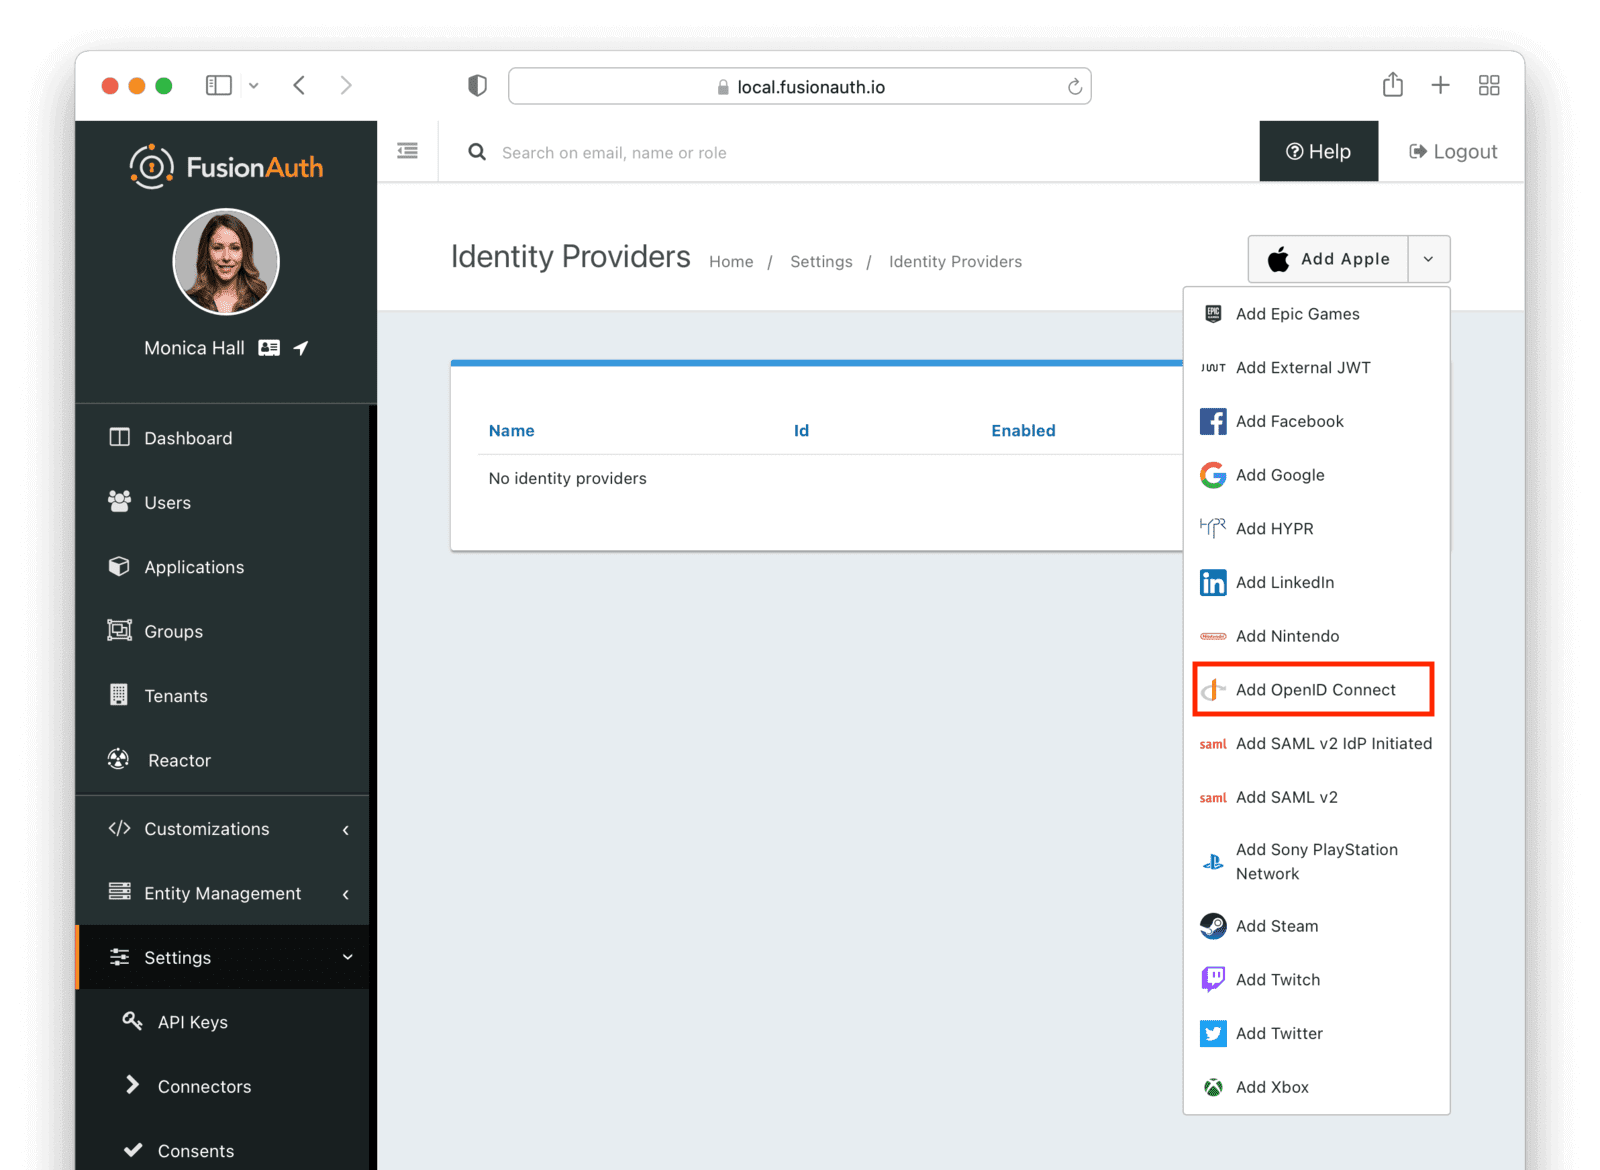
Navigate to Settings and then to Identity Providers . This is where you’ll configure the actual Discord Identity Provider. Click the dropdown menu at the top and select Add OpenID Connect .
This will take you to another page where you can enter the settings for the Discord application you created previously.
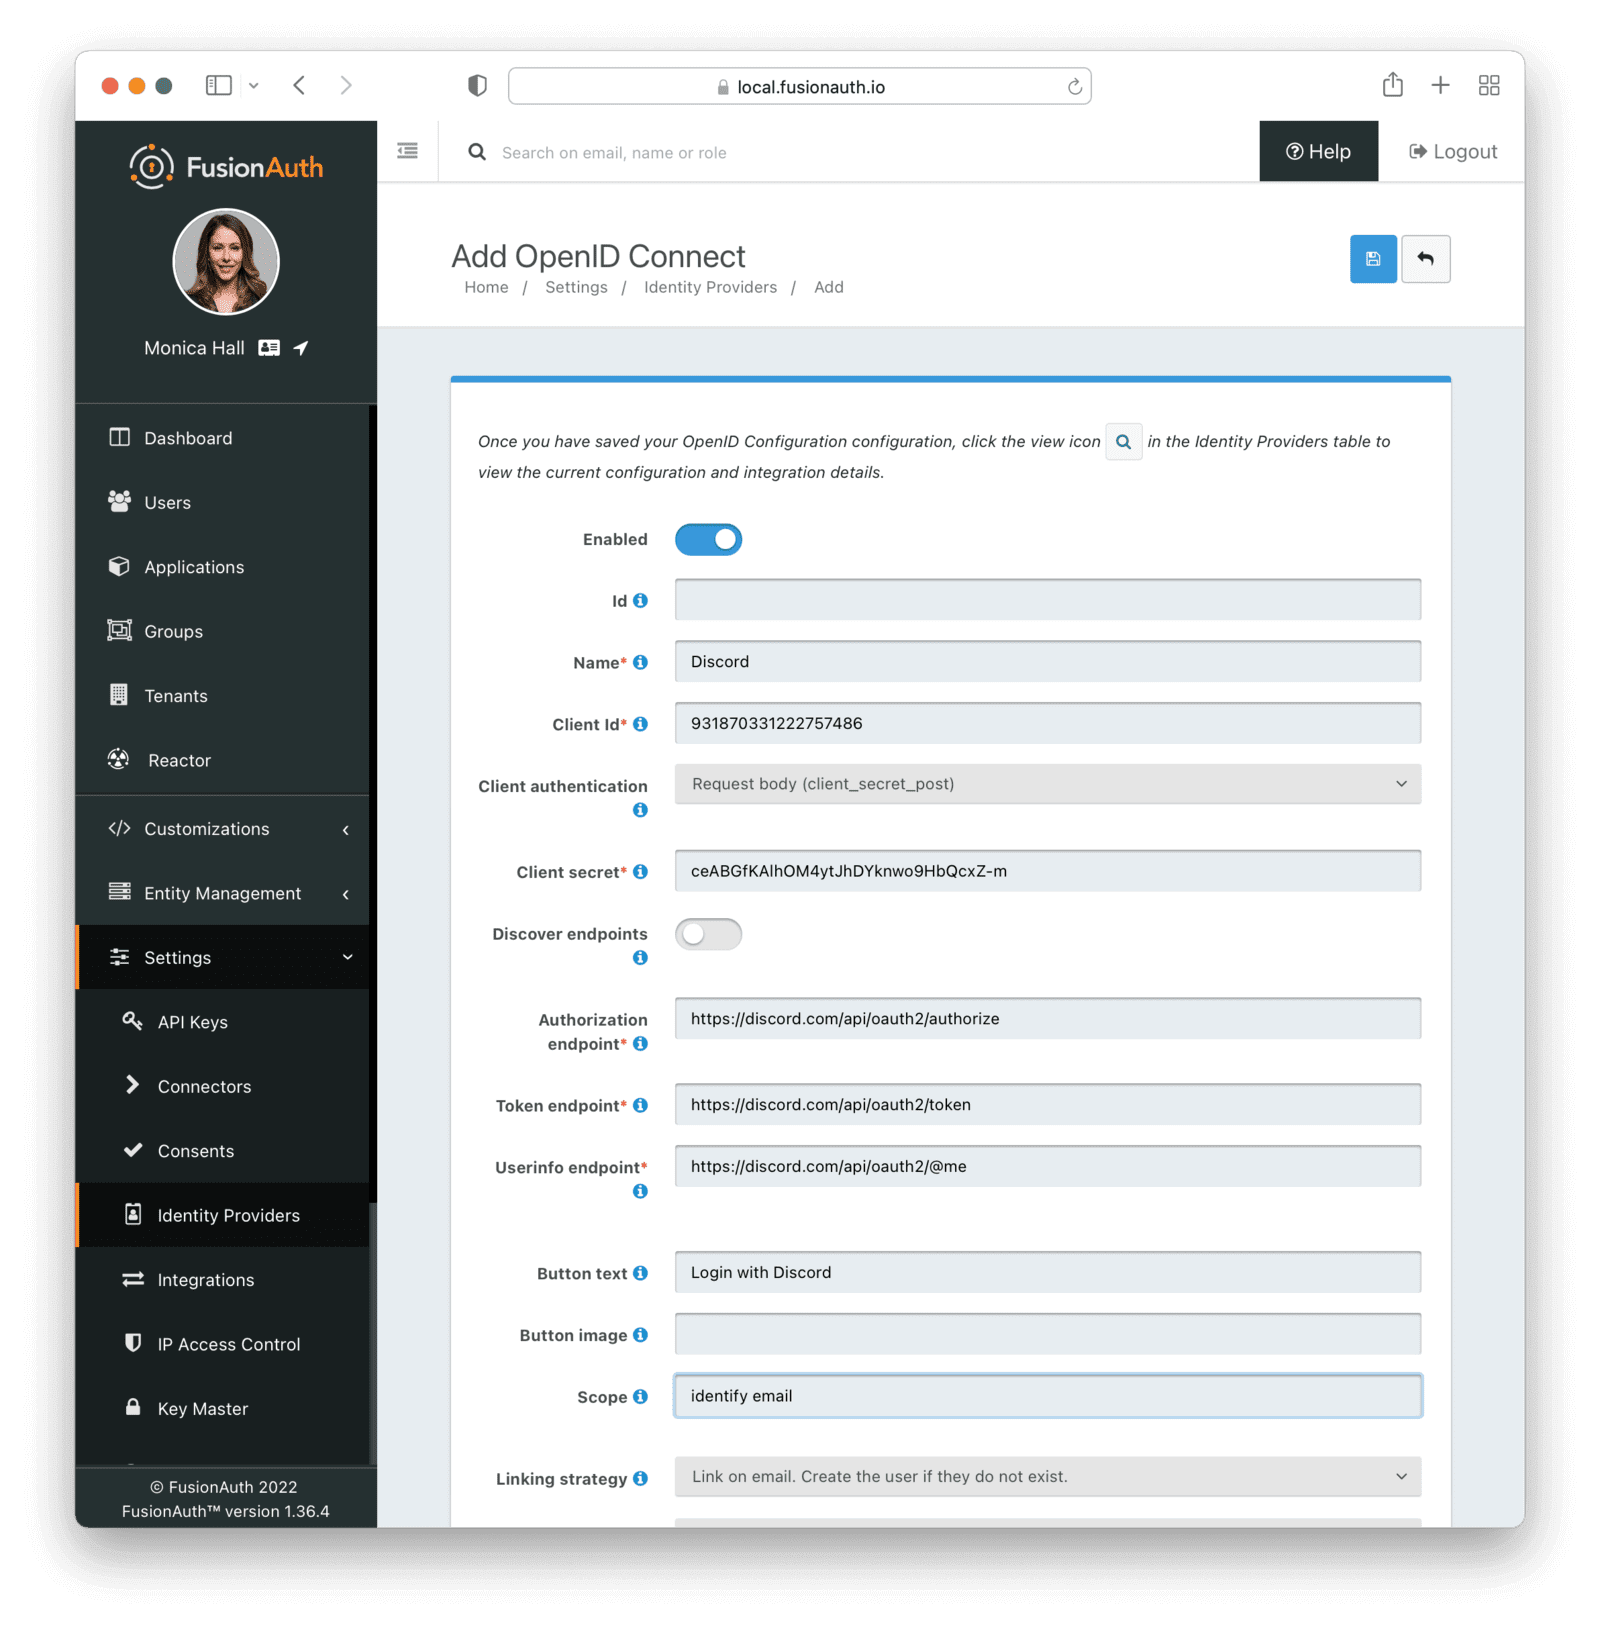
Give the Identity Provider a meaningful name (like "Discord"), enter the Client Id and Secret from your Discord application, and set the Client authentication to Request body (client_secret_post).
Next, configure endpoints, which tell FusionAuth how to communicate with Discord during the authentication process. It’s important to set all three endpoints here correctly, otherwise the integration will not work properly. These endpoints have been known to change in the past; however, at the time of writing (February 2022), the values are:
- Authorization endpoint:
https://discord.com/api/oauth2/authorize - Token endpoint:
https://discord.com/api/oauth2/token - UserInfo endpoint:
https://discord.com/api/users/@me(Note: make sure you use@meand not your Discord username here)
If you have trouble with these settings, be sure to refer to the official Discord documentation. Again, these URLS have changed in the past, and may change again in the future.
You also need to change the value of Scope to identify email and update Button text to Log In with Discord. The button text is a cosmetic, not functional, change.
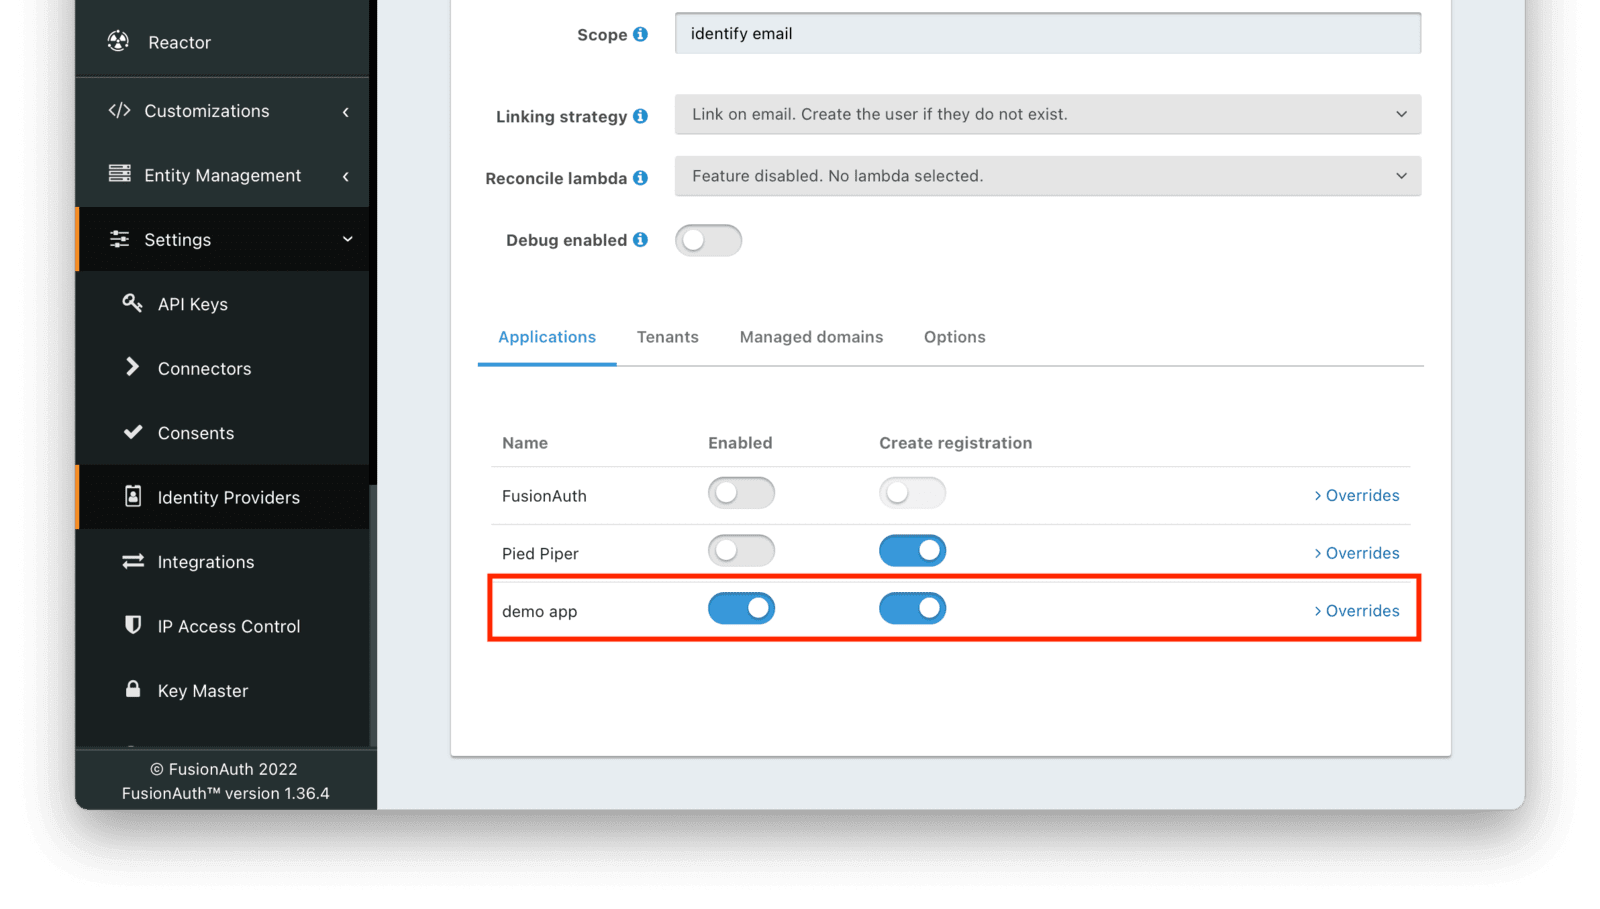
Next, make sure this Identity Provider is enabled for the FusionAuth application you created previously. You should be able to see your application listed at the bottom of the screen, alongside the default FusionAuth application. Enable the Discord Identity Provider for this application.
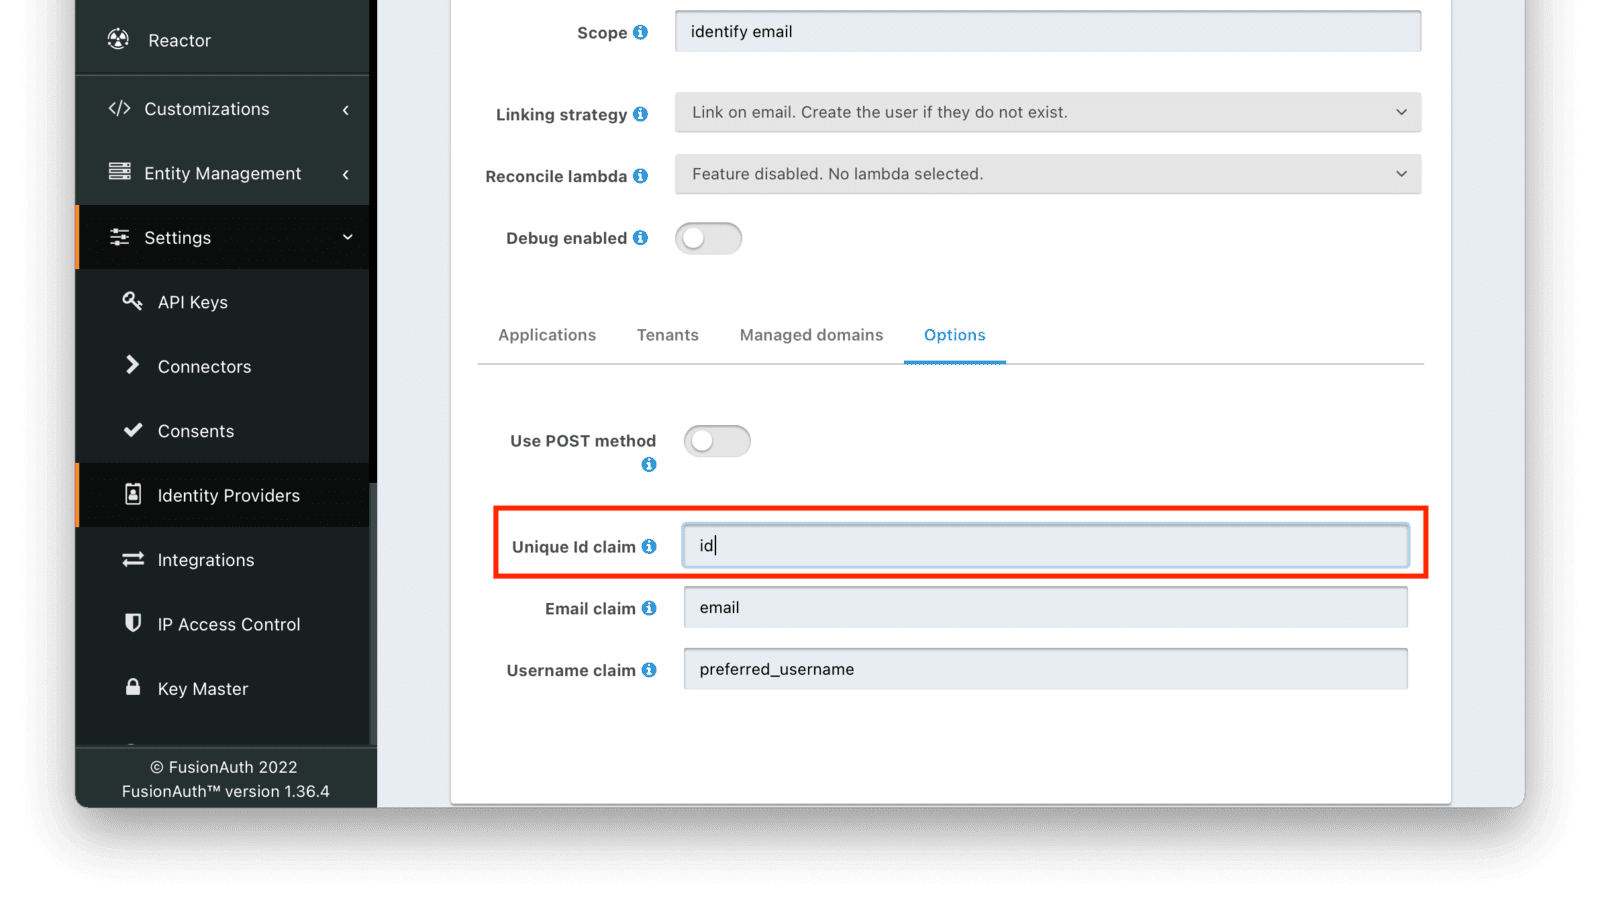
Finally, go to the Options tab, and update the "Unique Id claim" from sub to id.
Whew. You can now save your Identity Provider.
The last thing you need to do in the FusionAuth admin panel is to create an API key for the sample application.
To do this, navigate to Settings -> API Keys , and click the Plus button at the top.
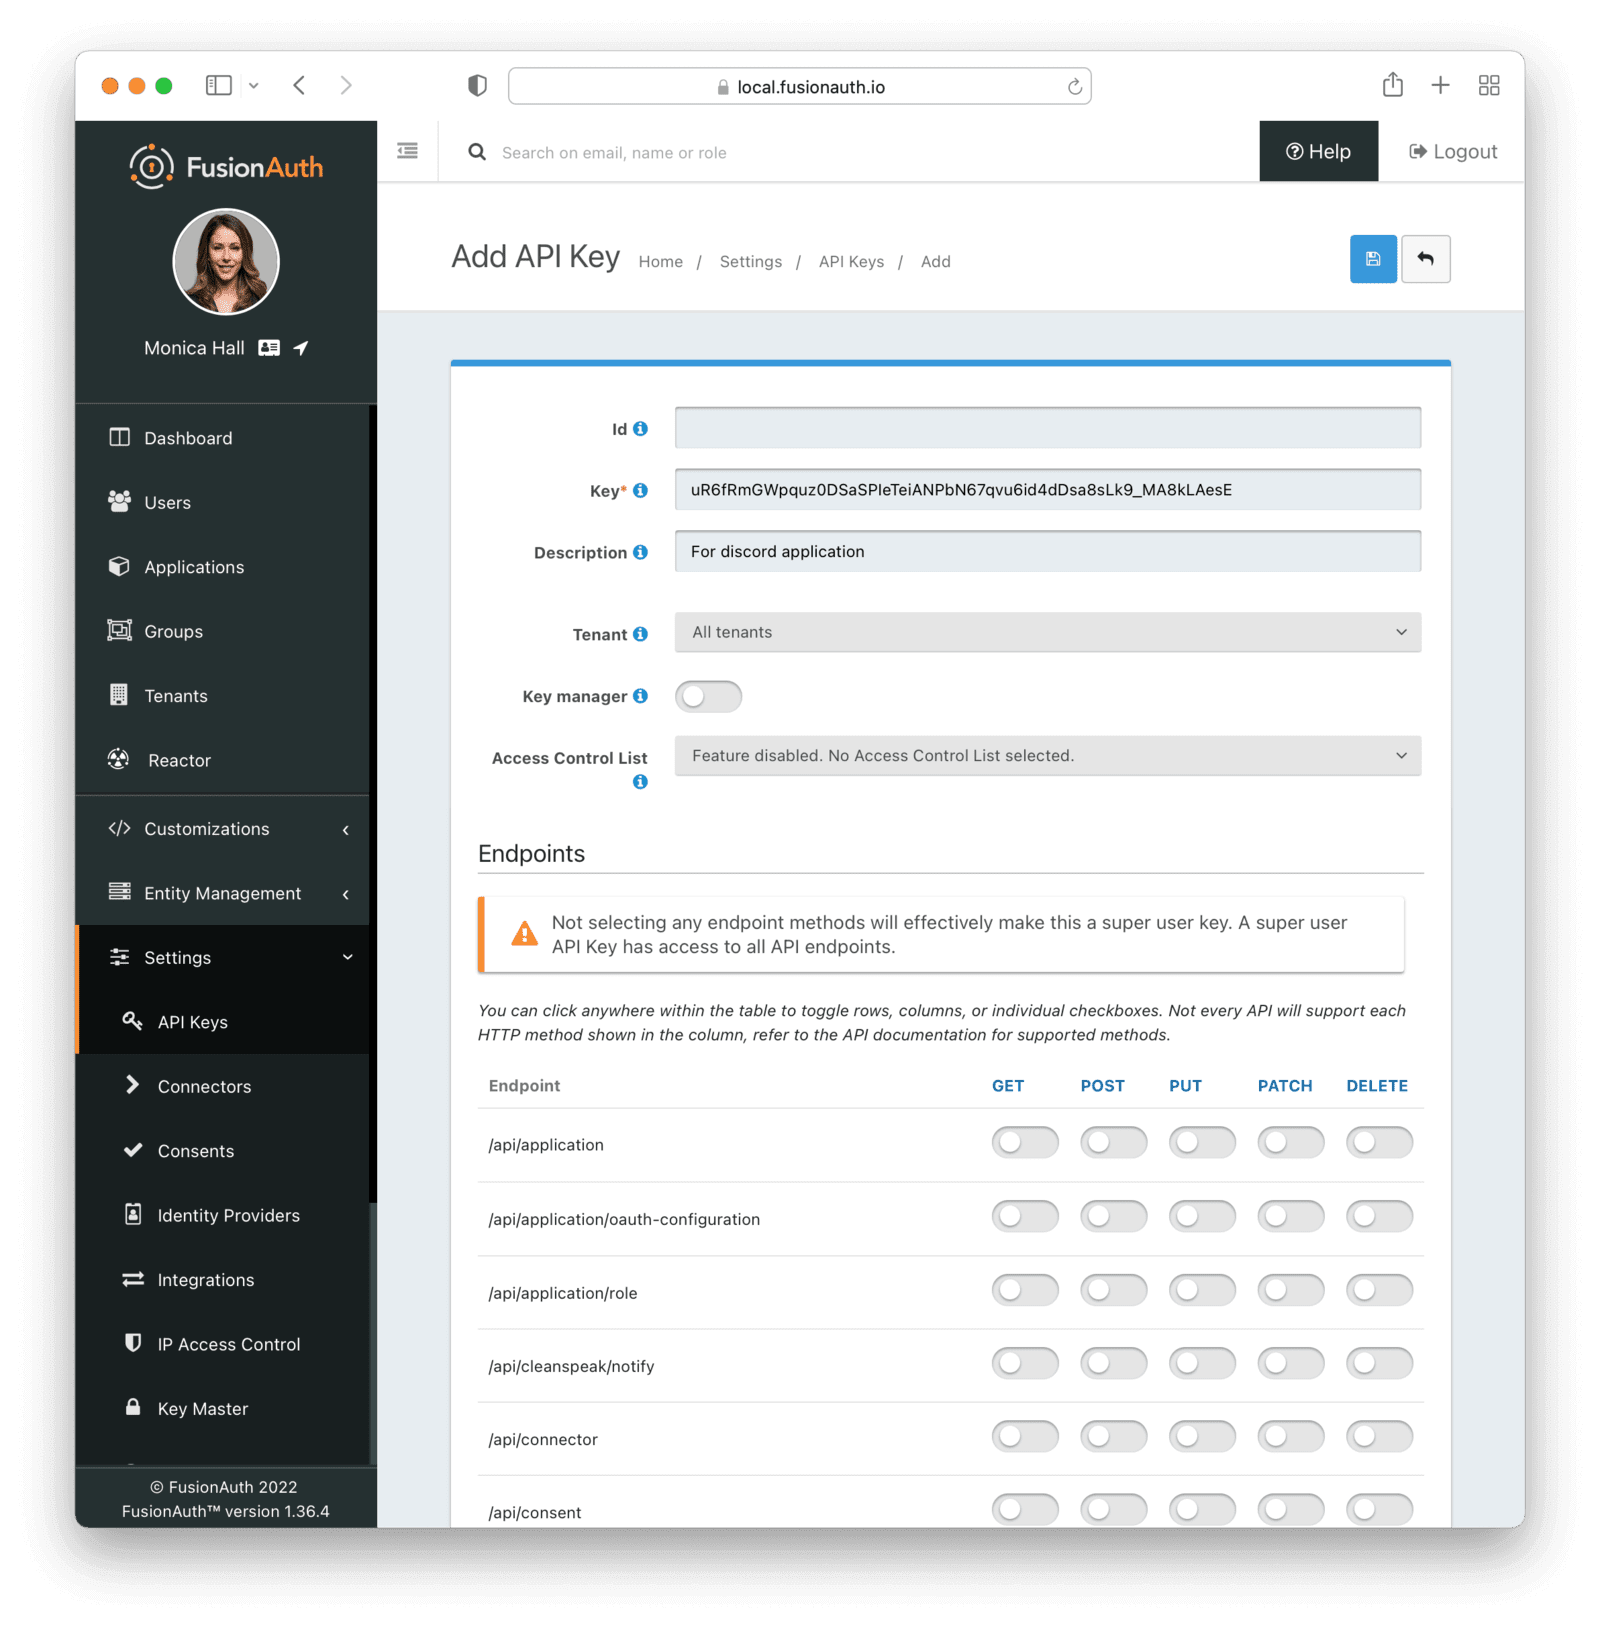
Leave the Id blank, and make a note of the Key value, then click the save button. Note that this creates a key with unlimited privileges. While that is fine for a demo application, limit the permissions for a production application.
Your FusionAuth instance is now configured to work with Discord.
Setting up the application#
While you spent a lot of time configuring FusionAuth and Discord, there has to be an application for the user to actually log in to! This could be a todo application, a recipe app or a video game application, whatever you're building that you want to add Discord login to.
For this demo, to see the Discord login in action, configure a simple application that will allow you to log in using this new Identity Provider. Rather than building one from scratch, you can make use of an existing public repo by the FusionAuth team, FusionAuth Example: React.
Clone this repo to your machine, and navigate to the config.js file located in the root directory of the project. Enter your details from when you set up your FusionAuth instance in the following fields:
- ClientId
- ClientSecret
- ApplicationId
- ApiKey
Once you have entered these details and saved them, do as the repo’s ReadMe prompts you, and navigate to both the server/ and client/ directories. In each directory, run npm install && npm start. Once both projects are installed and running, head to http://localhost:8080, and you should see the application running.
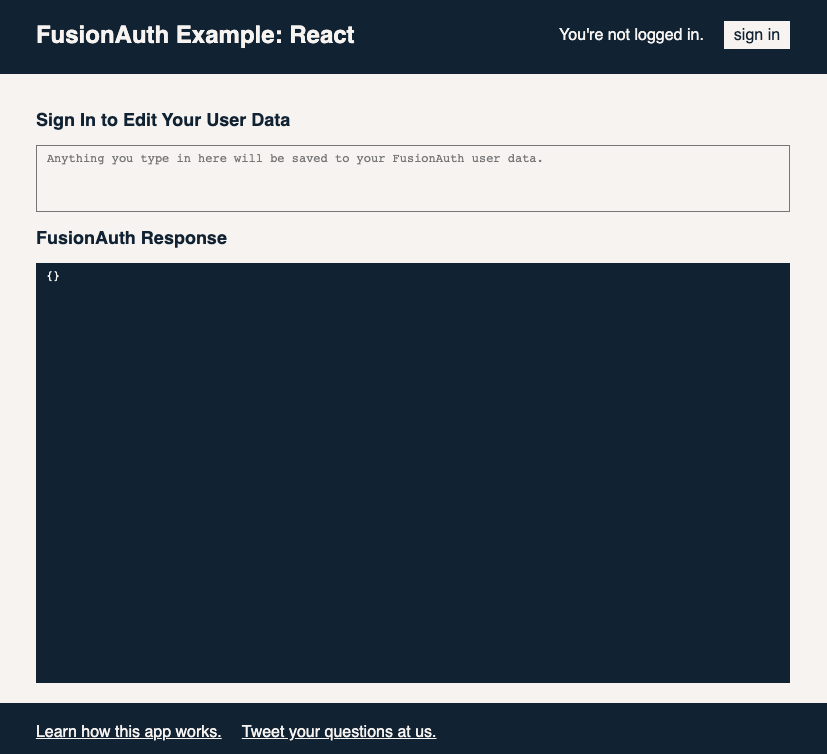
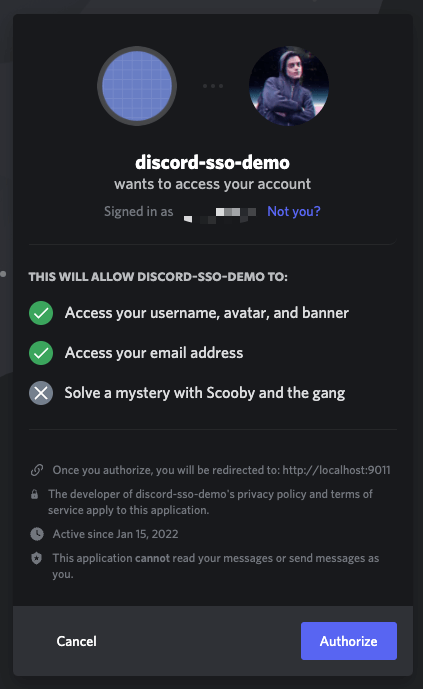
Click the sign in button, which will take you to your FusionAuth instance’s login screen, complete with a shiny new Sign in with Discord button. Click this button, and you will be prompted to authorize through Discord.
After clicking "Authorize", you’ll be taken back to the FusionAuth Example Application, where you’ll be presented with a response object containing your user data from Discord.
If you see this, you have successfully authenticated with FusionAuth via Discord. Woo-hoo!
Wrapping up#
If you’ve followed along, you should now have a FusionAuth instance configured to authenticate with Discord. As you would have seen during the configuration process, there are plenty more identity providers, and even more configuration options to choose from.
Embrace the ways of SSO, and never worry about adding authentication to a project again.
Take it further#
Some areas that you may want explore:
- Adding logins to other providers, such as Google or Facebook.
- Exploring roles and self-registration. Have the React app get information about the roles and offer different functionality for different roles.
- Install a different example application and set up Discord login for that application. Then you can SSO between both of them. For more, read the SSO guide.
Schedule a demo to see how easy it is to set up SSO for Discord — or any other app.


