> For the complete documentation index, see [llms.txt](/docs/llms.txt)
# Customize Advanced Themes | FusionAuth Docs
Learn how to theme and the FusionAuth login pages (including forgot password, two-factor authentication and others).
# Customize Advanced Themes
FusionAuth's Advanced Theme Editor provides control over every aspect of the look and feel of your hosted login pages.
The Advanced Theme Editor allows editing page templates directly. This allows you to take full control over all of the hosted pages by creating an advanced theme and editing the HTML, CSS, and messages. This is a powerful way to create a fully custom experience, but it can be complex and time-consuming. Additionally, advanced themes may require upgrades when you update to a new version of FusionAuth.
Since version `1.51.0`, you can instead use the [Simple Theme Editor](/docs/customize/look-and-feel/simple-theme-editor) to quickly and easily style FusionAuth with no code.
With the Simple Theme Editor, you can select from a set of pre-built themes and customize them with a few basic options.
Theme templates have access to sensitive configuration data including SSO cookies, tenant settings, JWT configuration, SMTP credentials, and user information. Only use themes from trusted sources and review all custom theme code before deployment.
## Create a Theme[#](#create-a-theme)
FusionAuth provides the ability to create and manage themes in the UI as well as a [Themes API](/docs/apis/themes). Any user of the FusionAuth role of `admin` or `theme_manager` may view, edit, update, and delete Themes.
All of the FusionAuth login templates are written in [FreeMarker](https://freemarker.apache.org). FreeMarker provides a very rich template language that will allow you to customize the pages and helpers to suit your needs. You can also define new macros and functions to assist you further.
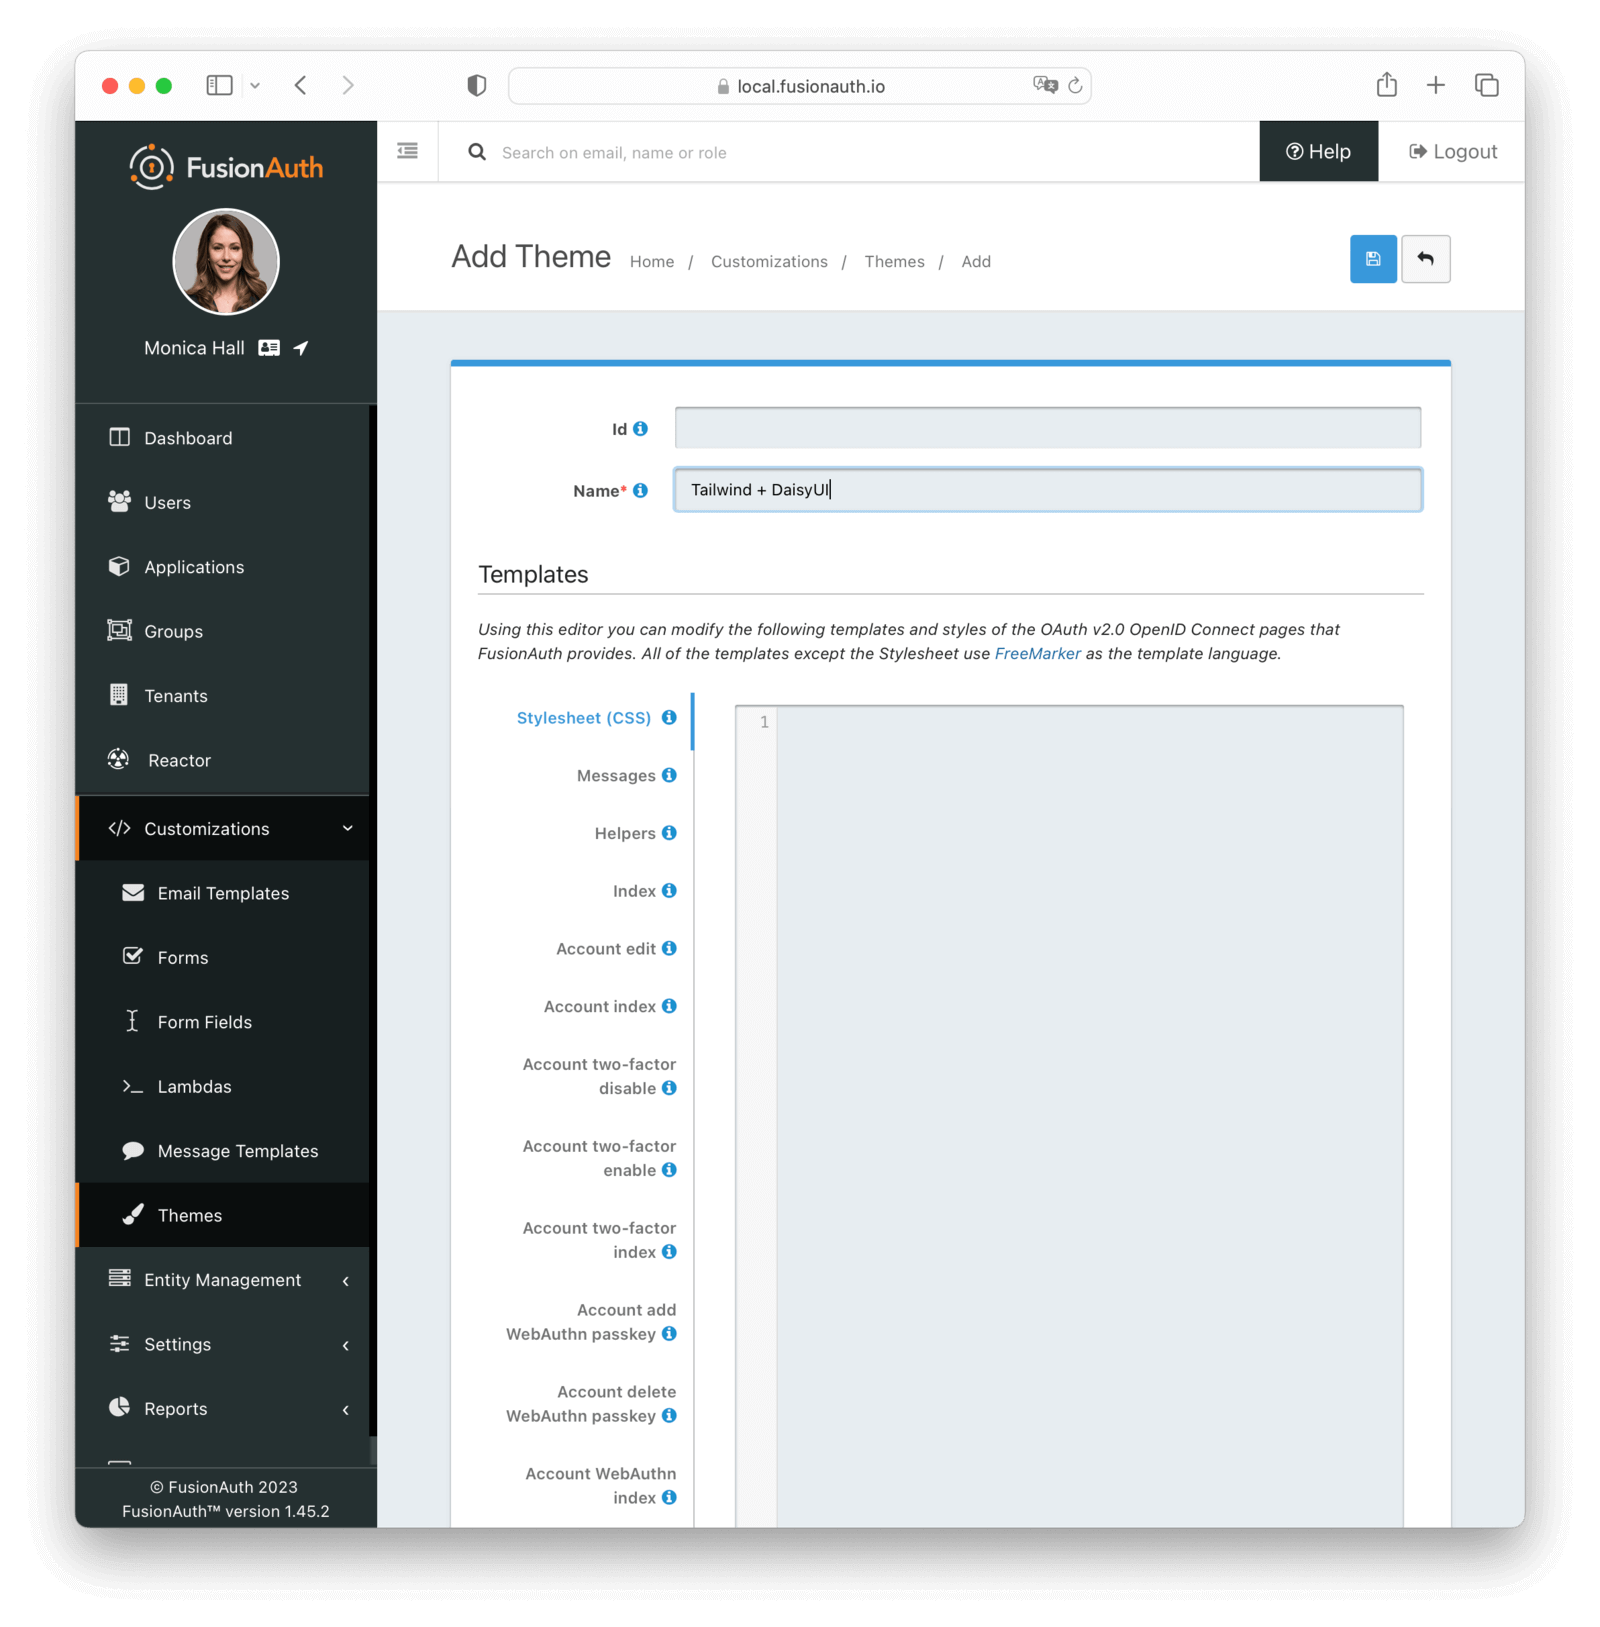
Below is an example screenshot of the Add Theme panel with each template described below.
### Form Fields[#](#form-fields)
`Id`optional
An optional UUID. When this value is omitted a unique Id will be generated automatically.
`Name`required
A unique name to identify the theme. This name is for display purposes only and it can be modified later if desired.
### Templates[#](#templates)
`Stylesheet (CSS)`optional
This CSS stylesheet may be used to style the themed pages.
This CSS will be included in the `head` tag in the Helpers `head` macro. You may also choose to include other remote stylesheets by using the `
```
`Messages`optional
This section allows you to add additional localized messages to your theme. When creating an additional locale it is not required that all messages are defined for each language. If a message key is not defined for the specified locale, the value from the default bundles will be used.
If you intend to localize your login templates, you may find our [community contributed and maintained messages in our GitHub repository](https://github.com/FusionAuth/fusionauth-localization) helpful.
`Helpers`required
This template contains all of the main helper macros to define the `head`, `body` and `footer`. To begin theming FusionAuth you'll want to start with this template as it will affect all other templates.
See the [Helpers](/docs/customize/look-and-feel/advanced-themes/helpers) page for additional information.
`Account edit`requiredAvailable since 1.26.0
This page contains a form that enables authenticated users to update their profile.
/account/edit
`Account index`requiredAvailable since 1.26.0
This is the self-service account landing page. An authenticated user may use this as a starting point for operations such as updating their profile or configuring multi-factor authentication.
/account
`Account two-factor disable`requiredAvailable since 1.26.0
This page contains a form that accepts a verification code used to disable a multi-factor authentication method.
/account/two-factor/disable
`Account two-factor edit`requiredAvailable since 1.68.0
This page contains a form that accepts a verification code used to edit a multi-factor authentication method.
/account/two-factor/edit
`Account two-factor enable`requiredAvailable since 1.26.0
This page contains a form that accepts a verification code used to enable a multi-factor authentication method. Additionally, this page displays recovery codes when a user enables multi-factor authentication for the first time.
/account/two-factor/enable
`Account two-factor index`requiredAvailable since 1.26.0
This page displays an authenticated user's configured multi-factor authentication methods. Additionally, it provides links to enable and disable a method.
/account/two-factor
`Account add WebAuthn passkey`requiredAvailable since 1.41.0
This page contains a form that allows a user to register a new WebAuthn passkey.
/account/webauthn/add
`Account delete WebAuthn passkey`requiredAvailable since 1.41.0
This page contains a form that allows a user to delete a WebAuthn passkey.
/account/webauthn/delete
`Account WebAuthn index`requiredAvailable since 1.41.0
This page displays an authenticated user's registered WebAuthn passkeys. Additionally, it provides links to delete an existing passkey and register a new passkey.
/account/webauthn/
`Confirmation required`requiredAvailable since 1.49.0
This page is displayed when a user attempts to complete an email based workflow that did not begin in the same browser. For example, if the user starts a forgot password workflow, and then opens the link in a separate browser the user will be shown this panel.
/confirmation-required
`Email verification complete`required
This page is used after a user has verified their email address by clicking the URL in the email. After FusionAuth has updated their user object to indicate that their email was verified, the browser is redirected to this page.
/email/complete
`Email verification re-sent`required
This page is used after a user has asked for the verification email to be resent. This can happen if the URL in the email expired and the user clicked it. In this case, the user can provide their email address again and FusionAuth will resend the email. After the user submits their email and FusionAuth re-sends a verification email to them, the browser is redirected to this page.
/email/sent
`Email verification required`requiredAvailable since 1.27.0
This page is rendered when a user is required to verify their email address prior to being allowed to proceed with login. This occurs when `Unverified behavior` is set to `Gated` in email verification settings on the Tenant.
/email/verification-required
`Email verification`required
This page is rendered when a user clicks the URL from the verification email and the `verificationId` has expired. FusionAuth expires `verificationId` after a period of time (which is configurable). If the user has a URL from the verification email that has expired, this page will be rendered and the error will be displayed to the user.
/email/verify
`Index`requiredAvailable since 1.27.0
This is the root landing page. This page is available to unauthenticated users and will be displayed whenever someone navigates to the FusionAuth host's root page. Prior to version `1.27.0`, navigating to this URL would redirect to `/admin` and would subsequently render the FusionAuth admin login page.
/
`OAuth authorize`required
This is the main login page for FusionAuth and is used for all interactive OAuth2 and OpenID Connect workflows.
/oauth2/authorize
`OAuth authorized not registered`requiredAvailable since 1.28.0
This page is rendered when a user is not registered and the Application configuration requires registration before FusionAuth will complete the redirect.
/oauth2/authorized-not-registered
`OAuth child registration not allowed`required
This page contains a form where a child must provide their parent's email address to ask their parent to create an account for them in a Consent workflow.
/oauth2/child-registration-not-allowed
`OAuth child registration not allowed complete`required
This page is rendered after a child provides their parent's email address for parental consent in a Consent workflow.
/oauth2/child-registration-not-allowed-complete
`OAuth complete registration`required
This page contains a form that is used for users that have accounts but might be missing required fields.
/oauth2/complete-registration
`OAuth consent prompt`requiredAvailable since 1.50.0
This page contains a form for capturing a user's OAuth scope consent choices. If there are no scopes that require a prompt, the user is redirected automatically.
/oauth2/consent
`OAuth device`requiredAvailable since 1.11.0
This page contains a form for accepting an end user's short code for the interactive portion of the OAuth Device Authorization Grant workflow.
/oauth2/device
`OAuth device complete`requiredAvailable since 1.12.0
This page contains a complete message indicating the device authentication has completed.
/oauth2/device-complete
`OAuth error`required
/oauth2/error
`OAuth logout`required
This page is used if the user initiates an OAuth logout. This page causes the user to be logged out of all associated applications or just the initiating application, as configured, via a front-channel mechanism before being redirected.
/oauth2/logout
`OAuth passwordless`required
This page is rendered when the user starts the passwordless login workflow. The page renders the form where the user types in their email address.
/oauth2/passwordless
`OAuth register`required
This page is used to register or sign up the user for the application when self-service registration is enabled.
/oauth2/register
`OAuth start IdP link`requiredAvailable since 1.28.0
This page is used if the linking strategy of the Identity Provider is set to create a pending link. The user is presented with the option to link their account with an existing FusionAuth user account or create a new FusionAuth user.
/oauth2/start-idp-link
`OAuth two-factor`required
This page is used if the user has two-factor authentication enabled or two factor authentication is required and they need to type in their code again. FusionAuth will properly handle the processing on the back end. This page contains the form that the user will put their code into.
/oauth2/two-factor
`OAuth two-factor enable`requiredAvailable since 1.42.0
This page contains a form providing a user with the Oauth2 two-factor enable form
/oauth2/two-factor-enable
`OAuth two-factor enable complete`requiredAvailable since 1.42.0
This page contains a form providing a user with the Oauth2 two-factor enable complete form
/oauth2/two-factor-enable-complete
`OAuth two-factor methods`requiredAvailable since 1.26.0
This page contains a form providing a user with their configured multi-factor authentication options that they may use to complete the authentication challenge.
/oauth2/two-factor-methods
`OAuth wait`requiredAvailable since 1.12.0
This page is rendered when FusionAuth is waiting for an external provider to complete an out of band authentication request. For example, during a HYPR login this page will be displayed until the user completes authentication.
/oauth2/wait
`OAuth WebAuthn`requiredAvailable since 1.41.0
This page contains a form where a user can enter their `loginId` (username or email address) to authenticate with one of their registered WebAuthn passkeys. This page uses the WebAuthn bootstrap workflow.
/oauth2/webauthn
`OAuth WebAuthn Reauth`requiredAvailable since 1.41.0
This page contains a form that lists the WebAuthn passkeys currently available for re-authentication. A user can select one of the listed passkeys to authenticate using the corresponding passkey and user account.
/oauth2/webauthn-reauth
`OAuth WebAuthn Reauth Enable`requiredAvailable since 1.41.0
This page contains two forms. One allows the user to select one of their existing WebAuthn passkeys to use for re-authentication. The other allows the user to register a new WebAuthn passkey for re-authentication.
/oauth2/webauthn-reauth-enable
`OAuth Change password form`required
This page is used if the user is required to change their password or if they have requested a password reset. This page contains the form that allows the user to provide a new password.
/password/change
`OAuth password complete`required
This page is used after the user has successfully updated their password, or reset it. This page should instruct the user that their password was updated and that they need to login again.
/password/complete
`Forgot password`required
This page is used when a user starts the forgot password workflow. This page renders the form where the user types in their email address.
/password/forgot
`Forgot password sent`required
This page is used when a user has submitted the forgot password form with their email. FusionAuth does not indicate back to the user if their email address was valid in order to prevent malicious activity that could reveal valid email addresses. Therefore, this page should indicate to the user that if their email was valid, they will receive an email shortly with a link to reset their password.
/password/sent
`Phone number verification complete`requiredAvailable since 1.59.0
This page is used after a user has verified their phone number by clicking the URL in the message. After FusionAuth has updated their user object to indicate that their phone number was verified, the browser is redirected to this page.
/phone/complete
`Phone number verification re-sent`requiredAvailable since 1.59.0
This page is used after a user has asked for the verification message to be resent. This can happen if the URL in the message expired and the user clicked it. In this case, the user can provide their phone number again and FusionAuth will resend the message. After the user submits their phone number and FusionAuth re-sends a verification message to them, the browser is redirected to this page.
/phone/sent
`Phone number verification required`requiredAvailable since 1.59.0
This page is rendered when a user is required to verify their phone number prior to being allowed to proceed with login. This occurs when `Unverified behavior` is set to `Gated` in identities/phone verification settings on the Tenant.
/phone/verification-required
`Phone number verification`requiredAvailable since 1.59.0
This page is rendered when a user clicks the URL from the verification message and the `verificationId` has expired. FusionAuth expires `verificationId` after a period of time (which is configurable). If the user has a URL from the verification message that has expired, this page will be rendered and the error will be displayed to the user.
/phone/verify
`Verify registration complete`required
This page is used after a user has verified their email address for a specific application (i.e. a user registration) by clicking the URL in the email. After FusionAuth has updated their registration object to indicate that their email was verified, the browser is redirected to this page.
/registration/complete
`Verify registration re-sent`required
This page is used after a user has asked for the application specific verification email to be resent. This can happen if the URL in the email expired and the user clicked it. In this case, the user can provide their email address again and FusionAuth will resend the email. After the user submits their email and FusionAuth re-sends a verification email to them, the browser is redirected to this page.
/registration/sent
`Verify registration required`requiredAvailable since 1.27.0
This page is rendered when a user is required to verify their registration prior to being allowed to proceed with the registration flow. This occurs when `Unverified behavior` is set to `Gated` in registration verification settings on the Application.
/registration/verification-required
`Verify registration`required
This page is used when a user clicks the URL from the application specific verification email and the `verificationId` has expired. FusionAuth expires `verificationId` after a period of time (which is configurable). If the user has a URL from the verification email that has expired, this page will be rendered and the error will be displayed to the user.
/registration/verify
`SAML logout`requiredAvailable since 1.25.0
This page is used if the user initiates a SAML logout. This page causes the user to be logged out of all associated applications via a front-channel mechanism before being redirected.
/samlv2/logout
`Unauthorized`requiredAvailable since 1.30.0
This page is used if the user is not authorized to use the application or page. If you have advanced threat detection enabled, this page is generally made available to you.
/unauthorized
## Preview a Theme[#](#preview-a-theme)
If you want to see how your theme works, you can always open a browser with no active FusionAuth session and visit the hosted login pages.
However, at times, you may need to make changes in your theme that you want to view without going through an entire registration process. You can easily do so by previewing the theme via the administrative user interface.
Navigate to Customizations -> Themes . Choose your theme, then click :
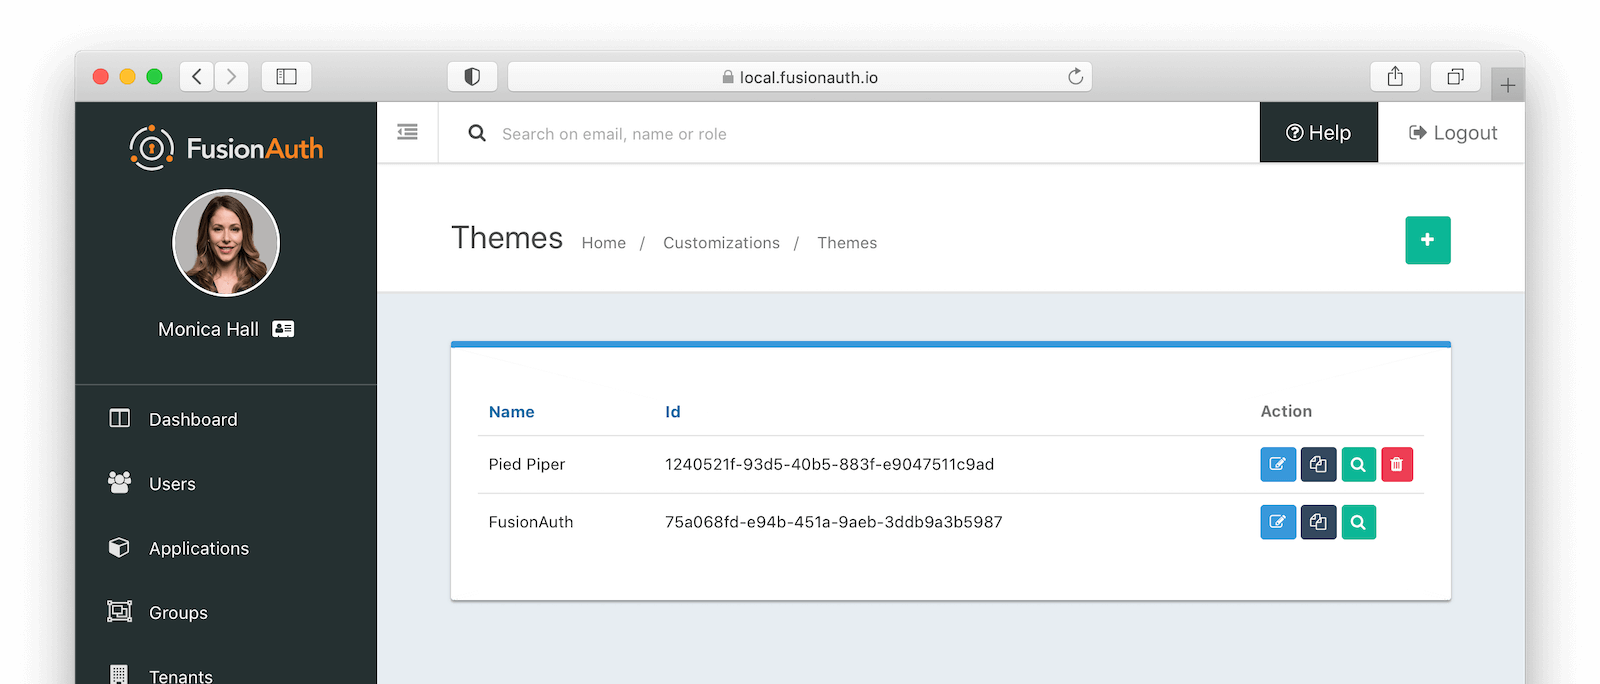
This will open a new tab. Click on any of the pages you've modified in the left hand navigation, for example OAuth register , and you'll see the page as it would be rendered.
## Example Code[#](#example-code)
### Displaying Messages[#](#displaying-messages)
You can customize messages by locale. You can also have optional keys.
Consider the following message bundle and theme usage example with English and German messages defined.
English
```
greeting=Good day
```
German
```
greeting=Guten Tag
optional-greeting=Mitmensch
```
Template
```
```
If I have selected German as my locale, I will be greeted with `Guten Tag Mitmensch` rendered on the page.
If I have English selected I will instead find the greeting `Good day optional-greeting`.
Prior to version `1.53.0`, the behavior of `theme.message` and `theme.optionalMessage` differed in that an exception would be thrown if you used `theme.message` and the message key could not be found. While a missing key should be a development time issue, returning the key should provide a better development experience than throwing an exception.
Beginning in version `1.53.0` there is no difference in behavior between these two methods and you should prefer `theme.message`.
The following example that demonstrates the difference in behavior between `theme.message` and `theme.optionalMessage` only pertains to versions of FusionAuth prior to `1.53.0.`
The behavior differs between `theme.message` and `theme.optionalMessage` only when the key doesn't exist in any of the messages files, including the default one.
When there is no suitable key found and `theme.message` is used, an exception is thrown and the template fails to completely render. When there is no suitable key found and `theme.optionalMessage` is used, the key value is returned: `optional-message` in the example above.
Here's an example of a template that will render for a user with a German locale but fail for a user with an English locale, because `message` fails when there is no key found:
Template Which Will Fail For Users With an English Locale
```
${theme.message('optional-greeting')}
```
Here's a Freemarker function which returns an empty string when there is no value found for an optional message:
Freemarker Function to Return the Empty String When No Value is Found
```
[#function getOptionalMessage key=""]
[#if "${theme.optionalMessage(key)}" == "${key}"]
[#return "" /]
[/#if]
[#return theme.optionalMessage(key) /]
[/#function]
```
If you add this to your `_helpers.ftl` file, you can call it like this:
Calling getOptionalMessage
```
[@helpers.getOptionalMessage key="optional-greeting" /]
```
### Customizing the Authorize Page[#](#customizing-the-authorize-page)
Now that you have a good overview of all the templates, macros and helpers, here is an example of customizing the Authorize page.
Let's assume you want to change the header and footer across all of the pages including the Authorize page. This is accomplished by editing the `helpers.header` and `helpers.footer` macros. For the header, let's assume you want to add a `Sign Up` and `Login` link. For the footer, let's assume you want to add a link to your privacy policy. Here are the macros that include these new links:
Custom header helper
```
[#macro header]
[#nested/]
[/#macro]
```
Custom footer helper
```
[#macro footer]
[#nested/]
[/#macro]
```
Once you make these changes, they will take effect on all of the pages listed above.
## Development Tools[#](#development-tools)
When building an advanced theme, the [FusionAuth theme helper project](https://github.com/FusionAuth/fusionauth-theme-helper) is useful.
You can pull down all your templates, edit them locally, and have them transparently uploaded to your FusionAuth instance.
### Managing Many Themes[#](#managing-many-themes)
If you have a large number of themes, you'll want additional tooling to manage them. Best practices include:
* Put your themes under version control and use CI/CD and one of the [client libraries](/docs/sdks) to apply changes.
* Prefer modifying CSS rather than theme templates.
* Leverage `tenant.data` for a small number of attributes that differ between tenants, which allows you to use the same theme with modified templates. See [Environment Management](#environment-management) for an example.
* Consider generating your themes locally using a templating language such as jinja and then uploading them.
* Automatically assign themes to tenants, using one of the [client libraries](/docs/sdks).
There is an [open feature request](https://github.com/FusionAuth/fusionauth-issues/issues/1869) to allow for theme inheritance, but it is not currently on the roadmap.
## Environment Management[#](#environment-management)
When moving themes from one environment to another, the theme logic and look and feel may be the same, but the assets may be different. FusionAuth templates only have access to [the documented variables](/docs/customize/look-and-feel/advanced-themes/template-variables). FusionAuth does not resolve environment variables in the themes templates.
You have a few options to handle the difference in assets between theme environments.
You can set variables at theme build time in the [Helpers](/docs/customize/look-and-feel/advanced-themes/helpers) template using the [assign](https://freemarker.apache.org/docs/ref_directive_assign.html) directive. These variables can then be used in other templates. You can use a templating language like jinja to build the `Helpers` template at build time.
Another option is to use custom fields in the **tenant.data** field. The `tenant` object is available to every template. Then you can reference these variables for different hostnames.
You can only set `tenant.data` values using the [client libraries](/docs/sdks) or the [API](/docs/apis).
For example, if your development assets are at `dev.example.com/assets` and your production assets are at `prod.example.com/assets`, set a variable such as `asset_base_url` in the **tenant.data** field.
Here's an excerpt of what the development tenant `data` object might look like:
```
{
"tenant" : {
"data" : {
"themes": {
"asset_base_url" : "dev.example.com/assets",
"css_base_url" : "cdn-dev.example.com"
}
}
}
}
```
Production, in contrast, will use different hostnames.
```
{
"tenant" : {
"data" : {
"themes": {
"asset_base_url" : "prod.example.com/assets",
"css_base_url" : "cdn-prod.example.com"
}
}
}
}
```
Then, in your template, reference images using `${tenant.data.themes.asset_base_url}` and CSS files using `${tenant.data.themes.css_base_url}`. For example, a simplified theme page might look like this:
```
...
```
## Troubleshooting[#](#troubleshooting)
### Theme Errors Preventing Login[#](#theme-errors-preventing-login)
If you have modified a custom theme and it is causing errors preventing you from logging in to FusionAuth or the admin UI, you can override the use of the UI templates. This will render a form allowing you to log in. To do this:
* Open your browser and access your FusionAuth admin UI.
* This will redirect you to the broken `/oauth2/authorize` page.
* Click in your browser's address bar and scroll to the end.
* Add the String `&bypassTheme=true` to the end of the URL and hit the Enter key.
This should render the default login page that ships with FusionAuth and allow you to log in and fix errors.
### Default Theme Used Incorrectly[#](#default-theme-used-incorrectly)
Anytime a request is made to a themed page and FusionAuth is unable to identify the tenant, the default tenant will be used. This includes, but is not limited to:
* The root page `/` when a `client_id` or `tenantId` is not provided.
* Any themed pages such as `/password/forgot` when a `client_id` is not provided.
* Edge case error conditions where FusionAuth doesn't have context to determine the application or tenant.
If you see the default theme unexpectedly, ensure you are passing required parameters, such as the `tenantId` or `client_id`, to the page so that it can determine the applicable application or tenant. These parameters allow FusionAuth to determine the correct theme to display.
### Theme Will Not Retain Change(s)[#](#theme-will-not-retain-changes)
If you have upgraded your version of FusionAuth and are using Advanced Theming, you may need to upgrade each theme.
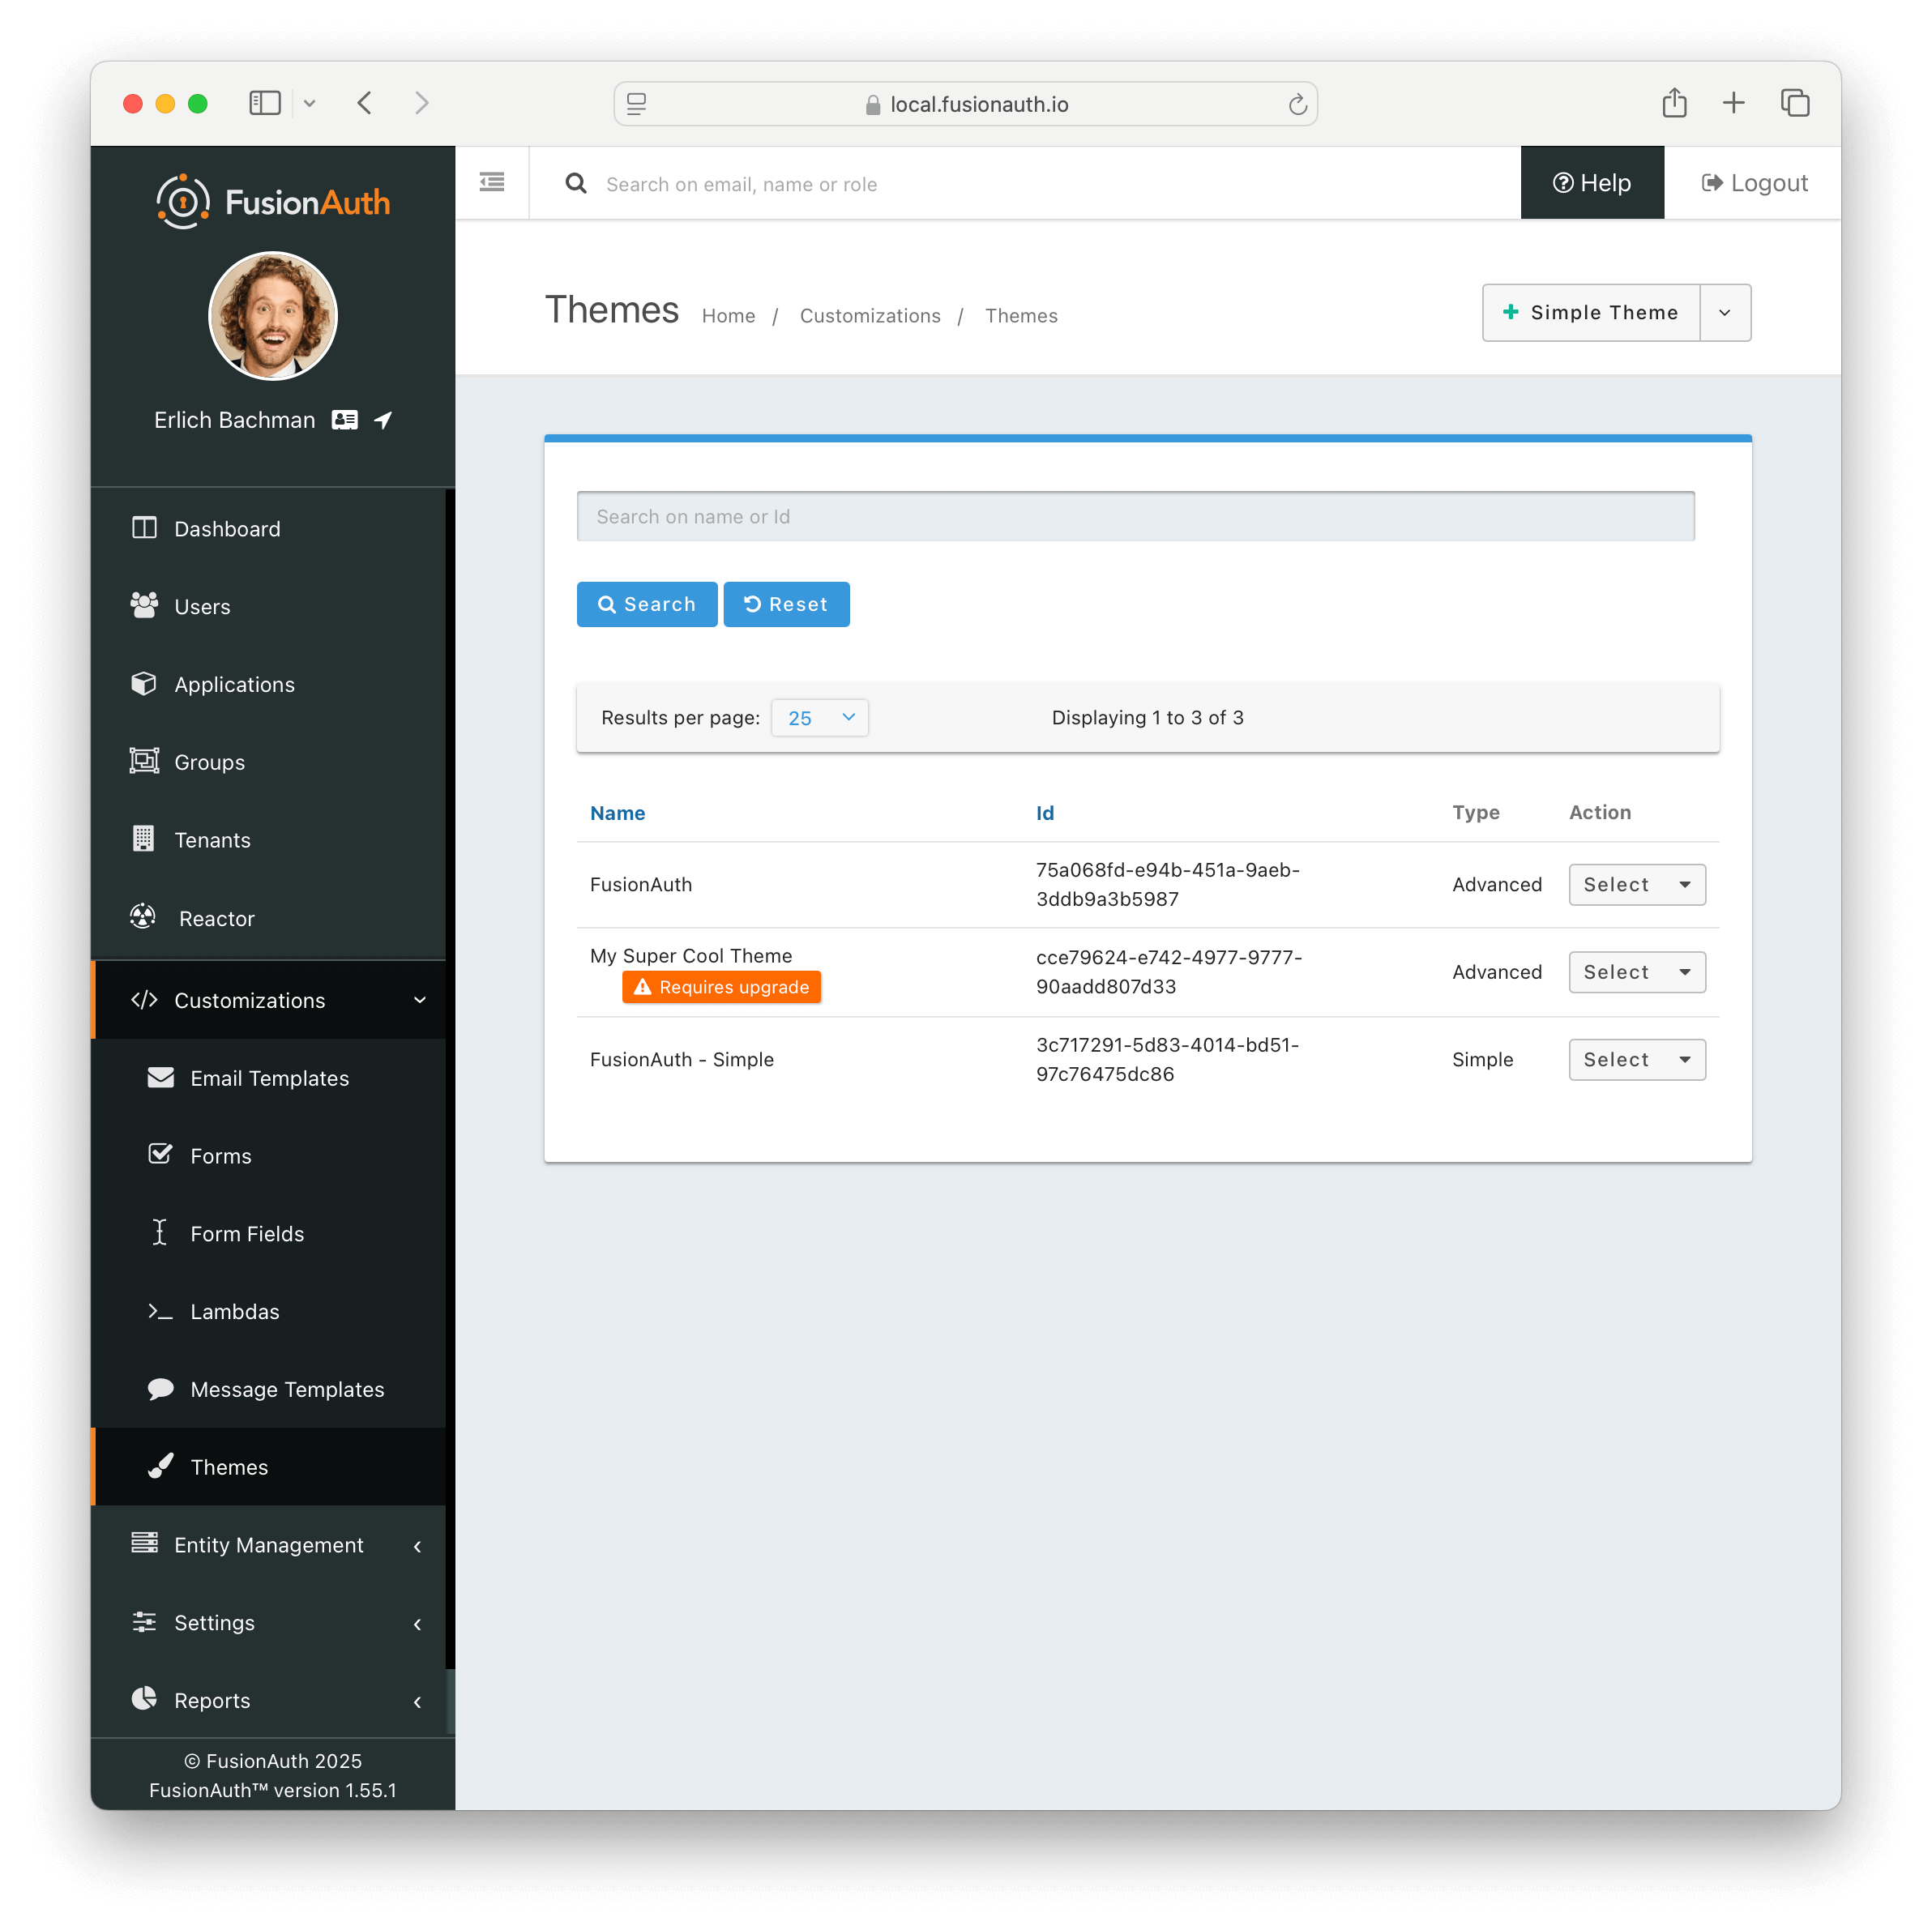
On theme "save" in the UI, an orange icon will indicate specific pages needing attention and changes. You can click on each page, copy in the new theme, and start customizing.
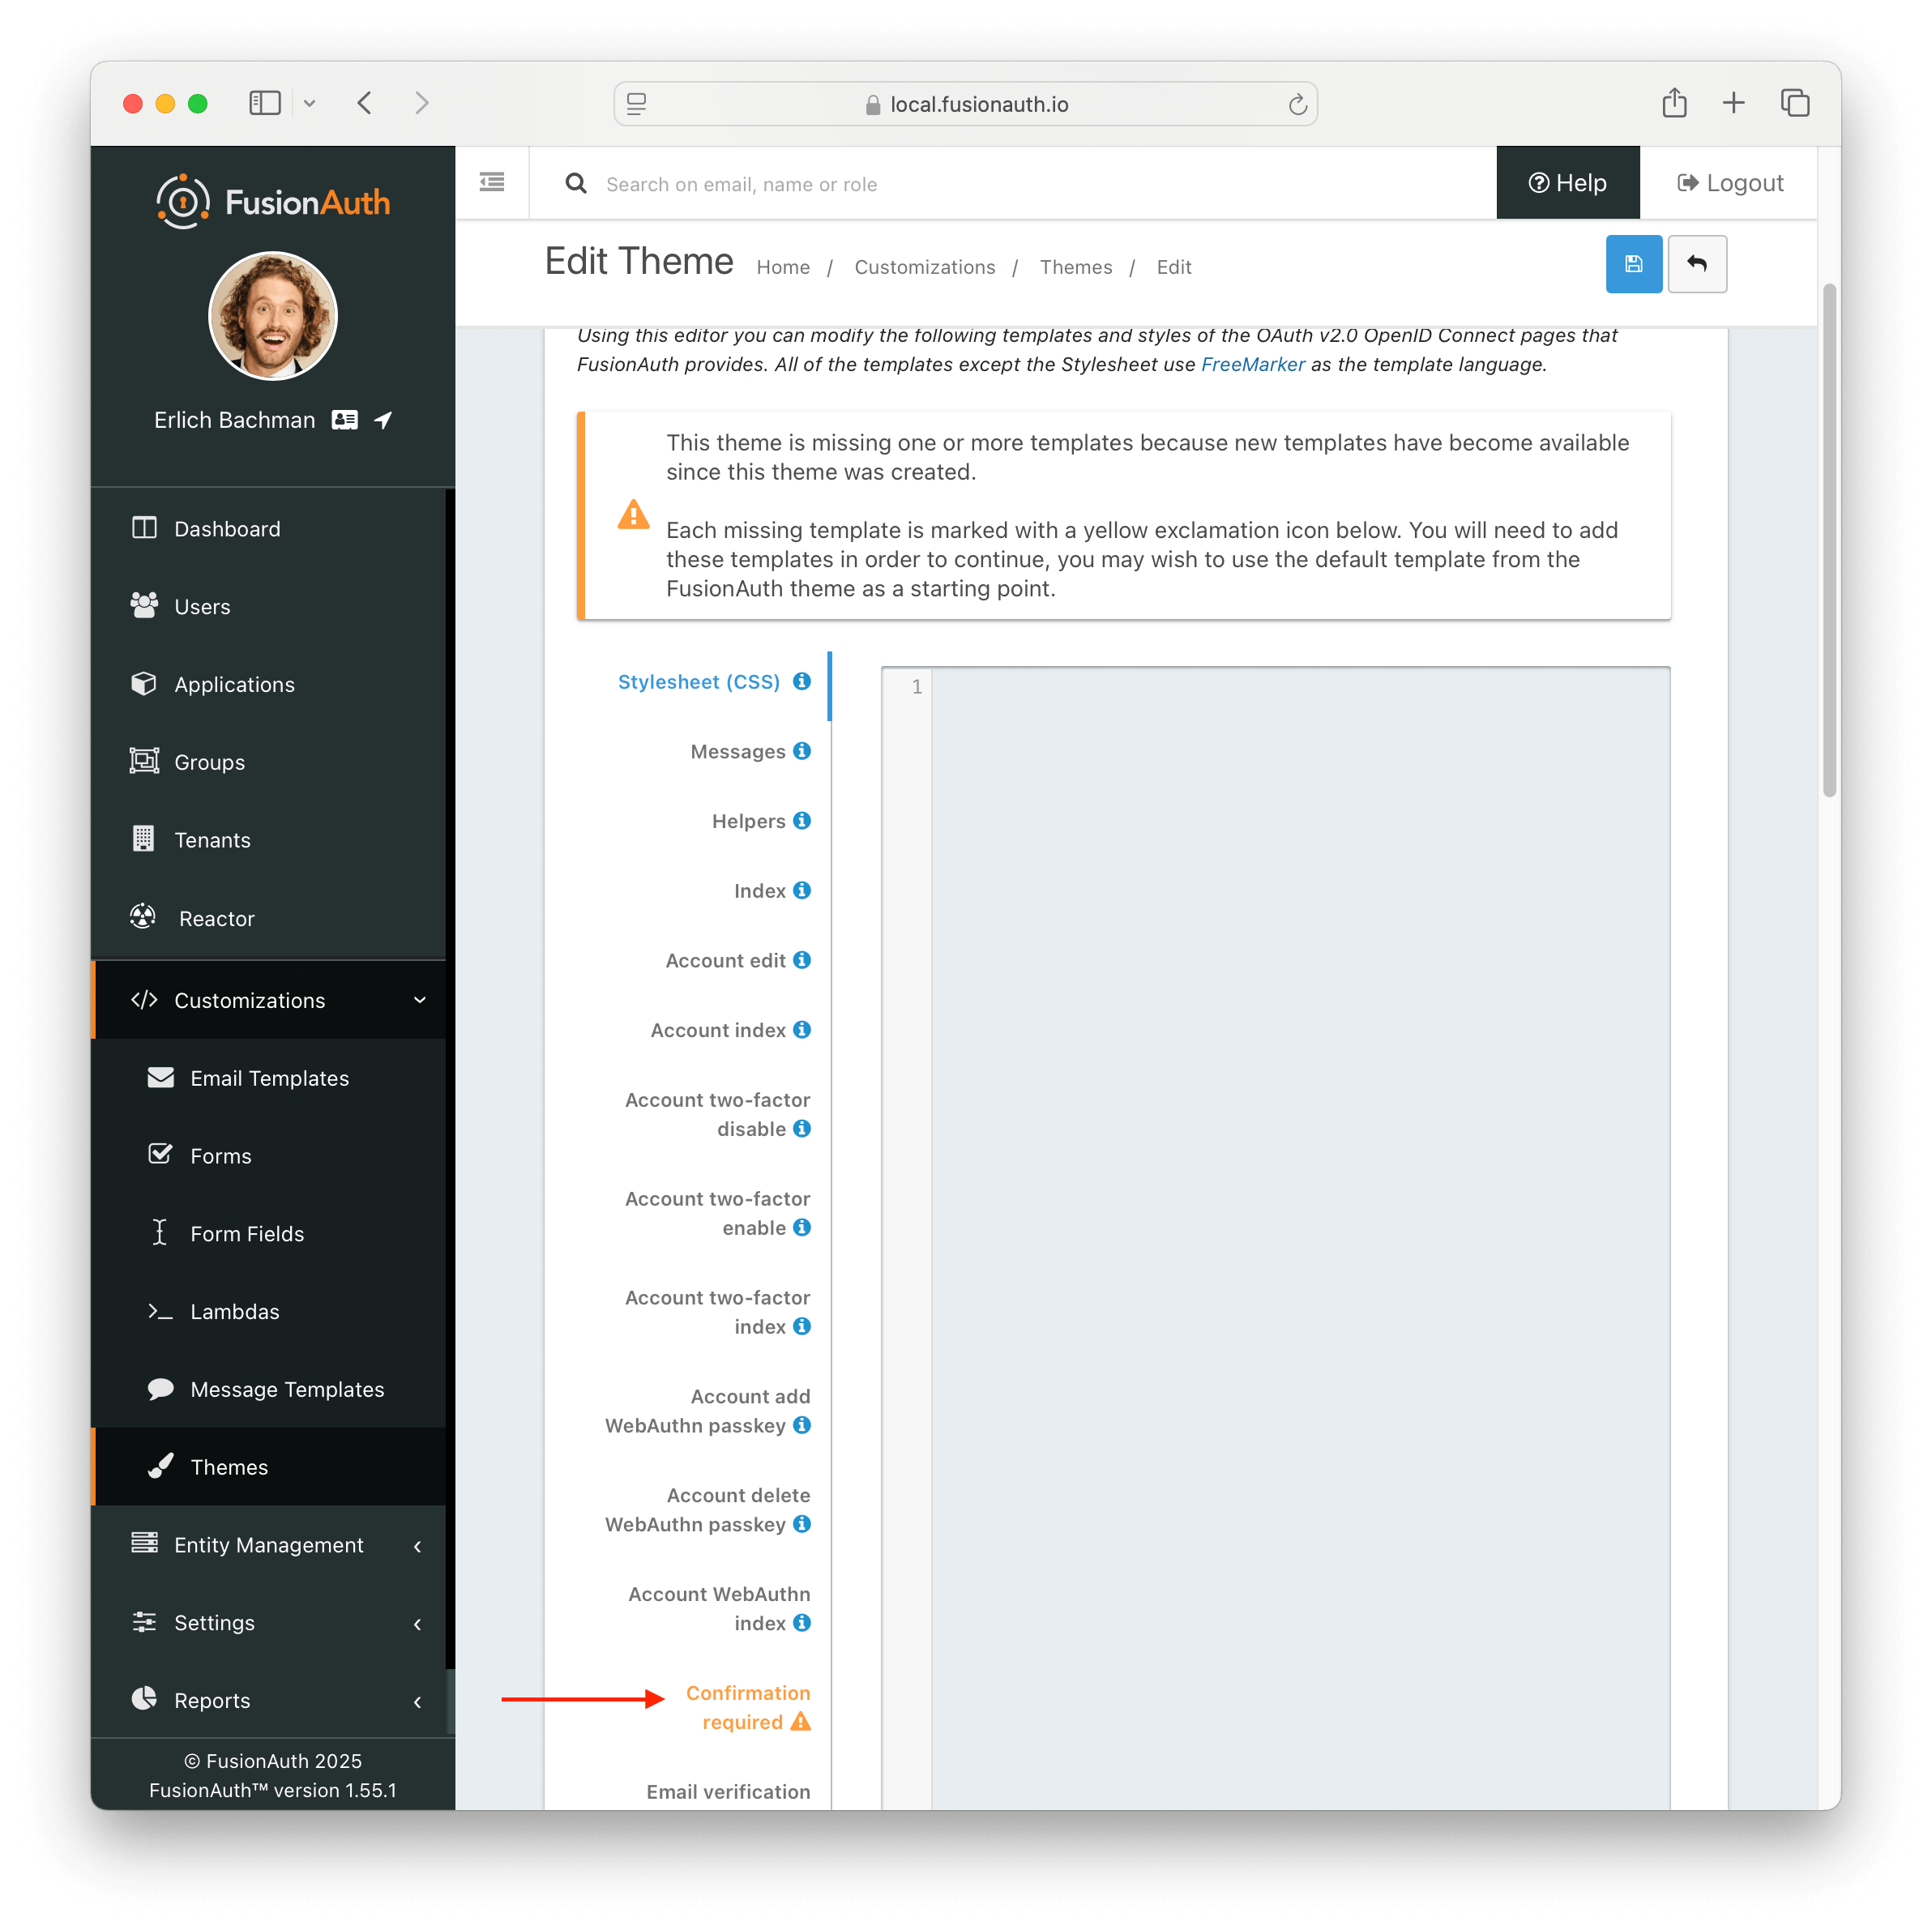
Additionally, in the messages bundle a validation notice will indicate the message keys to be added to support the newer FusionAuth version.
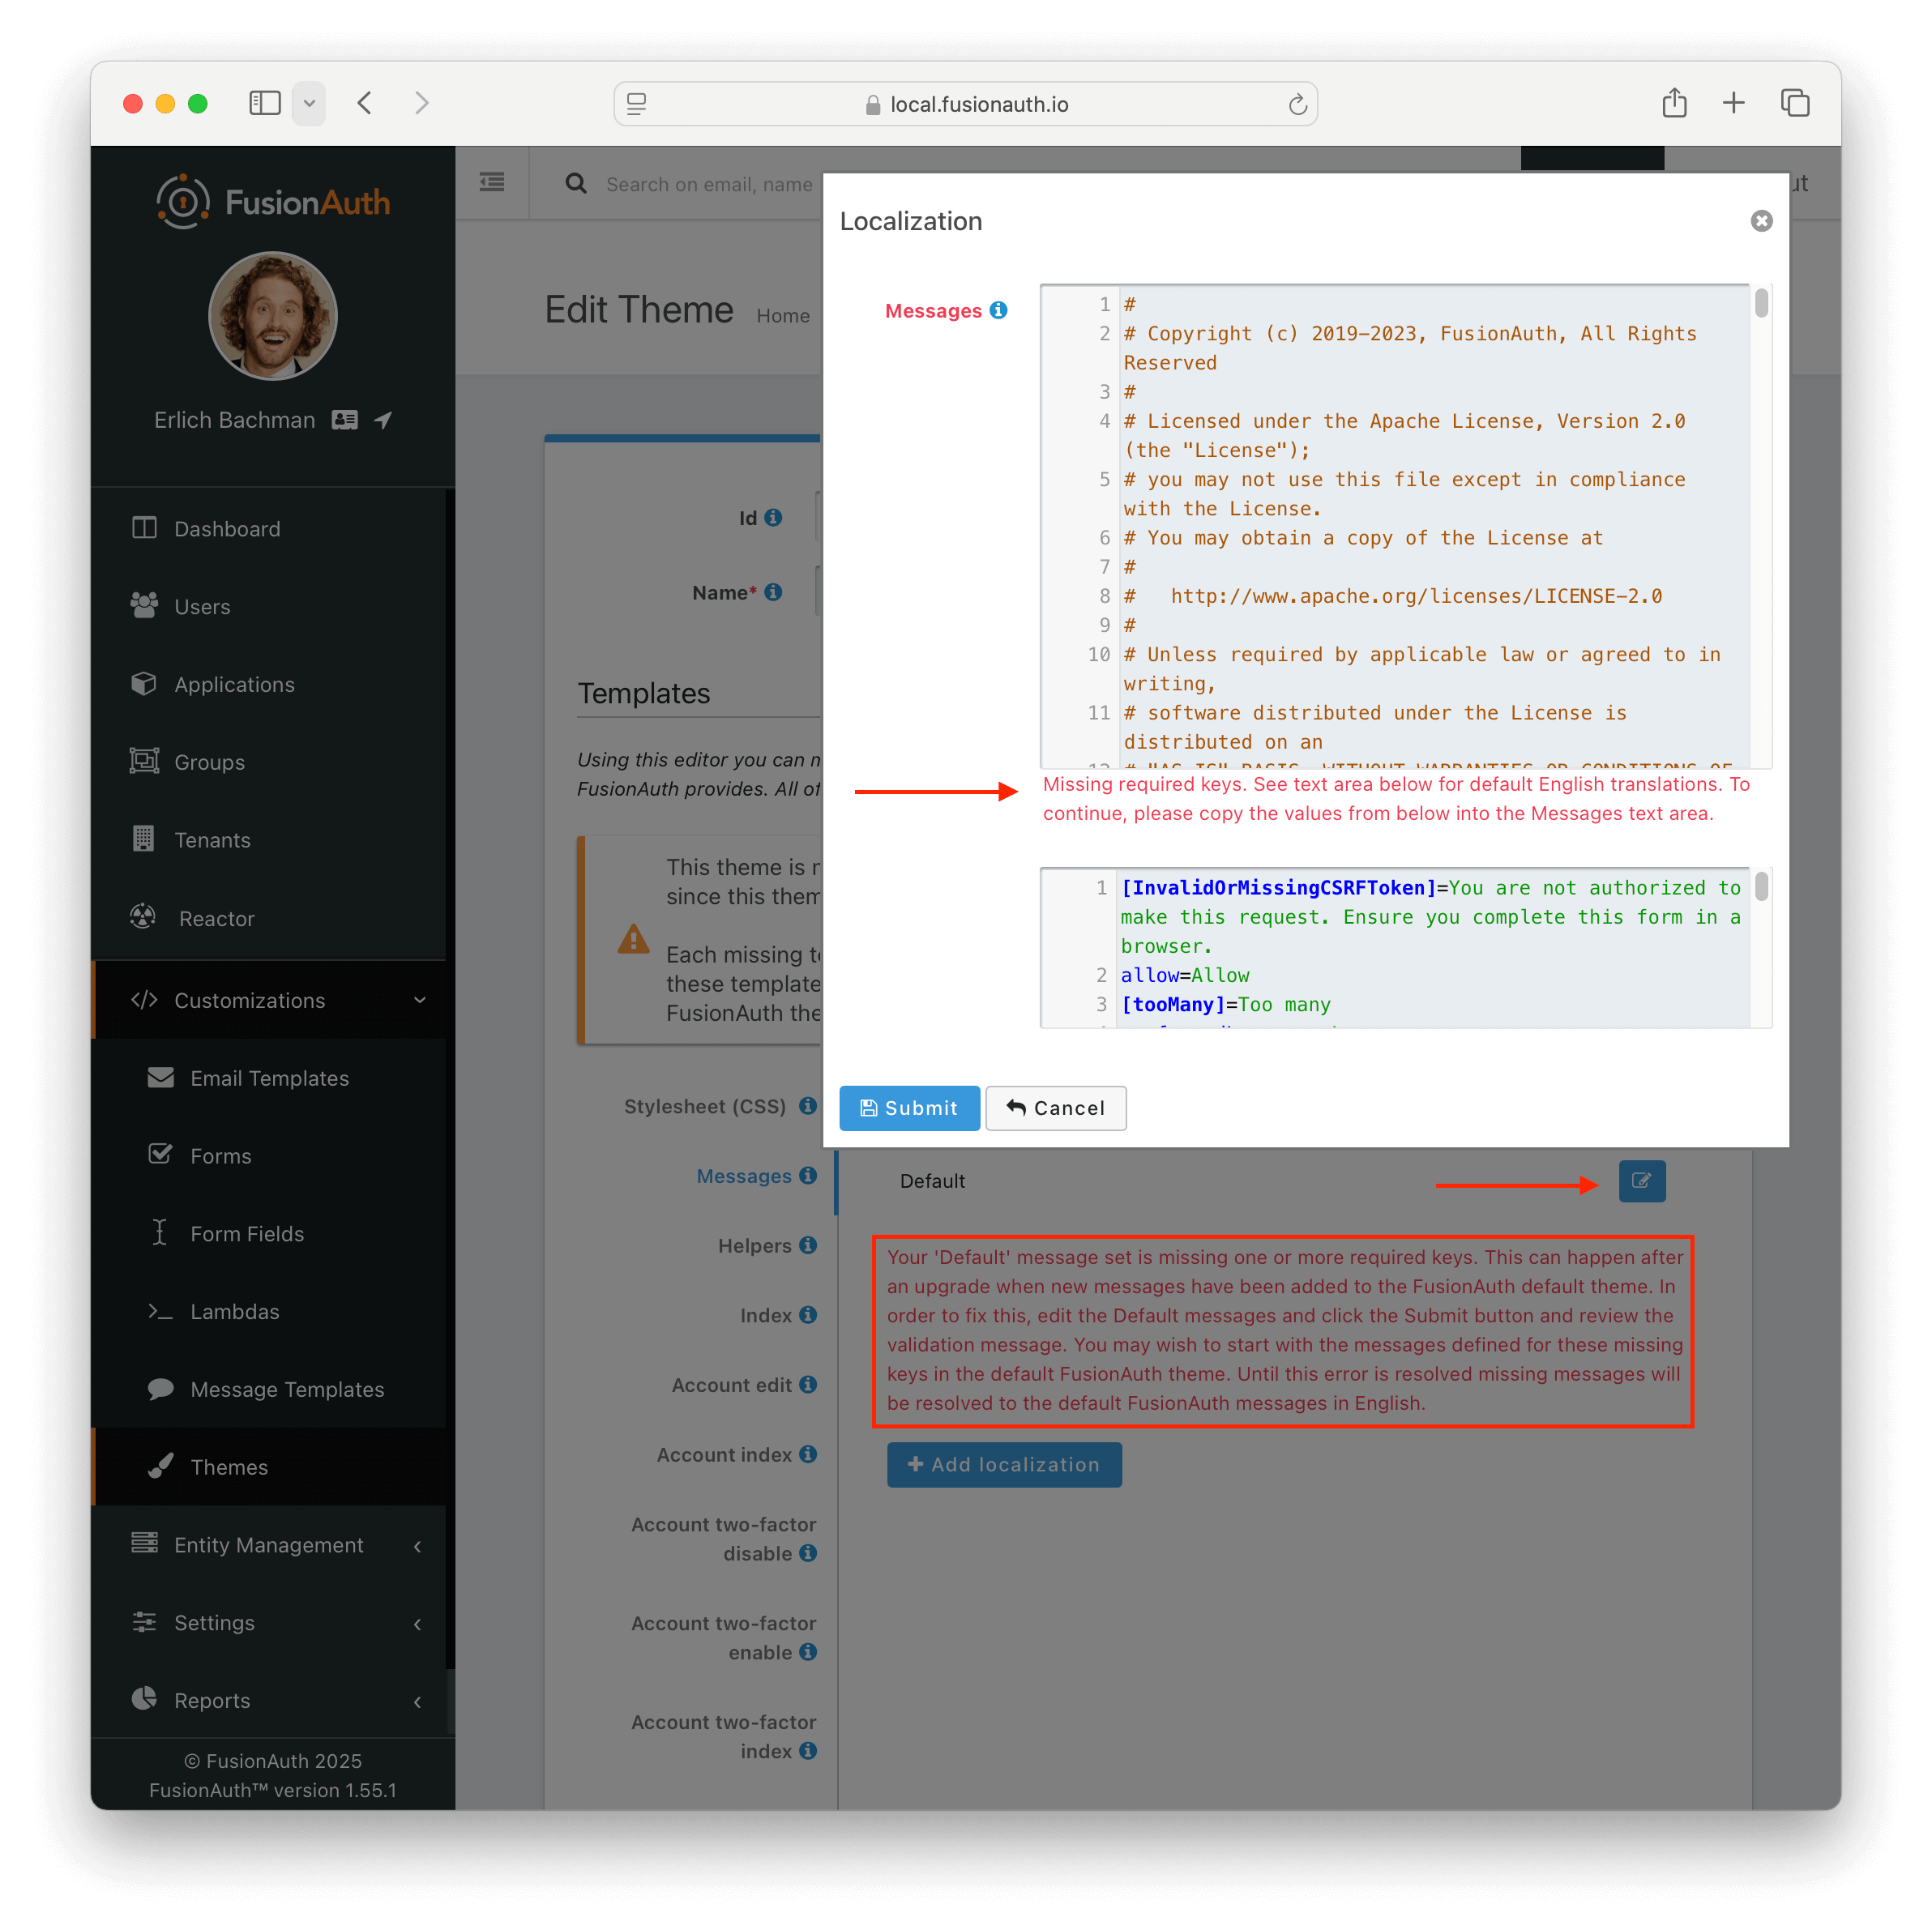
For more information about upgrading themes, see [Upgrade an Advanced Theme](/docs/customize/look-and-feel/advanced-themes/upgrade-advanced-theme).
## Upgrading[#](#upgrading)
To upgrade your custom theme from one version to another, see [Upgrade an Advanced Theme](/docs/customize/look-and-feel/advanced-themes/upgrade-advanced-theme).
 ...
...
 ```
## Troubleshooting[#](#troubleshooting)
### Theme Errors Preventing Login[#](#theme-errors-preventing-login)
If you have modified a custom theme and it is causing errors preventing you from logging in to FusionAuth or the admin UI, you can override the use of the UI templates. This will render a form allowing you to log in. To do this:
* Open your browser and access your FusionAuth admin UI.
* This will redirect you to the broken `/oauth2/authorize` page.
* Click in your browser's address bar and scroll to the end.
* Add the String `&bypassTheme=true` to the end of the URL and hit the Enter key.
This should render the default login page that ships with FusionAuth and allow you to log in and fix errors.
### Default Theme Used Incorrectly[#](#default-theme-used-incorrectly)
Anytime a request is made to a themed page and FusionAuth is unable to identify the tenant, the default tenant will be used. This includes, but is not limited to:
* The root page `/` when a `client_id` or `tenantId` is not provided.
* Any themed pages such as `/password/forgot` when a `client_id` is not provided.
* Edge case error conditions where FusionAuth doesn't have context to determine the application or tenant.
If you see the default theme unexpectedly, ensure you are passing required parameters, such as the `tenantId` or `client_id`, to the page so that it can determine the applicable application or tenant. These parameters allow FusionAuth to determine the correct theme to display.
### Theme Will Not Retain Change(s)[#](#theme-will-not-retain-changes)
If you have upgraded your version of FusionAuth and are using Advanced Theming, you may need to upgrade each theme.

On theme "save" in the UI, an orange icon will indicate specific pages needing attention and changes. You can click on each page, copy in the new theme, and start customizing.

Additionally, in the messages bundle a validation notice will indicate the message keys to be added to support the newer FusionAuth version.

For more information about upgrading themes, see [Upgrade an Advanced Theme](/docs/customize/look-and-feel/advanced-themes/upgrade-advanced-theme).
## Upgrading[#](#upgrading)
To upgrade your custom theme from one version to another, see [Upgrade an Advanced Theme](/docs/customize/look-and-feel/advanced-themes/upgrade-advanced-theme).
```
## Troubleshooting[#](#troubleshooting)
### Theme Errors Preventing Login[#](#theme-errors-preventing-login)
If you have modified a custom theme and it is causing errors preventing you from logging in to FusionAuth or the admin UI, you can override the use of the UI templates. This will render a form allowing you to log in. To do this:
* Open your browser and access your FusionAuth admin UI.
* This will redirect you to the broken `/oauth2/authorize` page.
* Click in your browser's address bar and scroll to the end.
* Add the String `&bypassTheme=true` to the end of the URL and hit the Enter key.
This should render the default login page that ships with FusionAuth and allow you to log in and fix errors.
### Default Theme Used Incorrectly[#](#default-theme-used-incorrectly)
Anytime a request is made to a themed page and FusionAuth is unable to identify the tenant, the default tenant will be used. This includes, but is not limited to:
* The root page `/` when a `client_id` or `tenantId` is not provided.
* Any themed pages such as `/password/forgot` when a `client_id` is not provided.
* Edge case error conditions where FusionAuth doesn't have context to determine the application or tenant.
If you see the default theme unexpectedly, ensure you are passing required parameters, such as the `tenantId` or `client_id`, to the page so that it can determine the applicable application or tenant. These parameters allow FusionAuth to determine the correct theme to display.
### Theme Will Not Retain Change(s)[#](#theme-will-not-retain-changes)
If you have upgraded your version of FusionAuth and are using Advanced Theming, you may need to upgrade each theme.

On theme "save" in the UI, an orange icon will indicate specific pages needing attention and changes. You can click on each page, copy in the new theme, and start customizing.

Additionally, in the messages bundle a validation notice will indicate the message keys to be added to support the newer FusionAuth version.

For more information about upgrading themes, see [Upgrade an Advanced Theme](/docs/customize/look-and-feel/advanced-themes/upgrade-advanced-theme).
## Upgrading[#](#upgrading)
To upgrade your custom theme from one version to another, see [Upgrade an Advanced Theme](/docs/customize/look-and-feel/advanced-themes/upgrade-advanced-theme).