FusionAuth QuickStart for WordPress

On this page
In this QuickStart, you are going to build an application with WordPress and integrate it with FusionAuth. You'll be building it for ChangeBank, a global leader in converting dollars into coins. It'll have areas reserved for users who have logged in as well as public facing sections.
The Docker Compose file and source code for a complete application are available at https://github.com/FusionAuth/fusionauth-quickstart-wordpress-web.
Prerequisites#
For this QuickStart, you'll need:
- Docker, which is the quickest way to start FusionAuth. (There are other ways.) The guide uses Docker version 29, but other close versions should work.
All instructions are for WordPress version 7, which will always run in Docker successfully. If your real WordPress installation is a later version, the most likely complication is obsolete plugins, which you might need to exclude or find modern alternatives for. Below are the WordPress plugins used in this guide:
- OpenID Connect Generic Client
- Shortcoder
- Snippet Shortcodes
- Simple Page Access Restriction
- Hide Admin Bar from Non-Admins
- Remove Dashboard Access
General Architecture#
Here's a typical application login flow before FusionAuth:
Request flow during login before FusionAuth
And here's the same application login flow after introducing FusionAuth:
Request flow during login after FusionAuth
In general, you are introducing FusionAuth in order to normalize and consolidate user data. This helps make sure it is consistent and up-to-date as well as offloading your login security and functionality to FusionAuth.
Getting Started#
In this section, you'll get FusionAuth up and running and create a new WordPress application.
Clone the Code#
First, clone the code from the repository and change into that directory.
$ git clone https://github.com/FusionAuth/fusionauth-quickstart-wordpress-web.git
$ cd fusionauth-quickstart-wordpress-web
All shell commands in this guide can be entered in a terminal in this directory. On Windows, you need to replace forward slashes with backslashes in paths.
Run FusionAuth via Docker#
You'll find a Docker Compose file (docker-compose.yml) and an environment variables configuration file (.env) in the root directory of the repo.
Assuming you have Docker installed, you can stand up FusionAuth on your machine with the following.
docker compose up -dHere you are using a bootstrapping feature of FusionAuth called Kickstart. When FusionAuth comes up for the first time, it will look at the kickstart/kickstart.json file and configure FusionAuth to your specified state.
If you ever want to reset the FusionAuth application, you need to delete the volumes created by Docker Compose by executing docker compose down -v, then re-run docker compose up -d.
FusionAuth will be initially configured with these settings:
- Your client Id is
e9fdb985-9173-4e01-9d73-ac2d60d1dc8e. - Your client secret is
super-secret-secret-that-should-be-regenerated-for-production. - Your example username is
richard@example.comand the password ispassword. - Your admin username is
admin@example.comand the password ispassword. - The base URL of FusionAuth is
http://localhost:9011/.
You can log in to the FusionAuth admin UI and look around if you want to, but with Docker and Kickstart, everything will already be configured correctly.
If you want to see where the FusionAuth values came from, they can be found in the FusionAuth app. The tenant Id is found on the Tenants page. To see the Client Id and Client Secret, go to the Applications page and click the View icon under the actions for the ChangeBank application. You'll find the Client Id and Client Secret values in the OAuth configuration section.
The .env file contains passwords. In a real application, always add this file to your .gitignore file and never commit secrets to version control.
Create a Basic WordPress Application#
Next, you'll set up a basic WordPress site. While this guide builds a new WordPress project, you can use the same method to integrate your existing project with FusionAuth.
If you simply want to run the application, there is a completed version in the complete-application directory. Once the Docker services have all started, you can use the following commands to get the complete WordPress app up and running if you do not want to create your own.
$ cd complete-application
$ ./setup.sh
Then view the application at the following URL: http://localhost:3000.
Install WordPress#
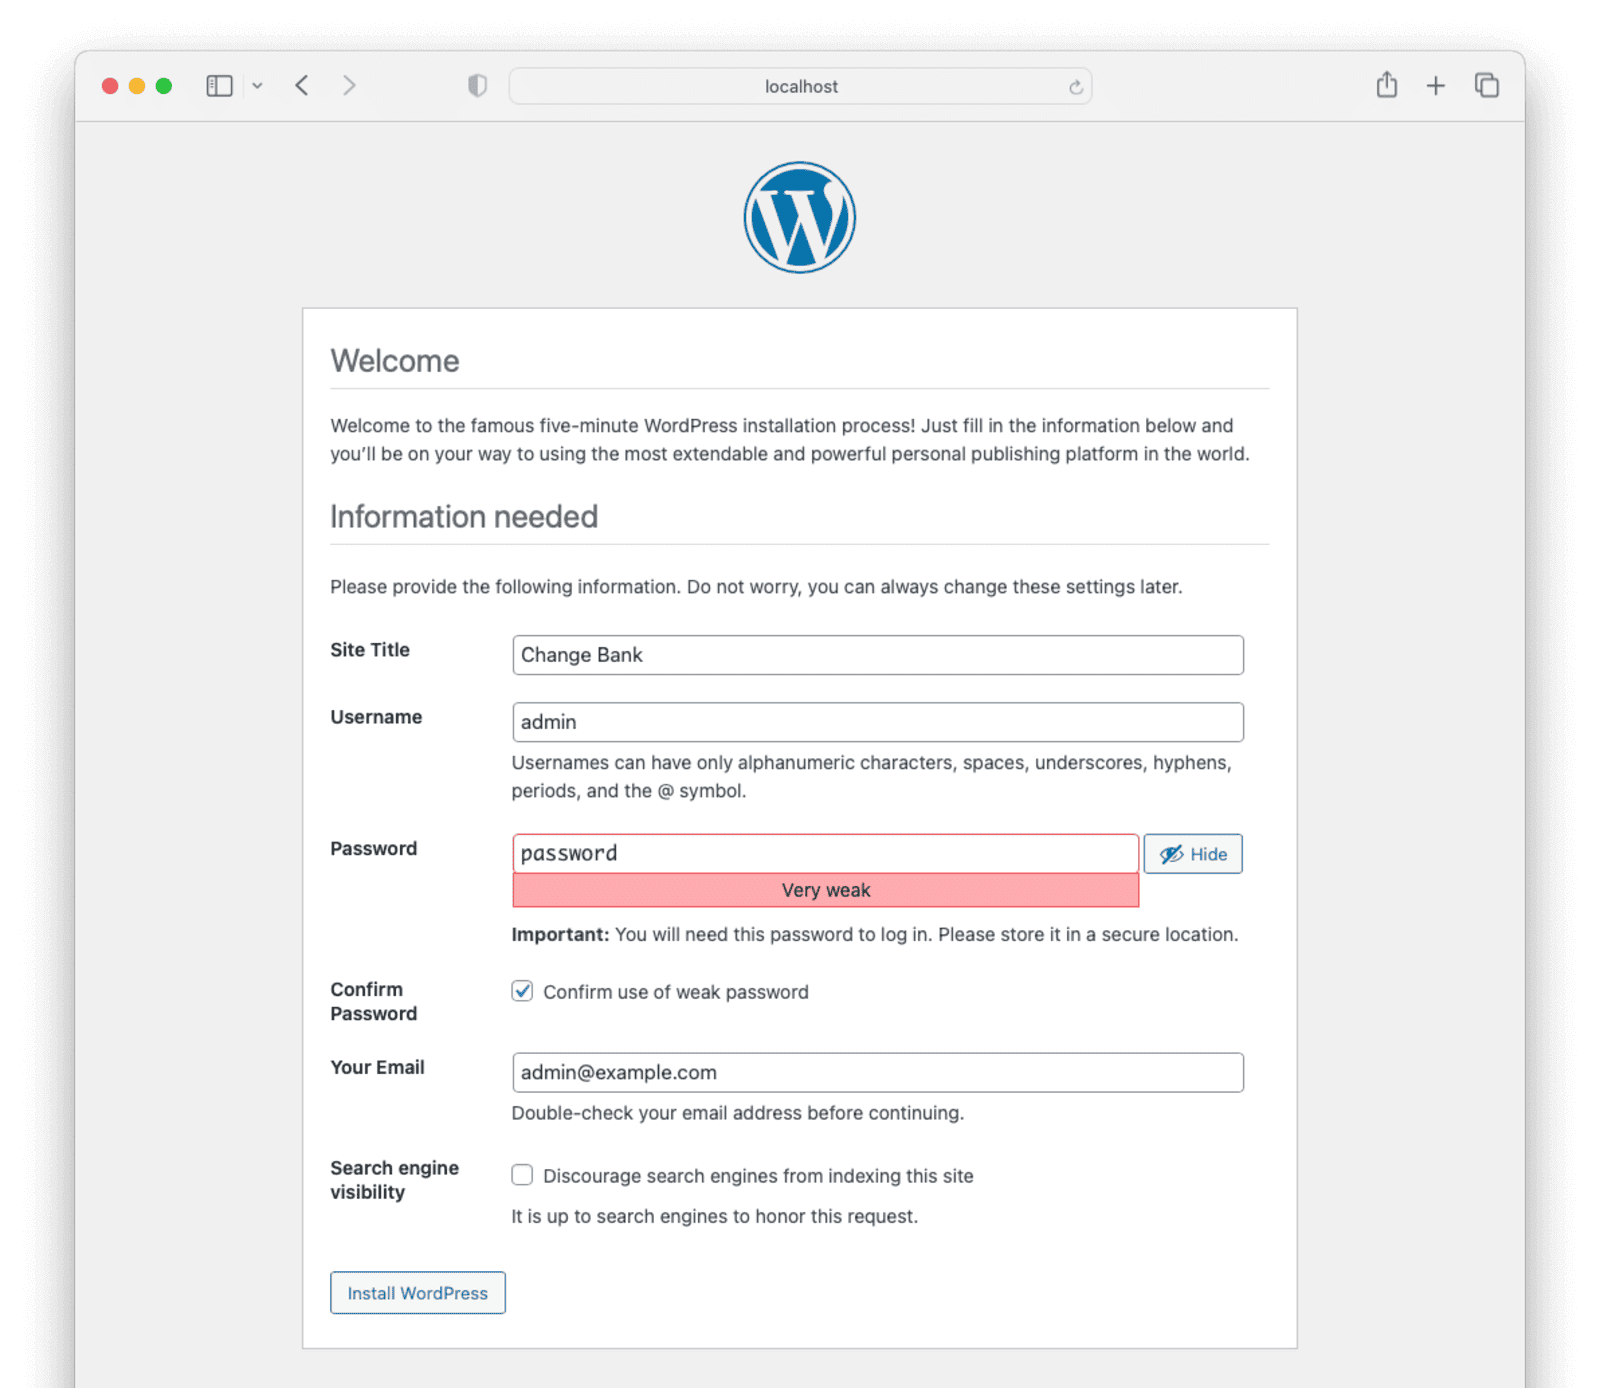
Browse to http://localhost:3000. It should automatically redirect you to http://localhost:3000/wp-admin/install.php, as this is a brand-new site.
Choose English (United States) and click Continue .
On the next page:
- Set Site Title to
Change Bank. - Set Username to
adminand Password topassword. - Enable Confirm use of weak password.
- Set Your Email to
admin@example.com. - Click Install WordPress .
Completing all these instructions using the WordPress UI is tedious for multiple installations. You can instead do all configuration using commands pasted into the terminal. All commands are given in complete-application/setup.sh.
For instance, to complete the site installation above, you could instead run this command:
$ docker compose exec cli wp core install --url="http://localhost:3000" --title="Change Bank" --admin_user="admin" --admin_password="password" --admin_email="admin@example.com" --skip-email
On the success page, click Log In . On the login page, enter the username admin and password password and click Log In . (You can return to this page later by browsing to http://localhost:3000/wp-login.php.)
Create a Blank Page Template#
WordPress doesn't include a blank page template by default. Create one, so your pages can display content at full browser width without any theme styling constraints:
- Browse to Appearance -> Editor .
- Click Templates in the sidebar.
- Click the Add Template button.
- Select Custom template .
- Name it
Blankand click Create . - The template starts with some default blocks. Select all of them and delete them.
- Click the + button to add a new block, search for
Content, and add the Content block. - Click Save .
Create Placeholder Pages#
Before you do any FusionAuth work, you'll create three placeholder pages:
- A home page that anonymous users can see.
- A make change page that only logged in users can see.
- An account page that only logged in users can see.
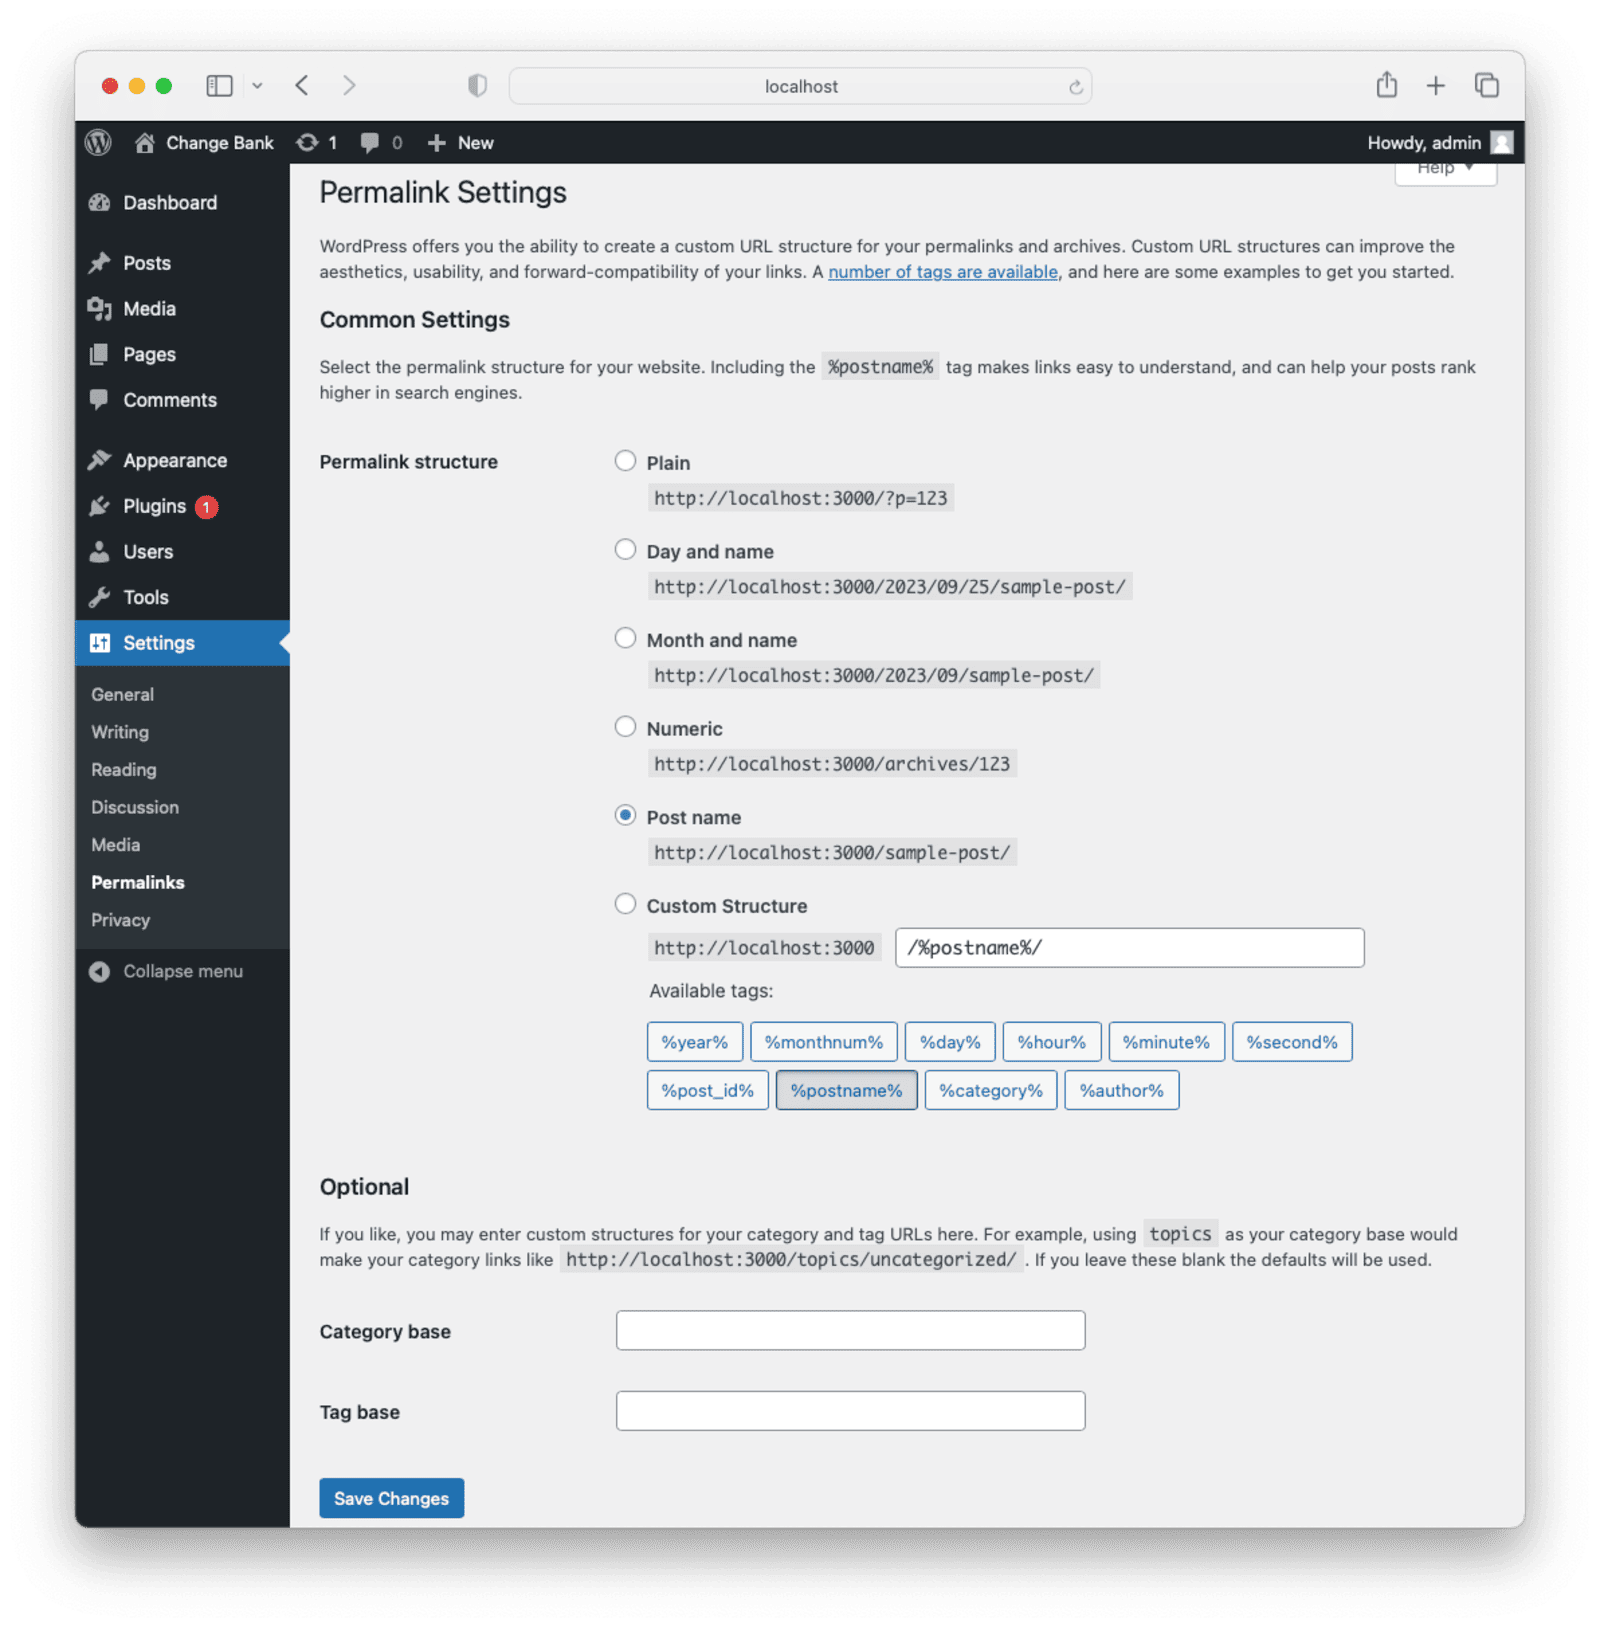
Under Settings -> Permalinks , change Permalink structure to Post name and click Save Changes . This sets page URLs to be more human-readable than the default numbered URLs.
To add the placeholder pages, first delete the default pages:
- Click Pages in the sidebar.
- Select the two existing sample pages.
- On the Bulk Actions dropdown, select Move to Trash and click Apply .
Now create new blank pages:
- Click Add New .
- Under Add Title enter
Home. - Under Page on the far right, view the Template field and modify it. Do so by clicking Pages - Change Template , and select Blank .
- Click Publish , confirm, and note the URL has been updated to one you can browse to.
- Click the WP icon on the top left to return to the pages screen.
- Repeat these steps to create and publish two more pages, one with the title
Accountand one with the titleChange.
You now have three blank pages.

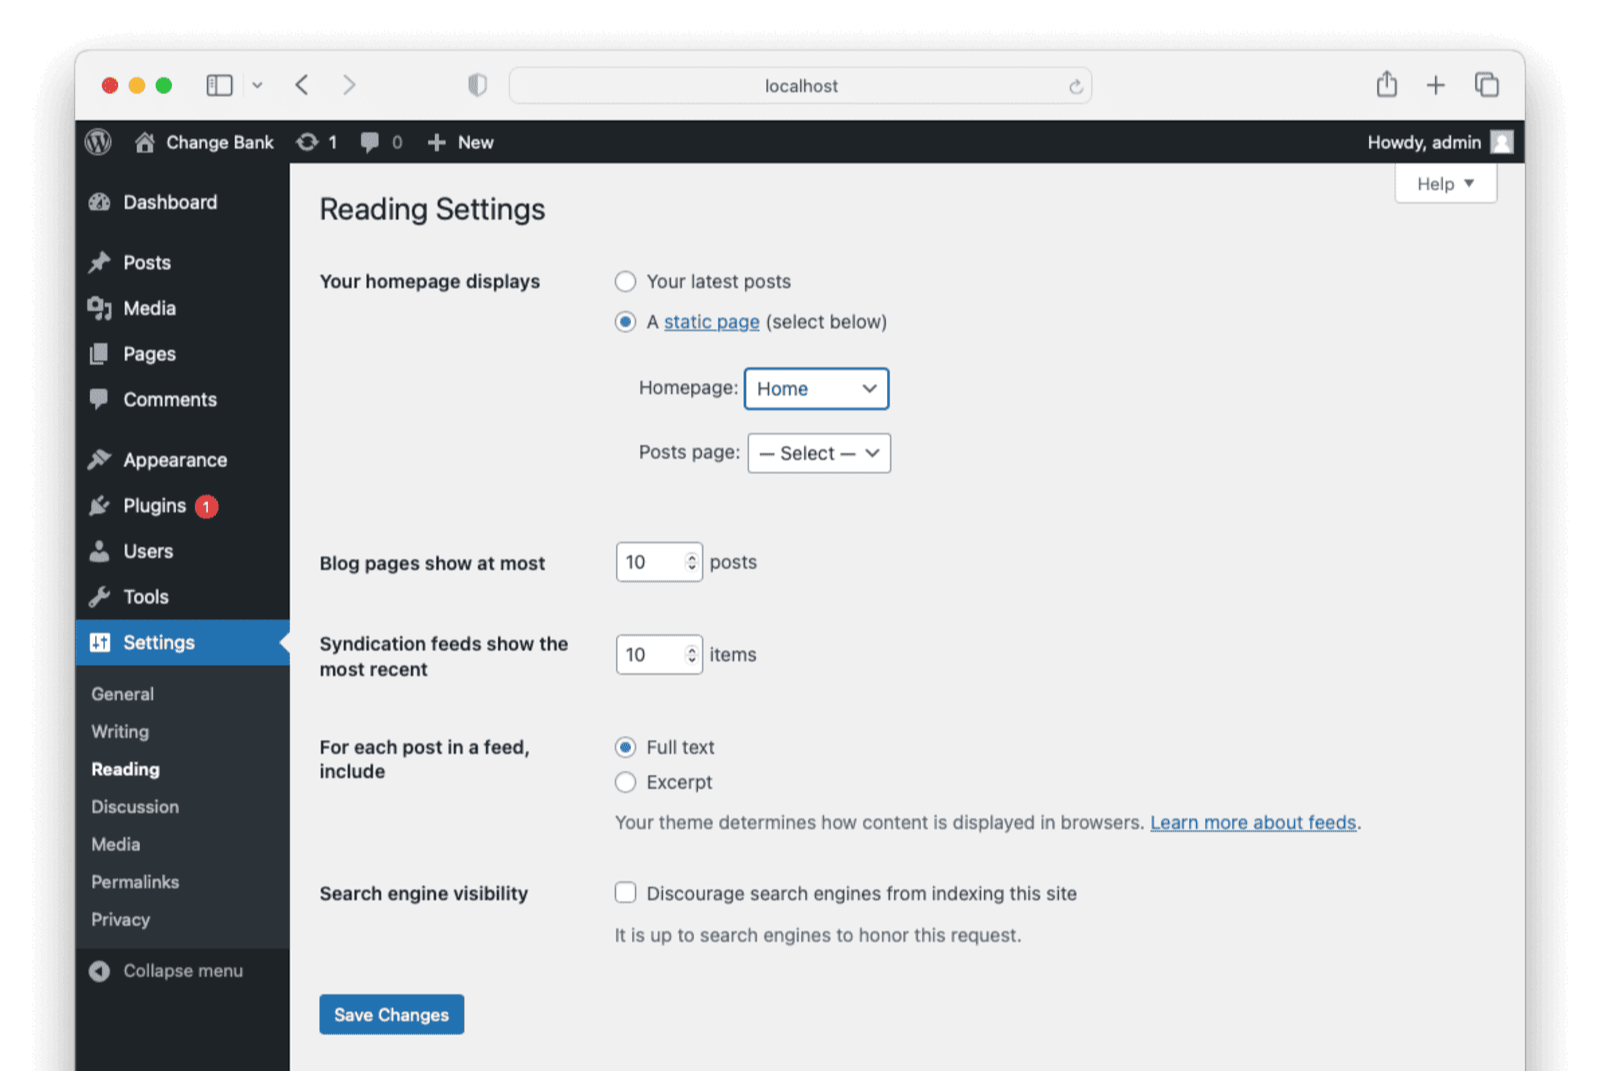
Browse to Settings -> Reading . Change Your homepage displays to A static page and under Homepage select Home. Save your changes. Now http://localhost:3000 points to your homepage.
Authentication#
You now have a basic WordPress site with three blank pages. Currently, a user authenticates against the WordPress user database. Next, you will enable WordPress to use FusionAuth for authentication so that your users can use the same FusionAuth login credentials with this site as any future sites you make or other applications.
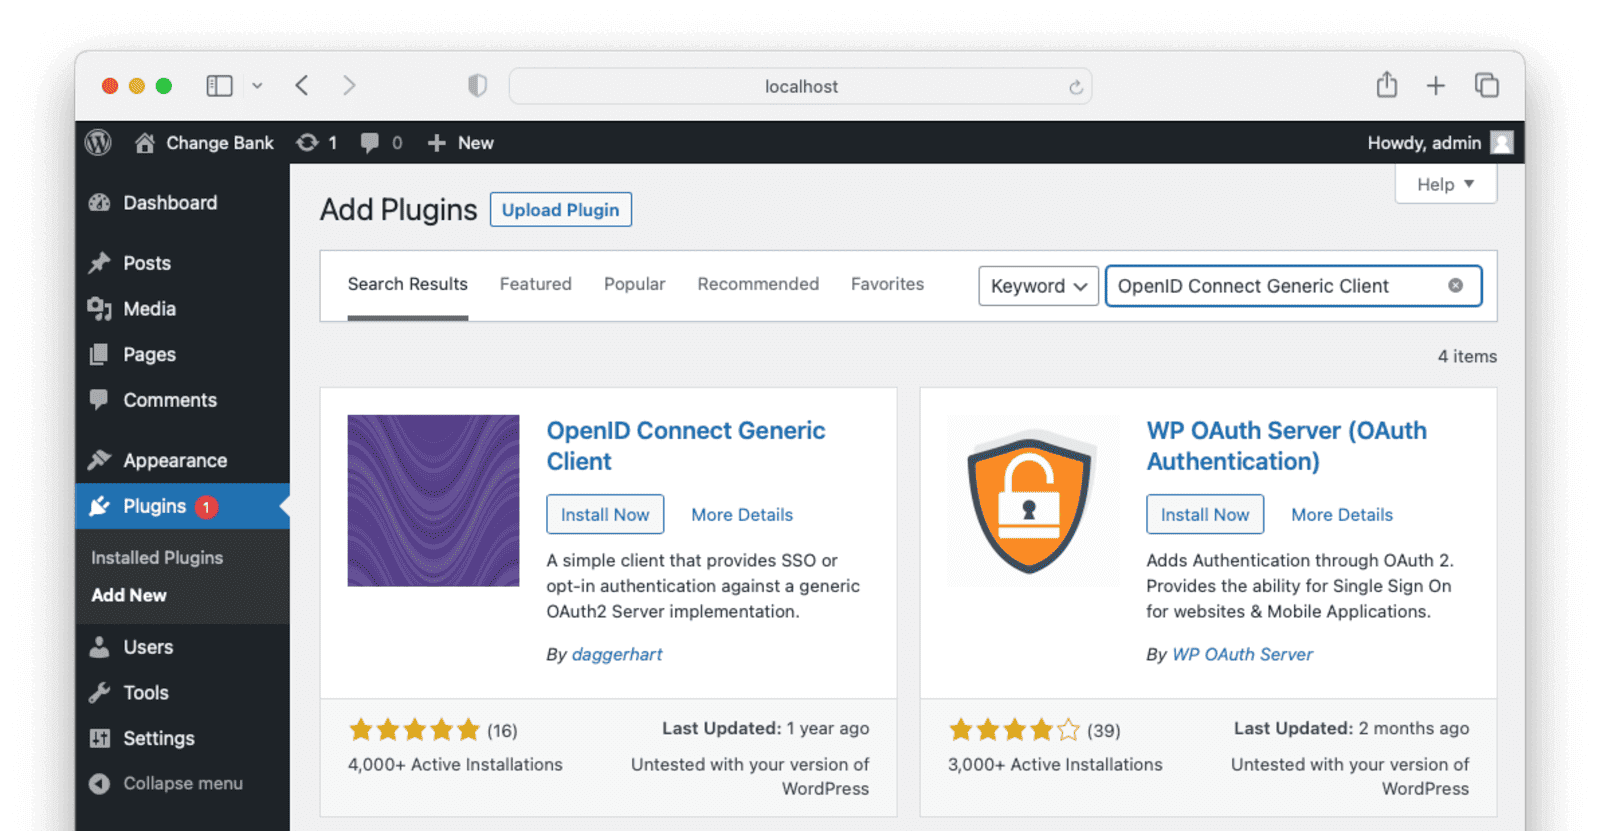
On the WordPress dashboard, click Plugins -> Add new . In the search box on the right, paste OpenID Connect Generic Client. On the first plugin in the results, by daggerhart, click Install Now , then Activate .
Browse to Settings -> Open ID Connect Client and enter the following settings:
- Client ID -
e9fdb985-9173-4e01-9d73-ac2d60d1dc8e - Client Secret Key -
super-secret-secret-that-should-be-regenerated-for-production - OpenID Scope -
openid email profile - Login Endpoint URL -
http://localhost:9011/oauth2/authorize - Userinfo Endpoint URL -
http://fusionauth:9011/oauth2/userinfo - Token Validation Endpoint URL -
http://fusionauth:9011/oauth2/token - End Session Endpoint URL -
http://localhost:9011/oauth2/logout - JWKS Endpoint URL -
http://fusionauth:9011/.well-known/jwks.json - Nickname Key -
sub - Display Name Formatting -
{email}(this is what will be displayed to the user in the WordPress admin screen) - Enable Link Existing Users - this marks a user in your local WordPress database who has the same email in FusionAuth as the same user, instead of duplicating them.
- Enable Allow Internal IDP so WordPress can talk to FusionAuth on the Docker network.
Requests from the browser to FusionAuth will use the endpoint http://localhost:9011 to communicate with the FusionAuth container. For server to FusionAuth communication the endpoint http://fusionauth:9011 is used, since the internal network name for the FusionAuth container specified in the Docker Compose file is fusionauth.
Click Save Changes .
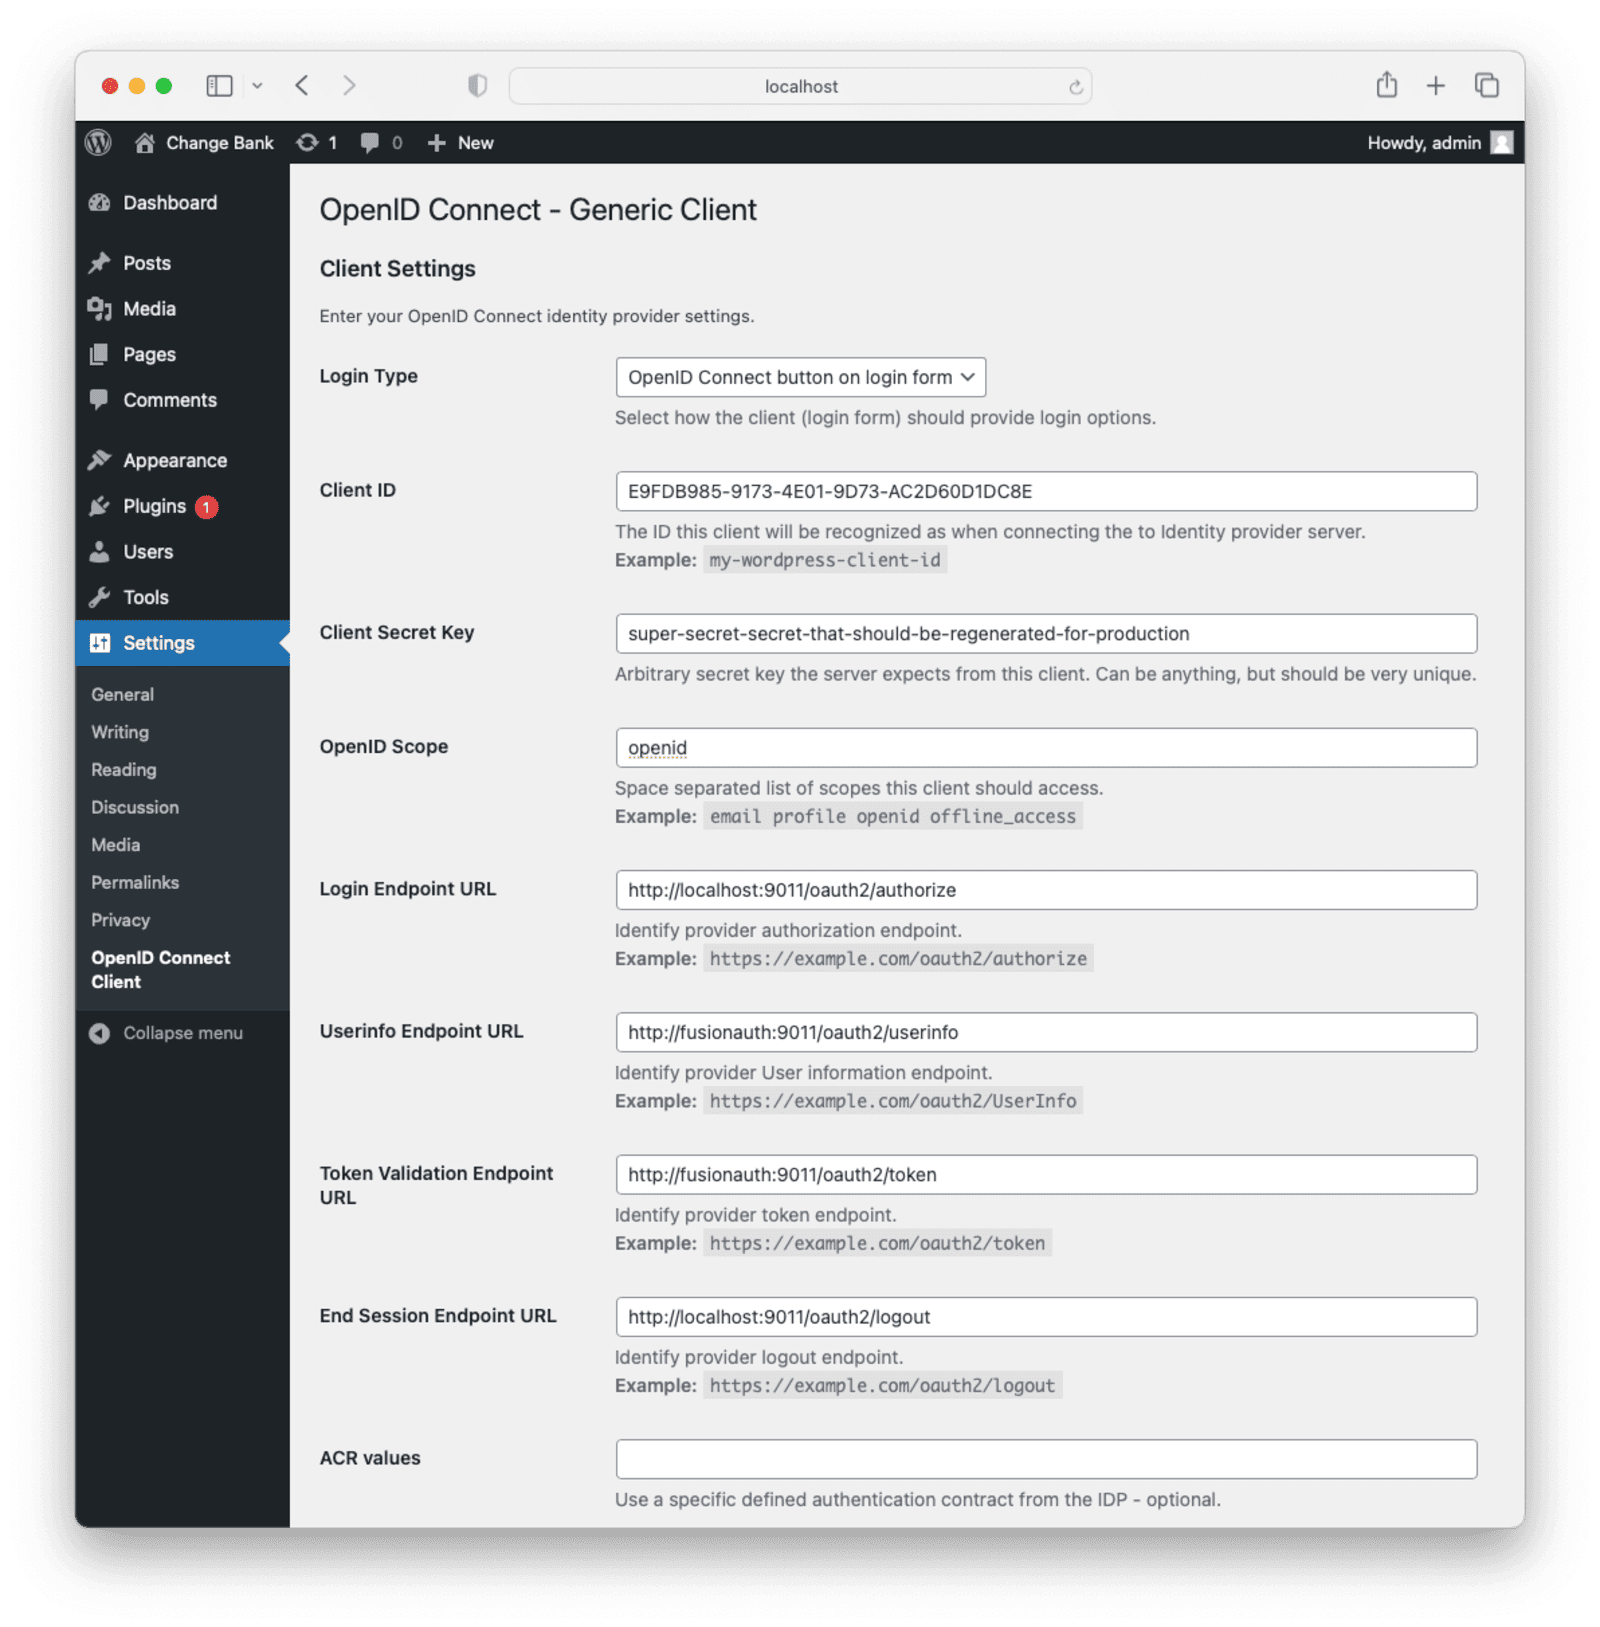
Now if you browse to http://localhost:3000/wp-login.php, you can click Login with OpenID Connect and log in on FusionAuth with email richard@example.com and password password.
Prevent Default Login#
For a simpler user experience, you can remove the option to log in with WordPress. This is an optional step.
Open a terminal and run the following command to overwrite the default wp-login.php file.
$ docker cp ./complete-application/wp-login.php wp:/var/www/html/wp-login.php
The new file starts commenting out the login form on line 1424 with <!--, and ends the comment on line 1504 with -->.
Now http://localhost:3000/wp-login.php looks much neater.
Restrict Pages to Logged-In Users#
Currently, if you log out, you can still browse to the pages that should be restricted, like http://localhost:3000/account. Let's prevent that.
At Plugins -> Add New , search for simple page access restriction and install and activate the one by Plugins & Snippets. Browse to the plugin settings in the sidebar. Set the following values:
- Login Redirect Type -
URL. - Login Redirect URL -
http://localhost:3000/wp-login.php. - Click Save Changes .
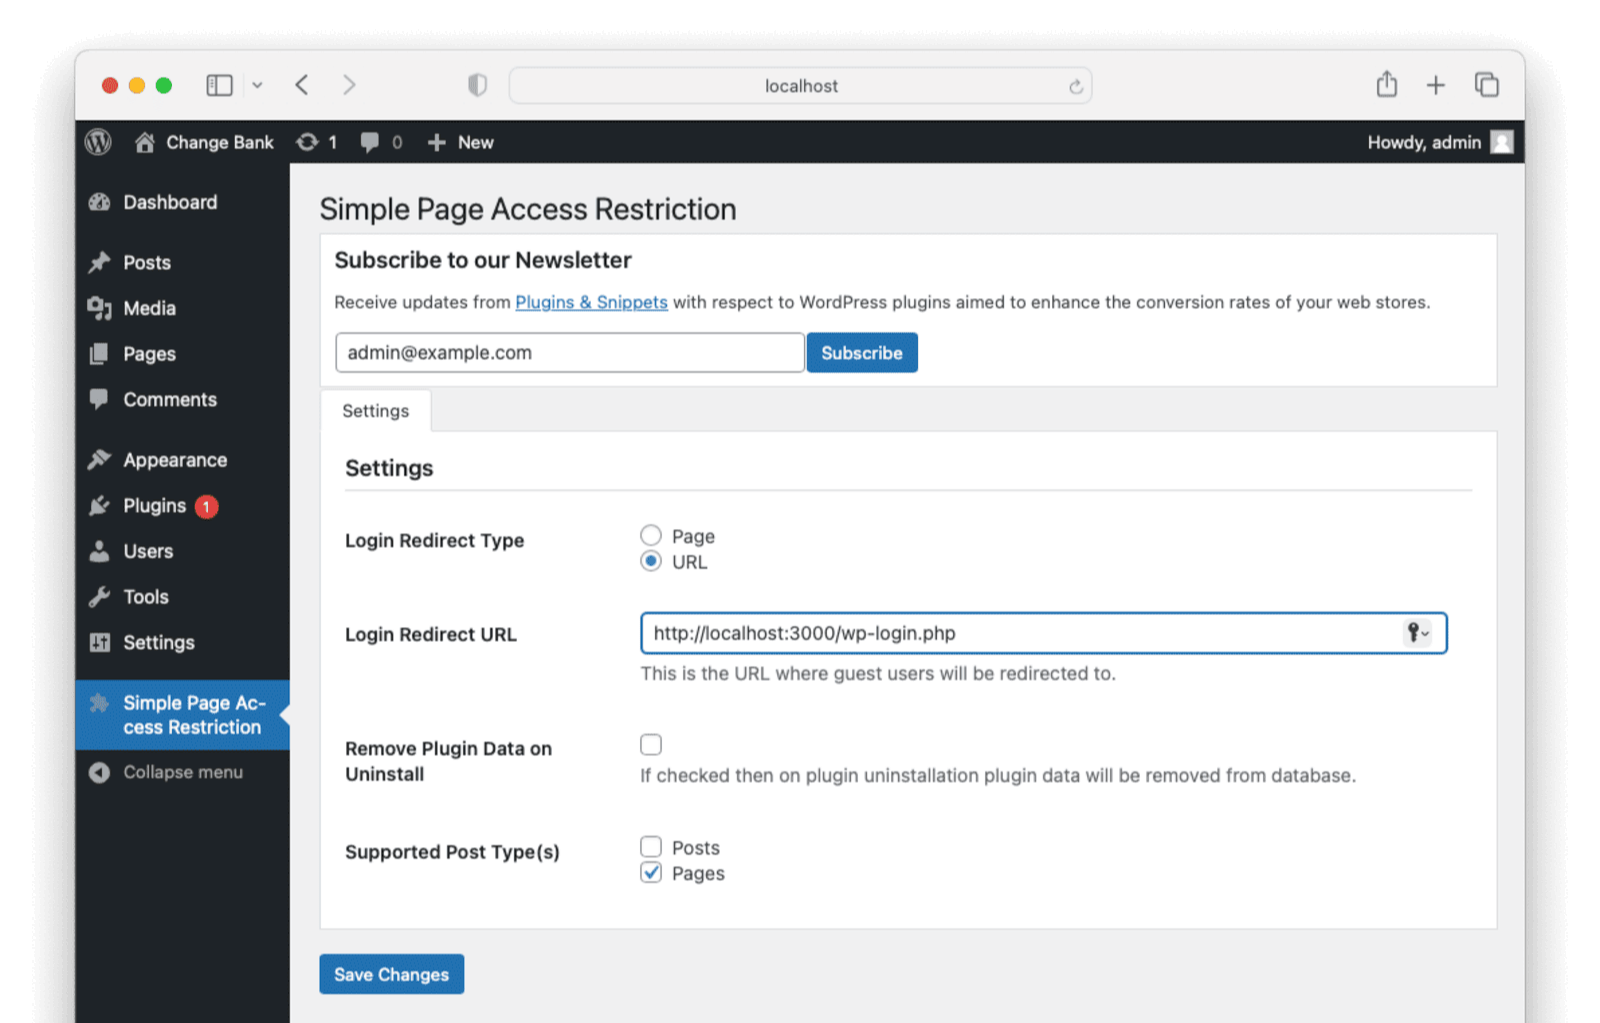
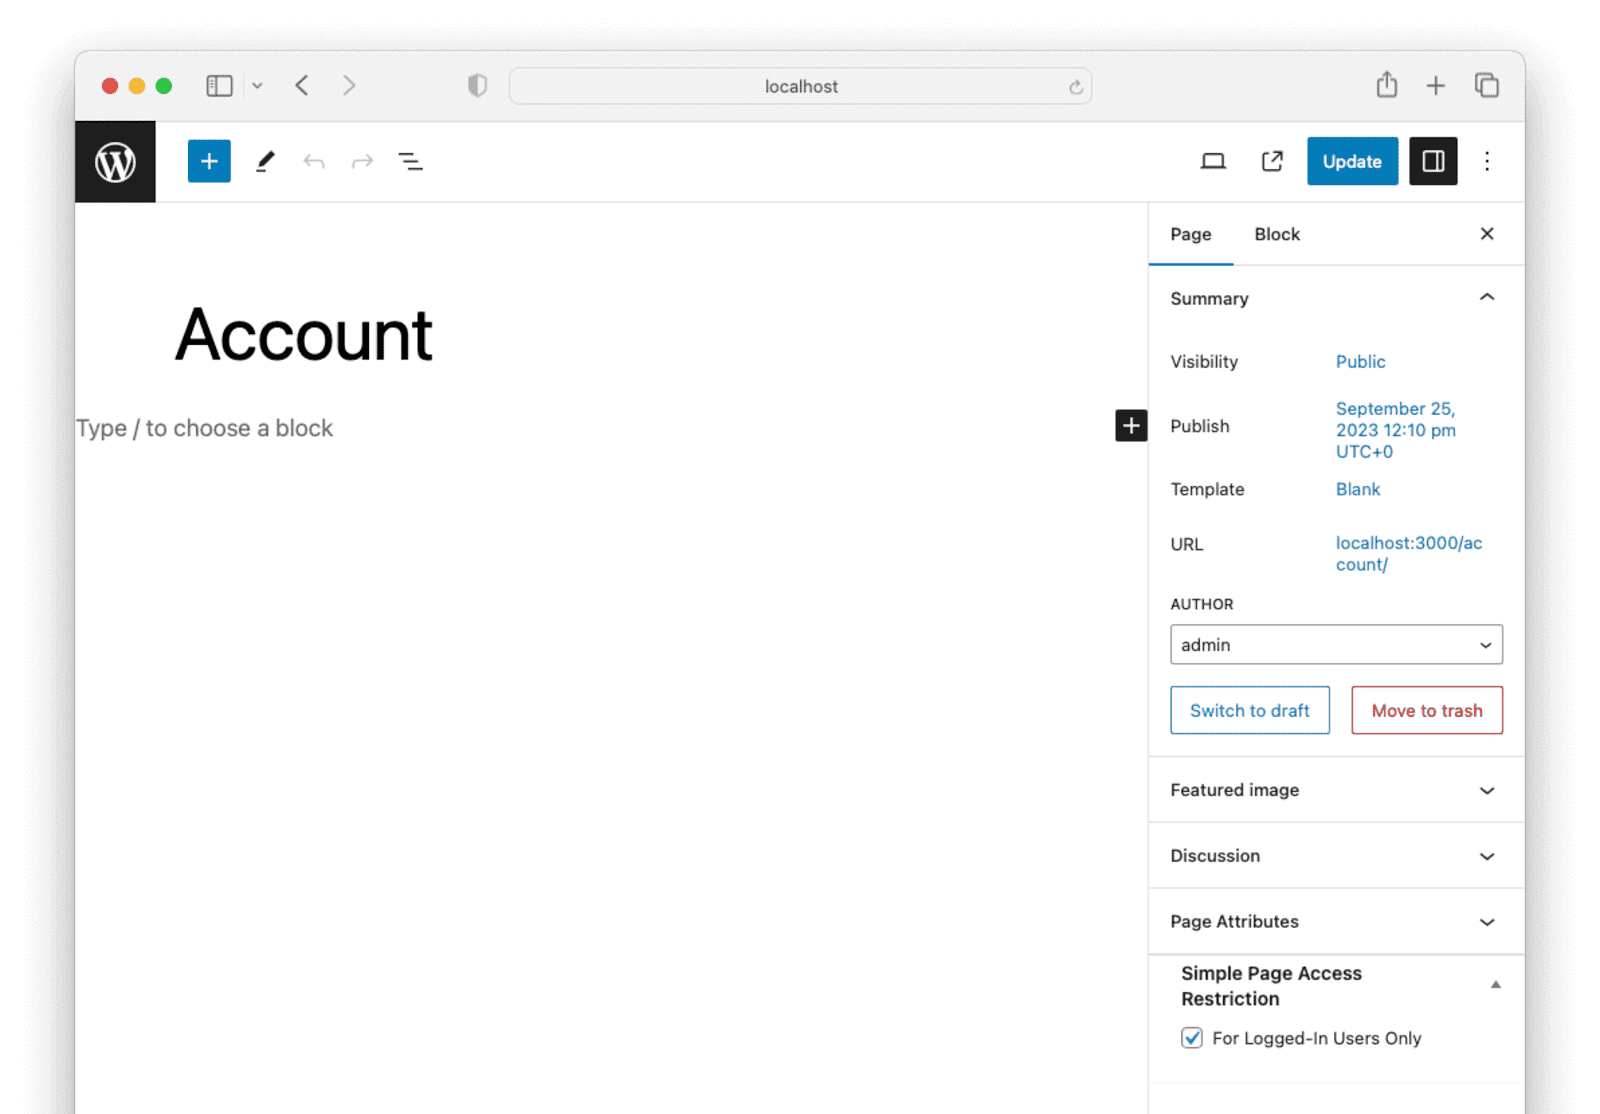
Back in Pages , for both the account and change pages, click Edit , enable For Logged-In Users Only at the bottom right, and click Update . Now if you log out and browse to either page, you won't be able to view it.
Send User to Account After Login#
Another improvement you can make to the login process is to send the user directly to their account page instead of the dashboard after login.
Search for and install the plugin "Remove Dashboard Access" by TrustedLogin.
Browse to Settings -> Dashboard Access . Change the value of Redirect URL to http://localhost:3000/account. Click Save Changes .
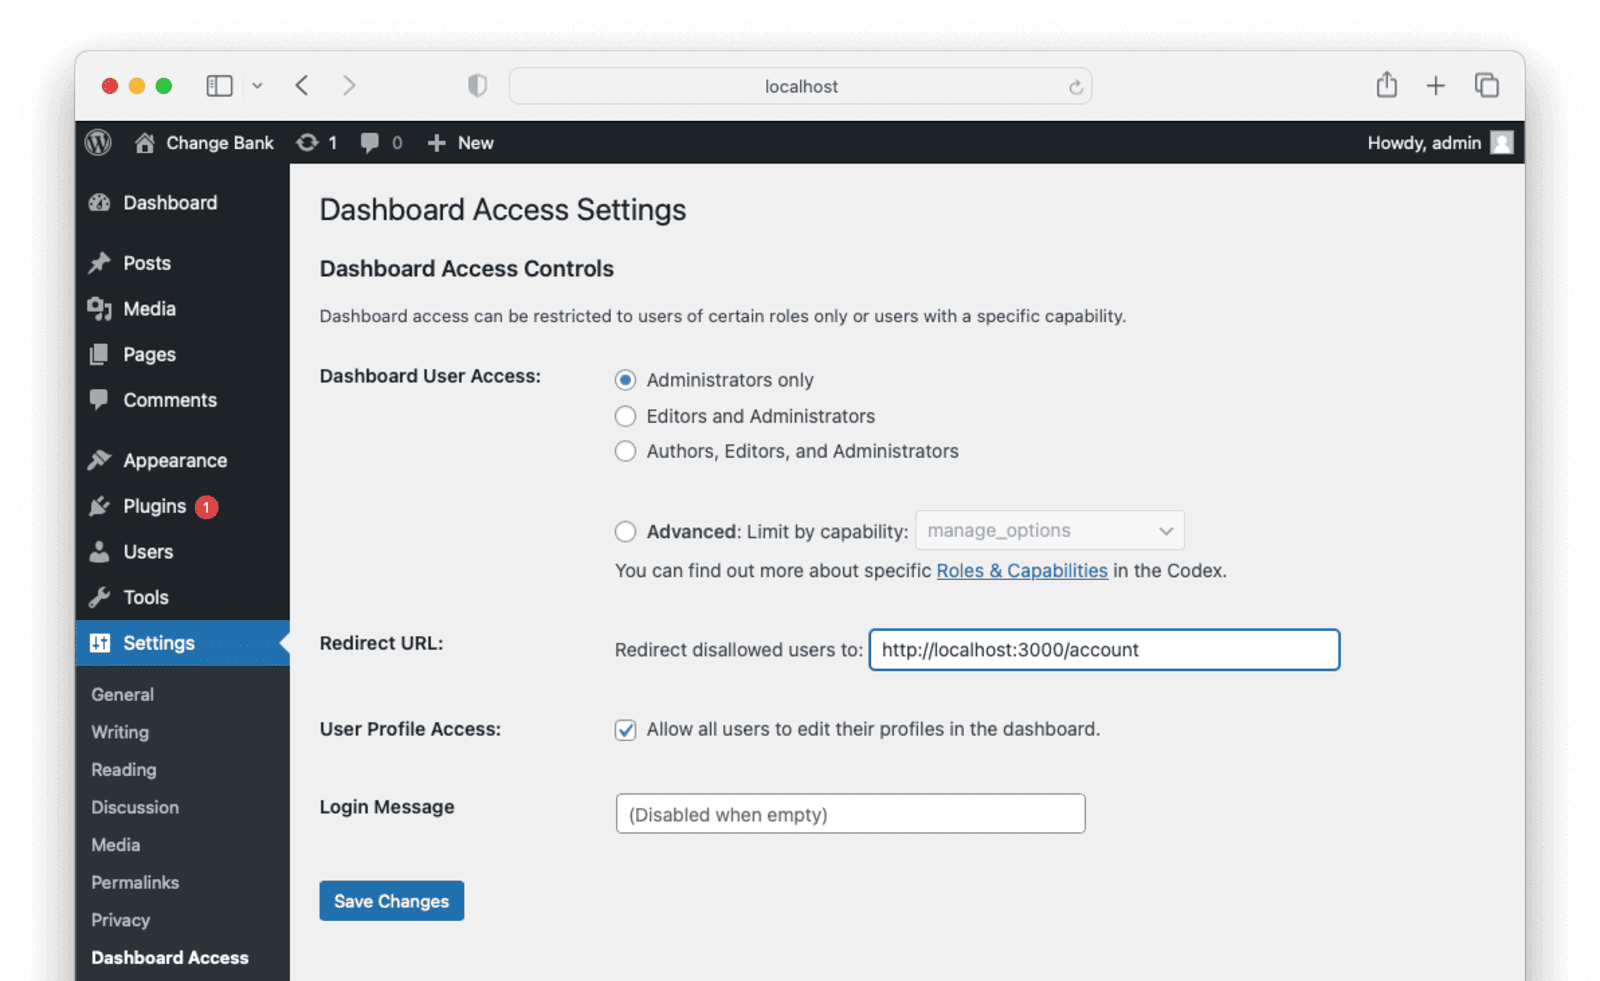
Now if you log out and log in as richard@example.com, who is not an administrator, you'll be redirected to the account page. Log in again as admin@example.com to continue editing the site.
Hide the Admin Bar for Non-Admin Users#
By default, WordPress shows an admin bar at the top of every page for logged-in users. For a cleaner experience, you can hide this bar for non-admin users.
At Plugins -> Add New , search for "hide admin bar from non admins" and install and activate the plugin by that name.
Now when you log in as richard@example.com, the admin bar will not be visible. Admin users like admin@example.com will still see it.
Customization#
You now have everything you need to configure FusionAuth authentication on your site. To complete this demonstration application, you'll add some content to the three blank pages. There are many ways to create custom pages on WordPress, including:
- Editing the theme.
- Making a child theme and editing that.
- Adding new template files for each page.
- Making custom shortcodes.
- Making custom blocks.
- Making custom plugins.
The easiest way to demonstrate the ChangeBank sample pages is to paste custom content into a plugin, but note that is not the most maintainable solution for a real site. If your site is large or complex, take the time to study custom themes and create your own.
For now, search for and add the plugins "Shortcoder" by vaakash and "Snippet Shortcodes" by YeKen.
Add an Image#
Browse to Media in the sidebar. Click Add New and select money.jpg from the complete-application directory.
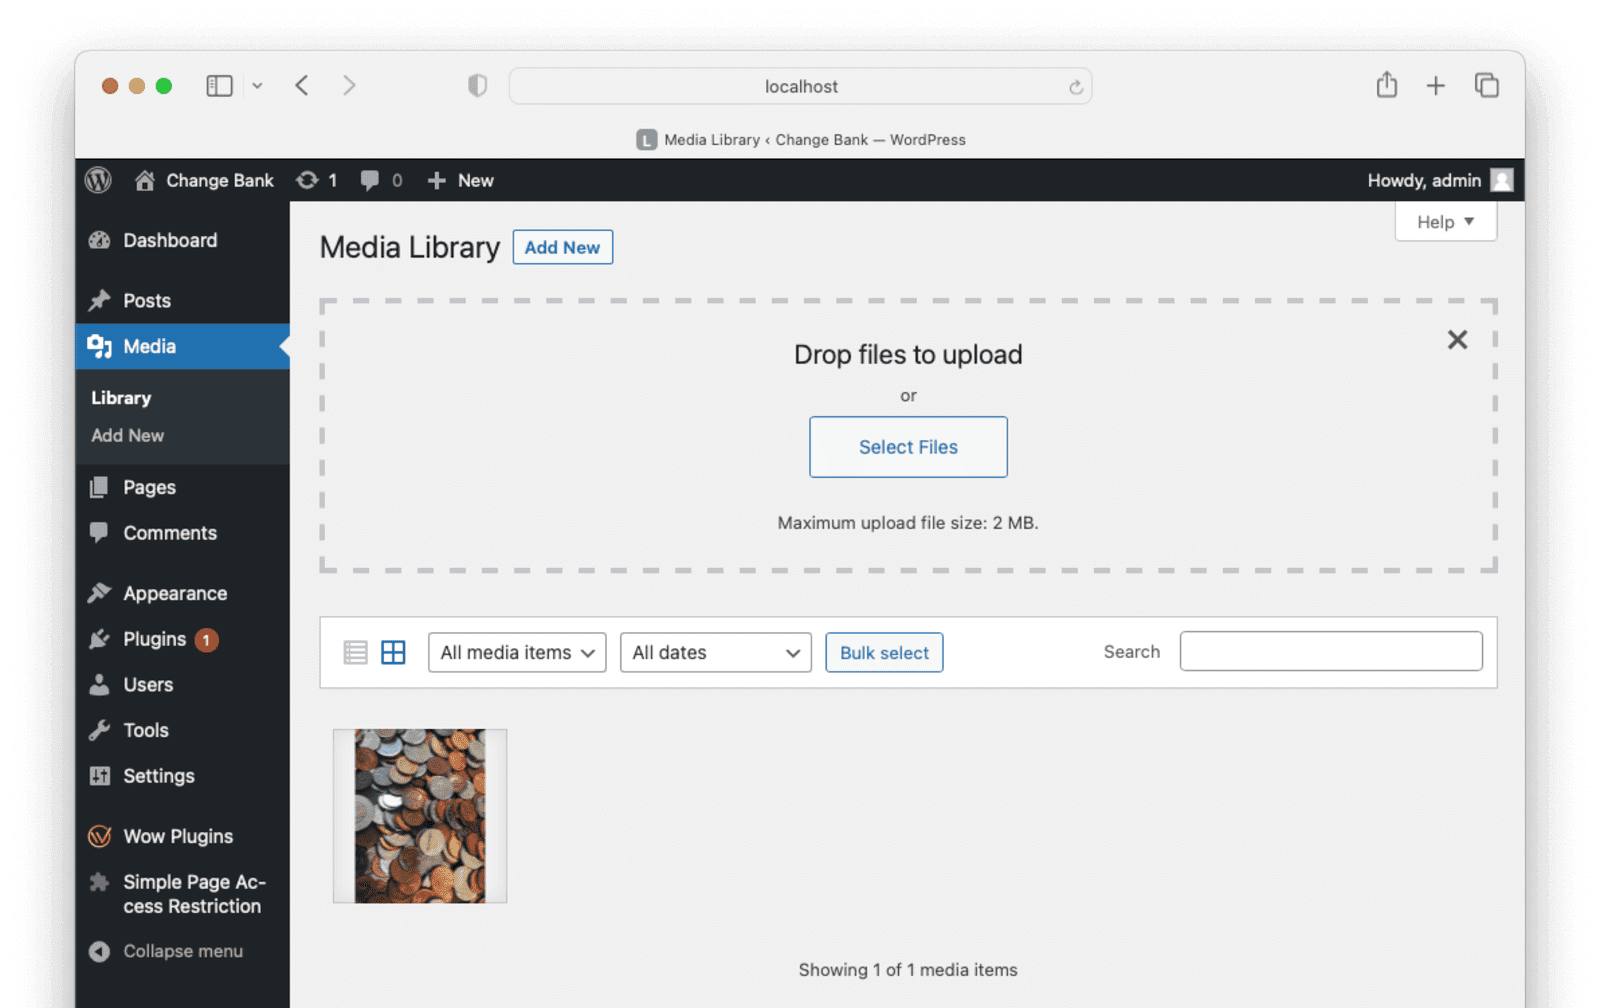
Click on the image once it has been uploaded. Copy the "File URL" to use later. It should look like http://localhost:3000/wp-content/uploads/2023/09/money.jpg.
Add Custom Page Shortcodes#
You'll now create three shortcodes with the HTML, CSS, and JavaScript for each page.
Browse to Shortcoder . Click Create shortcode . In the title box at the top, enter home. In the text box below, copy and paste the following code.
<style>
h1 {
    color: #096324;
  }

  h3 {
    color: #096324;
    margin-top: 20px;
    margin-bottom: 40px;
  }

  a {
    color: #096324;
  }

  p {
    font-size: 18px;
  }

  .header-email {
    color: #096324;
    margin-right: 20px;
  }

  .fine-print {
    font-size: 16px;
  }

  body {
    font-family: sans-serif;
    padding: 0px;
    margin: 0px;
  }

  .h-row {
    display: flex;
    align-items: center;
  }

  #page-container {
    display: flex;
    flex-direction: column;
    width: 100%;
    height: 100%;
  }

  #page-header {
    flex: 0;
    display: flex;
    flex-direction: column;
  }

  #logo-header {
    display: flex;
    justify-content: space-between;
    align-items: center;
    padding: 10px;
  }

  .menu-bar {
    display: flex;
    flex-direction: row-reverse;
    align-items: center;
    height: 35px;
    padding: 15px 50px 15px 30px;
    background-color: #096324;
    font-size: 20px;
  }

  .menu-link {
    font-weight: 600;
    color: #FFFFFF !important;
    margin-left: 40px;
  }

  .inactive {
    text-decoration-line: none;
  }

  .button-lg {
    width: 150px;
    height: 30px;
    background-color: #096324;
    color: #FFFFFF !important;
    font-size: 16px;
    font-weight: 700;
    border-radius: 10px;
    text-align: center;
    padding-top: 10px;
    text-decoration-line: none;
  }

  .column-container {
    display: flex;
    flex-direction: row;
    justify-content: space-between;
  }

  .content-container {
    flex: 1;
    display: flex;
    flex-direction: column;
    padding: 60px 20px 20px 40px;
  }

  .balance {
    font-size: 50px;
    font-weight: 800;
  }

  .change-label {
    font-size: 20px;
    margin-right: 5px;
  }

  .change-input {
    font-size: 20px;
    height: 40px;
    text-align: end;
    padding-right: 10px;
  }

  .change-submit {
    font-size: 15px;
    height: 40px;
    margin-left: 15px;
    border-radius: 5px;
  }

  .change-message {
    font-size: 20px;
    margin-bottom: 15px;
  }

  .error-message {
    font-size: 20px;
    color: #FF0000;
    margin-bottom: 15px;
  }

  .app-container {
    flex: 0;
    min-width: 440px;
    display: flex;
    flex-direction: column;
    margin-top: 40px;
    margin-left: 80px;
  }

  .change-container {
    flex: 1;
  }

  .wp-site-blocks,
  .wp-site-blocks .entry-content,
  .wp-site-blocks .entry-content.has-global-padding,
  .wp-site-blocks .entry-content.is-layout-constrained {
    max-width: 100% !important;
    padding-left: 0 !important;
    padding-right: 0 !important;
  }

  .wp-site-blocks .entry-content.is-layout-constrained > #page-container {
    max-width: 100% !important;
    margin-left: 0 !important;
    margin-right: 0 !important;
  }
</style>
<div id="page-container">
    <div id="page-header">
      <div id="logo-header">
        <img
          src="https://fusionauth.io/cdn/samplethemes/changebank/changebank.svg"
        />
        <a class="button-lg" href="/wp-login.php?redirect_to=/account"> Login </a>
      </div>

      <div id="menu-bar" class="menu-bar">
        <a class="menu-link">About</a>
        <a class="menu-link">Services</a>
        <a class="menu-link">Products</a>
        <a class="menu-link" style="text-decoration-line: underline">Home</a>
      </div>
    </div>

    <div style="flex: 1">
      <div class="column-container">
        <div class="content-container">
          <div style="margin-bottom: 100px">
            <h1>Welcome to Changebank</h1>
            <p>
              To get started,
              <a href="/wp-login.php?redirect_to=/account">log in or create a new account</a>.
            </p>
          </div>
        </div>
        <div style="flex: 0">
          <img src="http://localhost:3000/wp-content/uploads/2023/09/money-scaled.jpg" style="max-width: 800px" />
        </div>
      </div>
    </div>
  </div>
</div>
In the <img src at the bottom of this code, enter the file URL for the money image you uploaded.
Click Publish .
Click Create shortcode again. In the title box at the top, enter account. In the text box below, copy and paste the following code.
<style>
h1 {
color: #096324;
}
h3 {
color: #096324;
margin-top: 20px;
margin-bottom: 40px;
}
a {
color: #096324;
}
p {
font-size: 18px;
}
.header-email {
color: #096324;
margin-right: 20px;
}
.fine-print {
font-size: 16px;
}
body {
font-family: sans-serif;
padding: 0px;
margin: 0px;
}
.h-row {
display: flex;
align-items: center;
}
#page-container {
display: flex;
flex-direction: column;
width: 100%;
height: 100%;
}
#page-header {
flex: 0;
display: flex;
flex-direction: column;
}
#logo-header {
display: flex;
justify-content: space-between;
align-items: center;
padding: 10px;
}
.menu-bar {
display: flex;
flex-direction: row-reverse;
align-items: center;
height: 35px;
padding: 15px 50px 15px 30px;
background-color: #096324;
font-size: 20px;
}
.menu-link {
font-weight: 600;
color: #FFFFFF !important;
margin-left: 40px;
}
.inactive {
text-decoration-line: none;
}
.button-lg {
width: 150px;
height: 30px;
background-color: #096324;
color: #FFFFFF !important;
font-size: 16px;
font-weight: 700;
border-radius: 10px;
text-align: center;
padding-top: 10px;
text-decoration-line: none;
}
.column-container {
display: flex;
flex-direction: row;
justify-content: space-between;
}
.content-container {
flex: 1;
display: flex;
flex-direction: column;
padding: 60px 20px 20px 40px;
}
.balance {
font-size: 50px;
font-weight: 800;
}
.change-label {
font-size: 20px;
margin-right: 5px;
}
.change-input {
font-size: 20px;
height: 40px;
text-align: end;
padding-right: 10px;
}
.change-submit {
font-size: 15px;
height: 40px;
margin-left: 15px;
border-radius: 5px;
}
.change-message {
font-size: 20px;
margin-bottom: 15px;
}
.error-message {
font-size: 20px;
color: #FF0000;
margin-bottom: 15px;
}
.app-container {
flex: 0;
min-width: 440px;
display: flex;
flex-direction: column;
margin-top: 40px;
margin-left: 80px;
}
.change-container {
flex: 1;
}
.wp-site-blocks,
.wp-site-blocks .entry-content,
.wp-site-blocks .entry-content.has-global-padding,
.wp-site-blocks .entry-content.is-layout-constrained {
max-width: 100% !important;
padding-left: 0 !important;
padding-right: 0 !important;
}
.wp-site-blocks .entry-content.is-layout-constrained > #page-container {
max-width: 100% !important;
margin-left: 0 !important;
margin-right: 0 !important;
}
</style>
<div id="page-container">
<div id="page-header">
<div id="logo-header">
<img src="https://fusionauth.io/cdn/samplethemes/changebank/changebank.svg" />
<div class="h-row">
<p class="header-email">[sv slug="sc-user-email"]</p>
<a class="button-lg" href="/wp-login.php?action=logout" onclick="logout(event)"> Logout </a>
</div>
</div>
<div id="menu-bar" class="menu-bar">
<a class="menu-link inactive" href="/change">Make Change</a>
<a class="menu-link" href="/account">Account</a>
</div>
</div>
<div style="flex: 1;">
<div class="column-container">
<div class="app-container">
<h3>Your balance</h3>
<div class="balance">$0.00</div>
</div>
</div>
</div>
</div>
<script>
function logout(event) {
event.preventDefault();
fetch('/wp-login.php?action=logout')
.then(response => response.text())
.then(html => {
const match = html.match(/href="([^"]*action=logout[^"]*_wpnonce=[^"]*)"/);
window.location.href = match ? match[1].replace(/&/g, '&') : '/wp-login.php?action=logout';
})
.catch(() => { window.location.href = '/wp-login.php?action=logout'; });
}
</script>Click Publish .
Click Create shortcode again. In the title box at the top, enter change. In the text box below, copy and paste the following code.
<style>
h1 {
color: #096324;
}
h3 {
color: #096324;
margin-top: 20px;
margin-bottom: 40px;
}
a {
color: #096324;
}
p {
font-size: 18px;
}
.header-email {
color: #096324;
margin-right: 20px;
}
.fine-print {
font-size: 16px;
}
body {
font-family: sans-serif;
padding: 0px;
margin: 0px;
}
.h-row {
display: flex;
align-items: center;
}
#page-container {
display: flex;
flex-direction: column;
width: 100%;
height: 100%;
}
#page-header {
flex: 0;
display: flex;
flex-direction: column;
}
#logo-header {
display: flex;
justify-content: space-between;
align-items: center;
padding: 10px;
}
.menu-bar {
display: flex;
flex-direction: row-reverse;
align-items: center;
height: 35px;
padding: 15px 50px 15px 30px;
background-color: #096324;
font-size: 20px;
}
.menu-link {
font-weight: 600;
color: #FFFFFF !important;
margin-left: 40px;
}
.inactive {
text-decoration-line: none;
}
.button-lg {
width: 150px;
height: 30px;
background-color: #096324;
color: #FFFFFF !important;
font-size: 16px;
font-weight: 700;
border-radius: 10px;
text-align: center;
padding-top: 10px;
text-decoration-line: none;
}
.column-container {
display: flex;
flex-direction: row;
justify-content: space-between;
}
.content-container {
flex: 1;
display: flex;
flex-direction: column;
padding: 60px 20px 20px 40px;
}
.balance {
font-size: 50px;
font-weight: 800;
}
.change-label {
font-size: 20px;
margin-right: 5px;
}
.change-input {
font-size: 20px;
height: 40px;
text-align: end;
padding-right: 10px;
}
.change-submit {
font-size: 15px;
height: 40px;
margin-left: 15px;
border-radius: 5px;
}
.change-message {
font-size: 20px;
margin-bottom: 15px;
}
.error-message {
font-size: 20px;
color: #FF0000;
margin-bottom: 15px;
}
.app-container {
flex: 0;
min-width: 440px;
display: flex;
flex-direction: column;
margin-top: 40px;
margin-left: 80px;
}
.change-container {
flex: 1;
}
.wp-site-blocks,
.wp-site-blocks .entry-content,
.wp-site-blocks .entry-content.has-global-padding,
.wp-site-blocks .entry-content.is-layout-constrained {
max-width: 100% !important;
padding-left: 0 !important;
padding-right: 0 !important;
}
.wp-site-blocks .entry-content.is-layout-constrained > #page-container {
max-width: 100% !important;
margin-left: 0 !important;
margin-right: 0 !important;
}
</style>
<div id="page-container">
<div id="page-header">
<div id="logo-header">
<img
src="https://fusionauth.io/cdn/samplethemes/changebank/changebank.svg"
/>
<div class="h-row">
<p class="header-email">[sv slug="sc-user-email"]</p>
<a class="button-lg" href="/wp-login.php?action=logout" onclick="logout(event)"> Logout </a>
</div>
</div>
<div id="menu-bar" class="menu-bar">
<a class="menu-link" href="/change">Make Change</a>
<a class="menu-link inactive" href="/account">Account</a>
</div>
</div>
<div style="flex: 1">
<div class="column-container">
<div class="app-container change-container">
<h3>We Make Change</h3>
<div id="status" class="error-message">
Please enter a dollar amount
</div>
<form>
<div class="h-row">
<div class="change-label" >Amount in USD: $</div>
<input class="change-input" name="amount" value="0.00" id="total" />
<input
class="change-submit"
type="submit"
value="Make Change"
onclick="makeChange(event)"
/>
</div>
</form>
</div>
</div>
</div>
</div>
<script>
function logout(event) {
event.preventDefault();
fetch('/wp-login.php?action=logout')
.then(response => response.text())
.then(html => {
const match = html.match(/href="([^"]*action=logout[^"]*_wpnonce=[^"]*)"/);
window.location.href = match ? match[1].replace(/&/g, '&') : '/wp-login.php?action=logout';
})
.catch(() => { window.location.href = '/wp-login.php?action=logout'; });
}
function makeChange(event) {
event.preventDefault();
const amount = document.querySelector('#total').value;
const totalCents = Math.round(parseFloat(amount) * 100);
const totalString = isNaN(totalCents) ? '' : (totalCents / 100).toFixed(2);
const nickels = Math.floor(totalCents / 5);
const nickelsString = nickels.toLocaleString();
const pennies = totalCents - nickels * 5;
const penniesString = pennies.toLocaleString();
const hasError = !/^(\d+(\.\d*)?|\.\d+)$/.test(amount);
let message = 'Invalid or missing amount';
let css = 'error-message';
if (!hasError) {
message = 'We can make change for ' + totalString + ' with ' + nickelsString + ' nickels and ' + penniesString + ' pennies!';
css = 'change-message';
}
document.querySelector('#status').innerHTML = message;
document.querySelector('#status').className = css;
}
</script>Click Publish .
In the All shortcodes tab of the Shortcoder plugin, you can see the shortcodes of each page, like [sc name="home"][/sc]. You'll use these codes to link the custom code to the actual page.
Add Email Shortcode Plugin#
Add the plugin "Snippet Shortcodes" by Yeken. This plugin enables the shortcode [sv slug="sc-user-email"], which you might have noticed in the HTML of the account and change pages. The shortcode displays the user's email on the page.
Add the Shortcodes to the Pages#
Now you can use these shortcodes on the three pages. Browse to Pages and edit the account page. Click the hamburger menu at the top right and select Code editor . In the text box under the page title box, copy and paste the shortcode associated with account page which should look like [sc name="account"][/sc] and click Update .
Go back to the page list and edit the home page. Paste [sc name="home"][/sc] and click Update .
Edit the change page, paste [sc name="change"][/sc], and click Update .
Each of your previously blank pages now displays the custom HTML and CSS you added to the Shortcoder custom shortcodes.
Run the Application#
The demonstration application is now complete. Log out. Verify that you can't browse to the account page. Log in using richard@example.com and password. The make change page will allow you to enter a dollar amount to see how many nickels and pennies you will get.
Made it this far? Want a free t-shirt? We got ya.
Thank you for spending some time getting familiar with FusionAuth.
*Offer only valid in the United States and Canada, while supplies last.
Next Steps#
This QuickStart is a great way to get a proof of concept up and running quickly, but to run your application in production, there are some things you're going to want to do.
FusionAuth Customization
FusionAuth gives you the ability to customize just about everything to do with the user's experience and the integration of your application. This includes:
- Hosted pages such as login, registration, email verification, and many more.
- Email templates.
- User data and custom claims in access token JWTs.
Security
- You may want to customize the token expiration times and policies in FusionAuth.
- Choose password rules and a hashing algorithm that meet your security needs.
Tenant and Application Management
- Model your application topology using Applications, Roles, Groups, Entities, and more.
- Set up MFA, Social login, or SAML integrations.
- Integrate with external systems using Webhooks, SCIM, and Lambdas.
Troubleshooting#
- I get
This site can't be reached localhost refused to connectwhen I click the login button.
Ensure FusionAuth is running in the Docker container. You should be able to log in as the admin user admin@example.com with a password of password at http://localhost:9011/admin.
- I get
Your browser sent a request that this server could not understand. Size of a request header field exceeds server limit.
Open the app in an incognito browser window or clear your browser cache and cookies data.
docker composecommand is not found.
Ensure you have the latest version of Docker, or try docker-compose instead. If on Linux, install docker.ce instead of docker.io.
- It still doesn't work.
Run the following in a terminal.
$ cd complete-application
$ ./setup.sh
Browse to http://localhost:3000 and log in with admin@example.com and password.
Now you can look around at the settings and plugins to see how the completed working application differs from yours.