WebAuthn Explained
By Dan Moore
WebAuthn is a new way to authenticate your users using biometric, secure authentication methods. It is also called "passkeys", but WebAuthn is the standard, so that's the term this document will use.
WebAuthn requires something called an authenticator. What is an authenticator? An authenticator is a hardware or software device that is used to authenticate a user, via biometric or other methods, and that follows certain standards.
That's a bit tautological, isn't it? Well, yes, but read on for more details. Also, clowns.
WebAuthn Overview#
Let's start off with an overview of the use cases, "ceremonies", and types of authenticators (a way to authenticate a user, but you'll learn more about this term shortly) that all play a role in a WebAuthn implementation.
There are three main use cases that WebAuthn works well for.
- Re-authentication, where the user has an account created in another way, but wants an easier way to login.
- First factor authentication, where the user has no account or is on a new device, but uses WebAuthn to login instead of a more typical first factor like a username/password combination.
- As an additional factor for multi-factor authentication (MFA).
The main focus of this article is re-authentication, though the other use cases will be covered briefly.
WebAuthn has flows of data and interaction, termed "ceremonies". These extend a network protocol to include things in the real world, such as physical hardware or human beings. There are two main ceremonies:
- Authentication, where the user logs in, using WebAuthn
- Registration, where the user associates an authenticator with their account
What does an authentication ceremony look like? At a high level, the flow of interaction is:
- The user tries to login to a website
- The website prompts the user to authenticate
- The user authenticates against their authenticator
- The authenticator signs and passes a response back to the website through the browser
- The website verifies the authenticator response
- The user is logged in
Whenever the user authenticates against the relevant authenticator, that is an "authorization gesture". It's a gesture because it requires physical interaction. This could be biometric like Touch Id, using a PIN, or any other method that an authenticator offers. An authenticator requires a user to be present with the device.
There are two types of authenticators:
- Cross-platform authenticators, such as YubiKeys, which can move between different devices
- Platform authenticators, built into the operating system, such as Apple's Face Id or Touch Id, which are tied to a given device
Authenticators store public/private keypairs securely. The purpose of an authenticator is to create and hold such keypairs. It also needs to expose the public key. The entire credential, which includes the public key and associated metadata, is often called a "passkey". Further, the authenticator must be able to sign content with the private key.
A Brief Digression On Signing#
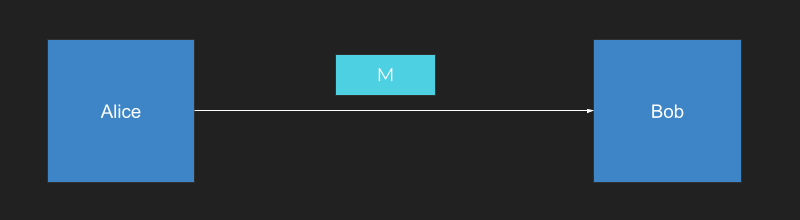
Let's dive into message signing a bit more, since it is so critical to WebAuthn. Suppose you have a user, Alice, who wants to send a message M to a user, Bob. Alice wants to make sure that Bob knows that Alice sent the message and that the message hasn't been changed.
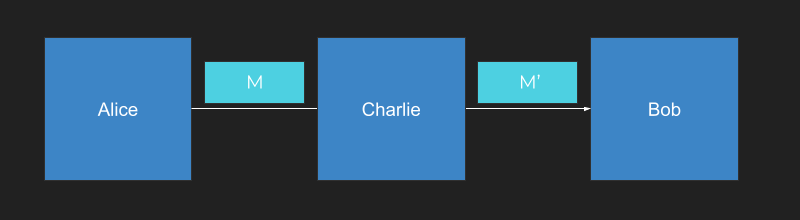
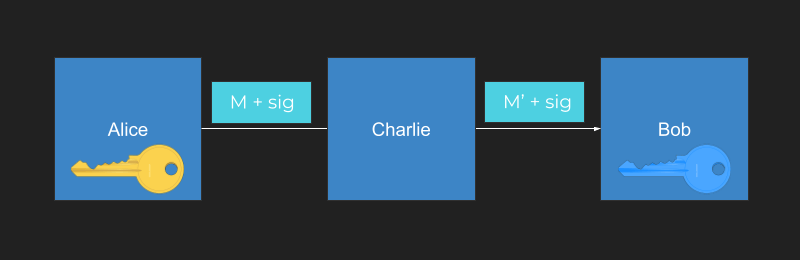
Charlie wants to interfere with the communication channel between Alice and Bob, changing the message content.
One way for Alice to succeed in keeping her message intact is for her to generate two keys: a public key and a private key. The public key is the blue key below and the private key is the yellow key.
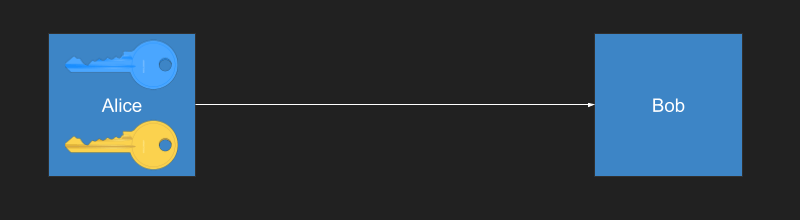
Alice sends the public key over to Bob. She can publish it on a website, send it over email, or print it out and use a carrier pigeon, it doesn't matter. The public key is public.
Next, Alice doesn't just create the message M, she creates a signature as well, which is based on mathematical operation with the private key.
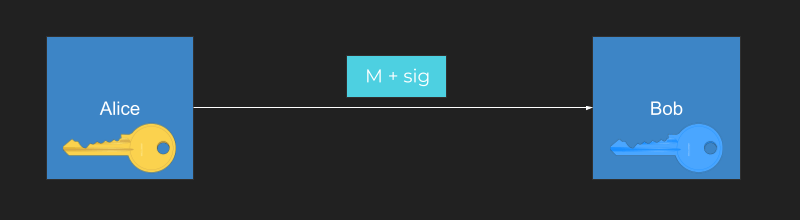
Bob can use the public key and verify the signature matches. Because of the nature of asymmetric signatures, only the holder of the private key could have created the signature.
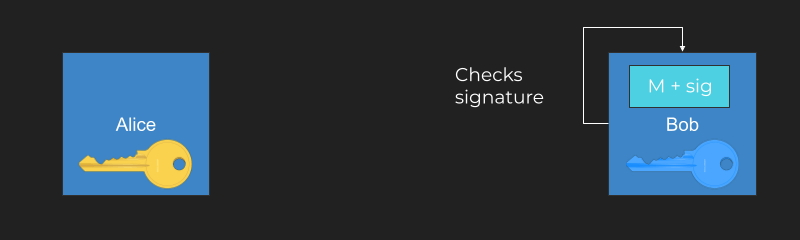
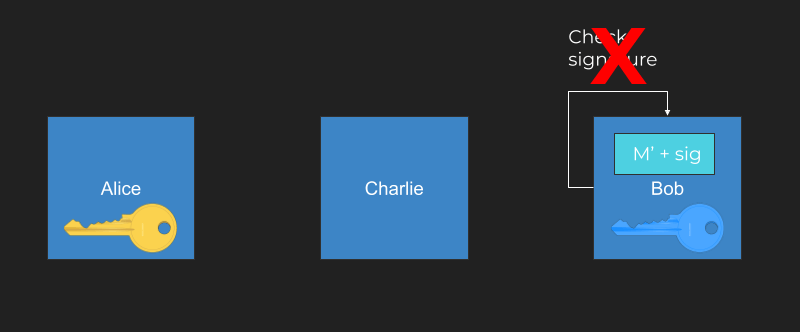
If Charlie gets in the middle and tries to modify the message, he can (what!). But he can't change the signature because only the holder of the private key can create the correct signature.
When Bob checks the signature that arrived with the modified message, it fails. Bob then knows the message has been tampered with.
This has been a brief overview of public/private key signatures. A signature ensures the validity of messages. WebAuthn uses messages and public/private keypairs to verify user identities.
However, let's take a look at where WebAuthn fits in the standards world.
Standards#
Taking a step back, WebAuthn was standardized by a partnership between FIDO and the W3C. FIDO is an organization that's been around for years. It stands for Fast Identity Online, and it creates standards focused on passwordless authentication. FIDO2 is the second version of the standard and WebAuthn is part of FIDO2. It was standardized starting in 2015 and fully baked in 2019.
WebAuthn focuses on the browser interaction with a passwordless protocol. CTAP2 is a complementary standard which handles communication between the browser and the hardware or software authenticator. (The yellow smiley face below is the user and the white globe is the browser.)
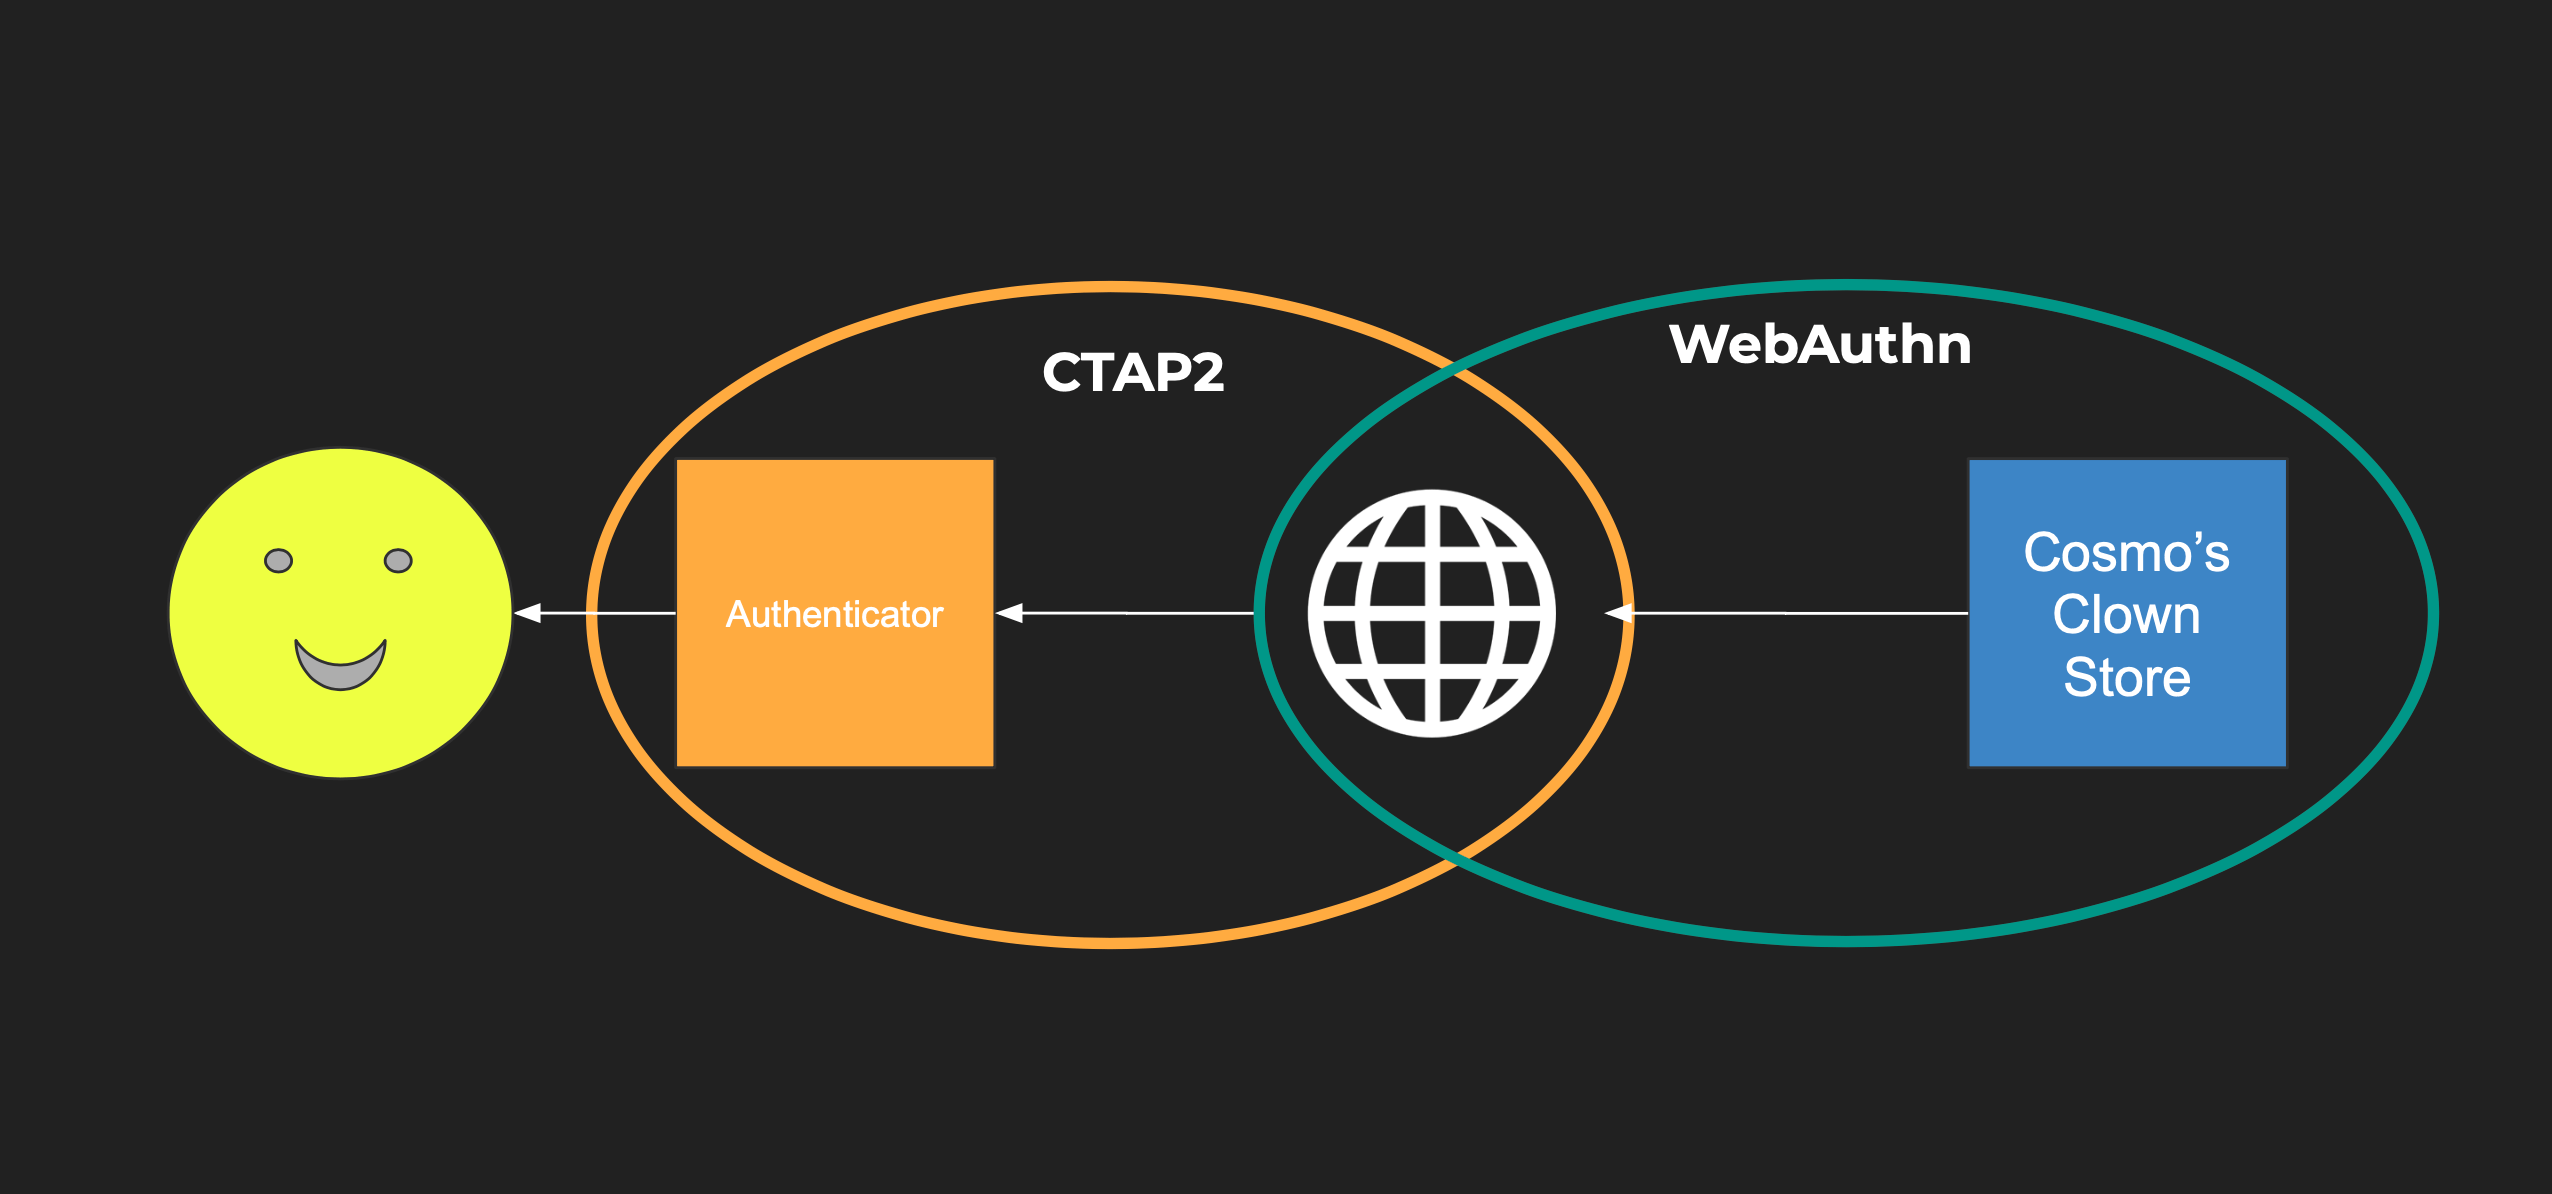
If you have a website that lets a user log in with an authenticator, then CTAP2 is handling communication between the authenticator and the browser. You can use CTAP2 without WebAuthn, for example, with a desktop app.
Selling Clownwear#
I promised clowns, did I not? Assume you have a website that you want to use to sell clownwear. You know, big shoes and red noses and the like? You will call it... Cosmo's Clown Store.

In order to use our store, people need to log in to perform tasks like checking their order status, adding things to their cart, and placing orders. Logging in will tie the user's identity to other data like their mailing address and credit card. If you want to let folks log in securely, what are your options?
Passwords#
Passwords are a solid choice, but can be forgotten, stolen or re-used. In fact, over 11B username/password pairs are publicly available on the site HaveIBeenPwned. User's aren't really fans of remembering passwords either, and insecurely re-use them across different systems.
This means that user accounts on your system don't simply depend on your security posture, but on the posture of all the other sites that the user has registered for with the same password.
Doh!
Password Managers#
Well, what about password managers?
The user experience can be tough when dealing with password managers. If you're using a password manager that integrates into the browser, any non-standard login form UX can be difficult for it to handle.
If a password manager is centralized, it is now a high-value target. If it is not, then users can't login to accounts from more than one device.
MFA#
If you add an additional factor of authentication (e.g. text the user a code, send them an email with a code, or require them to enter some code based on some algorithm using something like Google Authenticator), you can increase security. These additional factors of the authentication add additional assurance about who the user is during an authentication process.
However, the user experience is suboptimal. It can be a hassle to force someone to go to a different device to get a code.
Depending on the method, it can also be insecure. For example, SMS codes can be phished. If you are using push messaging, attackers can bombard users until MFA fatigue sets in.
Single Sign-on#
Single sign-on is another option, which doesn't have these same risks. To be more precise, it centralizes them. This makes sense, as most people pay more attention to their Google/Facebook/Apple account than to the many random accounts they've created on other sites. You can depend on a big company's engineers to encourage best practices.
However, single sign-on has a business risk. You are now depending on a third party to allow your users to access your website.
WebAuthn#
WebAuthn is a decentralized, consumer-friendly, secure alternative for protecting your clownwear store.
With WebAuthn, the private keys which authenticate the user to the website typically remain on the authenticator. (There are some services that sync them across devices, but that is not part of the specification.) The server stores only public keys, which means that, unlike password hashes, there's not much value in obtaining them.
WebAuthn is phishing-resistant because of built-in browser security checks. These include:
- Each credential is locked to a specific domain name and won't be presented to any other domain
- WebAuthn won't work if the requesting site is not on HTTPS
WebAuthn has additional security benefits:
- Physical access to the authenticator is required
- Unlike a code, a user can't share their passkey, because they don't know it (proprietary offerings from vendors like Apple notwithstanding)
- Unlike a push message, attackers can't start a WebAuthn ceremony
These all combine to offer a more secure experience than MFA or a password manager.
The specifics of the authentication method are dictated by the authenticator. Here are some examples of authentication experiences that a user can have during a WebAuthn authentication ceremony:
- facial recognition
- PIN entry
- fingerprint recognition
Browser Support#
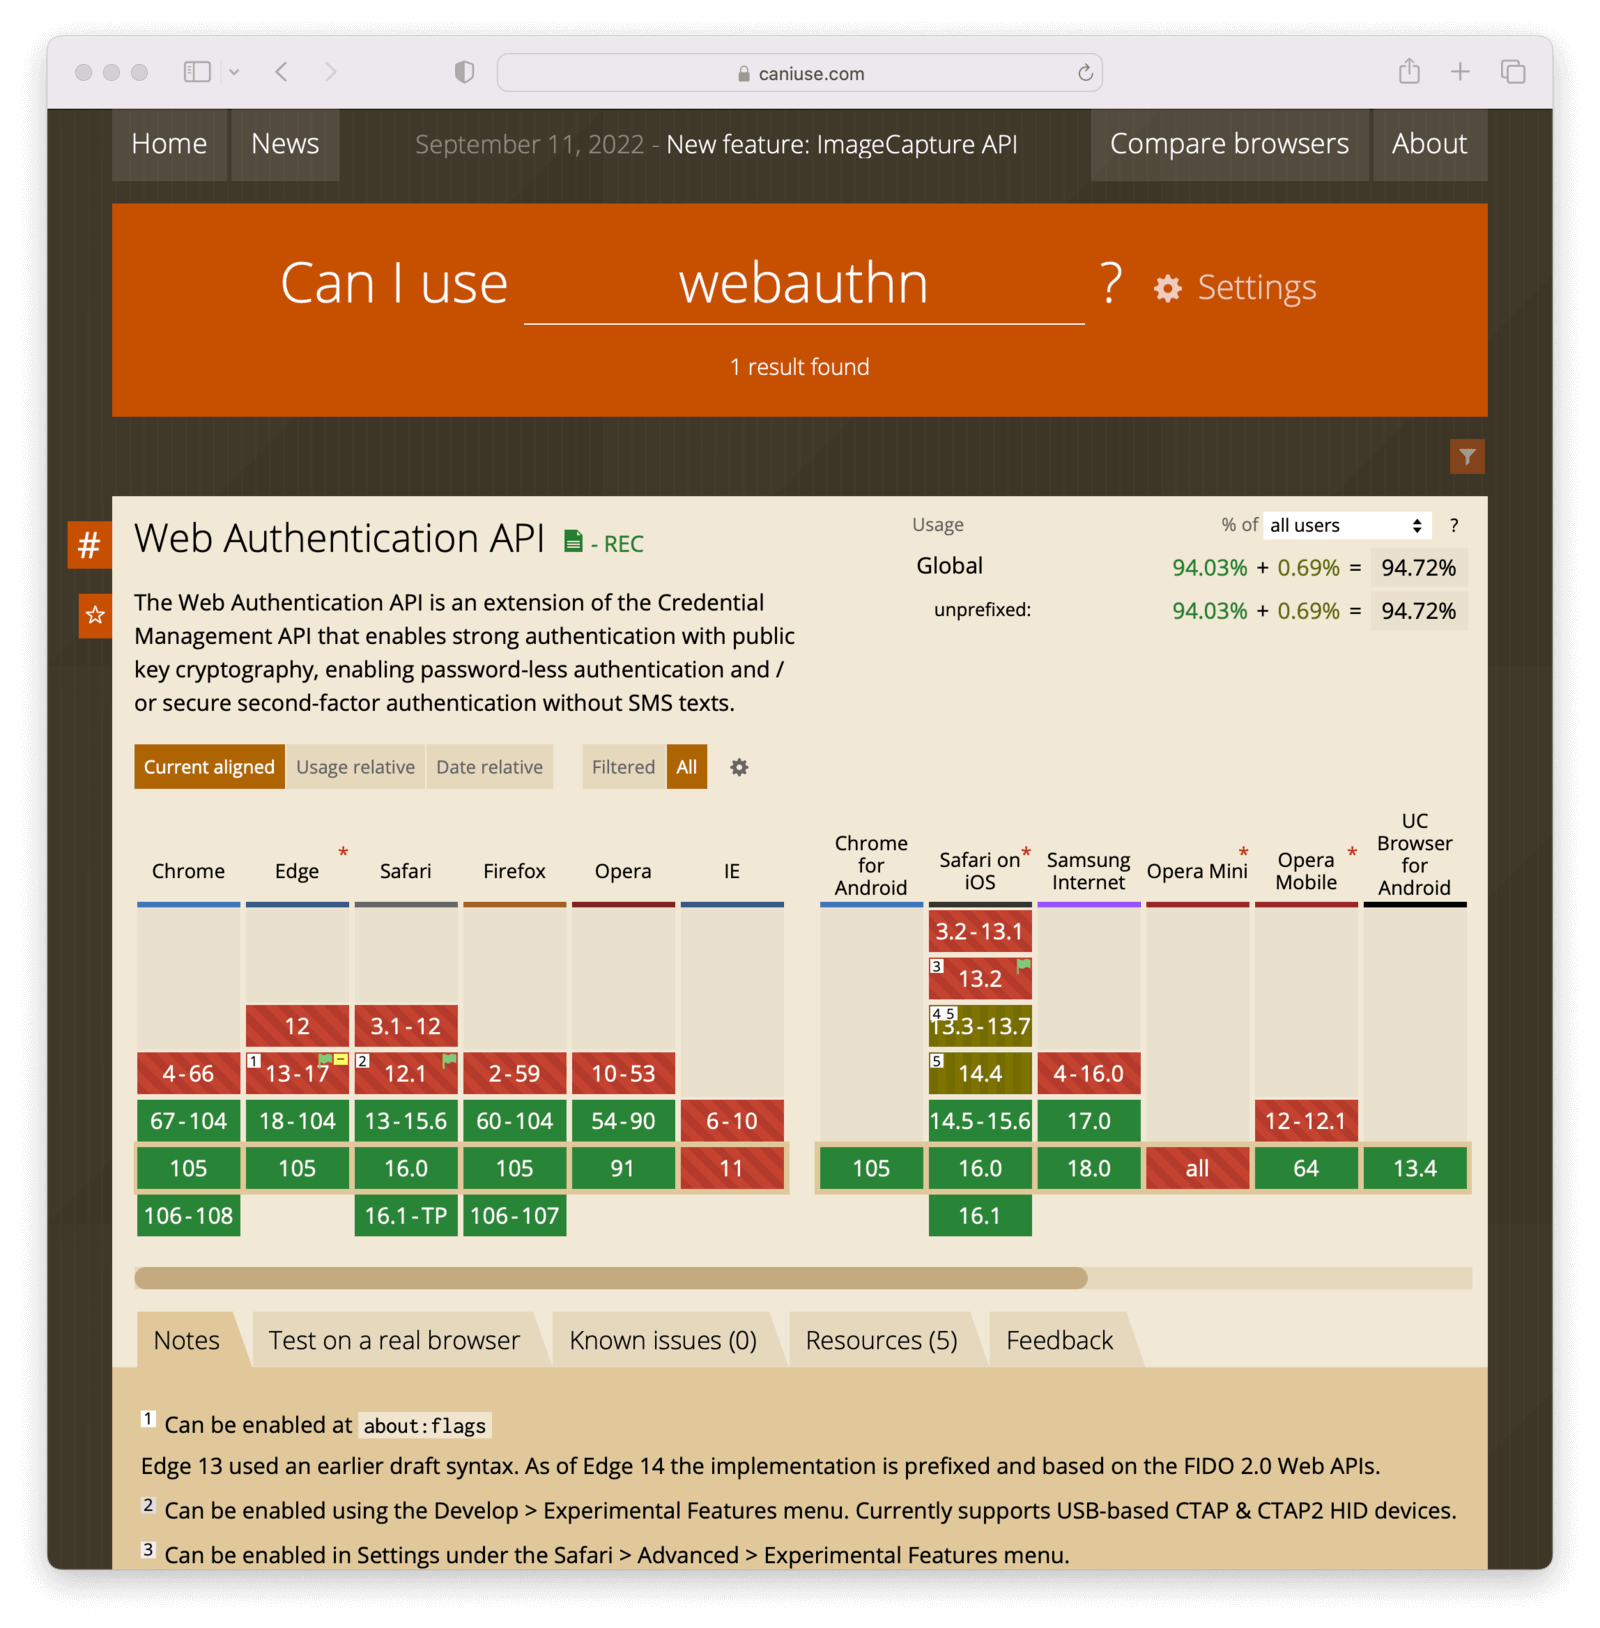
WebAuthn is available on all modern browsers except for IE and Opera Mini. Sorry, IE and Opera Mini users!
The Authentication Ceremony, Revisited#
You've already seen the high-level authentication flow, but let's take a closer look. When a user logs in with WebAuthn, a typical flow is:
- The system may optionally prompt a user to begin the interaction. This could be done with a previously set cookie or some other way to know the user has registered WebAuthn credentials.
- The user signals they want to use WebAuthn with interaction, such as clicking a button.
- The web server sends a request to the browser.
- The browser sends a request to the authenticator.
- The authenticator asks the user for their permission.
- The user grants permission, and the authenticator generates a signature and a result and sends them back to the web browser.
- The web browser sends the data back to the server.
- The server verifies the data with the previously registered public key. If it checks out, the user is logged in.
Don't worry, you'll see some code in a minute.
In more concrete terms, the user needs to authenticate to access their account at the clown store, so they begin the process.
The browser sends a request to the website to log in. The website then passes back a challenge, a website identifier, and some other data. The challenge is used to prevent replay attacks and is a randomly generated string of characters.
If the browser security checks mentioned above pass, the browser passes the request to the authenticator via CTAP2. The authenticator then authenticates the user using biometric means such as facial recognition (or any other means it implements).
The user can choose not to authenticate with the authenticator, in which case it sends back an error message. If the user does authenticate, the authenticator creates a signed assertion and passes it back to the browser. The browser passes the assertion back to Cosmo's Clown Store.
Cosmos Clown Store can verify the assertion with the public key that is stored and associated with that user. If the assertion checks out, the user is logged in and can buy all the clownwear they want.
Some WebAuthn Code#
The core of the web authentication workflow is using the credentials API. To begin authentication, use the get method.
navigator.credentials.get(options)
  .then(function (assertionResponse) {
    // Send authentication status to server
  }).catch(function (err) {
    // No acceptable authenticator or user refused.
  });
You pass it an options object and get a response back. Here's what the options object looks like:
options = {
  publicKey: {
    rpId: "cosmosclownstore.com",
    challenge: "...",
    userVerification: "preferred",
    allowCredentials: ...
    //...
  }
}
The options object has a few important properties:
- the
publicKeytop-level key: this indicates we're using WebAuthn - the
rpId: the website this request is for, such as cosmosclownstore.com - the
challenge: a random string to prevent replay attacks - the
allowCredentials: an array of credentials which are acceptable to this website
There are other options as well, which allow the site to determine if the user should be fully verified and authenticated or just prove presence. That option will be discussed more below.
After you call get with an options object, the response is returned as a promise. Here's an example response.
{
  authenticatorData: {
    rpIdHash : ..., // hash of the requesting party Id
    flags : ..., // bit array including authentication results
    // other info
  },
  clientDataJSON: {
    type: "webauthn.get",
    challenge: ... // should match initial challenge
  }
}
If the response is successful, the response data will have an authenticatorData key, which has a flags member. flags is a bit array indicating if the user was present or verified, as well as extension data. The difference between presence and verification is covered below.
You also receive a clientDataJSON object, which has the challenge and other information. In order to prevent replay attacks, verify that the challenge you receive is the same as the challenge you sent.
Authenticators, Revisited#
There are two types of authenticators: cross-platform authenticators and platform authenticators.
Cross-platform authenticators are hardware devices that can be used between different devices, like a YubiKey.
Platform authenticators are built into the operating system and exist in all major operating systems, both desktop and mobile. They typically have a secure hardware enclave where private keys are stored. The ubiquity of platform authenticators means they are best for consumer-facing applications. The operating systems have sophisticated biometric authentication; you can access these with WebAuthn using the standard JavaScript API outlined above.
Authenticators can also be implemented entirely in software, such as this one, but these are typically used for testing, not a real-world authentication scenario.
WebAuthn handles communication between the browser and the website, and the browsers leverage the CTAP2 protocol to talk to authenticators. As a WebAuthn system implementer, you don't need to know CTAP2, just understand it exists.
As mentioned above, there are two main WebAuthn ceremonies: authentication, which you've already seen and registration. Let's look at the latter.
The Registration Ceremony#
Let's say a user wants to register for Cosmo's Clown Store. The website will generate a challenge and send it to the user. That is passed on to the authenticator, along with other data.
The authenticator then asks the user if they want to register. If the answer is yes, then the following occurs:
-A public/private keypair is generated -The public key and other data, termed a "passkey" or a credential, is sent up to the browser -The private key is kept on the authenticator -The public key is passed up to the website's server via the browser
This allows the website's server to store the credential and associate it with the user. When an authentication ceremony happens, the website will therefore have the user's public key ready to go.
Registration is tied to a specific website. If you use the same authenticator on multiple websites, each website will have its own corresponding key pair.
Let's look at the code flow for the registration ceremony. The options are a bit more complicated than they are for the authentication ceremony.
options =  {
  publicKey: {
    rp: { id: "cosmosclownstore.com",
          name: "Cosmo's Clown Store" },
    user: { id: "1234",
            name: "krusty@example.com",
            displayName: "Krusty The Clown" },
    challenge: "...",
    pubKeyCredParams: [ { type: "public-key", alg: -7 }]
    //...
  }
}
You again have the publicKey as the top level options field, indicating that you are using WebAuthn.
Then there is the rp object, which has information about the website that is requesting the registration operation. This includes the name to be displayed to the end user by the authenticator.
You also have the user field, which contains information tying the user to the credential.
Additionally, to create the key, you need to specify the algorithm to use. Do this by passing the correct parameters in pubKeyCredParams. Above, the value is -7. This is an item in the IANA COSE Algorithms registry.
After creating the options object, call the create method on the credentials API and if it succeeds, the user will be registered with cosmosclownstore.com.
navigator.credentials.create(options)
  .then(function (newCredentialInfo) {
    // Send credential info to server
  }).catch(function (err) {
    // No acceptable authenticator or user refused consent.
  });
Here's an example response.
{
  response: {
    clientDataJSON: {
      type: "webauthn.create",
      challenge: ... // should match initial challenge
      origin: ...
    },
    attestationObject: {
      authData: {
        attestedCredentialData: {
          credentialId: ...,
          credentialPublicKey: ...
        }
      } // other stuff about attestation
    }
  }
}
The attestationObject contains the credentialId and the credentialPublicKey.
Store them both. You'll use the credentialId in future authentication flows to request that particular credential from an available authenticator. The corresponding public key is used to validate the signature on assertions from an authenticator.
You must also verify the challenge and type in the clientDataJSON object are as expected.
You may have noticed that at registration, the website passes down user information. This implies that you know who the user is. Typically, you can require another form of authentication first (i.e. user and password) and then the user will associate a WebAuthn credential with this account to make their future authentication easier. This is called re-authentication, and is the primary use case for WebAuthn.
As the relying party, aka cosmosclownstore.com, you may specify what type of authenticators you want to support. You can't get very granular, but you can specify if you only want to support platform authenticators or cross-platform authenticators.
Next, let's look at attestation. This is not a separate ceremony, but a way of verifying authenticator lineage.
Attestation#
Attestation is the process of answering the question: How do I know this authenticator the user is using is legitimate?
Attestation answers this through signatures. Each type of authenticator has a shared private key. This key is totally separate from private keys used for the authentication and registration ceremonies, which are tied to individual websites. The corresponding public key is stored in a public metadata registry or otherwise made available. Here's the FIDO alliance metadata service.
With attestation, you ask the authenticator to create a signature with the common private key, and then verify it with the public key from the registry.
This way, you can verify only the holder of the private key could have created that signature. Which means you know that the authenticator is of the corresponding type.
Attestation has some problems. The spec alludes to privacy concerns. You don't really know whether authenticators can provide this proof of lineage. In general, this is an enterprise use case.
However, the metadata registry has more than the public keys used for attestation. It includes information such as the capabilities each authenticator supports and whether or not an authenticator might be deprecated because of security issues.
Here is one example of a registry entry.
   {
      "aaguid": "08987058-cadc-4b81-b6e1-30de50dcbe96",
      "metadataStatement": {
        "legalHeader": "https://fidoalliance.org/metadata/metadata-statement-legal-header/",
        "aaguid": "08987058-cadc-4b81-b6e1-30de50dcbe96",
        "description": "Windows Hello Hardware Authenticator",
        "authenticatorVersion": 1,
        "protocolFamily": "fido2",
        "schema": 3,
        "upv": [
          {
            "major": 1,
            "minor": 0
          }
        ],
        "authenticationAlgorithms": [
          "rsa_emsa_pkcs1_sha256_raw"
        ],
        "publicKeyAlgAndEncodings": [
          "cose"
        ],
        "attestationTypes": [
          "attca"
        ],
        "userVerificationDetails": [
          [
            {
              "userVerificationMethod": "eyeprint_internal"
            }
          ],
          [
            {
              "userVerificationMethod": "passcode_internal"
            }
          ],
          [
            {
              "userVerificationMethod": "fingerprint_internal"
            }
          ],
          [
            {
              "userVerificationMethod": "faceprint_internal"
            }
          ]
        ],
        "keyProtection": [
          "hardware"
        ],
        "isKeyRestricted": false,
        "matcherProtection": [
          "software"
        ],
        "attachmentHint": [
          "internal"
        ],
        "tcDisplay": [],
        "attestationRootCertificates": [
          "MIIF9TCCA92gAwIBAgIQXbYwTgy/J79JuMhpUB5dyzANBgkqhkiG9w0BAQsFADCBjDELMAkGA1UEBhMCVVMxEzARBgNVBAgTCldhc2hpbmd0b24xEDAOBgNVBAcTB1JlZG1vbmQxHjAcBgNVBAoTFU1pY3Jvc29mdCBDb3Jwb3JhdGlvbjE2MDQGA1UEAxMtTWljcm9zb2Z0IFRQTSBSb290IENlcnRpZmljYXRlIEF1dGhvcml0eSAyMDE0MB4XDTE0MTIxMDIxMzExOVoXDTM5MTIxMDIxMzkyOFowgYwxCzAJBgNVBAYTAlVTMRMwEQYDVQQIEwpXYXNoaW5ndG9uMRAwDgYDVQQHEwdSZWRtb25kMR4wHAYDVQQKExVNaWNyb3NvZnQgQ29ycG9yYXRpb24xNjA0BgNVBAMTLU1pY3Jvc29mdCBUUE0gUm9vdCBDZXJ0aWZpY2F0ZSBBdXRob3JpdHkgMjAxNDCCAiIwDQYJKoZIhvcNAQEBBQADggIPADCCAgoCggIBAJ+n+bnKt/JHIRC/oI/xgkgsYdPzP0gpvduDA2GbRtth+L4WUyoZKGBw7uz5bjjP8Aql4YExyjR3EZQ4LqnZChMpoCofbeDR4MjCE1TGwWghGpS0mM3GtWD9XiME4rE2K0VW3pdN0CLzkYbvZbs2wQTFfE62yNQiDjyHFWAZ4BQH4eWa8wrDMUxIAneUCpU6zCwM+l6Qh4ohX063BHzXlTSTc1fDsiPaKuMMjWjK9vp5UHFPa+dMAWr6OljQZPFIg3aZ4cUfzS9y+n77Hs1NXPBn6E4Db679z4DThIXyoKeZTv1aaWOWl/exsDLGt2mTMTyykVV8uD1eRjYriFpmoRDwJKAEMOfaURarzp7hka9TOElGyD2gOV4Fscr2MxAYCywLmOLzA4VDSYLuKAhPSp7yawET30AvY1HRfMwBxetSqWP2+yZRNYJlHpor5QTuRDgzR+Zej+aWx6rWNYx43kLthozeVJ3QCsD5iEI/OZlmWn5WYf7O8LB/1A7scrYv44FD8ck3Z+hxXpkklAsjJMsHZa9mBqh+VR1AicX4uZG8m16x65ZU2uUpBa3rn8CTNmw17ZHOiuSWJtS9+PrZVA8ljgf4QgA1g6NPOEiLG2fn8Gm+r5Ak+9tqv72KDd2FPBJ7Xx4stYj/WjNPtEUhW4rcLK3ktLfcy6ea7Rocw5y5AgMBAAGjUTBPMAsGA1UdDwQEAwIBhjAPBgNVHRMBAf8EBTADAQH/MB0GA1UdDgQWBBR6jArOL0hiF+KU0a5VwVLscXSkVjAQBgkrBgEEAYI3FQEEAwIBADANBgkqhkiG9w0BAQsFAAOCAgEAW4ioo1+J9VWC0UntSBXcXRm1ePTVamtsxVy/GpP4EmJd3Ub53JzNBfYdgfUL51CppS3ZY6BoagB+DqoA2GbSL+7sFGHBl5ka6FNelrwsH6VVw4xV/8klIjmqOyfatPYsz0sUdZev+reeiGpKVoXrK6BDnUU27/mgPtem5YKWvHB/soofUrLKzZV3WfGdx9zBr8V0xW6vO3CKaqkqU9y6EsQw34n7eJCbEVVQ8VdFd9iV1pmXwaBAfBwkviPTKEP9Cm+zbFIOLr3V3CL9hJj+gkTUuXWlJJ6wVXEG5i4rIbLAV59UrW4LonP+seqvWMJYUFxu/niF0R3fSGM+NU11DtBVkhRZt1u0kFhZqjDz1dWyfT/N7Hke3WsDqUFsBi+8SEw90rWx2aUkLvKo83oU4Mx4na+2I3l9F2a2VNGk4K7l3a00g51miPiq0Da0jqw30PaLluTMTGY5+RnZVh50JD6nk+Ea3wRkU8aiYFnpIxfKBZ72whmYYa/egj9IKeqpR0vuLebbU0fJBf880K1jWD3Z5SFyJXo057Mv0OPw5mttytE585ZIy5JsaRXlsOoWGRXE3kUT/MKR1UoAgR54c8Bsh+9Dq2wqIK9mRn15zvBDeyHG6+czurLopziOUeWokxZN1syrEdKlhFoPYavm6t+PzIcpdxZwHA+V3jLJPfI="
        ],
        "icon": "data:image/png;base64,iVBORw0KGgoAAAANSUhEUgAAAEgAAABICAYAAABV7bNHAAACkUlEQVR42uyai3GDMAyGQyegGzACnaCMkBHoBhkhnSAj0A2SDaAT0E6QbEA3cOXW6XEpBtnImMv9utOllxjF/qKHLTdRSm0gdnkAAgACIAACIAACIAACIAgAARAAARAAARAAARBEAFCSJINKkpLuSTtSZbQz76W25zhKkpFWPbtaz6Q75vPuoluuPmqxlZK2yi76s9RznjlpN2K7CrFWaUAHNS0HT0Atw3YpDSjxbdoPuaziG3uk579cvIdeWsbQD7L7NAYoWpKmLy8chueO5reB7KKKrQnQJdDYn9AJZHc5QBT7enINY2hjxrqItsvJWSdxFxKuYlOlWJmE6zPPcsJuN7WFiF7me5DOAws4OyZyG6TOsr/KQziDaJm/mcy2V1V0+T0JeXxqqlrWC9mGGy3O6wwFaI0SdR+EMg9AEAACIAByqViZb+/prgFdN6qb306j3lTWs0BJ76Qjw0ktO+3ad60PQhMrfM9YwqK7lUPe4j+/OR40cDaqJeJ+xo80JsWih1WTBAcb8ysKrb+TfowQKy3v55wbBkk49FJbQusqr4snadL9hEtXC3nO1G1HG6UfxIj5oDnJlHPOVVAerWGmvYQxwc70hiTh7Bidy3/3ZFE6isxf8epNhUCl4n5ftYqWKzMP3IIquaFnquXO0sZ1yn/RWq69SuK6GdPXORfSz4HPnk1bNXO0+UZze5HqKIodNYwnHVVcOUivNcStxj4CGFYhWAWgXgmuF4JzdMhn6wDUm1DpmFyVY7IvQqeTRdod2v2F8lNn/gcpW+rUsOi9mAmFwlSo3Pw9JQ3p+8bhgnAMkPM613BxOBQqc2FEB4SmPQSAAAiAAAiAAAiAAAiAIAAEQAAEQAAEQPco3wIMADOXgFhOTghuAAAAAElFTkSuQmCC",
        "authenticatorGetInfo": {
          "versions": [
            "FIDO_2_0"
          ],
          "aaguid": "08987058cadc4b81b6e130de50dcbe96",
          "options": {
            "plat": true,
            "rk": true,
            "up": true
          },
          "maxCredentialCountInList": 100,
          "maxCredentialIdLength": 32,
          "transports": [
            "internal"
          ],
          "algorithms": [
            {
              "type": "public-key",
              "alg": -257
            }
          ],
          "minPINLength": 4,
          "firmwareVersion": 19042
        }
      },
      "statusReports": [
        {
          "status": "FIDO_CERTIFIED_L1",
          "effectiveDate": "2020-08-05",
          "certificationDescriptor": "Windows Hello Hardware Authenticator",
          "certificateNumber": "FIDO20020190418002",
          "certificationPolicyVersion": "1.3.6",
          "certificationRequirementsVersion": "1.1.0"
        }
      ],
      "timeOfLastStatusChange": "2020-08-05"
    }
There is a lot of structured metadata that you can use if desired.
User Presence vs User Verification#
Authenticators can be also used as a second factor of authentication, when paired with a username and password or other factor. An authentication ceremony indicates the user has access to the authenticator. This is the MFA use case mentioned above.
If you are using an authenticator in this way, you want to distinguish between user presence versus user verification.
User presence is when someone is there behind the authenticator who gave permission, but you don't know who. All it proves is that you have access to the authenticator. An example of this is when you press a button on a YubiKey. Every authenticator must support checking user presence, as it is part of the specification.
User verification, on the other hand, is when the user provides proof that they are who they say they are. The authenticator could require a PIN, known only to the user. It could be a Face Id or Touch Id challenge. In any case, verification allows you to tie a specific user to the authentication ceremony.
Of the two types, user verification is more common with platform authenticators than with cross platform authenticators. And user presence is more useful as a second factor. When not used for MFA, you will typically want user verification.
The initiating server specifies whether to use user verification during a registration or authentication. The three choices for user verification are preferred, required, and discouraged:
- Preferred means that user verification is preferred, but not required.
- Required means that user verification is required and the ceremony will fail if it cannot be performed.
- Discouraged means that user verification is not preferred and should not be used if possible.
Discoverable Credentials#
Another WebAuthn feature is discoverable credentials, also known as "resident keys". These can be used without first identifying the user. This is the first factor use case mentioned above.
They are requested by a website leaving the allowCredentials list empty in the authentication ceremony. If there is a discoverable credential available, it will be used to complete the authentication ceremony, and the authenticator response will indicate which credential was used. That credential must then be mapped to the user on the server.
For non-discoverable credentials, the user must be identified in some way. These include a secure cookie, username/email field, or some other means before the authentication ceremony can begin. This is required to determine which credentials are owned by that user account. The server returns these registered credentials as part of the credential request options object in the allowCredentials field.
Implementation Details#
What do you need to consider when implementing WebAuthn authentication? In some ways, the actual ceremonies are easy; they are specified in a fair bit of detail in the W3C standard. One FusionAuth developer said "the hardest part of the WebAuthn portion was translating from byte arrays to base64 and back".
But there's more, such as:
- Storing public key data in a safe and secure way
- Streamlining workflows, such as knowing when to prompt the user for WebAuthn
- Prompting users to register their WebAuthn capable device
- Allowing users to use WebAuthn during the app sign in process
- Considering the account recovery process
There are libraries which can help with generating, translating, and validating the WebAuthn request options and response objects. These other tasks, which are not defined in the WebAuthn specification but are critical to building a full-fledged system, are not as well supported and will vary.
To build a WebAuthn compatible server, you can use any server-side language you want. The magic is in the WebAuthn APIs, which are embedded in the browser.
Summing Up#
WebAuthn lets consumers have the security of biometric authentication methods, such as Touch Id and Face Id, without requiring additional expensive hardware.
WebAuthn is supported by every browser and can bring a safer, more secure, more easily usable means of authentication to all your users.