Cross-Platform Gaming Accounts: Why And How?
By Rabo James Bature
More and more games are launching across two or more platforms. One of the prime reasons why game developers go cross-platform is to leverage a larger market. Being able to sell products to a whole new set of users is an incredible win for game developers, and demand for cross-play from gamers is increasing as well.
Having a cross-platform gaming account enables users to play games on different platforms while syncing their progress as they switch platforms or consoles.
In this guide, you’ll be introduced to cross-platform gaming accounts and why they're so useful. You’ll also learn how to implement one into your platform using FusionAuth.
What Is a Cross-Platform Gaming Account?#
A few years ago, one of the major challenges of digital gaming was platform independence and compatibility issues between gaming platforms. For example, PlayStation players couldn’t play with Xbox players, meaning that friends couldn’t play together because their systems didn’t interoperate or because there was no mechanism to abstract away their hardware and allow cross-play. Players, fans, and game developers all wanted a method where games could be accessed and played regardless of the hardware used.
Advancements in technology and shifts in the gaming community have made cross-platform gaming not only possible, but far more common. One way this is achieved is by using cross-platform accounts, in which an auth server stores all account data (including progress, level, and cosmetic skins) and authenticates a user.
Advantages of Cross-Platform Accounts#
Cross-platform accounts are a win for both sides of the game market. Gamers get even more playing opportunities without needing to buy multiple consoles, while game developers can increase their market reach.
This paradigm offers several advantages.
Wider Range of Users#
Game developers and publishers are leveraging cross-platform gaming accounts to develop a larger community of gamers across different platforms, because the console limitation is gradually fading away and games are becoming less exclusive.
Cross-Platform Play#
A cross-platform gaming account allows users to play a game on one platform with a particular console and then smoothly transfer to another platform or console. Not only does this enable gamers to save their progress no matter where they’re playing, but it allows them to play their favorite games without worrying about what platform they’re using.
Faster Delivery#
If you launch a single-platform game, further down the line you may find yourself porting it and spending development days doing the work. It’s easier to have one single codebase that can run on multiple platforms. Apex Legends, for example, is one of the biggest modern games at around 115 million players per month. Because it’s written in C/C++, it mostly works out of the box without requiring custom code for all its platforms (it currently runs on PC, PS5, Xbox One, and Nintendo Switch).
Enabling Cross-Platform Play via Auth Servers#
One of the major challenges of implementing cross-platform gaming is determining how to secure and transfer gamers’ accounts from one platform to another.
This is where an authentication server comes into play. Instead of relying on platform-specific gaming authentication mechanisms (like Google Play Games and PSN), you need to use a third-party authentication server to verify a gamer’s login credentials. The authentication server may delegate and link accounts across different game networks, through buttons stating “Log In With Nintendo” or API calls, but the auth server is what the users visit to authenticate. Once verified, you could share their game details such as progress, collectibles, and more, directly to the platform that they are playing on.
How Do You Choose an Auth Provider?#
The gaming industry has been experiencing rapid growth, both in the number of gamers and the number of games published. As these numbers increase, gaming platforms will continue to become a target for hackers. That makes your choice of auth provider even more important.
In order to properly secure cross-platform gaming accounts, your auth provider should include the following features.
Support for Major Game Networks#
Each game platform is built differently, so in choosing an auth server, you need to verify that the server supports logging into major game networks like PSN, Xbox, Nintendo, Twitch, or Epic. Pre-built integrations will remove the need for your developers to spend time building that undifferentiated code.
Ensure that your auth server allows identity linking, which enables a gamer to log in on a PC and later log in on a PlayStation and link those two accounts together, even if the user signed up on the PC with a different email address than they did with the PlayStation network. It also allows gamers to switch platforms without worrying about compatibility issues, loss of progression, logging delays, or eventual failure.
Support for Device Grants#
One of the authentication methods that auth servers offer is the device grant. With this grant, rather than authenticating the console directly (which has input constraints, making it tedious to enter a username and password), gamers are directed to use a link on their smartphone to authorize access to the console. A device grant makes it easier to access the console because it saves the gamer from having to do much typing.
SDKs for Multilingual Access#
One of the advantages of cross-platform gaming is that gamers can play not only across platforms but across different programming languages. Your auth server should have SDKs that support profile access in multiple languages so that you can localize messages and the user interface. This allows gamers to read messages and interact in their preferred language.
Localization Support#
Depending on your target audience, you may want to support different human languages as well. Make sure that your application, auth server, and other components support localization of messages, phone numbers, and dates. Doing so allows more gamers to play.
Customizable Login Pages#
One of the more captivating aspects of digital gaming and gaming platforms is the graphics. To keep your interface and login page at the same high level of quality that your game provides, choose an auth server that allows you to customize your login page to look like your game.
Implementing a Cross-Platform Gaming Account Using an Auth Server#
Now that you understand how cross-platform gaming accounts are implemented, you’re going to build one. In this tutorial, you’ll do the following:
- Install FusionAuth (on Mac, Windows, or Linux)
- Start your auth server (to accept the cross-platform accounts)
- Review your Maintenance Mode settings
- Complete the Setup Wizard
- Create a cross-platform game (Android and Windows) where users can register and login from either platform
Requirements#
This tutorial assumes you have either a MySQL or PostgreSQL database already initialized with the necessary permissions to create, delete, and update tables. If you don’t, follow these instructions to install.
You’ll also need Node.js installed. You can verify that it’s installed by running node -v in your terminal; you should see a version returned:
% node -v
v18.8.0
Install FusionAuth (on Mac, Windows, or Linux)#
When enabling cross-platform gaming, you first need to create a single account and authenticate the player using an auth server (such as FusionAuth). This account will then be used to unify the player’s gaming platform account or various accounts such as PlayStation, Xbox, or Nintendo, using FusionAuth identity-linking. With this, the player can access the game from different platforms or multiple platforms and still be recognized by the game.
Settling down with a cross-platform gaming auth server is tricky. Your auth server needs to allow your users to login via device grants since some consoles can be restricting when it comes to text input. Your auth server also needs to provide a reliable flow, so that your users can register in your app during peak traffic times without dealing with crashes.
FusionAuth does that and more. Gaming accounts are valuable since players invest money into buying in-game merchandise and services. FusionAuth implements a powerful hashing scheme to ensure that user accounts are secure. With its identity-linking strategies for a variety of identity providers, you can achieve seamless integration of your users’ accounts across multiple platforms.
Installing FusionAuth is painless, and it can all be run from a simple cURL request (or PowerShell command in Windows). FusionAuth provides multiple installation methods.
This guide will assume you are using Fast Path, which requires a previously installed MySQL or PostgreSQL database.
After you install and run the Fast Path script, you will see something like this:
Downloading zip packages
######################################################################## 100.0%
Installing packages

Install is complete. Time for tacos.

1. To start FusionAuth run the following command
    /path/to/your/directory/fusionauth/bin/startup.sh

2. To begin, access FusionAuth by opening a browser to http://localhost:9011

3. If you're looking for documentation, open your browser and navigate to https://fusionauth.io/docs

Thank you for using FusionAuth. Happy coding!
Start Your Auth Server#
In the directory where you just installed FusionAuth, run it by executing the startup script provided:
fusionauth/bin/startup.shIf you’re following along on Windows, you’ll need to use startup.bat instead of startup.sh.
Review Your Maintenance Mode Settings#
When you first run the commands, your database is probably not set up, meaning that when you navigate to http://localhost:9011 you’ll likely see the Maintenance Mode screen.
You need to enter the following:
- The superuser credentials for your database
- The name of the host of your database
Click Submit .
If you do encounter the error
Exception in thread main java.lang.NoClassDefFoundError: com/inversoft/mysql/MySQLHelper, make sure you've installed the MySQL driver.
Complete the Setup Wizard#
Once FusionAuth starts, you’ll be taken to the Setup Wizard. Create an administrator account and accept the license.
For more on setup wizard, read the documentation.
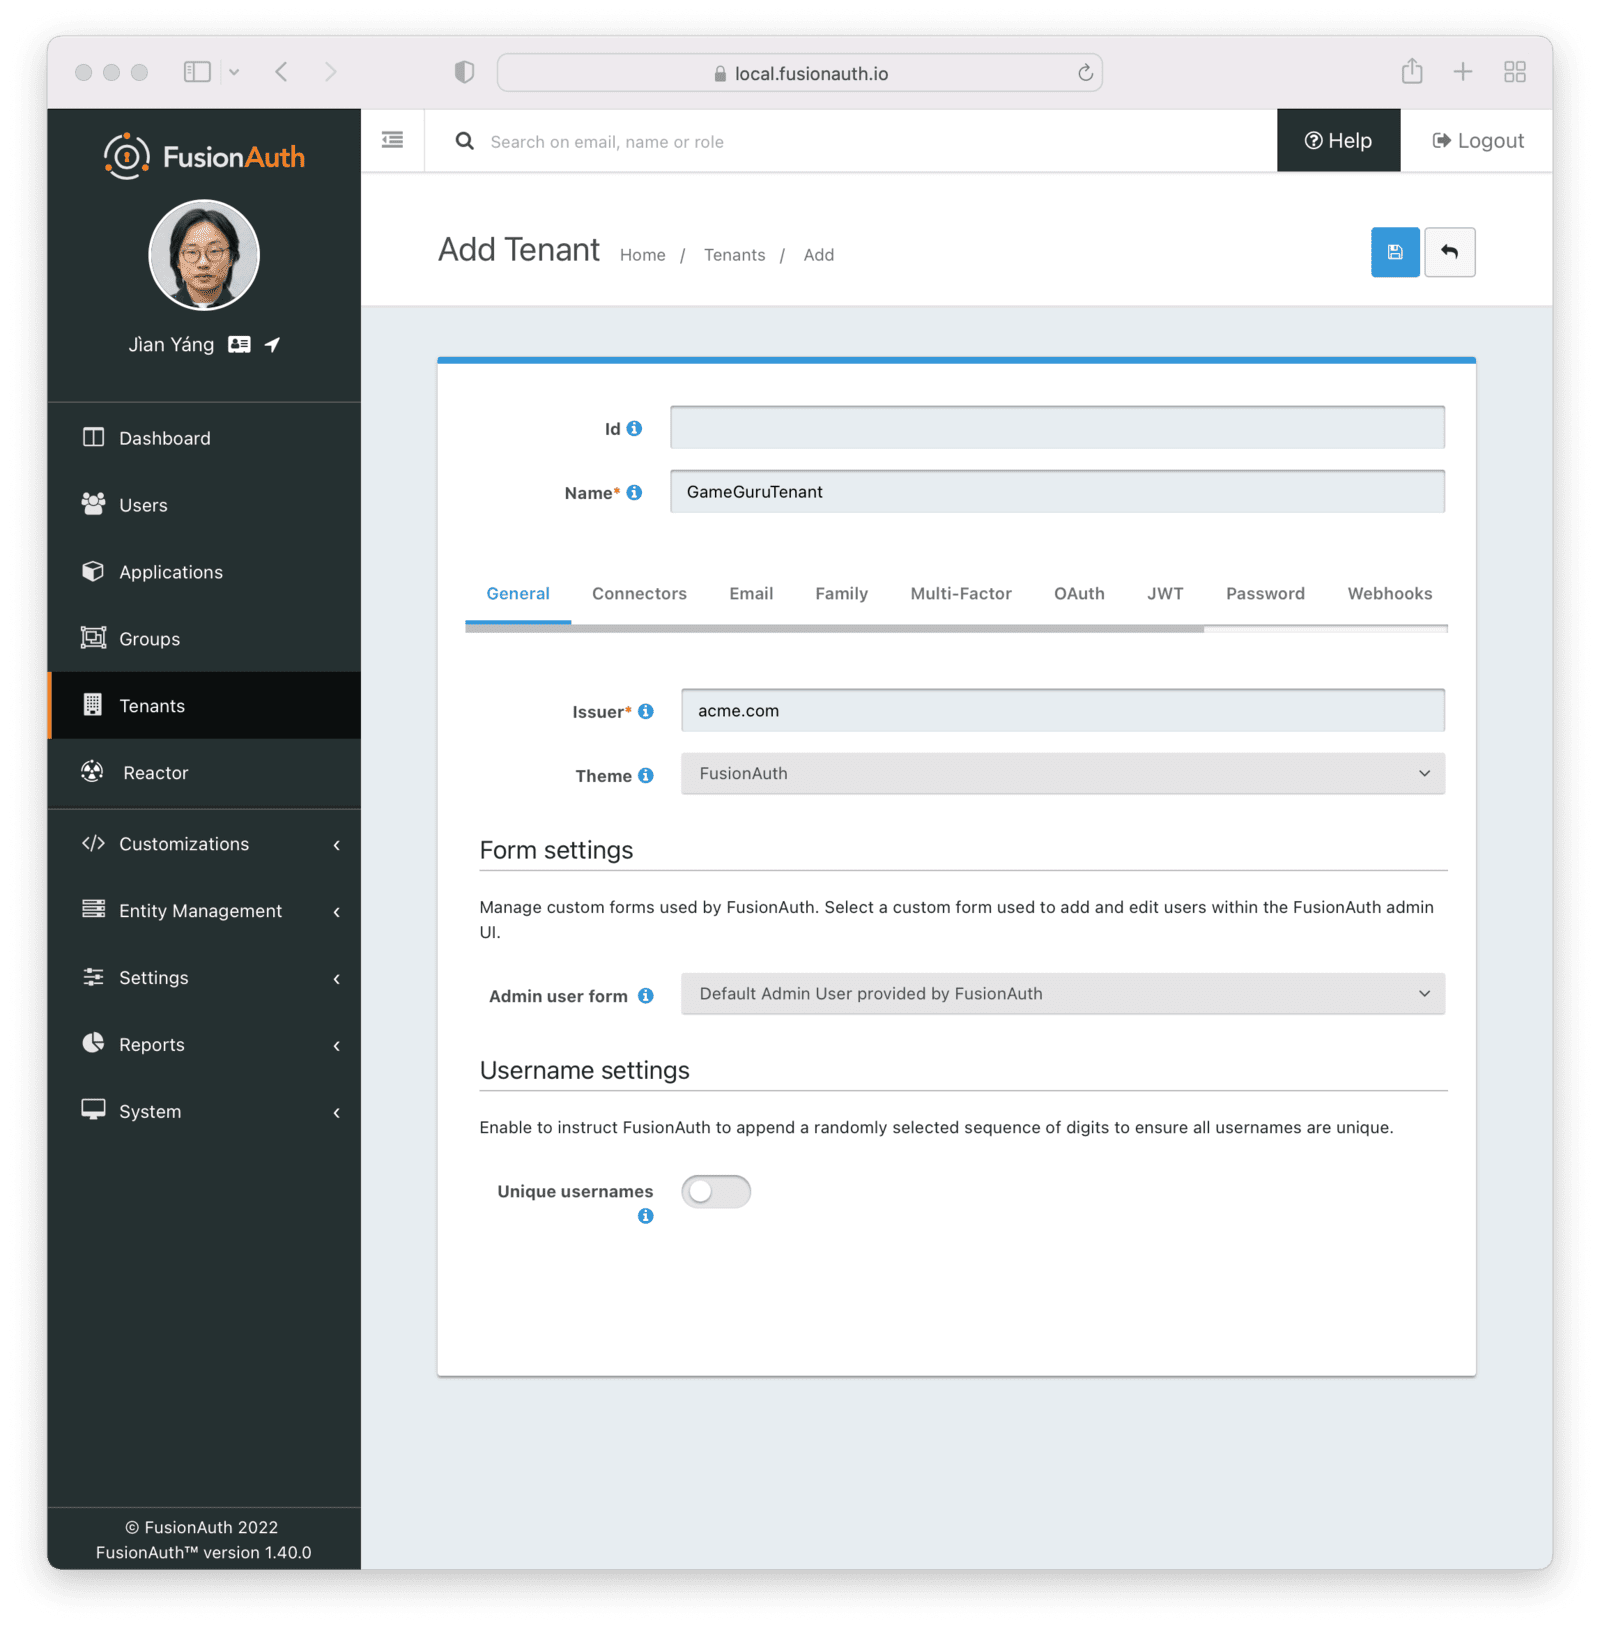
Create a Tenant#
FusionAuth supports single and multiple tenants. This enables you to host multiple games or applications on a single instance of the FusionAuth server. A tenant can hold multiple groups of users in which each user is unique by email address or username.
To create a tenant, open the Tenants tab on the side pane and click the plus button in the top right corner. Give the tenant a unique name, in this case GameGuruTenant, leaving the rest of the options as they are and saving the tenant.
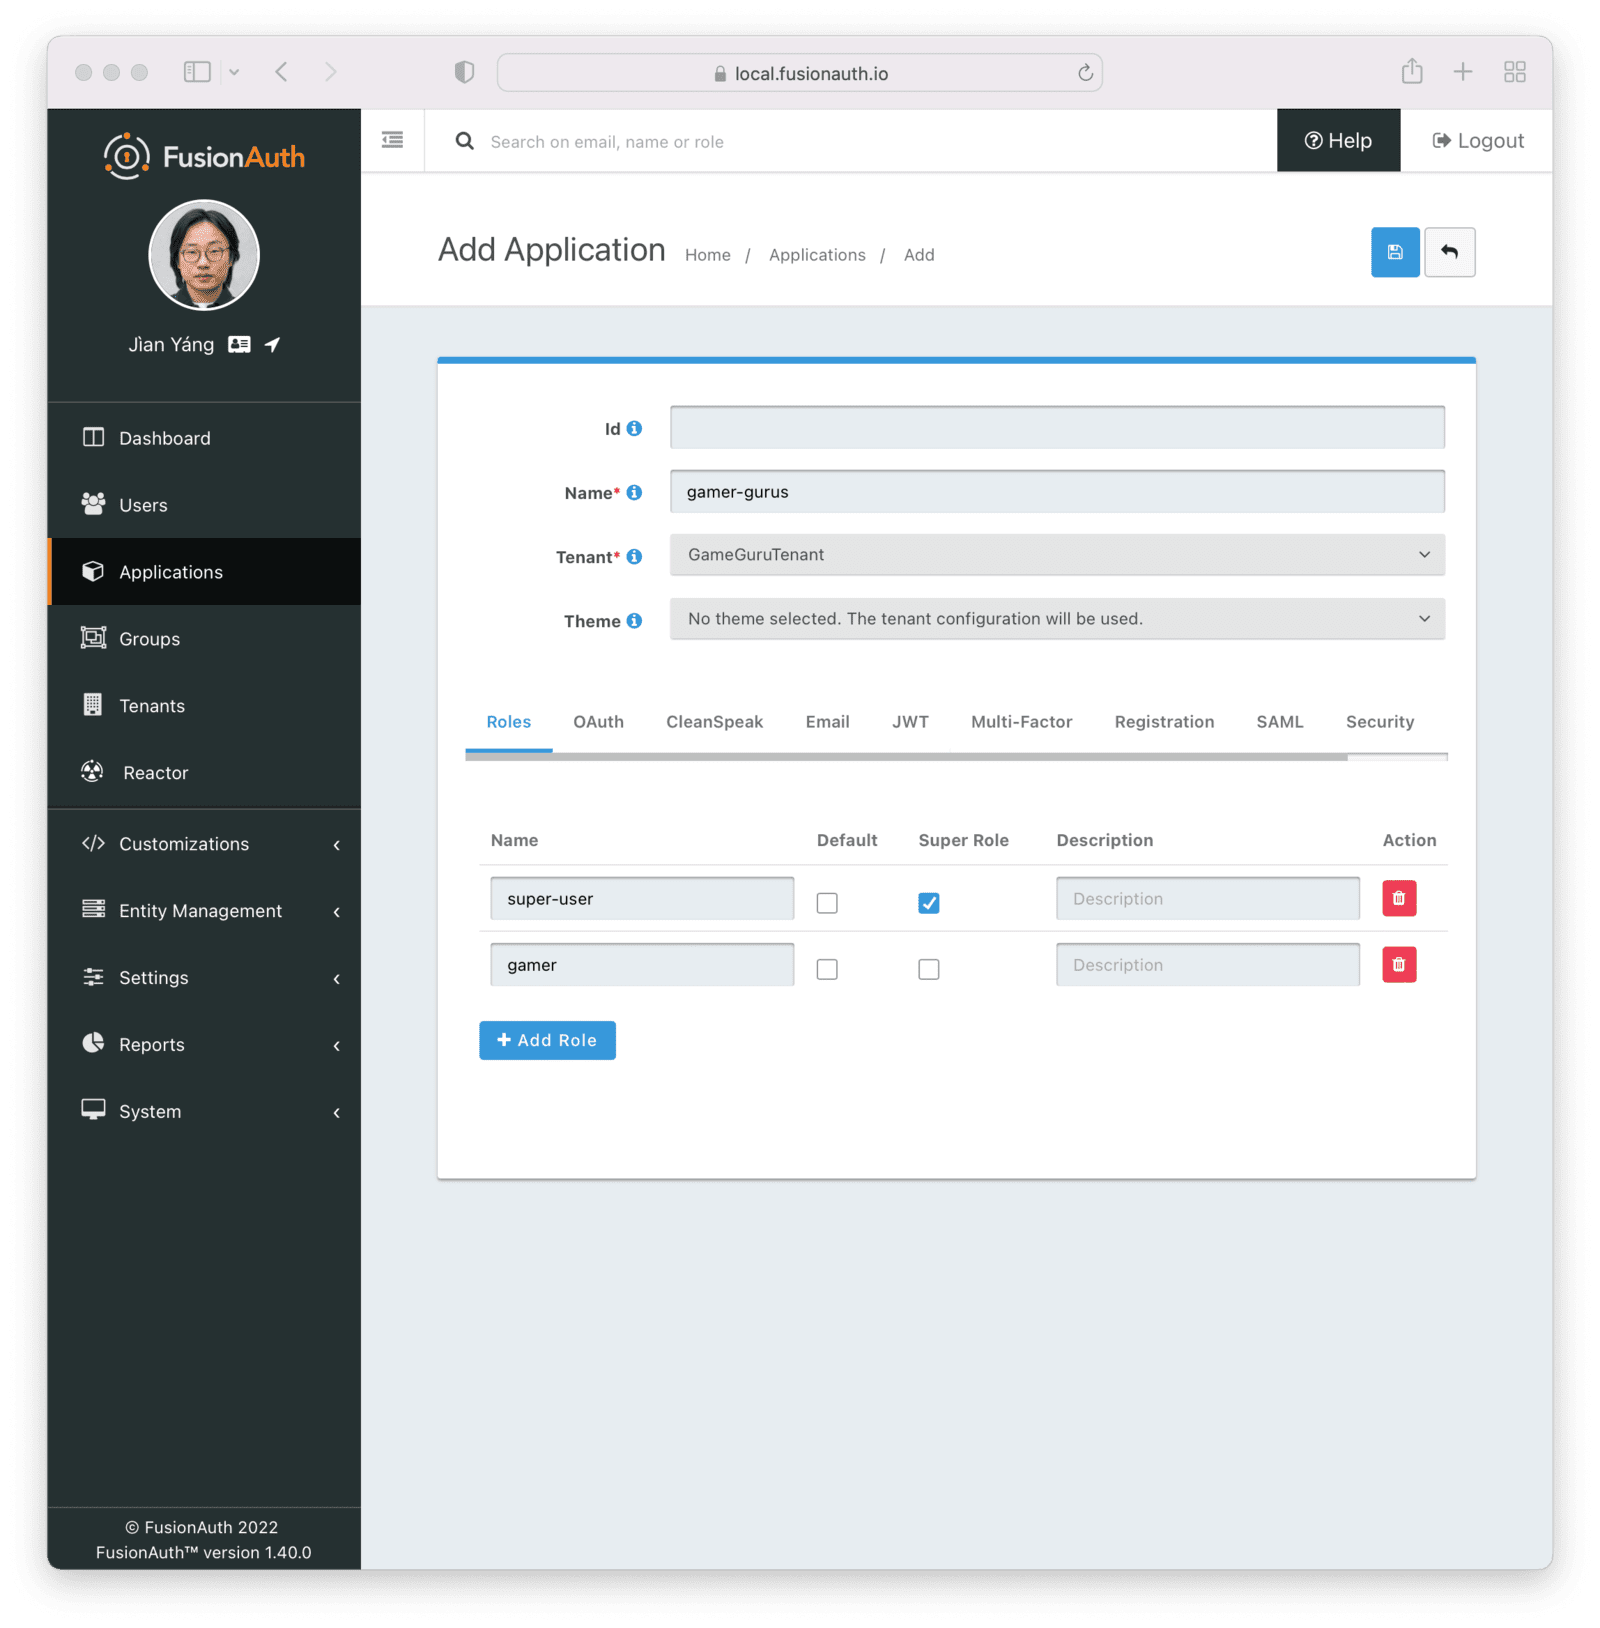
Create an Application#
On the left-hand side of your dashboard, navigate to Applications and click the green plus icon in the top right to create a new application associated with GameGuruTenant.
You can leave the default settings in place. A UUID is auto-generated for you. Feel free to click through tabs like OAuth , CleanSpeak , and Email to customize anything you think you’ll need.
You also need to add some roles for this apps use case:
super-user, with the Super Role checkbox ticked, and is used for admin users.gamer, which will be assigned to all players registering from the app
Create an API Key#
Most FusionAuth APIs require authentication when making requests. This is done by adding an Authorization header to the request with an API key associated with your application.
On the side pane, click Settings -> API Keys and click the plus button on the top right corner.
This API key will only be associated with the above tenant GameGuruTenant.
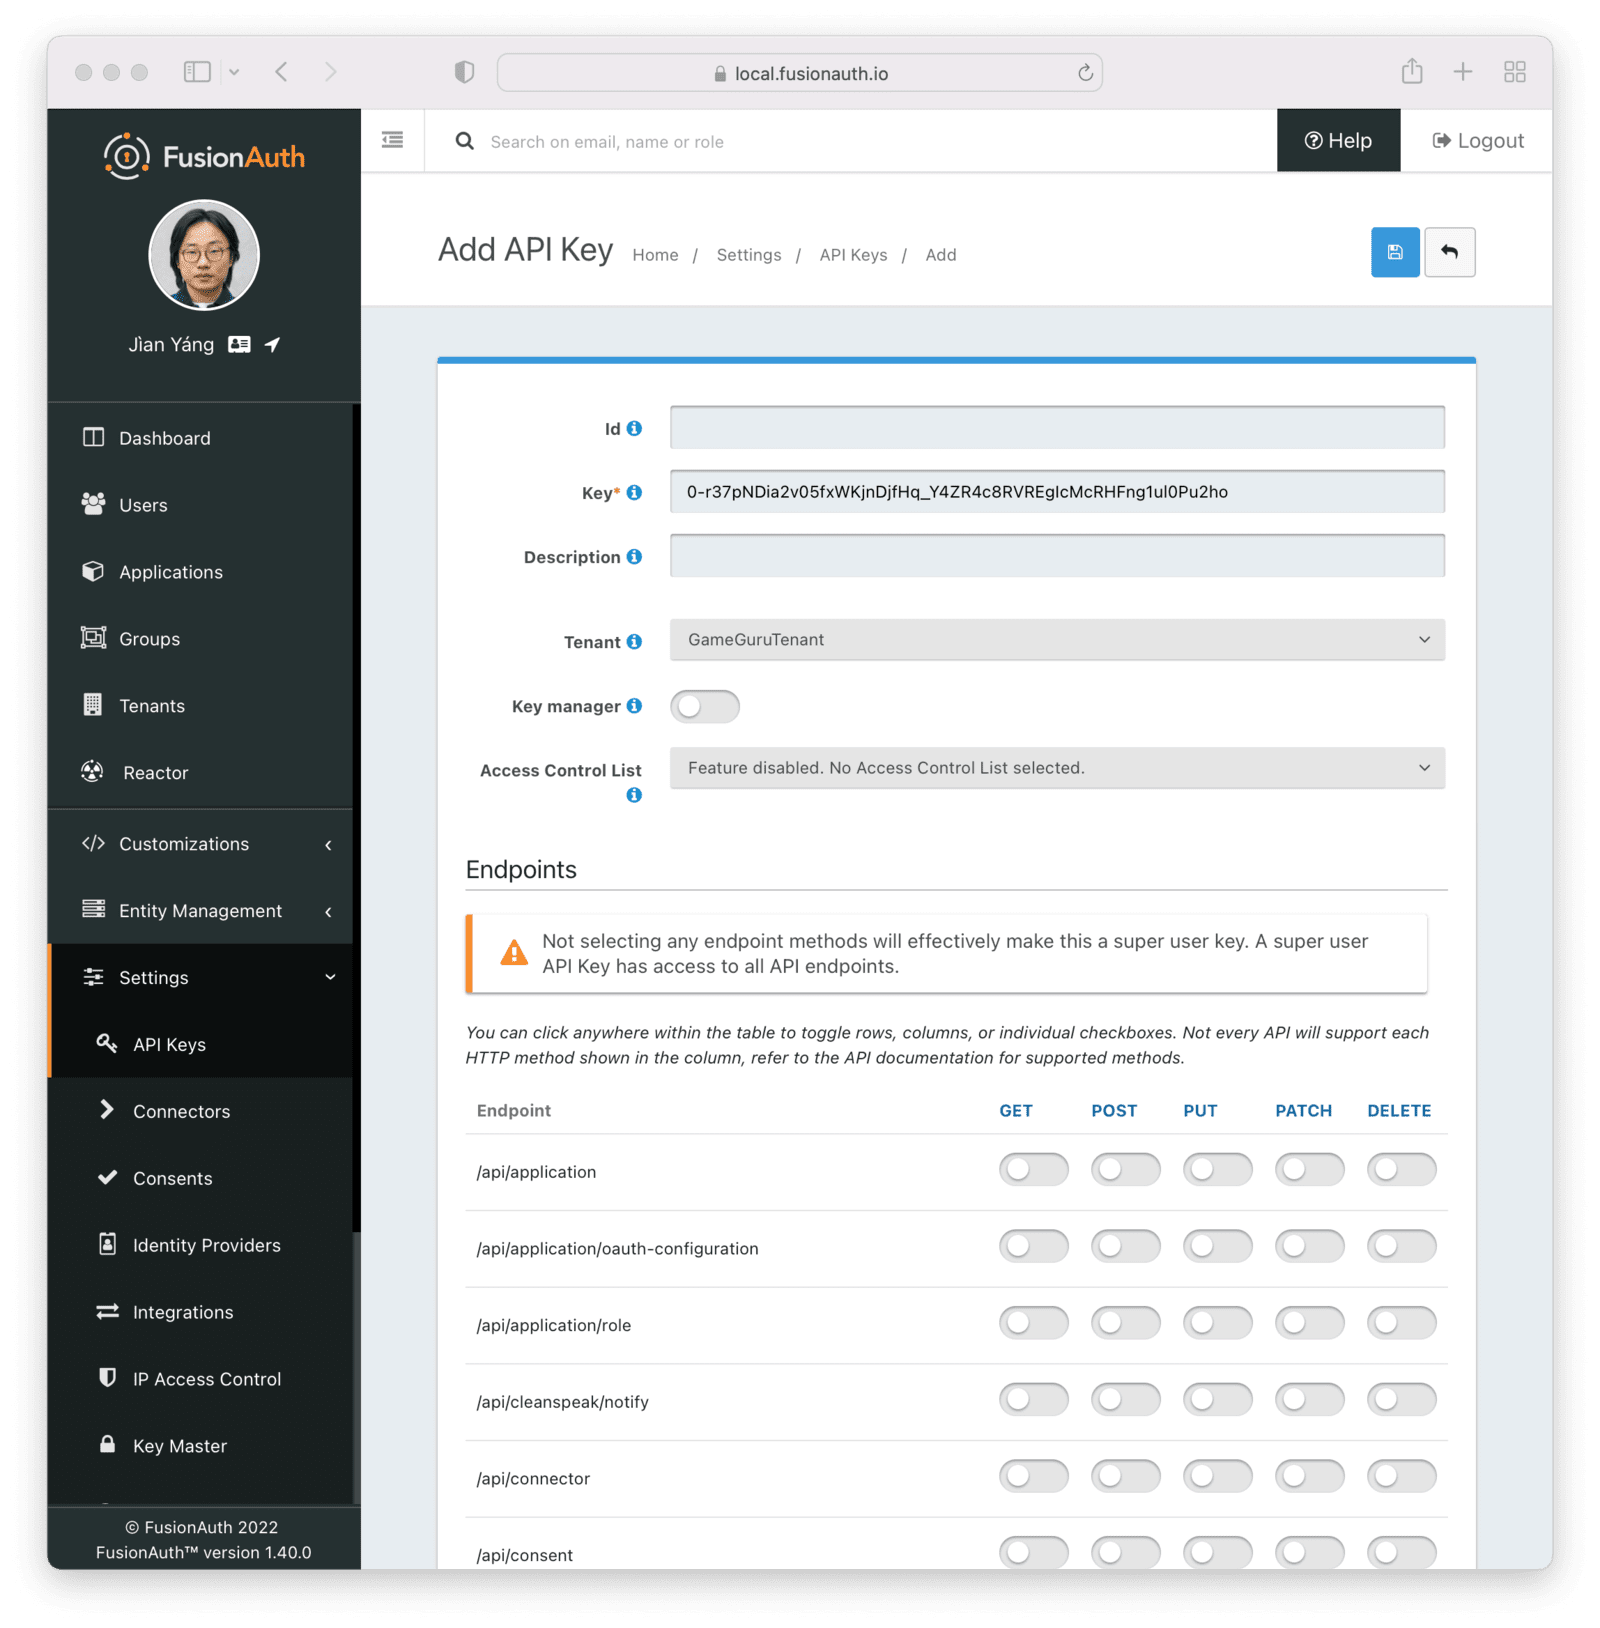
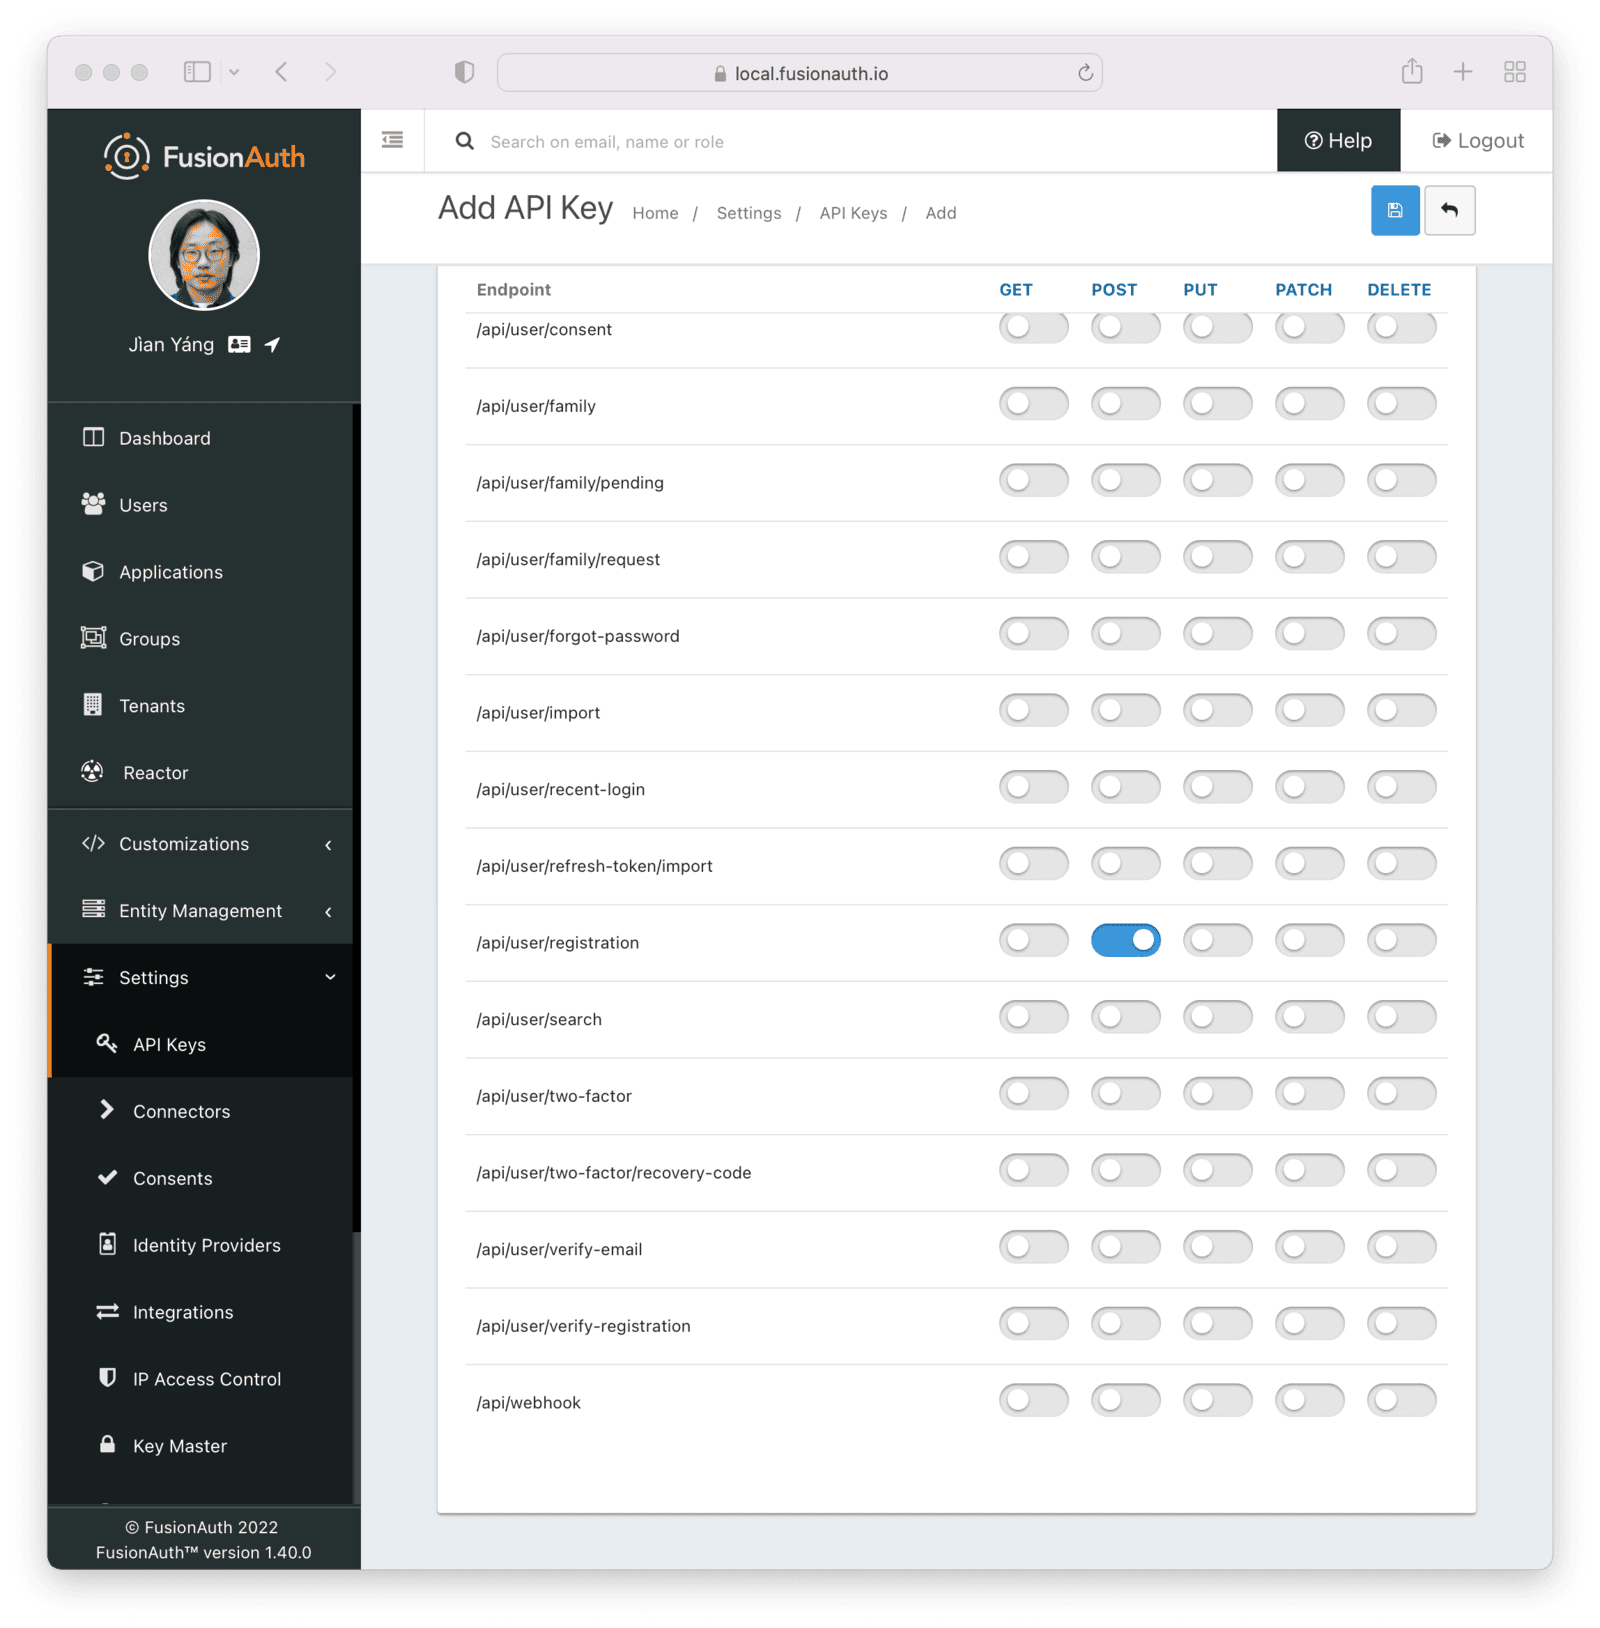
To allow this API key to have access to all endpoints, do not select any in the list provided; to restrict access, enable only the ones you need.
For the purposes of this article, those endpoints are POST for /api/user/registration and POST for /api/login. You can see the former selected below.
Building the Game#
You are going to build a Flutter cross-platform game for Windows and Android that allows a user to register and log in from either platform.
FusionAuth offers multiple authentication options for you to consider when building your application. These include:
- The hosted login pages where FusionAuth hosts the registration forms and pages.
- An API-based approach to manage users.
- Third-party login using identity providers such as Google.
You can use any combination of these. In this application, you are going to utilize the API option due to its simplicity and direct approach.
In a real-world application, you’ll want to use the hosted login pages, because that will allow you to offload all responsibility to FusionAuth for passwords or other credentials. It also allows you to easily add more security to your application if needed, including enabling MFA or rate-limiting certain users. But you'll want to make sure you theme them to look like your application.
Create a New Flutter Application#
This is the start of building the Android and Windows Flutter applications. To implement the UI, check this repository for the code.
Prerequisites#
You’ll need the following for this part:
- A system with a Flutter installation
- A VS Code editor with Flutter and Dart extensions installed
Create the Application#
To create a fresh Flutter application, run the command flutter create my_app on your terminal pointing to a directory of your choice.
Adding Dependencies#
Open your Flutter project in VS Code and add these dependencies to the pubsec.yaml file located in the root folder of the project:
dependencies:
    flutter:
        sdk: flutter
    cupertino_icons: ^1.0.2

    #Facilitates making Network calls.
    dio:
    #For secure storage of user data
    flutter_secure_storage:
Flutter will automatically download these dependencies, though you can run the command flutter pub get on your terminal to download them immediately.
At this point, run the app to make sure everything is set up correctly.
flutter run path/to/dartfileConnecting the App With the FusionAuth Server#
In the "lib" folder, create a new file called network.dart. This is where you are going to write code to connect the app and the FusionAuth server.
import 'dart:convert';
import 'package:dio/dio.dart';
import 'package:flutter_secure_storage/flutter_secure_storage.dart';

const FlutterSecureStorage secureStorage = FlutterSecureStorage();

class ApiResponse {
  bool success;
  String? errorMessage;
  ApiResponse({required this.success, this.errorMessage});
}

class NetworkApi {
  // Use this when building for Windows or MacOS. When in production, you'd have this point to the FusionAuth instance for both environments.
  static const FUSION_AUTH_DOMAIN = 'http://localhost:9011';

  //Uncomment and use this when building for Android
  //static const FUSION_AUTH_DOMAIN = 'http://your-ip-address:9011';

  // your API key from above
  static const apiKey = 'your-API-key';

  // your application Id from above
  static const applicationId = 'your-application-id';

  static final dio = Dio();

  static Future<ApiResponse> login(String username, String password) async {
    try {
      var result = await dio.post(
        '$FUSION_AUTH_DOMAIN/api/login',
        data: jsonEncode({
          "applicationId": applicationId,
          'loginId': username,
          'password': password,
        }),
        options: Options(headers: <String, String>{'Authorization': apiKey}),
      );

      print(result.data);

      //Securely Save important data such as token received from the server
      secureStorage.write(key: 'token', value: result.data['token']);
      secureStorage.write(
          key: 'tokenExpirationInstant',
          value: result.data['tokenExpirationInstant'].toString());
      secureStorage.write(
          key: 'username', value: result.data['user']['username']);

      return ApiResponse(success: true);
    } on DioError catch (e) {
      print(e);
      print(e.response);
      return ApiResponse(success: false, errorMessage: "An Error Occurred");
    } catch (e) {
      print(e);
      return ApiResponse(success: false, errorMessage: 'An Error Occurred');
    }
  }

  static Future<ApiResponse> register(String username, String password) async {
    try {
      var result = await dio.post(
        '$FUSION_AUTH_DOMAIN/api/user/registration/',
        data: jsonEncode({
          "registration": {
            "applicationId": applicationId,
            "roles": [
              "gamer",
            ],
          },
          "user": {
            'username': username,
            'password': password,
          },
        }),
        options: Options(headers: <String, String>{'Authorization': apiKey}),
      );

      return ApiResponse(success: true);
    } on DioError catch (e) {
      print(e);
      print(e.response);
      return ApiResponse(success: false, errorMessage: "An Error Occurred");
    } catch (e) {
      print(e);
      return ApiResponse(success: false, errorMessage: 'An Error Occurred');
    }
  }
}
Here is an explanation of some of the variables in the above code.
secureStorageis a global variable that exposes theFlutterSecureStoragefunctions to store and retrieve data securely.ApiResponseis the data and status to be returned to the UI when an API request is finished.FUSION_AUTH_DOMAINis the URL domain to which the app is going to connect.apiKeyis the credential key required to authorize API requests from your app to FusionAuth.applicationIdis your Application Id, which is used to associate your API request to a specific FusionAuth application.
Tips for Securing the API Key for Production
- Use
flutter_dotenvto secure and read the API keys from a .env file.- Store the keys in the backend and retrieve them when the app launches.
The login function receives two arguments, username and password, which are sent to the server for user authentication.
The FusionAuth login API is located at /api/login and requires an API key authentication, which is passed in the Authorization header. If authentication is successful, the API will return data that you store securely for other purposes. An unsuccessful request will fail with an error code as defined in the Login API documentation.
The register function also receives two arguments, username and password, which are sent to the server for user creation and registration. The FusionAuth Registration API is located at /api/user/registration/, and also requires an API key for authentication.
However, in some scenarios, the X-FusionAuth-TenantId header is required to scope the request properly.
Finally, in the JSON request, you add a list of roles that the user should have. In this case, you assign the gamer role created above.
User creation involves creating a tenant scoped account for a user on the FusionAuth server while user registration entails associating the user to the FusionAuth application they are going to log into, gamer-gurus in this case.
FusionAuth offers two ways to create and register a user:
This application uses the first option, since it is simpler. Below is a video of how your application should be working when registering an account on Android.
Here's a video of the process for logging in from the Windows application.
Feel free to grab the code if you'd like to take a closer look.
Conclusion#
Cross-platform gaming is a positive development for gamers and game developers alike, but you need to ensure the safety of your players as well as the security of their accounts. This way, they can play on whatever platform they like without worrying about access problems.
By using an auth server to verify gamers’ credentials, you can maintain strong security with minimal setup and ensure convenient access so your users can get started playing right away.
While the game you built in this tutorial was trivial, this approach can scale to any number of platforms and games, allowing your users to play the game on the console or PC of their choice while maintaining a single, consolidated identity.