Guide To User Data Security
By Brian Pontarelli
Overview#
"Facebook says new hack leaked data of 50 million users."
"Uber Pays $148 Million Over Yearlong Cover-Up Of Data Breach."
"LinkedIn hack releases 167 million accounts."
"Milwaukee Bucks organization accidentally leaks player financials onto the Internet."
"4.8 Million V-Tech customer's data stolen."
These headlines scream: software security is a big deal.
While thinking about software security often creates that sinking, pit-like feeling in your stomach, it pales in comparison to the nausea that strikes when the CEO is on the news explaining that the software system you built leaked private information about users.
There's no industry, no organization and no classification of software that is immune to the predatory antics of hackers. Personal information, corporate data, even high-profile social media accounts are under constant attack. Any server system accessible from the Internet is not just a potential target, but an actual target. When Microsoft first starting working on their Windows 2000 software system they wanted to see how well it would resist attack. To test this, they put a few servers onto the network and waited. Within hours the attacks began. We conducted the same experiment in 2016 and it took less than 60 minutes for the first brute force attack to come in from overseas.
So as I mentioned before, software security is a big deal.
Security is complex and for many software professionals an incredibly intimidating task that is easy to just ignore as a problem "outside the scope of requirements". However, this is no longer a viable option. Security has moved from a "we'll get to that eventually" feature to a priority. Security must be skillfully factored into designs, projects and timelines.
This guide is for the software developer, architect or system administrator who doesn't want to spend a lifetime wading through cryptographic algorithms and complicated explanations of arcane system administration topics to tackle software security. We are a software development company and we have taken everything we know (and have learned through the years) about server and application security and distilled it into this simple yet detailed guide. This is not the sum of all things that could be or have been said about software security, but if you implement each of the concepts below your user data will be highly secure.
There are two parts to the guide: Server Security and Application Security. We don't see one as more important than the other, so we strongly encourage readers to digest both sections with equal attention. We provide a series of guidelines and steps to harden the servers/applications and protect against direct attacks. This isn't a "Why" kind of guide; this is a "How" guide. We trust that those interested in the "Why" will find plenty of other resources to satisfy their curiosity. For those of you interested in the "How", let's get started.
TLDR#
If you would rather not read our entire security guide (though we suggest you do), check out the GitHub project created around this guide. This project contains a set of scripts you can execute from your local computer to secure a remote server. The scripts perform most of the steps listed in this guide. The GitHub project also contains full configuration files based on the configuration detailed below that are deployed to the server by the scripts.
In addition to setup scripts and configuration, we also added a Chef cookbook to the GitHub repository. Chef is a great way to provision new servers and ensure they are setup exactly how you want them. There are a number of other systems similar to Chef, but we use Chef for all of our servers and thought we would share our Chef recipe with everyone.
Find our GitHub project here: https://github.com/FusionAuth/security-scripts
NOTE: That is only half of the equation, so you will still want to read the Application Security section of the guide.
As you read through this guide, keep in mind that most of the instructions below are framed as if you were building an application whose architecture is comprised of an application server and database server. However, any server-side application can use any or all of the techniques covered below but you might need to make some tweaks in order to get our instructions to work for your specific application.
We've also had a number of questions regarding which parts of this guide are not necessary for various cloud providers like AWS or GCP. Every cloud provider offers different levels of security, but primarily focus on network security. Therefore, if your cloud provider offers a comprehensive network security layer, you can probably skip the network pieces below. We still lock down our servers even though we use AWS, so you might want to do the same.
Server Security#
The first step to securing user data is to secure the servers you will be running your applications and/or databases on. The process of securing servers centers on a couple of core guidelines.
- Use the least privilege possible
- Prevent direct access when it isn't required
- Automate security checks and constraints
- Send notifications for all activity
- Identify users that can access the server
This section details a step-by-step process to secure your servers.
Server Architecture#
In order to illustrate our thinking around server security, we need to cover what type of servers we are talking about. Since this guide is specifically about user data security, we will focus on applications that use a server side component and a database to store and manage user data. This application will allow users to register, login and perform various functions. A few examples of this type of application are:
- A web application where a user can login, access their account and perform various functions
- A mobile application that communicates with the server to manage user accounts and user data
Now that we know what type of servers and applications we will be securing, let's take a look at the server architecture for a simple example of a fictional "To-do Application" and the server architecture we recommend you use for your applications.
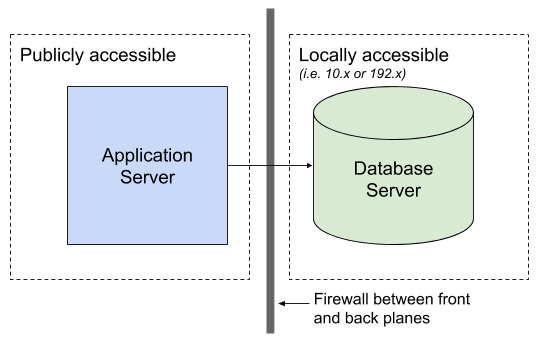
In general, you will want to separate your Database Server from your Application Server. While securing two servers instead of one does require additional work, it will give you the flexibility to control access to each server separately. This also means that if a breach does occur, the hacker will have a couple more hoops to jump through in order to gain access to your user data (we'll discuss this later).
On the Application Server you will install the server-side code for your application. On the Database Server you will install the database that you will be using (MySQL, PostgreSQL, Mongo, Redis, etc). Depending on your needs, you can horizontally scale either of these servers. You will want to use the exact same configuration and access controls on each server to ensure consistency. DevOps is out of scope for this guide, however there are numerous tools available to create server images and deploy multiple instances of them. Similarly, there are many tools you can use to make a configuration change to all servers without having to log into each one separately.
Provisioning#
In this guide, we will take you through the steps to create servers using Linode, a virtual server provider. Linode provisions stock versions of most operating systems and the server is open to the world. This would be the same setup if you were running your own servers. If you use Amazon, Google or other cloud providers instead, some of the security configurations below will be managed using the web based configuration systems of the hosting provider or their APIs. We'll try to indicate places where providers like Amazon provide tools to manage various security components.
Now that you know what the architecture looks like, let's create the two servers you need. We'll be using the Ubuntu Linux version 18.04 LTS image for this guide. Most of the file locations and instructions assume that you will be using Ubuntu. If you prefer to use CentOS or a different distribution, you will need to translate these instructions.
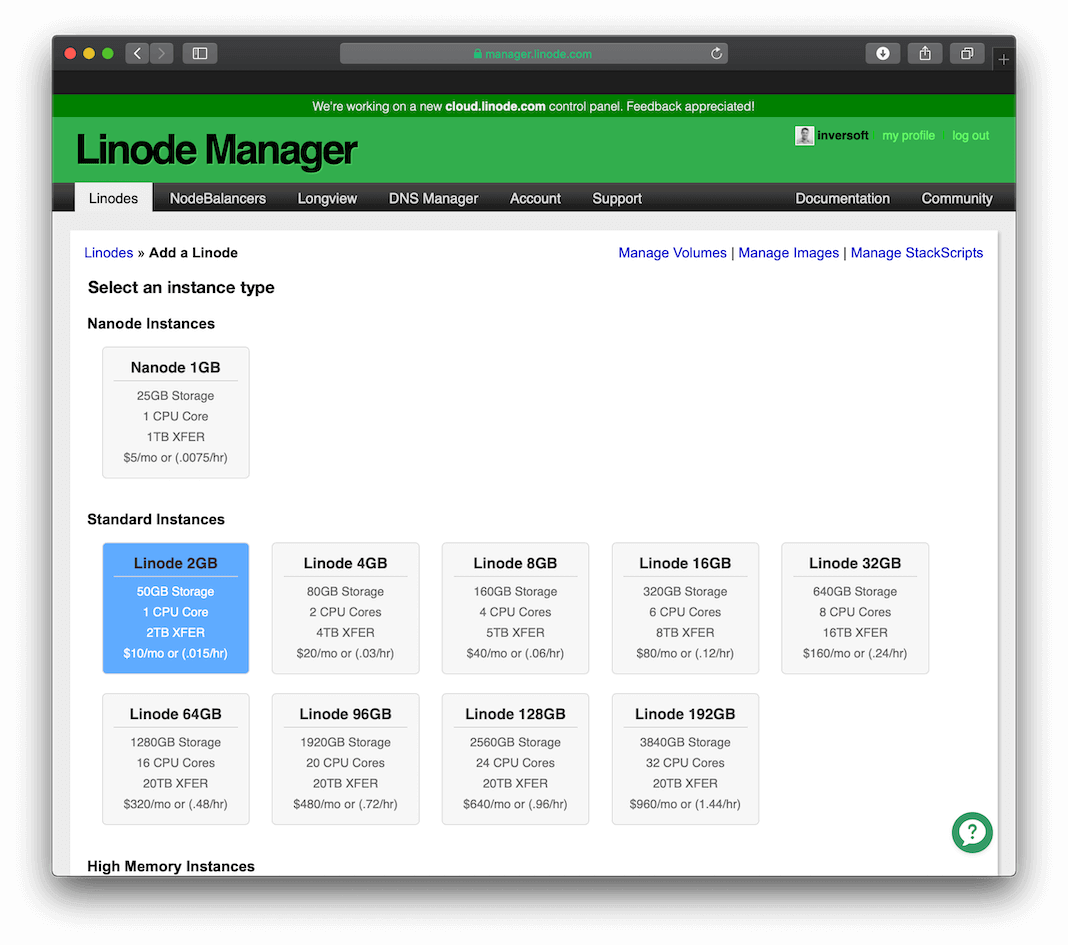
Our examples will use two Linode 1024 instances hosted in California. Here are the setup steps you can use to create the servers:
Step 1: Select the server type#
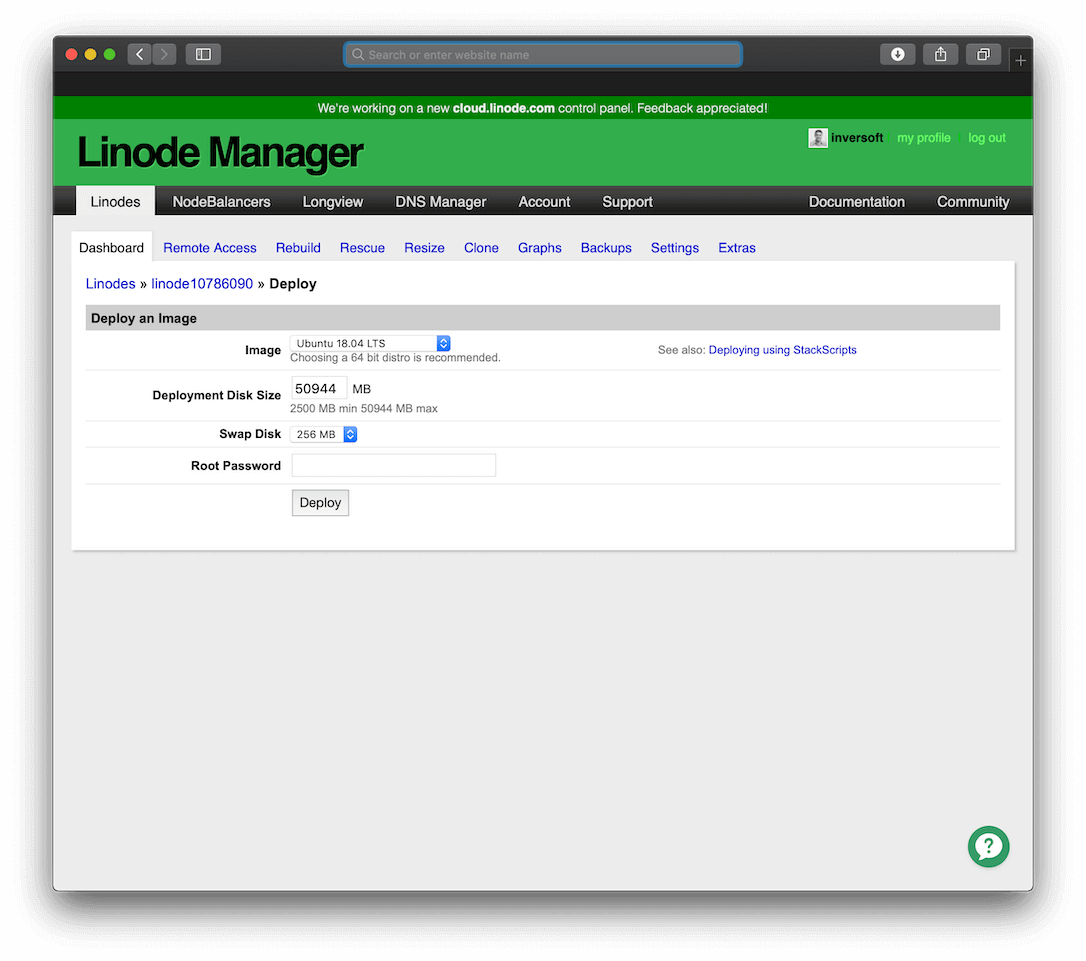
Step 2: Deploy the Linux Operating System#
In this step, be sure to select a long and secure root password. Later you will disable root passwords, but for the initial process you need to ensure the server is secure.
Prevent direct access when it isn't required
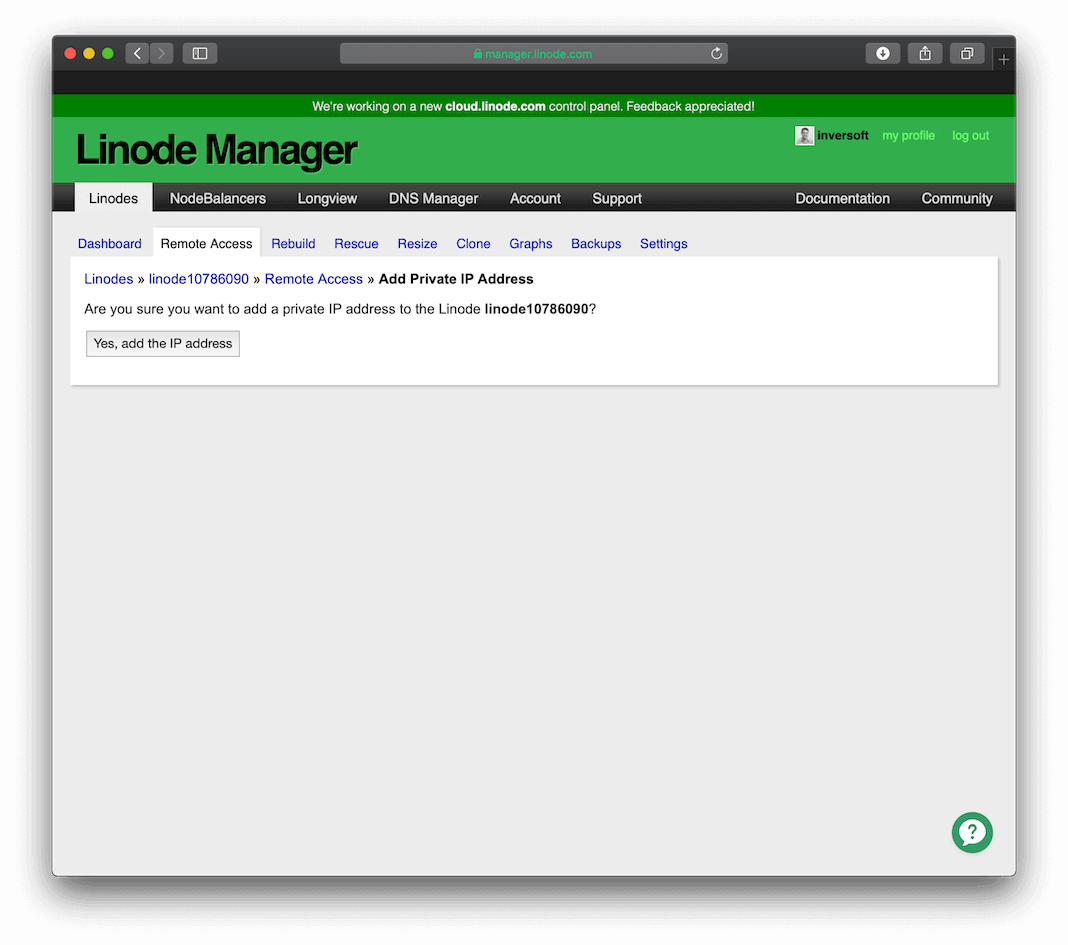
Step 3: Configure a private IP address#
You need to give both servers a private IP address that is not world accessible, but is accessible between Linode servers. This setting is on the Remote Access page.
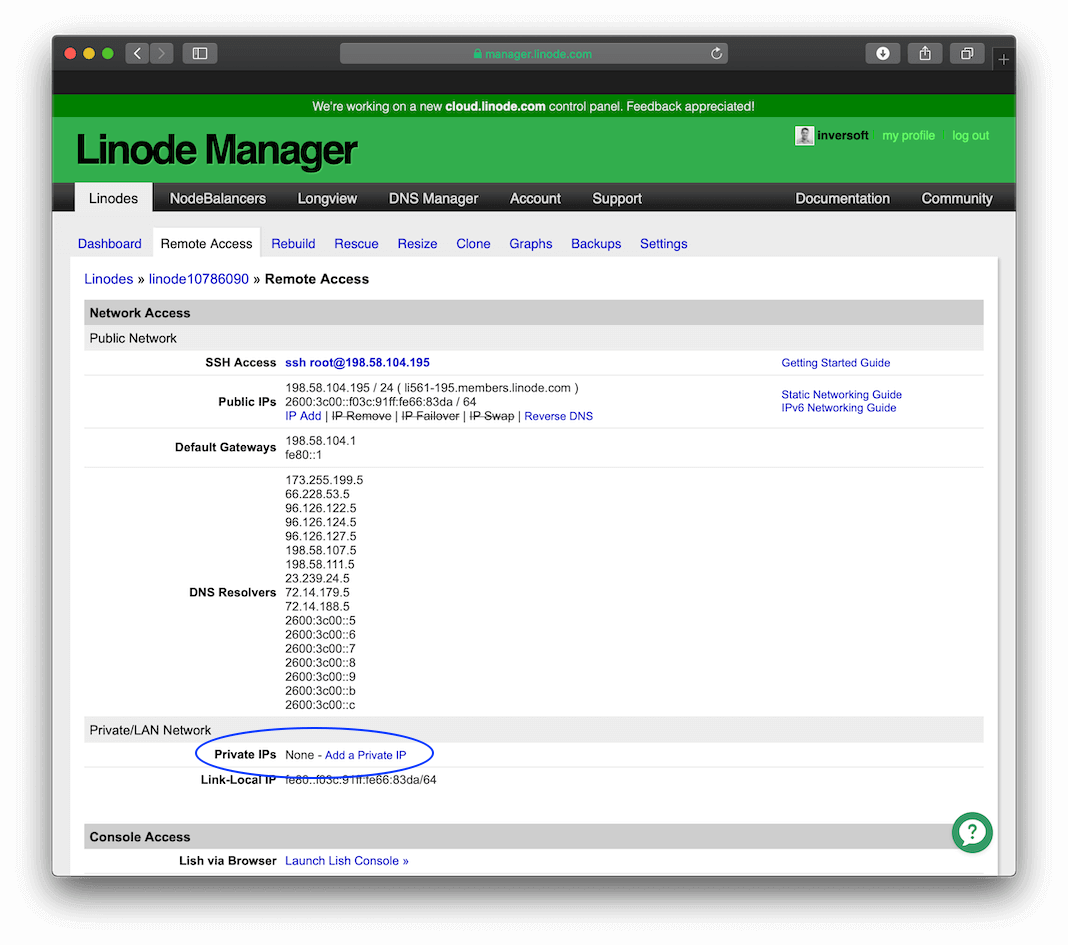
Once you click the Add a Private IP button, you will be presented with this screen that allows you to create a private IP for the server.
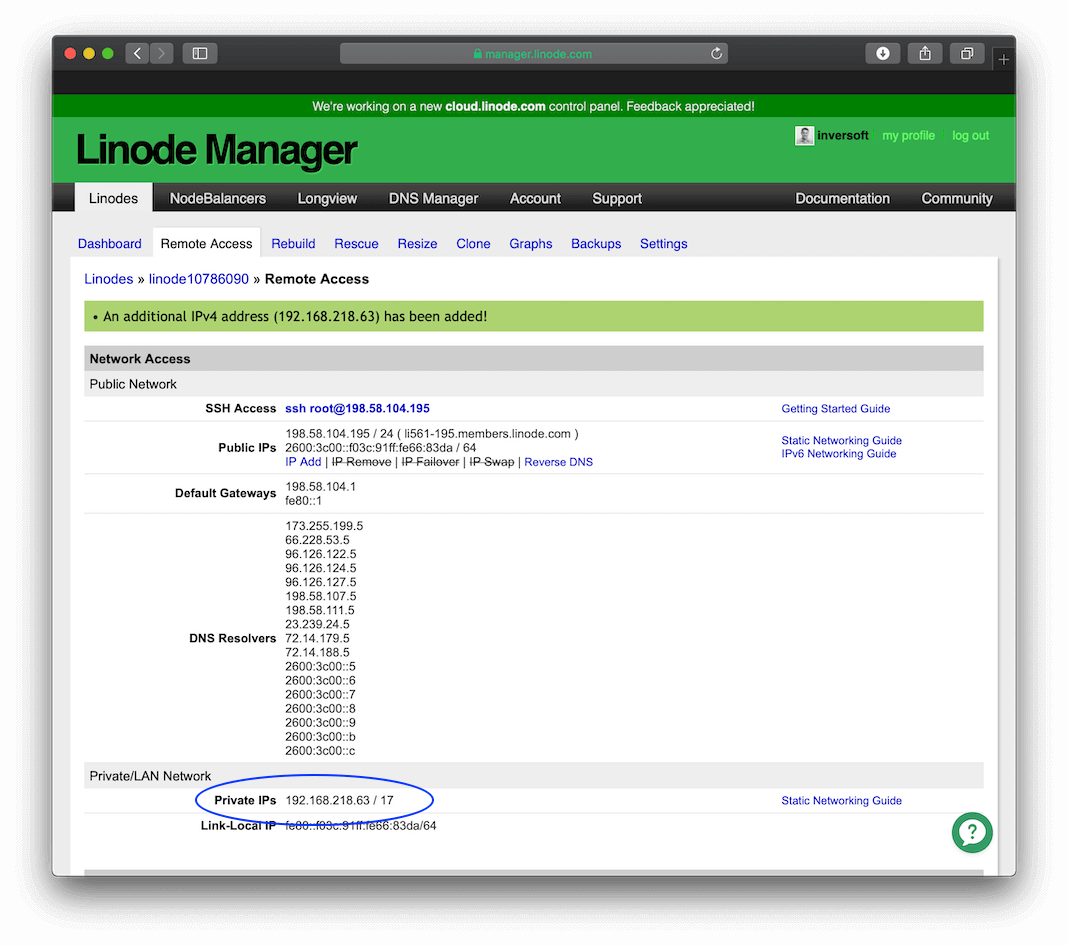
After you add a private IP address, your configuration should look like this:
Before the private IP address will take effect, you need to enable the "Auto-configure Networking" setting. From the Dashboard click the Edit link to the right of your configuration at the top of the page. This will take you to the configuration options. At the bottom, enable the "Auto-configure networking setting". This option looks like this:
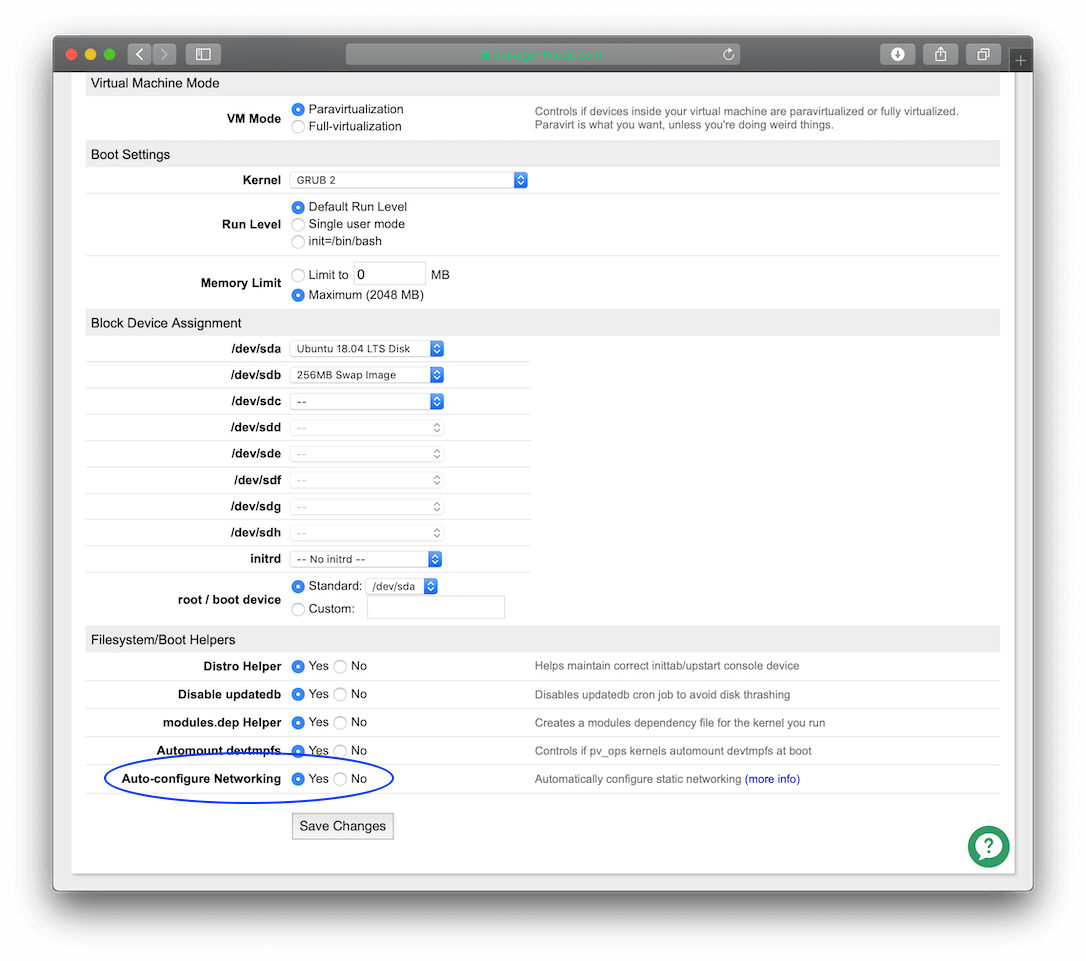
Then click Save Changes .
Step 4: Boot the server#
Now, boot your Linode server by clicking the Boot button on the details page:
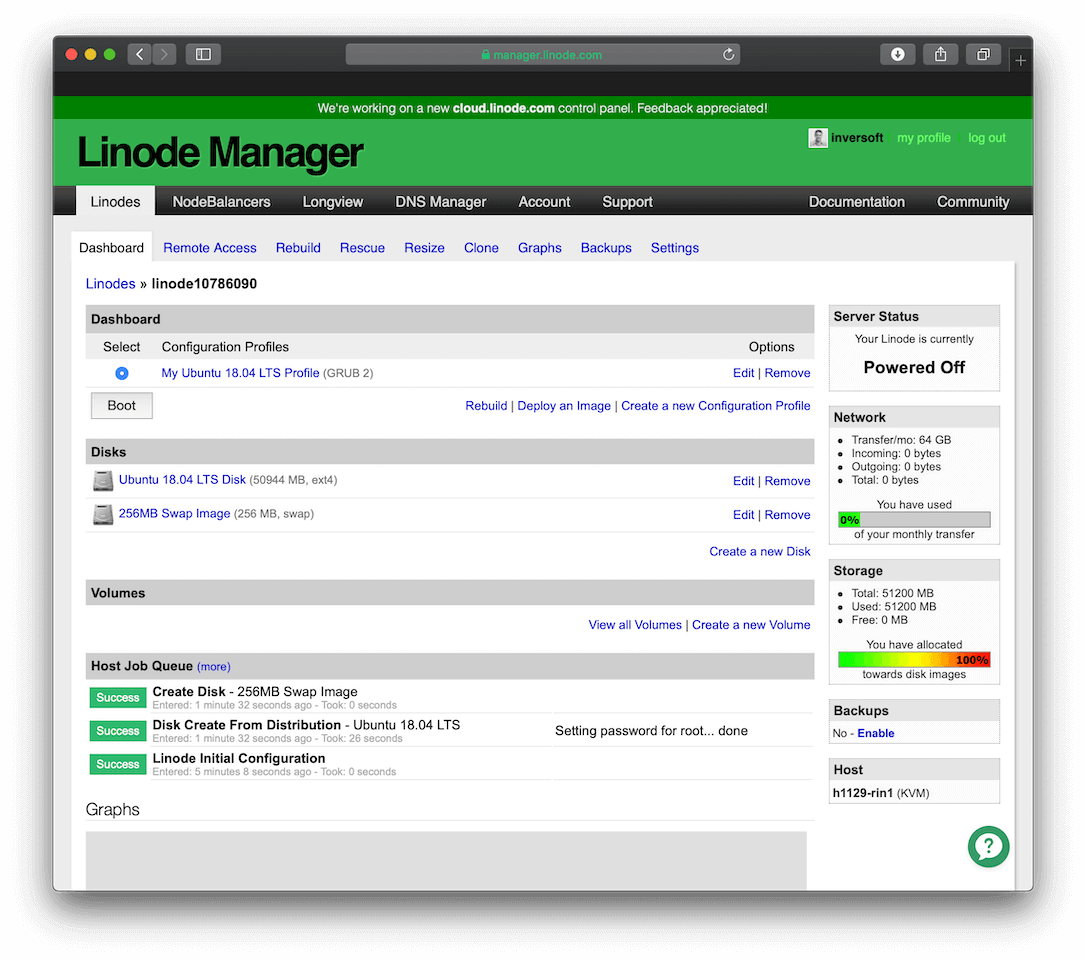
Both servers should now be running. The next step of the process is to lock down remote access to the servers and secure passwords and user accounts. You will need to perform all of these steps on each server to ensure they both are secure. There are numerous guides available to help you secure Linux servers, but we will cover the most common steps we use at FusionAuth.
NOTE: We assume once a hacker has gained access to the server undetected, they will eventually succeed in gaining root access and will have access to everything. Therefore, we will cover some steps to secure user accounts and make the hacker's job harder, but we won't go into extreme detail here. Instead, we will focus primarily on preventing hackers from gaining access to the server in the first place.
Logging in the First Time#
First, log into your server as the root user using the password you entered above. To log into the server, execute this command:
$ ssh root@192.81.133.144You can leave this terminal window open while you configure the server. This makes life simpler and will allow you to fix issues if something breaks along the way.
Securing Passwords#
Automate security checks and constraints
By forcing users to select secure passwords you will prevent users with accounts on your servers from using passwords like "password".
To ensure passwords are secure, you will install a PAM module called Cracklib. This module provides the ability to set password constraints. To install this module, execute this command:
$ apt-get install libpam-cracklibTo make the most of this module, you need to edit the configuration file to require user passwords to contain complex characters including uppercase, lowercase, digits and punctuation. To set this configuration, edit the file /etc/pam.d/common-password like this:
$ nano /etc/pam.d/common-passwordNOTE: You can also use vi if you prefer that over nano for text file editing. If you aren't familiar with vi, nano will save you a lot of headache learning vi commands.
Find the line that starts with:
password requisite pam_cracklib.soand replace it with:
password requisite pam_cracklib.so retry=3 minlen=10 difok=3 ucredit=-1 lcredit=-2 dcredit=-1 ocredit=-1The configuration options are as follows:
- Allow 3 retries to type a new password twice before giving up (
retry=3) - Passwords must be at least 10 characters long (
minlen=10) - The new password must differ from the old password by 3 characters (
difok=3) - The new password must contain at least 1 uppercase character (
ucredit=-1) - The new password must contain at least 2 lowercase characters (
lcredit=-2) - The new password must contain at least 1 digit/number (
dcredit=-1) - The new password must contain at least 1 symbol (
ocredit=-1)
You can change these values if you wish, but you should ensure users are selecting complex passwords that are hard to brute force attack.
Locking Sudo#
Some standard Linux installations allow passwordless sudo superuser access using the sudo command. Often this capability is provided to users in the sudo group. One potential issue with passwordless superuser access is that if a hacker gains access to a ordinary user account on your server, and that ordinary user account is in the correct group, then the hacker can become the root user without knowing the user's password.
To prevent this, we will lock down the sudo command to require all users to type their password in before the sudo command will grant them superuser privileges.
From your terminal window that is logged into the root account, edit the file /etc/sudoers like this:
$ nano /etc/sudoersThis file should contain a line that looks like this:
%sudo ALL=(ALL:ALL) ALLIf this line looks like this:
%sudo ALL=(ALL:ALL) NOPASSWD: ALLYou will want to remove the "NOPASSWD": part of the line.
Setup Ordinary User Account#
Identify users that can access the server
Up to this point, we have been using the root user account for everything. This is fine when you are setting up a server but it is better to create an ordinary user account and start using that instead. This method provides better security because ordinary user accounts must use the sudo command in order to gain superuser privileges. Plus, we know that our configuration change above will require them to type in their password as well.
NOTE: You will still want to leave a terminal window open with the root user logged into your server just in case something goes wrong.
To create an ordinary user account, run this command and specify the username you want to use from the terminal window that is logged in as the root user:
$ useradd -m -G sudo -s /bin/bash your-usernameThis command specifies that the user should have an extra group of sudo (the -G sudo option). This group will allow the user permissions to execute superuser commands on the server.
Now that the user has been created, you need to set a strong password for this user. This password should be complex. To set the password for your user, execute this command:
$ passwd your-usernameIn another terminal window, ensure that you can log into this user account using the password you just created:
$ ssh your-username@173.255.241.203While you are here, you should also verify that this user has sudo access. Type this command to test for sudo access:
$ sudo ls /You should see a directory listing of the server. However, if you see a message that says you aren't in the sudoers file, you will need to edit your /etc/sudoers file from the terminal that is logged in as root and add this line:
%sudo ALL=(ALL:ALL) ALLYou can logout of this terminal by typing exit or hitting ctrl-d.
Locking Remote Access#
Remote access is always through SSH on Linux servers. In most cases, SSH is setup to allow access to user accounts via passwords. By allowing users to log into your server using their passwords, you allow hackers to brute force attack your server from anywhere in the world. Instead, your servers should use RSA keys to allow users to login. This will only allow users to access the server from the computer that contains their private key. Since private keys will be password locked and never shared, this will ensure that only authorized users will be able to access the server.
To secure remote access to your servers, we will change the server configuration so that SSH access requires RSA keys. If you are running in Amazon, they will require an RSA public key in order to provision a server (such as an EC2 instance). However, this doesn't prevent someone from changing the configuration of the server to allow passwords, or from using an AMI (the images used to create EC2 instances) that allows password based login. Your best bet is to apply this configuration regardless of the hosting provider you are using.
To start this process, you need to create a public/private key pair on your local computer. To generate a key pair on a Mac or Linux machine, execute this command:
$ ssh-keygen -t rsa -b 2048This process will ask for a passphrase for the key. You should select a passphrase that is complex.
NOTE: A complex passphrase generally means it is 16 characters or longer and contains numbers, letters and punctuation. You should always use a complex passphrase for your keys because leaving the key without a passphrase makes it much more vulnerable overall. Even if your private key is stolen or socially hacked, a passphrase will ensure it will be much more difficult to use.
Next, copy your public key from your local computer to the server and store it under the ordinary user account we created above.
NOTE: Be sure to copy your public key only and NOT your private key.
Here's the command to copy your public key to the server:
$ scp ~/.ssh/id_rsa.pub your-username@173.255.241.203:/home/your-usernameAfter the public key is on the server, put the key into the ~/.ssh/authorized_keys file so that the SSH system will use it next time you log in rather than prompting for a password. Log back into the server as the ordinary user and then execute the following commands:
$ mkdir .ssh
$ chmod 700 .ssh
$ mv id_rsa.pub .ssh/authorized_keys
$ chmod 600 .ssh/authorized_keys
NOTE: The commands above change the permissions of the .ssh directory and the authorized_keys file so that only the ordinary user can read them. This is required for this model of using RSA keys to work on the server. If you don't do this and jump ahead to where we disable password login for SSH, your server could become inaccessible.
Now, logout of the server and log back in as the ordinary user. You should not be prompted to type in a password. You should instead be prompted to enter the passphrase you used when creating the SSH key above. If you are prompted for a password rather than the passphrase you likely renamed your key files or specified a different name when you created them. Therefore, you must use the -i flag to tell SSH to use the proper identity file for this server like this:
$ ssh -i server_rsa your-username@173.255.241.203The server is now ready to have the SSH system secured. In the terminal that is still logged in as root, edit the /etc/ssh/sshd_config file. You need to change a few lines in this file to prevent anyone from logging into the server without a SSH key pair and to prevent the root user from logging into the server via SSH. Find these configuration options and change their values to those below. Some of these options might be commented out because they are prefixed with a # character. Simply remove the # character and change the setting.
PermitRootLogin no
PasswordAuthentication no
Save this file and restart the SSH service like this:
$ service ssh restartYou can verify that your server is now secure by attempting to SSH to it as the root user. You should receive an error message like this:
Permission denied (publickey).SSH Agents#
You might be wondering what will happen if you SSH to the Application Server and then try to SSH from there to the Database Server. By default, you won't be able to do this because your private key won't be on the Application Server. However, SSH has a feature that allows you to accomplish this without copying your private key all over the place.
The feature you will use is called SSH agent. By enabling an SSH agent, you will be able to log into any server that has your public key setup in the authorized_keys file (as long as you start from a computer that has your private key).
To setup an SSH agent, add your private key to the agent by running this command:
$ ssh-addThis will add your default private key to the SSH agent.
NOTE: If you are on a Mac, you don't need to run this command. macOS will automatically prompt for your private key passphrase and add this key to your SSH agent.
You need to enable your SSH agent when you SSH to a server. To do this, you will use the -A option like this:
$ ssh -A -i server_rsa your-username@173.255.241.203You can also add an alias for the SSH command to automatically add the -A option in your shell's configuration file.
3.9. Locking the Root Account#
Prevent direct access when it isn't required
Next, we will disable the root user's login to prevent users from trying to brute force attack the root user if they ever gain access to the server. You might be concerned that if you lock the root account you won't be able to administer the server easily. Even if the root user account is locked, you'll still be able to use the root account via the command sudo su -, but you won't be able to log in directly to the root user's account. To lock the root user's login, type this command into the terminal window that is logged in as the root user:
$ usermod -p '*' rootTwo-Factor Authentication#
Identify users that can access to the server
Since we are going for über security, let's get crazy and add one more layer of authentication to your remote access. We will add two-factor authentication to the server. This will require users to type in a 6-digit code from their mobile phone in order to log in. Even if a user's private key is compromised, two-factor authentication ensures a hacker would still need the user's mobile phone to log into the server.
First, you will need to install a two-factor app on your mobile phone. There are many two-factor applications available for iOS and Android. I personally like the Authy app because it has slick icons for different services like AWS and GitHub. Next, install the Google Authenticator two-factor PAM module on the server by executing this command in the root user terminal:
$ apt-get install libpam-google-authenticatorEdit the PAM configuration file for SSH like this:
$ nano /etc/pam.d/sshdAdd this line to the top of the file:
auth [success=done new_authtok_reqd=done default=die] pam_google_authenticator.so nullokThis line enables the two-factor PAM module and also specifies what happens if the user fails two-factor login. In this case, the handling will be to reject the login if the two-factor code is invalid (i.e. default=die). Save this file and then open the SSH configuration file like this:
$ nano /etc/ssh/sshd_configFind and modify or add the configuration parameters below:
ChallengeResponseAuthentication yes
AuthenticationMethods publickey,keyboard-interactive
These two settings are a bit tricky. If you recall from above, we changed our SSH configuration to only allow publickey authentication. This would normally not allow our two-factor PAM module to work because that setting also refuses to let the user type anything in during login. Now, we need to allow the user to type in their two-factor code during login. Therefore, we need to enable the ChallengeResponesAuthentication setting and enable keyboard-interactive as an allowed AuthenticationMethod.
Before enabling this module for a user, you must install the network time system so that the server's clock is updated and consistent with the atomic clock. Since the two-factor authentication system uses a time-based algorithm, this will ensure that the server clock remains in sync with your mobile phone. This is an assumption that your mobile phone is syncing with an atomic clock, but this is generally a safe assumption since most phones periodically update the time to be in sync.
To install this package, type this command:
$ apt-get install ntpNow restart the SSH service to pick up all of our changes like this:
$ service ssh restartFinally, log into the ordinary user account and execute this command to enable two-factor authentication:
$ google-authenticator -l 'your-username@Application Server'This will display a QRCode that you can scan from the two-factor authentication app on your smartphone. It will also ask you additional questions to determine how you want to handle time-skew and brute force login attempts. Additionally, there will be 5 emergency scratch codes generated for your account. You should write these down in a secure location such as iCloud Secure Notes.
Before logging out of this terminal, open a new terminal window and verify that you can still login to the ordinary user account with your SSH key and the two-factor code from the authenticator app on your mobile phone. If you ever have problems logging in, you can use one of the scratch codes that you saved off above. This will grant you access to your account and allow you to fix the two-factor authentication issue.
If you install the two-factor authentication as described above and a user doesn't enable it for their account, everything will still work fine. They will be able to log in using their SSH key but it will also prompt them for their password as their two-factor response.
Firewalling#
Prevent direct access when it isn't required
This section covers how to prevent access to the servers except on specific ports and from specific IP addresses.
Configuration are different for each server to ensure that each server prevents as much direct access as possible. For the Application Server, you will lock down all ports except those needed to access your application's server-side components and to access the server via SSH. For the Database Server, you will lock down all ports except the database port and SSH port. In addition, on the Database Server you will also prevent access from everywhere except the Application Server. If you are using Amazon, they provide a web based firewall configuration for servers and you will use that rather than IPTables to manage access to your servers.
First, install the firewall package. This package will ensure that the firewall rules are loaded each time the server is restarted. To install this package, execute this command in the root terminal:
$ apt-get install iptables-persistentMake sure you save both the rules.v4 and rules.v6 file during this installation process.
Now, setup the firewall on the Application Server. Your application isn't running yet, but when it does run it might be listening on a couple of ports. These will vary based on your setup, but our examples will use 3003 for HTTPS web requests and port 3000 for HTTP web requests. We will actually forward requests from the standard ports 80 for HTTP and 443 for HTTPS to ports 3000 and 3003 respectively. This forwarding is covered later.
Additionally, the Application Server will listen on port 22 for SSH requests. Since you installed the persistent IPTables package, you can simply edit the rules file to set your rules. Copy and paste the following content into the /etc/iptables/rules.v4 file (via nano or any other editor):
*filter
# Allow all outgoing, but drop incoming and forwarding packets by default
:INPUT DROP [0:0]
:FORWARD DROP [0:0]
:OUTPUT ACCEPT [0:0]

# Custom per-protocol chains
:UDP - [0:0]
:TCP - [0:0]
:ICMP - [0:0]

# Acceptable UDP traffic

# Acceptable TCP traffic
-A TCP -p tcp --dport 22 -j ACCEPT
-A TCP -p tcp --dport 443 -j ACCEPT
-A TCP -p tcp --dport 80 -j ACCEPT
-A TCP -p tcp --dport 3000 -j ACCEPT
-A TCP -p tcp --dport 3003 -j ACCEPT

# Acceptable ICMP traffic

# Boilerplate acceptance policy
-A INPUT -m conntrack --ctstate ESTABLISHED,RELATED -j ACCEPT
-A INPUT -i lo -j ACCEPT

# Drop invalid packets
-A INPUT -m conntrack --ctstate INVALID -j DROP

# Pass traffic to protocol-specific chains
## Only allow new connections (established and related should already be handled)
## For TCP, additionally only allow new SYN packets since that is the only valid
## method for establishing a new TCP connection
-A INPUT -p udp -m conntrack --ctstate NEW -j UDP
-A INPUT -p tcp --syn -m conntrack --ctstate NEW -j TCP
-A INPUT -p icmp -m conntrack --ctstate NEW -j ICMP

# Commit the changes
COMMIT

*raw
:PREROUTING ACCEPT [0:0]
:OUTPUT ACCEPT [0:0]
COMMIT

*nat
:PREROUTING ACCEPT [0:0]
:INPUT ACCEPT [0:0]
:OUTPUT ACCEPT [0:0]
:POSTROUTING ACCEPT [0:0]

-A PREROUTING -p tcp --dport 80 -j REDIRECT --to-port 3000
-A PREROUTING -p tcp --dport 443 -j REDIRECT --to-port 3003

# Commit the changes
COMMIT

*security
:INPUT ACCEPT [0:0]
:FORWARD ACCEPT [0:0]
:OUTPUT ACCEPT [0:0]
COMMIT

*mangle
:PREROUTING ACCEPT [0:0]
:INPUT ACCEPT [0:0]
:FORWARD ACCEPT [0:0]
:OUTPUT ACCEPT [0:0]
:POSTROUTING ACCEPT [0:0]
COMMIT
A complete explanation of the IPTables rule file format is out of scope for this guide however we will cover some of the basics so that you can configure your file to suit your needs. IPTables rule files are broken down into Tables. Tables are defined using an asterisk character followed by the table name. Everything after the table definition is included in that table's rules until the COMMIT command is hit.
The filter table is the most important table above, but the NAT table is also used and we'll cover that shortly. The filter table defined like this:
*filter
...
COMMIT
We'll ignore the raw, security and mangle tables for now. You can find more information about them online if you are interested.
A table can hold one or more chains. There are a number of predefined chains in each table, but for the filter table the three chains are INPUT, OUTPUT and FORWARD. In the NAT table, we will use the PREROUTING chain as well. Here are the definitions of these chains:
INPUT- this chain is used when packets are sent from an external source to the serverOUTPUT- this chain is used when packets are sent from the server to an external sourceFORWARD- this chain is used when the server is forwarding packets between two external computers (rarely used)PREROUTING- this chain is used to modify incoming packets before they are delivered
Chains are defined using a colon character followed by the name of the chain. Here's an example of defining a new chain called FOOBAR:
:FOOBAR [0:0]NOTE: The numbers inside the brackets are the number of bytes sent and received on the chain. They are mostly for informational purposes and in the example above, we initialize everything to zero.
It is also important to keep in mind that a connection based protocol like TCP will use both the INPUT and the OUTPUT chain because packets flow in both directions.
When network packets arrive at the server, they are handled by one of these three chains. You can define all of your rules directly on these chains or you can define new chains and JUMP to them from the three predefined chains. The rules file above defines three new chains, one for each of the protocols you are probably interested in handling on your servers. The rules file also defines how the predefined chains JUMP to the new chains. The chains are defined at the top of the file and are named TCP, UDP and ICMP to map to each of the protocols.
The JUMP rules are midway through the file and look like this:
-A INPUT -p udp -m conntrack --ctstate NEW -j UDPHere's how this rule reads: "Append to the INPUT chain (-A INPUT), for protocol UDP (-p udp), when new connections are made (-m conntrack -cstate NEW), jump to the UDP chain (-j UDP). As you can see, there is a similar rule for each of the new chains we created for each protocol.
Each rule must define a policy that determines how packets are handled. This is done by indicating one of these 3 policies:
ACCEPT- the packet is allowed and whatever service is listening for network traffic on the specific port will be sent the packetsDROP- the packet is completely ignored; the external computer that sent the packet will not receive a response and will be forced to time-out the connectionREJECT- a response is sent to the external computer indicating that the server has rejected the packet
In the configuration above, we initialize the INPUT and FORWARD chains to DROP everything by default. This prevents your server from accepting packets unless you explicitly define a rule. The OUTPUT chain on the other hand is set to ACCEPT by default. The OUTPUT chain is used when a new connect is opened from the server to an external source (usually another server) or when a packet is sent back to a client on an established connect (like an HTTP response to an HTTP request). Therefore, you should almost always set the OUTPUT to ACCEPT for all traffic. You can lock the OUTPUT chain down if you want, just be careful because it could lock your server since outgoing packets for SSH might be dropped.
The file above sets up a few default rules for the predefined INPUT chain. These rules are:
# Boilerplate acceptance policy
-A INPUT -m conntrack --ctstate ESTABLISHED,RELATED -j ACCEPT
-A INPUT -i lo -j ACCEPT

# Drop invalid packets
-A INPUT -m conntrack --ctstate INVALID -j DROP
Here's a quick explanation of these rules:
- All traffic on the loopback interface (packets going from the server to itself) are allowed.
- All traffic on connections that have already been established or related connections are allowed.
- All invalid packets are dropped. Switches and other networking systems can mark packets as invalid, so ignoring those packets won't cause any issues.
The final rules are setup for each of the protocols you are interested in. By default, UDP and ICMP traffic are completely ignored. The file above assumes that you will only be using TCP connections to the server, so it only defines rules for that filter chain. If you need to use UDP or ICMP, you can add additional rules for those protocols. Here are the rules for the TCP chain:
-A TCP -p tcp --dport 22 -j ACCEPT
-A TCP -p tcp --dport 443 -j ACCEPT
-A TCP -p tcp --dport 80 -j ACCEPT
-A TCP -p tcp --dport 3000 -j ACCEPT
-A TCP -p tcp --dport 3003 -j ACCEPT
These rules read like this, "for TCP packets (-A TCP -p tcp), on port 22 (--dport 22), accept them (-j ACCEPT)". There is a separate rule for each port that should be open on the server. You'll notice that the server listens on the standard HTTP and HTTPS ports, but also port 3000 and 3003, which are the ports our example application will be listening on.
In addition to the filter table, the configuration above also makes use of the NAT table. The NAT table is used because later in this guide, you will run your application as a non-privileged user (i.e. not the root user). This is to ensure that breaches to the application won't allow hackers full access to the server. Linux servers don't allow non-privileged users to bind ports below 1000. Therefore, the IPTables configuration forwards traffic on port 80 to port 3000 and traffic on port 443 to port 3003. To accomplish this port forwarding, we make use of the PREROUTING chain in the NAT table.
Under the NAT table, there are two rules defined:
-A PREROUTING -p tcp --dport 80 -j REDIRECT --to-port 3000
-A PREROUTING -p tcp --dport 443 -j REDIRECT --to-port 3003
These rules read like this, "append to the PREROUTING chain (-A PREROUTING) for TCP packets (-p tcp), forward destination port 80 (--dport 80 -j REDIRECT) to port 3000 (--to-port 3000).
Now that the rules are setup, load this configuration by executing this command:
$ service netfilter-persistent reloadNext, configure the firewall on the Database Server. Each database will have different ports that it needs open. You will only allow connections from your Application Server's private IP address, which you will need to know and insert into the rules below. Here are the IPTable rules for the Database Server.
*filter
# Allow all outgoing, but drop incoming and forwarding packets by default
:INPUT DROP [0:0]
:FORWARD DROP [0:0]
:OUTPUT ACCEPT [0:0]

# Custom per-protocol chains
:UDP - [0:0]
:TCP - [0:0]
:ICMP - [0:0]

# Acceptable UDP traffic

# Acceptable TCP traffic
-A TCP -p tcp --dport 22 -s 192.168.197.56 -j ACCEPT
-A TCP -p tcp --dport 3306 -s 192.168.197.56 -j ACCEPT

# Acceptable ICMP traffic

# Boilerplate acceptance policy
-A INPUT -m conntrack --ctstate ESTABLISHED,RELATED -j ACCEPT
-A INPUT -i lo -j ACCEPT

# Drop invalid packets
-A INPUT -m conntrack --ctstate INVALID -j DROP

# Pass traffic to protocol-specific chains
## Only allow new connections (established and related should already be handled)
## For TCP, additionally only allow new SYN packets since that is the only valid
## method for establishing a new TCP connection
-A INPUT -p udp -m conntrack --ctstate NEW -j UDP
-A INPUT -p tcp --syn -m conntrack --ctstate NEW -j TCP
-A INPUT -p icmp -m conntrack --ctstate NEW -j ICMP

# Commit the changes
COMMIT

*raw
:PREROUTING ACCEPT [0:0]
:OUTPUT ACCEPT [0:0]
COMMIT

*nat
:PREROUTING ACCEPT [0:0]
:INPUT ACCEPT [0:0]
:OUTPUT ACCEPT [0:0]
:POSTROUTING ACCEPT [0:0]
COMMIT

*security
:INPUT ACCEPT [0:0]
:FORWARD ACCEPT [0:0]
:OUTPUT ACCEPT [0:0]
COMMIT

*mangle
:PREROUTING ACCEPT [0:0]
:INPUT ACCEPT [0:0]
:FORWARD ACCEPT [0:0]
:OUTPUT ACCEPT [0:0]
:POSTROUTING ACCEPT [0:0]
COMMIT
The primary difference between the Application Server's and the Database Server's IPTables is that the Database Server only allows connections on port 22 for SSH and 3306 for MySQL. Plus, only connections that originate from the Application Server to the Database Server are allowed. The lines that setup this configuration are:
-A TCP -p tcp --dport 22 -s 192.81.133.144 -j ACCEPT
-A TCP -p tcp --dport 3306 -s 192.81.133.144 -j ACCEPT
You can also define multiple IP addresses using a comma separated list or subnet masks (e.g. 192.168.1.2,192.168.1.3 or 192.168.1.0/24).
It might seem like a pain to have to log into the Application Server in order to log into the Database Server. Nevertheless, this is usually a good idea. By doing so, the Database Server (where all your user data is stored) is protected from brute force attacks. If you put yourself in a hacker's shoes this security measure makes sense:
You have finally managed to log into the Application Server because the Database Server wasn't publicly accessible. However, you still have the daunting task of hacking either the MySQL password on the current server by gaining root access or hacking the login to the Database Server.
Both are challenging feats and it is likely the hacker will be discovered well before they accomplish either task.
Intrusion Detection#
Send notifications for all activity
Since most servers aren't actively logged into on a frequent basis, you should be notified when anyone logs into the server. There are many ways to handle this, but we will cover how to setup notifications using a tool called Monit. Monit allows you to watch log files for messages that contain certain text and generate alerts. To install Monit, execute this command in the root terminal window:
$ apt-get install monitAfter Monit is installed, you can create a configuration file to monitor SSH login. Copy and paste the configuration below into the file /etc/monit/conf.d/ssh-logins:
check file ssh_logins with path /var/log/auth.log
  # Whitelist IPs here if you want
  # ignore match /etc/monit/whitelist_ips.regex
  if match "Accepted keyboard-interactive/pam" then alert
This file states that Monit should watch the file /var/log/auth.log and if it sees new lines that contain the expression "Accepted keyboard-interactive/pam" an alert should be generated. Since you configured two-factor authentication above, the SSH system will insert a log into this file that matches this pattern. If you did not enable two-factor authentication above (and are only using key based authentication) your configuration should instead match on the string "Accepted publickey".
You can also whitelist certain IP addresses by uncommenting the ignore match line and creating the file /etc/monit/whitelist_ips.regex. This file would contain regular expressions for each whitelisted IP on a separate line.
The last step to configuring Monit is to edit the file /etc/monit/monitrc. Add the lines below to configure Monit to send email alerts to you. This configuration will vary depending on your SMTP mail server, the authentication required for your SMTP server and your email address. Our examples use SendGrid for sending emails and my email address.
set mailserver smtp.sendgrid.net port 587 username "<sendgrid-username>" password "<sendgrid-password>" using tlsv12
set alert  jared@piedpiper.com not on { instance, action }
The second line tells Monit to email me whenever alerts happen, but to ignore alerts I created manually. This will reduce spamming your inbox if you choose to use Monit for other tasks such as process watching and restarting.
You might want to receive Monit notifications quickly. By default, Monit runs checks every 2 minutes. Rather than wait two minutes, you can change this setting to something smaller like 5 seconds. This configuration parameter is near the top of the /etc/monit/monitrc file and looks like this:
set daemon 5Finally, restart the Monit daemon so that it picks up the configuration change:
$ service monit restartAs an added option, you can have Monit send push notifications to your mobile devices and/or send notifications to a Slack channel. One option for handling push notifications is using the Pushover service. To implement this you need to change the last line in /etc/monit/conf.d/ssh-logins to this:
if match "Accepted keyboard-interactive/pam" then exec "/etc/monit/monit-slack-pushover.rb"Then copy this Ruby script into the file /etc/monit/monit-slack-pushover.rb:
#!/usr/bin/ruby

require 'net/https'
require 'json'

slack_webhook_url=""
slack_enabled=true
pushover_application=""
pushover_user=""
pushover_enabled=true

def log(message)
  open('/var/log/monit.log', 'a') { |f|
    f.puts message
  }
end

if slack_enabled
  begin
    uri = URI.parse(slack_webhook_url)
    Net::HTTP.start(uri.host, uri.port, {use_ssl: true}) { |http|
      request = Net::HTTP::Post.new(uri.request_uri, {'Content-Type' => 'application/json'})
      request.body = {
        :text => "[#{ENV['MONIT_HOST']}] #{ENV['MONIT_SERVICE']} - #{ENV['MONIT_DESCRIPTION']}"
      }.to_json
      response = http.request(request)
      log("Response from Slack [#{response.code}] [#{response.body}]")
    }
  rescue Exception => e
    log("Exception while calling Slack [#{e.message}]")
  end
end

if pushover_enabled
  begin
    uri = URI.parse("https://api.pushover.net/1/messages.json")
    Net::HTTP.start(uri.host, uri.port, {use_ssl: true}) { |http|
      request = Net::HTTP::Post.new(uri.request_uri, {'Content-Type' => 'multipart/form-data'})
      request.set_form_data(token: pushover_application, user: pushover_user, message: "[#{ENV['MONIT_HOST']}] #{ENV['MONIT_SERVICE']} - #{ENV['MONIT_DESCRIPTION']}")
      response = http.request(request)
      log("Response from Pushover [#{response.code}] [#{response.body}]")
    }
  rescue Exception => e
    log("Exception while calling Pushover [#{e.message}]")
  end
end
You must configure the Pushover and Slack variables defined at the top of the file for the integrations to work properly. For the Pushover integration, create a Pushover account and a Pushover application. The Pushover application creation looks like this:
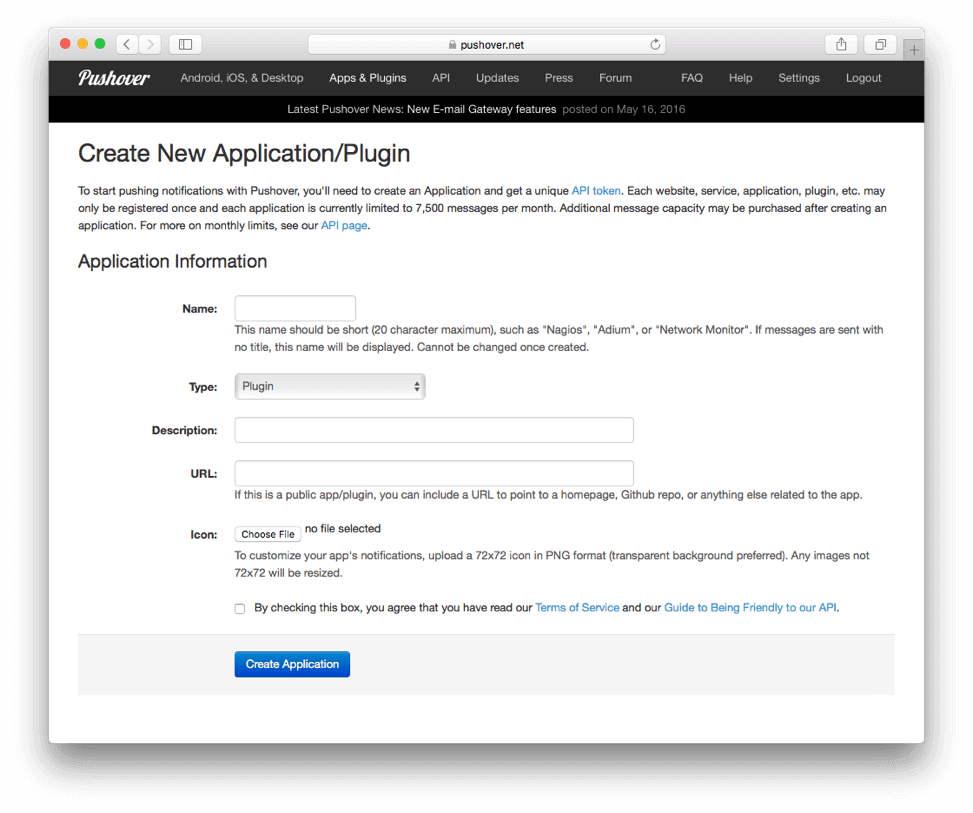
Give your Pushover application a name, description and URL. Select Script from the Type select box.
Once you create the Pushover application it will have an id associated with it. Take the Pushover application and user ids and put them into the variables pushover_application and pushover_user in the script above. Enable Pushover in the script by setting the variable pushover_enabled to true.
For Slack integration, configure an Incoming Webhook using these steps:
- Open your Slack interface and click on the name in the top left corner.
- Select Administration -> Manage Apps .
- Click Custom Integrations on the right menu.
- Click Incoming Webhooks and then click the Add Configuration button on the left.
- Here you'll select the channel you want to post to and then create the Webhook. On the next page, you'll have some other options to set if you want. All you need from here is the integration URL.
- Copy and paste that URL into the variable
slack_webhook_urlin the script above.
To ensure the Ruby script above will run properly, make sure you have Ruby installed and the script is executable by executing these commands:
$ apt-get install ruby
$ chmod +x /etc/monit/monit-slack-pushover.rb
Finally, restart Monit again using this command:
$ service monit restartDatabase Server Specific Security#
This section will cover security measures that are specific to the Database Server using MySQL. You can translate these instructions for nearly any database solution you use.
MySQL#
First, install MySQL. To install MySQL on the Database Server, execute this command in the root terminal window:
$ apt-get install mysql-serverDuring this installation process you will be prompted to create a password for the MySQL root user. Make sure that you select a very strong password and store it somewhere safe.
By default, MySQL only listens on the loopback interface. Change this configuration so that it will listen on the private IP address you created for the Application Server above. Open the file /etc/mysql/mysql.conf.d/mysqld.cnf (NOTE: This is a Ubuntu/Debian specific location and your server might have this file in another directory with a different name) and find and edit the listen configuration setting to this value:
bind-address = 192.168.142.213Prevent direct access when it isn't required
This is the private IP address from our example above. You will need to change this to your private IP address. This will ensure that only servers on the same LAN will be able to connect to the database.
Lastly, verify that the MySQL data directory is properly secured and the MySQL user cannot be logged into.
This is the default on nearly all Linux distributions, but let's double check. In the MySQL configuration file, you can determine where the data directory is by finding the configuration property datadir. On most Debian distributions, the data directory is located at /var/lib/mysql. Do a long directory listing in /var/lib to see if the directory is secure. Here's the command and what the output should look like:
$ ls -alu /var/lib
...
drwx------  5 mysql mysql 4096 Apr 28 19:32 mysql
drwx------  2 mysql mysql 4096 Apr 28 19:33 mysql-files
drwx------  2 mysql mysql 4096 Apr 28 19:33 mysql-keyring
Your directories should look similar. They should all be owned by the user and group named mysql. The permissions should be read, write, execute for that user only (that's what "drwx------" means). If this is not how your directories are set, you can change the ownership and permissions for these directories by executing these commands:
$ chown -R mysql:mysql /var/lib/mysql*
$ chmod -R go-rwx /var/lib/mysql*
Also, open the file /etc/password and ensure that the line that starts with "mysql" ends with "/bin/false". It should look something like this:
mysql:x:110:117:MySQL Server,,,:/nonexistent:/bin/falseIf the MySQL user's line doesn't end in "/bin/false", you can edit this file manually and change it using nano or vi.
Backups#
Automate security checks and constraints
You'll want to make backups of your Database Server and store them offsite in case of a server failure. One issue that arises with backups is that they are often not secured. The server they are stored on might have been built by a hosting provider or some other third party therefore, the Backup Server might not have the level of security you require. You should encrypt database backups before transferring them offsite. This reduces the likelihood that a Backup Server breach will allow the hacker to gain access to your data.
First, set up encryption keys. To properly encrypt backups from a script, you need a public/private key pair. As the root user on your Database Server, change to the root user's home directory and then execute these commands:
$ openssl genrsa -out private-key.pem 2048
$ openssl rsa -in private-key.pem -out public-key.pem -outform PEM -pubout
Now that you have the key pair, leave the public-key.pem on the Database Server and move the private-key.pem file to the Backup Server (or any other secure location). Now you are ready to backup the database and encrypt the backup file.
First, get the backups running on your Database Server. The simplest way to run a backup is using the mysqldump command via cron. To start, you need to create a shell script in a protected directory. For this example, we are going to use the root user's home directory. From the root user terminal, type these commands:
$ cd
$ mkdir bin
$ touch bin/backup.sh
$ chmod +x bin/backup.sh
$ nano bin/backup.sh
In this file, you will need to dump the contents of your database to a file. The command to do this is mysqldump. Here's an example script that creates a backup of a database called production to the /tmp/backups directory:
#!/bin/bash

BACKUP_DIR=/tmp/backups
DATE=`date +%Y%m%d`
BACKUP_FILE="${DATE}.tar.gz"
BACKUP_FILE_ENCRYPTED="${DATE}.tar.gz.enc"
BACKUP_PASSPHRASE_FILE="${DATE}.passphrase"
BACKUP_PASSPHRASE_FILE_ENCRYPTED="${DATE}.passphrase.enc"

# Make the directory just in case it doesn't exist
mkdir ${BACKUP_DIR}
cd ${BACKUP_DIR}

# Delete the oldest files by only listing out everything older than the newest 7 files
ls *.gz.enc | sort | tail -n +7 | xargs rm
ls *.gz.passphrase.enc | sort | tail -n +7 | xargs rm

# Backup the MySQL databases
mysqldump -u<username> -p<password> production > production.sql

# Tar GZ everything (modify this line to include more files and directories in the backup)
tar -pczf ${BACKUP_FILE} *.sql

# Generate a random passphrase
openssl rand 32 -out ${BACKUP_PASSPHRASE_FILE}

# Encrypt the backup tar.gz
openssl enc -aes-256-cbc -pass file:${BACKUP_PASSPHRASE_FILE} < ${BACKUP_FILE} > ${BACKUP_FILE_ENCRYPTED}

# Encrypt the passphrase
openssl rsautl -encrypt -pubin -inkey ~/public-key.pem < ${BACKUP_PASSPHRASE_FILE} > ${BACKUP_PASSPHRASE_FILE_ENCRYPTED}

# Clean up
rm ${BACKUP_FILE} ${BACKUP_PASSPHRASE_FILE}

# Copy offsite
scp ${BACKUP_FILE_ENCRYPTED} ${BACKUP_PASSPHRASE_FILE_ENCRYPTED} <username>@<backup-server>:backups/.
You might want to backup additional files and directories in this script as well. The last line is used to copy the file offsite to a Backup Server. If you choose to store your backups offsite, you will need to create a Backup Server and secure it using a similar process as above. The setup of the Backup Server is out of scope for this guide, but the main differences in the process above are as follows:
- The Backup Server will not use two-factor authentication.
- The Backup Server will only allow SSH access from the Database Server and all other ports will be locked down.
- The Database Server will be setup with a SSH public/private key pair specifically for the Backup Server. This key pair will be stored in the root user's
~/.sshfolder on the Database Server and the public key will be stored on the Backup Server in a special user account just for backups. - The SSH key cannot have a passphrase since that would prevent the backup script from running automatically.
The last step to setup your backups is to enable them via cron. To accomplish this, type this command in as the root user on the Database Server:
$ crontab -eYou can select the editor you want to use and then add this line to the end of the crontab file:
1 0 * * * /root/bin/backup.shSave this file. Your backups will run each night at 12:01am.
If you ever need to use a backup, you will need to decrypt it first. To decrypt a backup, you will need the private key you created above and the two encrypted files that the backup script created (the encrypted tar.gz and the encrypted passphrase file). If you are in a directory that contains all of these files, execute these commands to decrypt the backup (you'll need to change the file names below to match your file names):
$ openssl rsautl -decrypt -inkey private-key.pem < 20160502.passphrase.enc > 20160502.passphrase
$ openssl enc -aes-256-cbc -d -pass file:20160502.passphrase < 20160502.tar.gz.enc > 20160502.tar.gz
Application Security#
Now that your servers are nicely secured, let's take a look at securing the application. When we discuss application level security, we are talking about hacks and exploits that would allow hackers access to all or most of the user data. We won't be focusing on attacks that might allow a hacker access to a single user account.
Application Security centers around a set of guidelines:
- Use the least privilege possible
- Encrypt all communications
- Automate security checks and constraints
- Cleanse user input
- Keep it on the server
This section will cover the different aspects of securing an application.
Application User#
Use the least privilege possible
When you install and start your application on the Application Server you have a couple of options. You can run the application using root, the ordinary user you created above or a new user. We recommend that you create a new user to run your application for a couple of reasons:
- Creating a new user prevents the application from having root privileges to the server.
- If the application has root privileges on the server and it has a security flaw, hackers might exploit that flaw to gain access to the server.
- If you run the application as the ordinary user you created above and a hacker gains access to that account, they will have access to the application configuration. This usually means they will have access to the user database.
You should instead create a new user that is a locked account just for your application. To create this user, execute this command as root on the Application Server (you can change the username if you want):
$ useradd -M -s /bin/false applicationThis command creates a user named application that has no password and no home directory. It cannot be logged into. However, you will be able to start your application as this user using the sudo or su commands like this:
#!/bin/bash

sudo -u application nodejs /usr/local/application/app.jsSSL#
NOTE: We use the term SSL but in reality, we are talking specifically about TLS v1.2 or newer. SSL and earlier versions of TLS are no longer considered secure and many browsers will refuse to connect to websites and services that use them.
The first level of defense for any application is to use SSL for all network traffic to the web server. Without SSL encryption, a hacker could intercept network traffic in and out of the server and store it. Since this network traffic would contain usernames, passwords and other user data this would generally be the same level of breach as a hacker gaining access to the user database.
Encrypt all communications
Each web server will have a different mechanism for implementing SSL. In all cases, you will need to obtain a validated and signed SSL certificate from a known certificate authority (also known as a CA). Rather than cover all possible web servers and how you configure SSL, we'll cover the example application we built for this guide. You can translate these instructions for your application.
Our application was developed on Node.js and we obtained an SSL certificate through LetsEncrypt. LetsEncrypt is an awesome free service that allows you to obtain a certificate and also ensure it never expires. LetsEncrypt will automatically check and renew your certificate using a cron job on the server. To setup LetsEncrypt on our Ubuntu 18.04 server we used these steps:
$ sudo apt-get update
$ sudo apt-get install software-properties-common
$ sudo add-apt-repository ppa:certbot/certbot
$ sudo apt-get update
$ sudo apt-get install certbot
These commands install Certbot. Certbot is an implementation of an automated bot that will contact LetsEncrypt using the ACME protcol to issue and renew certificates. On Ubuntu, the Certbot installation creates a systemd timer that will run the Certbot twice per day to check the certificates on the server and possibly renew them.
Before you generate a certificate, you need to setup your DNS entry to point to your server. LetsEncrypt/Certbot uses a verification process that ensures that the DNS is pointed at the server you are requesting the certificate for. For our example application, we setup the DNS hackthis.fusionauth.io and pointed it to our Linode public IP address.
Now that Certbot is installed and we have setup our DNS, we can generate a certificate. To do this, execute this command:
$ certbot certonlyThis command is interactive and will ask you if you want to spin up a local HTTP server or use Apache (webroot). This process is necessary for LetsEncrypt to verify domain ownership. You will also need to provide an email address where notices will be sent. We suggest that you use a mailing list for this so that it doesn't go to an employee's email that could eventually stop working. Finally, this command will ask you for one or more domain names that the certificate will be assigned to. You can enter multiple domain names if your server will respond to multiple requests.
After the command runs, it should spit out a message that looks like this:
IMPORTANT NOTES:
 - Congratulations! Your certificate and chain have been saved at:
   /etc/letsencrypt/live/hackthis.fusionauth.io/fullchain.pem
   Your key file has been saved at:
   /etc/letsencrypt/live/hackthis.fusionauth.io/privkey.pem
   Your cert will expire on 2019-01-10. To obtain a new or tweaked
   version of this certificate in the future, simply run certbot
   again. To non-interactively renew *all* of your certificates, run
   "certbot renew"
This tells you know where Certbot stored the certificate files. Certificates require 3 components to work:
- A private key
- The certificate itself
- A certificate chain
The last piece is required in order for the server to tell clients (browsers in most cases) who generate the certificate and why they should be trusted. The certificate chain lists out all of the certificates for the CA that were used when creating your certificate. At some point in that chain, the browser must have one of the certificates stored locally. These are usually referred to as "Root Certificates". Most browsers ship with hundreds of the most common root certificates including Thawte, Verisign, GoDaddy, etc. LetsEncrypt uses DST as their root certificate and it works in most browsers.
In the case of LetsEncrypt, the certificate chain and the certificate for your server are actually stored in the same file. In our case, this file is /etc/letsencrypt/live/hackthis.fusionauth.io/fullchain.pem.
The last step we performed to setup our application for SSL was to enable it in our Node.js code. We always want visitors to be redirected to the SSL version of our website so we setup a redirect from all HTTP requests. Here's the basic Node.js code that sets up SSL for our application.
var https = require('https');

var fs = require('fs');
var options = {
  cert: fs.readFileSync('/etc/letsencrypt/live/hackthis.fusionauth.io/fullchain.pem'),
  key: fs.readFileSync('/etc/letsencrypt/live/hackthis.fusionauth.io/privkey.pem')
};

https.createServer(options, function (req, res) {
  // Secure code goes here!
}).listen(3003);

// Redirect from http port 80 to 443 (https)
var http = require('http');
http.createServer(function (req, res) {
  res.writeHead(301, { "Location": "https://hackthis.fusionauth.io" + req.url });
  res.end();
}).listen(3000);
You can also another CA like GoDaddy if you prefer. We don't cover the process of obtaining a certificate via CA, but most providers will step you through the process of generating a CSR (certificate signing request), creating the certificate and then downloading it to your dev box. Once you have the certificate and private key, you can copy it to the server (using SCP) and install it wherever you want. Once it is installed on the server, the code above would be updated to point to the certificate and private key file locations you used.
Password Security#
Automate security checks and constraints
When a user registers, they will provide a password for their account. The application needs to ensure that all passwords provided by users are secure. This usually means that the password is sufficiently complex.
If you aren't using FusionAuth, which has password security built in, you will need to implement this password validation routine yourself. Here's some simple Java code that can be used to validate passwords:
public class PasswordValidator {
  public boolean validate(String password) {
    if (password == null || password.trim().length() == 0) {
      return false;
    }

    if (password.length() < 10) {
      return false;
    }

    char[] ca = password.toCharArray();
    return containsLowerCase(ca) && containsUpperCase(ca) && containsNonAlphabetic(ca);
  }

  private boolean containsLowerCase(char[] ca) {
    for (char c : ca) {
      if (Character.isLowerCase(c)) {
        return true;
      }
    }
    return false;
  }

  private boolean containsNonAlphabetic(char[] ca) {
    for (char c : ca) {
      if (!Character.isAlphabetic(c)) {
        return true;
      }
    }
    return false;
  }

  private boolean containsUpperCase(char[] ca) {
    for (char c : ca) {
      if (Character.isUpperCase(c)) {
        return true;
      }
    }
    return false;
  }
}
This code ensures that the password contains at least 10 characters, an uppercase letter, a lowercase letter and one special character.
NOTE: NIST recently updated their recommendation regarding password complexity and security. The new standard suggests that passwords should be more than 10 characters, not contain a single common word, and not be a breached password. The older requirements that require different types of characters and require users to change their password frequently are not longer part of the recommendation.
ADDITIONAL NOTE: Even though NIST has updated their recommendations, many other standards still require passwords using the complexity requirements in the sample code above. If your application is for a regulated purposed, you should check out the Password Security Compliance Checklist.
In addition to password validation, you should never store passwords in plain-text. Passwords should always be hashed using a strong, one-way hash algorithm. The hash is then stored in the database. When a user logs in, you will perform the same hashing on the password they provide on the login form and compare it with the hash in the database.
Before we get to hashing of passwords, let's take a quick look at some code and SQL that handles login. This is important to avoid SQL injection and other attacks that could compromise your application. Applications should always load the identity information from the database into memory using ONLY the unique identifier. Here's an example select statement:
SELECT login, password FROM users WHERE login = 'jared@piedpiper.com';Once you have to identity information in memory, you can take the password that the user provided on the login form, hash it, and then compare it with the value from the database. Here's some example code:
public class LoginHelper {
  public boolean login(String email, String password) {
    User user = loadUser(email);
    if (user == null) {
      return false;
    }

    String hashedPassword = hashPassword(password);
    return hashedPassword.equals(user.password);
  }
}
This method ensures that you are always correctly validating passwords and this part of the code cannot be circumvented. Depending on your requirements, you might also want to introduce a random pause or some other type of sleep in the code above. This is useful to prevent an account enumeration attack. This attack is possible when a login for a valid user takes longer than a login for an invalid user. This is caused by the hashing of the password taking a while to complete.
Here's the same code from above that mitigates the account enumeration attack. The implementation of the randomSleep method is left up to you to implement but it could introduce a random sleep to ensure that the timing of the equals can't be used to enumerate accounts:
public class LoginHelper {
  public boolean login(String email, String password) {
    User user = loadUser(email);
    if (user == null) {
      // Do the same work we do if the user exists: hash, random sleep and compare
      hashPassword("password");
      randomSleep();
      "447rs/aqqN47ICipNovHZ.Te87.DiZNUtU8mhdx7JFvMNkc5jUtZG".equals("447rs/aqqN47ICipNovHZ.Te87.DiZNUtU8mhdx7JFvMNkc5jUtZG");
      return false;
    }

    String hashedPassword = hashPassword(password);
    randomSleep();
    return hashedPassword.equals(user.password);
  }
}
There are two core concepts that impact the security of password hashing: salting and complexity. We will cover both of these in the sections below.
Password Salting#
Salting of passwords is a measure that prevents a specific type of password attack. This attack is done by leveraging lookup tables. A lookup table attack is when all possible combinations of passwords are hashed and then stored in a massive reverse lookup table. Let's assume that we aren't salting our passwords but just hashing them directly. In this case, we could build a lookup table like this:
2206b1bbf30cf86bd1ecb952d1676aa3b9df45a9704e50e899d9615e20e53c2c -> foobarbaz
4206bfbbf20cfa6bdfeab9s2da676as319d54579804150a89ffdd62e20ed3cg7 -> barbazfoo
...
The attacker takes the hashes that they have stolen from your database and does a lookup to convert the hash to the original password. By salting the password, we prevent these lookup tables from working because if you hash the same password with two different salts, you will get two different hashes.
To prevent this type of attach, you salt your passwords before hashing them. Each user should have a different salt and it is safe to store the salt next to the password in the database. Your application can optionally perform in-memory salt modification as well. A salted, in-memory modified password prior to hashing might look something like this:
[{SALT}]PASSWORDIf the salt is a UUID like "16e49f4f-fd87-41b9-8013-57ed3b0403d8" and the password is something complex like "Ksie923kd-A291kndj", the initial value would look like this:
[{16e49f4f-fd87-41b9-8013-57ed3b0403d8}]Ksie923kd-A291kndjThis value is then hashed with an algorithm like Bcrypt or PBKDF2. The result might be a hash that looks like this:
2206b1bbf30cf86bd1ecb952d1676aa3b9df45a9704e50e899d9615e20e53c2cComplexity#
The second part of password security is using a complex hashing algorithm. As engineers, we are trained that performance is good. Things that run faster are better because the end-user doesn't have to wait. This is not the case for passwords. Instead, we actually want our password hashing algorithm to be as slow and complex as tolerable.

The reason that slow algorithms are better is that it takes the computer time to generate the hash. This time makes brute-force attacks nearly impossible. Here's why.
- Let's assume that a modern day bitcoin rig (like the one in the image) can to about 10 tera-hashes per second
- Assume passwords can contain 100 different characters
- That's 1e18 different passwords for everything up to 9 characters in length
- Generating every possible hash for all these passwords will take approximately 1e2 seconds
- That's 1.5 minutes!
This math is straight-forward and based on the complexity of the hashing algorithm. The simpler the algorithm, the easier for a CPU or GPU to generate hashes using it. What we want is a complex algorithm that forces the CPU or GPU to work hard to create a single hash. There are a number of modern algorithms that fit this profile including: BCrypt, SCrypt, PBKDF2, etc.
Each of these algorithm's have a load-factor. Sometimes this is simply how many times the algorithm is applied. In other cases, it might be a change to the way the algorithm processes the data. Regardless of the approach, you should understand what valid load-factors are for each algorithm and write your code accordingly.
FusionAuth allows you to specify the load-factor for each algorithm and it also allows you to write custom hashing algorithms as well. An additional feature it provides is the ability to upgrade a user's password hashing complexity over time as they log in. If for example your user's are currently using a weak hash such as MD5, you can upgrade their hash to PBKDF2 next time they log in. This removes the need to force all your users to reset their password in order to increase your security.
Here is the PBKDF2 implementation of the PasswordEncryptor interface that ships with FusionAuth. It illustrates how the salt and load-factor are used to generate the password hash. If you are implementing your own password encryption, you will need to tweak this code to suit your needs:
public class PBKDF2HMACSHA256PasswordEncryptor implements PasswordEncryptor {
  @Override
  public int defaultFactor() {
    return 24_000;
  }

  @Override
  public String encrypt(String password, String salt, int factor) {
    if (factor <= 0) {
      throw new IllegalArgumentException("Invalid factor value [" + factor + "]");
    }

    SecretKeyFactory keyFactory;
    try {
      keyFactory = SecretKeyFactory.getInstance("PBKDF2WithHmacSHA256");
    } catch (NoSuchAlgorithmException e) {
      throw new IllegalArgumentException("No such algorithm [PBKDF2WithHmacSHA256]");
    }

    KeySpec keySpec = new PBEKeySpec(password.toCharArray(), Base64.getDecoder().decode(salt), factor, 256);
    SecretKey secret;
    try {
      secret = keyFactory.generateSecret(keySpec);
    } catch (InvalidKeySpecException e) {
      throw new IllegalArgumentException("Could not generate secret key for algorithm [PBKDF2WithHmacSHA256]");
    }

    byte[] encoded = secret.getEncoded();
    return new String(Base64.getEncoder().encode(encoded));
  }
}
It is interesting to note that the PBKDF2 algorithm takes the salt as a parameter to the key specification rather than using it to modify the password String itself. Each algorithm works differently, so keep that in mind as you are writing your password hashing.
SQL Injections#
SQL injection is an application level vulnerability that is caused when an application builds SQL queries (or any type of database query) directly from user input. The xkcd comic strip illustrates this principle:
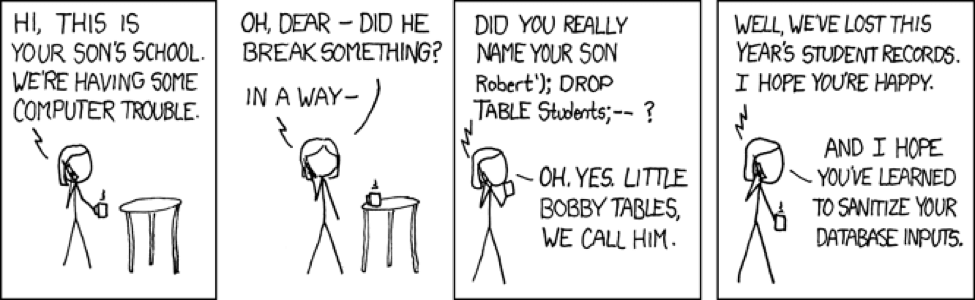
Cleanse user input
A classic example of a SQL injection is a set of search results or tabular data that can be sorted. Many applications put the sorting column and direction on the anchor tags or the select box used to select the sort. When a user selects the sort, the browser will make a request like this:
http://www.my-application.com/some-data?sort=first_name+descThe application takes this information and appends it to the SQL query like this:
SELECT * FROM users ORDER BY first_name descThis works, but opens a massive security risk for the application. If a hacker changes the URL to this:
http://www.my-application.com/some-data?sort=(select%20CAST((select concat(email,':',password) from users limit 1) as date))+descIt will cause an SQL error, which will also contain the email and password for the first user in the database. The error might look something like this:
Cannot CAST "admin@fusionauth.io:173ad94aa37d140a5aab46795b14cef88efe8be76930b90460b5da60f4cff76e" to Date.If the error is sent back from the server to the browser either in JSON or HTML, hackers can then modify the URL above to learn everything about the database and query the data of every user.
There are a number of ways to remove SQL vulnerabilities from your code. Here are a few:
Never send errors or exceptions back to the front-end. Instead, log them and send back a nice error message that says something like "Sorry, something bad happened. Please try again."
Protect SQL queries by validating user input and preventing injections. This can be implemented using a simple check like this:
if (!sort.matches("[a-zA-Z_0-9.]+\\s+[adescADESC]+")) {
  sort = "";
}
This code ensures that the sort matches a specific regular expression. If it doesn't match, it removes the sort completely.
Another possible solution is to enumerate the possible sort options and pass an enumeration value instead of the SQL snippet on the URL. To use this method, the URL above would become:
http://www.my-application.com/some-data?sort=firstName_DOWNAnd the code might look like this:
if (sort == SortEnum.firstName_DOWN) {
  orderBy = "first_name desc";
}
A final solution is to use prepared statements whenever possible. Prepared statements allow you to put placeholders into a SQL statement that are replaced with a value at runtime. Most database drivers will properly escape the value that is passed into the variable which makes SQL injections impossible. An SQL statements that use prepared statements looks like this:
SELECT * FROM users WHERE name = ?The '?' character would be replaced and escaped by the database driver. Therefore, even if a user sent a malicious string in an attempt to perform SQL injection, their attempt would fail because the database would properly escape the string. Here's an example of a malicious string that is attempting to select the first user from the database, but the database driver has correctly escaped it:
SELECT * FROM users WHERE name = '\';select concat(email,\':\',password) from users limit 1;'It is a good idea to centralize all of your database logic into a single module and regularly query the code for string concatenation or variable replacements that might open your application up to security risks.
Finally, you should evaluate the database table that is being accessed and select the solution from above that best fits your requirements and provides the best security. For example, a public facing form that accesses a table that contains sensitive information might use prepared statements and enumerations in order to reduce the possibility of an attacker exploiting a regular expression vulnerability. On the other hand, an admin interface that accesses a small table might prefer to use regular expressions for their flexibility.
Configuration#
Keep it on the server
Server applications generally need access to a database in order to store and retrieve data. The credentials that the application uses to connect to the database should be stored in a configuration file. However, this configuration file should not be checked into source control. A development version of the configuration file can be checked in to make it simpler for developers to work. Therefore, a mechanism that determines which configuration file to load is required. Here's a simple code snippet from our Node.js application that determines if a production configuration file exists or if the development version should be used:
var config = require("./config-dev.json");
try {
  var stats = fs.statSync("/usr/local/application/config/config-production.json");
  if (stats.isFile()) {
    config = require("/usr/local/application/config/config-production.json");
  }
} catch (err) {
  // Already initialized to a good value, ignoring the exception for now
}

module.exports = config;
This will allow production configuration to be stored in a secure location on the production server and development configuration to be stored in source control for development.
It is also vital to secure the production configuration on the server. If a hacker manages to log into a server and they can simply read the application configuration file, they'll immediately have full access to the database. This is the same level of security breach as if they gained access to the database server.
Therefore, the configuration file must be secured. To secure the file on Linux simply change the ownership and permissions of the configuration directory and file. Lock down your configuration file by executing these commands as the root user:
$ chown -R application:application /usr/local/application/config
$ chmod 700 /usr/local/application/config
$ chmod 400 /usr/local/application/config/*
This will ensure that only the user running the application can read the configuration file.
All sensitive configuration should be locked down in a similar manner. This includes:
- SSL private keys
- API keys and tokens for third-party software
- Database usernames and passwords
Database Security#
We talked about securing the database at the server level in the previous section. Here we will cover securing the database at the application level. Since most applications connect to a database, these connections must be secured.
Use the least privilege possible
The most important aspect of securing a database is the database user the application connects with. Never connect your application to your database as a superuser (AKA a root database user). Instead, create an application user and limit the privileges of this user to only those needed for the application.
For our example application, we created a database user named fusionauth. We granted this user permission to only the database for our application. Here's the SQL statements we used:
mysql> create user 'fusionauth'@'192.81.133.144' identified by 'super-strong-password';
mysql> grant insert, select, update, delete on users_todos.* to 'fusionauth'@'192.81.133.144'
This creates our user and then allows the user to perform the standard SQL data options (insert, select, update and delete) on our database only.
User Data Hacks#
Most modern applications use a combination of server-side code and client-side code. These two layers of code communicate with each other via APIs. Often, JSON data is sent between the client and server using AJAX requests. This new model of application development adds a lot of flexibility, but also opens up a lot of security risks.
After a user logs in, the application will need the user Id in order to look up additional data for the user as well as ensure the user has the correct permissions to take actions. This user id will also be used when the user modifies, creates or deletes their data.
Keep it on the server
Since the user Id is such a powerful component of an application, it needs to be secured and validated. Applications can send the user id to the front-end but should do so in a secure and verifiable way. Leveraging JSON Web Tokens (JWTs) is a good way to send user data (including their id) to the front-end of an application. On the server side, the APIs that are open to the front-end should never take a user id as the way to identify a user. This would allow any hacker to send it arbitrary ids and exploit user accounts. Instead, a secure token should be sent to APIs from the front-end. If you are using JWTs, these should be signed using RSA key-pairs. The server can then verify that the JWT is valid (by checking the RSA signature) and extract the user id from the JWT. Other solutions to this include using session cookies as the token, OAuth access tokens or other types of tokens.
Here's a code snippet from a Node.js application that is leveraging FusionAuth and HTTP cookies to store a session identifier:
var express = require("express");
var app = express();

// ...

// Setup secure session IDs that are stored in a client cookie
app.use(session({
  secret: uuid.v4(),
  name: 'sessionId',
  cookie: {
    secure: true,
    maxAge: 3600 * 1000
  }
}));

// Store the user in the session on login
var router = express.Router();
var fusionAuthClient = new FusionAuth.FusionAuthClient("API-KEY", "http://localhost:9011");
router.route("/login").post(function (req, res) {
  fusionAuthClient.login(req.body).then((clientResponse) => {
    req.session.user = clientResponse.successResponse.user;
    // ...
  });
});
Each request then uses the user object that was stored in the session when performing actions on behalf the user. Here's a code snippet that illustrates loading the user's Id from the session and looking up the user's Todos from the database:
router.route("/todos").get(function (req, res) {
  var todos = todo.retrieveCompletedTodos(req.session.user.id);
  // ...
});
In addition to securing the user's identity, you should also be authorizing API calls from your front-end to ensure the user making the request has the correct permissions to do so. In most cases, a user will have a list of roles and your code will check those roles to ensure the user has permission to take an action. Here's an example of this check an Node.js application:
router.route("/todos").post(function (req, res) {
  var user = new User(req.session.user);
  if (user.hasRole("CREATE_TODO")) {
    todo.createTodo(req.body.todo, req.session.user.id);
  }
});
One thing to note about this code is that the Express session only stores data, not objects. In some web server frameworks, you can store objects in the session. To get around this limitation, we create a new User object using the user data we stored in the session. This object has helper functions on it, including the Role function that allows us to check if the user has a specific role.
You can continue to secure your application on the server by adding additional checks and storing other secure data in the session.
If you are leveraging JWTs, your code would change quite a bit since the server would no longer be using sessions. Instead, each API would take a JWT via a cookie or an HTTP header. The server would then validate the JWT and extract any necessary data from it. Since, JWTs are just JSON, you can also store roles inside your JWT and the server can use them to authorize the user.
Here's the same API from above that creates Todos, but it uses JWTs instead of sessions:
router.route("/todos").post(function (req, res) {
  const authorization = req.header('Authorization');
  if (authorization === null || typeof authorization === 'undefined') {
    return;
  }

  const encodedJWT = authorization.substr('JWT '.length);
  if (encodedJWT === null || typeof encodedJWT === 'undefined') {
    return;
  }

  // Decode the JWT
  const user = _decodeAndValidateJWT(encodedJWT);

  // Authorize the user
  if (user.hasRole('CREATE_TODO')) {
    todo.createTodo(req.body.todo, user.id);
  }
});
The code that decodes and validates the JWT was left out because there are a number of libraries out there that provide this for you. A key benefit of using JWTs is that the server only needs the RSA public key that the identity provider used to sign the JWT with. This makes backends that use JWTs stateless since they don't require a session and decouples them from the identity provider since they don't need to call the identity provider to validate the JWT.
Cross-Site Request Forgery (CSRF)#
Cross-site request forgery is a type of attack that hackers make on applications. It involves requests made to an application that a user cannot prevent or control but causes the application to perform some type of action for the user. The simplest form of CSRF is using an image tag to exploit an API that accepts GET requests. The attacker would put the URL they are trying to exploit in a forum or message board and anyone that is logged into the application would be immediately exploited.
Here's an example. Let's say you write an application and have an API that updates a user's password. For whatever reason, this API is accessible via an HTTP GET request. First off, you should avoid writing APIs that modify data as GET requests, but let's just assume this API accepts GET requests. An attacker figures out that your API takes GET requests and that it uses server sessions for identity. If a user is logged into your application and then later visits a forum, the attacker can put this HTML into a forum post to exploit your API:
<img src="https://your-application.com/apis/update-user-password?newPassword=foobarbaz&confirmPassword=foobarbaz">The user doesn't have to click anything to be exploited. Instead, their password will be instantly changed to foobarbaz because they are logged into your application, which means they have a session cookie and that cookie is sent over when their browser requests the URL in the image tag.
CSRF attacks can also happen with forms embedded in other sites. Here's a simple example of a form that looks like a button, that causes the same effects as the one above:
<form action="https://your-application.com/apis/update-user-password" method="POST">
  <input type="hidden" name="newPassword" value="foobarbaz">
  <input type="hidden" name="confirmPassword" value="foobarbaz">
  <input type="submit" name="submit" value="Check out my cat video" style="border:none;background:none;cursor:pointer;color:blue;"
         onMouseOver="this.style.textDecoration='underline'" onMouseOut="this.style.textDecoration='none'">
</form>
You'll notice that the submit button is styled to look very similar to a standard anchor tag (<a>). This makes it more susceptible to unknowing users that click the button thinking it is just a link to a cat video.
CSRF attacks can be mitigated in a number of ways. We'll cover them below with examples:
Session Tokens#
First, you can generate a secure token that is put into the session on the server and output into the form. Tokens should be 256 or more bits of information and generated using a secure random number generator. Implementations can then Base64 encode the bits to get a secure token. The resulting form would look like this:
<form action="https://your-application.com/apis/update-user-password" method="POST">
  <input type="hidden" name="csrf" value="aknjsdoiu3907sdhke4bkja9y823b1">
  <input type="hidden" name="newPassword" value="foobarbaz">
  <input type="hidden" name="confirmPassword" value="foobarbaz">
  <input type="submit" name="submit" value="submit">
</form>
When the form is submitted, the server then checks that the value in the session is the same as the value on the form. This works well in most cases except it breaks if the user has multiple tabs open or uses the back-button in unexpected ways. In order to prevent issues with tabs and the back-button, you need to generate a CSRF token when the user logs in and store it in the session. This means that the user has the same token for their entire session, but this method will prevent most CSRF attacks. If you prefer to generate a new token for each request, then your best approach to invalid tokens is to redraw the form. If the token is missing completely, you should log the user out immediately.
Cookie#
This method uses a cookie that stores the CSRF token rather than writing it out to a form. This approach then uses JavaScript to read the value of the cookie and write it out to a form field or into a header value when making AJAX requests from a JavaScript application. This approach uses JavaScript like this:
var cookie = document.cookie.split(";").filter(function(cookie) {
  return cookie.startsWith("csrf");
})[0];
var csrfToken = cookie.split("=")[1];

// Put in header or form
The key security constraint for this approach is that the browser must conform to the same-origin policy. This policy ensures that JavaScript can only access cookies and documents from the same origin (i.e. only JavaScript from example.com can read cookies and documents from example.com). Most browsers enforce this so it is safe to use this technique.
Cookie and Form#
This approach is similar to the previous example, except it writes out a cookie that contains the CSRF token and also writes it out to the form. The cookie that is written out for this should be an httpOnly cookie. This means that it is not readable by JavaScript. This approach also works because of the access controls enforced by the browser. Even though the user might have the CSRF token on the website where the hacker has injected the malicious code, the hackers code will not be able to access the CSRF cookie using JavaScript and therefore won't be able to craft a form that contains the same CSRF token.
Here's an example HTTP response that contains the CSRF tokens in the cookie and the form:
HTTP/1.1 200 OK
Content-Length: 109298
Content-Type: text/html
Set-Cookie: csrf=aknjsdoiu3907sdhke4bkja9y823b1; HttpOnly
Connection: Closed
<html>
  ...
  <form action="https://your-application.com/apis/update-user-password" method="POST">
    <input type="hidden" name="csrf" value="aknjsdoiu3907sdhke4bkja9y823b1">
    <input type="hidden" name="newPassword" value="foobarbaz">
    <input type="hidden" name="confirmPassword" value="foobarbaz">
    <input type="submit" name="submit" value="submit">
  </form>
  ...
</html>
Referrer and Origin#
This approach verifies the HTTP Referrer and Origin headers are from the same domain your application is running on. While this seems like a simple task, it is often very challenging to implement and most people don't even bother with these checks. The issue is that your application code could be sitting behind a proxy, load-balancer or many other types of components that could strip or change these headers. Additionally, your application might be running under multiple domains and will need to configured to know the domains it should validate these headers against. Your best bet is to check these headers if they are present but do not rely sole on this approach.
Here's some simple Java code to check these conditions:
String origin = request.getHeader("Origin");
String referrer = request.getHeader("Referrer");
if ((origin != null && !configuredDomains.contains(origin)) ||
    (referrer != null && !configuredDomains.contains(referrer))) {
  // Return an error
}Others#
There are a few other approaches to mitigating CSRF including encrypted tokens, HMAC and others. You should review the resources at the bottom of this guide under CSRF to determine which method works best for your application.
Social Hacks#
Social hacking is another issue that your application could be subject to. An example of a classic social hack is when a user gets a support representative to change the password of someone else's account so that they can log into that account.
Here's a scene from the movie Hackers that illustrates this concept:
Of course, you'll want to ensure your "BLT drive" is secure, but in this case you need to ensure that your application prevents your employees from falling prey to social hacks.
The best way to prevent social hacking is to ensure that employees, more specifically customer service representatives, don't have too much power. For example, customer service representatives should not be able to change user passwords. Instead, they should only be allowed to send password reset emails to users so that the user can change their own password. You can also use push services like Twilio to send a code (also known as a one-time password) to the user's mobile phone. The user then has to read the code back to the employee, who types it into your backend in order to be granted access to the user's account.
Summary#
This guide covers a set of best practices that will help you secure your user data. It is by no means exhaustive, but if you implement each of the concepts above your user data will be nicely secured.
We also would like to note that this guide is applicable for both large and small companies. Even if you have 10,000 servers and large configuration, deployment and management processes, you can still use the concepts in this guide to ensure your processes are secure.
If you find any errors in this guide, please let us know. Also, if you find any vulnerabilities in this guide, send us an email at dev@fusionauth.io so that we can investigate them and update the guide.
References#
In addition to the experience and knowledge of our development team, we used additional resources to build this guide. Below is a non-exhaustive list of the references and resources we used:
General
Password Complexity
SSH
IPTables
- https://wiki.archlinux.org/index.php/iptables
- https://www.digitalocean.com/community/tutorials/how-to-implement-a-basic-firewall-template-with-iptables-on-ubuntu-14-04
- http://www.howtogeek.com/177621/the-beginners-guide-to-iptables-the-linux-firewall/
- http://serverfault.com/questions/373871/dont-understand-00-iptable-syntax
- http://serverfault.com/questions/157375/reject-vs-drop-when-using-iptables
- https://www.thegeekstuff.com/2011/01/iptables-fundamentals/
Two-Factor Authentication
- https://www.digitalocean.com/community/tutorials/how-to-protect-ssh-with-two-factor-authentication
- http://serverfault.com/questions/629883/trying-to-get-ssh-with-public-key-no-password-google-authenticator-working-o
- http://www.howtogeek.com/121650/how-to-secure-ssh-with-google-authenticators-two-factor-authentication/
Monit and Intrusion Detection
- http://askubuntu.com/questions/179889/how-do-i-set-up-an-email-alert-when-a-ssh-login-is-successful
- https://mmonit.com/wiki/MMonit/PushoverNotification
- https://mmonit.com/wiki/MMonit/SlackNotification
Backup Encryption
Node.js SSL
- https://nodejs.org/api/https.html
- http://stackoverflow.com/questions/22453782/nodejs-http-and-https-over-same-port
- https://en.wikipedia.org/wiki/Transport_Layer_Security
Express
- http://stackoverflow.com/questions/20938620/node-js-express-disable-automatic-session-creation
- http://expressjs.com/en/advanced/best-practice-security.html
CSRF