FusionAuth And Terraform
Overview
In this section you’ll learn about the open source FusionAuth Terraform provider, with which you will be able to manage FusionAuth using Terraform, an open source infrastructure as code automation tool.
Since it began as a community project, the provider is not as complete as the client libraries, but it covers the majority of use cases. If you find yourself needing to manage an unsupported resource or configuration, please submit a PR to the GitHub repository. PRs are regularly reviewed and merged.
Types Of Resources
In any FusionAuth system, there are three types of configuration information.
- Default object with configuration defined by FusionAuth. For example, the FusionAuth admin UI is represented as an Application inside FusionAuth’s default Tenant.
- Objects managed by the application developer. Examples of these include any Applications other than the admin UI, Groups, Email Templates and more.
- Self-managed objects. The most common of these is user objects, when users can self-register.
Only the first two are good fits for management by an infrastructure as code tool like Terraform. And the first, since they cannot be created by Terraform, require special handling to import and manage.
Prerequisites
In order to get the most value from this guide, you should have a running FusionAuth instance and the Terraform CLI installed. If you don’t have these set up yet, please review the following documentation:
- The FusionAuth 5 minute setup guide - get a FusionAuth instance running and integrated with an Express application. If you want to use a different technology, please check out the quickstarts.
- The Install Terraform section in the Get Started - Docker guide from Terraform walks you through installing the Terraform CLI.
This document has been tested with Terraform 1.5 but should work with any modern version.
You can download all of the terraform files in this guide in the corresponding GitHub repository.
Initial Setup
In this section, you initialize the Terraform working directory with a FusionAuth API key.
The FusionAuth API Key
First, create an API key as described in Managing API Keys. Create a superuser key by not selecting any endpoint methods for the key. A super user API key has access to all API endpoints. If you want to limit the operations which can be performed by Terraform, limit the API key to specific endpoints. For this document, a super user API key is assumed.
Copy the key value before pressing the Save button.
If you wanted to set up the key automatically, use Kickstart with a predefined API key. Then you can add this key as a secret in your automated deployment.
Example Kickstart File
{
  "apiKeys": [
    {
      "key": "4737ea8520bd454caabb7cb3d36e14bc1832c0d3f70a4189b82598670f11b1bd"
    }
  ]
}
Initializing The Working Directory
With the API key from your FusionAuth instance, you need to initialize the Terraform working directory.
Create a new directory. Any name will do, but for consistency, it is suggested to name it after your FusionAuth instance host name.
mkdir auth.example.com
cd auth.example.com
You’ll use Terraform variables, so create a variables.tf file with the following content to declare all the Input Variables used in this example.
Example Variables File
variable "fusionauth_api_key" {
  description = "The API Key for the FusionAuth instance"
  type        = string
  default     = ""
  sensitive   = true
}

variable "fusionauth_host" {
  description = "Host for FusionAuth instance"
  type        = string
  default     = ""
}

variable "fusionauth_default_tenant_id" {
  description = "The Tenant Id of the Default FusionAuth Tenant"
  type        = string
  default     = ""
}

variable "fusionauth_default_application_id" {
  description = "The Application Id of the Default FusionAuth Application"
  type        = string
  default     = "3c219e58-ed0e-4b18-ad48-f4f92793ae32"
}For the fusionauth_api_key variable, the configuration option sensitive = true is set. This will prevent sensitive data being added to the Terraform state.
For the variable definitions, create a terraform.tfvars file with the following content and changes:
- Set the
fusionauth_api_keyvariable to the value of the previously created API key. - Set the
fusionauth_hostvariable to the hostname of the FusionAuth instance you want to manage. Make sure this value is the full URL including the protocol of your FusionAuth instance. When using docker, this will typically behttp://localhost:9011. - The
fusionauth_default_tenant_idvariable can be omitted for now, but you’ll update it later.
Example Variable Definitions
fusionauth_api_key = "gHPdrfQa4A36JVoFfVDAY4jG4g8FGTpCd98_zZHTfW1KM2BI7an2gUhB"

fusionauth_host = "http://localhost:9011"
The variable definition with terraform.tfvars is only one option for setting these variables. Review the Assigning Values to Root Module Variables documentation for more options.
Next, add the FusionAuth Terraform Provider configuration in the directory by:
- Opening the FusionAuth Terraform Provider Documentation.
- Clicking the USE PROVIDER button.
- Copying the HashiCorp Configuration Language (HCL) provided.
- Creating a Terraform configuration file named
main.tf. - Pasting the copied HCL into that file.
- Adding the previously created variable as
var.fusionauth_api_keyto theprovidersection - Adding the FusionAuth instance you plan to manage with the
var.fusionauth_hostvariable in theprovidersection
Here’s a screenshot of the page.
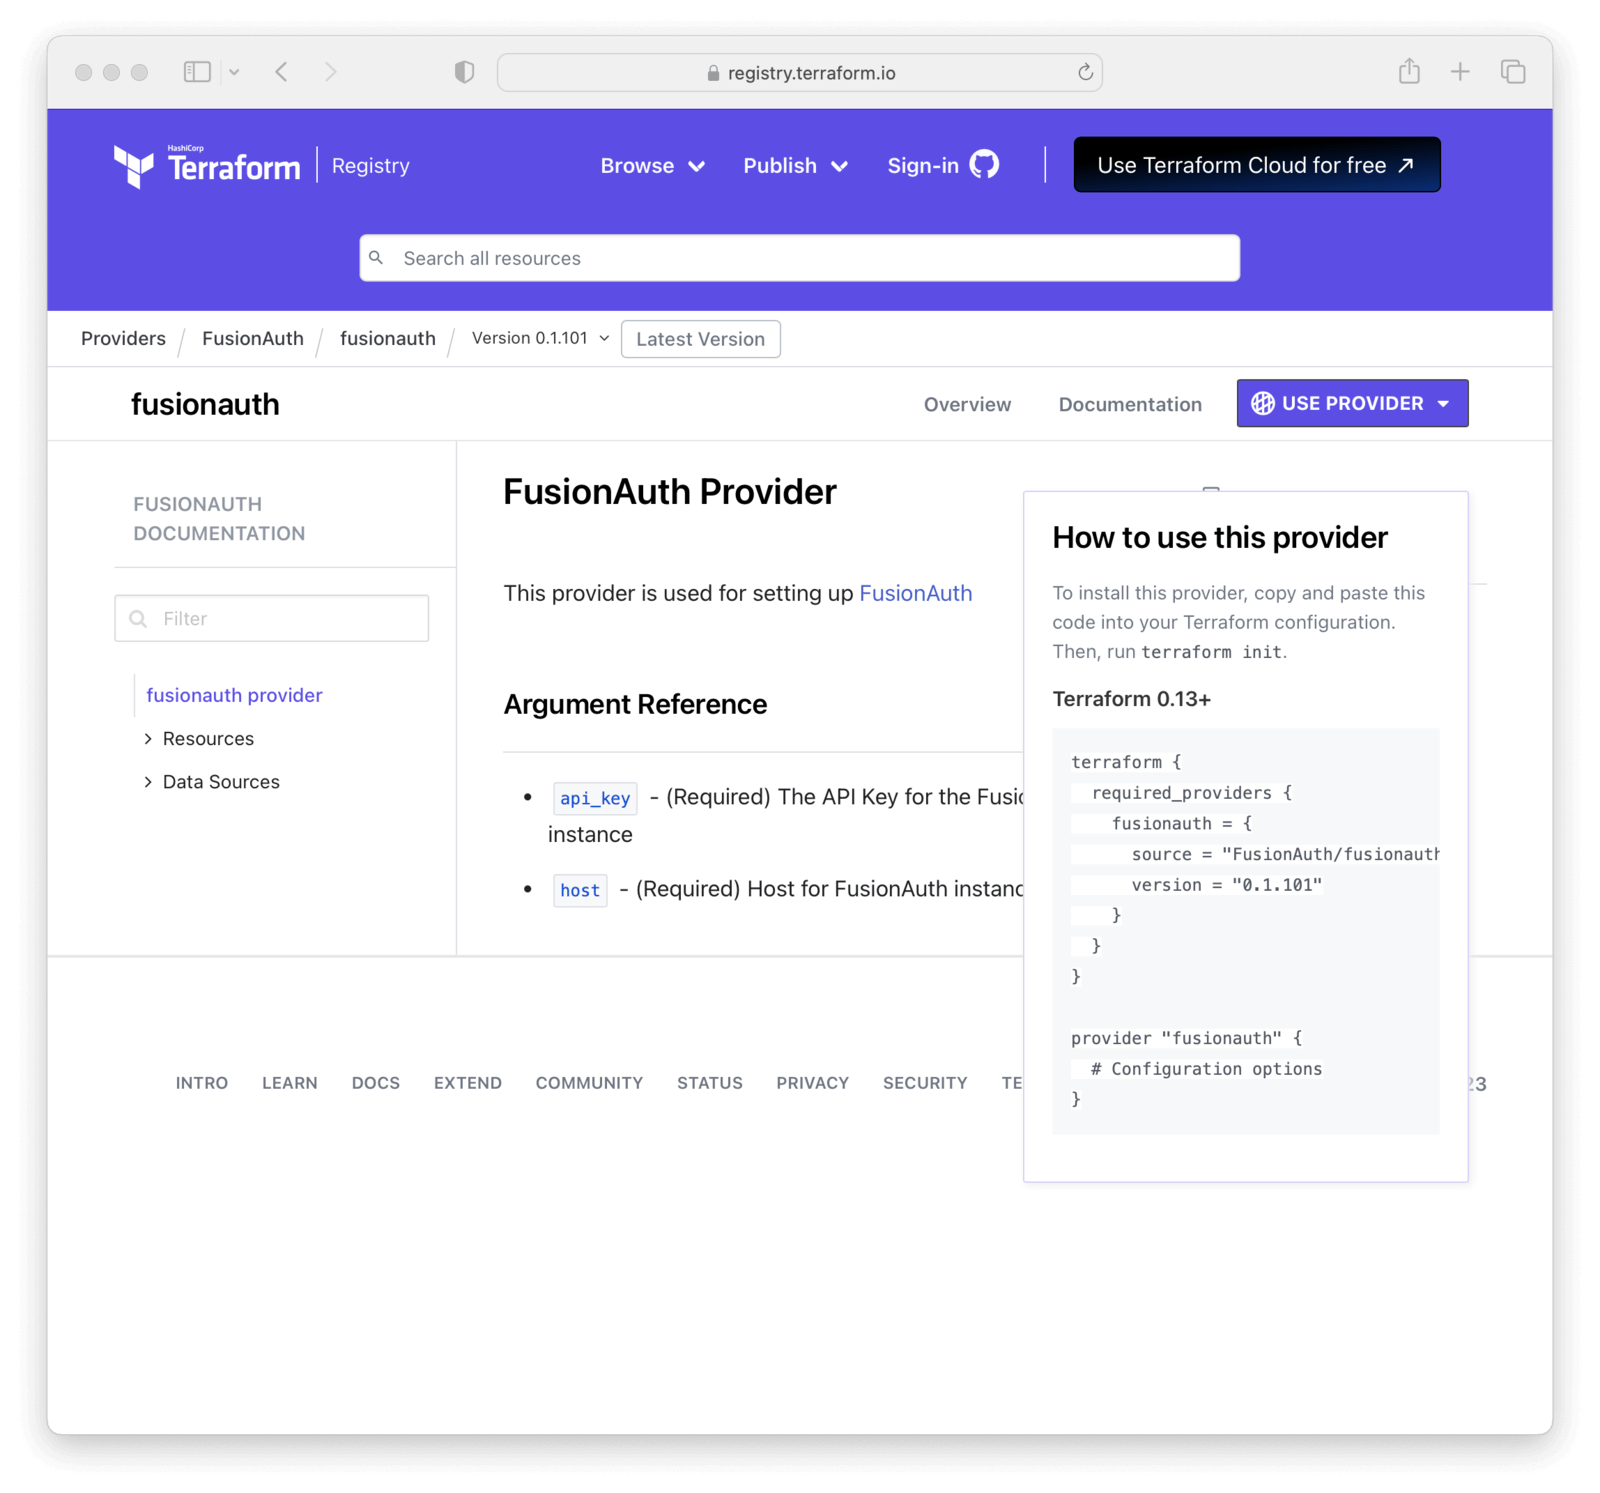
Here’s what your main.tf file should look like at this point.
Example main.tf File
terraform {
  required_providers {
    fusionauth = {
      source = "FusionAuth/fusionauth"
      version = "0.1.101"
    }
  }
}

provider "fusionauth" {
  api_key = var.fusionauth_api_key
  host = var.fusionauth_host
}
Finally, the following command prepares the current working directory for use with Terraform.
terraform initIt is always safe to run terraform init multiple times, to bring the working directory up to date with changes in the configuration. Though subsequent runs may give errors, this command will never delete your existing configuration or state.
Choosing A Configuration Strategy
Once you initialize the Terraform working directory, review different initial strategies to handle resource creation.
| Strategy | Advantages | Disadvantages |
|---|---|---|
| import | manage existing resources | some resources don’t fully support the Terraform lifecycle |
| data source | reference existing resources without having to manage them | requires a external process to manage these resources |
| create | always create and be able to manage all resources through Terraform | bigger initial effort and default resources can’t be managed |
Importing Default Resources
Before you create, update, and remove resources with Terraform, let’s examine the Import and Data Source functionality.
There are FusionAuth default configuration elements present in every FusionAuth instance. If you want to manage changes to these elements via Terraform, you must tell Terraform about them. Or, if you have existing FusionAuth configuration you want to manage via Terraform, import it.
The most consistent method for managing FusionAuth is to create all resources through Terraform. However, you must use either Import or Data Source to handle default or existing FusionAuth configuration.
The FusionAuth default Tenant and default Application are two configuration elements that you will almost certainly want to manage via Terraform. There are others outlined in the FusionAuth default configuration elements that can be managed using the same methods described below.
Importing Tenants
The default Tenant is created whenever you install FusionAuth. To manage it through Terraform, you must import this resource. The FusionAuth Application, which is the administrative user interface, is always in this Tenant.
While you can use the default Tenant for all your Applications, when using Terraform, it is easier to create your own Tenant and create Applications in that Tenant.
As outlined in the Tenant Terraform Resource documentation, add the following code to main.tf.
Default Tenant Import
import {
  to = fusionauth_tenant.Default
  id = "Replace-This-With-The-Existing-Default-Tenant-Id"
}

resource "fusionauth_tenant" "Default" {
  lifecycle {
    prevent_destroy = true
  }
  name = "Default"
  issuer = "acme.com"
  theme_id = "00000000-0000-0000-0000-000000000000"
  external_identifier_configuration {
    authorization_grant_id_time_to_live_in_seconds = 30
    change_password_id_generator {
      length = 32
      type   = "randomBytes"
    }
    change_password_id_time_to_live_in_seconds = 600
    device_code_time_to_live_in_seconds        = 300
    device_user_code_id_generator {
      length = 6
      type   = "randomAlphaNumeric"
    }
    email_verification_id_generator {
      length = 32
      type   = "randomBytes"
    }
    email_verification_id_time_to_live_in_seconds      = 86400
    email_verification_one_time_code_generator {
      length = 6
      type   = "randomAlphaNumeric"
    }
    external_authentication_id_time_to_live_in_seconds = 300
    one_time_password_time_to_live_in_seconds          = 60
    passwordless_login_generator {
      length = 32
      type   = "randomBytes"
    }
    passwordless_login_time_to_live_in_seconds = 180
    registration_verification_id_generator {
      length = 32
      type   = "randomBytes"
    }
    registration_verification_id_time_to_live_in_seconds = 86400
    registration_verification_one_time_code_generator {
      length = 6
      type   = "randomAlphaNumeric"
    }
    saml_v2_authn_request_id_ttl_seconds = 300
    setup_password_id_generator {
      length = 32
      type   = "randomBytes"
    }
    setup_password_id_time_to_live_in_seconds   = 86400
    two_factor_id_time_to_live_in_seconds       = 300
    two_factor_one_time_code_id_generator {
      length = 6
      type   = "randomDigits"
    }
    two_factor_trust_id_time_to_live_in_seconds = 2592000
  }
  jwt_configuration {
    refresh_token_time_to_live_in_minutes              = 43200
    time_to_live_in_seconds                            = 3600
    refresh_token_revocation_policy_on_login_prevented = true
    refresh_token_revocation_policy_on_password_change = true
    access_token_key_id                                = "00000000-0000-0000-0000-000000000000"
    id_token_key_id                                    = "00000000-0000-0000-0000-000000000000"
  }
  login_configuration {
    require_authentication = true
  }
  email_configuration {
    default_from_email                  = "change-me@example.com"
    default_from_name                   = "FusionAuth"
    host                                = "localhost"
    implicit_email_verification_allowed = true
    port                                = 25
    security                            = "NONE"
    verification_strategy               = "ClickableLink"
    verify_email                        = false
    verify_email_when_changed           = false
  }
}
To make things easier, you only have to update the first Id in the import section with the default Tenant Id. You can find this Id in the FusionAuth admin UI under “Tenants”.
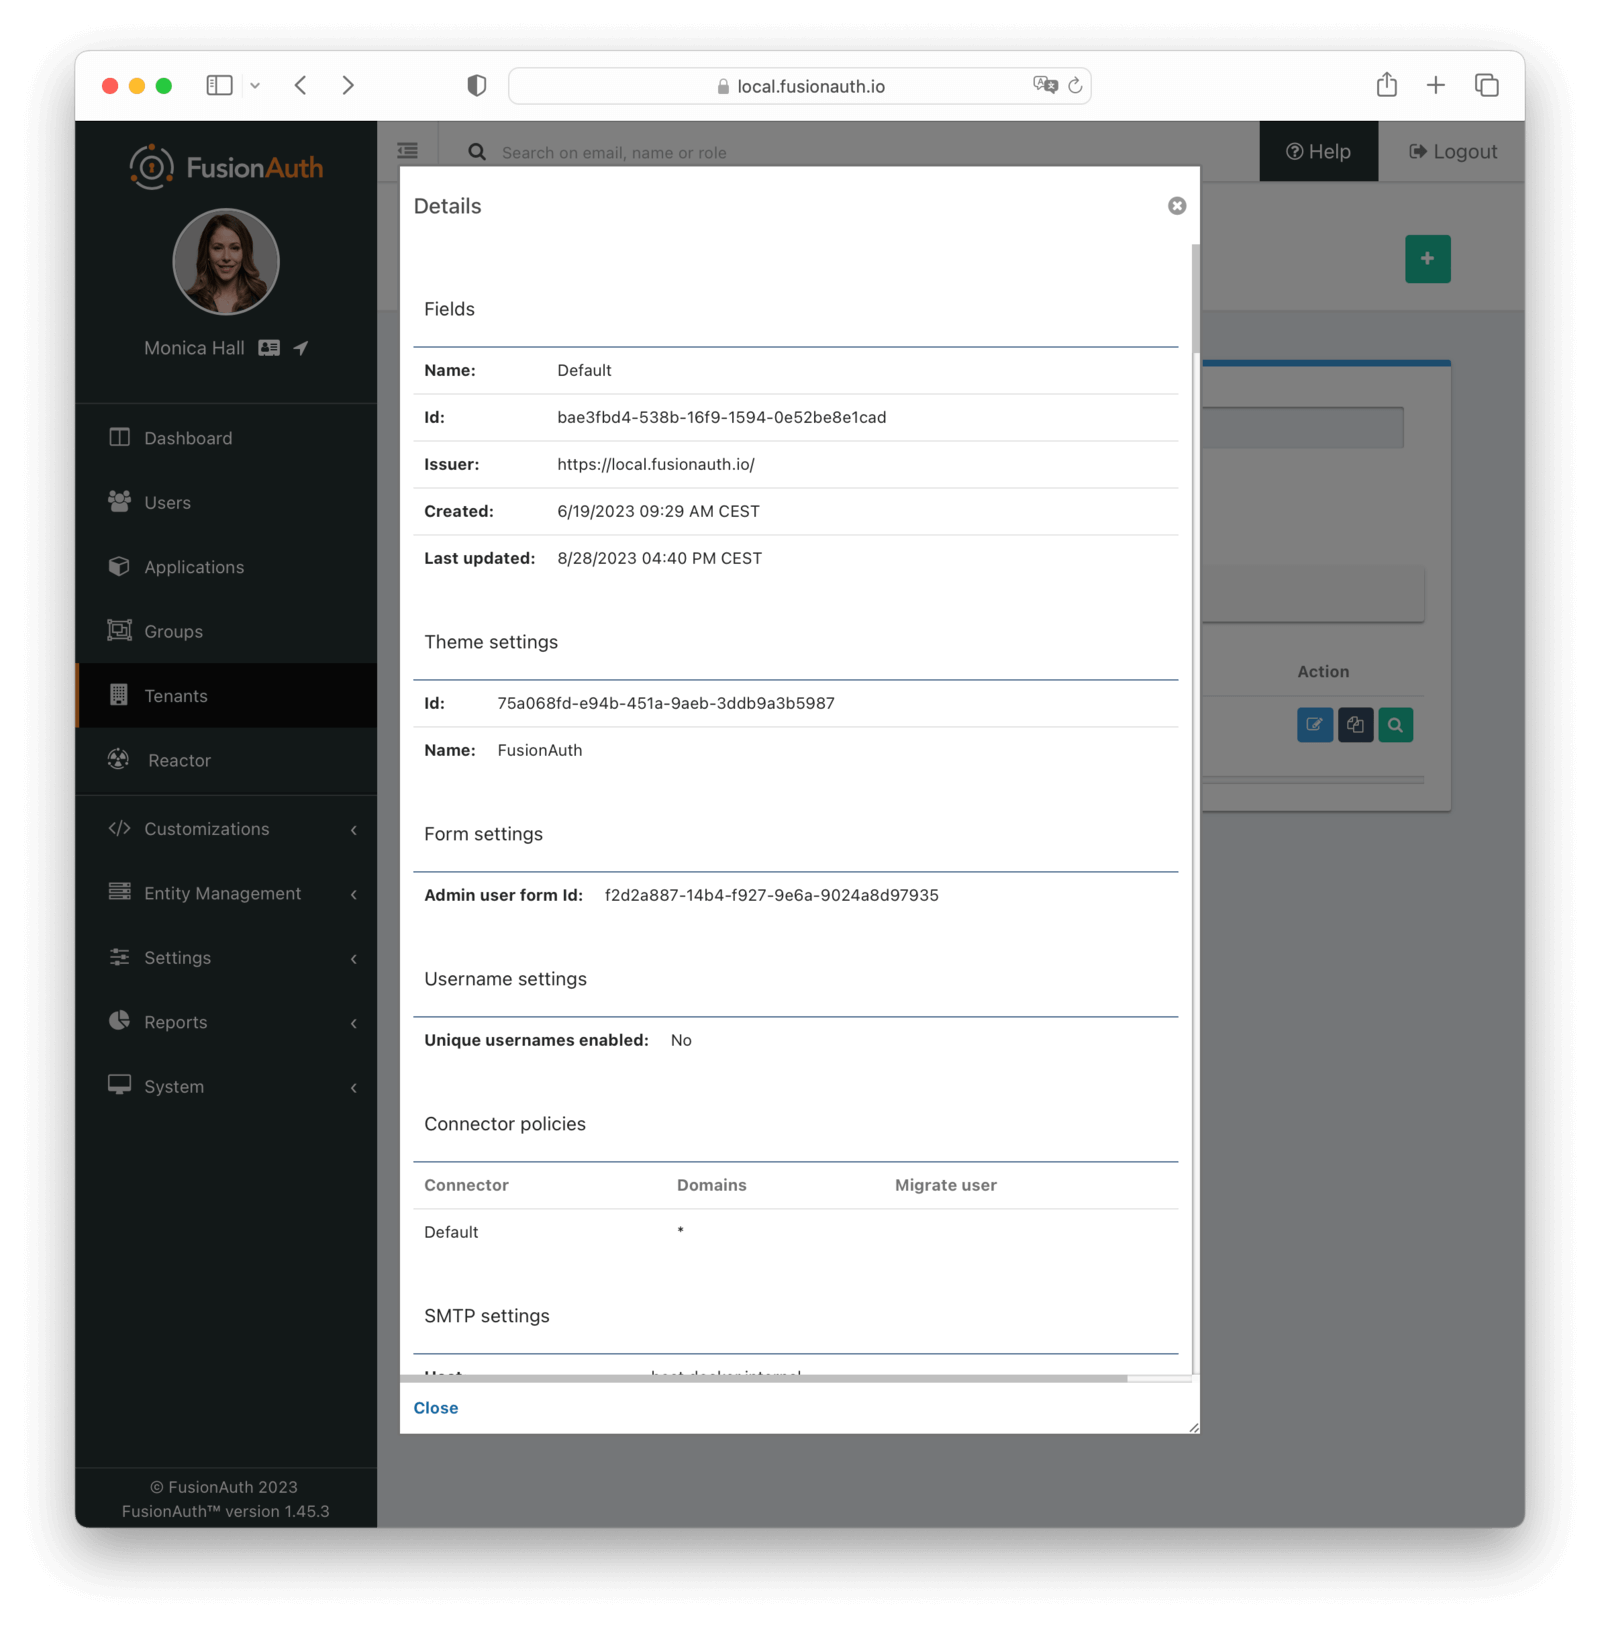
Replace the value Replace-This-With-The-Existing-Default-Tenant-Id with the Tenant’s Id, for example bafb4319-b7ca-ed27-fa2f-bbdba9d8ec06.
All other UUID definitions are set to 00000000-0000-0000-0000-000000000000. You’ll find the correct values for the other Ids later. You can use this technique with any resource you want to import into Terraform.
Since you provided a valid Tenant Id, you can let Terraform find the other Ids by searching the plan output for in-place updates. Then update main.tf with those values. Do this by running terraform plan.
terraform plan | grep \~Because of the way Terraform works, this plan suggests replacing the UUID definitions for configuration with 00000000-0000-0000-0000-000000000000. You don’t want to do that, you just used that value to find the real UUID values. So, copy the UUIDs to main.tf and replace each instance of 00000000-0000-0000-0000-000000000000 with the correct value.
Here is how the output of the grep command might look:
  ~ update in-place
  ~ resource "fusionauth_tenant" "Default" {
      ~ theme_id                           = "75a068fd-e94b-451a-9aeb-3ddb9a3b5987" -> "00000000-0000-0000-0000-000000000000"
      ~ email_configuration {
      ~ jwt_configuration {
          ~ access_token_key_id                                = "a39be146-51cb-0288-7806-6eb6c066aed3" -> "00000000-0000-0000-0000-000000000000"
          ~ id_token_key_id                                    = "092dbedc-30af-4149-9c61-b578f2c72f59" -> "00000000-0000-0000-0000-000000000000"
Make sure you copy all those Id’s from your output to the main.tf file. For example, modify jwt_configuration to look like
jwt_configuration {
    refresh_token_time_to_live_in_minutes              = 43200
    time_to_live_in_seconds                            = 3600
    refresh_token_revocation_policy_on_login_prevented = true
    refresh_token_revocation_policy_on_password_change = true
    access_token_key_id                                = "a39be146-51cb-0288-7806-6eb6c066aed3"
    id_token_key_id                                    = "092dbedc-30af-4149-9c61-b578f2c72f59"
  }
Once appended run terraform plan to check the validity of your configuration. If there is no output, that indicates that the remote FusionAuth configuration and the main.tf file are in sync.
The above configuration is subject to change either due to changes made using the admin UI or version differences. New tenant configuration defaults may be added over time. Carefully check the terraform plan output to make sure the imported configuration matches the values in FusionAuth.
When the plan is valid, run terraform apply.
terraform plan
terraform apply
You can take the same steps with the FusionAuth Application to import its default configuration into Terraform.
Once imported, Terraform tracks the Tenant object in your state file. You can then manage the imported resource in the same way as others.
You can’t destroy the default Tenant or FusionAuth Application. Attempting to do so will break your Terraform state. See the Prevent Destroy section for more details.
Leave the import block in your main.tf file as a record of the resource’s origin. The import block records that Terraform imported the resource and didn’t create it.
Using Data Sources
Instead of importing a resource, you can use a Data Source. The list of supported FusionAuth data sources is in the Terraform Provider documentation.
Data sources are useful if you choose to manage the default Tenant and FusionAuth Application outside of Terraform, either manually or via a script using the client libraries, but you still need to reference the Tenant or Application. Examples of this include:
- adding Applications in the default Tenant
- associating a JWT signing key with the FusionAuth Application
- setting up an IP ACL to limit access to the FusionAuth Application
Review the tenant and application data source documentation to learn more.
Here’s an example of how you might add data sources to your Terraform file:
A Data Source For The default Tenant
data "fusionauth_tenant" "Default" {
  name = "Default"
}
A Data Source For The FusionAuth Application
data "fusionauth_application" "FusionAuth" {
  name = "FusionAuth"
}If you manage the default Tenant and FusionAuth Application outside of Terraform but want specific actions (scripts, API calls, etc.) integrated and triggered by your Terraform configuration, you could use Provisioners. Terraform includes the concept of provisioners as a measure of pragmatism and last resort since provisioners are non-declarative and potentially unpredictable.
Now that you’ve configured Terraform to handle some of FusionAuth’s default configuration elements, let’s walk through creating, updating, and removing other resources.
Creating Resources
To create a new resource review the list of resources available to you in the FusionAuth Terraform Provider documentation. Pick the resource you’re interested in. Each resource contains information about required and optional arguments.
For this example, you’ll create the following:
- A new Tenant called
Forum. - An Application in that Tenant, also called
Forum. - Two roles for that Application,
adminanduser. - A token signing key for that Application.
- Email templates for password emails that will be assigned to the Tenant.
Variables
You’ll need to update variables.tf to include additional variables.
Forum Variable
variable "fusionauth_api_key" {
  description = "The API Key for the FusionAuth instance"
  type        = string
  default     = ""
  sensitive   = true
}

variable "fusionauth_host" {
  description = "Host for FusionAuth instance"
  type        = string
  default     = ""
}

variable "fusionauth_default_tenant_id" {
  description = "The Tenant Id of the Default FusionAuth Tenant"
  type        = string
  default     = ""
}

variable "fusionauth_default_application_id" {
  description = "The Application Id of the Default FusionAuth Application"
  type        = string
  default     = "3c219e58-ed0e-4b18-ad48-f4f92793ae32"
}

variable "fusionauth_default_theme_id" {
  description = "The Default Theme Id of the FusionAuth Instance"
  type        = string
  default     = "75a068fd-e94b-451a-9aeb-3ddb9a3b5987"
}

variable "fusionauth_email_configuration_host" {
  description = "The Email Server Host used to send emails from FusionAuth"
  type = string
  default = "localhost"
}

variable "fusionauth_email_configuration_port" {
  description = "The Email Server Port used to send emails from FusionAuth"
  type = string
  default = "25"
}
The fusionauth_default_theme_id is another constant value across all FusionAuth instances. If you imported or added the default Tenant as a data source, you could also reference the theme Id via that object.
Next, update the terraform.tfvars with customizations of those values. It should look similar to the below file, but you’ll need to update it.
Forum Variable Definitions
fusionauth_api_key = "gHPdrfQa4A36JVoFfVDAY4jG4g8FGTpCd98_zZHTfW1KM2BI7an2gUhB"

fusionauth_host = "http://localhost:9011"

fusionauth_default_tenant_id = ""- Set the
fusionauth_api_keyvariable to the value of the previously created API key. - Set the
fusionauth_hostvariable to the hostname of the FusionAuth instance you want to manage. Make sure this value is the full URL including the protocol of your FusionAuth instance. When using docker, this will typically behttp://localhost:9011. - The
fusionauth_default_tenant_idvariable should be the UUID of the default Tenant.
The Terraform File
Next, update the main.tf file.
If you haven’t worked through the prerequisites above, make sure you add the required_providers and provider sections.
main.tf Initial Sections
terraform {
  required_providers {
    fusionauth = {
      source = "FusionAuth/fusionauth"
      version = "0.1.101"
    }
  }
}

provider "fusionauth" {
  api_key = var.fusionauth_api_key
  host = var.fusionauth_host
}
Then, configure the Forum Tenant; this Tenant will contain users and applications.
Creating A Forum Tenant
resource "fusionauth_tenant" "forum" {
  lifecycle {
    prevent_destroy = true
  }
  issuer   = "forum"
  name     = "Forum"
  theme_id = var.fusionauth_default_theme_id
  multi_factor_configuration {
    login_policy = "Disabled"
  }
  login_configuration {
    require_authentication = false
  }
  external_identifier_configuration {
    authorization_grant_id_time_to_live_in_seconds = 30
    change_password_id_generator {
      length = 32
      type   = "randomBytes"
    }
    change_password_id_time_to_live_in_seconds = 600
    device_code_time_to_live_in_seconds        = 300
    device_user_code_id_generator {
      length = 6
      type   = "randomAlphaNumeric"
    }
    email_verification_id_generator {
      length = 32
      type   = "randomBytes"
    }
    email_verification_id_time_to_live_in_seconds = 86400
    email_verification_one_time_code_generator {
      length = 6
      type   = "randomAlphaNumeric"
    }
    external_authentication_id_time_to_live_in_seconds = 300
    one_time_password_time_to_live_in_seconds          = 60
    passwordless_login_generator {
      length = 32
      type   = "randomBytes"
    }
    passwordless_login_time_to_live_in_seconds = 180
    registration_verification_id_generator {
      length = 32
      type   = "randomBytes"
    }
    registration_verification_id_time_to_live_in_seconds = 86400
    registration_verification_one_time_code_generator {
      length = 6
      type   = "randomAlphaNumeric"
    }
    saml_v2_authn_request_id_ttl_seconds = 300
    setup_password_id_generator {
      length = 32
      type   = "randomBytes"
    }
    setup_password_id_time_to_live_in_seconds = 86400
    two_factor_id_time_to_live_in_seconds     = 300
    two_factor_one_time_code_id_generator {
      length = 6
      type   = "randomDigits"
    }
    two_factor_trust_id_time_to_live_in_seconds = 2592000
  }
  jwt_configuration {
    refresh_token_time_to_live_in_minutes = 43200
    time_to_live_in_seconds               = 3600
  }
  email_configuration {
    host = var.fusionauth_email_configuration_host
    port = var.fusionauth_email_configuration_port
    forgot_password_email_template_id = fusionauth_email.forgot-password.id
    set_password_email_template_id = fusionauth_email.setup-password.id
  }
}
Then, configure the signing key. This will be used to sign access tokens for the Forum Application.
Creating A Signing Key
resource "fusionauth_key" "forum-access-token" {
  algorithm = "HS512"
  name      = "Forum Application Access Token Key"
}
Next, set up the email templates. Because email templates can be long, use the file() function. You’ll need to create files in the email_templates directory and give them the same names. Terraform will import these files.
Creating An Email Template
resource "fusionauth_email" "forgot-password" {
  name                  = "Forgot Password"
  default_from_name     = "Forgot Password"
  default_html_template = file("${path.module}/email_templates/Forgot_Password.html.ftl")
  default_subject       = "Forgot Password"
  default_text_template = file("${path.module}/email_templates/Forgot_Password.txt.ftl")
  from_email            = "example@local.fusionauth.io"
}

resource "fusionauth_email" "setup-password" {
  name                  = "Setup Password"
  default_from_name     = "Setup Password"
  default_html_template = file("${path.module}/email_templates/Setup_Password.html.ftl")
  default_subject       = "Setup Password"
  default_text_template = file("${path.module}/email_templates/Setup_Password.txt.ftl")
  from_email            = "example@local.fusionauth.io"
}
While the values of the email templates don’t matter for this guide, you can find sample files in the GitHub repository.
Now, create the Application in the Tenant. This configuration represents what users actually log in to.
Creating A Forum Application In The Forum Tenant
resource "fusionauth_application" "forum" {
  tenant_id = fusionauth_tenant.forum.id
  name      = "forum"
  jwt_configuration {
    access_token_id = fusionauth_key.forum-access-token.id
  }
}
Create the roles for the Application. These roles will be used by the Forum Application.
Creating Roles In The Forum Application
resource "fusionauth_application_role" "forum_admin_role" {
  application_id = fusionauth_application.forum.id
  is_default     = false
  is_super_role  = true
  name           = "admin"
}

resource "fusionauth_application_role" "forum_user_role" {
  application_id = fusionauth_application.forum.id
  is_default     = true
  is_super_role  = false
  name           = "user"
}
Finally, get the plan.
terraform planOnce you’re happy with your configuration run terraform plan. If you aren’t experiencing errors and are ok with the planned changes, run terraform apply.
Where Are The Users?
As mentioned above, Terraform is great for configuring and tracking changes of relatively slow-changing aspects of systems.
With FusionAuth, users typically self-register or are managed dynamically using API calls. Using Terraform to manage them doesn’t make much sense.
Instead, turn on self-service registration, create them using the User API, or migrate your users.
Updating Resources
Once a resource is managed by Terraform, you can change the main.tf or other Terraform files according to the Terraform Provider Documentation.
You might decide you want to change the time_to_live_in_seconds value for your JWT configuration from 3600 to 1800 seconds. If so, update the configuration element to look something like this:
  jwt_configuration {
    refresh_token_time_to_live_in_minutes = 43200
    time_to_live_in_seconds               = 1800
  }
After you’re done with editing the Terraform file, run terraform plan to check the planned changes. Review and fix any errors. Terraform will show you what it will change.
Terraform will perform the following actions:

  # fusionauth_tenant.forum will be updated in-place
  ~ resource "fusionauth_tenant" "forum" {
        id                                 = "ef1f5235-82de-4a2a-b103-4d130fa5f5f2"
        name                               = "Forum"
        # (7 unchanged attributes hidden)

      ~ jwt_configuration {
          ~ time_to_live_in_seconds                            = 3600 -> 1800
After review, run terraform apply.
If you want to know what already has been defined by Terraform but is not specified in your .tf files you can run terraform show.
The configuration file can get very large. If you want to show specific resources, list all resources with the terraform state list command. Then examine the resource state with terraform state show <resource-name>.
Ignoring Changes
Every time you make changes it is possible that configuration has been updated in your FusionAuth instance manually or via API. While it is best to lock down access so every change runs through Terraform, this isn’t always possible.
You can either align your configuration with the installation or decide to ignore_changes in your configuration.
Here is an example with FusionAuth resources. Imagine a situation where a business web or mobile app adds data to a FusionAuth Application’s data field. For example, the app could update the configuration with a curl command to add a productOwner or other data.
Example Script To Modify An Application
curl \
-X PATCH \
-H 'Content-Type: application/json' \
-H 'X-FusionAuth-TenantId: TENANT-ID-HERE' \
-H 'Authorization: API-KEY-HERE' \
http://localhost:9011/api/application/APPLICATION-ID-HERE \
-d @patch.json
JSON To Patch An Application
{
  "application": {
    "data": {
      "externalApplication": "Acme. Customer Support Forum",
      "productOwner": "john@acme.com",
      "supportHotline": "+1 (650) 933-5102"
    }
  }
}
You will see in the terraform plan output that Terraform wants to revert the Application back to the original state.
Terraform used the selected providers to generate the following execution plan. Resource actions are indicated with the following symbols:
  ~ update in-place

Terraform will perform the following actions:

  # fusionauth_application.forum will be updated in-place
  ~ resource "fusionauth_application" "forum" {
      ~ data                                       = {
          - "externalApplication" = "Acme. Customer Support Forum" -> null
          - "productOwner"        = "john@acme.com" -> null
          - "supportHotline"      = "+1-636-555-3226" -> null
        }
        id                                         = "7acaec93-edd4-49a1-82db-602fe8dda23f"
        name                                       = "forum"
        # (12 unchanged attributes hidden)

        # (5 unchanged blocks hidden)
    }

Plan: 0 to add, 1 to change, 0 to destroy.
To prevent Terraform from doing this, use ignore_changes to tell Terraform to ignore parts of your configuration.
resource "fusionauth_application" "forum" {
  tenant_id = fusionauth_tenant.forum.id
  name = "forum"
  lifecycle {
    ignore_changes = [
      data
    ]
  }
}
If you’re only interested in creating and destroying resources, rather than updating them, you can ignore all changes:
lifecycle {
  ignore_changes = all
}
Removing Resources
If you want to remove a resource, comment out or delete the lines defining the resource in your Terraform files. Run terraform plan to double check what will be removed. Then run terraform apply, which will destroy the resource.
If you run terraform destroy, be aware that all Terraform managed resources will be destroyed.
Deleting a Tenant removes all the associated Applications, Groups, and Users. If you want to make sure that the Tenant isn’t destroyed, see Prevent Destroy for more details.
Prevent Destroy
If you want to make sure that certain resources aren’t destroyed, specify the prevent_destroy lifecycle meta-argument as a measure of safety against the accidental replacement of objects that may be costly or impossible to reproduce. However, using this argument makes certain configuration changes impossible to apply.
lifecycle {
  prevent_destroy = true
}
A good example of an element to apply prevent_destroy to would be a Tenant currently in use. Deleting a Tenant removes all the associated Applications, Groups, and Users. Below, notice that the Forum Tenant can’t be destroyed.
Creating A Forum Tenant
resource "fusionauth_tenant" "forum" {
  lifecycle {
    prevent_destroy = true
  }
  issuer   = "forum"
  name     = "Forum"
  theme_id = var.fusionauth_default_theme_id
  multi_factor_configuration {
    login_policy = "Disabled"
  }
  login_configuration {
    require_authentication = false
  }
  external_identifier_configuration {
    authorization_grant_id_time_to_live_in_seconds = 30
    change_password_id_generator {
      length = 32
      type   = "randomBytes"
    }
    change_password_id_time_to_live_in_seconds = 600
    device_code_time_to_live_in_seconds        = 300
    device_user_code_id_generator {
      length = 6
      type   = "randomAlphaNumeric"
    }
    email_verification_id_generator {
      length = 32
      type   = "randomBytes"
    }
    email_verification_id_time_to_live_in_seconds = 86400
    email_verification_one_time_code_generator {
      length = 6
      type   = "randomAlphaNumeric"
    }
    external_authentication_id_time_to_live_in_seconds = 300
    one_time_password_time_to_live_in_seconds          = 60
    passwordless_login_generator {
      length = 32
      type   = "randomBytes"
    }
    passwordless_login_time_to_live_in_seconds = 180
    registration_verification_id_generator {
      length = 32
      type   = "randomBytes"
    }
    registration_verification_id_time_to_live_in_seconds = 86400
    registration_verification_one_time_code_generator {
      length = 6
      type   = "randomAlphaNumeric"
    }
    saml_v2_authn_request_id_ttl_seconds = 300
    setup_password_id_generator {
      length = 32
      type   = "randomBytes"
    }
    setup_password_id_time_to_live_in_seconds = 86400
    two_factor_id_time_to_live_in_seconds     = 300
    two_factor_one_time_code_id_generator {
      length = 6
      type   = "randomDigits"
    }
    two_factor_trust_id_time_to_live_in_seconds = 2592000
  }
  jwt_configuration {
    refresh_token_time_to_live_in_minutes = 43200
    time_to_live_in_seconds               = 3600
  }
  email_configuration {
    host = var.fusionauth_email_configuration_host
    port = var.fusionauth_email_configuration_port
    forgot_password_email_template_id = fusionauth_email.forgot-password.id
    set_password_email_template_id = fusionauth_email.setup-password.id
  }
}
You should always apply the prevent_destroy same meta-argument for Terraform managed non-deletable resources like the default Tenant and the FusionAuth Application, since Terraform can’t delete these anyway.
Default Tenant Import
import {
  to = fusionauth_application.FusionAuth
  id = "3c219e58-ed0e-4b18-ad48-f4f92793ae32"
}

resource "fusionauth_application" "FusionAuth" {
  lifecycle {
    prevent_destroy = true
  }
  tenant_id = fusionauth_tenant.Default.id
  name = "FusionAuth"
}
FusionAuth And OpenTofu
The FusionAuth Terraform provider should work fine with OpenTofu as long as OpenTofu remains compatible with Terraform. If you notice any differences, please open a GitHub issue.
Limitations
You must create an API key either manually or via Kickstart. There is no way to create the initial API key using Terraform.
The Terraform implementation is not currently at parity with the client libraries and the REST API. If you run into any discrepancies that affect your usages, please open a GitHub issue.