


The React SDK from FusionAuth enables developers to implement the login, logout, and registration flows in a React application with ease.
To show the React SDK in action, we will be using the FusionDesk application. FusionDesk is a simple help desk example application that allows users to create tickets and view them. The application is built using React and Node.js. It uses a server backend built using Ts.Ed, Node.js, and Typescript.
To get started with your own React application, install the FusionAuth React SDK and follow the FusionAuth React SDK documentation.
npm install @fusionauth/react-sdk
Prerequisites#
To follow along with this article, you will need to have the following installed:
- Node.js
- Git
- Docker with Docker Compose (optional)
If you want to run the example application on another domain than localhost, you need to make sure that FusionAuth runs on the same domain as the backend of the application.
FusionAuth will set the SameSite attribute of the access token app.at cookie to Lax. This enables the cookie to be sent with requests to applications in the same subdomain. If the backend of the application runs on a different domain, the cookie will not be sent. This will result in the backend not being able to validate the token.
For example, if FusionAuth is running on https://auth.example.com and the backend of the application is running on https://api.example.com, the access token will be transmitted, but if the backend of the application is running on https://api.piedpiper.com, the access token will not be transmitted.
See the Hosted Backend APIs documentation for more information.
Clone the Repository#
To begin, clone the demo application from GitHub using the following command:
git clone https://github.com/fusionauth/fusionauth-example-react-fusiondesk
Set up the FusionAuth Application#
To set up the FusionAuth application, follow the steps below:
cd fusionauth-example-react-fusiondesk
docker compose up -d
# Wait until FusionAuth is set up and available at http://localhost:9011
cd server && cp example.env .env && npm install && npm run seed && cd ..
cd client && cp example.env .env && npm install && cd ..
Run the Application#
To run the application, follow the steps below:
cd server && npm run start
Open a new terminal and run the following command:
cd client && npm run start
The application is now running on localhost:3000.
Use the following credentials to log in:
- Email:
admin@example.com - Password:
password
This will log you in as an agent. You can also log in as a user by using the following credentials:
- Email:
richard@example.com - Password:
password
Set up the FusionAuth Instance manually#
If you do not want to use Docker, you can set up the FusionAuth instance manually. To do so, follow the steps detailed in the FusionAuth documentation and the README.md of the example application.
Using Hosted OAuth Service Provider Endpoints#
Authentication is hard. We want to make it easy. That is why we have added the necessary endpoints for the OAuth 2.0 login flow into the FusionAuth API. This means that you can use FusionAuth to authenticate users without setting up a separate back end to handle the token exchange. This is a great way to get started with FusionAuth and to use it as a drop-in replacement for your existing OAuth 2.0 provider. So you can concentrate on providing the best experience for your users.
As you can see - if you inspect the backend of the example application - we do not provide any OAuth 2.0 endpoints. Instead, we use FusionAuth provided functionality to authenticate users.
After the user has logged in to FusionAuth, the app.at is stored in a cookie. This cookie is then sent with every request to the backend, where we validate the token in a middleware. If the token is valid, we allow the request to continue. If the token is invalid, we return a 401 status code.
import {Middleware, MiddlewareMethods} from '@tsed/platform-middlewares';
import {Context, Locals} from '@tsed/platform-params';
import {Unauthorized} from '@tsed/exceptions';
import {Constant, OnInit} from "@tsed/di";
import * as jose from "jose";

/**
 * FusionAuth middleware
 *
 * Checks if the user is logged in and has a valid access token
 */
@Middleware()
export class FusionAuthMiddleware implements MiddlewareMethods, OnInit {

  @Constant('envs.FUSIONAUTH_SERVER_URL')
  private baseUrl: string;

  @Constant('envs.FUSIONAUTH_CLIENT_ID')
  private clientId: string;

  @Constant('envs.FUSIONAUTH_ISSUER')
  private issuer: string;

  private jwks: ReturnType<typeof jose.createRemoteJWKSet>;

  async $onInit(): Promise<void> {
    this.jwks = jose.createRemoteJWKSet(new URL(`${this.baseUrl}/.well-known/jwks.json`));
  }

  async use(@Context() $ctx: Context, @Locals() locals: any) {
    const access_token = $ctx.request.cookies['app.at'];

    if (access_token) {
      try {
        const {payload} = await jose.jwtVerify(access_token, this.jwks, {
          issuer: this.issuer,
          audience: this.clientId,
        });
        // Add the payload including roles and user id to the locals
        locals.user = payload;
      } catch (e: unknown) {
        if (e instanceof jose.errors.JOSEError) {
          this.throwAuthError();
        } else {
          throw e;
        }
      }
    } else {
      this.throwAuthError()
    }
  }

  throwAuthError() {
    throw new Unauthorized('You are not authorized to access this resource');
  }

}
We also use the FusionAuth API to retrieve user information for the creator of a ticket. This is done in the FindAllTicketsController.ts file using the retrieveUser method of the FusionAuth API client for typescript.
const tickets = await this.ticketRepository.find({where, order: {id: 'DESC'}});

// Retrieve uses from FusionAuth
const creators = new Map<string, any>();
const client = new FusionAuthClient(this.apiKey, this.baseUrl);

for await (const ticket of tickets) {
  if (!creators.has(ticket.creator)) {
    const user = await client.retrieveUser(ticket.creator);
    creators.set(ticket.creator, user.response.user);
  }
}
Theming the Login / Register View in FusionAuth#
The login / register view in FusionAuth can be themed using the FusionAuth theme editor. You can find more information about the theme editor in the FusionAuth documentation.
For this example application, we integrate Tailwind CSS and DaisyUI into the theme by automatically generating the CSS stylesheet based on the FusionAuth theme templates. See the Tailwind CSS documentation for more information.
Benefits of the React SDK#
The React SDK enables developers to implement the login, logout, and registration flows in a React application.
It provides pre-built buttons for login, logout, and registration. It also provides a withFusionAuth HOC that can be used to wrap a component and provide the user information to the component.
With RequireAuth you can wrap a component and require the user to be authenticated before the component is rendered. The withRole option also enables you to restrict the user to a specific role.
RequireAuth is used in the LoggedInMenu component, which is used to display the user information, profile, and logout button if the user is authenticated.
import React, {FC} from 'react';
import {RequireAuth, useFusionAuth} from '@fusionauth/react-sdk';
import {Link} from 'react-router-dom';
import {Avatar} from './Avatar';

/**
 * LoggedInMenu component
 *
 * This component is used to display the logged-in menu.
 * It is used in the Header component.
 * @constructor
 */
export const LoggedInMenu: FC = () => {
  const {user, isAuthenticated, isLoading, logout} = useFusionAuth();

  if (!isAuthenticated || isLoading) {
    return null;
  }

  return (
    <RequireAuth>
      <div className="flex-none gap-2">
        <div>
          {user.roles?.map((role: string) => {
            return (<div className="badge badge-lg badge-ghost" key={role}>{role}</div>)
          })}
        </div>

        <Link to={'tickets/new'} className="btn">Create Ticket</Link>

        <div className="dropdown dropdown-end">
          <label tabIndex={0} className="btn btn-ghost btn-circle">
            <Avatar name={user.given_name + ' ' + user.family_name} url={user.picture}/>
          </label>
          <ul tabIndex={0} className="mt-3 p-2 shadow menu menu-compact dropdown-content bg-base-100 rounded-box w-52">
            <li>
              <Link className="justify-between" to={'profile'}>
                Profile
              </Link>
            </li>
            <li>
              {/* The out-of-the-box Logout button. You may customize how logout is performed by */}
              {/* utilizing the `logout` method supplied by the FusionAuthContext */}
              <button onClick={() => logout()}>Logout</button>
            </li>
          </ul>
        </div>
      </div>
    </RequireAuth>
  );
}
With the FusionAuthConfig you can configure the FusionAuth instance that is used by the React SDK. If you are using a different OAuth 2.0 backend, you will most likely have to configure the route props.
We are using the React Router v6 in the example application. To protect routes, we are using a custom ProtectedRoutes component. This component uses the useFusionAuth hook to check if the user is authenticated. If the user is authenticated, the component renders the Outlet component. If the user is not authenticated, the component redirects the user to the / route.
import {Navigate, Outlet} from 'react-router-dom';
import {useFusionAuth} from '@fusionauth/react-sdk';
import {FC} from 'react';

/**
 * ProtectedRoutes component
 *
 * This component is used to protect routes.
 * Any route that is a child of this component will be protected.
 * @constructor
 */
export const ProtectedRoutes: FC = () => {
  const {isLoading, isAuthenticated} = useFusionAuth();

  if (isLoading) return null;

  return (
    isAuthenticated ? <Outlet/> : <Navigate to={'/'} replace={true}/>
  );
};Login Page#
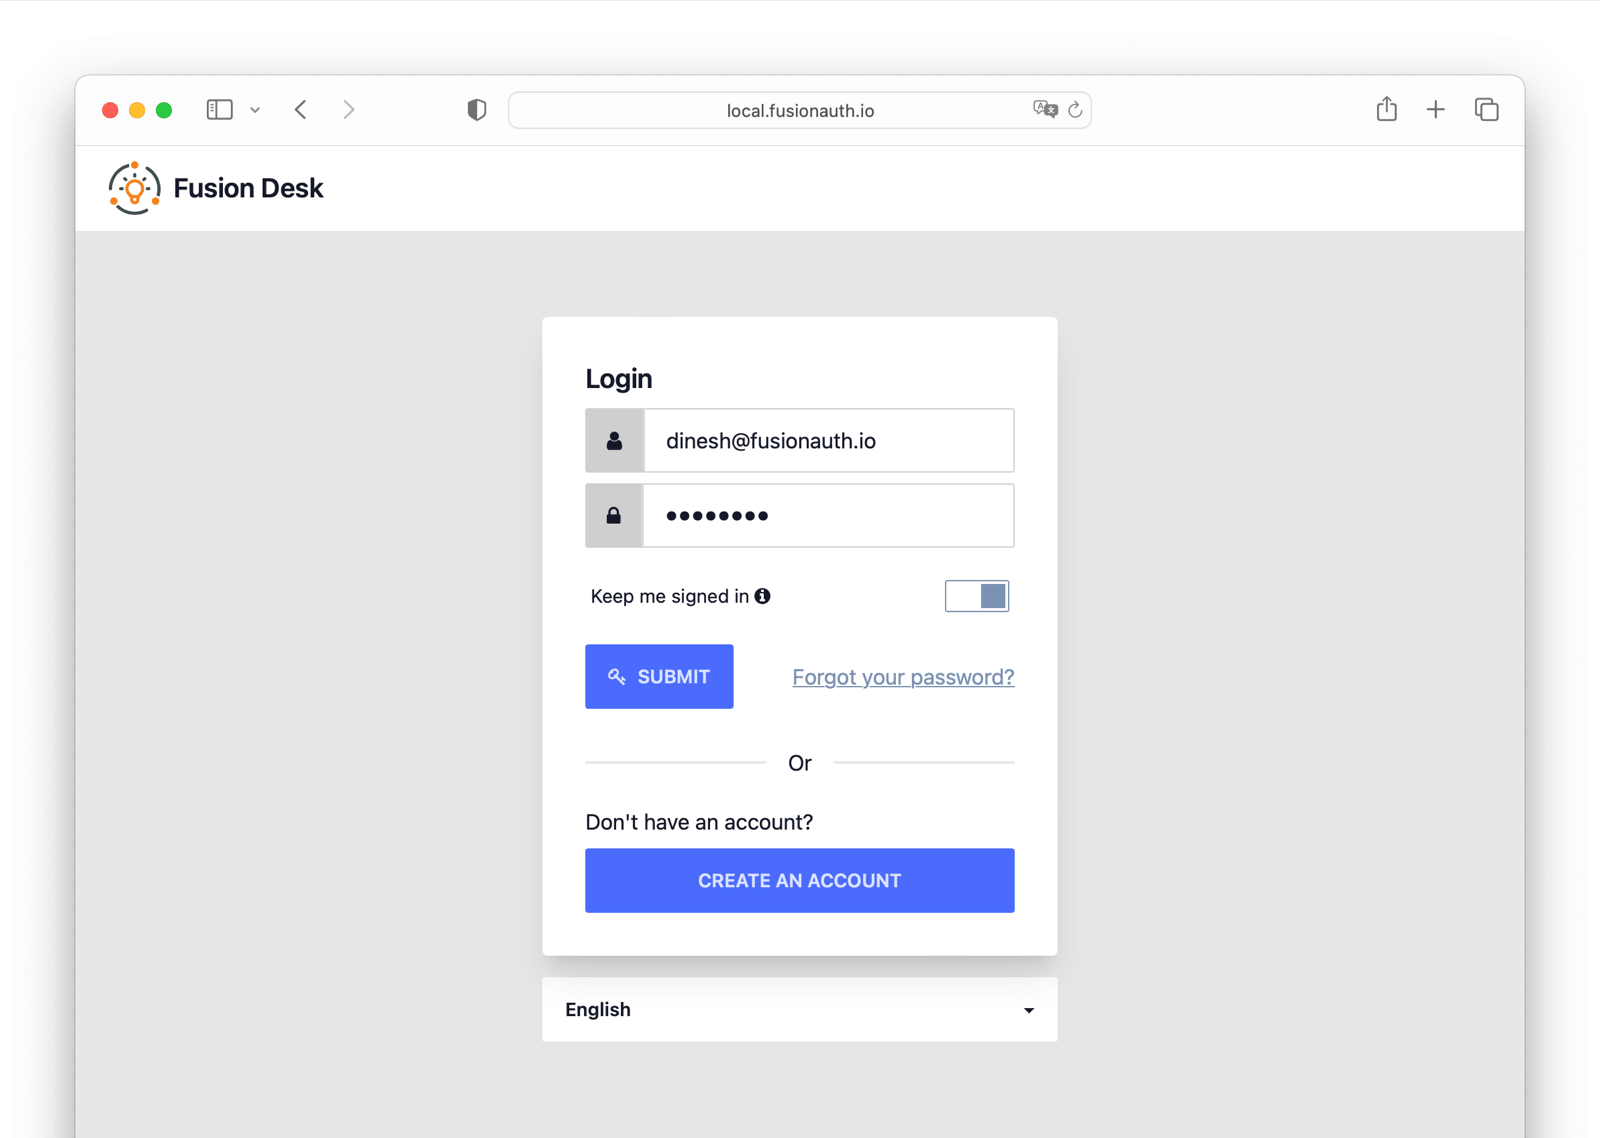
For any application, you need to have a page where customers can log in.
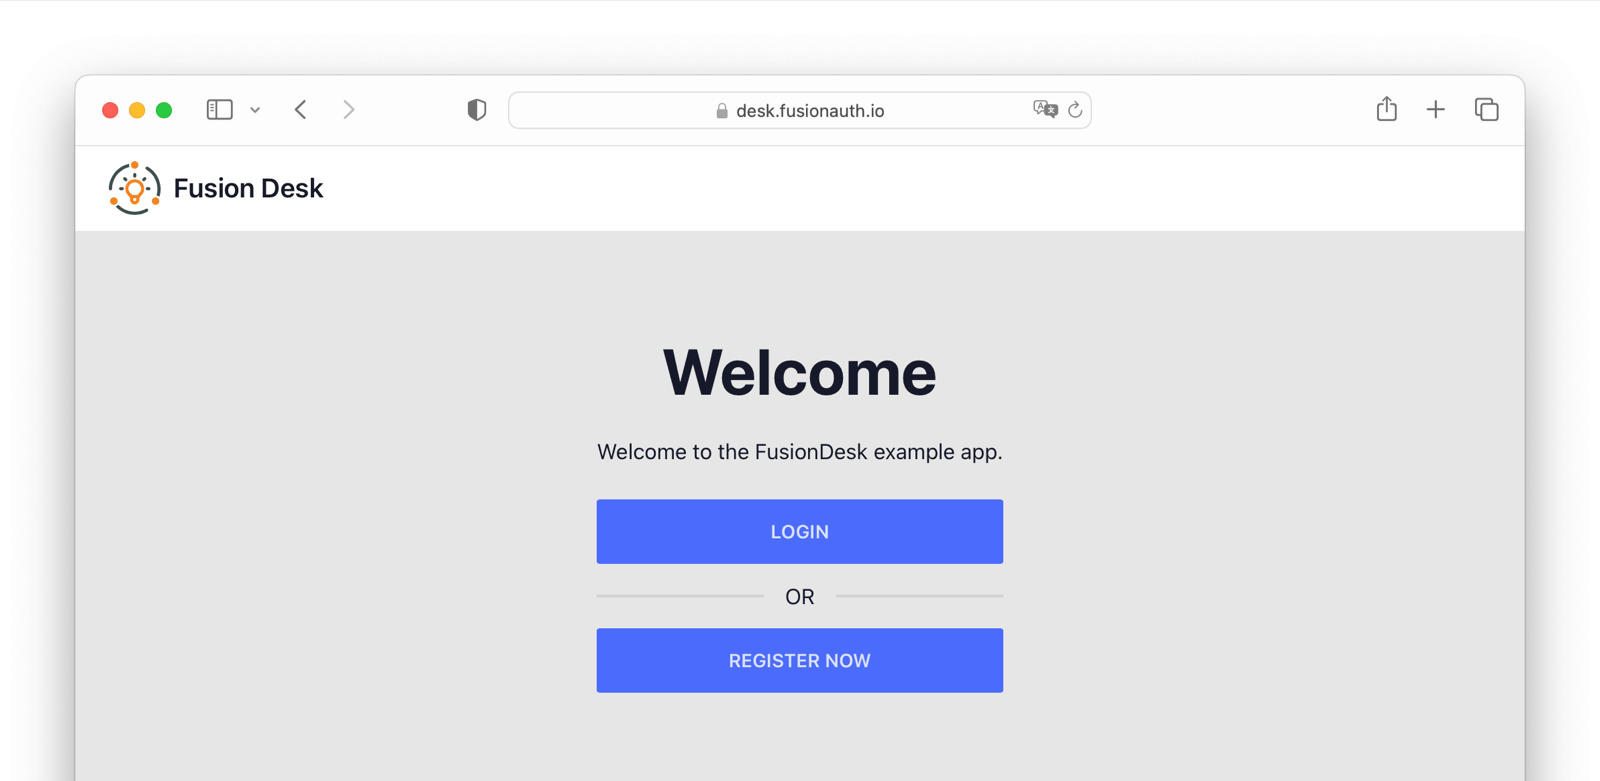
The login page allows the user to login or register using the FusionAuth login / register flow. The login page is implemented in the LoginPage.tsx file and displays the login and register buttons.
To use the button styling provided by DaisyUI instead of the one provided by FusionAuth, we are not using the pre-built buttons from the React SDK. Instead, we are using the useFusionAuth hook to get the login and register methods from the FusionAuthContext.
import React, {FC, useEffect} from 'react';
import {useFusionAuth,} from '@fusionauth/react-sdk';
import {useNavigate} from 'react-router-dom';
/**
* LoginPage component
*
* This page is displayed if the user is not authenticated.
* It shows a login and a register button.
* @constructor
*/
export const LoginPage: FC = () => {
const navigate = useNavigate();
// Pull loading/authentication state out of FusionAuth context
const {isAuthenticated, isLoading, login, register} = useFusionAuth();
// If the user is authenticated, redirect them to the `tickets` page
useEffect(() => {
if (isAuthenticated) {
navigate('/tickets');
}
}, [isAuthenticated, navigate])
// Check if the user is authenticated or if the authentication state is still loading
if (isAuthenticated || isLoading) {
return null;
}
// If the user is not authenticated, show the login and register buttons
return (
<div className="hero mt-16">
<div className="hero-content text-center">
<div className="max-w-md">
<h1 className="text-5xl font-bold">Welcome</h1>
<p className="py-6">Welcome to the FusionDesk example app.</p>
<div className="flex flex-col w-full border-opacity-50">
{/* We use the FusionAuth `login` method to redirect to the OAuth login page */}
{/* If you don't need to customize the login, you could use the out-of-box Login button. */}
<button onClick={() => login()} className="btn btn-primary">Login</button>
<div className="divider">OR</div>
{/* We use the FusionAuth `register` method to redirect to the OAuth login page */}
{/* If you don't need to customize the login, you could use the out-of-box Register button. */}
<button onClick={() => register()} className="btn btn-primary">Register Now</button>
</div>
</div>
</div>
</div>
);
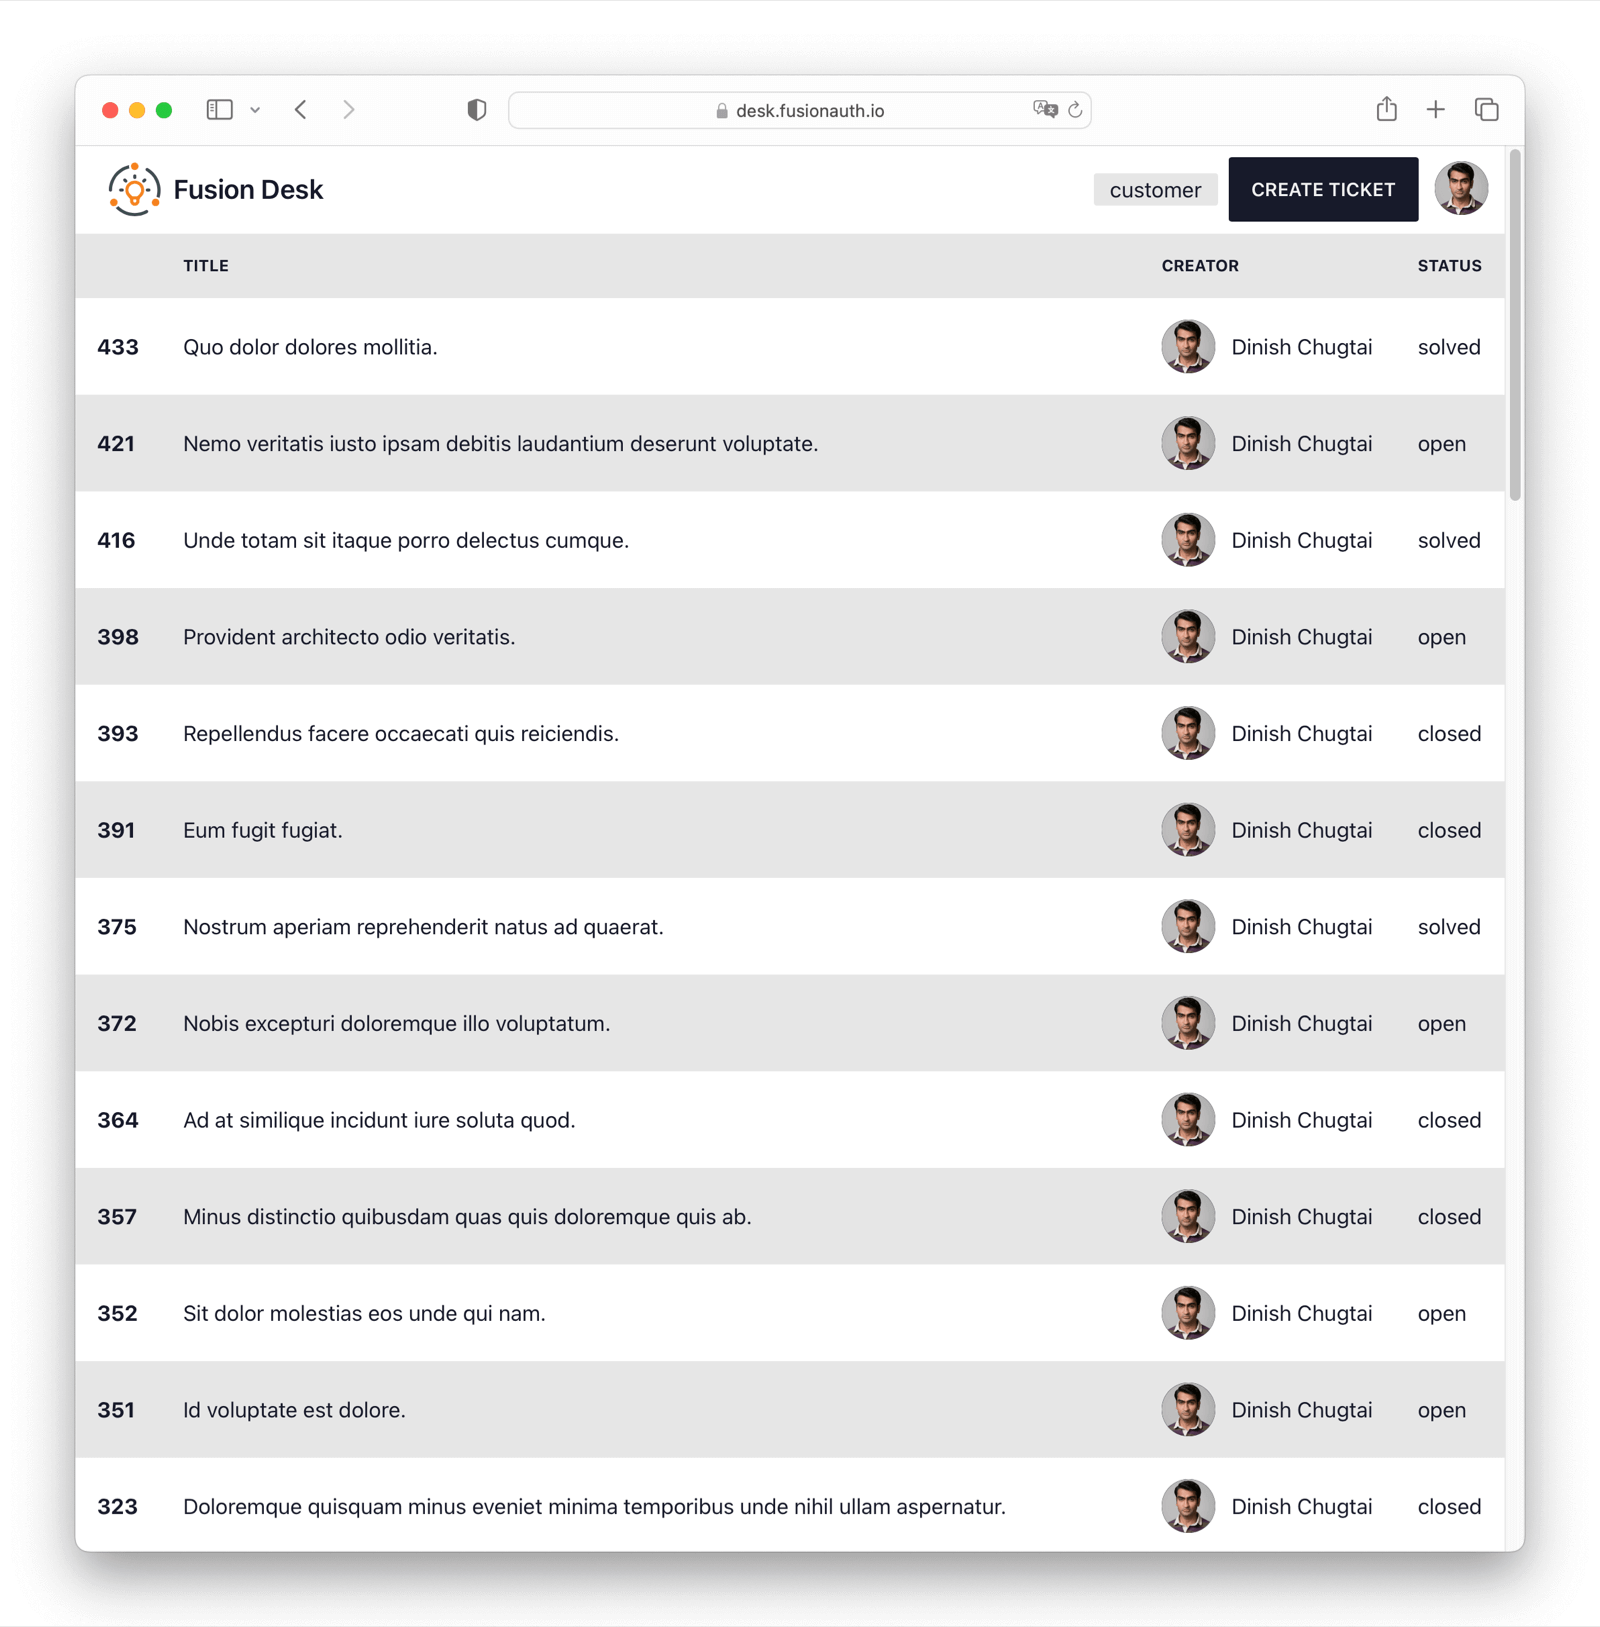
};Tickets Page#
After a user is authenticated, you should show them their tickets. Otherwise, why bother?
The tickets page displays the tickets of the user. The tickets are retrieved from the backend using the /api/tickets endpoint. The returned tickets depend on the role of the user. If the user is only a customer, only the tickets of the user are returned.
We also embed the user information in the backend response. This allows us to display the creator information of the ticket (full name, picture).
Here's the backend GET / endpoint:
import {Controller, Inject} from '@tsed/di';
import {Get} from '@tsed/schema';
import {Locals} from '@tsed/platform-params';
import {TicketEntity} from '../../../datasources/Ticket.entity';
import {FindOptionsWhere} from 'typeorm/find-options/FindOptionsWhere';
import {TICKET_REPOSITORY} from '../../../datasources/TicketRepository';
import {Constant} from '@tsed/cli-core';
import {FusionAuthClient} from '@fusionauth/typescript-client';

@Controller('/')
export class FindAllTicketsController {

  @Inject(TICKET_REPOSITORY)
  private ticketRepository: TICKET_REPOSITORY;

  @Constant('envs.FUSIONAUTH_API_KEY')
  private apiKey: string;

  @Constant('envs.FUSIONAUTH_SERVER_URL')
  private baseUrl: string;

  /**
   * Get all tickets
   * @param locals
   */
  @Get()
  async findAll(@Locals() locals: { user: any }): Promise<(Partial<TicketEntity> & { _creator: any }) []> {
    const where: FindOptionsWhere<TicketEntity> = {};
    if (!locals.user?.roles?.includes('agent')) {
      where['creator'] = locals.user.sub;
    }

    // Get all tickets
    const tickets = await this.ticketRepository.find({where, order: {id: 'DESC'}});

    // Retrieve uses from FusionAuth
    const creators = new Map<string, any>();
    const client = new FusionAuthClient(this.apiKey, this.baseUrl);

    for await (const ticket of tickets) {
      if (!creators.has(ticket.creator)) {
        const user = await client.retrieveUser(ticket.creator);
        creators.set(ticket.creator, user.response.user);
      }
    }

    // Return tickets with creator data embedded
    return tickets
      .map(ticket => {
        return {
          id: ticket.id,
          title: ticket.title,
          creator: ticket.creator,
          status: ticket.status,
          created: ticket.created,
          updated: ticket.updated,
          _creator: creators.get(ticket.creator)
        };
      });
  }

}
Here's the frontend TicketsPage.tsx which ingests the API response and builds a nice looking ticket list:
import React, {FC} from 'react';
import {Tickets} from '../entity/Ticket';
import {Link} from 'react-router-dom';
import {useQuery} from 'react-query';
import {Loading} from '../components/Loading';
import {Avatar} from '../components/Avatar';

/**
 * Tickets page
 *
 * This page is used to display all tickets.
 * @constructor
 */
export const TicketsPage: FC = () => {
  const {isLoading, isError, data, error} = useQuery<Tickets, Error>('tickets', () => {
    return fetch('http://localhost:8083/api/tickets', {
      credentials: 'include'
    })
      .then(response => response.json() as Promise<Tickets>);
  }, {
    refetchInterval: 5000,
  })

  if (isLoading) return <Loading/>

  if (isError) return <div>Error: {error?.message}</div>

  return (
    <div className="overflow-x-auto">
      <table className="table table-zebra w-full">
        <thead>
        <tr>
          <th></th>
          <th>Title</th>
          <th>Creator</th>
          <th>Status</th>
        </tr>
        </thead>
        <tbody>
        {data?.map((ticket) =>
          <tr key={ticket.id}>
            <th><Link to={`${ticket.id}`}>{ticket.id}</Link></th>
            <td><Link to={`${ticket.id}`}>{ticket.title}</Link></td>
            <td>
              <div className="flex items-center space-x-3">
                <Avatar name={ticket._creator.firstName + ' ' + ticket._creator.lastName}
                        url={ticket._creator.imageUrl}/>
                <div>{ticket._creator.firstName} {ticket._creator.lastName}</div>
              </div>
            </td>
            <td>{ticket.status}</td>
          </tr>
        )}
        </tbody>
      </table>
    </div>
  );
};
Ticket Details Page#
Along with a list page, you have a details page too. This page is useful when a user wants to dig in a bit more to the details of a ticket.
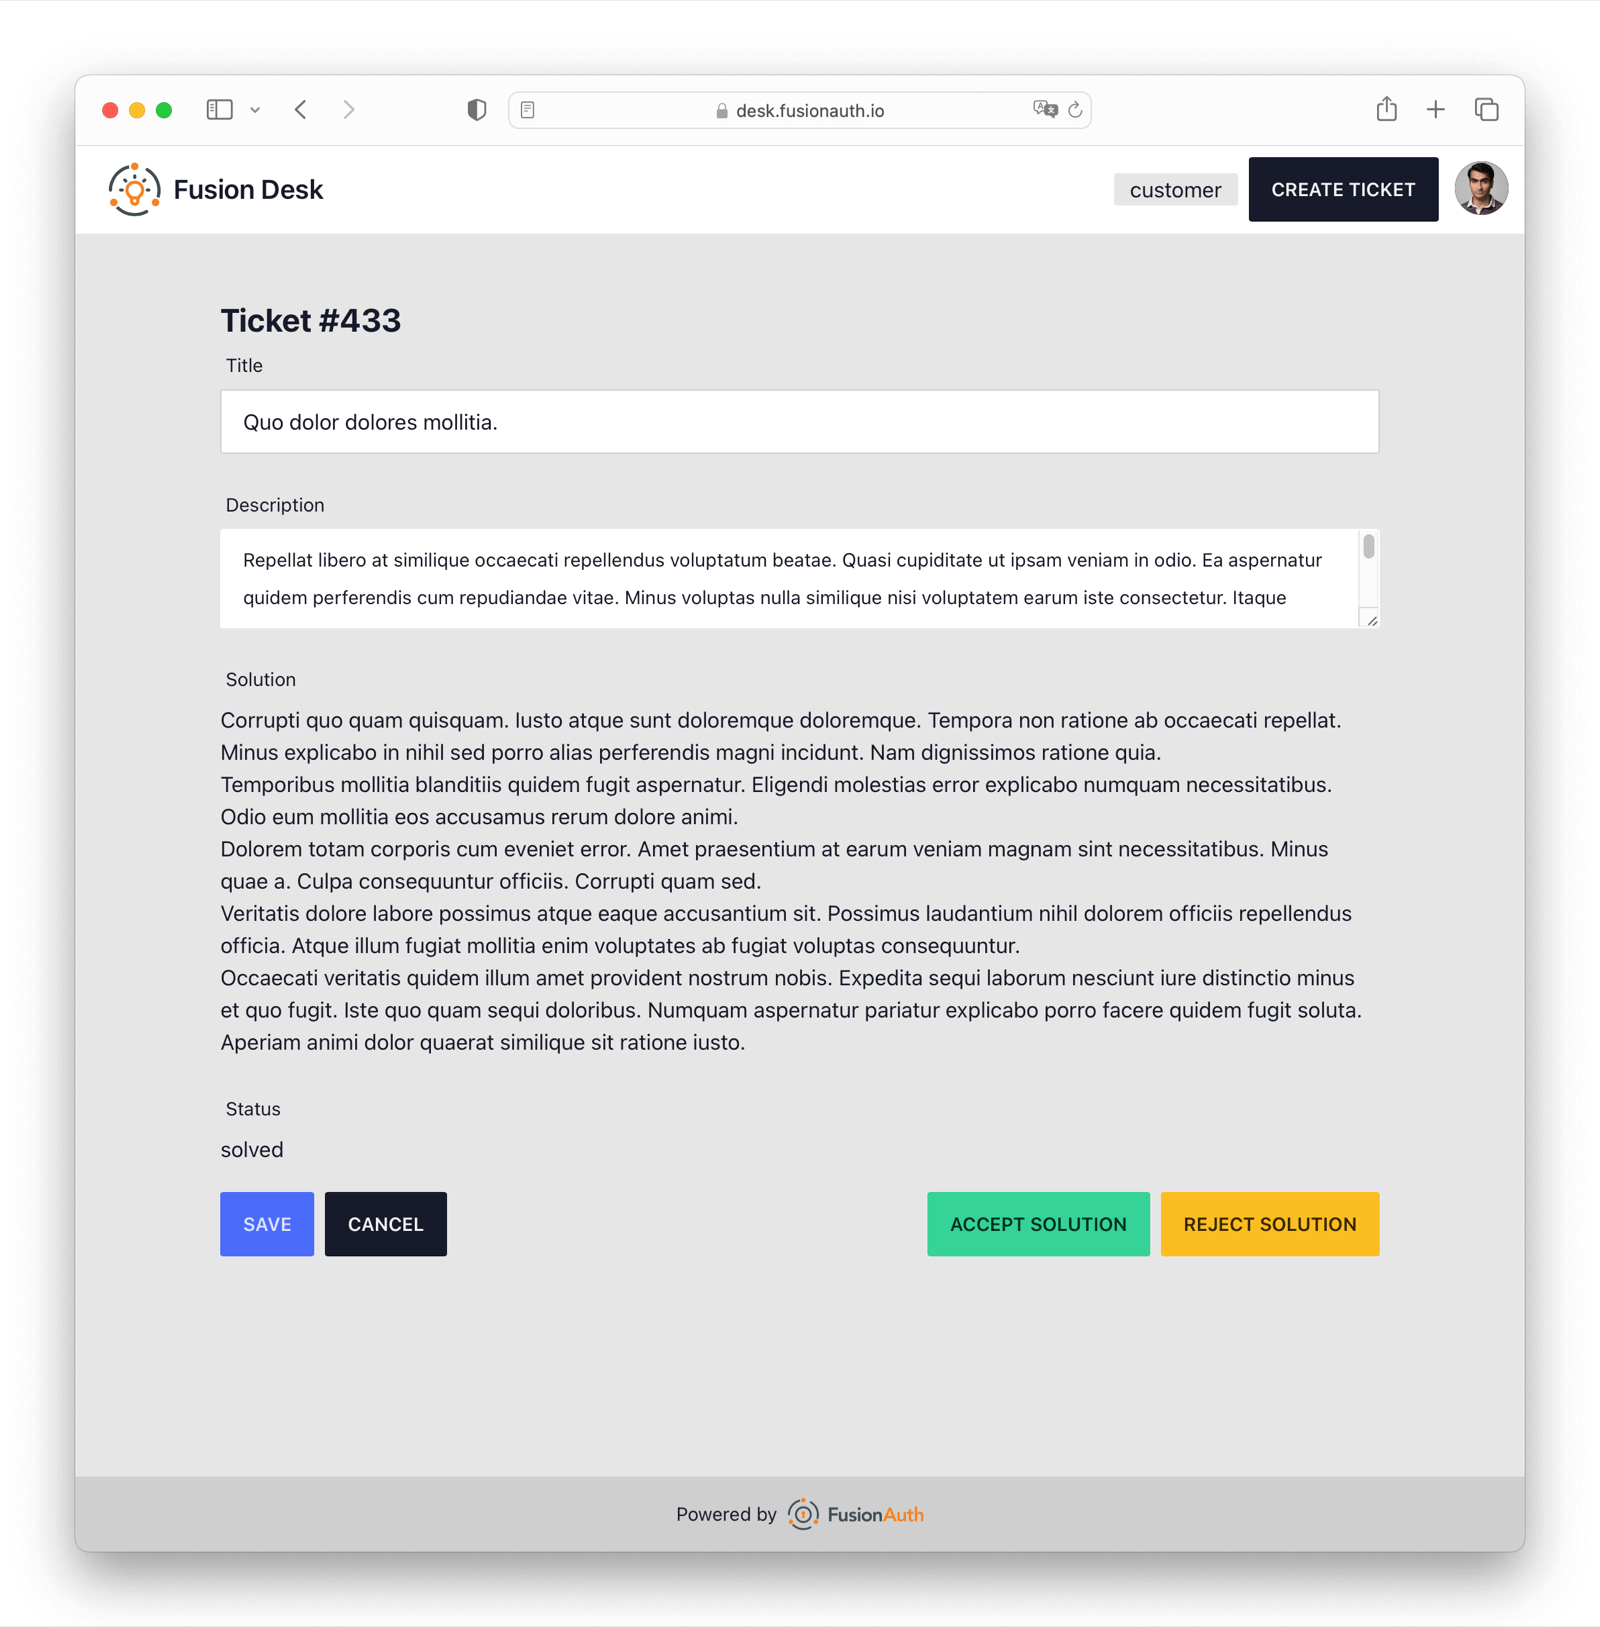
The ticket page allows the user to create or update a ticket. The ticket page is implemented in the TicketPage.tsx file.
Depending on the state of the ticket and the role of the user, different actions are available.
Currently, the following ticket workflow is implemented:

If the ticket is open and the user is an agent, the user can mark the ticket as solved. The creator of the ticket then has the option to either close or reopen the ticket with Accept solution or Reject solution. After the ticket is closed, it cannot be edited anymore.
Okay, it's not Zendesk, but this is a prototype application, not a multi-billion dollar SaaS unicorn.
This is the API to pull the details of a single ticket, using GET and passing the id:
import {Get, Integer} from '@tsed/schema';
import {PathParams} from '@tsed/platform-params';
import {TicketEntity} from '../../../datasources/Ticket.entity';
import {Controller, Inject} from '@tsed/di';
import {TICKET_REPOSITORY} from '../../../datasources/TicketRepository';

@Controller('/:id')
export class FindTicketController {

  @Inject(TICKET_REPOSITORY)
  private ticketRepository: TICKET_REPOSITORY;

  /**
   * Get a single ticket
   * @param id
   */
  @Get()
  find(@PathParams("id") @Integer() id: number): Promise<TicketEntity> {
    return this.ticketRepository.findOneByOrFail({id});
  }

}
Here's the corresponding create API, using the POST method:
import {Controller, Inject} from '@tsed/di';
import {Post} from '@tsed/schema';
import {BodyParams, Locals} from '@tsed/platform-params';
import {DeepPartial} from 'typeorm/common/DeepPartial';
import {TicketEntity} from '../../../datasources/Ticket.entity';
import {TICKET_REPOSITORY} from '../../../datasources/TicketRepository';

@Controller('/')
export class CreateTicketController {

  @Inject(TICKET_REPOSITORY)
  private ticketRepository: TICKET_REPOSITORY;

  /**
   * Create a new ticket
   * @param ticket
   * @param locals
   */
  @Post('/')
  create(@BodyParams() ticket: DeepPartial<TicketEntity>, @Locals() locals: { user: any }): Promise<TicketEntity> {
    const ticketEntity = this.ticketRepository.create();
    this.ticketRepository.merge(ticketEntity, {
      title: ticket.title,
      description: ticket.description,
    });
    ticketEntity.creator = locals.user.sub;
    return this.ticketRepository.save(ticketEntity);
  }

}
Here's the method to update a ticket with PATCH:
import {Controller, Inject} from '@tsed/di';
import {TICKET_REPOSITORY} from '../../../datasources/TicketRepository';
import {Integer, Patch} from '@tsed/schema';
import {BodyParams, Locals, PathParams} from '@tsed/platform-params';
import {DeepPartial} from 'typeorm/common/DeepPartial';
import {TicketEntity, TicketStatus} from '../../../datasources/Ticket.entity';

@Controller('/')
export class UpdateTicketController {

  @Inject(TICKET_REPOSITORY)
  private ticketRepository: TICKET_REPOSITORY;

  /**
   * Update a ticket
   * @param id
   * @param ticketInput
   * @param locals
   */
  @Patch('/:id')
  async update(@PathParams("id") @Integer() id: number, @BodyParams() ticketInput: DeepPartial<TicketEntity>, @Locals() locals: {
    user: any
  }): Promise<TicketEntity> {
    let filteredTicketInput: DeepPartial<TicketEntity> = {
      title: ticketInput.title,
      description: ticketInput.description,
      status: ticketInput.status,
    };
    if (locals.user.roles.includes('agent')) {
      filteredTicketInput = {
        ...filteredTicketInput,
        solution: ticketInput.solution,
      };
    } else if (ticketInput.status !== TicketStatus.OPEN && ticketInput.status !== TicketStatus.CLOSED)
      throw new Error('You are not allowed to change the status of the ticket');

    const ticket = await this.ticketRepository.findOneByOrFail({id});
    this.ticketRepository.merge(ticket, filteredTicketInput);
    return this.ticketRepository.save(ticket);
  }

}
Finally, here's the front end code for building the display.
import {FC} from 'react';
import {useLoaderData, useNavigate} from 'react-router-dom';
import {Ticket} from '../entity/Ticket';
import {useForm} from 'react-hook-form';
import {useFusionAuth} from '@fusionauth/react-sdk';
import {hasRole} from '../utils/hasRole';

/**
 * Ticket page
 *
 * Displays a ticket and allows the user to edit it
 * @constructor
 */
export const TicketPage: FC = () => {
  const navigate = useNavigate();
  const {ticket} = useLoaderData() as { ticket: Ticket };

  const {user} = useFusionAuth();

  const {register, handleSubmit} = useForm<Ticket>({
    defaultValues: ticket
  });
  const onSubmit = (data: any) => {
    return fetch(`http://localhost:8083/api/tickets/${ticket.id ?? ''}`, {
      method: ticket.id ? 'PATCH' : 'POST',
      body: JSON.stringify(data),
      headers: {
        'Content-Type': 'application/json; charset=UTF-8'
      },
      credentials: 'include'
    })
      .finally(() => {
        navigate('/tickets', {replace: true});
      });
  }

  const updateStatus = (e: any, status: string) => {
    e.preventDefault();
    return onSubmit({
      id: ticket.id,
      status: status
    });
  }

  return (
    <div className="p-4 mt-8 mx-auto max-w-4xl">
      <h1 className="text-2xl font-bold">Ticket {ticket.id &&
        <span>#{ticket.id}</span>}
      </h1>

      <form onSubmit={handleSubmit(onSubmit)} className="space-y-5">
        <div className="form-control w-full">
          <label className="label">
            <span className="label-text">Title</span>
          </label>
          <input type="text" placeholder="Title" className="input input-bordered w-full"
                 {...register("title")}/>
        </div>

        <div className="form-control w-full">
          <label className="label">
            <span className="label-text">Description</span>
          </label>
          <textarea className="textarea" {...register("description")}></textarea>
        </div>

        <div className="form-control w-full">
          <label className="label">
            <span className="label-text">Solution</span>
          </label>
          {hasRole(user, 'agent')
            ? <textarea className="textarea" {...register("solution")}></textarea>
            : <article className="whitespace-pre-wrap">{ticket.solution ?? 'No solution provided'}</article>
          }
        </div>

        <div className="form-control w-full">
          <label className="label">
            <span className="label-text">Status</span>
          </label>
          <span>{ticket.status}</span>
        </div>

        <div className="flex space-x-2">
          {ticket.status !== 'closed' &&
            <button className="btn btn-primary" type="submit">Save</button>
          }

          <button className="btn" type="button" onClick={() => navigate('/tickets', {replace: true})}>Cancel</button>

          <div className="grow text-right">
            {ticket.status === 'open' && hasRole(user, 'agent') &&
              <button className="btn btn-success" type="button" onClick={(e) => updateStatus(e, 'solved')}>Mark as
                Solved</button>
            }
            {ticket.status === 'solved' && user?.sub === ticket.creator &&
              <div className="space-x-2">
                <button className="btn btn-success" type="button" onClick={(e) => updateStatus(e, 'closed')}>Accept
                  solution
                </button>
                <button className="btn btn-warning" type="button" onClick={(e) => updateStatus(e, 'open')}>Reject
                  solution
                </button>
              </div>
            }
          </div>
        </div>
      </form>
    </div>
  );
};
Profile Page#
Users are important, so let's give them a profile page in FusionDesk as well.
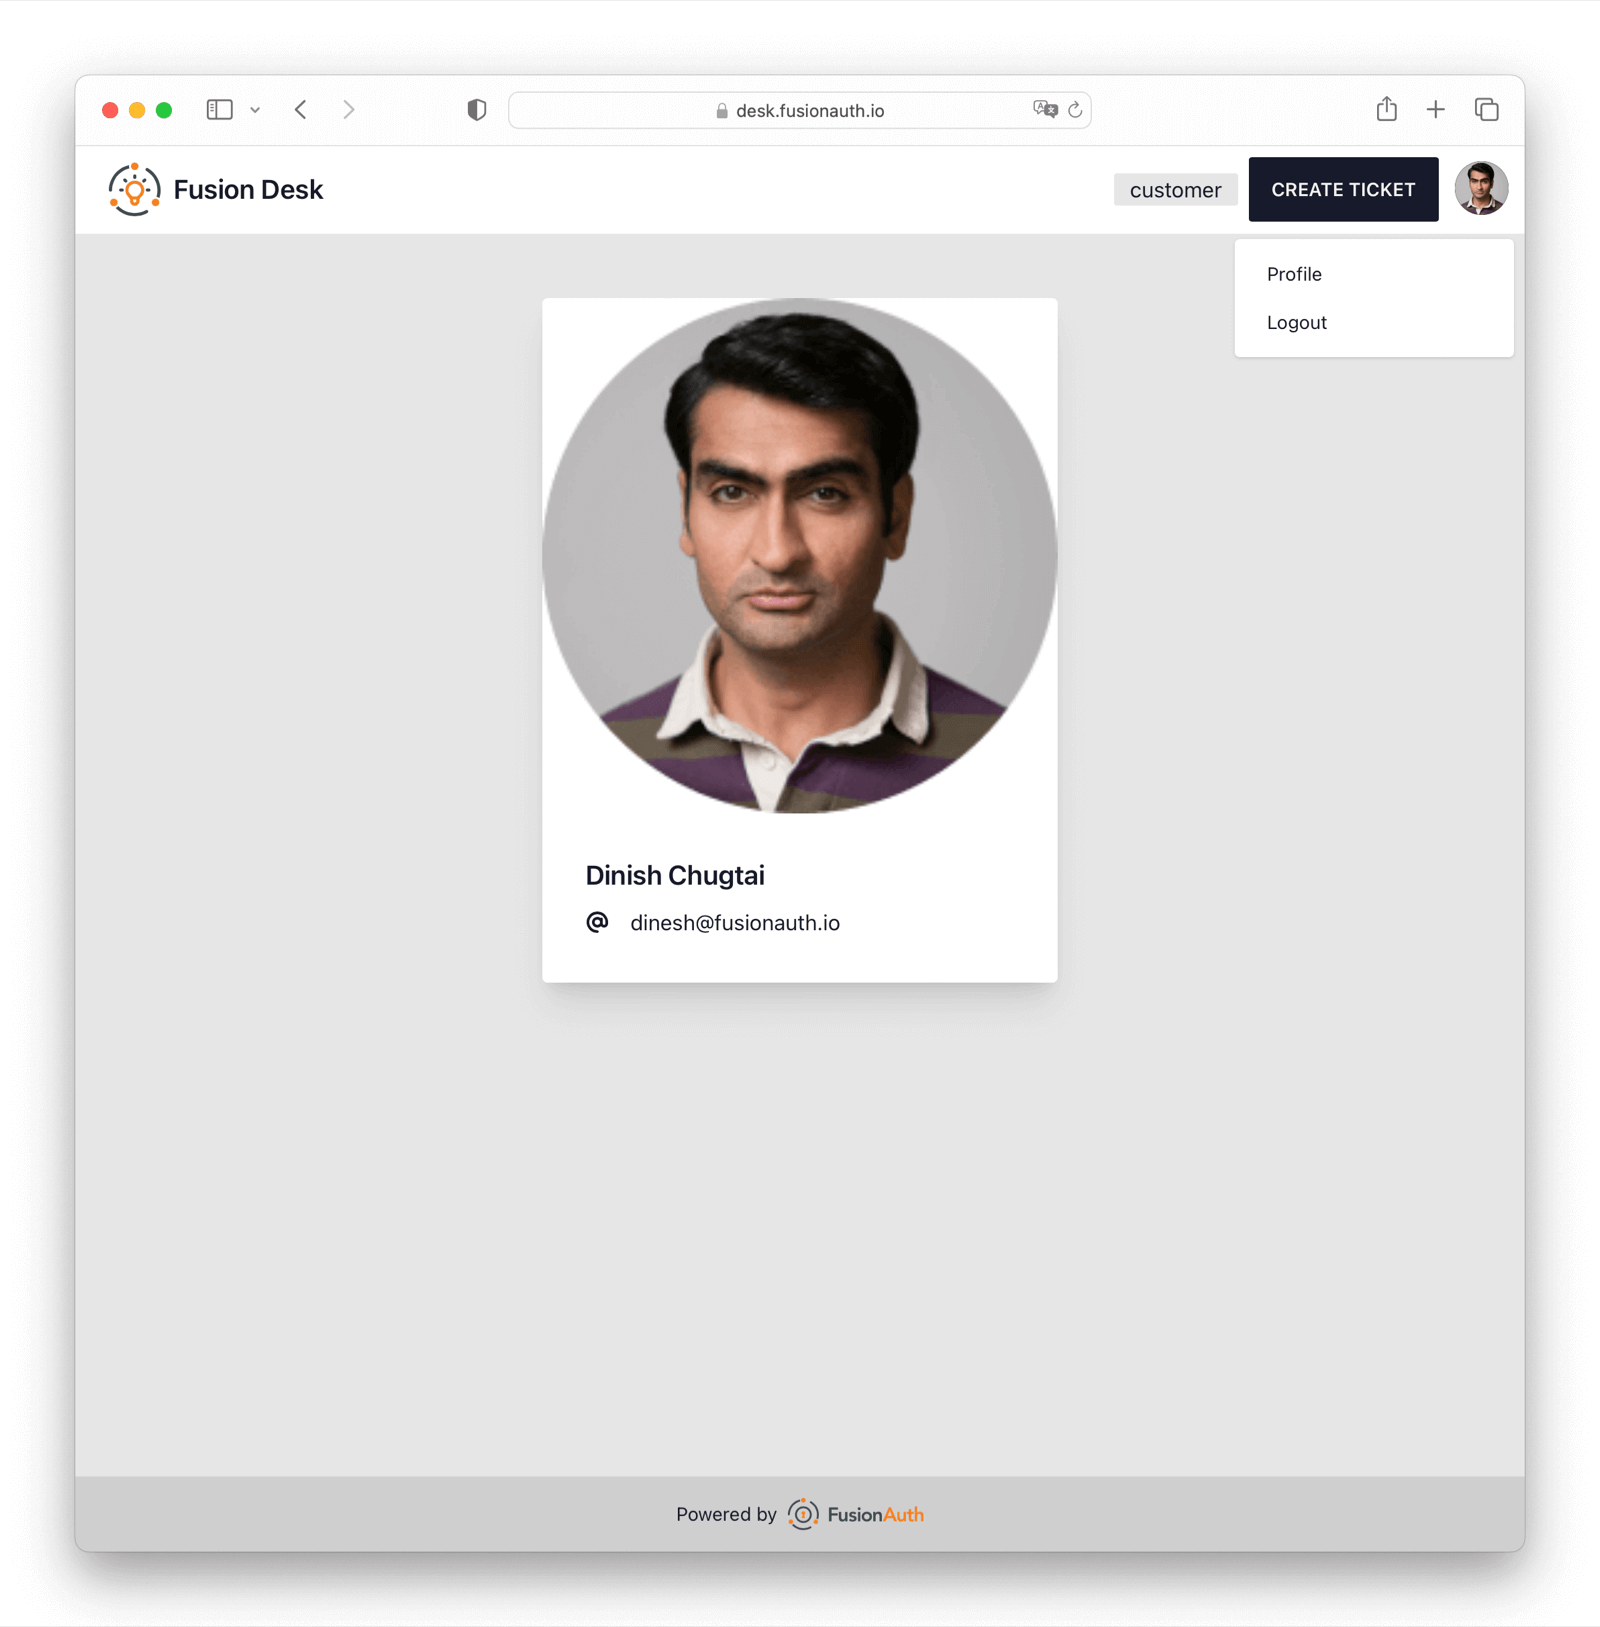
The profile page displays the user information. The profile page is implemented in the ProfilePage.tsx file and displays the information of the FusionAuth user.
import {FC} from 'react';
import {useFusionAuth} from '@fusionauth/react-sdk';
import {FontAwesomeIcon} from '@fortawesome/react-fontawesome';
import {faAt, faPhone} from '@fortawesome/free-solid-svg-icons'
import {initials} from '../utils/initials';

/**
 * ProfilePage component
 *
 * This component is used to display the profile page.
 * @constructor
 */
export const ProfilePage: FC = () => {
  const {user} = useFusionAuth();

  return (
    <div className="p-4 mt-8 w-full">
      <div className="card mx-auto w-96 bg-base-100 shadow-xl">
        {user.picture ? (
          <figure><img src={user.picture} className="w-96 h-96" alt="Avatar"/></figure>
        ) : (
          <figure className="bg-neutral-focus text-neutral-content w-96 h-96">
            <span className="text-8xl">{initials(user.given_name + ' ' + user.family_name)}</span>
          </figure>
        )}
        <div className="card-body">
          <h2 className="card-title">{user.given_name} {user.family_name}</h2>

          <table>
            <tbody>
            <tr>
              <td><FontAwesomeIcon icon={faAt}/></td>
              <td>{user.email}</td>
            </tr>
            {user.phone_number &&
              <tr>
                <td><FontAwesomeIcon icon={faPhone}/></td>
                <td>{user.phone_number}</td>
              </tr>
            }
            </tbody>
          </table>
        </div>
      </div>
    </div>
  );
}
There's no way to edit or modify the user information in FusionDesk. You'd modify user data in the FusionAuth installation instead.
Conclusion#
In this article, you have learned shown how to use the FusionAuth React SDK in a React application, including using middleware to protect various API endpoints. Hopefully you got to file some fun tickets as well.
You have also learned how to use the FusionAuth OAuth 2.0 Authorization Code grant in a React application. While the FusionDesk application consists of a few screens, the principles can be applied to larger React applications.
Happy coding!


