GitHub Actions
This page explains:
- How to upgrade FusionAuth.
- How to write automated tests of your application login with FusionAuth.
- How to run these tests in a GitHub Actions workflow when pushing to the main branch.
- How to automate deployment and testing on your live application.
Prerequisites#
To follow this article, you need to know how to create a project in GitHub, but you don't need to know anything about FusionAuth, GitHub Actions, or automated testing, as the basics are explained here.
You will need Docker and Node.js installed to run the example application accompanying this guide.
Some Definitions And Goals#
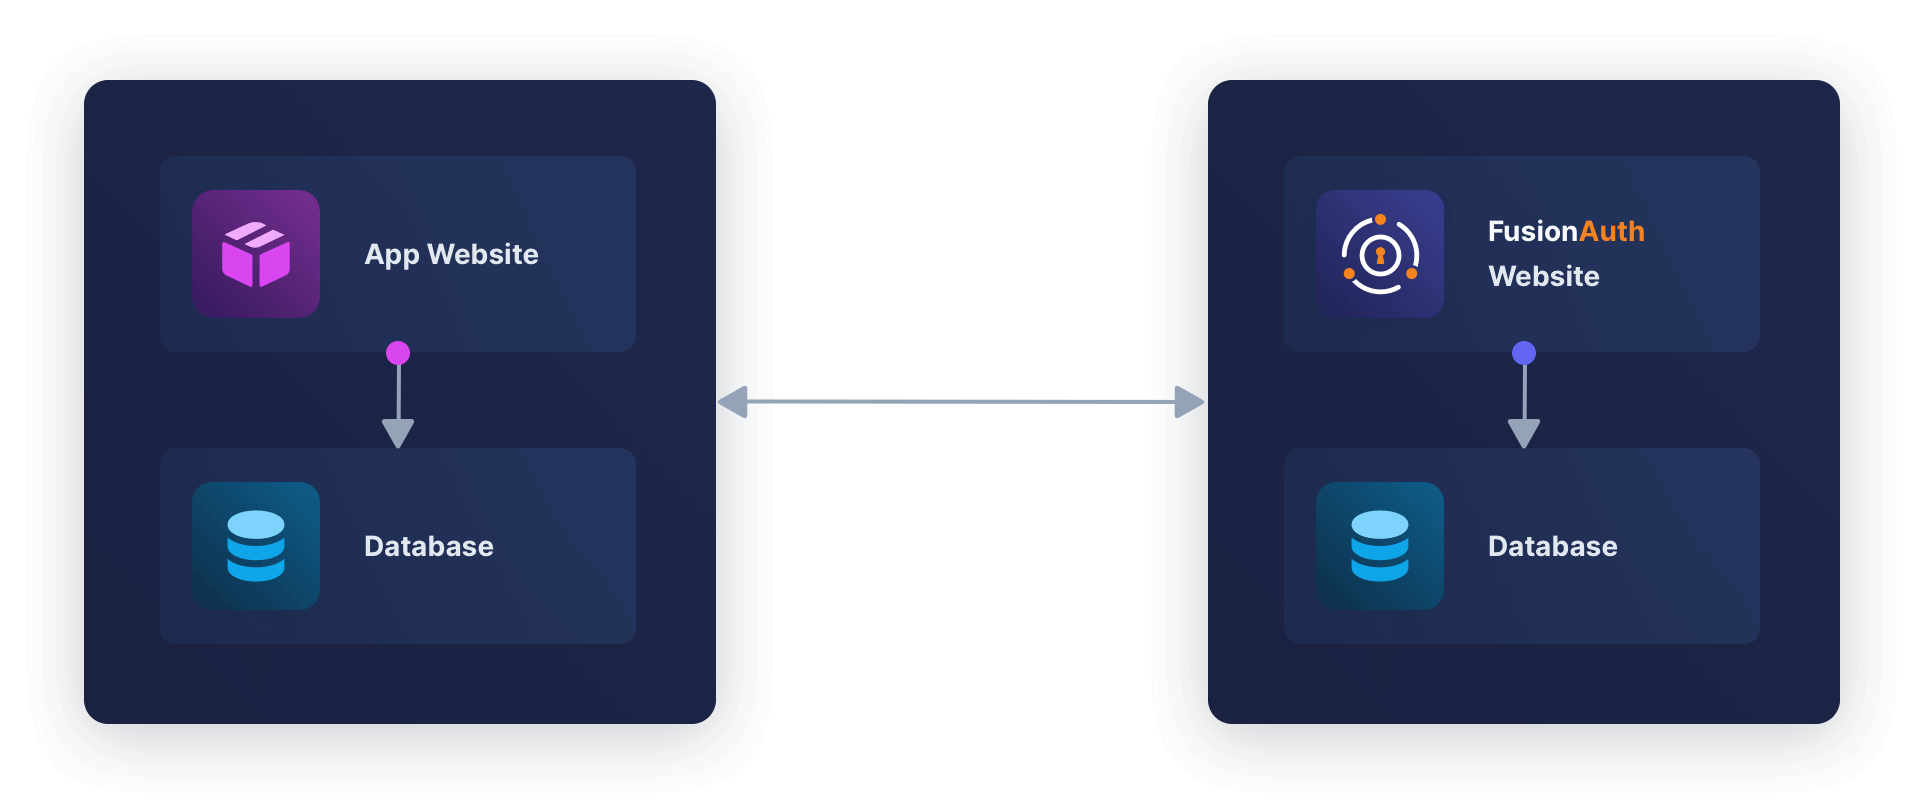
FusionAuth provides login functionality for your web application. Users are stored in the FusionAuth database, separate from the database your app uses to keep its data. Assuming you have built a login page that redirects a user to FusionAuth, your system will have the components shown below.
You might have the following questions:
- How do I deploy these components to production?
- What happens when FusionAuth releases a new version? How do I upgrade FusionAuth without losing data?
- How can I test that login still works after upgrading my app or FusionAuth?
- How do I separate and manage my development and production environments?
- How do I securely keep administrative passwords, including database access passwords, and include them when deploying?
Automating these tasks is called CI/CD or continuous integration and continuous deployment.
- CI refers to testing changes to code you push to the main branch to ensure it fits in with the existing system and everything still works.
- CD refers to deploying every push to the main branch of your production (live) site.
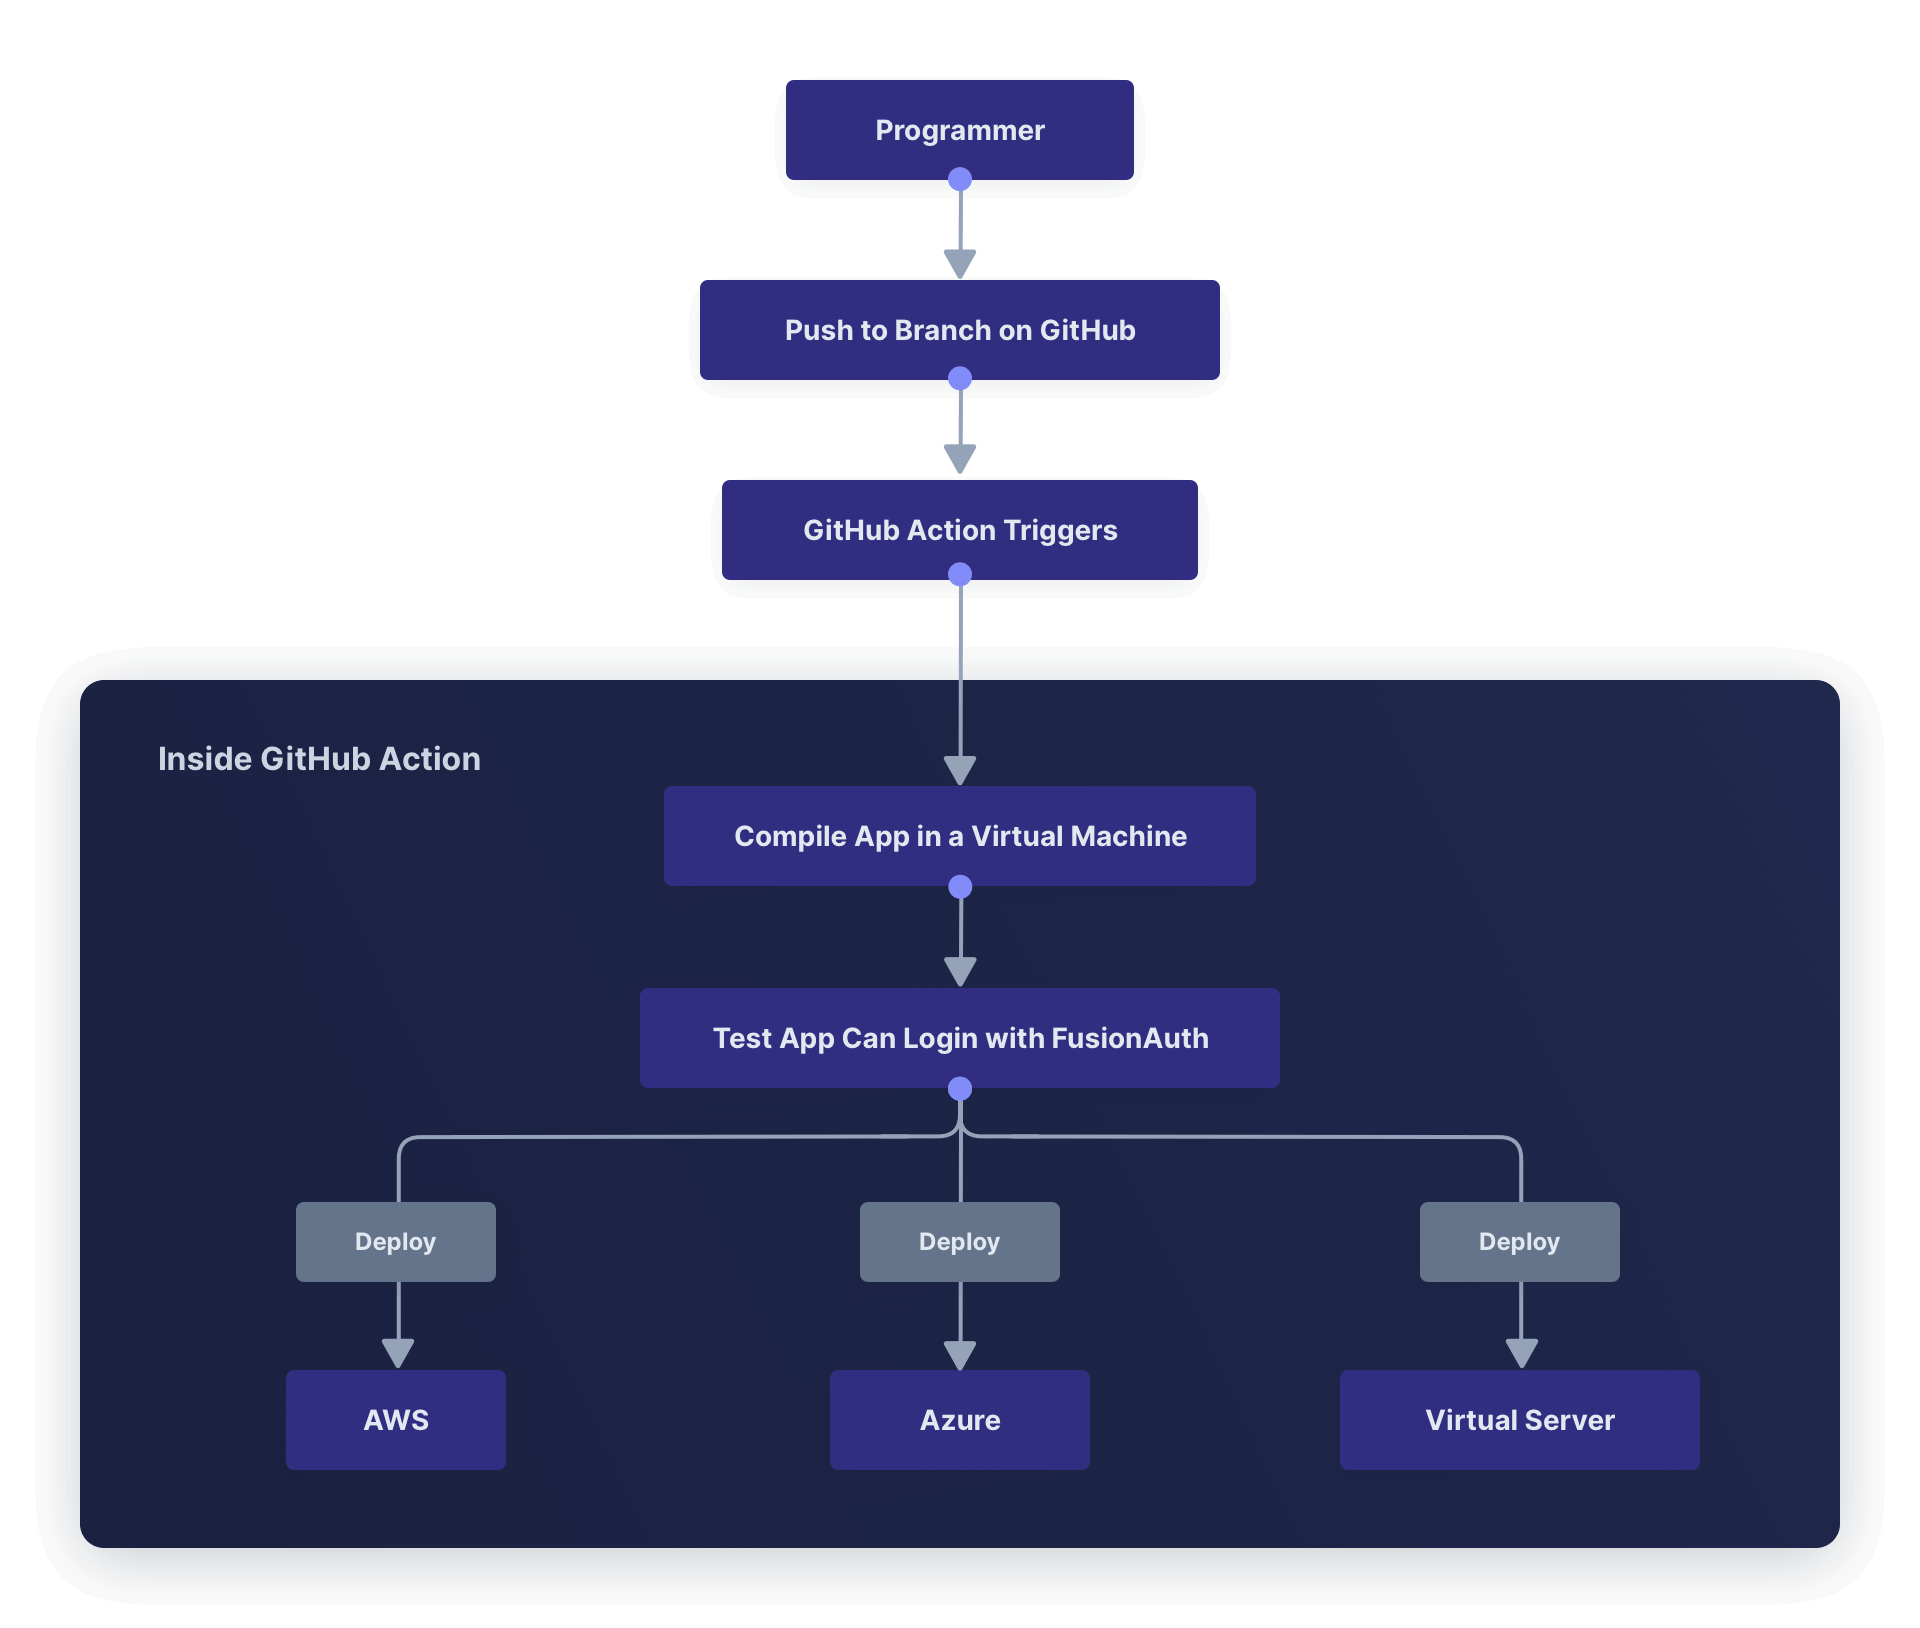
GitHub provides a tool for automating workflows called GitHub Actions. It provides a virtual machine in which you can run scripts to check out your code, compile it, deploy alongside FusionAuth and other services, run tests, and manage deployment.
The flow looks like the diagram below.
A Simple Example Using GitHub Actions#
There is a minimal but complete CI/CD example in this repository. An overview of the setup is shown below.
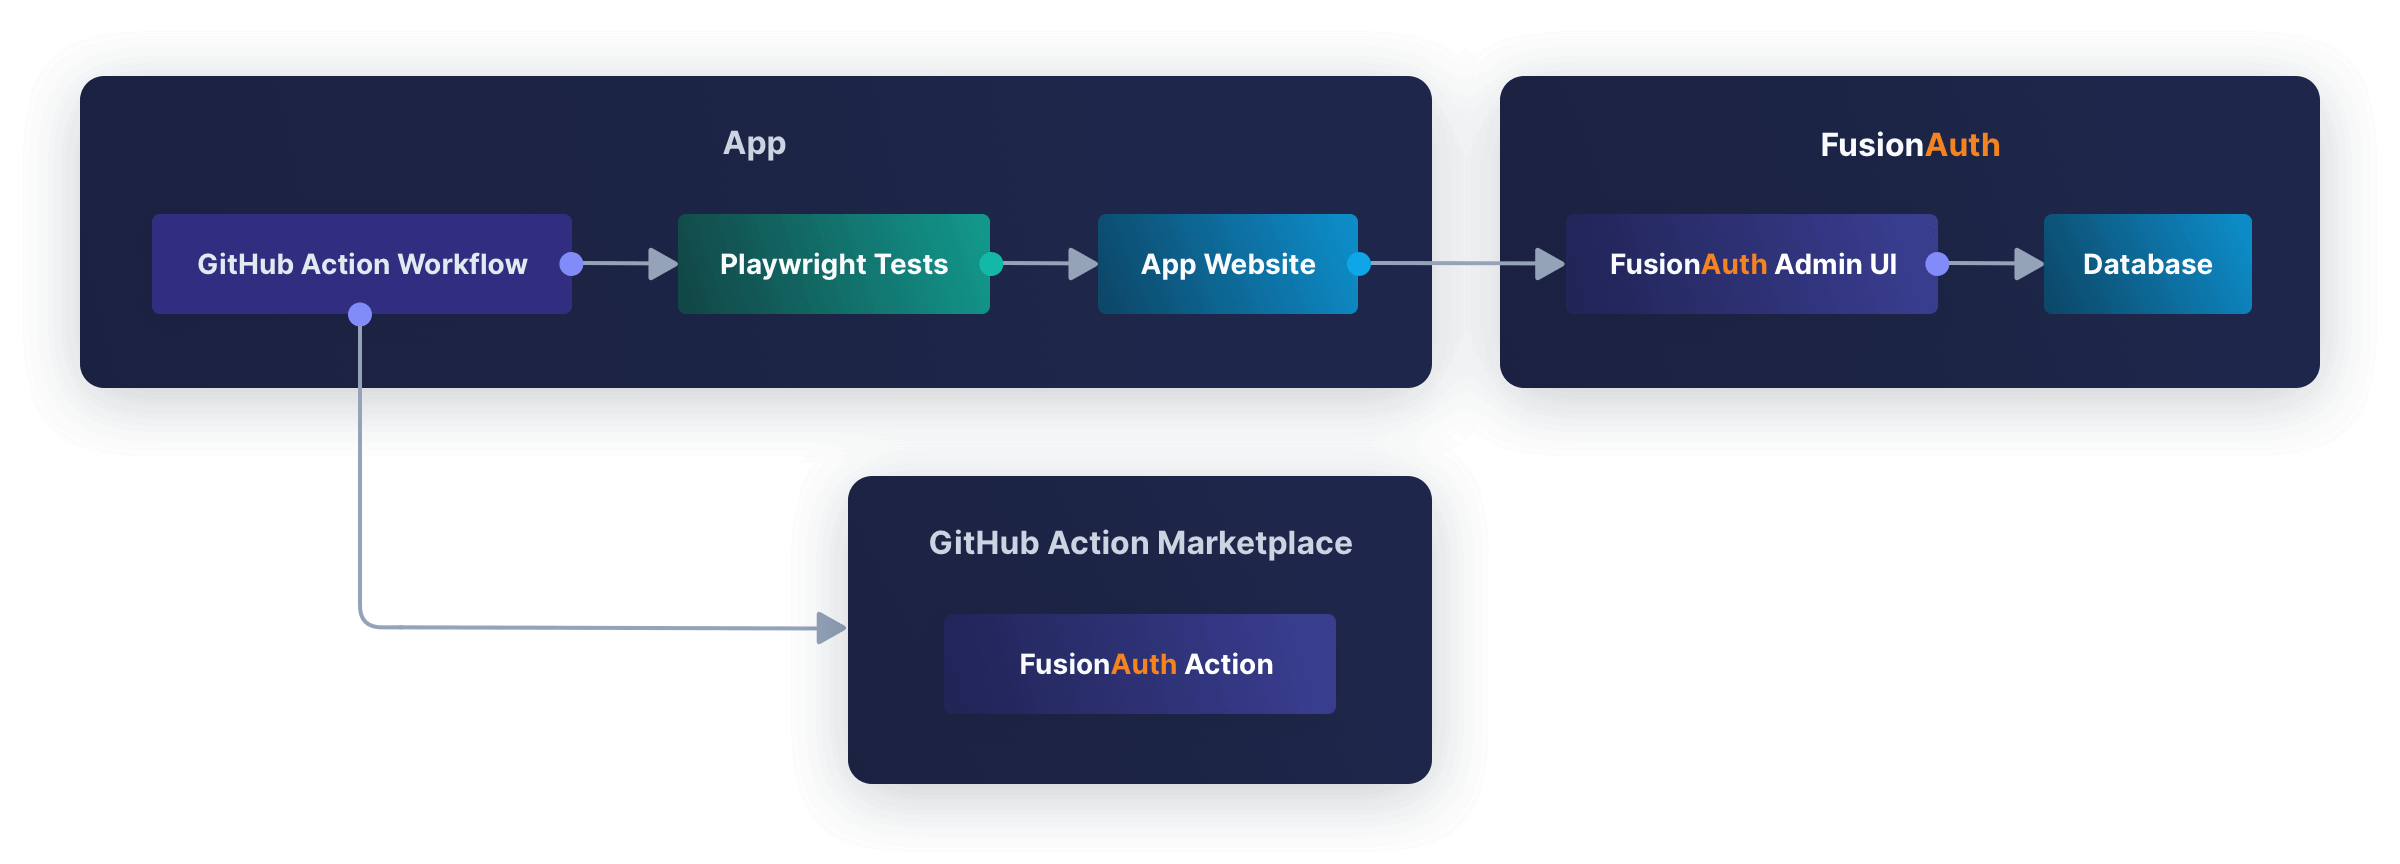
In GitHub, click Fork and add the repository to your GitHub account. Then run git clone https://github.com/<your_username>/fusionauth-example-github-actions.git in a terminal to download it. Remember to replace <your_username> with your GitHub username.
Below is the repository structure.
├── app
│   ├── app.js
│   ├── .env
│   ├── .github
│   │   └── workflows
│   │       └── playwright.yml
│   ├── package.json
│   ├── playwright.config.js
│   ├── public # css and images
│   ├── routes
│   │   └── index.js
│   ├── services
│   │   └── authentication.js
│   ├── tests
│   │   └── test.spec.js
│   └── views # html templates
├── docker-compose.yml
├── .env
├── .github
│   └── workflows
│       └── test.yaml
└── kickstart
    ├── css
    │   └── styles.css
    └── kickstart.json
FusionAuth is managed by the docker-compose.yml and .env files, and the kickstart directory. FusionAuth runs in a Docker container. On starting, FusionAuth uses the .env file to get the database password. The database is stored in files in a Docker volume. When FusionAuth starts for the first time, it uses the kickstart details to configure the visual style and various settings. If FusionAuth has run before, it attaches to the existing volume and uses that database.
The app folder contains a Node.js JavaScript application. The Express server provides a login page that sends the user to FusionAuth, and then to the account page after login. The tests folder contains a login test written in Playwright. Playwright runs tests in a web browser to see if all elements and interactions behave as they would with a real user. The tests can all be run from the terminal, however, so you can test your application on a computer without a graphical environment.
The .github/workflows/test.yaml file is the GitHub Actions workflow script. The app/.github/workflows/playwright.yml file contains a Playwright-provided script, but this script uses more GitHub resources, has a long timeout, and saves the test results to a file. The test.yaml script is written to take advantage of the GitHub Free 2000 CI/CD minutes per month.
How To Upgrade FusionAuth#
Before running the app, let's demonstrate how to upgrade FusionAuth. It should usually be as trivial as changing the version number and restarting FusionAuth.
In this section, you will:
- Start an older version of FusionAuth.
- Create a new user in Users .
- Upgrade FusionAuth.
- Check that the new user is still there.
Open the docker-compose.yml file. On line 51, set the FusionAuth image to the following.
image: fusionauth/fusionauth-app:1.47.1In a terminal, run the following command.
docker compose upFusionAuth will start, and you will be able to log in at http://localhost:9011/admin with username admin@example.com and password password. In Users , add a new user by clicking the green + button.
After logging in successfully, you should be able to see the FusionAuth version number 1.47.1 at the bottom of the left sidebar.
Stop Docker in the terminal by pressing control-C. In the docker-compose.yml file, change line 51 to use a new FusionAuth version, 1.48.3. Run the startup command again.
docker compose upThe output of the Docker command below shows that FusionAuth silently (without needing user approval) successfully runs database migration (upgrade) scripts on the existing database when starting.
fa | ---------------------------------- Entering Silent Configuration Mode ---
fa | ----------------------------
fa | 12:49:04.337 PM INFO JDBCMaintenanceModeDatabaseService - Attempting to lock database to support multi-node configurations
fa | 12:49:04.348 PM INFO JDBCMaintenanceModeDatabaseService - Obtained a database lock
fa | 12:49:04.386 PM INFO JDBCMaintenanceModeDatabaseService - Database Version [1.47.1]
fa | 12:49:04.393 PM INFO JDBCMaintenanceModeDatabaseService - Latest Migration Version [1.48.1]
fa | 12:49:04.459 PM INFO JDBCMaintenanceModeDatabaseService - Execute migration script [1.48.0]
fa | 12:49:04.472 PM INFO JDBCMaintenanceModeDatabaseService - Execute migration script [1.48.1]
fa | 12:49:04.500 PM INFO JDBCMaintenanceModeDatabaseService - Database Version [1.48.1]
fa | 12:49:04.500 PM INFO JDBCMaintenanceModeDatabaseService - Latest Migration Version [1.48.1]
fa | 12:49:04.500 PM INFO JDBCMaintenanceModeDatabaseService - Attempting to unlock database to support multi-node configurations
fa | 12:49:04.501 PM INFO JDBCMaintenanceModeDatabaseService - Unlock completed
If you browse to FusionAuth again, you'll see that the user you created is still there.
The FusionAuth application is separate from the FusionAuth database. In this case, the database is stored in a Docker volume. When the upgrade scripts run, the data should not be broken, and upgrading FusionAuth should be unnoticeable. However, mistakes can happen, as well as database crashes, and you should back up both the FusionAuth database and your application database daily. The rest of this article will show you how to automate login tests to check that your system still works after upgrading FusionAuth or your app. If something breaks, you can restore the old version of the database and begin debugging.
For more details on upgrading FusionAuth, including non-silent upgrades, please read this article.
FusionAuth also has a paid version that runs in the cloud. If you want to avoid the hassle of managing, backing up, and upgrading FusionAuth yourself, this might be the solution for you. Tests in this guide will still work after the version of FusionAuth has been upgraded.
Test Your App Login With Playwright#
FusionAuth is already running. To start the app that uses it, run the code below in a new terminal window.
cd app
npm install
npm run start
Browse to http://localhost:3000 and log in with the same user as previously.
When changing your application, it would be faster to test that login works automatically, rather than by hand. This is called an integration, or end-to-end test, as opposed to a unit test, which tests only a single function. For integration tests in the browser, you can use Playwright.
Playwright was created by Microsoft, runs in JavaScript, and allows you to run tests in multiple browsers. It is a popular successor to Selenium, which used Java, and Puppeteer, which was written by Google and focused on Chrome.
To start the Playwright tests for this app, open a new terminal in the app directory and run the code below.
npx playwright install
npx playwright install-deps
npx playwright test --project=chromium
The output should be as below.
Running 1 test using 1 worker

  ✓  1 [chromium] › test.spec.js:3:1 › Test login (5.1s)

  1 passed (5.8s)
The command returns 0 if all tests passed, and another number if any tests failed. This allows you (and GitHub Actions) to write shell scripts that perform different tasks if the tests succeed or not.
To see what is happening visually, run the code below.
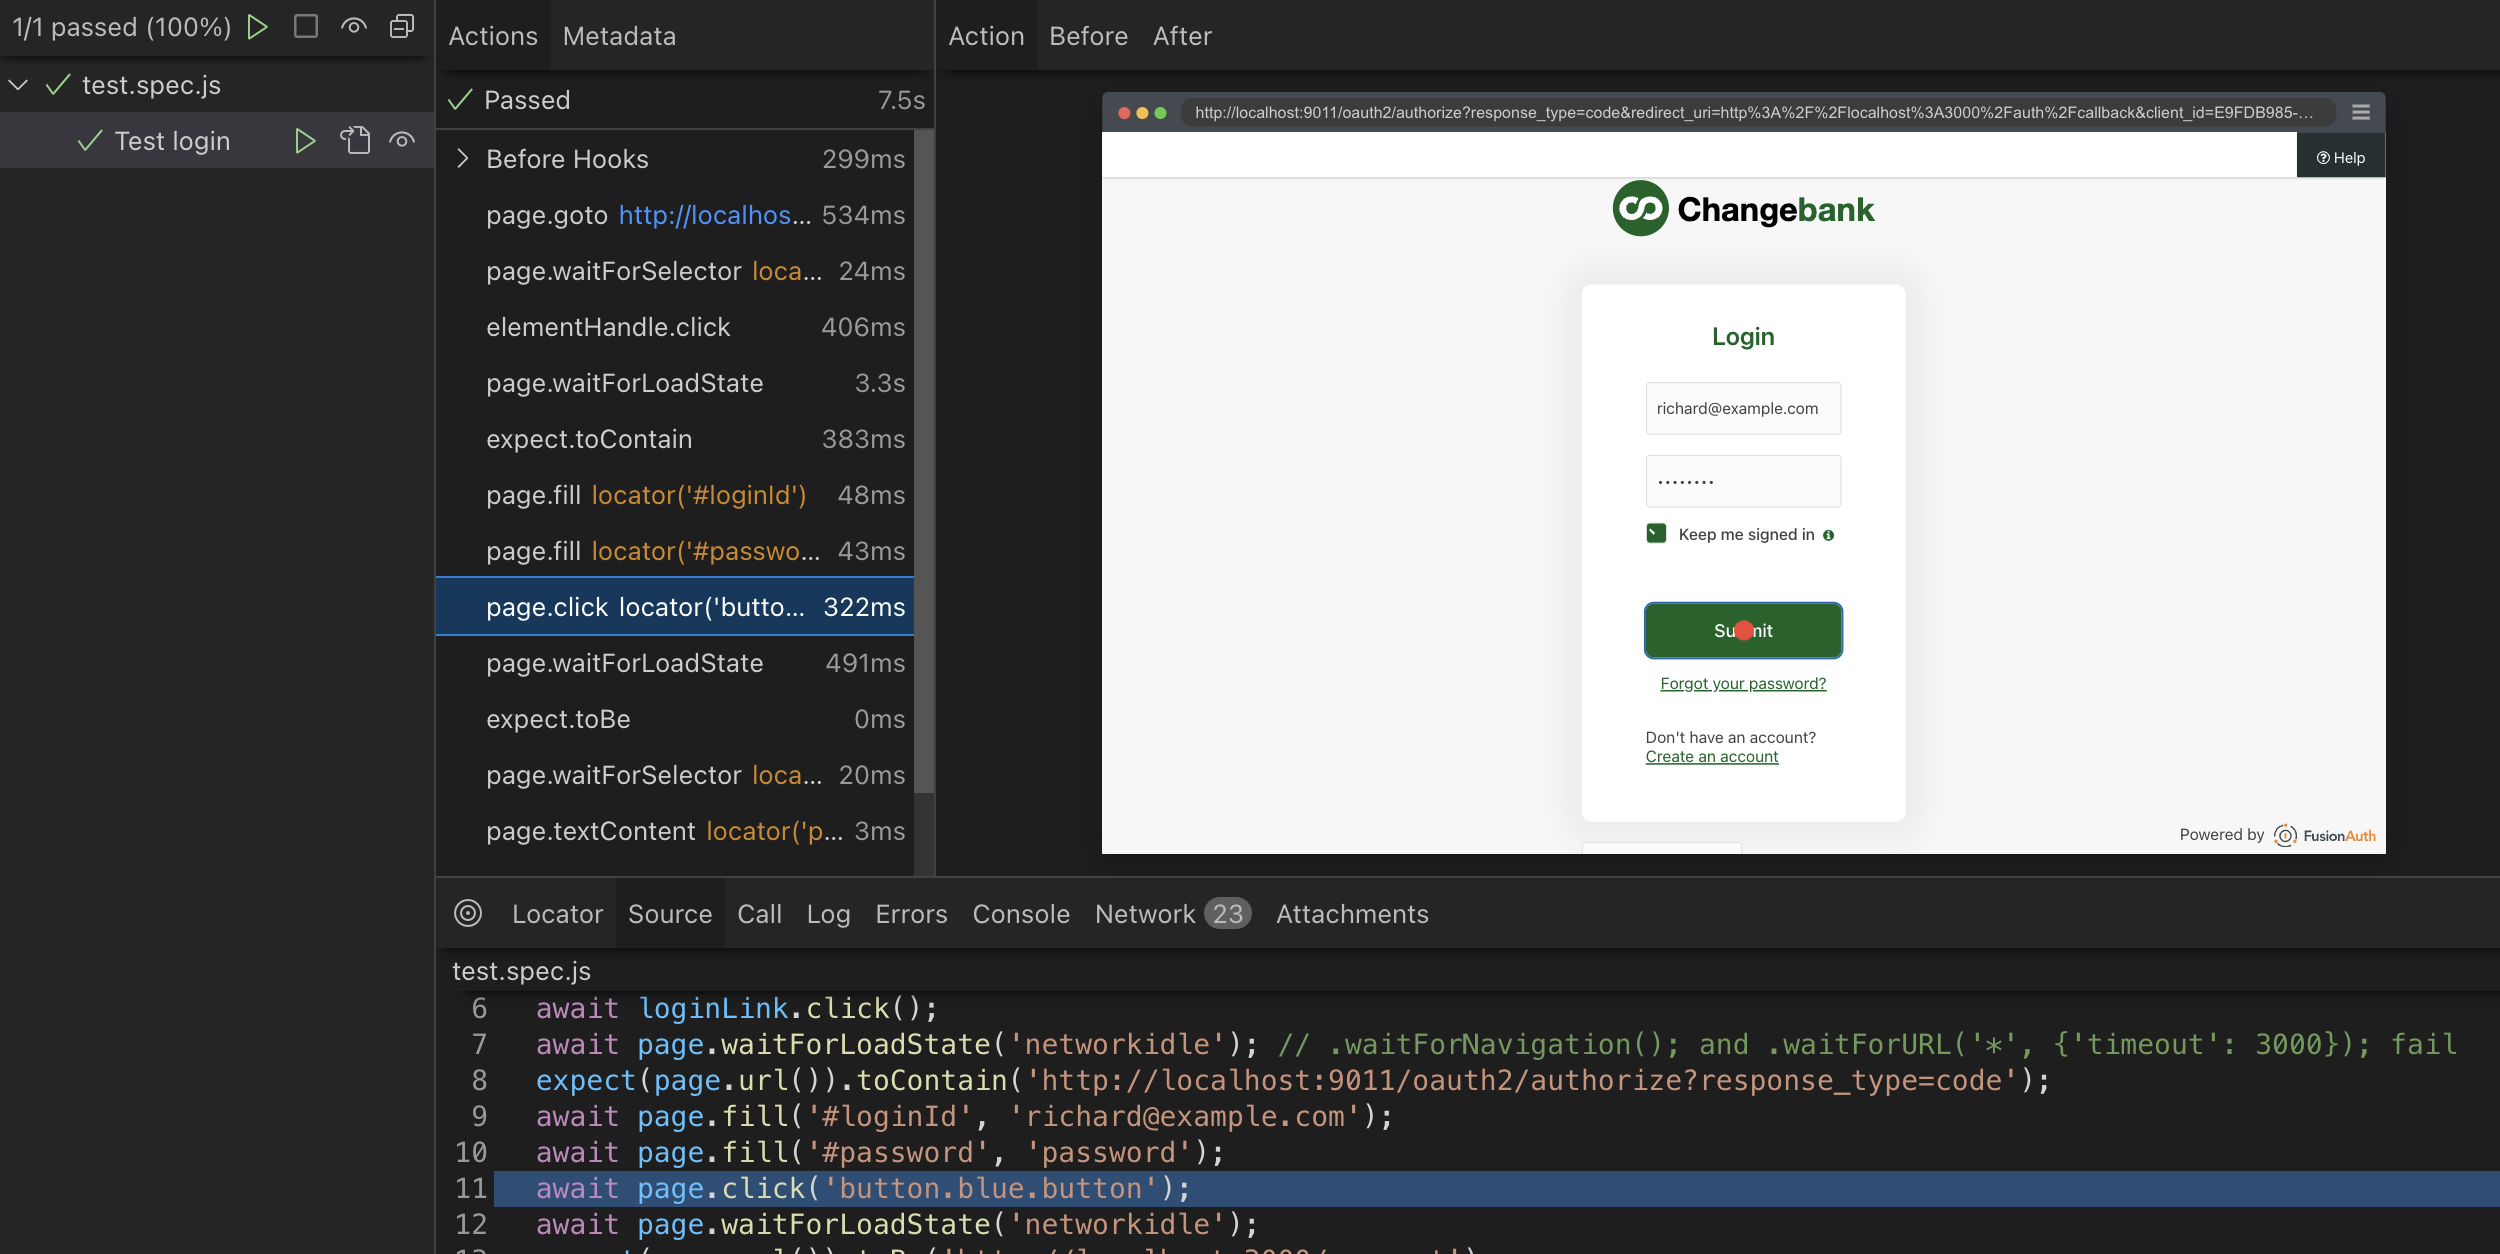
npx playwright test --project=chromium --uiThis will open the playwright window. Click on the Run button next to the test name to execute the test. You can see that Playwright runs a browser, clicks buttons, and fills in forms.
Write A Test For Playwright#
The code for the test Playwright runs is in the file app/tests/test.spec.js.
const { test, expect } = require('@playwright/test');

test('Test login', async ({ page }) => {
  await page.goto('http://localhost:3000');
  const loginLink = await page.waitForSelector('a[href="/login"]');
  await loginLink.click();
  await page.waitForLoadState('networkidle'); // .waitForNavigation(); and .waitForURL('*', {'timeout': 3000}); fail
  expect(page.url()).toContain('http://localhost:9011/oauth2/authorize?response_type=code');
  await page.fill('#loginId', 'richard@example.com');
  await page.fill('#password', 'password');
  await page.click('button.blue.button');
  await page.waitForLoadState('networkidle');
  expect(page.url()).toBe('http://localhost:3000/account');
  await page.waitForSelector('p.header-email');
  const emailText = await page.textContent('p.header-email');
  expect(emailText).toBe('richard@example.com');
});
The code should mostly be self-explanatory, but there are a few things to note:
awaitis used frequently as most operations on the page are asynchronous.waitForLoadState('networkidle')is used to wait for pages to load. When this article was written,.waitForNavigation()and.waitForURL()failed.- Tests start with
expect(), such asexpect(emailText).toBe('richard@example.com'). Without this function, your tests won't test anything. - To add a new test of your own, write a new function like
test('Test login', async ({ page }) => {.
To add Playwright to your own project, follow their guide. Running npm init playwright will create a configuration file and sample test you can use as a starting point.
In the configuration file playwright.config.js, you can set which browsers to use (we used --project=chromium earlier), whether to start your app before running the tests, and which directory contains test files.
Test Your App In A GitHub Action#
Now that you know how to test your app after a change to it or FusionAuth, let's automate the process in GitHub. Your goal is to have a test run whenever committing to your main branch. GitHub will email you if the test fails.
By default, GitHub prevents action workflows from running on forked repositories. To grant permission for the workflow to execute, navigate to the Actions tab on your forked repository and click on the I understand my workflows, go ahead and enable them button on the repository.
In this example, we'll trigger the execution of the test by listening to push events on the main branch. Open the file .github/workflows/test.yaml in your IDE. The fifth line in the file specifies the branch name that triggers the execution of the action when commits are pushed to it. It currently reads as follows.
- main_RENAME_THIS_TO_ENABLE_TESTChange this line from a nonsense name to the main branch of your application.
- mainSave the changes to the .github/workflows/test.yaml file, commit to the main branch of your repository in Git, and push to GitHub. The commit you just pushed will trigger the execution of the test. The test may take a few minutes to run as GitHub configures the necessary resources.
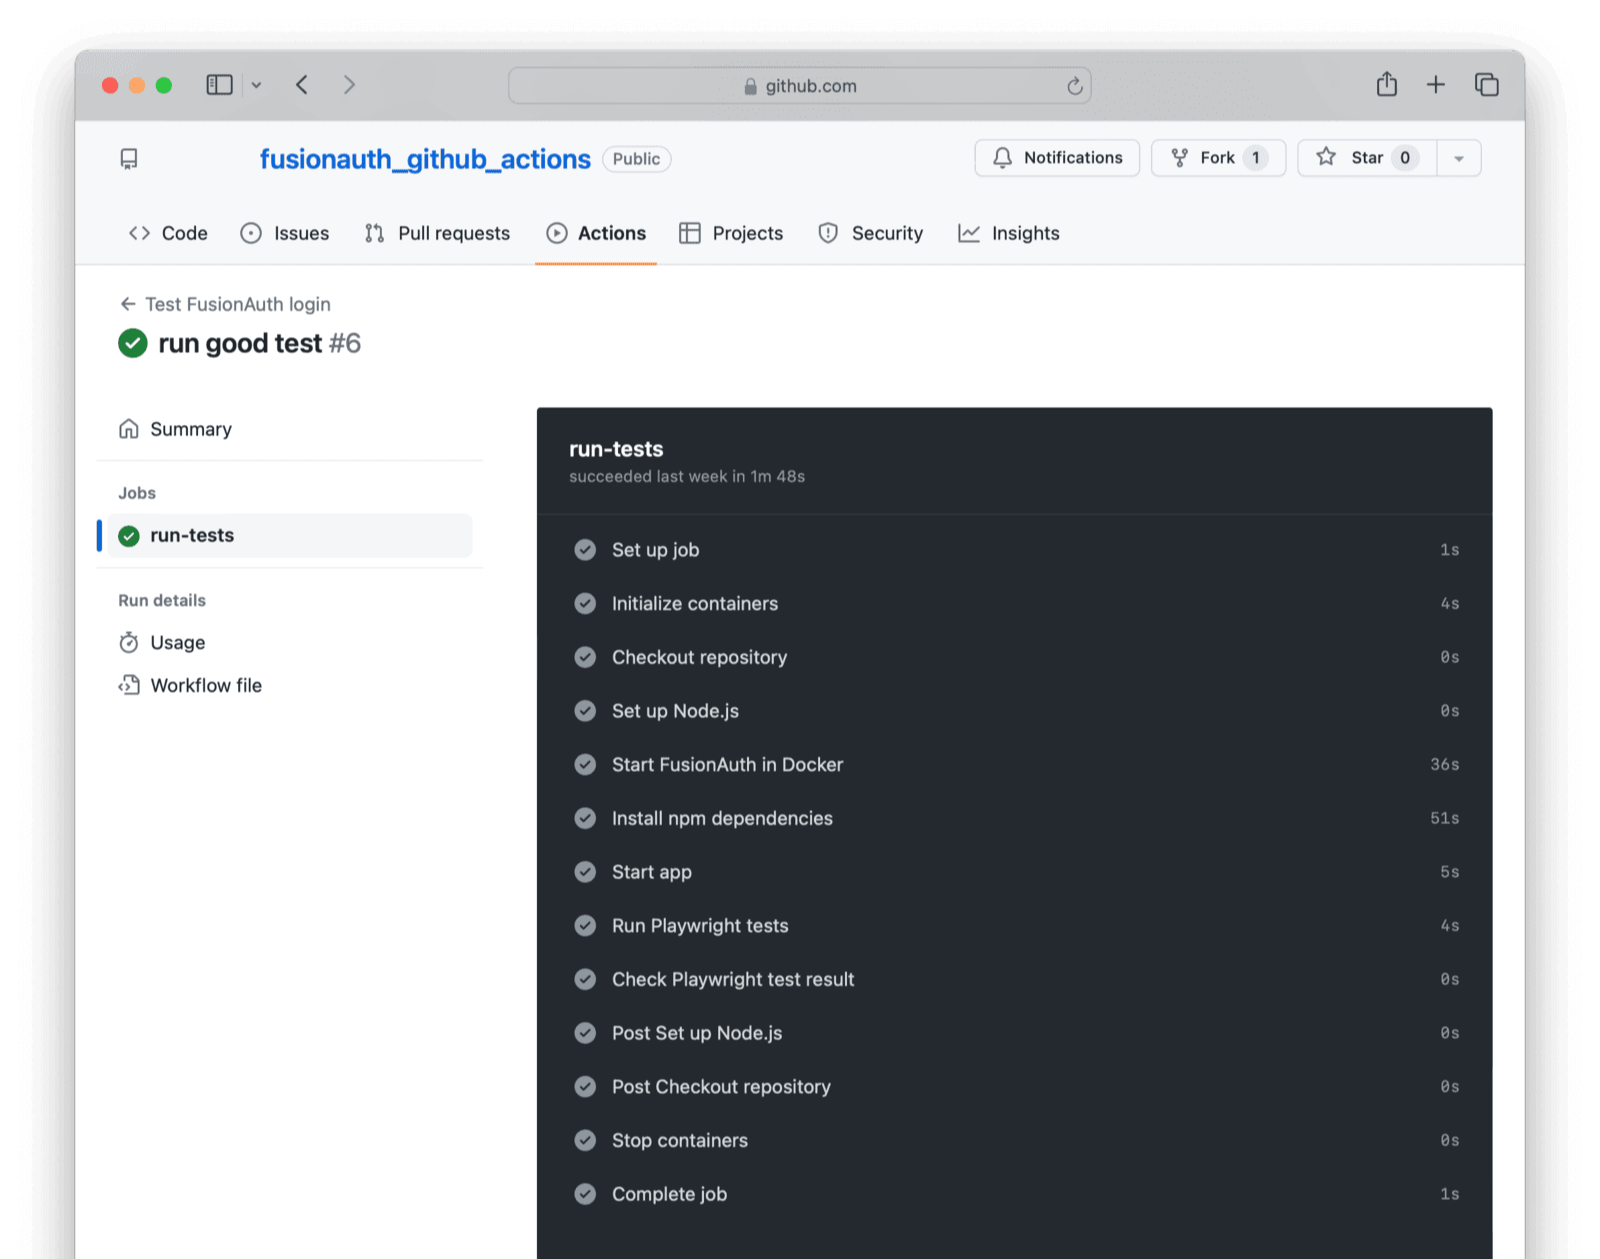
You can browse to the Actions tab in your GitHub repository and then select Test FusionAuth login on the left sidebar to see the workflow run. The most recent workflow run will appear at the top of the list and you can see further details by clicking on the title of the workflow run items. Clicking on the run-tests job item will reveal further details of the workflow execution steps.
To test that the test works, change the login email in test.spec.js, on the line expect(emailText).toBe('richard@example.com'); change to expect(emailText).toBe('wrong@example.com'); and push to GitHub again. You can now verify that the test does detect a broken login or invalid credentials.
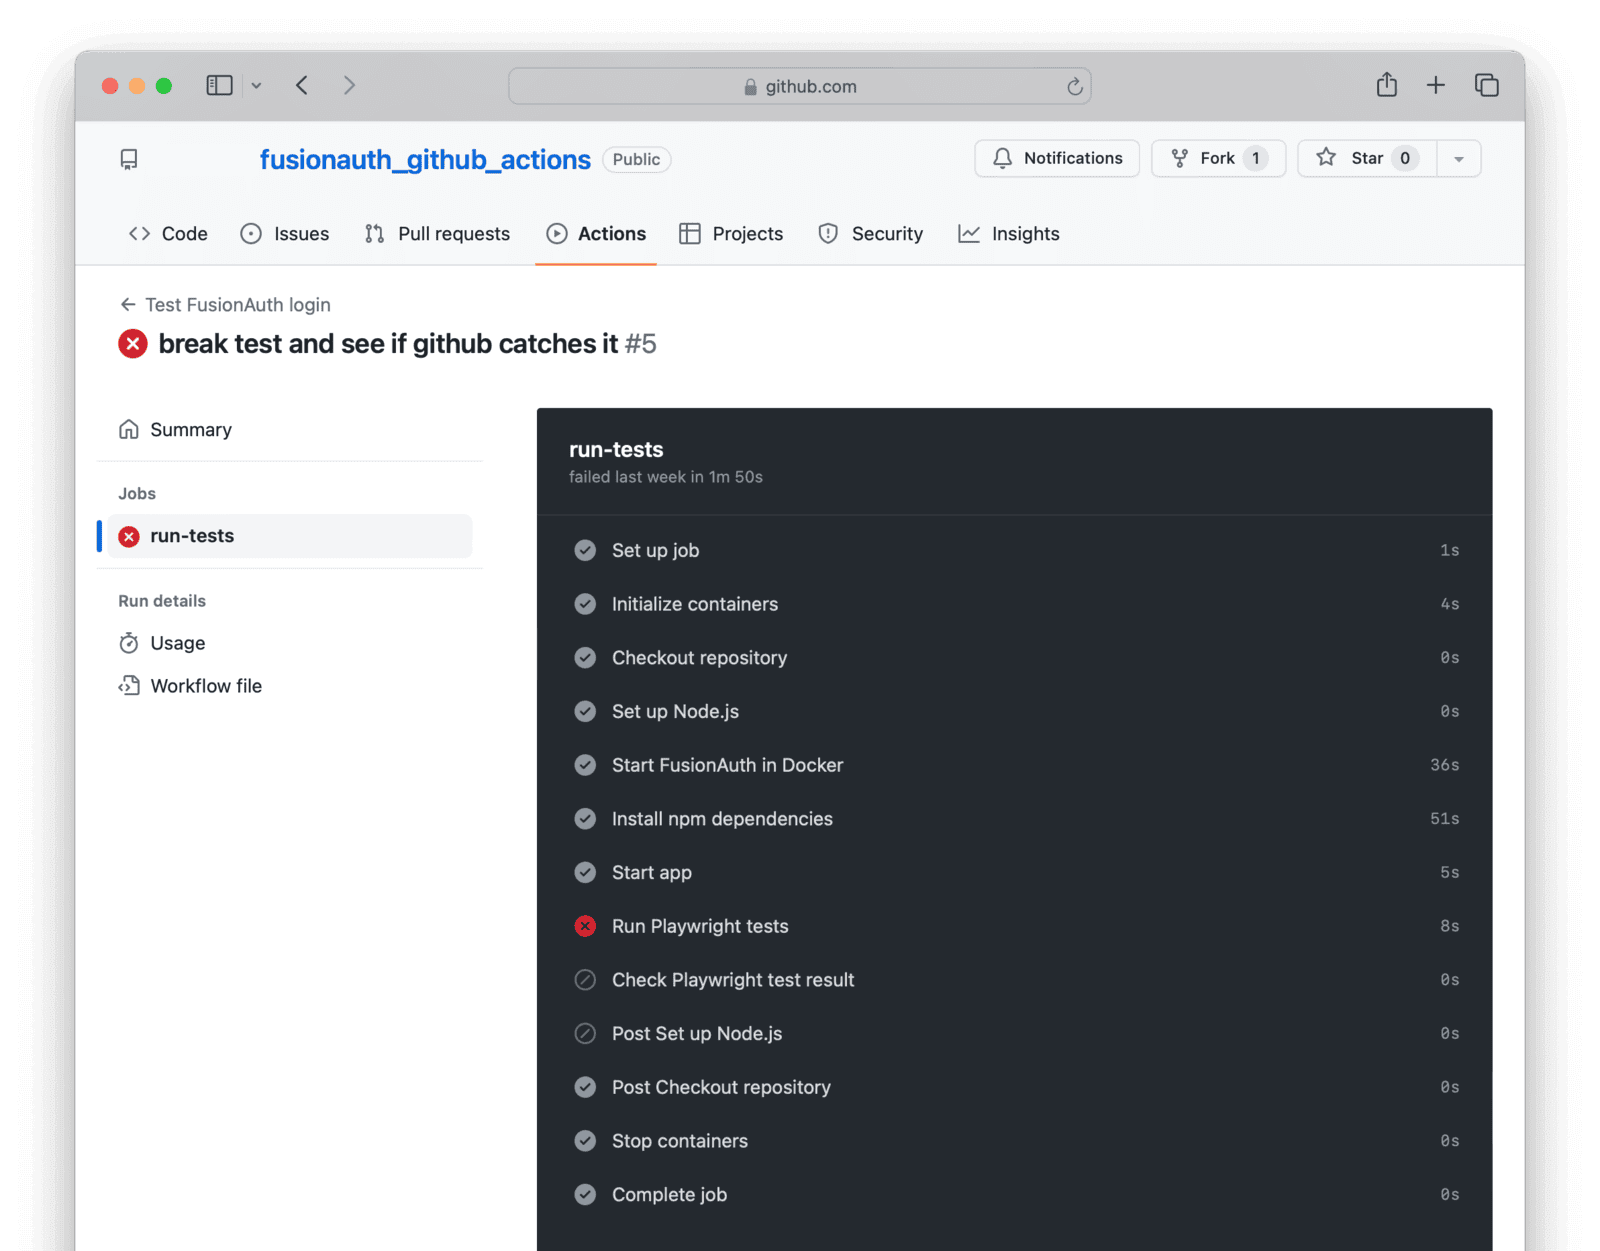
If your test runs successfully, you can be certain that your app and FusionAuth are both running, can speak to each other, and that the user is still present in the database after any migrations have run.
Understand GitHub Actions#
GitHub Actions is a service provided by GitHub that allows you to run workflows that can do anything you can write in a script, triggered by different types of events in your repository. GitHub runs your script in a virtual machine. GitHub allocates each user a certain amount of free CPU minutes per month and a set amount of storage, depending on your plan. For more details, see the learn GitHub Actions documentation and pricing page.
Let's review the GitHub Actions workflow script to see how it works. All scripts are stored in the .github/workflows directory, and the files can be called whatever you like. Here, the file is called test.yaml.
name: Test FusionAuth login
on:
  push:
    branches:
      - main_RENAME_THIS_TO_ENABLE_TEST

jobs:
  run-tests:
    runs-on: ubuntu-latest

    services:
      docker:
        image: docker:19.03.12
        options: --privileged # container has full access to host
        ports:
          - 9011:9011

    steps:
      - name: Checkout repository
        uses: actions/checkout@v4

      - name: Set up Node.js
        uses: actions/setup-node@v4
        with:
          node-version: '18'

      - name: Start FusionAuth in Docker
        run: docker-compose up -d # -d in background

      - name: Install npm dependencies
        run: |
          npm install
          npx playwright install-deps
          npx playwright install
        working-directory: ./app

      - name: Start app
        run: npm run start & # & in background
        working-directory: ./app

      - name: Run Playwright tests
        run: npx playwright test --project=chromium
        working-directory: ./app
Each workflow has a name, which is a human-readable label.
name: Test FusionAuth loginThis is followed by an event, which is all the conditions that trigger the workflow to execute. Events are stored in the on object. The most common ones to use are when pushing a commit or receiving a pull request. For a full list, see the documentation.
Your workflow uses the push-to-main-branch event.
  push:
    branches:
      - main
Then comes the workflow jobs. This is what will run when the push event occurs. This workflow has just one job, run-tests.
You need to specify the type of operating system the machine will run to execute the job steps. Here, you use ubuntu-latest. It is the cheapest runner on GitHub. Windows runners use minutes at twice the rate of Linux, and Mac runners use ten times the rate of Linux.
The steps section defines a sequence of tasks that are executed during the workflow run.
The steps consist of two types of code:
- Actions, which are existing tasks in GitHub like checking out a repository or installing Node.js.
- Custom commands, which run code directly in the machine's terminal.
This script starts by checking out your repository, and then installs FusionAuth and Node.js using the respective actions.
    steps:
      - name: Checkout repository
        uses: actions/checkout@v4

      - name: Start FusionAuth
        uses: fusionauth/fusionauth-github-action@v1
        with:
          FUSIONAUTH_VERSION: "latest" # Optional: provide FusionAuth version number otherwise it defaults to latest

      - name: Set up Node.js
        uses: actions/setup-node@v4
        with:
          node-version: '18'
Custom code then installs Node.js modules, runs the app, and runs the tests. Note that steps usually run in serial. To run steps simultaneously, you use & to start the next step without waiting for the first step to exit. If a step fails, the next step will not run.
      - name: Install npm dependencies
        run: |
          npm install
          npx playwright install-deps
          npx playwright install
        working-directory: ./app

      - name: Start app
        run: npm run start & # & in background
        working-directory: ./app

      - name: Run Playwright tests
        run: npx playwright test --project=chromium
        working-directory: ./app
Using the fusionauth-github-action is the preferred method to start FusionAuth in the workflow. If you want to start FusionAuth with Docker compose instead of the action, you can use the commented-out configuration in the .github/workflows/test.yaml file (for example, if you need customizations to use a custom password hashing plugin).
In the commented-out workflow configuration, the services section specifies that the action requires Docker where FusionAuth will run.
    services:
      docker:
        image: docker:19.03.12
        options: --privileged # container has full access to host
        ports:
          - 3000:3000
          - 9011:9011
Then FusionAuth is started using docker-compose.
       - name: Start FusionAuth in Docker
         run: docker-compose up -d # -d in background
Compile Your App In A GitHub Action#
You might have noticed that GitHub did not build your app at any point in this workflow. This is because JavaScript is a dynamic language and does not need to be compiled. If you are using FusionAuth with C#, Go, Rust, or TypeScript, you can easily add another step to your workflow to compile the code before running the tests. This might look like the code below.
      - name: Compile app
        run: cargo build
        working-directory: ./app
Deploy Your App In A GitHub Action#
Deploying your app with a GitHub action is more complex than building it. Your production environment might be a physical server, a virtual server like DigitalOcean, or a large service provider like AWS or Azure. You might also want to deploy a new version of FusionAuth, which may use Docker.
You can deploy using an existing action, such as those for AWS, Azure, or DigitalOcean, or you can write your own deployment script.
Let's assume your production environment is a virtual server that runs your application in a Go binary and FusionAuth in Docker.
After the tests in your action have run successfully, you can deploy your app and FusionAuth to the server.
To run a command on your server from within an action, use SSH for GitHub Actions. This action allows you to open a terminal on your server and run commands. Here's how you would change the version number of FusionAuth, and restart it in Docker.
We'll discuss the secrets used in the code below in a later section Secrets And Deployment Environments.
- name: Update FusionAuth and Restart Docker
  uses: appleboy/ssh-action@master
  with:
    host: ${{ secrets.SERVER_HOST }}
    username: ${{ secrets.SERVER_USERNAME }}
    key: ${{ secrets.SERVER_SSH_KEY }}
    script: |
      cd /fa_config # assume this is where docker compose file is

      # change docker version number
      sed -i 's|fusionauth/fusionauth-app:.*|fusionauth/fusionauth-app:latest|' docker-compose.yml

      # pull the latest image from DockerHub before we try to use it
      docker-compose pull fusionauth-app

      # restart docker and leave it running
      docker-compose up -d fusionauth-app
Let's say you want to deploy a Go application you created. You can do one of the following:
- Download the repository of source code to the server and compile it there.
- Compile the executable in the action and download it on the server.
- Build your app into a Docker image, upload the image to DockerHub, and download and run it on the server.
Using Docker is the least work for the server and least likely to disrupt your operations. It requires compiling the executable on the server, as with option two. Downloading the code on the server and compiling it there is the easiest to do but might disrupt the server.
To make your Go binary (and all the HTML templates it serves) available for other steps in the workflow, use the upload-artifact action. To build and push a DockerHub image, use the Docker action.
Once you have your application files ready, you can SSH into your server using the SSH action, download the Docker image or binary files, run any database migrations scripts, and restart your web application.
Test Your Production Release#
Even if your tests run successfully in the GitHub virtual machine, your production release might not allow users to log in. You need to test again.
Add a final step to your script, after the deployment step, that runs the Playwright login test. This time, run a test file that uses the production server URL instead of your localhost in the line await page.goto('http://localhost:3000');.
If this test passes, you can be certain your live website and FusionAuth can still communicate. If it fails, you need to revert your release to the previous version.
Secrets And Deployment Environments#
Your organization will probably have several environments (server and database) where your application runs:
| Environment | Purpose |
|---|---|
| Development | Where programmers are free to test new features without fear of breaking anything. Database users are obfuscated. |
| Test | Where quality assurance testers test the latest release that is scheduled to go live soon. |
| Pre-production | An exact duplicate of the production environment, with real sensitive user information. This is used for debugging errors in production. Access is restricted. |
| Production | The live site that must always be online. Access is restricted to a system administrator and automated deployment programs. |
The production environment might also be two mirrored applications and databases (called blue and green). You could deploy to one color, and then immediately transfer the live URL from the other color once it's complete. This way, your application will never suffer a moment's downtime.
Each environment should correspond to a single branch in GitHub, and have its own set of secrets: passwords, URLs, and database values.
In this guide's sample application action, you set the action event to be triggered when pushing to the main branch (which corresponds to the production environment). You'll need to add other events and scripts to run tests, but not deploy, for all other environments and pull-request events. For example, you would probably want a push to the test branch to run tests and deploy the new release to the test environment.
This application also used two .env files to store secrets that your app and FusionAuth use. In reality, you should never do this, as it allows anyone to access your private database with your password kept publicly on GitHub.
Instead, each environment should store its secrets in environment variables or a configuration file that is not overwritten on deployment. These values should be readable only by the system administrator and the application's user account.
But you also need some secrets in the GitHub action, such as the SSH key of the server you are deploying to. This was seen in the script above.
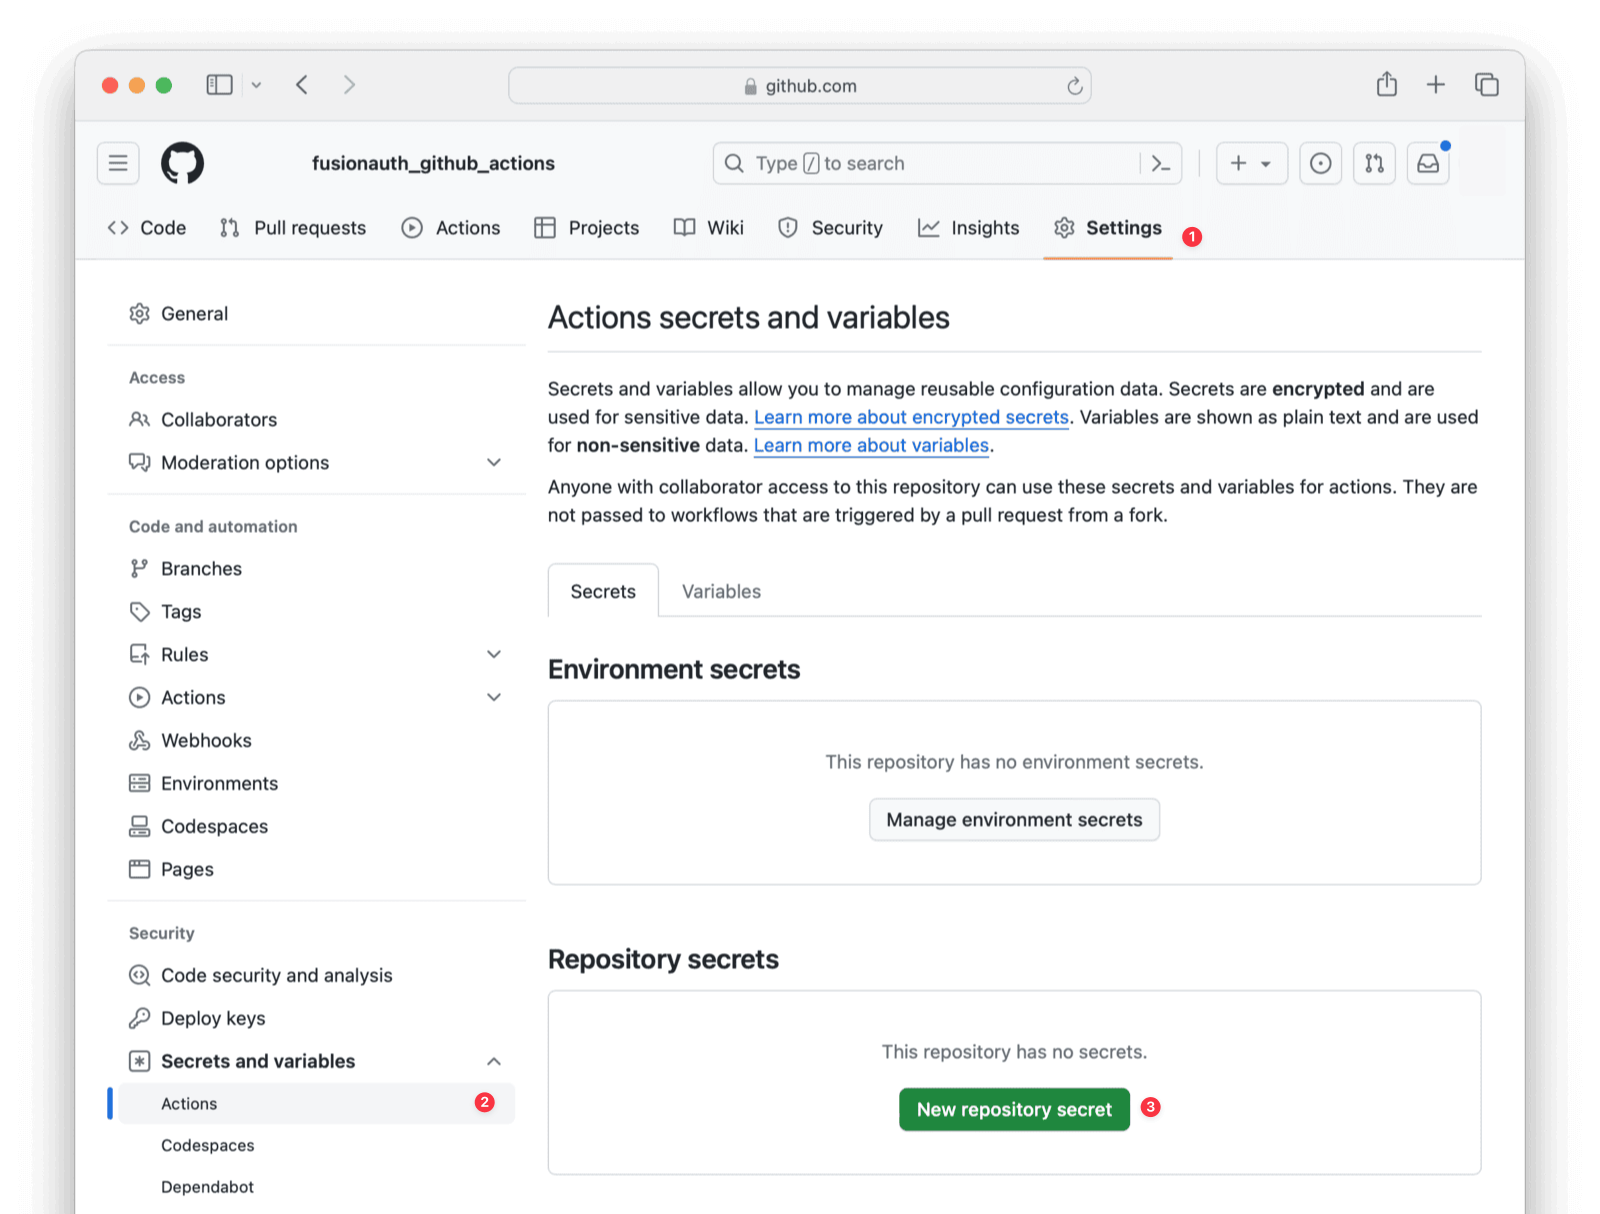
key: ${{ secrets.SERVER_SSH_KEY }}These secrets are kept in the GitHub Secrets page, where they are automatically available to your scripts.
Summary Of Testing And Deployment#
Let's summarize what you need to do to test and deploy your application:
- Configure your server to run Docker and the programming framework that your app uses.
- Keep secrets safe and private in environment variables on each server, even from your developers.
- Back up your FusionAuth and app database frequently, and test that you can restore them successfully.
- Write Playwright tests that check your app can log in with FusionAuth and any other essential functionality, including new features that you are releasing.
- Write a GitHub Actions workflow that runs these tests when receiving a pull request or pushing code to a branch.
- Add secrets in GitHub that allow it to access your deployment environment.
- Add a deployment step to your GitHub Actions workflow that sends your new release to the server and starts it.
- Add a final step in the workflow to test that your Playwright tests work on the deployed server.
- If your tests are successful, switch your public URL over to the latest release.
Further Reading#
- Playwright test framework
- Install FusionAuth with Docker
- FusionAuth Express QuickStart
- FusionAuth upgrade guide
- FusionAuth cloud version
- GitHub Actions
- GitHub Actions pricing
- GitHub Actions events
- GitHub Secrets
- AWS actions
- Azure actions
- DigitalOcean actions
- SSH for GitHub Actions
- Upload-artifact action
- Build and push Docker images action