API Consents Platform
If you have APIs that others are building on top of, use FusionAuth to manage user data, and want to allow your users to delegate access to their data accessible via your APIs, FusionAuth can handle the OAuth grant, including custom scopes and access token customization. The application or AI agent can then use the token to access APIs on your user's behalf.
FusionAuth can be part of your API platform strategy, handling user consent and access token generation.
Problem#
You have valuable data, robust APIs and a substantial user base. You want to build and foster an ecosystem of applications or services on top of your data and APIs to make your data more valuable and to enhance the experience of your users. Such applications are called third-party applications, since you don't create, update, maintain or manage them.
With the API consents platform, let internal or external developers build on your platform, with FusionAuth handling the authentication, consent gathering, and scopes management. Scope is OAuth for "logical grouping of permissions that a third-party application can request".
This is the inverse of the authorization hub use case. Instead of managing access and refresh tokens for external APIs, here you are issuing tokens for your APIs after users offer consent.
Solution#
FusionAuth allows you to manage third-party applications, including custom scopes, for your APIs. FusionAuth can also manage the user consents for each set of scopes, which can vary between different third-party applications.
You can use FusionAuth to:
- centrally manage scopes for your APIs
- store information about third-party applications
- allow users to offer consent to or revoke consent from such applications
This is an example of the First-Party Service Authorization Mode.
Are Scopes Different Than Roles?#
FusionAuth already lets you assign roles to a user after they log in, and offers full role based access control (RBAC). FusionAuth can also integrate with other authorization methods solutions such as attribute based access control (ABAC), policy based access control (PBAC) or relationship based access control (ReBAC).
Both roles and scopes limit access to data and functionality. But how are scopes different from roles? The table below outlines the differences:
| RBAC Roles | Scopes | |
|---|---|---|
| Applies to | Users or groups | Token |
| Who picks them | Admins or business rules | 3rd party app developers constructing the authorization URL |
| How are they accepted | By logging in | By explicitly accepting |
| Lifetime | Indefinite until removed | Token lifetime with optional refreshes |
| Access enforced by | Depends on application architecture | The API being called |
| Visibility | Varies, usually internal to application | Visible to the user via consents |
Use scopes when:
- you have a third party that is going to use the authentication results (the tokens) on behalf of a user
- you want to offer the user control over what data and functionality the third party can access on their behalf
Prerequisites#
You have configured your application or applications to delegate authentication to FusionAuth via the Authorization Code grant and are using the hosted login pages. Your user data is stored in FusionAuth.
You have APIs you want to expose and allow applications outside of your organization to access.
You have a paid license installed on your FusionAuth instance. The functionality in this use case requires the Essentials plan or higher. Learn more about pricing.
Example Scenario#
Suppose you are a financial service software package offering payment processing, investment management and more. You are operating under the name Changebank. You want to allow developers to build on top of your APIs to make your software a platform.
You aren't quite sure what applications developers will build, but you hope that they will help your users out and build things like:
- analytics tools
- budget tracking solutions
- investment management and optimization software
- loan comparison software packages
You have APIs for these operations already and are ready to publish them publicly.
You need to manage each of these applications built on your platform. Every user who installs an application will need to give explicit permission to each one to access their data.
To make the scenario even more specific, let's say you are onboarding a developer who built analytics tool. This tool helps users understand their spending habits over time, but won't make any account modifications. Let's walk through how to build a system to give read-only access to the third-party engineering team.
Actors/Components#
- a developer building on your platform, creating an spending analytics application called MoneyScope
- your users, who will, with their consent, allow data to be ingested into MoneyScope
- FusionAuth, which gathers consents, manages the MoneyScope OAuth settings, and issues access tokens
- Changebank APIs, which will verify access tokens and provide your users' data
- the Changebank application, run by you, where your users normally log in
Implementation Steps#
This is a three phase implementation:
- Set up your platform. This happens once. Define your scopes, ensure your APIs accept access tokens, including scope verification, and build an onboarding plan.
- Onboard a new application to your platform. This happens once per third-party application, and to do so you need to add a new third-party Application in FusionAuth with the appropriate scopes, provide configuration information to the specific engineering (for example, the MoneyScope team). The developers must add the correct URLs to their applications and store resulting tokens.
- The user logs in and authorizes the application. Optionally, you build a page to show the users their authorized applications.
Set Up Your System#
First off, make your APIs available for third-party developers.
Define Your Scopes#
Think about the type of operations you want your third-party developers to be able to perform; these are called scopes. Group these into similar areas, and give them a name and definition. Scopes:
- should be coarse grained; they should not map one to one to API endpoints
- can be hierarchical; you could have
account:readandaccount:details:readwhere the latter is a subset of the former - should be designed around business concepts, not technical ones
- must use terms intelligible to the end user
Each scope will have a string representation useful to developers. This can contain any visible ASCII character except " and \; the : and . characters are often used as delimiters. You also need to have a text description you can display to your users. For an example, accounts.read is the developer version of the scope, but the user display could be Basic account information and balances.
Whatever you choose, scopes are long lived once released. Plan to have a beta test with a known set of external and internal developers to test assumptions about the right definitions. It's also better to start with a smaller set of scopes and add more later; easier to give than to take away.
In the Changebank example above, the following scopes can be used:
accounts.read: Basic account information and balancesprofile.read: User profile and contact informationtransactions.read: Transaction history and detailstransfers.write: Initiate money transfers between accountspayments.write: Make bill paymentsinvestments.read: Investment portfolio informationinvestments.trade: Execute investment tradescreditScore.read: Access credit score information
Modify Your APIs To Check Scopes#
Modify your APIs to accept an OAuth access token to determine if a request is allowed or denied. Validate the access token signature and the claims associated with the access token. Your APIs may already support access tokens.
Next, associate every API with one or more scopes. If a request comes in with an invalid scope or no scope, fail the request in the same way you would if the token signature was invalid.
Here are two routes that offer up banking information and check scopes.
Example Changebank API routes
router.get('/read-balance', hasScope('accounts.read'), function (req, res, next) {
  res.json({ balance: 42 });
});
router.post('/make-transfer', hasScope('transfers.write'), function (req, res, next) {
  const amount = req.query.newbalance;

  // update balance

  res.json({ message: "ok"});
});
The hasScope method looks like this:
The hasScope logic
function hasScope(scope) {
  return (req, res, next) => {
    const decodedToken = jose.decodeJwt(req.verifiedToken);
    let scopes = []
    if (decodedToken.scope) {
      // need to check array, not string, to avoid partial matches
      scopes = decodedToken.scope.split(" ");
    }
    if (scopes.includes(scope)) return next();
    res.status(403);
    res.send({ error: `You do not have permissions to do this.` });
  }
}
You could check claims and signatures at your API gateway rather than in your code, but the process for handling scopes is the same:
- map an API endpoint to one or more scopes
- split the
scopestring provided by the access token - check if the required scope is present
Build Your Onboarding Process#
Once you've decided on scopes and implemented checks through the Changebank APIs, build out an application approval and onboarding process. This varies but will include:
- capturing prospective application information, including desired scopes and how users' data is used and stored
- paying fees associated with accessing Changebank APIs and user data
- signing legal agreements regarding data access
- after submission, evaluating the application, including verifying appropriate scopes
- configuring FusionAuth if the application is approved
- getting required configuration to the developer
- promoting the developer's application to your users
The detailed business processes outlined above for onboarding a new third-party application are specific to your organization.
Onboard A New Third-Party Application#
Now that your technical changes are made and onboarding process built, let's walk through setting up MoneyScope.
Since much of the onboarding is business specific, we'll skip over that and jump into the FusionAuth changes and the technical communication with the MoneyScope development team.
FusionAuth Configuration#
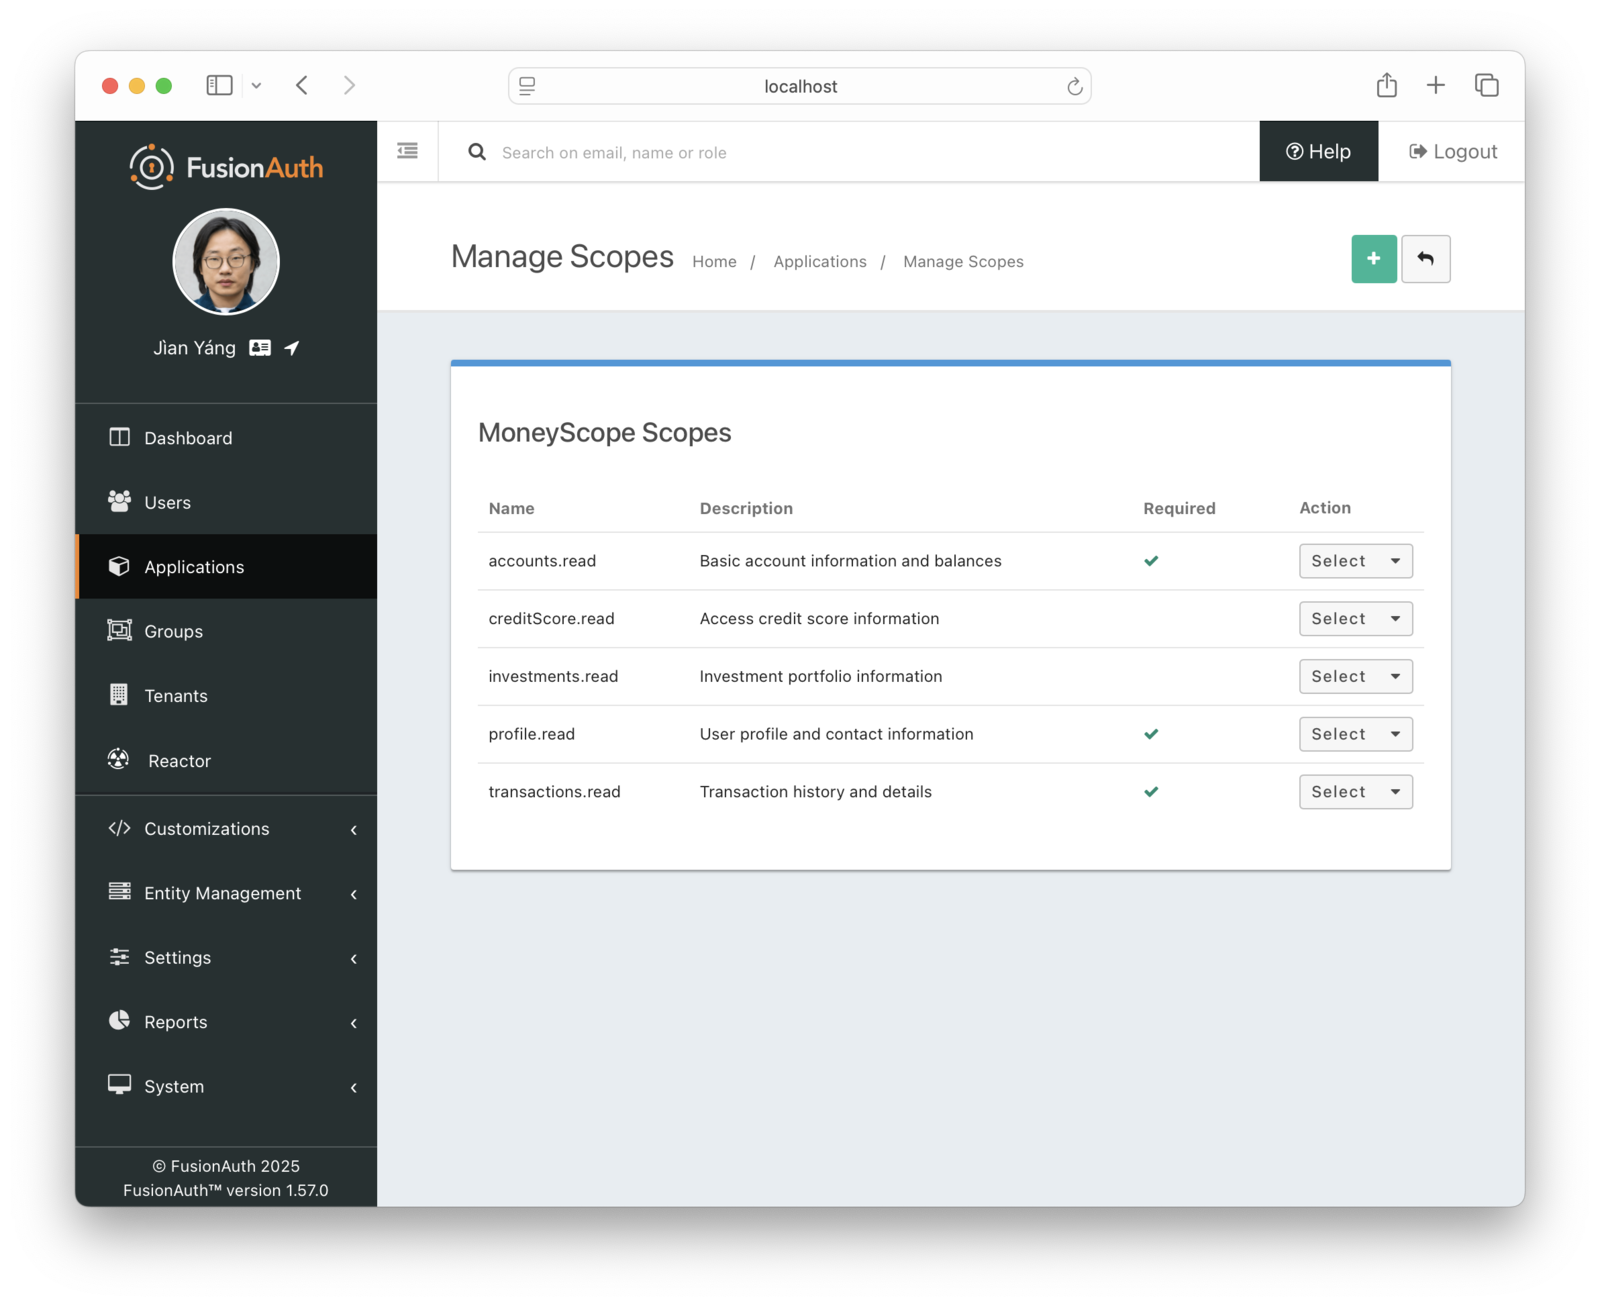
As part of your onboarding evaluation, you gathered the type of data MoneyScope needs. Now, create a new Application in FusionAuth with these scopes.
Since you are onboarding an analytics tool, only the read options should be even considered. After discussion with the developers, you decide that the following scopes will be required:
accounts.read: Basic account information and balancesprofile.read: User profile and contact informationtransactions.read: Transaction history and details
Required scopes are included in the consent of the user automatically, though they are still displayed. MoneyScope can expect APIs or data corresponding to these scopes to be available.
These scopes will be optional, which means the user can choose to allow or disallow them during the consent process:
investments.read: Investment portfolio informationcreditScore.read: Access credit score information
MoneyScope should fully function without the APIs or data corresponding to these scopes.
You can use the admin UI to configure scopes for your application.
You can also do this with our SDKs. Here's sample code to create the application:
Using the TypeScript SDK to create the application
async function createApplication() {
  try {
    const response = await client.createApplication('e9fdb985-9173-4e01-9d73-ac2d60d1dc8e', {
      application: {
        name: 'MoneyScope',
        registrationConfiguration: {
          enabled: true,
          type: 'basic'
        },
        oauthConfiguration: {
          clientSecret: 'super-secret-secret-that-should-be-regenerated-for-production',
          authorizedRedirectURLs: [
            "http://localhost:8080/oauth-redirect"
          ],
          logoutURL: "http://localhost:8080/oauth2/logout",
          enabledGrants: [
            'authorization_code',
            'refresh_token'
          ],
          generateRefreshTokens: true,
          consentMode: 'AlwaysPrompt',
          relationship: 'ThirdParty',
          providedScopePolicy: {
            profile: {
              required: true
            },
            email: {
              required: true
            }
          }
        }
      }
    });

    console.log('Application created:', response.response);
    return response.response.application.id;
  } catch (error) {
    console.error('Error creating application:', error);
  }
}
Here's sample code to add needed scopes:
Using the TypeScript SDK to create the application
async function createScopes(applicationId) {

const analyticsScopes = [
  {
    name: "accounts.read",
    description: "Basic account information and balances",
    required: true,
    consent: "Read basic account and balance information"
  },
  {
    name: "profile.read",
    description: "User profile and contact information",
    required: true,
    consent: "Read user profile information"
  },
  {
    name: "transactions.read",
    description: "Transaction history and details",
    required: true,
    consent: "Read transaction history"
  },
  {
    name: "investments.read",
    description: "Investment portfolio information",
    required: false,
    consent: "Read investment profile information"
  },
  {
    name: "creditScore.read",
    description: "Access credit score information",
    required: false,
    consent: "Read credit score information"
  }
];


  try {
    for (const scope of analyticsScopes) {
      const req = {
        scope: {
          name: scope.name,
          required: scope.required,
          defaultConsentMessage: scope.consent,
          defaultConsentDetail: scope.description,
          description: scope.description
        }
      };
      const useCreatedScopeId = "";
      const response = await client.createOAuthScope(applicationId, useCreatedScopeId, req);

      console.log('Scope created:', response);
    }

  } catch (error) {
    console.error('Error creating scope:', JSON.stringify(error));
  }
}
You could also use the FusionAuth Terraform provider to manage the application and scopes.
If you need to support multiple languages, you can localize the displayed consent messages. This allows every user to see the consent screen in their preferred language.
Communicate With The Third-Party Developer#
Once you've provisioned the application in FusionAuth, provide integration information for the MoneyScope developers. Provide these values:
- client Id
- client secret
- scopes, scope requirements, and scope descriptions
The first two correspond to the application and are relatively static. The last could vary depending on what the application needs. For example, one part of the MoneyScope might request only the accounts.read scope, whereas others might need data corresponding to all the read scopes.
FusionAuth doesn't have a dedicated page for displaying integration details, but you could store them in a database table in your application, or in the data field in the application. You could also use entities to model each third-party company inside FusionAuth.
Other functionality that might go on such a custom developer portal page includes:
- adding or removing team members with privileges to manage the third-party application
- the ability to rotate the client secret
- a way to request more or fewer scopes from Changebank
- a method to update their contact information, so you can contact the team
- a news feed showing new features available for the APIs your organization offers
- example code for integrating the scopes request
Third-Party Developer Actions#
Finally, the developer needs to add the correct URL to their application to begin the authentication and authorization process with FusionAuth. The URL will look something like this:
${fusionAuthURL}/oauth2/authorize?client_id=${clientId}&response_type=code&redirect_uri={redirectURI}&state=${stateValue}&code_challenge=${codeChallenge}&code_challenge_method=S256&scope=profile%20email%20openid%20offline_access%20accounts.read%20creditScore.read%20investments.read%20profile.read%20transactions.readThe clientId corresponds to the application created for this developer. The scope parameter lists the scopes you and the MoneyScope developers agreed was required for the application.
You can read more about the other parameters for the authorization code grant to learn about the other parameters.
Should this URL be available to anyone or do users have to log in to MoneyScope before they can authorize the application to access their data held by Changebank? Third-party developers could entirely delegate authentication to the Changebank application. Or they could run their own login system and have Changebank login be an authorization process. Choose this option if there is useful functionality in an application even without the access to the Changebank APIs. In that case, there'd be a button to connect with Changebank within the MoneyScope.
After this is done, you should test the MoneyScope application and make sure it works as advertised. Things to test for:
- Scopes are in the URL, and therefore can be edited by a malicious end user. Make sure the third party developer's application handles when scopes are not exactly as they expect.
- Clicking the Cancel button on the consent screen terminates the OAuth workflow. The user is sent to the
redirect_uriwith an OAuth error. The third-party developer must handle this scenario in a way the user expects.
User Authorization Process#
Let's talk about what happens when a user visits MoneyScope.
They have to log in to the Changebank app and give needed consents.
Here's a diagram of the user authorization flow:
sequenceDiagram
    participant User as Logged In User/Browser
    participant App as MoneyScope
    participant FusionAuth

    User ->> App : Requests Login Page
    App ->> User : Redirects To FusionAuth Authorize URL
    User ->> FusionAuth : Requests Login Page
    FusionAuth ->> User : Returns Login Page
    User ->> FusionAuth : Authenticates
    FusionAuth ->> FusionAuth : Validates Credentials
    FusionAuth ->> User : Displays Consent Page
    User ->> FusionAuth : Accepts Consents
    FusionAuth ->> User : Returns Redirect To Application
    User ->> App : Requests Redirect URL
    App ->> FusionAuth : Requests Tokens, Including Refresh Token
    FusionAuth ->> App : Sends Tokens
    App ->> App : Stores Tokens
    App ->> User : Display Page
A diagram of the user authorization flow.
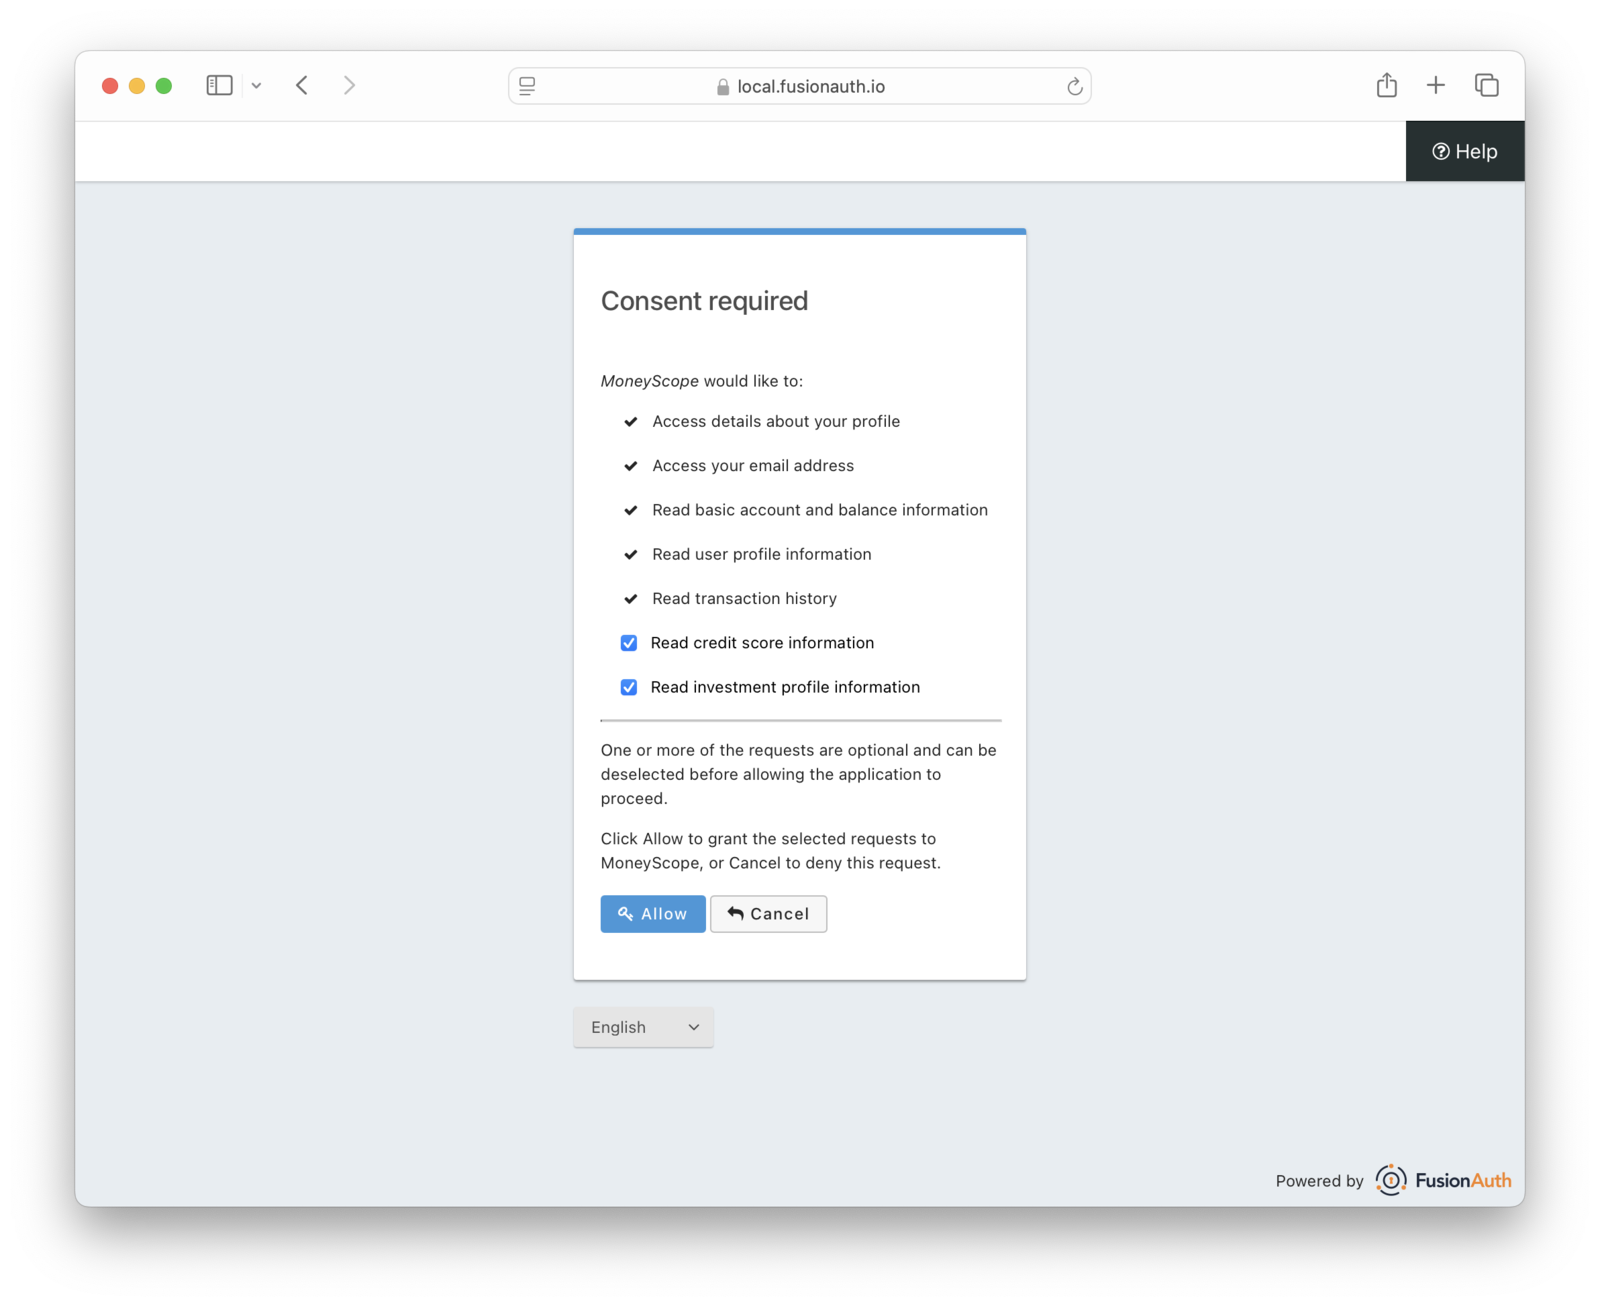
Here's an example of the consent screen the MoneyScope user will see.
MoneyScope stores the Changebank access and refresh tokens. Then, when it needs it, it makes requests of the Changebank APIs. Depending on the timeframe, it may need to refresh the access token before it calls the APIs.
Here's a diagram of the flow that MoneyScope follows to get the data it needs, when it needs a refresh token:
sequenceDiagram
    participant App as MoneyScope
    participant APIs as Changebank APIs
    participant FusionAuth


    App ->> App : Query All Users To Update Data
    loop for each user
       App ->> APIs : Requests Data Using User's (Expired) Access Token
       APIs ->> APIs : Validates Access Token
       APIs ->> App : Returns Unauthorized
       App ->> App : Retrieve User's Refresh Token
       App ->> FusionAuth : Request New Access Token Using Refresh Token
       FusionAuth ->> FusionAuth : Validates Refresh Token
       FusionAuth ->> App : Sends New Access Token
       App ->> APIs : Requests Data Using New Access Token
       APIs ->> APIs : Validates Access Token
       APIs ->> App : Returns Data
       App ->> App : Stores Data
    end
A diagram of the flow that MoneyScope follows to get the data it needs.
Third-Party Application List#
You, as a developer at Changebank, can build a page to display the third-party applications that your users have authorized. This would be a custom page you'd build out using the FusionAuth APIs or SDKs. Here are the steps you'd take:
- Use the FusionAuth user Id to find all the user's refresh tokens.
- Filter the refresh tokens to find all the application Ids
- Retrieve each application and filter out any that do not have an
application.oauthConfiguration.relationshipofThirdParty. You don't want to display any Changebank-owned, first-party applications. - Display the names of third-party applications with a valid refresh token token, including when the token was issued and scopes issued.
Here's a screenshot of such a screen from GitHub.
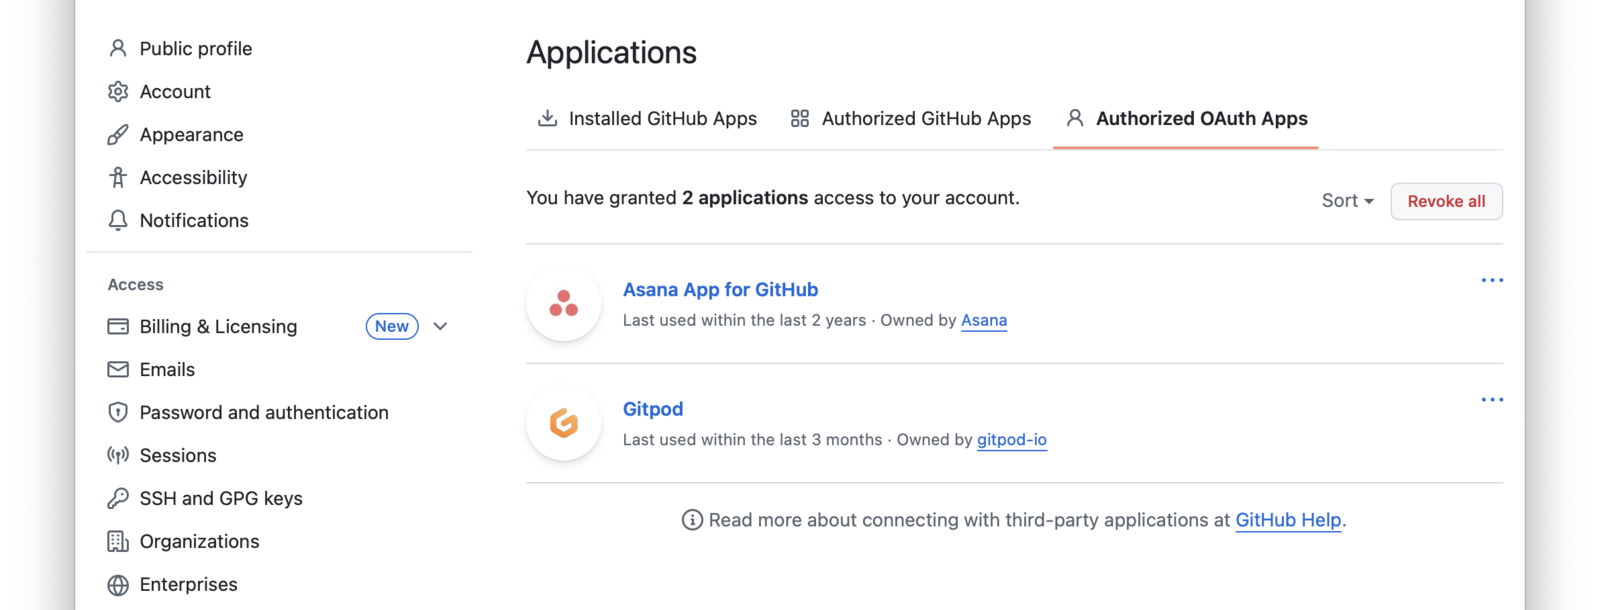
To allow users to revoke access, add a button or action to this page which calls the FusionAuth API and revokes the refresh token. For example, a user could revoke the MoneyScope refresh token. The next time MoneyScope tries to retrieve a new access token, it will be denied.
Expected Outcome#
After implementing this use case, third-party developers can build on top of your APIs, accessing user data with your user's permission.
This fosters an ecosystem of applications around your APIs, which makes your APIs more valuable.
Your users will also have access to functionality that might not ever get built by you.
Edge Cases#
Usually you want to enable self service registration for third-party applications, so that users can from any application that has been onboarded. If you want to control who can authorize specific third-party applications, configure Require registration in FusionAuth and turn off self-service registration. In this case, you'll need to register users via the API, SDKs, or admin UI before the third-party application can be used.
In this use case, FusionAuth handles scopes and user consents. There are other considerations you'll want to consider, such as rate limiting and per-call monetization.
In the example scenario, the consent was displayed every time the user authenticated with FusionAuth. You can also remember the user's decision for a configurable period of time.
You almost always want third-party applications to request the offline_access scope, which creates a refresh token. This allows for requests from the third-party applications long after the initial authorization while still allowing you to keep the access token lifetime short.
Even after access is revoked, a third-party application might have user data stored. You can use the jwt.refresh-token.revoke event to notify a third-party application they should remove data associated with the user. Setting this up would be part of the onboarding process.
OAuth scopes as described in this document only applies to grants involving user interaction. The Client Credentials grant follows a different model of scopes.
Other Example Scenarios#
These include:
- A CRM who wants to let third-party developers build mini-apps using their data and APIs
- A social media platform which wants to enable third-party teams to build custom posting applications
- Any platform that wants to allow a model context protocol (MCP) client to access to APIs guarded by an MCP server
- An e-commerce marketplace that wants to support other companies building tools for inventory management, fulfillment and sales analysis
All of these have a platform with valuable data behind APIs and want to allow API access in a controlled fashion. They all want to build an ecosystem and respect users' choices about their data.