FusionAuth supports the following grant types as defined by the OAuth 2.0 framework in RFC 6749, RFC 8628, and OpenID Connect Core.
- Authorization Code Grant
- Implicit Grant
- Password Grant (also referred to as the Resource Owner Credentials Grant)
- Refresh Token Grant
- Client Credentials Grant
- Device Authorization Grant
To begin using the FusionAuth login system, start by configuring your Application for OAuth2.
To begin using the Client Credentials grant, start by configuring Entities.
It is recommended to utilize the Authorization Code Grant unless you have a technical requirement that makes a different grant a better choice. The following outline some example login flows.
- Example Authorization Code Grant
- Example Implicit Grant
- Example Password Grant
- Example Refresh Token Grant
- Example Client Credentials Grant
- Example Device Authorization Grant
You can also learn about OAuth Modes, which are different methods of using OAuth that are higher level than the individual grants.
Configure Application OAuth Settings#
Navigate to the Application configuration from the main menu, Applications .
If you have already created a FusionAuth Application for the purpose of your application, you do not need to create another, however you will still need to complete the OAuth configuration. If an application has not yet been created, click Add and name your application accordingly and fill out the OAuth configuration.
In this example you will see we have created a new Application named Pied Piper and have filled out the fields in the OAuth Configuration tab. A FusionAuth application represents an authenticated resource that you will be using with FusionAuth.
Additional OAuth controls can be managed through Tenant Configuration.
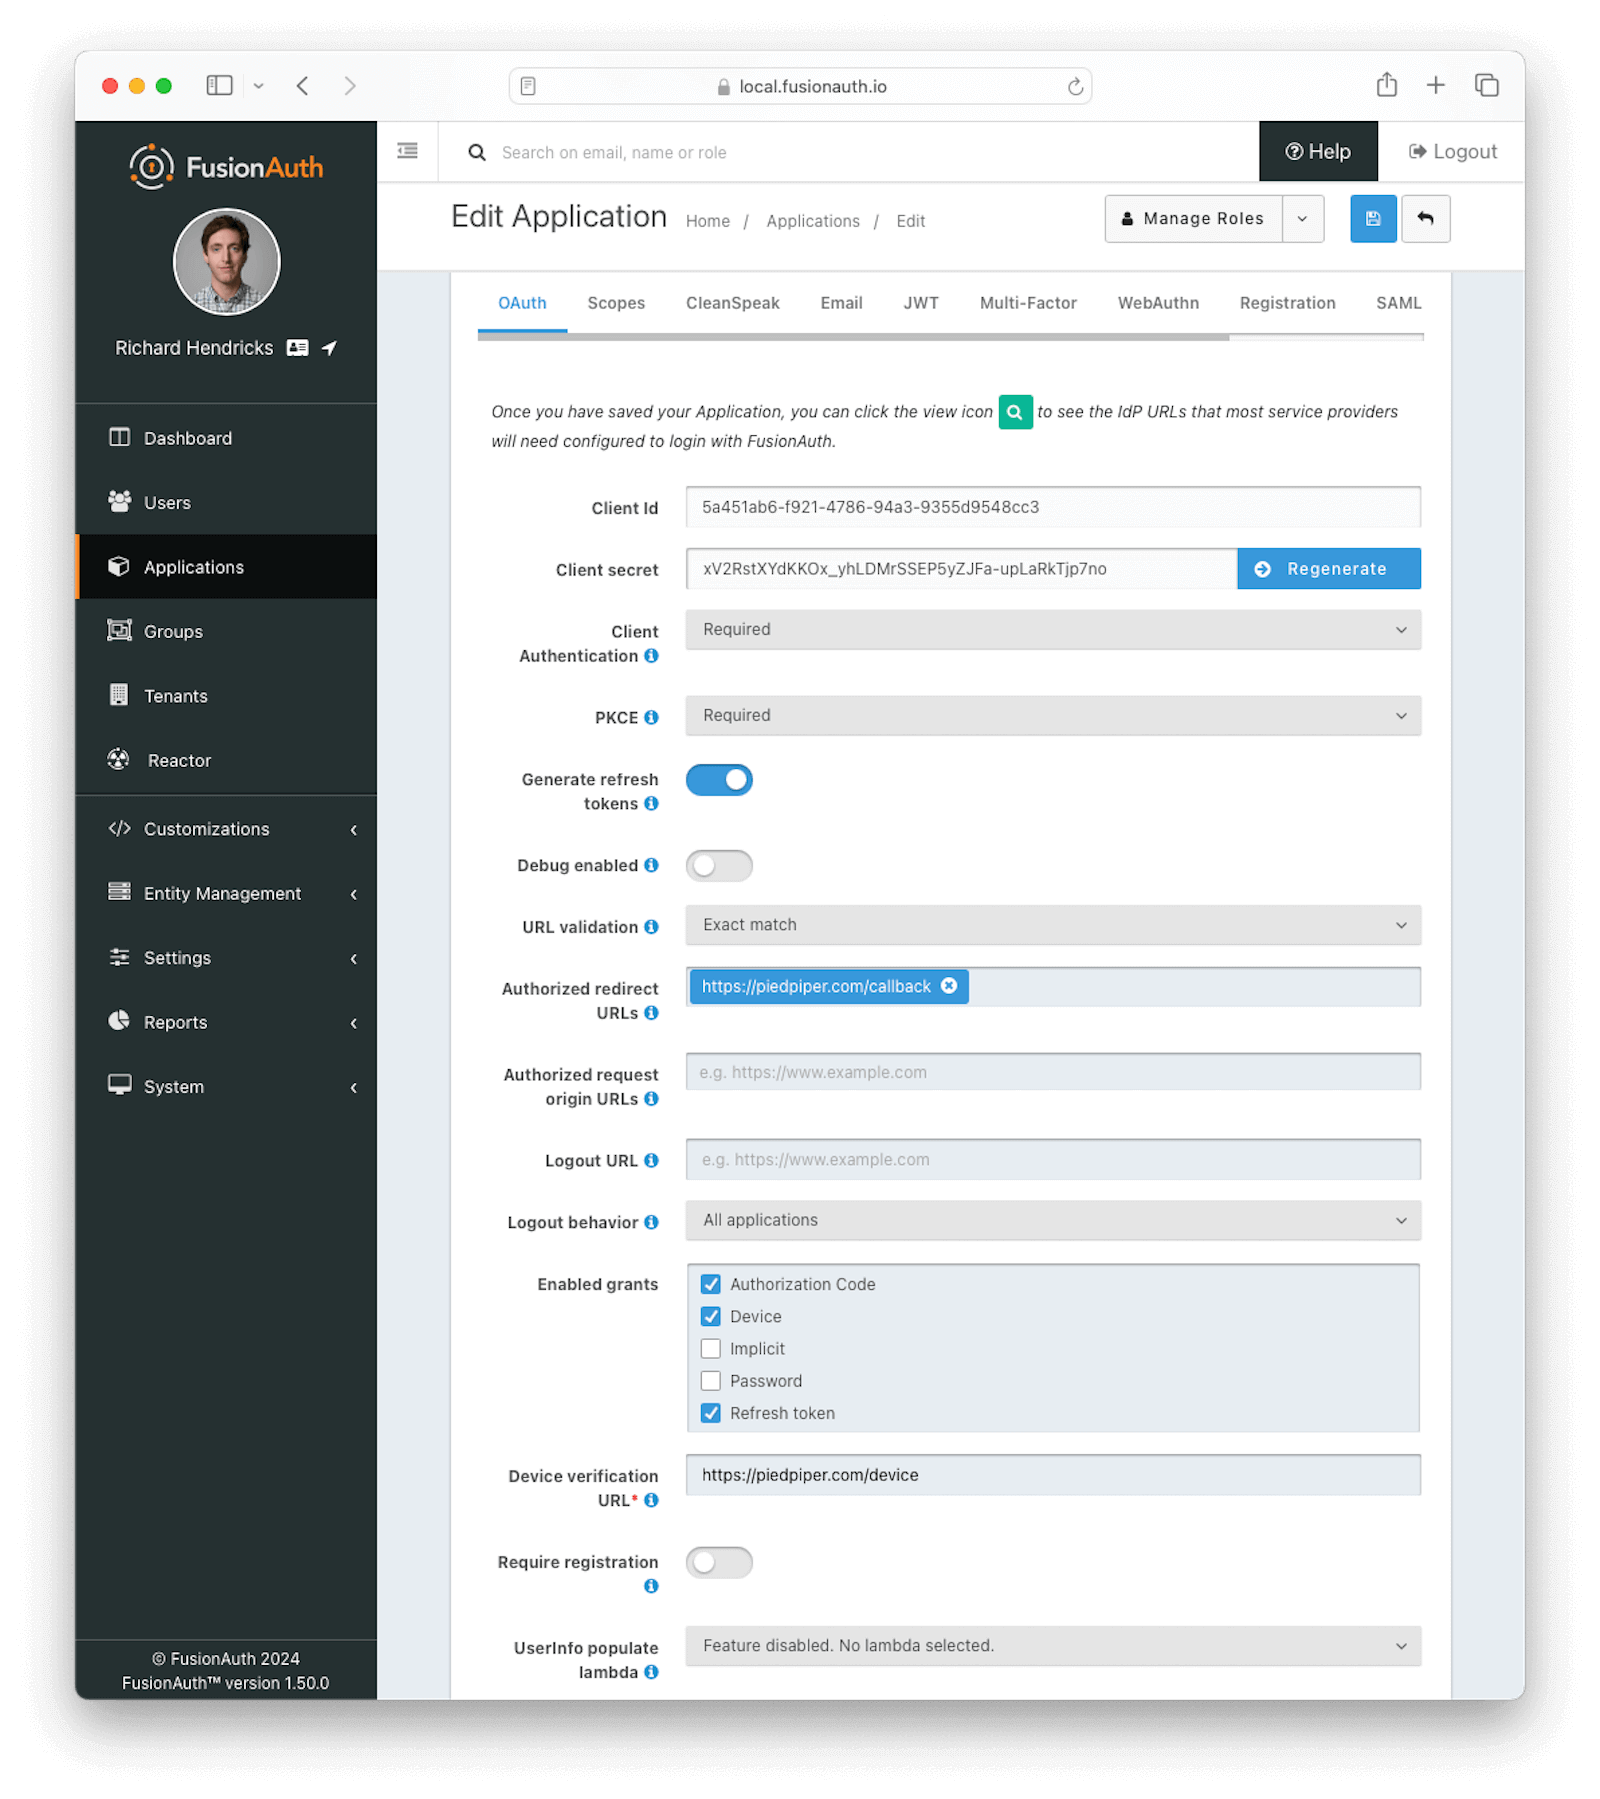
OAuth Form Fields#
Client IdRead onlyThe unique client identifier as defined by RFC 6749 Section 2.2. This value is read only and is equal to the unique Id of the Application.
Client secretRead onlyThe client secret as defined by RFC 6749 Section 2.3.1. When Client Authentication is Required, this client secret will be required to obtain an access token from the Token endpoint.
This value may be regenerated if you think it has been compromised by clicking the regenerate button. If this Application is configured to require client authentication, regenerating the client secret will cause all clients to fail, and they will not be able to complete the OAuth login process. If this Application is not configured to require client authentication, regenerating this secret will not have any effect.
Client AuthenticationoptionalAvailable since 1.28.0This selector allows you to set a rule for accessing the Token endpoint.
The possible values are:
Required- Theclient_secretparameter must be used. This is the default setting. In most cases you will not want to change this setting.Not required- Use of theclient_secretparameter is optional.Not required when using PKCE- Requires the use of theclient_secretparameter unless a valid PKCE code_verifier parameter is used. This is useful for scenarios where you have a requirement to make a request to the Token endpoint where you cannot safely secure a client secret such as native mobile applications and single page applications (SPAs) running in a browser. In these scenarios it is recommended you use PKCE.
See the Token endpoint for more information.
PKCEoptionalAvailable since 1.28.0This selector allows you to set a rule for Proof Key for Code Exchange (or PKCE) requirements when using the authorization code grant.
The possible values are:
Required- Thecode_verifierparameter must be used. If you want to require PKCE for this application, set PKCE to this value.Not required- Use of thecode_verifierparameter is optional. This is the default setting.Not required when using client authentication- Requires the use of thecode_verifierparameter unless a validclient_secretparameter is used.
Generate refresh tokensAvailable since 1.3.0When enabled, FusionAuth will return a refresh token when the offline_access scope has been requested. When this setting is disabled refresh tokens will not be generated even if the offline_access scope is requested.
In order to use the Refresh Token with the Refresh Grant to refresh a token, you must ensure that the Refresh Token grant is enabled. See the Enabled grants field.
Enable debug loggingoptionalAvailable since 1.25.0Enable debug to create an event log to assist you in debugging integration errors.
URL validationoptionalAvailable since 1.43.0Controls the validation policy for Authorized redirect URLs and Authorized request origin URLs.
The possible values are:
Exact match- Only the configured values that do not contain wildcards are considered for validation. Values during OAuth 2.0 workflows must match a configured value exactly.Allow wildcards- Configured values with and without wildcards are considered for validation. Values during OAuth 2.0 workflows can be matched against wildcard patterns or exactly match a configured value.
Authorized redirect URLsoptionalWhen OAuth grants, such as the authorization code grant, require a browser redirect to a URL found in the redirect_uri parameter, the destination URLs must be added to this list. URLs that are not authorized may not be utilized in the redirect_uri parameter or the post_logout_redirect_uri parameter.
You can add as many URLs as you'd like to this list. Prior to version 1.43.0 only exact string matches with the provided redirect_uri will be allowed. No partial or wildcard matches will be accepted.
Configured URLs containing wildcards are considered during validation when Authorized redirect URLs is set to Allow wildcards. Wildcards are allowed in the following positions:
- The left-most subdomain - A full or partial wildcard is allowed in the left-most subdomain. The replacement value cannot contain a
.. - The port number - A wildcard is allowed in place of the port number. Partial wildcards are not allowed in this position.
- A path segment - A full or partial wildcard is allowed in any path segment. The replacement value cannot contain a
/. - A query string value - A wildcard is allowed in place of a query string value. Partial wildcards are not allowed in this position. Wildcards are not allowed in query string names.
See the OAuth 2.0 URL Validation page for more detail.
Authorized request origin URLsoptionalThis optional configuration allows you to restrict the origin of an OAuth2 / OpenID Connect grant request. If no origins are registered for this Application, all origins are allowed.
By default FusionAuth will add the X-Frame-Options: DENY HTTP response header to the login pages to keep these pages from being rendered in an iframe. If the request comes from an authorized origin, however, FusionAuth will not add this header to the response. To load FusionAuth hosted login pages in an iframe, you will need to add the request origin to this configuration.
Configured URLs containing wildcards are considered during validation when Authorized request origin URLs is set to Allow wildcards. Wildcards are allowed in the following positions:
- The left-most subdomain - A full or partial wildcard is allowed in the left-most subdomain. The replacement value cannot contain a
.. - The port number - A wildcard is allowed in place of the port number. Partial wildcards are not allowed in this position.
- A path segment - A full or partial wildcard is allowed in any path segment. The replacement value cannot contain a
/. - A query string value - A wildcard is allowed in place of a query string value. Partial wildcards are not allowed in this position. Wildcards are not allowed in query string names.
See the OAuth 2.0 URL Validation page for more detail.
Authorized resource URIsoptionalAvailable since 1.67.0An optional list of allowed resource server URIs for this Application, per RFC 8707 (Resource Indicators for OAuth 2.0). Defaults to an empty list.
Each URI must be an absolute URI and may not contain a fragment (#). When this list is non-empty, clients may pass a resource parameter during the OAuth authorize and token flows to request access tokens scoped to a specific resource server. These flows only accept URIs present in this list; all other values return an invalid_target error.
When this list is empty (the default), FusionAuth silently ignores any resource parameter sent by the client; existing application behavior is unchanged.
Examples of valid resource URIs:
https://api.example.comhttps://mcp.example.com/v2/api
Logout URLoptionalThe optional logout URL for this Application. When provided this logout URL should handle the logout of a user in your application.
If you need to end an HTTP session or delete cookies to logout a user from your application, these operations should be handled by this URL. When the /oauth2/logout endpoint is retrieved, each Logout URL registered for Applications in this tenant will be called within an iframe to complete the SSO logout.
If the OAuth2 logout endpoint is used with this Client Id, this configured Logout URL will be also utilized as the redirect URL. This behavior only occurs when the post_logout_redirect_uri parameter is not provided.
If this Application has not defined a Logout URL, the value configured at the Tenant level will be used. If no Logout URL has been configured, a redirect to / will occur. A specific redirect URL may also be provided by using the post_logout_redirect_uri request parameter.
See the Logout endpoint or the Logout And Session Management guide for more information.
Logout behavioroptionalAvailable since 1.11.0This selector allows you to modify the behavior when using the Logout endpoint with this Client Id.
The possible values are:
All applications- This is the default behavior. Upon Logout of the FusionAuth SSO, call each registered Logout URLs for the entire tenant and then redirect to the Logout URL registered for this application.Redirect only- Do not call each registered Logout URL in the tenant, instead logout out of the FusionAuth SSO and then only redirect to the Logout URL registered for this application.
See the Logout endpoint for more information.
Enabled grantsoptionalAvailable since 1.5.0The enabled OAuth2 grants. If a grant is not enabled and a client requests this grant during authentication an error will be returned to the caller indicating the grant is not enabled.
- Authorization Code
- Device
- Implicit
- Password
- Refresh Token
When creating a new Application, the Authorization Code and Refresh Token grants will be enabled by default. See The OAuth 2.0 & OpenID Connect Overview for additional information on each of these grants.
Device Verification URLoptionalAvailable since 1.11.0The URL to be returned during the Device Authorization request to be displayed to the end user. This URL will be where the end user navigates in order to complete the device authentication workflow.
This field is required if Device is enabled in the OAuth Enabled grants for this Application and hidden when not.
Require registration to complete OAuth authorizationoptionalAvailable since 1.28.0When enabled the user will be required to be registered, or complete registration before redirecting to the configured callback in the authorization code grant or the implicit grant. This configuration does not affect any other grant, and does not affect the API usage.
UserInfo populate lambdaoptionalAvailable since 1.50.0The lambda to be invoked during the generation of the UserInfo response when provided a token associated with this Application. See UserInfo populate lambda.
OAuth Scopes#
The supported OAuth grant types that involve user interaction allow specifying a space-delimited set of OAuth scopes via the scope request parameter. See Scopes for more information on configuring the application's OAuth scope policies, managing custom OAuth scopes, and prompting for user consent to granting scopes to third-party applications.
Configure Entities#
This feature is only available in paid plans. To learn more, see our pricing page.
The Client Credentials grant takes place between two Entities. You can learn more about Entities in the Core Concepts section.
There are two entities which take part in a Client Credentials grant in FusionAuth: the recipient Entity and the target Entity.
Imagine you have a todo API which lets you create, read, update, and delete todos. You also have an email API, which lets you send emails. You can represent these both in FusionAuth as Entities.
When building functionality to allow the todo API to send email reminders, grant permissions on the email API (the target Entity) to the todo API (the recipient Entity). To set up this relationship:
- Create an API entity type with the following permissions:
executeandconfigure. - Create a todo API entity
- Create an email API entity
- Grant the todo API
executepermissions on the email API
The todo API is the recipient Entity, because it receives the permissions to call the email API. The email API is the target Entity, because it will process the token. The email API is the system to which access is controlled.
The set up happens once and then the todo API can perform the client credentials grant any time it needs to call the email API. It will get a token at the end of a successful grant and can present that to the email API.
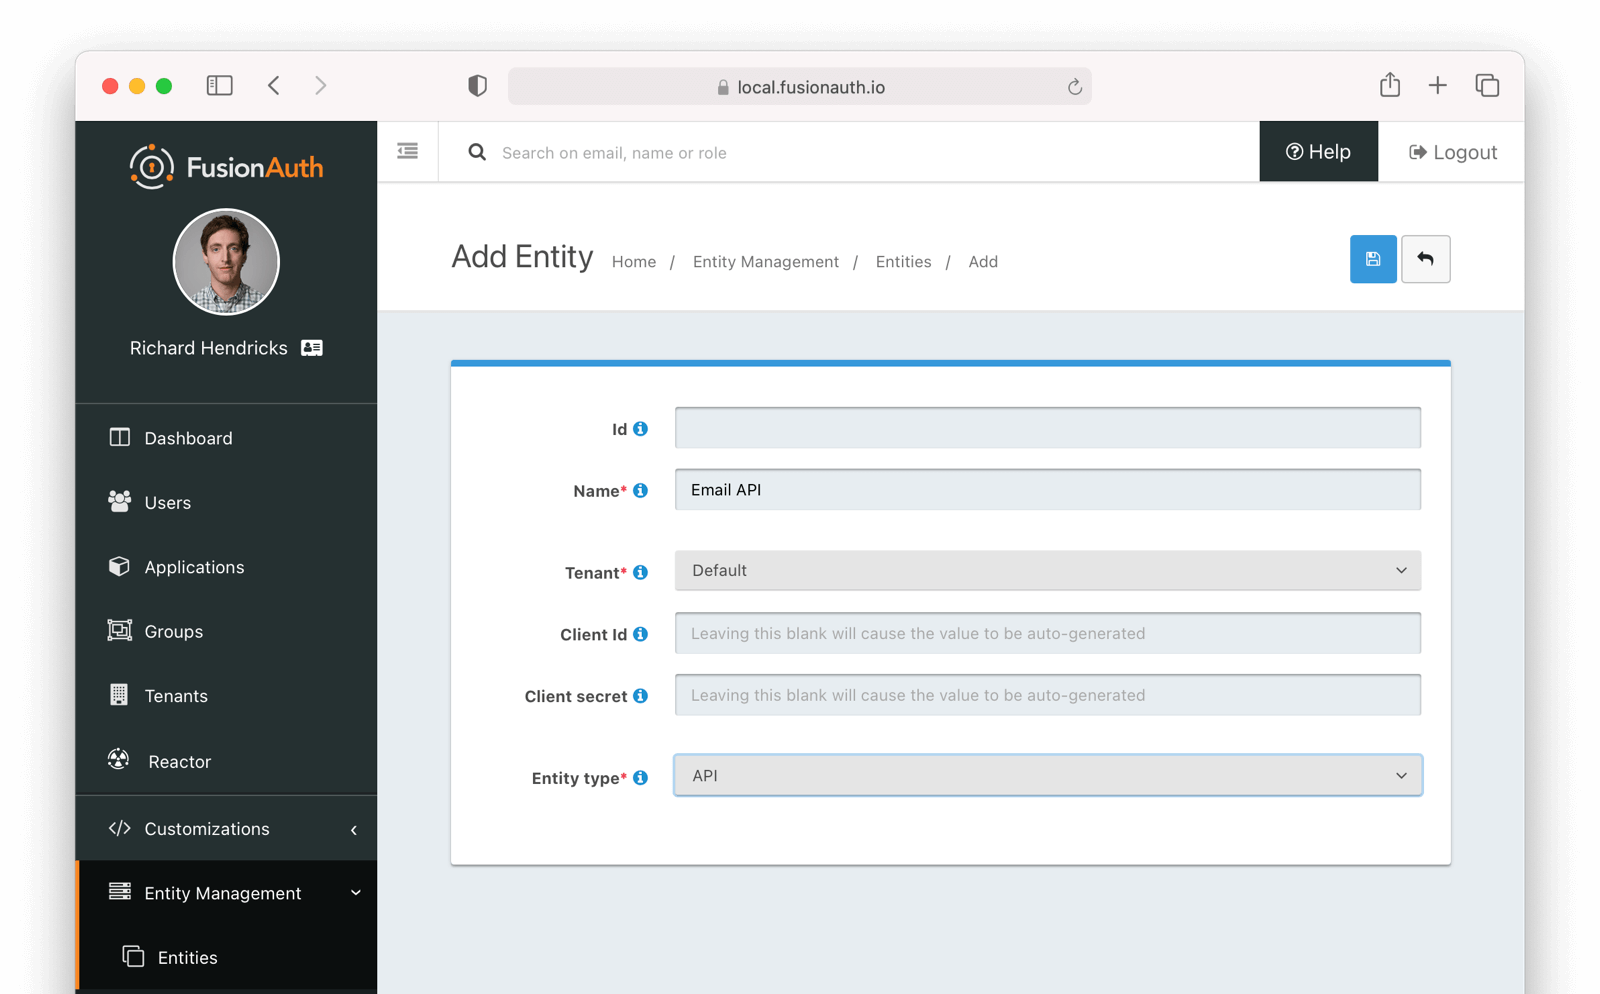
You may configure Entities and Grants via the FusionAuth API or the administrative user interface. You can specify the Client Id and Client Secret if desired.
Below is the creation screen for an Entity:
Below is the management screen for an Entity where you'd add or remove Grants:
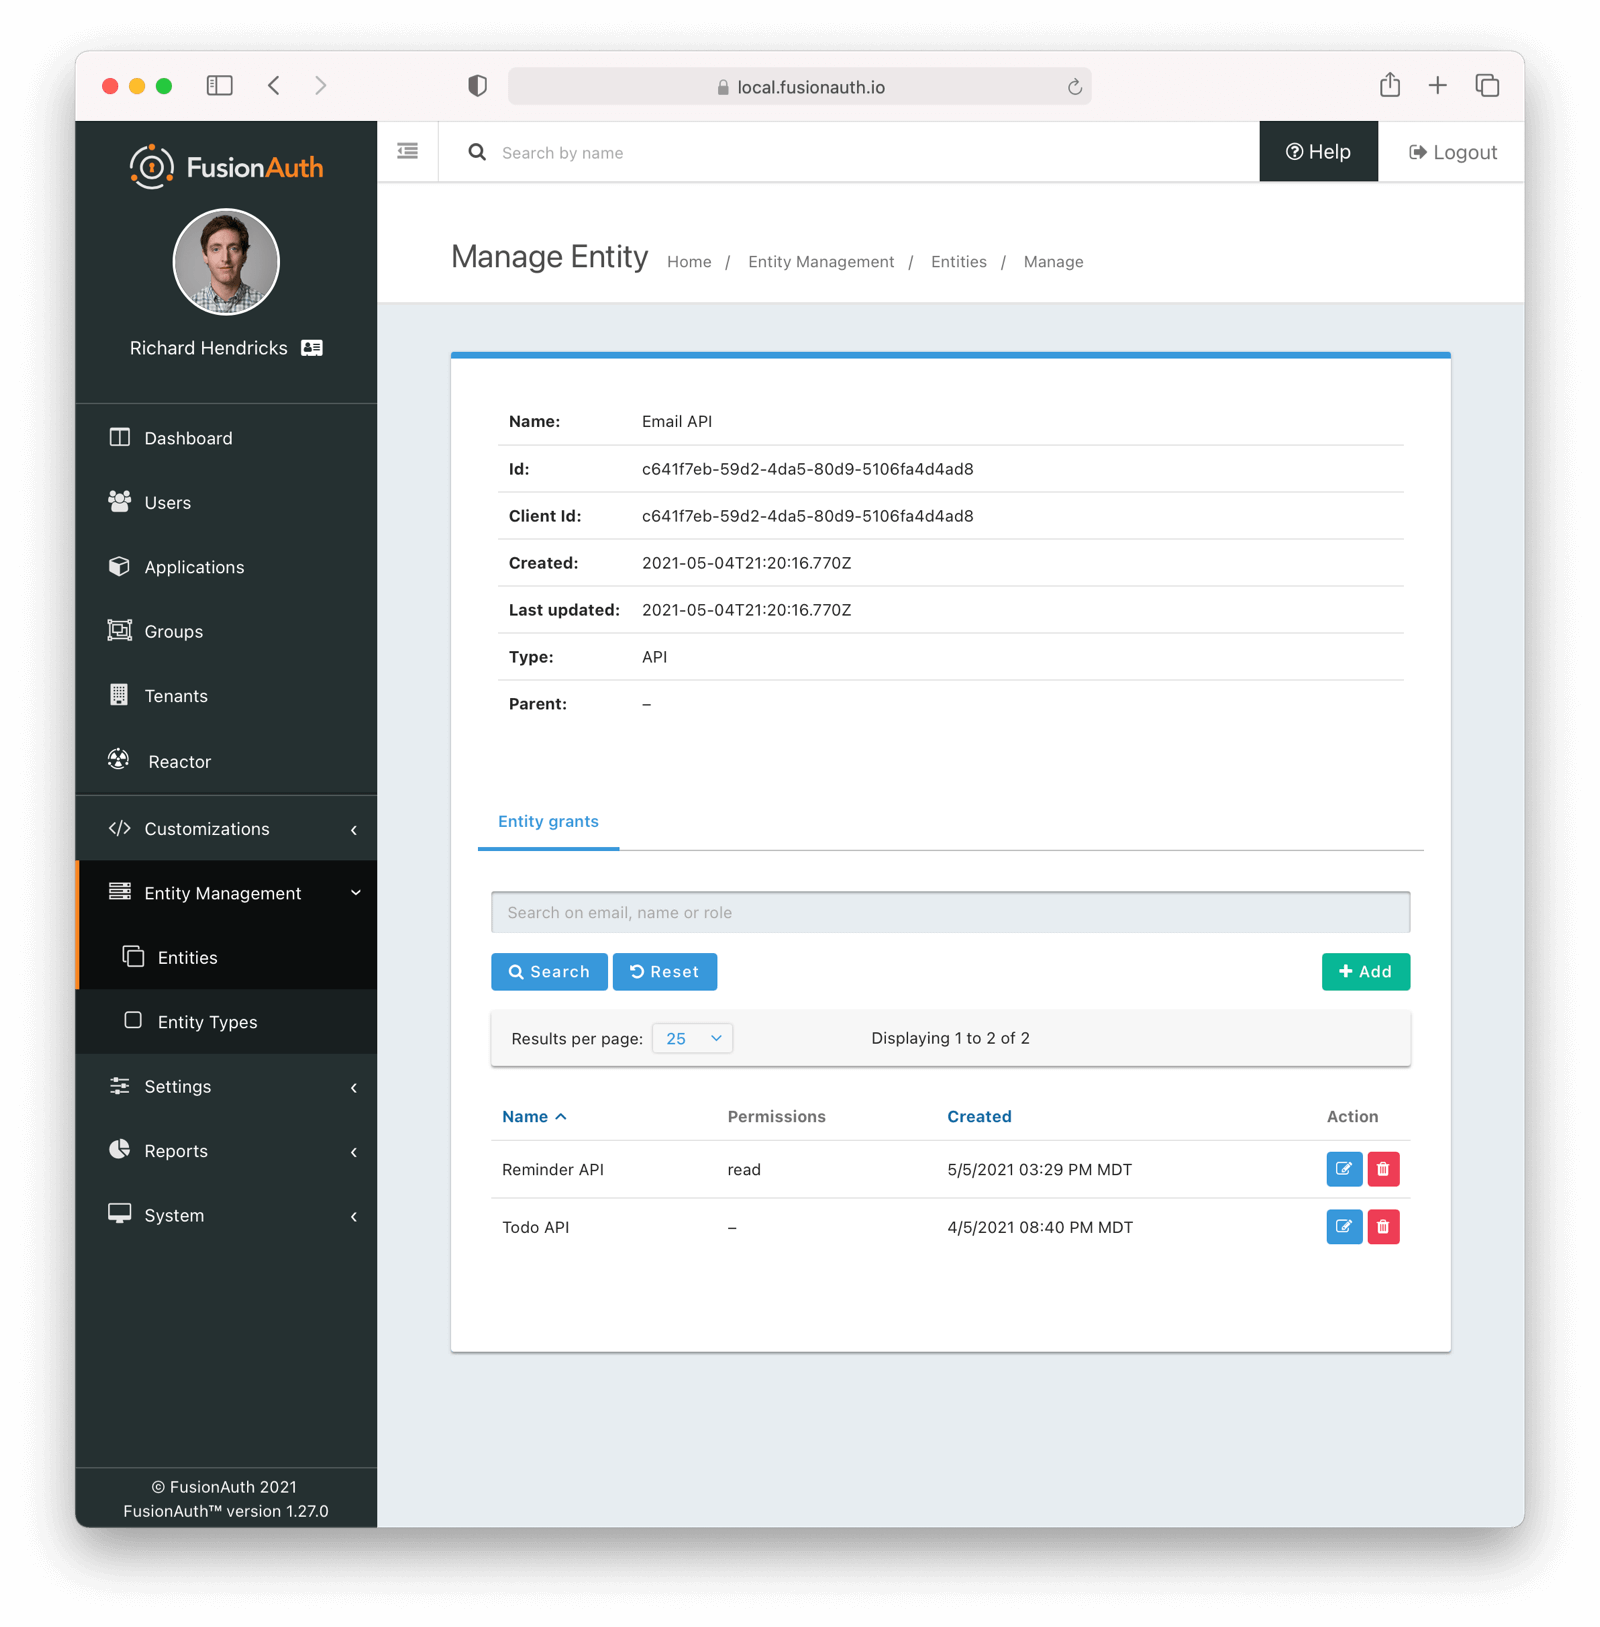
Here's an example of adding a Grant to an Entity via the API:
Example Grant Request
API_KEY=...
TARGET_ENTITY_ID=e13365f1-a270-493e-bd1b-3d239d753d53
RECIPIENT_ENTITY_ID=2934f41f-d277-4a32-b0d5-16e47dad9721

curl \
  -XPOST \
  -H "content-type: application/json" \
  -H "Authorization: $API_KEY"  \
  'https://local.fusionauth.io/api/entity/'$TARGET_ENTITY_ID'/grant' -d'
{
  "grant": {
    "recipientEntityId": "'$RECIPIENT_ENTITY_ID'",
    "permissions" : ["read","write"]
  }
}
'
Next, learn how to perform a Client Credentials Grant.
Example Authorization Code Grant#
Mobile applications require additional security in implementing the Authorization Code Grant Flow due to inability to safely store a client-secret and the potential of the authorization code being intercepted.
For these reasons, it is best practice to implement the Authorization Code Grant Flow with Proof Key for Code Exchange (PKCE, pronounced "pixie").
Review the Authorization and Token endpoint documentation for additional detail on these necessary request parameters.
Point your application to the authorize endpoint#
Now that your FusionAuth application has been configured to use the OAuth provider, you may now point the login for your application to the FusionAuth authorize endpoint which will now handle user authentication.
For the purposes of this example, I will make the assumption that FusionAuth App is running locally at http://localhost:9011, the client_id will be found on the OAuth tab in the application configuration, the redirect_uri will be where you wish FusionAuth to redirect the browser when the authorization step has completed. This value will need to be predefined in the authorized redirect URLs in the OAuth configuration. The response_type will always be code for this grant type. The tenantId will be the unique Id of the tenant this request is scoped for, the tenant's configured theme will be applied.
Review the Authorization endpoint documentation for more detail.
http://localhost:9011/oauth2/authorize?client_id=06494b74-a796-4723-af44-1bdb96b48875&redirect_uri=https://www.piedpiper.com/login&response_type=code&tenantId=78dda1c8-14d4-4c98-be75-0ccef244297dConsume the authorization code returned from the authorize request#
When the authorize request completes successfully it will respond with a status code of 302 to the location provided by the redirect_uri parameter. The request will contain a code parameter which can be exchanged for an access token. The access token contains the user Id of the authenticated user which can then be used to retrieve the entire user object.
Review the Token endpoint documentation for more detail. The following is an example redirect URI containing the authorization code.
https://www.piedpiper.com/login?code=+WYT3XemV4f81ghHi4V+RyNwvATDaD4FIj0BpfFC4Wzg=&userState=AuthenticatedExchange the authorization code for an access token#
The last step to complete the authentication process and retrieve the user's Id is to exchange the returned authorization code for an access token. The JSON response will contain the user Id of the authenticated user.
If the authorization code grant is being implemented in a Single Page App (SPA), the token request should be made by the application server in order to keep the client secret secure from introspection of the client code.
Line breaks have been added for readability.
Example HTTP Request
POST /oauth2/token HTTP/1.1
Host: piedpiper.fusionauth.io
Content-Type: application/x-www-form-urlencoded
Accept: */*
Content-Length: 436
client_id=3c219e58-ed0e-4b18-ad48-f4f92793ae32
    &code=+WYT3XemV4f81ghHi4V+RyNwvATDaD4FIj0BpfFC4Wzg
    &grant_type=authorization_code
    &redirect_uri=https%3A%2F%2Fwww.piedpiper.com%2Flogin
Example HTTP Response
{
  "access_token" : "eyJhbGciOiJIUzI1NiIsInR5cCI6IkpXVCJ9.eyJleHAiOjE0ODUxNDA5ODQsImlhdCI6MTQ4NTEzNzM4NCwiaXNzIjoiYWNtZS5jb20iLCJzdWIiOiIyOWFjMGMxOC0wYjRhLTQyY2YtODJmYy0wM2Q1NzAzMThhMWQiLCJhcHBsaWNhdGlvbklkIjoiNzkxMDM3MzQtOTdhYi00ZDFhLWFmMzctZTAwNmQwNWQyOTUyIiwicm9sZXMiOltdfQ.Mp0Pcwsz5VECK11Kf2ZZNF_SMKu5CgBeLN9ZOP04kZo",
  "expires_in" : 3600,
  "token_type" : "Bearer",
  "userId" : "3b6d2f70-4821-4694-ac89-60333c9c4165"
}
Verify Authorization#
If you only need to validate registration and User roles, this can be done by inspecting the JWT payload as returned in the access_token
property of the response body.
If you require the entire User object to validate authorization, you may need to retrieve the entire User. The User may be
retrieved in one of several ways. If you have an API key you can retrieve the User by Id or email, these two values are returned in the JWT
payload. The email address is returned in the email identity claim, and the User's Id is returned in the sub identity claim. You may
also retrieve the User without an API key by utilizing the JWT as returned in the access_token property in the response body.
See the Retrieve a User API for examples.
You may also choose to use the Introspect or Userinfo endpoints to validate the access token returned from the Token endpoint and to provide you decoded claims as a JSON object.
Now that you have the user, or retrieved the roles from the JWT, you may review their roles and registration to ensure they have adequate authority for the intended action, and if the user is not yet registered for the requested application, you can either fail their login, or complete a registration workflow. Once you have determined a user can be logged into your application, you'll need to log them into your application. For a web based application, this generally will include creating an HTTP session and storing the user in the newly created session.
Log Out#
To log the user out, a typical workflow would include first logging out of your application, if that is successful, you would then log the
user out of FusionAuth. This is accomplished by making a GET request to the /oauth2/logout endpoint. The logout request will complete
with a 302 redirect to the configured logout URL.
Line breaks have been added for readability.
Example HTTP Response
GET /oauth2/logout?
      client_id=06494b74-a796-4723-af44-1bdb96b48875
      &tenantId=78dda1c8-14d4-4c98-be75-0ccef244297d HTTP/1.1
Host: piedpiper.fusionauth.io
Example HTTP Request
HTTP/1.1 302 Found
Location: https://www.piedpiper.com
Example Implicit Grant#
Always prefer the Authorization Code Grant over the Implicit Grant. We provide the Implicit Grant for compatibility with existing integrations, but the we do not recommend using this grant for new development for the following reasons:
- this grant type returns the access token in the URL as a fragment, which is susceptible to interception
- the client (the browser) does not have a secure way to store the token, which makes the token susceptible to theft
The Implicit Grant is similar to the Authorization grant, instead of exchanging a code for an access token, the token is provided in response to the initial authorization request.
Make the authorization request to the authorization server#
Make a GET request to the Authorize endpoint with the client_id and redirect_uri. The response_type will always be token. Below is an example HTTP request.
Line breaks have been added for readability.
Example HTTP Request
GET /oauth2/authorize?
      client_id=3c219e58-ed0e-4b18-ad48-f4f92793ae32
      &response_type=token
      &redirect_uri=https%3A%2F%2Fwww.piedpiper.com%2Fcallback
Host: piedpiper.fusionauth.io
Upon successful authentication, a redirect to the configured redirect_uri will be made with an access_token as one of the redirect parameters. The following is an example HTTP 302 redirect, with line breaks added to improve readability. The redirect from an Implicit Grant will contain parameters after the fragment delimiter, #.
HTTP Redirect Response
HTTP/1.1 302 Found
Location: https://piedpiper.com/callback#
           access_token=eyJhbGciOiJIUzI1NiIsInR5cCI6IkpXVCJ9.eyJleHAiOjE0ODUxNDA5ODQsImlhdCI6MTQ4NTEzNzM4NCwiaXNzIjoiYWNtZS5jb20iLCJzdWIiOiIyOWFjMGMxOC0wYjRhLTQyY2YtODJmYy0wM2Q1NzAzMThhMWQiLCJhcHBsaWNhdGlvbklkIjoiNzkxMDM3MzQtOTdhYi00ZDFhLWFmMzctZTAwNmQwNWQyOTUyIiwicm9sZXMiOltdfQ.Mp0Pcwsz5VECK11Kf2ZZNF_SMKu5CgBeLN9ZOP04kZo
           &expires_in=3599
           &locale=fr
           &token_type=Bearer
           &userState=Authenticated
Example Resource Owner Password Credentials Grant#
Note
The Authorization Code Grant is nearly always preferred over the Resource Owner Password Credentials Grant. This grant is provided for compatibility with existing integrations but the use of this grant is not recommended.
The use of this grant removes the delegation pattern intended in the OAuth 2 framework. This means that you no longer will be delegating to FusionAuth to collect user credentials, instead you will be collecting the credentials and passing them to FusionAuth.
The Resource Owner Password Credentials Grant, also referred to as the Password Grant allows you to obtain an access token by directly providing the user credentials to the Token endpoint. This grant may also be used to receive a refresh token by specifying the offline_access scope.
Exchange the user credentials for an access token#
Once you have collected the user's email and password you will make a POST request to the Token endpoint. Below is an example HTTP request where the user's email is richard@piedpiper.com and password is disrupt. The grant_type will always be password.
Line breaks have been added for readability.
Example HTTP Request
POST /oauth2/token HTTP/1.1
Host: piedpiper.fusionauth.io
Content-Type: application/x-www-form-urlencoded
Accept: */*
Content-Length: 436
client_id=3c219e58-ed0e-4b18-ad48-f4f92793ae32
    &grant_type=password
    &username=richard%40piedpiper.com
    &password=disrupt
    &scope=offline_access
Example HTTP Response
{
  "access_token" : "eyJhbGciOiJIUzI1NiIsInR5cCI6IkpXVCJ9.eyJleHAiOjE0ODUxNDA5ODQsImlhdCI6MTQ4NTEzNzM4NCwiaXNzIjoiYWNtZS5jb20iLCJzdWIiOiIyOWFjMGMxOC0wYjRhLTQyY2YtODJmYy0wM2Q1NzAzMThhMWQiLCJhcHBsaWNhdGlvbklkIjoiNzkxMDM3MzQtOTdhYi00ZDFhLWFmMzctZTAwNmQwNWQyOTUyIiwicm9sZXMiOltdfQ.Mp0Pcwsz5VECK11Kf2ZZNF_SMKu5CgBeLN9ZOP04kZo",
  "expires_in" : 3600,
  "refresh_token": "Nu00yJrGw0qlBJNUz2S6LJ3KZFN7uw6Dj4C2mnzF4I6wkM5xingxuw",
  "token_type" : "Bearer",
  "userId" : "3b6d2f70-4821-4694-ac89-60333c9c4165"
}
Example Refresh Token Grant#
An access token is designed to have a short time-to-live (TTL). A related refresh token with a longer TTL can be used for generating new access tokens and extending a user's session. The application's OAuth settings must be configured with "Generate refresh tokens" enabled, and "Refresh Token" as an "Enabled grant".
Exchange a refresh token for an access token#
With a refresh token obtained from a previous call to the /Authorize endpoint, a new access token may be generated with a POST request to the Token endpoint. Below is an example HTTP request, the grant_type will always be refresh_token.
Line breaks have been added for readability.
Example HTTP Request
POST /oauth2/token HTTP/1.1
Host: piedpiper.fusionauth.io
Content-Type: application/x-www-form-urlencoded
Accept: */*
Content-Length: 436
client_id=3c219e58-ed0e-4b18-ad48-f4f92793ae32
    &grant_type=refresh_token
    &refresh_token=Nu00yJrGw0qlBJNUz2S6LJ3KZFN7uw6Dj4C2mnzF4I6wkM5xingxuw
Example HTTP Response
{
  "access_token": "eyJhbGciOiJIUzI1NiIsInR5cCI6IkpXVCIsImtpZCI6ImVjZWUzMTYyZjAifQ.eyJhdWQiOiI4YmY4YWIwYy1iMWNlLTQ0NjUtYmQzNy1jMTU1MThjYWU2YmQiLCJleHAiOjE1NzA0ODQwNTcsImlhdCI6MTU3MDQ4MDQ1NywiaXNzIjoiYWNtZS5jb20iLCJzdWIiOiJhZjRiMzk2Yy01MGM4LTQwNzQtOTA5YS0zYzgwNjU0OTEzMzUiLCJhdXRoZW50aWNhdGlvblR5cGUiOiJSRUZSRVNIX1RPS0VOIiwiZW1haWwiOiJqb2huQGRvZS5pbyIsImVtYWlsX3ZlcmlmaWVkIjp0cnVlLCJwcmVmZXJyZWRfdXNlcm5hbWUiOiJqb2hubnkxMjMiLCJyb2xlcyI6WyJjb21tdW5pdHlfaGVscGVyIiwidXNlciJdLCJhcHBsaWNhdGlvbklkIjoiOGJmOGFiMGMtYjFjZS00NDY1LWJkMzctYzE1NTE4Y2FlNmJkIn0.laSlkKQMOwZmfI_3NT3-1F_VdpLL-ceCQZ2fRL1lvF4",
  "expires_in": 3600,
  "scope": "offline_access",
  "token_type": "Bearer",
  "userId": "3b6d2f70-4821-4694-ac89-60333c9c4165"
}
Example Client Credentials Grant#
This feature is only available in paid plans. To learn more, see our pricing page.
Most OAuth grants are designed to allow users to delegate permissions.
The Client Credentials grant allows entities to authenticate and receive access tokens with no user interaction.
Therefore, unlike other grants, the Client Credentials grant isn't configured in an Application. Instead, it occurs between two Entities. Learn more about setting up Entities.
Here's a short video showing one possible usage of this grant.
Exchange credentials for an access token#
An access token may be generated with a POST request to the Token endpoint. Below is an example HTTP request, the grant_type will always be client_credentials.
Line breaks have been added for readability.
Example HTTP Request
POST /oauth2/token HTTP/1.1
Host: piedpiper.fusionauth.io
Authorization: Basic MDkyZGJkZWQtMzBhZi00MTQ5LTljNjEtYjU3OGYyYzcyZjU5OitmY1hldDlJdTJrUWk2MXlXRDlUdTRSZVoxMTNQNnlFQWtyMzJ2NldLT1E9
Content-Type: application/x-www-form-urlencoded
Accept: */*
Content-Length: 436

grant_type=client_credentials
    &scope=target-entity%3Ae13365f1-a270-493e-bd1b-3d239d753d53%3Aread
{
"access_token": "eyJhbGciOiJIUzI1NiIsInR5cCI6IkpXVCIsImtpZCI6IjM0ZjE3ZDdiNzIifQ.eyJhdWQiOiJlMTMzNjVmMS1hMjcwLTQ5M2UtYmQxYi0zZDIzOWQ3NTNkNTMiLCJleHAiOjE2MjAyMzc3MjksImlhdCI6MTYyMDIzNDEyOSwiaXNzIjoiaHR0cHM6Ly9sb2NhbC5mdXNpb25hdXRoLmlvIiwic3ViIjoiMjkzNGY0MWYtZDI3Ny00YTMyLWIwZDUtMTZlNDdkYWQ5NzIxIiwianRpIjoiMGIwMmY1MDktYmNmMy00YjhkLWEzZGItMDNmOThhY2U5ZDlmIiwicGVybWlzc2lvbnMiOnsiZTEzMzY1ZjEtYTI3MC00OTNlLWJkMWItM2QyMzlkNzUzZDUzIjpbInJlYWQiXX19.1BR367JxpWp33HuHEY0_zHuVDmnYrgi7CzzjlIYwtqQ",
"expires_in": 3599,
"scope": "target-entity:e13365f1-a270-493e-bd1b-3d239d753d53:read",
"token_type": "Bearer"
}Client Credentials Scopes#
In order for permissions to be correctly determined, pass a scope parameter. This parameter can have multiple values, space separated. Each value has this format:
target-entity:entity_id:permissionwhere entity_id is a required entity UUID and permission is an optional, comma separated list of permissions.
You will typically provide a scope specifying a target entity:
target-entity:92dbded-30af-4149-9c61-b578f2c72600You may provide append a comma separated list of permissions as well:
target-entity:92dbded-30af-4149-9c61-b578f2c72600:read,writeYou may combine multiple entities and permissions in the same scope parameter:
target-entity:92dbded-30af-4149-9c61-b578f2c72600:read,write target-entity:119a84d9-06c5-4d1f-a0d4-a60490b70ac5:readThe scope will be checked against previously granted permissions. If all requested permissions have been found, the grant succeeds and an access_token is returned.
If you do not pass scope, you will still get an access_token if the request is authorized. The token will omit the following claims:
audpermissions
Permissions associated with the grant from the target entity to the recipient entity will be available in the permissions claim in the token. If specific permissions are requested, the recipient entity must have previously been granted all of those permissions for a successful access request. If specific permissions are requested, only the requested permissions will be in the permissions claim, otherwise all permissions will be available in that claim.
You can see all claims of the token in the Token documentation.
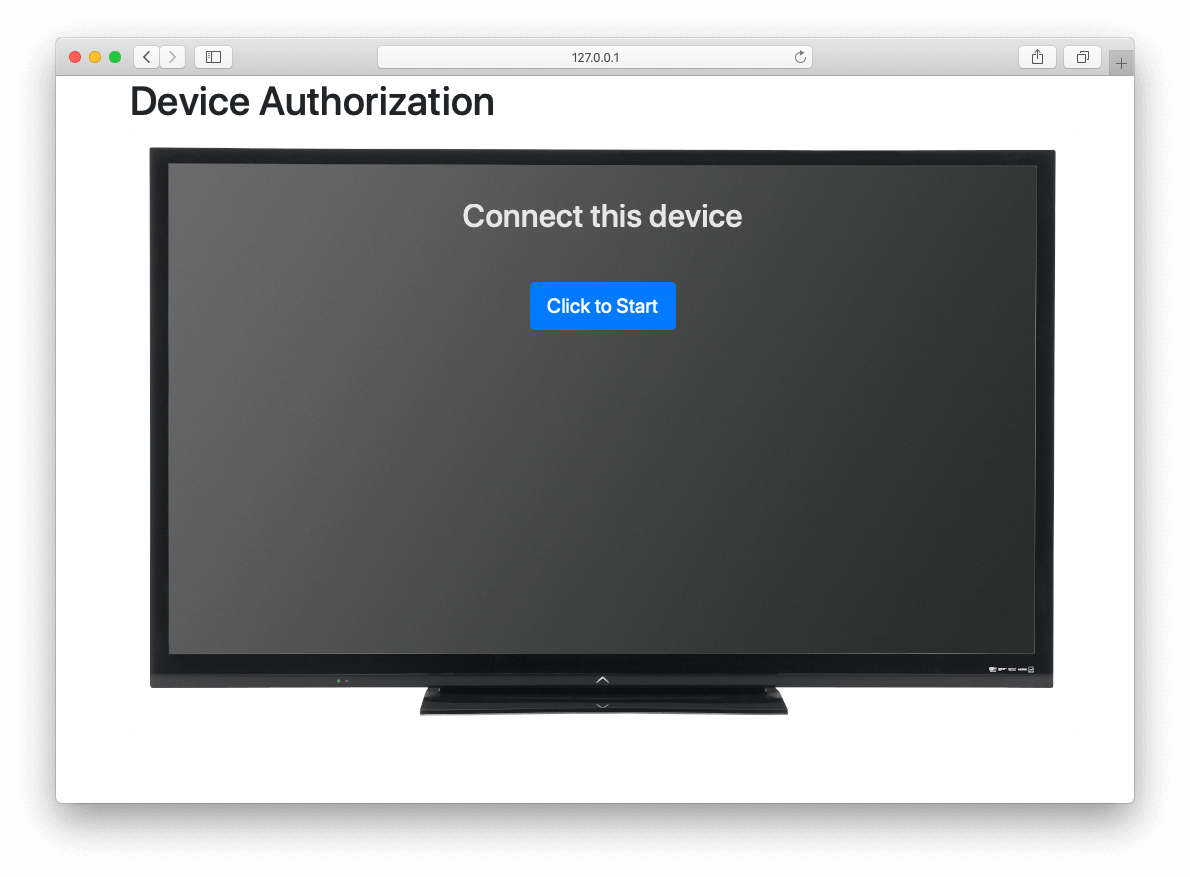
Example Device Authorization Grant#
This example contains screenshots of our Device Grant Example which may be a useful code reference during implementation.
Device Authorization Grant Configuration#
In order to leverage FusionAuth for the Device Authorization Grant, the Device Grant must be enabled and the Device Verification URL must be set. See the Configure Application OAuth Settings section above.
FusionAuth requires that the Device Verification URL be a page that you control within your application so that a required Tenant Id is provided throughout the grant flow.
While you may host your own form on this page, FusionAuth provides a themed OAuth device template that may be redirected to from your application to complete the user-interaction portion of the Device Authorization Grant as a convenience.
This template is located at /oauth2/device. With the required request parameters being client_id and tenantId. On submission of the OAuth device template the end-user is prompted to authenticate using the Authorization Grant flow.
This will redirect to the configured OAuth redirect_uri per the typical Authorization Grant flow.
The Device Authorization Grant will be considered approved when the Authorization Grant code has been exchanged for a token.
Default values are provided for the durations that the device code and user code remain valid, as well as the user code generator settings. These values may be adjusted through the Advanced tab of Tenant Configuration.
Initiate the Device Authorization Grant flow#
In order to initiate the Device Authorization Grant flow, make a request from the device to the Device Authorize endpoint, which is also discoverable via the OpenID Configuration.
This request may be made with the optional scope field in order to request OAuth scopes on tokens from the eventual /oauth2/token endpoint return. A refresh token can be requested by including offline_access in the scope request parameter.
The scope value here will be used for the interactive portion of the workflow when the user_code is passed to FusionAuth. See Scopes for more information on configuring the application's OAuth scope policies, managing custom OAuth scopes, and prompting for user consent to granting scopes to third-party applications.
This request will return a JSON response with values necessary to fulfill the remainder of the grant flow.
Line breaks have been added for readability.
Example HTTP Request
POST /oauth2/device_authorize HTTP/1.1
Host: piedpiper.fusionauth.io
Content-Type: application/x-www-form-urlencoded
Accept: */*
Content-Length: 67
client_id=3c219e58-ed0e-4b18-ad48-f4f92793ae32
    &scope=offline_access
Example JSON Response
{
  "device_code": "e6f_lF1rG_yroI0DxeQB5OrLDKU18lrDhFXeQqIKAjg",
  "expires_in": 600,
  "interval": 5,
  "user_code": "SFYNPV",
  "verification_uri": "http://localhost:9011/oauth2/device",
  "verification_uri_complete": "http://localhost:9011/oauth2/device?user_code=SFYNPV"
}
Poll Token endpoint#
Upon receiving a response from the Device Authorize endpoint the device may begin polling the Token endpoint with the device_code at the requested interval in seconds returned in the response. Requests to the Token endpoint will return an error stating that authorization is pending, until the end-user approves the request, at which point an access token will be returned.
Line breaks have been added for readability.
Example HTTP Request
POST /oauth2/token HTTP/1.1
Host: piedpiper.fusionauth.io
Content-Type: application/x-www-form-urlencoded
Accept: */*
Content-Length: 166
client_id=3c219e58-ed0e-4b18-ad48-f4f92793ae32
    &device_code=e6f_lF1rG_yroI0DxeQB5OrLDKU18lrDhFXeQqIKAjg
    &grant_type=urn%3Aietf%3Aparams%3Aoauth%3Agrant-type%3Adevice_code
Example pending JSON Error Response
{
  "error": "authorization_pending",
  "error_description": "The authorization request is still pending"
}
Example expired JSON Error Response
{
  "error": "expired_token",
  "error_description": "The device_code has expired, and the device authorization session has concluded."
}
Example invalid JSON Error Response
{
  "error": "invalid_request",
  "error_reason": "invalid_device_code",
  "error_description": "The request has an invalid parameter: device_code"
}User-interaction#
Upon receiving a response from the Device Authorize endpoint the device may display to the end-user the user_code and a prompt to navigate to the verification_uri. The verification_uri_complete is provided as a convenience so that the device may display a QR code used to navigate the end-user to the user-interaction page with a pre-populated user_code in the form.
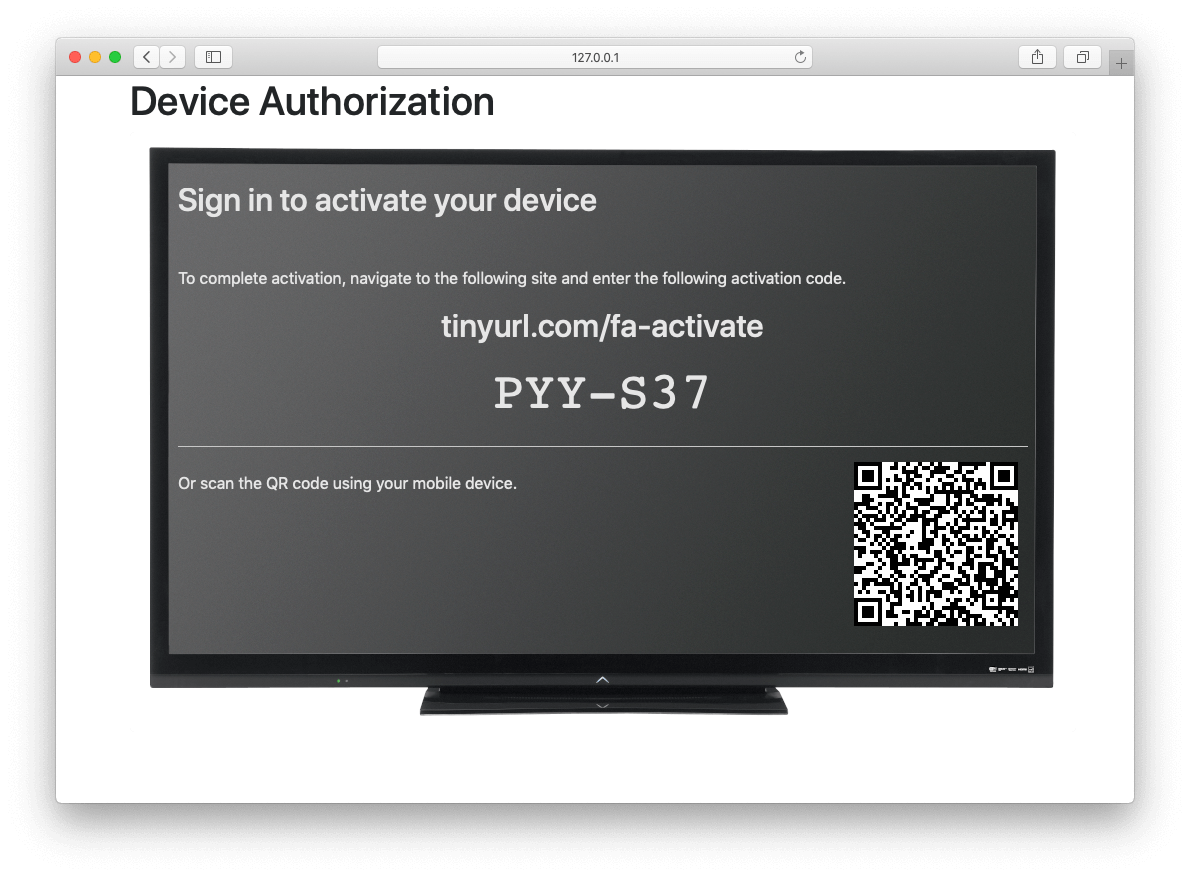
The user should then navigate to the displayed URL, and enter the activation code.
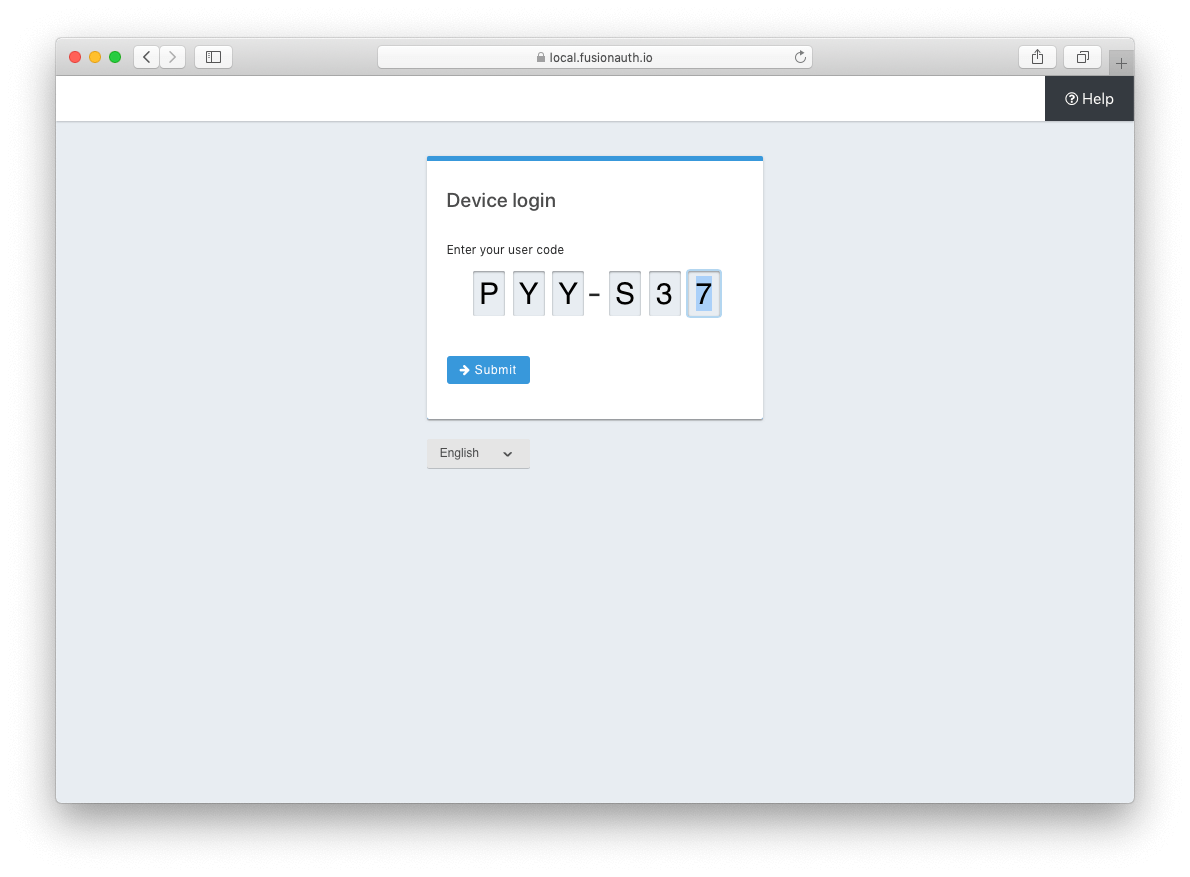
Pass user_code to FusionAuth#
Once the user_code has been received from the end-user, it may be validated by making a request to the Device Validate endpoint.
This endpoint will return a 200 response code without a JSON body on successful validation.
Upon validating the end-user provided user_code the typical Authorization Grant, Implicit Grant, or Password Grant flows may be followed for authentication.
The OAuth endpoints that facilitate these typical OAuth flows take a user_code parameter to facilitate the Device Authorization Grant approval.
See the Authorize endpoint and Token endpoint documentation for more information.
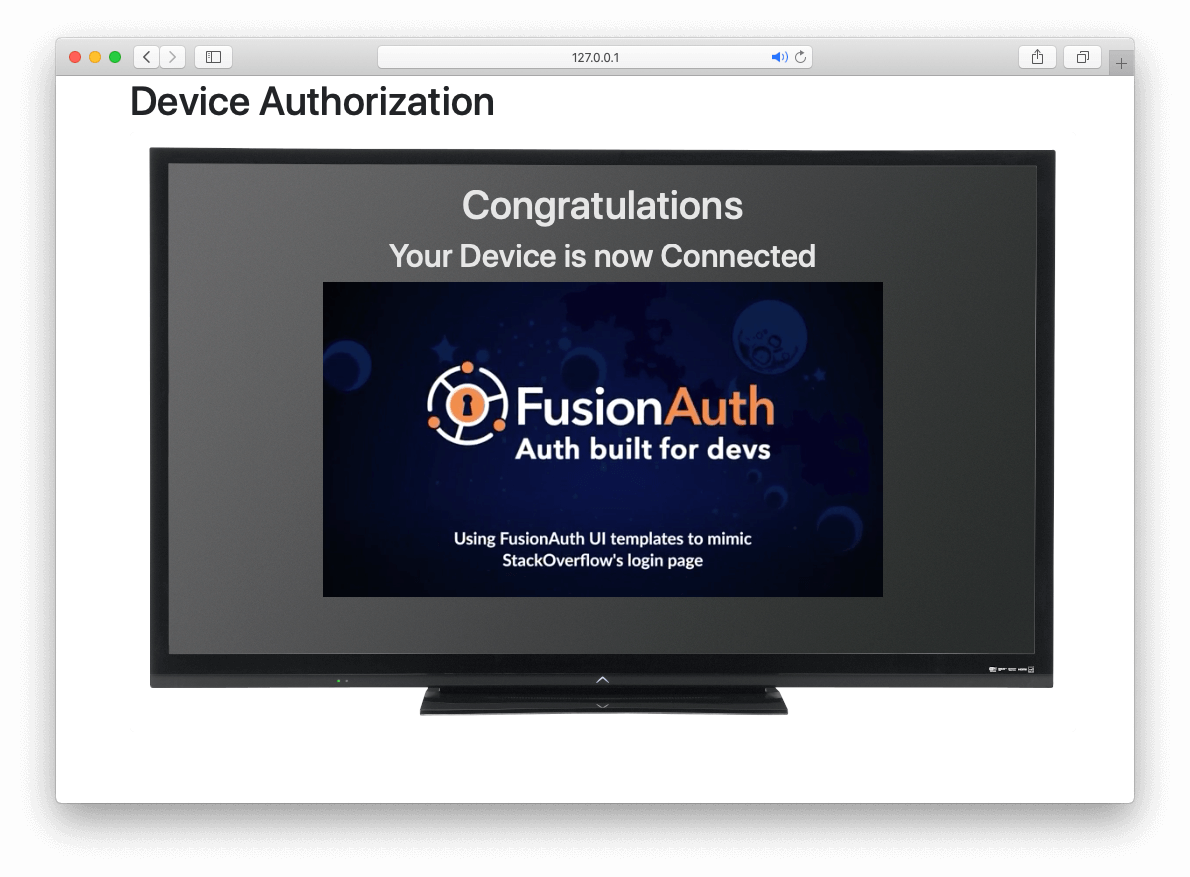
Receive access_token#
Once the user has provided a valid user_code and successfully authenticated, the request from the device to the Token endpoint will return successfully with an access token.
Line breaks have been added for readability.
Example HTTP Request
POST /oauth2/token HTTP/1.1
Host: piedpiper.fusionauth.io
Content-Type: application/x-www-form-urlencoded
Accept: */*
Content-Length: 166
client_id=3c219e58-ed0e-4b18-ad48-f4f92793ae32
    &device_code=e6f_lF1rG_yroI0DxeQB5OrLDKU18lrDhFXeQqIKAjg
    &grant_type=urn%3Aietf%3Aparams%3Aoauth%3Agrant-type%3Adevice_code
Example JSON Response
{
  "access_token" : "eyJhbGciOiJIUzI1NiIsInR5cCI6IkpXVCJ9.eyJleHAiOjE0ODUxNDA5ODQsImlhdCI6MTQ4NTEzNzM4NCwiaXNzIjoiYWNtZS5jb20iLCJzdWIiOiIyOWFjMGMxOC0wYjRhLTQyY2YtODJmYy0wM2Q1NzAzMThhMWQiLCJhcHBsaWNhdGlvbklkIjoiNzkxMDM3MzQtOTdhYi00ZDFhLWFmMzctZTAwNmQwNWQyOTUyIiwicm9sZXMiOltdfQ.Mp0Pcwsz5VECK11Kf2ZZNF_SMKu5CgBeLN9ZOP04kZo",
  "expires_in" : 3600,
  "id_token" : "eyJhbGciOiJIUzI1NiIsInR5cCI6IkpXVCJ9.eyJleHAiOjE0ODUxNDA5ODQsImlhdCI6MTQ4NTEzNzM4NCwiaXNzIjoiYWNtZS5jb20iLCJzdWIiOiIyOWFjMGMxOC0wYjRhLTQyY2YtODJmYy0wM2Q1NzAzMThhMWQiLCJhcHBsaWNhdGlvbklkIjoiNzkxMDM3MzQtOTdhYi00ZDFhLWFmMzctZTAwNmQwNWQyOTUyIiwicm9sZXMiOltdfQ.Mp0Pcwsz5VECK11Kf2ZZNF_SMKu5CgBeLN9ZOP04kZo",
  "refresh_token": "ze9fi6Y9sMSf3yWp3aaO2w7AMav2MFdiMIi2GObrAi-i3248oo0jTQ",
  "token_type" : "Bearer",
  "userId" : "3b6d2f70-4821-4694-ac89-60333c9c4165"
}