How To Use User Actions
User Actions in FusionAuth are ways to interact with, reward, and discipline users. For example, you could use them to email a user, call another application when a user does something, or temporarily disable a user's login.
This guide refers to User Actions simply as Actions. In the first part, you'll learn about the components of an Action and their sequences of events. In the second part, you'll learn ways to create and apply Actions.
Part 1: Theory of FusionAuth Actions#
Definitions#
Below are the terms you'll encounter when working with Actions.
-
Action — An Action is a state or event that can be applied to a User. It is reusable for many Users in many Applications. Applying an Action to a specific User is called an Action instance. This is similar to programming, where you have classes (Actions) and objects (Action instances). An Action instance consists of one User applying the Action on another User, the time of the Action, and the name of the Action.
Other FusionAuth documentation pages might speak interchangeably about Actions and Action instances. For example, saying "the Action expires" when it is actually the Action instance that expires. The pages call an Action instance "taking an Action" or "applying an Action", which is correct, but very wordy.
In this guide, the detailed discussion of the two concepts requires distinguishing between them by using the word "instance". Actions and their instances are separate types of objects in FusionAuth, created in separate areas of the admin UI, and in separate APIs.
-
Actionee — The User an Action is applied to.
-
Actioner — The User that applies the Action. Every Action has an Actioner, even if the instance is programmatically created, in which case the Actioner should be set to an administrator of the Application.
-
Reason — A text description of why an Action is taken. A Reason is not required when you apply an Action, but it's useful for auditing and filtering Actions sent to webhooks.
-
Webhook — A webhook is an outbound HTTP request or requests bearing a message to an endpoint. A webhook is used to inform an external system of some event and can be triggered by an Action. An example is FusionAuth calling a customer-support service like Intercom to start the customer onboarding process when the user has verified their email in FusionAuth. Another example would be posting a message to a Slack channel whenever a new customer signs up.
The webhook/API terminology can be confusing. Note that most web applications, including FusionAuth, call a trigger to send data a "Webhook", but when they receive data they call it an "API". So if you're looking for a destination for a FusionAuth webhook in an external system, you won't find it under the webhook documentation; you'll find it under API documentation. This is why webhooks are sometimes known as "reverse APIs". However, some companies, like Slack in their documentation, also call incoming requests "incoming webhooks".
-
Temporal Actions — Temporal (or time-based) Actions have a duration. Once a temporal Action expires or is canceled, it will no longer be considered active and will not affect the user. However, you can apply a temporal Action to a user indefinitely by setting a very distant end date. An Action that prevents login must be temporal.
Unlike an instantaneous Action, a temporal Action may be canceled or modified. An example of an instantaneous Action would be a reward, such as sending a user a discount coupon.
-
Active — An active Action can be applied to Users. In contrast, an inactive Action cannot be applied to Users. It is viewable in the list of inactive Actions in FusionAuth. An inactive Action can be reactivated if you want to use it again.
If a temporal Action instance has ended, it is still considered active. Active relates to the Action definition and expiry relates to a particular instance of the Action.
-
Option — A custom text field that you can add to an instantaneous Action but not to temporal Actions. You can add multiple Options to an Action definition, but choose only one for an instance of the Action. Options can be sent through emails and webhooks.
-
Localization — A text field with an associated language. It's a way of providing more information to users who speak different languages. Localizations can be added for an Action name, Reason, and Options.
-
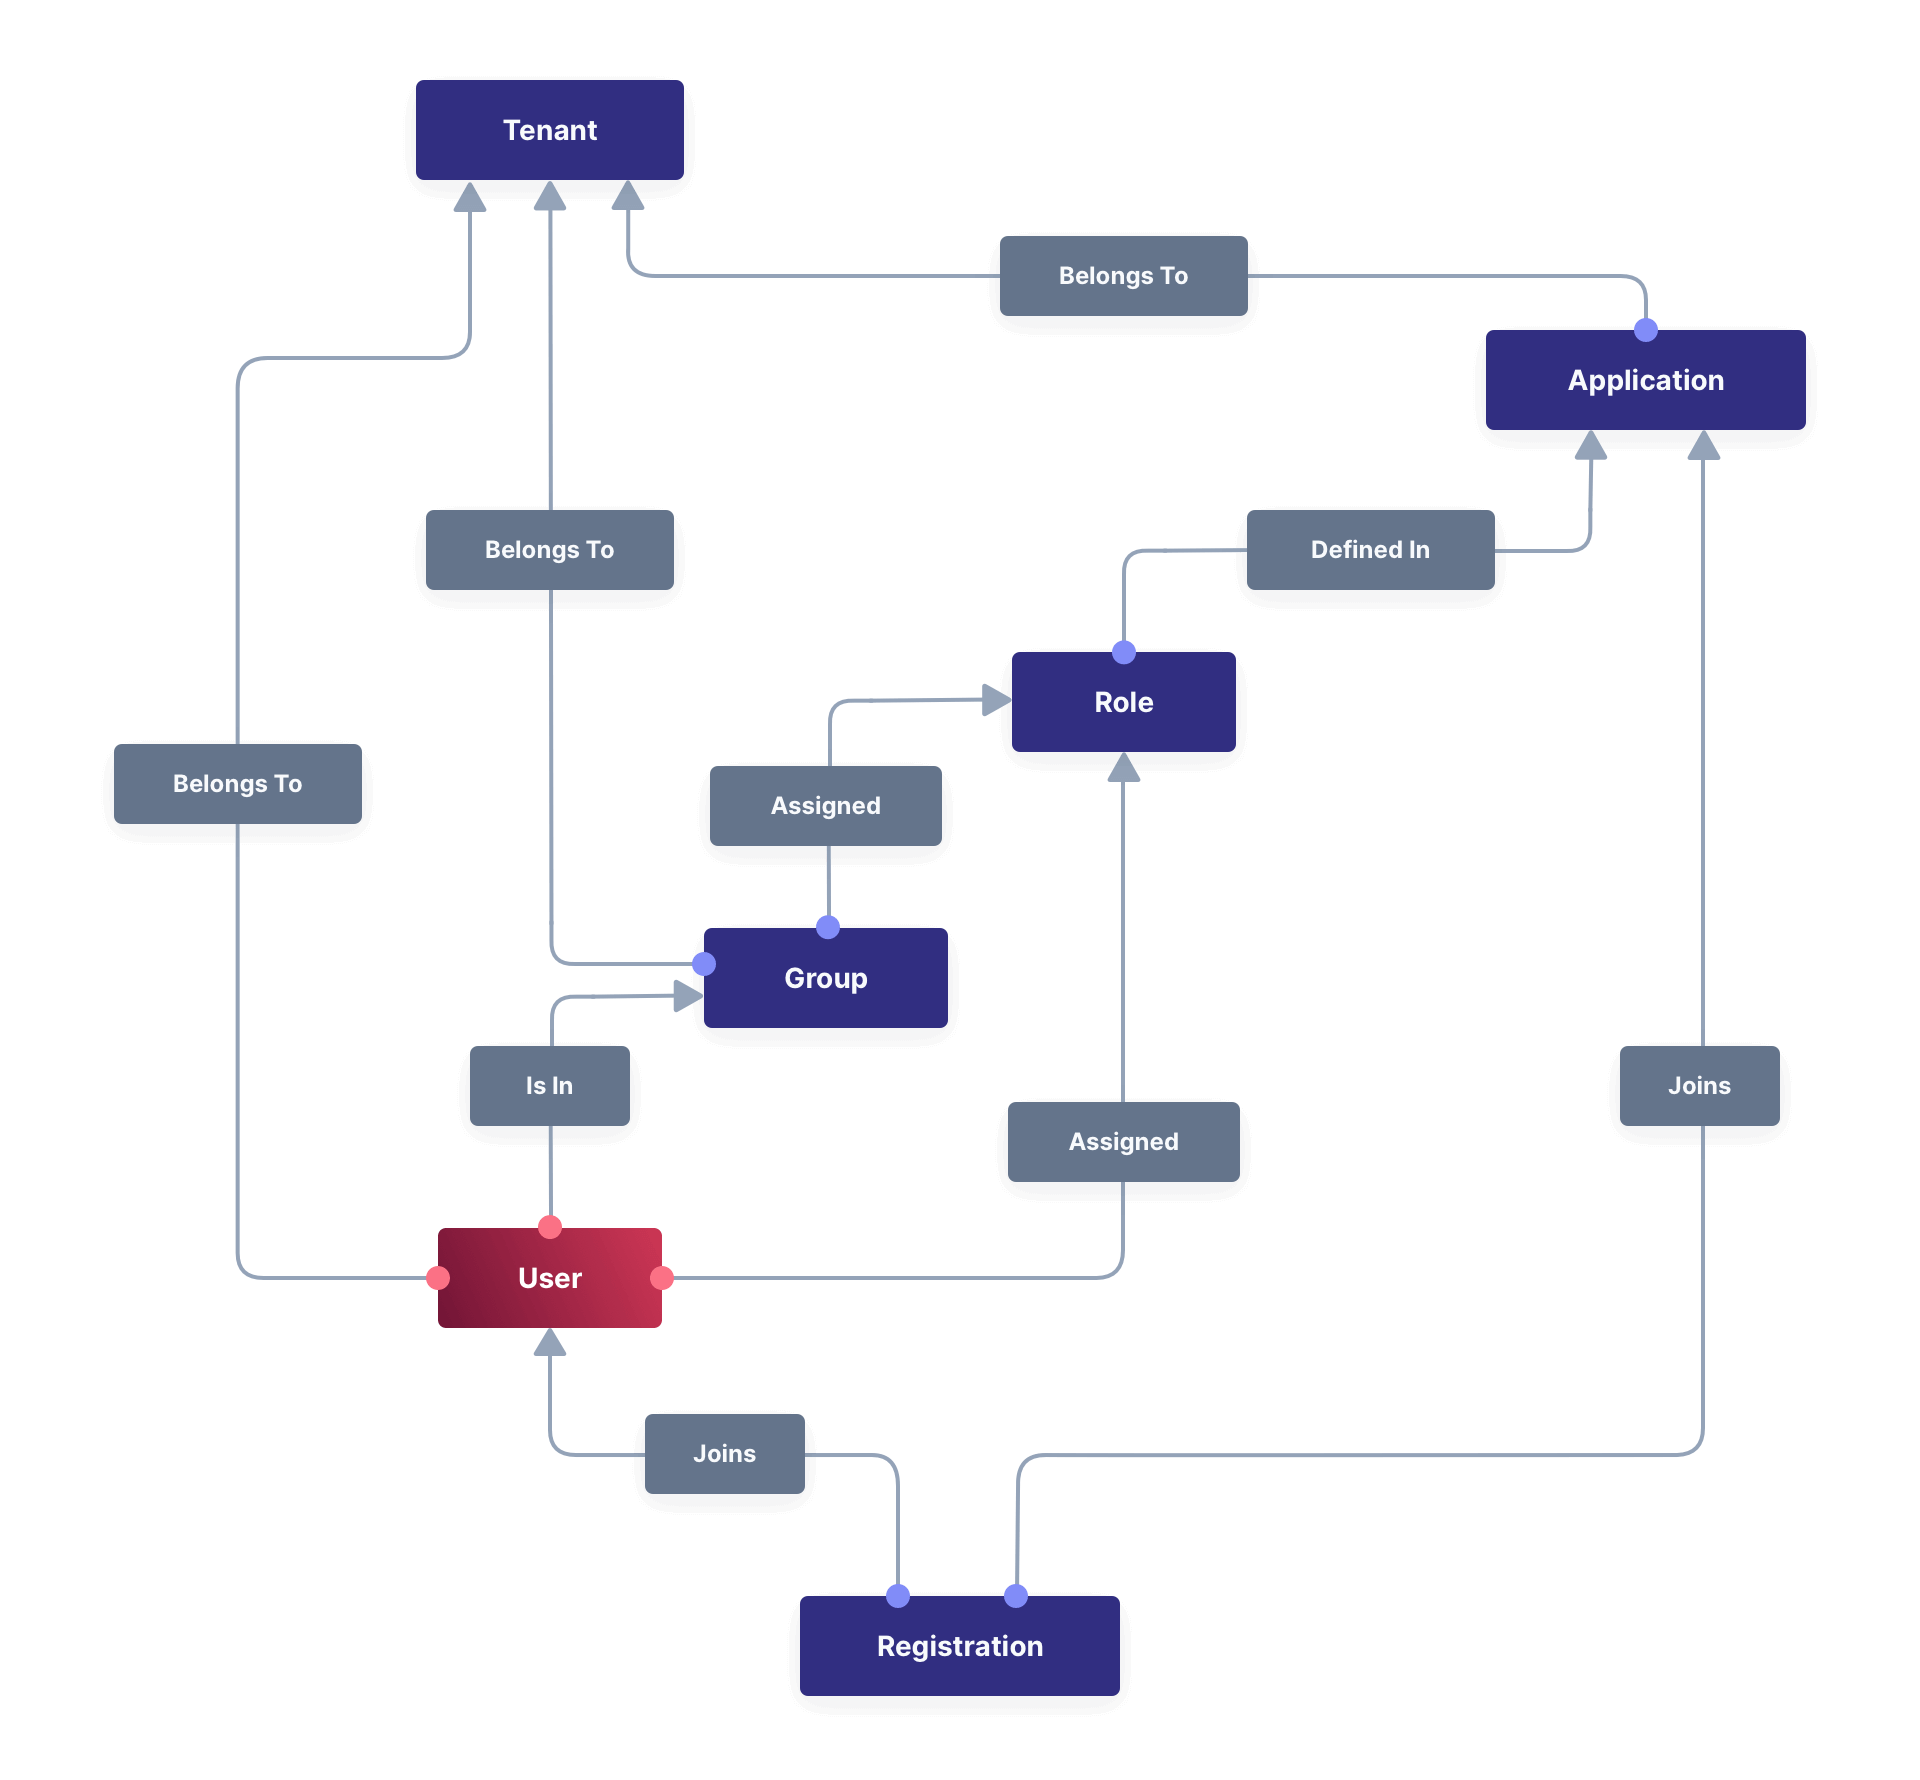
Tenant — You can make an Action available to all Tenants or just a few.
Below is a visual reminder of the relationships between Tenants, Groups, and Applications.
Types of Actions and Their Purpose#
There are two main types of Actions: "temporal Actions" and "instantaneous Actions". They are summarized below.
| Type | Purpose | Example of use |
|---|---|---|
| Temporal | To apply a state to a user for a period of time. | Subscription access · Expiring software trial · Forum ban |
| Instantaneous | To apply a state to a user at a single point in time, recording who did so, optionally with comments. | User surveyed and was happy/indifferent/frustrated · User has earned a sufficient level of trust on your forum and been given an award (possibly increasing their access rights) |
You cannot create a temporal Action that also has Options in FusionAuth.
The general process to use an Action is to:
- Create the Action in the FusionAuth admin UI or with the API.
- Optionally, create Reasons for the Action.
- Apply the Action to a User, with an expiry date if appropriate, and with a Reason if you want. You can do this many times, to many users, if needed.
You'll see some detailed examples of this process later in this guide.
The primary purpose of FusionAuth is to simplify authentication (verifying a user's identity) and authorization (giving your app a user's role).
Actions are an additional feature that you might want to use in your app. Think of them as a premade way for you to store extra user-related data in FusionAuth instead of your own database, at a specified time, and notify people or systems if these fields change.
FusionAuth has no built-in support for payments and no automated subscription features, so you need to decide carefully if you want to write the code you need to manage such features in FusionAuth using Actions, in your own app with custom code, or an external system that specializes in handling subscriptions and payments.
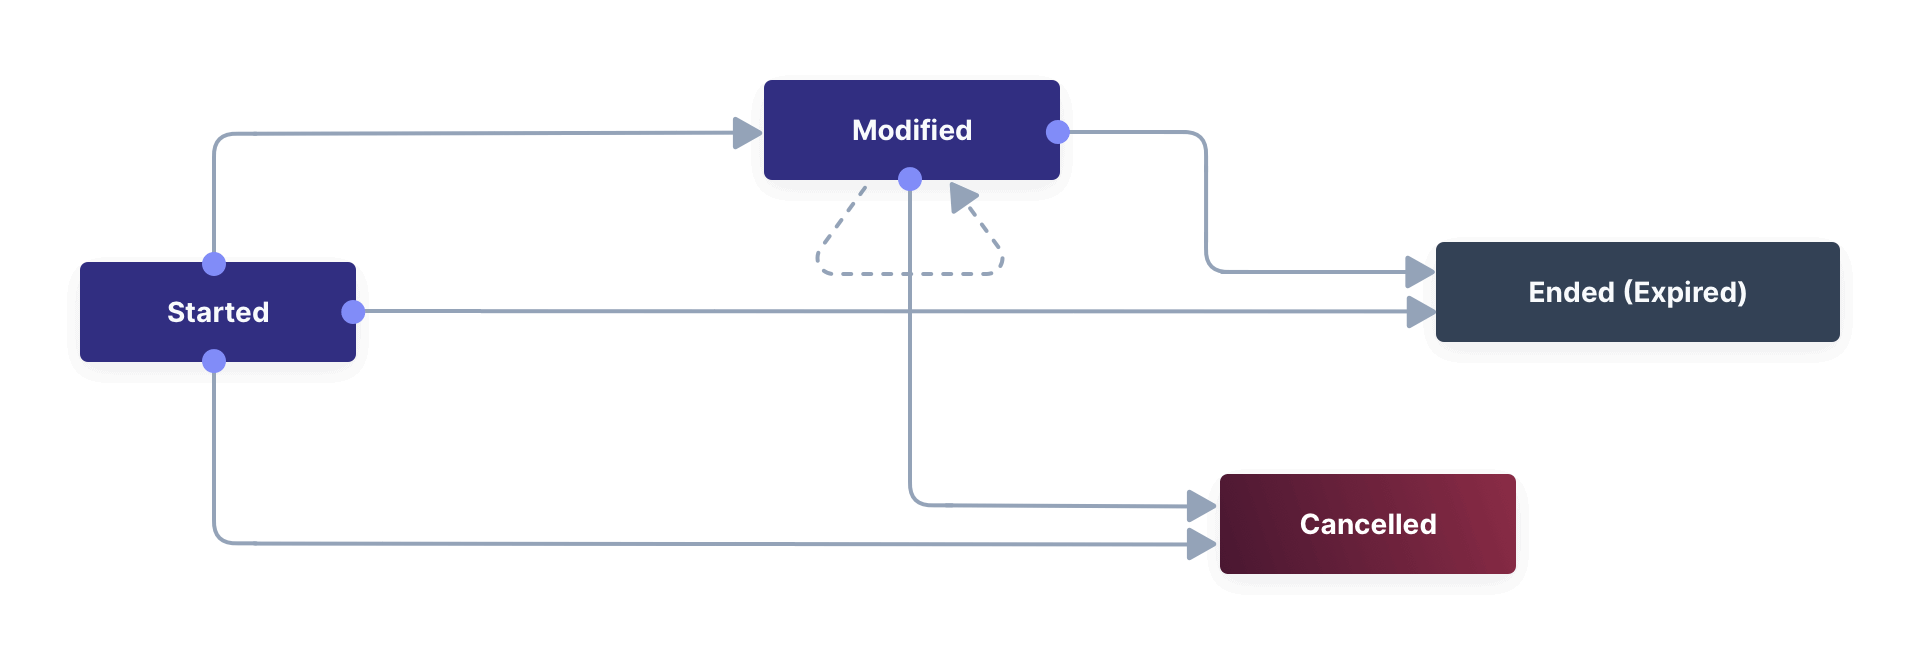
Temporal Actions#
Temporal Action instances can be in one of four states. Each state can trigger a webhook or an email to a user.
Subscription Example#
Let's look at a temporal Action example where a user purchases a one-month subscription to a newspaper website that you manage. Assume you have already created a temporal Action named "Subscription" in FusionAuth. Once the user has made their purchase (either on your newspaper site or through some payment gateway), your code will call the FusionAuth API to apply the Action to the User and give the Action instance an end-date one month from now. The user will now have access to the newspaper when they are authenticated on your site with FusionAuth.
On creation, this Action instance will be in the Started state shown above. You can set the Action to trigger a welcome email created from a template to be sent to the user and a webhook that sends the user's information to another subscription site you manage. The associated subscription site can then use the email address to advertise to the user or to target advertising to the user, for example, through Facebook adverts.
Once the Action instance expires (the Ended event), it can trigger a goodbye email to the user and any webhooks you configure. To prevent the user from accessing your site after this date, you could do one of the following:
- Check the subscription state of the Action for the User in FusionAuth from your site when the user attempts to log in.
- Use a webhook at the end of the Action to change the User's Role in FusionAuth and disallow that role in your site.
- Use a webhook at the end of the Action to call your code to create another temporal Action in FusionAuth with an indefinite end date and preventLogin set to
true.
The last option is probably the simplest and most idiomatic way to use FusionAuth in most cases. In fact, using an Action to prevent login is the most common use case for Actions.
Instantaneous Actions#
An instantaneous Action instance has an Option that can be chosen from a list but no temporal states. Once you set the Action for a User, it either remains or is removed.

Survey Example#
Let's take an instantaneous Action example where a user gives feedback on their interaction with customer support by assigning a rating and giving a comment.
Assume you have already created an instantaneous Action named "Feedback" in FusionAuth, with Options of "Bad", "Neutral", and "Good". Your user chooses "Good" in your feedback form and enters the comment "Problem solved quickly". When the form is saved, your code will call the Action API and create an Action instance for the User with the option "Good", and populate the comment field. The actionee of the instance will be set to the support User who helped the customer.
At any point in the future, you can use the Actions API to retrieve this saved Action instance and create a report of the customer support agent's performance or the approval ratings of your app. You can also use a webhook to immediately send this data to an external system when the Action is created.
Applying an Action Automatically#
In addition to applying an Action using the FusionAuth Actions API, FusionAuth can automatically apply a temporary Prevent Login Action to a User in the case of repeatedly failing authentication. For more information, see this guide to setting up user account lockout.
Part 2: A Tutorial Example Using Actions#
The remainder of this guide will demonstrate a practical example of using Actions that you can follow. Let's start with a brief tour of the APIs that you'll use in the example.
The Action APIs#
Three separate APIs manage Actions. Each API has its own documentation.
- Actions — Defines an Action, updates it, and deletes it. The API path is
/api/user-action. - Action Reasons — Defines the reason an Action is taken. The API path is
/api/user-action-reason. - Action instances — Applies an existing Action to a User, optionally with a Reason. Can also update or cancel the Action instance. The API path is
/api/user/action.
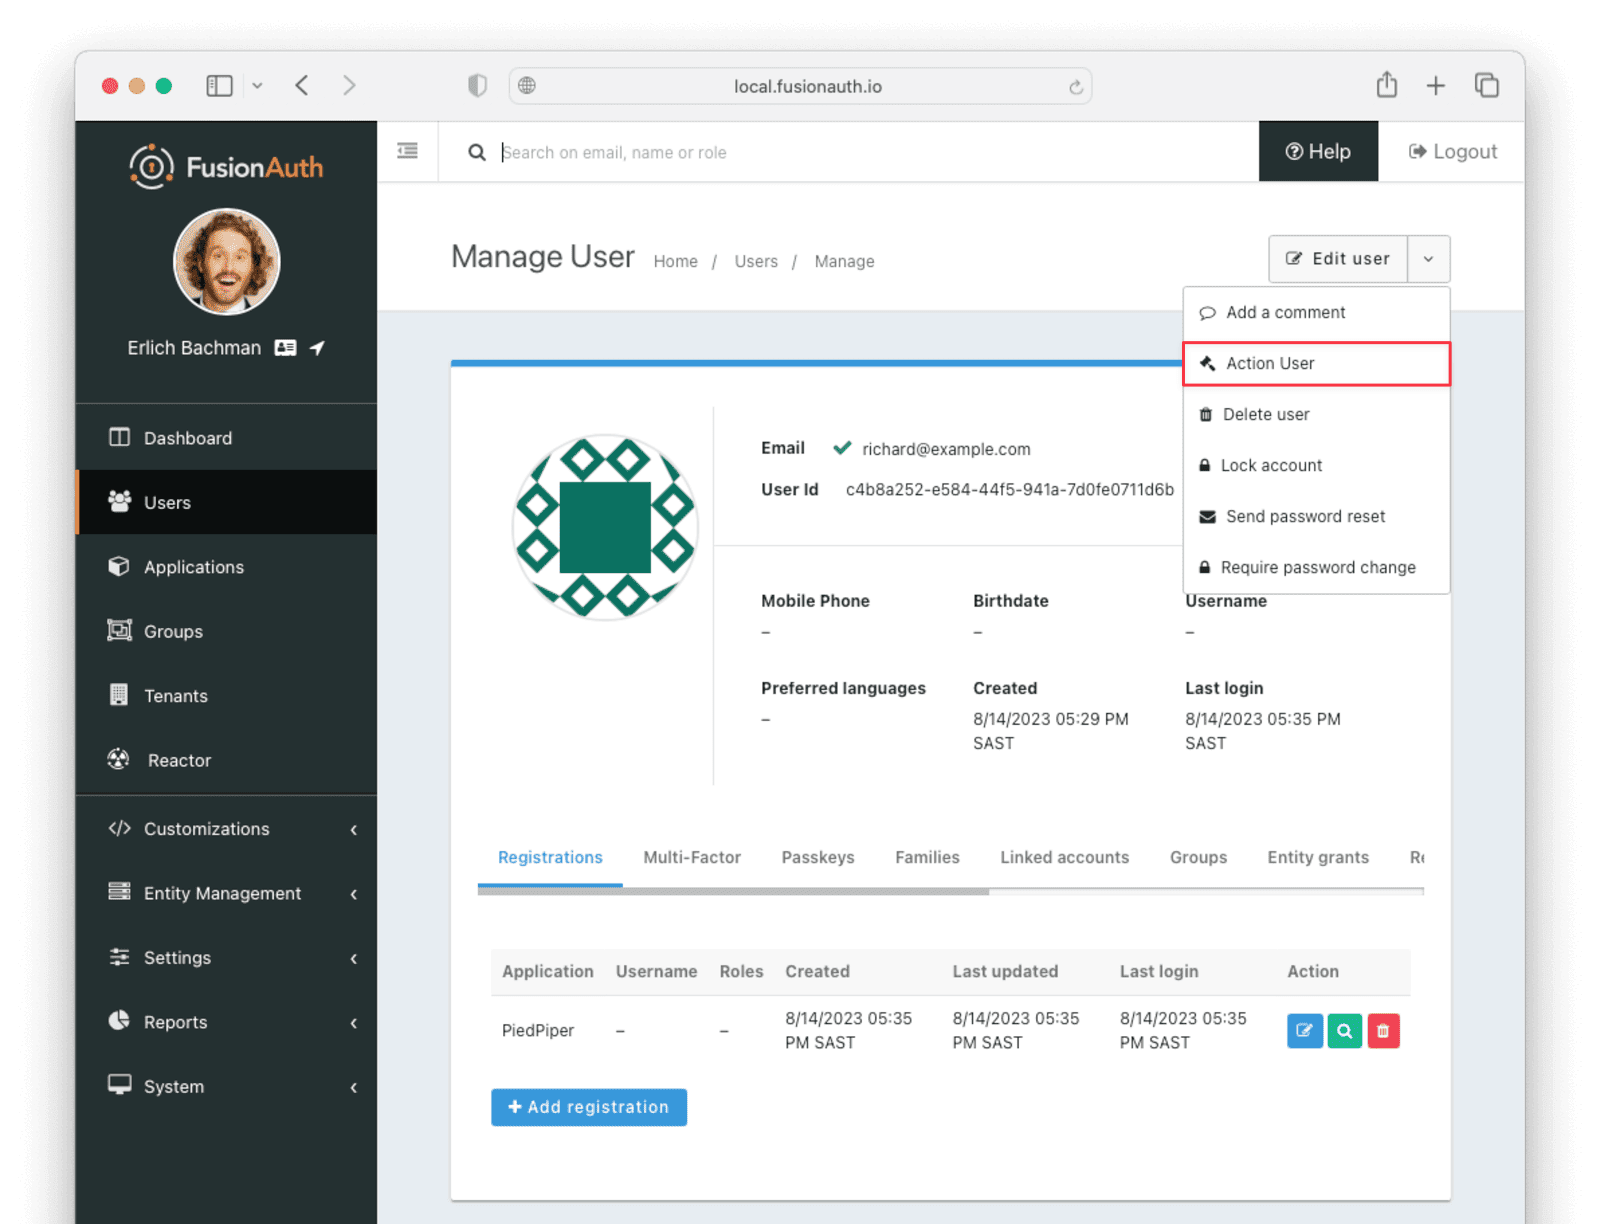
Actions and Action Reasons can be managed on the FusionAuth admin UI. You can also apply an Action to a User using the Action User option directly on the User in the FusionAuth admin UI. However, you cannot edit an Action instance or see lists of instances without using the API. To action a User, browse to Users -> Manage -> Action User .
It is faster to use FusionAuth client libraries rather than make HTTP calls directly. You can read how to use client libraries in the client library guide before continuing. This guide uses the TypeScript client library.
The Actions API reference documentation is long and repeats the same parameters for each type of request. For easier understanding, the parameters listed there are grouped and summarized below for each API. Parameters such as Ids and names, whose purpose is obvious from the earlier definitions section, are not described here.
Action Parameters#
Action parameters are used when you create an Action definition.
- userActionId - The Id of the Action.
- name - The name of the Action.
- localizedNames - The name of the Action in various languages.
- startEmailTemplateId, cancelEmailTemplateId, modifyEmailTemplateId, endEmailTemplateId — The Id of the email templates to use when the Action starts, is canceled, is modified, or expires. Temporal Actions have all four events, whereas instantaneous Actions have only the start event.
- includeEmailInEventJSON — Whether to include the email information in the JSON sent to the webhook when an Action is taken.
- options, options[x].name, options[x].localizedNames
- preventLogin — User may not log in if
trueuntil the Action expires. - sendEndEvent — Whether to call webhooks when this Action instance expires.
- temporal — Whether the Action is temporal.
- userEmailingEnabled, userNotificationsEnabled — Enabling user notifications for an Action doesn't contact the user, but adds a notifyUser field to the JSON sent to webhooks.
Action Reason Parameters#
These are the parameters used when creating an Action Reason.
- userActionReasonId - The Id of the Action Reason.
- text, localizedTexts — The description of the Reason that a human can understand, possibly in many languages.
- code — A short text string to categorize the Reason, for software to process.
Action Instance Parameters#
These are the parameters used when applying an Action to a User, possibly with a Reason.
- userActionId - The Id of the User Action.
- actioneeUserId - The Id of the User to which the Action is applied.
- actionerUserId - The Id of the User who is applying the Action.
- applicationIds — The Action can be applied to the actionee for multiple Applications.
- broadcast — Whether the Action should trigger webhooks.
- comment — A note by the Actioner if they want to add information in addition to the Reason.
- emailUser — Whether the user should be emailed when the Action instance is created.
- expiry — Time after which this temporal Action should end. This is not a duration, but a moment in time.
- notifyUser — Whether the literal text value notifyUser should be sent to webhooks to be acted on.
- option — The option the Actioner chose for this instance of the Action.
- reasonId
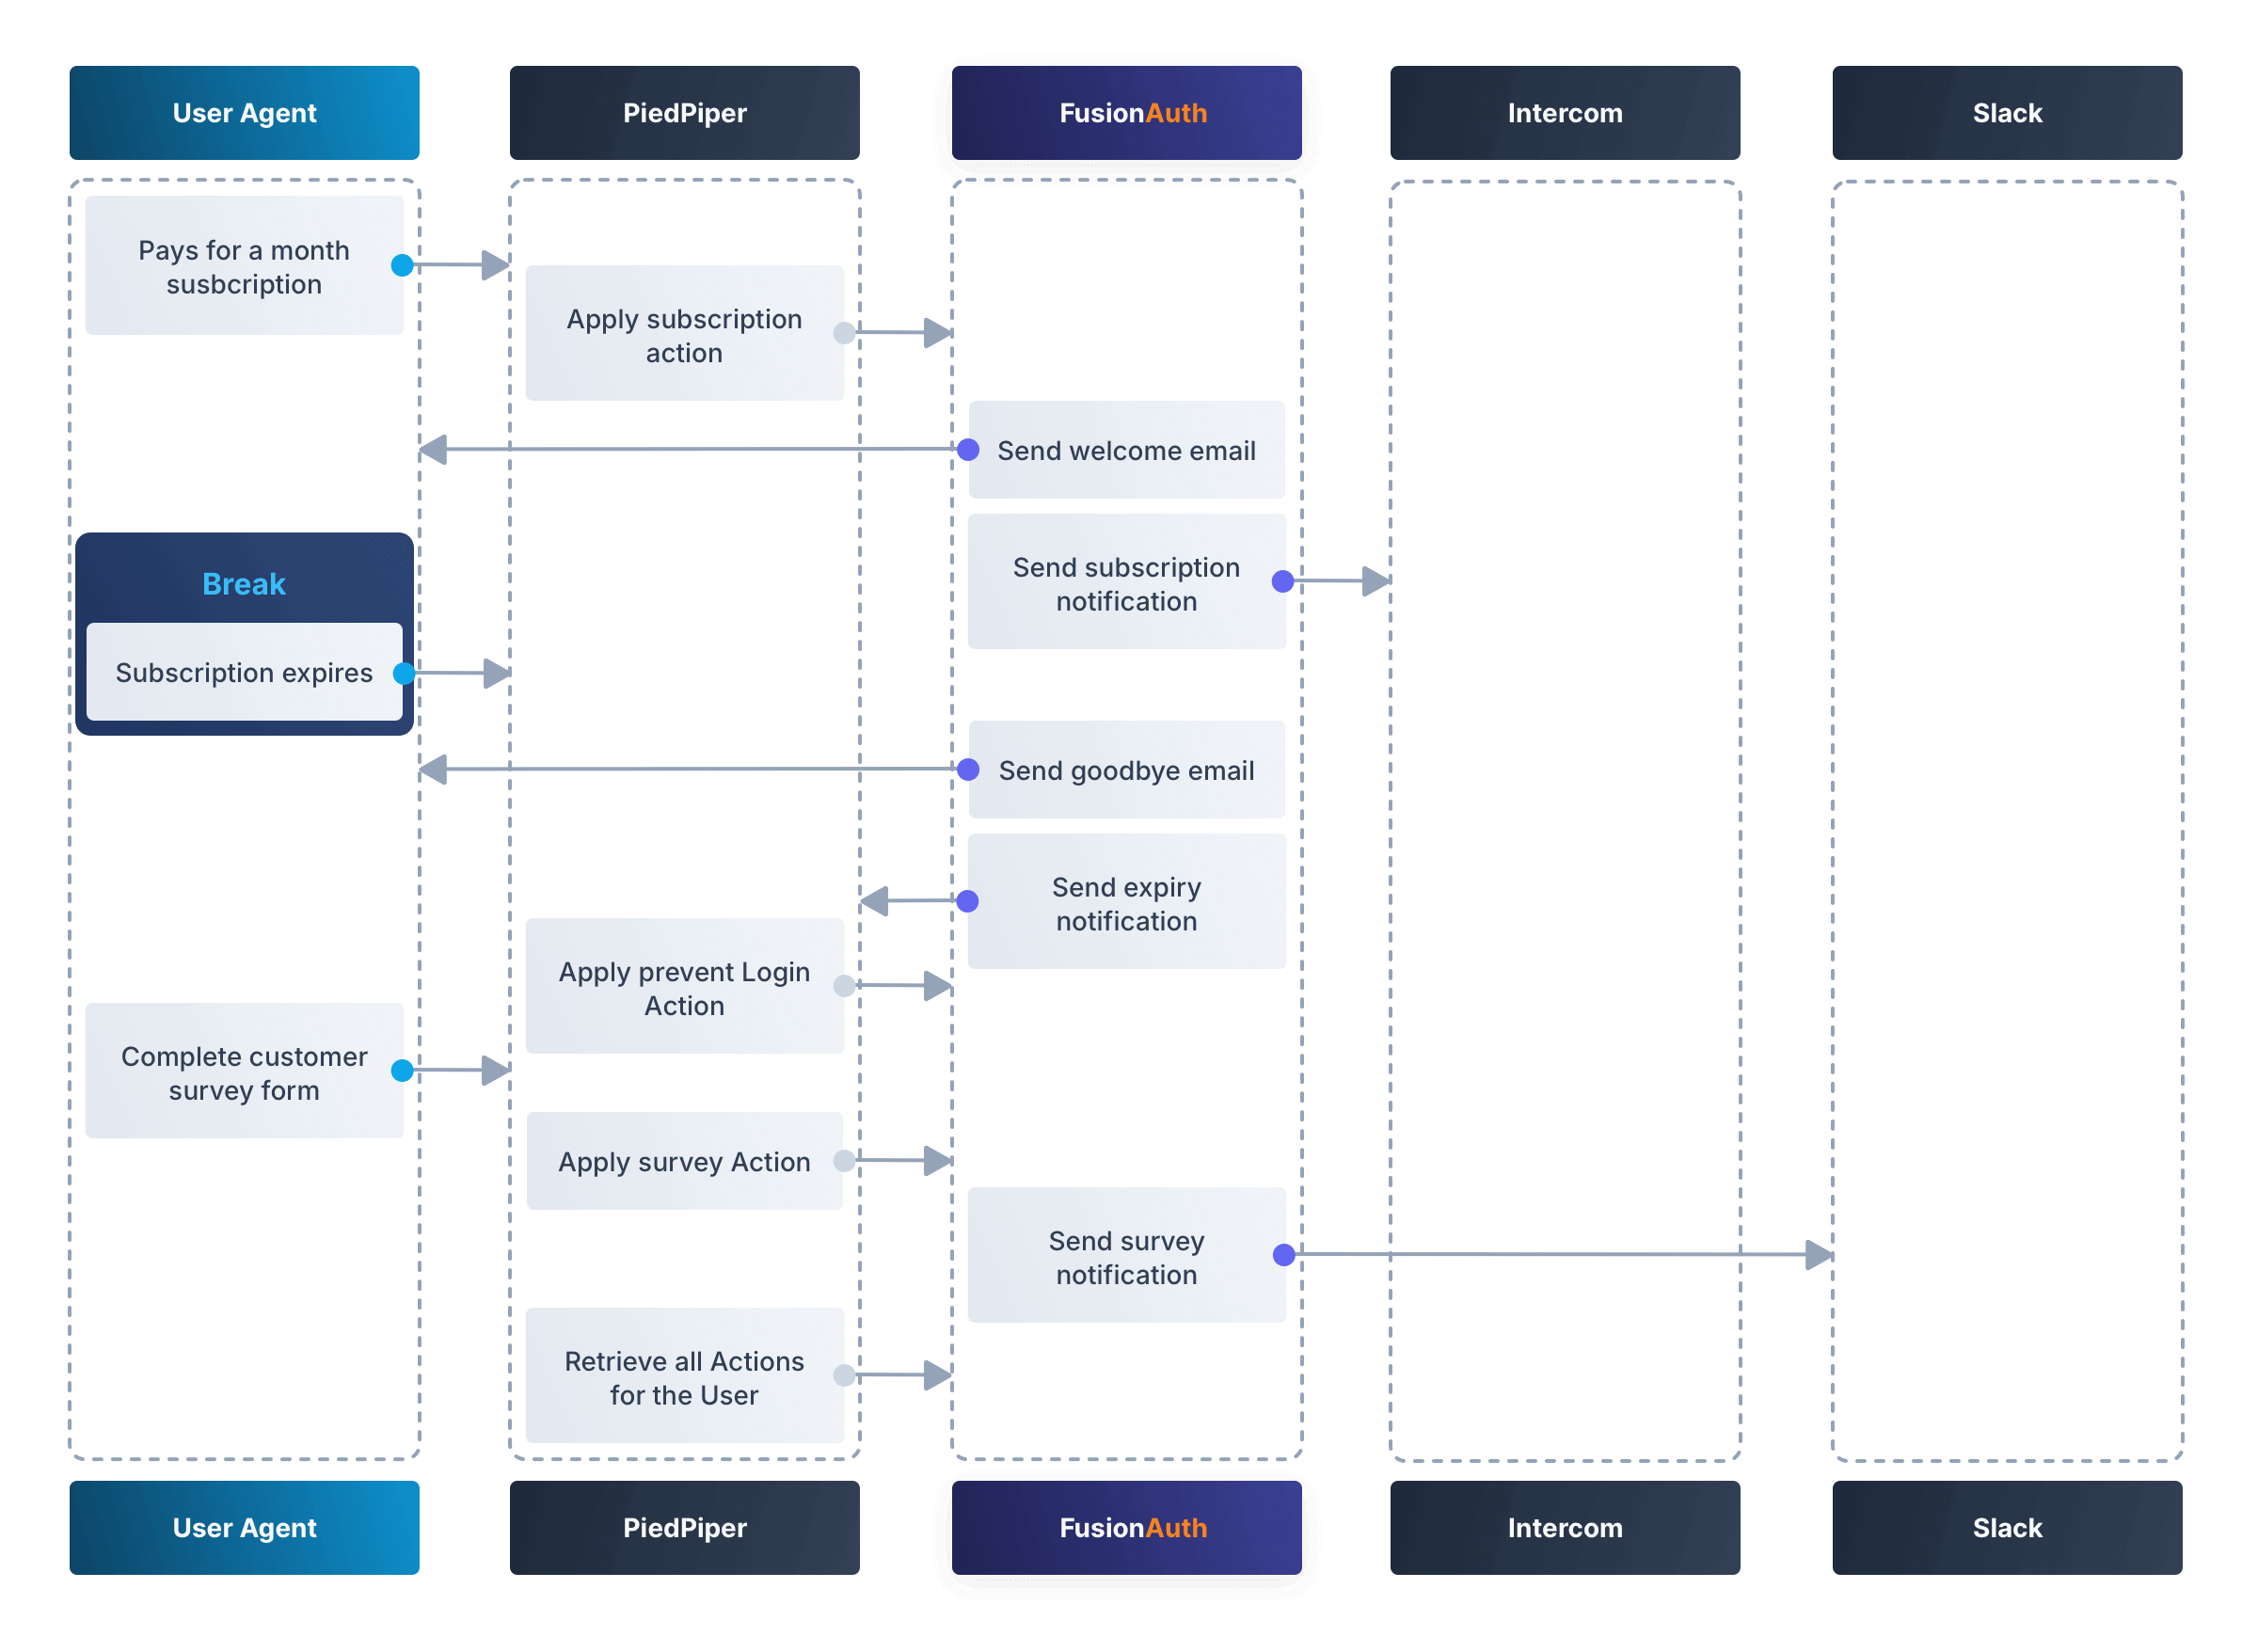
Starting the PiedPiper Newspaper Company#
Let's take a look at a practical example to demonstrate creating Actions to manage subscriptions and a survey for a paid news site called "PiedPiper".
The subscription Action will email the user and trigger a webhook to Intercom. When the Action instance expires, FusionAuth will send the user a goodbye email and trigger a webhook to PiedPiper to create a Prevent Login Action.
The survey Action will trigger a webhook to Slack.
Below is a diagram of this process.
FusionAuth Setup#
This guide assumes you have installed Node.js and FusionAuth. For FusionAuth installation instructions, please follow the 5 minute getting started guide. You should be able to log in to FusionAuth at http://localhost:9011/admin and your Node.js test app at http://localhost:3000.
You can't use the online FusionAuth sandbox for this tutorial because you need to point the webhooks and emails to fake localhost services.
Create a Mock Email Service#
The first task is to configure email for FusionAuth. You'll use MailDev, a Node.js mock SMTP server.
- Open a new terminal window. It doesn't matter where, but your test application folder is a neat place. Run the following command.
npm install maildev && npx maildev -v;- Leave this terminal window running until you have finished this tutorial. Run other commands in a different terminal.
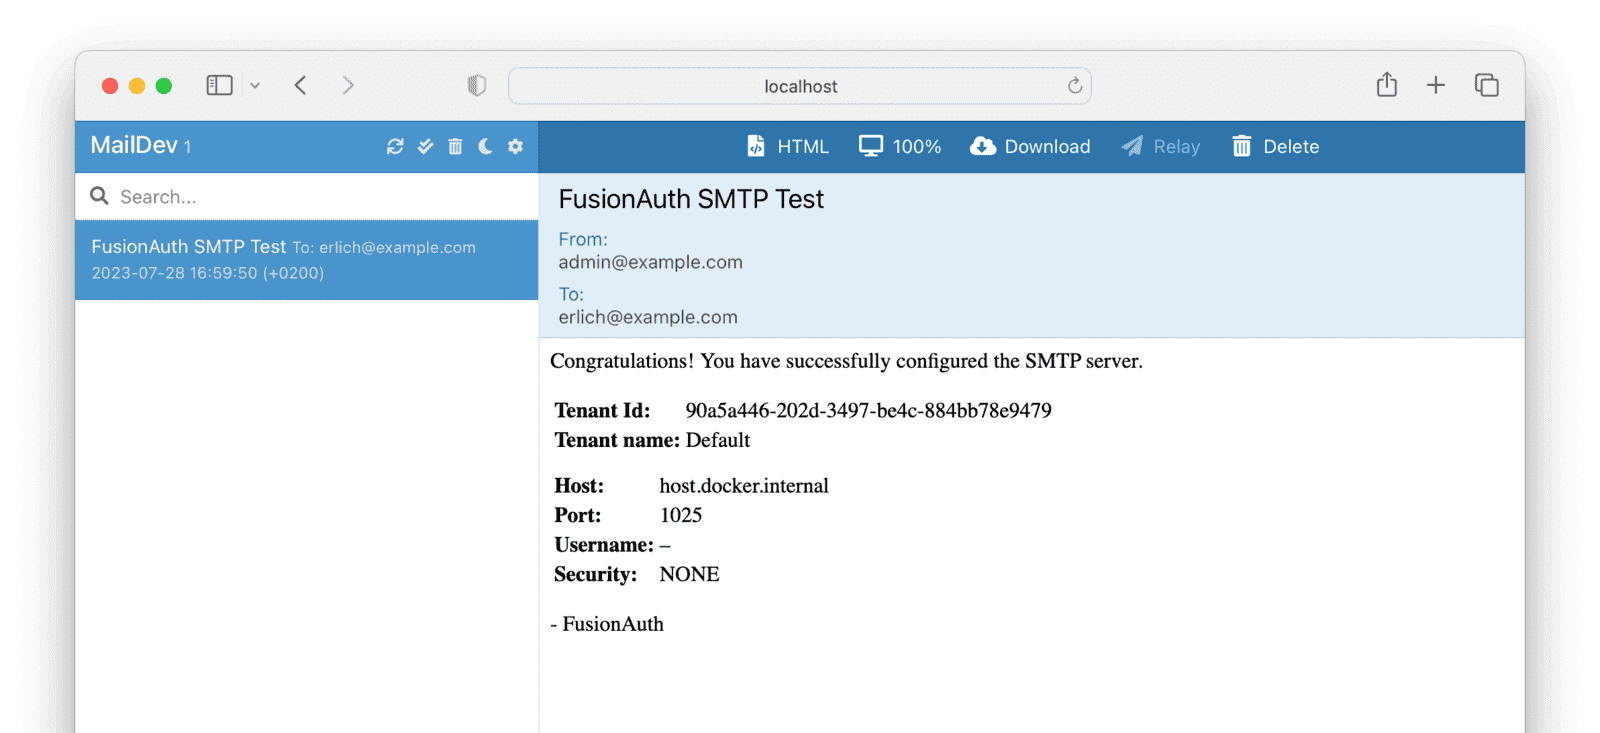
- Browse to
http://localhost:1080/so that you can see emails arrive as you test Actions.
If you're running FusionAuth through Docker, review the callout note below. If you're running FusionAuth directly on your localhost, you can skip to the Tenant email setup instructions.
Configuring localhost access on Docker
You need to use Docker version 18 or higher on macOS or Windows. On Linux, you need version 20 to support host.docker.internal, which allows Docker services to call out to your localhost.
- Open the
docker-compose.ymlfile for FusionAuth and add the following text to thefusionauth:service definition, on the same indentation level as the servicevolumes:key.
extra_hosts:
- "host.docker.internal:host-gateway"- Run the following commands in a new terminal in the folder to restart FusionAuth with mail capabilities. Be warned: This might reset your existing FusionAuth database.
docker compose down && docker compose up;- Log in to FusionAuth and navigate to Tenants . Edit the Default tenant by clicking on the icon.
- Click on the Email tab and enter the following values:
- If FusionAuth is running on Docker.
- Host:
host.docker.internal - Port:
1025
- Host:
- If FusionAuth is running on localhost.
- Host:
localhost - Port:
1025
- Host:
- If FusionAuth is running on Docker.
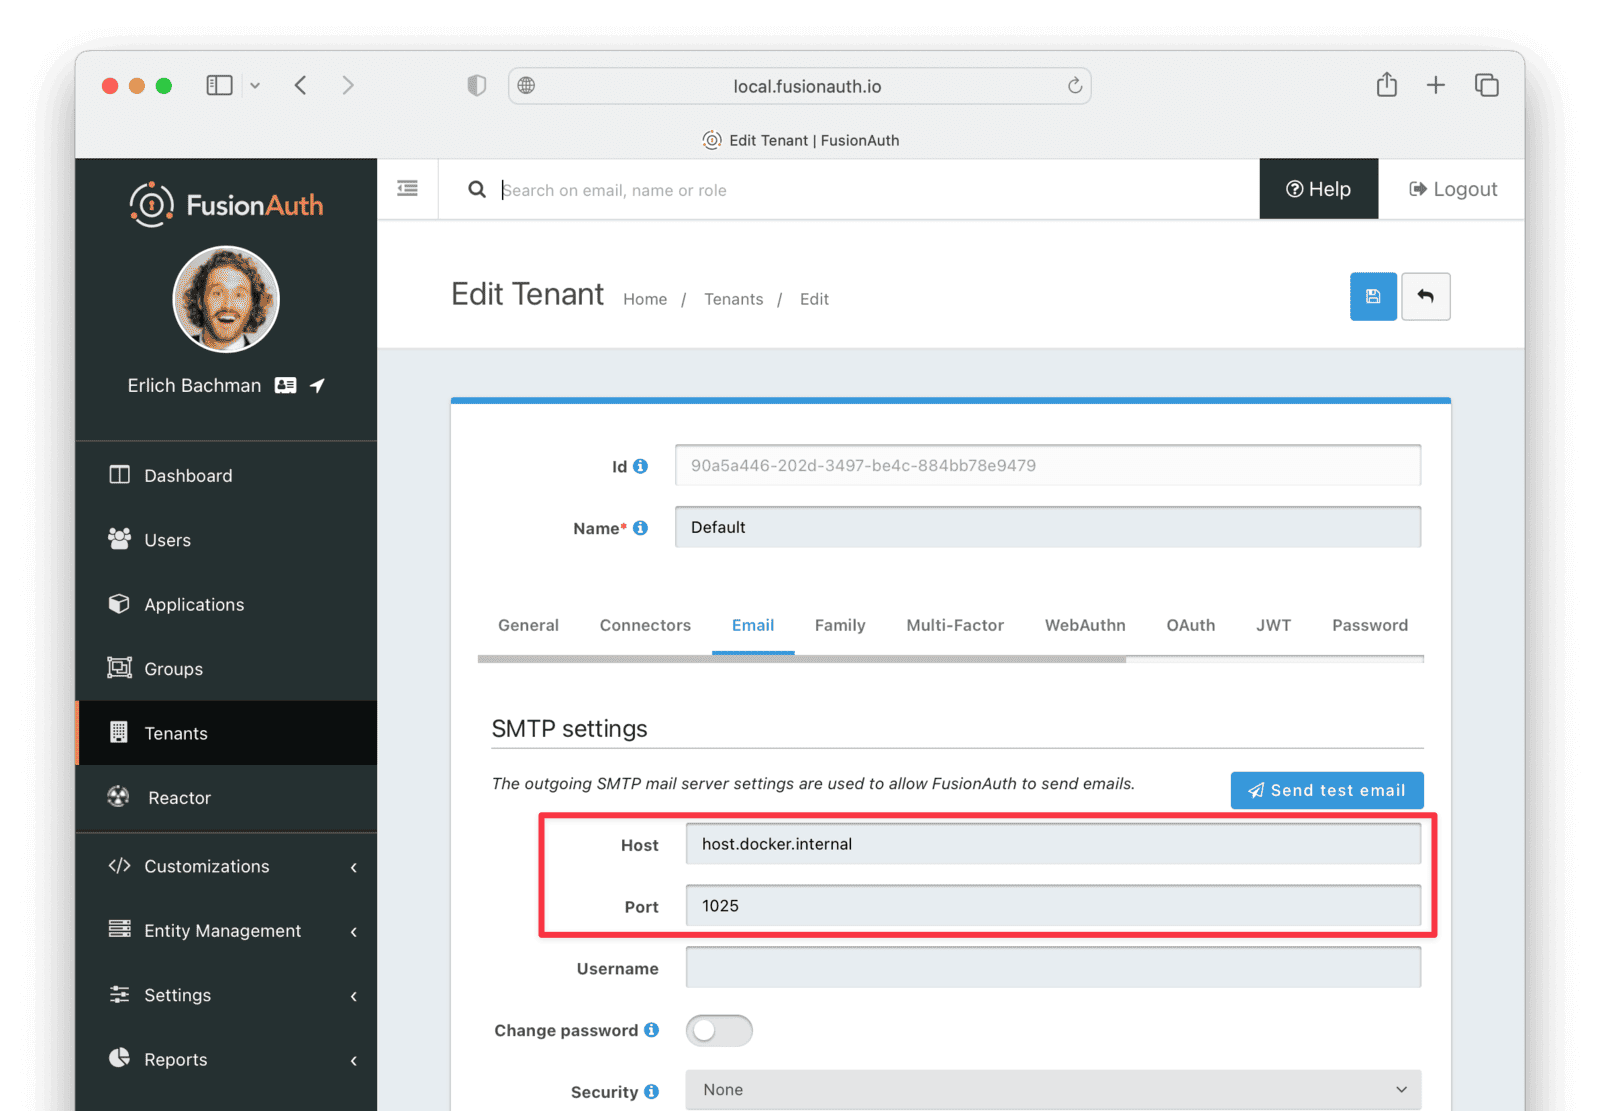
- Click Send test email and an email should arrive in the MailDev web interface.
- Click the button to save your changes to the Tenant configuration.
Create PiedPiper Application#
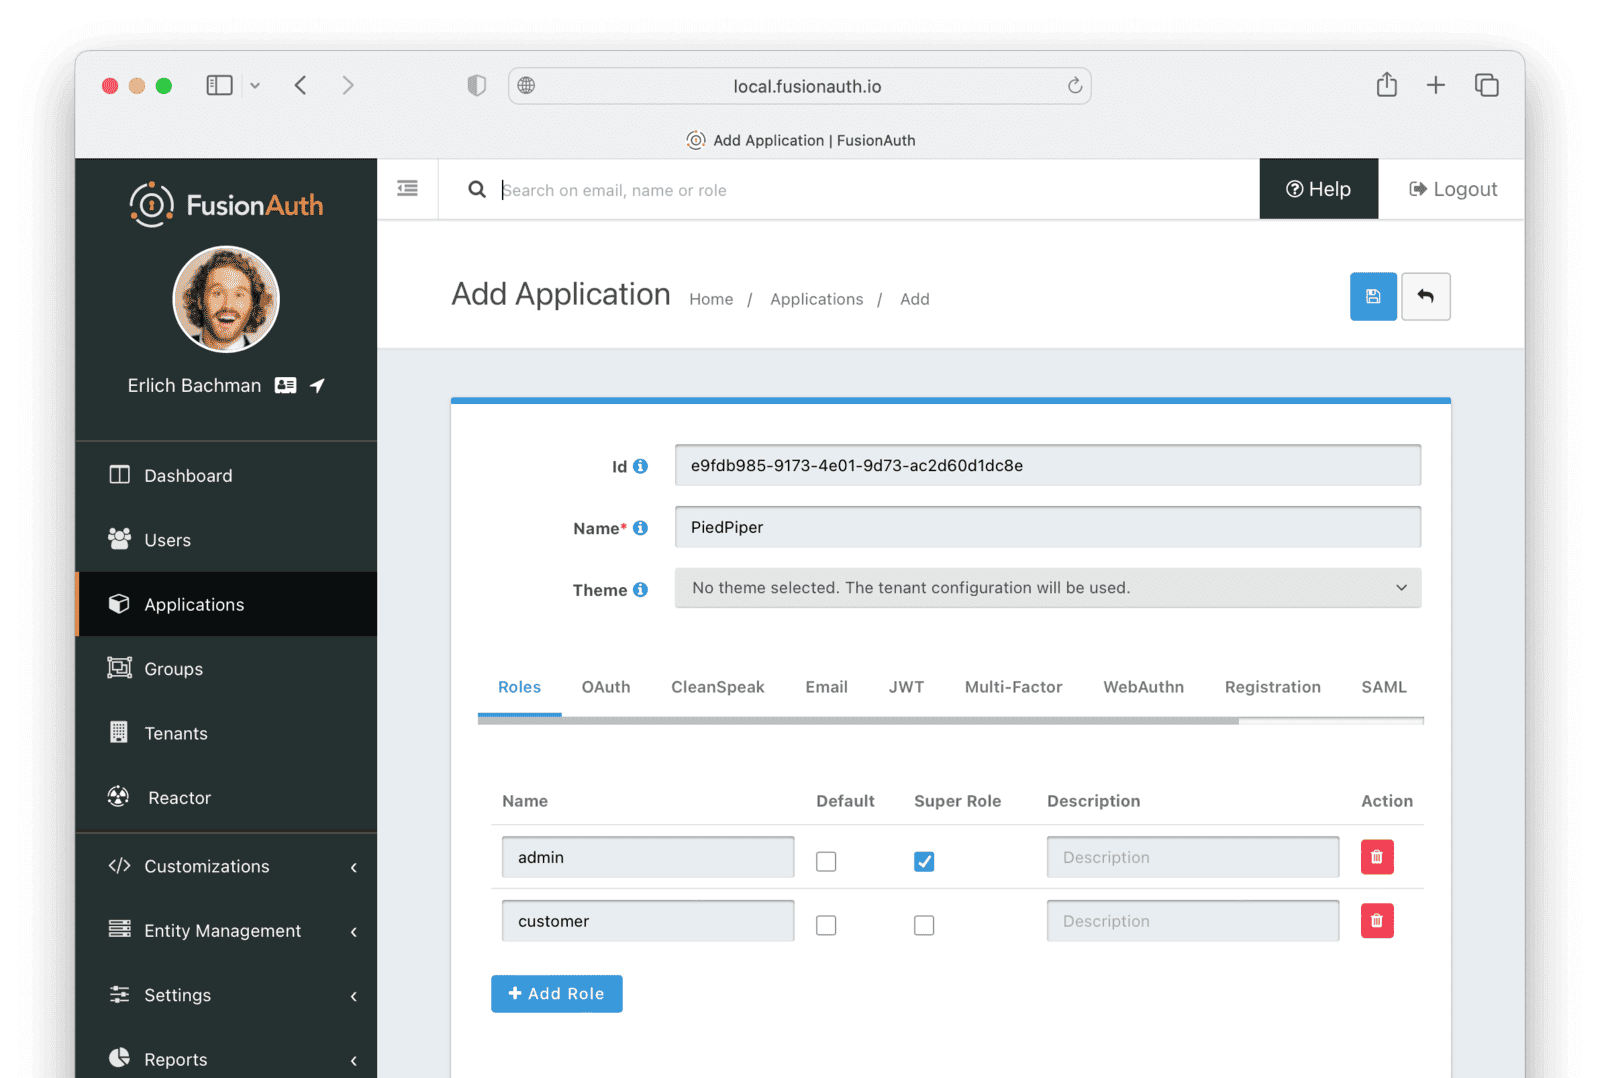
- In the FusionAuth admin UI, navigate to Applications and click the button to add a new Application.
- Enter the values:
- Id:
e9fdb985-9173-4e01-9d73-ac2d60d1dc8e - Name:
PiedPiper
- Id:
In general, you can leave the Ids of new objects in FusionAuth blank to have them autogenerated but you need to know their values to call them in the API in this tutorial.
- On the Roles tab, click the Add Roles button to add two Roles.
- For the first Role, enter:
- Name:
admin - Super Role:
enable
- Name:
- For the second Role, enter:
- Name:
customer
- Name:
- For the first Role, enter:
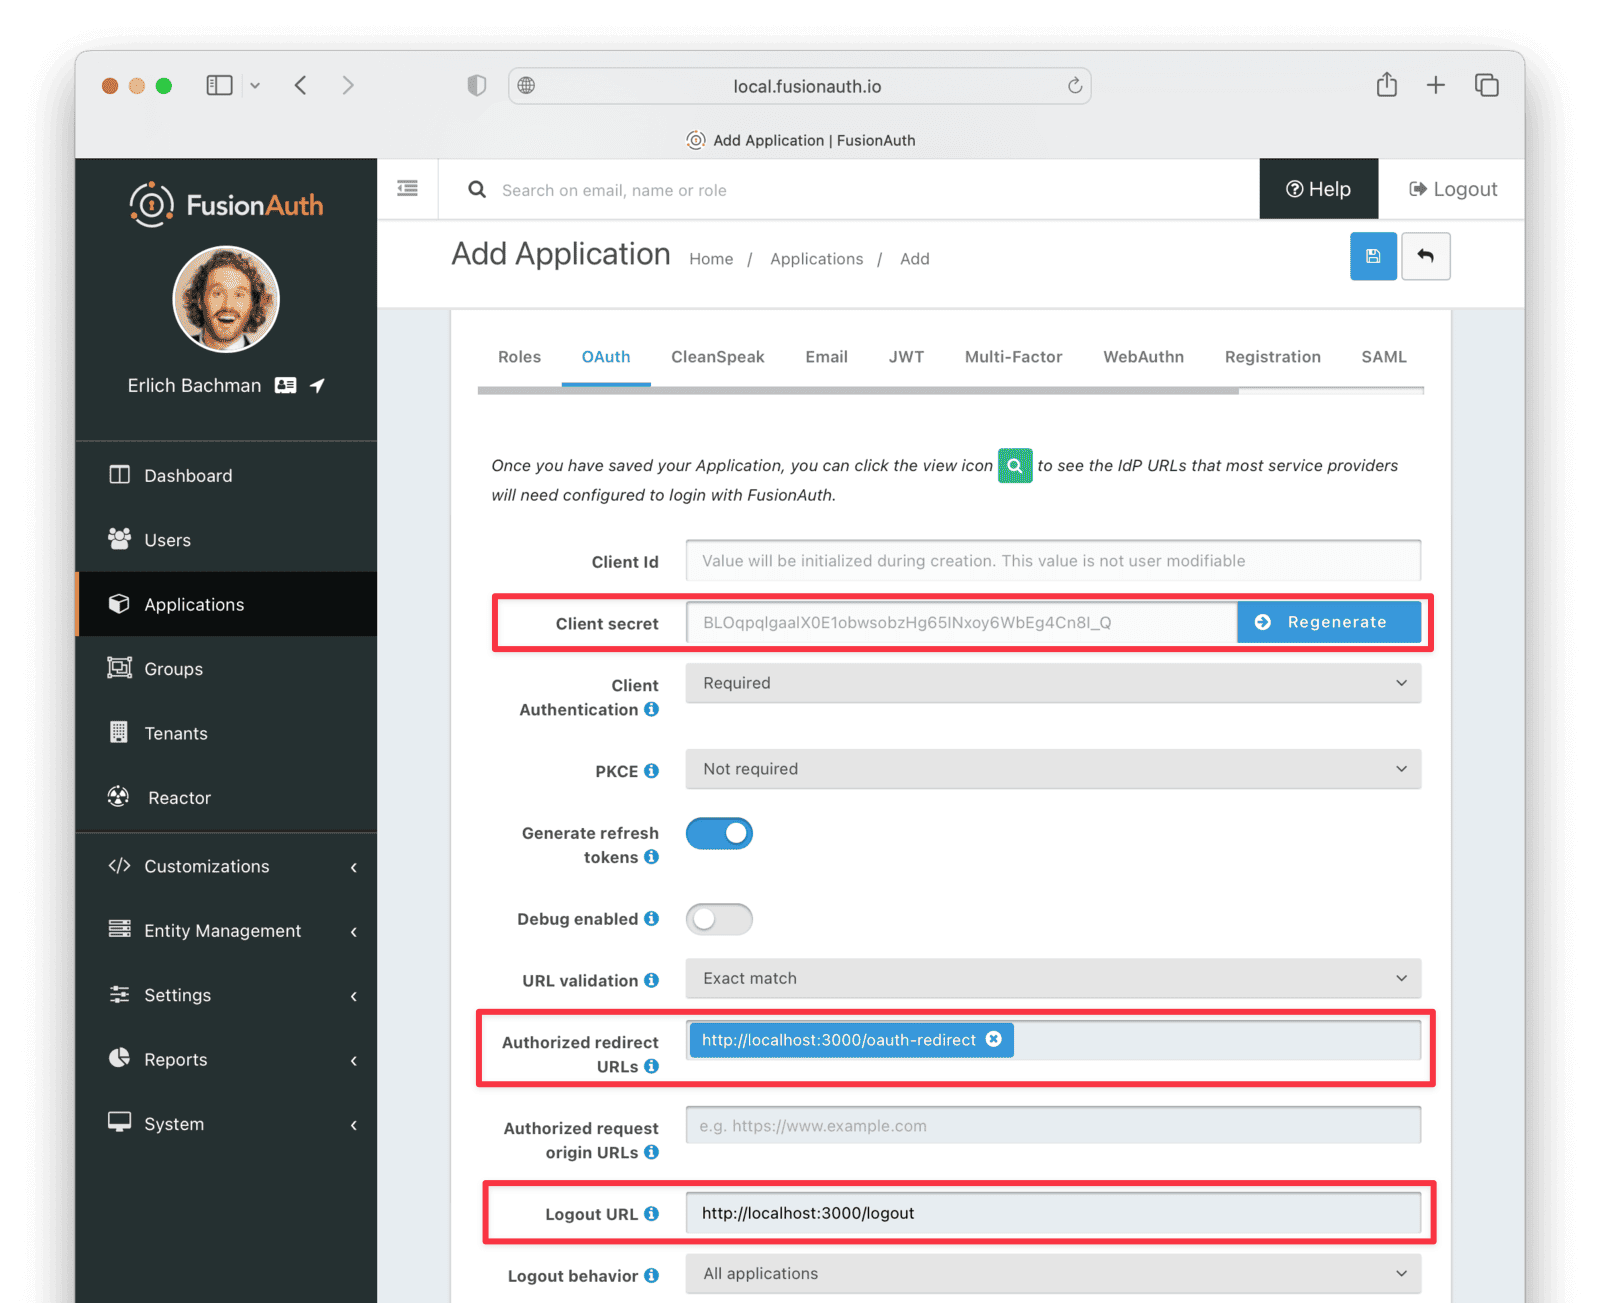
- Switch to the OAuth tab and enter the following values.
- Authorized redirect URLs:
http://localhost:3000/oauth-redirect. - Logout URL:
http://localhost:3000/logout. - Record the Client secret value to use later.
- Authorized redirect URLs:
The Authorized redirect URLs field accepts multiple entries. To insert entries, enter the text followed by a space. A popup will appear, click it to confirm the entry.
- Save the new Application.
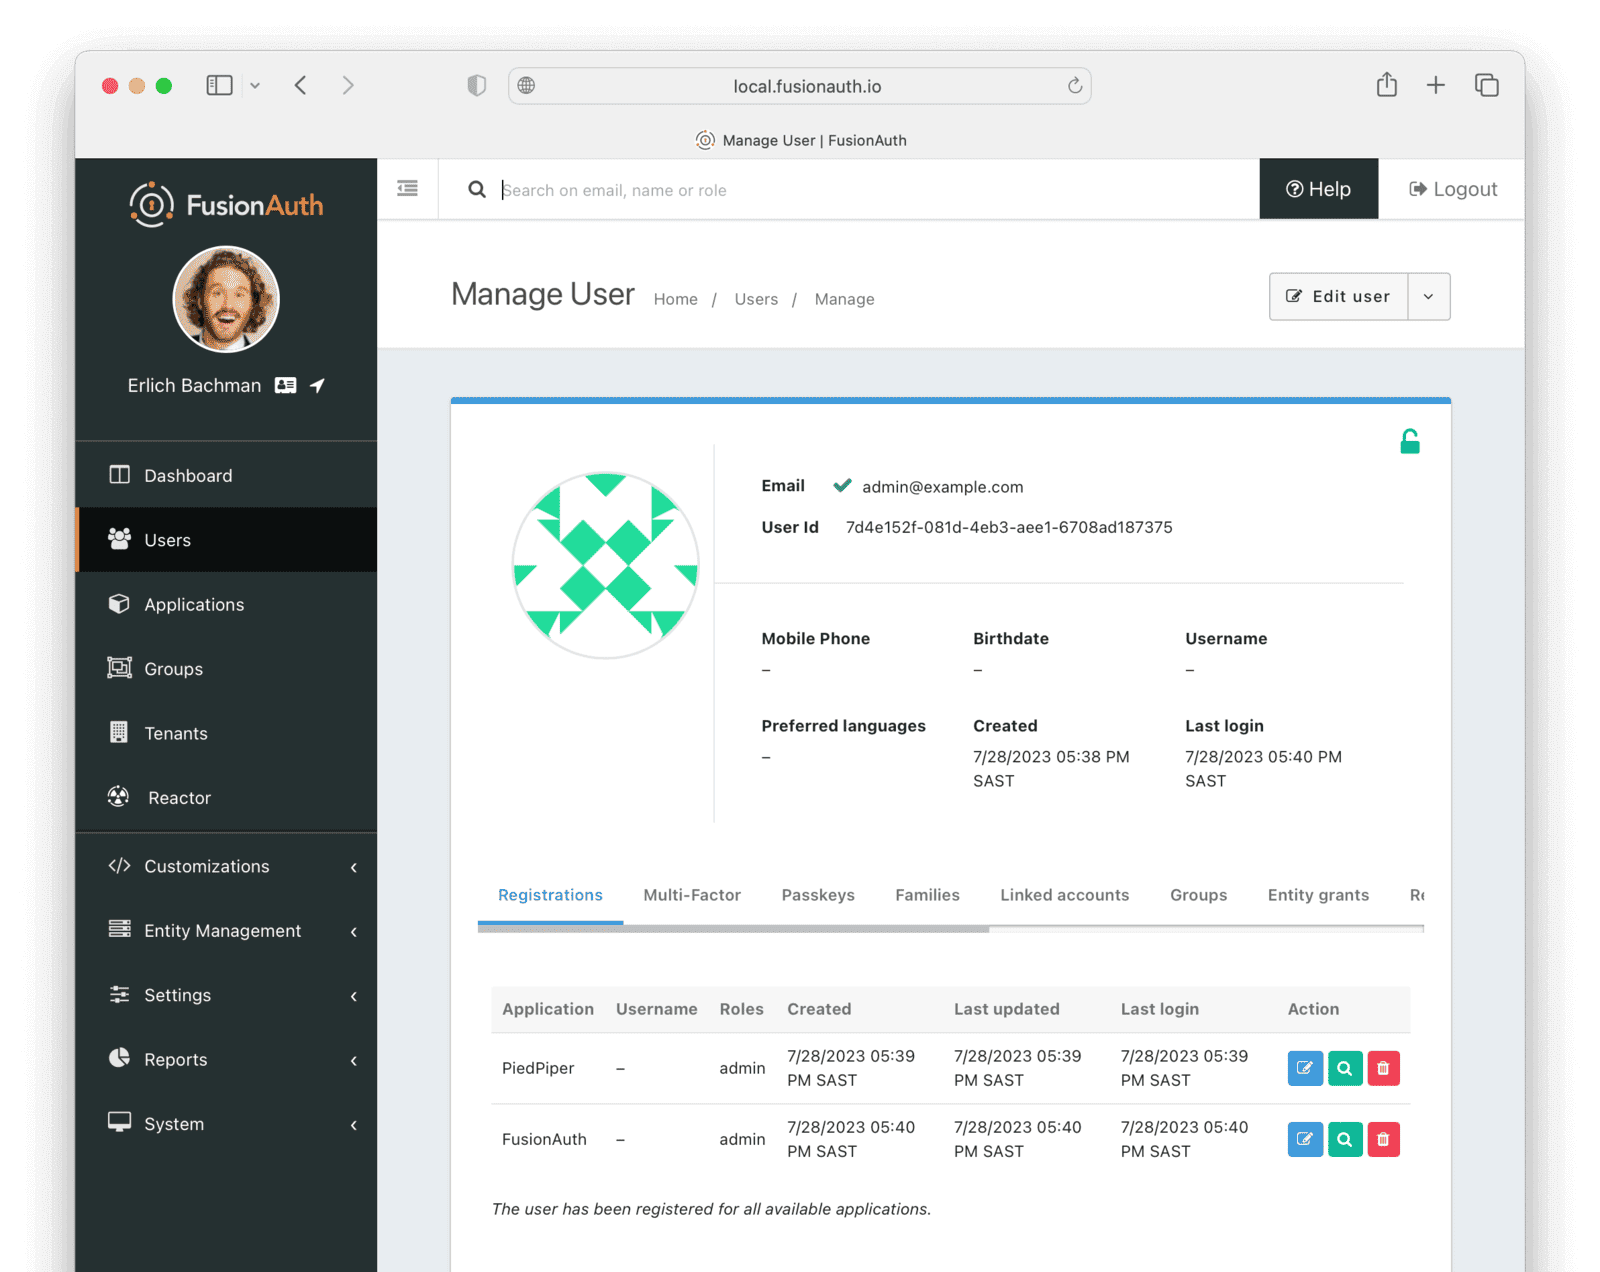
Create an Administrative User (Actioner)#
- Navigate to Users and click the button to add a User.
- Enter the following values.
- Email:
admin@example.com - Disable Send email to set up password to manually set the password.
- Password:
password - Confirm:
password
- Password:
- Email:
- Save the User.
- Register the User to the following Applications on the Registrations tab by clicking the Add registration button.
- First registration:
- Application:
PiedPiper - Roles:
admin - Save the Registration
- Application:
- Second registration:
- Application:
FusionAuth - Roles:
GlobalAdmin - Save the Registration
- Application:
- First registration:
Create a Subscriber User (Actionee)#
- Under Users , click the button to add a User.
- Enter the values:
- Email:
reader@example.com - Disable Send email to set up password to manually set the password.
- Password:
password - Confirm:
password
- Password:
- Languages:
Esperanto(Note that you have to enter the text, wait for a popup to appear, then click it to confirm the entry.)
- Email:
- Save the User.
- Click Add registration under the Registrations tab to register the user to the
PiedPiperapplication.- Application:
PiedPiper - Roles:
customer
- Application:
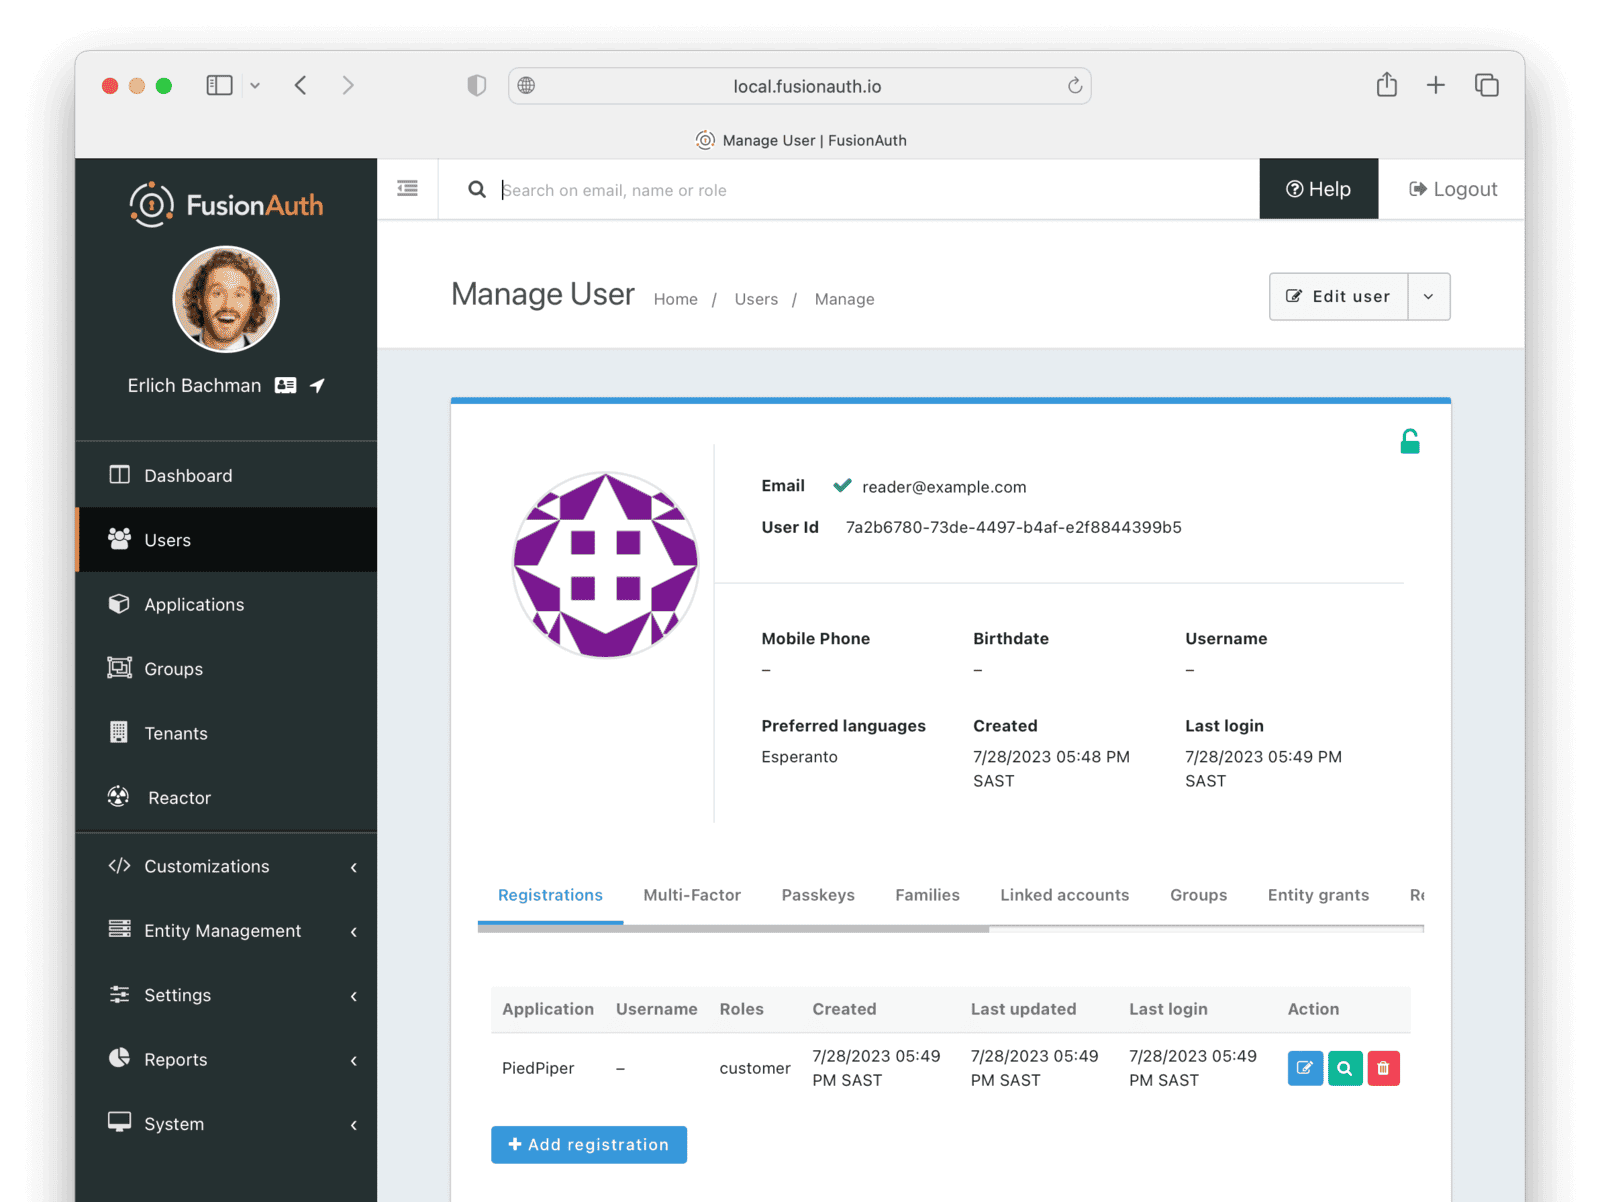
Record the User Id of both the Users you created to use later.
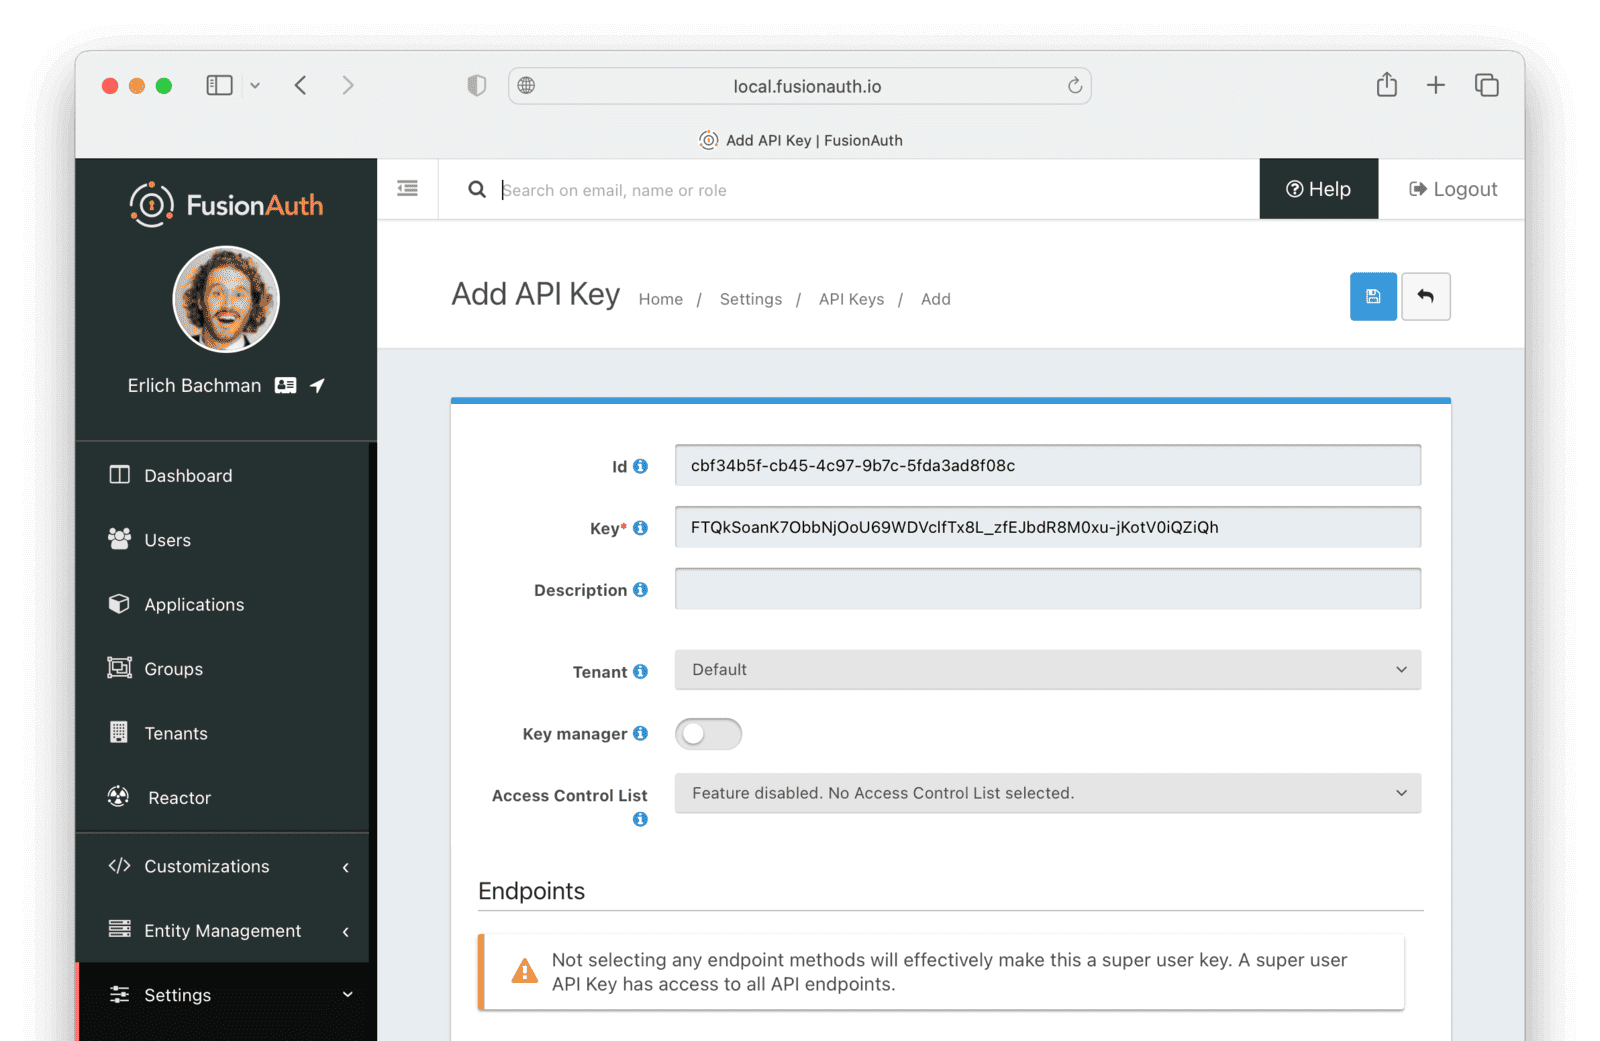
Create an API Key#
You now have an Application with two registered Users.
To apply Actions using the API, you need to create an API Key. In reality, you should grant as few privileges as possible to an API Key (principle of least privilege), but you'll make a key with all privileges in this tutorial to save time.
- Navigate to Settings -> API Keys and click the button to add an API Key.
- Enter the following values:
- Id:
cbf34b5f-cb45-4c97-9b7c-5fda3ad8f08c - Key:
FTQkSoanK7ObbNjOoU69WDVclfTx8L_zfEJbdR8M0xu-jKotV0iQZiQh - Leave all the toggle buttons for the endpoints disabled to give the key super access.
- Id:
- Save the API Key.
More information on keys is available here.
Subscription Work#
The following steps will create the parts needed to handle subscriptions.
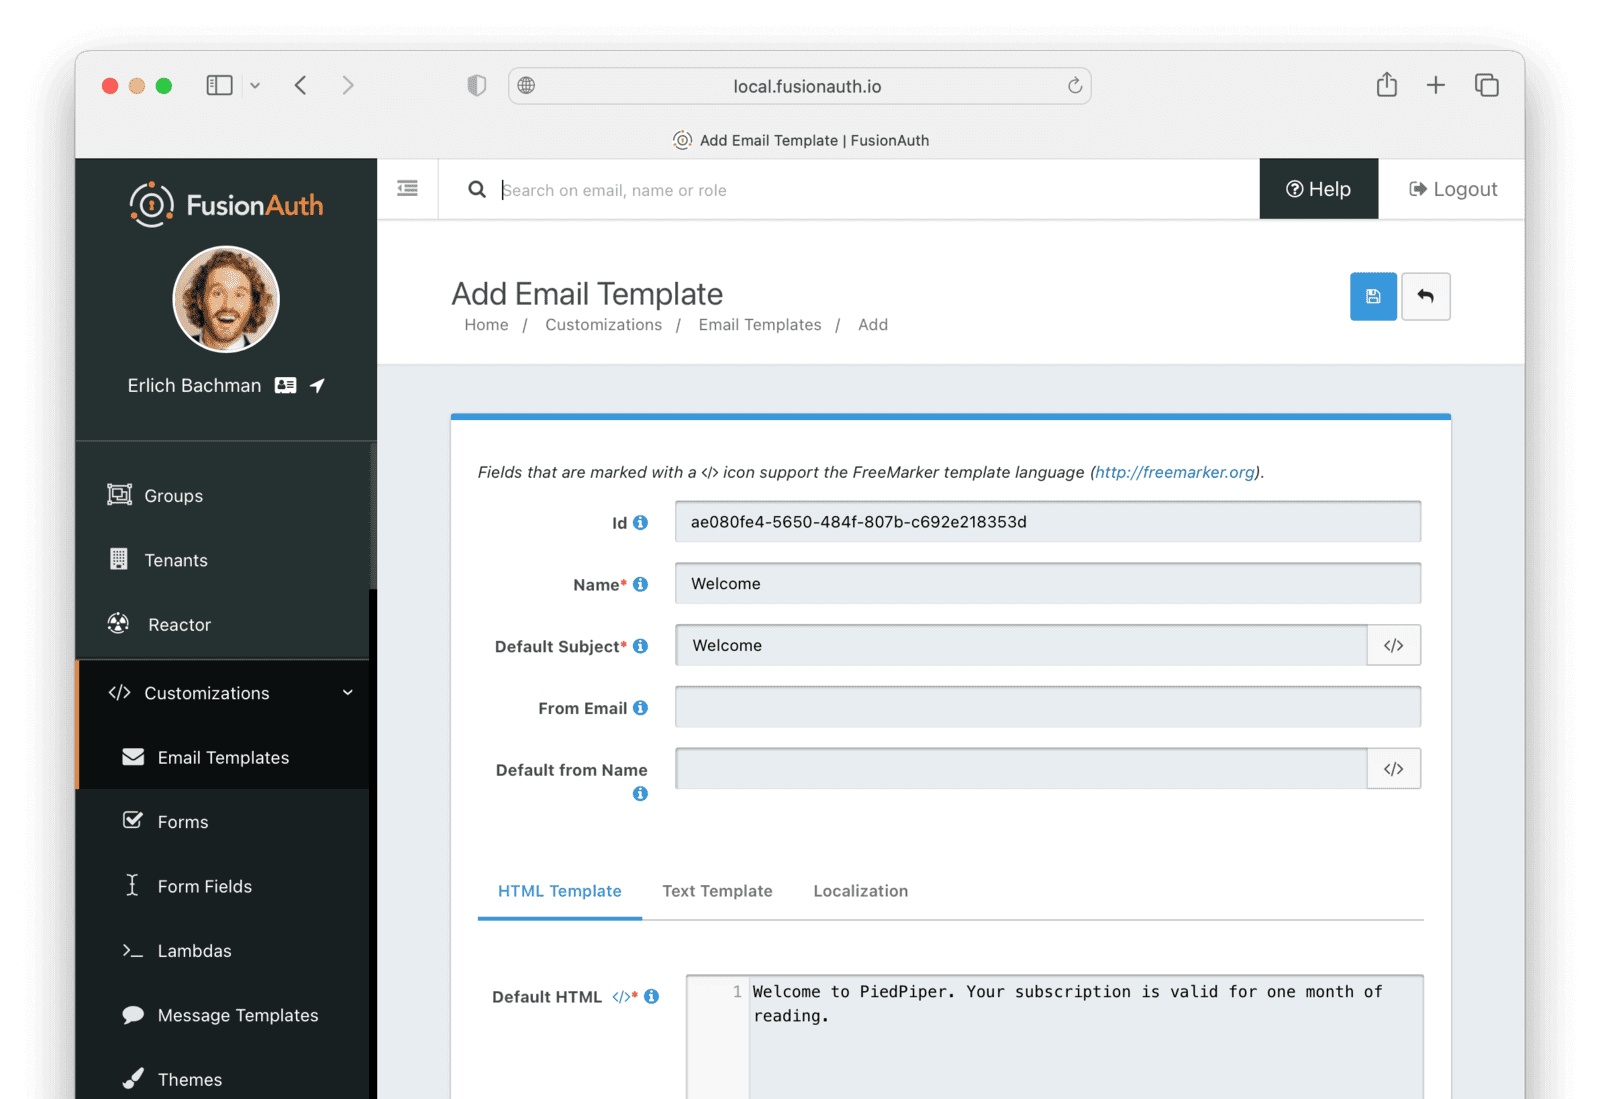
Create Welcome Email Template#
First create two email templates, one for an email to send to the user when they subscribe and one for when their subscription ends. (The templates in this tutorial do not use variables like the user's name, but you should in reality.)
- Navigate to Customizations -> Email Templates and click the icon to create an email template.
- Enter the values:
- Id:
ae080fe4-5650-484f-807b-c692e218353d - Name:
Welcome - Default Subject:
Welcome - On the HTML Template tab:
- Set the Default HTML to
Welcome to PiedPiper. Your subscription is valid for one month of reading.
- Set the Default HTML to
- On the Text Template tab:
- Set the Default Text to
Welcome to PiedPiper. Your subscription is valid for one month of reading.
- Set the Default Text to
- Id:
- Save the email template.
Create Expiry Email Template#
- Under Customizations -> Email Templates , click the button to create an email template.
- Enter the values:
- Id:
1671beff-78ed-420d-9e13-46b4d7d5c00d - Name:
Goodbye - Default Subject:
Goodbye - On the HTML Template tab:
- Set the Default HTML to
Your subscription has expired and you may no longer read the news. Goodbye.
- Set the Default HTML to
- On the Text Template tab:
- Set the Default Text to
Your subscription has expired and you may no longer read the news. Goodbye.
- Set the Default Text to
- Id:
- Save the email template.
More information on email templates is available here.
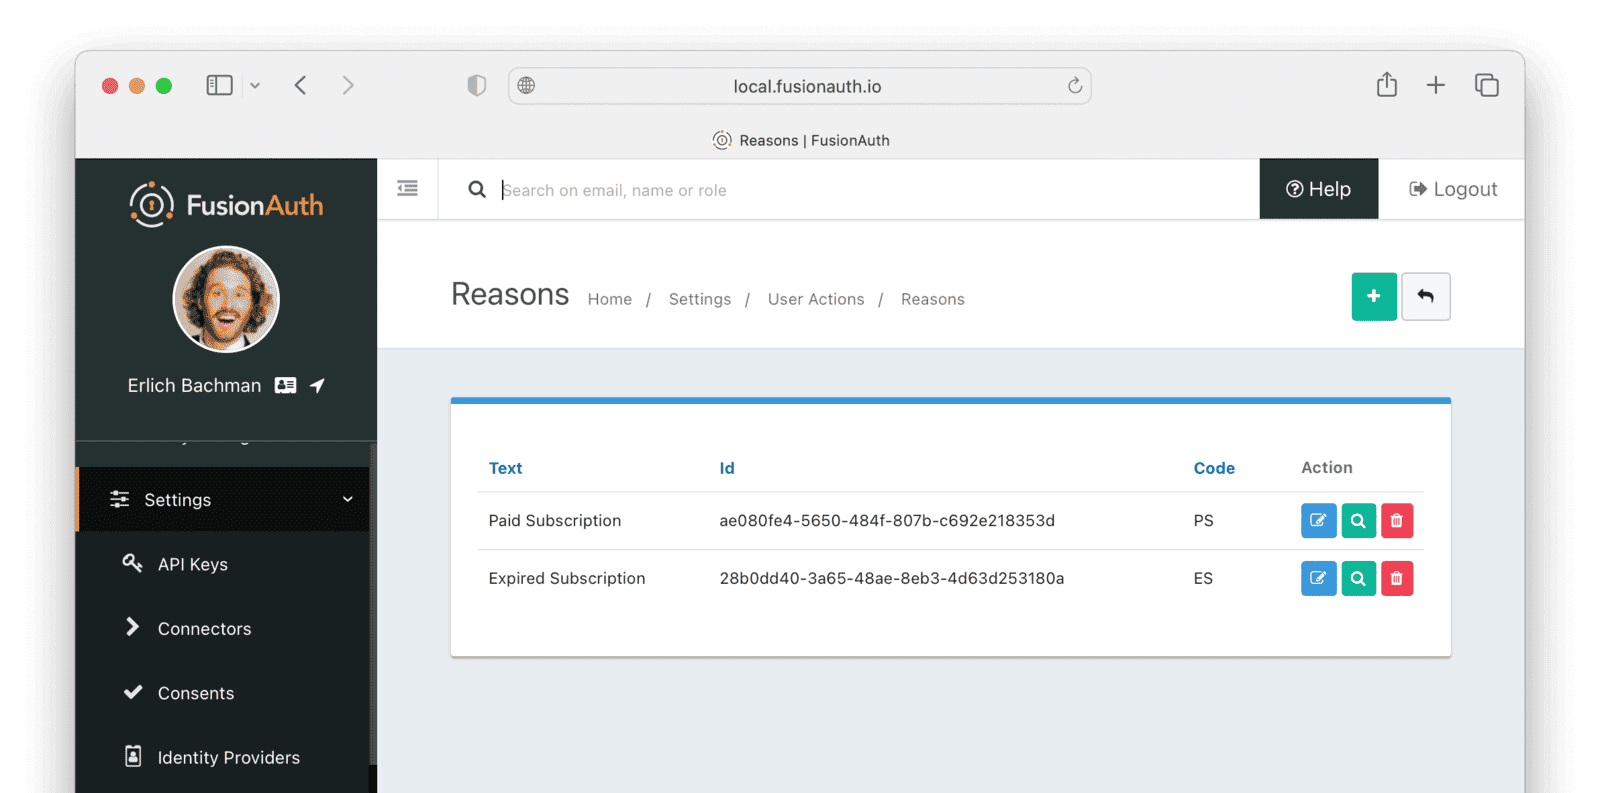
Create Reasons#
Now create two Reasons for applying Actions to the subscriber. Remember that Reasons are optional. Reasons are most useful when a single Action could have multiple Reasons, such as a subscription given as a free trial, a competition win, part of a bundle, or for normal payment.
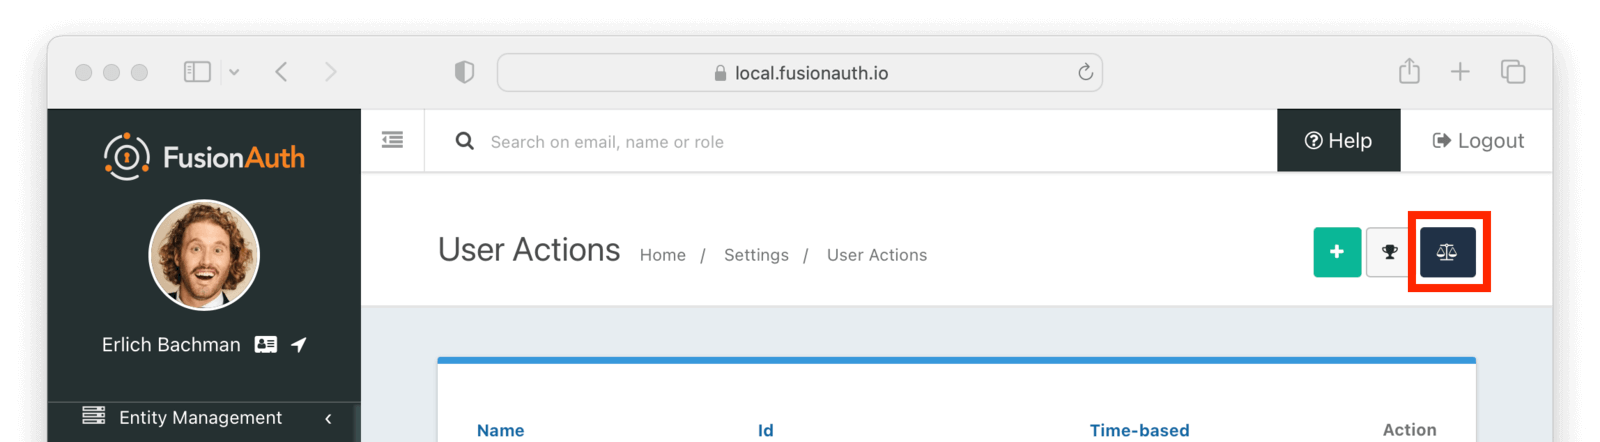
- Navigate to Settings -> User Actions and click the Reasons button on the top right.
- Add the first Reason.
- Id:
ae080fe4-5650-484f-807b-c692e218353d - Text:
Paid Subscription - Code:
PS - Save the Reason.
- Id:
- Add the second Reason.
- Id:
28b0dd40-3a65-48ae-8eb3-4d63d253180a - Text:
Expired Subscription - Code:
ES - Save the Reason.
- Id:
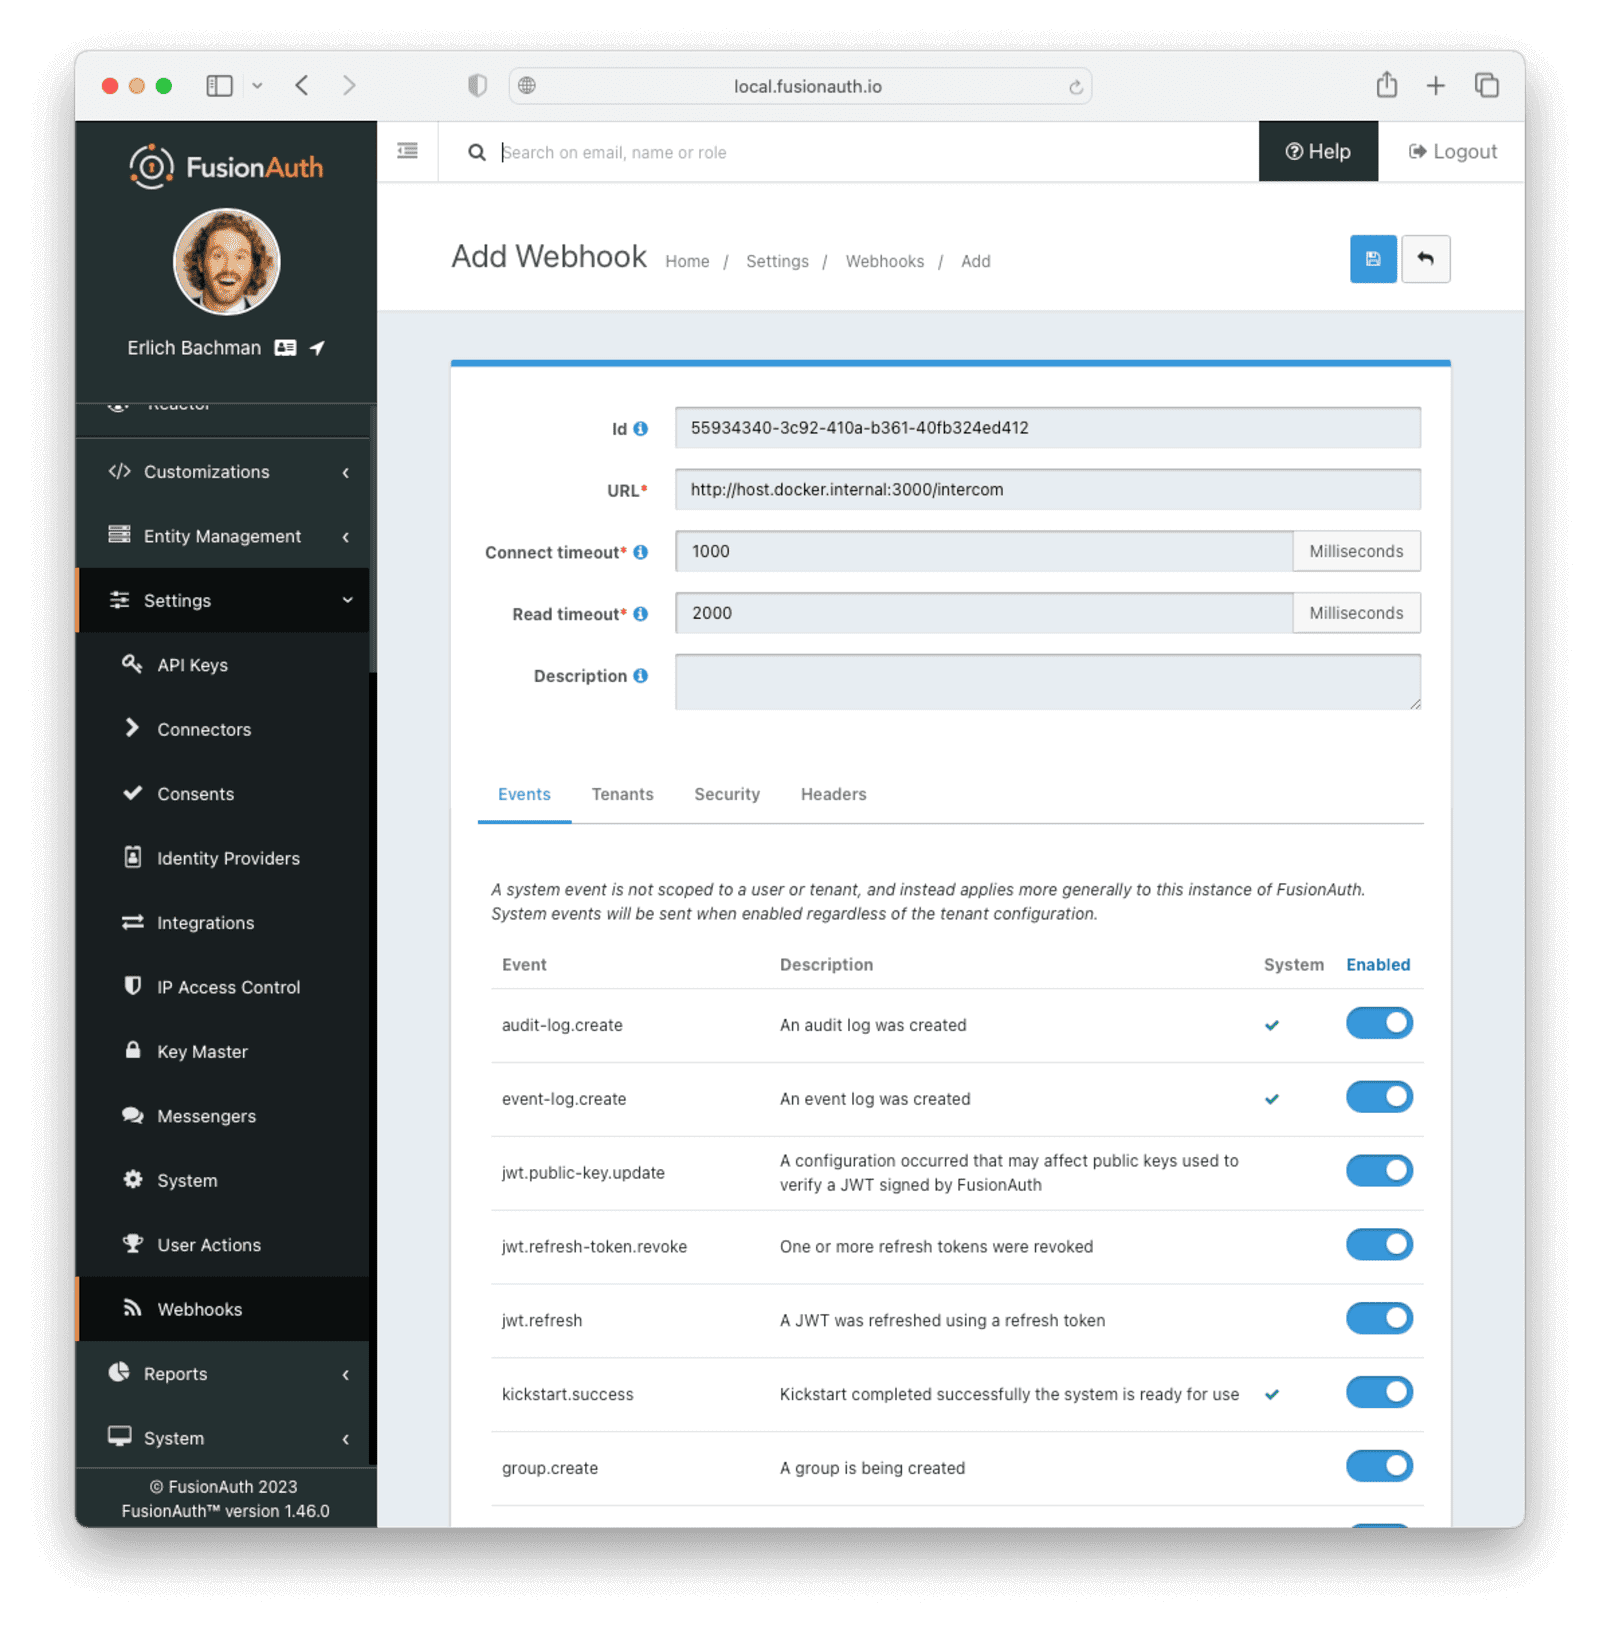
Create Signup Webhook to Intercom#
Since your Actions will rely on calling webhooks, you're going to create the webhooks first. Your first webhook will notify Intercom that a new user has subscribed and should be sent the onboarding series of emails that explain how to use all the paid features of PiedPiper. All our webhooks in this tutorial are sent to fake localhost versions of these real companies.
- Navigate to Settings -> Webhooks and add a webhook.
- Id:
55934340-3c92-410a-b361-40fb324ed412 - URL:
http://host.docker.internal:3000/intercom - Scroll down and ensure that the user.action event is enabled.
- Id:
- Save the webhook.
Create Expiry Webhook to PiedPiper#
The next webhook calls PiedPiper to notify it once the user's subscription expires.
- Under Settings -> Webhooks , click the button to add a new webhook.
- Id:
fa76b458-e0a0-438a-a5c8-26ca487e473e - URL:
http://host.docker.internal:3000/expire - Scroll down and ensure that the user.action event is enabled.
- Id:
- Save the webhook.
Enable Webhooks in Tenants#
- Navigate to Tenants and edit the Default tenant.
- Click on the Webhooks tab. Note that the two webhooks you just created are enabled in the checkbox list.
- Scroll down and
enableuser.action. - Save updates to the Tenant.
- Scroll down and
Enabling the webhooks in two places gives you fine-grained control across Tenants. More information on webhooks is available here.
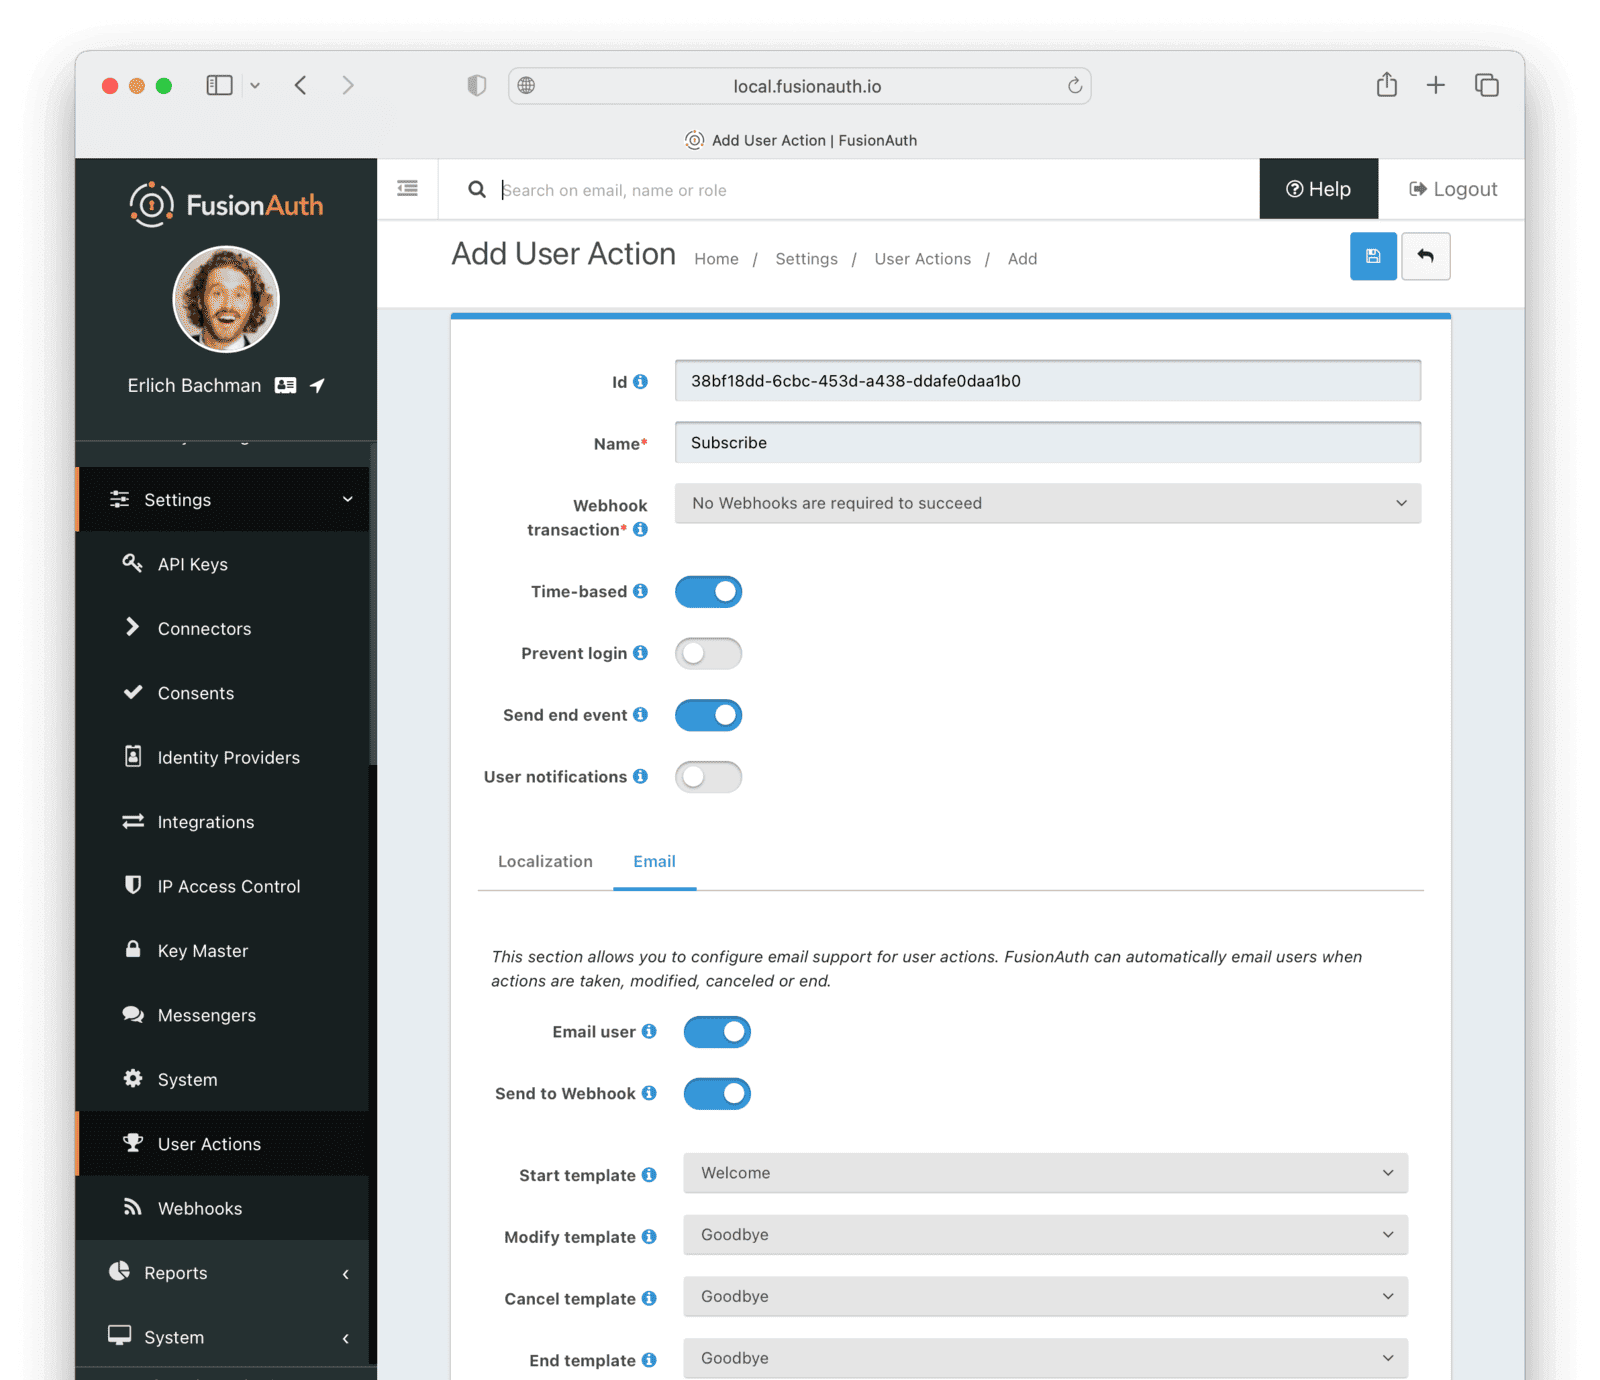
Create Subscription Action#
Now you can create the subscription and banning Actions to apply to the user in our PiedPiper code. They're both temporal Actions.
You'll continue using the FusionAuth admin UI to create objects in this tutorial. You can also use client libraries and the API. Here's a blog post which illustrates this functionality.
- Navigate to Settings -> User Actions and add a User Action.
- Id:
38bf18dd-6cbc-453d-a438-ddafe0daa1b0 - Name:
Subscribe - Time-based:
Enable - Click on the Email tab.
- Email user:
Enable - Send to Webhook:
Enable - For Start template, select the
Welcometemplate. - For Modify template, select the
Goodbyetemplate. - For Cancel template, select the
Goodbyetemplate. - For End template, select the
Goodbyetemplate.
- Email user:
- Id:
- Save the User Action.
Note that this example workflow never modifies or cancels a user subscription and these emails will never be sent. Nevertheless, FusionAuth requires a template to be chosen for every possibility if you enable Email user.
Create Prevent Login Action#
This next Action will prevent the User from logging in after the subscription expires.
- Under Settings -> User Actions , click the icon to add a new User Action.
- Id:
b96a0548-e87c-42dd-887c-31294ca10c8b - Name:
Ban - Time-based:
Enable - Prevent login:
Enable
- Id:
- Save the User Action.
This Action will not email or notify anyone.
Survey Work#
Now you can use instantaneous Actions to create the survey.
Create Thanks Email Template#
Create an email template that thanks the user for completing the survey.
- Navigate to Customizations -> Email Templates and add a new email template.
- Enter the values:
- Id:
9006bb3c-b13b-4238-b858-d7a97e054a8d - Name:
Thanks - Default Subject:
Thanks - On the HTML Template tab:
- Set the Default HTML to
Thank you for your survey feedback. It helps us improve. If your experience was negative we'll contact you shortly.
- Set the Default HTML to
- On the Text Template tab:
- Set the Default Text to
Thank you for your survey feedback. It helps us improve. If your experience was negative we'll contact you shortly.
- Set the Default Text to
- Save the email template.
- Id:
Create Survey Webhook to Slack#
- Navigate to Settings -> Webhooks and add a new webhook.
- Id:
d86e097a-f23f-459b-80c5-8b47bae182ee - URL:
http://host.docker.internal:3000/slack - Scroll down and ensure that the user.action event is enabled.
- Id:
- Save the webhook.
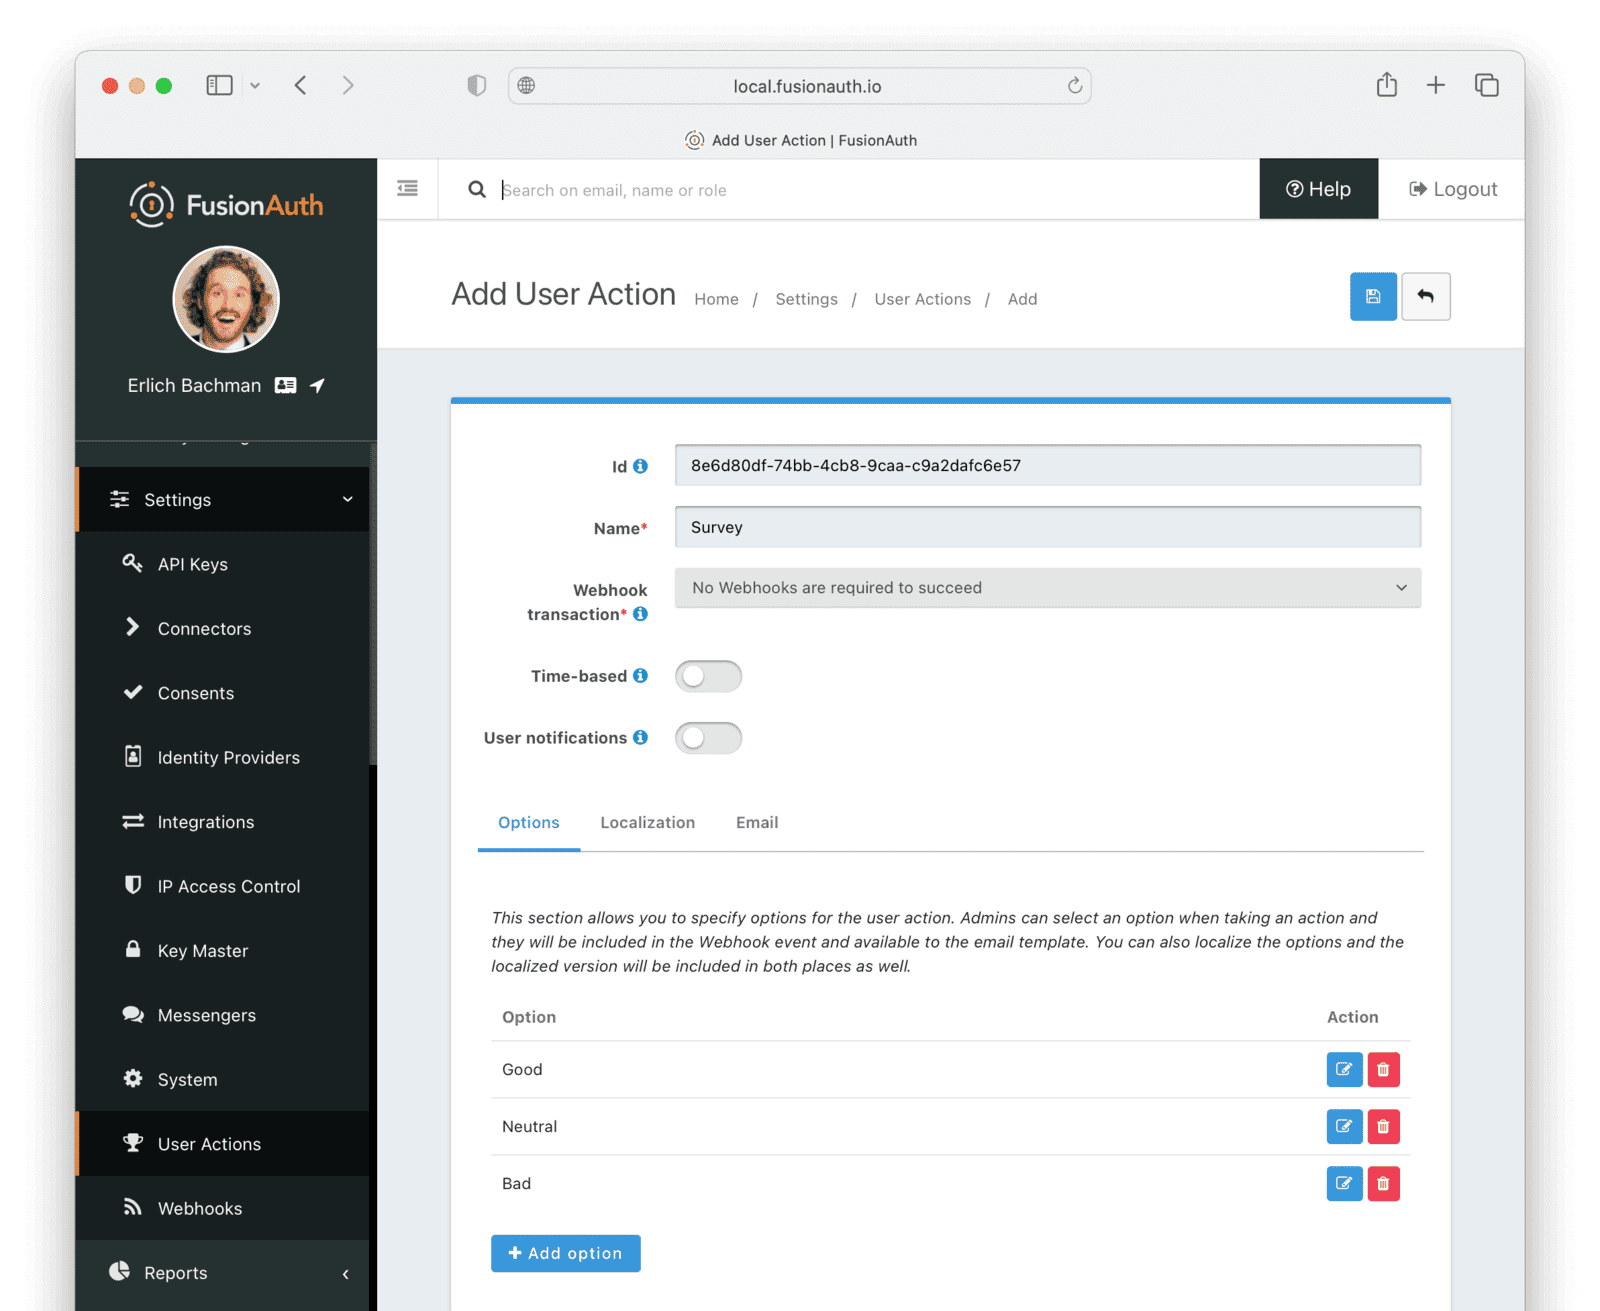
Create Survey Action With Options With Localizations#
In this last Action, you will add Options that represent the responses a user may have in the survey. You will also add a translation (localization) for each Option so that agents who don't speak English can see feedback in their own language.
- Navigate to Settings -> User Actions and add a new User Action.
- Id:
8e6d80df-74bb-4cb8-9caa-c9a2dafc6e57 - Name:
Survey - Leave all temporal, email, and notification settings disabled.
- Under the Options tab, click Add option to add the first option.
- Name:
Good - Click Add localization .
- Locale:
Esperanto - Text:
Bona
- Locale:
- Click Submit to save the option.
- Name:
- Add a second option by clicking the Add option button.
- Name:
Neutral - Click Add localization .
- Locale:
Esperanto - Text:
Meza
- Locale:
- Click Submit to save the option.
- Name:
- Add a third option by clicking the Add option button.
- Name:
Bad - Click Add localization .
- Locale:
Esperanto - Text:
Malbona
- Locale:
- Click Submit to save the option.
- Name:
- Id:
- Save the User Action.
PiedPiper Setup#
Your JavaScript code will act as PiedPiper, Intercom, and Slack, all in one. You'll use the fusionauth-example-5-minute-guide Node.js app as the base to start from. If you have not worked through that guide and do not have the code available, please do so before continuing.
- Set the
CLIENT_IDandCLIENT_SECRETin your.envfile to the values you recorded for the new PiedPiper Application in this section. - Create a new environment variable in the
.envfile called API_KEY and set the value to the value of the API key you created earlierFTQkSoanK7ObbNjOoU69WDVclfTx8L_zfEJbdR8M0xu-jKotV0iQZiQh. - Note in the
package.jsonfile that the@fusionauth/typescript-clientlibrary is available for use. This is what will be calling the FusionAuth API to create Action instances.
Create Mock Intercom API#
In the fusionauth-example-5-minute-guide Node.js app, open app.js.
You'll add a new route that pretends to be Intercom and will listen for new subscribers to start the onboarding process. In this tutorial, the API will just print the webhook to the console so that you can see what it looks like.
After the line var indexRouter = require('./routes/index');, add a reference to the FusionAuth TypeScript client library, the API_KEY and BASE_URL environment variables.
const client = require('@fusionauth/typescript-client');
const apikey = process.env.API_KEY;
const fusionAuthURL = process.env.BASE_URL;
Below the line app.use('/', indexRouter);, add the following.
app.post('/intercom', function(req, res) {
  console.log('Incoming Request to Intercom:');
  console.log(req.body);
  console.log('');
  res.sendStatus(200);
});
Create Mock Slack API#
Now make a similar API to mock Slack by adding the following code below the code you added previously.
app.post('/slack', function(req, res) {
  console.log('Incoming Request to Slack:');
  console.log(req.body);
  console.log('');
  res.sendStatus(200);
});
Administrators monitoring PiedPiper on Slack can immediately contact the user to help them if their survey response was Bad.
Create PiedPiper API to Listen for Expiry and Call Prevent Login Action#
The final piece of code you'll add to app.js is a little more complex. The expire route below is called by FusionAuth when the user's subscription Action instance ends. To ban the user from logging in after this time, PiedPiper applies the Prevent Login Action to the user by calling the FusionAuth API. Add this code directly below the mock Slack code you just added.
app.post('/expire', async function(req, res) {
  console.log('Incoming Request to PiedPiper Expiry:');
  console.log(req.body);
  console.log('');
  if (req.body.event.action === 'Subscribe' && req.body.event.phase === 'end') {
    try {
      const request = {
        action: {
          actioneeUserId: req.body.event.actioneeUserId,
          actionerUserId: req.body.event.actionerUserId,
          applicationIds: ['e9fdb985-9173-4e01-9d73-ac2d60d1dc8e'],
          emailUser: false,
          expiry: 8223372036854775806, // the end of time
          notifyUser: false,
          reasonId: '28b0dd40-3a65-48ae-8eb3-4d63d253180a', // subscription expired reason
          userActionId: 'b96a0548-e87c-42dd-887c-31294ca10c8b' //ban action
        },
        broadcast: false
      };
      const fusion = new client.FusionAuthClient(apikey, fusionAuthURL);
      const clientResponse = await fusion.actionUser(request);
      if (!clientResponse.wasSuccessful)
        throw Error(clientResponse);
      console.info('User banned successfully');
    }
    catch (e) {
      console.error('Error handling expiry: ');
      console.dir(e, { depth: null });
    }
  }
  res.sendStatus(200);
});Testing#
In this last section, you'll see how Actions work by applying them and watching the emails and webhooks be triggered.
Start PiedPiper#
Run the PiedPiper Node.js app by typing the following in a terminal.
npm run startApply Subscription Action#
Let's start testing by applying the subscription Action to the user. In reality, your app would do this in code once the user has paid, but for now we'll do it in a new terminal.
You'll need to install curl if it's not already installed.
In the following code, you will replace the values of actioneeUserId and actionerUserId with the values you recorded earlier for the reader and administrator users respectively.
To test out the workflow, you can let the subscription expire after 60 seconds. From the FusionAuth Date-Time tool, copy the Milliseconds value, add 60000 (60 seconds) to it, and paste it into the "expiry" field below. This will ensure the subscription action expires quickly. If you're on Linux, use the Option 2 code snippet to set the expiry value automatically.
Option 1: Set the expiry manually (remember to change the user Ids)
curl -i --location --request POST 'http://localhost:9011/api/user/action' \
  --header 'Authorization: FTQkSoanK7ObbNjOoU69WDVclfTx8L_zfEJbdR8M0xu-jKotV0iQZiQh' \
  --header 'Content-Type: application/json' \
  --data-raw '{
  "broadcast": true,
  "action": {
    "actioneeUserId": "9af67e9a-8332-4c06-971c-463b6710c340",
    "actionerUserId": "ac2f073d-c063-4a7b-ab76-812f44ed7f55",
    "comment": "Paid for the news",
    "emailUser": true,
    "expiry": 1690288205000,
    "userActionId": "38bf18dd-6cbc-453d-a438-ddafe0daa1b0",
    "reasonId": "ae080fe4-5650-484f-807b-c692e218353d"
  }
 }'
Option 2: Set the expiry automatically (remember to change the user Ids)
curl -i --location --request POST 'http://localhost:9011/api/user/action' \
  --header 'Authorization: FTQkSoanK7ObbNjOoU69WDVclfTx8L_zfEJbdR8M0xu-jKotV0iQZiQh' \
  --header 'Content-Type: application/json' \
  --data-raw '{
    "broadcast": true,
    "action": {
      "actioneeUserId": "9af67e9a-8332-4c06-971c-463b6710c340",
      "actionerUserId": "ac2f073d-c063-4a7b-ab76-812f44ed7f55",
      "comment": "Paid for the news",
      "emailUser": true,
      "expiry": '"$(($(date +%s) * 1000 + 60000))"',
      "userActionId": "38bf18dd-6cbc-453d-a438-ddafe0daa1b0",
      "reasonId": "ae080fe4-5650-484f-807b-c692e218353d"
    }
  }'
You should receive a 200 status code and a response that looks like the following.
{
  "action":
  {
    "actioneeUserId":"223515c6-6be5-4027-ac4f-4ebdcded2af9",
    "actionerUserId":"a1b4962f-0480-437c-9bb1-856fa2acabed",
    "applicationIds":[],
    "comment":"Paid for the news",
    "emailUserOnEnd":true,
    "endEventSent":false,
    "expiry":1690204666927,
    "id":"ad07e697-1583-4c2e-922e-8038945b3c09",
    "insertInstant":1690204662349,
    "localizedName":"Subscribe",
    "name":"Subscribe",
    "notifyUserOnEnd":false,
    "userActionId":"38bf18dd-6cbc-453d-a438-ddafe0daa1b0",
    "reason":"Paid Subscription",
    "localizedReason":"Paid Subscription",
    "reasonCode":"PS"
  }
}
If you are experimenting with Action instances and wish to delete one, you can use the following code and change the UUID in the URL to match the instance Id that was returned by FusionAuth when you created it.
curl -i --location --request DELETE 'http://localhost:9011/api/user/action/3cc31d87-25b9-4528-970a-2b177508afe1'\
   --header 'Authorization: FTQkSoanK7ObbNjOoU69WDVclfTx8L_zfEJbdR8M0xu-jKotV0iQZiQh'\
   --header 'Content-Type: application/json'\
   --data-raw '{"action": {"actionerUserId": "ac2f073d-c063-4a7b-ab76-812f44ed7f55"}}'
Examine the Webhook Calls#
Open the terminal that the Node.js PiedPiper app is running in to view the webhooks the app received. You might expect to see only one for the subscription webhook sent to Intercom. FusionAuth has no way of configuring an Action to trigger only one specific webhook. Instead, every Action triggers every webhook, so you'll need to filter the JSON arriving at your webhook targets by action, reason, and phase to decide whether to use it or not.
Below is an example of the JSON sent to webhooks.
event: {
    action: 'Subscribe',
    actionId: '32754f74-d92c-4829-ab8b-704825baf1ef',
    actioneeUserId: '9af67e9a-8332-4c06-971c-463b6710c340',
    actionerUserId: 'ac2f073d-c063-4a7b-ab76-812f44ed7f55',
    applicationIds: [],
    comment: 'Paid for the news',
    createInstant: 1690282558415,
    emailedUser: true,
    expiry: 1690282574000,
    id: '5dba9944-ce71-4ce0-b18f-c44723e7394b',
    info: { ipAddress: '172.28.0.1' },
    localizedAction: 'Subscribe',
    localizedDuration: '15 seconds',
    notifyUser: false,
    phase: 'start',
    tenantId: '8891ecad-ae5c-3d5d-1f4e-3e95f8583b78',
    type: 'user.action'
  }
Check that at least two specific webhooks have been sent after one minute — one for the Subscribe Action to Intercom and one for the Expiry Action to PiedPiper.
Check Welcome and Expiry Emails Arrive#
Check that the welcome and goodbye emails arrived in the MailDev browser window. If you can't see them, go back to the FusionAuth Tenant email settings and verify that you're using port 1025 and host host.docker.internal.
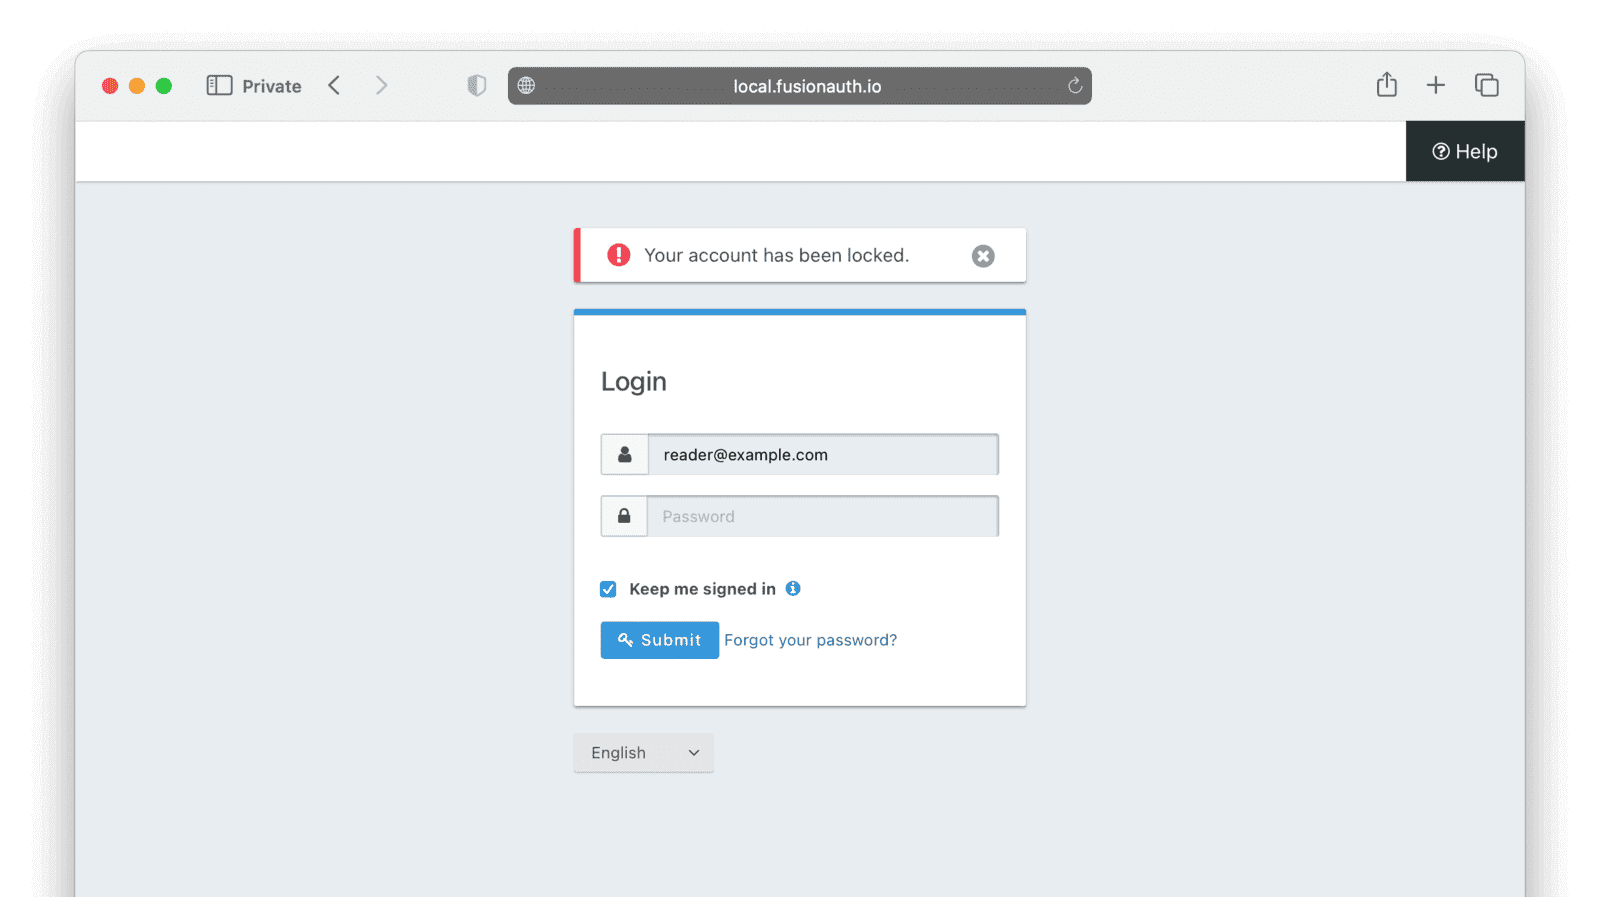
Check Prevent Login Action Was Created#
After a minute has passed, the terminal should display User banned successfully. This means that PiedPiper received the expired subscription webhook, tested for (req.body.event.action === 'Subscribe' && req.body.event.phase === 'end'), and applied the "Ban" Action to the user.
To test that it did indeed work, try to log in to the test application at http://localhost:3000 with the user reader@example.com. You should be prohibited.
Apply Survey Action#
Assume the user has now filled in a survey and sent his response to PiedPiper. You'll emulate the app applying the survey Action to the User with the chosen Option and given comment. There is no need to set an expiry value in this command because the Action is instantaneous, not temporal. You need to change the User Ids to match the ones you recorded earlier. The customer is the Actioner and the customer support agent is the Actionee.
curl -i --location --request POST 'http://localhost:9011/api/user/action' \
  --header 'Authorization: FTQkSoanK7ObbNjOoU69WDVclfTx8L_zfEJbdR8M0xu-jKotV0iQZiQh' \
  --header 'Content-Type: application/json' \
  --data-raw '{
    "broadcast": true,
    "action": {
      "actioneeUserId": "ac2f073d-c063-4a7b-ab76-812f44ed7f55",
      "actionerUserId": "9af67e9a-8332-4c06-971c-463b6710c340",
      "applicationIds": ["e9fdb985-9173-4e01-9d73-ac2d60d1dc8e"],
      "comment": "Could not find my horoscope in the newspaper :( Agent did not help me.",
      "emailUser": false,
      "userActionId": "8e6d80df-74bb-4cb8-9caa-c9a2dafc6e57",
      "option": "Bad"
    }
  }'
Note that the option field is a string, Bad, not a UUID. Because of this, if you ever change the wording of your Options in FusionAuth, you need to change them in every piece of code that uses them. When creating your Options, instead of using a descriptive word for the Name, like Bad, you could give it a code or UUID, like Bad-269edb4a-aef0-461a-917d-a7f76a254841 to discourage people from changing it in future. Then create a localization for English too, Bad. Now, even if you want to change the localization Bad to Negative in the future, you can keep using the same Name in all your code that calls the API. Here, we include the word in addition to the UUID so that when you are browsing the Options in the FusionAuth admin UI, you can still see what the Options represent without going into the localization detail screens.
Check Slack Is Called#
In the PiedPiper terminal, you'll see JSON being sent to the mock Slack.
{
  event: {
    action: 'Survey',
    actionId: 'ef9e753f-ecc0-468b-8160-dcb25dbb4d91',
    actioneeUserId: 'ac2f073d-c063-4a7b-ab76-812f44ed7f55',
    actionerUserId: '9af67e9a-8332-4c06-971c-463b6710c340',
    applicationIds: [ 'e9fdb985-9173-4e01-9d73-ac2d60d1dc8e' ],
    comment: 'Could not find my horoscope in the newspaper :(',
    createInstant: 1690291936476,
    emailedUser: false,
    id: 'be3470aa-0dfd-408e-a286-6d3c16a9af1f',
    info: { ipAddress: '172.28.0.1' },
    localizedAction: 'Survey',
    localizedOption: 'Malbona',
    notifyUser: false,
    option: 'Bad',
    tenantId: '8891ecad-ae5c-3d5d-1f4e-3e95f8583b78',
    type: 'user.action'
  }
}
The user's comment has been recorded as the survey response. The option they chose is also shown as localizedOption: 'Malbona'. Note that translations are always shown in the preferred language of the Actionee, not the Actioner. In this example, the Actioner is the customer and the localized option is shown in the language of the administrator (customer service agent).
Retrieve All Survey Action Instances for This User#
The last thing you might want to do with Actions is retrieve them all from FusionAuth to create an audit trail of PiedPiper interactions with the subscriber. The following command will do that. Remember to replace the subscriber's UUID with yours.
curl -i --location --request GET 'http://localhost:9011/api/user/action?userId=9af67e9a-8332-4c06-971c-463b6710c340'\
   --header 'Authorization: FTQkSoanK7ObbNjOoU69WDVclfTx8L_zfEJbdR8M0xu-jKotV0iQZiQh'