Generic Migration Tutorial
Overview
This document will help you migrate users from a custom authentication provider to FusionAuth.
This guide is a low-level, technical tutorial focusing on transferring password hashes, calling APIs, and preparing data when migrating users from a custom authentication provider. For more information on how to plan a migration at a higher level, please read the FusionAuth migration guide.
Prerequisites
If you want to import user passwords in addition to user personal details, you need a basic understanding of how password hashing and salts work. FusionAuth has a hashing article that is a good starting point.
To follow this tutorial, you need Docker to run an example web application and the migration scripts.
You may need to update your hosts file to include an entry for 127.0.0.1 host.docker.internal if it’s not already present. On macOS and Linux, you can add the entry with the following command.
echo "127.0.0.1 host.docker.internal" | sudo tee -a /etc/hostsIf you prefer to run scripts directly on your machine, you will need Node.js installed locally. You will also need to change occurrences of db and host.docker.internal to localhost in all the scripts.
Planning Considerations
Mapping User Attributes
The attributes of the User object in FusionAuth are well documented.
If there is an attribute in your exported user which cannot be directly mapped to a FusionAuth attribute, you can place it in the user.data field. This field can store arbitrary JSON values and will be indexed and searchable.
Social Logins
Migrating users with social logins such as Apple or Facebook requires that you have an existing user Id for that provider. What this unique user Id looks like depends on the particular social identity provider. The unique Id may be an email address, an integer, UUID, or a random string.
Configure the appropriate FusionAuth Identity Provider with the same values (client_id, etc) as the original user management system you are migrating away from.
Import users with the Import API, assigning each user with a social login a random password such as a UUID.
Your next step depends on whether the social login provider’s unique identifier is available as part of your migration data. If you have the social login provider’s unique identifier, for each user, use the Link API to create a link with the appropriate User Id, Identity Provider Id, and Identity Provider User Id.
- The User Id is the Id of the recently created FusionAuth User.
- The Identity Provider Id is found on the corresponding Identity Provider API documentation. Look for identityProvider.id .
- The Identity Provider User Id is the existing social provider user identifier exported or otherwise extracted from the original system.
You do not need to migrate the social network token, which may or may not be accessible. During the first login of a newly migrated user, FusionAuth finds the unique user in the social login provider based on the migrated Identity Provider User Id, and completes the login. During this process, FusionAuth stores a token on the Link, if the social provider returns one. Depending on the configuration of the social provider, users may see a prompt asking if they want to allow FusionAuth to have access to user data such as email address.
IdP linking strategies have been available since version 1.28.0. Before that version, users were linked on email.
If you do not have the social login provider’s identifier, you need to decide if you want to transparently link the two accounts, which is easier for the end user, or if you want to ask the user to manually link the accounts, which is more accurate, but may be confusing.
To transparently link the accounts, choose a linking strategy of Link On Email or Link On Username, which will create the user if they don’t exist. However, if the user has an email address at their social provider which differs from the email address that was used to sign up for your application and which you imported to FusionAuth, then two accounts will be created.
For example, if the user has a Google account richard@gmail.com, but signed up for your application with richard@fusionauth.io, then if you use the Link On Email strategy, two different accounts will be created, since FusionAuth is trying to match on email address and they don’t. The same holds true for usernames with the Link on Username strategy.
To prompt the user to link the accounts, choose a linking strategy of Pending, which will prompt the end user to sign into FusionAuth after they sign into the social provider, authoritatively linking the two accounts.
Here’s more information about IdP Linking Strategies.
Apple only returns a user’s full name the first time the user logs in. Since you have users who have already used Apple to log in to your previous authentication gateway, Apple will not provide the user’s name when they log in to FusionAuth now. The only solution is to import the user’s name manually from your previous database into FusionAuth.
Other Entities
There are often other important entities, such as connections or roles, that need to be migrated. There are usually fewer of these, so an automated migration may not make sense, but plan to move this configuration somehow.
Be aware that functionality may not be the same between your Custom Authentication System and FusionAuth. This is different from user data; as long as you can somehow migrate a login identifier (a username or email) and a password hash, a user will be authenticated and successfully migrated. You can download FusionAuth before you begin a migration and build a proof of concept to learn more about the differences.
A partial list of what may need to be migrated for your application to work properly includes the following:
- If your application makes use of roles, FusionAuth has roles that are configured on an application-by-application basis and made available in a token after successful authentication.
- In FusionAuth, you can manage a set of users via a Tenant.
- If your application sends emails like forgotten password notifications, FusionAuth has this functionality, and the templates are customizable.
- In FusionAuth, custom user attributes are stored on the
user.datafield and are dynamic, searchable, and unlimited in size. Any valid JSON value may be stored in this field. - If your application uses multi-factor authentication (MFA), FusionAuth supports MFA, and you can enable it for a tenant and configure it for a user at any time.
Identifiers
When you create an object with the FusionAuth API, you can specify the Id. It must be a UUID. This works for users, applications, tenants, and others.
Exporting Users
Let’s consider a minimal web application to demonstrate how to migrate users and authentication to FusionAuth. This example app only has a sign-in page, a restricted account details page, and a PostgreSQL database with a single table to hold user passwords.
Create An Example Application With Custom Authentication
To get the code used in this tutorial, clone the Git repository below.
git clone https://github.com/FusionAuth/fusionauth-import-scriptsThe generic directory contains all the code you need for this tutorial, and generic/exampleData contains the output of the scripts.
Navigate to the generic/src directory.
cd fusionauth-import-scripts/generic/srcStart a Docker container for the app and database by running the command below in a terminal.
docker compose --file 1_appDockerCompose.yaml upCreate The User Table
Now that the database is running, you need to create a table to hold users. Open a new terminal in the fusionauth-import-scripts/generic/src directory and run the command below.
docker exec --interactive --tty app shThis will connect to the app container running in Docker and start an interactive terminal. You will run all the JavaScript scripts in this interactive Docker terminal. Run the code below in this terminal to create the user table.
cd /workspace
npm install
node 2_createUser.mjs
The 2_createUser.mjs script creates a table with the text fields email, hash, and salt.
If you want to see the table, browse the database in any database IDE that can connect to PostgreSQL. DBeaver is a free, cross-platform IDE you can use.
Create a new connection to localhost, port 7770, database p, username p, and password p. Open the connection and expand the database tables to see the user table.
Run The Web App
Run the command below in the interactive Docker terminal to start the minimal Express web app.
node 3_webApp.mjsBrowse to http://localhost:7771/account. This is a restricted page. Since you are not authenticated, you are not able to view it.
Browse to http://localhost:7771. On the authentication page displayed, enter a random email like user@example.com and password password.
The user will be created in the database, and you will be redirected to the account page. Now you will be able to see the page as you have a cookie in your browser with the user’s email address.
Open 3_webApp.mjs and take a look. It has two GET routes to display the home page and account page. The POST route for the home page is more complex. It does the following:
- Checks if username and password have been entered.
- Queries the database to see if the email exists.
- If the email exists, compares the password hash in the database with the hash of the password entered.
- If not, creates the user and saves their password hashed with a random UUID salt.
The getHash function at the bottom of the file creates a password hash using SHA256. This is a simple algorithm, supported natively by FusionAuth. If your real application uses an uncommon hashing algorithm, you can write a custom hashing plugin for FusionAuth.
In the interactive Docker terminal, click Ctrl + C to stop the application server.
Create A Users File
Run the command below in the interactive Docker terminal to export your users to the file users.json.
node 4_exportUsers.mjsIn reality, you could create a JSON file of users from your application in whatever language suits you — most likely a SQL script run directly against your database.
The next script, 5_convertUserToFaUser.mjs, is the most important. It maps the fields of users.json to FusionAuth fields. The tiny example app has only email and password, so you will want to alter this script significantly for your real app. The attributes of the User object in FusionAuth are well documented here.
The script uses stream-json, a JSON library that can incrementally read massive files with millions of users. It opens the users.json file for reading in the line new Chain([fs.createReadStream(inputFilename), parser(), new StreamArray(),]);. For more information, read https://github.com/uhop/stream-json. The processUsers() function calls getFaUserFromUser() to map your user to FusionAuth, and then saves them to an faUsers.json file.
The getFaUserFromUser() function does a few things:
- Maps as many matching fields from your app to FusionAuth as possible.
- Stores all user details that don’t map to FusionAuth in the
datafield. - Uses the hashing algorithm name in
faUser.encryptionScheme = 'salted-sha256';. The salt is converted to Base64 to meet FusionAuth requirements. - Adds Registrations (a Role link between a User and an Application) for users. You will need to change these Ids to match those of your application when doing a real migration.
If you are uncertain about what a user attribute in FusionAuth does, read more in the user guide, as linked in the general migration guide.
In the interactive Docker terminal, run the script with the following command.
node 5_convertUserToFaUser.mjsYour output should be valid JSON and look like the file fusionauth-import-scripts/generic/exampleData/faUsers.json.
Importing Users
If you are not already running FusionAuth or want to test this process on another instance, you can start FusionAuth in Docker.
Open a new terminal in the fusionauth-import-scripts directory and run the commands below.
cd generic/fusionAuthDockerFiles
docker compose up
FusionAuth will now be running and accessible at http://localhost:9011. You can log in to the FusionAuth admin UI with admin@example.com and password. The container is called fa.
This configuration makes use of a bootstrapping feature of FusionAuth called Kickstart, defined in fusionauth-import-scripts/generic/fusionAuthDockerFiles/kickstart/kickstart.json. When FusionAuth comes up for the first time, it will look at the kickstart.json file and configure FusionAuth to the specified state. In summary, the defined Kickstart sets up an API Key, an admin user to log in with, a theme, and a Test application in FusionAuth.
Now you have the users file faUsers.json, and FusionAuth is running. To import the users into FusionAuth, you need to run the Node.js import script.
In the interactive Docker terminal, run the command below.
node 6_importUsers.mjsThis script uses the FusionAuth SDK for Node.js @fusionauth/typescript-client. It’s used only for a single operation, fa.importUsers(importRequest). For more information, read the FusionAuth TypeScript Client Library documentation.
This script imports users individually. If this is too slow when running the production migration, wrap the importUsers() FusionAuth SDK call in a loop that bundles users in batches of 1000.
Verify The Import
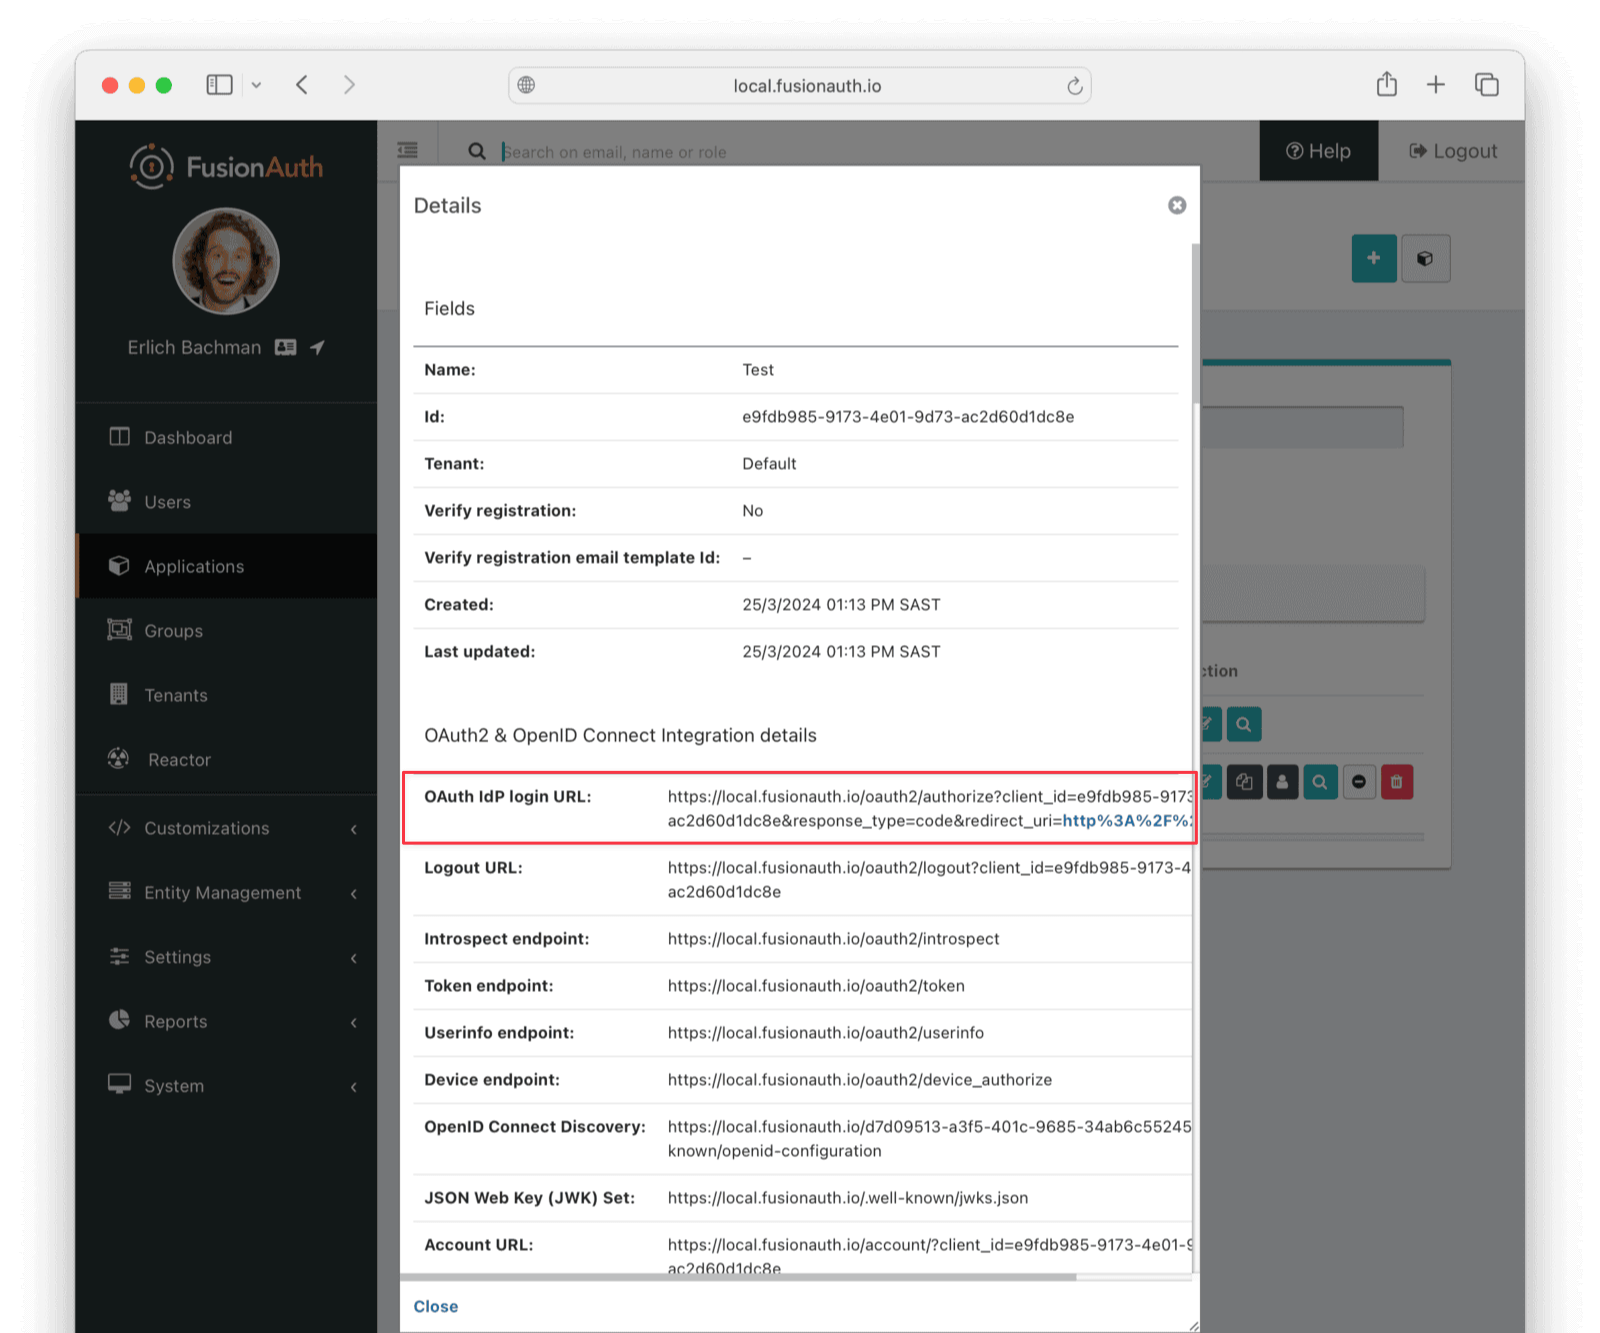
If the migration script ran successfully, you should be able to log in to the Test application with one of the imported users. In the FusionAuth admin UI, navigate to Applications -> Test . Click the View button (green magnifying glass) next to the application and note the OAuth IdP login URL .

Copy this URL and open it in a new incognito browser window. (If you don’t use an incognito window, the admin user session will interfere with the test.) You should see the login screen. Enter username user@example.com and password password. Login should work.
After a successful test login, the user will be redirected to a URL like https://example.com/?code=2aUqU0ZhQCjtz0fnrFL_i7wxhIAh7cTfxAXEIpJE-5w&locale=en&userState=AuthenticatedNotRegistered.
This occurs because you haven’t set up a web application to handle the authorization code redirect yet. This will be done in the Use FusionAuth As Your Authentication Provider section.
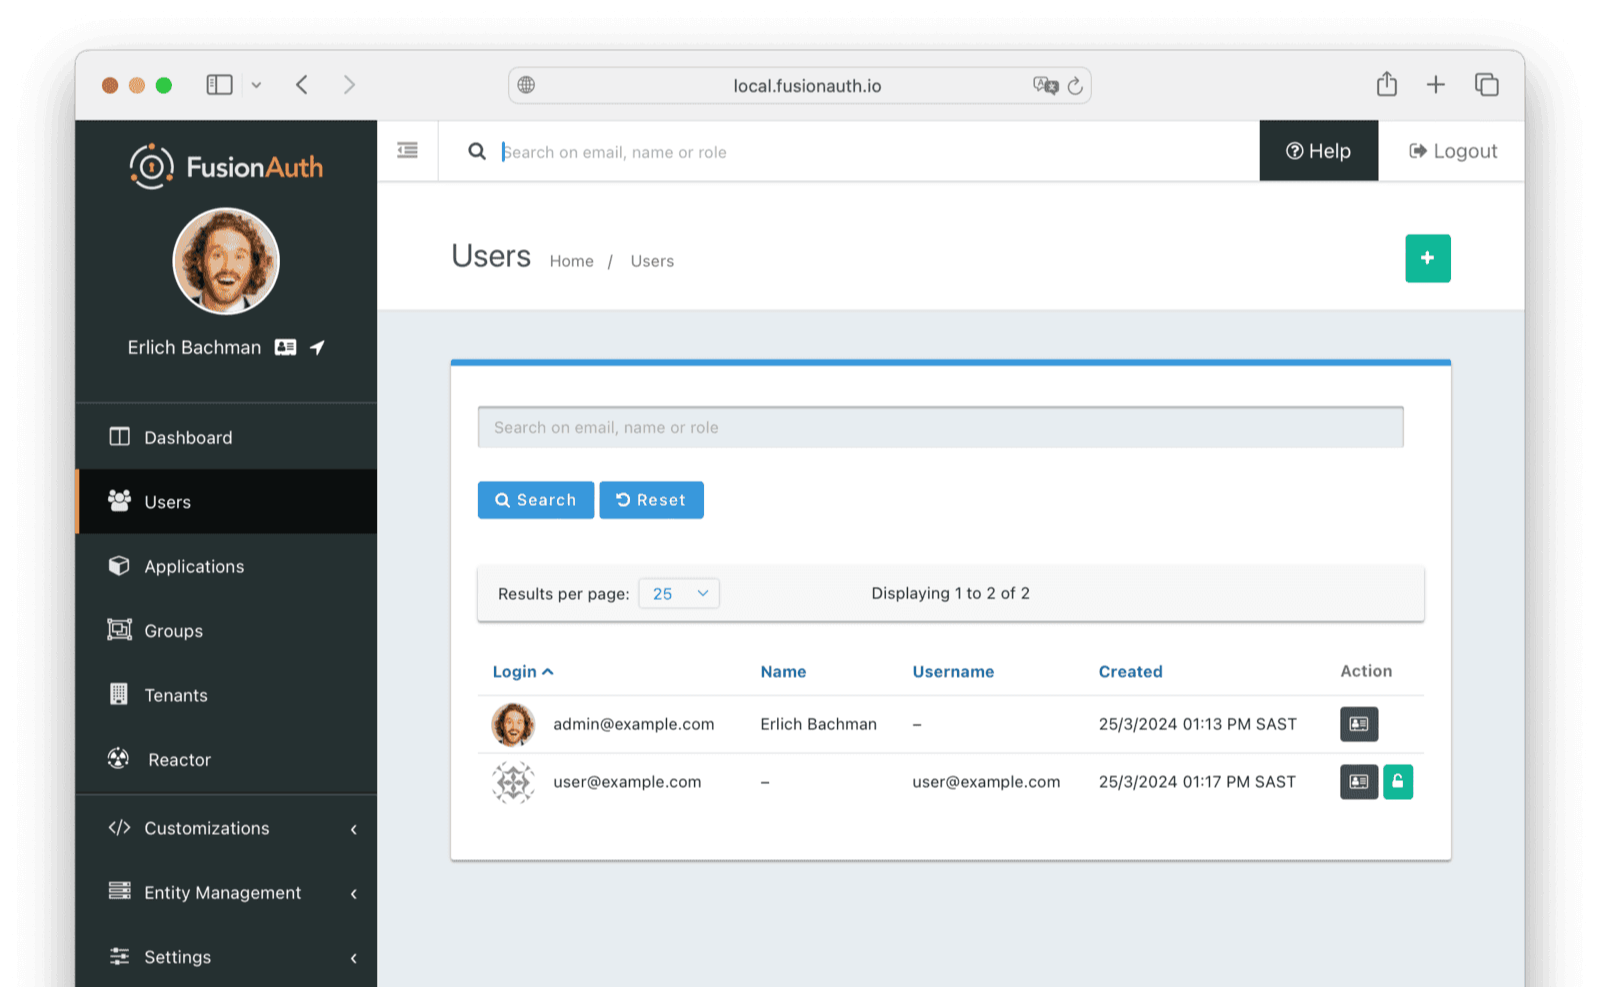
Next, log in to the FusionAuth admin UI with admin@example.com and password password. Review the user entries to ensure the data was correctly imported.

Click the Manage button (black button) to the right of a user in the list of users to review the details of the imported user’s profile. In the Source tab, you can see all the user details as a JSON object.
Debug With The FusionAuth Database
If you have errors logging in, you can use the FusionAuth database directly to see if your users were imported, and check their hashes manually.
You can use any PostgreSQL browser. DBeaver will work. The connection details are in the files docker-compose.yml and .env in the fusionauth-import-scripts/generic/fusionAuthDockerFiles/ directory.
In your database IDE, create a new PostgreSQL connection with the following details:
- URL:
jdbc:postgresql://localhost:5432/fusionauth - Host:
localhost - Port:
5432 - Database:
fusionauth - Username:
fusionauth - Password:
hkaLBM3RVnyYeYeqE3WI1w2e4Avpy0Wd5O3s3
Log in to the database and browse to Databases/fusionauth/Schemas/public/Tables. The identities and users tables will show the login credentials and user personal information.
Use FusionAuth As Your Authentication Provider
Now that your users have been migrated into FusionAuth, how do you authenticate them in your app?
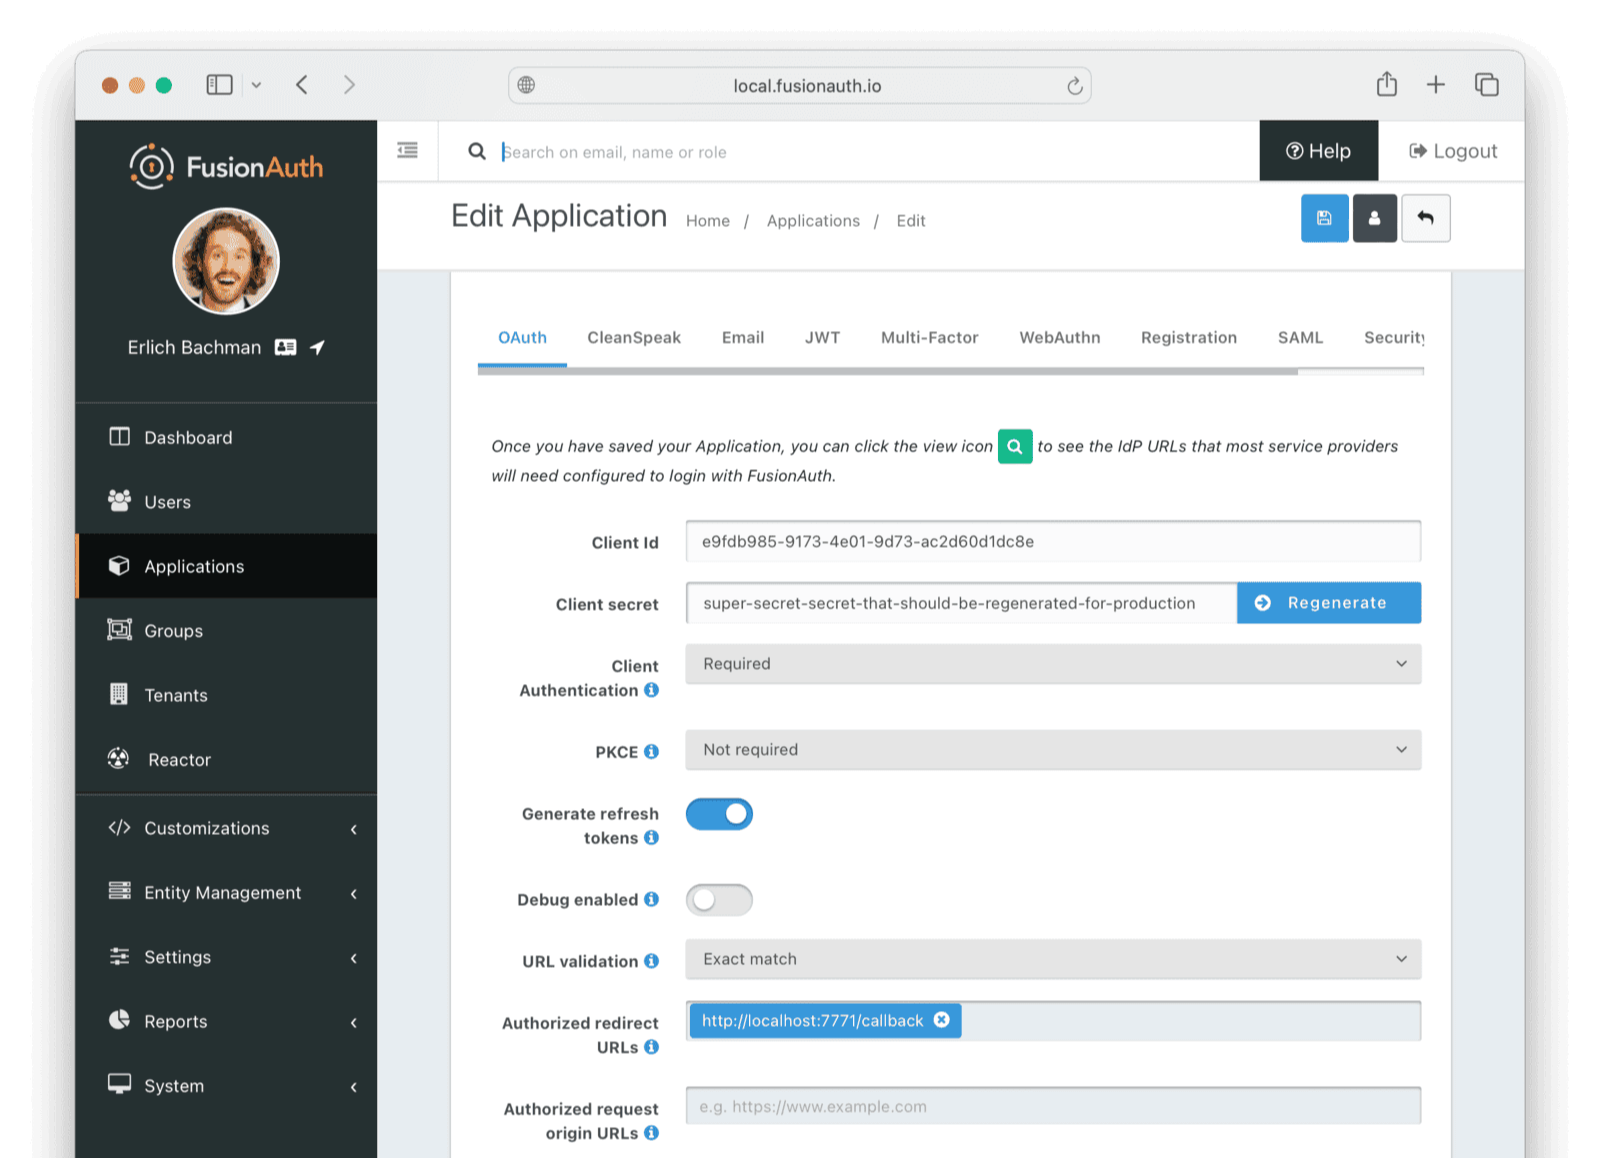
The first step is to set your OAuth callback URL in the FusionAuth admin UI. Under Applications edit your Test application and set the Authorized redirect URLs to http://localhost:7771/callback.

Now run the command below in the interactive Docker terminal to see the original Express app rewritten to use FusionAuth for authentication.
node 7_webAppWithFa.mjsBrowse to http://localhost:7771. You’ll see that the sign-in page has been replaced by FusionAuth. You can style this page however you like. For more information, see the full quickstart guide for Express.
The new application code looks very similar to the original, except that the login and hashing code has been replaced by OAuth 2.0 calls to FusionAuth via the Node.js Passport library.
Note that the authOptions object defined at the bottom stores secrets directly in the code. In reality, you should move these to a .env file that is not checked into GitHub. Be sure to use host.docker.internal instead of localhost for URLs that call a server directly (browser URLs still use localhost).
Delete The Docker Containers
Push Ctrl + C in all terminals to stop the Docker instances. Run the code below on your host machine to remove the Docker containers and images if you are done testing.
docker rm app app_db fa fa_db
docker rmi postgres:16.2-alpine3.19 node:alpine3.19 fusionauth/fusionauth-app:latest postgres:16.0-bookworm
What To Do Next
The sample application uses a relatively old and weak hashing algorithm, though not terrible. You might want to rehash your users’ passwords on their next login with a stronger algorithm. To enable this setting, follow these instructions.
You now have your users migrated, or a plan to do so. Congratulations! What is next?
You need to migrate additional configurations, as mentioned in Other Entities. Since the type of configuration varies, it is hard to provide a full list of how to import these items, but the general pattern will be:
- Identify corresponding FusionAuth functionality.
- Configure it in your FusionAuth instance, either manually or by scripting it using the client libraries or API.
- Update your application configuration to use the new FusionAuth functionality.
Make sure you assign your users to the appropriate FusionAuth applications. You can do this either:
- As part of your import process by adding registrations at import time.
- After users have been migrated with the Registrations API.
You’ll also need to modify and test each of your applications, whether custom, open source, or commercial, to ensure:
- Users can successfully log in.
- The authorization code redirect is handled correctly.
- Users receive appropriate permissions and roles based on the JWT.
- The look and feel of the hosted login pages matches each application’s look and feel.
If your application uses a standard OAuth, SAML or OIDC library to communicate with , the transition should be relatively painless.
Additional Support
If you need support in your migration beyond that provided in this guide, you may:
- Post in our forums and get support from the community.
- Purchase a support plan and get expert help from the Engineering Team.


