SAML v2 & Aiven
Aiven is a cloud-based Database-as-a-Service platform. This document covers the configuration necessary to get it working with FusionAuth as the Identity Provider using SAML v2, allowing users to log in to your Aiven account using their FusionAuth credentials.
Prerequisites#
This document assumes you have a running instance of FusionAuth and a working Aiven application with a project already created. You will also need admin accounts for both to configure them correctly.
This does not work if you are running FusionAuth on Docker. Please check out this issue for progress on fixing this problem.
Configure Aiven#
Create a Team#
First, you need to create a team where new users will be added to. In your Aiven console, browse to Admin -> Organization and click Create team in the organization details section. Set the Team name as Developers and click Create team .
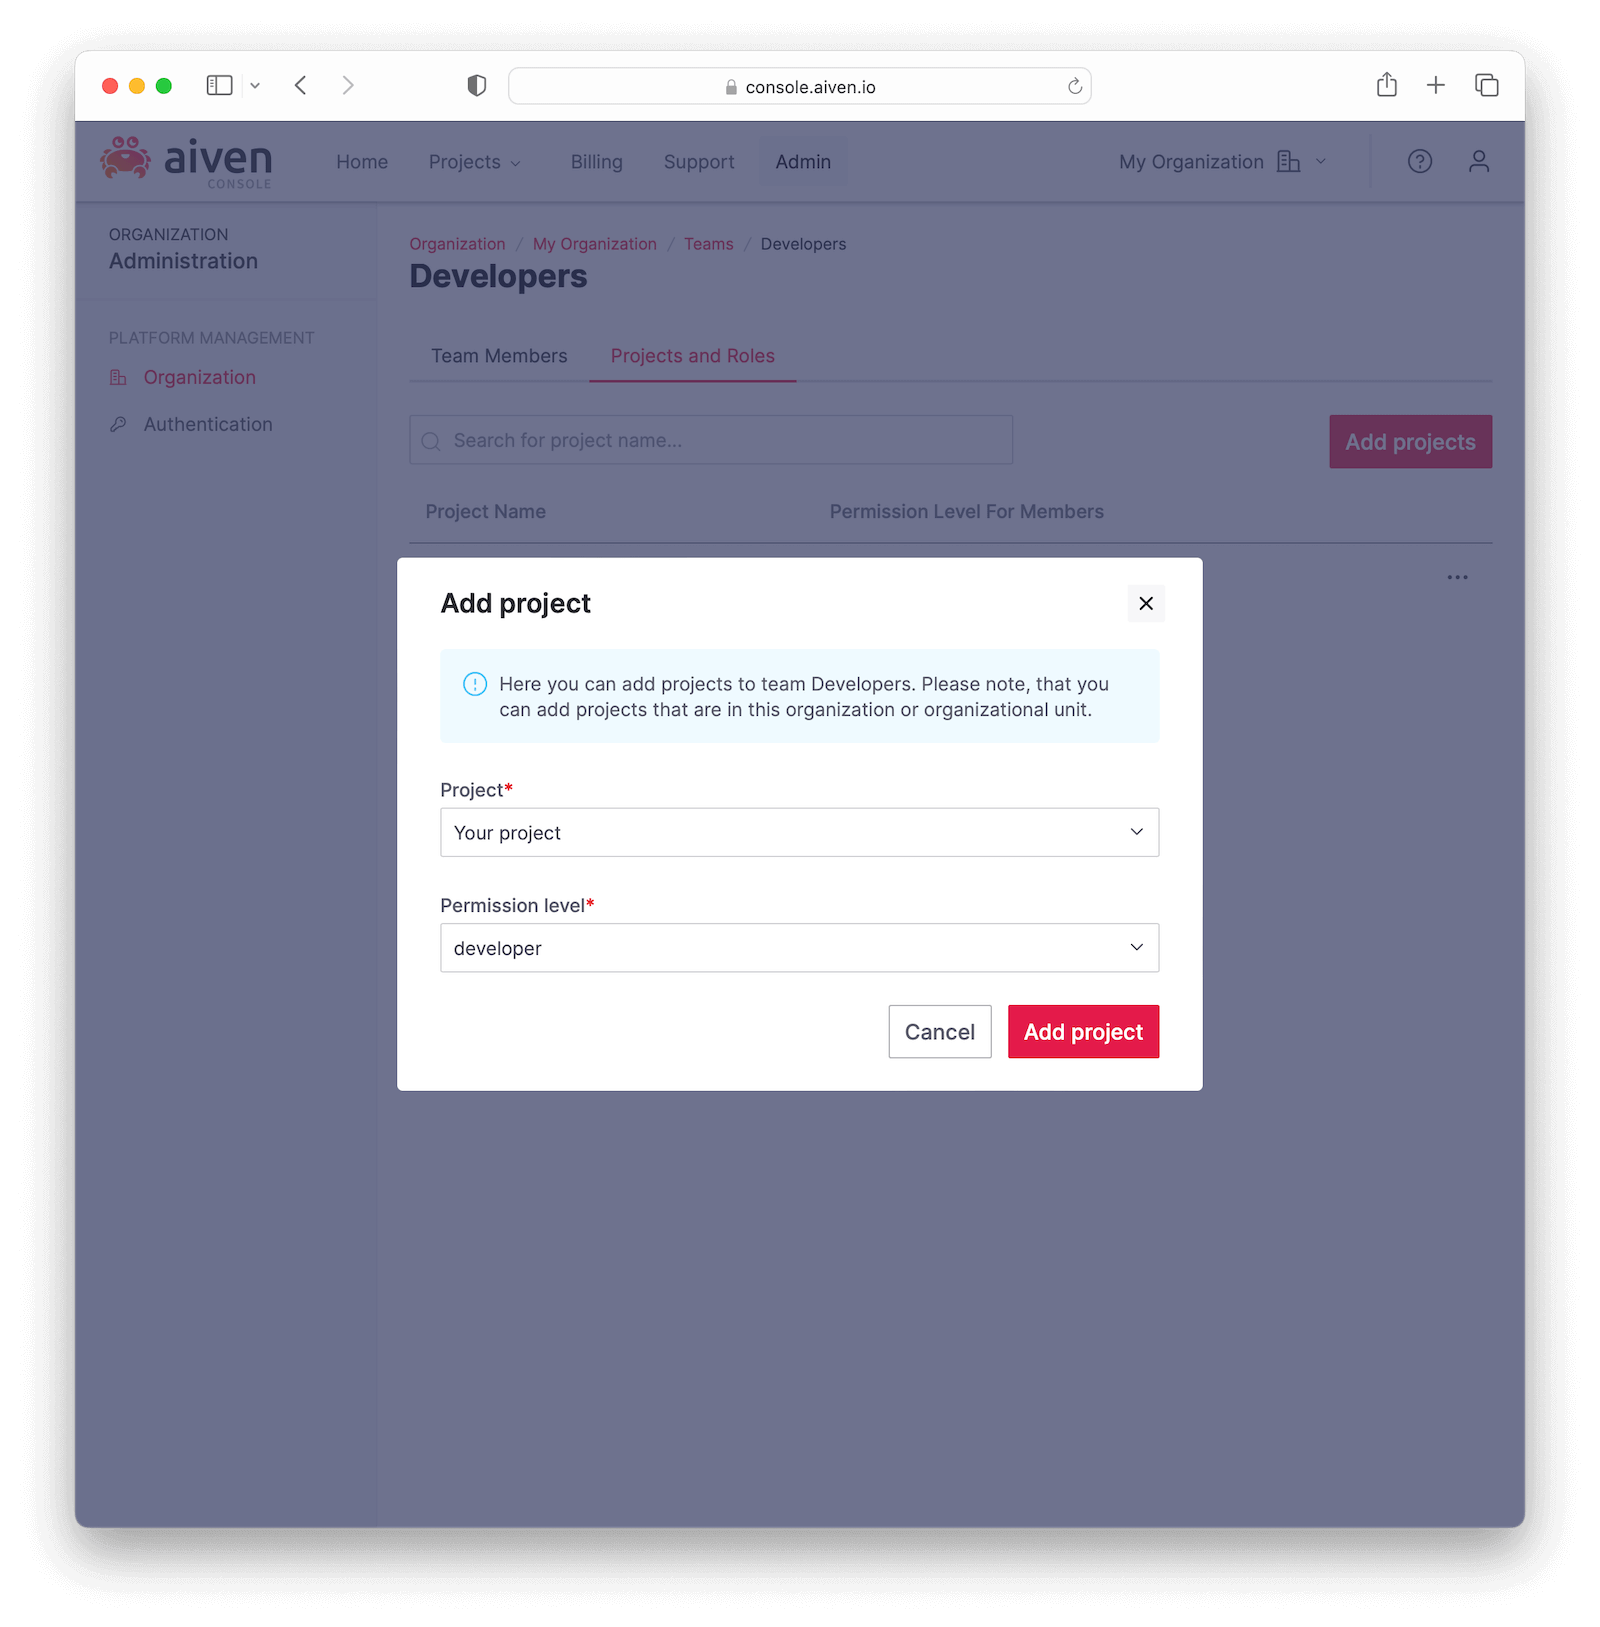
When arriving back to the teams page, click on the newly created team and go to the Projects and Roles tab. Click Add projects , select the project, the desired Permission level (e.g. Developer) and click Add project to finish setting up the team.
Configure SSO#
Click on Authentication in the sidebar and then on Add authentication method to create one. Name it FusionAuth, select SAML as the Method Type and choose the Developers team you just created in Team to autojoin on signup. Click Add method to save.
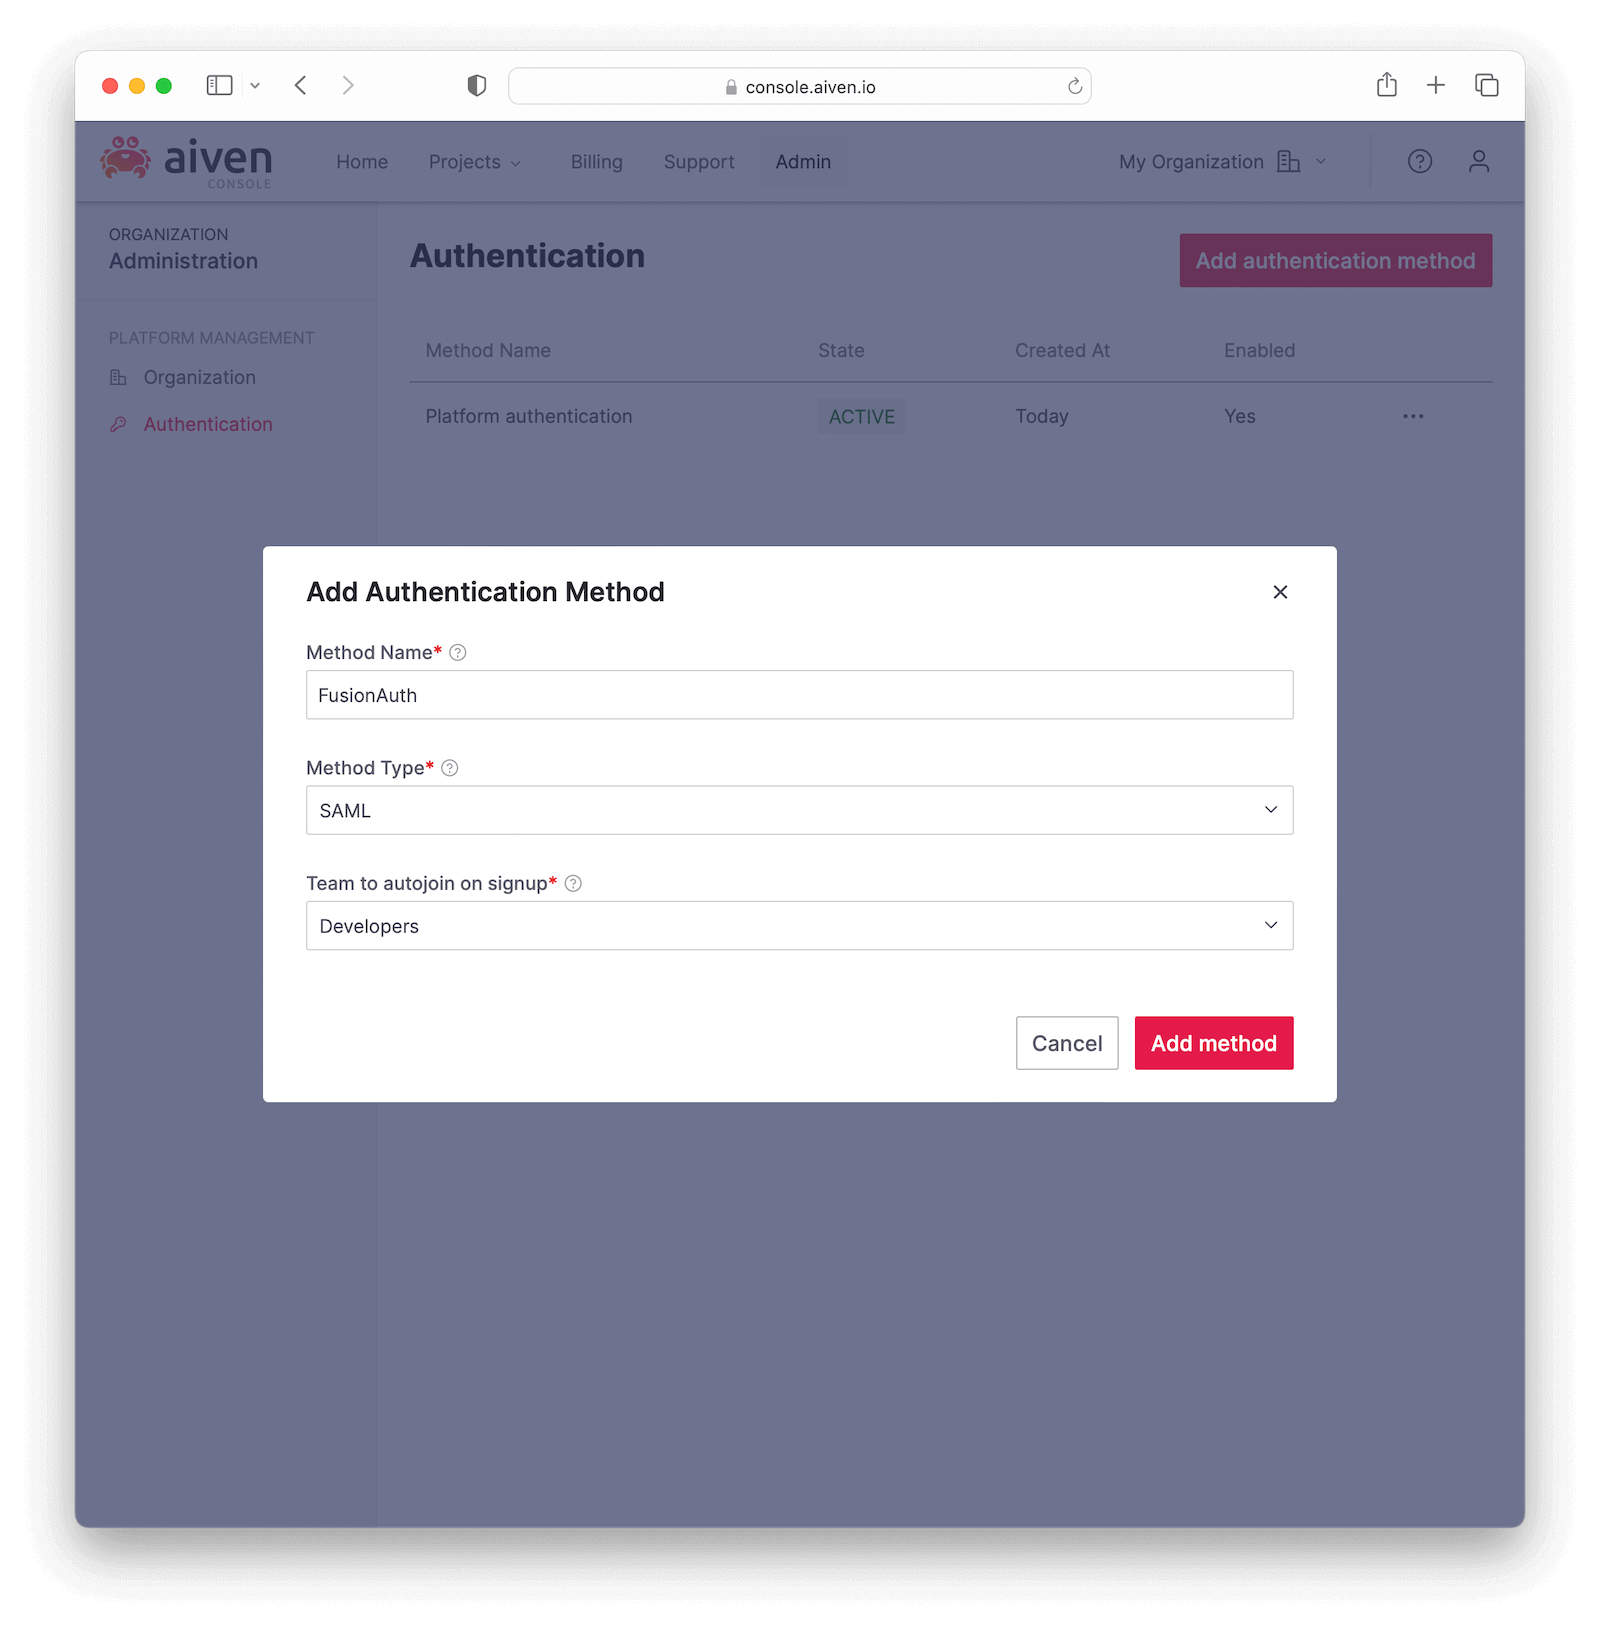
In the next screen, record both the Metadata URL and ACS URL values and click Finish . You'll use these values later.
Configure FusionAuth#
Generate the Certificate#
You need to generate a custom RSA certificate and upload it to your FusionAuth instance's Key Master . To do so you can use a script that you'll create below.
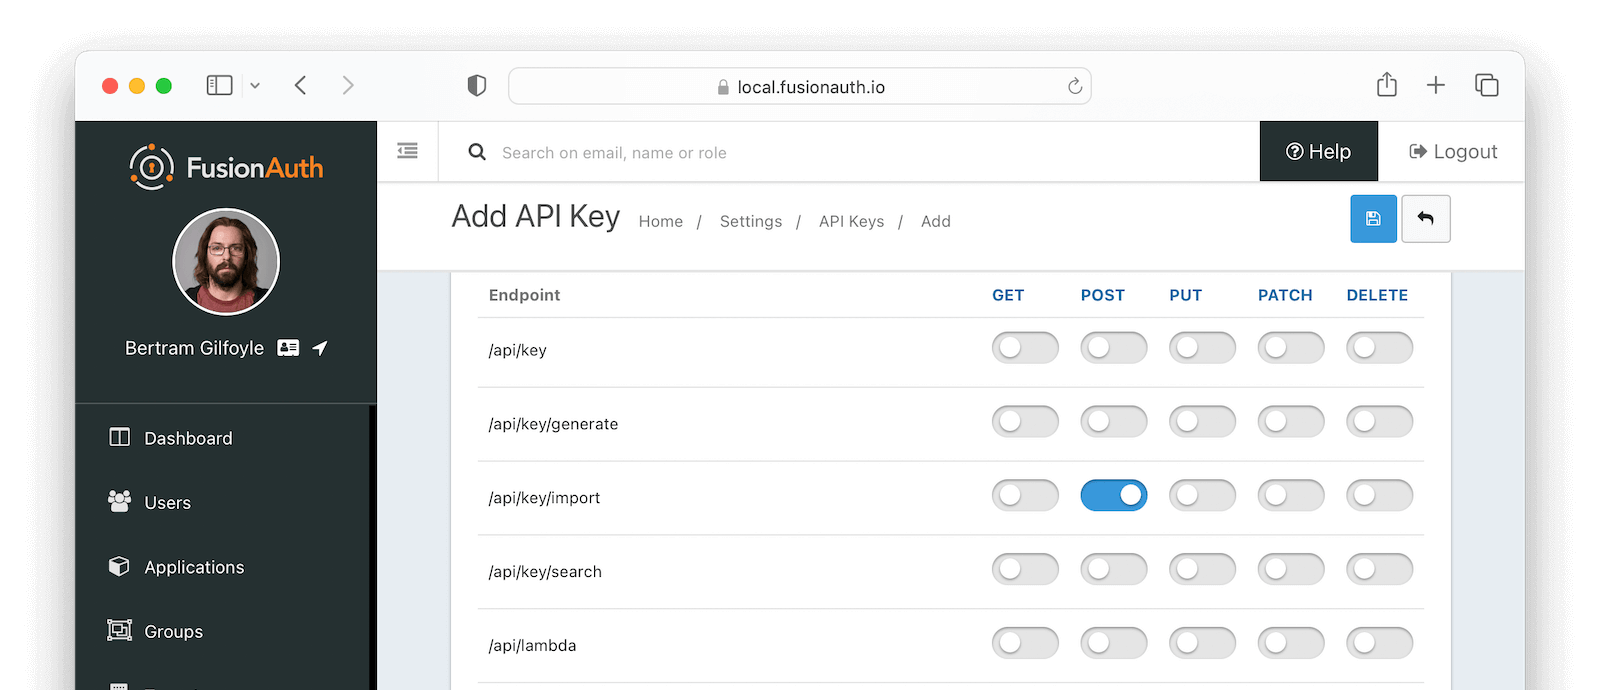
Before running it, you need to create an API Key in your FusionAuth instance. Browse to Settings -> API Keys and click on . Set the Description as Certificate generator and locate /api/key/import in the Endpoints section. Click the POST switch to enable it and confirm by clicking on save .
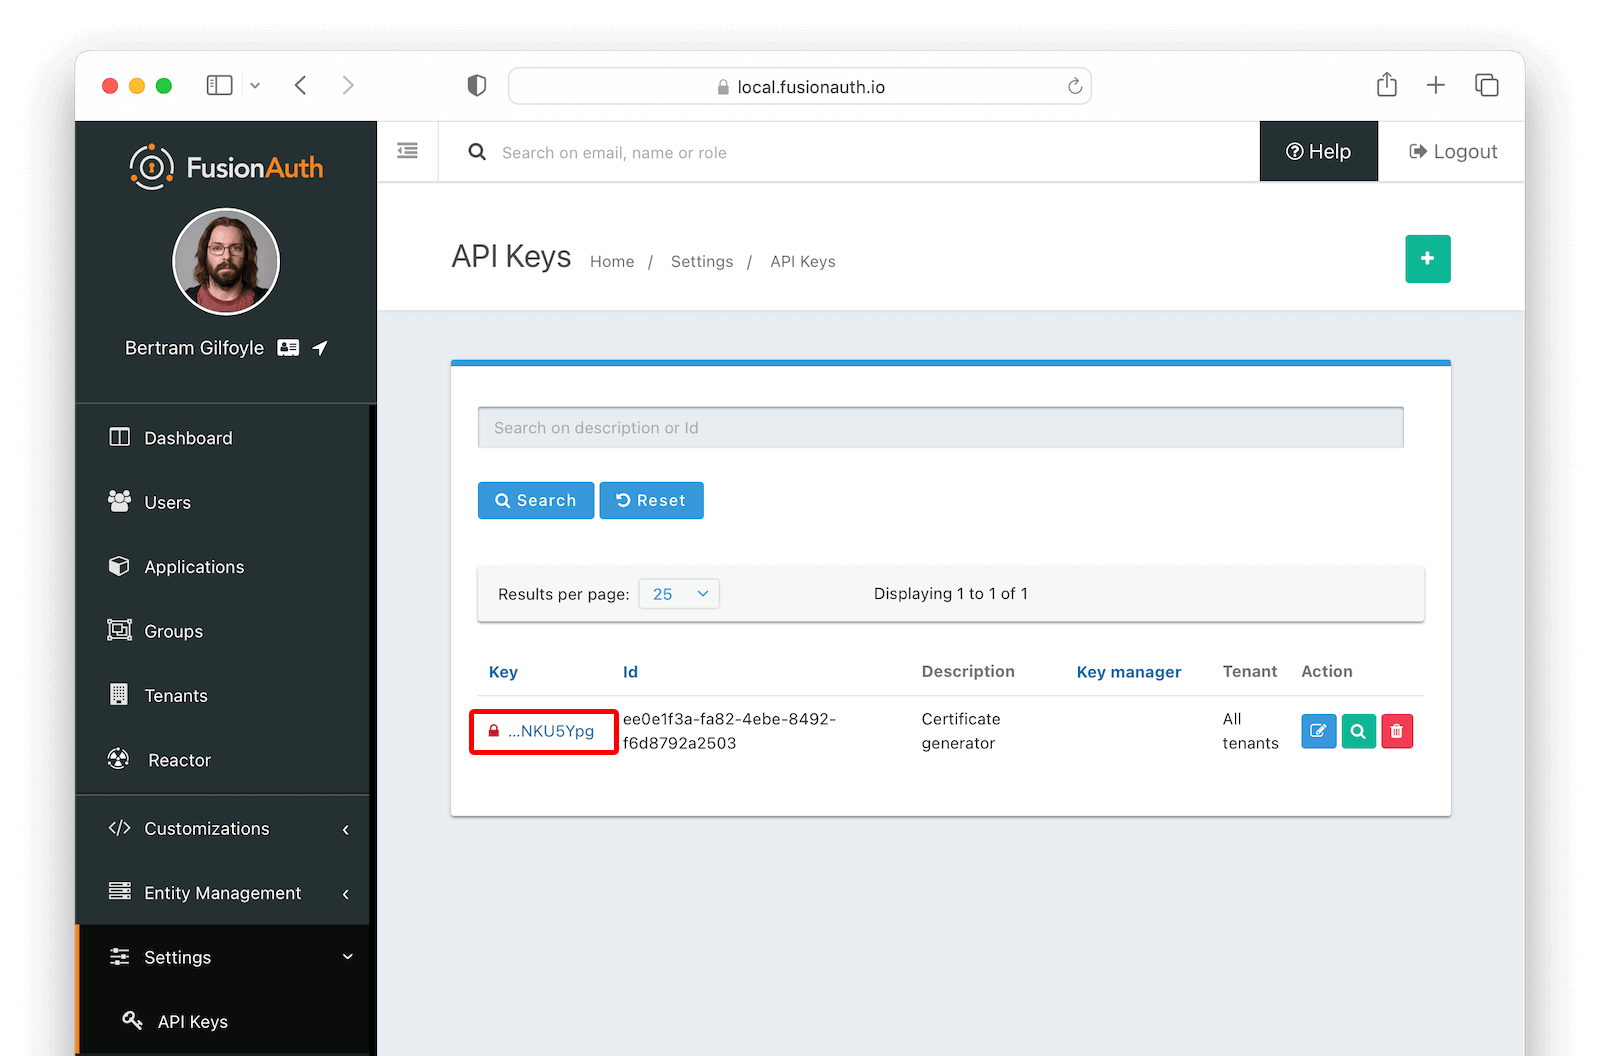
After being redirected back to the API Keys page, click on the Key field to reveal its actual value. Then copy it. You'll have to provide this value to the script below.
Create a script named generate-certificate and paste the contents below.
#!/bin/bash

# Checking openssl
if [[ -z $(which openssl) ]]; then
  echo "Please download openssl and make sure it is available in your PATH variable"
  echo "Homepage: https://www.openssl.org/"
  exit 1
fi

# Checking jq
if [[ -z $(which jq) ]]; then
  echo "Please download jq and make sure it is available in your PATH variable"
  echo "jq is used to parse JSON elements"
  echo "Homepage: https://stedolan.github.io/jq/"
  exit 1
fi

# FusionAuth URL
read -r -p "Your FusionAuth instance URL (with scheme): " FA_URL
regex='^https?:\/\/[^\/]+(:[0-9]+\/)?$'
if ! [[ $FA_URL =~ $regex ]]; then
  echo "FusionAuth URL is not valid. Please make sure you have included the scheme (http:// or https://)."
  exit 2
fi

# Extracting domain from URL
FA_DOMAIN=$(echo "$FA_URL" | awk -F/ '{print $3}')
if [[ -z "$FA_DOMAIN" ]]; then
  echo "FusionAuth URL is not valid. Please make sure you have included the scheme (http:// or https://)."
  exit 2
fi

# FusionAuth API Key
read -r -p "API Key with /api/key/import endpoint:      " API_KEY
if [[ -z "$API_KEY" ]]; then
  echo "Please provide an API Key."
  exit 2
fi

# Key name
read -r -p "Name for the generated key:                 " NAME
if [[ -z "$NAME" ]]; then
  echo "Please provide a valid name for the key."
  exit 2
fi

# Creating temporary files for public and private keys
PRIVATE_KEY_FILE=$(mktemp)
if [[ -z "$PRIVATE_KEY_FILE" ]]; then
  echo "Cannot create private key. Please make sure your temporary directory is writable."
  exit 3
fi
PUBLIC_KEY_FILE=$(mktemp)
if [[ -z "$PUBLIC_KEY_FILE" ]]; then
  echo "Cannot create public key. Please make sure your temporary directory is writable."
  exit 3
fi

# Creating certificate
RSA_LENGTH=2048
echo "Generating certificate..."
if ! openssl req -x509 -newkey "rsa:$RSA_LENGTH" -nodes -keyout "$PRIVATE_KEY_FILE" -out "$PUBLIC_KEY_FILE" -sha256 -days 3650 -subj "/CN=$FA_DOMAIN/"; then
  echo "Error generating certificate. Check messages above for more details."
  exit 4
fi
PUBLIC_KEY=$(cat "$PUBLIC_KEY_FILE")
PRIVATE_KEY=$(cat "$PRIVATE_KEY_FILE")

# shellcheck disable=SC2016
JSON_TEMPLATE='{
  "key": {
    "algorithm": "RS256",
    "name": $name,
    "publicKey": $publicKey,
    "privateKey": $privateKey,
    "length": $rsaLength
  }
}'

# Uploading keys to the key master
echo "Uploading to the Key Master..."
JSON=$(jq --null-input \
  --arg name "$NAME" \
  --arg publicKey "$PUBLIC_KEY" \
  --arg privateKey "$PRIVATE_KEY" \
  --arg rsaLength "$RSA_LENGTH" \
  "$JSON_TEMPLATE")
if ! curl --fail-with-body -s -o /dev/null \
  -d "$JSON" \
  -H "Authorization: $API_KEY" \
  -H "Content-type: application/json" \
  "$FA_URL/api/key/import"; then
  echo "Error uploading certificate to the Key Master. Check messages above for more details."
  exit 5
fi

echo "Successfully uploaded key to the Key Master."
echo "Here is the generated public key:"
echo "$PUBLIC_KEY"
Now execute the script.
bash generate-certificate
Answer the questions which the script asks. Make sure to give the key a meaningful name, like Aiven key.
Example response for the script
Your FusionAuth instance URL (with scheme): https://local.fusionauth.io
API Key with /api/key/import endpoint:      Dy9bphElA3L3_ayW86T5KvrZkyK1Gj5EDV_2NKU5Ypg
Name for the generated key:                 Aiven key
After finishing, you'll have a certificate in the Key Master in your FusionAuth instance ready to be used. The script will also print the generated certificate. Copy that as well, as you'll need it later.
Create the Application#
Create an application in your FusionAuth instance by navigating to Applications and clicking on . Name it Aiven and go to the SAML tab. Toggle the Enable SAML v2 switch, paste the Metadata URL and ACS URL you copied from Aiven to Issuer and Authorized redirect URLs fields in your FusionAuth application, respectively.
Table 1. Mapping fields
| Aiven field | FusionAuth field |
|---|---|
| Metadata URL | Issuer |
| ACS URL | Authorized redirect URLs |
Scroll down to the Authentication response section and change the Signing key to the Aiven key you imported above. Click on to save your application.
When redirected to the Applications page, view your application details by clicking on . In SAML v2 Integration details , record both the Entity Id and Login URL fields.
Create a User#
Finally, make sure there is at least one user registered to your application so that you can test the login process. You can create a new user by navigating to Users -> Add user . Toggle the Send email to set up password switch to off and manually enter a password in the Password field.
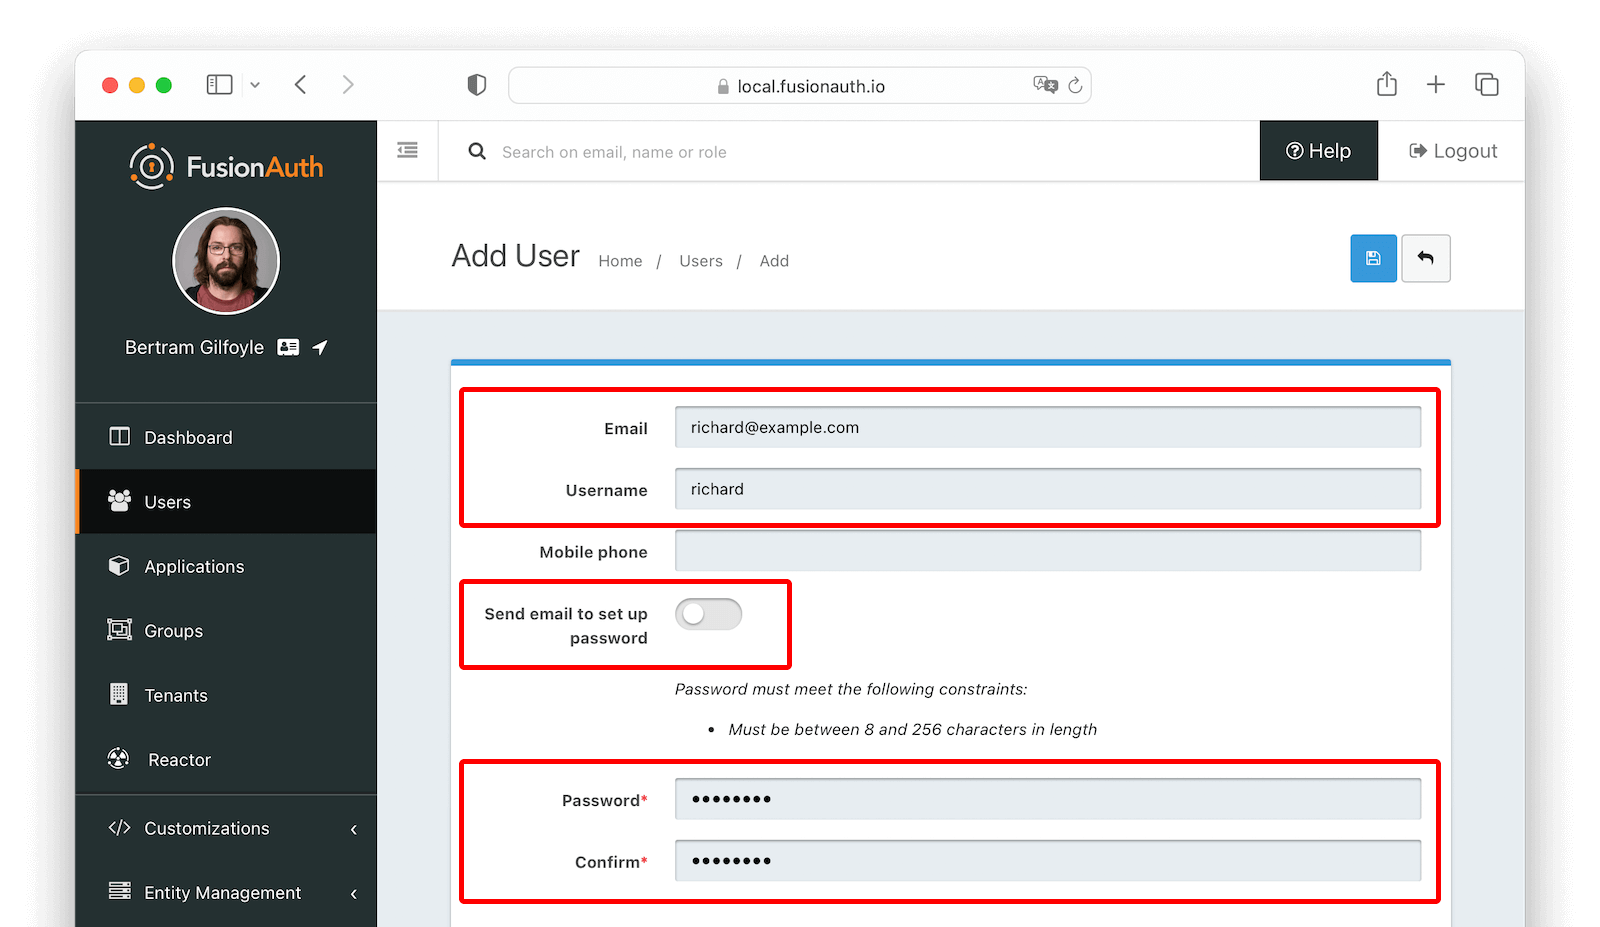
After saving this user, click Manage and go to the Registrations tab. Click Add Registration to register the user to your application.

You can also add a Registration for the Aiven application to an existing user.
Finish Aiven Configuration#
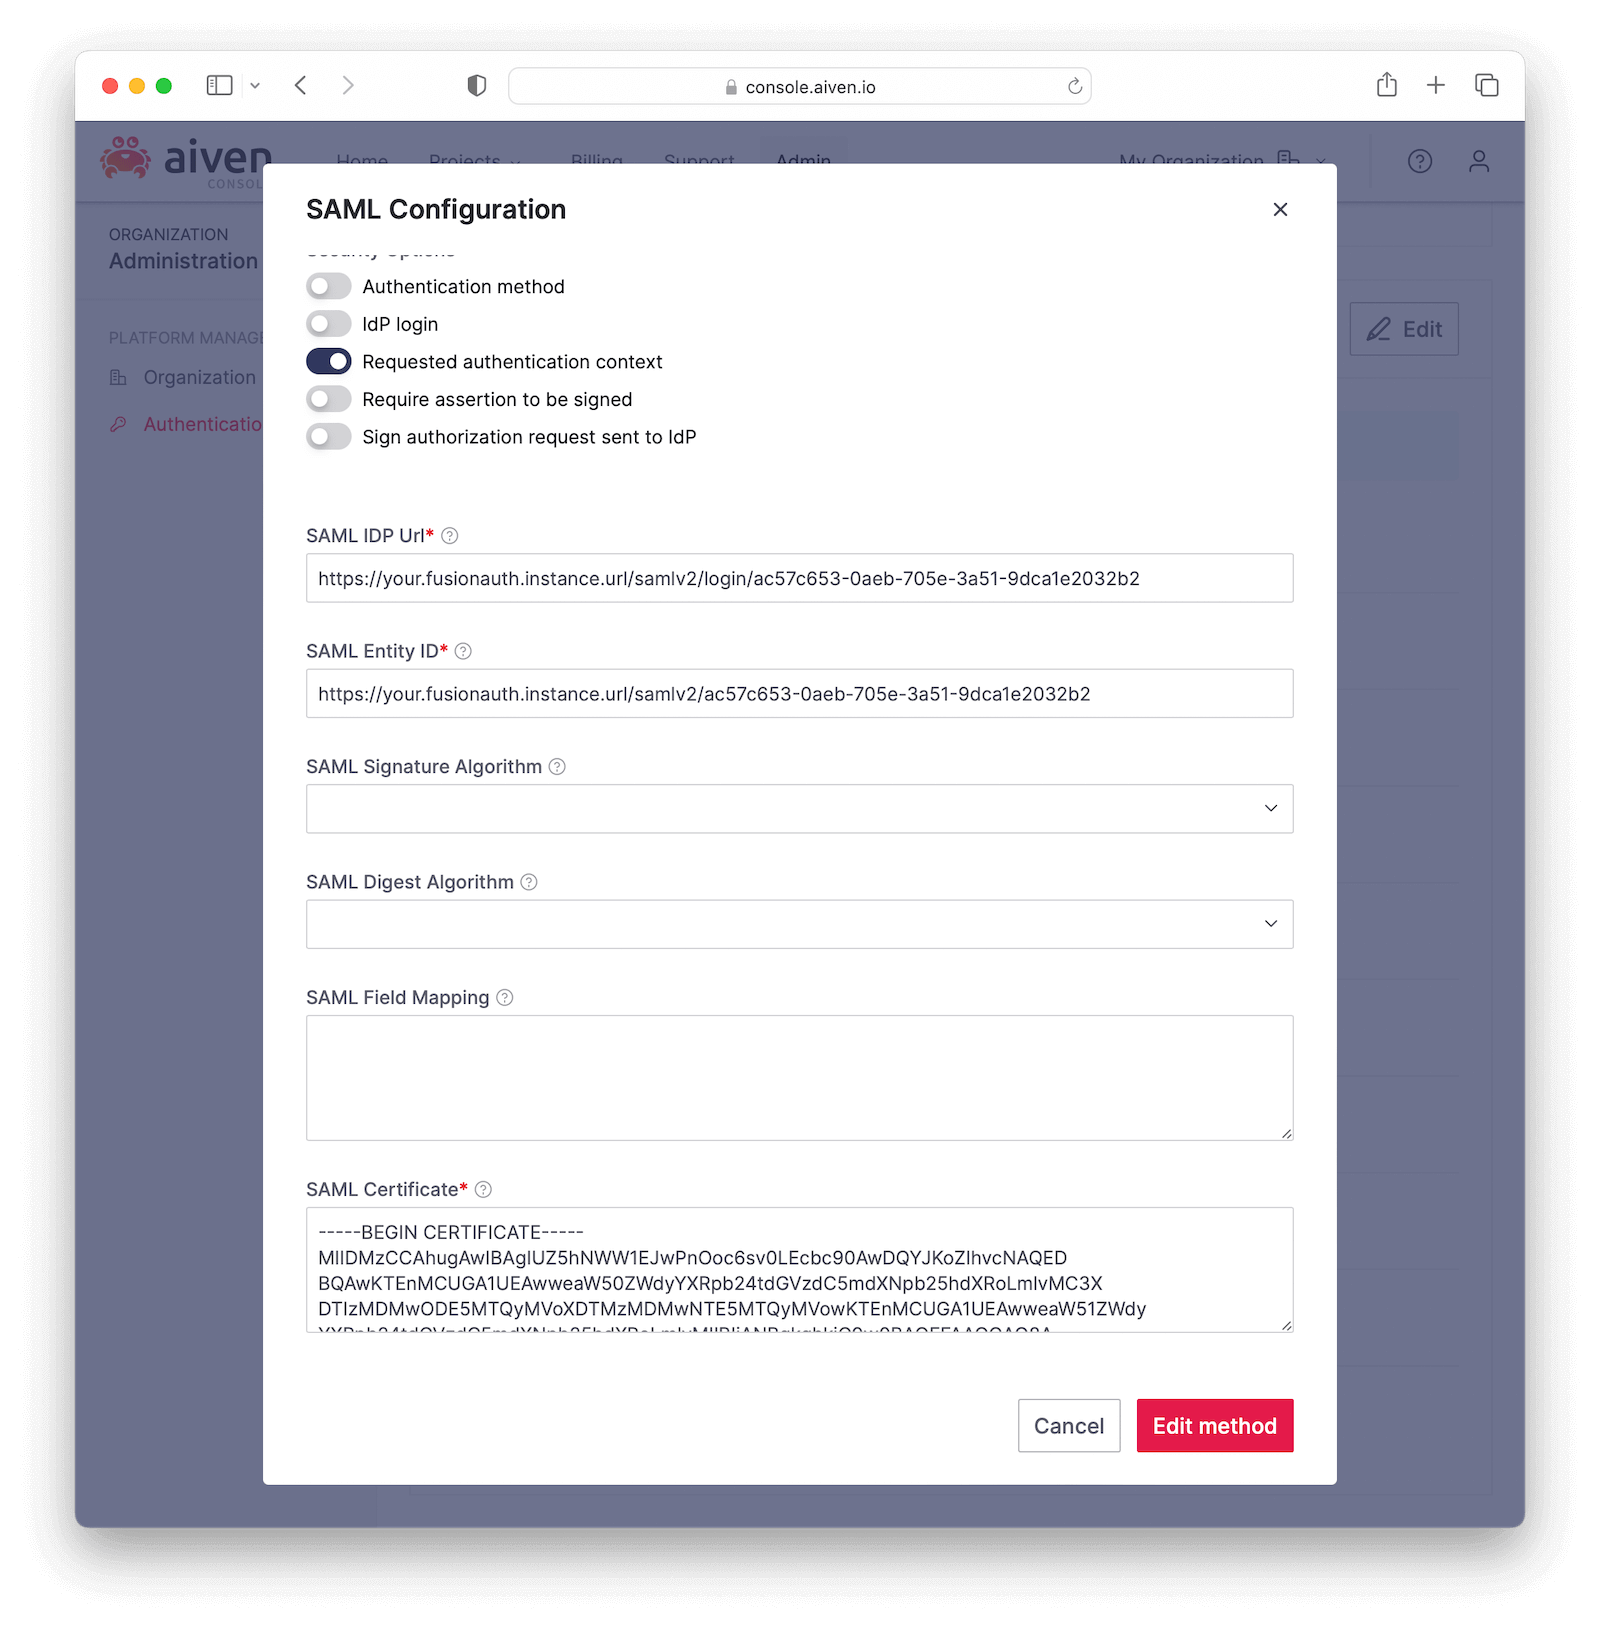
Go back to your Aiven console and click Admin and then on Authentication in the sidebar to list the authentication methods again. Click on FusionAuth , which will still have a PENDING CONFIGURATION state until you finish setting it up.
Scroll down to the SAML config section and click the Edit button and fill in the information below.
- SAML IDP Url: the Login URL from your FusionAuth application.
- SAML Entity ID: the Entity Id from your FusionAuth application.
- SAML Signature Algorithm: you can leave this blank.
- SAML Digest Algorithm: you can leave this blank.
- SAML Field Mapping: you can leave this blank.
- SAML Certificate: paste the certificate you've copied from the Generating certificate step above.
Finally, click Edit method to save the changes.
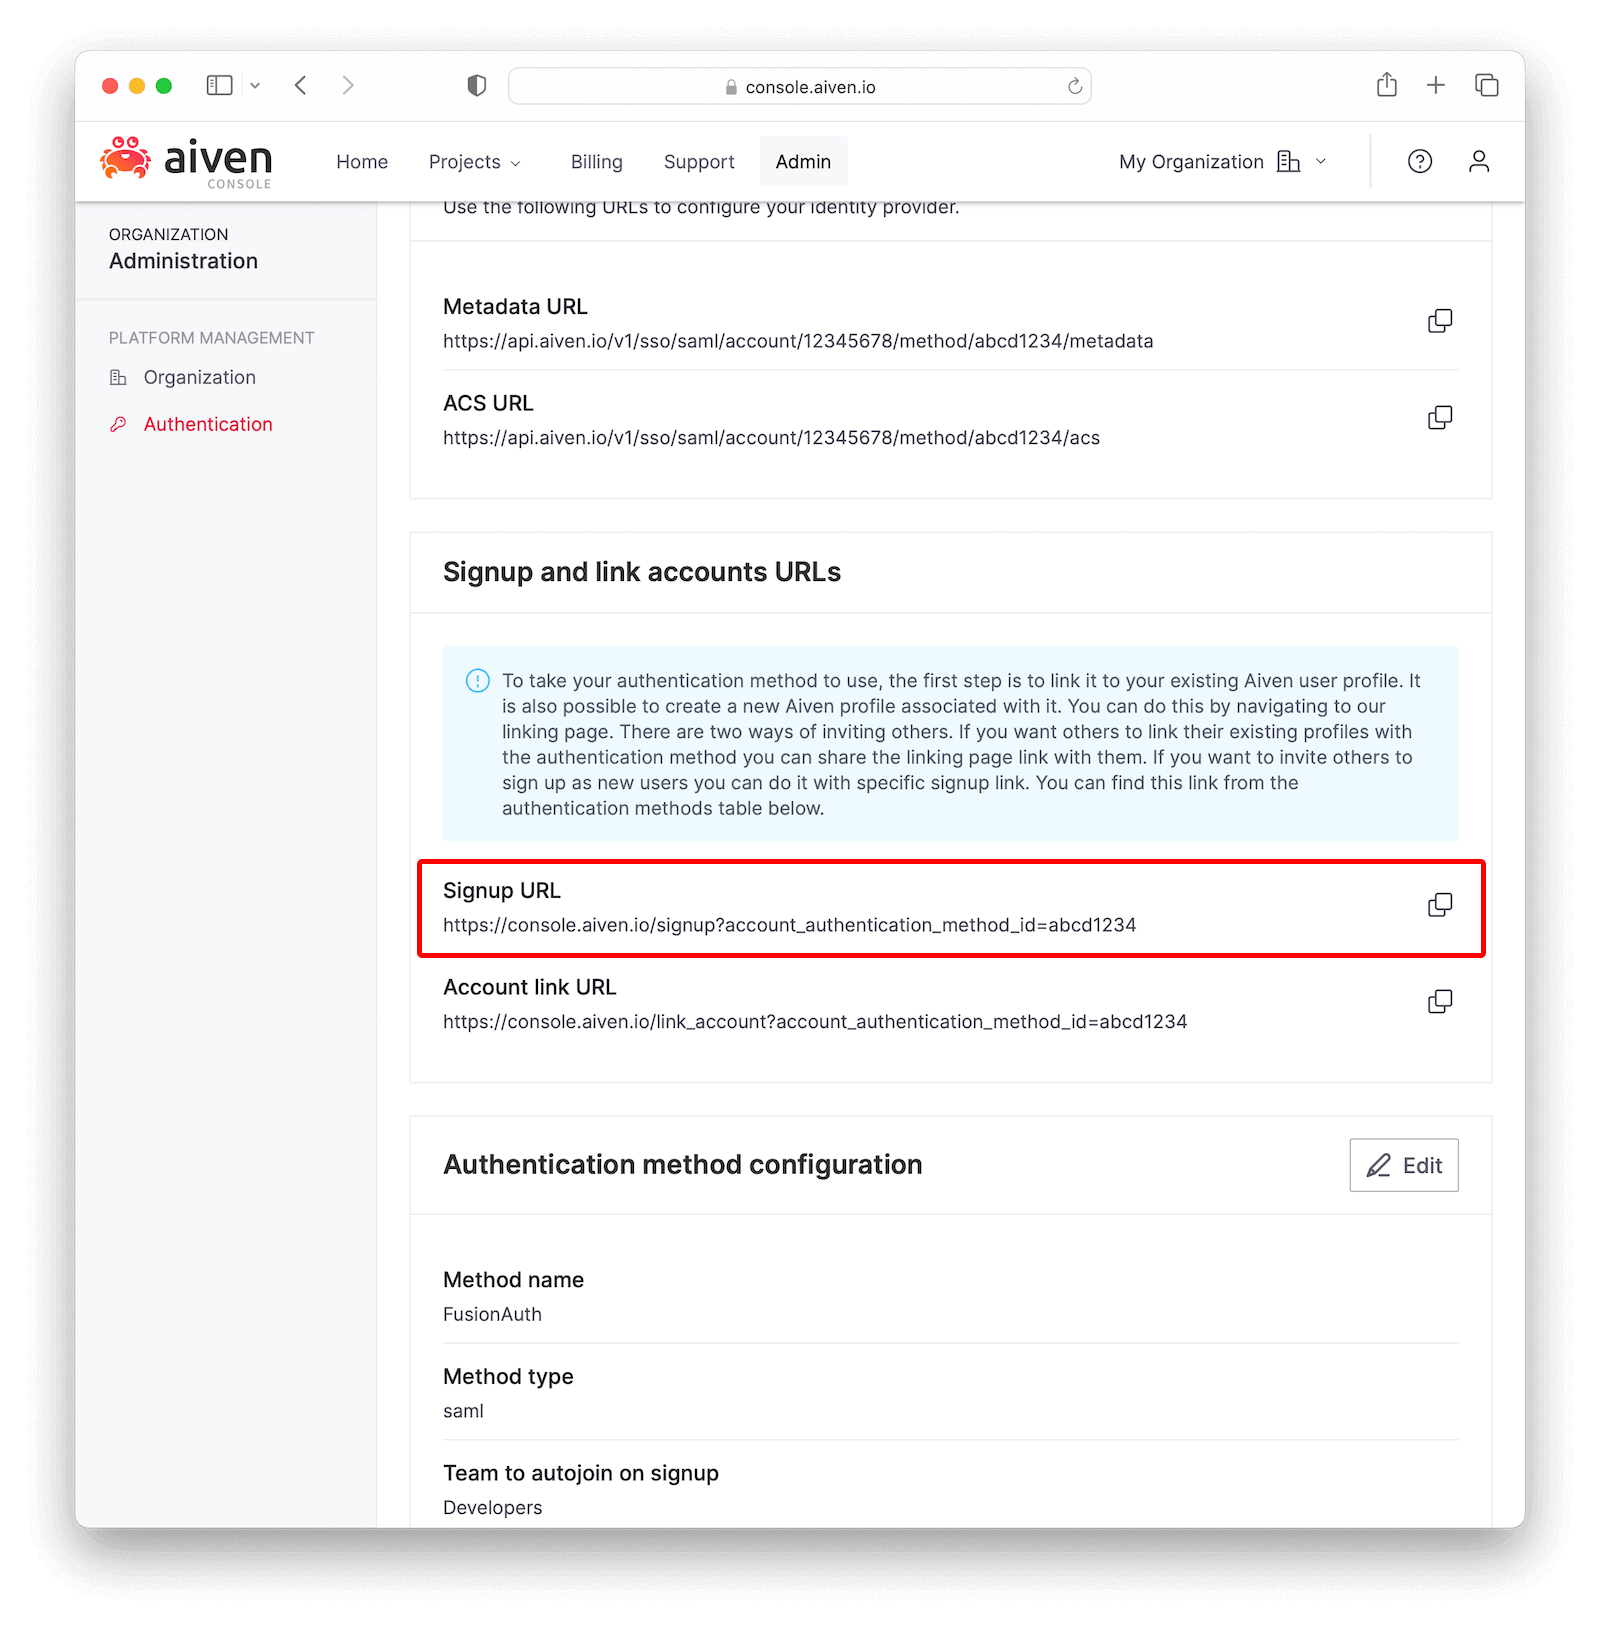
Go to the beginning of the page and click the Enable authentication method switch to enable logging in with FusionAuth.
Scroll down to Signup and link accounts URLs and copy the Signup URL. You'll use it to test the integration and then share it with others to log into your Aiven application.
Testing#
Open the Signup URL you copied above in an incognito tab or using another browser. You'll reach the signup page below.
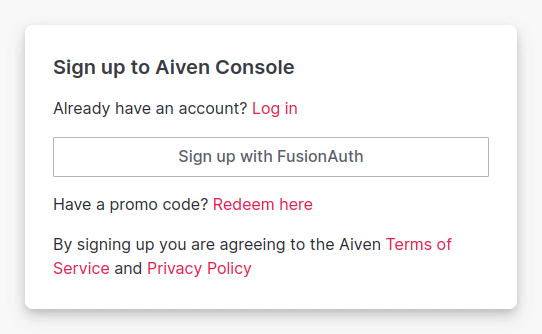
Click on Sign up with FusionAuth , which will redirect you to the FusionAuth login page. Fill in your credentials and submit the form to be taken back to the Aiven console, already logged in and part of the Developers team.