SAML v2 IdP Initiated
This feature is only available in paid plans. To learn more, see our pricing page.
Available since version 1.26.0
Using IdP initiated SSO with this Identity Provider is not recommended and is inherently less secure than a service provider initiated login.
FusionAuth does not recommend this type of login due to the inherent risks of accepting an unsolicited authentication response from a third-party identity provider. During an identity provider initiated login, the third-party identity provider sends FusionAuth a SAML Authentication Response indicating a user has been authenticated without any context. Since FusionAuth did not initiate this login, it limits what can be verified and requires FusionAuth to allow a cross site request from this third party.
If you must enable this feature to support a legacy integration or because the user experience is of the highest concern, then proceed.
Please note that starting in version 1.43.0 this configuration is only necessary if you only want support for IdP initiated configuration. The SAMLv2 Identity Provider now offers a unified option to support both IdP and SP initiated login.
This FusionAuth Identity Provider allows you to configure FusionAuth to accept a SAML request initiated by a SAMLv2 identity provider. With this Identity Provider, FusionAuth is acting as the SAMLv2 service provider (SP).
Typically, a SAML flow begins at a service provider such as FusionAuth. In a service provider initiated login, the SAML Authentication Response is returned to the service provider in response to an authentication request. FusionAuth can validate certain parameters and only accept a response for a request that FusionAuth initiated.
In contrast, during an identity provider initiated login, the third-party identity provider sends FusionAuth a SAML Authentication Response indicating a user has been authenticated. FusionAuth did not initiate this request so it is unexpected and FusionAuth does not have the full context. This limits what can be verified and requires FusionAuth to allow a cross site request from this third party.
We also provide specific examples for configuring SAML with some providers whose implementation requires unique configuration. If you'd like us to provide additional examples, please open a request on GitHub.
Once you have completed this configuration you will be able to log in to FusionAuth directly from a SAMLv2 IdP.
Create a SAML v2 IdP Initiated Identity Provider#
To create an Identity Provider navigate to Settings -> Identity Providers and click Add provider and select SAML v2 IdP Initiated .
This will take you to the Add SAML v2 IdP Initiated panel. Here you will need to fill out the required fields.
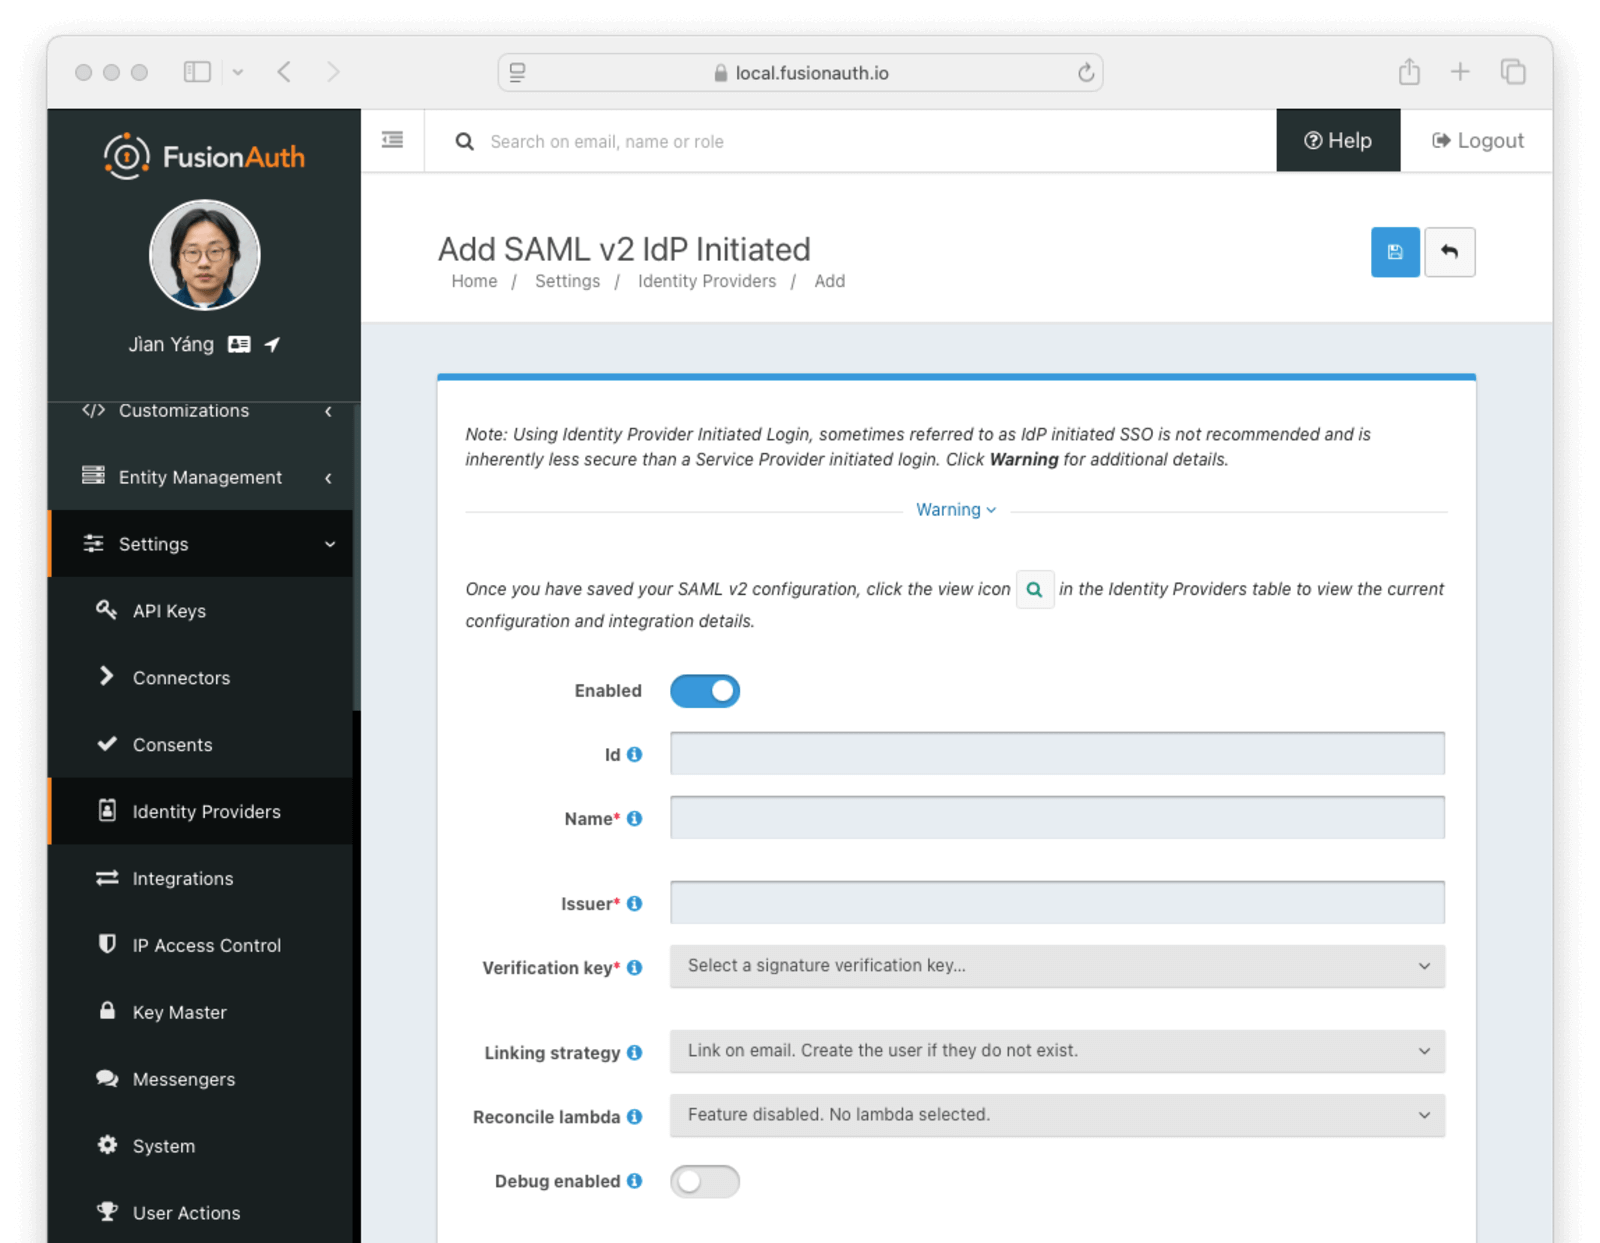
Form Fields#
EnabledDetermines if this provider is enabled. If it is false then it will be disabled globally.
IdoptionalAn optional UUID. When this value is omitted a unique Id will be generated automatically.
TenantoptionalAvailable since 1.62.0The tenant to which this identity provider belongs. This field only displays when the user selects a specific tenant on the previous page. When Global identity provider is selected on the previous page, this field does not display.
NamerequiredA unique name to identify the identity provider. This name is for display purposes only and it can be modified later if desired.
IssuerrequiredThe EntityId (unique identifier) of the SAML v2 identity provider. This value should be provided to you.
Verification keyrequiredThe public key or certificate that you must import into FusionAuth's KeyMaster. This is the public key provided to you by the identity provider.
Linking strategyoptionalAvailable since 1.28.0The linking strategy for the SAML v2 identity provider. See Linking Strategies for more information.
Available since 1.65.0 You can only change this value when the identity provider is disabled. To change the linking strategy for an identity provider that is already enabled, disable the provider, change the value, and then re-enable the provider.
Reconcile lambdaoptionalA lambda maps custom claims returned from the SAML response into the FusionAuth User and Registration. To learn more about creating a lambda, view the SAML v2 Reconcile lambda documentation.
To configure a lambda, navigate to Settings -> Lambdas .
Enable debug loggingoptionalSome identity providers are not compliant with the SAML and XML signing specifications. This can make it challenging to integrate with them.
If you are running into integration issues, toggle this setting on and FusionAuth will output debugging information into the Event Log during a SAML login. You can find the event log in System -> Event Log .
Options#
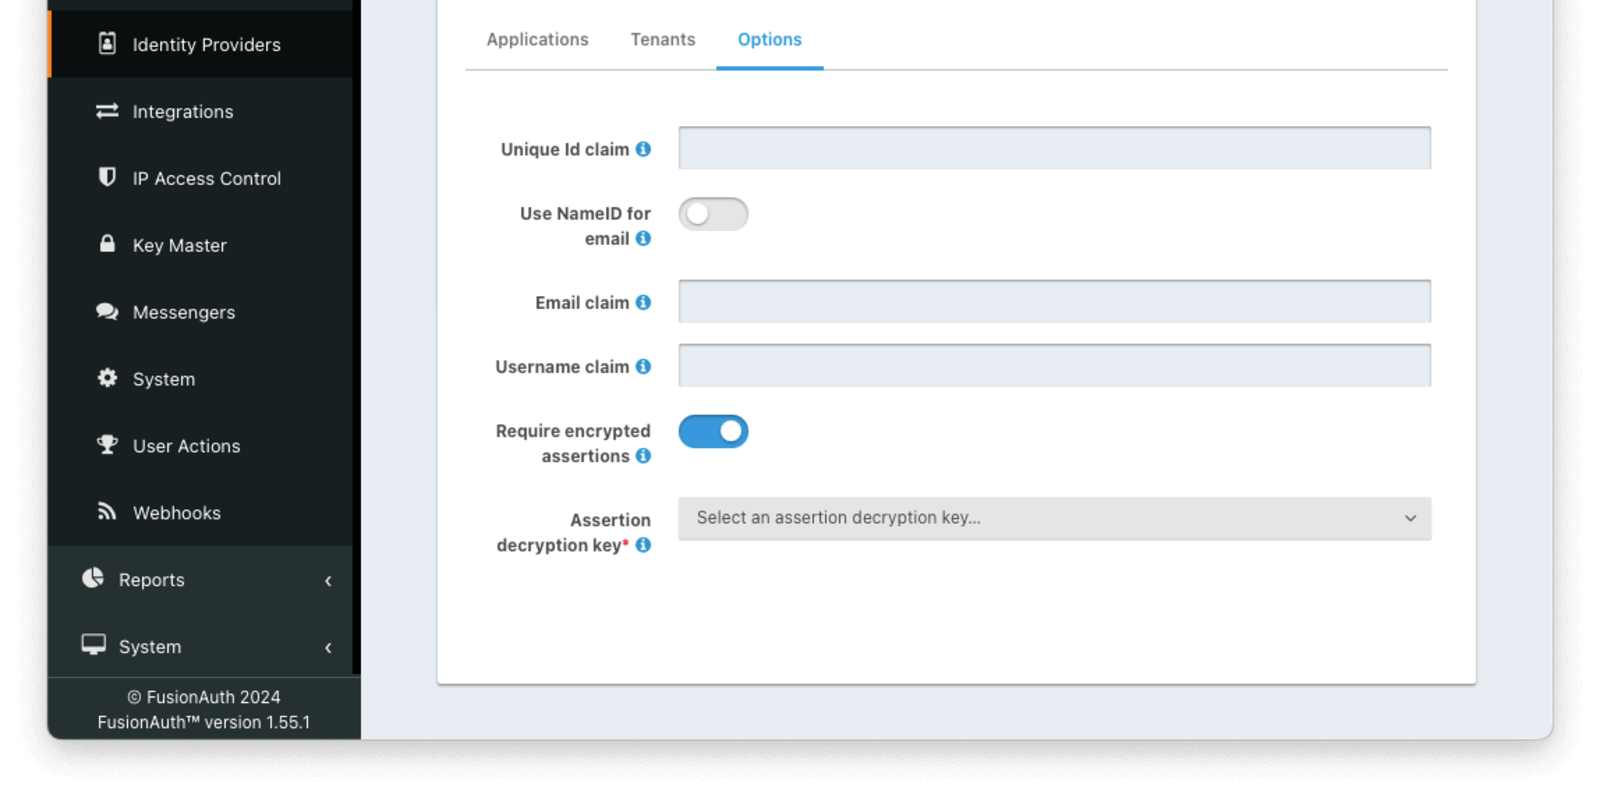
Form Fields#
Unique Id claimoptionalThe name of the claim that is returned in the SAML response that contains the unique Id of the user.
Use NameId for emailoptionalIf this is enabled, FusionAuth will assume that the NameID in the SAML response contains the email address of the user.
Email claimrequiredThe name of the email claim returned in the SAML response.
When Use NameId for email is enabled, this field will not be displayed and will not be required.
Username claimoptionalThe name of the username claim returned in the SAML response.
Require encrypted assertionsoptionalAvailable since 1.55.1When enabled FusionAuth requires encrypted assertions in SAML responses from the identity provider. SAML responses from the identity provider containing unencrypted assertions will be rejected by FusionAuth.
Assertion decryption keyoptionalAvailable since 1.55.1The key used to decrypt SAML responses. Required when Require encrypted assertions is enabled. To create, manage or import a key, navigate to Settings -> Key Master .
The selected Key must contain an RSA private key. The associated public key or certificate should be provided to the SAML Identity Provider to encrypt assertions.
Integration Details#
After configuring the Identity Provider, FusionAuth will display values likely required by your SAML v2 Identity Provider to trust FusionAuth as a relying party. Do so by navigating to Settings -> Identity Providers and click next to your SAML provider.
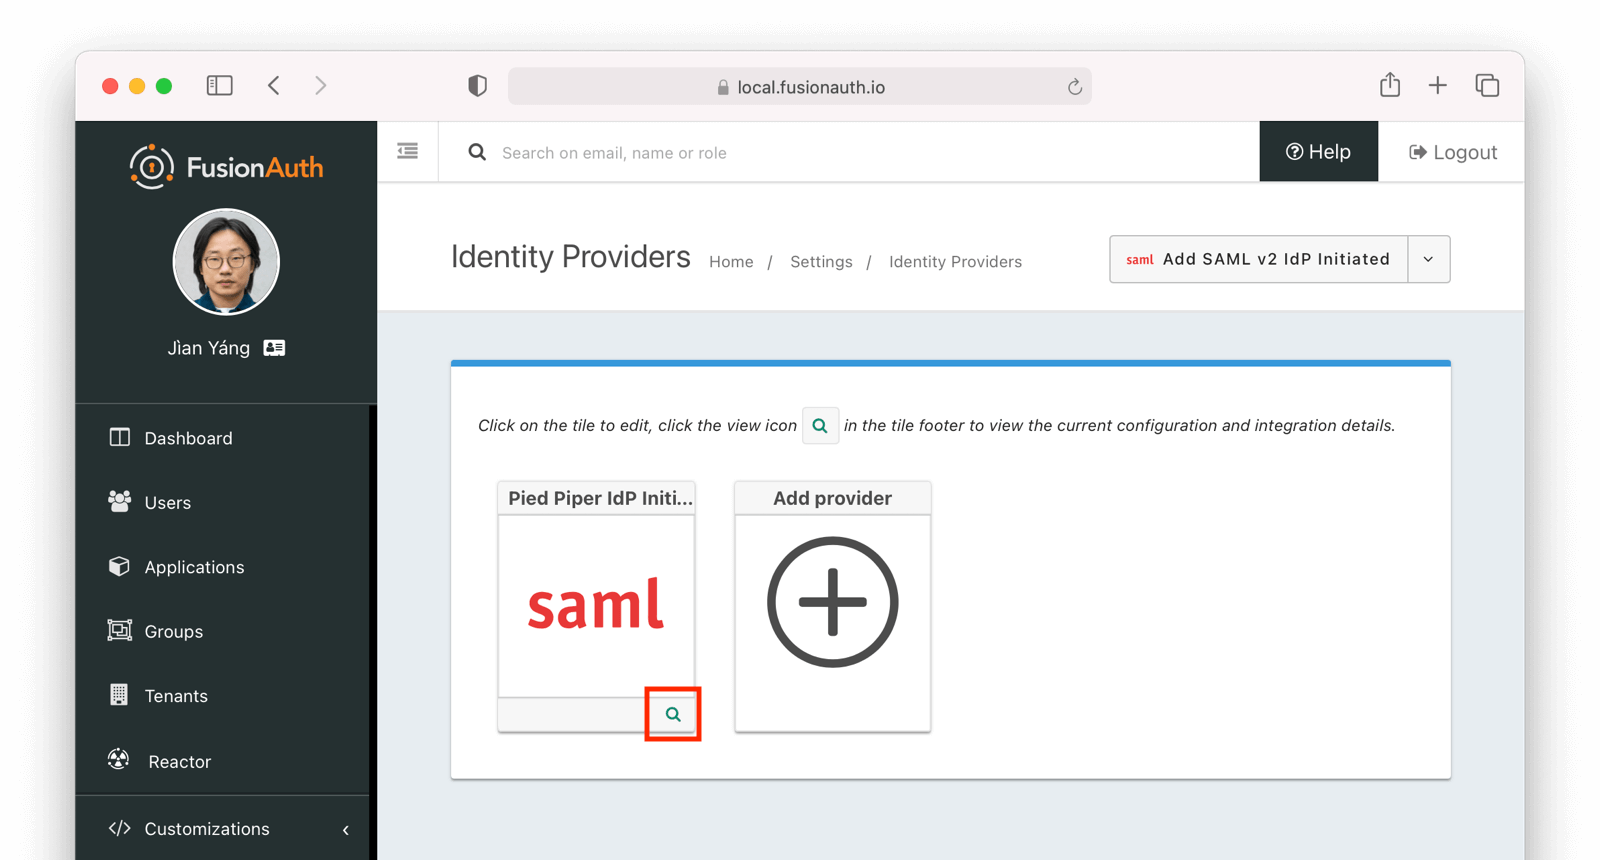
When viewing the details, scroll to the SAML v2 Integration details section. There you will find the necessary values to configure an integration with a SAMLv2 IdP.
SAML v2 Integration Details#
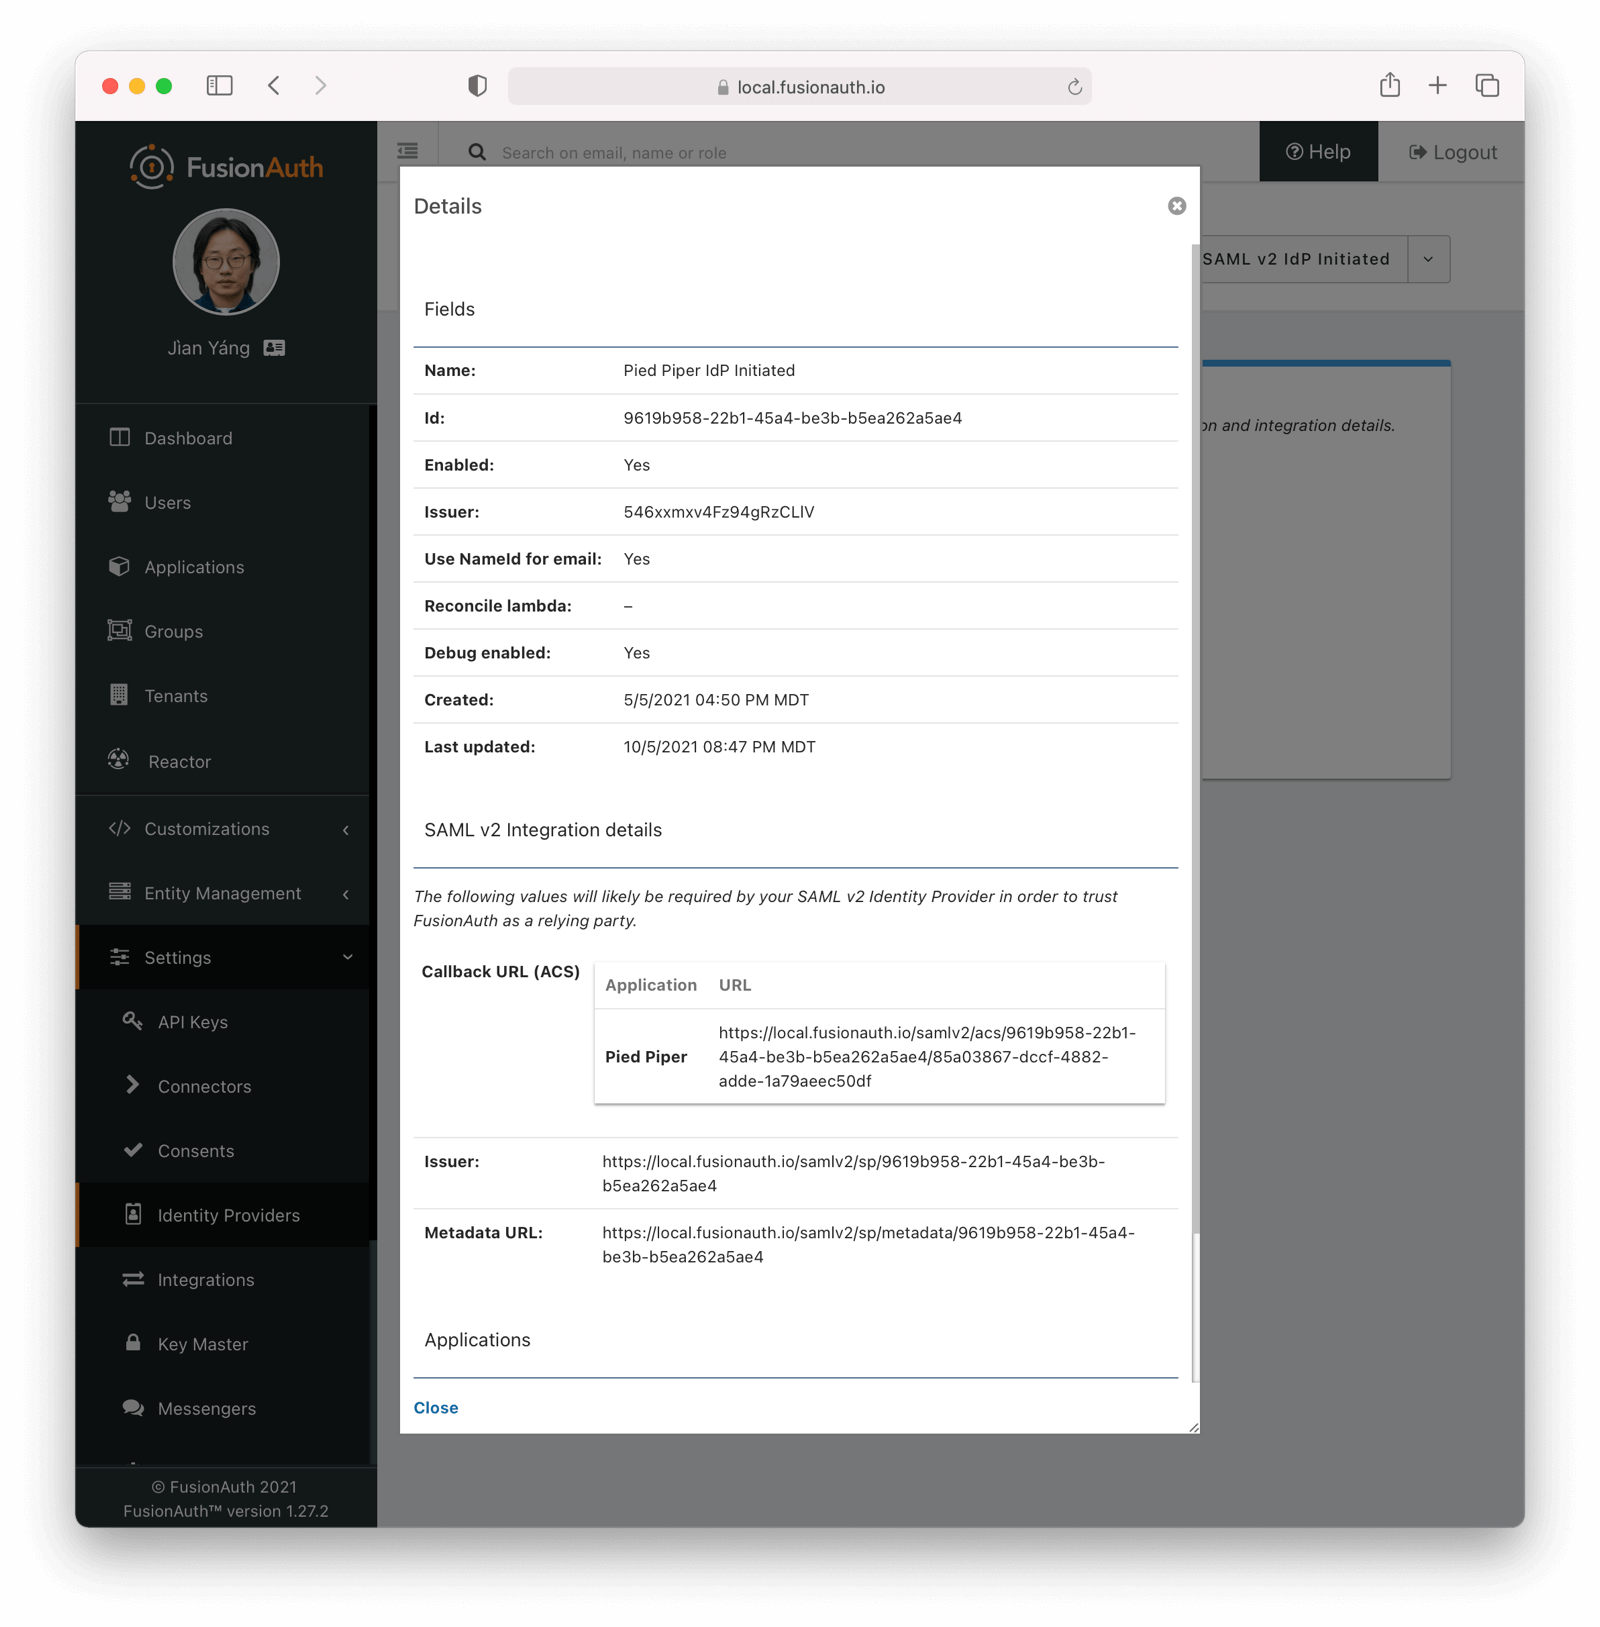
Fields#
IdP Initiated Callback URLs (ACS)An Assertion Consumer Service (or ACS) is the location at a service provider that accepts messages to establish a session based on the assertion.
By default the redirect URI will be the first Authorized redirect URI found in the FusionAuth Application OAuth configuration. To specify a redirect URI send the authorized URI in the RelayState parameter. Support for using the RelayState in this manner is supported in FusionAuth version greater than or equal to 1.41.0. In prior versions, append a query parameter named redirect_uri to the ACS in the IdP configuration.
This field will only be present if you have Enable IdP initiated login toggled on for this identity provider.
Note: IdP initiated logins go through a separate endpoint from SP initiated logins. For IdP initiated logins in order to receive a refresh token the query parameter ?scope=offline_access will need to be appended to the url. When logging into the FusionAuth Admin application this parameter is included by default and does not need to be supplied.
Callback URL (ACS)This is the Assertion Consumer Service (ACS) endpoint for SP initiated logins and otherwise follows the same rules as IdP Initiated Callback URLs (ACS).
IssuerThe service provider EntityId. This is a URL.
Metadata URLThe URL where the service provider metadata resides.
CORS Configuration#
To complete the login request, the SAML v2 identity provider will make an HTTP POST request to the callback URL in FusionAuth. In order for this request to be allowed through the CORS filter you will need to navigate to Settings -> System -> CORS and add the SAML IdP origin as an Allowed Origin the CORS configuration.
Troubleshooting#
To troubleshoot, turn on the Debug option and then navigate to System -> Event Log .
Proceed through the SAML flow and review the Event log entries to see if there are any configuration issues.