Modeling Organizations
Business-to-business (B2B) enterprises commonly model the profiles of their customers and the roles of customers' employees. This practice isn't limited to SaaS businesses, as many companies sell products and services to other companies and need to ensure that employees, contractors, and other user groups can access the necessary applications to do their work.
Let's consider a CRM example to illustrate organization modeling. You're building a hot new CRM called AwesomeCRM. Your customers are other businesses, and one is Pied Piper. Pied Piper employs ten salespeople, and they each need access to your CRM, but each salesperson may have different permissions. Additionally, Pied Piper uses an outsourced CRO service called Big Bucks CRO. Jane is a fractional CRO with Big Bucks, and she also needs access to your CRM. Besides Pied Piper, Jane works with ten or more clients (like Aviato and Hooli). You need to ensure Jane can access all her clients' accounts and has the correct permissions for each.
A structure like this CRM introduces a lot of complexity. This is where FusionAuth's Entity Management feature comes in handy. Entity Management allows you to create objects (that is, Entities) and grant Users permissions to them. Users aren't limited to having permissions to just one Entity; Users can be granted different permissions to different Entities.
This feature is only available in paid plans. To learn more, see our pricing page.
This guide will walk you through implementing the use case described above with Entity Management using the FusionAuth APIs. See the core concepts for Entity Management documentation for more information.
You can take a look at the companion application that implements the concepts in this guide at https://github.com/fusionauth/fusionauth-example-modeling-organizations. The application repo includes a Kickstart file with all the settings detailed in the steps below and a Docker Compose file to run FusionAuth locally. Follow the steps in the companion application README to get up and running.
Let's get started.
Create An Entity Type#
The first step is to create an Entity Type. Entity types define a class of entities along with the permissions that can be granted. You can create Entity Types using the API but in most cases, Entity Types are only created once, so you can use the admin UI for that. If you prefer to use the APIs, you'll find the API you need here.
Create an Entity Type and give it a name. In the image below, the new Entity Type is called Customers, but the name is just for display purposes, so you can give it any name.
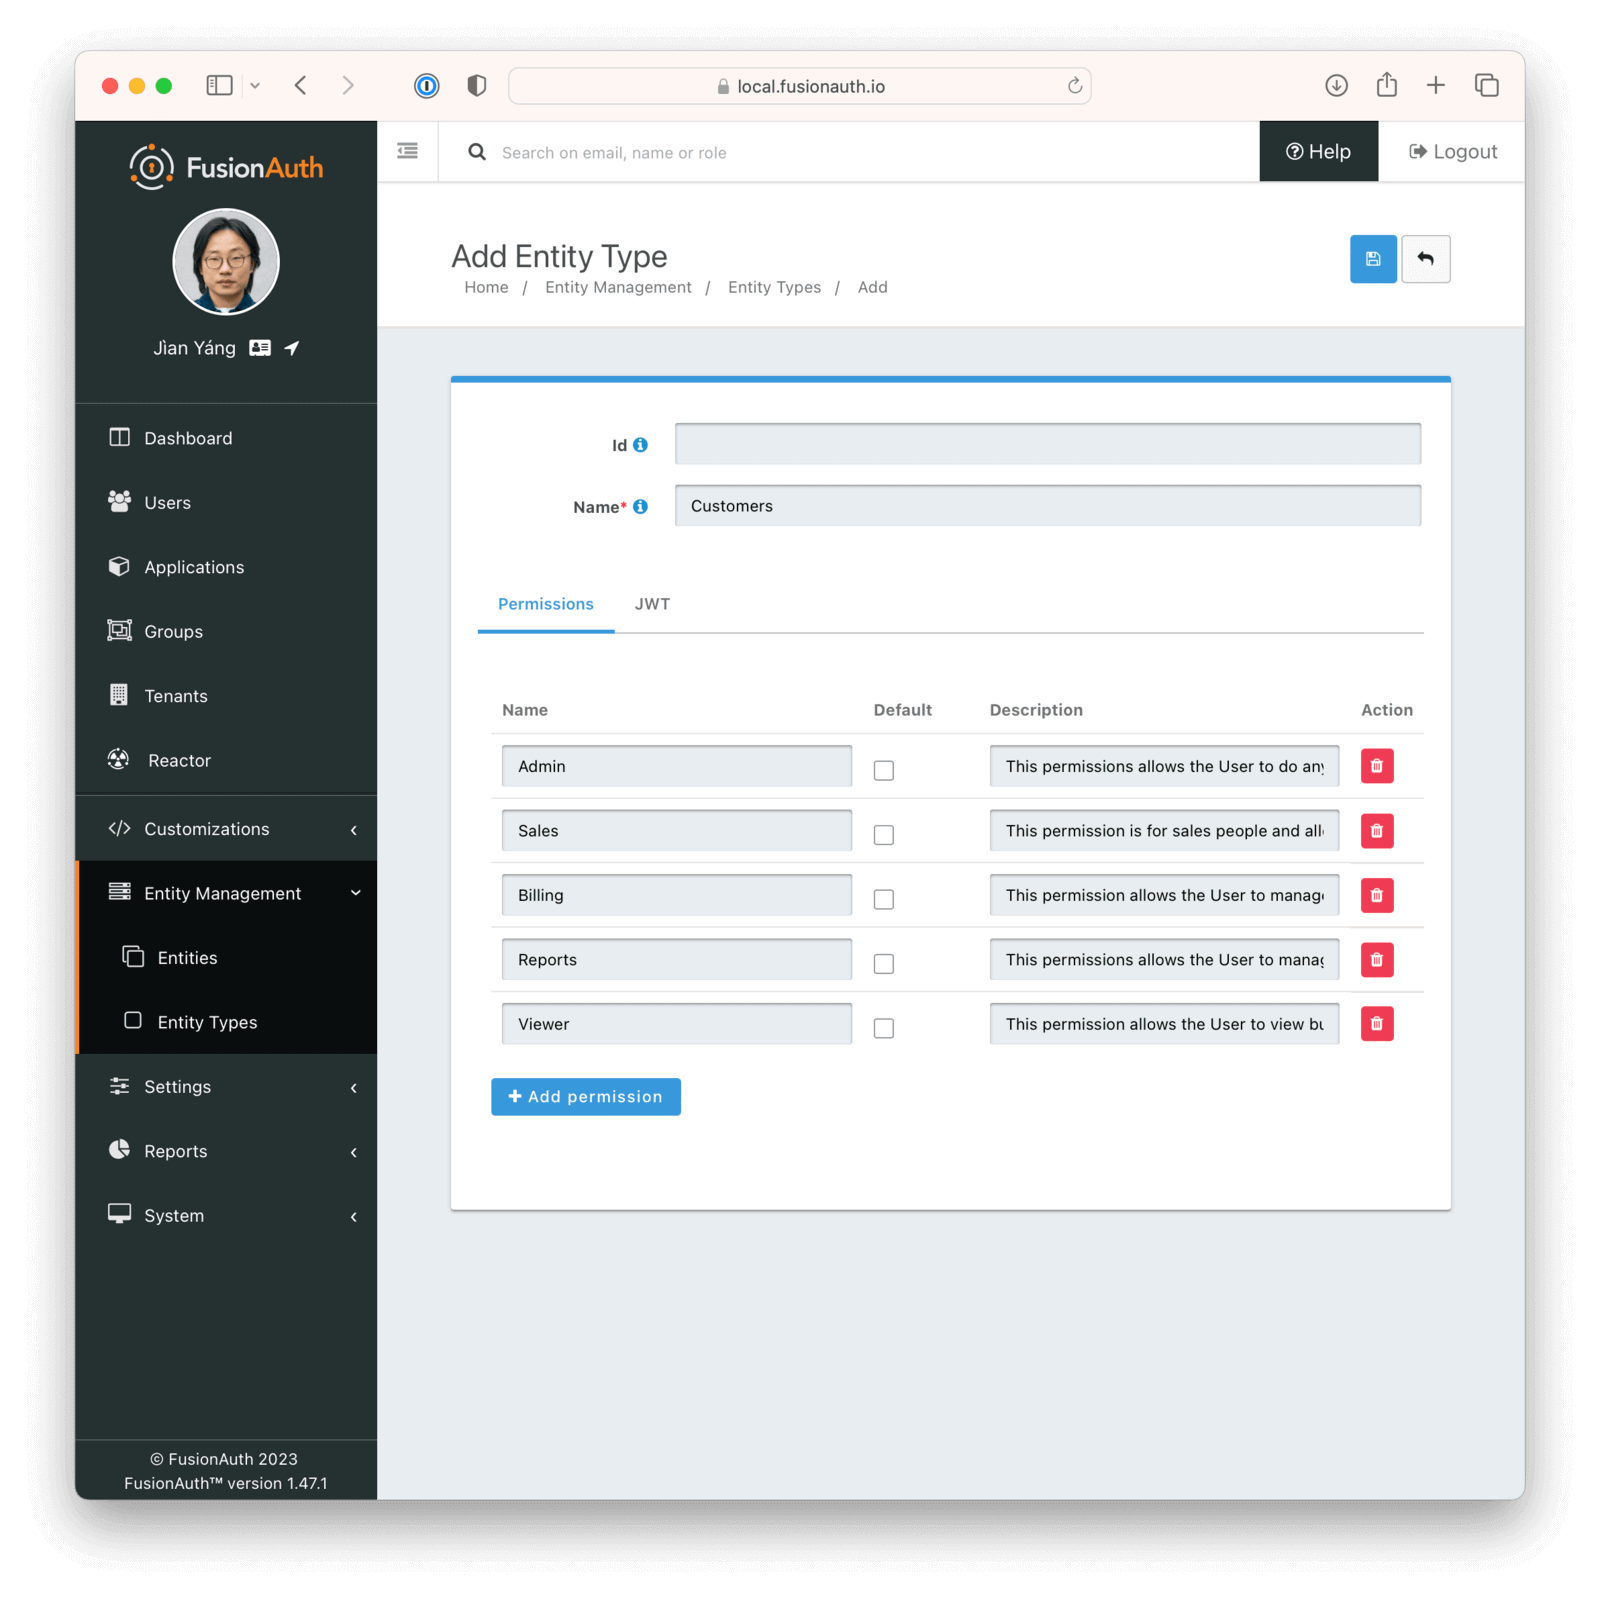
Five different permissions for the Customers type are defined here.
- Admin: Allows the User to do anything with the account.
- Sales: For salespeople, allows the User to do things like create contacts, companies, deals, and so on.
- Billing: Allows the User to manage billing things like invoices, credit cards, and so on.
- Reports: Allows the User to manage reports.
- Viewer: Allows the User to view but not edit.
The names for permissions are also arbitrary and mostly for display purposes, so feel free to name your permissions categories whatever you want.
After you create the Entity Type, copy its Id for the next step.
Creating Entities#
Now that you have an Entity Type, you can start creating Entities. The process of creating Entities is usually part of a signup or other onboarding process and depends on how your business handles creating accounts for your customers. For AwesomeCRM, you'll collect account information when the user signs up. During the signup process, you'll create the Entity and then grant the newly created User permissions to that Entity. In this model, the first user to sign up is the first Admin of the account.
To create the Entity for a new customer, call the Create an Entity API. Your JSON should look similar to below.
{
  "entity": {
    "type": {
      "id": "<entity-type-id>"
    },
    "name": "Pied Piper"
  }
}
This JSON will create an Entity with the name Pied Piper with the newly created Entity Type from the previous step. Entity names are not unique, so you don't need to worry about multiple users conflicting with respect to their company name.
Parse the response to capture the Id of this newly created Entity. The JSON response should look like this.
{
  "entity": {
    "clientId": "092dbded-30af-4149-9c61-b578f2c72f59",
    "clientSecret": "+fcXet9Iu2kQi61yWD9Tu4ReZ113P6yEAkr32v6WKOQ=",
    "id": "8174f72f-5ecd-4eae-8de8-7fef597b3473",
    "insertInstant": 1595361142909,
    "lastUpdateInstant": 1595361143101,
    "name": "Pied Piper",
    "tenantId": "30663132-6464-6665-3032-326466613934",
    "type": {
      "id": "4838d96a-4e7b-42c6-a4a1-ebc64952e1c8",
      "insertInstant": 1518962408732,
      "jwtConfiguration": {
        "enabled": false,
        "timeToLiveInSeconds": 60
      },
      "lastUpdateInstant": 1518962408732,
      "name": "Customers"
    }
  }
}
Extract the id from the JSON and store it in a variable.
Create Entity Grants#
The final step during the signup process assigns the correct permissions for the User to their Entity. To do this, call the grant permissions API. You will need the Entity and User Ids to call this API. The JSON for the grant request will look like this.
{
  "grant": {
    "permissions": [
      "Admin"
    ],
    "userId": "<user-id>"
  }
}
Notice that the JSON only includes the User Id. The Entity Id is added to the URL when calling this API, like this.
POST /api/entity/<entityId>/grant
Note that the User Id can be determined several different ways, depending on how your registration process is set up. If you are using FusionAuth for registration, you can extract the User Id from the JWT access token that FusionAuth provides at the end of the OAuth workflow. The User Id is stored in the sub claim. Or you can use the UserInfo or Introspect APIs with the access token to retrieve the User details.
Now you have constructed all the necessary pieces to model the customers of AwesomeCRM and the Users that have access to the customer accounts.
Login#
Now that your data model is prepared, you need to handle login events. When a user logs in, your application needs to know what organization they belong to. Generally, this information is stored in a cookie or a server-side session so that it is available on each request to the application.
To get this information from FusionAuth, call the search grants API, which allows you to retrieve all the Grants a specific User has to any Entities. This API doesn't take a JSON body. Supply the User Id in the URL as below.
GET /api/entity/grant/search?userId={userId}
Replace the userId parameter with the Id of the user that is currently logged in. Retrieve the User's organization information from the access token JWT or the UserInfo or Introspect APIs.
The response from the search grants API looks like this.
{
  "grants": [
    {
      "entity": {
        "clientId": "092dbded-30af-4149-9c61-b578f2c72f59",
        "clientSecret": "+fcXet9Iu2kQi61yWD9Tu4ReZ113P6yEAkr32v6WKOQ=",
        "data": {
          "companyType": "Legal"
        },
        "id": "8174f72f-5ecd-4eae-8de8-7fef597b3473",
        "insertInstant": 1595361142909,
        "lastUpdateInstant": 1595361143101,
        "name": "Raviga",
        "tenantId": "30663132-6464-6665-3032-326466613934",
        "type": {
          "id": "4838d96a-4e7b-42c6-a4a1-ebc64952e1c8",
          "insertInstant": 1518962408732,
          "jwtConfiguration": {
            "enabled": false,
            "timeToLiveInSeconds": 60
          },
          "lastUpdateInstant": 1518962408732,
          "name": "Customers"
        }
      },
      "id": "8174f72f-5ecd-4eae-8de8-6fef597b3473",
      "insertInstant": 1595361142929,
      "lastUpdateInstant": 1595361143121,
      "permissions": [
        "Admin"
      ],
      "userId": "7174f72f-5ecd-4eae-8de8-7fef597b3473"
    }
  ],
  "total": 1
}
You can see that the permissions are available in the response. You can extract the permissions and use them to authorize actions that the user takes or APIs they call. In this example, the User has Admin permission, which means they are allowed to do anything they wish.
You can store the grant object (or some portion of it) in various locations for easy access, for example, in a cookie (encrypted is preferred), a server-side session, or a database. The search grants API is designed to be queried frequently and returned quickly. Depending on the scale of the application and where FusionAuth is deployed, you could query this API for each request, ensuring that the User's permissions are always the most current.
In the companion application, the grant object is loaded via a middleware function and appended to the user object so it is available in the req object for each request. This middleware function is called loadGrants and is shown below.
async function loadGrants(req, res, next) {
    if (req.isAuthenticated()) {
        const grantsResponse = await fetch(`${FUSIONAUTH_URL}/api/entity/grant/search?userId=${req.user.user.id}`, {
            headers: {
                'Authorization': FUSIONAUTH_API_KEY
            }
        });
        const grants = await grantsResponse.json();
        req.user.grants = grants.grants;
    }
    next();
};
The loadGrants function is then added to the Express app request pipeline:
app.use(loadGrants);The loadGrants middleware function first checks if the user is authenticated before trying to retrieve the Grants, as the User is needed to find the Grants. Therefore, immediately before authentication with Passport in the passport.authenticate callback pipeline, the loadGrants middleware exits early because the User is not yet available. To tack the Grants onto the user object in this special request flow, the loadGrants middleware function is added to the passport.authenticate callback pipeline.
app.get("/auth/callback",
  passport.authenticate("oauth2", { failureRedirect: "/" }),
  loadGrants,
  function (req, res) {
    // Successful authentication, redirect home.
    req.session.selectedGrant = req.user.grants[0];
    res.redirect("/");
  }
);
Once the Grant with permissions is loaded, you can use it to authorize actions in your application. For example, you can check if the user has the billing permission before allowing them to view the billing page.
The companion application uses another custom middleware function called checkGrantPermissions to check if the user has the required permission to access a route.
function checkGrantPermissions(allowedPermissions) {
    return function (req, res, next) {
        const selectedGrant = req.session.selectedGrant;
        const permissions = selectedGrant.permissions;
        const hasPermission = allowedPermissions.some(perm => permissions.includes(perm));
        if (!hasPermission) {
            return res.render('no-permission', {
                title: 'No Permission',
                company: req.session.selectedGrant.entity.name,
                companyId: req.session.selectedGrant.entity.id,
                user: req.user.user,
                logoutURL: req.logoutURL,
                selectedGrant: req.session.selectedGrant
            });
        }
        next();
    }
}
This middleware function can be used on individual routes as below.
router.post('/', checkGrantPermissions(['Admin', 'Billing']), function (req, res, next) {
    const companyId = req.session.selectedGrant.entity.id;
    billingData[companyId].push(req.body);
    fs.writeFileSync('data/billing.json', JSON.stringify(billingData, null, 2));
    res.redirect('/billing');
});
Notice that all routes in the companion application are protected by the checkGrantPermissions middleware function, with the appropriate permissions required to access the route.
Multiple Organizations#
The final component to cover in this guide is handling multiple organizations for a single User. AwesomeCRM works with many partners, and often these partners work with many clients. This means that a user at a partner company might be working with multiple organizations at the same time. To handle this scenario, you need to ensure you can handle multiple results from the Retrieve Grants API.
Here's an example of the response from the Retrieve Grants API when a User has multiple organizations (many properties have been trimmed for brevity).
{
  "grants": [
    {
      "entity": {
        "name": "Pied Piper",
        ...
      },
      "permissions": [
        "Admin"
      ],
      ...
    },
    {
      "entity": {
        "name": "Hooli",
        ...
      },
      "permissions": [
        "Sales"
      ],
      ...
    },
    {
      "entity": {
        "name": "Aviato",
        ...
      },
      "permissions": [
        "Billing",
        "Reports"
      ],
      ...
    }
  ],
  "total": 3
}
This response indicates that the user belongs to three organizations and has different permissions for each. To manage this in your AwesomeCRM application, you can provide users with an option to select the company they would like to work on when they log in, as in the example below.

Notice that in the companion app passport.authenticate pipeline, when the user is authenticated the first time, the first Grant is selected as the default Entity for the user and added to the req.session object on the selectedGrant property.
app.get("/auth/callback",
  passport.authenticate("oauth2", { failureRedirect: "/" }),
  loadGrants,
  function (req, res) {
    // Successful authentication, redirect home.
    req.session.selectedGrant = req.user.grants[0];
    res.redirect("/");
  }
);
When the user selects another Entity to work on from the index page, the selectedGrant is updated with the new Entity.
router.post('/company', ensureLoggedIn('/login'), function(req, res, next) {
  const grantId = req.body.grantId;
  // find the corresponding grant:
  let selectedGrant = req.user.grants.find(grant=> grant.id === grantId)
  req.session.selectedGrant = selectedGrant;
  console.log(`Selected company: ${grantId} - ${selectedGrant.entity.name}`);
  return res.redirect('/');
});
Managing Users#
Applications often allow Users to manage other Users on their account.
- Add a User to an organization using the grant permissions API.
- Remove a User from an organization using the Delete a Grant API.
- Adjust the permissions a User has to an organization using the grant permissions API. The grant permissions API is an upsert, which means that if a Grant already exists, it will update its attributes.
In the companion app, managing Users is demonstrated in the routes/users.js file. There is a trick to getting all Users filtered by FusionAuth application. By default, getting Users from FusionAuth will return all Users in the containing tenant. You will need to use a search query combined with the Search for Users API to find all Users in the particular application. The companion app demonstrates this in the GET /users route, using an Elasticsearch query to filter Users by application.
After filtering for the Users you want to manage, use the grant search API function to retrieve the Grants for each User. In the companion application, Grants are managed for a single Entity (or company) at a time. Since the API returns all Grants to all Entities associated with a User, the application filters the Grants to only show the Grant for the selected Entity.
// Get the grants for each user:
const allPermissions = req.session.selectedGrant.entity.type.permissions
for (let i = 0; i < results.users.length; i++) {
  const user = results.users[i];
  const grantsResponse = await fetch(`${FUSIONAUTH_URL}/api/entity/grant/search?userId=${user.id}`, {
    headers: {
      'Authorization': FUSIONAUTH_API_KEY
    }
  });
  const grants = await grantsResponse.json();
  // Only include the grants for the selected entity (company)
  const userGrants = grants.grants.find(grant => grant.entity.id === req.session.selectedGrant.entity.id);

  // make a list of all permissions, and mark the ones the user has:
  user.permissions = allPermissions.map(perm => {
    return {
      permission: perm,
      hasPermission: userGrants ? userGrants.permissions.includes(perm.name) : false
    }
  });
}
Custom Data And Search#
Custom data on an Entity can be used to store additional information about the Entity, like various Ids (for Stripe, QuickBooks, or NetSuite), organization attributes (locations, parent company, and so on), or just about anything you need. Custom data on an Entity is indexed within FusionAuth, which means it is also searchable using the Search for Entities API.
For example, say your organizations have a custom attribute for addresses like below.
{
  "entity": {
    "data": {
      "address": {
        "city": "Denver"
      }
    },
    "type": {
      "id": "<entity-type-id>"
    },
    "name": "Pied Piper"
  }
}
You can search for the address attribute using a request like this.
GET /api/entity/search?queryString=data.address.city:denver
This request uses the Elasticsearch query string query syntax.
The companion application stores the address of the company in the Entity custom data, which is displayed on the Admin page. The custom data is returned with the Entity when it is retrieved using the Retrieve an Entity API and doesn't need to be loaded separately.
Changing An Organization#
Beyond managing users, some applications allow you to rename or modify a User's organization. Use the Update an Entity API to update any Entity attribute, including custom data.
This is demonstrated in the companion app in the routes/admin.js file. This route can update the Entity name and the company address. Use the PATCH HTTP method for this type of operation, as it allows you to update only the fields that have changed, even when updating custom data.
const response = await fetch(`${FUSIONAUTH_URL}/api/entity/${entityId}`, {
    method: 'PATCH',
    headers: {
        'Authorization': FUSIONAUTH_API_KEY,
        'Content-Type': 'application/json'
    },
    body: JSON.stringify(updates)
});
const entity = await response.json();
req.session.selectedGrant.entity = entity.entity;Conclusion#
This is just one of the many uses for the FusionAuth Entity Management feature, allowing you to easily implement a data model for organizations and permissions and grant the permissions to users in your application. Other uses for Entity Management include IOT (permissions to devices), machine-to-machine clients (OAuth Client Credentials), SCIM clients, and many more.