This guide discusses ways of modeling hierarchical organizations and entities, with users and permissions, and provides an example script you can use in your own website. Entities are not available in the free version of FusionAuth.
This feature is only available in paid plans. To learn more, see our pricing page.
Understand FusionAuth Types And Their Relationships#
Before continuing, please read the review of FusionAuth types and how they relate. You need to understand these types well to adjust the hierarchical system design in this guide to suit your situation.
To avoid confusion with FusionAuth applications in this guide, the service you provide your users will be called your "website", as opposed to an application, app, or service.
An Example Company Hierarchy With Permissions#
None of the FusionAuth types are hierarchical. In other words, no types can be nested in any other types. Groups can't be members of groups, applications can't contain other applications, and entities don't have sub-entities.
This is a problem when trying to model organizations that are hierarchical, especially when trying to decide when a user who has permissions to one level of the hierarchy should have permissions to an entity somewhere in the hierarchy.
Let's take an example. Assume that you want to use FusionAuth to authorize users in your corporation, Change Corp, to have access to certain documents. Your corporation has two sub-companies: Change Bank and Change Insurance. Each company has many departments, like marketing, sales, finance, operations, and management. Documents belong to a single department in an organization. Companies, departments, and documents have read and write permissions.
Permissions propagate downwards. So an employee with write permissions to the marketing department in Change Insurance will have write permissions to all its documents. And an employee with read permissions to Change Corp has read permissions to every document in every department of both sub-companies. But you might have an auditor who you add as a user in FusionAuth that has only read access to a specific document in a specific department. This will not give her permissions to any other documents anywhere higher in the organizational hierarchy.
Below is a diagram of the company structure to model.
graph BT
  n1[Change Corp]
  n2(Change Bank)
  n3(Change Insurance)

  n4[/Operations/]
  n5[/Finance/]
  n6[/HR/]
  n7[/Operations/]
  n8[/Finance/]
  n9[/HR/]

  n10((Alice))
  n11((Bob))
  n12@{ shape: doc, label: "Passwords doc" }
  n13@{ shape: doc, label: "Financial statements" }
  n14@{ shape: doc, label: "HR manual" }

  n2 --o n1
  n3 --o n1
  n4 --o n2
  n5 --o n2
  n6 --o n2
  n7 --o n3
  n8 --o n3
  n9 --o n3

  n10 --o n4
  n11 --o n5
  n12 --o n4
  n13 --o n5
  n14 --o n9
Company structure
You can probably see some challenges already:
- How do you handle documents that everyone in the corporation needs to read, such as a corporate HR manual, which is managed by the HR department of the top-level corporation? Because permissions don't propagate upwards, you have to individually give read permissions to everyone, instead of relying on the hierarchy to do it automatically.
- What happens when permissions conflict? The operations department might have a passwords document that should have read access only by members of that department, but anyone with read access to the sub-company will have access to the passwords.
There are solutions to these problems, such as including "Deny access" permissions and a "Common" department for shared documents, and you need to pick what works for your organization. These challenges won't be discussed in this guide, as you can use the techniques shown here to implement your own solution.
How To Model Hierarchy In FusionAuth With Entities And Grants#
The best way to model a hierarchy in FusionAuth is with Entities.
For the example above, you should create entity types Company and Department with permissions Read, Write, and IsMember. Read and write are used to show permissions, but IsMember is used to show hierarchy.
Then create an entity called Change Bank of type Company and entity of Department called Operations. Create an entity grant for Operations to Change Bank with IsMember set to true to show that this Operations entity belongs to the Change Bank entity. Note that it will not be possible to tell departments called Operations in different companies apart by their name alone. You will need to examine each department's entity grant to see which company it belongs to.
Finally, you'll create an entity grant for user Alice to entity Change Bank with no permissions, and an entity grant for Alice to Operations with permissions Read and Write. Below is a diagram of this example, which is similar to the earlier types diagram, but includes a department hierarchy now. Permissions are shown in separate blocks now too.
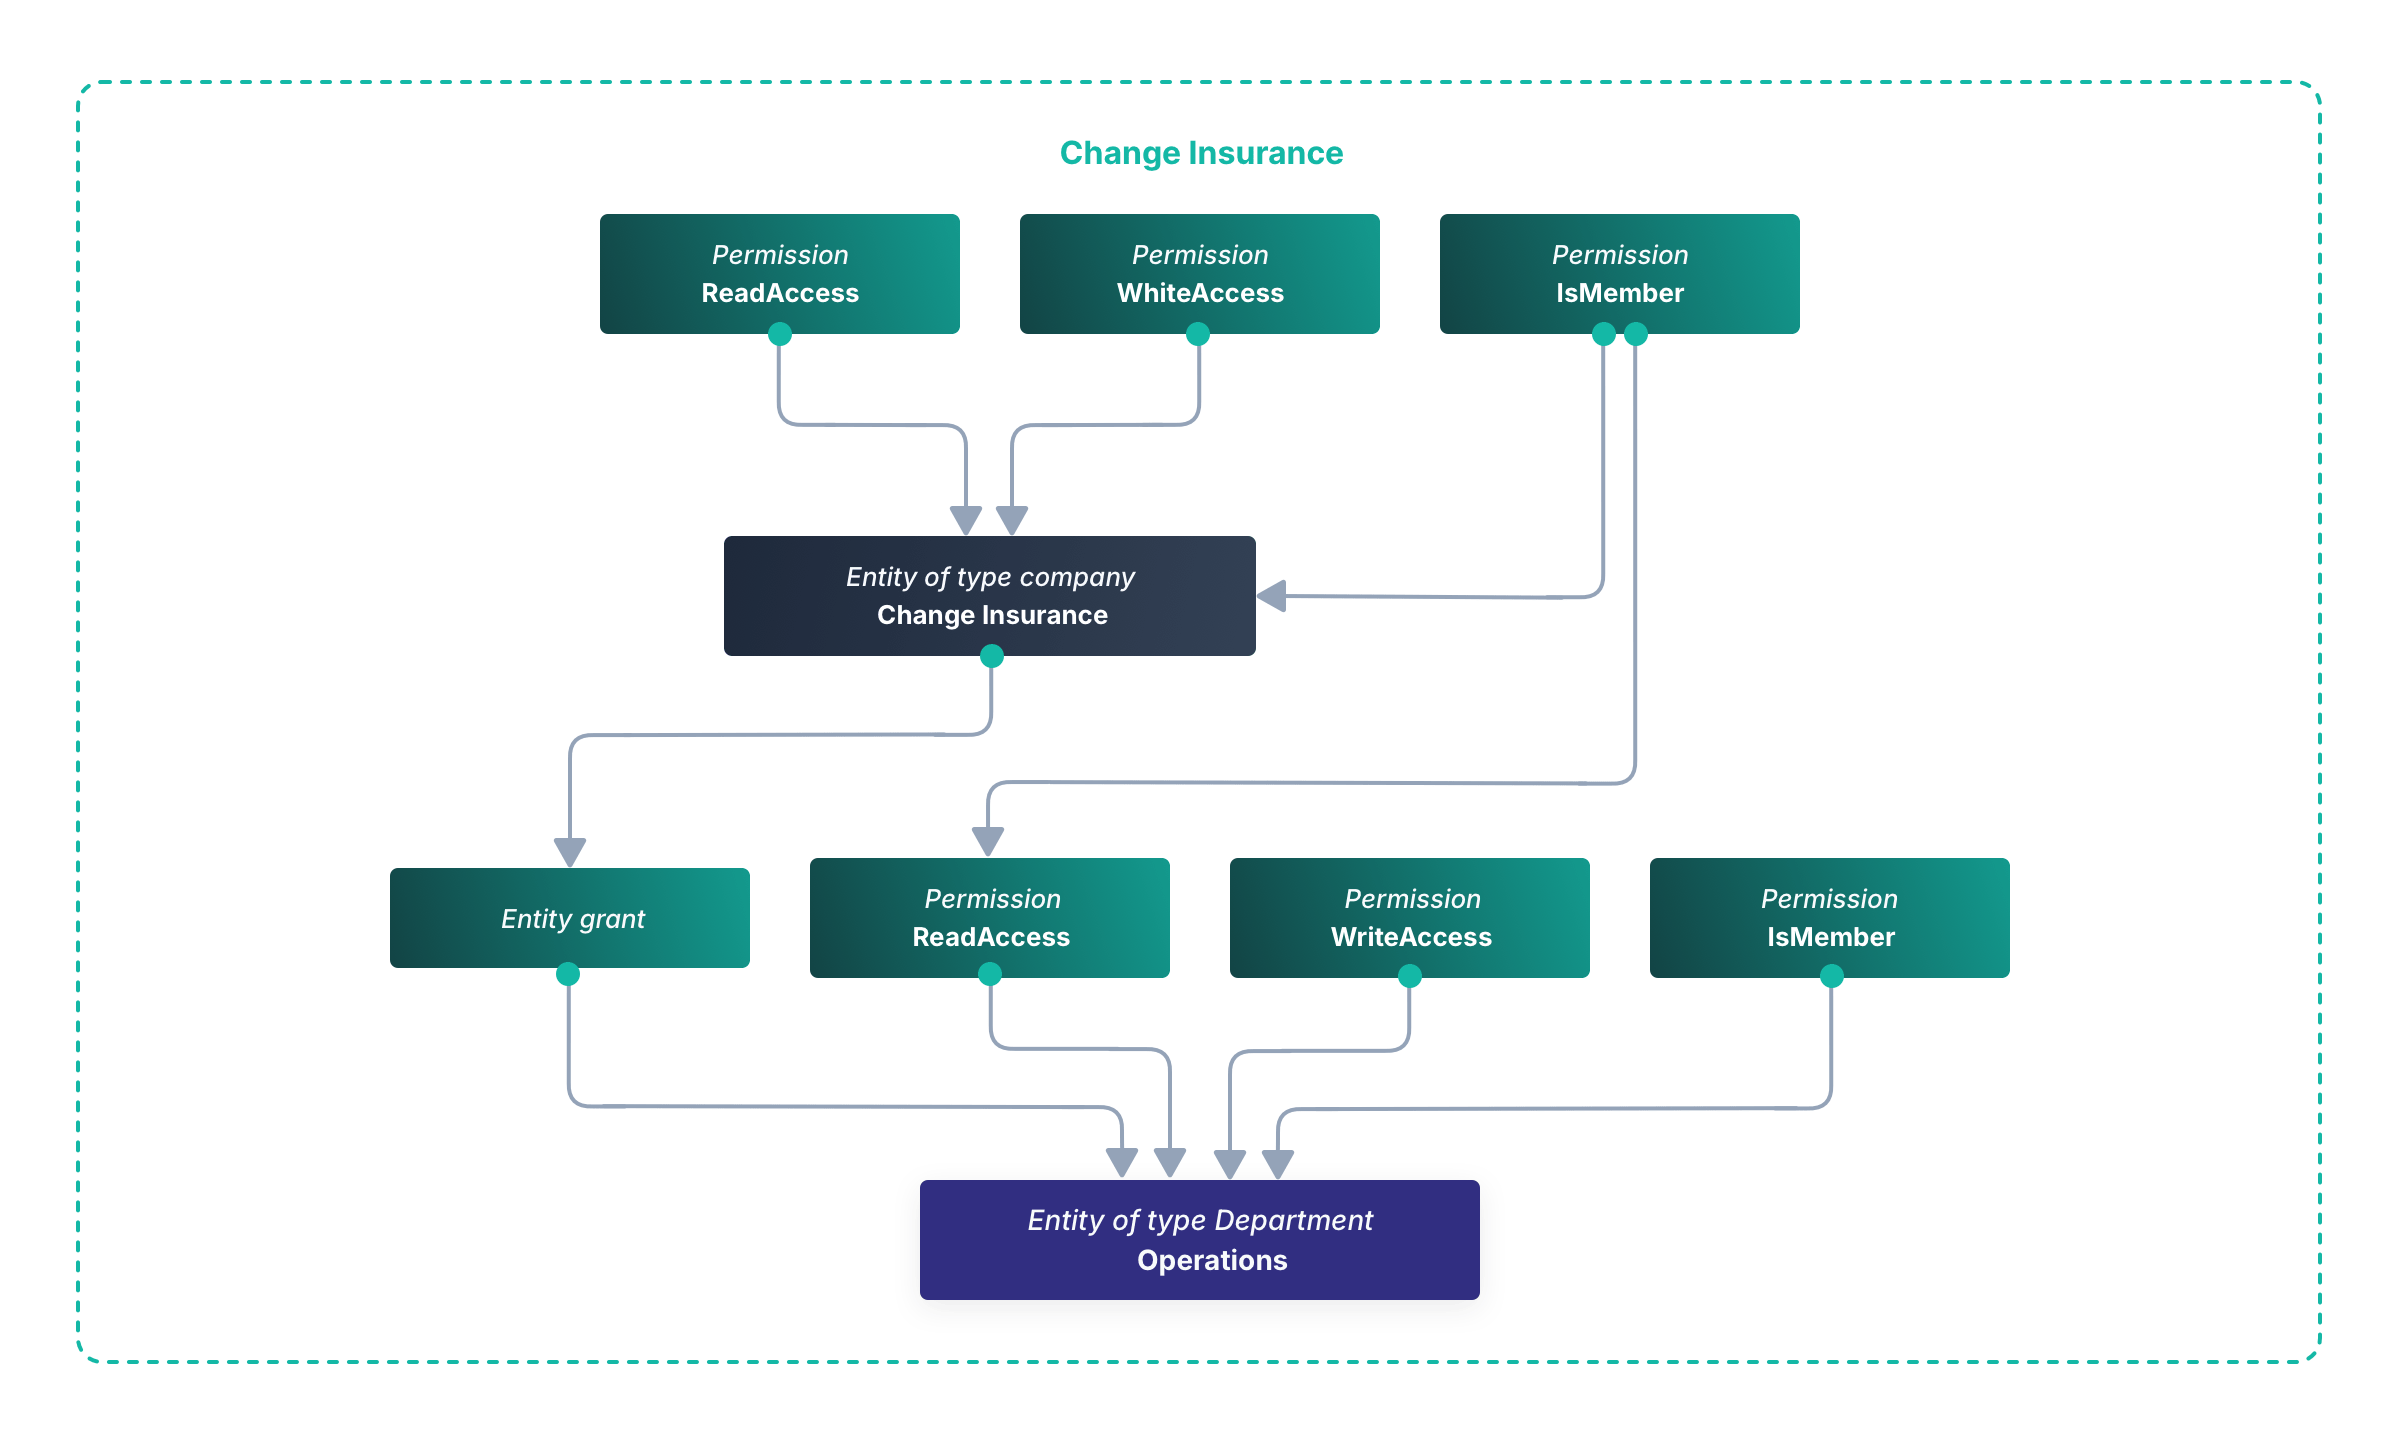
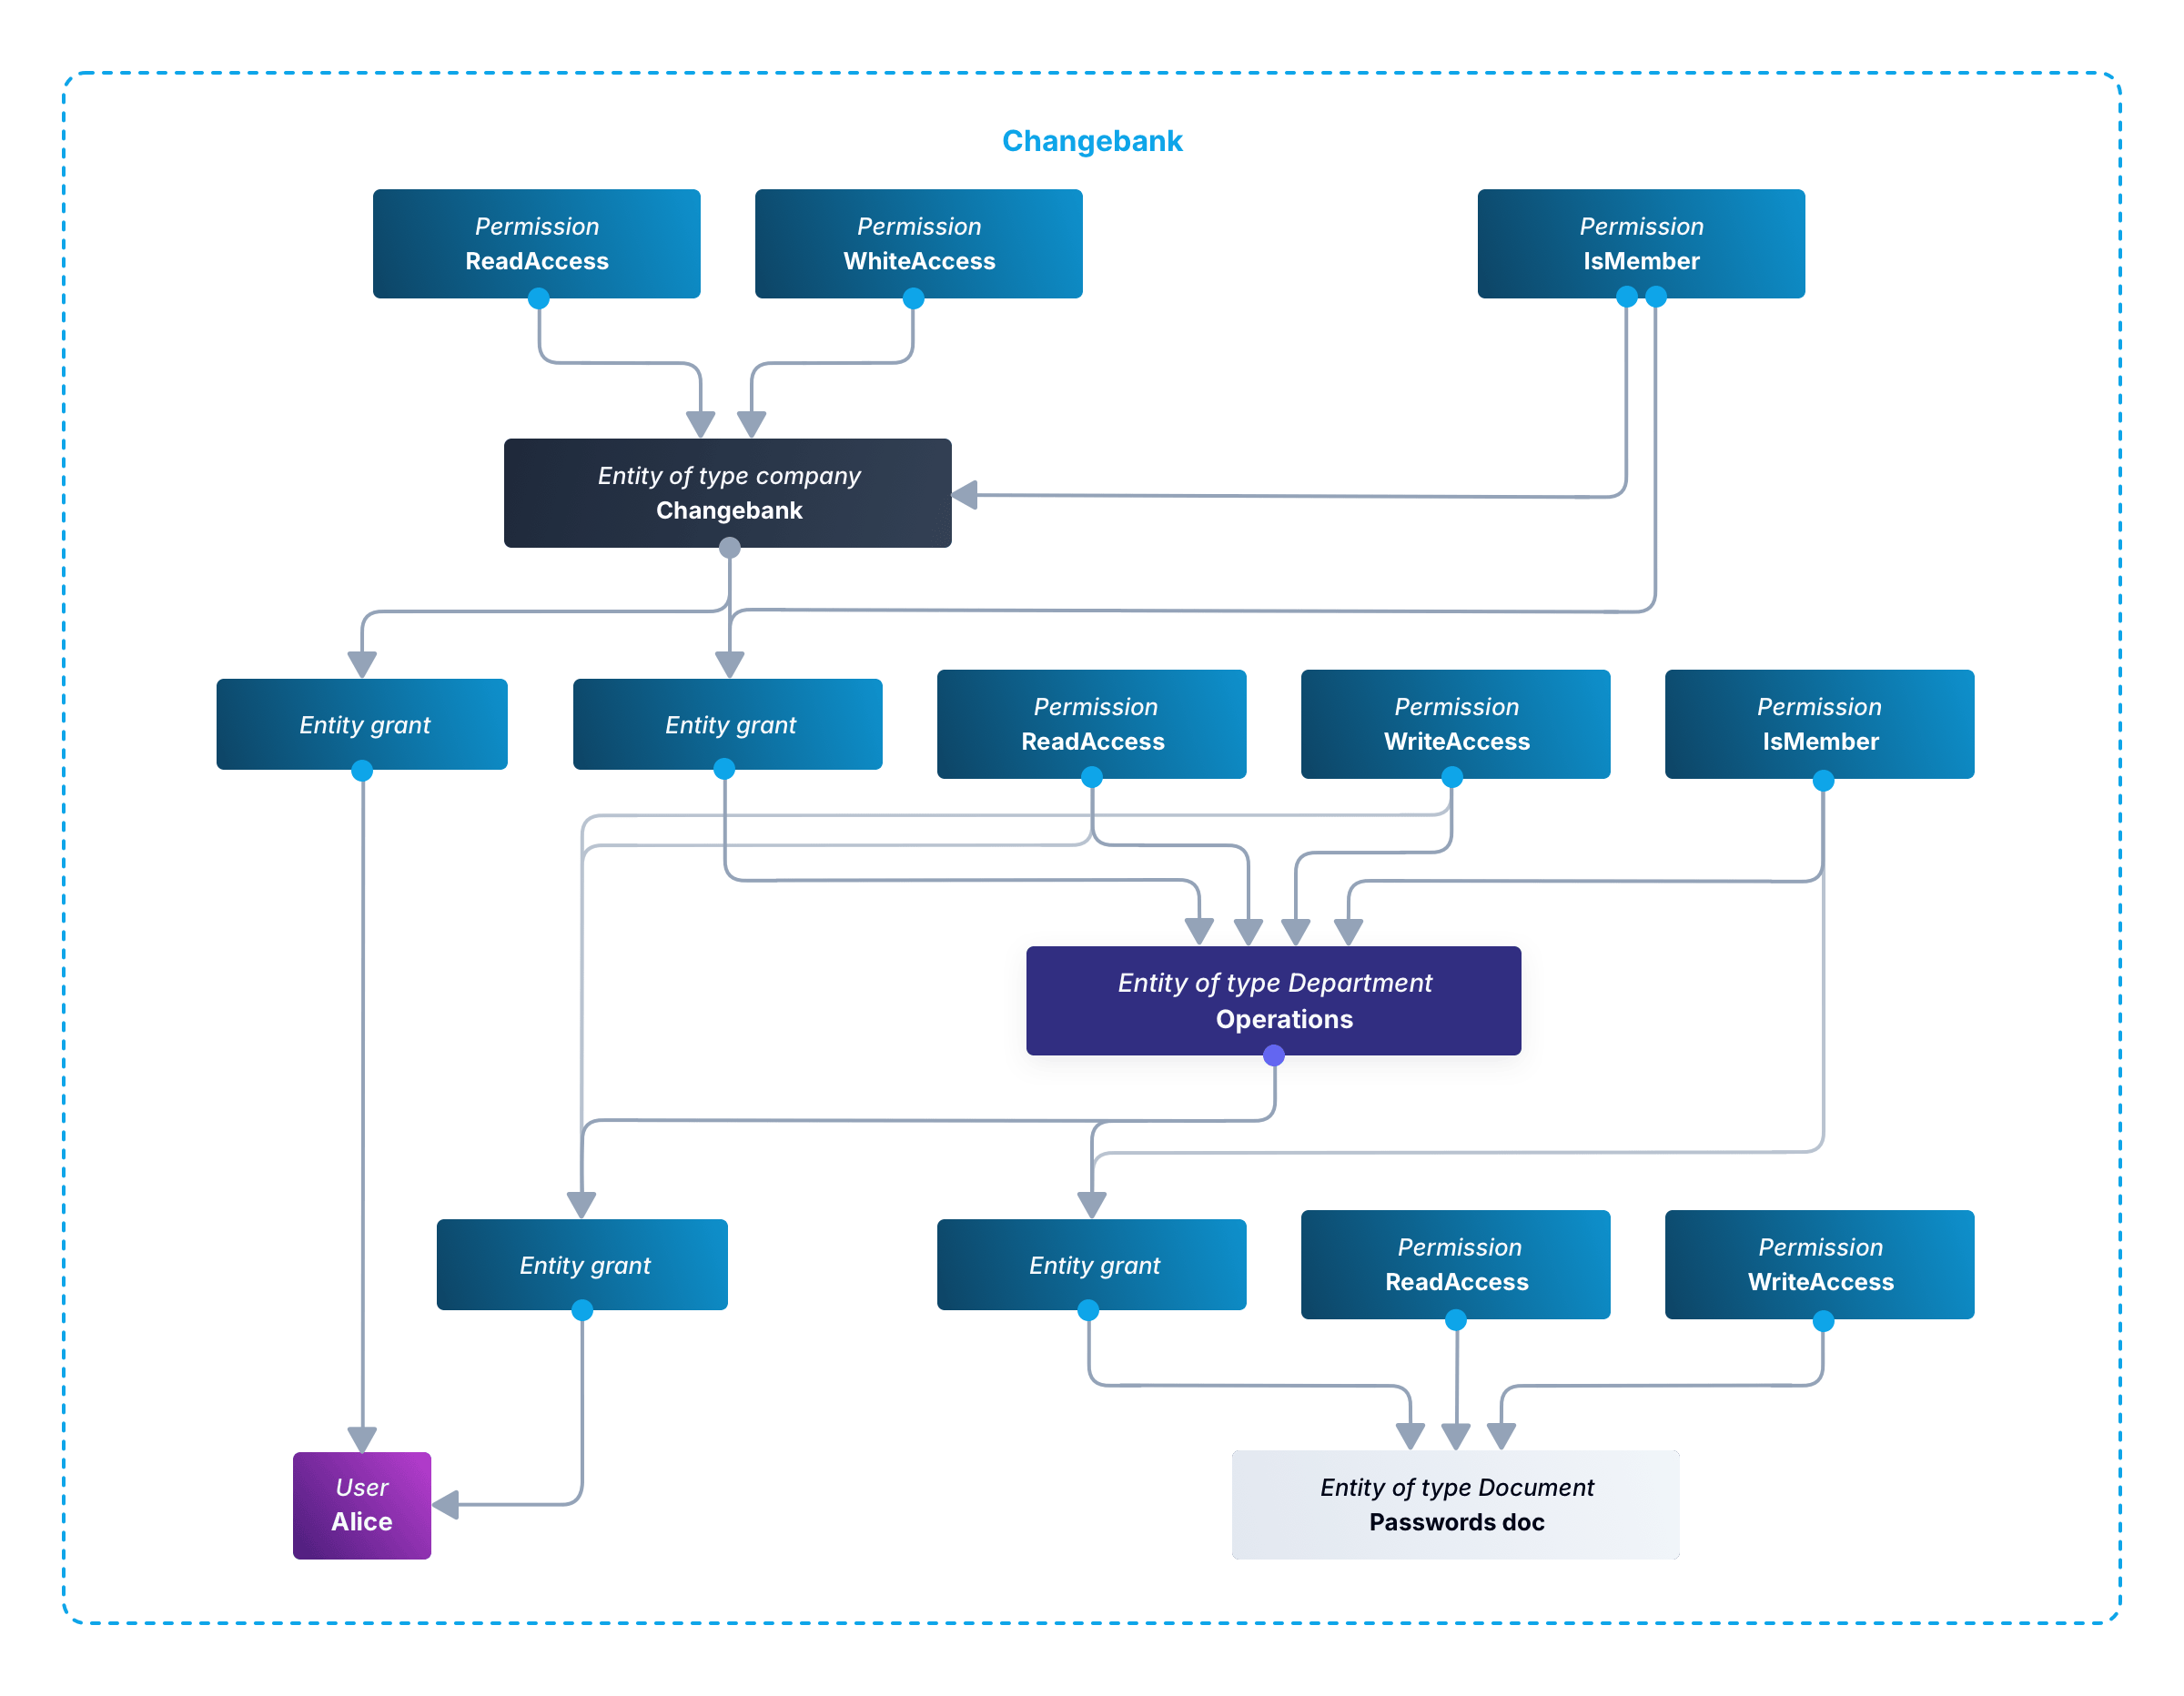
For simplicity's sake, this diagram does not include the Change Corp entity of entity type Corporation. There are two blocks: one for Change Insurance and one for Change Bank. Ignore the Change Insurance block and concentrate on Change Bank to see how Alice is connected to her department, which is connected to the company. This diagram also shows a document attached to the Operations department. The document itself needs read and write permissions, for when you want to enable individual access, and is linked to the Operations department via an entity grant with the IsMember permission, in the same way departments are linked to companies.
Finally, note that you should use a matching UUID for every document in your document management system and in FusionAuth, to handle situations where document names and versions change.
Example Permissions Calculation Script#
This section demonstrates how to create all the entities for the example company hierarchy, and how to write a script to determine a user's permissions to any document in the hierarchy.
Download Example Project And Start FusionAuth#
Use git clone to clone the repository at https://github.com/FusionAuth/fusionauth-example-docker-compose, or download and unzip it.
Open a terminal in the directory containing the repository files.
Run the command below to start FusionAuth.
cd light
docker compose upIf you have completed any FusionAuth tutorials before, you might need to first delete any existing FusionAuth containers with the same name and the database volumes. Run the command below to do that.
docker rm fa fa_db; docker compose down -vThis command starts FusionAuth using Kickstart, which automatically creates an example application with an example user called Richard. It saves you the time of having to configure everything yourself when following this tutorial.
- Log in to your FusionAuth web interface at http://localhost:9011/admin with credentials
admin@example.comandpassword. - Browse to Reactor .
- Enter your license key to activate Reactor and refresh the page.
If you have any trouble with this tutorial, try replacing the FusionAuth image in the Docker compose file with fusionauth/fusionauth-app:1.54.0, in case future versions of FusionAuth introduced a breaking change.
Create Hierarchy Entities#
In this section, you'll create the entities and permissions in FusionAuth to represent a company hierarchy with documents.
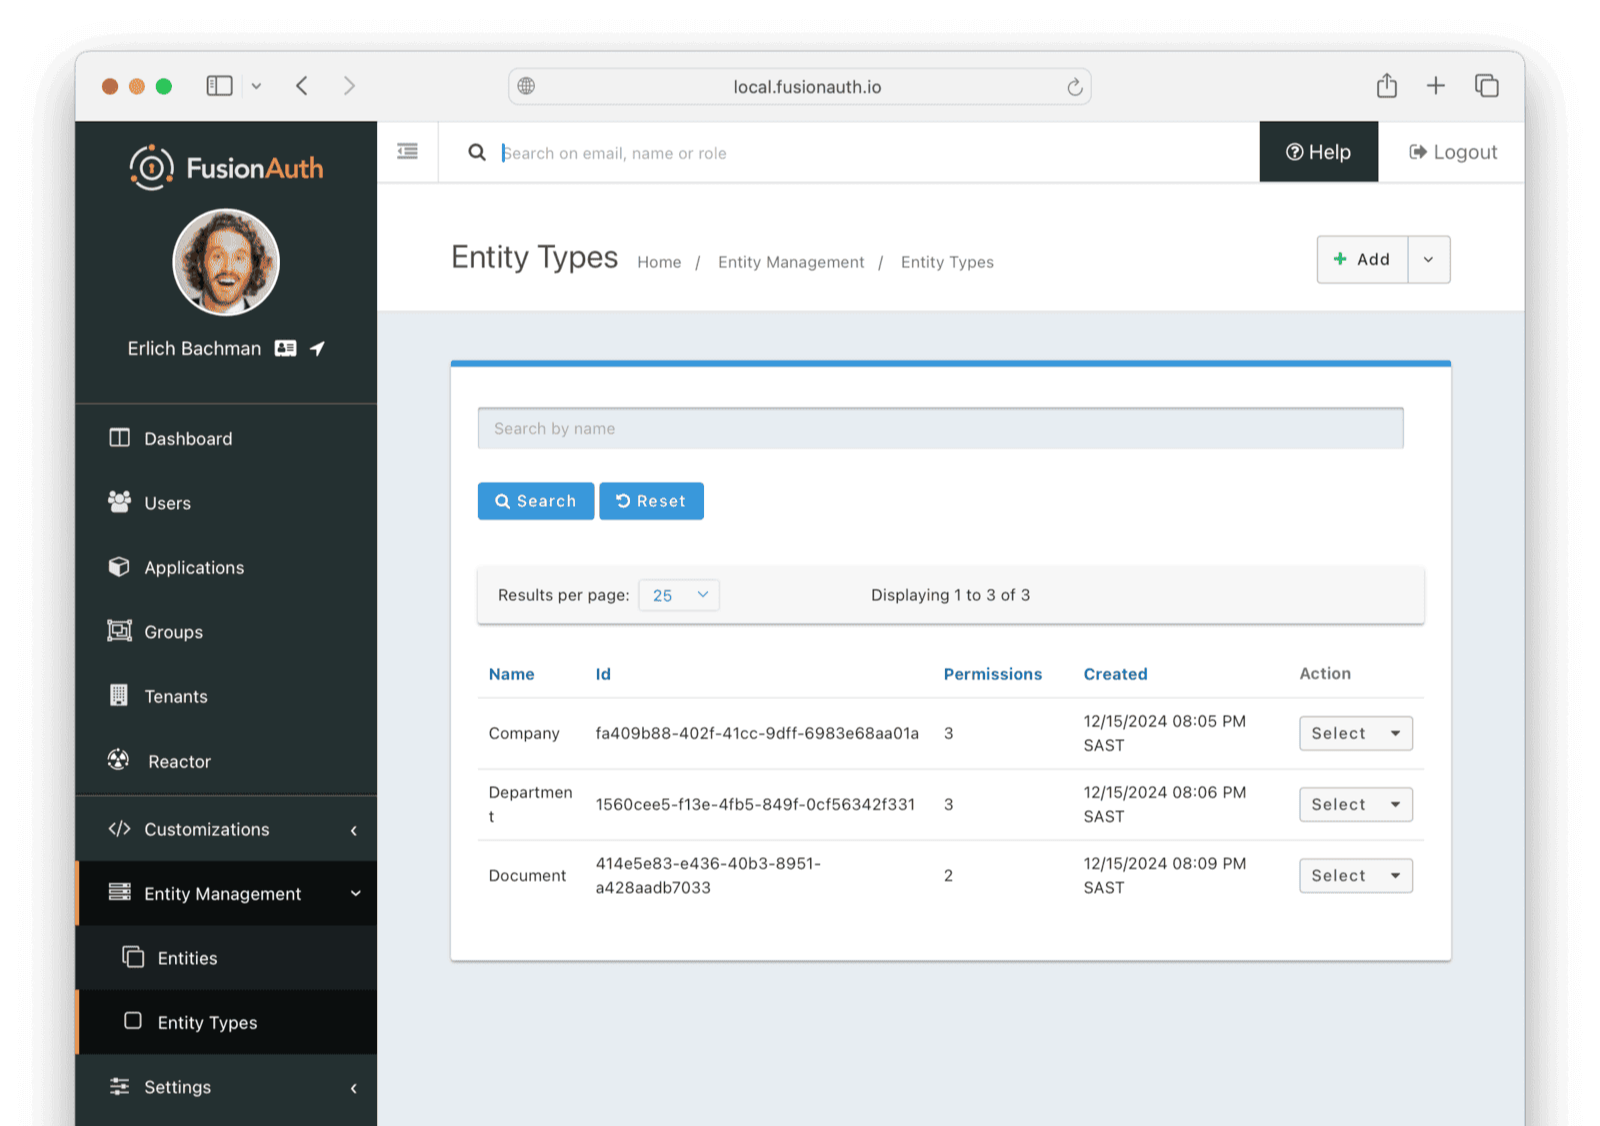
- Browse to Entity Management -> Entity Types .
- Click the + Add button.
- Name the entity type
Company. - Add the permissions
Read,Write, andIsMemberand save the entity type. - Add another entity type called
Departmentwith the same permission names and save it. - Add a final entity type called
Documentwith onlyReadandWritepermissions. Nothing can be a member of a document, so it doesn't need anIsMemberpermission.
Next you'll populate FusionAuth with some entities of these types:
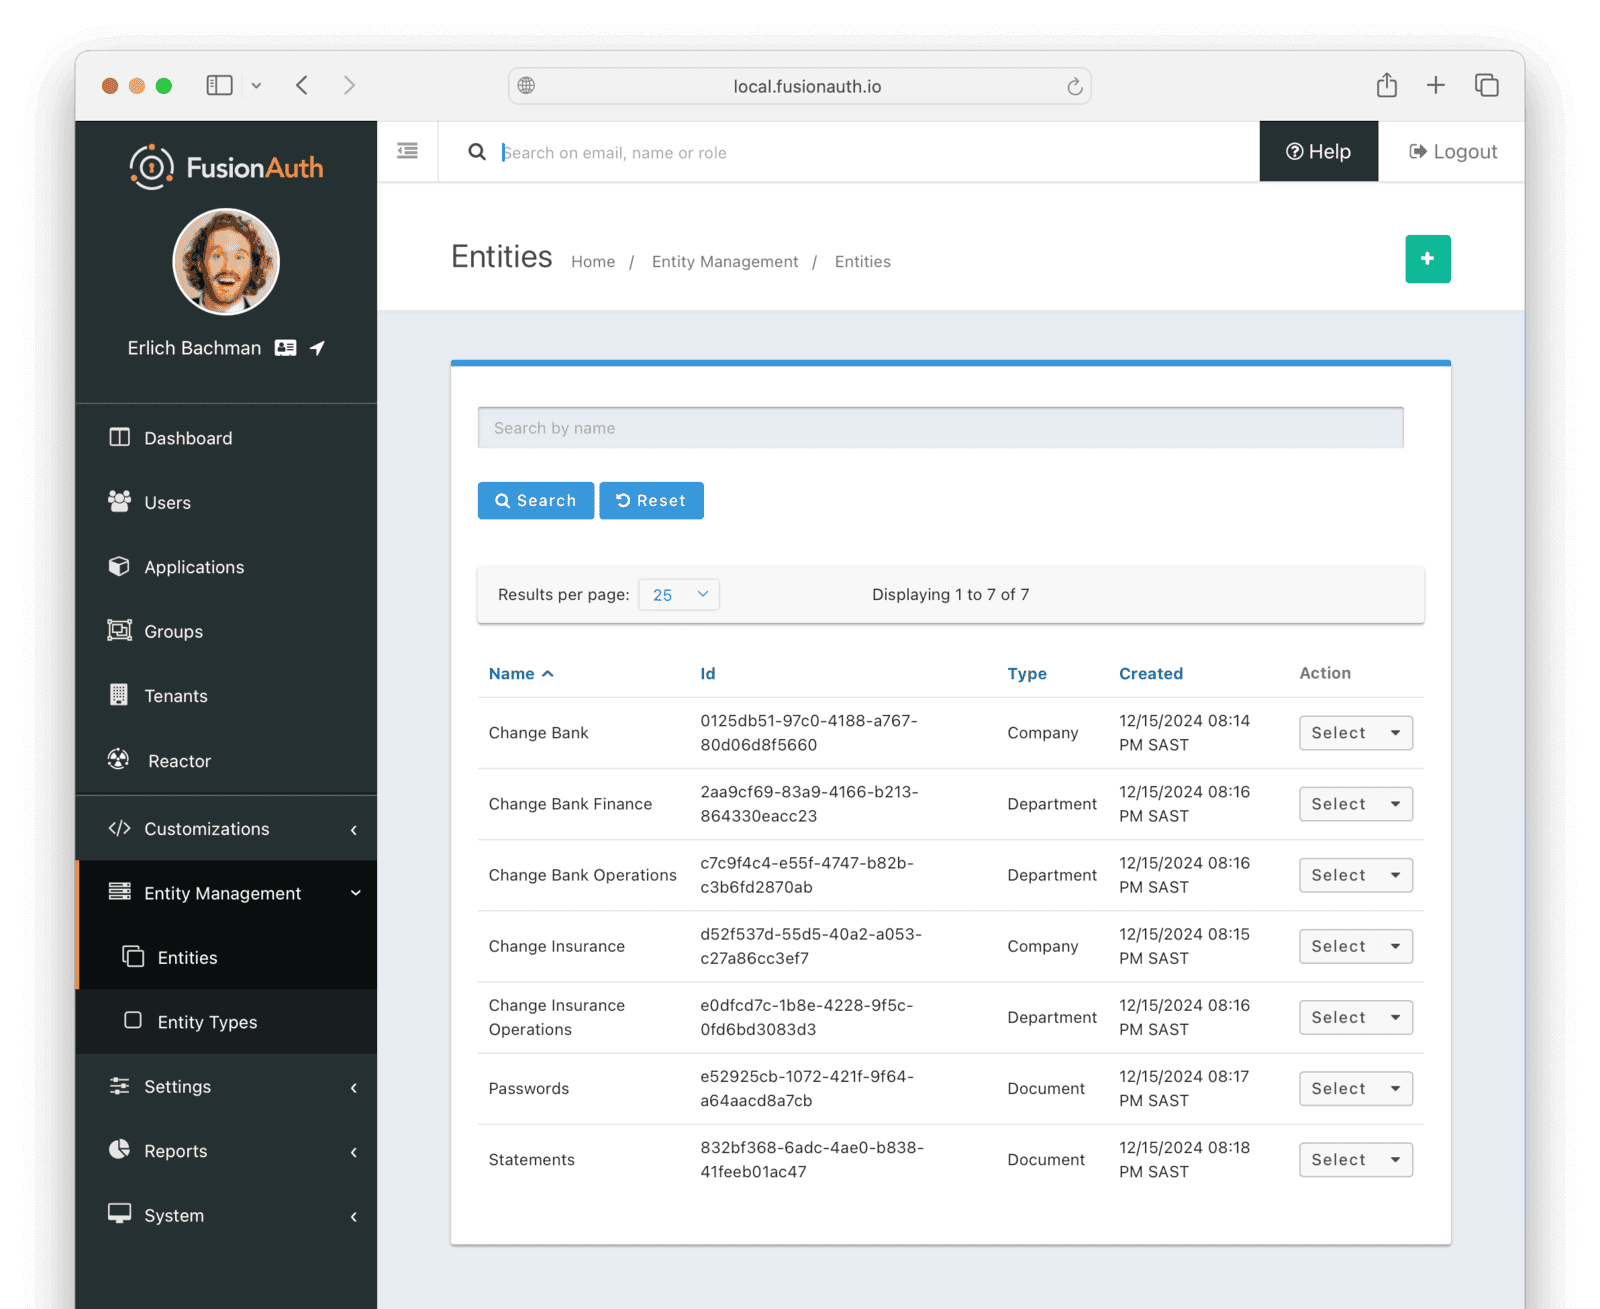
- Browse to Entity Management -> Entities .
- Add a new entity.
- For Name enter
Change Bank. - For Entity type choose
Company. - You don't need to give the entity an Id since FusionAuth alone will manage companies and users. Only documents need to share Ids between FusionAuth and your website.
- Save.
- For Name enter
- Add another entity of type Company and call it
Change Insurance. - Add another entity of type Department and call it
Change Insurance Operations. - Add another entity of type Department and call it
Change Bank Operations. - Add another entity of type Department and call it
Change Bank Finance. - Add another entity of type Document and call it
Passwords.- Give this entity the Id
e52925cb-1072-421f-9f64-a64aacd8a7cb.
- Give this entity the Id
- Add another entity of type Document and call it
Statements.- Give this entity the Id
832bf368-6adc-4ae0-b838-41feeb01ac47.
- Give this entity the Id
Finally, you need to connect the entities in a hierarchy using permissions as a link.
- In the Select menu for the Change Bank Operations department entity, click Manage .
- Click + Add to add an entity grant.
- In the search box, enter
Change Bank, and select it from the dropdown list. - Enable the IsMember permission.
- Save.
- Return to Entity Management -> Entities .
- Add the Change Bank Finance department entity to the Change Bank company in the same way as above.
- Add the Change Insurance Operations department entity to the Change Insurance company in the same way as above.
- Change Bank now has two departments and Change Insurance has one.
- Manage the Passwords document, and give it an entity grant to the Change Bank Operations department with permission IsMember.
- Manage the Statements document, and give it an entity grant to the Change Bank Finance department with permission IsMember.
Notice here that when you search for Operations, the search dropdown list provides you only the names Change Bank Operations and Change Insurance Operations, with no Ids or hierarchical links displayed. So if you had instead called both departments just Operations, without indicating the company they belonged to in their name, you wouldn't know which department to choose when trying to add the document to the department. Though it would be more elegant to call the entity by the same name as the real department, just Operations, you need to work with the limitations of FusionAuth here to create a makeshift hierarchy. Alternatively, you could create all entities programmatically using the API and entity Ids. That would allow you to use any names you wanted.
Grant Entity Permissions To A User#
You haven't set any read or write permissions yet, because those are linked only to users, or flow implicitly downwards through the company hierarchy set by IsMember. So let's add a user to the Operations department.
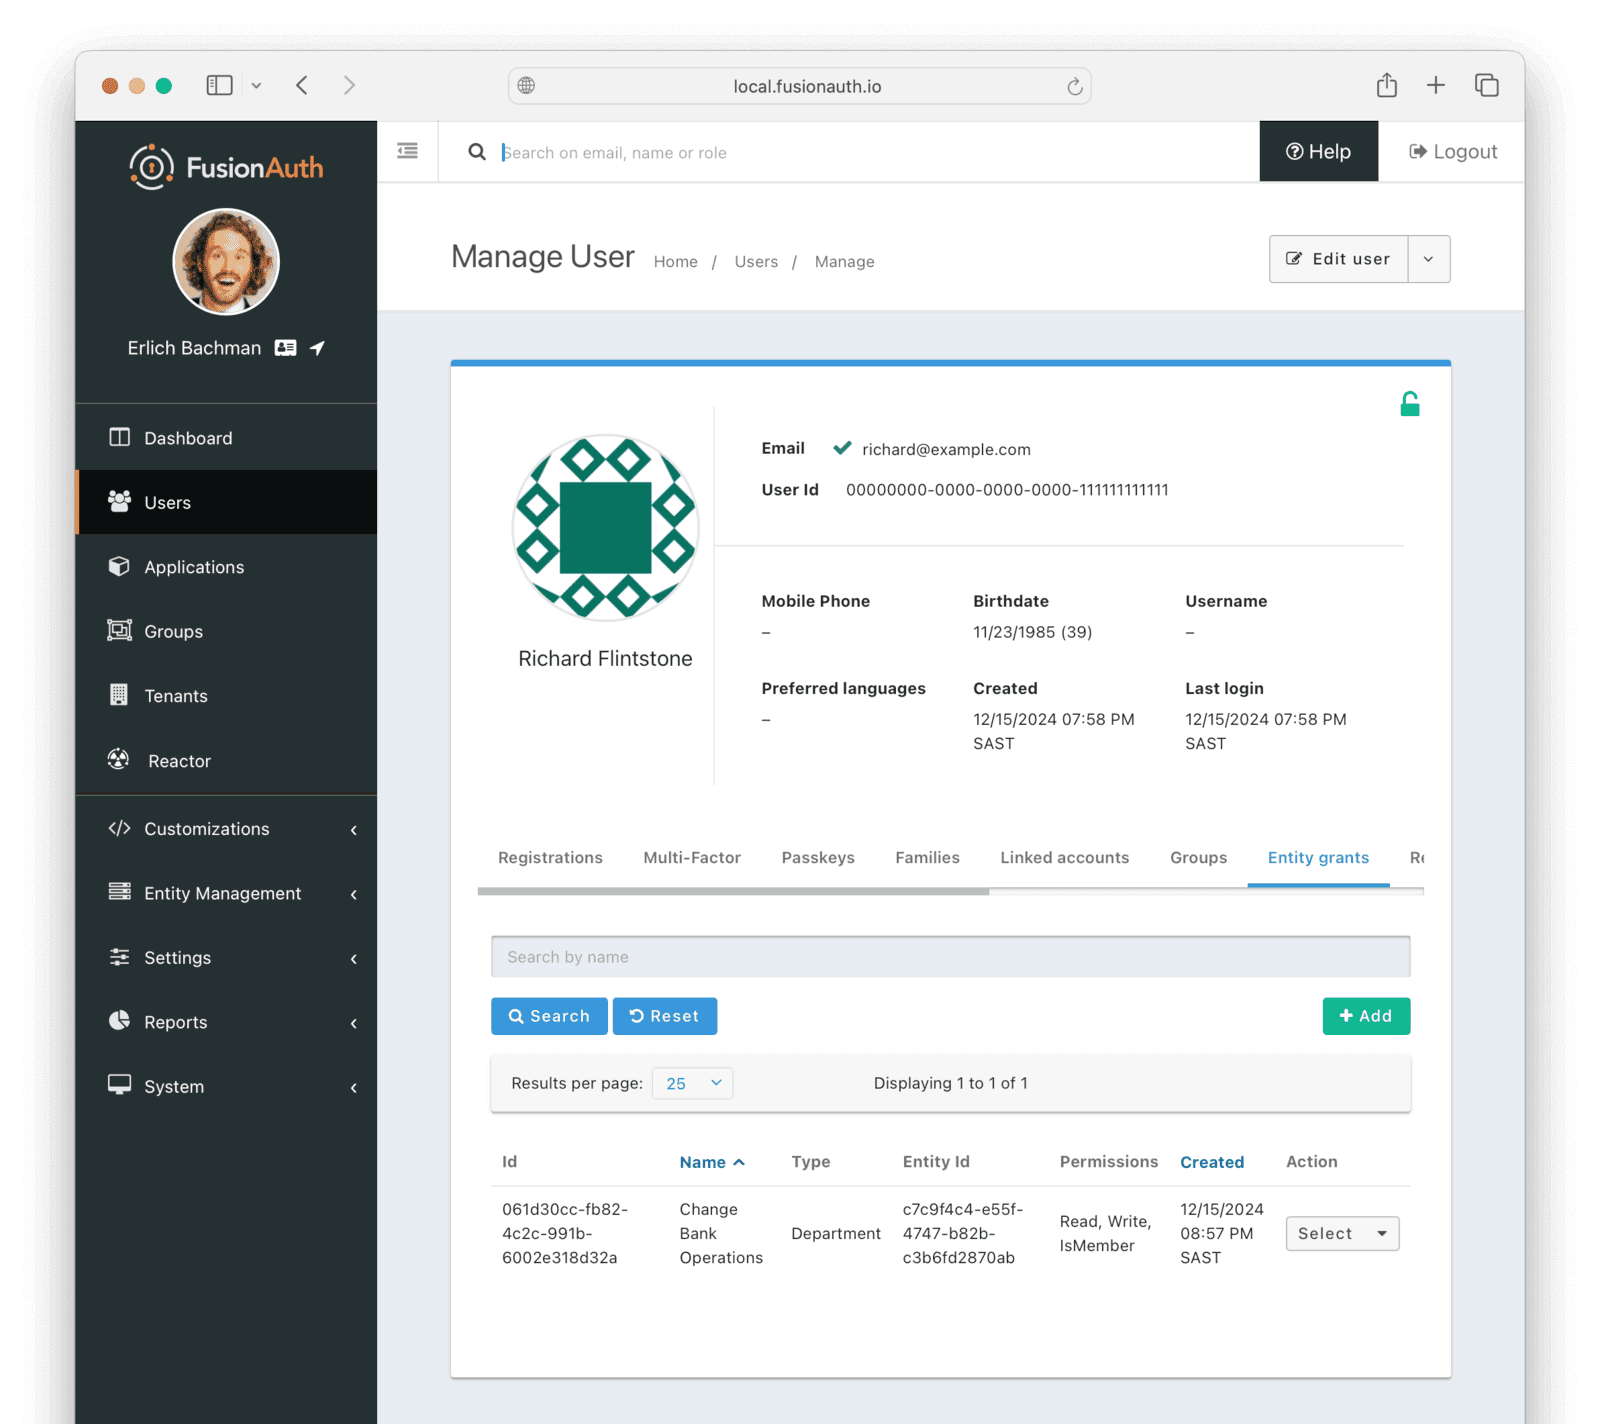
- Browse to Users .
- From the Select menu for user
Richard, choose Manage . - In the Entity grants tab, click + Add .
- Search for and add
Change Bank Operations. - Enable all three permissions for the user and save.
FusionAuth now represents your corporate hierarchy and you can start work on the website.
Run Your Website To Calculate All The User Permissions#
In this section, you'll write a script to get all the direct and indirect (through the company hierarchy) permissions a user has to all documents in FusionAuth. All you need is the user's email address or Id. Though this is a simple script, you can use exactly the same code after the user has logged in to your website with FusionAuth. (To learn how to make a simple Node.js website that uses FusionAuth, read the quickstart.)
For this script, you'll use TypeScript. It's easy to make errors when working with a tree structure, like these parent and child entities. TypeScript's strong typing will prevent errors, and enable you to see exactly which properties are available on each object. If you prefer JavaScript, you can delete all the type syntax, rename the file with .js, and the code will still run fine.
Start by creating the script, called getPermissions.ts in the current light working directory, and add the type definitions below. Axios will be used to call the FusionAuth API on the network.
import axios from "npm:axios@1.7.9";

type TUser = {
  id: string,
  email: string,
};

type TEntity = {
  id: string,
  name: string,
  type: {
    id: string,
    name: string,
  }
};

type Grant = {
  id: string,
  permissions: string[]
  entity: TEntity,
};
type TUserGrant = Grant & { userId: string };
type TEntityGrant = Grant & { recipientEntityId: string };

type TPermission = {
  entityId: string,
  entityName : string,
  permissions: Set<string>
}
These types show all the objects returned when calling FusionAuth, listing only the important properties, and ignoring the other properties. An entity has only a name and a type. There are two types of grants, one for users and one for entities. Note the Id here points to the grant object itself, not the target entity. You usually want to use the Id of the entity inside the grant. A grant's permissions are an array of strings.
The goal of this script is to find the permission type: A document (an entity with a name and Id) and all the permissions a user has to it. These permissions are a set, not an array, to avoid duplicates.
Next, add a function to calculate the user's permissions to every document, which starts with code to get the user from FusionAuth, all entities, and all grants from every entity to every other.
async function getUserPermissions(emailAddress: string): Promise<TPermission[]> {
  // get user, entities, and grants from fusionauth
  const api = axios.create({ baseURL: 'http://fa:9011/api', headers: { 'Authorization': '33052c8a-c283-4e96-9d2a-eb1215c69f8f-not-for-prod' } });

  const { data: { user } }  =              await api.get(`/user`, { params: { email: emailAddress } }) as {data: {user: TUser}};
  const { data: { grants: userGrants } } = await api.get(`/entity/grant/search?userId=${user.id}`) as {data: {grants: TUserGrant[]}};
  const { data: { entities } } =           await api.post(`/entity/search`, { search: { numberOfResults: 10000, queryString: "*" } }) as {data: {entities: TEntity[]}};

  const entityGrants: TEntityGrant[] = [];
  for (const entity of entities) {
    const { data: { grants } } = await api.get(`/entity/grant/search?entityId=${entity.id}`);
    entityGrants.push(...grants);
  }
Note that the FusionAuth API key is hardcoded into this file and passed to Axios. In reality, you should never commit your key to Git, but keep it in a .env file. The rest of the code is straightforward: It calls the FusionAuth API for each type and stores the result returned. Read more about the APIs for users, entities, and grants.
Continue the function above by calculating the permissions for the user for every document, and end the script by calling the function.
  // the goal: all documents and user's permissions to them
  const permissionsToDocuments: TPermission[] = [];

  // for each document
  for (const document of entities.filter(e => e.type.name == 'Document')) {
    // add document with no starting permissions to list of documents
    permissionsToDocuments.push({ entityId: document.id, entityName: document.name, permissions: new Set() });

    // get list of document and all ancestor entities
    const entitiesWithPermissionsToDocument : TEntity[] = [];
    let currentEntity: TEntity | null = document;
    while (currentEntity != null) {
      entitiesWithPermissionsToDocument.push(currentEntity);
      currentEntity = getEntityParent(currentEntity, entities, entityGrants);
    }

    // if user has permissions to ancestor, add those permissions to document permissions for the user
    for (const entityWithPermissionsToDocument of entitiesWithPermissionsToDocument)
      userGrants.find(grant => grant.entity.id === entityWithPermissionsToDocument.id)
        ?.permissions.map(p => permissionsToDocuments.at(-1)?.permissions.add(p));
  }

  console.log('All documents and permissions to them for ' + emailAddress + '\n');
  console.dir(permissionsToDocuments, { depth: null });
  return permissionsToDocuments;
}

function getEntityParent(entity: TEntity, entities: TEntity[], entityGrants: TEntityGrant[]): TEntity | null {
  for (const entityGrant of entityGrants)
    if (entityGrant.recipientEntityId == entity.id && entityGrant.permissions.includes('IsMember'))
      for (const parentEntity of entities)
        if (parentEntity.id == entityGrant.entity.id)
          return parentEntity;
  return null;
}

await getUserPermissions('richard@example.com');
This code is a little tricky if you haven't worked with a tree structure before. Luckily, our example assumes that every entity has only one owner (parent node), so in all searches, once you find a grant with IsMember, you know you have found the node's only parent. The code starts by looping through every entity that is a document, because you can ignore entities that aren't documents. For each document, the code gets all ancestors (the document's department and the department's company). Then it finally checks if the user has any permissions to any of those entities, and adds the permissions to the list of permissions the user has to the document.
In a new terminal, run the commands below to install Axios and run the script to check what permissions Richard has to both documents. Here, to save time, you use Docker again, with the Deno 2 image, which can run TypeScript without any compile step, as well as allowing you to freely mix JavaScript, ES modules, and CommonJS modules. In reality, you could use the TypeScript compiler, and Node, Bun, or any other JavaScript environment you like.
docker run --platform=linux/amd64 --rm --network faNetwork -v ".:/app" -w "/app" denoland/deno:alpine-2.1.3 sh -c "deno run --allow-net --allow-read ./getPermissions.ts"The result should be as below.
All documents and permissions to them for richard@example.com

[
  {
    entityId: "e52925cb-1072-421f-9f64-a64aacd8a7cb",
    entityName: "Passwords",
    permissions: Set(3) { "IsMember", "Read", "Write" }
  },
  {
    entityId: "832bf368-6adc-4ae0-b838-41feeb01ac47",
    entityName: "Statements",
    permissions: Set(0) {}
  }
]
You can see the user has permissions to the passwords document because he is a member of the Operations department where the document is a member.
The user has no permissions to the financial statements. In the FusionAuth web interface, browse to the list of users and manage Richard. Give him an entity grant with permission Write to the Change Bank entity.
Now when you run the script again, you'll see he has been given indirect write permissions to the financial statements too.
All documents and permissions to them for richard@example.com

[
  {
    entityId: "e52925cb-1072-421f-9f64-a64aacd8a7cb",
    entityName: "Passwords",
    permissions: Set(3) { "IsMember", "Read", "Write" }
  },
  {
    entityId: "832bf368-6adc-4ae0-b838-41feeb01ac47",
    entityName: "Statements",
    permissions: Set(1) { "Write" }
  }
]
Clean Up#
To remove all the Docker volumes, containers, images, and networks used in this guide, run the commands below.
docker compose down -v
docker rm fa fa_db
docker rmi postgres:16.0-bookworm fusionauth/fusionauth-app:latest denoland/deno:alpine-2.1.3
docker network prune;
Alternative Methods To Model Hierarchy In FusionAuth#
The code above demonstrates modeling hierarchies using entities, but there are other ways to model the example company structure in FusionAuth. Documents must be entities, or stored outside FusionAuth, and employees must be users. No other types in FusionAuth will work for this.
With these constraints in mind, below are alternatives to using entities and grants.
Fine-Grained Authorization#
This feature is only available in the Enterprise plan. To learn more, see our pricing page.
Fine-grained authorization (FGA) allows for more granular permissions than Entities, including:
- attribute based access control (ABAC), where you can limit access based on attributes of the request or objects being accessed. For instance, you could limit access to a system based on time of day.
- relationship based access control (ReBAC), where you make authorization decisions based on relationships. For instance, you could grant access to subfolders based on who has access to parent folders.
To use FGA, you use FusionAuth FGA by Permify, a standalone authorization server.
For example, you could use FGA to model corporate, department, and document relationships using the following schema:
entity user {}

entity corporation {
    // Direct permission grants
    relation reader @user
    relation writer @user

    // Permissions
    permission read  = reader or writer
    permission write = writer
}

entity company {
    // Hierarchy: a company belongs to a corporation
    relation parent @corporation

    // Direct permission grants
    relation reader @user
    relation writer @user

    // Permissions inherit from parent corporation
    permission read  = reader or writer or parent.read
    permission write = writer or parent.write
}

entity department {
    // Hierarchy: a department belongs to a company
    relation parent @company

    // Direct permission grants
    relation reader @user
    relation writer @user
    relation member @user

    // Permissions inherit from parent company
    permission read  = reader or writer or member or parent.read
    permission write = writer or member or parent.write
}

entity document {
    // Hierarchy: a document belongs to a department
    relation parent @department

    // Direct permission grants
    relation reader @user
    relation writer @user

    // Permissions inherit from parent department
    permission read  = reader or writer or parent.read
    permission write = writer or parent.write
}
FusionAuth FGA by Permify has the following benefits:
- permissions are propagated without any manual coordination or calculation
- ABAC support without code
- efficient answers to queries like "which resources can this user access?" and "which users can access this resource?"
- permissions can be checked in bulk
Use one of the supported authorization SDKs to check permissions within your application:
const response = await client.permission.check({
  tenantId: "t1",
  metadata: {
    depth: 20
  },
  entity: {
    type: "department",
    id: "cb_operations",
  },
  permission: "write",
  subject: {
    type: "user",
    id: "richard",
  },
});

return response.can === permify.CheckResult.Allowed;
When you add a new object, update the relationships to ensure access to the documents associated with that object. Use the authorization SDKs to create and update those relationships.
To use this solution, you need to run a separate authorization server, either in your environment or in FusionAuth Cloud.
For more information, see the fine-grained authorization documentation.
Applications And Roles#
In this option, you add the finance employee, Alice, to an application representing her company and department, like Change Bank Operations application, instead of an entity representing the company. Each application will have two roles, read and write, which are effectively permissions not roles. You can't use groups instead of applications to model this example because groups do not have permissions. Alice will need to be a member of multiple applications, for different departments and companies.
You would have to keep record of what department each document belongs to outside FusionAuth. This approach offers no benefit over using entities, unless you are using the free version of FusionAuth, which does not have entities.
User JSON Data#
In this option, you store every user's company and department as properties in their JSON user.data field. This has to be done through the FusionAuth API, and cannot be maintained in the FusionAuth web interface. You will need to write your own UI app for HR staff to work with FusionAuth. With this approach, you don't need to use applications, roles, or groups. Below is example JSON data for Alice:
"permissions": {
  "Change Bank": [],
  "Change Bank Operations": ["read", "write"],
  "Change Bank Human Resources manual": ["read"],
}
The last line, regarding permissions to a document, could either be stored manually, as is shown above, or could be an entity grant from Alice to the document. If you remove the last line, you would keep only company permissions in JSON and store document permissions using entities.
Using entities, as the example script demonstrated earlier, or using JSON, are opposite approaches. Using entities explicitly stores the relationship between all organizational departments and all documents and their related permissions in FusionAuth. In contrast, using JSON doesn't use any FusionAuth features to store a user's departments and permissions. Instead, you can choose any naming scheme you want to represent your hierarchy. Here it's very important that you are able to map the text in the JSON with the names of your departments stored elsewhere. For instance, your permissions manager code would have to consistently use "Change Bank" and not "ChangeBank" for thousands of lines of JSON across hundreds of users.
If you are using the free plan of FusionAuth, using JSON might be suitable for you, but may become confusing. A better alternative would be to use FusionAuth only for user authentication, and keep all authorization and company structure information in a separate dedicated document management system that uses FusionAuth as its authentication gateway. Example document management systems that can use an external OAuth provider like FusionAuth are Nuxeo and M-Files. (There may be other document management systems that allow the use of FusionAuth, but their documentation does not state it.)