Twilio Segment
Twilio Segment consolidates information about your users from multiple sources. For instance, you might collect purchasing information from your website, interaction patterns from your mobile app, customer feedback through your support channels, and engagement data from email marketing.
This guide shows you how to send FusionAuth data to Segment. Specifically, when a user is created or updated in FusionAuth, they are added to Segment with all their metadata. When the user logs in to FusionAuth, the event is saved in Segment.
Understand The System Design#
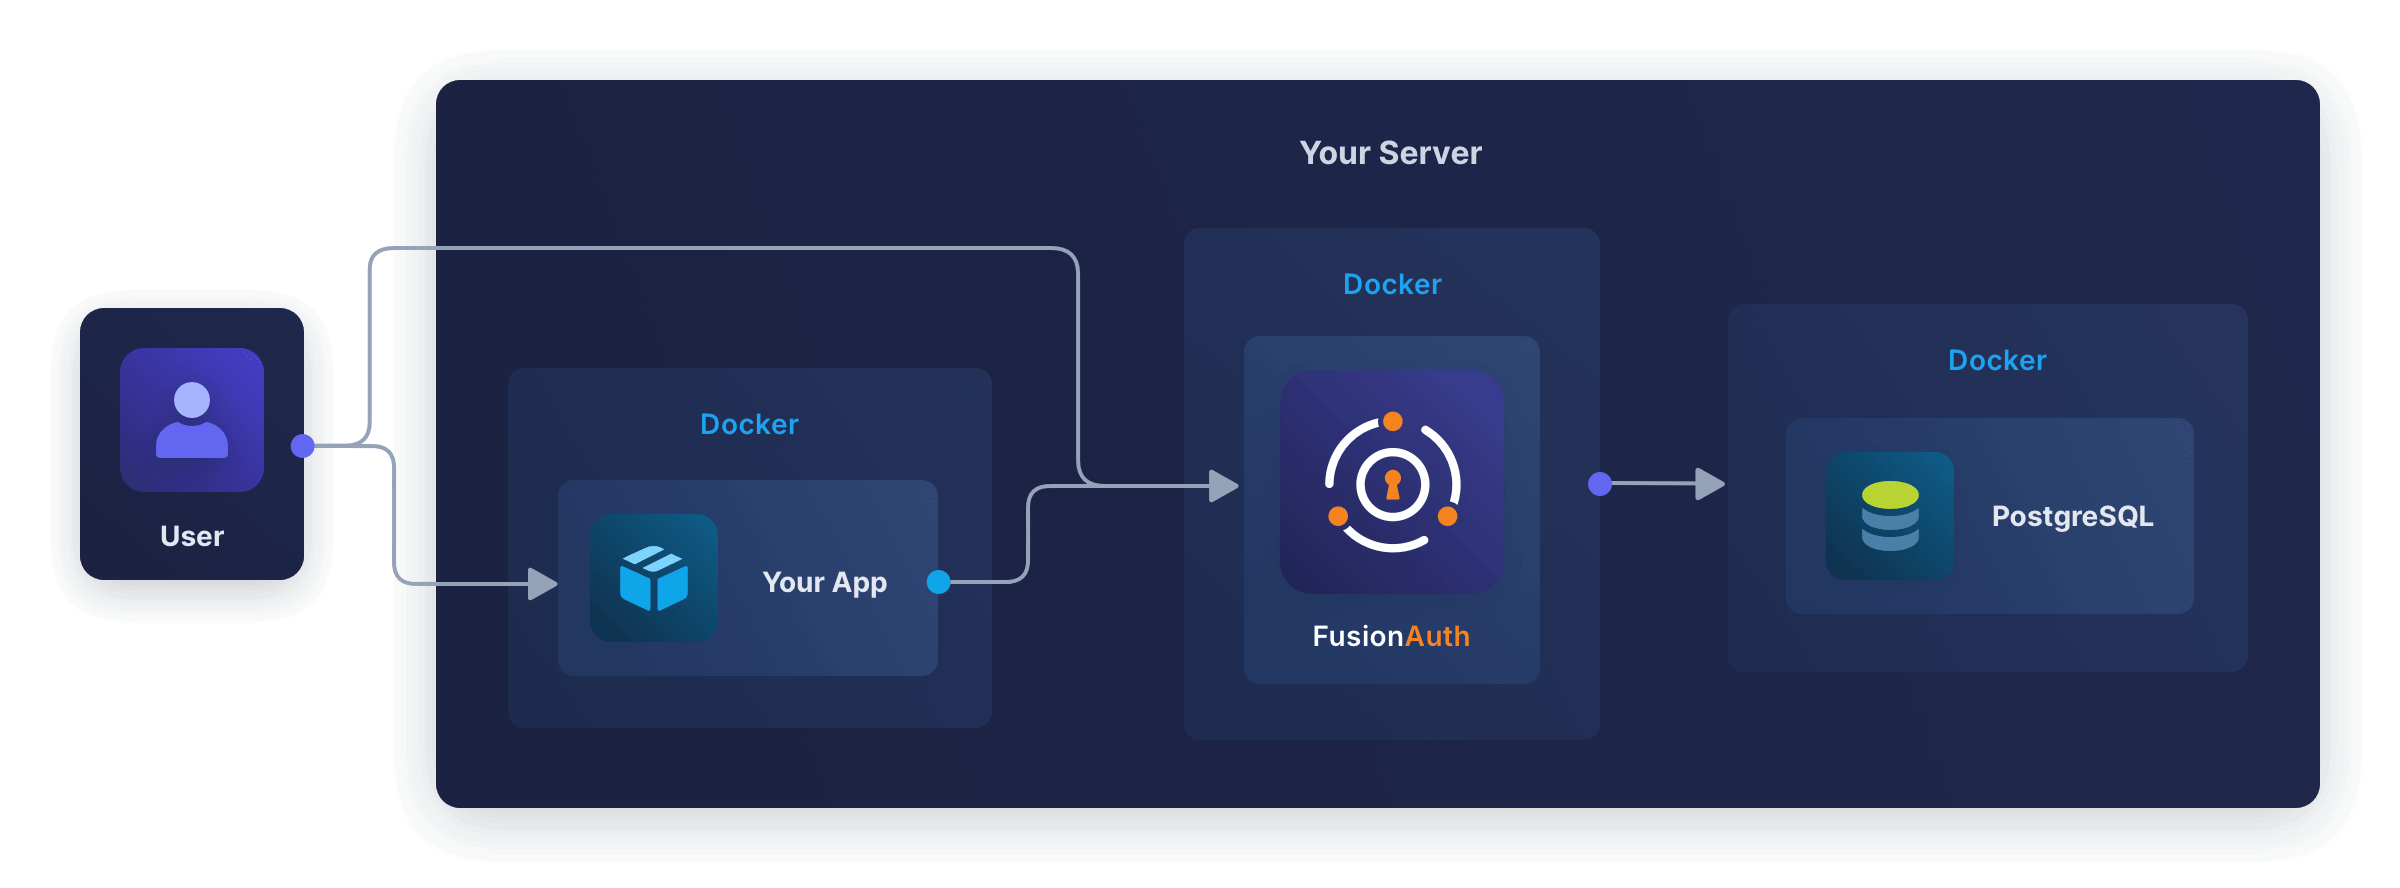
Running FusionAuth and PostgreSQL in Docker usually looks like the diagram below (you might also run OpenSearch in another Docker container).
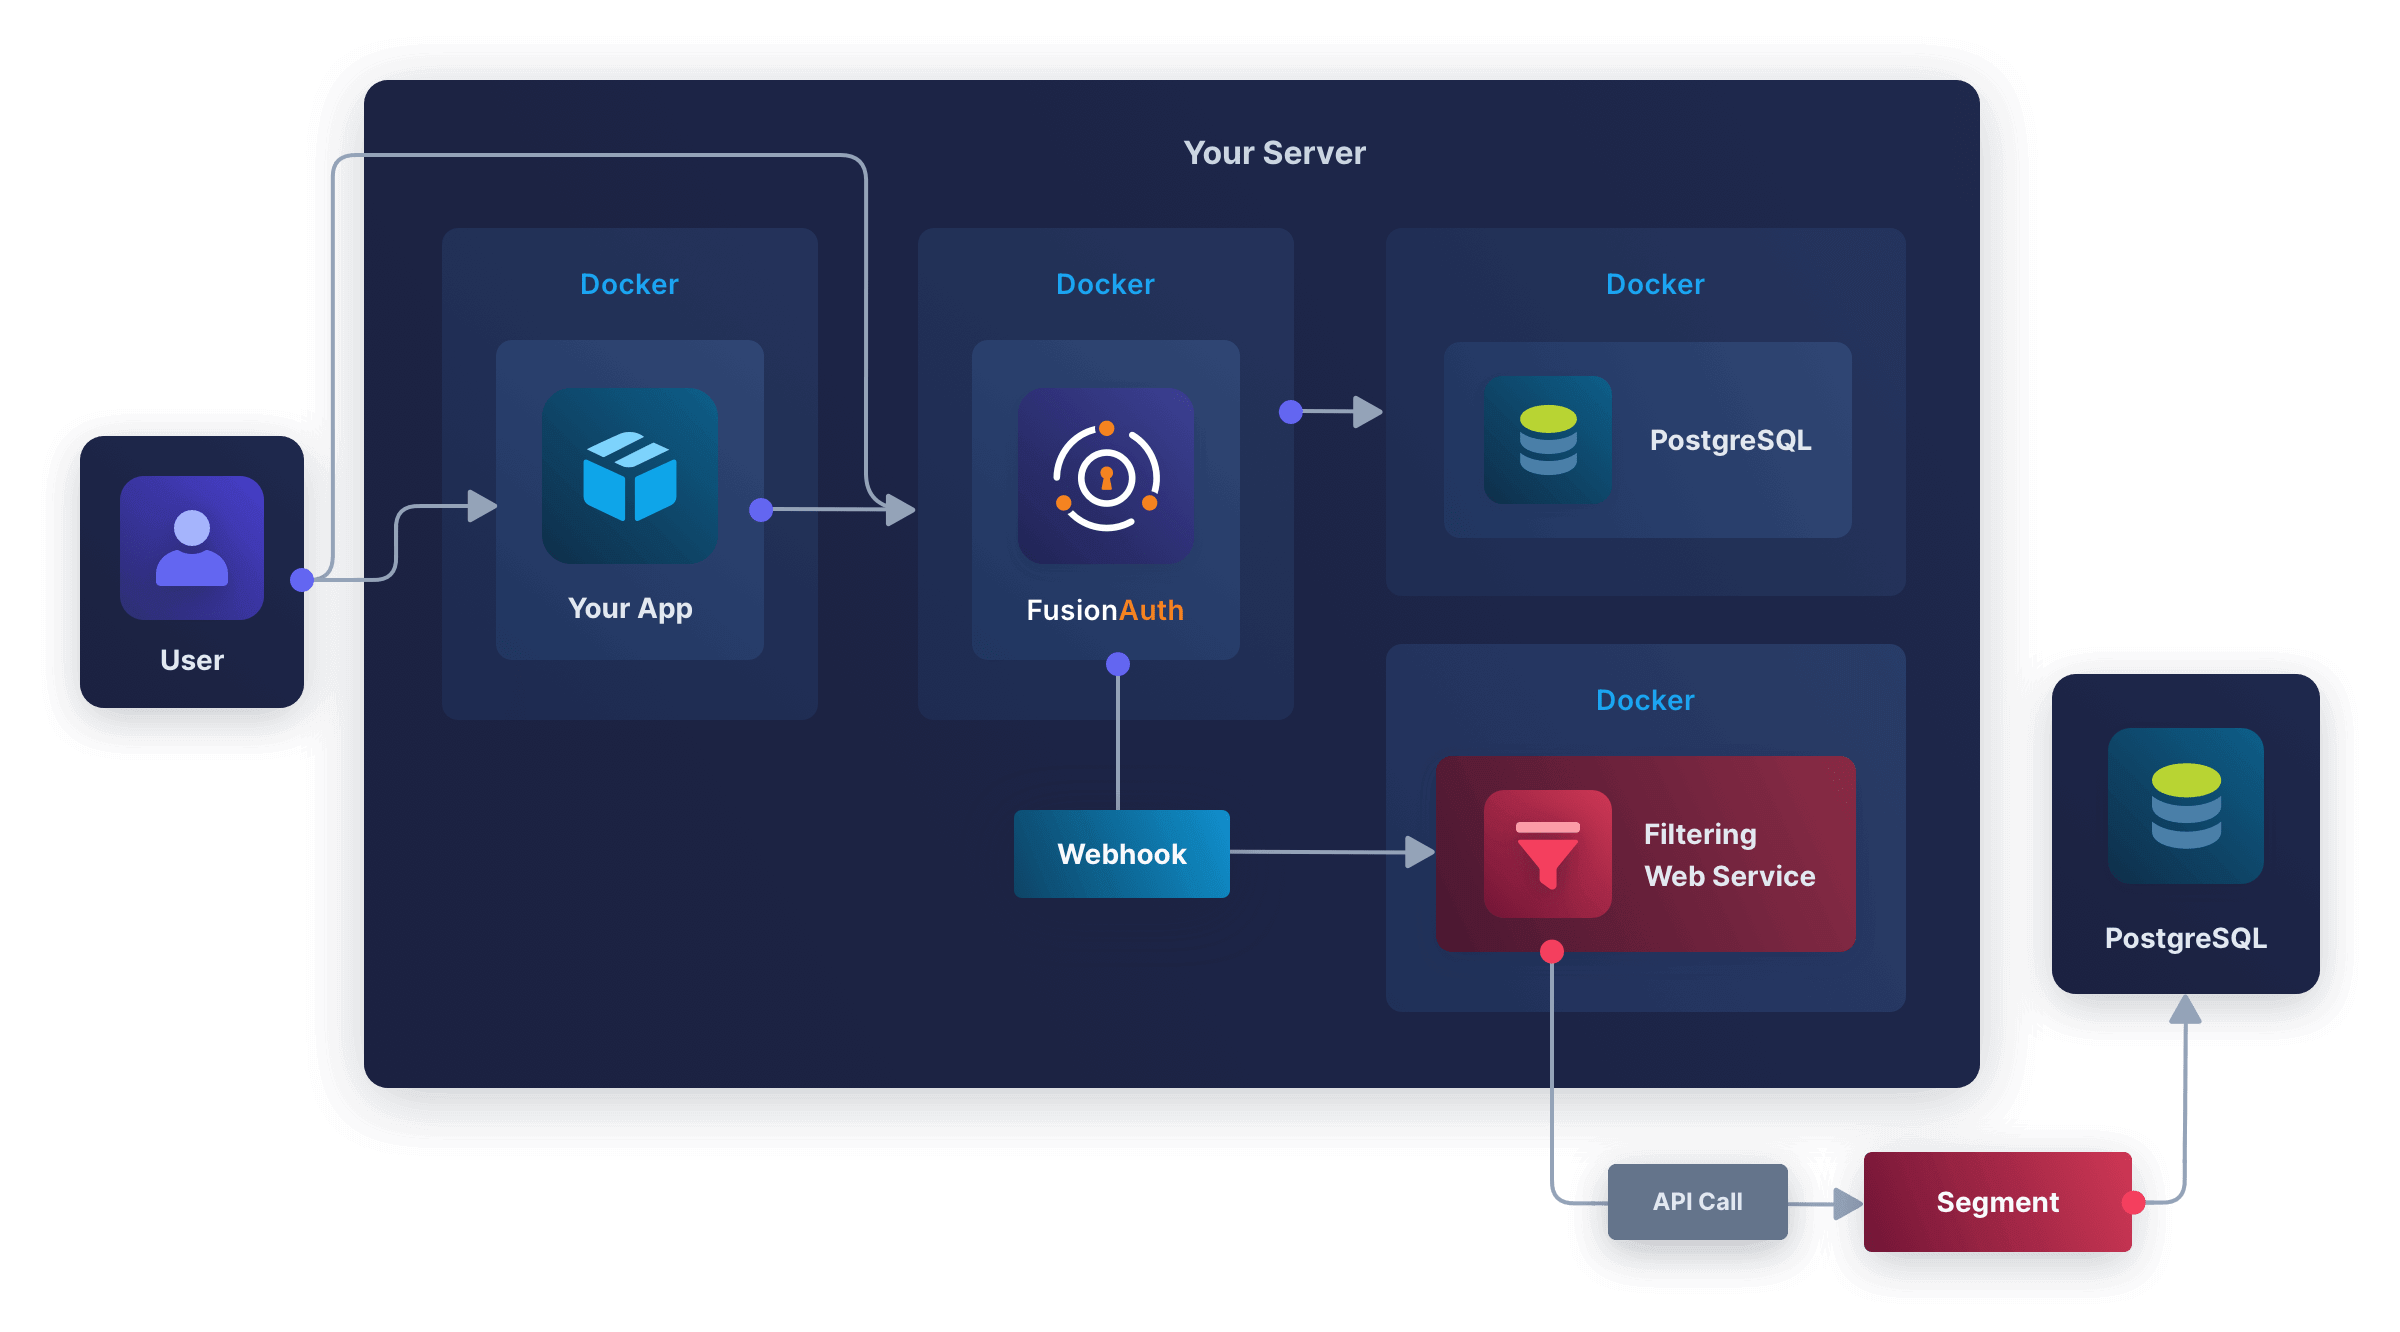
In this guide, you will use webhooks to send data from FusionAuth to Segment. Unfortunately, FusionAuth does not allow you to set which events trigger which webhooks. Instead, any event will trigger all webhooks. So you have to write an adapter web service that receives the webhook call from FusionAuth, checks what event caused the call, and forwards the appropriate information to Segment.
While Segment stores all the events you send, you can't query Segment's store to extract information. Instead, Segment is intended as a communications hub that receives data from multiple sources, filters, adjusts, and merges the data, and sends it to multiple destinations. The easiest destination to configure is a PostgreSQL database.
This design looks like the diagram below.
If you already use Segment, you will have your own data warehouse configured, and that's fine. Once you've finished following this guide, using a fresh warehouse for testing, you can add your production warehouse as a destination for the new FusionAuth source.
You're going to follow the steps below in the next sections:
- Create a free cloud-hosted PostgreSQL database.
- Create a free Segment account and connect the database as a destination and FusionAuth as a source.
- Create a filtering web service to receive FusionAuth webhooks and forward some event types to Segment.
- Run FusionAuth, create a new user, and log in with that user to test the whole system.
Create A PostgreSQL Database In Aiven#
In this section, you'll create a free fresh database to act as a Segment destination. If you already have a server with a public IP address and PostgreSQL installed, you can use that instead.
- Browse to https://aiven.io and click Get started for free .
- Sign up for a new account and create a new database. Follow the wizard to the end and wait for the new database instance to start.
- The screenshot below shows a project called
faand a database calleddefaultdb.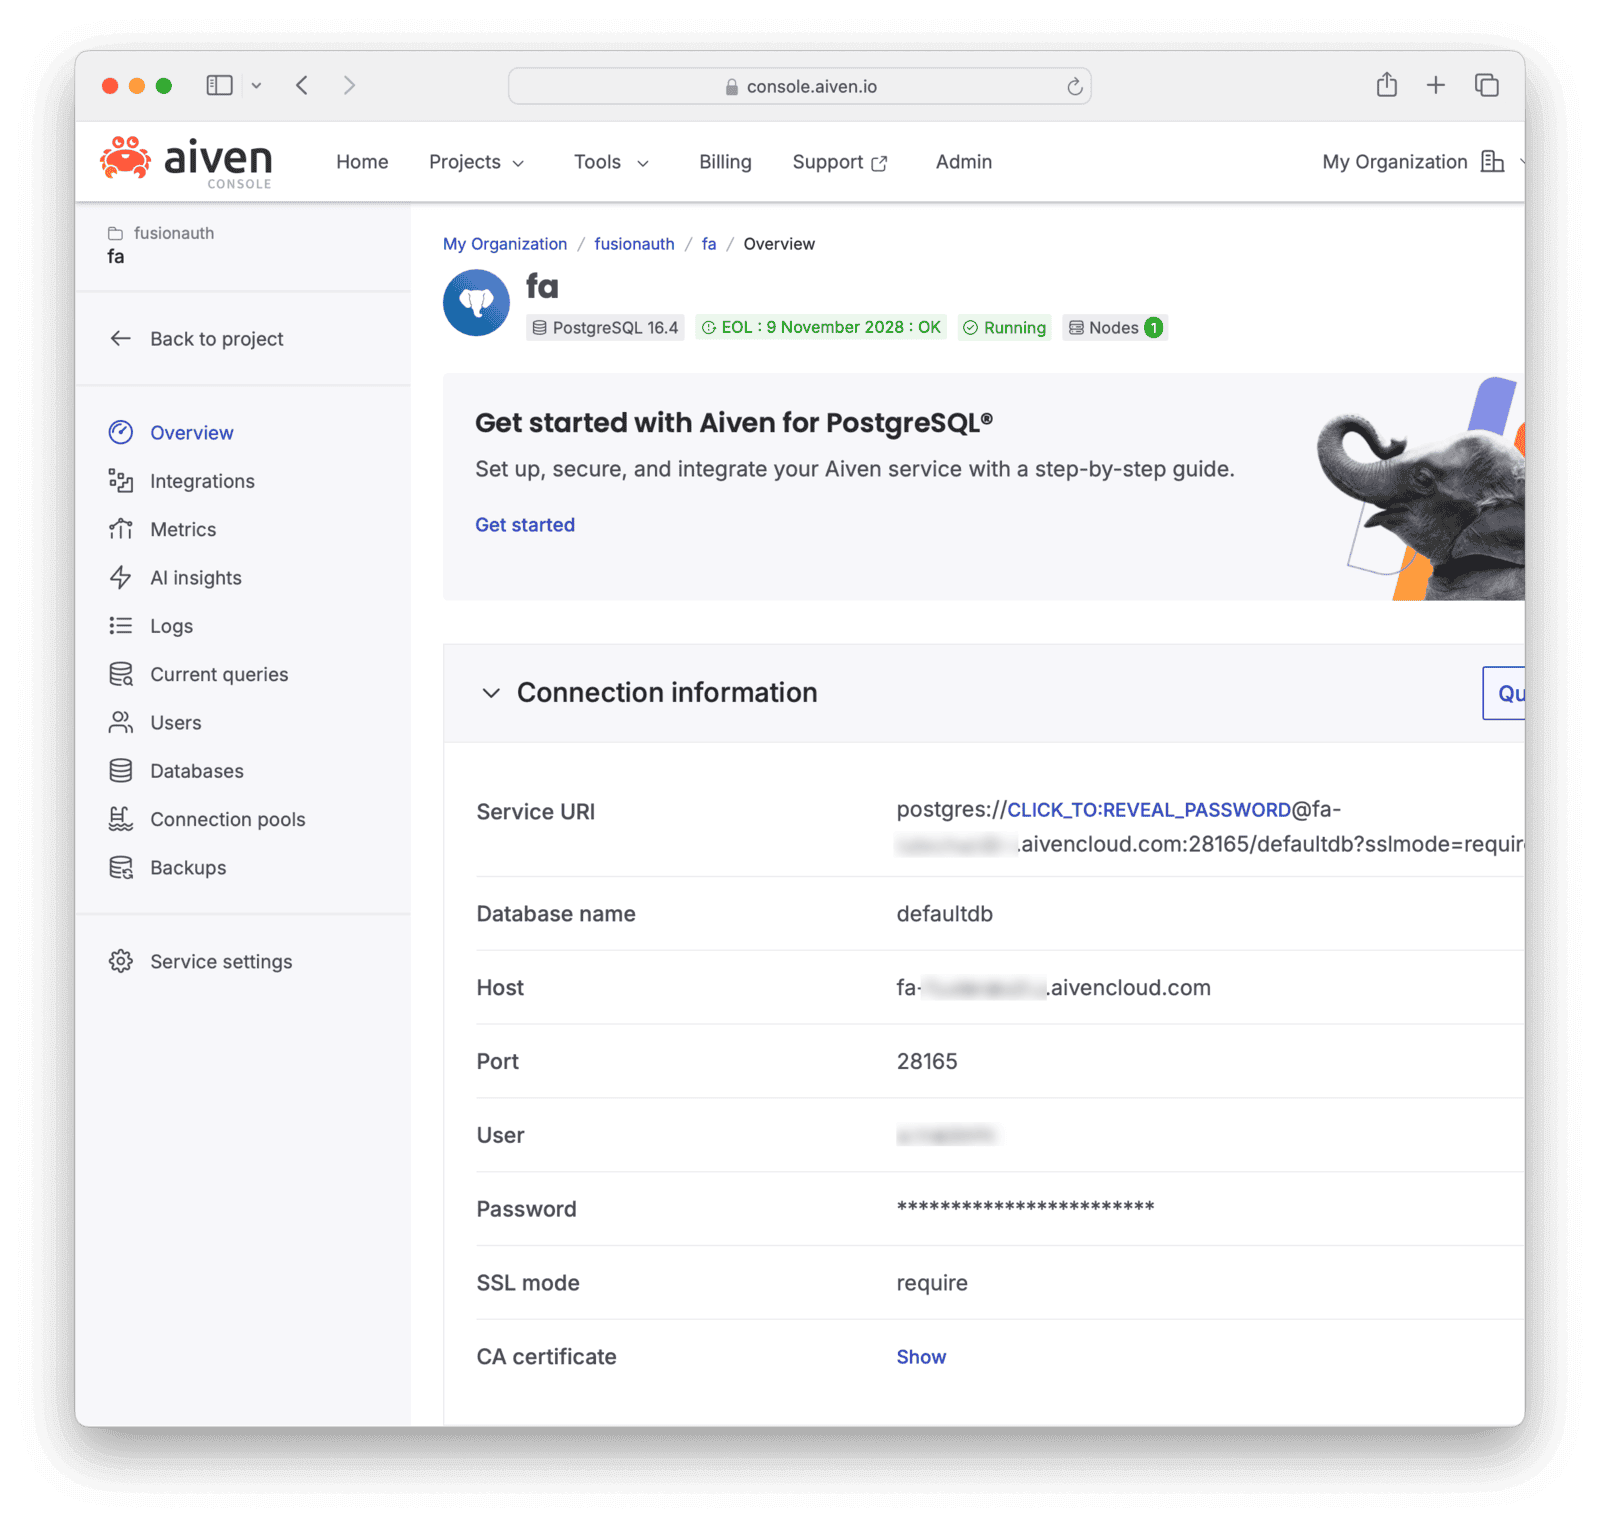
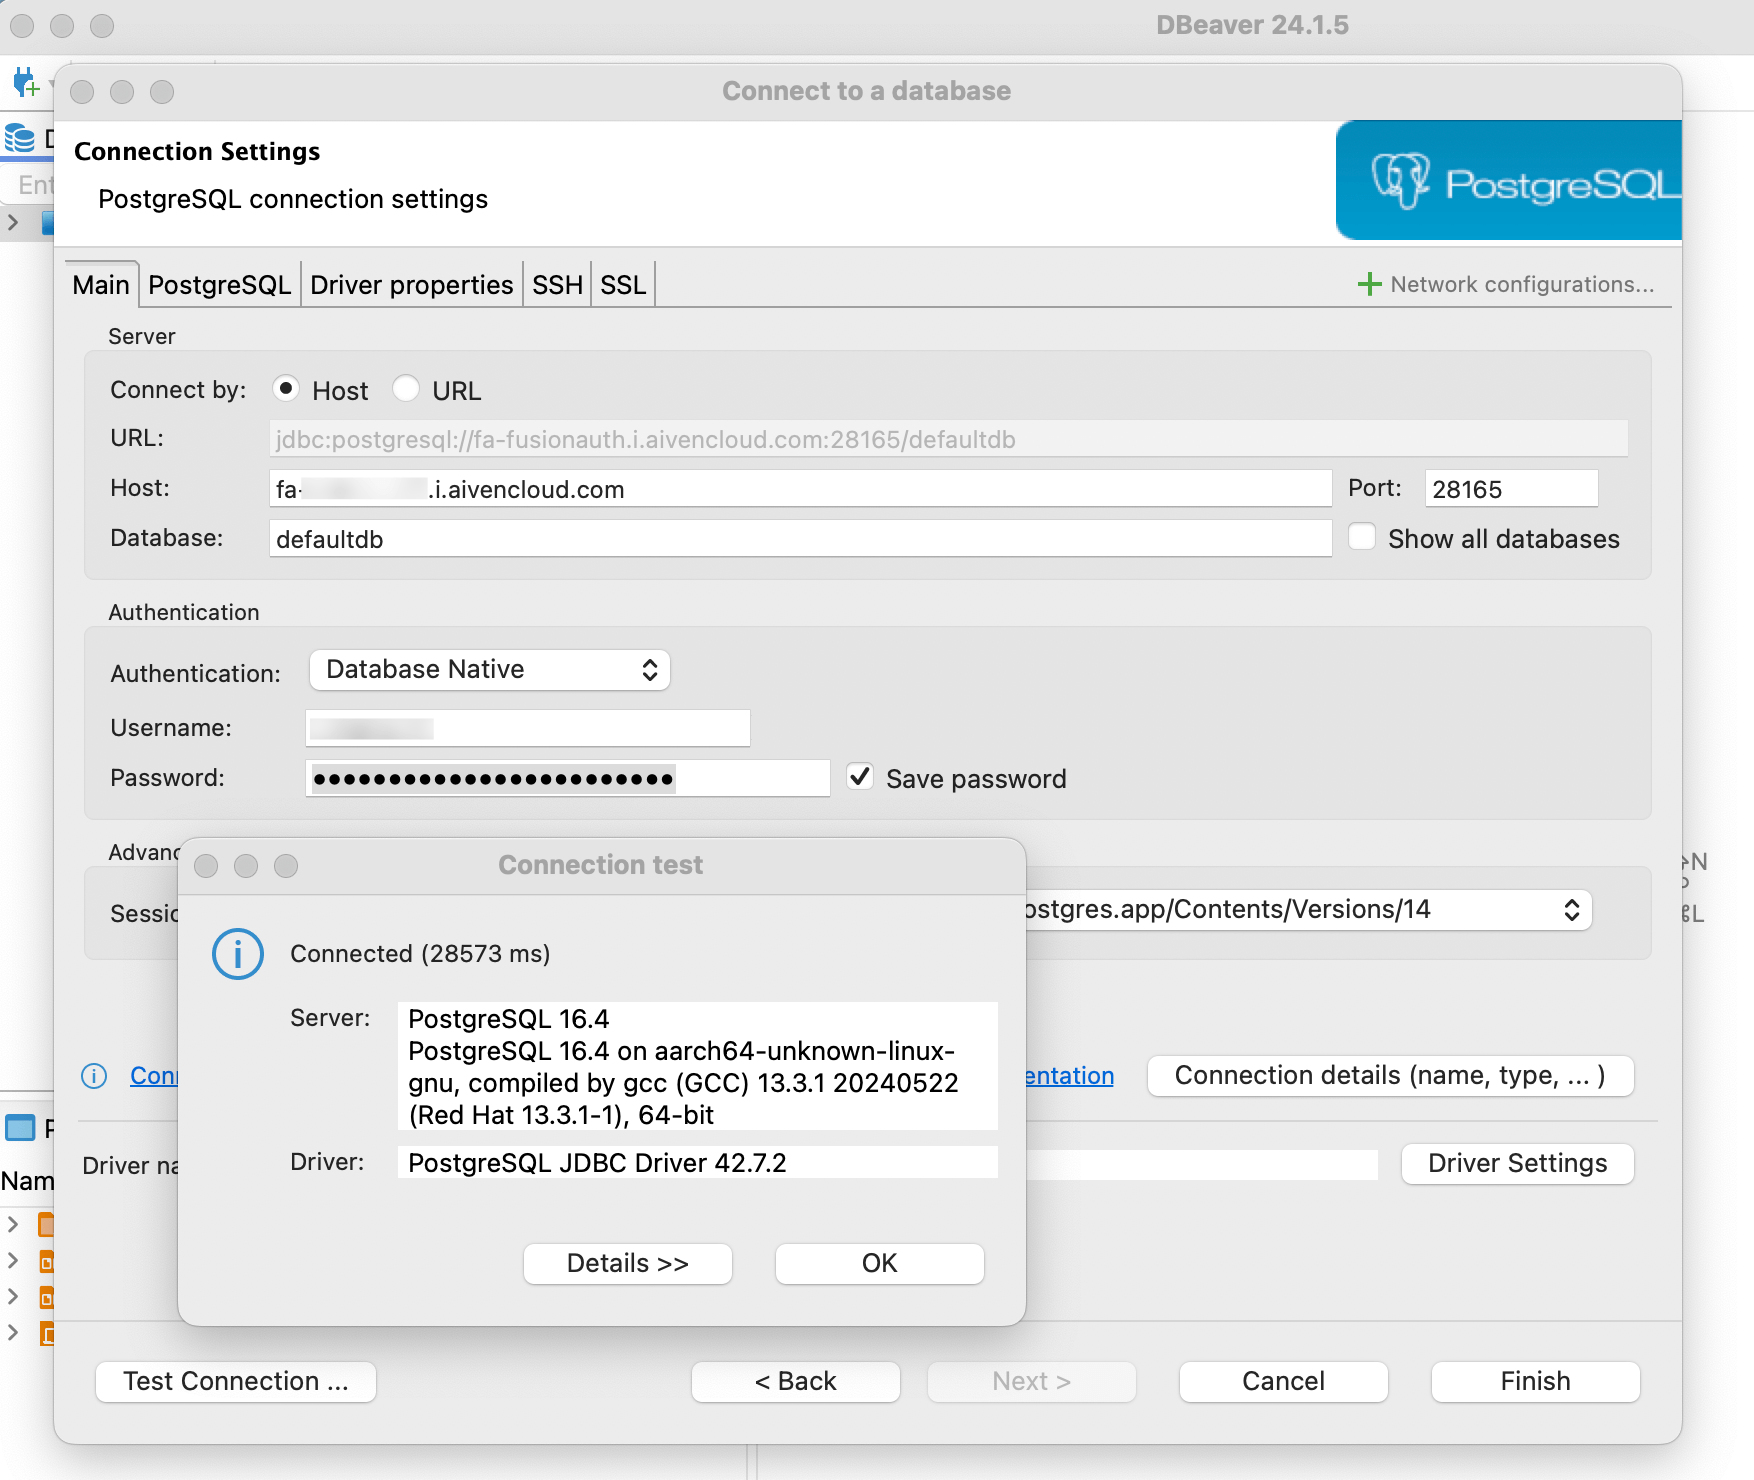
- The Aiven overview page shown above lists all the details you need to create a PostgreSQL connection: host, port, database, username, and password. You can test your connection in a cross-platform database IDE like DBeaver or Azure Data Studio (ADS). If you use ADS, install the PostgreSQL extension in the sidebar before trying to create a database connection. The details shown in the new connection window below match the ones in the Aiven list above, and will be similar for your database.
This is all you need for a Segment destination.
Other options are available, but they may be a bit more difficult to use:
- Neon.tech created a database that had connection errors from Segment ("Endpoint ID does not exist").
- Render.com needs credit card details.
- Google Sheets can be used as a destination, but requires manually-created multiple mappings between source event types and the flat format requirement for a spreadsheet. It's more tedious than using an automated relational database.
Create A Segment Account#
If you don't have a Segment account, register for one:
- Register for a new workspace at https://segment.com/signup.
- Browse to https://app.segment.com.
Add FusionAuth as a source:
- Click Connections -> Sources in the sidebar.
- Click Add source .
- Choose HTTP API and click Add Source . (The Segment API is documented here).
- Give the source the Name
fa. - Click Add Source .
- Note your Write Key. Keep it secret and do not commit it to GitHub.
Add PostgreSQL as a destination:
- Click Connections -> Destinations in the sidebar.
- Click Add destination .
- Choose Postgres .
- Add your connection details from Aiven and test the connection.
- Save and continue.
Create A Filtering Web Service#
Follow the steps below to write a web service that receives the webhook calls from FusionAuth, filters them by event, and forwards relevant events to Segment.
- Create a file called
app.mjs. You will use Node.js for the adapter web service in this guide, but the code is simple enough to easily code it in your favorite language. - Add the content below to
app.mjs. Set your_writeKeyfrom Segment.import express from 'express'; import axios from 'axios'; const _writeKey = '8iVzf647lDo07'; const _apiUrl = 'https://api.segment.io'; const app = express(); app.use(express.json()); app.post('/', (req, res) => { try { console.log(`Received event of type: ${req.body.event.type}`); if (req.body.event.type == 'user.create.complete') callSegmentIdentify(req.body); if (req.body.event.type == 'user.email.update') callSegmentIdentify(req.body); if (req.body.event.type == 'user.login.success') callSegmentTrack(req.body); if (req.body.event.type == 'user.update.complete') callSegmentIdentify(req.body); res.send('Event processed'); } catch (error) { console.log('Invalid request data'); console.dir(error); res.status(500).send('Internal server error'); } }); app.listen(80, '0.0.0.0', () => {console.log('Server running on port 80');}); function convertToDate(timestamp) { if (!timestamp) return ''; return new Date(timestamp).toISOString(); } async function callSegmentIdentify(body) { const data = { 'writeKey': _writeKey, 'event': body.event.type, 'userId': body.event.user.id, "timestamp": convertToDate(body.event.createInstant), "context": { 'ip': body.event.ipAddress, 'deviceName': body.event.info.deviceName, 'deviceType': body.event.info.deviceType, 'userAgent': body.event.info.userAgent, }, "traits": { 'data': body.event.data, "email": body.event.user.email, "firstName": body.event.user.firstName, "lastName": body.event.user.lastName, 'active': body.event.user.active, 'birthDate': body.event.user.birthDate, 'connectorId': body.event.user.connectorId, 'insertInstant': body.event.user.insertInstant, 'lastLoginInstant': body.event.user.lastLoginInstant, 'lastUpdateInstant': body.event.user.lastUpdateInstant, 'memberships': body.event.memberships, 'passwordChangeRequired': body.event.user.passwordChangeRequired, 'passwordLastUpdateInstant': body.event.user.passwordLastUpdateInstant, 'preferredLanguages': body.event.preferredLanguages, 'registrations': body.event.registrations, 'tenantId': body.event.user.tenantId, 'twoFactor': body.event.twoFactor, 'usernameStatus': body.event.user.usernameStatus, 'verified': body.event.user.verified, 'verifiedInstant': body.event.user.verifiedInstant }, }; await axios.post(`${_apiUrl}/v1/identify`, data, { headers: { 'Content-Type': 'application/json' } }) .catch(error => console.dir(error)); } async function callSegmentTrack(body) { const data = { 'writeKey': _writeKey, 'event': body.event.type, 'userId': body.event.user.id, "timestamp": convertToDate(body.createInstant), "properties": { /* none yet */ }, "context": { 'ip': body.event.ipAddress, 'deviceName': body.event.info.deviceName, 'deviceType': body.event.info.deviceType, 'userAgent': body.event.info.userAgent, 'applicationId' : body.event.applicationId, }, }; await axios.post(`${_apiUrl}/v1/track`, data, { headers: { 'Content-Type': 'application/json' } }) .catch(error => console.dir(error)); } - The Segment API endpoint URL might differ depending on whether you created your workspace in the USA or EU. Either https://events.eu1.segmentapis.com or https://api.segment.io/v1.
The code above has three important functions:
- An Express POST method listens to all incoming FusionAuth webhooks but responds only to those you care about, like the line
(req.body.event.type == 'user.create.complete'). callSegmentIdentify()calls the Segmentidentifymethod to update user information. The call is made only for FusionAuth update completed webhooks. User data goes in thetraitsproperty.callSegmentTrack()calls the Segmenttrackmethod to associate an event with a user. This script only tracks logins, but you could add any event you need. Data about the event goes in thepropertiesproperty. There isn't any data to add for a successful login.
If you want to test sending an event to Segment manually, you can run the curl command below using your writeKey.
curl -v --location 'https://api.segment.io/v1/track'   --header 'Content-Type: application/json'   --data-raw '{
    "event": "user.login.success",
    "userId": "00000000-0000-0000-0000-000000000001",
    "writeKey": "8iVzf6"
}'
The Segment API returns a successful status code for most errors. Check the debugger log on the Segment website if your data does not show in the Segment events list.
Run FusionAuth#
Now that Segment is prepared and you have a service to send events, you can start FusionAuth and begin testing.
- Install Docker if you don't have it on your machine.
- Clone the FusionAuth example Docker Compose repository to your computer.
- In your terminal, navigate to the
lightdirectory in the repository. You will work in this directory for the rest of this guide, creating files and running terminal commands. - Copy the previously created
app.mjsscript into this directory. - Edit the
docker-compose.ymlfile from the FusionAuth kickstart example project to add the new service below. The service will be a Node.js container that runs yourapp.mjsscript.fa_seg: image: segimage container_name: fa_seg networks: - db_net - Create the file
Dockerfilewith the content below.FROM --platform=linux/amd64 alpine:3.19 RUN apk add --no-cache curl nodejs npm bash RUN mkdir /app; cd /app; npm install express axios; COPY app.mjs /app/app.mjs CMD node /app/app.mjs - Run the command below to build the
segimageimage with the script.docker build --no-cache --platform linux/amd64 -t segimage . - Start FusionAuth and the filtering service with
docker compose up.
Enable Webhooks#
Now that FusionAuth is running, you can enable webhooks so that events start to flow from FusionAuth into the filtering service.
- Browse to http://localhost:9011/admin and check you can log in with
admin@example.comandpassword. - In the FusionAuth web interface, browse to Tenants .
- Edit the Default tenant.
- Click the Webhooks tab.
- Enable webhooks for the events:
- user.create.complete
Checked - user.email.update
Checked - user.login.success
Checked - user.update.complete
Checked
- user.create.complete
- Click at the top right of the page.
- Browse to Settings -> Webhooks .
- Click at the top right.
- Enter the URL
http://fa_seg. - Click at the top right. All events are enabled by default. You don't need to worry about security because the receiving service will run on the same Docker network as FusionAuth.
You can click Test on the created webhook now to see example JSON for all the events that will be sent.
Test The System#
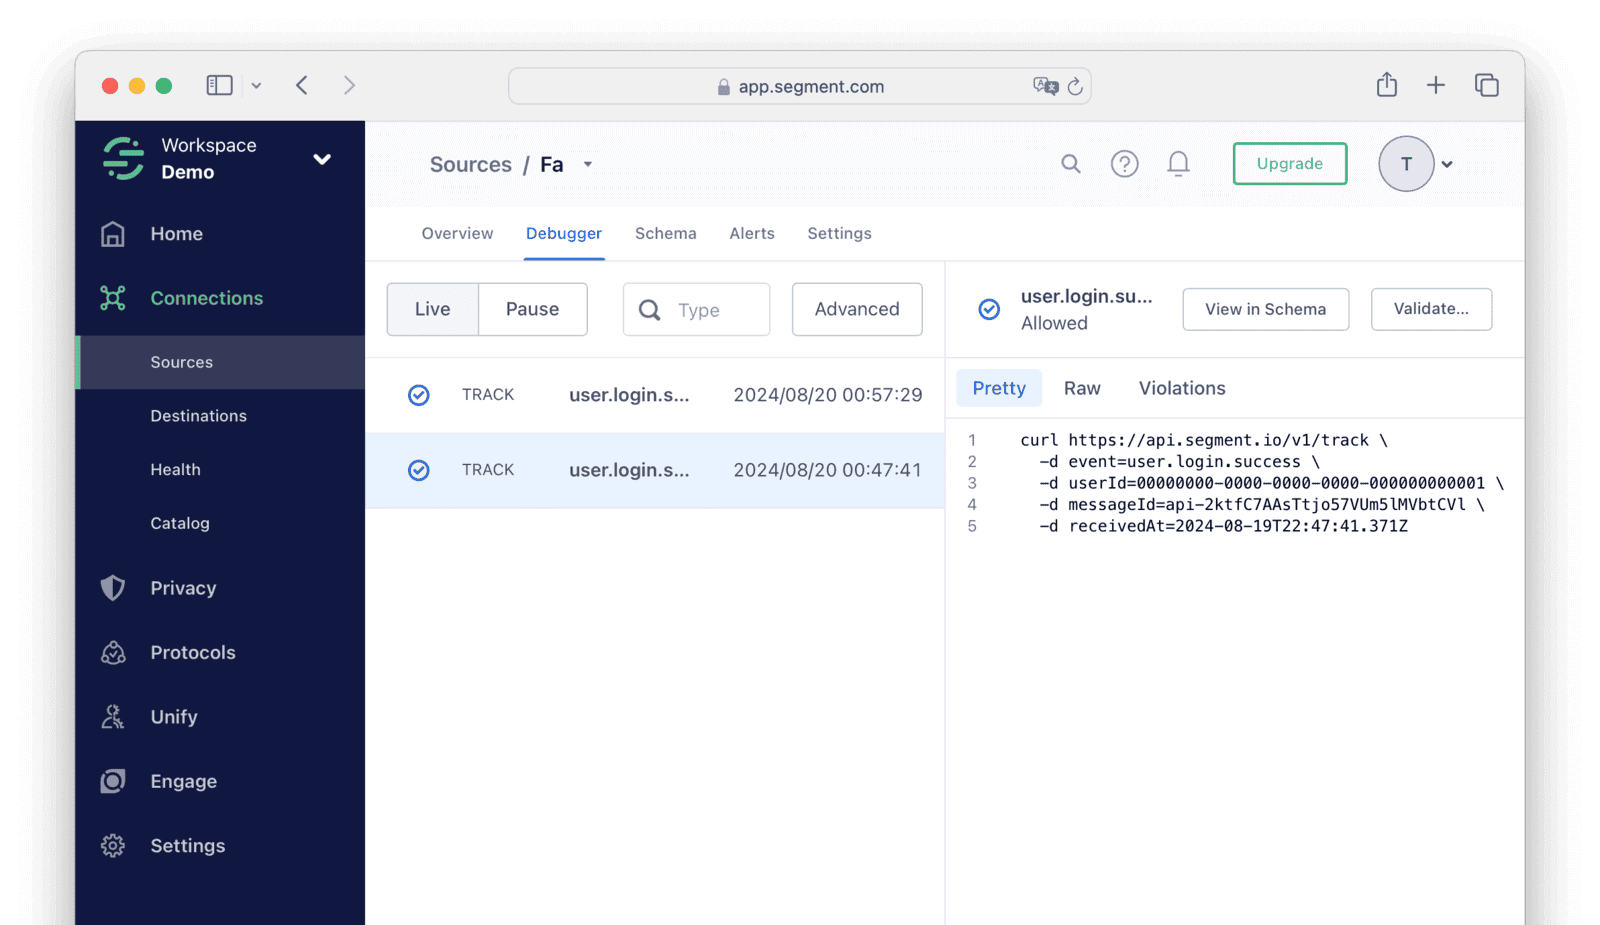
First test the track event in Segment.
Log out of FusionAuth and log in again.
In the terminal, you should see a notification from the filtering script:
fa_seg | Received event of type: user.login.successIn Segment, you should see your event arriving. You may have to refresh the page. If you cannot see your event, consult the troubleshooting section at the end of this guide.
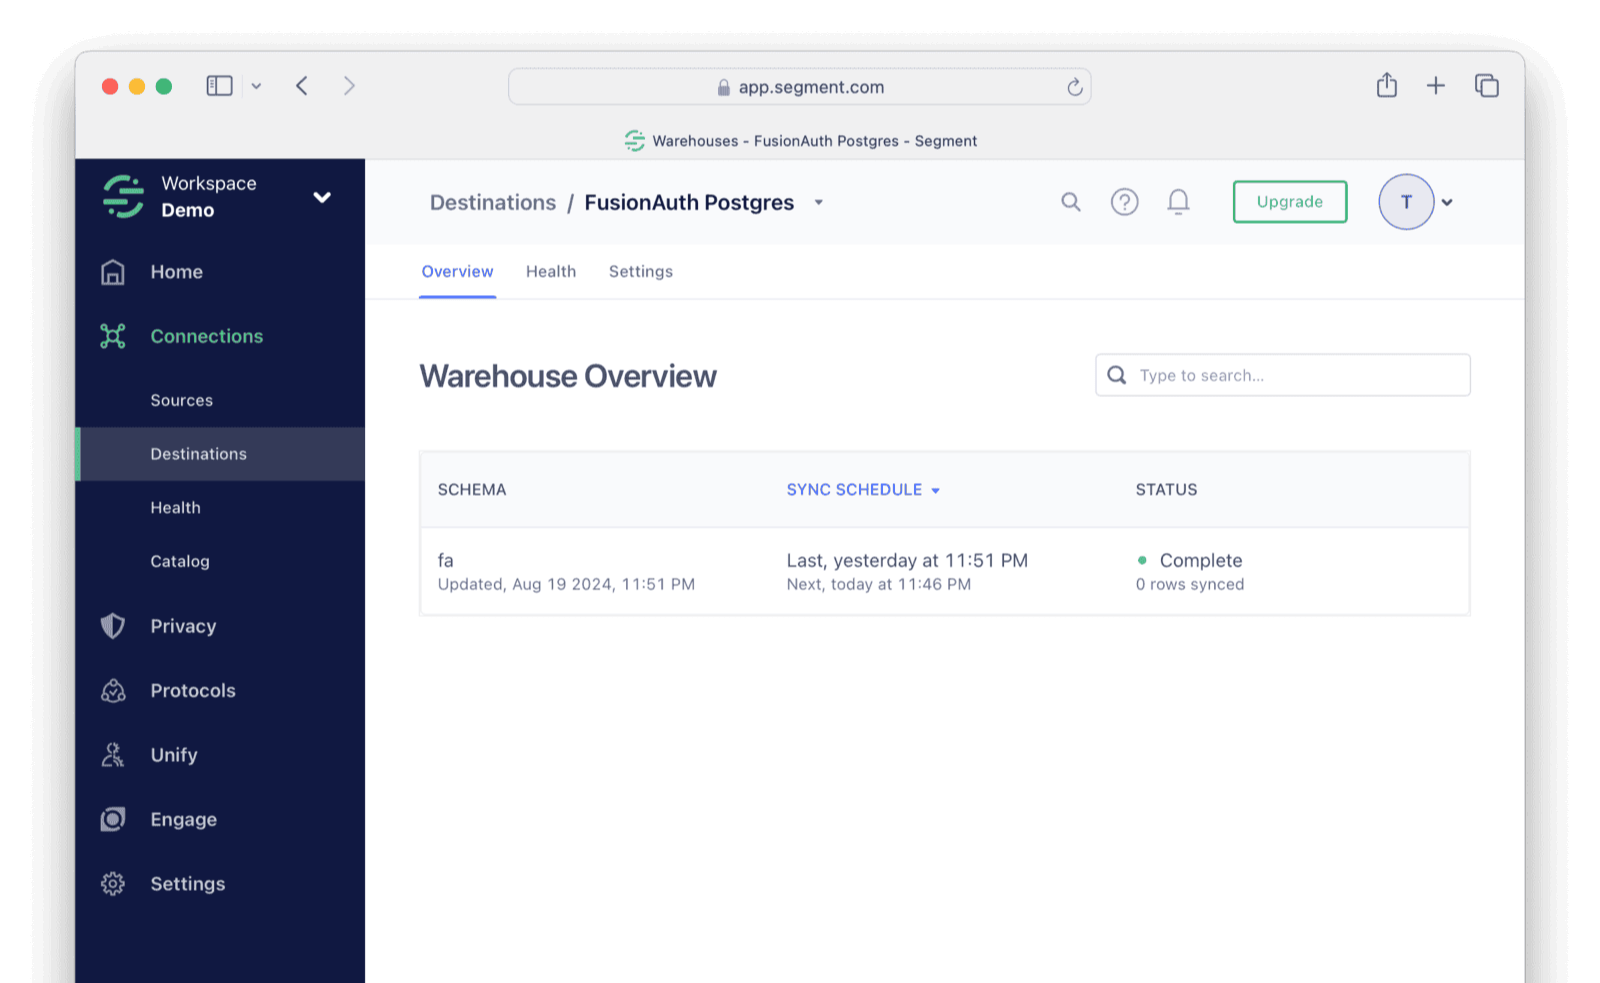
If you connected DBeaver to your PostgreSQL database earlier, you should be able to refresh your tables and see that data has arrived in the destination table.
To test the identify event, create a new user.
Browse to http://localhost:9011/admin/user and create a new user with any details.
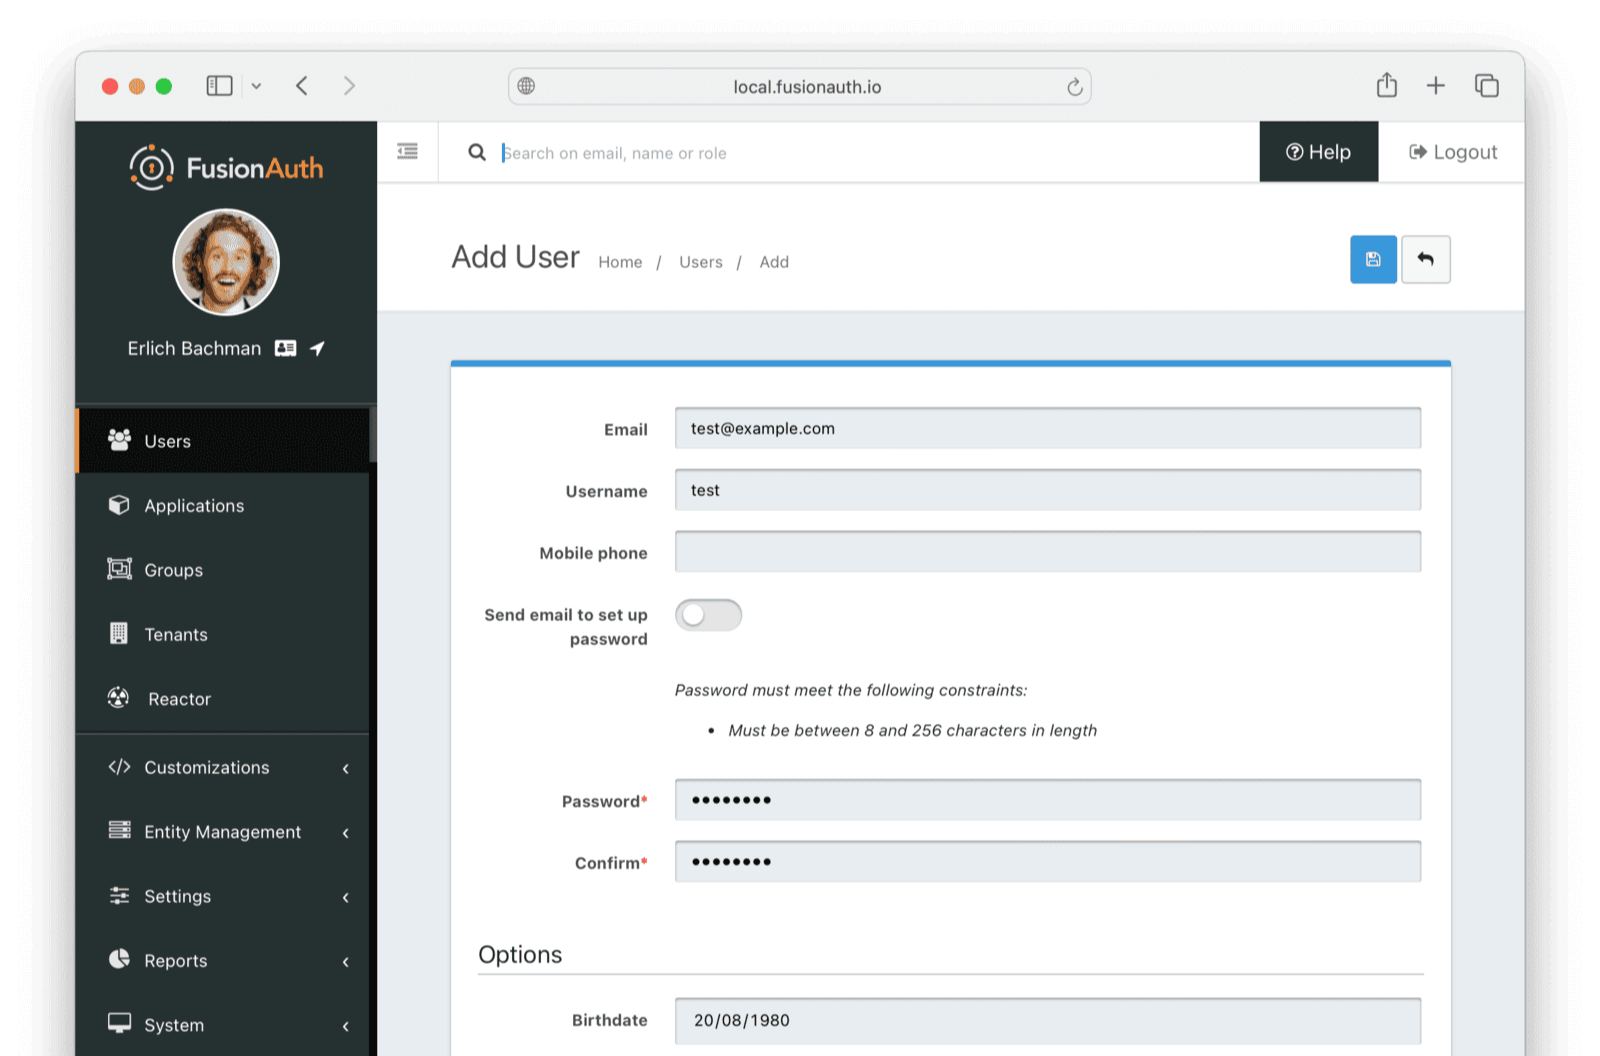
In the terminal, you should see a notification from the filtering script:
fa_seg | Received event of type: user.create.completeThe event should show in the Segment event list as an identify type. The new event might not propagate to PostgreSQL until the Segment store is synchronized with the warehouse in a few hours.
Next Steps#
Now that your FusionAuth user data is available in your data warehouse, you can write a SQL query on user Id or email address to match user data in FusionAuth to user activity sent to Segment from your other apps.
At this stage, you might want to:
- Add more event types to the filtering script.
- Change the user data sent to Segment (being mindful of your users' data privacy).
- Forward the data to your real destinations instead of the test PostgreSQL instance.
Troubleshooting#
If you don't see events arrive in Segment, try the following:
- Run the curl command manually to send events to Segment.
- Check that the URL details and key are correct.
- Check the event debug log in Segment to see if events are being rejected due to a flaw in the JSON, even though an HTTP 200 code is returned.
If curl works but the Node.js script fails, try debugging on your physical machine instead of in Docker.
- Install Node.js.
- Change the webhook URL in FusionAuth settings from
http://fa_segtohttp://host.docker.internal:3000. - Open the
app.mjsscript in Visual Studio Code. - Change
app.listen(80, '0.0.0.0',toapp.listen(3000, '0.0.0.0',. - Run the script from the VS Code debug sidebar to see where errors occur.