Test Lambdas
This guide shows you how to create a simple lambda manually, update it programmatically, and test it with unit and integration tests. You can familiarize yourself with lambdas by reading the FusionAuth lambda documentation.
Prerequisites#
To follow this guide, you need
- Node.js version 18 or later
- Docker
Lambda Limitations#
Remember the following limitations of lambdas when planning what they'll do:
- Lambdas do not have full access to JavaScript libraries, nor can they load them currently.
- The console methods take only one argument.
- HTTP requests are not available in the Community or Starter FusionAuth plans.
- If you set the Identity Provider linking strategy to "Link Anonymously", no lambdas will be used for external authentication.
Set Up The FusionAuth Sample Project#
Download or use Git to clone the testing-lambdas repository. Open a terminal in the directory you just created and start FusionAuth with Docker.
docker compose up -d
This command will run FusionAuth and set up a sample application with an API Key and a User, configured in the kickstart.json file in the kickstart subdirectory.
FusionAuth will be initially configured with these settings.
- Your example username is
richard@example.comand the password ispassword. - Your admin username is
admin@example.comand the password ispassword. - The base URL of FusionAuth http://localhost:9011/.
The .env and kickstart.json files contain passwords. In a real application, always add these files to your .gitignore file and never commit secrets to version control.
Manually Create A Simple Lambda#
Let's start by making a simple lambda to test that it works on your machine.
- Log in to the FusionAuth admin UI.
- Navigate to Customizations -> Lambdas .
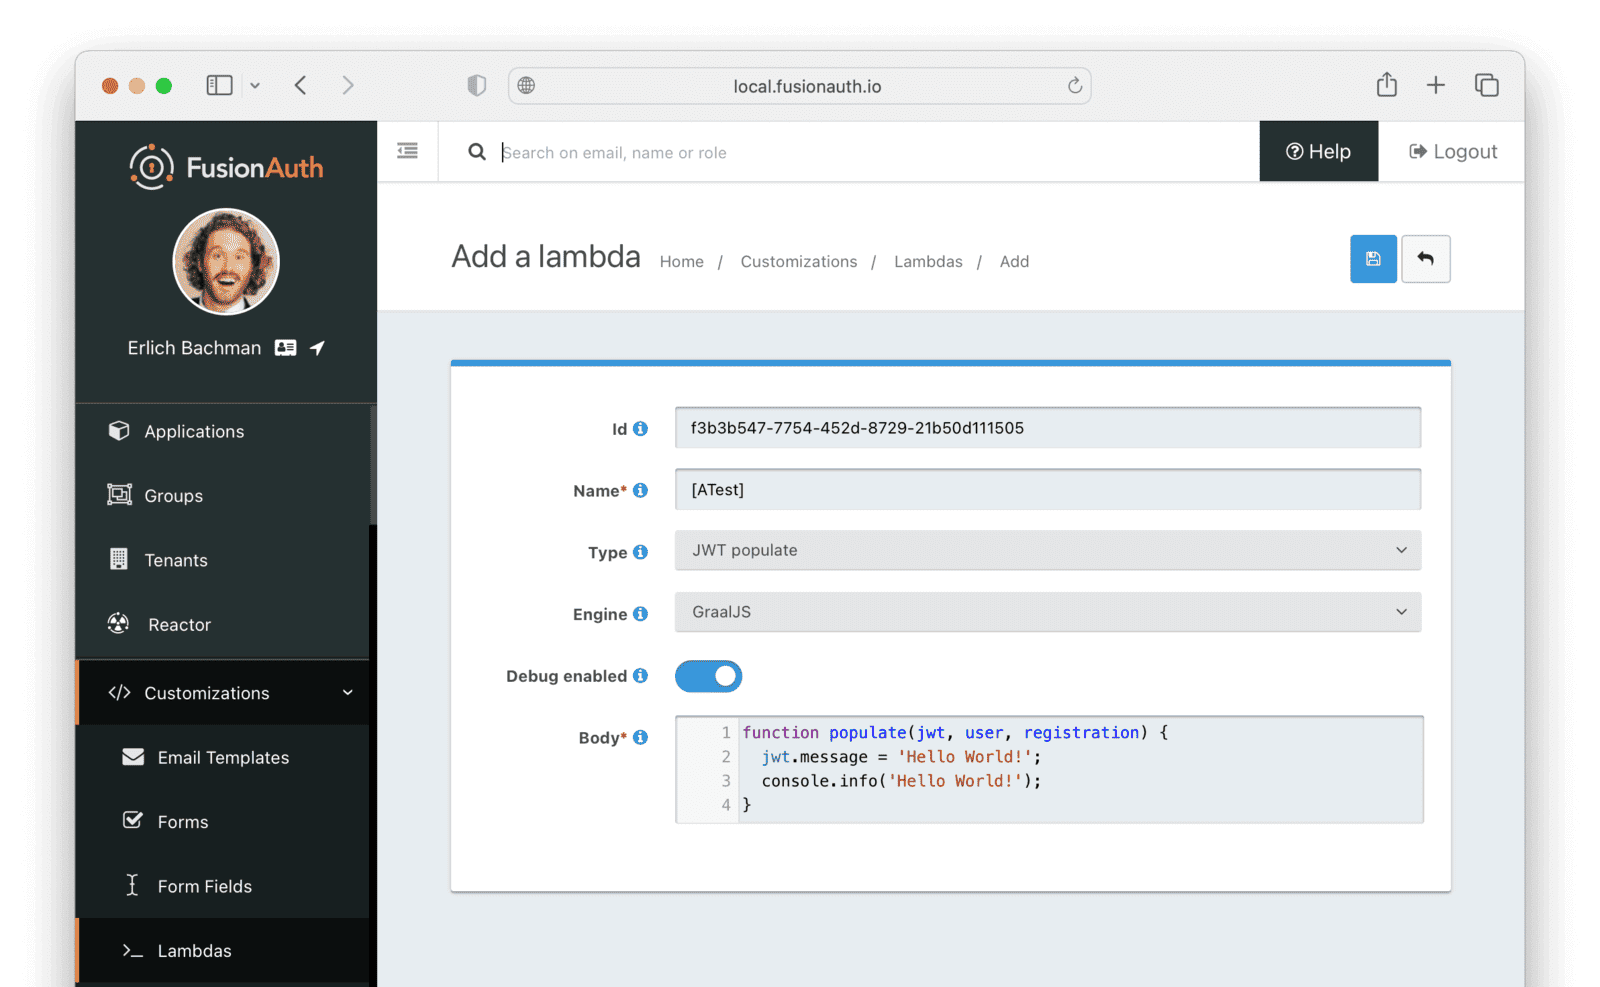
- Click the button at the top right to add a new lambda.
- Enter the Id
f3b3b547-7754-452d-8729-21b50d111505. - Enter the Name
[ATest](to put it at the top of the list of lambdas alphabetically). - Select the Type
JWT Populate. - Leave the Engine as
GraalJS. - Enable Debug Enabled so that you can see messages in the event log.
- Add the line
jwt.message = 'Hello World!';to the body of thepopulatefunction.
The body should now be similar to below.
function populate(jwt, user, registration) {
  jwt.message = 'Hello World!';
  console.info('Hello World!');
}
Save the lambda.
Now activate the lambda for the example app.
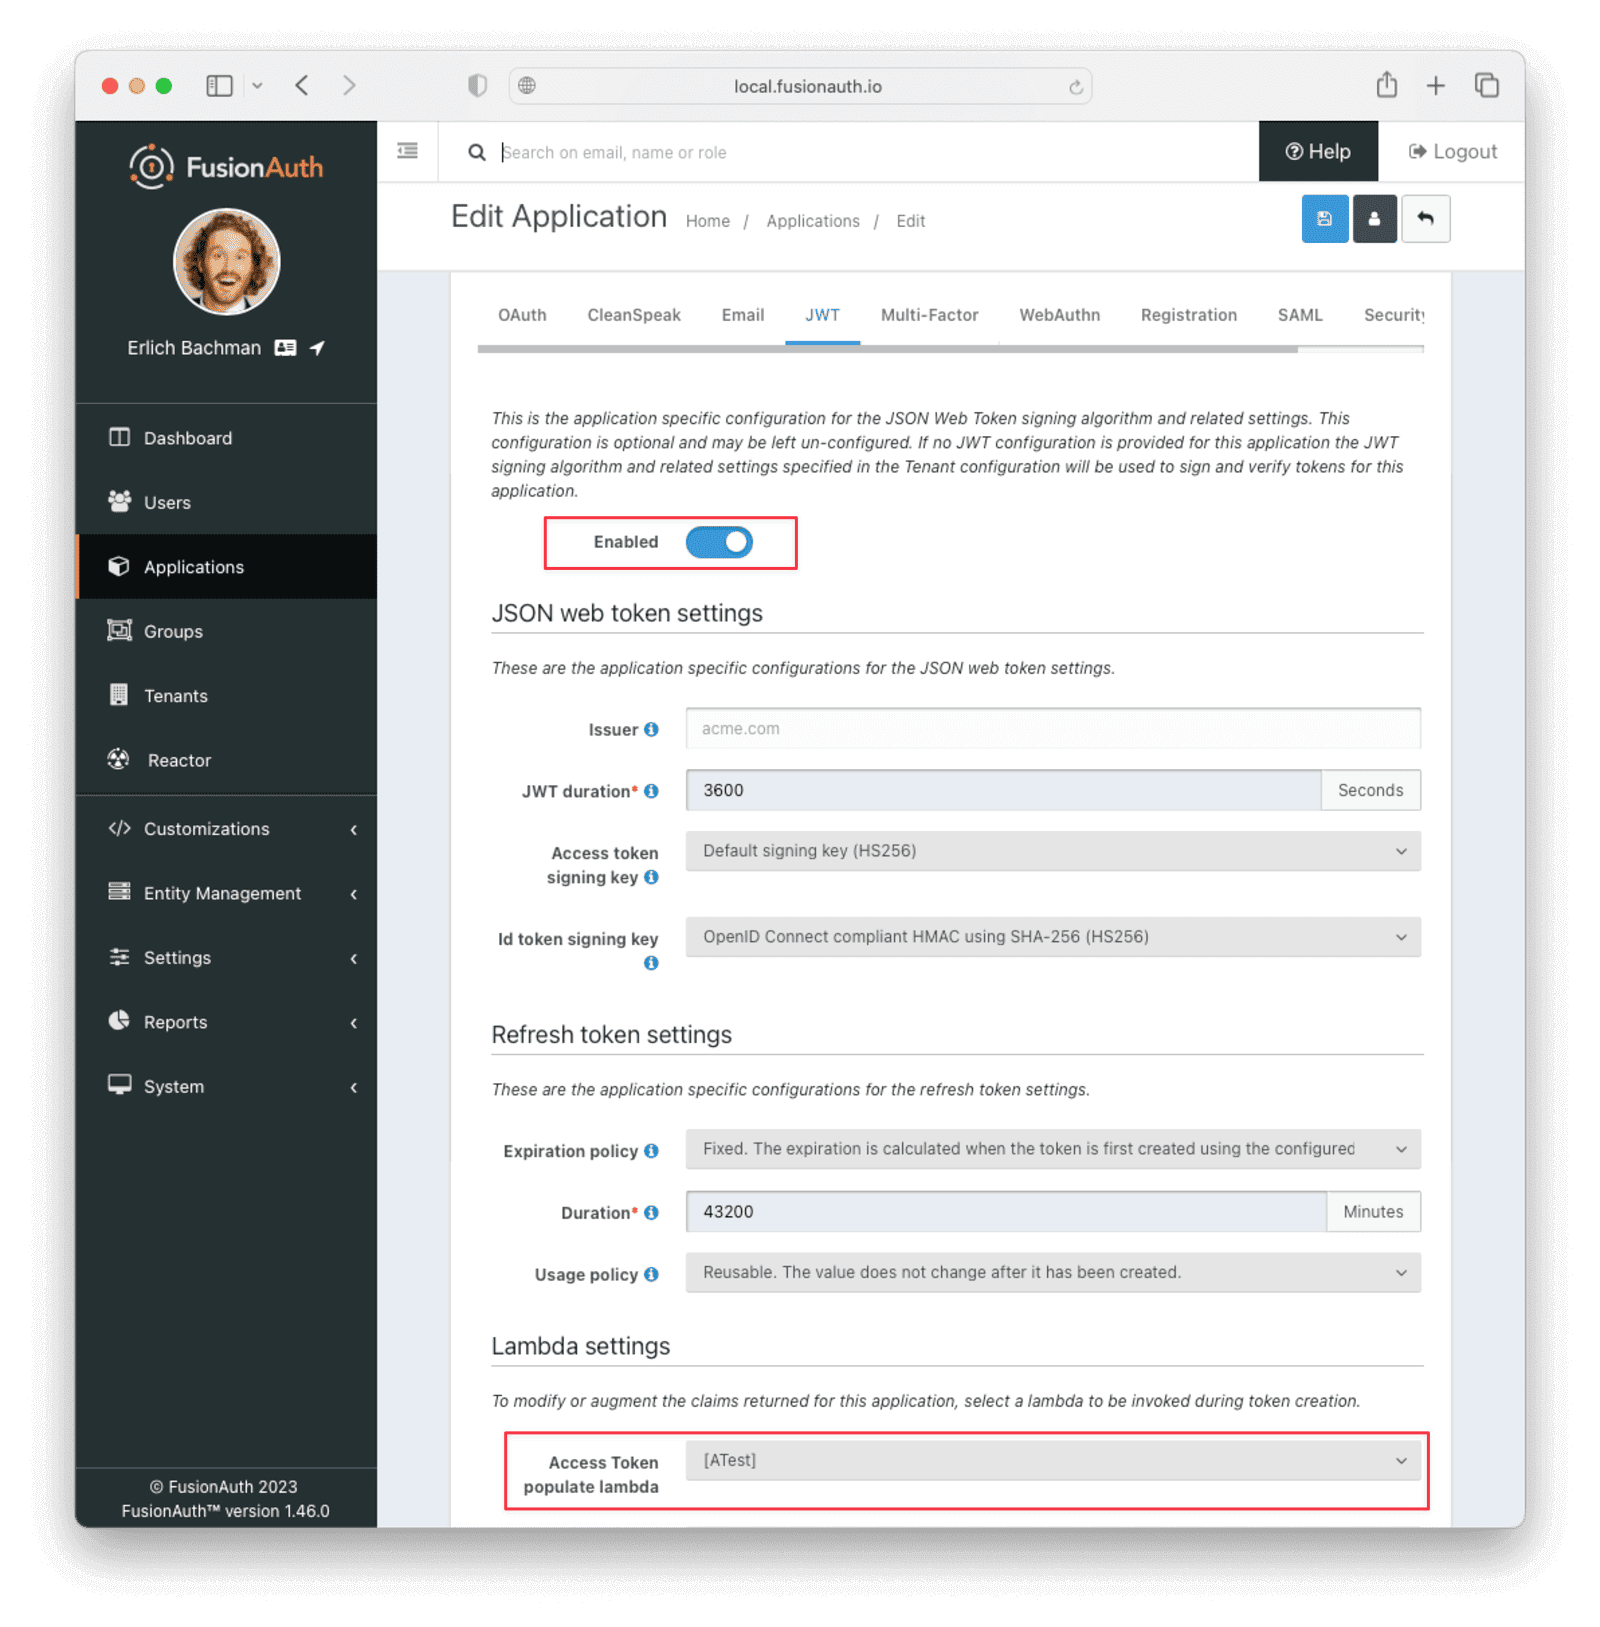
- Navigate to Applications and click the button on the "Example app".
- Click on the JWT tab.
- Toggle Enabled to on.
- Under Lambda Settings , select the lambda you created, called
ATest, for the Access Token populate lambda. - Click the button to save the changes.
You can now test that the new lambda writes to the event log and returns extra data in the JWT. The repository you downloaded contains two directories.
complete-application— This is the result of the work you will complete in this guide if you need to refer to the finished files. Do not work in this directory.app— This contains a basic application to which you will add tests in this guide. Work in this directory.
Open the routes/index.js file in the app directory.
Locate the redirect route handler (which is the function that starts with router.get('/oauth-redirect') and add a line to write the JWT to the console at login.
router.get('/oauth-redirect', function (req, res, next) {
  console.dir(res); // You should insert this line
Save the file and start the test app with the following command.
npm install
npm start
Log in to the app at http://localhost:3000 with user richard@example.com and password password.
In the FusionAuth admin UI, navigate to System -> Event Log and you will see a log entry of the invocation of your "Hello World" lambda. The entire HTTP response is logged in the test app terminal. The JWT is a long alphanumeric line at the end of the response. It should look something like below.
eyJhbGciOiJIUzI1NiIsInR5cCI6IkpXVCIsImd0eSI6WyJhdXRob3JpemF0aW9uX2NvZGUiXSwia2lkIjoiMWU1NmM0OWU4In0.eyJhdWQiOiJkZGQwNTAyMS0wNjgyLTQ4NWUtYThlMi1kMDMyOTY0YjAyMTEiLCJleHAiOjE2ODkyNjQwNzEsImlhdCI6MTY4OTI2MDQ3MSwiaXNzIjoiYWNtZS5jb20iLCJzdWIiOiIwYTkzOTYwNi0zNmVjLTQ1M2ItOTM0Mi04ZWZmOTE3ZjJhZWYiLCJqdGkiOiIyYmZlMjUwNy1hZWM0LTRjOTEtYWY5Yy1hOWVhYjQzNmQ4MGYiLCJhdXRoZW50aWNhdGlvblR5cGUiOiJQQVNTV09SRCIsImVtYWlsIjoiZXJsaWNoQGV4YW1wbGUuY29tIiwiZW1haWxfdmVyaWZpZWQiOnRydWUsImFwcGxpY2F0aW9uSWQiOiJkZGQwNTAyMS0wNjgyLTQ4NWUtYThlMi1kMDMyOTY0YjAyMTEiLCJzY29wZSI6Im9mZmxpbmVfYWNjZXNzIiwicm9sZXMiOltdLCJzaWQiOiIzNDk5MTAxMS1kNzUxLTRlOTctYWZiNi0zNzQ2N2RlYTc5YWIiLCJhdXRoX3RpbWUiOjE2ODkyNjA0NzEsInRpZCI6ImNiY2VkOWVhLWQ3NzgtZDBlYi03ZjU4LWE0MGYxY2VlNWFhYiIsIm1lc3NhZ2UiOiJIZWxsbyBXb3JsZCEifQ.3DOvP8LRAp6pIh0guUjJjYbNwZKzruVWre8Xq8x_S8k
Copy this token from your terminal and paste it into the Token text box on the FusionAuth Online JWT Decoder. You'll see "message": "Hello World!" in the Payload box, showing you that your new lambda ran correctly.
Programmatically Update A Lambda#
Let's take a look at how to update your lambda programmatically using the FusionAuth API. Refer to the APIs documentation for more.
Understand The Client Libraries#
Although you can use the lambda API directly by making HTTP requests, it's much easier to use one of the provided client libraries.
There are two ways to do this using JavaScript:
- The TypeScript client library, documented here, should be used for any browser or Node.js code you write in JavaScript or TypeScript. It provides a straightforward way of calling the underlying HTTP API.
- The Node CLI is a set of commands you can run in the terminal to perform a few advanced functions. The focus of this CLI is on uploading and downloading of commonly modified assets such as lambdas or themes. The Node CLI is a wrapper on the TypeScript client library and operates at a higher level of abstraction. It is helpful to manage lambdas, but you can always drop down to the TypeScript client library if needed.
Create An API Key#
The API, CLI, and client library all need an API Key to access FusionAuth.
The kickstart configuration file used by FusionAuth already created a sample API Key with superuser privileges. For more information on managing API keys, please refer to the following guide.
For production, you would want to enable only the following endpoints necessary to perform actions on lambdas, such as updating and deleting, and to mimic user actions to test the lambdas, such as logging in /api/lambda, /api/lambda/search, /api/login, /api/user and /api/user/registration.
Use The Lambda CLI#
First, install the Node CLI library. Open a terminal in your app folder and use the following commands.
npm install --save-dev @fusionauth/cli
npx fusionauth --help
You should see the FusionAuth logo and a usage help message.
The lambda commands that the CLI provides match operations in the underlying TypeScript client library: update, delete, and retrieve.
Now you can retrieve the ATest lambda you created earlier. This is a useful way to check that a lambda you've created has been successfully uploaded for your app.
npx fusionauth lambda:retrieve f3b3b547-7754-452d-8729-21b50d111505 --key lambda_testing_key
The lambda will be saved to a file, where the file name is the UUID of your lambda. So it should look like this: ./lambdas/f3b3b547-7754-452d-8729-21b50d111505.json.
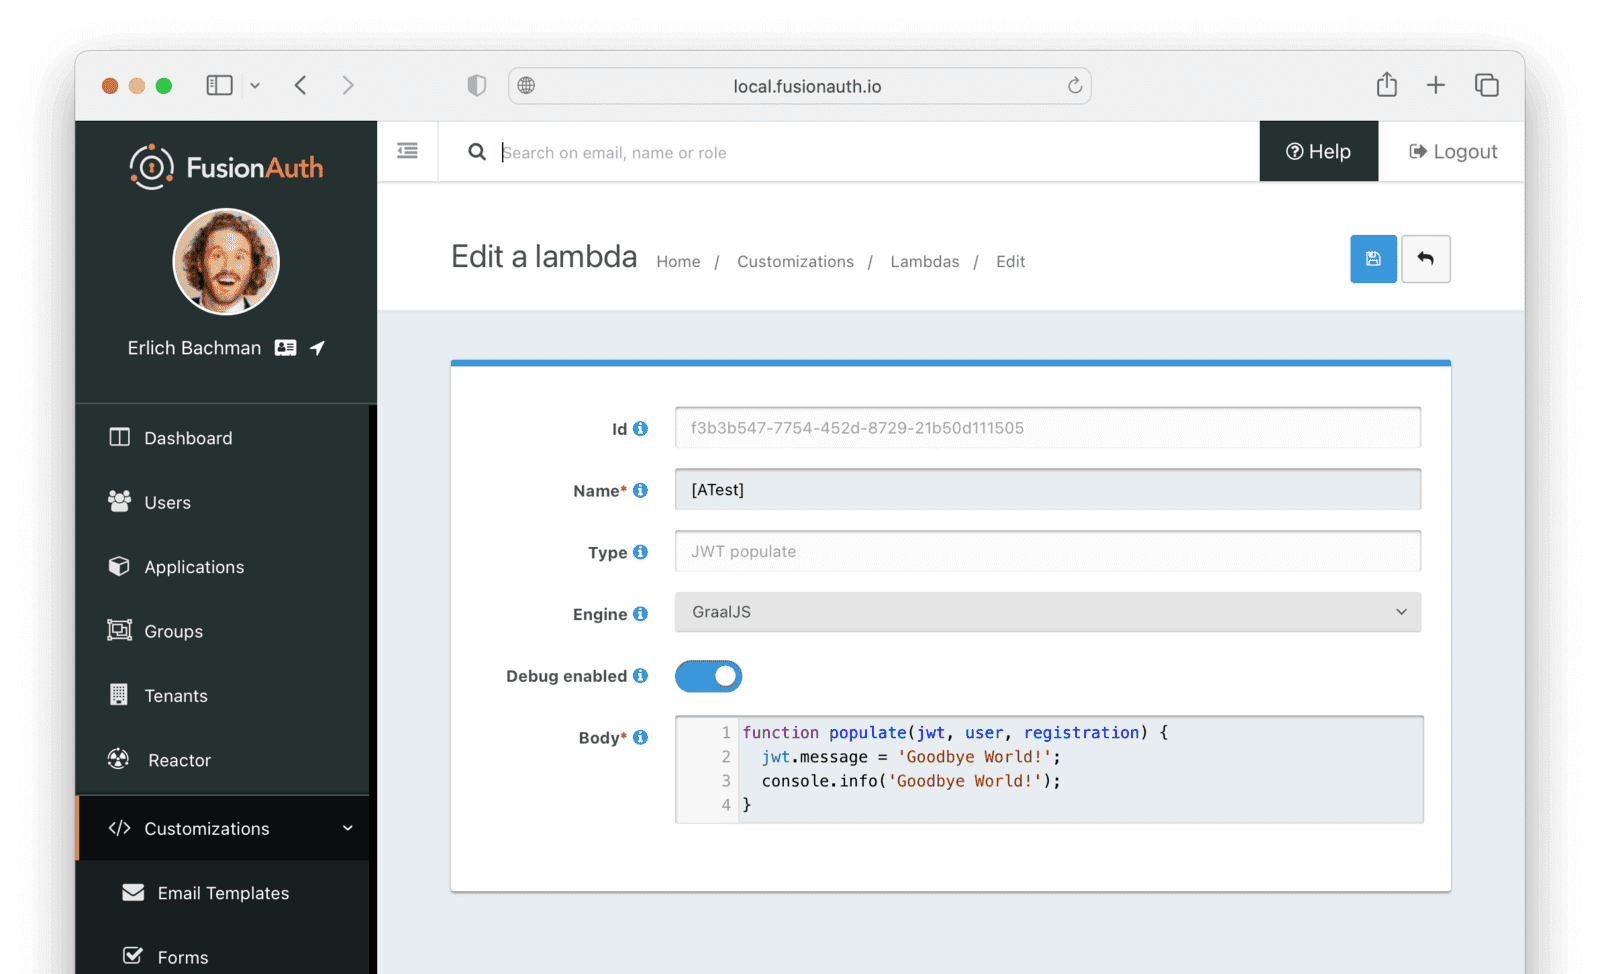
Let's update the lambda to say "Goodbye World!" instead of "Hello World!" and re-upload it. Open the file in a text editor, and change the value of the body property to the following.
"body": "function populate(jwt, user, registration) {\n jwt.message = 'Goodbye World!';\n console.info('Goodbye World!');\n}",
Save the file and upload the lambda with the following command.
npx fusionauth lambda:update f3b3b547-7754-452d-8729-21b50d111505 --key lambda_testing_key
You can check that the lambda in FusionAuth now says "Goodbye World!" by viewing the "ATest" lambda details.
CLI Limitations#
The Node CLI allows you only to create, retrieve, and update lambdas. You can delete a lambda that is not in use by an application with lambda:delete. The way to link or unlink a lambda with an application is through the admin UI, API, or a client library.
For example, to link a lambda with an application in the TypeScript client library, you could use code similar to the following.
const request: ApplicationRequest = {
  application: {
    lambdaConfiguration: {
      accessTokenPopulateId: "f3b3b547-7754-452d-8729-21b50d111505"
    }
  }
};
await new FusionAuthClient(apiKey, host).patchApplication(applicationId, request);
Testing Overview#
Lambdas run arbitrary code at certain points in an authentication flow. For example, you can use lambdas to:
- Get user information from an external provider (like a first name or photo from Facebook) or the User object in FusionAuth to put in a JWT.
- Call an external service at login, for example, to send any suspicious login attempt to a private Slack channel monitored by administrators.
In both these cases, there are two types of tests you can perform:
- Integration test: Check if the lambda has uploaded and is running correctly by logging in and seeing if the expected output happens.
- Unit test: You don't upload the lambda, but instead create a mock FusionAuth event that calls the lambda in your code and checks that the lambda does what it is supposed to.
Each of these types of lambda tests is outlined below.
Test Library#
There are many JavaScript test libraries available, and everyone has their preference. This guide uses a simple library for demonstration so that you can generalize the tests to your favorite library. The tests below use tape, which implements the Test Anything Protocol (TAP), a language-agnostic specification for running tests that's been in use since 1987. The tests also use fetch-mock to mock fetch calls from your lambda, faucet to give neat output from tape, jsonwebtoken to decode the JWT, and uuid to make a random user Id.
Install the following packages in your test app terminal.
npm install --save-dev tape faucet fetch-mock jsonwebtoken uuid
The fetch() method is available natively from Node.js LTS version 18. In earlier versions, fetch was provided by libraries, so many popular mocking libraries for fetch (such as Nock) won't work with modern Node.js in 2023.
Integration Test: Verify JWT Population#
The first of the two tests you're going to write is an integration test. It will verify that your updated lambda is populating the JWT with a "Goodbye World" message when you log in programmatically.
Create A User#
Before you can write any tests, you need a test user profile to log in with. The test app package.json includes a reference to the @fusionauth/typescript-client discussed earlier, so you can use that to create a test user programmatically.
Make a new file called userCreator.js in the app folder and paste the following code into it.
const client = require("@fusionauth/typescript-client");
const { v4: uuidv4 } = require("uuid");

createRandomUser(uuidv4());

async function createRandomUser(
  userUUID,
  applicationId = "e9fdb985-9173-4e01-9d73-ac2d60d1dc8e",
  fusionUrl = "http://localhost:9011",
  userPassword = "password"
) {
  try {
    const randomEmail = new Date().getTime() + "@example.com";
    const username = "lambdatestuser" + new Date().getTime();
    const request = {
      registration: {
        applicationId: applicationId,
        username: username,
      },
      sendSetPasswordEmail: false,
      skipRegistrationVerification: true,
      skipVerification: true,
      user: {
        active: true,
        email: randomEmail,
        password: userPassword,
        username: username,
        registrations: [
          {
            applicationId: applicationId,
          },
        ],
      },
    };
    const fusion = new client.FusionAuthClient("lambda_testing_key", fusionUrl);
    const clientResponse = await fusion.register(userUUID, request);
    if (!clientResponse.wasSuccessful) throw Error(clientResponse);
    console.info(`User ${userUUID} created successfully`);
    return randomEmail;
  } catch (e) {
    console.error("Error creating user: ");
    console.dir(e, { depth: null });
    process.exit(1);
  }
}

async function deleteUser(userUUID, fusionUrl) {
  try {
    const fusion = new client.FusionAuthClient("lambda_testing_key", fusionUrl);
    const clientResponse = await fusion.deleteUser(userUUID);
    if (!clientResponse.wasSuccessful) throw Error(clientResponse);
    console.info(`User ${userUUID} deleted successfully`);
  } catch (e) {
    console.error(`Error deleting user ${userUUID}: `);
    console.dir(e, { depth: null });
    process.exit(1);
  }
}

module.exports = {
  createRandomUser,
  deleteUser,
};
The code above has two functions:
- The
createRandomUserfunction, which creates a User request object withconst requestand then sends it tofusion.register(). Details on this can be found in the TypeScript client library interface. - The
deleteUserfunction, which you can use in the tests to delete the user just created.
Run the code to test user creation with the following command.
node userCreator.js
In FusionAuth, navigate to Users to check that a new user called lambdatestuser has been created. You can delete the createRandomUser(uuidv4()); line in userCreator.js as each test will use a new temporary user. This will allow you to add multiple lambda tests while avoiding potential conflicts between test users and permissions.
Write The Test#
Now you will test that the lambda returns "Goodbye World", which will confirm that the CLI update command worked.
Create a file called userLogin.js and add the following code.
const client = require("@fusionauth/typescript-client");
const jwt = require("jsonwebtoken");

async function login(userEmail, applicationId, fusionUrl, userPassword) {
  try {
    const request = {
      applicationId: applicationId,
      loginId: userEmail,
      password: userPassword,
    };
    const fusion = new client.FusionAuthClient("lambda_testing_key", fusionUrl);
    const clientResponse = await fusion.login(request);
    if (!clientResponse.wasSuccessful) throw Error(clientResponse);
    const jwtToken = clientResponse.response.token;
    const decodedToken = jwt.decode(jwtToken);
    const message = decodedToken.message;
    return message;
  } catch (e) {
    console.error("Error: ");
    console.dir(e, { depth: null });
    process.exit(1);
  }
}

module.exports = {
  login,
};
This helper file allows your tests to log in to FusionAuth programmatically. The login function calls the FusionAuth TypeScript library. It then decodes the JWT response and returns its message property.
Now create a test file that will use it, test_1.js, and add the following code.
const test = require("tape");
const { v4: uuidv4 } = require("uuid");
const {createRandomUser, deleteUser} = require("./userCreator.js");
const {login} = require("./userLogin");

const applicationId = "e9fdb985-9173-4e01-9d73-ac2d60d1dc8e";
const fusionUrl = "http://localhost:9011";
const userPassword = "password";

test('test login returns JWT with "Goodbye World"', async function (t) {
  t.plan(1);
  const userId = uuidv4();
  const email = await createRandomUser(userId, applicationId, fusionUrl, userPassword);
  try {
    const result = await login(email, applicationId, fusionUrl, userPassword);
    t.ok(result.toLowerCase().includes("goodbye world"));
    t.end();
  } finally {
    await deleteUser(userId, fusionUrl);
  }
});
This file starts with a declaration of constant variables that match the kickstart.json and .env files. The login function is called by the tape function test. This test specifies the name of the test, says that it expects exactly one assertion to occur with plan, checks that calling login returns the property you expect from the lambda updated earlier, and exits. Even if the test fails, the finally clause will delete the temporary user created.
Run it with the following command.
node test_1.js
The output should be as follows.
TAP version 13
# test login returns JWT with "Goodbye World"
User c82aced2-b25b-4390-a4a2-72562b9bc13b created successfully
ok 1 should be truthy
User c82aced2-b25b-4390-a4a2-72562b9bc13b deleted successfully

1..1
# tests 1
# pass  1

# ok
When your code has several tests, and you want a colorful, concise summary, you can use the following instead.
node test_1.js | npx faucet
The output should be as follows.
✓ test login returns JWT with "Goodbye World"
# tests 1
# pass  1
✓ ok
Unit Test: Call An External Service#
The next test you'll write is a unit test that verifies your lambda locally using a fake mock service and not in FusionAuth. The benefit of this test is that you can test your logic works without needing an external service to be reliable at the time of testing. The danger is that your test might pass locally, but the lambda might fail on FusionAuth due to it running on a different JavaScript environment with different restrictions and configuration.
Let's take an example where you check if users have email addresses from a country sanctioned by the United States, such as North Korea or Cuba. You call the external site https://issanctioned.example.com with an email address, and you're told whether or not the domain is banned.
Create a file called test_2.js and add the following code.
const test = require("tape");
const fetchMock = require("fetch-mock");

test("test lambda rejects sanctioned emails and accepts others", async function (t) {
  t.plan(2);

  fetchMock.get(
    "https://issanctioned.example.com/api/banned?email=kim%40company.kp",
    { isBanned: true }
  );
  const jwt1 = {};
  await populate(jwt1, { email: "kim@company.kp" }, {});
  t.true(jwt1.isBanned, "Check North Korea email banned");

  fetchMock.get(
    "https://issanctioned.example.com/api/banned?email=kim%40company.ca",
    { isBanned: false }
  );
  const jwt2 = {};
  await populate(jwt2, { email: "kim@company.ca" }, {});
  t.false(jwt2.isBanned, "Check Canada email allowed");

  fetchMock.restore();
  t.end();
});

async function populate(jwt, user, registration) {
  const response = await fetch(
    "https://issanctioned.example.com/api/banned?email=" +
      encodeURIComponent(user.email),
    {
      method: "GET",
      headers: { "Content-Type": "application/json" },
    }
  );
  if (response.status === 200) {
    const jsonResponse = await response.json();
    jwt.isBanned = jsonResponse.isBanned;
  } else jwt.isBanned = false;
}
This test function uses fetchMock to mock the external service that would be called from the lambda function in FusionAuth. The first test checks if North Korea (.kp) is banned and the second if Canada (.ca) is allowed. The mocks for the JWT, user, and registration objects are all simple {} objects you can pass as parameters to the populate() lambda. This is the lambda function that would run on FusionAuth, similar to the "Hello World" function described earlier.
Finally, run the tests.
node test_2.js | npx faucet
The output should be as follows
✓ test lambda rejects sanctioned emails and accepts others
# tests 2
# pass  2
✓ ok
If all your unit tests for a lambda pass, you can safely upload it to FusionAuth manually or with the CLI for further testing.
If your HTTP Connect fetch request fails when deployed to FusionAuth, please review the documentation. In particular, ensure you are using a license and have purchased the correct plan (Essentials or Enterprise).
Unit Test: Populate JWT From FusionAuth#
In this final unit test, let's look at how to check user information available in FusionAuth to determine custom fields to return to your app. You are also going to download the lambda code to test from FusionAuth programmatically, instead of hardcoding the populate function into your test.
There are two objects related to login to consider. The first is the JWT fields that are returned to your app by default.
Complete JWT Response
{
  "aud": "e9fdb985-9173-4e01-9d73-ac2d60d1dc8e",
  "exp": 1692273965,
  "iat": 1692270365,
  "iss": "acme.com",
  "sub": "00000000-0000-0000-0000-111111111111",
  "jti": "47cc65ce-3981-4e40-8c99-5221d69c53da",
  "authenticationType": "PASSWORD",
  "email": "richard@example.com",
  "email_verified": true,
  "applicationId": "e9fdb985-9173-4e01-9d73-ac2d60d1dc8e",
  "roles": [
    "Petty cash keeper",
    "First aider"
  ],
  "auth_time": 1692270365,
  "tid": "d7d09513-a3f5-401c-9685-34ab6c552453"
}
The second object is the user supplied to your populate() function in a lambda.
Complete User Object
{
  "token": "eyJhbGciOiJIUzI1NiIsInR5cCI6IkpXVCJ9.eyJleHAiOjE0ODUxNDA5ODQsImlhdCI6MTQ4NTEzNzM4NCwiaXNzIjoiYWNtZS5jb20iLCJzdWIiOiIyOWFjMGMxOC0wYjRhLTQyY2YtODJmYy0wM2Q1NzAzMThhMWQiLCJhcHBsaWNhdGlvbklkIjoiNzkxMDM3MzQtOTdhYi00ZDFhLWFmMzctZTAwNmQwNWQyOTUyIiwicm9sZXMiOltdfQ.Mp0Pcwsz5VECK11Kf2ZZNF_SMKu5CgBeLN9ZOP04kZo",
  "user": {
    "active": true,
    "birthDate": "1976-05-30",
    "breachedPasswordLastCheckedInstant": 1471786483322,
    "breachedPasswordStatus": "None",
    "connectorId": "e3306678-a53a-4964-9040-1c96f36dda72",
    "data": {
      "displayName": "Johnny Boy",
      "favoriteColors": [
        "Red",
        "Blue"
      ]
    },
    "email": "example@fusionauth.io",
    "expiry": 1571786483322,
    "firstName": "John",
    "fullName": "John Doe",
    "id": "00000000-0000-0001-0000-000000000000",
    "identities": [
      {
        "insertInstant": 1742936980069,
        "lastLoginInstant": 1742936980069,
        "lastUpdateInstant": 1742936980069,
        "primary": true,
        "type": "email",
        "value": "example@fusionauth.io",
        "verified": false,
        "verifiedReason": "Disabled"
      },
      {
        "insertInstant": 1742936980069,
        "lastLoginInstant": 1742936980069,
        "lastUpdateInstant": 1742936980069,
        "primary": true,
        "type": "phoneNumber",
        "value": "+13035551212",
        "verified": false,
        "verifiedReason": "Disabled"
      },
      {
        "displayValue": "johnny123",
        "insertInstant": 1742936980069,
        "lastLoginInstant": 1742936980069,
        "lastUpdateInstant": 1742936980069,
        "moderationStatus": "ACTIVE",
        "primary": true,
        "type": "username",
        "value": "johnny123",
        "verified": false,
        "verifiedReason": "Unverifiable"
      }
    ],
    "imageUrl": "http://65.media.tumblr.com/tumblr_l7dbl0MHbU1qz50x3o1_500.png",
    "insertInstant": 1742936980069,
    "lastLoginInstant": 1742936980069,
    "lastName": "Doe",
    "middleName": "William",
    "mobilePhone": "303-555-1234",
    "passwordChangeRequired": false,
    "passwordLastUpdateInstant": 1742936980069,
    "phoneNumber": "+13035551212",
    "preferredLanguages": [
      "en",
      "fr"
    ],
    "registrations": [
      {
        "applicationId": "10000000-0000-0002-0000-000000000001",
        "data": {
          "displayName": "Johnny",
          "favoriteSports": [
            "Football",
            "Basketball"
          ]
        },
        "id": "00000000-0000-0002-0000-000000000000",
        "insertInstant": 1742936980069,
        "lastLoginInstant": 1742936980069,
        "preferredLanguages": [
          "en",
          "fr"
        ],
        "roles": [
          "user",
          "community_helper"
        ],
        "username": "johnny123",
        "usernameStatus": "ACTIVE",
        "verified": true,
        "verifiedInstant": 1742936980069
      }
    ],
    "timezone": "America/Denver",
    "tenantId": "f24aca2b-ce4a-4dad-951a-c9d690e71415",
    "twoFactor": {
      "methods": [
        {
          "authenticator": {
            "algorithm": "HmacSHA1",
            "codeLength": 6,
            "timeStep": 30
          },
          "id": "35VW",
          "method": "authenticator"
        },
        {
          "id": "V7SH",
          "method": "sms",
          "mobilePhone": "555-555-5555"
        },
        {
          "email": "example@fusionauth.io",
          "id": "7K2G",
          "method": "email"
        }
      ]
    },
    "usernameStatus": "ACTIVE",
    "username": "johnny123",
    "verified": true,
    "verifiedInstant": 1742936980069
  }
}
You can see that the user object has data that the JWT does not, like names, birthdates, and languages, that you might want to add in a lambda. You can also add logic in the lambda to manipulate these fields before returning them to your app.
To demonstrate, let's write a lambda function that returns permissions to your app based on the user's role.
In the FusionAuth admin UI, open the [ATest] lambda function you created earlier and overwrite it with the following code.
function populate(jwt, user, registration) {
  jwt.message = 'Goodbye World!';
  jwt.permissions = [];
  if (user.registrations[0].roles.includes("admin")) {
    jwt.permissions.push("all");
  } else if (user.registrations[0].roles.includes("editor")) {
    jwt.permissions.push("read");
    jwt.permissions.push("write");
  } else if (user.registrations[0].roles.includes("viewer")) {
    jwt.permissions.push("read");
  }
}
This lambda function populate adds a permissions array to the JWT returned.
Create a file called test_3.js and add the following code.
const test = require("tape");
const { FusionAuthClient } = require("@fusionauth/typescript-client");

test("test lambda rejects returns permissions based on role", async function (t) {
  t.plan(3);
  const lambda = await getLambda();
  eval(lambda); // creates a function called populate()

  const jwt1 = {};
  await populate(jwt1, { registrations: [{ roles: ["admin", "viewer"] }] }, {});
  t.true(
    jwt1.permissions.includes("all"),
    "Check admin and viewer has all permissions"
  );

  const jwt2 = {};
  await populate(jwt2, { registrations: [{ roles: ["editor"] }] }, {});
  t.true(
    jwt2.permissions.includes("write"),
    "Check editor has write permission"
  );
  t.true(jwt2.permissions.includes("read"), "Check editor has read permission");

  t.end();
});

async function getLambda() {
  const lambdaId = "f3b3b547-7754-452d-8729-21b50d111505";
  const apiKey = "lambda_testing_key";
  const host = "http://localhost:9011";
  const fusionAuthClient = new FusionAuthClient(apiKey, host);
  const clientResponse = await fusionAuthClient.retrieveLambda(lambdaId);
  return clientResponse.response.lambda.body;
}
The test function downloads the lambda from FusionAuth using getLambda(), runs eval it to make it available in memory, and calls it, passing it a mock user object. You need to mock only the fields the lambda needs in this parameter. In this test, you've added a roles array inside application registrations.
Run the test.
node test_3.js
The output is as follows.
TAP version 13
# test lambda rejects returns permissions based on role
ok 1 Check admin and viewer has all permissions
ok 2 Check editor has write permission
ok 3 Check editor has read permission

1..3
# tests 3
# pass  3

# ok
Note that running code downloaded from a database is a security risk. Any administrator with access to your FusionAuth admin UI can put malicious code into your lambdas that could use Node.js to access your local disk or send passwords over the internet. To keep safe, run your tests only in a Docker or LXC container with no disk access to your physical machine, and no passwords stored in the container.
How To Run All The Tests#
If you want to run your entire test suite, use the following command.
npx tape test_*.js | npx faucet
All tests should be green, as follows.
✓ test login returns JWT with "Goodbye World"
✓ test lambda rejects sanctioned emails and accepts others
✓ test lambda rejects returns permissions based on role
# tests 6
# pass  6
✓ ok