Upgrade FusionAuth
This document explains how to upgrade FusionAuth on various platforms and distributions.
When to Upgrade#
Upgrading to a newer version of FusionAuth can provide the following benefits:
- access to new features and improvements
- improved performance and stability
- critical security updates and patches
You might want to delay upgrading in the following situations:
- Your current version meets all your requirements.
- You are in the middle of a project or have tight deadlines.
- You have concerns about compatibility with customizations or third-party integrations.
Being Aware of Upgrade Options#
To stay informed about new FusionAuth releases and updates:
- Sign up for release notifications.
- Watch the release notes and the release notes RSS feed.
- Join the FusionAuth community forum and/or Slack.
- Follow FusionAuth on social media platforms like BlueSky and LinkedIn.
- Watch the fusionauth-issues GitHub repository.
How to Think About Upgrades#
Upgrading FusionAuth is similar to upgrading a library that your application depends on.
Version Changes and Notes#
FusionAuth releases come in three flavors: major, minor, and patch.
You can tell what a release is from the rightmost non-zero number in the version: <major>.<minor>.<patch>. For example:
1.0.0: major release, may significantly change the API1.63.0: minor release, may make small changes to the API1.45.1: patch release, never changes the API
The FusionAuth team provides detailed information about every change in every version, including tying the change back to a GitHub issue. To understand how a version update affects your systems, read the release notes.
Testing#
Before starting the upgrade process on production, test the upgrade in a staging or development environment to identify potential issues. This is particularly important for upgrades involving multiple version jumps or a FusionAuth instance that has been heavily customized.
Downtime and Database Migrations#
Plan for any downtime or maintenance windows required for the upgrade. If changes to the database schema are required, required data migrations could lead to downtime that affects end users. Such changes are always noted in the release notes, so read the release notes carefully. An upgrade without a schema change, on the other hand, may not require any downtime from an end-user perspective.
FusionAuth can perform database migrations automatically and silently using a process called Silent Mode.
If you want to run the database migrations interactively or with other tooling, you can run any needed scripts manually:
- Remove all server nodes from a load balancer/proxy.
- Run the database migration scripts.
- Add all server nodes back to the load balancer/proxy.
Always back up your database before upgrading, so you can roll back in an emergency.
The timing of the database upgrade is also important to note. When an upgraded node first connects to the database, it immediately locks the database until the upgrade is complete if Silent Mode is enabled and the database requires upgrading. Silent Mode is an optional runtime mode that can automatically handle upgrades on startup. When locked, the database is unavailable to other nodes in the cluster. Learn more about the different runtime modes and how they affect database upgrades in the Upgrade FAQs section below.
Upgrade a Client Library#
Older FusionAuth client libraries should work properly with newer FusionAuth versions upon upgrading. However, once you use new features on that instance, FusionAuth might return enumeration values that older clients do not understand. This can cause client operations to fail.
Note that newer FusionAuth client libraries might not be compatible with older FusionAuth versions.
The release notes provide more information about API changes between versions.
If you are using an OIDC-compatible library in your application to log your users in, it is unlikely that this integration would require modification, but test it in a non-production environment to make sure.
Client Library Versioning#
FusionAuth represents releases with a version number: <major>.<minor>.<patch>. Major releases can add, change, or remove functionality from the API, minor releases can add to the API, but patch releases never change the API. Client library version numbers show you which API version a client library was built for.
We recommend using a client library with the same major and minor numbers as your FusionAuth instance version. This ensures that your client library supports the same APIs as your FusionAuth instance.
If you don't keep your client library in sync with your FusionAuth version:
- you won't be able to access new API endpoints
- you won't benefit from client library improvements (e.g. exponential backoff, improved HTTP connections, etc)
- you could experience subtle bugs when existing API endpoints change behavior (e.g. changed argument order in an untyped language)
Patch releases don't always exist for client libraries since many bugfixes and small changes don't impact client libraries. FusionAuth only creates patch releases for client libraries when we fix an issue in the library, so always upgrade to the latest patch release for your major and minor version. Patch releases may also update dependencies, language engines, and operating systems, as we follow the deprecation and sunsetting policies of each platform.
Consider a user whose FusionAuth instance runs version 1.61.1. They should:
- use Java client library version
1.61.2, the latest patch release for1.61.x - use TypeScript client library version
1.61.0, the latest patch release for1.61.x
This theoretical user also ought to update their FusionAuth instance to 1.61.2, the latest patch for the major and minor instance version.
Skipping Versions#
Sometimes, you will want to upgrade to a FusionAuth version that is multiple minor versions ahead of your current version. For example, you might want to upgrade from version 1.43.0 to 1.45.0. FusionAuth can run all the necessary database migrations to get you to the latest version, or you can apply the database migrations yourself.
To determine if you can perform a version jump, review the release notes carefully. If the releases focus on bug fixes and minor improvements, you can probably perform a version jump safely. Version jumping across patch versions, for example from 1.43.0 to 1.43.3, is usually safe.
The alternative to a version jump is to migrate and test at each version of FusionAuth. This is a good option because if there are any issues, you'll be able to know precisely which version of FusionAuth is problematic. It's a great option if you have automated tests that can exercise FusionAuth integrations.
Whichever approach you take, always test the upgrade in a staging environment to identify potential issues. This is particularly important for complex upgrades that jump across several minor versions (from 1.22.0 to 1.43.0, for example) or if you have customized FusionAuth. We recommend that the staging environment be as close as possible to your production environment. This includes using the same data, or at least the same data volume, as production. This enables you to test both functionality changes and performance before committing to the upgrade on production.
Updating Configuration#
To learn about new configuration options with defaults that affect your installation, see the release notes.
There are a number of options for managing the configuration of your FusionAuth instance over time and promoting changes from one environment to another. This includes changes from one version to another.
Configuration management options include:
- Scripting changes using a client library
- Terraform
- Pulumi
- Manual configuration via the UI
For more information, see the Configuration Management guide.
Updating Your Theme#
FusionAuth's Advanced Theme Editor provides control over every aspect of the look and feel of your hosted login pages. For an explanation of how to upgrade an advanced theme, see Upgrade an Advanced Theme.
Alternatively, in version 1.51.0 and later, use the Simple Theme Editor to quickly and easily style FusionAuth with no code. If you use a simple theme, you never have to perform a theme upgrade.
Upgrade Options#
Never use Maintenance Mode in production. You don't want your end users to be prompted to update a database!
Always back up your database before upgrading regardless of the upgrade method you choose.
For each of the options below, FusionAuth automatically runs any database migrations. However, you can also stop all nodes and run the database migration SQL statements yourself, rather than relying on FusionAuth to run them. See Downtime and Database Migrations for more.
Easiest Route#
- stop all your services
- upgrade each FusionAuth node
- restart your services
FusionAuth automatically peforms the database upgrade, if needed, when the first node connects to the database.
This is a good option for development instances or non-production systems such as QA.
This is also a good option for systems that can tolerate longer periods of downtime. For instance, you could upgrade during a period of near-zero user activity (e.g. early morning). You could also upgrade FusionAuth during scheduled downtime for other components of your system.
If minimizing downtime is a goal, rolling upgrades or a blue-green deployment might be more suitable.
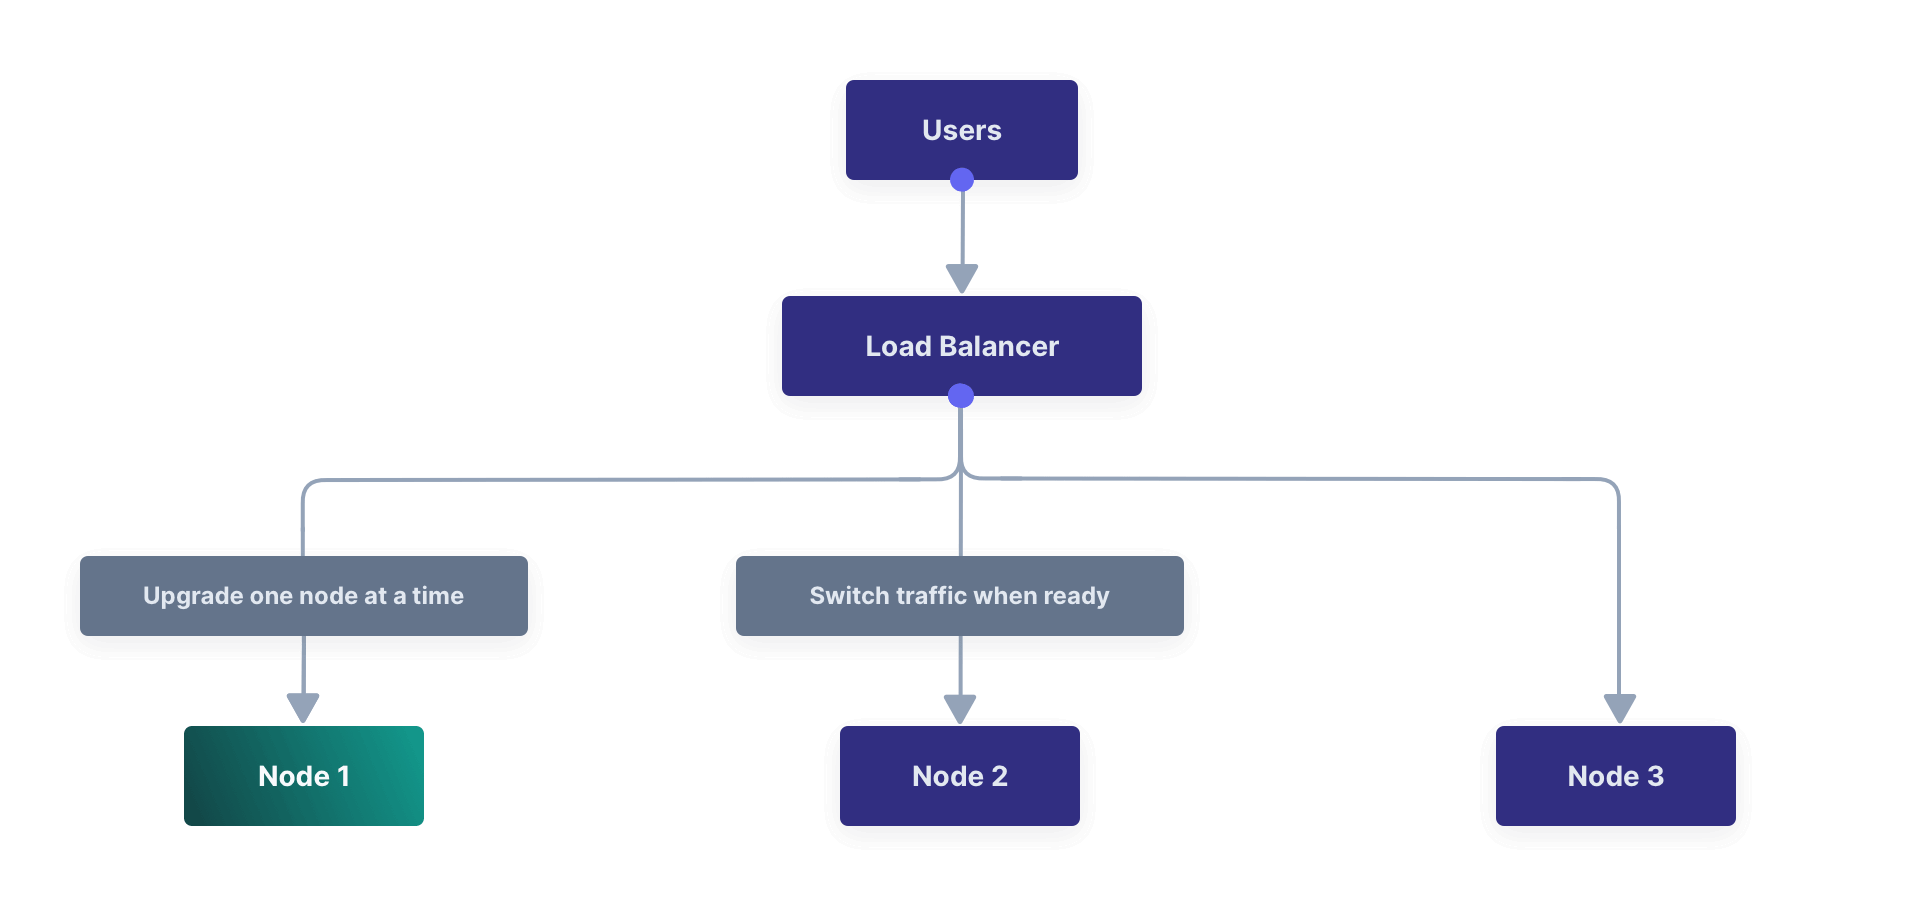
Rolling Upgrade#
You can perform a rolling upgrade if you run multiple FusionAuth nodes behind a load balancer. This method upgrades nodes one at a time, using the load balancer to direct traffic to the upgraded nodes as they become available for use.
Because individual nodes go offline during the rolling upgrade, this upgrade temporarily reduces the capacity of your installation.
You can run in-place upgrades on each node or replace each node with a new node running the latest version of FusionAuth:
-
In-place upgrades are simpler and faster because you don't have to spin up a new server. But if something goes wrong, rolling back the upgrade is more complex.
-
Replacing nodes may be slower, but if something goes wrong, you can revert to the previous version of FusionAuth by pointing the load balancer to the old nodes.
An in-place rolling upgrade for a three node cluster might look like the following example:
- Stop the first node and remove it from the load balancer.
- Upgrade FusionAuth on the first node.
- Start FusionAuth on the upgraded node.
- The upgraded node will perform required database migrations.
- Add the first node back to the load balancer.
- Remove the second and third nodes from the load balancer
- Stop the second and third nodes.
- Upgrade the second and third nodes.
- Start the second and third nodes.
- Add the second and third nodes back to the load balancer.
This method causes a temporary schema mismatch between the first node and the other nodes, so the other nodes may produce errors once the database upgrade begins. The nature of these errors depends on the code paths being updated as well as how users interact with the system. Errors should be minimal for core login functionality.
The upgraded node will lock the database during the database upgrade. Downtime for this upgrade method is limited to the time it takes the first node to run the database migration. There will be limited capacity during node upgrades, but the system will be available for use for most of the upgrade process.
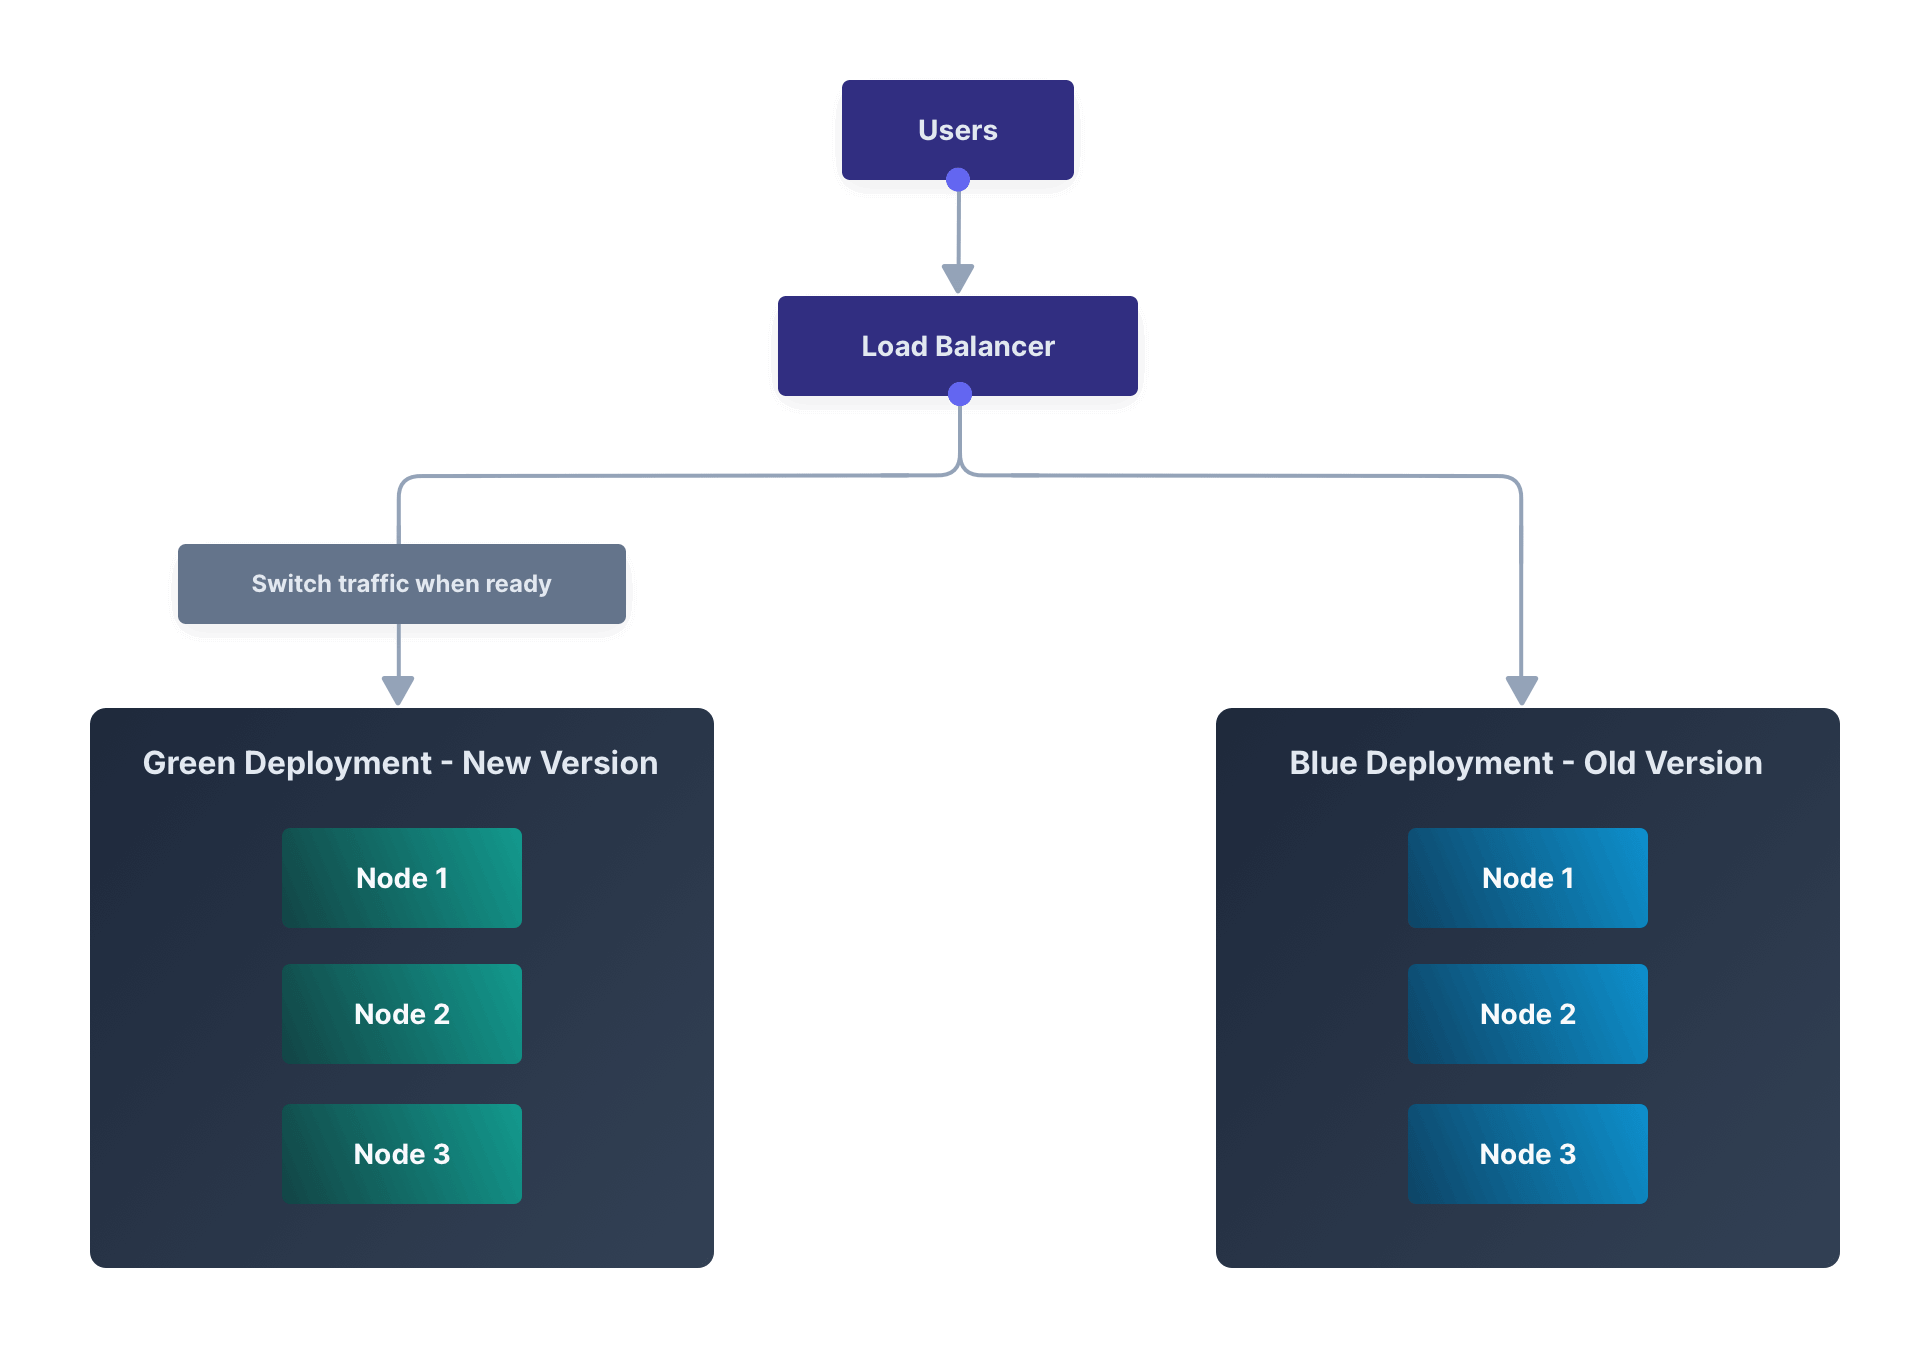
Blue-Green Deployment#
A blue-green deployment reduces downtime and risk by running two identical environments in parallel. A load balancer directs traffic to one of the environments. Using a blue-green deployment isolates the upgrade process from the existing production servers, reducing the impact and risk compared to a rolling upgrade.
Upgrading a blue-green deployment for a three node cluster might look like the following example:
- Create three new nodes with the new version of FusionAuth.
- Start FusionAuth on one of the new nodes.
- The new node will perform required database migrations.*
- Add the new nodes to the load balancer.
- Remove the old nodes from the load balancer.
This method causes a temporary schema mismatch between the first node and the other nodes, so the other nodes may produce errors once the database upgrade begins. The nature of these errors depends on the code paths being updated as well as how users interact with the system. Errors should be minimal for core login functionality.
The upgraded node will lock the database during the database upgrade. Downtime for this upgrade method is limited to the time it takes the first node to run the database migration. There will be limited capacity during node upgrades, but the system will be available for use for most of the upgrade process.
Out-of-Band Database Upgrades#
FusionAuth can handle database migrations automatically using Silent Mode. FusionAuth can also handle updates interactively on development environments using Maintenance Mode.
In production you may want to perform the database migration yourself rather than allow FusionAuth to do so. This is also known as an out-of-band upgrade. This is useful if you want to perform the database migration in a way that minimizes downtime or as part of a larger automated or coordinated upgrade process. Performing the database migration involves running SQL scripts to update the database schema.
Depending on your current version and the new version you will be updating to, you might need to execute one or more SQL scripts to update your database. These scripts are located in the migrations folder in the Database Schema ZIP file, which you can download from the Direct Downloads page.
When upgrading your database from a previous version, be sure to only run the scripts located in the migrations folder. The base files
mysql.sql and postgresql.sql should only be used during a clean installation when no database schema is present.
Find the FusionAuth migrations in the Database Schema ZIP file. Run them in order, starting with the first migration greater than your current FusionAuth version, and ending with the version that is less than or equal to the target upgrade version.
For example, if upgrading from version 1.19.1 to 1.22.0, run the following SQL migrations in this order:
1.20.0.sql1.21.0.sql1.22.0.sql
fusionauth-database-schema/
|-- migrations/
    |--  [mysql | postgresql]/
      |-- 1.1.0.sql
      |-- 1.2.0.sql
      |-- 1.3.0.sql
      |-- 1.3.1.sql
      |-- 1.5.0.sql
      |-- 1.6.0.sql
      |-- 1.7.0.sql
      |-- 1.7.1.sql
      |-- 1.8.0-RC.1.sql
      |-- 1.8.1-RC.1.sql
      |-- 1.11.0.sql
      |-- 1.12.0.sql
      |-- 1.13.0.sql
      |-- 1.14.0.sql
      |-- 1.15.0.sql
      |-- 1.15.3.sql
      |-- 1.16.0-RC.1.sql
      |-- 1.16.0.sql
      |-- 1.17.0.sql
      |-- 1.17.3.sql
      |-- 1.18.0.sql
      |-- 1.18.2.sql
      |-- 1.19.0.sql
      |-- 1.20.0.sql
      |-- 1.21.0.sql
      |-- 1.22.0.sql
      |-- 1.23.0.sql
      |-- 1.25.0.sql
      |-- 1.26.0.sql
      |-- 1.27.0.sql
      |-- 1.28.0.sql
      |-- 1.28.1.sql
      |-- 1.29.1.sql
      |-- 1.30.0.sql
      |-- 1.30.1.sql
      |-- 1.30.2.sql
      |-- 1.32.0.sql
      |-- 1.33.0.sql
      |-- 1.35.0.sql
      |-- 1.36.0.sql
      |-- 1.37.0.sql
      |-- 1.40.1.sql
      |-- 1.41.0.sql
      |-- 1.43.0.sql
      |-- 1.44.0.sql
      |-- 1.45.2.sql
      |-- 1.46.0.sql
      |-- 1.47.0.sql
      |-- 1.48.0.sql
      |-- 1.48.1.sql
      |-- 1.49.0.sql
      |-- 1.50.0.sql
      |-- 1.50.1.sql
      |-- 1.51.0.sql
      |-- 1.53.0.sql
      |-- 1.54.0.sql
      |-- 1.55.0.sql
      |-- 1.55.1.sql
      |-- 1.56.0.sql
      |-- 1.57.0.sql
      |-- 1.58.0.sql
      |-- 1.58.1.sql
      |-- 1.59.0.sql
      |-- 1.62.0.sql
Rolling Back an Upgrade#
If your upgrade is unsuccessful or causes unexpected issues, you may need to roll back your FusionAuth instance to a previous version.
Here are the steps for initiating a rollback:
- Stop your FusionAuth instances.
- Initiate the process to restore from the database backup taken prior to starting the upgrade.
- Redeploy FusionAuth using your previous version. How you do this will depend on your deployment method.
If you are running a FusionAuth Cloud deployment, you can find instructions for rolling back an upgrade here: Rolling Back From a Problematic Upgrade.
It's important to consider the timing implications of a rollback or any disaster recovery process. RTO, or Recovery Time Objective, is the targeted period time within which a service should be restored after an outage to avoid unacceptable consequences. Simply put, it is how long you can afford to be without the service or system before it severely impacts your business. It represents the goal for the time taken to recover from failure.
RPO, or Recovery Point Objective, on the other hand, refers to the maximum tolerable amount of data loss measured in time. Determine RPO by looking at the time of the last backup you need to restore from and the restore time.
In the context of a FusionAuth upgrade rollback, the RPO would be the time since the last backup before the upgrade, and the RTO would be the time it takes to stand up the older version of the system and restore the database.
The RPO effectively measures the maximum tolerable data loss in the event of a rollback, and the RTO measures the time it takes to recover from the failure.
Upgrade FAQs#
Q: What is runtime mode and how does it affect upgrades?
A: FusionAuth runtime mode can be either production or development. When in the development runtime mode, Maintenance Mode will interactively assist you to configure the database and connect to Elasticsearch, if configured. Once you move FusionAuth into production, it is recommended that you modify the runtime mode to production. When in production runtime mode, Maintenance Mode will no longer be available to you, which means you can be certain that your end users will not find themselves on the database upgrade panel during an upgrade. When in production mode, you will either need to leverage Silent Mode to automatically apply database migrations or you will need to apply the database migrations yourself (either by hand or via a script of some sort). For more on runtime modes, see the FusionAuth Installation Guide.
Q: What is Maintenance Mode?
A: Maintenance Mode is a special admin interface for FusionAuth installations in development environments. Maintenance Mode helps you to interactively upgrade FusionAuth or set up database connections. You can switch to Maintenance Mode by switching to the development runtime mode and setting Silent Mode to false. Note that Maintenance Mode should never be used in production.
Q: What is Silent Mode?
A: Silent Mode is a feature of FusionAuth that automatically applies database migrations. This is useful for automated deployments. Silent Mode can be enabled in the development runtime mode and, as of version 1.19.0, in the production runtime mode too. Silent Mode will attempt to perform database migrations on startup. If the database migrations fail, FusionAuth will display an error message on the login page. You should always test your database migrations in a non-production or staging environment before deploying to production.
Q: How many versions can I skip?
A: We recommended migrating from one minor version to the next. Read the release notes carefully and test your upgrade in a non-production environment.
Q: How often should I upgrade?
A: We recommend staying within the last three minor versions, but we will not force an upgrade. In addition, we typically don't backport bug fixes. If you run into an issue with a bug, you'll need to upgrade to get the fix. We recommend you set up a regular cadence of reviewing and upgrading FusionAuth that fits your business needs, the same as you would with a framework or library your application depends on.
Q: How can I find out about new releases?
A: We publish release notes for every release. You can find them here: Release Notes. There are a variety of ways to be notified of releases, including an email list and RSS feed.
Q: Does FusionAuth support zero-downtime upgrades?
A: At this time, FusionAuth does not support zero-downtime upgrades when there is a database change. While there are a variety of options that can minimize downtime, upgrades will cause downtime whenever a schema change is required. Please review and upvote this issue if zero-downtime upgrades are important to you.
Q: What kind of downtime can I expect?
A: This depends. Factors include the amount of data in your system, the speed of your database, the schema changes required, and your upgrade option choice. If you run multiple nodes, downtime can be minimized. For example, multi-node clusters in FusionAuth Cloud experience user-facing downtime on the order of seconds to minutes during upgrades. Testing an upgrade in a non-production environment is the surest way to understand the amount of downtime.
Detailed Upgrade Instructions#
This section will guide you with detailed technical instructions on how to upgrade FusionAuth nodes on different platforms.
Cloud#
To upgrade your FusionAuth Cloud instance, see the Cloud Installation Guide.
Docker#
To upgrade your Docker instance, see the Docker Upgrade guide.
Homebrew#
To upgrade an instance you installed with Homebrew, see the Homebrew Upgrade guide.
ZIP Packages#
FusionAuth is available in a ZIP package for macOS, Linux, and Windows. If you are using the ZIP package, please use this guide to update an existing instance of FusionAuth. Find the ZIP packages at the FusionAuth Downloads page.
macOS and Linux#
In this example, we'll assume you have previously installed FusionAuth in /usr/local/fusionauth and this directory will be referred to as FUSIONAUTH_HOME. If you have used a different directory you can adjust the following example accordingly.
Example filesystem layout
/usr/local/fusionauth/bin
/usr/local/fusionauth/config
/usr/local/fusionauth/config/keystore
/usr/local/fusionauth/config/fusionauth.properties
/usr/local/fusionauth/data
/usr/local/fusionauth/fusionauth-app
/usr/local/fusionauth/fusionauth-search
/usr/local/fusionauth/java
The first step will be to shut down the FusionAuth services.
Shut down and uninstall FusionAuth
# Stop services
/usr/local/fusionauth/bin/shutdown.sh
# Delete or move existing installation
cd /usr/local/fusionauth
rm -rf ./fusionauth-app
rm -rf ./fusionauth-search
rm -rf ./bin
During an upgrade, most everything is saved in the database, so it is safe to delete these directories. To preserve your configuration and Elasticsearch index, you want to be sure to preserve the following directories:
Preserve these directories
/usr/local/fusionauth/config
/usr/local/fusionauth/data
/usr/local/fusionauth/java
/usr/local/fusionauth/logs
Extract the new ZIP files and place them in FUSIONAUTH_HOME. In the following example, we use the unzip command with the -n and -q flags. The -q flag is optional, it causes the command to be run in quiet mode to reduce the amount of output to the console. The other flag -n is a no-overwrite flag so that any configuration files are not overwritten.
Unzip the new packages with a no-overwrite flag
unzip -nq new-fusionauth-app.zip
unzip -nq new-fusionauth-search.zip
Finally, restart the FusionAuth services.
Start up FusionAuth
# Start Services
/usr/local/fusionauth/bin/startup.shWindows#
In this example, we'll assume you have previously installed FusionAuth in \fusionauth and this directory will be referred to as FUSIONAUTH_HOME. If you have used a different directory, you can adjust the following example accordingly.
Example filesystem layout
\fusionauth\bin
\fusionauth\config
\fusionauth\config\keystore
\fusionauth\config\fusionauth.properties
\fusionauth\data
\fusionauth\fusionauth-app
\fusionauth\fusionauth-search
\fusionauth\java
The first step will be to shut down the FusionAuth services and delete the old installation.
Shut down and uninstall FusionAuth
# Stop Services
net stop FusionAuthApp
net stop FusionAuthSearch
# Uninstall Services
cd \fusionauth\fusionauth-app\bin
FusionAuthApp.exe /uninstall
cd \fusionauth\fusionauth-search\elasticsearch\bin
FusionAuthSearch.exe /uninstall

# Delete or move existing installation
cd \fusionauth
move fusionauth-app fusionauth-app-old
move fusionauth-search fusionauth-search-oldPrior to version 1.37.0, the executable will be found in the apache-tomcat directory. For example,
\fusionauth\fusionauth-app\apache-tomcat\bin\FusionAuthApp.exe
Versions 1.37.0 through 1.39.0 do not support native Windows installation.
During an upgrade, most everything is saved in the database, so it is safe to delete these directories. To preserve your configuration and Elasticsearch index, you want to be sure to preserve the following directories:
Preserve these directories
\fusionauth\config
\fusionauth\data
\fusionauth\java
\fusionauth\logs
Extract the new ZIP files and place them in FUSIONAUTH_HOME. You may do this using Windows File Explorer or other command line tools to unpack the ZIP archive. Ensure you delete or move the existing directories to prevent unzipping the new version on top of the existing version. If the new version is unzipped on top of the existing version, you will end up with duplicate libraries in the classpath that will lead to runtime errors.
After you have extracted the new packages, reinstall the Windows services and start them.
Install and start FusionAuth
# Install Windows Services
cd \fusionauth\fusionauth-app\bin
FusionAuthApp.exe /install
cd \fusionauth\fusionauth-search\elasticsearch\bin
FusionAuthSearch.exe /install
# Startup Services
net start FusionAuthSearch
net start FusionAuthAppPrior to version 1.37.0, you can find FusionAuthApp.exe at:
\fusionauth\fusionauth-app\apache-tomcat\bin\FusionAuthApp.exe
Versions 1.37.0 through 1.39.0 do not support native Windows installation.
Linux Packages#
Updating your application is easy if you installed using the RPM or Debian packages. All you need to do is to issue an update command to the dpkg or RPM program and specify the new package file. Here is an example:
Running the update script will shut down the FusionAuth service if it has not yet been stopped. The service will need to be restarted after the update is finished.
Shut down FusionAuth
sudo service fusionauth-app stop
sudo service fusionauth-search stop
Upgrade FusionAuth using Debian bundles
sudo dpkg -i fusionauth-search-<version>.deb
sudo dpkg -i fusionauth-app-<version>.deb
Upgrade FusionAuth using RPM bundles
sudo rpm -U fusionauth-search-<version>.rpm
sudo rpm -U fusionauth-app-<version>.rpm
Start FusionAuth
sudo systemctl start fusionauth-search
sudo systemctl start fusionauth-app
Troubleshooting Upgrade with RPMs#
Please review the procedure outlined below if attempting to perform a clean install or upgrade using RPM's and have experienced a failure that you have been unable to resolve. Please only consider these steps after other attempts have been unsuccessful.
This will completely remove FusionAuth App and FusionAuth Search from your server. Proceed with caution.
It is always recommended you back up the database before performing an upgrade or troubleshooting steps outlined here.
The following steps will produce a clean installation preserving:
- The FusionAuth config file found in
/usr/local/fusionauth/config/fusionauth.properties - The Elasticsearch index found in
/usr/local/fusionauth/data
Below assumes both fusionauth-app and fusionauth-search will be uninstalled and reinstalled together. If you are not using fusionauth-search, you may ignore the steps related to this service.
Manual Removal Steps#
- Remove the RPM package for
fusionauth-searchandfusionauth-app
sudo rpm -e fusionauth-searchsudo rpm -e fusionauth-app
- Manually delete anything leftover from RPM
sudo rm -rf /usr/local/fusionauth/fusionauth-search/sudo rm -rf /usr/local/fusionauth/fusionauth-app/sudo rm -rf /usr/local/fusionauth/bin/
- After removal, the following directories will remain:
/usr/local/fusionauth/config//usr/local/fusionauth/data/- In some cases this directory may not exist/usr/local/fusionauth/java/- While safe to delete, it is not necessary.
- Reinstall
fusionauth-appandfusionauth-search.
- Download the desired version of
fusionauth-appandfusionauth-search- Direct download.
sudo rpm -i <file_to_be_installed>.rpm
FastPath#
While FastPath is an option to perform an upgrade, the FastPath process limits the flexibility of the installation in order to get it up and running quickly. We therefore don't recommend you use FastPath install scripts in a production environment.
We recommend using .deb or .rpm packages on Linux production environments. If your production platform is macOS or Windows, please manually manage the upgrade using the .zip bundles.