FusionAuth developer image
FusionAuth developer logo
  • Back to site
  • Expert Advice
  • Blog
  • Developers
  • Downloads
  • Account
  • Contact sales
Navigate to...
  • Welcome
  • Getting Started
    • Getting Started
    • 5-minute Setup Guide
      • Overview
      • Docker
      • Fast Path
      • Sandbox
    • Setup Wizard & First Login
    • Register a User and Login
    • Self-service Registration
    • Start and Stop FusionAuth
    • Core Concepts
      • Overview
      • Users
      • Roles
      • Groups
      • Registrations
      • Applications
      • Tenants
      • Identity Providers
      • Authentication/Authorization
      • Integration Points
    • Example Apps
      • Overview
      • Dart
      • Go
      • Java
      • JavaScript
      • .NET Core
      • PHP
      • Python
      • Ruby
    • Tutorials
  • Installation Guide
    • Overview
    • System Requirements
    • Server Layout
    • Cloud
    • Cluster
    • Docker
    • Fast Path
    • Kubernetes
      • Overview
      • Deployment Guide
      • Minikube Setup
      • Amazon EKS Setup
      • Google GKE Setup
      • Microsoft AKS Setup
    • Kickstart™
    • Homebrew
    • Marketplaces
    • Packages
    • Database
    • FusionAuth App
    • FusionAuth Search
    • Common Configuration
  • Migration Guide
    • Overview
    • General
    • Auth0
    • Keycloak
    • Amazon Cognito
    • Firebase
    • Microsoft Azure AD B2C
    • Tutorial
  • Admin Guide
    • Overview
    • Account Portal
    • Config Management
    • Editions and Features
    • Key Rotation
    • Licensing
    • Monitoring
    • Prometheus Setup
    • Proxy Setup
    • Reference
      • Overview
      • Configuration
      • CORS
      • Data Types
      • Hosted Login Pages Cookies
      • Known Limitations
      • Password Hashes
    • Releases
    • Roadmap
    • Search And FusionAuth
    • Securing
    • Switch Search Engines
    • Technical Support
    • Troubleshooting
    • Upgrading
    • WebAuthn
  • Login Methods
    • Identity Providers
      • Overview
      • Apple
      • Epic Games
      • External JWT
        • Overview
        • Example
      • Facebook
      • Google
      • HYPR
      • LinkedIn
      • Nintendo
      • OpenID Connect
        • Overview
        • Amazon Cognito
        • Azure AD
        • Discord
        • Github
      • Sony PlayStation Network
      • Steam
      • Twitch
      • Twitter
      • SAML v2
        • Overview
        • ADFS
        • Azure AD
      • SAML v2 IdP Initiated
        • Overview
        • Okta
      • Xbox
    • OIDC & OAuth 2.0
      • Overview
      • Endpoints
      • Tokens
      • OAuth Modes
    • Passwordless
      • Overview
      • Magic Links
      • WebAuthn & Passkeys
    • SAML v2 IdP
      • Overview
      • Google
      • Zendesk
  • Developer Guide
    • Overview
    • API Gateways
      • Overview
      • ngrok Cloud Edge
    • Client Libraries & SDKs
      • Overview
      • Dart
      • Go
      • Java
      • JavaScript
      • .NET Core
      • Node
      • OpenAPI
      • PHP
      • Python
      • React
      • Ruby
      • Typescript
    • Events & Webhooks
      • Overview
      • Writing a Webhook
      • Securing Webhooks
      • Events
        • Overview
        • Audit Log Create
        • Event Log Create
        • JWT Public Key Update
        • JWT Refresh
        • JWT Refresh Token Revoke
        • Kickstart Success
        • Group Create
        • Group Create Complete
        • Group Delete
        • Group Delete Complete
        • Group Update
        • Group Update Complete
        • Group Member Add
        • Group Member Add Complete
        • Group Member Remove
        • Group Member Remove Complete
        • Group Member Update
        • Group Member Update Complete
        • User Action
        • User Bulk Create
        • User Create
        • User Create Complete
        • User Deactivate
        • User Delete
        • User Delete Complete
        • User Email Update
        • User Email Verified
        • User IdP Link
        • User IdP Unlink
        • User Login Failed
        • User Login Id Dup. Create
        • User Login Id Dup. Update
        • User Login New Device
        • User Login Success
        • User Login Suspicious
        • User Password Breach
        • User Password Reset Send
        • User Password Reset Start
        • User Password Reset Success
        • User Password Update
        • User Reactivate
        • User Reg. Create
        • User Reg. Create Complete
        • User Reg. Delete
        • User Reg. Delete Complete
        • User Registration Update
        • User Reg. Update Complete
        • User Reg. Verified
        • User 2FA Method Add
        • User 2FA Method Remove
        • User Update
        • User Update Complete
    • Guides
      • Overview
      • Authentication Tokens
      • Exposing A Local Instance
      • JSON Web Tokens
      • Key Master
      • Localization and Internationalization
      • Multi-Factor Authentication
      • Multi-Tenant
      • Passwordless
      • Registration-based Email Verification
      • Searching With Elasticsearch
      • Securing Your APIs
      • Silent Mode
      • Single Sign-on
      • Two Factor (pre 1.26)
    • Integrations
      • Overview
      • CleanSpeak
      • Kafka
      • Twilio
    • Plugins
      • Overview
      • Writing a Plugin
      • Custom Password Hashing
    • User Control & Gating
      • Overview
      • Gate Unverified Users
      • Gate Unverified Registrations
      • User Account Lockout
  • Customization
    • Email & Templates
      • Overview
      • Configure Email
      • Email Templates
      • Email Variables
      • Message Templates
    • Lambdas
      • Overview
      • Apple Reconcile
      • Client Cred. JWT Populate
      • Epic Games Reconcile
      • External JWT Reconcile
      • Facebook Reconcile
      • Google Reconcile
      • HYPR Reconcile
      • JWT Populate
      • LDAP Connector Reconcile
      • LinkedIn Reconcile
      • Nintendo Reconcile
      • OpenID Connect Reconcile
      • SAML v2 Populate
      • SAML v2 Reconcile
      • SCIM Group Req. Converter
      • SCIM Group Resp. Convtr.
      • SCIM User Req. Converter
      • SCIM User Resp. Converter
      • Sony PSN Reconcile
      • Steam Reconcile
      • Twitch Reconcile
      • Twitter Reconcile
      • Xbox Reconcile
    • Messengers
      • Overview
      • Generic Messenger
      • Twilio Messenger
    • Themes
      • Overview
      • Examples
      • Helpers
      • Localization
      • Template Variables
  • Premium Features
    • Overview
    • Advanced Registration Forms
    • Advanced Threat Detection
    • Application Specific Themes
    • Breached Password Detection
    • Connectors
      • Overview
      • Generic Connector
      • LDAP Connector
      • FusionAuth Connector
    • Entity Management
    • SCIM
      • Overview
      • Azure AD Client
      • Okta Client
      • SCIM-SDK
    • Self Service Account Mgmt
      • Overview
      • Updating User Data & Password
      • Add Two-Factor Authenticator
      • Add Two-Factor Email
      • Add Two-Factor SMS
      • Add WebAuthn Passkey
      • Customizing
      • Troubleshooting
    • WebAuthn
  • APIs
    • Overview
    • Authentication
    • Errors
    • API Explorer
    • Actioning Users
    • API Keys
    • Applications
    • Audit Logs
    • Connectors
      • Overview
      • Generic
      • LDAP
    • Consents
    • Emails
    • Entity Management
      • Overview
      • Entities
      • Entity Types
      • Grants
    • Event Logs
    • Families
    • Forms
    • Form Fields
    • Groups
    • Identity Providers
      • Overview
      • Links
      • Apple
      • External JWT
      • Epic Games
      • Facebook
      • Google
      • HYPR
      • LinkedIn
      • Nintendo
      • OpenID Connect
      • SAML v2
      • SAML v2 IdP Initiated
      • Sony PlayStation Network
      • Steam
      • Twitch
      • Twitter
      • Xbox
    • Integrations
    • IP Access Control Lists
    • JWT
    • Keys
    • Lambdas
    • Login
    • Message Templates
    • Messengers
      • Overview
      • Generic
      • Twilio
    • Multi-Factor/Two Factor
    • Passwordless
    • Reactor
    • Registrations
    • Reports
    • SCIM
      • Overview
      • SCIM User
      • SCIM Group
      • SCIM EnterpriseUser
      • SCIM Service Provider Config.
    • System
    • Tenants
    • Themes
    • Users
    • User Actions
    • User Action Reasons
    • User Comments
    • WebAuthn
    • Webhooks
  • Release Notes

    Provision a Microsoft AKS (Azure Kubernetes Service) Kubernetes Cluster

    Overview

    This guide will show you how to quickly setup an AKS cluster on Microsoft Azure. When completed, you will have a fully functional Kubernetes cluster ready to deploy FusionAuth as well as a supporting Azure Database for PostgresSQL. The following method uses the default settings when provisioning an AKS cluster with the required resources and services. It is recommended that you consult the Azure Kubernetes Service docs for details on how to customize the configuration for your use case.

    Requirements

    • A Microsoft Azure account and active subscription with sufficient permissions to create resources.

    • az - Azure command Line tool used to manage resources on Azure. For installation instructions, see How to install the Azure CLI.

    • kubectl - Command line tool that interacts with the Kubernetes API server and is useful for managing Kubernetes clusters. Before proceeding, follow the installation documentation that corresponds to your platform found here. This guide will be using version 1.22

    Architecture

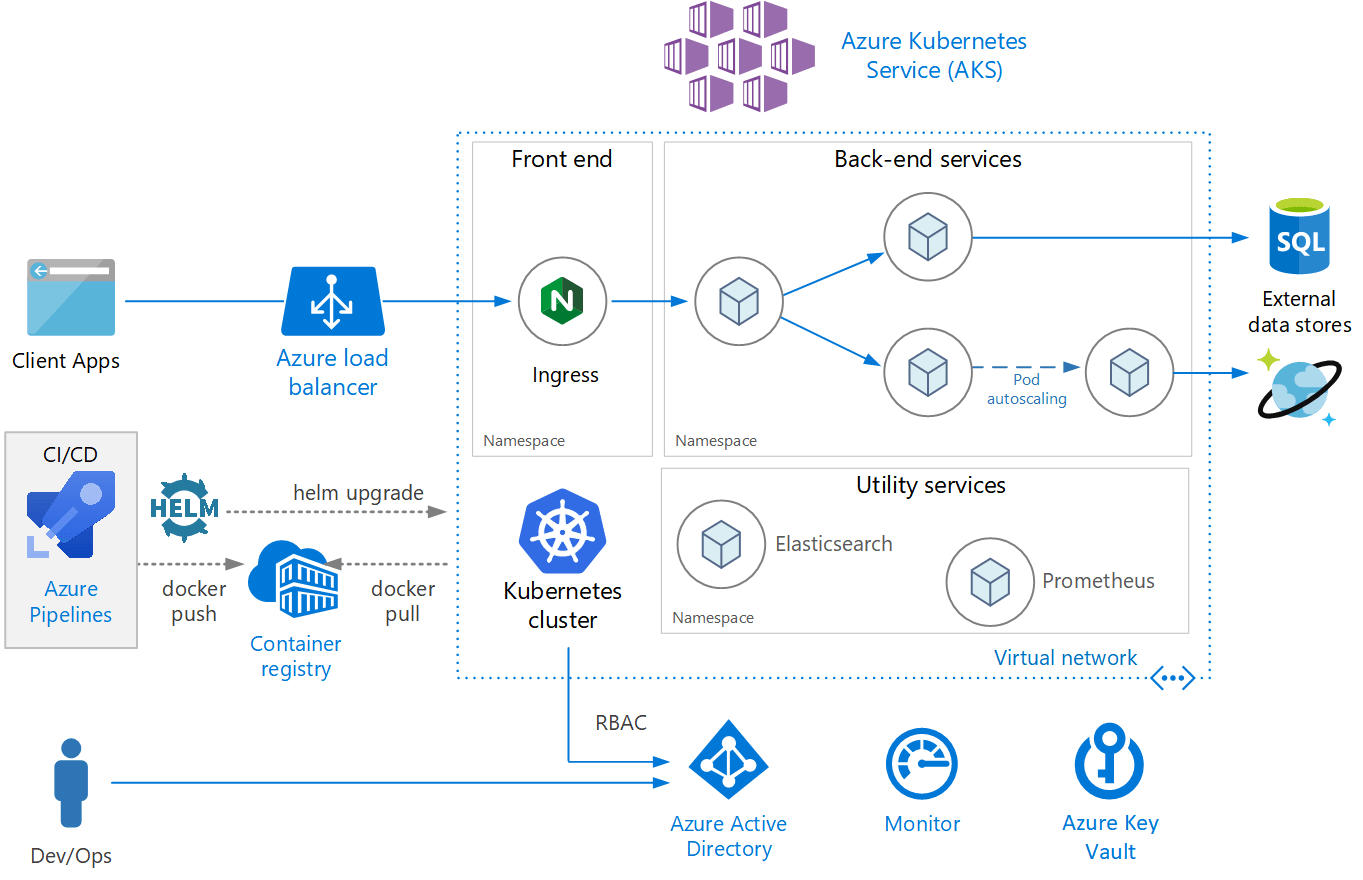
    The resulting architecture for this guide centers around creating an AKS cluster. By default, AKS creates a virtual network hosted in the Azure cloud; the worker nodes will connect to this network. You will create a PostgreSQL database and Elasticsearch cluster that will reside within the same virtual network.

    The following reference architecture shows an example application deployed in AKS.

    EKS Architecture

    Create an AKS cluster

    Create a Resource Group

    Before you create the cluster, you need to first create a Resource Group, a logical grouping of Azure resources. A resource group location is where resources will run by default when a region is not provided on creation.

    Create a new resource group
    
    az group create --name fusionauthResourceGroup --location westus
    JSON output of the resource group creation command
    
    {
      "id": "/subscriptions/2683a458-c361-4b5e-87d9-a4e5237d5b91/resourceGroups/fusionauthResourceGroup",
      "location": "westus",
      "managedBy": null,
      "name": "fusionauthResourceGroup",
      "properties": {
        "provisioningState": "Succeeded"
      },
      "tags": null,
      "type": "Microsoft.Resources/resourceGroups"
    }

    Create the cluster

    Create a new AKS cluster
    
    az aks create \
      --resource-group fusionauthResourceGroup \
      --name fusionauthCluster \
      --node-count 1 \
      --enable-addons monitoring \
      --generate-ssh-keys

    More on these arguments:

    • resource-group - The name of the resource group where the cluster will be created.

    • name - The name of the cluster.

    • node-count - The number of nodes in the replica set.

    • enable-addons - The Kubernetes addons to enable.

    • generate-ssh-keys - Generates SSH public and private key files in the ~/.ssh directory.

      For more information on the create command, see az aks create documentation.

    Update Kubernetes Configuration

    The following retrieves credentials for the newly created cluster and then configures your ~/.kube/config file so that you can use kubectl to connect to this cluster.

    Get access credentials and update Kubeconfig
    
    az aks get-credentials \
      --resource-group fusionauthResourceGroup \
      --name fusionauthCluster

    Verify Cluster Information

    Execute the list command to see AKS clusters that have been configured.

    Get list of AKS clusters
    
    az aks list

    You now have a fully functional provisioned AKS cluster. For good measure, view the nodes that have been created. Use kubectl to make requests to the Kubernetes API Server.

    Get list of nodes running on the cluster
    
    kubectl get nodes -o wide
    
    NAME                                STATUS   ROLES   AGE     VERSION   INTERNAL-IP   EXTERNAL-IP   OS-IMAGE             KERNEL-VERSION     CONTAINER-RUNTIME
    aks-nodepool1-13281124-vmss000000   Ready    agent   8m42s   v1.20.9   10.240.0.4    <none>        Ubuntu 18.04.6 LTS   5.4.0-1059-azure   containerd://1.4.9+azure

    Great! You have a node in a READY status. This means that the node is healthy and ready to accept pods.

    Create a Database

    For this setup, you will create a PostgreSQL database. Such a database is required for FusionAuth. Replace fusionauth-db-<my-organization> with the desired database name.

    Azure database names are globally unique and you may encounter the error, "Specified server name is already used". Consider appending your own unique identifier such as an organization name in this example.

    Create a PostgreSQL flexible server
    
    az postgres flexible-server create \
      --resource-group fusionauthResourceGroup \
      --name fusionauth-db-<my-organization> \
      --location westus \
      --admin-user postgres \
      --admin-password changeMeToSomethingSecure \
      --version 12 \
      --public-access 0.0.0.0

    More on these arguments:

    • resource-group - The name of the resource group where the cluster will be created.

    • name - The name of the database.

    • location - The location.

    • admin-user - The database admin user.

    • admin-password - The database admin user password.

    • version - The version of PostgreSQL to install.

    • public-access - Allows public access in the firewall rules. The 0.0.0.0 parameter allows access to this database from any resource deployed in Azure.

      For more information on the create command, see az postgres flexible-server create documentation.

    Upon successful database creation, you will receive a JSON object that contains important information about your new database.

    JSON output from a successful database creation
    
    {
      "connectionString": "postgresql://postgres:<your-password>@fusionauth-db-example.postgres.database.azure.com/postgres?sslmode=require",
      "databaseName": "flexibleserverdb",
      "firewallName": "AllowAllAzureServicesAndResourcesWithinAzureIps_2021-10-10_23-34-29",
      "host": "fusionauth-db-example.postgres.database.azure.com",
      "id": "/subscriptions/2683a458-c361-4b5e-87d9-a4e5237d5b91/resourceGroups/fusionauthResourceGroup/providers/Microsoft.DBforPostgreSQL/flexibleServers/fusionauth-db-example",
      "location": "West US",
      "password": "your-password",
      "resourceGroup": "fusionauthResourceGroup",
      "skuname": "Standard_D2s_v3",
      "username": "postgres",
      "version": "12"
    }

    Take note of the database username, password and hostname, as those will be needed to configure FusionAuth. If you need to retrieve this information later, you can use the following command to get a list:

    List available flexible servers
    
    az postgres flexible-server list

    Deploy Elasticsearch using Elastic Cloud

    Azure offers its Elasticsearch Service through Elastic Cloud. This section will guide you through setting up your account and deploying an Elasticsearch cluster.

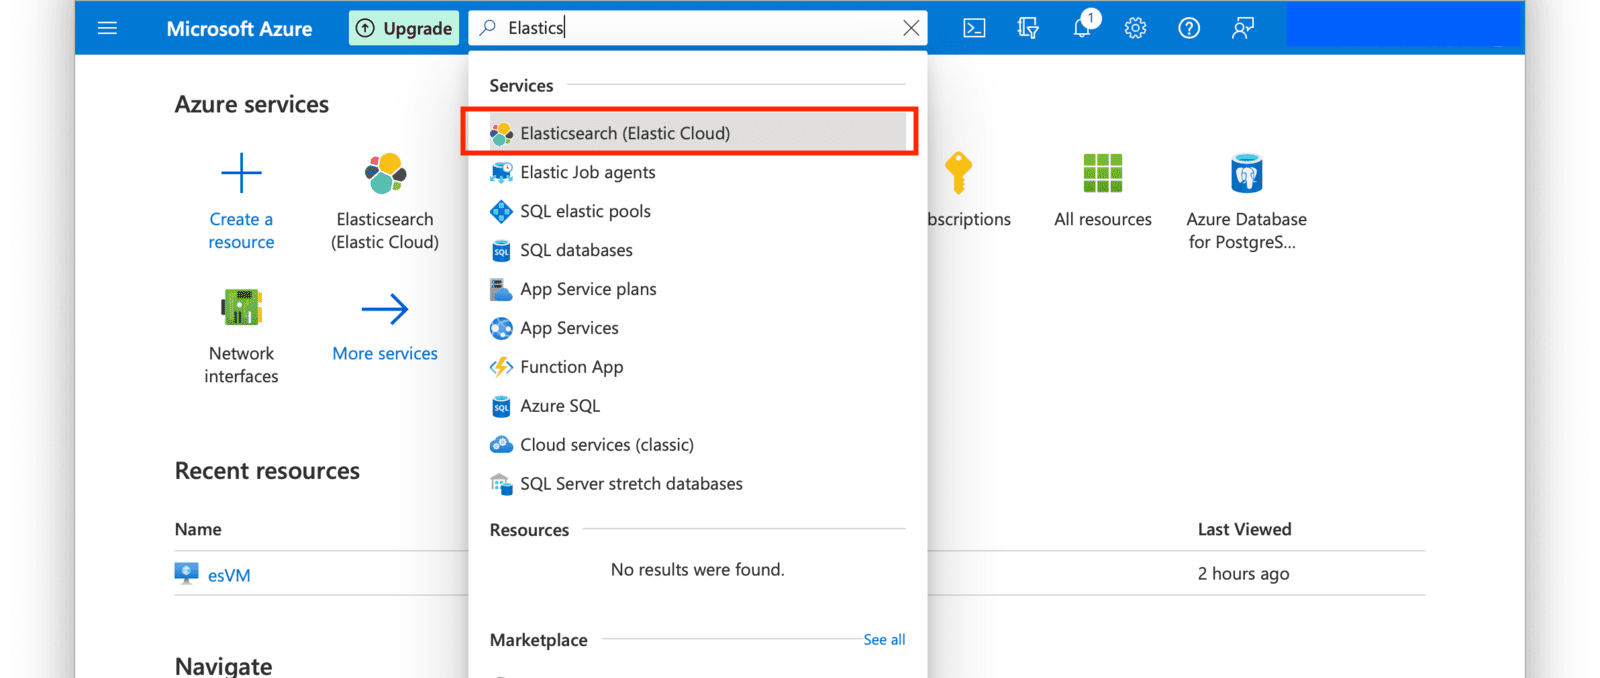
    From the Azure Portal home screen, enter a search for "Elasticsearch" and click on the Elasticsearch (Elastic Cloud) service.

    Navigate to Elasticsearch service

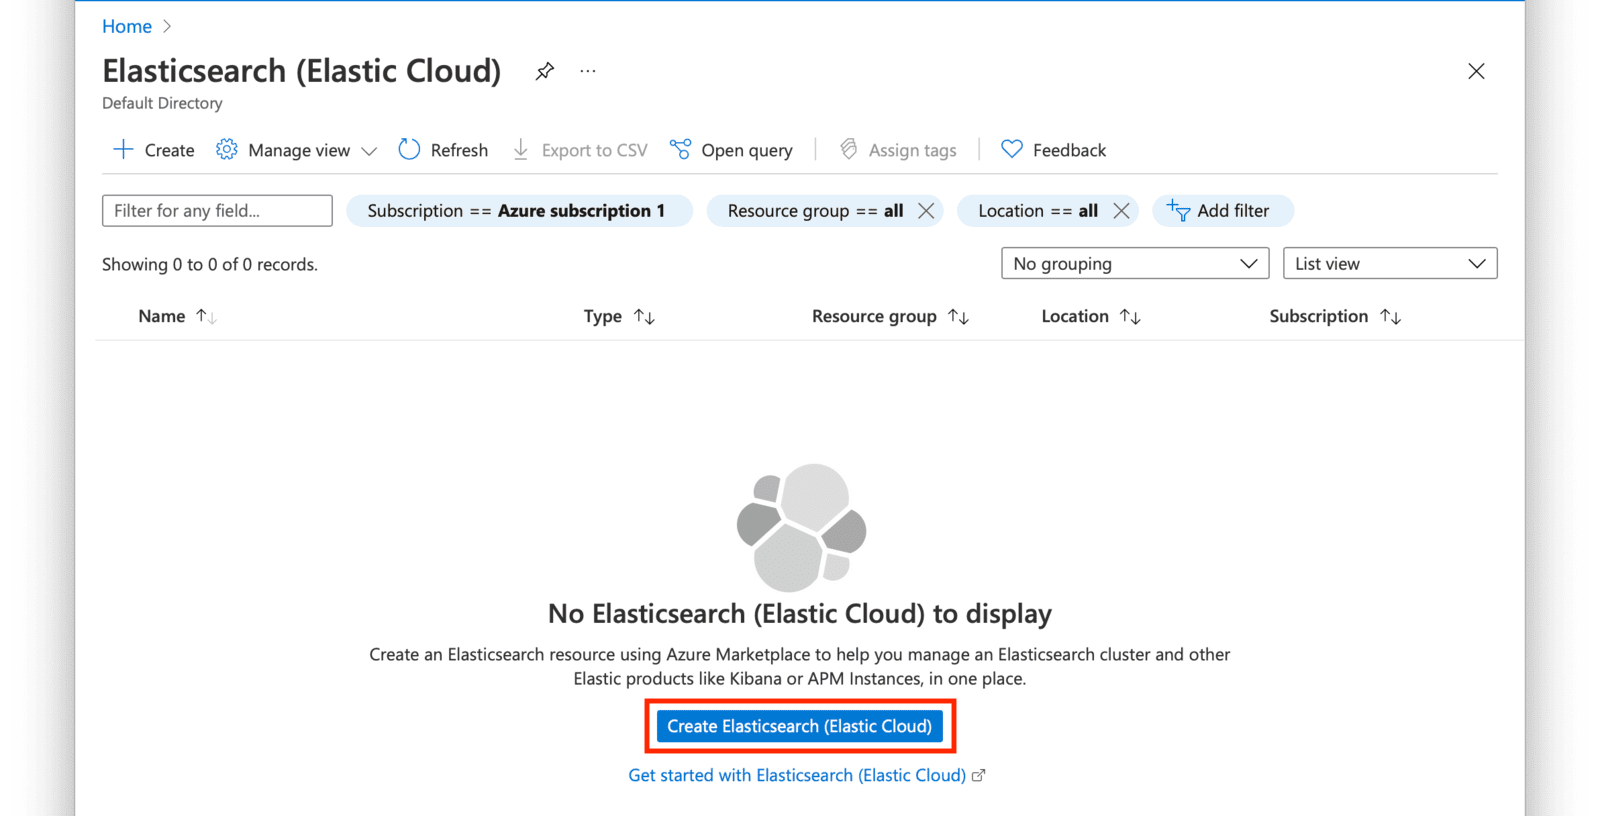
    Click on the Create Elasticsearch (Elastic Cloud) button.

    Create Elasticsearch

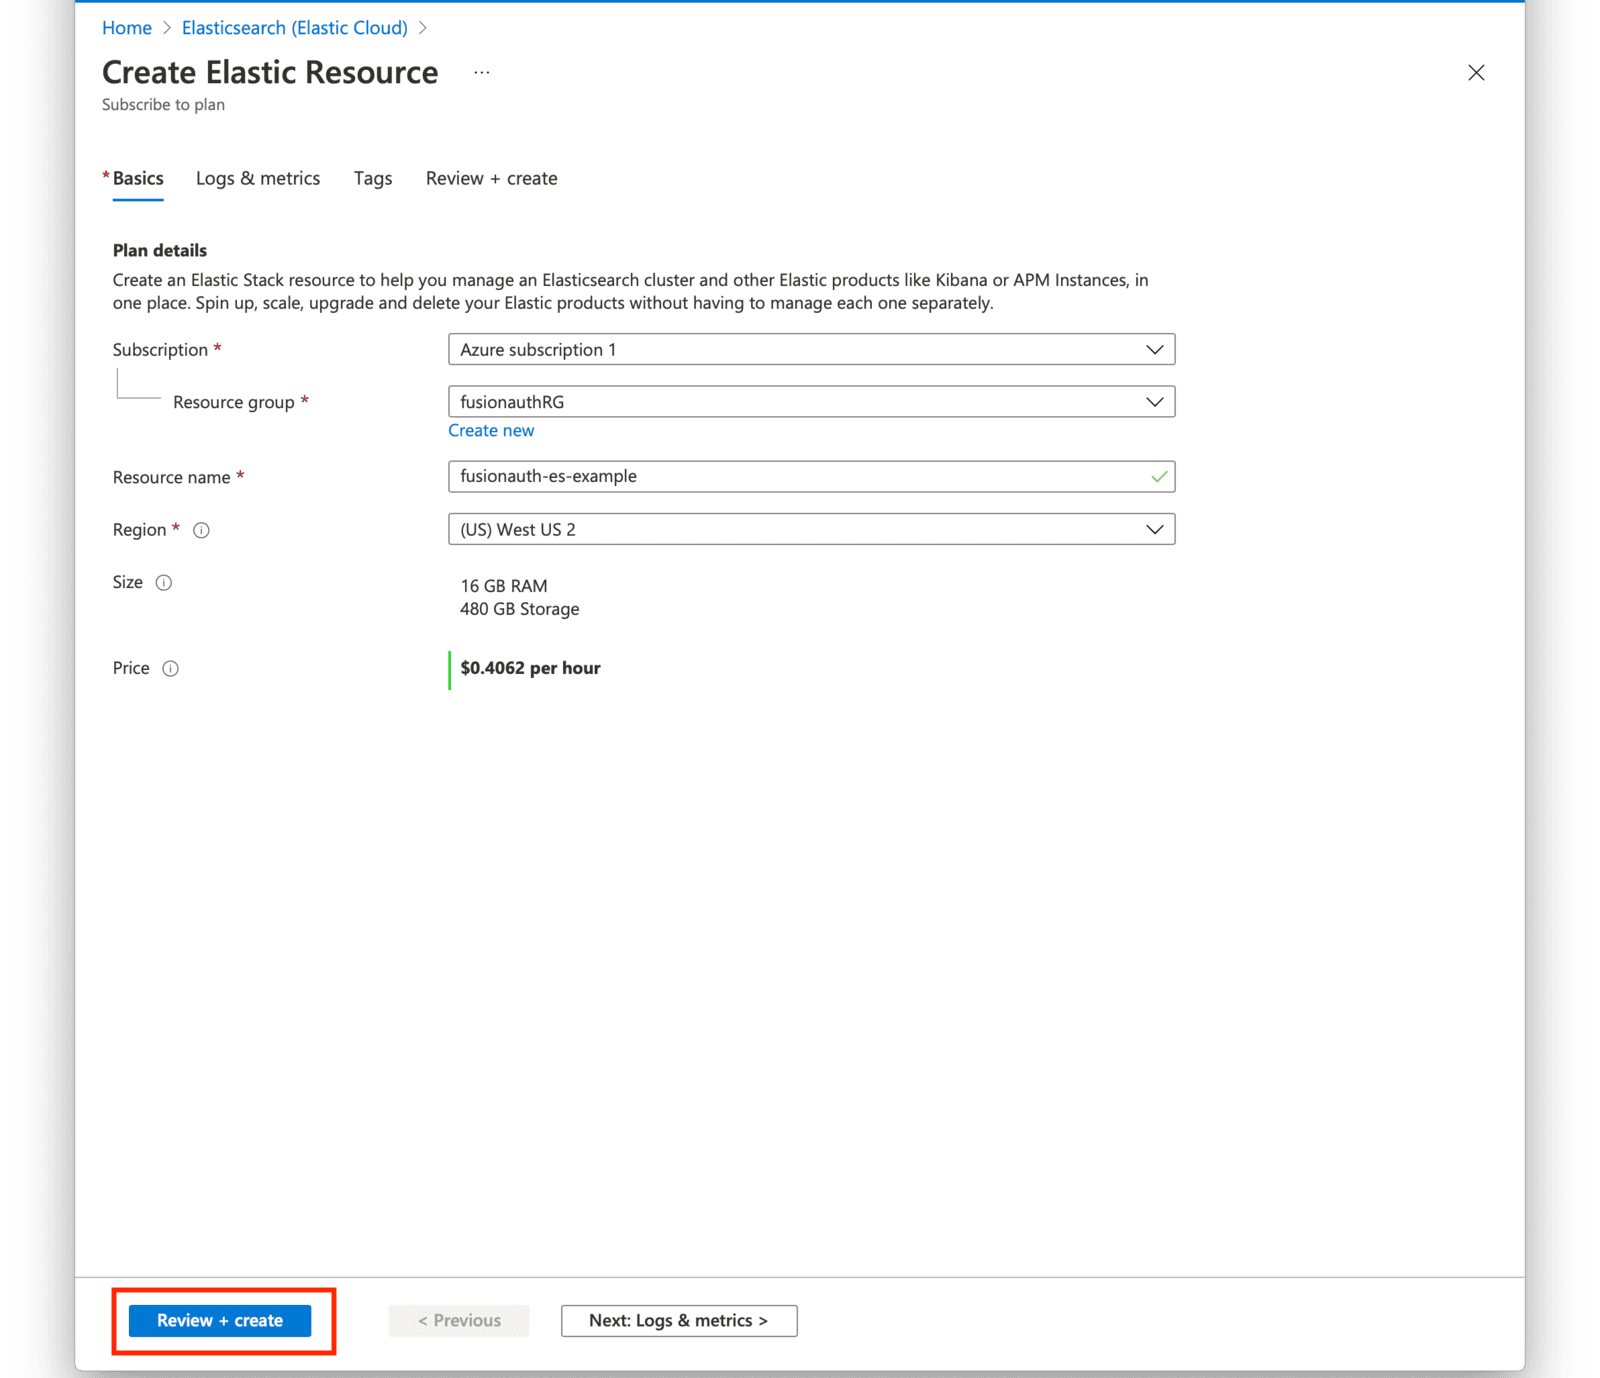
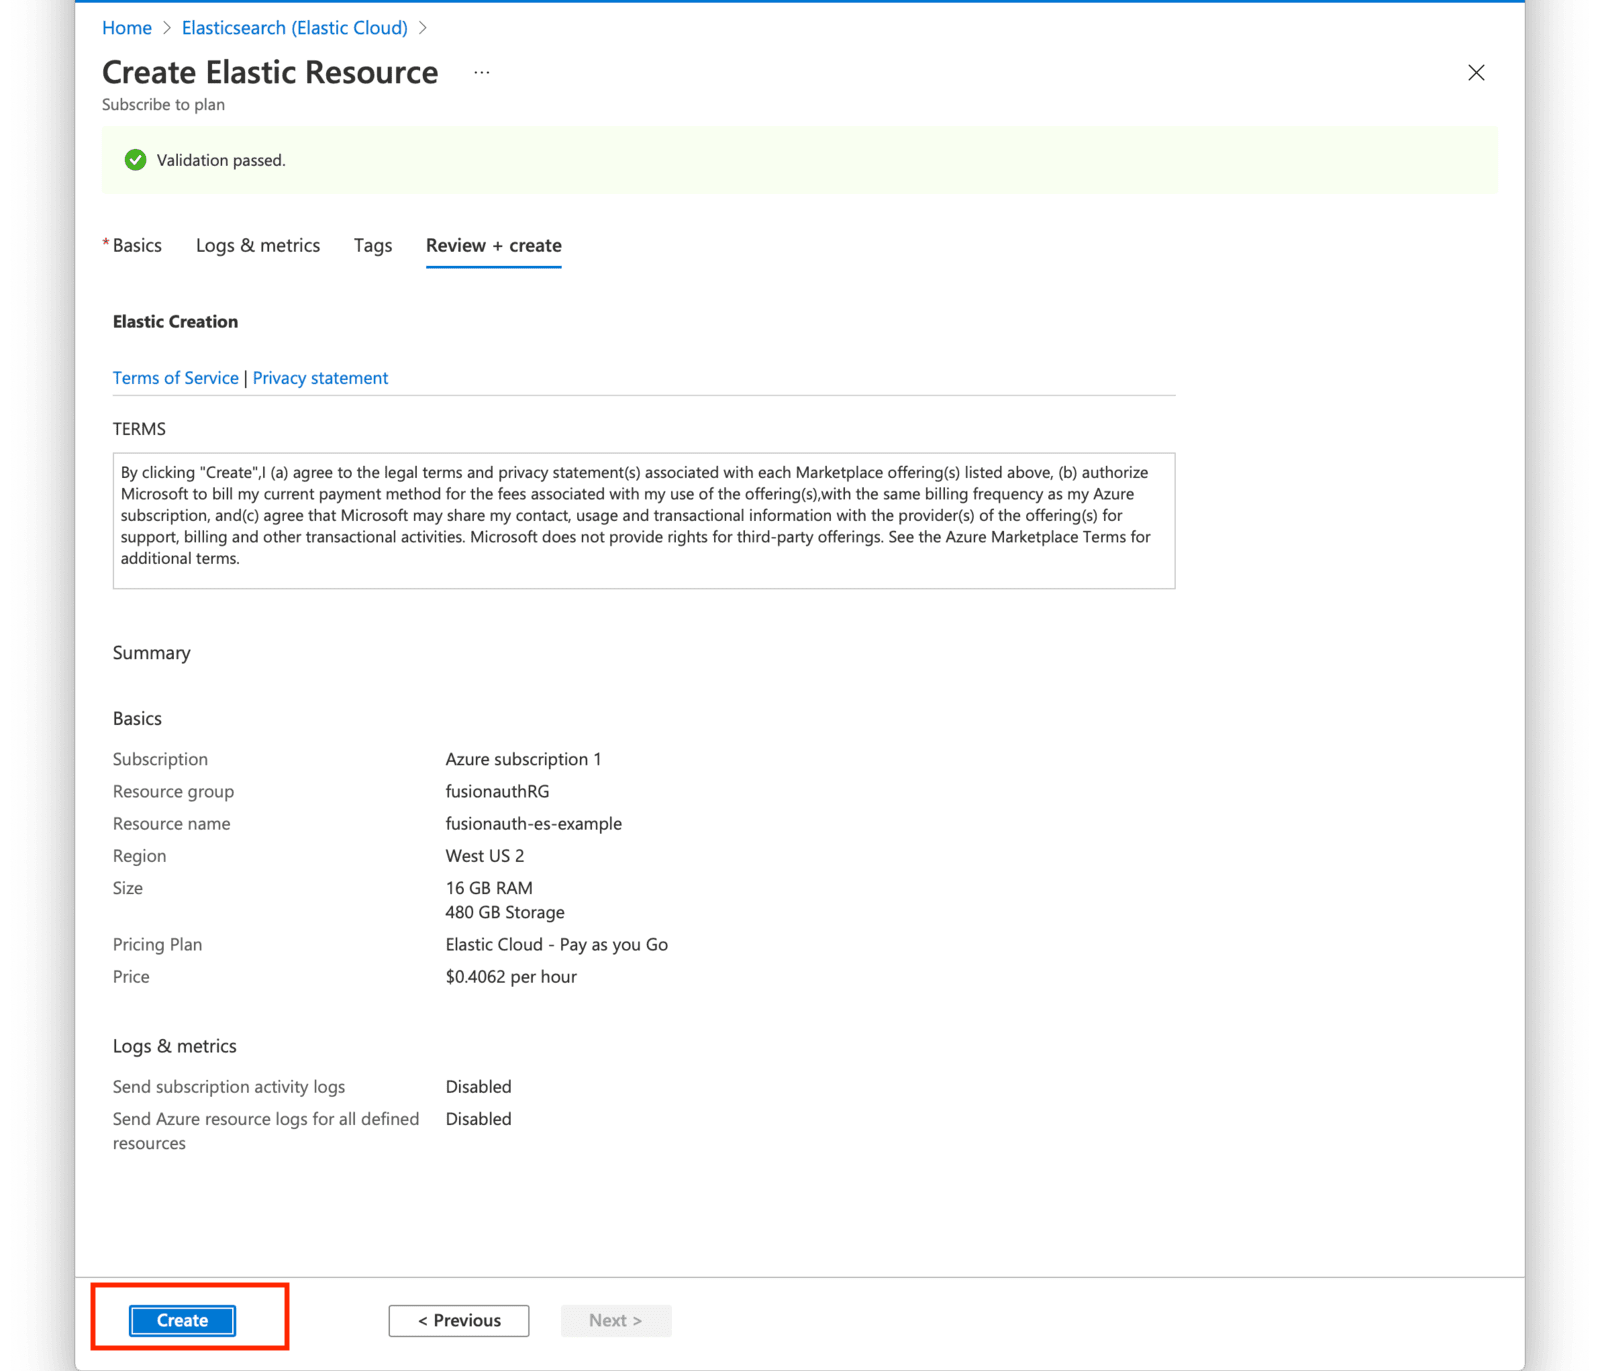
    Create an Elastic Resource by selecting the resource group you created in the first section of this guide and a name for the resource. Click on Review + Create after providing the required fields.

    Create resource screen

    Review your selections and press the Create button when ready.

    Review and create screen

    Your deployment will now be in-progress as indicated on the next screen. This may take a few minutes to complete.

    In-progress screen

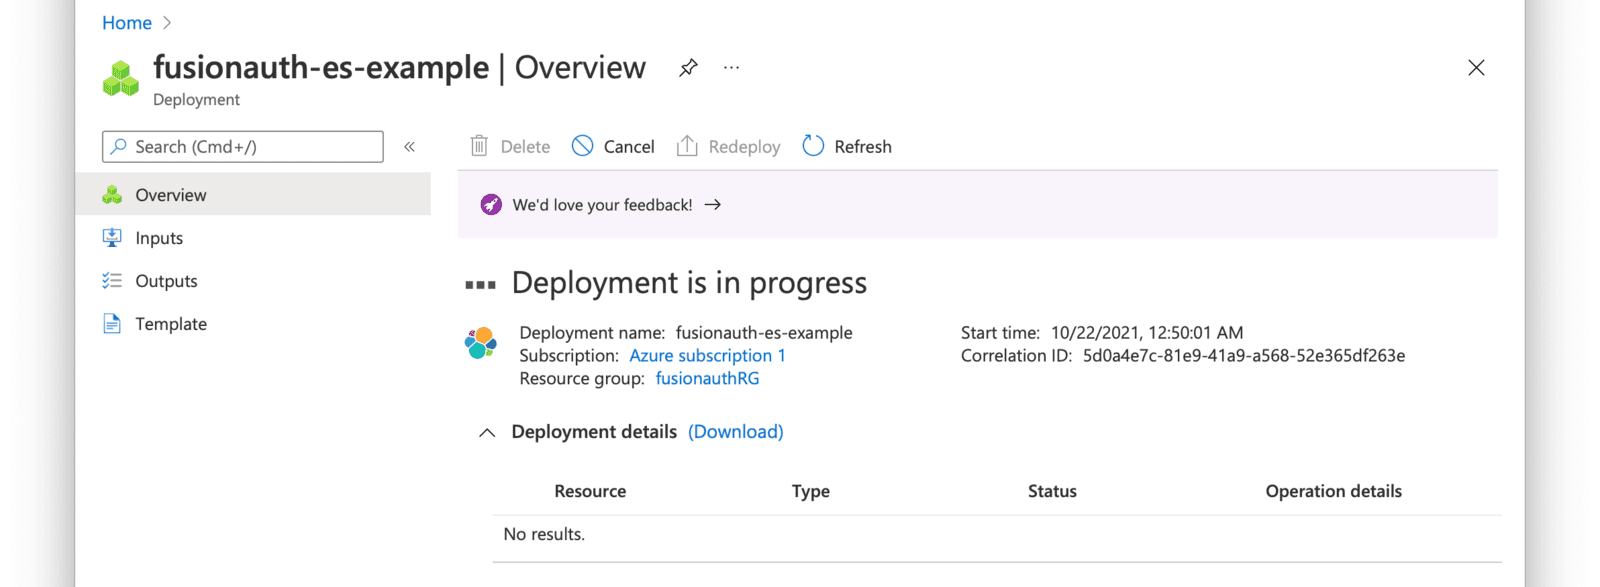
    When the deployment is complete, click on Go to resource group and then click on the Elasticsearch resource that you just created.

    Resources screen

    Click on the Manage changes in Elastic Cloud link.

    Elasticsearch resource detail screen

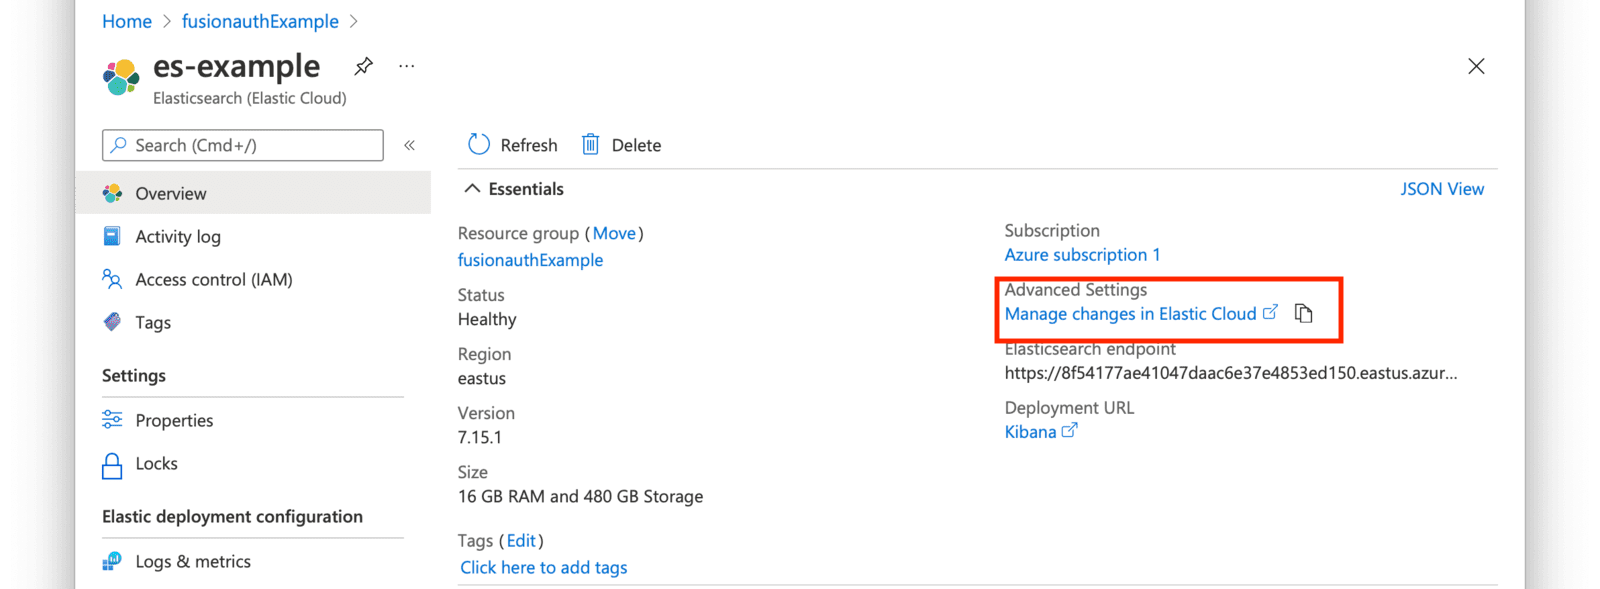
    You will be directed to your Elastic Cloud dashboard and will see your new deployment listed.

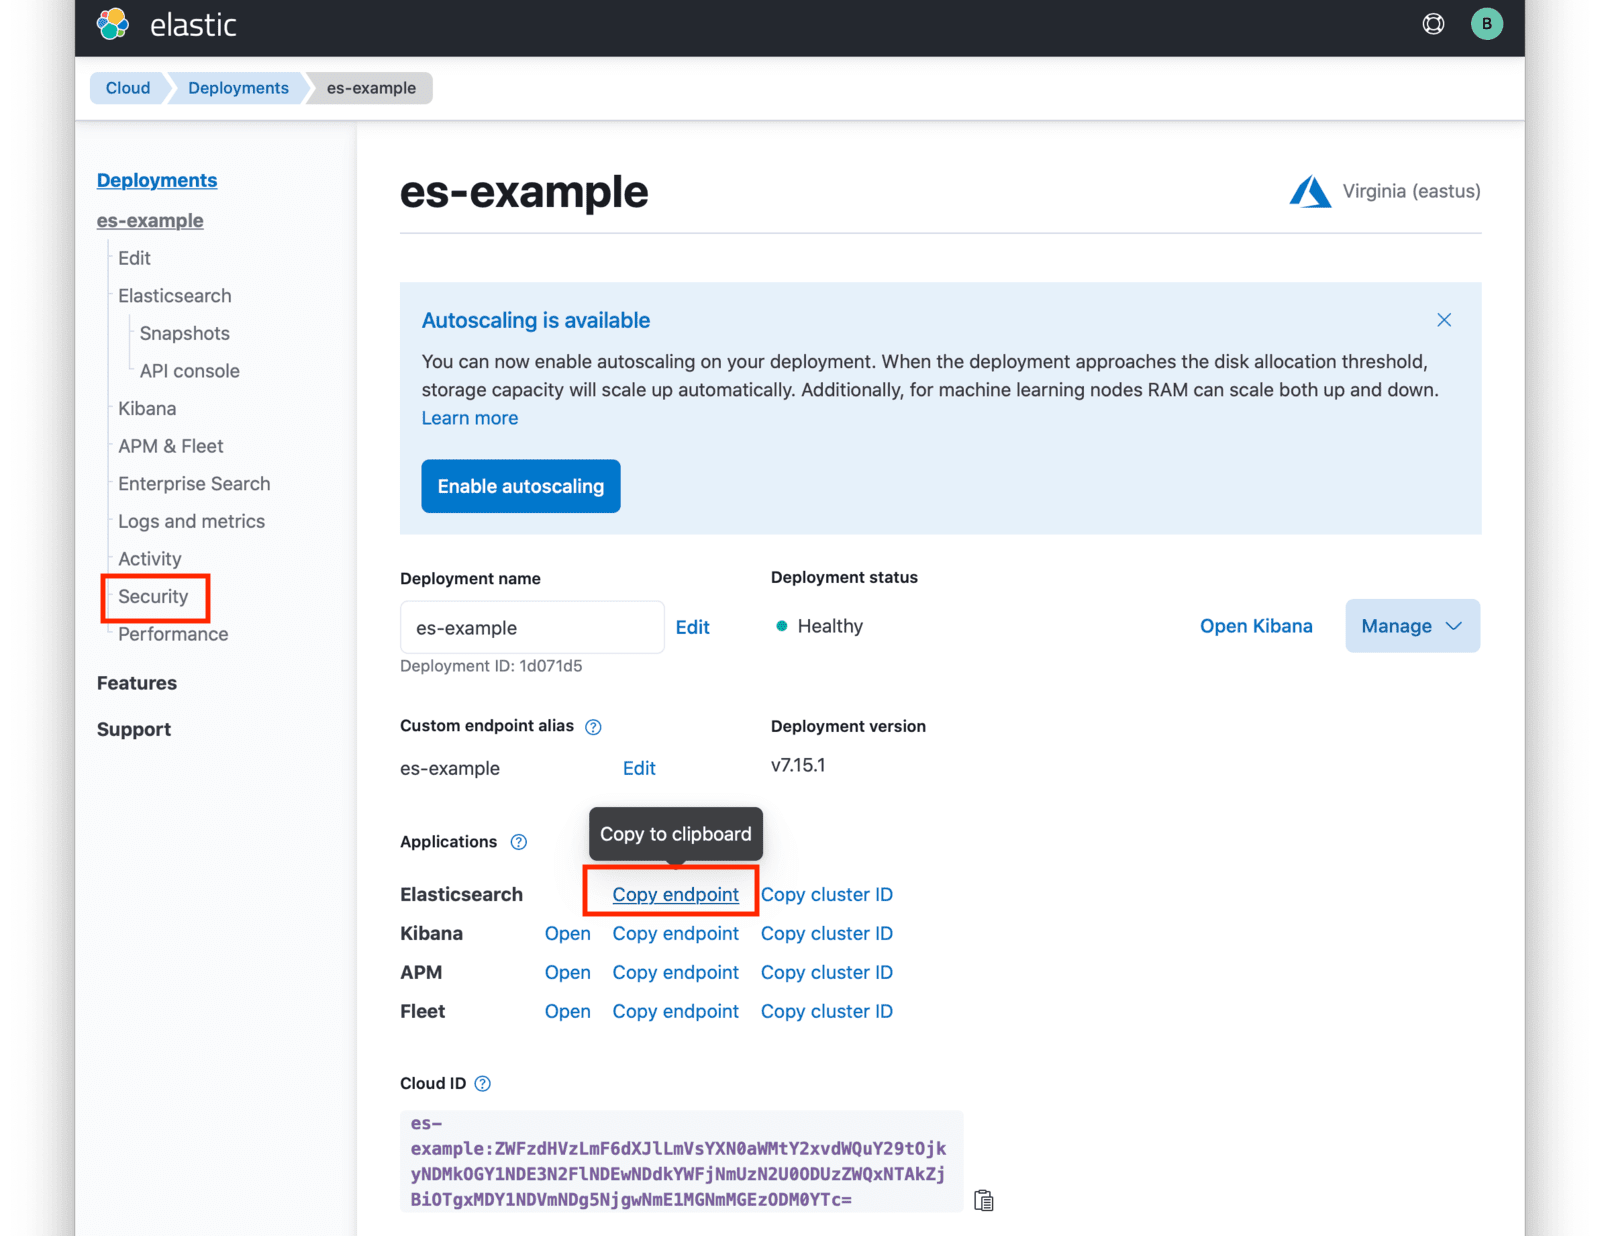
    Click on the name of your deployment to manage it. On the next page, you have access to all of the necessary endpoint information you will need to connect to your deployment. Under Applications, click on the Copy endpoint link next to Elasticsearch to copy the URL to your clipboard. You will need to save this URL for use when deploying FusionAuth to your AKS cluster. Next, click on the Security link seen on the left navigation panel.

    Example dashboard on Elastic Cloud

    Click on the Reset Password button to set your administrative credentials for your cluster.

    Security screen

    You now have your Elasticsearch cluster deployed and the required credentials to connect to it.

    Next Steps

    You now are running all the necessary infrastructure to deploy a containerized application to AKS.

    Next up, Deploy FusionAuth in Kubernetes.

    Feedback

    How helpful was this page?

    See a problem?

    File an issue in our docs repo

    Have a question or comment to share?

    Visit the FusionAuth community forum.

    © 2023 FusionAuth
    Subscribe for developer updates