Elastic Kubernetes Service (EKS)
This guide will show you how to quickly set up an EKS cluster in AWS. When completed, you will have a fully functional Kubernetes cluster ready for a FusionAuth deployment. The following method uses the default settings when provisioning the EKS cluster with the required resources and services.
Required Tools#
AWS CLI- Amazon Command Line Interface. This allows users to interact with AWS resources and services from the command-line. For more information, see Installing, updating, and uninstalling the AWS CLI. This will need to be installed and configured for a user with IAM permissions to manage EKS.eksctl- For this guide, you will useeksctl, a command line tool for managing EKS clusters. For installation information, see The eksctl command line utility.
kubectl- Command line tool that interacts with the Kubernetes API server and is useful for managing Kubernetes clusters. Before proceeding, follow the installation documentation that corresponds to your platform found here. This guide will be using version1.22
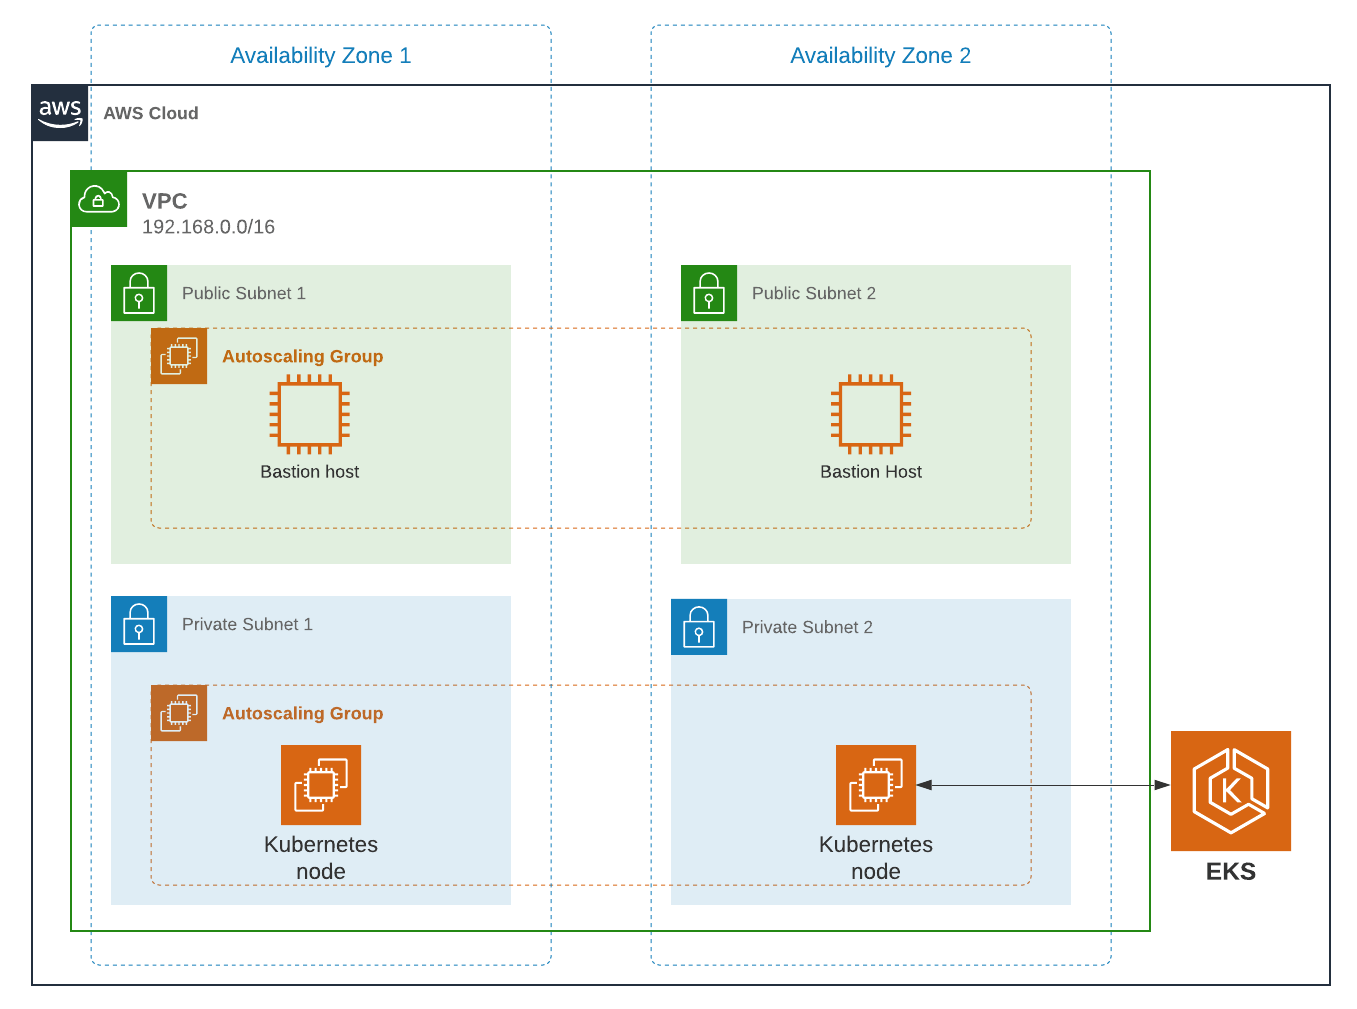
Architecture#
The resulting EKS cluster will use a dedicated VPC with two availability zones, each consisting of a public and private subnet. It will use an autoscaling node group with a node (Linux EC2 instance) in each private subnet. Additionally, you will provision a PostgreSQL RDS instance to satisfy installation requirements of FusionAuth.
For the remainder of this guide, the value used for region will be us-west-1.
Create an EKS Cluster#
Prior to creating the cluster, either create a new key pair or have an existing pair on hand. This is because providing a key when running the create command configures EKS to allow SSH access to the created compute nodes. If a key is not provided, this can not be changed later. Having SSH access allows for easier troubleshooting.
Create key pair
aws ec2 create-key-pair --region us-west-1 --key-name eksExampleKeyPairIf successful, information about your new key will be displayed. Store the private key for future use.
Now create a new EKS cluster.
Create EKS cluster
eksctl create cluster \
--name fusionauth-example \
--region us-west-1 \
--with-oidc \
--ssh-access \
--ssh-public-key eksExampleKeyPair
This command uses CloudFormation to provision all of the necessary resources that your EKS cluster needs. You should see output that looks something like this:
CloudFormation output
2021-10-05 14:18:03 [ℹ]  eksctl version 0.66.0
2021-10-05 14:18:03 [ℹ]  using region us-west-1
2021-10-05 14:18:03 [ℹ]  setting availability zones to [us-west-1a us-west-1c us-west-1a]
2021-10-05 14:18:03 [ℹ]  subnets for us-west-1a - public:192.168.0.0/19 private:192.168.96.0/19
2021-10-05 14:18:03 [ℹ]  subnets for us-west-1c - public:192.168.32.0/19 private:192.168.128.0/19
2021-10-05 14:18:03 [ℹ]  subnets for us-west-1a - public:192.168.64.0/19 private:192.168.160.0/19
2021-10-05 14:18:03 [ℹ]  nodegroup "ng-3fa00736" will use "" [AmazonLinux2/1.20]
2021-10-05 14:18:03 [ℹ]  using EC2 key pair %!q(*string=<nil>)
2021-10-05 14:18:03 [ℹ]  using Kubernetes version 1.20
2021-10-05 14:18:03 [ℹ]  creating EKS cluster "fusionauth-example" in "us-west-1" region with managed nodes
2021-10-05 14:18:03 [ℹ]  will create 2 separate CloudFormation stacks for cluster itself and the initial managed nodegroup
2021-10-05 14:18:03 [ℹ]  if you encounter any issues, check CloudFormation console or try 'eksctl utils describe-stacks --region=us-west-1 --cluster=fusionauth-example'
2021-10-05 14:18:03 [ℹ]  CloudWatch logging will not be enabled for cluster "fusionauth-example" in "us-west-1"
2021-10-05 14:18:03 [ℹ]  you can enable it with 'eksctl utils update-cluster-logging --enable-types={SPECIFY-YOUR-LOG-TYPES-HERE (e.g. all)} --region=us-west-1 --cluster=fusionauth-example'
2021-10-05 14:18:03 [ℹ]  Kubernetes API endpoint access will use default of {publicAccess=true, privateAccess=false} for cluster "fusionauth-example" in "us-west-1"
2021-10-05 14:18:03 [ℹ]  2 sequential tasks: { create cluster control plane "fusionauth-example", 3 sequential sub-tasks: { 4 sequential sub-tasks: { wait for control plane to become ready, associate IAM OIDC provider, 2 sequential sub-tasks: { create IAM role for serviceaccount "kube-system/aws-node", create serviceaccount "kube-system/aws-node" }, restart daemonset "kube-system/aws-node" }, 1 task: { create addons }, create managed nodegroup "ng-3fa00736" } }
2021-10-05 14:18:03 [ℹ]  building cluster stack "eksctl-fusionauth-example-cluster"
2021-10-05 14:18:04 [ℹ]  deploying stack "eksctl-fusionauth-example-cluster"
2021-10-05 14:31:07 [ℹ]  waiting for CloudFormation stack "eksctl-fusionauth-example-cluster"
2021-10-05 14:35:10 [ℹ]  building iamserviceaccount stack "eksctl-fusionauth-example-addon-iamserviceaccount-kube-system-aws-node"
2021-10-05 14:35:11 [ℹ]  deploying stack "eksctl-fusionauth-example-addon-iamserviceaccount-kube-system-aws-node"
2021-10-05 14:35:11 [ℹ]  waiting for CloudFormation stack "eksctl-fusionauth-example-addon-iamserviceaccount-kube-system-aws-node"
2021-10-05 14:35:27 [ℹ]  waiting for CloudFormation stack "eksctl-fusionauth-example-addon-iamserviceaccount-kube-system-aws-node"
2021-10-05 14:35:44 [ℹ]  waiting for CloudFormation stack "eksctl-fusionauth-example-addon-iamserviceaccount-kube-system-aws-node"
2021-10-05 14:35:45 [ℹ]  serviceaccount "kube-system/aws-node" already exists
2021-10-05 14:35:45 [ℹ]  updated serviceaccount "kube-system/aws-node"
2021-10-05 14:35:45 [ℹ]  daemonset "kube-system/aws-node" restarted
2021-10-05 14:37:46 [ℹ]  building managed nodegroup stack "eksctl-fusionauth-example-nodegroup-ng-3fa00736"
2021-10-05 14:37:46 [ℹ]  deploying stack "eksctl-fusionauth-example-nodegroup-ng-3fa00736"
2021-10-05 14:37:46 [ℹ]  waiting for CloudFormation stack "eksctl-fusionauth-example-nodegroup-ng-3fa00736"
2021-10-05 14:41:48 [ℹ]  waiting for the control plane availability...
2021-10-05 14:41:48 [✔]  saved kubeconfig as "/Users/brettguy/.kube/config"
2021-10-05 14:41:48 [ℹ]  no tasks
2021-10-05 14:41:48 [✔]  all EKS cluster resources for "fusionauth-example" have been created
2021-10-05 14:41:48 [ℹ]  nodegroup "ng-3fa00736" has 2 node(s)
2021-10-05 14:41:48 [ℹ]  node "ip-192-168-45-153.us-west-1.compute.internal" is ready
2021-10-05 14:41:48 [ℹ]  node "ip-192-168-91-228.us-west-1.compute.internal" is ready
2021-10-05 14:41:48 [ℹ]  waiting for at least 2 node(s) to become ready in "ng-3fa00736"
2021-10-05 14:41:48 [ℹ]  nodegroup "ng-3fa00736" has 2 node(s)
2021-10-05 14:41:48 [ℹ]  node "ip-192-168-45-153.us-west-1.compute.internal" is ready
2021-10-05 14:41:48 [ℹ]  node "ip-192-168-91-228.us-west-1.compute.internal" is ready
2021-10-05 14:43:50 [ℹ]  kubectl command should work with "/Users/myuser/.kube/config", try 'kubectl get nodes'
2021-10-05 14:43:50 [✔]  EKS cluster "fusionauth-example" in "us-west-1" region is ready
We now have a fully functional provisioned EKS cluster. You will need additional information, in particular the VPC Id, subnet Ids, and security group Id, all of which are used later in this guide. Use the CLI to describe our newly created cluster to retrieve this configuration data.
Get cluster information
aws eks describe-cluster --name fusionauth-exampleCluster information JSON output
{
    "cluster": {
        "name": "fusionauth-example",
        "arn": "arn:aws:eks:us-west-1:<ACCOUNT_ID>:cluster/fusionauth-example",
        "createdAt": "2021-10-05T14:19:21.612000-06:00",
        "version": "1.20",
        "endpoint": "https://EC8E2DC8514200E91A4748FA6EE525A4.yl4.us-west-1.eks.amazonaws.com",
        "roleArn": "arn:aws:iam::<ACCOUNT_ID>:role/<role-name>",
        "resourcesVpcConfig": {
            "subnetIds": [
                "subnet-091347798a21eabe2",
                "subnet-0cb7540073e8b30aa",
                "subnet-052f8750345045581",
                "subnet-040e32678cf7a85da"
            ],
            "securityGroupIds": [
                "sg-00d13e92c29ed1ecf"
            ],
            "clusterSecurityGroupId": "sg-07cf61370371ba323",
            "vpcId": "vpc-08da2a4800ea6e0e2",
            "endpointPublicAccess": true,
            "endpointPrivateAccess": false,
            "publicAccessCidrs": [
                "0.0.0.0/0"
            ]
        },
        "kubernetesNetworkConfig": {
            "serviceIpv4Cidr": "10.100.0.0/16"
        }
    }
}
Note the VPC Id, subnet Ids, and security group Id.
Now review the Kubernetes nodes that have been created.
This is where kubectl comes in handy. Looking at the previous log, you will notice that one of the last things eksctl did was update the ~/.kube/config file with the new cluster configuration. Go ahead and use kubectl to make requests to the Kubernetes API Server.
Get EKS cluster nodes
kubectl get nodes -o wide

NAME                                           STATUS   ROLES    AGE     VERSION              INTERNAL-IP      EXTERNAL-IP    OS-IMAGE         KERNEL-VERSION                CONTAINER-RUNTIME
ip-192-168-45-153.us-west-1.compute.internal   Ready    <none>   4m57s   v1.20.7-eks-135321   192.168.45.153   50.18.29.248   Amazon Linux 2   5.4.149-73.259.amzn2.x86_64   docker://20.10.7
ip-192-168-91-228.us-west-1.compute.internal   Ready    <none>   4m54s   v1.20.7-eks-135321   192.168.91.228   3.101.73.65    Amazon Linux 2   5.4.149-73.259.amzn2.x86_64   docker://20.10.7
Great! We have two instances in a READY status.
Create a Database#
Create a Postgres RDS instance required for FusionAuth installation. For simplicity, this database will be created in the same VPC and configured with the same security groups applied to the private subnets. Finally, you will modify the inbound rules to the security group to allow traffic on port 5432. This will enable our worker nodes to communicate with the database successfully!
Since an RDS instance needs to be assigned to a database subnet group, you may either assign it to an existing group with subnets in the same VPC or create a new one. Here, you create a new subnet group using the subnets assigned to your cluster in the cluster creation step.
Create DB subnet group
aws rds create-db-subnet-group \
--db-subnet-group-name fusionauth-example-db-group \
--db-subnet-group-description "FusionAuth example database subnet group" \
--subnet-ids "subnet-091347798a21eabe2" "subnet-0cb7540073e8b30aa" "subnet-052f8750345045581" "subnet-040e32678cf7a85da"
Now create the database. Set db-subnet-group and vpc-security-group-ids to the values for the subnet Id and the VPC Id from the above creation steps.
Create Postgresql DB instance
aws rds create-db-instance \
    --db-instance-identifier fusionauth-eks-example \
    --allocated-storage 20 \
    --db-instance-class db.m6g.large \
    --engine postgres \
    --master-username postgres \
    --master-user-password changeMeToSomethingMoreSecure \
    --no-publicly-accessible \
    --vpc-security-group-ids sg-08b95dbacc02ba628 \
    --db-subnet-group fusionauth-example-db-group \
    --availability-zone us-west-1c \
    --port 5432
Add an inbound rule to the security group to allow nodes to access the database. Again, use the security group Id from above.
Create inbound rule
aws ec2 authorize-security-group-ingress \
    --group-id sg-08b95dbacc02ba628 \
    --protocol tcp \
    --port 5432 \
    --source-group sg-08b95dbacc02ba628
You are done! To confirm the database has been created, simply ask AWS using the db-instance-identifier used on the creation step.
It may take a few minutes for the provisioning process to complete.
Get DB instance information
aws rds describe-db-instances --db-instance-identifier fusionauth-eks-exampleThe resulting output should contain an Endpoint attribute. This value will be necessary when configuring your FusionAuth deployment.
DB instance JSON output
{
    "DBInstances": [
        {
            "DBInstanceIdentifier": "fusionauth-eks-example",
            "DBInstanceClass": "db.m6g.large",
            "Engine": "postgres",
            "DBInstanceStatus": "available",
            "MasterUsername": "postgres",
            "Endpoint": {
                "Address": "fusionauth-eks-example.sadkjl222.us-west-1.rds.amazonaws.com",
                "Port": 5432
            },
    ...
Create an AWS Elasticsearch Domain#
Define a policy that will enable EKS to talk to the Elasticsearch domain. Copy the following JSON, replacing the value for ACCOUNT_ID , to a local file and save it as eks-policy.json:
Policy JSON
{
  "Version": "2012-10-17",
  "Statement": [
    {
      "Action": [
        "es:*"
      ],
      "Resource": "arn:aws:es:us-west-1:<ACCOUNT_ID>:domain/fusionauth-es",
      "Effect": "Allow"
    }
  ]
}
Create the policy:
Create access policy
aws iam create-policy \
--policy-name fusionauth-es-policy \
--policy-document file://eks-policy.json
Attach the policy to the service role that assigned to your EKS cluster:
Assign policy to EKS role
aws iam attach-role-policy \                                                                                                                                                                               ✔
  --policy-arn arn:aws:iam::<ACCOUNT_ID>:policy/fusionauth-es-policy \
  --role-name <role-name>
Create a domain access policy to be assigned to the new Elasticsearch cluster. Copy the following, replacing the value for ACCOUNT_ID , to a local file and save it as access-policy.json:
Create Elasticsearch domain access policy
{
  "Version": "2012-10-17",
  "Statement": [
    {
      "Effect": "Allow",
      "Principal": {
        "AWS": "*"
      },
      "Action": "es:*",
      "Resource": "arn:aws:es:us-west-1:<ACCOUNT_ID>:domain/fusionauth-es/*"
    }
  ]
}
Create a new cluster, updating the subnet Ids and security group Ids:
Create the Elasticsearch cluster
aws es create-elasticsearch-domain \
--domain-name fusionauth-es-2 \
--elasticsearch-version 7.10 \
--elasticsearch-cluster-config InstanceType=m5.large.elasticsearch,InstanceCount=1 \
--vpc-options SubnetIds=subnet-040e32678cf7a85da,SecurityGroupIds=sg-08b95dbacc02ba628 \
--ebs-options EBSEnabled=true,VolumeType=standard,VolumeSize=10 \
--access-policies file://access-policy.json
Next Steps#
You now are running all the necessary infrastructure to deploy a containerized application to EKS.
Next up, Deploy FusionAuth in Kubernetes.
It is recommended that you consult Getting started with Amazon EKS for more EKS documentation, including needed customization for your situation.