Google Kubernetes Engine (GKE)
This guide will show you how to set up a GKE cluster on Google Cloud Platform, commonly referred to as GCP. When completed, you will have a fully functional Kubernetes cluster ready to deploy FusionAuth to as well as a PostgreSQL database using GCP's Cloud SQL. The following method uses the default settings when provisioning the GKE cluster with the required resources and services. It is recommended that you consult Google Kubernetes Engine for full GKE documentation, including any custom changes needed for your situation.
Requirements#
- Google Cloud Platform account with sufficient IAM permissions to create resources.
gcloud- Command Line tool used to manage resources in Google Cloud. For installation instructions, see Installing Cloud SDK.
kubectl- Command line tool that interacts with the Kubernetes API server and is useful for managing Kubernetes clusters. Before proceeding, follow the installation documentation that corresponds to your platform found here. This guide will be using version1.22
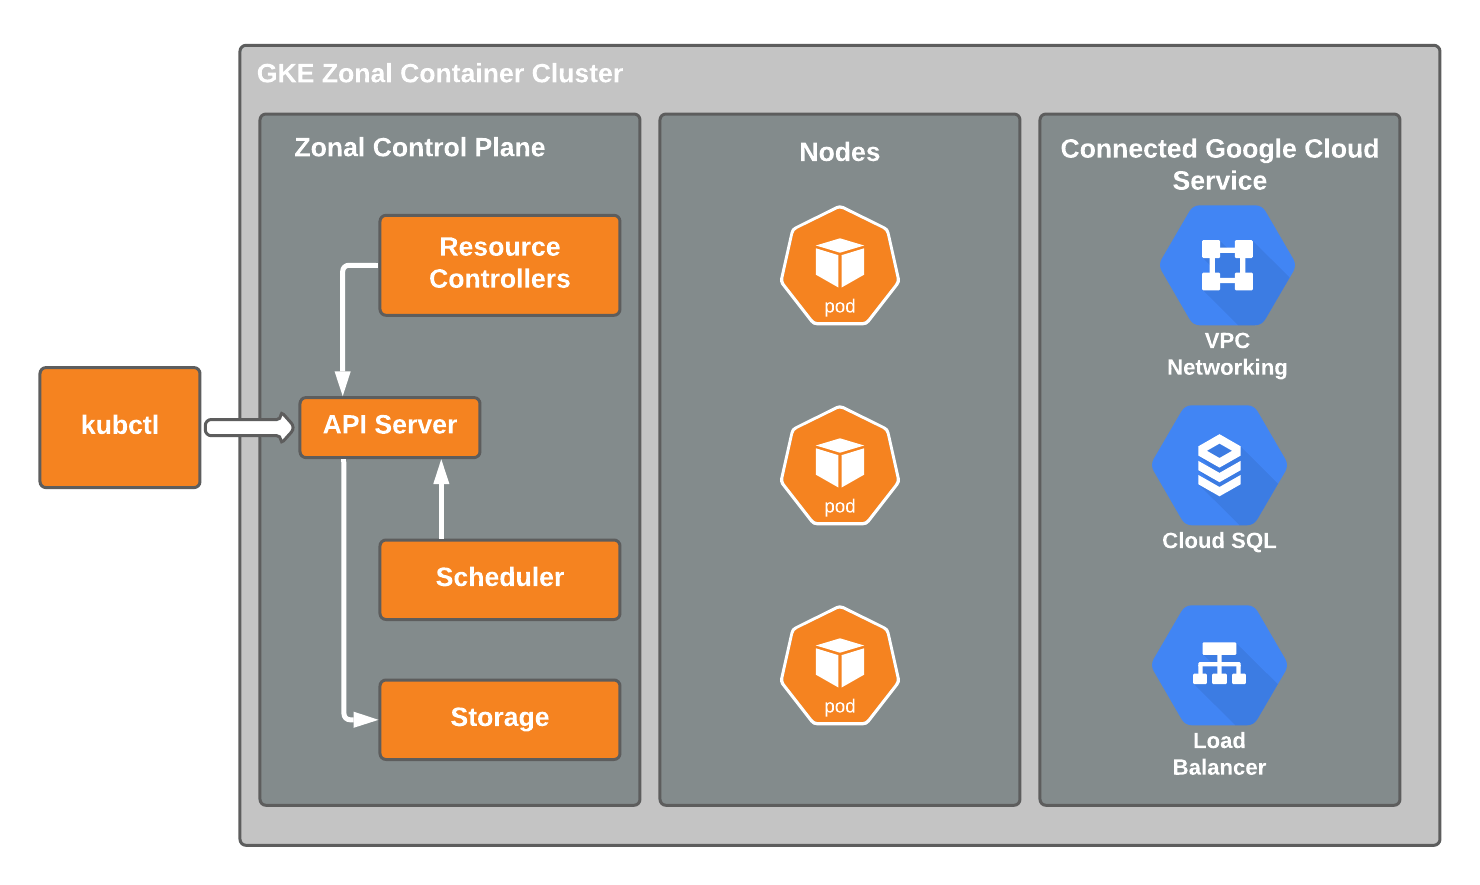
Architecture#
The resulting GKE cluster will use a VPC-native cluster in the us-west1 region of which consists of three availability zones (us-west1-a, us-west1-b, and us-west1-c). You will provision a Cloud SQL PostgreSQL instance to satisfy installation requirements of FusionAuth.
GCP provides a number of configuration options designed to meet specific needs based on cluster availability and workload types. For this example, you will use the Standard mode of operation.
Project Setup#
Each of these commands can take anywhere from a few seconds to a few minutes to run. It can also take several minutes for the propagation to appear in the Google Cloud Console. Be patient and refresh your browser when checking for verification.
Having installed the Cloud SDK, authorize gcloud to access GCP using your Google credentials:
Authorize gcloud
gcloud auth loginNow create a new project used to organize all of your Google Cloud resources:
If you get an error when trying to create the project stating "Project creation failed. The project Id you specified is already in use by another project. Please try an alternative ID.", you may need to choose a new id such as fusionauth-gke-example-9876. Be sure then to replace the Id you use in all the subsequent commands.
Create a project
gcloud projects create fusionauth-gke-example \
  --name="FusionAuth GKE example"
You will want to set the newly created project as your default project. When you create resources and enable APIs, they will be assigned to your default project:
Set the default project
gcloud config set project fusionauth-gke-exampleOutput of the default project selection command
Create in progress for [https://cloudresourcemanager.googleapis.com/v1/projects/fusionauth-gke-example].
Waiting for [operations/cp.999999999156305912] to finish...done.
Enabling service [cloudapis.googleapis.com] on project [fusionauth-gke-example]...
Enable Billing#
In order to proceed, you will need to enable and link billing for your project. To do this:
- Navigate to the GCP Console.
- From the navigation menu, select Billing .
- Verify that billing is enabled for your project. If it's not, follow the prompts to link a billing to your project.
Enable Required APIs#
Enable the Kubernetes Engine API. This will allow you to make a service request to the API to create your GKE cluster:
Enable Kubernetes Engine API
gcloud services enable container.googleapis.comYou will need to enable the Cloud SQL API in order to create a PostgreSQL database. Run the following command to do this:
Enable Cloud SQL API
gcloud services enable sqladmin.googleapis.comIn order for our GKE cluster to communicate with PostgreSQL and Elasticsearch on internal IP addresses, the Service Networking API must be enabled:
Enable Cloud SQL API
gcloud services enable servicenetworking.googleapis.com \
    --project=fusionauth-gke-example
Configure the Network#
Allocate an IP address range for private communication on your VPC:
Create a private IP address range
gcloud compute addresses create fusionauth-private-range \
  --global \
  --purpose=VPC_PEERING \
  --addresses=192.168.0.0 \
  --prefix-length=16 \
  --description="Fusionauth private IP range for GKE and SQL" \
  --network=default
In order for GKE to communicate with Cloud SQL and Elasticsearch over a private network you need to create a private connection from your VPC network to the underlying service producer network.
Create a private connection
gcloud services vpc-peerings connect \
  --service=servicenetworking.googleapis.com \
  --ranges=fusionauth-private-range \
  --network=default \
  --project=fusionauth-gke-example
Create a GKE Cluster#
With your project configured, billing enabled, and the Kubernetes Engine API enabled, you can proceed to create your GKE cluster.
To create a new cluster, execute the following.
Create GKE cluster
gcloud container clusters create fusionauth-cluster \
  --num-nodes=1 \
  --region=us-west1 \
  --enable-ip-alias \
  --cluster-version=1.30.8-gke.1051000 \
  --cluster-ipv4-cidr=10.44.0.0/14 \
  --services-ipv4-cidr=10.48.0.0/20 \
--labels=goog-partner-solution=isol_plb32_001kf000012eawziay_hgq452iixrlzpeddhfr5gp4uxglz5lvnnum-nodes- The number of nodes to be created in each zone. In this example, you specify the region of which consists of three zones. Therefore you will have a total of3nodes.region- The region to create the cluster.enable-ip-alias- Indicates to create a VPC-native cluster. This greatly simplifies network connectivity when communicating with the database by making pod IP addresses natively routable within the cluster's VPC network.cluster-version- The Kubernetes version to use. [optional]cluster-ipv4-cidr- Used to create the subnet's secondary IP address range for Pods. [optional]service-ip-range- Used to create the subnet's secondary IP address range for Services. [optional]labels- FusionAuth's identifier in the Google Cloud Marketplace program. This is a static value and you use the exact values shown here. [optional]
If you receive an error message stating "Master version '1.30.8-gke.1051000' is unsupported.", please see the Google documentation for currently supported versions.
For more information on the create command, see gcloud container clusters create documentation.
Update Kubernetes Configuration#
If the create operation completed successfully, the last thing it will do is update your local ~/.kube file. If that didn't happen for whatever reason, gcloud provides the following to update your configuration and set the newly created cluster as the active context. This will let you use kubectl to access your cluster.
Get and update Kubeconfig
gcloud container clusters get-credentials fusionauth-clusterVerify Cluster Configuration#
Execute the list command to see GKE clusters that have been configured.
Get cluster information
gcloud container clusters listCluster list results
NAME                LOCATION  MASTER_VERSION   MASTER_IP     MACHINE_TYPE  NODE_VERSION     NUM_NODES  STATUS
fusionauth-cluster  us-west1  1.21.4-gke.2300  34.83.218.38  e2-medium     1.21.4-gke.2300  3          RUNNING
You now have a fully functional provisioned EKS cluster. For good measure, view the nodes that have been created.
Use kubectl to make requests to the Kubernetes API Server.
Get list of nodes running on the cluster
kubectl get nodes -o wideGet nodes results
NAME                                                STATUS   ROLES    AGE   VERSION            INTERNAL-IP   EXTERNAL-IP      OS-IMAGE                             KERNEL-VERSION   CONTAINER-RUNTIME
gke-fusionauth-cluster-default-pool-2a2e7af5-nrrb   Ready    <none>   66m   v1.21.4-gke.2300   10.138.0.23   35.203.183.157   Container-Optimized OS from Google   5.4.120+         containerd://1.4.4
gke-fusionauth-cluster-default-pool-30c935b6-0mt4   Ready    <none>   66m   v1.21.4-gke.2300   10.138.0.24   35.185.202.53    Container-Optimized OS from Google   5.4.120+         containerd://1.4.4
gke-fusionauth-cluster-default-pool-431a5f55-rf11   Ready    <none>   66m   v1.21.4-gke.2300   10.138.0.22   34.145.99.163    Container-Optimized OS from Google   5.4.120+         containerd://1.4.4
Great! You have three nodes in a READY status. You can proceed to setting up a database.
Create a Database#
Create a SQL Cloud PostgreSQL instance required for FusionAuth installation.
Create Cloud SQL for PostgreSQL instance
gcloud beta sql instances create fusionauth-test-db \
  --project=fusionauth-gke-example \
  --database-version=POSTGRES_12 \
  --tier=db-g1-small  \
  --region=us-west1 \
  --network=default \
--no-assign-ipproject- The Id of the shared VPC service.database-version- Database engine type and version. See FusionAuth supported databases here.tier- Machine type for a shared-core instance.region- The region to create the cluster.network- Network in the current project that the instance will be part of.no-assign-ip- Disables assignment of a public IP address.
For more information on the create command, see gcloud beta SQL instances create documentation.
Configure the Default User#
Google cloud SQL requires that you execute the following to configure the postgres user.
Set admin user password
gcloud sql users set-password postgres \
  --instance=fusionauth-test-db \
  --password=changeMeToSomethingMoreSecure
Verify Database Creation#
Get list of Cloud SQL instances in the current project
gcloud sql instances listList Cloud SQL instances results
NAME                 DATABASE_VERSION  LOCATION    TIER               PRIMARY_ADDRESS  PRIVATE_ADDRESS  STATUS
fusionauth-test-db3  POSTGRES_12       us-west1-a  db-g1-small        -                10.50.144.5      RUNNABLE
Configure Search Engine#
There are two options available to configure search in FusionAuth. The first is a simple search through the database search engine and the second is the Elasticsearch engine. For more details on the differences, please see Search And FusionAuth.
Database Search#
The database search is the easiest to configure. To use this option, no additional configuration needs to occur at this point. However, after completing provisioning the Google Kubernetes Engine Cluster instructions, there are additional steps required. One of those steps is setting configuration values in a values.yaml file. To use the database search engine, you will set the engine value under search in the values.yaml to database.
search:
  # search.engine -- Defines backend for fusionauth search capabilities. Valid values for engine are 'elasticsearch' or 'database'.
  engine: database
Deploy Elasticsearch using Elastic Cloud#
To use the Elasticsearch engine, Google Cloud offers its Elasticsearch Service through Elastic Cloud. This section will guide you through setting up your account and deploying an Elasticsearch cluster.
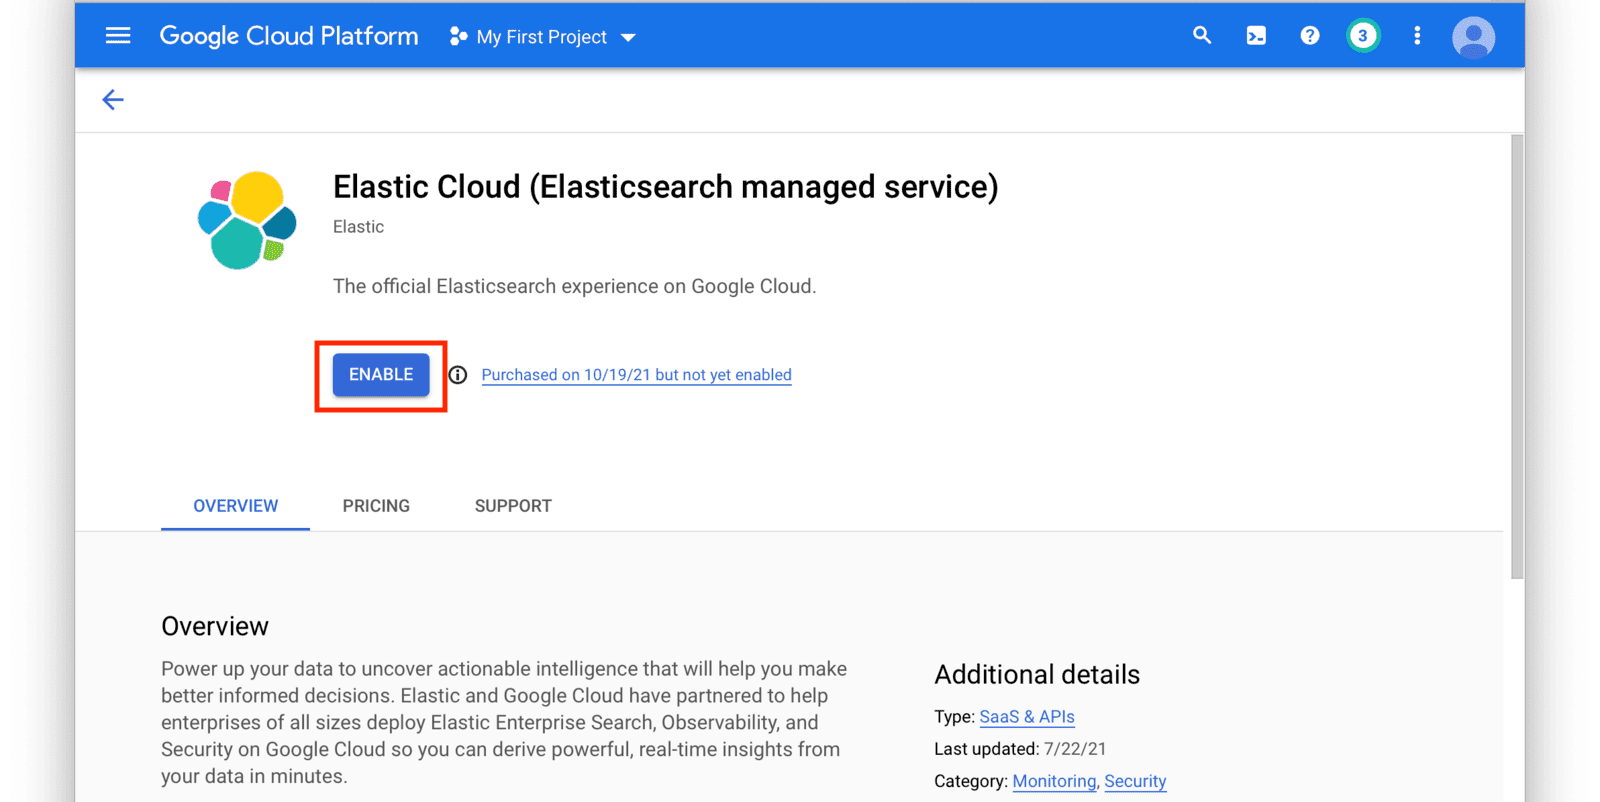
From the navigation menu in the GCP console, click on Elasticsearch Service and then click the Enable button. Follow the instructions on the next screen to set up a new Elastic Cloud subscription.
After you have set up a subscription you will land on the GCP Elasticsearch Service Overview page. From here, click on the Manage Via Elastic button near the top of the window.
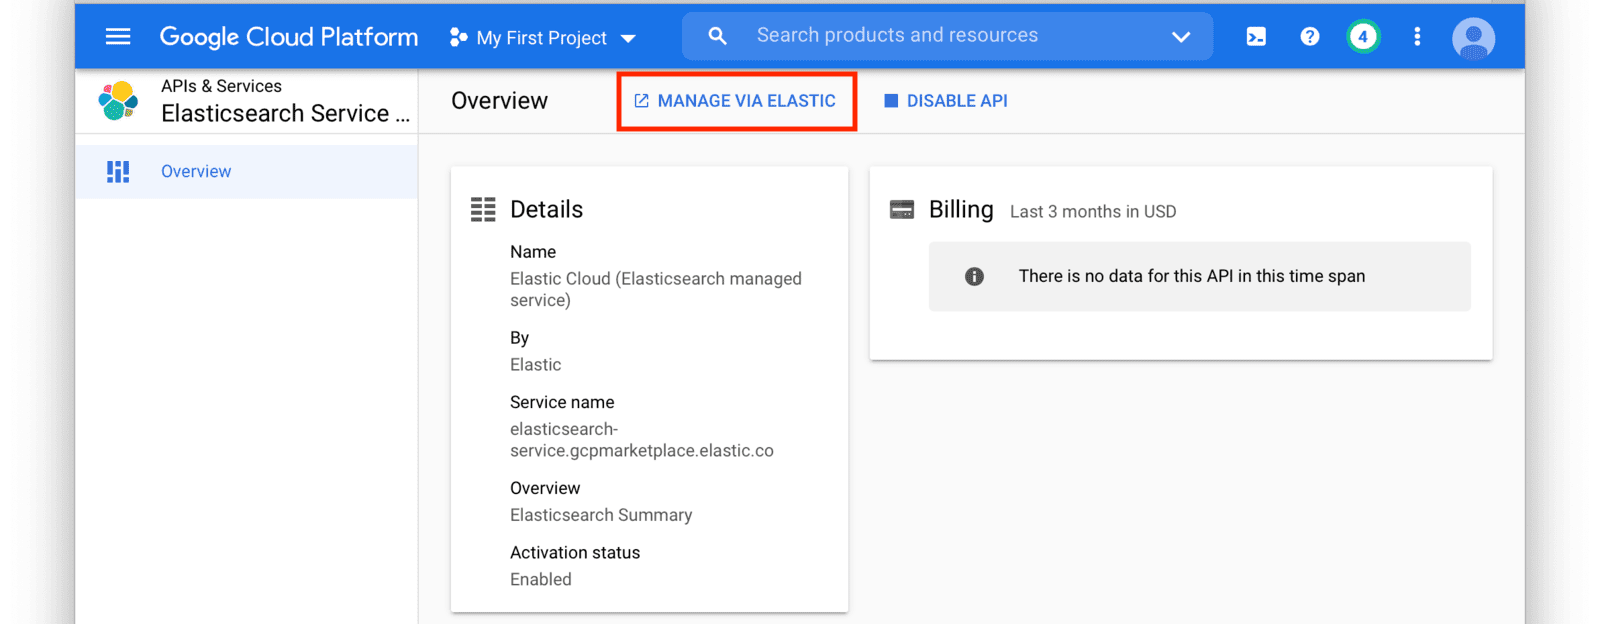
This will redirect you to the Elastic Cloud website. Login to Elastic Cloud using your Google account credentials.
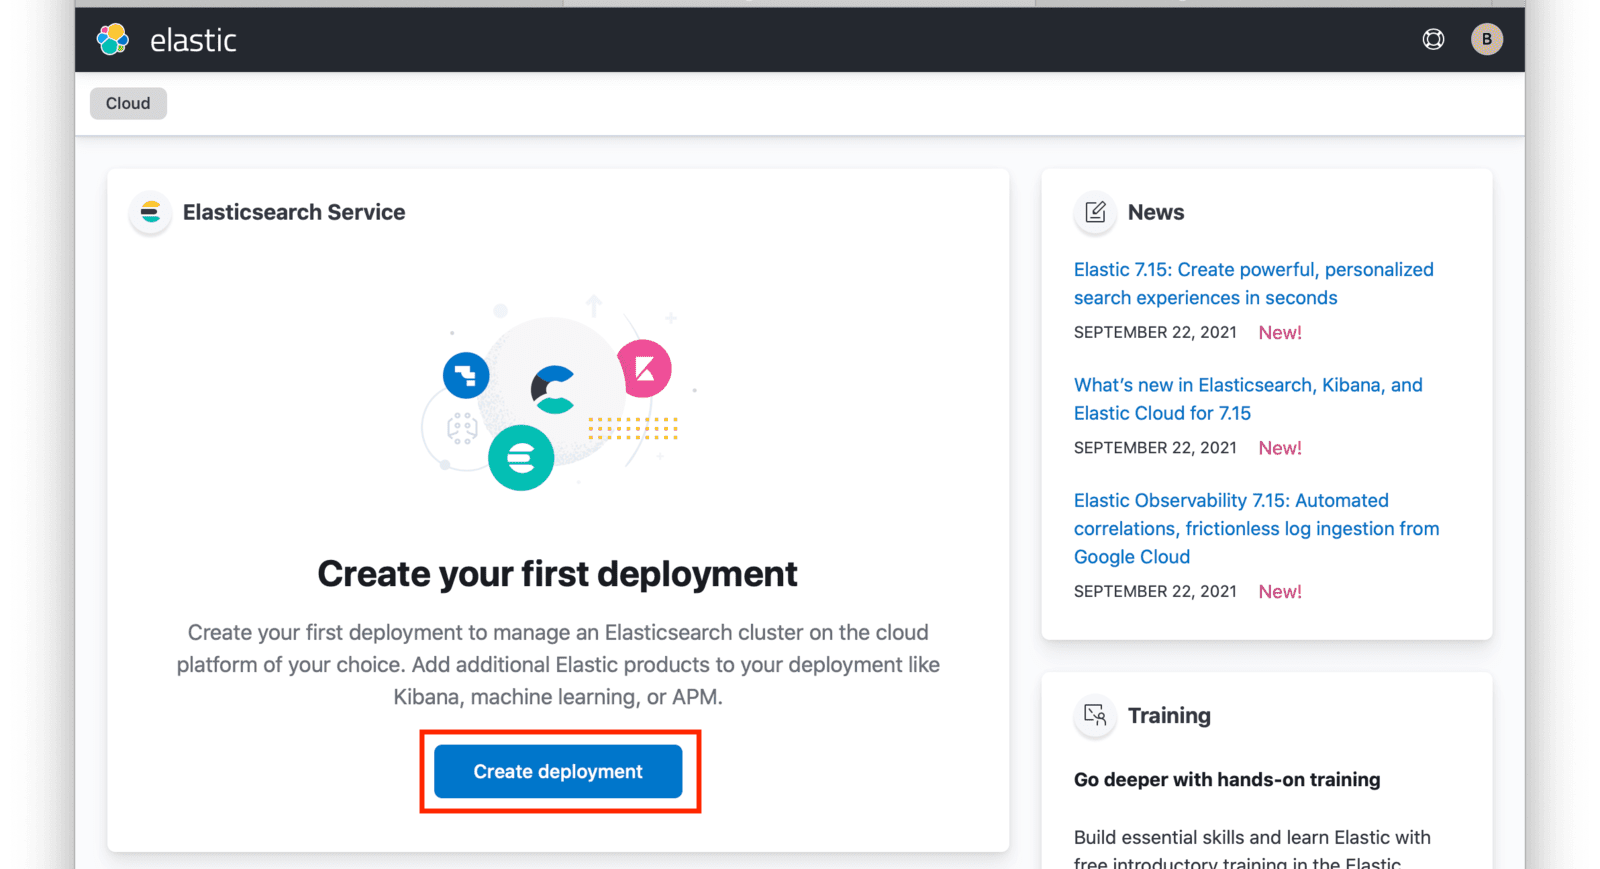
After logging in, you will arrive at your Elastic Cloud dashboard. To begin creating a new Elasticsearch cluster, click on the Create deployment button.
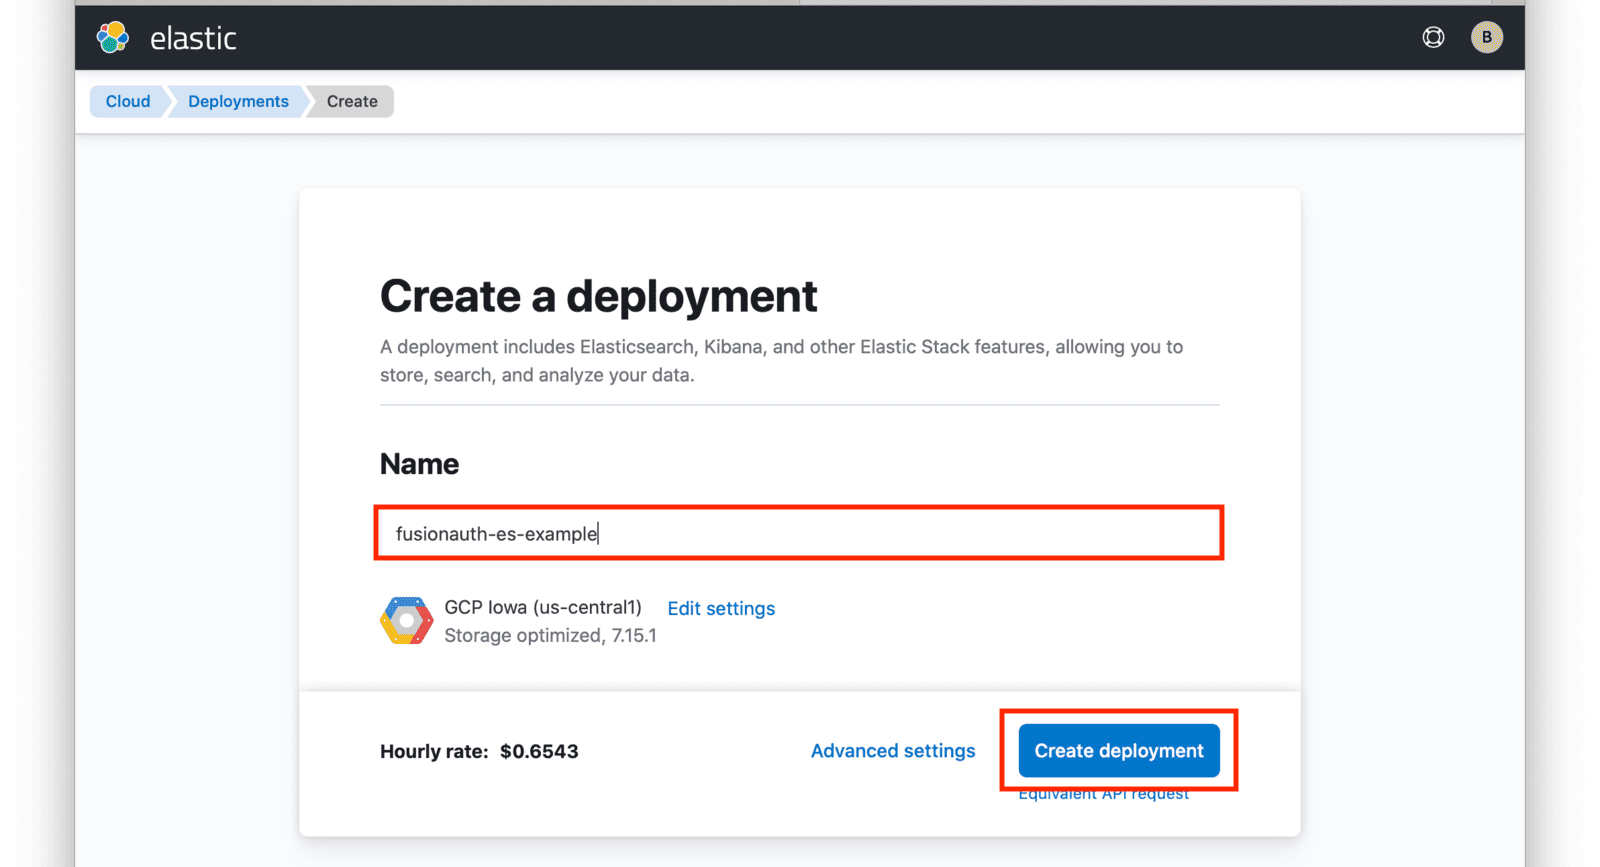
Input a name for your deployment and again click on Create deployment.
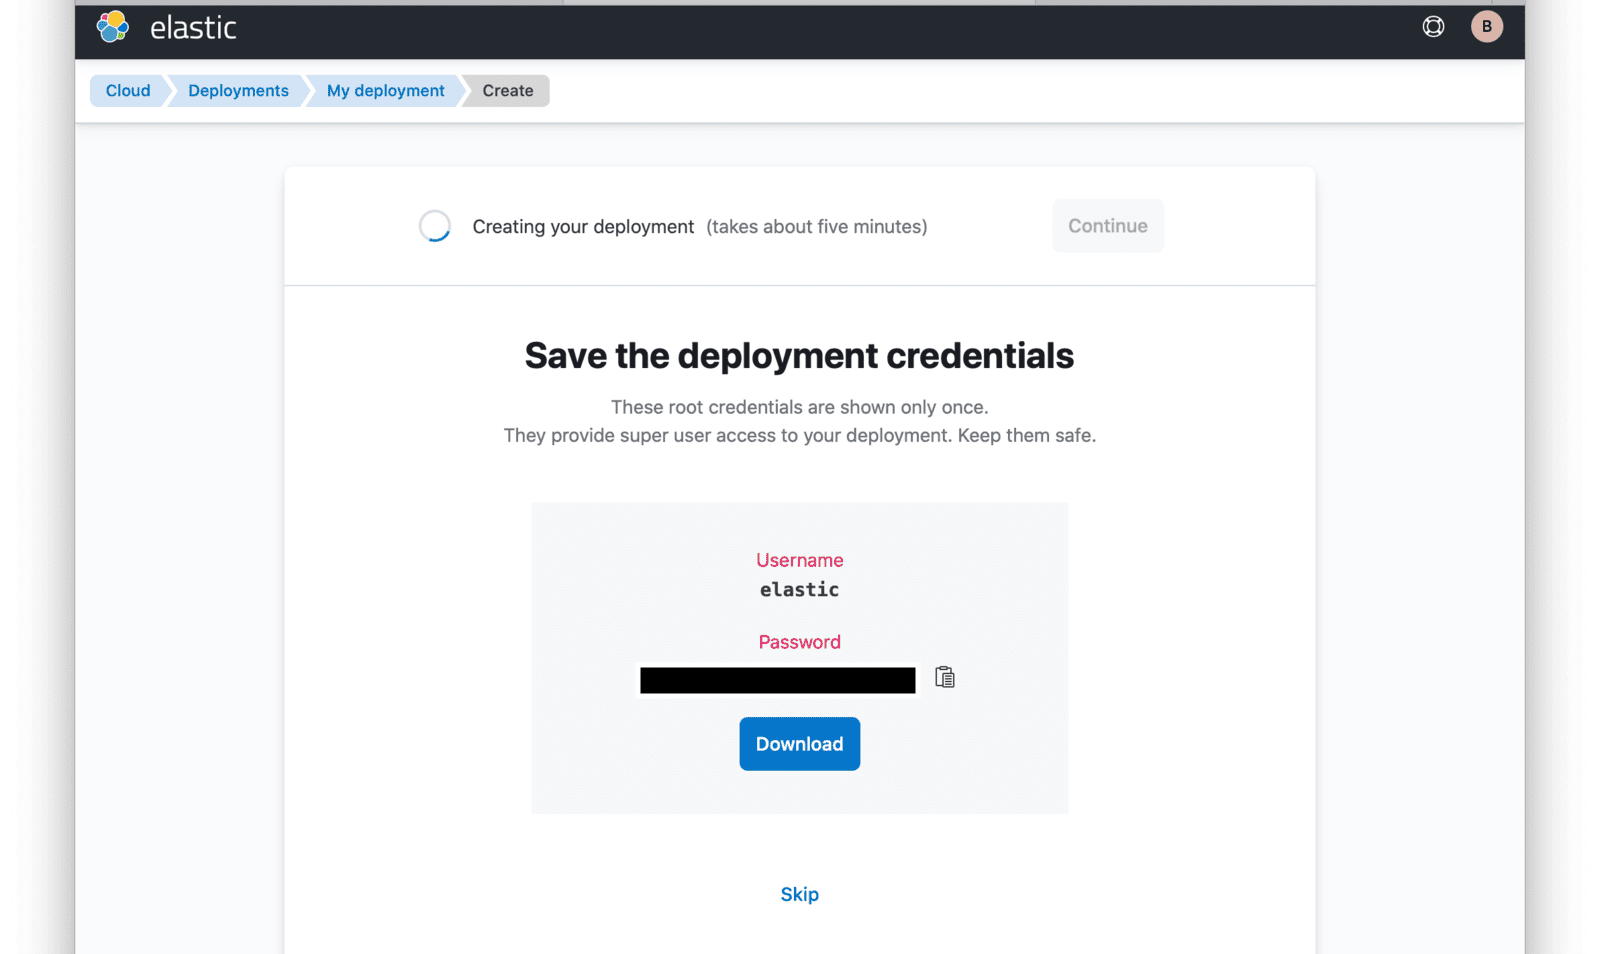
At this point, your deployment is now being created. You will be presented with deployment credentials on the next page. Download or save your credentials as instructed.
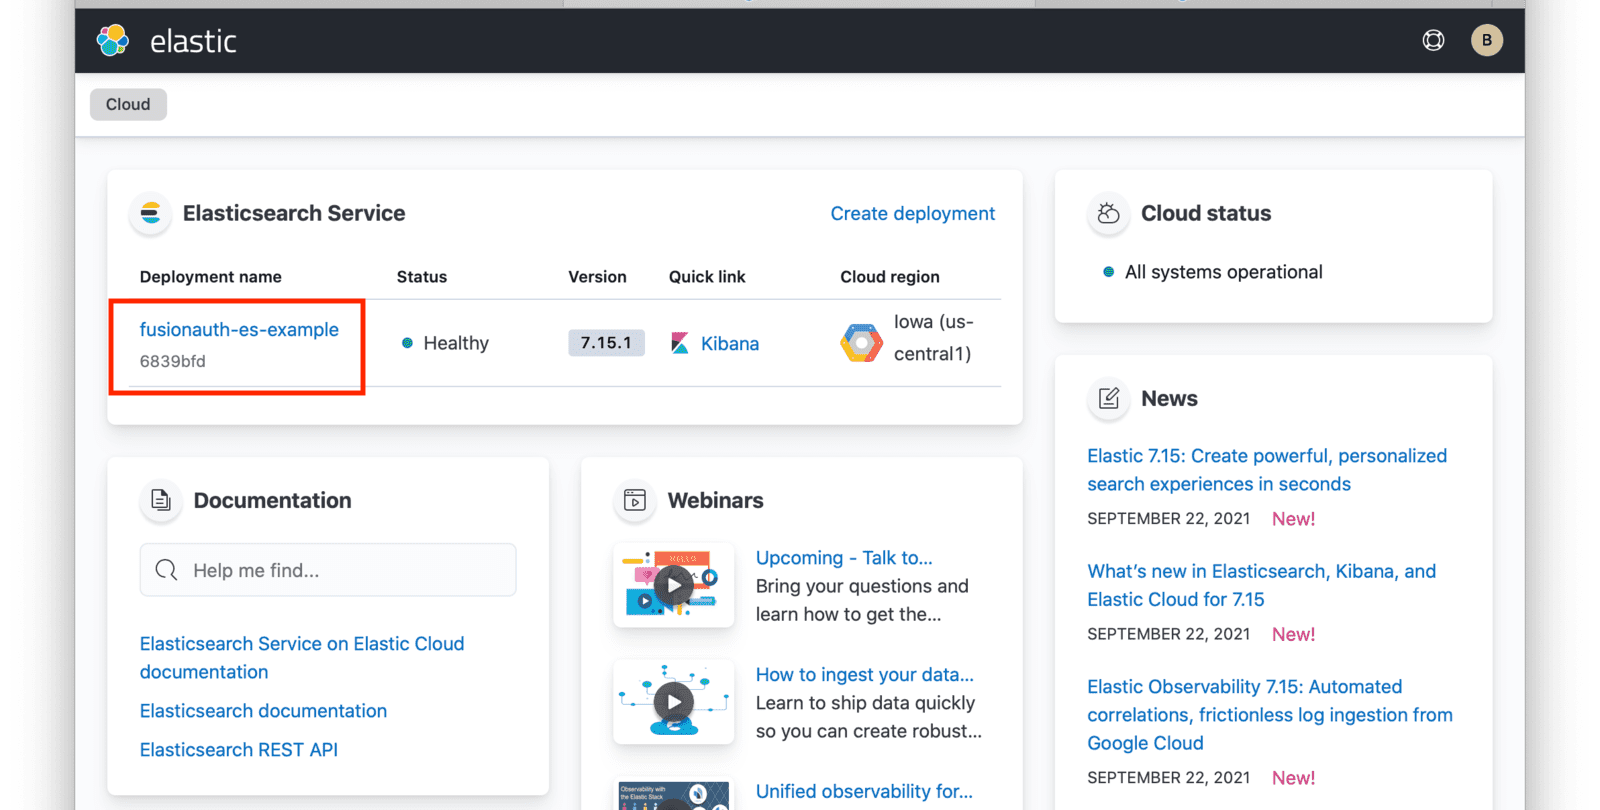
When your deployment creation process is complete, click on the Continue button. You will then be directed to your Elastic Cloud dashboard and will see your new deployment listed.
Click on the name of your deployment to manage it.
From this dashboard, you have access to all of the necessary endpoint information you will need to connect to your deployment.
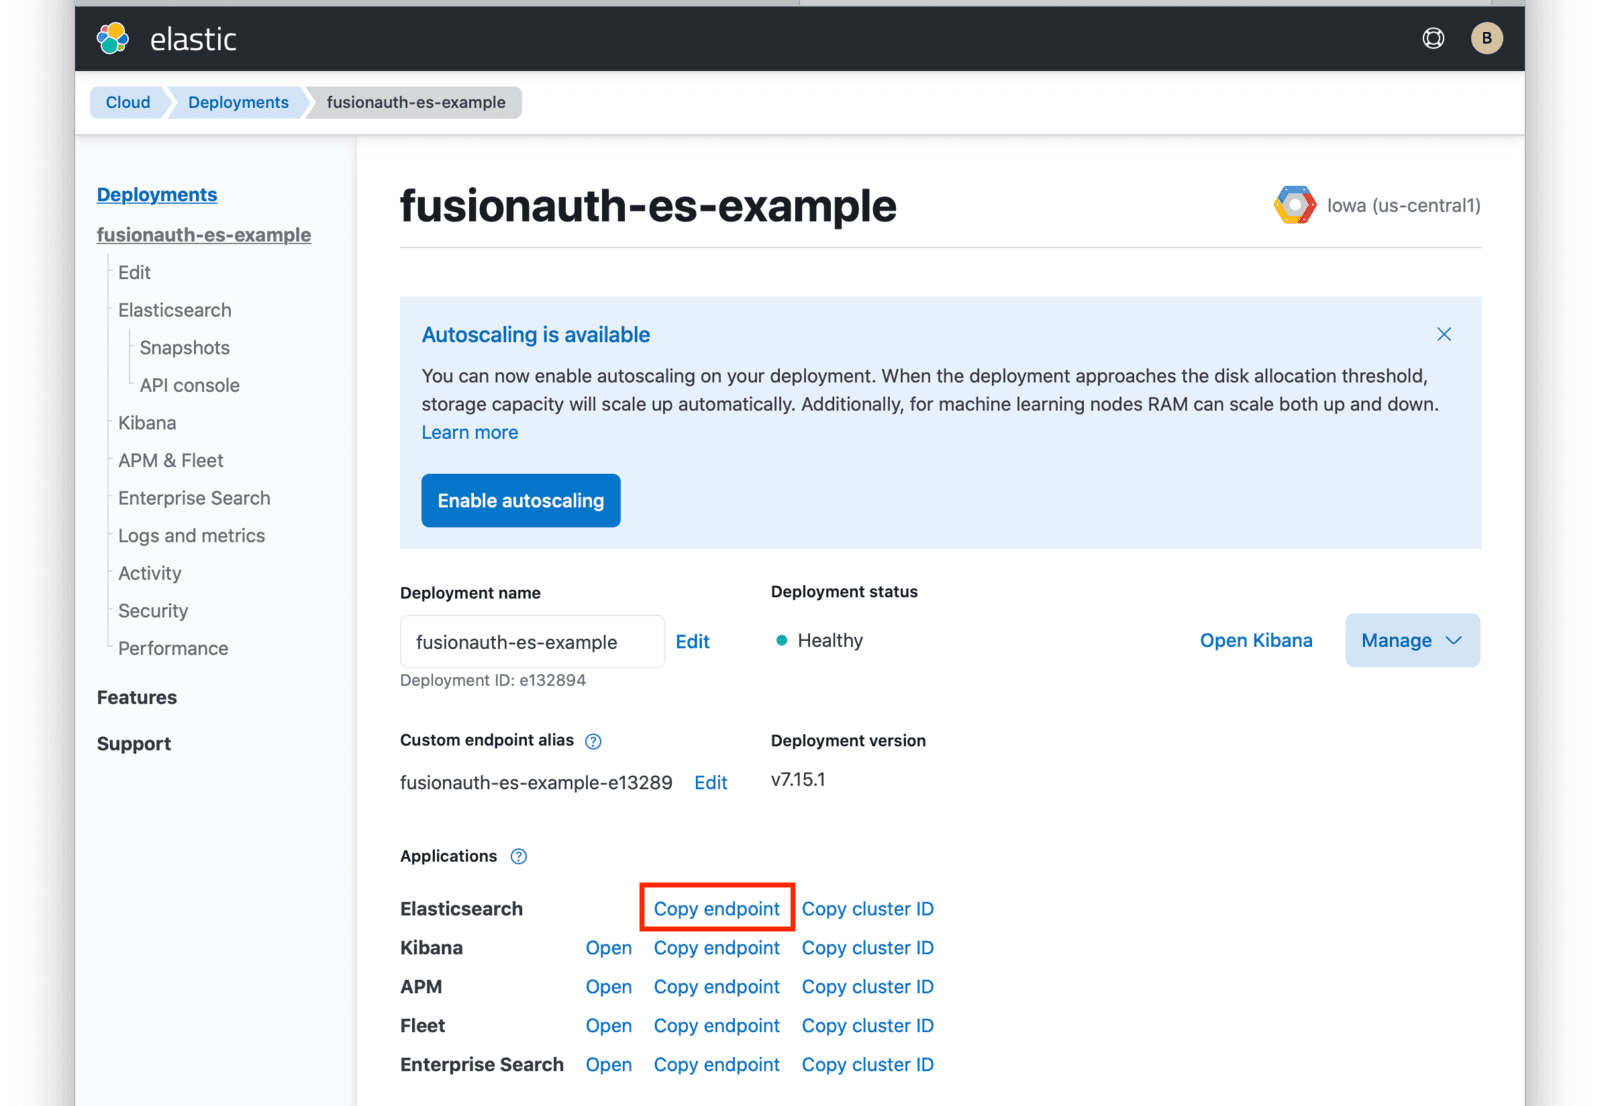
Under Applications, click on the Copy endpoint link next to Elasticsearch to copy the URL to your clipboard. You will need to save this URL for use when deploying FusionAuth to your GKE cluster.
Next Steps#
You now are running all the necessary infrastructure to deploy a containerized application to GKE.
There is an additional configuration value when running the next steps for running in a cluster on the GKE. In the Deploy FusionAuth in Kubernetes instructions below, there is a Helm Chart Configuraiton section. In addition to following the directions given in that section, you will need to update an additional section of the values.yaml file. You will need to find the section for the podLabels and replace it with the following:
Additional podLabels configuration
podLabels: {
   goog-partner-solution: isol_plb32_001kf000012eawziay_hgq452iixrlzpeddhfr5gp4uxglz5lvn
}
This allows the pod to be associated with FusionAuth in the Google Cloud Marketplace program. This is a static value and you will use the exact values shown here.
Next up, Deploy FusionAuth in Kubernetes.