Local Cluster with minikube
Having the capability to deploy applications in a local Kubernetes environment allows engineers to quickly develop, test, and demo without the operational overhead of a full-blown cluster. This is precisely what minikube is designed for by creating a single-node cluster within a virtual machine.
This guide will show you how to install and configure minikube and then install FusionAuth, including the required PostgreSQL database and Elasticsearch, on your minikube cluster.
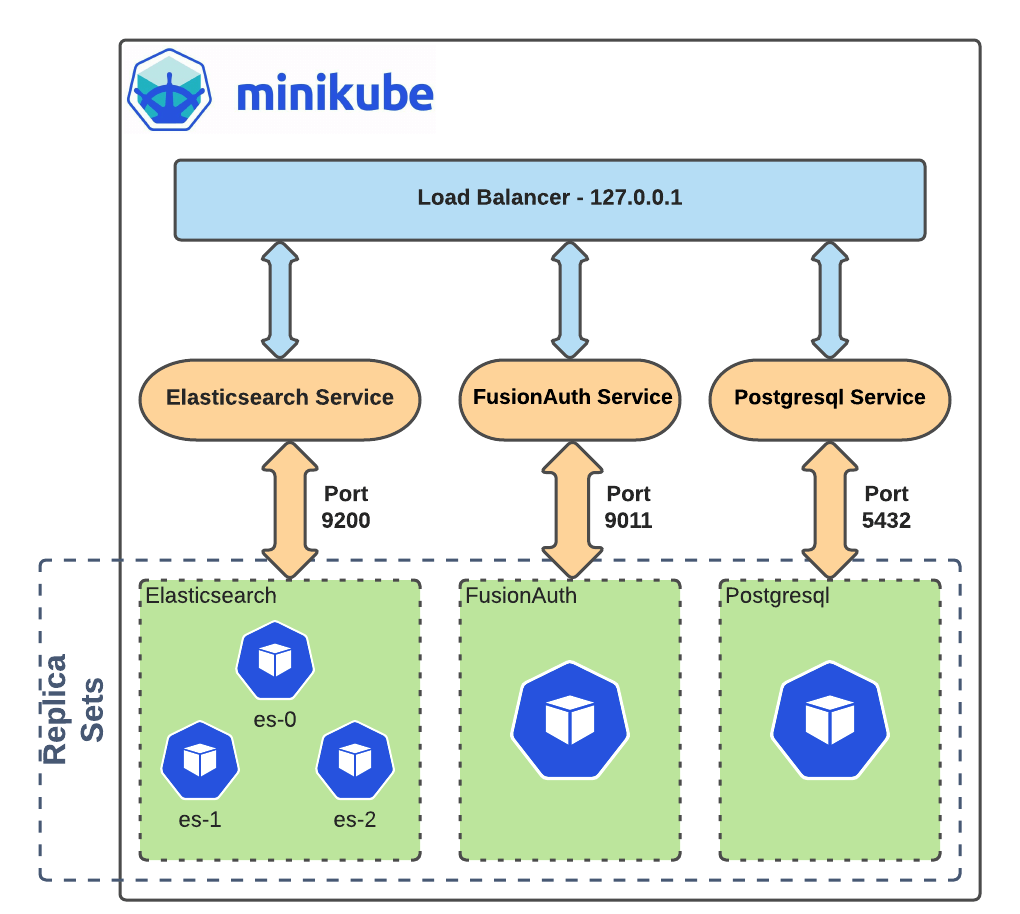
Figure 1 shows an example of the minikube configuration that you will create. The cluster will consist of three Replica Sets, one for each deployment of Elasticsearch, Postgresql, and FusionAuth. Each will have one Pod, with the exception of Elasticsearch which will have three. You could scale it down to one pod, but for simplicity, you will use the default settings for the Elasticsearch chart.
Each deployment exposes a Service which exposes each application as a network service.
Finally, you will use an Ingress Controller of type Load Balancer that allows external traffic, or in this case, traffic from localhost to the cluster.
Requirements#
Before you begin, you will need to have the following installed.
- Docker Desktop - The virtual machine environment you will use to run minikube.
helm- Package manager used for installing and managing Kubernetes applications. In this guide, you will be using a Helm chart to install FusionAuth, a Postgresql database, and Elasticsearch cluster. For more information, see Installing Helm.kubectl- Command line tool that interacts with the Kubernetes API server and is useful for managing Kubernetes clusters. Before proceeding, follow the installation documentation that corresponds to your platform found here.
Install minikube#
Navigate to minikube start and complete step one by selecting the options that apply to your local machine.
For example, if you are running on macOS with x86-64 architecture, Homebrew is a popular installer type :
Install minikube
brew install minikubeStart minikube#
Since you will be deploying multiple applications, you will want to start minikube using some additional resource considerations.
Before proceeding, make sure Docker Desktop has sufficient resources allocated. These settings can be found in Docker Desktop by navigating to Preferences and then clicking on Resources in the side menu bar. You need to have at least as much memory allocated to Docker Desktop as you give to minikube below.
Start minikube by additionally specifying cpus and memory .
Start minikube
minikube start --cpus 4 --memory 5gThis minikube setting is a general recommendation that has been tested for this guide based on resource requirements of FusionAuth, Postgresql, and Elasticsearch.
When the command finishes, it will configure kubectl to point to the minikube cluster. You can confirm this by checking the status:
Get minikube status
minikube status

minikube
type: Control Plane
host: Running
kubelet: Running
apiserver: Running
kubeconfig: Configured
Or by running the kubectl command to view pods running on the cluster. Use the -A or --all-namespaces to list all pods deployed to the cluster.
Since you have not deployed anything yet, only pods in the kube-system namespace will be returned:
Get all pods deployed on the cluster
kubectl get pods -A

NAMESPACE     NAME                               READY   STATUS    RESTARTS       AGE
kube-system   coredns-78fcd69978-tr4jt           1/1     Running   0              9m38s
kube-system   etcd-minikube                      1/1     Running   0              9m53s
kube-system   kube-apiserver-minikube            1/1     Running   0              9m51s
kube-system   kube-controller-manager-minikube   1/1     Running   0              9m54s
kube-system   kube-proxy-2h8b2                   1/1     Running   0              9m38s
kube-system   kube-scheduler-minikube            1/1     Running   0              9m51s
kube-system   storage-provisioner                1/1     Running   1 (9m8s ago)   9m50s
Deploy PostgreSQL#
Start by adding the bitnami helm repository that contains the Postgresql chart:
Add PostgreSQL chart repository
helm repo add bitnami https://charts.bitnami.com/bitnamiTo list all of the Helm repositories that you have added, execute this command:
List chart repositories
helm repo listThe resulting output will display the chart you just added and any other helm charts that you may have added previously.
Output
NAME      	URL
bitnami   	https://charts.bitnami.com/bitnami
Install the chart using the helm command. Set the postgresqlPassword value using the set flag for the postgres user. In this example, the release field is set to pg-minikube:
Install the postgresql chart
helm install pg-minikube --set auth.postgresPassword=<your-postgres-password> bitnami/postgresqlSetting the password is optional. A password will be generated automatically if you do not set one.
When completed successfully, the output will contain some useful information about your deployment:
Output of PostgreSQL creation command
** Please be patient while the chart is being deployed **

PostgreSQL can be accessed via port 5432 on the following DNS names from within your cluster:

    pg-minikube-postgresql.default.svc.cluster.local - Read/Write connection

To get the password for "postgres" run:

    export POSTGRES_PASSWORD=$(kubectl get secret --namespace default pg-minikube-postgresql -o jsonpath="{.data.postgresql-password}" | base64 --decode)

To connect to your database run the following command:

    kubectl run pg-minikube-postgresql-client --rm --tty -i --restart='Never' --namespace default --image docker.io/bitnami/postgresql:11.13.0-debian-10-r40 --env="PGPASSWORD=$POSTGRES_PASSWORD" --command -- psql --host pg-minikube-postgresql -U postgres -d postgres -p 5432

To connect to your database from outside the cluster execute the following commands:

    kubectl port-forward --namespace default svc/pg-minikube-postgresql 5432:5432 &
    PGPASSWORD="$POSTGRES_PASSWORD" psql --host 127.0.0.1 -U postgres -d postgres -p 5432
When you deploy FusionAuth, you will need to use the DNS name pg-minikube-postgresql.default.svc.cluster.local as seen above and the postgres user password generated or specified during the postgres helm chart installation.
Export the Postgres password
export POSTGRES_PASSWORD=$(kubectl get secret --namespace default pg-minikube-postgresql -o jsonpath="{.data.postgresql-password}" | base64 --decode)If you did not set a password when installing pg-minikube, use the command below to display the value of the POSTGRES_PASSWORD environment variable.
Display your password
echo $POSTGRES_PASSWORDYou can also test your deployment by attempting to connect to the database.
Connect to the database
kubectl run pg-minikube-postgresql-client --rm --tty -i --restart='Never' --namespace default --image docker.io/bitnami/postgresql:11.13.0-debian-10-r40 --env="PGPASSWORD=$POSTGRES_PASSWORD" --command -- psql --host pg-minikube-postgresql -U postgres -d postgres -p 5432You can also verify the pg-minikube-postgresql pod by again retrieving pods with kubectl. The following command requests pods in the default namespace with output (-o) containing additional information such as IP Address :
Get pods in the default namespace
kubectl get pods -n default -o wideThe resulting output will show 1/1 pg-minikube-postgresql pod in a READY state:
Output
NAME                       READY   STATUS    RESTARTS   AGE     IP           NODE       NOMINATED NODE   READINESS GATES
pg-minikube-postgresql-0   1/1     Running   0          8m33s   172.17.0.3   minikube   <none>           <none>
When a Pod is in a status of READY, it means that it is available to serve requests and should be added to load balancing pools of all matching services.
You can read more about Pod lifecycles here.
You can also retrieve active services on the cluster. A Kubernetes Service exposes applications running on a pod as a network service. The following command will display the new service exposing the Postgresql application with an IP address running on port 5432:
Get services
kubectl get services -n default

NAME                              TYPE        CLUSTER-IP       EXTERNAL-IP   PORT(S)    AGE
kubernetes                        ClusterIP   10.96.0.1        <none>        443/TCP    82m
pg-minikube-postgresql            ClusterIP   10.108.174.128   <none>        5432/TCP   27m
pg-minikube-postgresql-headless   ClusterIP   None             <none>        5432/TCP   27m
In addition to the pg-minikube-postgresql service, you will see another service with the name kubernetes. This service is responsible for directing traffic to the Kubernetes API server.
You also might have noticed the additional postgresql service pg-minikube-postgresql-headless. This is what is known in Kubernetes as a Headless Service. To read more about these types of services, see the official Kubernetes documentation here.
Deploy Elasticsearch#
Start by adding the Elasticsearch Helm Chart repository by running this command:
Add Elasticsearch chart repository
helm repo add elastic https://helm.elastic.coYou will now have the two charts that you have added in this guide in addition to any other charts you have added if you have used Helm prior to this guide.
List chart repositories
helm repo list

NAME      	URL
bitnami   	https://charts.bitnami.com/bitnami
elastic   	https://helm.elastic.co
Before installing, you will need to download a copy of a recommended configuration for minikube virtual machines:
Download example minikube configuration
curl -O https://raw.githubusercontent.com/elastic/Helm-charts/master/elasticsearch/examples/minikube/values.yamlThe contents of this configuration uses a smaller JVM heap, smaller memory per pods requests, and smaller persistent volumes.
The values.yaml file you downloaded should look like this:
Configuration details
# Permit co-located instances for solitary minikube virtual machines.
antiAffinity: "soft"

# Shrink default JVM heap.
esJavaOpts: "-Xmx128m -Xms128m"

# Allocate smaller chunks of memory per pod.
resources:
  requests:
    cpu: "100m"
    memory: "512M"
  limits:
    cpu: "1000m"
    memory: "512M"

# Request smaller persistent volumes.
volumeClaimTemplate:
  accessModes: [ "ReadWriteOnce" ]
  storageClassName: "standard"
  resources:
    requests:
      storage: 100M
Now install the Elasticsearch chart using this values.yaml configuration by including the -f flag:
Install elasticsearch chart
helm install es-minikube elastic/elasticsearch -f values.yamlBe aware, it may take a minute or two for the pods to reach a READY state.
Confirm your deployment by retrieving active pods in the cluster.
Get pods
kubectl get pods -n default -o wideThe resulting output will show three pods for each elasticsearch node:
Output
NAME                         READY   STATUS    RESTARTS   AGE     IP           NODE       NOMINATED NODE   READINESS GATES
elasticsearch-master-0       1/1     Running   0          7m17s   172.17.0.5   minikube   <none>           <none>
elasticsearch-master-1       1/1     Running   0          7m17s   172.17.0.4   minikube   <none>           <none>
elasticsearch-master-2       1/1     Running   0          7m17s   172.17.0.6   minikube   <none>           <none>
pg-minikube-postgresql-0     1/1     Running   0          39m     172.17.0.3   minikube   <none>           <none>
Running the kubectl command to get service information again will show that the installed Elasticsearch chart exposes the elasticsearch-master Service running at a dedicated IP address on port 9200:
Get services
kubectl get services -n default

NAME                              TYPE        CLUSTER-IP       EXTERNAL-IP   PORT(S)             AGE
elasticsearch-master              ClusterIP   10.107.78.6      <none>        9200/TCP,9300/TCP   3m38s
elasticsearch-master-headless     ClusterIP   None             <none>        9200/TCP,9300/TCP   3m38s
kubernetes                        ClusterIP   10.96.0.1        <none>        443/TCP             98m
pg-minikube-postgresql            ClusterIP   10.100.117.198   <none>        5432/TCP            92m
pg-minikube-postgresql-headless   ClusterIP   None             <none>        5432/TCP            92m
Kubernetes DNS#
The default installation of minikube enables kube-dns, a Service that automatically assigns DNS names to other services in the cluster.
When you deploy PostgreSQL and deploy Elasticsearch, each service that was created was assigned the following DNS names respectively by kube-dns:
pg-minikube-postgresql.default.svc.cluster.localelasticsearch-master.default.svc.cluster.local
You will use these values for the database and elasticsearch host values when deploying FusionAuth.
For more information on DNS see Kubernetes documentation for DNS for Services and Pods.
Next Steps#
You now are running all the necessary infrastructure to deploy a containerized application to minikube.
Next up, Deploy FusionAuth in Kubernetes.