This feature is only available in the Enterprise plan. To learn more, see our pricing page.
Available since 1.30.0
Flagging and responding to suspicious behavior is a part of any cybersecurity product. The FusionAuth Advanced Threat Detection feature provides best-practice functionality to help you manage unusual, potentially malicious behavior around logins, registrations, user creation, and user updates.
Advanced Threat Detection can be enabled when the user creates a license or updates an existing license.
The Advanced Threat Detection feature requires increased RAM on servers running the FusionAuth application, as documented in the System Requirements.
Advanced Threat Detection features include:
- Rate limiting (too many failed login attempts).
- CAPTCHA to prevent automated logins.
- Location and IP restriction.
- Administrator notifications through emails and webhooks.
Each feature is configurable on a tenant-by-tenant basis using the Tenant API or by browsing to Tenants -> My Tenant -> Security .
Here's a brief video covering some aspects of Advanced Threat Detection:
Enable Advanced Threat Detection#
When you enter a license key into FusionAuth in the admin UI at /admin/reactor, FusionAuth should contact the licensing server and enable Advanced Threat Detection. If you wait a minute and then refresh the page, Threat Detection should say Active.
If the field does not update, please contact FusionAuth support.
Customizable Rate Limiting#
A rate limit is the maximum number of times a user may perform an action in a set duration. You can set the following limits for each tenant:
- Failed login.
- Forgot password.
- Send or resend email verification.
- Passwordless or magic link login.
- Send or resend registration verification.
- Send two-factor code.
- Send or resend phone number verification.
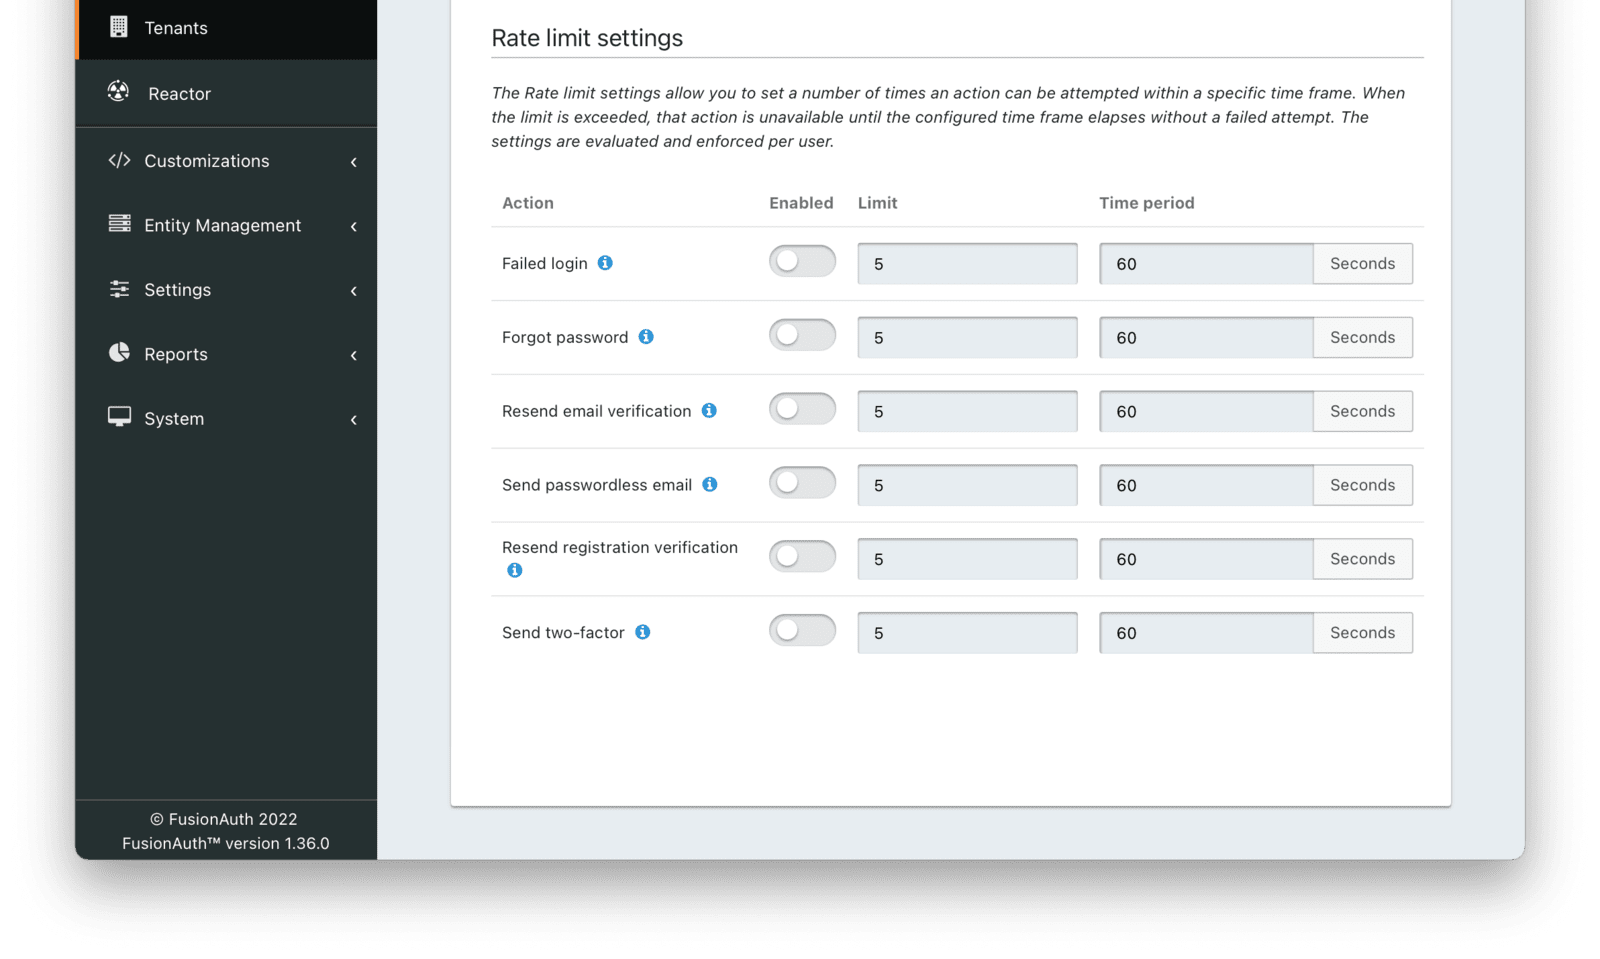
You can enable or disable each of these and control the number of allowed attempts within a window before an action will be rate-limited.
Let's consider failed logins as an example. Assume you limit failed logins to five per sixty seconds. Should someone try to log in with an email address and the wrong password five times within a minute, that email address will be locked. From the time of the fifth login until one minute passes, no logins will succeed, even with the correct password. (Note that this means an attacker can lock another user out of their account by triggering failed login attempts using their email address.)
Further login attempts during the lockout duration, with or without the correct password, will not extend the duration of the lockout. Once a minute has elapsed, a user can log in again with the correct password. The lockout duration effectively clears failed login attempts because it is the same length as the sliding window of duration in which to check for failed logins. In other words, once the lockout period has passed, the user has up to five new attempts to enter the correct password. Entering an incorrect password won't trigger another lockout period immediately, even if the user had been trying unsuccessfully to log in during the lockout period.
Rate limiting applies whether you are accessing FusionAuth through the admin UI or in the terminal using the APIs.
An example of how rate limiting is applied for login is represented in the diagram below.

If you need to lock an account after several failed logins, consider user account locking. Using the account lockout feature rather than rate limiting offers additional flexibility in the duration. FusionAuth can also send emails or webhooks when it locks a user's account.
Before User Creation#
Rate limiting is also utilized for cases before a user is created, like pre-verification. In this case, rate limiting occurs by identity value (email address or phone number).
Usability Considerations#
In security, it is good practice to give as little information to potential attackers as possible. This is why a website will tell you vaguely on failed login that the username or password is incorrect, rather than admitting that the user is not registered. Similarly, with rate limiting in FusionAuth, the user (or potential attacker) is not notified that rate-limiting restrictions have been triggered.
For example, when the number of incorrect login attempts is exceeded, any further correct login attempts within the duration will still fail — but the user won't be told why. Below is an example.
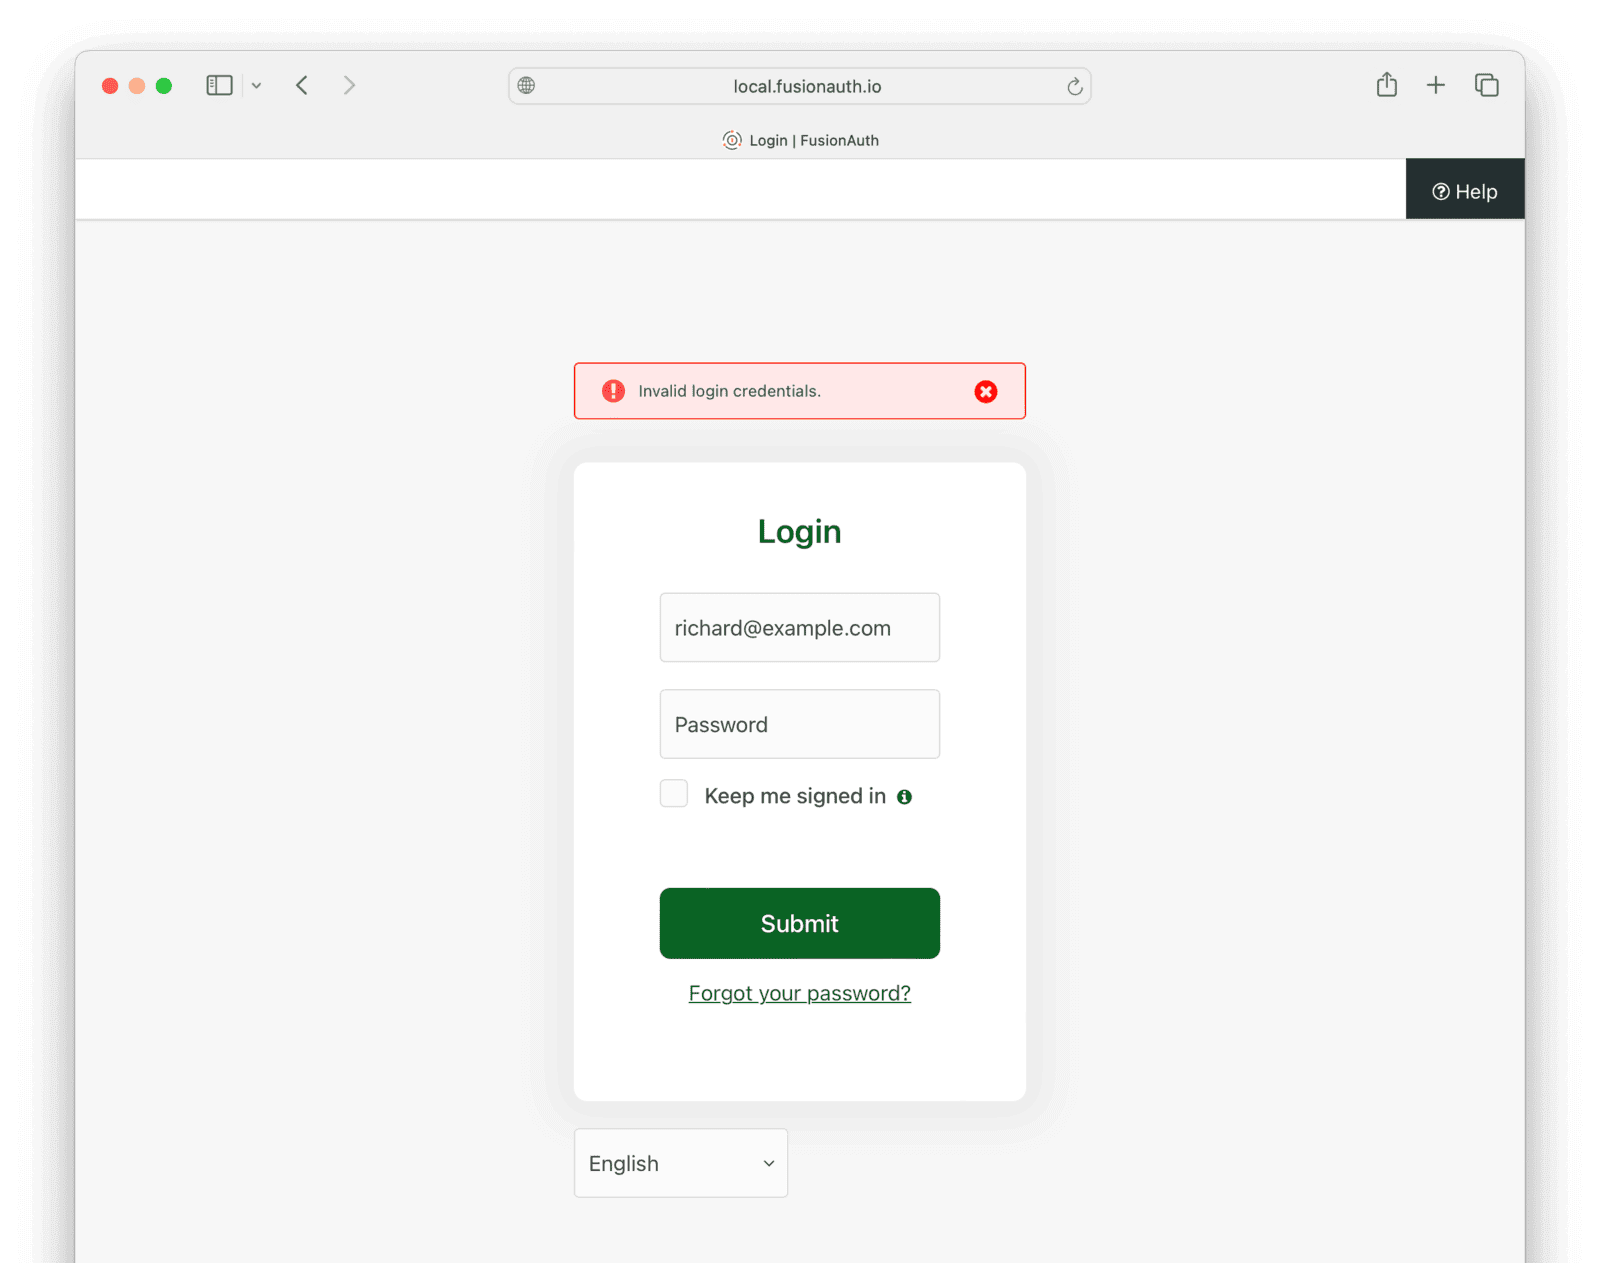
This can be extremely confusing to users, who may waste their time resetting their password with the Forgot Password flow, or waste your time making support requests. Note also that an attacker can use rate limiting to completely lock a user out of their account by automating failed login attempts with the victim's email address. FusionAuth does not distinguish between the IP addresses of the callers when applying rate limiting.
To improve the user experience, you can provide additional information in the messages shown on the various login pages and in email templates warning users about rate limits.
For example, you can browse to Customizations -> Themes and edit any of the available Themes, such as the default FusionAuth theme. In the Messages tab, you can change messages shown to users. You could change the following message.
[InvalidLogin]=Invalid login credentials.To include a bit more information in the message, as below.
[InvalidLogin]=Invalid login credentials. If you are certain your password is
               correct, please wait 60 seconds and retry.
To balance security with usability, you need to decide how much information to reveal to users based on the usage patterns of your system and its security risks.
You can also use CSS and JavaScript to customize your theme and provide more information to users. For more information, please see the theme customization documentation.
Best Practices#
There are three main concerns for rate limiting, from most to least important:
- Denial of service attacks on your authentication system. These can leave your entire application unusable.
- User email spam. This annoys users and reduces your email server's reputation. Two-factor SMS spam can incur significant costs to a company, too.
- Brute forcing login passwords. Login attempts are slow, and it's unlikely that attackers will guess any but the simplest of passwords.
For these reasons, you should enable rate limiting on all six functions in your tenant security tab. But they do not have to be very strict to prevent spam. The default limits (five attempts with a minute lockout) are sufficient to prevent most attacks when combined with other FusionAuth security features.
Some systems provide adaptive rate limiting, where limits change dynamically based on the load of the system. FusionAuth does not provide adaptive rate limiting, so you need to adjust your rates manually if you see an increase in attacks on your application.
Note that even if you enable rate limiting, FusionAuth will still receive every request sent to it. An overload of requests will cause a denial of service attack. You need to prevent this attack at the network layer of your system, not in FusionAuth itself.
CAPTCHA#
CAPTCHA stands for Completely Automated Public Turing test to tell Computers and Humans Apart, and can provide additional security. If you enable CAPTCHA, FusionAuth will use it on the login and registration pages.
FusionAuth supports:
- Google reCAPTCHA v2 (puzzle or one-click).
- Google reCAPTCHA v3 (invisible with threat score from 0 to 1).
- hCaptcha and hCaptcha Enterprise.
FusionAuth does not support Google reCAPTCHA Enterprise. reCAPTCHA Enterprise is similar to reCAPTCHA v3, but with added machine learning capability.
reCAPTCHA v3 requires no work from your users and offers a more pleasant user experience than v2, although there is a danger that a user is mistaken as non-human and will have no way to remedy the issue. reCAPTCHA v2 is useful if you prefer to validate that a user is human, rather than operating on the probability they are human. The ease of use of reCAPTCHA v2 makes it a good option to start with, unless your users report errors.
hCaptcha is a reCAPTCHA alternative offered by a company that is not Google. You should research your options before deciding which CAPTCHA service to use, but here are a few of the alleged differences claimed online:
- hCaptcha keeps less private user information than reCAPTCHA and has a strict privacy policy. reCAPTCHA violates GDPR and is not suitable for European sites.
- hCaptcha works in every country. China blocks Google.
- hCaptcha is free for one million verifications per month. reCAPTCHA is free for ten thousand verifications per month.
- Paid plans for both hCaptcha and reCAPTCHA are a bit complicated, and you should carefully estimate the total fee based on your number of users.
At the beginning of 2024, hCaptcha seems to be the better choice for number of countries supported, privacy, and price (depending on your number of users).
"reCAPTCHA scores run from 0.0 (bot) to 1.0 (person). hCaptcha Enterprise scores are risk scores, and thus they run from 0.0 (no risk) to 1.0 (confirmed threat)." - hCaptcha documentation
How To Set Up reCAPTCHA#
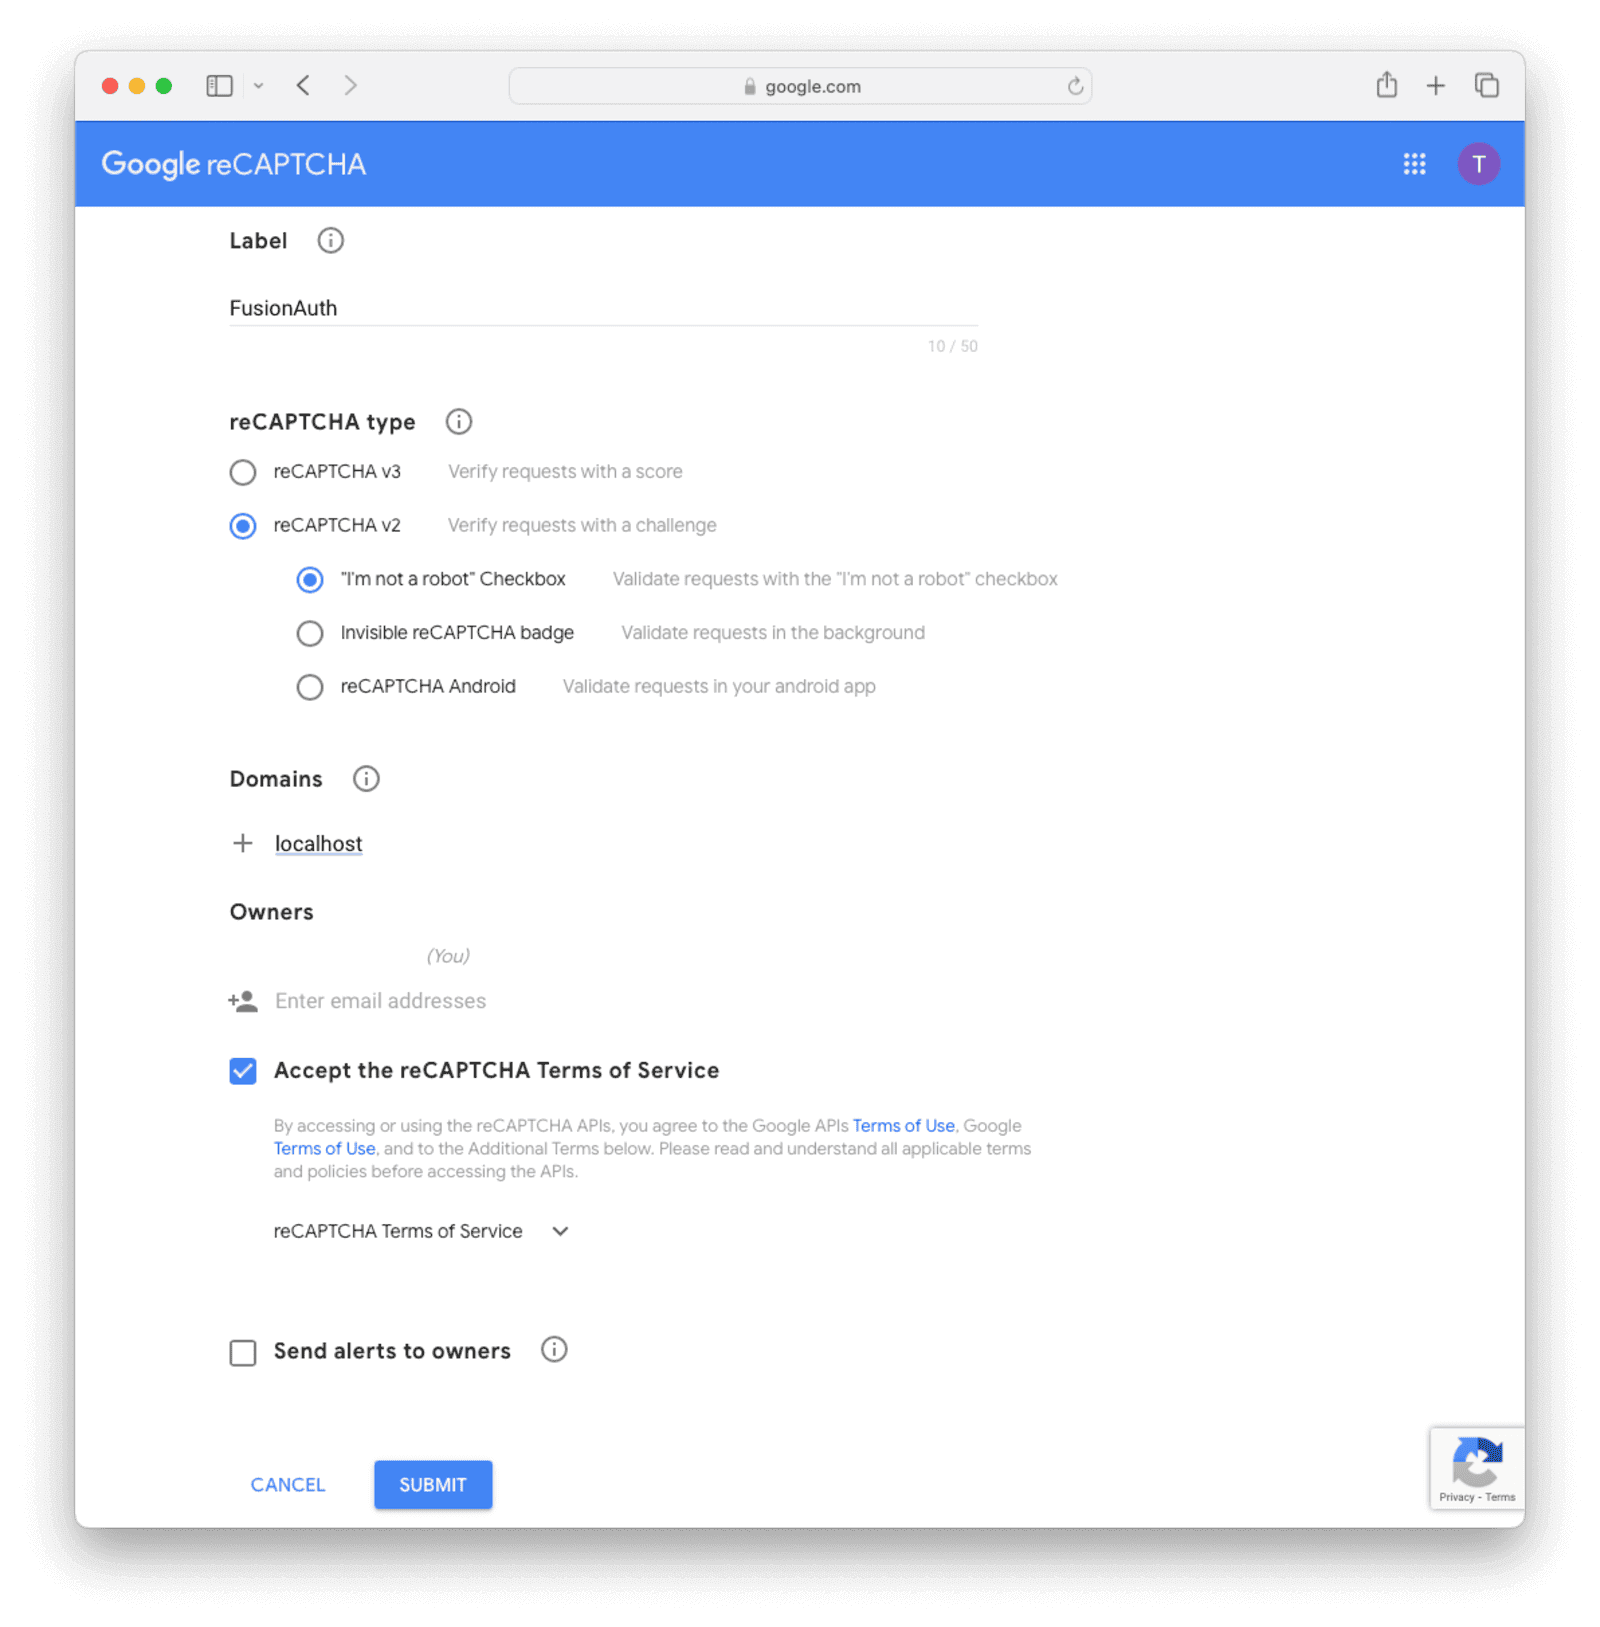
First, create a CAPTCHA site on Google:
- Browse to https://www.google.com/recaptcha/admin/create.
- Click Switch to create a classic key to ensure that you are not creating an Enterprise key.
- Enter your domain name, or
localhostif you are testing locally. - Choose v2 or v3.
The form should look like the image below.
To delete a CAPTCHA site, browse to the Google administrative console at https://www.google.com/recaptcha/admin, select a site, click settings, and click the tiny delete icon at the top-right of the page.
When you enable reCAPTCHA, take care that your keys in FusionAuth are correct and your domain name in Google is correct. If you make a mistake, you will not be able to log in with your administrator account to make changes because CAPTCHA will fail. You will need to remove CAPTCHA manually by connecting to the FusionAuth database and altering tables. Test on a copy of your live site first.
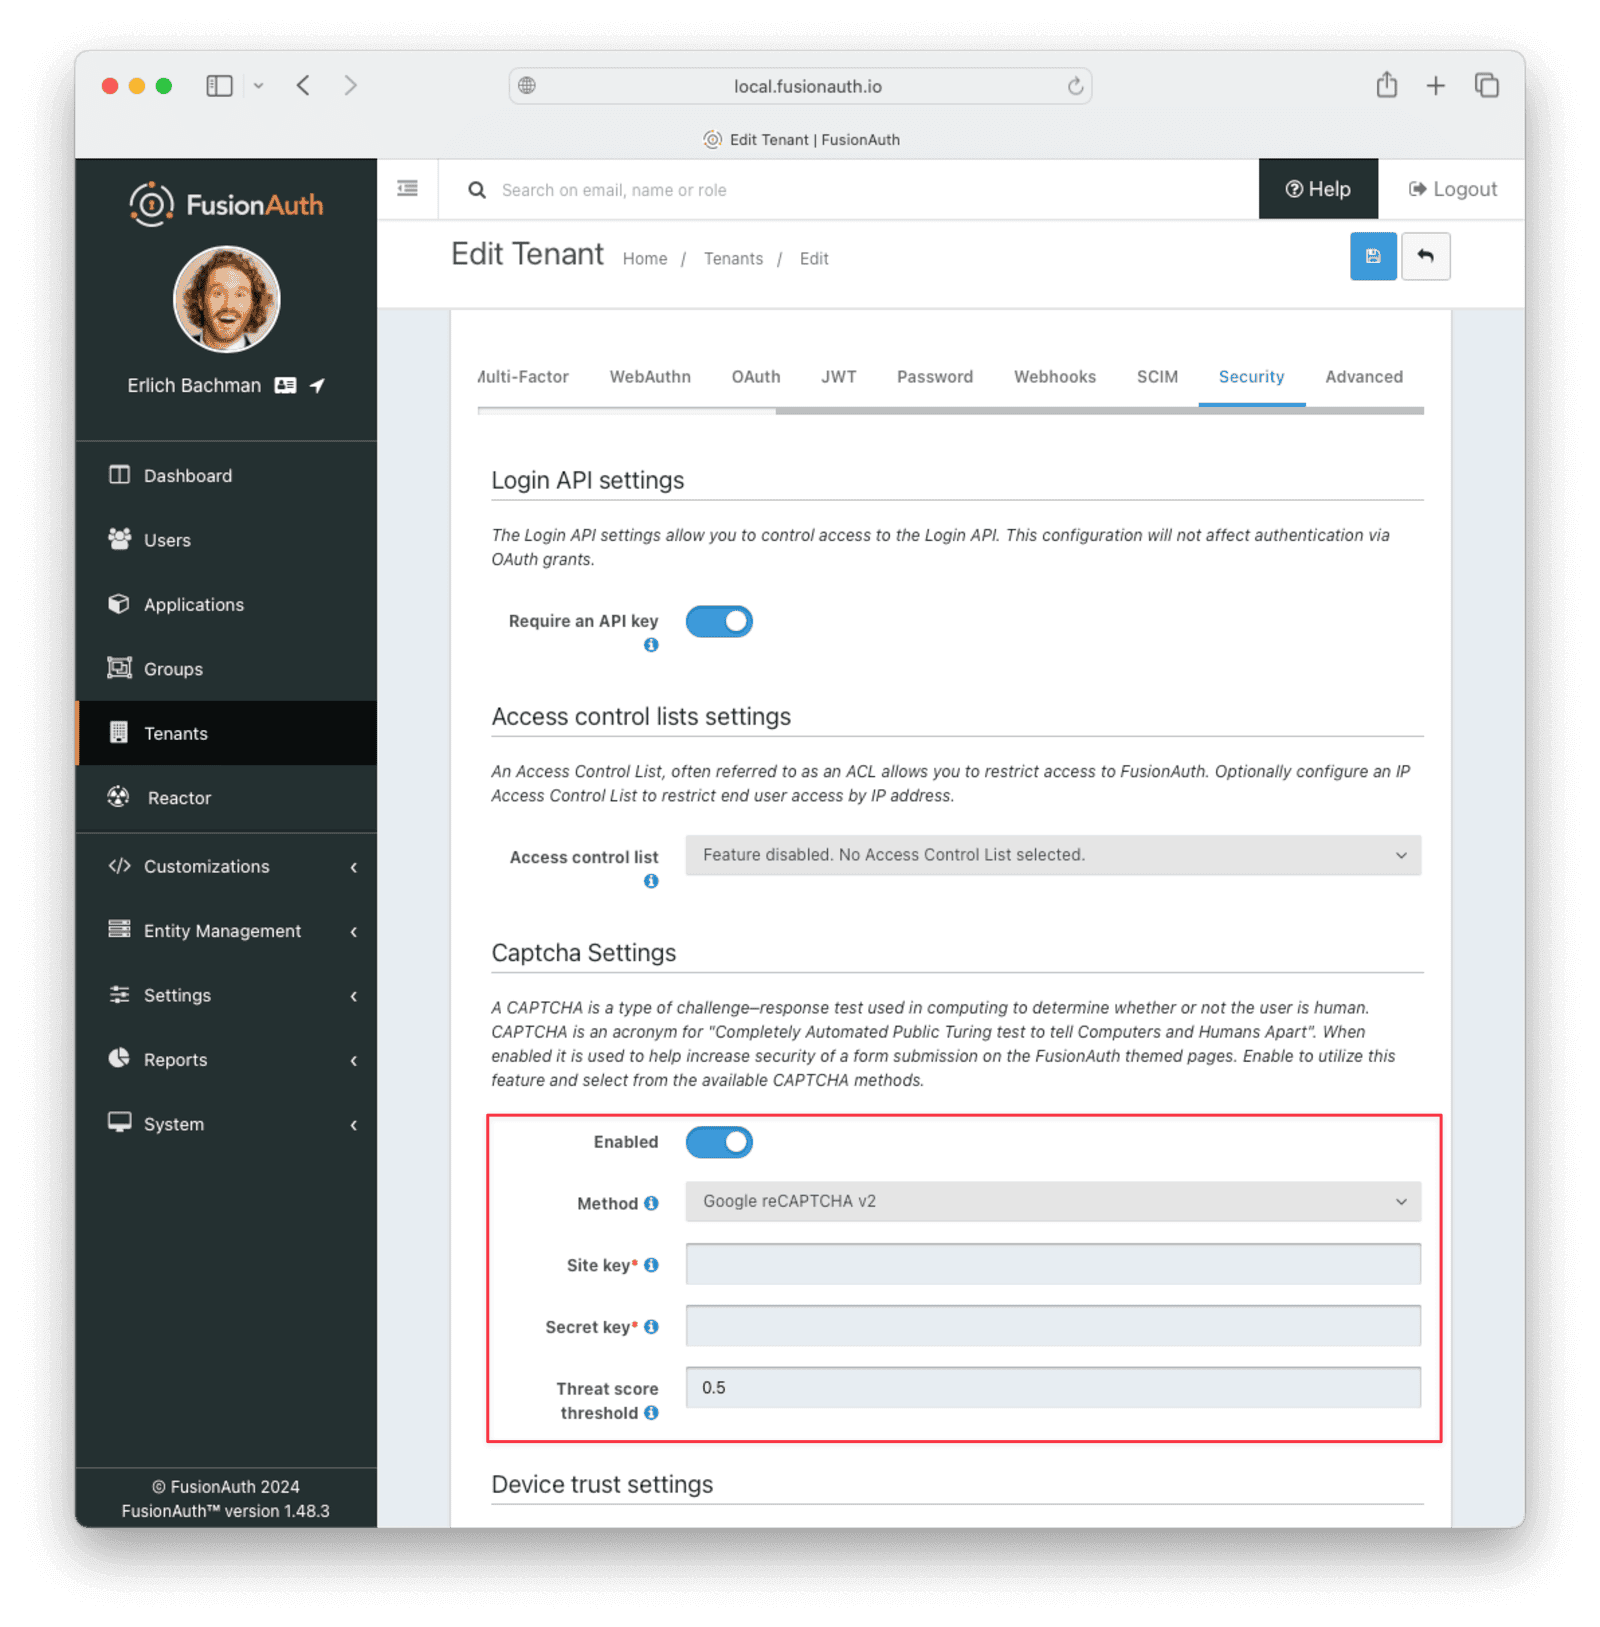
In the FusionAuth admin UI, edit a tenant and navigate to the Security tab. Go to CAPTCHA and toggle on Enable CAPTCHA . Enter your chosen reCAPTCHA version and the keys from Google. Leave the threat score at half and adjust it later if necessary. Save the changes.
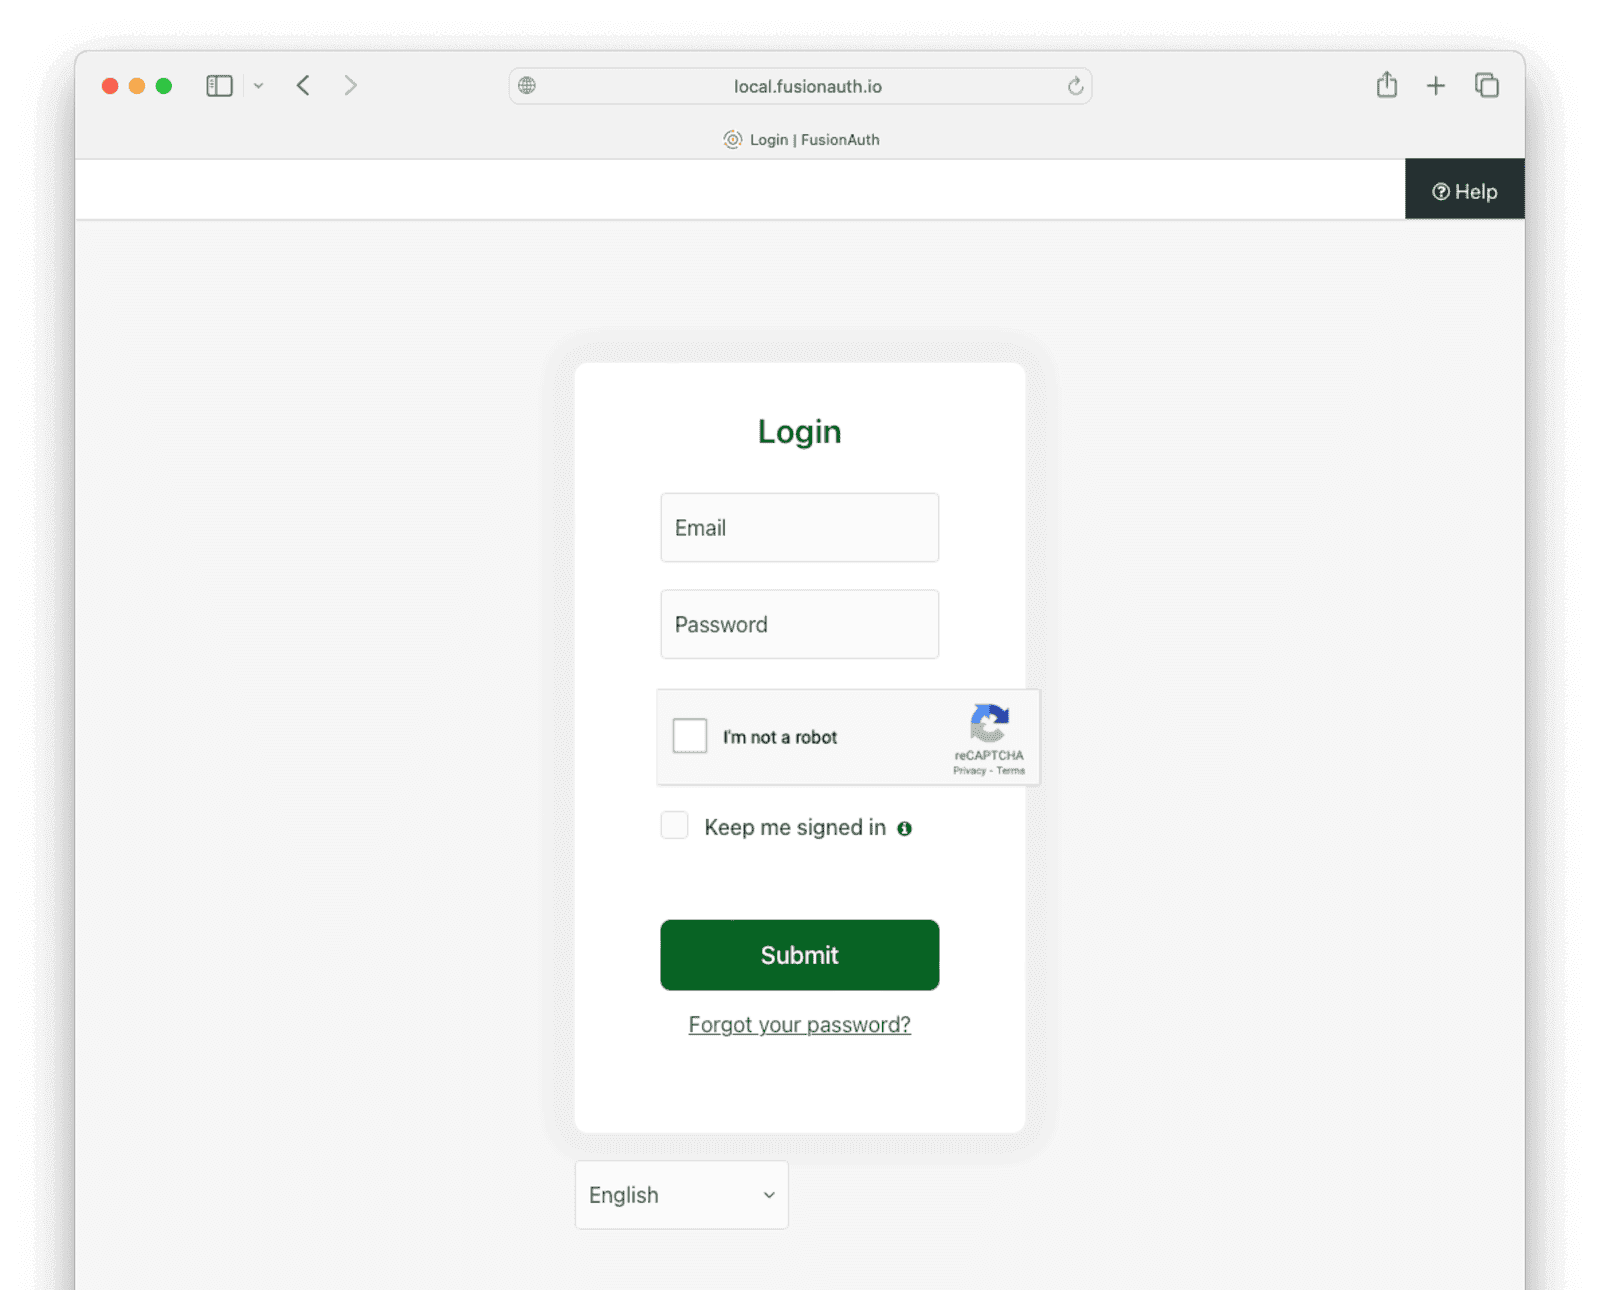
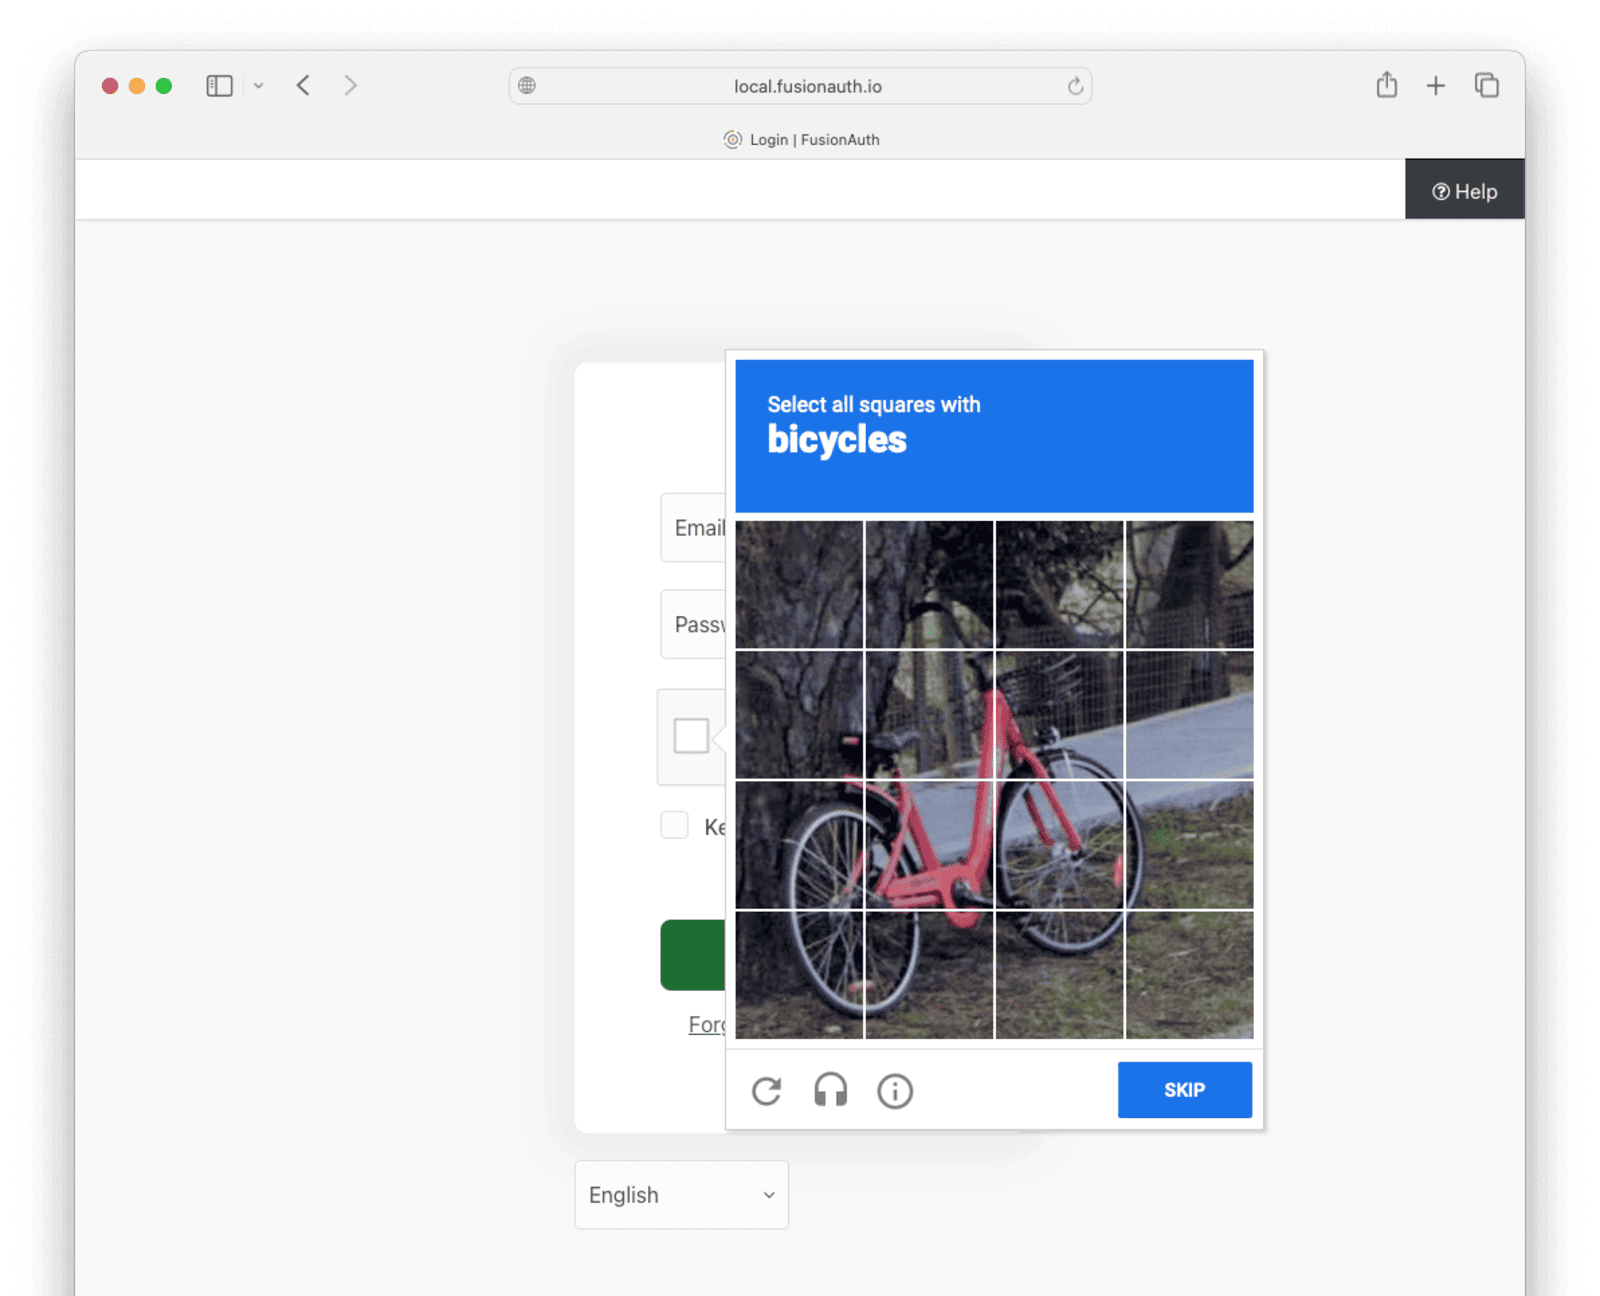
If you log out and go to the login screen, you'll be given a CAPTCHA puzzle if you specified reCAPTCHA v2. If you specified reCAPTCHA v3, nothing will be shown.
Below is what the user will see when logging in with reCAPTCHA v2 enabled.
How To Set Up hCaptcha#
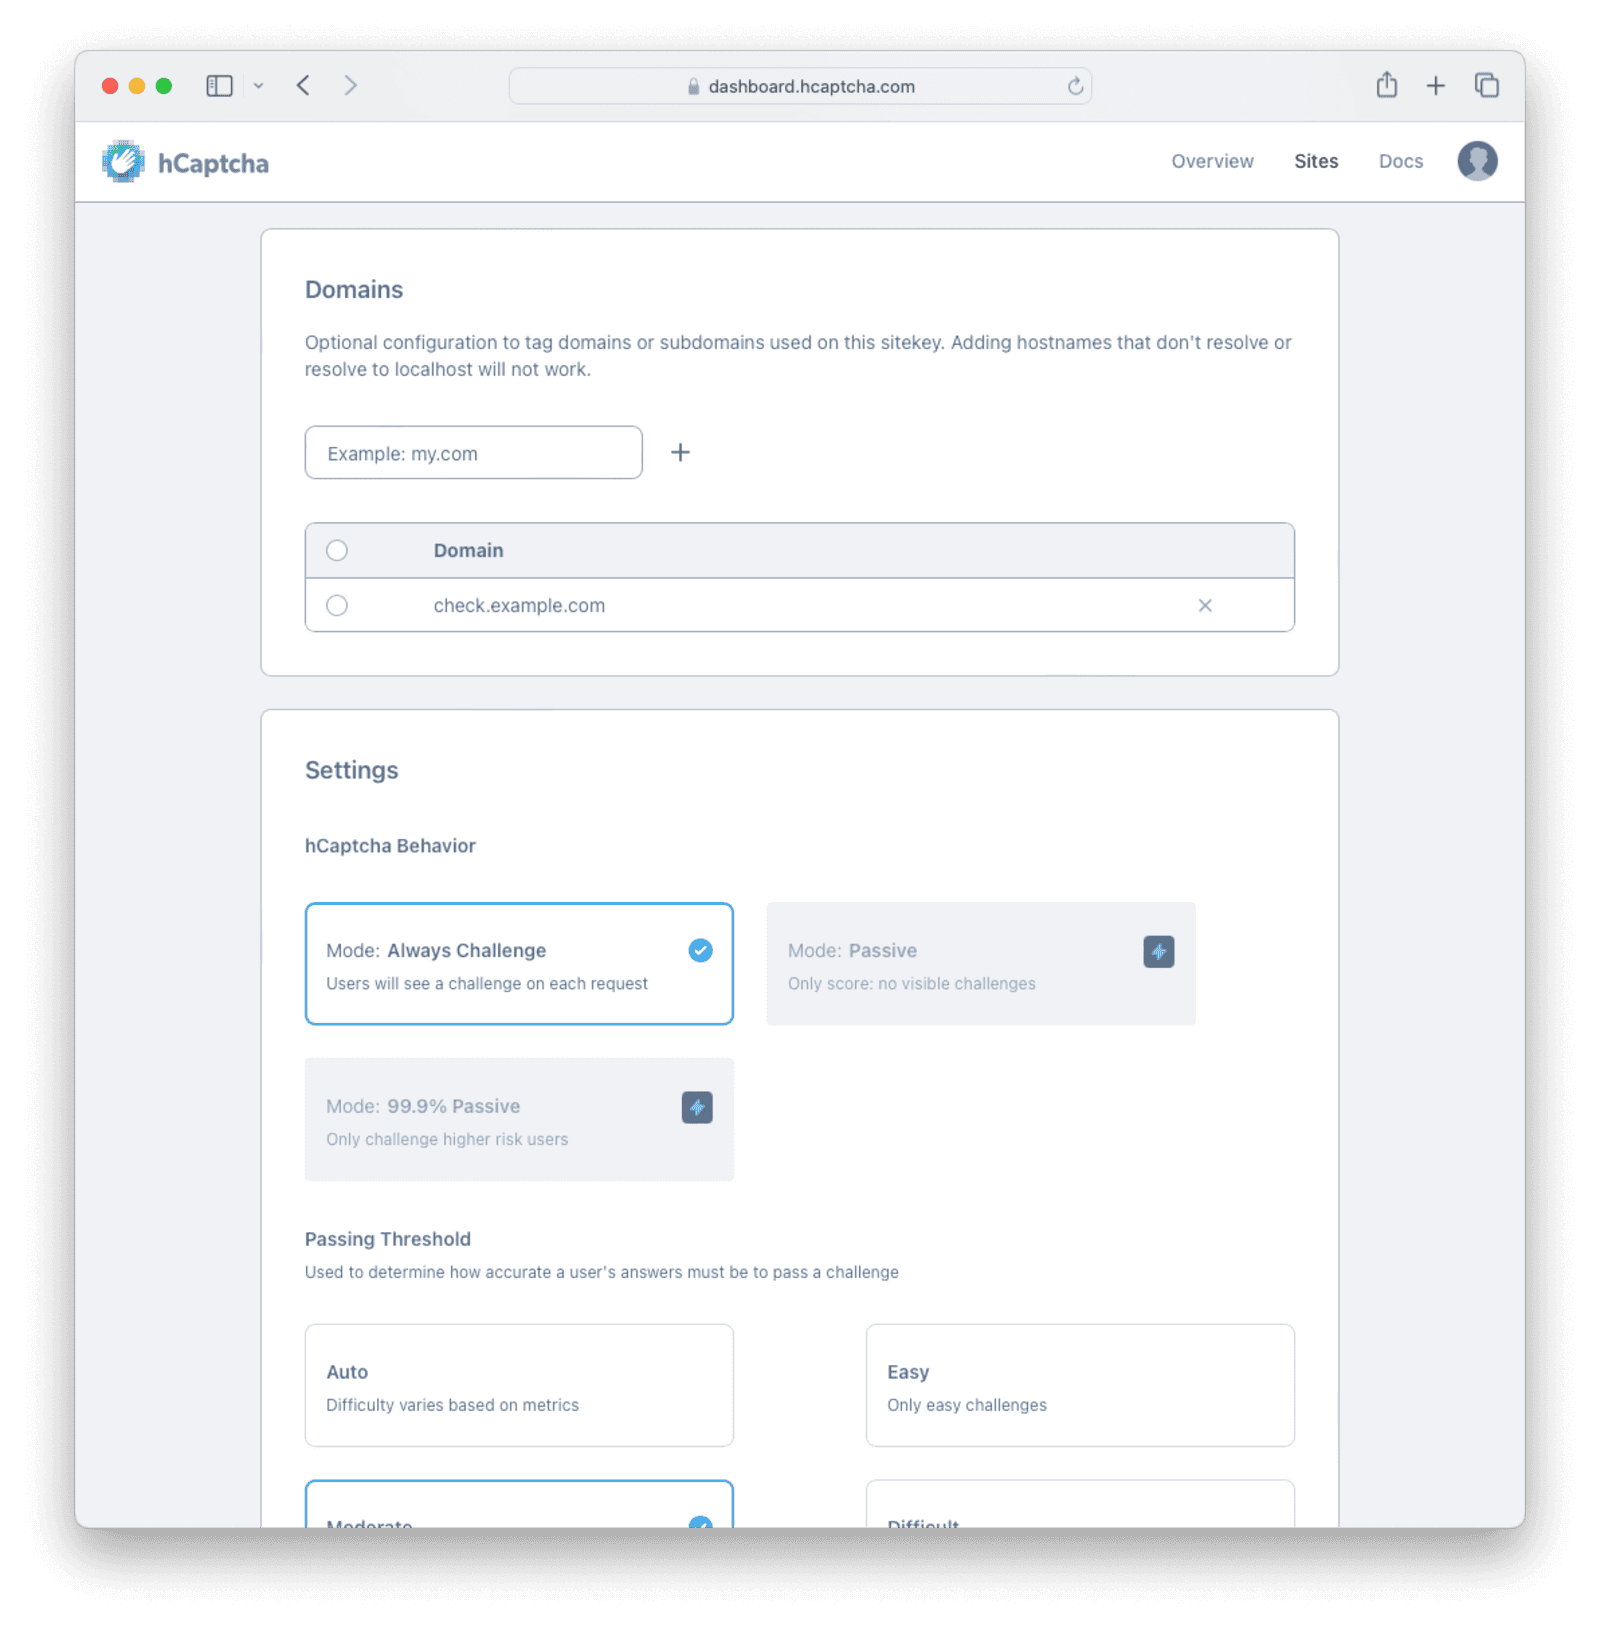
Browse to https://dashboard.hcaptcha.com/signup and create an hCaptcha account. Generate a secret key and proceed to add a site. Unlike reCAPTCHA, hCaptcha will not work with localhost. Browse to https://dashboard.hcaptcha.com and click on your site to edit its settings. If you are testing on your localhost, enter a URL for a domain, such as check.example.com. Save the site.
In your local /etc/hosts file, add the entry line below to redirect your localhost to the hCaptcha domain and save the file.
127.0.0.1 check.example.comFor your operating system, see the instructions at https://docs.hcaptcha.com/#local-development.
Now browse to FusionAuth at http://check.example.com:9011/admin. Edit a tenant, and under CAPTCHA , toggle Enable CAPTCHA to on. Choose hCaptcha and enter your keys from the site. Leave the threat score at half and adjust it later if necessary. Save the changes.
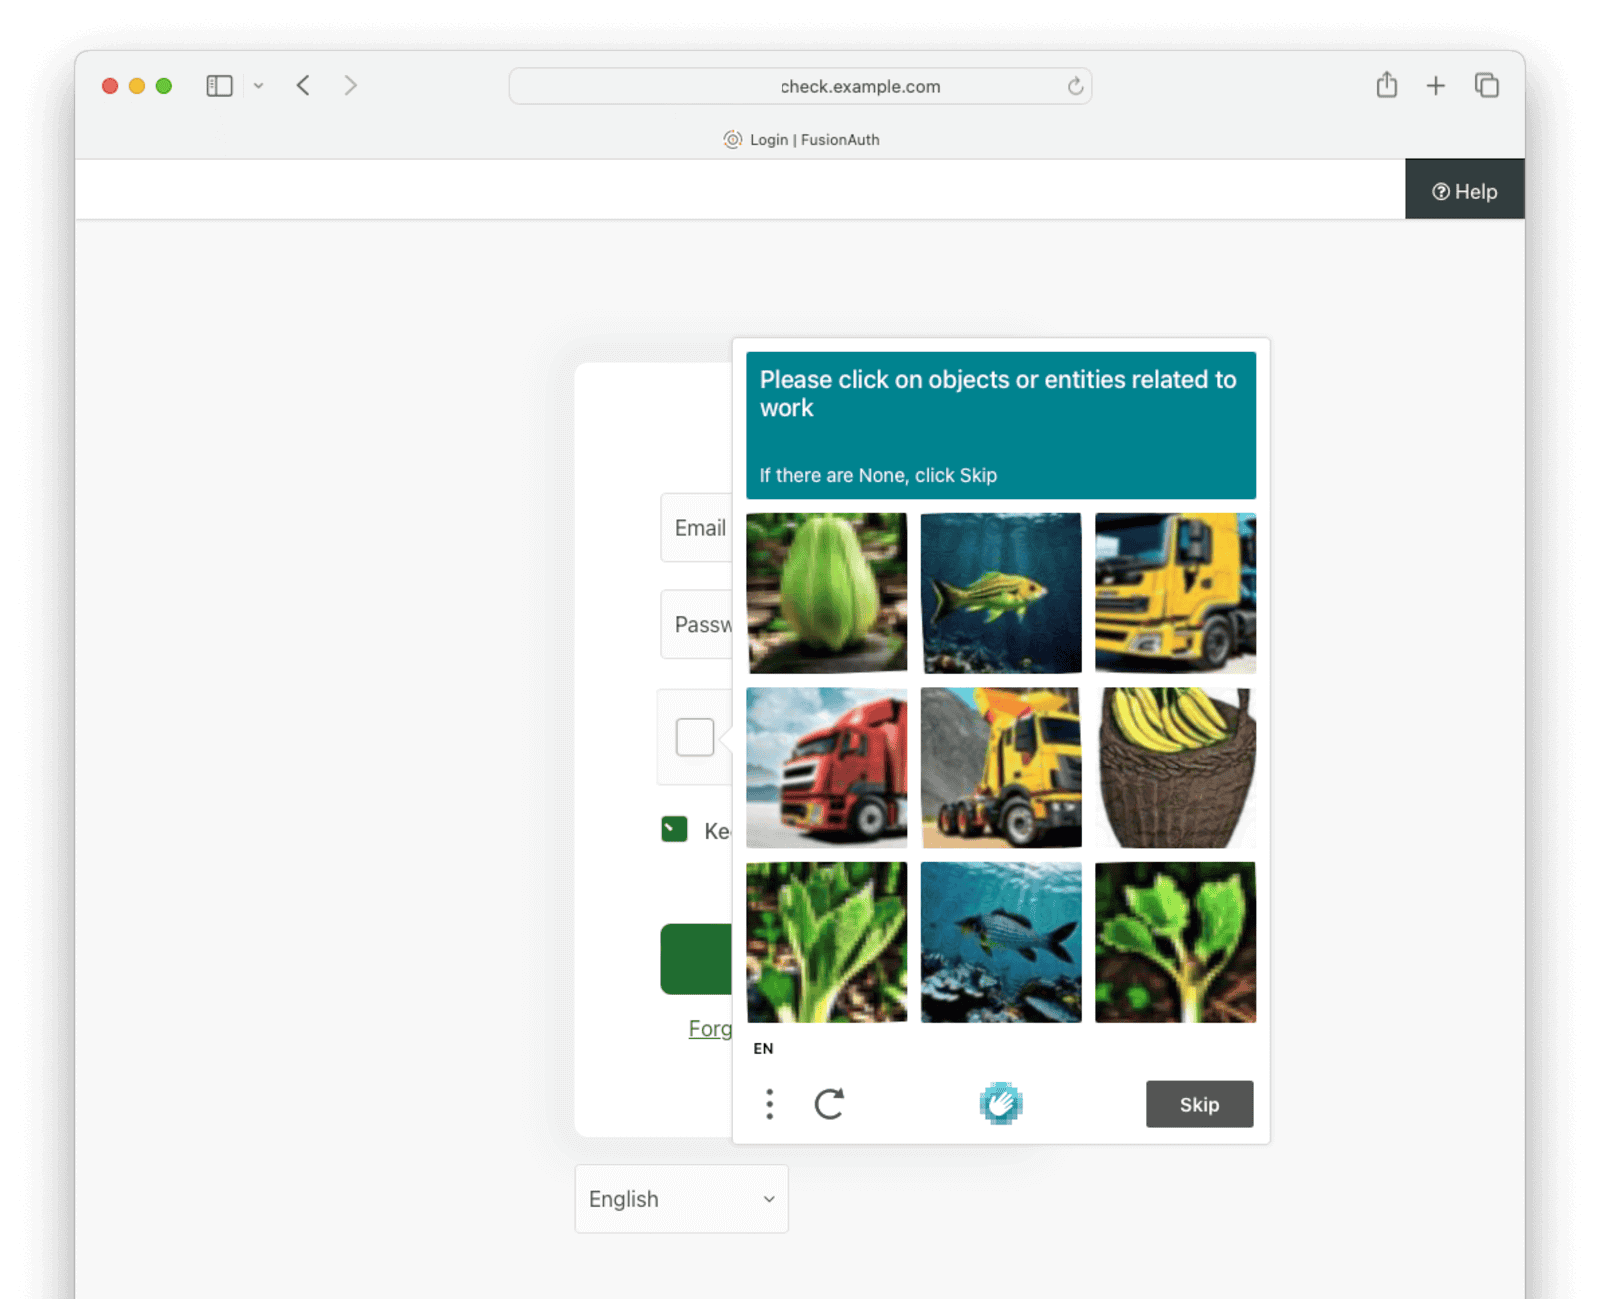
If you log out and go to the login screen, you'll be given a CAPTCHA puzzle.
Below is what the user will see when logging in.

Location Aware Security#
FusionAuth collects location information for requests and uses it to secure user accounts in various ways that developers can configure and control.
Some location-aware features are:
- Each Forgot Password email to users displays the geographic location the password reset request was made from. The recipient can determine if the location of the requester seems suspicious.
- Suspicious login events are flagged, users are notified with a message containing an approximate location of the login, and a webhook is sent.
- Logins from different locations around the globe calculate "impossible travel" to see if the user could realistically log in from these locations in a reasonable time frame.
- Logins from unexpected IP addresses send notification emails to the user containing an approximate location of the IP address.
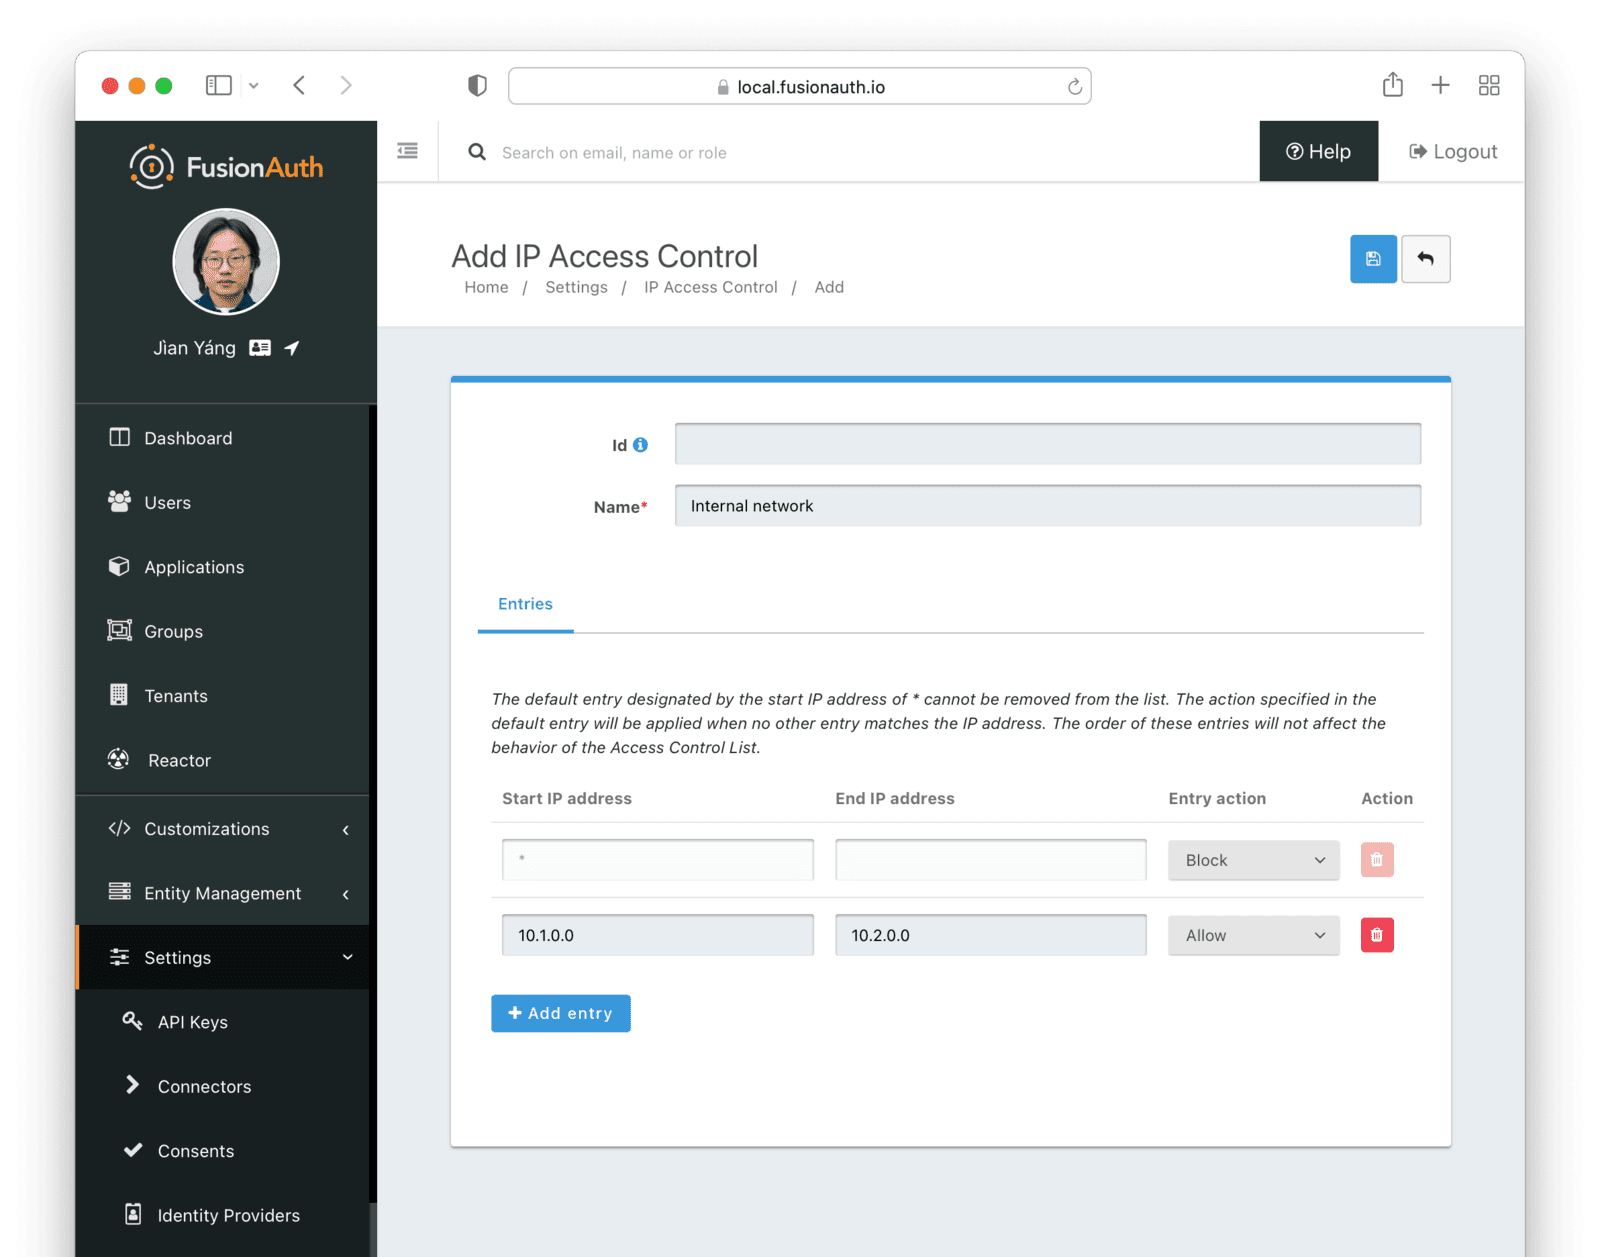
IP Access Control Lists#
You can use Advanced Threat Detection to restrict an application or API key to a certain IP address or range of IP addresses.
Create an IP address access control list (IP ACL) in the FusionAuth admin UI at Settings -> IP Access Control .
Be careful when enabling an ACL for the default tenant or a FusionAuth application. If you make a mistake, you will not be able to log in with your administrator account to make changes because your IP address is restricted. You will need to remove the ACL by connecting to the FusionAuth database and altering tables.
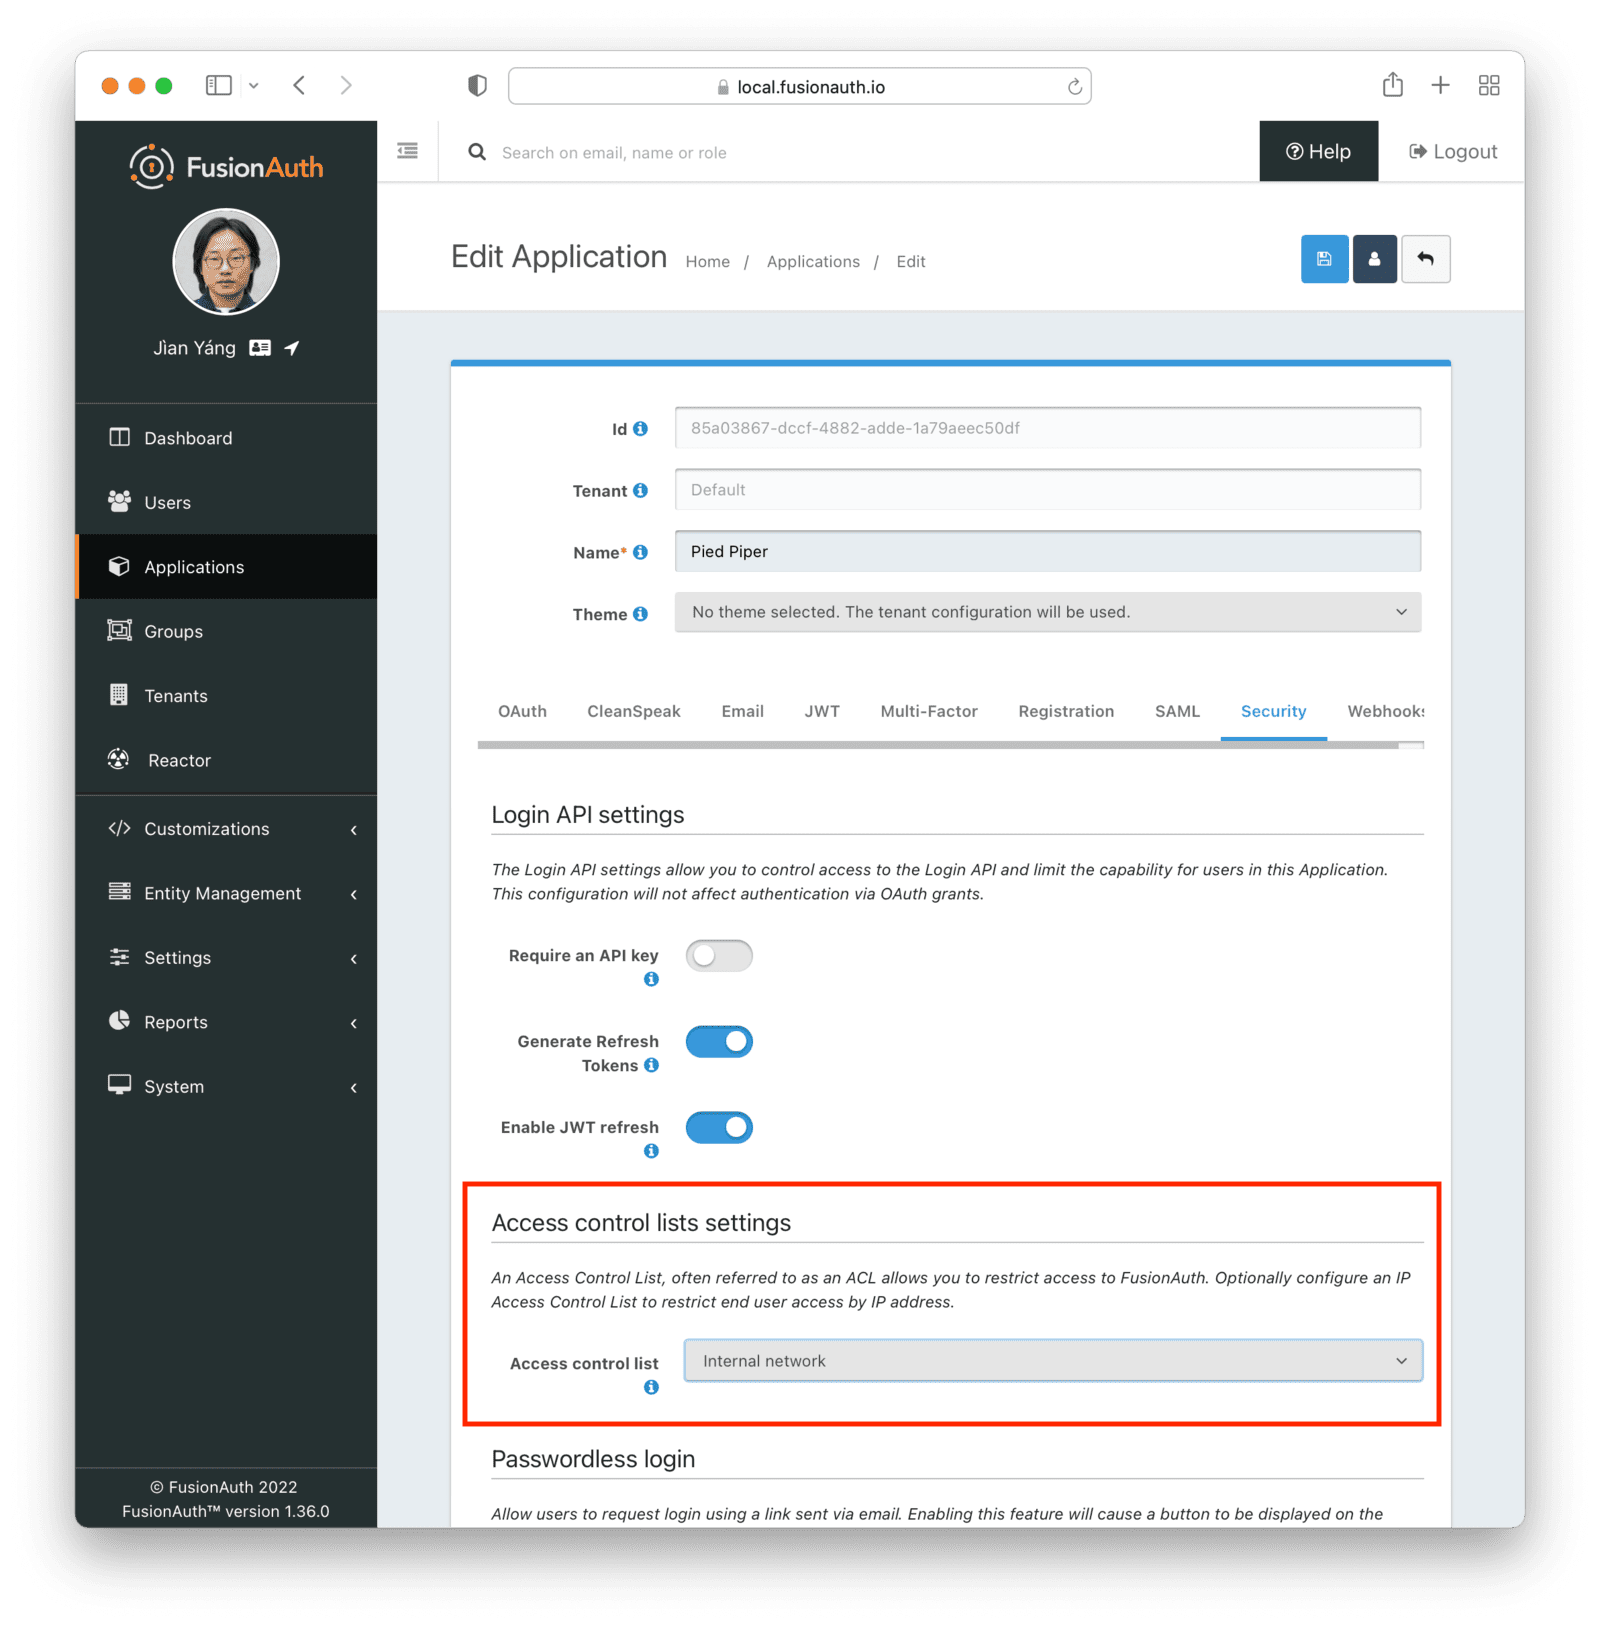
To apply the ACL to an application, browse to Applications and edit the application. On the Security tab under Access control lists settings, select the ACL.
With an ACL applied, a user will be prevented from even accessing an application login page if they are not in the IP address range. If you have internal applications or applications to which access should otherwise be limited, this feature can help secure them.
You can restrict access on a tenant instead of an application in the same way: Edit the Security tab of the tenant. The ACL restriction will be applied to every application and user belonging to that tenant.
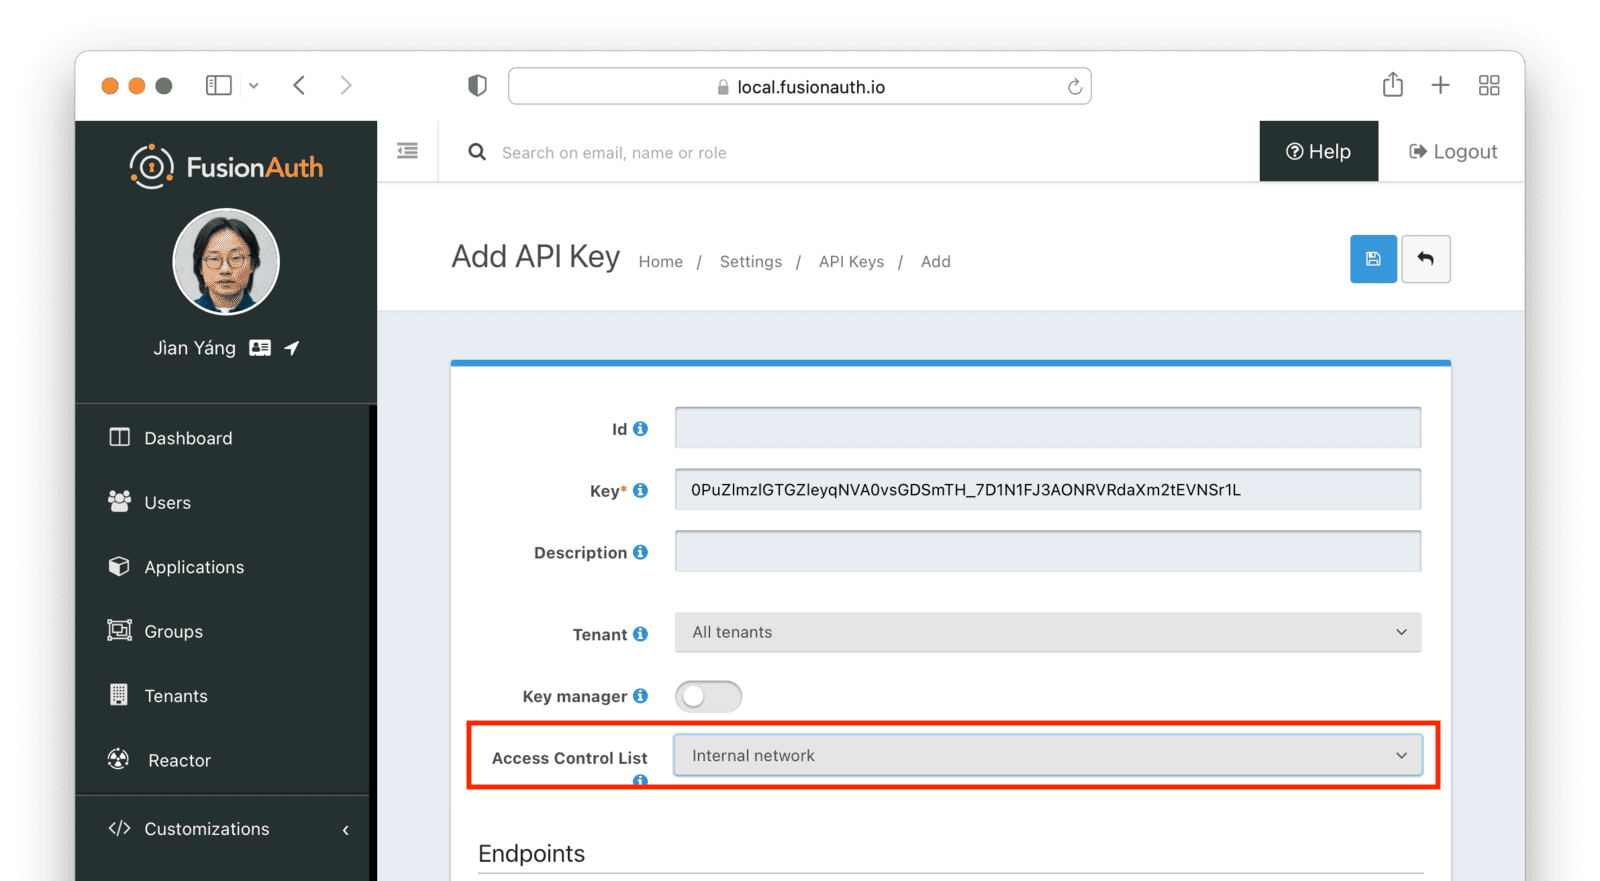
In addition to restricting users to an IP range, you can also restrict API keys. This is useful if you are managing your FusionAuth configuration via a CI/CD system. You can create an API key to modify configurations, but limit that key to the IP address range of your CI/CD system, increasing security and lowering the risk of the API key being used incorrectly.
To only allow administrators in your company to make API calls to your application or restrict an API key to IP addresses in your building, edit the API key security in Settings -> API Keys .
Finally, IP address restriction can be used in the case of denial-of-service attacks. If an adversary is making thousands of calls a minute to your application, performance will degrade. If you detect an IP address spamming your application, block it in FusionAuth or your network gateway.
Usability Considerations#
In general, restricting IP addresses for users will be more harmful than beneficial. Personal VPN use has risen significantly in the last few years due to people avoiding national firewalls, digital sanctions against countries, governments spying on citizens, and corporate data collection and privacy violations. The IP address your application sees for a user might not indicate their actual country if they use a VPN. It's becoming more common for users' IP addresses to change frequently. Employees work from home, remotely, or use dynamic IP addresses from their internet service providers instead of static ones. VPNs also reduce the reliability of impossible travel calculations. Finally, if you see suspicious behavior from an IP address that is a VPN gateway, you should not ban that address and lock out all other users of that VPN.
In addition to IP address restriction being unpleasant for users, you cannot completely trust the reported IP addresses of clients. As an IP request passes through the internet through various proxy servers, they record the path of addresses in the X-Forwarded-For HTTP header. If any proxy lies or is misconfigured, FusionAuth might grant access to an IP address of a client that should not be trusted.
When setting an ACL, be careful that you are not causing unnecessary difficulty for users of your system. You could instead use another solution like CAPTCHA or rate limiting.
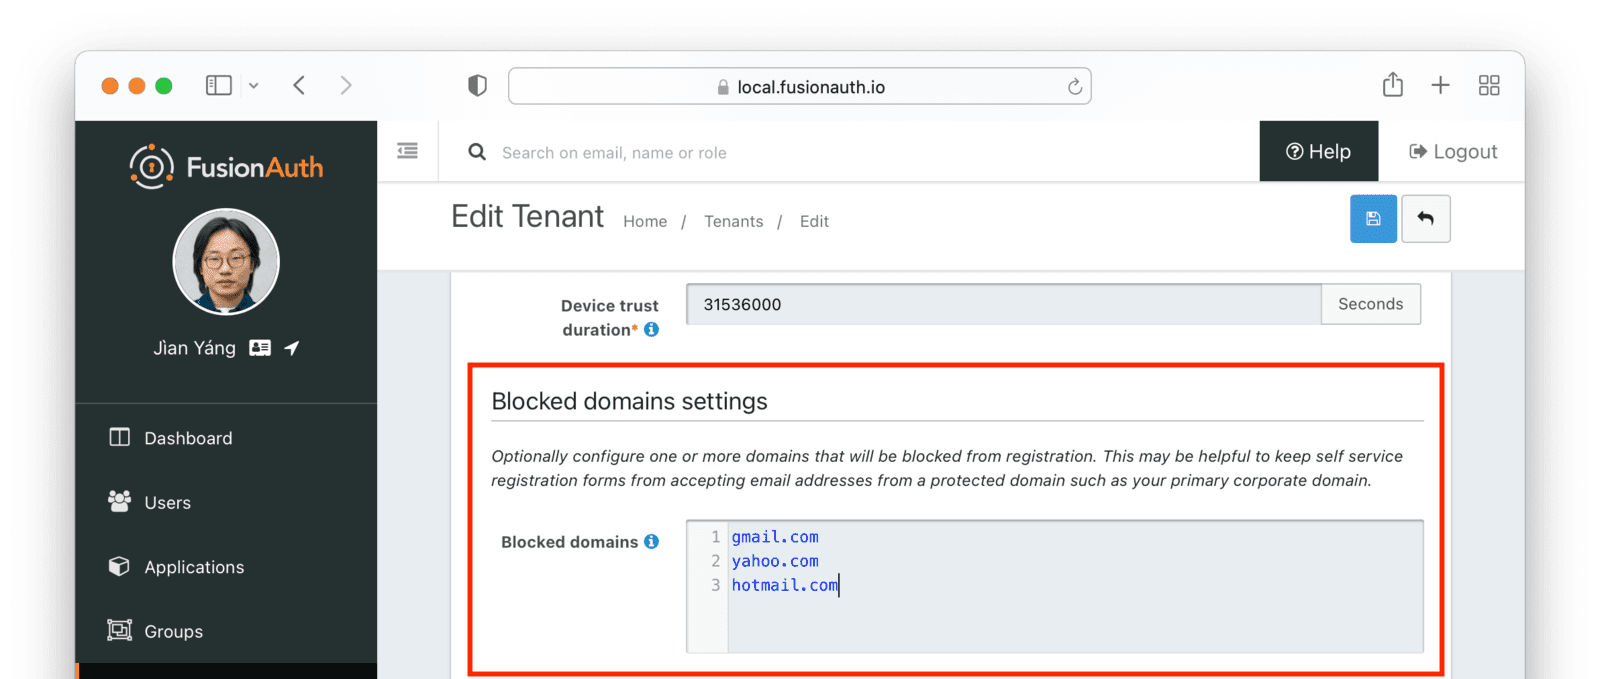
Registration Email Domain Blocking#
If you enable self-service registration, users can provide any email address they like. But you may have email domains that have elevated privileges, like your company.com domain. There may be email addresses for which you want to block registration, like consumer gmail.com addresses if your application is aimed at business users.
In either of these cases, you can block one or more domains from the registration process using Advanced Threat Detection.
Webhooks And Emails#
You can configure FusionAuth to send emails and webhooks when certain security events occur. The difference between the two is that emails are sent to the end user of your application for a security event associated with their account, and webhooks can be sent to any external system for a wide variety of security events.
Emails can be configured separately for tenants and applications. Webhooks can be configured for all tenants (global webhooks) or configured per tenant. Unlike emails, webhooks cannot be configured per application.
Emails#
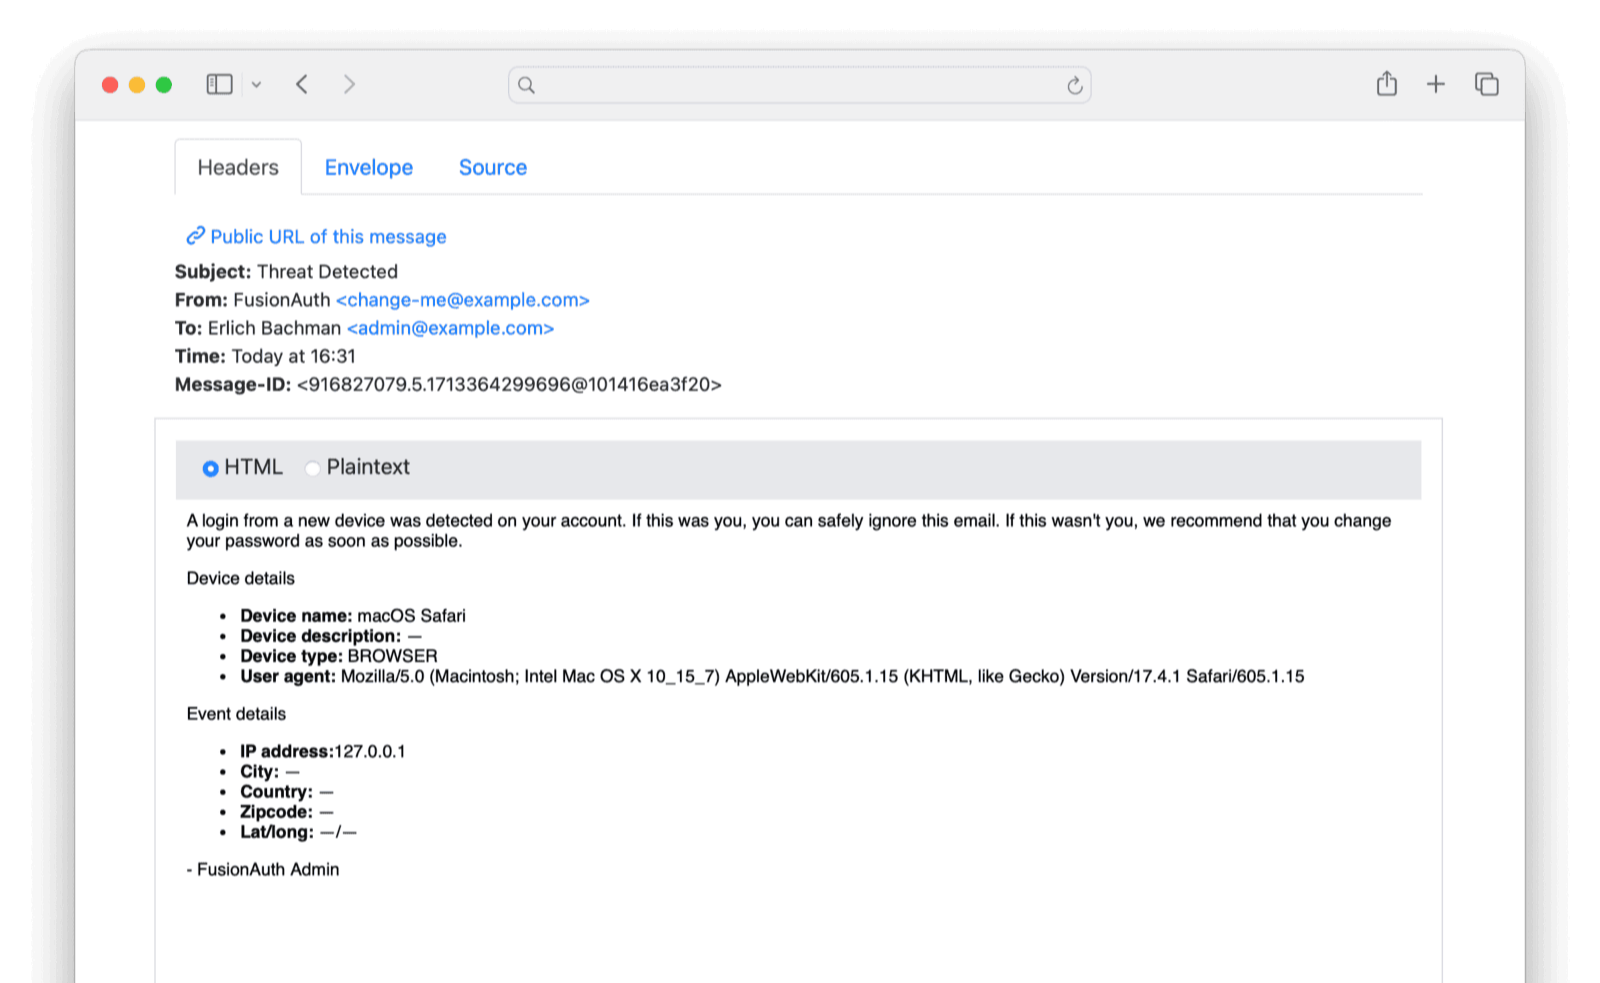
Emails can be sent to the user when an event involving their account occurs. You can add your own email templates. A sample "Threat Detected" email template documents available variables. Security-related emails may be localized, like any other email template.
If you need help setting up email in FusionAuth for the first time, please see the guide to SMTP.
Here are the security events for which you can send emails:
- Email update — When a user's email address changes. This email is sent to the new and old addresses.
- Forgot password — When a user starts the "Forgot password" workflow.
- Login Id duplicate on create — When a user attempts to create a new user with an existing user's email address.
- Login Id duplicate on update — When a user attempts to change their email address to an existing user's email address.
- Login with new device — When a user logs in with a device not previously used.
- Suspicious login — When a login is flagged by FusionAuth as suspicious.
- Password reset success — When a user completes a "Forgot password" flow successfully.
- Password update — When a user's password is updated.
- Passwordless login — When a user requests a login link to be sent to their email address.
- Setup password — When a new account is created for a user and they are asked to set a password.
- Two-factor method added — When a two-factor authentication method is added to a user's account.
- Two-factor method removed — When a two-factor authentication method is removed from a user's account.
You can configure emails for tenants in Tenant -> Your Tenant -> Email -> Template Settings or for Applications in Applications -> Your Application -> Email -> Templates .

The easiest way to test security emails is to trigger the "Login with new device" email by logging in to FusionAuth from a private browser window. The image below shows how the "Threat Detected" email template looks to the user.
Webhooks#
A webhook is an outbound HTTP request that carries a message to an endpoint. A webhook is used to inform an external system of some event in FusionAuth. The webhook/API terminology can be confusing. Note that most web applications, including FusionAuth, call a trigger to send data a "webhook", but when receiving data, the term "API" is used. So if you're looking for a destination for a FusionAuth webhook in an external system, you won't find it under the webhook documentation; you'll find it under API documentation. This is why webhooks are sometimes known as "reverse APIs". However, some companies, like Slack in their documentation, also call incoming requests "incoming webhooks".
Webhooks can be sent to any IP address. Your security information and event management (SIEM) or other analytics systems may need to process security-related events, such as when MFA has been disabled for a user or when a user has requested a password reset.
Here's the full list of Advanced Threat Detection webhooks:
- User Login Id Duplicate Create - when a request to create a user with an already in-use login Id (email or username) has been received.
- User Login Id Duplicate Update - when a request to update a user with an already in-use login Id (email or username) has been received.
- User Login New Device - when a user begins login with a new device.
- User Login Suspicious - when a user complete login and is considered to be a potential threat.
- User Password Reset Send - when a forgot password email has been sent to a user.
- User Password Reset Start - when a user starts the reset password flow.
- User Password Reset Success - when a user password reset flow has completed successfully.
- User Password Update - when a user's password is updated.
- User Two-factor Method Add - when a user has added a two-factor method.
- User Two-factor Method Remove - when a user has removed a two-factor method.
For a comprehensive explanation of using webhooks in FusionAuth, please read the guide. If you want to send webhooks programmatically, you can do so using the FusionAuth API.
If you want to see an example webhook, the easiest way is to browse to https://public.requestbin.com/r and paste the random link they give you, such as https://enxy8i2pfzcy9.x.pipedream.net, into the URL of a new webhook you create on the Settings -> Webhooks page.
Then, in your tenant webhooks tab, enable user.login.new-device. Open a new incognito browser window and log in to FusionAuth.
You will see JSON like the following arriving in the logs of requestbin.com.
{
  "event": {
    "applicationId": "3c219e58-ed0e-4b18-ad48-f4f92793ae32",
    "authenticationType": "PASSWORD",
    "connectorId": "e3306678-a53a-4964-9040-1c96f36dda72",
    "createInstant": 1713179501580,
    "id": "30caed6b-829f-47a3-8733-ab62a9c2e76b",
    "info": {
      "deviceName": "Linux Chrome",
      "deviceType": "BROWSER",
      "ipAddress": "127.0.0.1",
      "userAgent": "Mozilla/5.0 (X11; Linux x86_64) AppleWebKit/537.36 (KHTML, like Gecko) Chrome/123.0.0.0 Safari/537.36"
    },
    "ipAddress": "127.0.0.1",
    "tenantId": "d7d09513-a3f5-401c-9685-34ab6c552453",
    "type": "user.login.new-device",
    "user": {
      "active": true,
      "birthDate": "1985-11-23",
      "connectorId": "e3306678-a53a-4964-9040-1c96f36dda72",
      "data": {},
      "email": "richard@example.com",
      "firstName": "Fred",
      "id": "00000000-0000-0000-0000-111111111111",
      "insertInstant": 1712746261562,
      "lastLoginInstant": 1713179501579,
      "lastName": "Flintstone",
      "lastUpdateInstant": 1712746261562,
      "memberships": [],
      "passwordChangeRequired": false,
      "passwordLastUpdateInstant": 1712746261581,
      "preferredLanguages": [],
      "registrations": [
        {
          "applicationId": "e9fdb985-9173-4e01-9d73-ac2d60d1dc8e",
          "data": {
            "favoriteColor": "turquoise"
          },
          "id": "03ec163e-b4d6-43ba-84f1-963318011e1b",
          "insertInstant": 1712746261587,
          "lastLoginInstant": 1712746261587,
          "lastUpdateInstant": 1712746261587,
          "preferredLanguages": [],
          "roles": [],
          "tokens": {},
          "usernameStatus": "ACTIVE",
          "verified": true,
          "verifiedInstant": 1712746261587
        }
      ],
      "tenantId": "d7d09513-a3f5-401c-9685-34ab6c552453",
      "twoFactor": {
        "methods": [],
        "recoveryCodes": []
      },
      "usernameStatus": "ACTIVE",
      "verified": true,
      "verifiedInstant": 1712746261562
    }
  }
}
To receive a webhook for a location-aware event, use the user.login.suspicious event for your tenant.
Using webhooks in combination with API calls to FusionAuth, you can write a simple web server script to perform various security tasks. For instance, if the script received the event user.password.breach, it could call FusionAuth to change the user's password to a random UUID and force the user to complete the "Forgot password" workflow and choose a safer password.