FusionAuth Cloud
FusionAuth Cloud is an entirely managed FusionAuth instance in the cloud. As the owner of that server, you have complete access to the administrative user interface and can create API keys and manage the instance via client libraries or APIs. But you have no access to the servers or networks where the instance runs.
With FusionAuth Cloud, you create "deployments". A deployment is a FusionAuth instance, a database, a search application, and all the necessary networking configuration to connect your FusionAuth deployment to the internet.
You can create as many deployments as you want and tear them down when you do not need them. You pay only for the time each deployment is running.
Every deployment is separated, both logically and physically, from every other deployment. There is no network path between deployments except over the internet. There is no shared database or other storage infrastructure.
Why Use FusionAuth Cloud#
FusionAuth Cloud is a fully managed service which can be used for many use cases. Among them:
- Proof of concepts
- FusionAuth trials
- Testing new versions without affecting prod
- Development servers
- High availability production environments
With FusionAuth Cloud, spin up a functioning FusionAuth instance in minutes. This allows you to get to work testing or integrating with FusionAuth, rather than installing or configuring it. FusionAuth Cloud is protected by world class security measures and DDoS protections.
If you want to use FusionAuth and hand all the management burden to the team who built it, FusionAuth Cloud is a good choice.
Supported Geographies#
FusionAuth has datacenters in the following locations:
Africa
- South Africa
Asia/Pacific
- Australia
- Singapore
- South Korea
Europe
- France
- Germany
- Ireland
- Sweden
- UK
Middle East
- Bahrain
North America
- Canada
- USA
If none of our current locations meet your needs, please contact our sales team to discuss other options. You can also download and self-host FusionAuth if you need data residency in a country not listed above and have the expertise to operate FusionAuth.
The Account Portal#
You can control all aspects of FusionAuth Cloud deployments by logging into the account portal.
Portal Areas#
You can control all aspects by logging into the account portal.
Your account portal contains the following areas:
- Home - displays the dashboard, giving you an overview of everything in your account.
- Plan - select or modify the account's FusionAuth plan (also known as an edition). More details on the plan differences here. This is also where you will find your license keys when you are not using the Community plan.
- Hosting - configure and manage FusionAuth Cloud deployments.
- Users - add and remove users from the account portal. Any user added may have one of many roles.
- Billing - add or update your billing information.
- Company - add or update your company information.
- Early access - access pre-release FusionAuth builds.
- Support - learn more about support options or open a support ticket. Learn more about technical support.
- Account - manage your user account, including adding MFA or changing your password.
- Logout - logs you out of the application.
Adding a user to your company will allow them to manage FusionAuth deployments and take other account portal actions.
Doing so will not provision the user an account on the FusionAuth instance in the deployment.
You must do that separately.
You can read more about the other portal areas in the Account Portal documentation.
Setting Up Your Account#
You can register for a free portal user account. Register by going to the account portal.
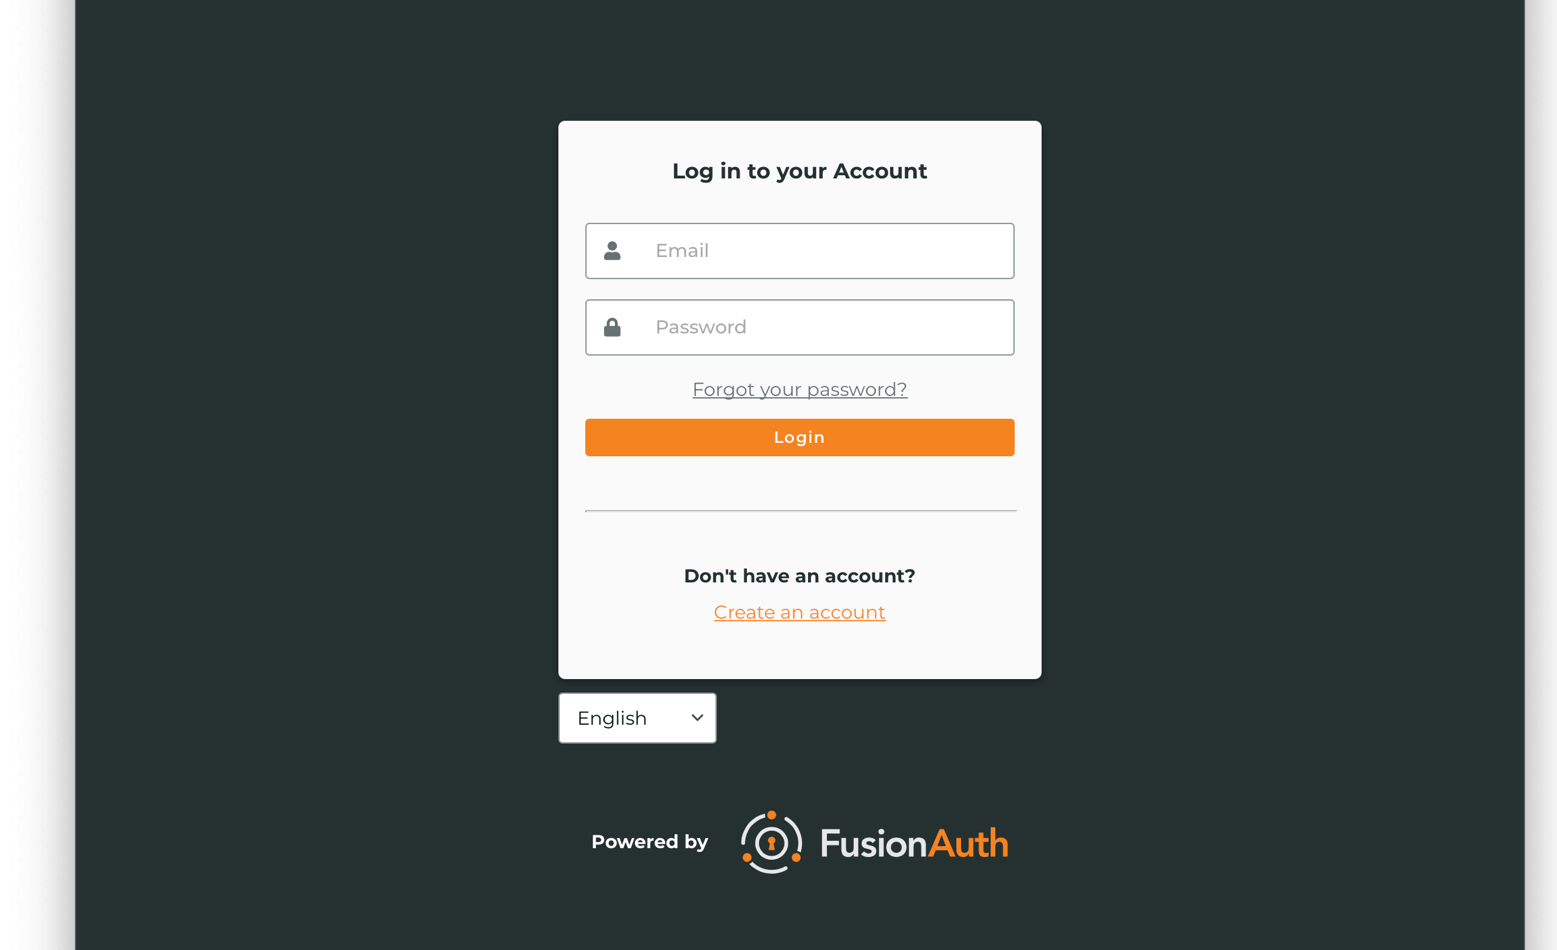
If you do not have an account, follow the Create one link. On the Register form, you'll be prompted to enter your details such as your name, company, email and password.

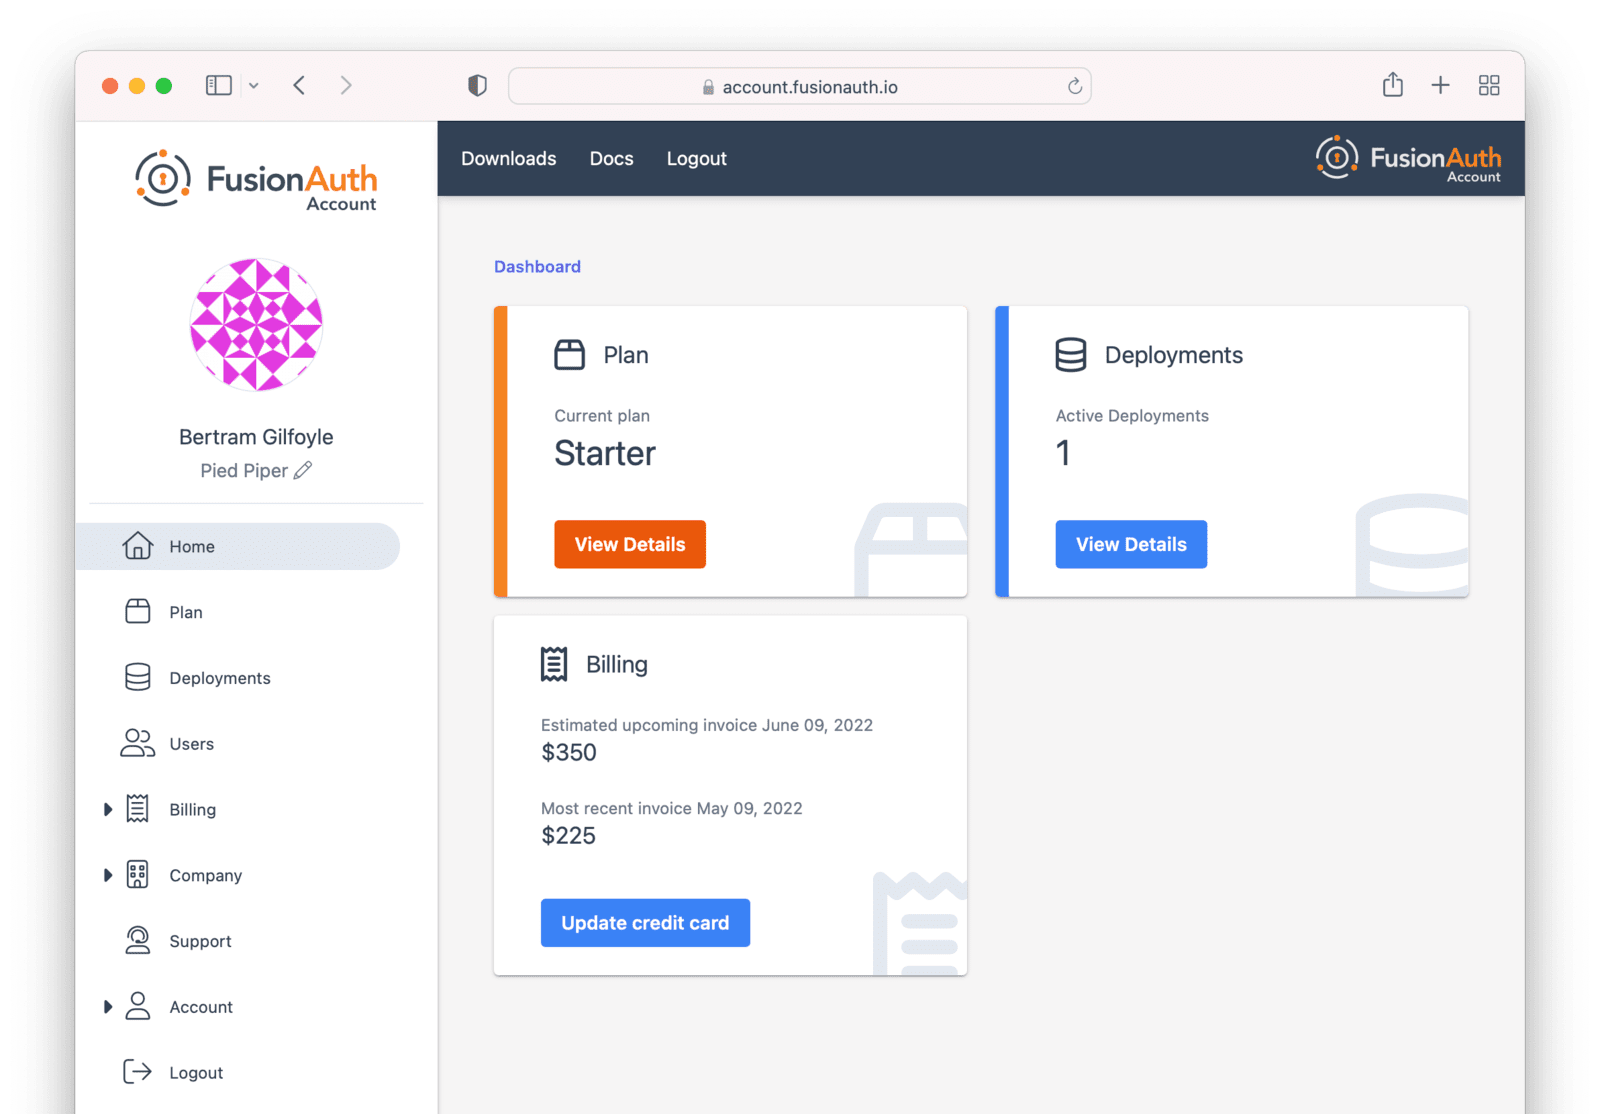
After you register, you'll be taken to the Home tab.
You can choose a plan, price out a deployment, or add your billing information. You'll need to provide that before you can create a deployment. However, you can fully price out a deployment before entering billing information.
You can navigate away from the Home tab and explore other areas of the account portal. For example, you can add other users, update your information, or change your company name.
If you'd prefer to be invoiced rather than provide credit card details, contact us.
If you are paying with a credit card, you will receive a payment receipt to the email address you signed up with. If you need the receipt to go to a different address, you can update details in the Billing tab. You will also be able to find past invoices there as well.
The following section focuses on deployments and the actions available in the Hosting tab. Learn more about the other portal areas here.
After you have created an account, the next step is to create a deployment.
Creating a Deployment#
As mentioned above, a deployment is a FusionAuth instance that is operated by FusionAuth. You can create as many deployments as you like. There are a few steps to getting access to a deployment.
Navigate to the Hosting tab. If you have no deployments, you will see a screen like this:
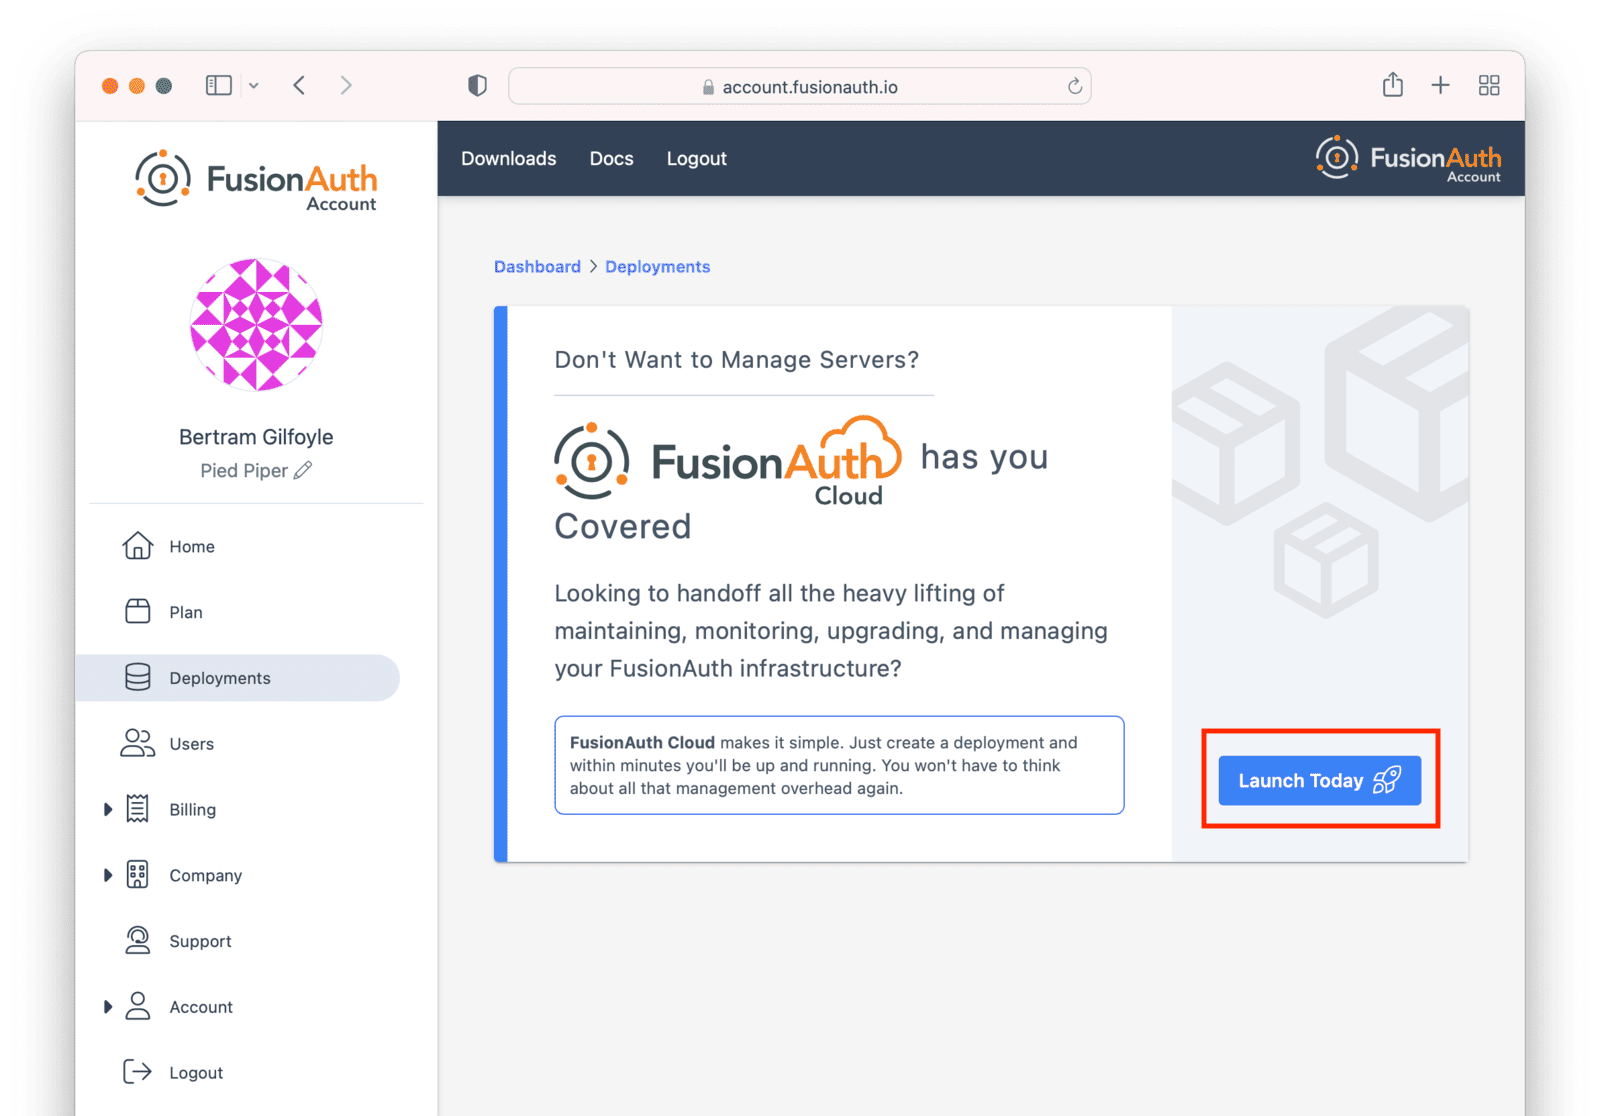
Click the Launch Today button to start your first FusionAuth Cloud deployment.
Billing Issues#
If you are on invoice billing, you cannot launch a FusionAuth Cloud deployment. You'll see a screen like this:
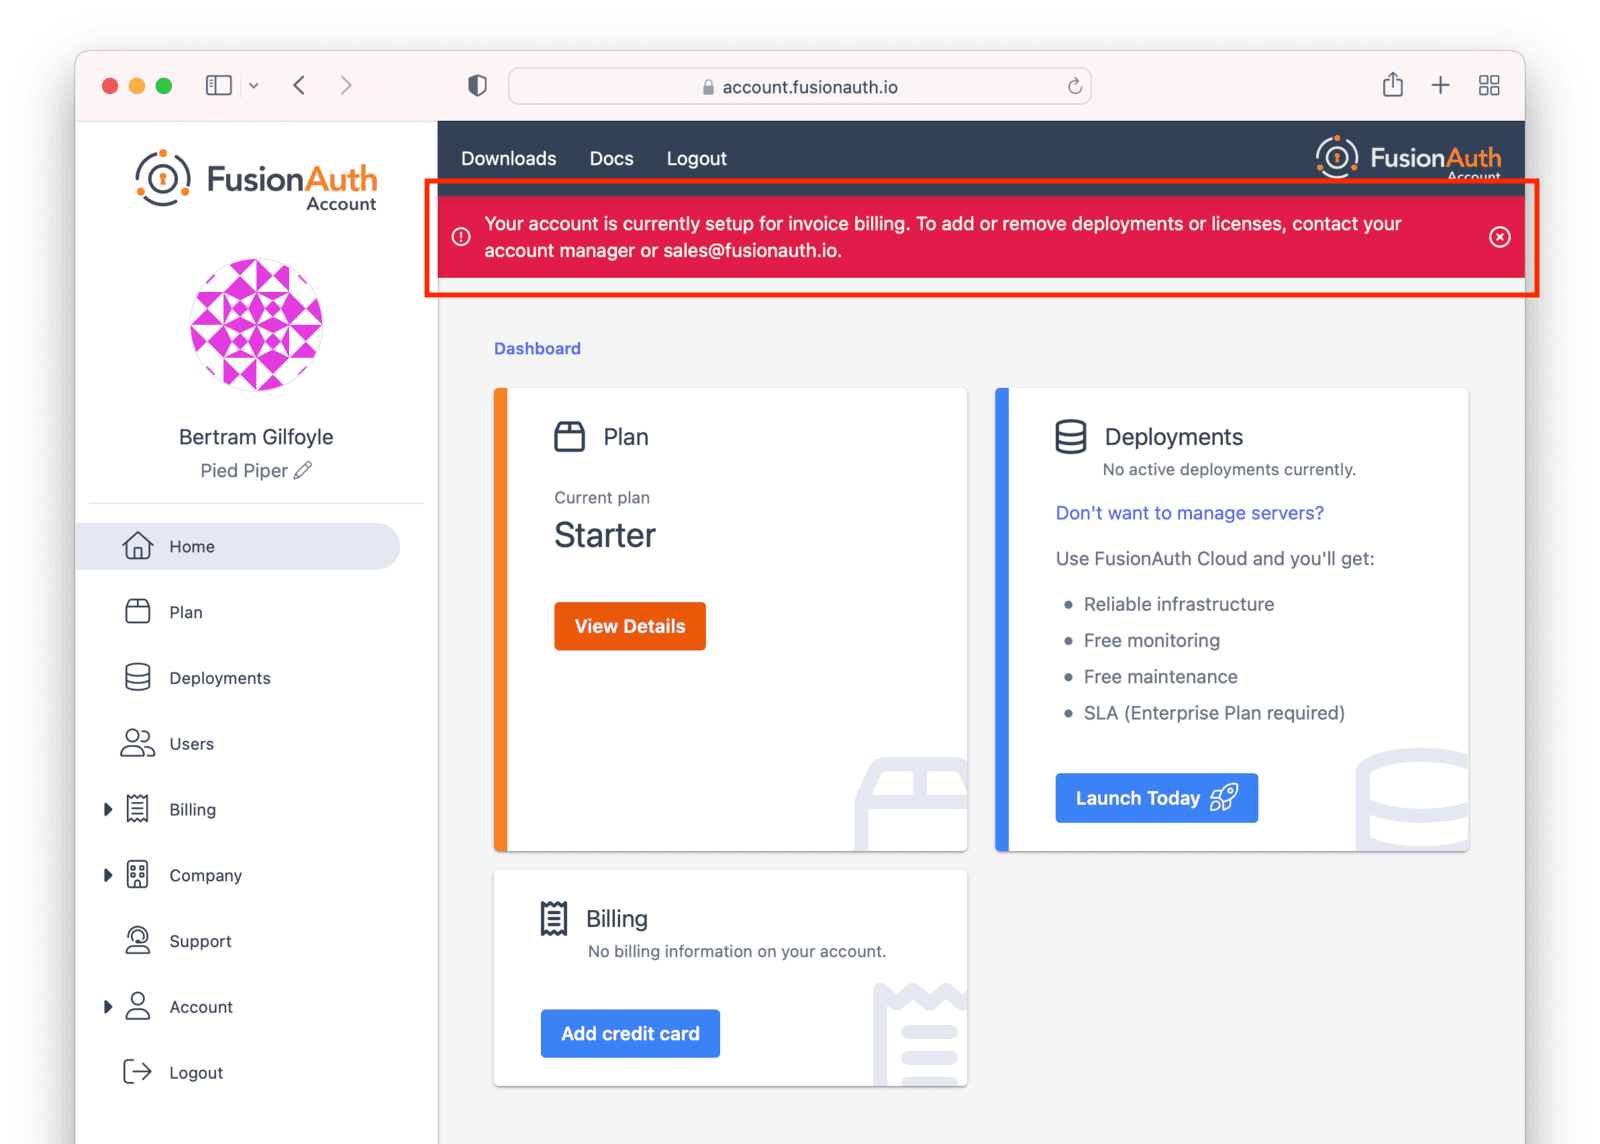
In this situation, please file a support ticket to modify your billing status or request a new deployment.
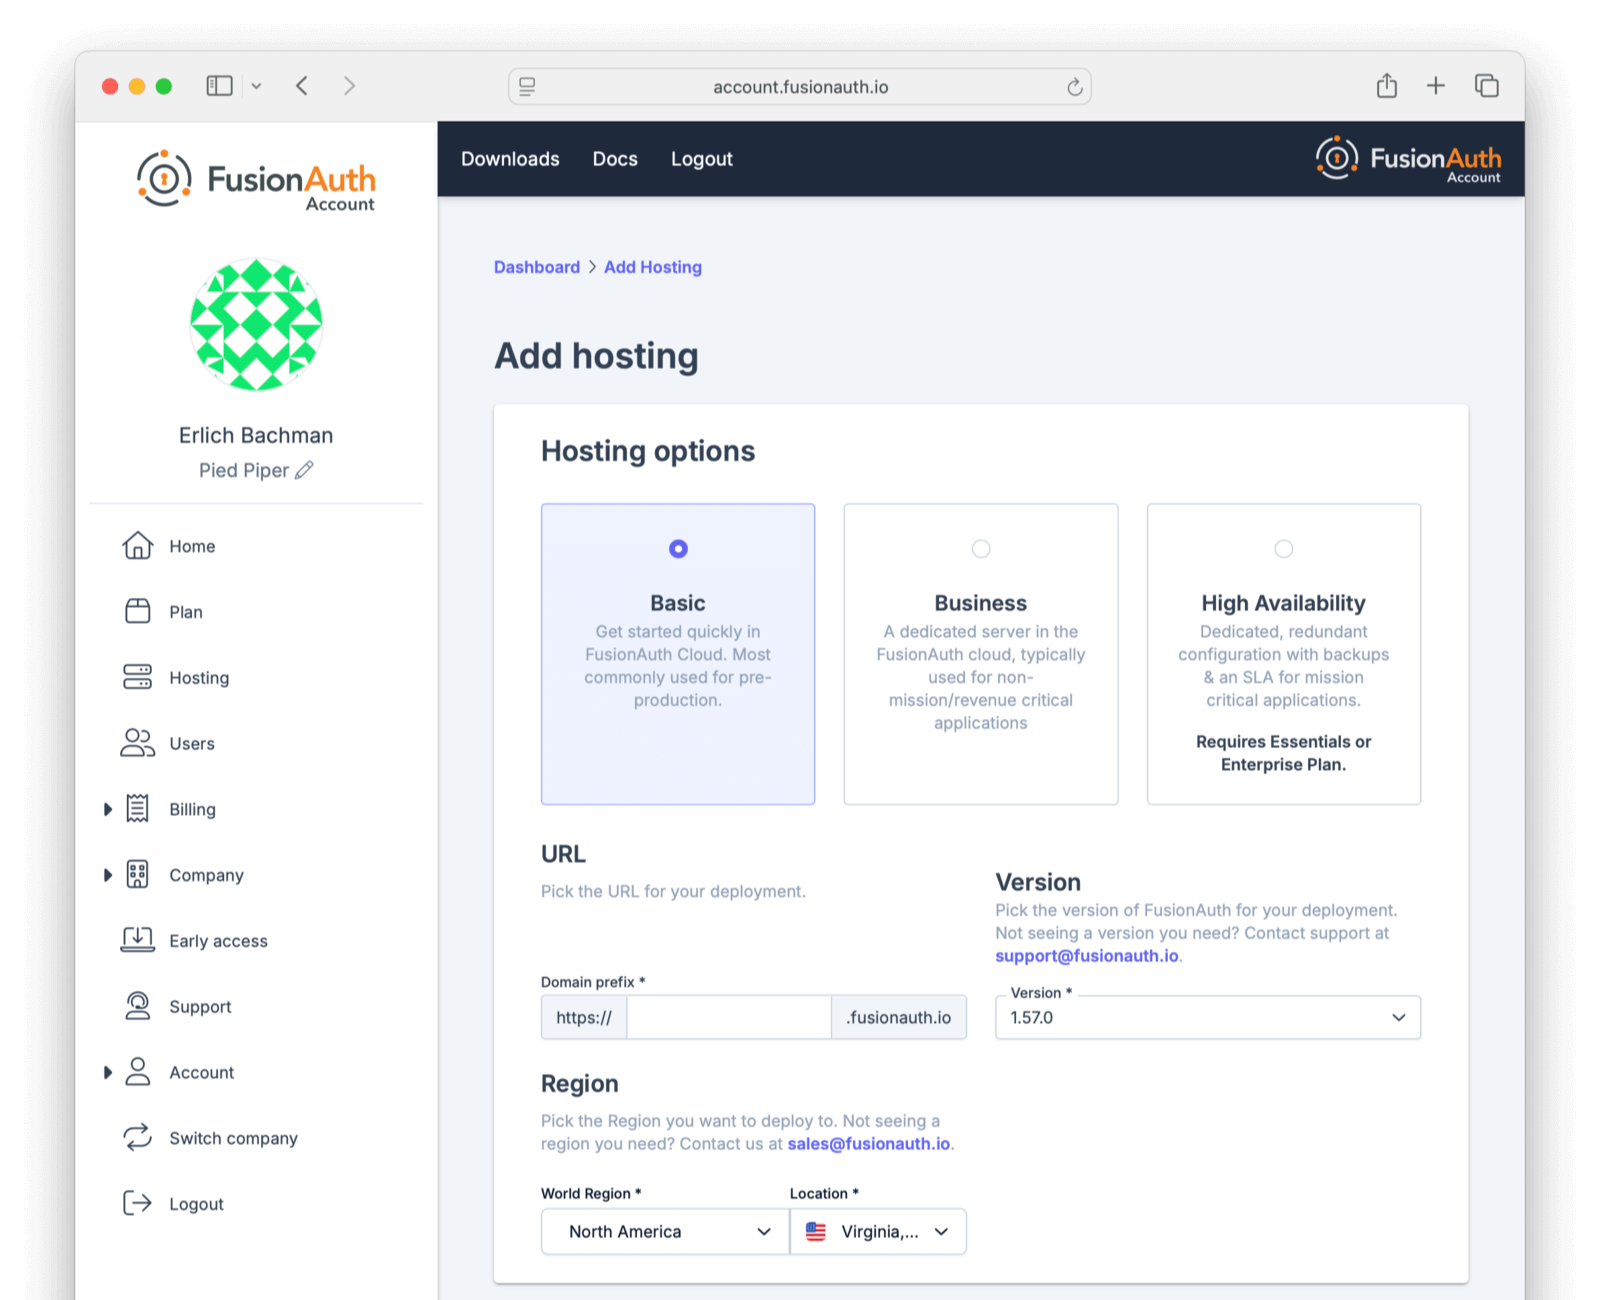
Configuring Your Deployment#
In order to create the correct FusionAuth instance, specify attributes of the deployment.
First, select your hosting option: Basic, Business or High-Availability (HA). Each has different features and data durability guarantees.
Then provide a unique hostname for the deployment, such as piedpiper-dev.
This hostname will be suffixed with the fusionauth.io domain name.
If your plan supports it, you will be able to configure a different hostname, such as auth.piedpiper.com.
If you need to reuse an existing hostname or migrate data from an existing deployment, open a support ticket.
Next, choose your FusionAuth version and hosting region. Supported regions include:
- North America
- Europe
- Asia Pacific
- Africa
- Middle East
See Supported Geographies for the full list of countries in which FusionAuth has data centers.
If you don't see a region you need, please contact us and let us know what you are looking for.
Within each region, select a geographic area, such as Oregon, USA. Pick the location that meets your legal and compliance needs and is close to your applications.
You'll see a price at the bottom of the screen. This price will update as you change attributes of your deployment.
When you have your deployment configured as you would like, scroll to the bottom and click Purchase to begin the deployment creation process. This will also charge your credit card.
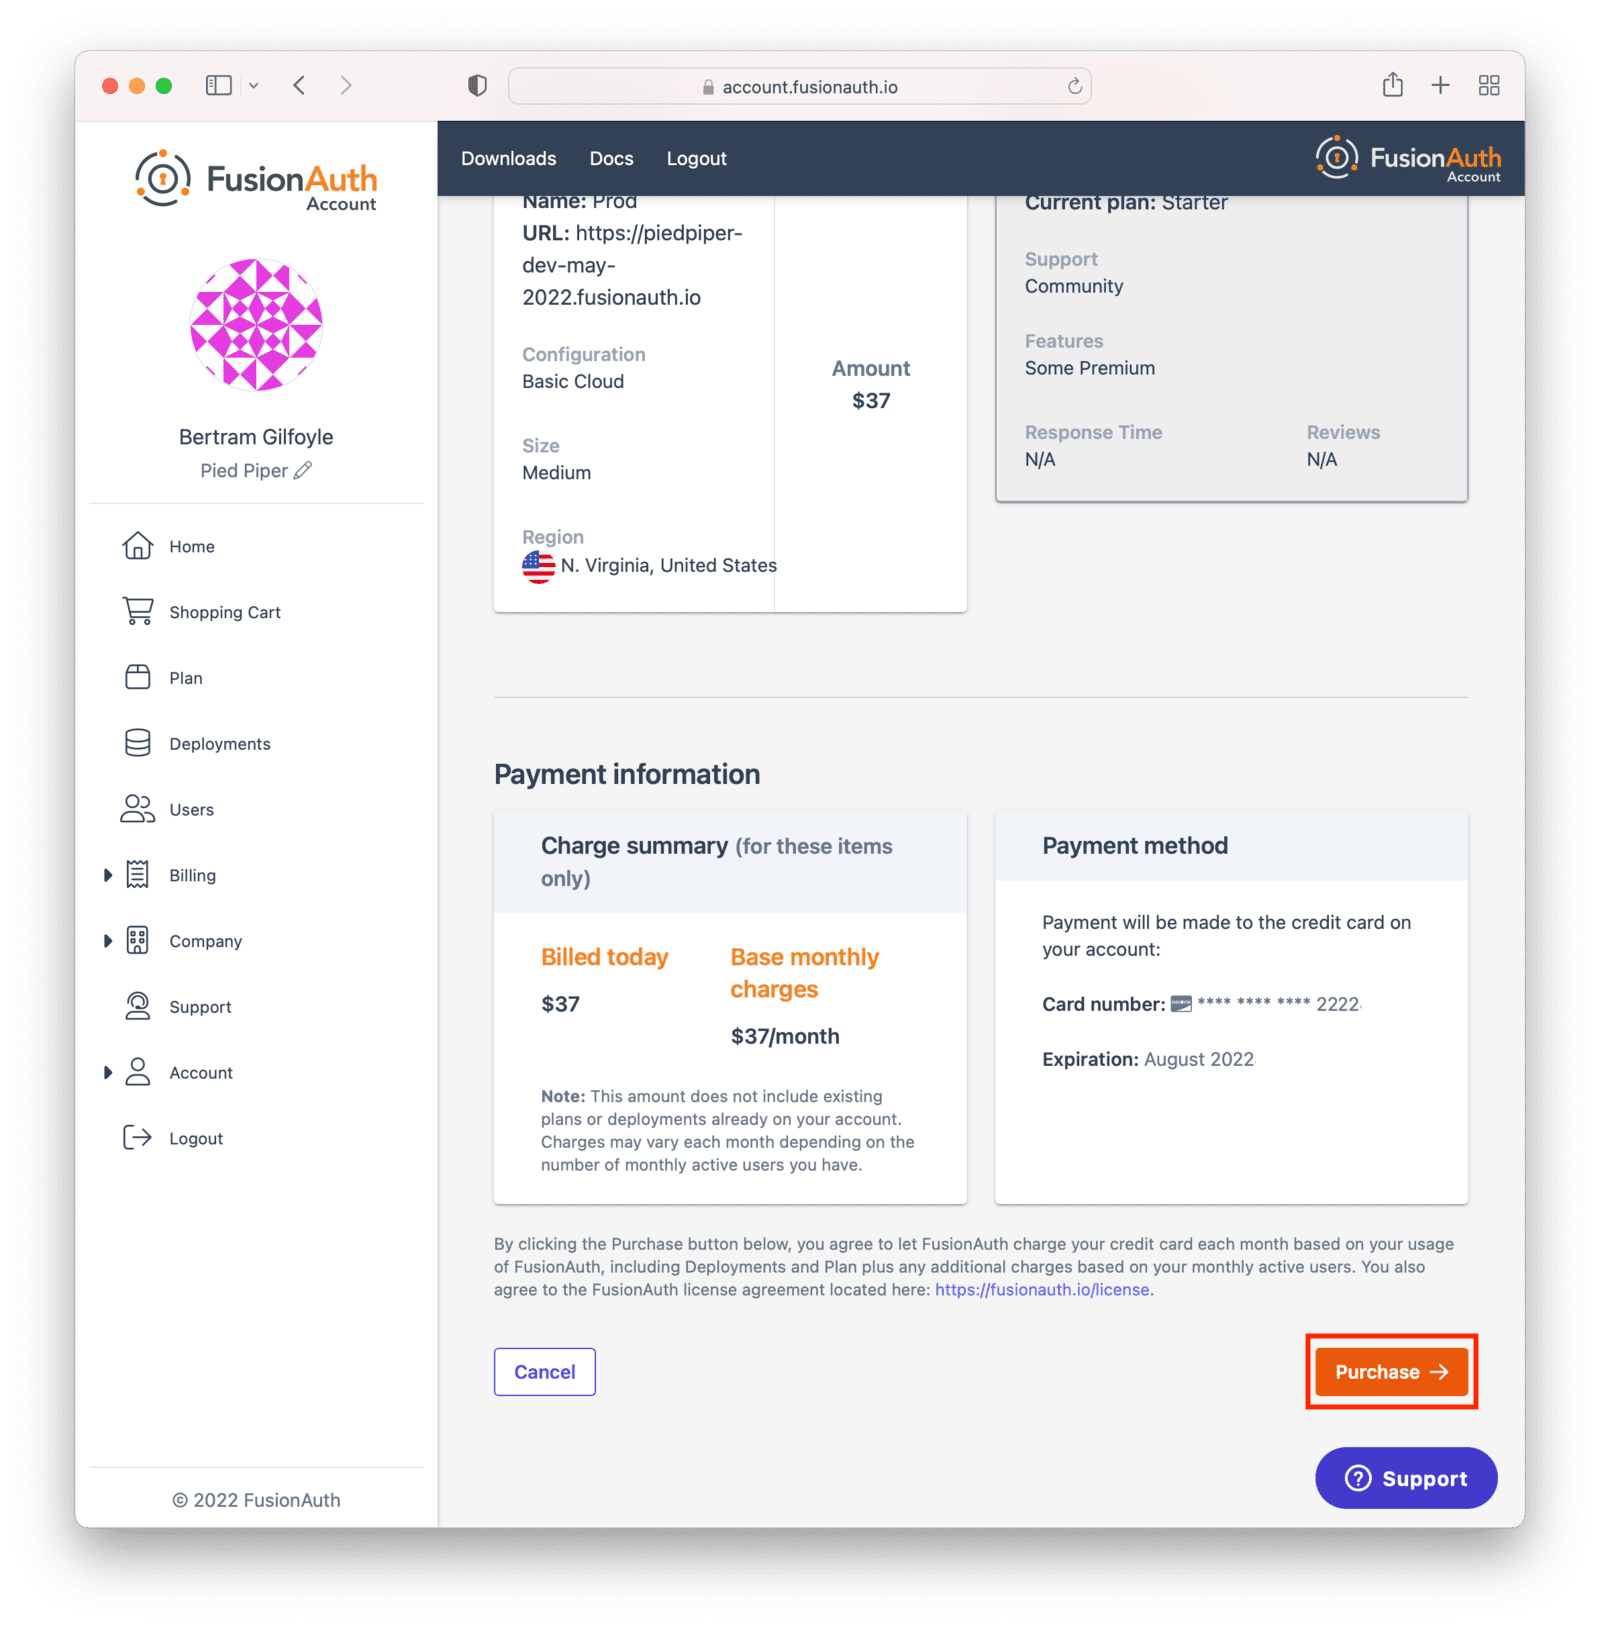
If you do not have a payment method on file, add one in the Billing tab.
The screenshots above are for a Basic FusionAuth Cloud deployment.
Different deployments will show different options.
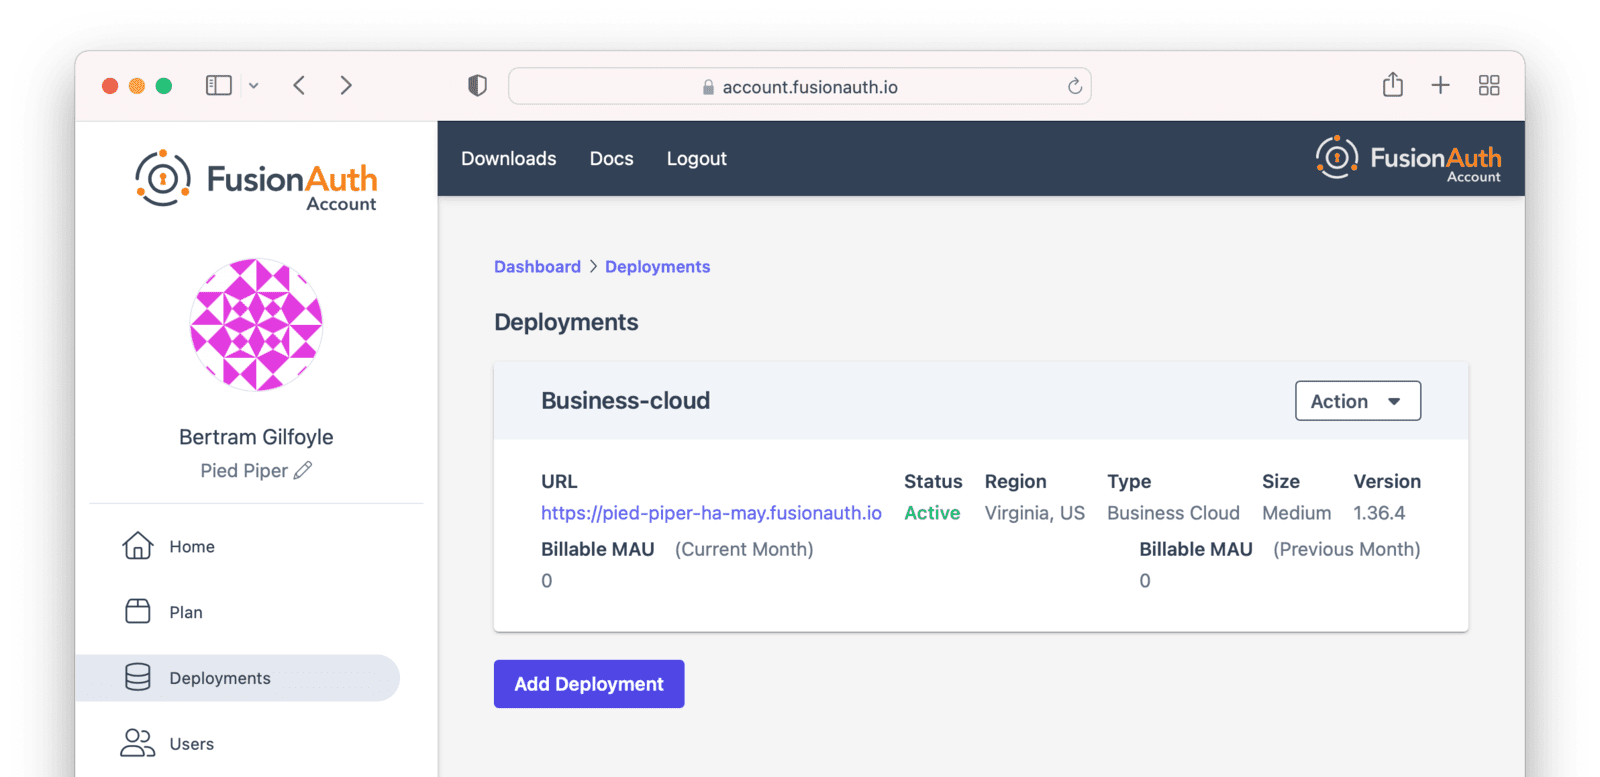
Deployment Provisioning#
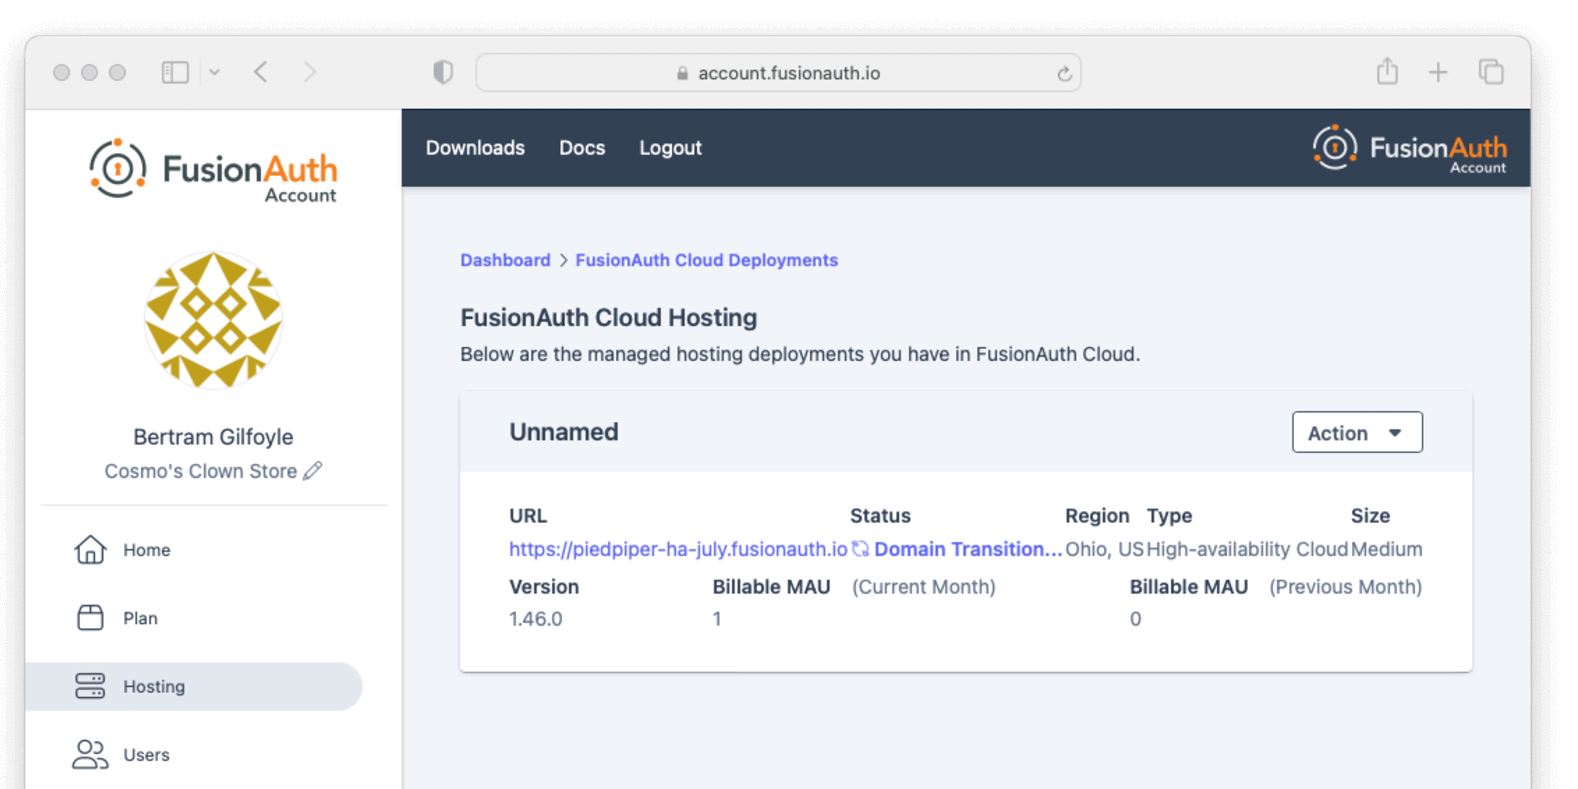
Navigate to the Hosting tab to see the new deployment.
The exact duration of the deployment process depends on system load as well as the tier chosen. Expect your deployment to be available in 5 to 30 minutes. When the deployment is ready, the link to your deployment will be live and the Hosting tab will look similar to this:
Accessing the FusionAuth UI#
In order to ensure that only authorized users can set up your new deployment, a setup token is required to access the deployment's
administrative user interface. If you navigate directly to the deployment URL, such as https://piedpiper-dev-ha-may.fusionauth.io,
you will be prompted to enter an 8-character setup token. This token is available under the Setup status section on the
deployment management screen.
If you access the deployment by clicking on provided URL link, the setup token will be automatically submitted and the Setup Token screen will be bypassed.
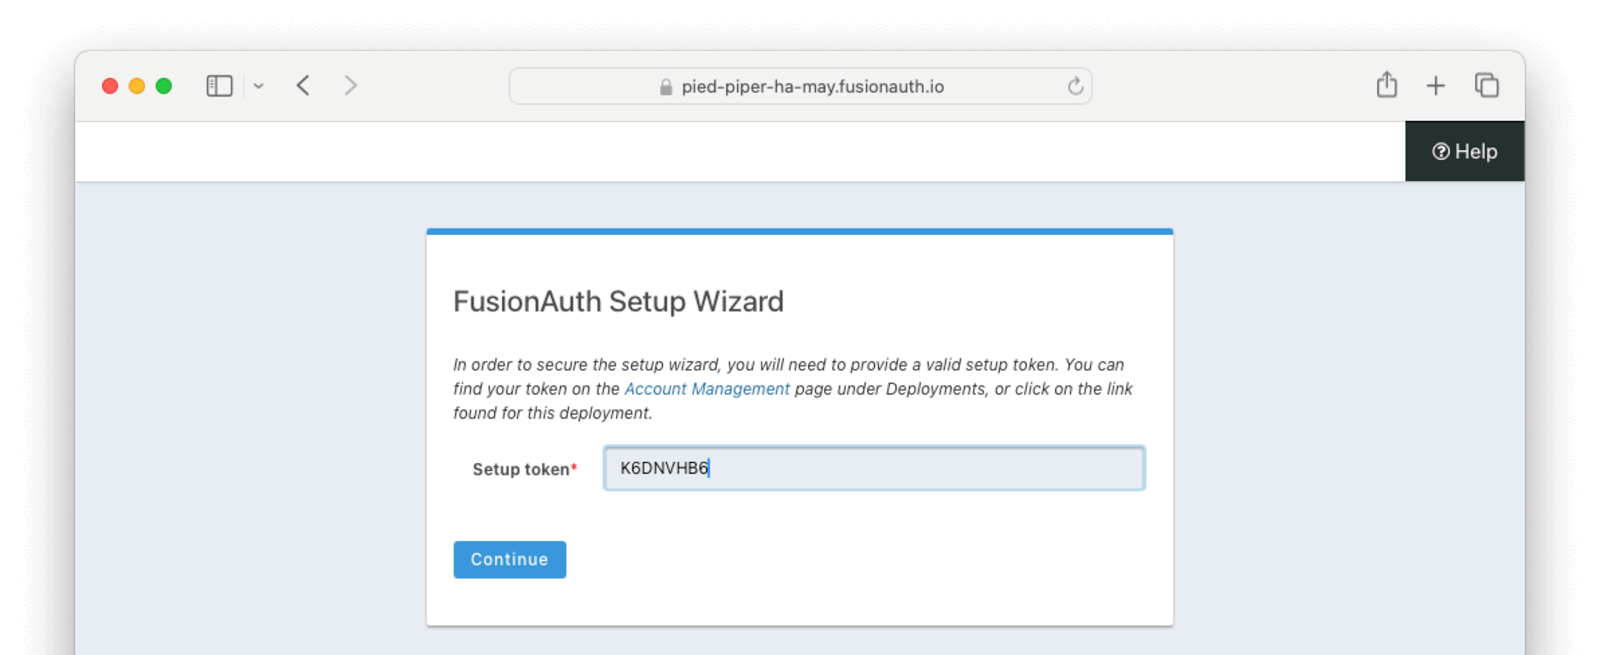
At that point the Setup Wizard will begin. You can configure FusionAuth by creating API keys, adding additional users, setting up applications for your users to log in to, or any other task. The interface will be exactly the same as a self hosted FusionAuth instance.
If new to FusionAuth, you might want to work through the "Start Here" guide to gain familiarity.
You'll also want to update various system or tenant level settings. This includes creating API keys, updating your email host settings and configuring groups and roles. This guide to Common configuration is helpful at this point.
Many infrastructure or network providers don't allow any traffic on port 25. This includes FusionAuth Cloud.
You cannot connect a FusionAuth Cloud deployment to an SMTP server on port 25. Such a connection will always be blocked. No email will be sent.
Instead, we recommend using one of the TLS ports for SMTP, such as 465 or 587.
FusionAuth will work with any email provider which has a SMTP interface.
Managing Your Deployments#
At any time you can log in to the account portal, navigate to Hosting and manage your deployments.
To add another deployment, click Add Hosting . You'll go through the same provisioning workflow as above, and end up with another FusionAuth Cloud deployment.
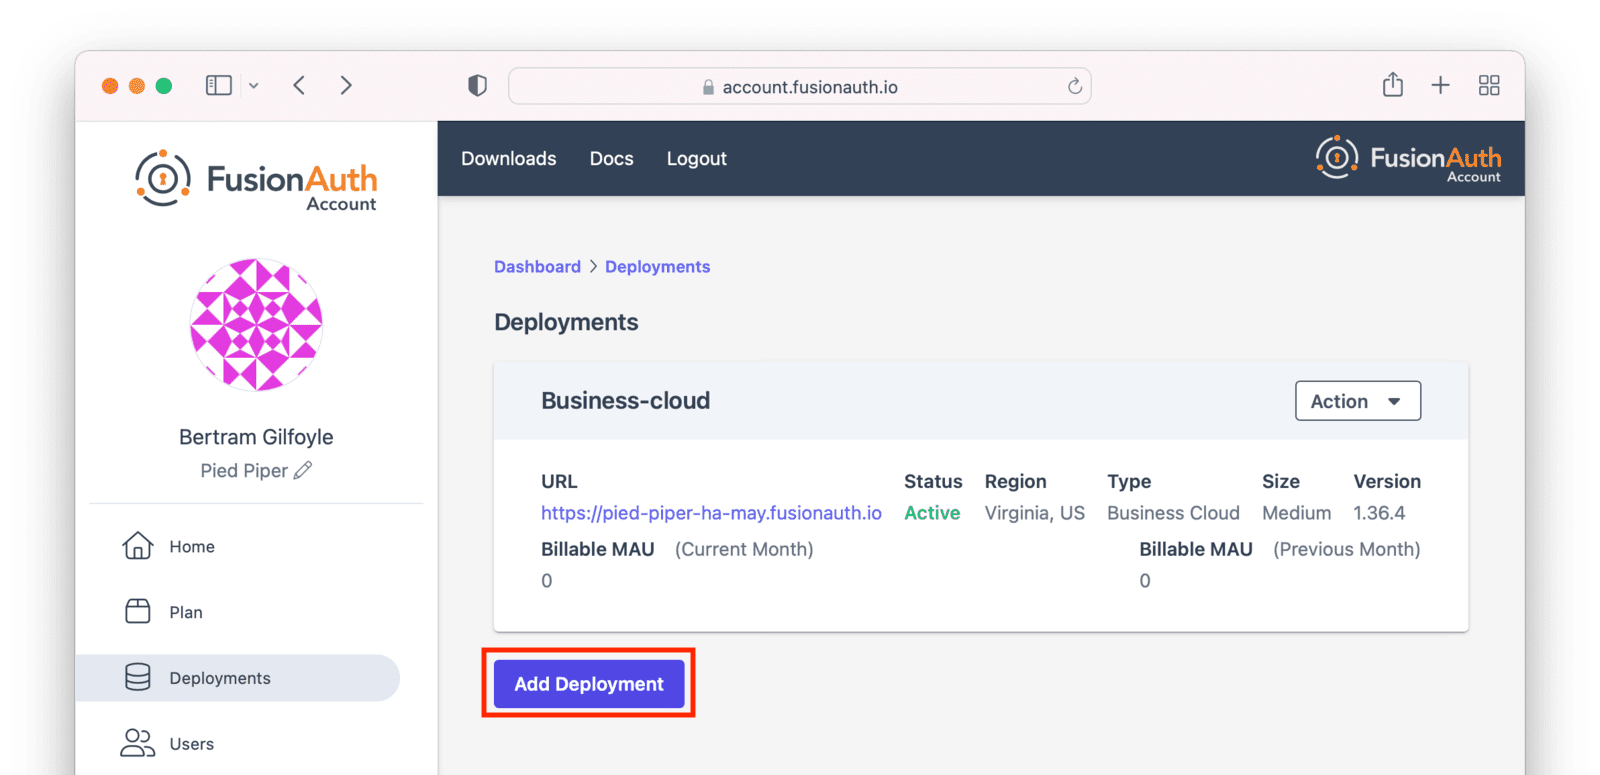
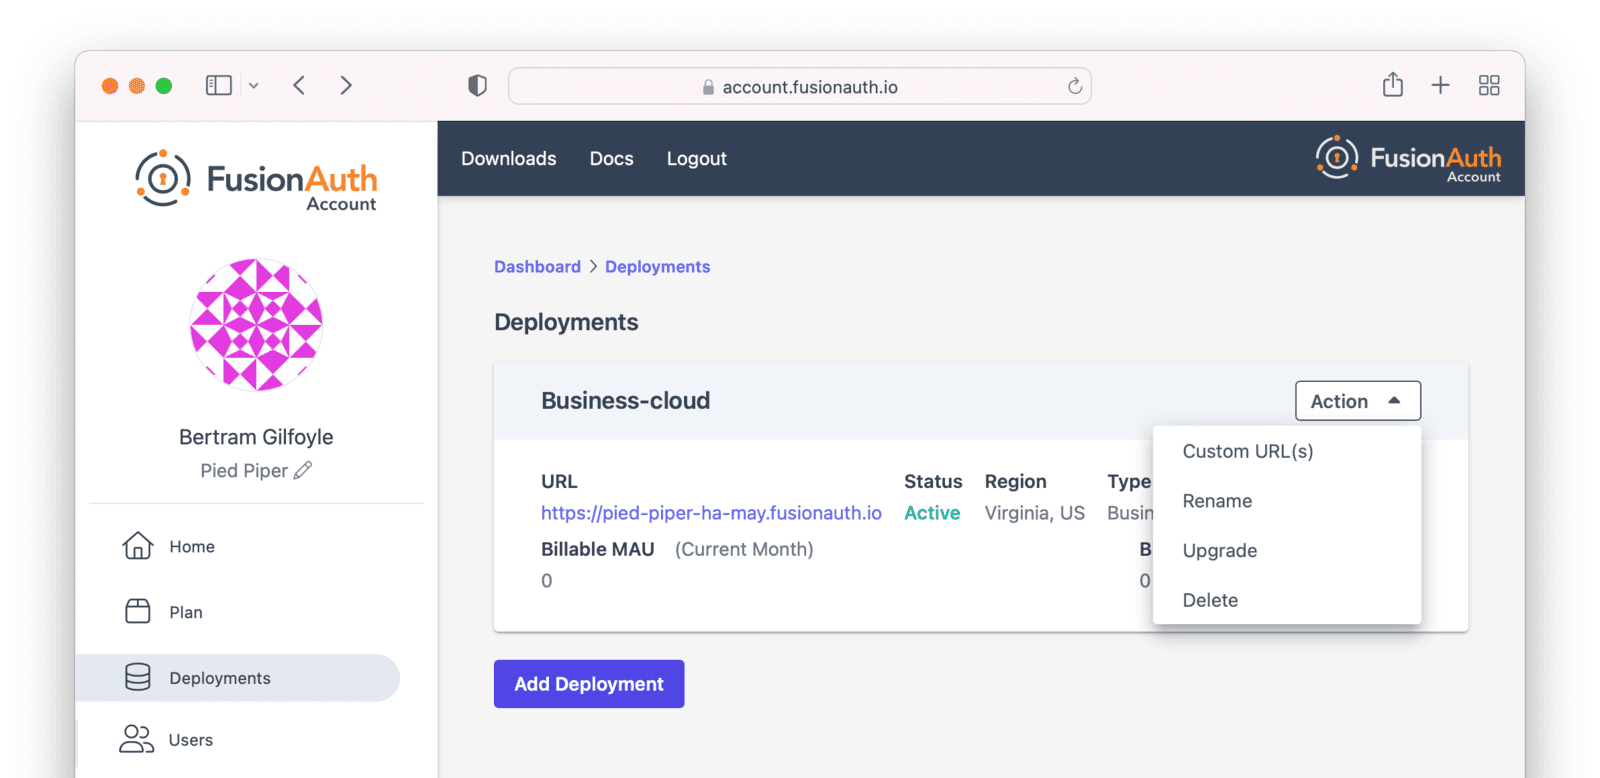
You can also upgrade or destroy each deployment. To begin either process, select the menu under Action :
Upgrading a Deployment#
If your deployment is not running the latest version of FusionAuth, you may upgrade it. It is a good idea to run the latest released version of FusionAuth, which has the latest bug fixes, security updates, and features.
However, you will not be forced to upgrade on a certain schedule. Upgrades are optional and controlled by you.
Upgrade management is only available if the deployment is not currently running the latest released FusionAuth version.
Upgrade Duration#
This upgrade process takes between 5 minutes and 60 minutes of time. The exact duration of system downtime depends on the type of deployment, amount of data in your system, and database changes required by the version upgrade.
Table 2. Upgrade Durations in FusionAuth Cloud
| Hosting Option | Duration of Upgrade | Expected Downtime |
|---|---|---|
| Basic Cloud | 5 to 60 minutes | 5 to 60 minutes |
| Business Cloud | 5 to 60 minutes | 5 to 60 minutes |
| HA Cloud | 5 to 60 minutes | seconds |
HA systems have significantly lower downtime during an upgrade because the system has two or more nodes. They are upgraded one at a time and can continue to receive traffic during the upgrade.
Upgrade Considerations#
Consult the relevant release notes for functional changes. Such changes may require updates or modifications to your code, whether to take advantage of new features or, occasionally, to handle changes in FusionAuth functionality.
Due to the downtime, it is recommended that you schedule the upgrade for a low traffic period. Test the upgrade process on development or test servers first.
The upgrade process described in this section updates the version of FusionAuth.
If you are looking to modify other attributes of your deployment, such as the region it is running in, the deployment size, or the service tier, review the Modifying Deployments section.
Upgrade Process#
To upgrade a deployment from version 1.x-1 to version 1.x:
- Test
1.xon a staging or development environment. - Select a time that works for your users, your team, and your applications.
- Log into your account.
- Record the time you began the upgrade.
- Navigate to the Hosting tab. Manage the deployment, then choose the Upgrade option. Select
1.xfrom the Version dropdown. - Confirm you want to start the upgrade.
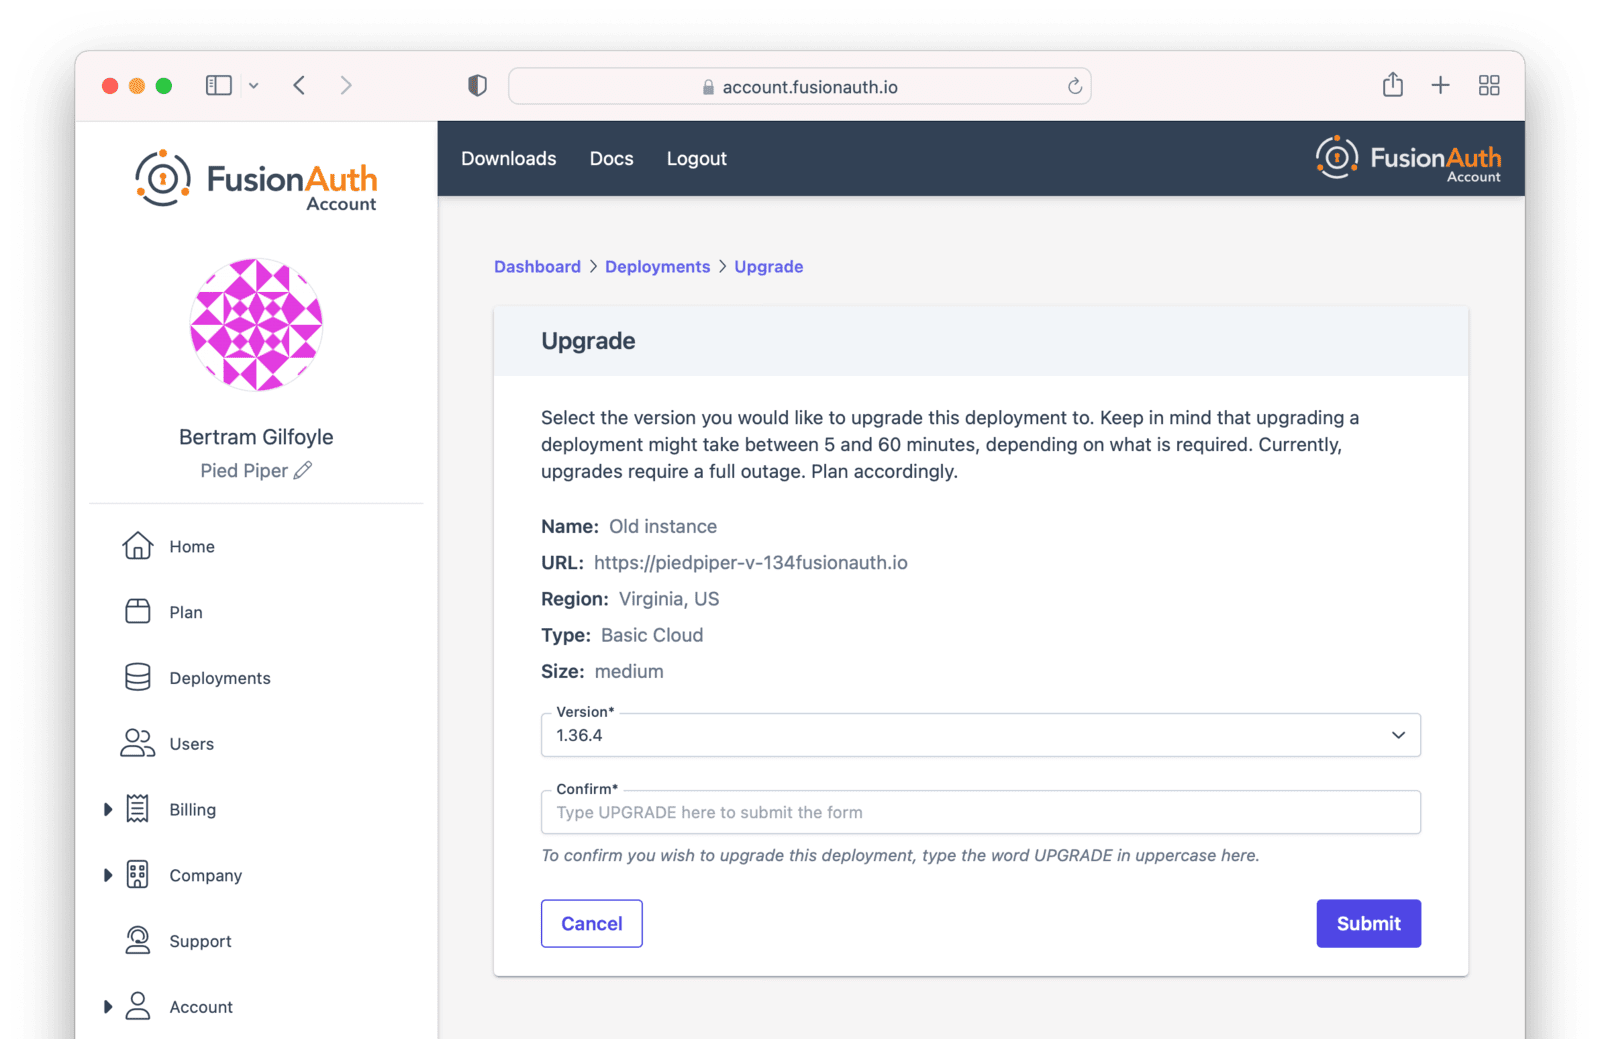
- After confirmation, the deployment will be in an "Upgrading" state until finished. Monitor the upgrade by viewing the Hosting tab. To programmatically monitor the upgrade, call the System Status API.
- The upgrade to version
1.xis complete when the user interface deployment has a status of "Active", or when the System Status API returns success.
You cannot downgrade a FusionAuth Cloud deployment version.
Please test upgrades before performing them on your production system.
Rolling Back From a Problematic Upgrade#
If an upgrade is problematic, and you identify the issue during the timeframe of your plan's backup retention period, open a support ticket to restore your data to the previous version.
In the support ticket, please provide:
- The version from which you were upgrading. This will be the version of your restored instance.
- The approximate time the upgrade began, including timezone, so that the correct backup can be restored.
For Business and High Availability deployments, backups from an upgrade are available for 30 days. For Basic deployments, no backups are available.
Both production and non-production environments can be rolled back if on a plan with backups.
Production rollbacks will be treated the same as a production outage.
Non-production rollbacks will be completed within two business days, and will be handled during normal FusionAuth business hours (9am-5pm Mountain time, Monday-Friday). Non-production rollbacks will not be treated as a production outage.
All rollbacks will have data loss; the amount of data loss depends on when the upgrade began and when the rollback was requested.
Destroying a Deployment#
If you have a FusionAuth deployment and want to delete it, do so by logging into your account.
Before destroying a deployment, ensure you back up your user data and configuration. You can retrieve your configuration using the APIs.
See Accessing User Data for more about retrieving user data and passwords.
For Business and High Availability deployments, FusionAuth will retain a backup for a maximum of 30 days.
For Basic deployments, no backups are available.
Navigate to the Hosting tab. Click the Action button. Choose the Delete option.
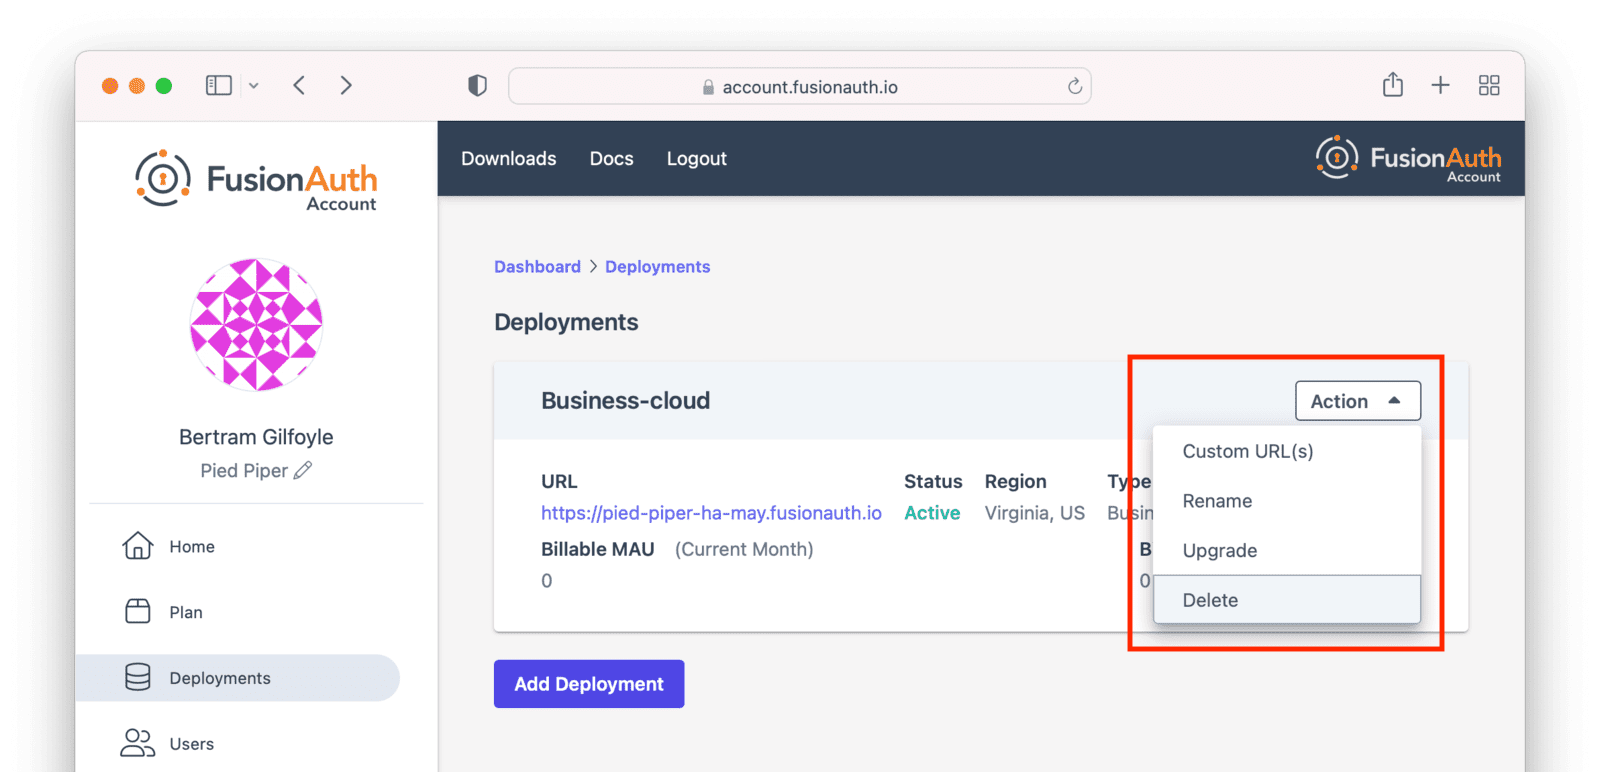
You will be prompted to confirm your decision.
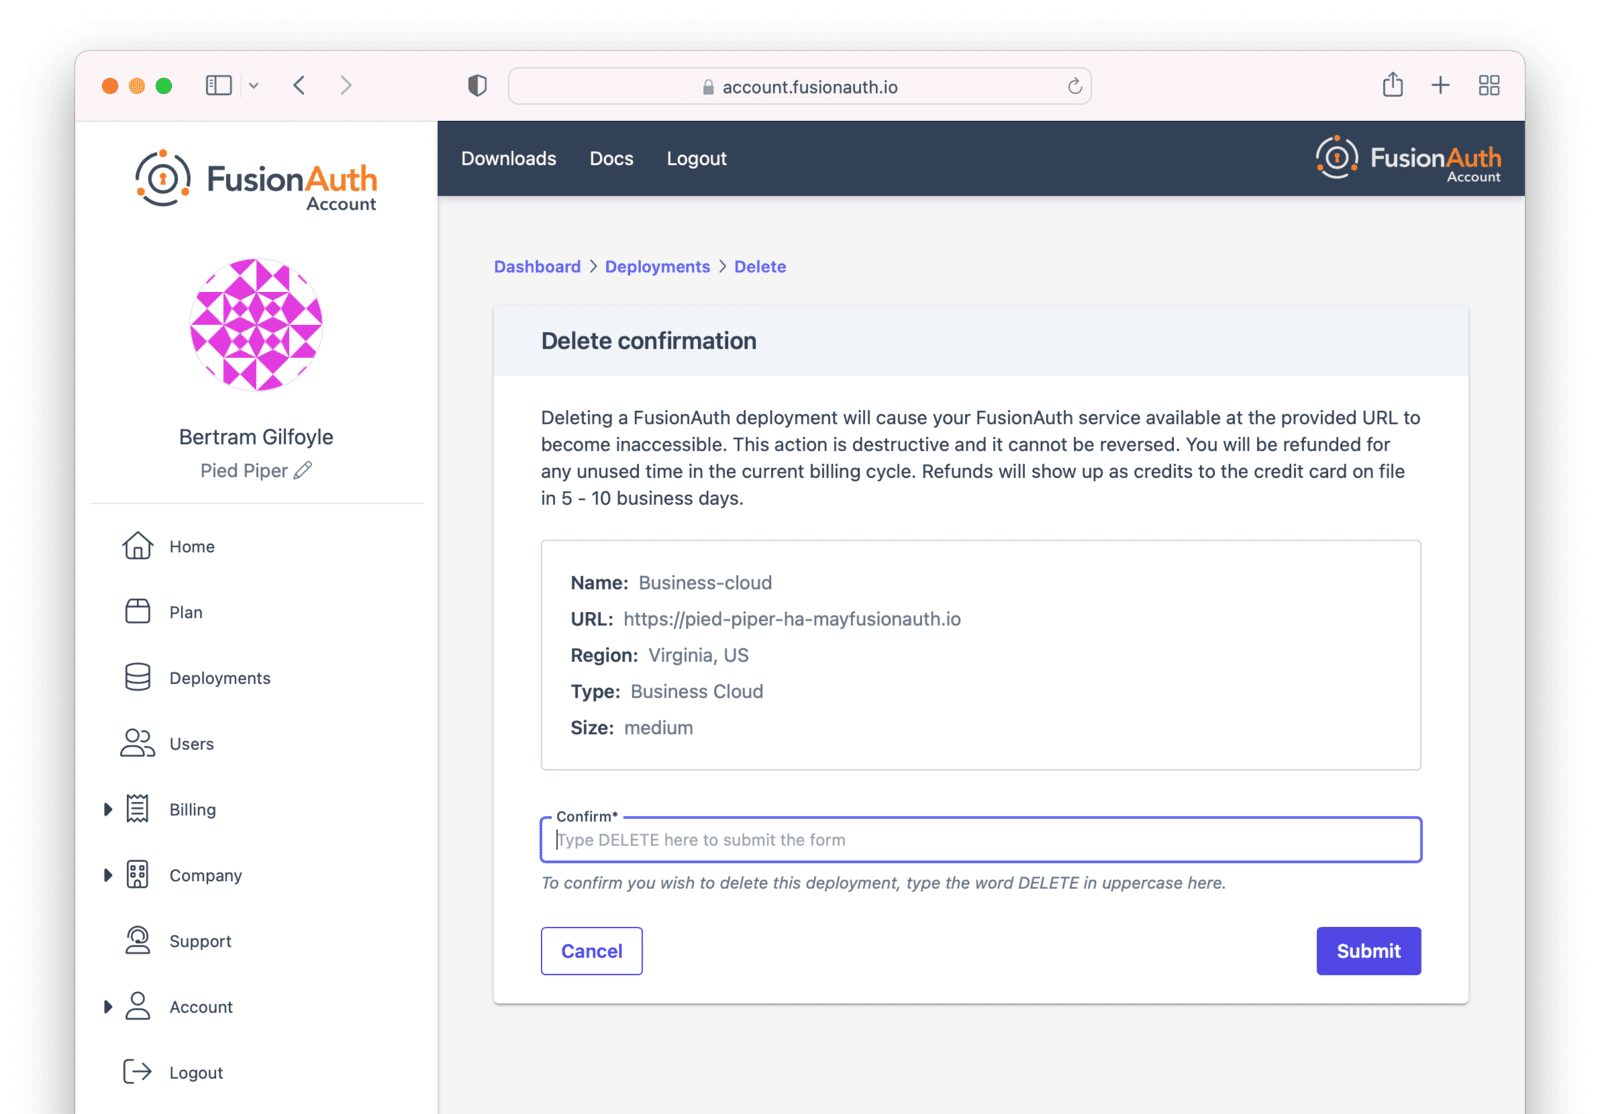
After confirmation, the deployment will transition to the "Destroying" state.
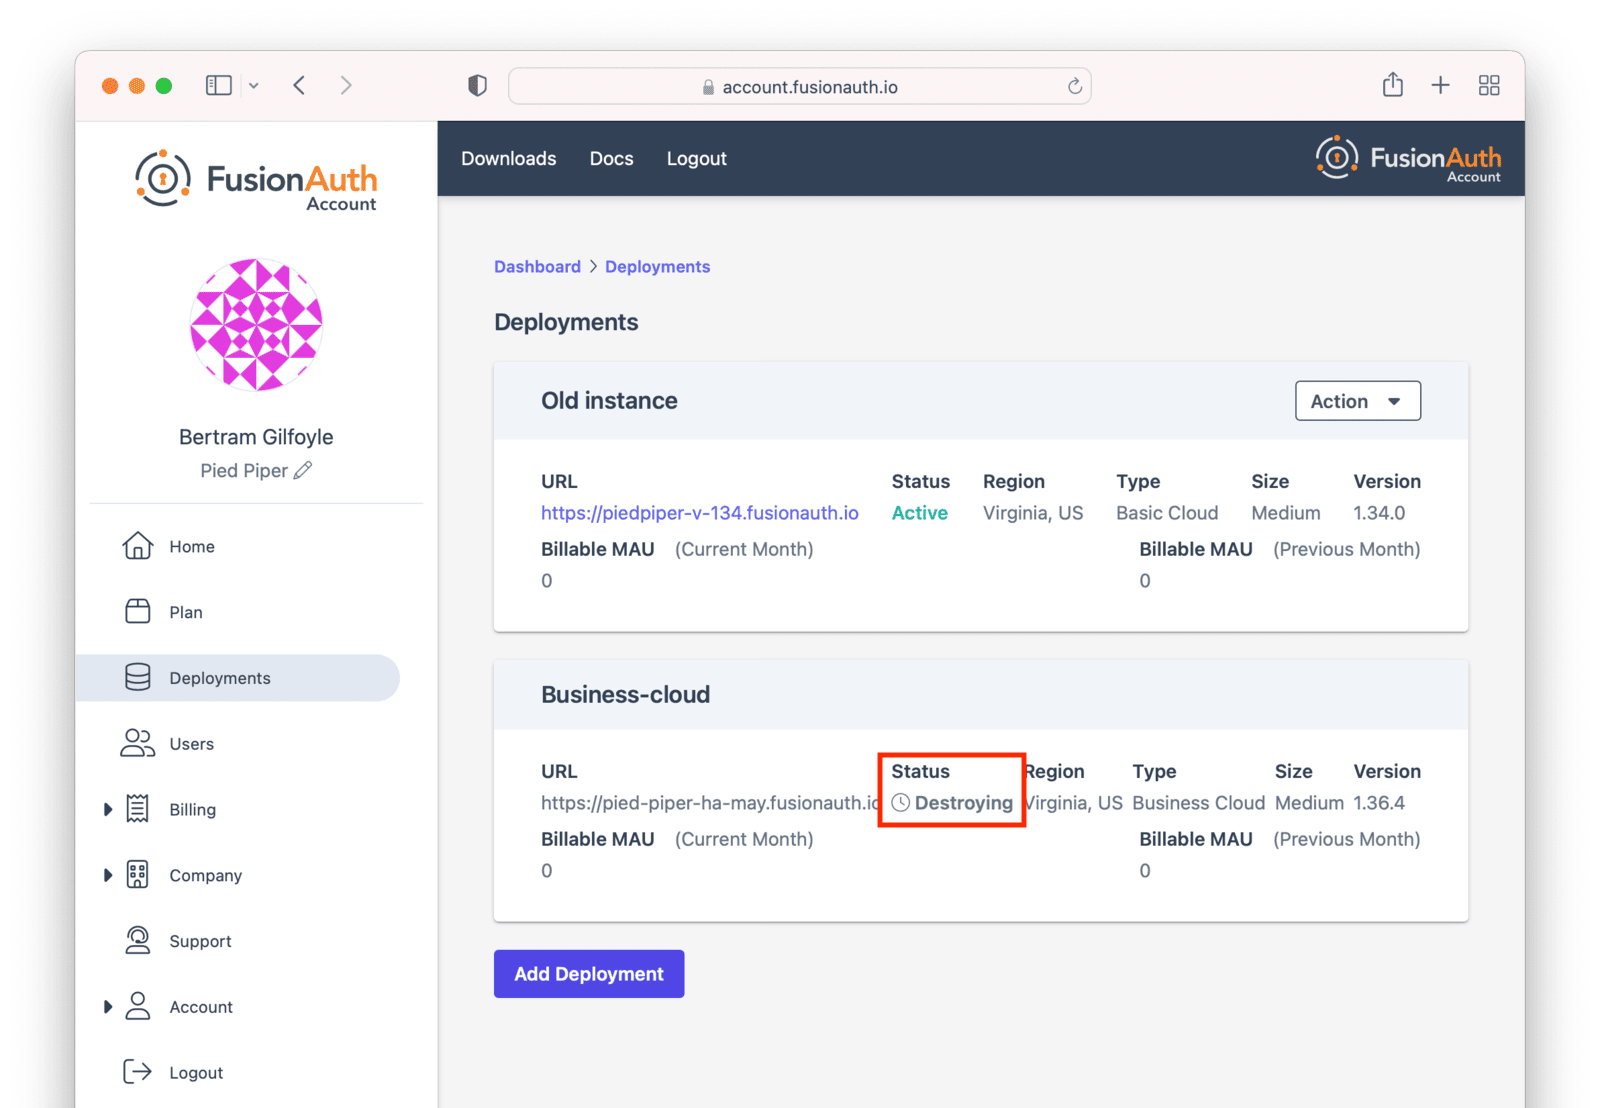
After the deployment is completely removed, it will have a "Destroyed" state on the Hosting tab. At this point you will no longer be charged for this deployment.
If you configured custom domains, remove the DNS records you added.
Migrating Data From a Deployment#
FusionAuth can be run in a variety of environments, but you may want to migrate between them because:
- You want to let the FusionAuth team operate your auth server.
- You started out in FusionAuth Cloud but now want to run the software on internal systems for performance, compliance or control.
- You started out running FusionAuth locally for cost reasons, but now have launched and want to have someone else run it for you.
You can migrate the user data FusionAuth holds for you in a number of ways:
- From a self-hosted FusionAuth instance to a FusionAuth Cloud deployment.
- From a FusionAuth Cloud deployment to a self-hosted FusionAuth instance.
- From a different auth provider into FusionAuth.
- Away from FusionAuth to a different auth provider.
If you want to retrieve your user data from FusionAuth Cloud in order to migrate to a different auth provider, see Accessing User Data. To retrieve user data from a self-hosted FusionAuth instance, query the database.
Migrating From A Different Auth Provider#
If you are interested in migrating to FusionAuth from an auth system other than FusionAuth, check out the Migration Guide.
Migrating To FusionAuth Cloud#
To migrate from a self-hosted instance to FusionAuth Cloud:
- You must be running PostgreSQL. If you are running MySQL, please migrate to a PostgreSQL database locally. Here's a forum post on how to do this. This has been provided by the community and is not supported nor endorsed by FusionAuth.
- Export your FusionAuth database to a file. When you run the
pg_dumpcommand, please use the following options:--format=cand--compress 9to minimize the file size. - Encrypt the export file with a symmetric solution such as gpg.
- Purchase a FusionAuth Cloud deployment that meets your needs. Select the version of FusionAuth that is the same as your local installation. You will be able to upgrade FusionAuth later; see Upgrading a Deployment for more.
- Open a support ticket and provide the database export file, the version of PostgreSQL you are running, and the name of the new FusionAuth deployment.
- Provide the password for the database export through another channel. You can mention the channel you'd prefer in the support ticket. Slack, email and a separate support ticket are all options.
Within 1-2 business days, we will upload your data to your FusionAuth Cloud deployment.
After your data is uploaded, upgrade your deployment to any subsequent FusionAuth version, if desired. See Upgrading a Deployment for more.
Table 3. Migration checklist
| Done? | Task |
|---|---|
| Confirmed running Postgres for local instance. | |
| Found FusionAuth version for local instance. | |
| Created a new deployment. Instructions: Creating a Deployment. | |
| Ensured the FusionAuth Cloud deployment and the local instance are running the same version of FusionAuth. | |
| Communicated the version of Postgres used in the export file. | |
| Encrypted the database export. | |
| Provided the decryption password via a separate communication channel. |
Migrating Away From FusionAuth Cloud#
To migrate from FusionAuth Cloud to a self-hosted instance, please request a database export, as documented in Accessing User Data. After you have the data, install it in a PostgreSQL database and configure your self-hosted instance to point to that database.
Ensure your self-hosted instance uses the same FusionAuth and database versions as those used by your Cloud deployment. You can view your FusionAuth version in the administrative user interface.
To find your deployment's database version:
- If you are running a version of FusionAuth before 1.30.2, open a support ticket.
- If running a version >= 1.30.2, navigate to System -> About to view the version.
Once you've tested your self-hosted installation, destroy your FusionAuth Cloud deployment as outlined in Destroying a Deployment.
Modifying Deployments#
Modifying certain aspects of a deployment, such as the region, requires assistance from the FusionAuth team. This is in contrast with upgrading the version of FusionAuth your deployment is running, which is a self-serve operation described in Upgrading a Deployment.
Please open a support ticket to change any of the following attributes of your deployment:
- the type (basic, business, or high availability)
- the region or geographic location
- the size of each compute node
- the number of compute nodes
- your database size and class
- the hostname
- any database redundancy attributes
These changes are typically handled in 1-2 business days, and in certain contexts may require changes to your billing/contract.
Data Integrity#
A common question is: "will I lose any data when migrating between tiers, region, size, or hostname?"
When performing any change which requires modifying cloud infrastructure, the cloud database is backed up, and then reconnected to the new infrastructure.
No data loss should occur and your configuration will be preserved.
Custom Domains#
If your Hosting tab does not contain the Custom URL(s) option, your deployment may still use the Legacy Custom Domains workflow. To migrate to the newest custom domains workflow, open a support ticket. This migration requires 30 to 60 minutes of downtime.
If you need the IP addresses associated with your deployment for allow-listing or network configuration, please contact support directly. IP addresses are not exposed through the user interface.
If you see an interface with Add Domain , Delete , and DNS validation statuses, you are using the new unlimited Custom Domains UI. If you instead see the older Update Custom URL(s) button, your deployment is using the legacy workflow described in the Legacy Custom Domains section.
FusionAuth Cloud supports custom domains across all plans. Deployments on Enterprise High Availability plans can enable the Unlimited Custom Domains experience, which includes advanced management capabilities and a modern user interface. In addition to allowing unlimited custom domains, the feature provides the following benefits:
- A streamlined UI for managing custom domains
- The ability to add and remove individual custom domains
- Custom domain validation and routing with a single DNS change
- DNS validation status checks for custom domains
- Faster provisioning of certificates
If you wish to enable the custom domains feature on one of your High Availability cloud deployments, please open a support ticket to get started.
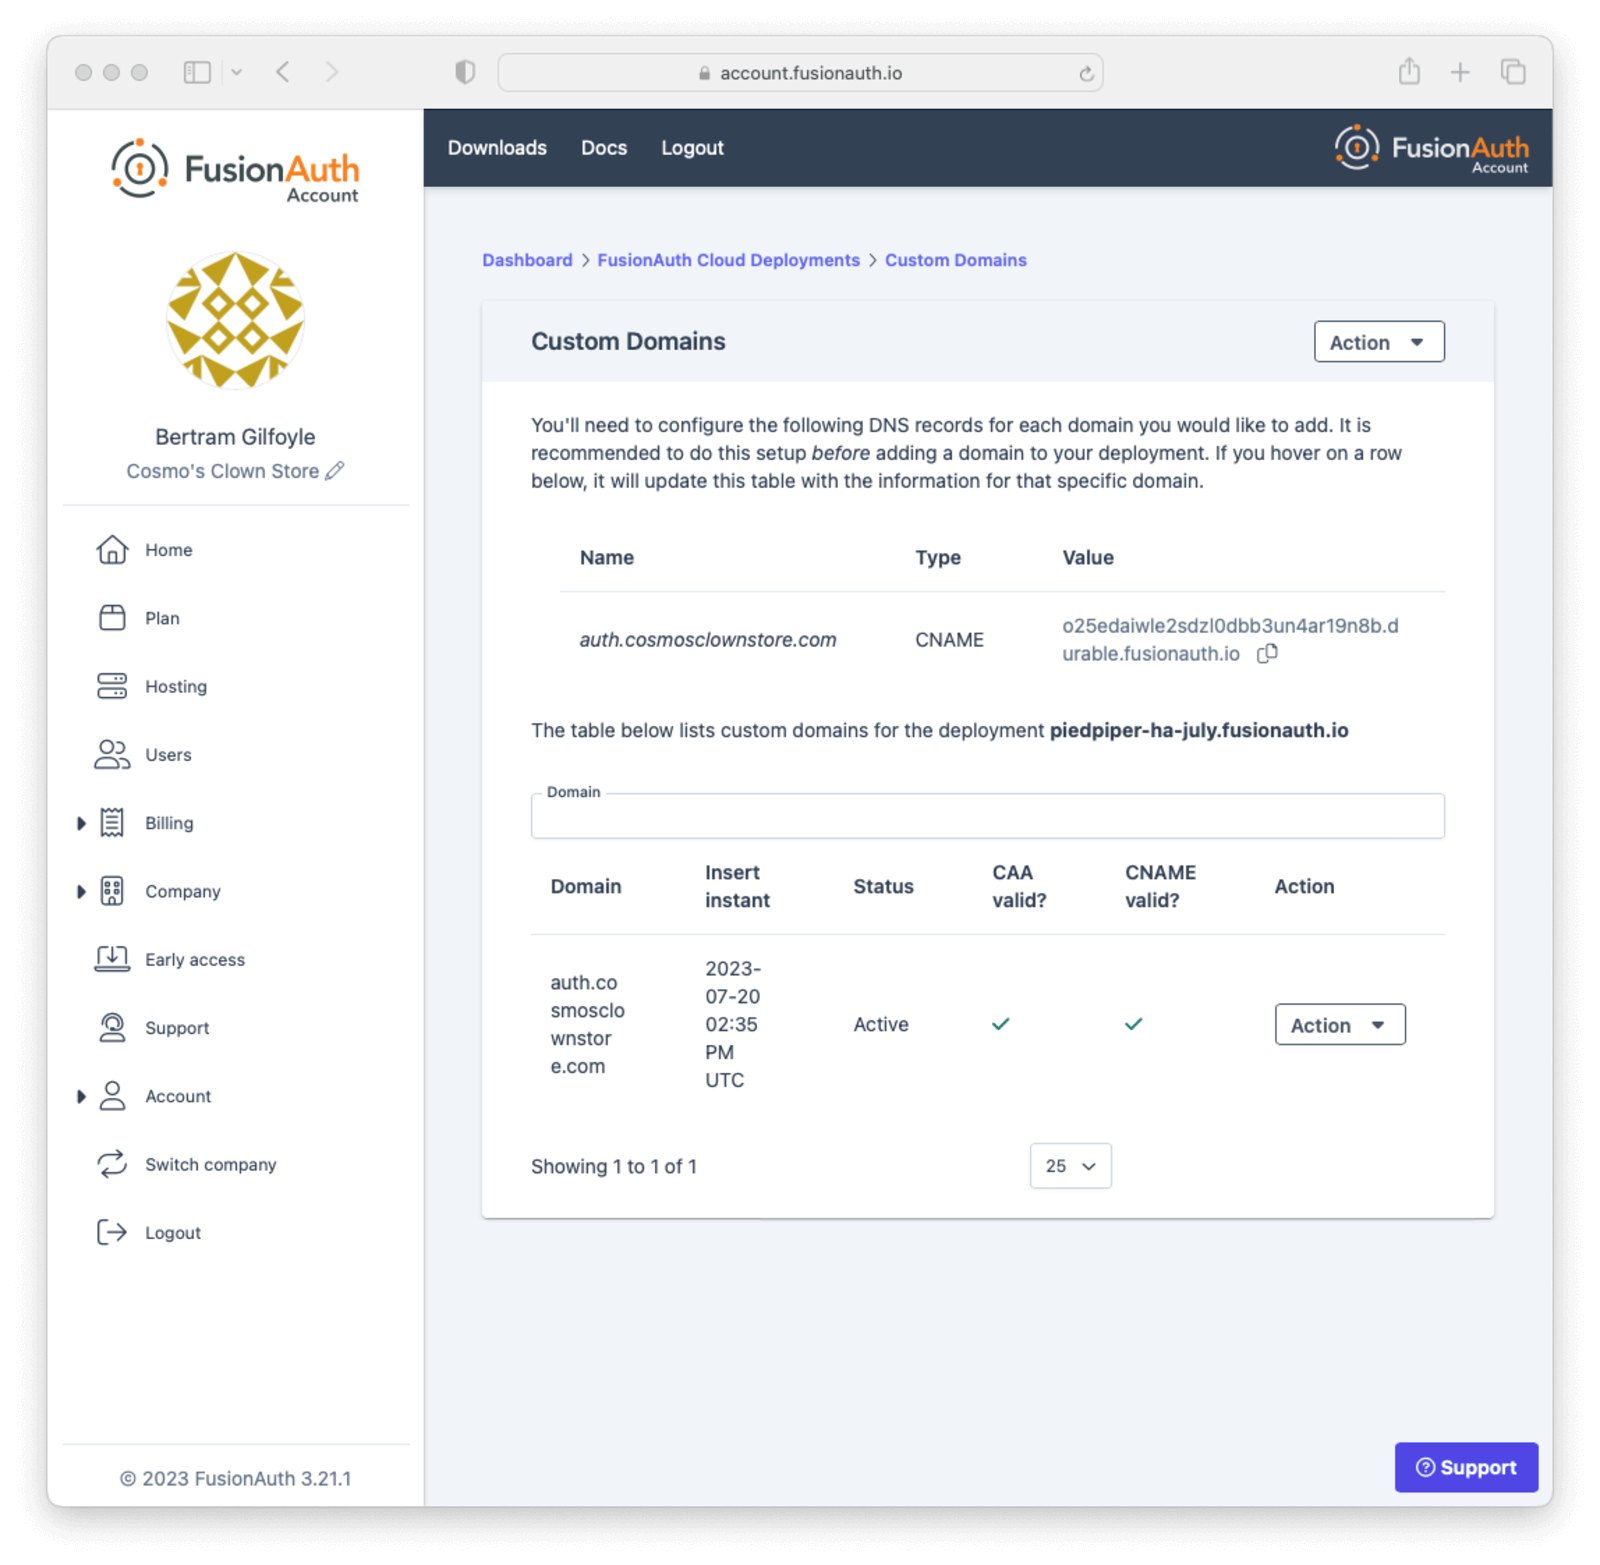
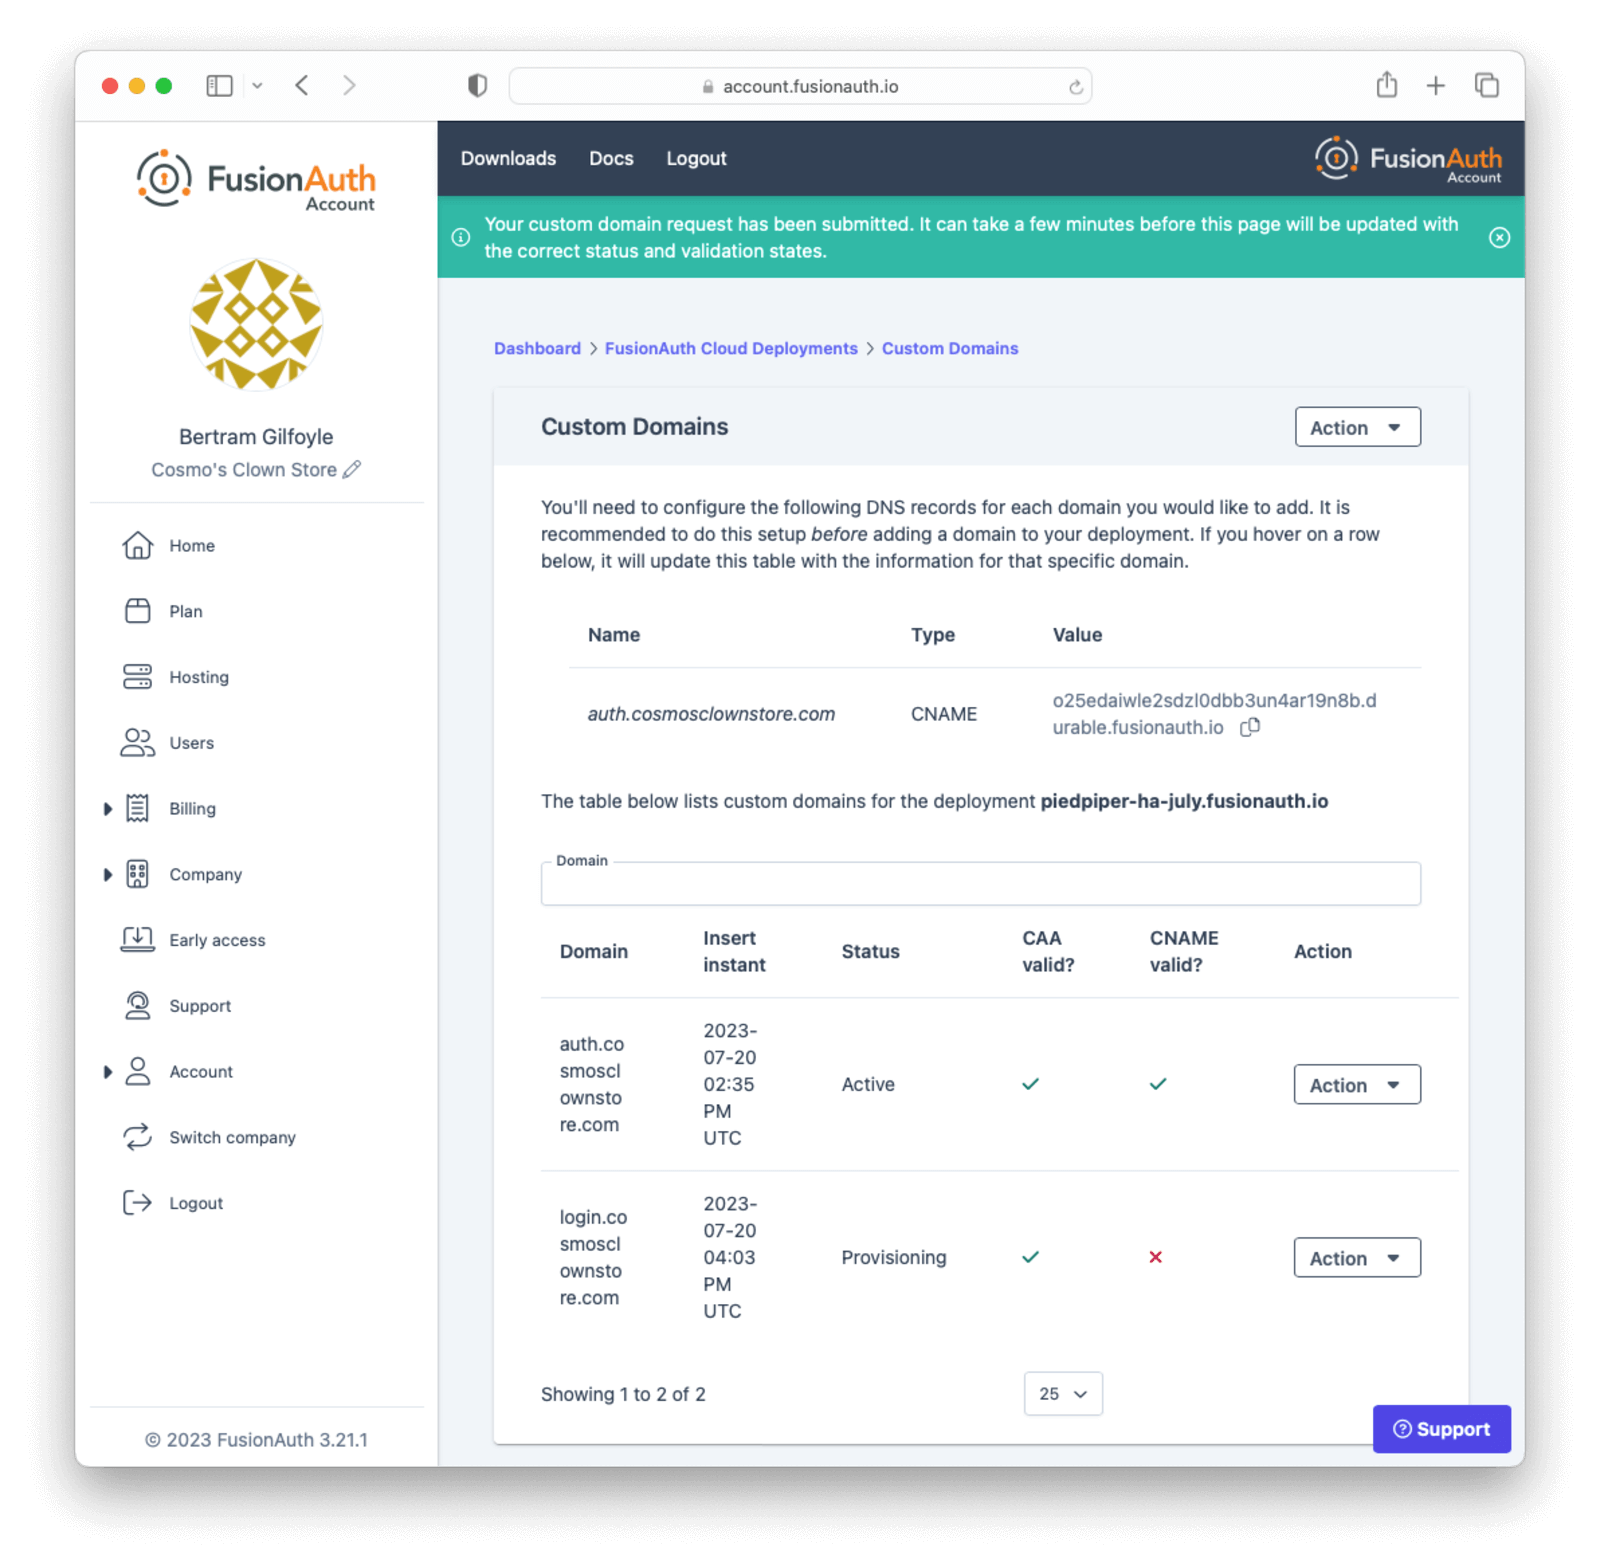
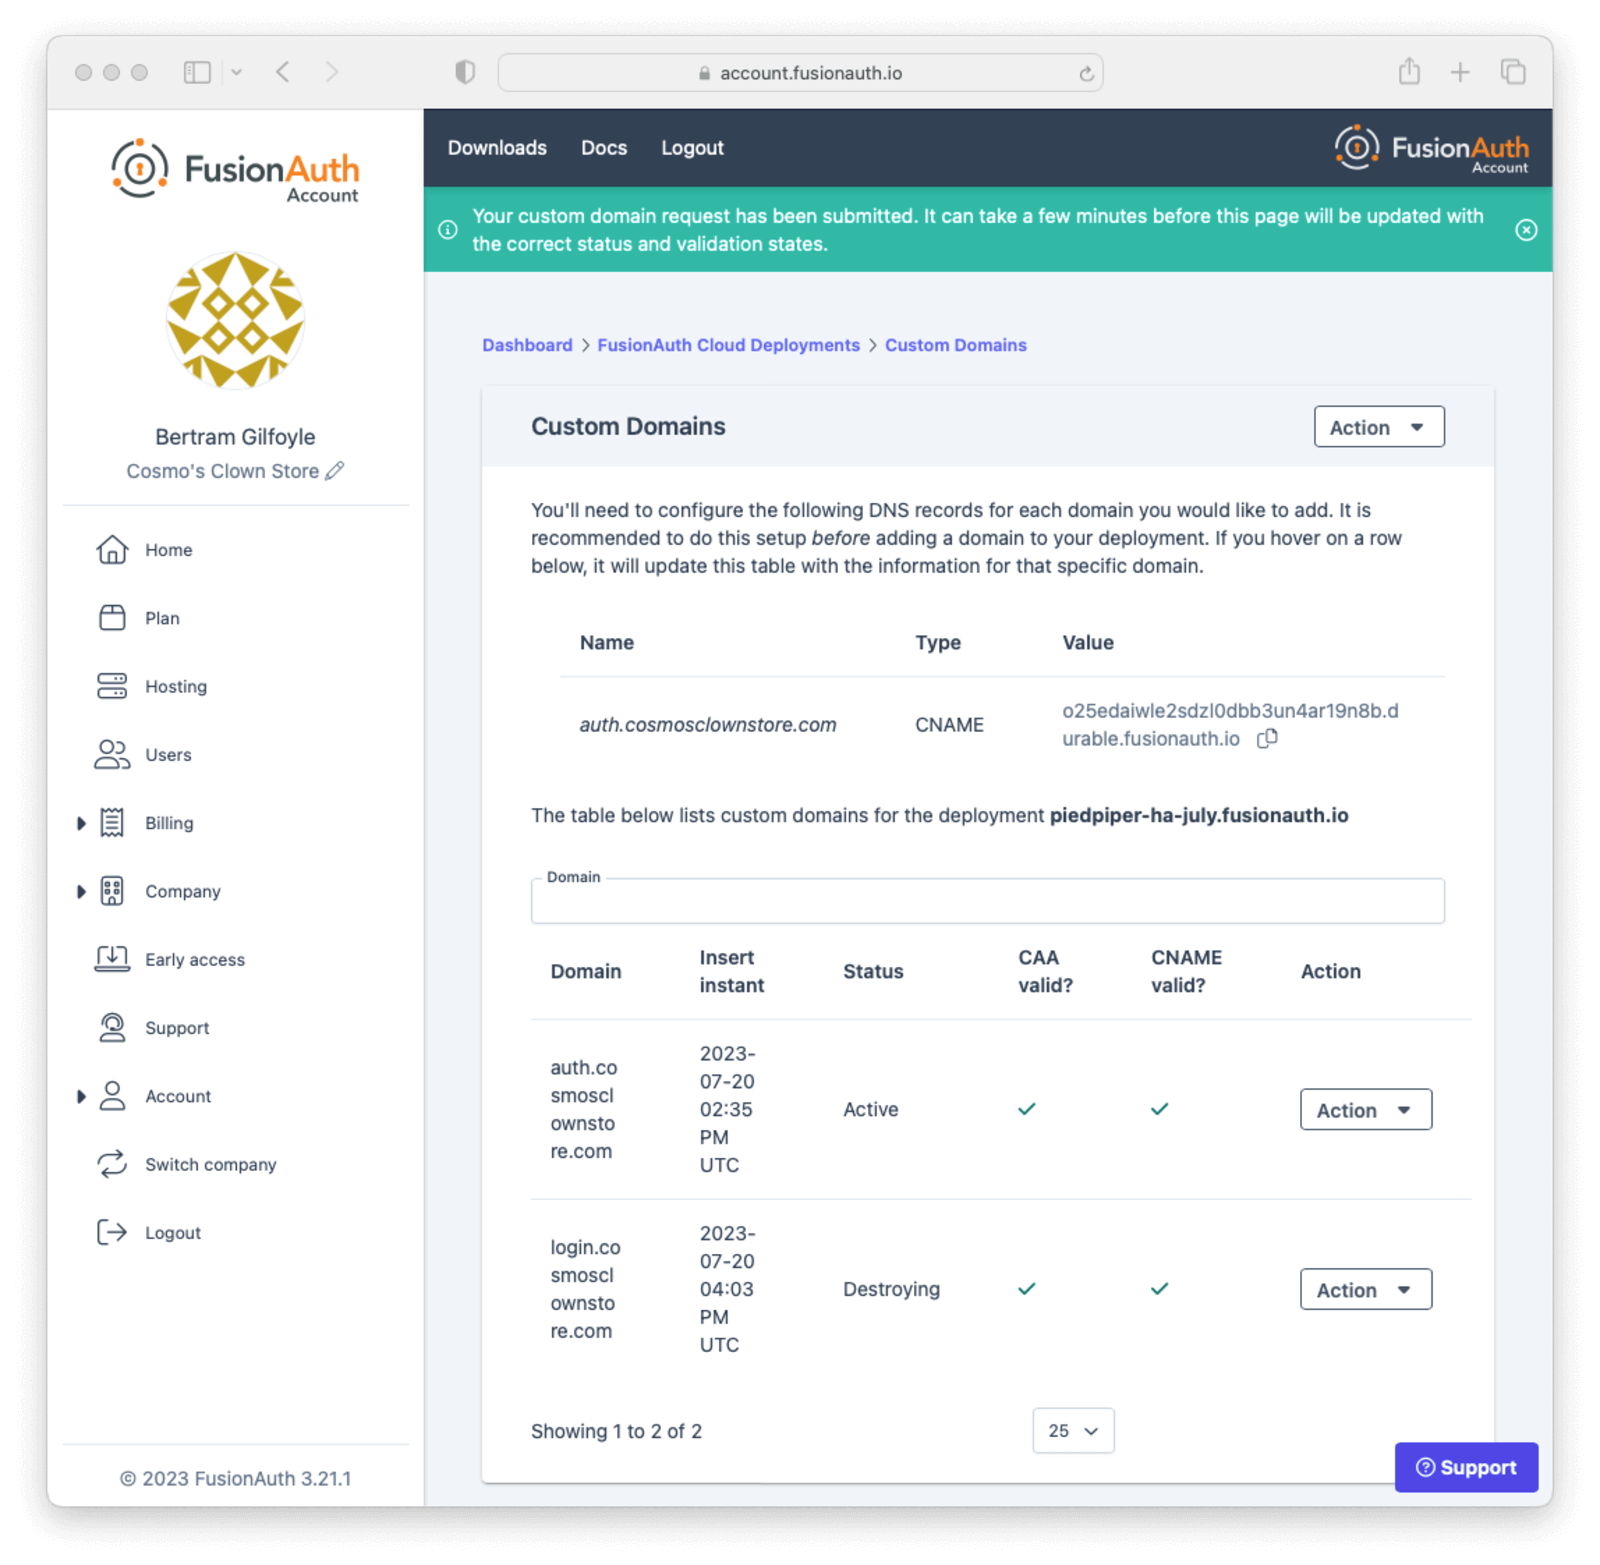
Domains Listing#
The updated UI for Unlimited Custom Domains lists the existing custom domains for the deployment. This listing includes the DNS validation status of each custom domain, and search capabilities. During the transition phase, this page does not include the ability to add or remove domains.
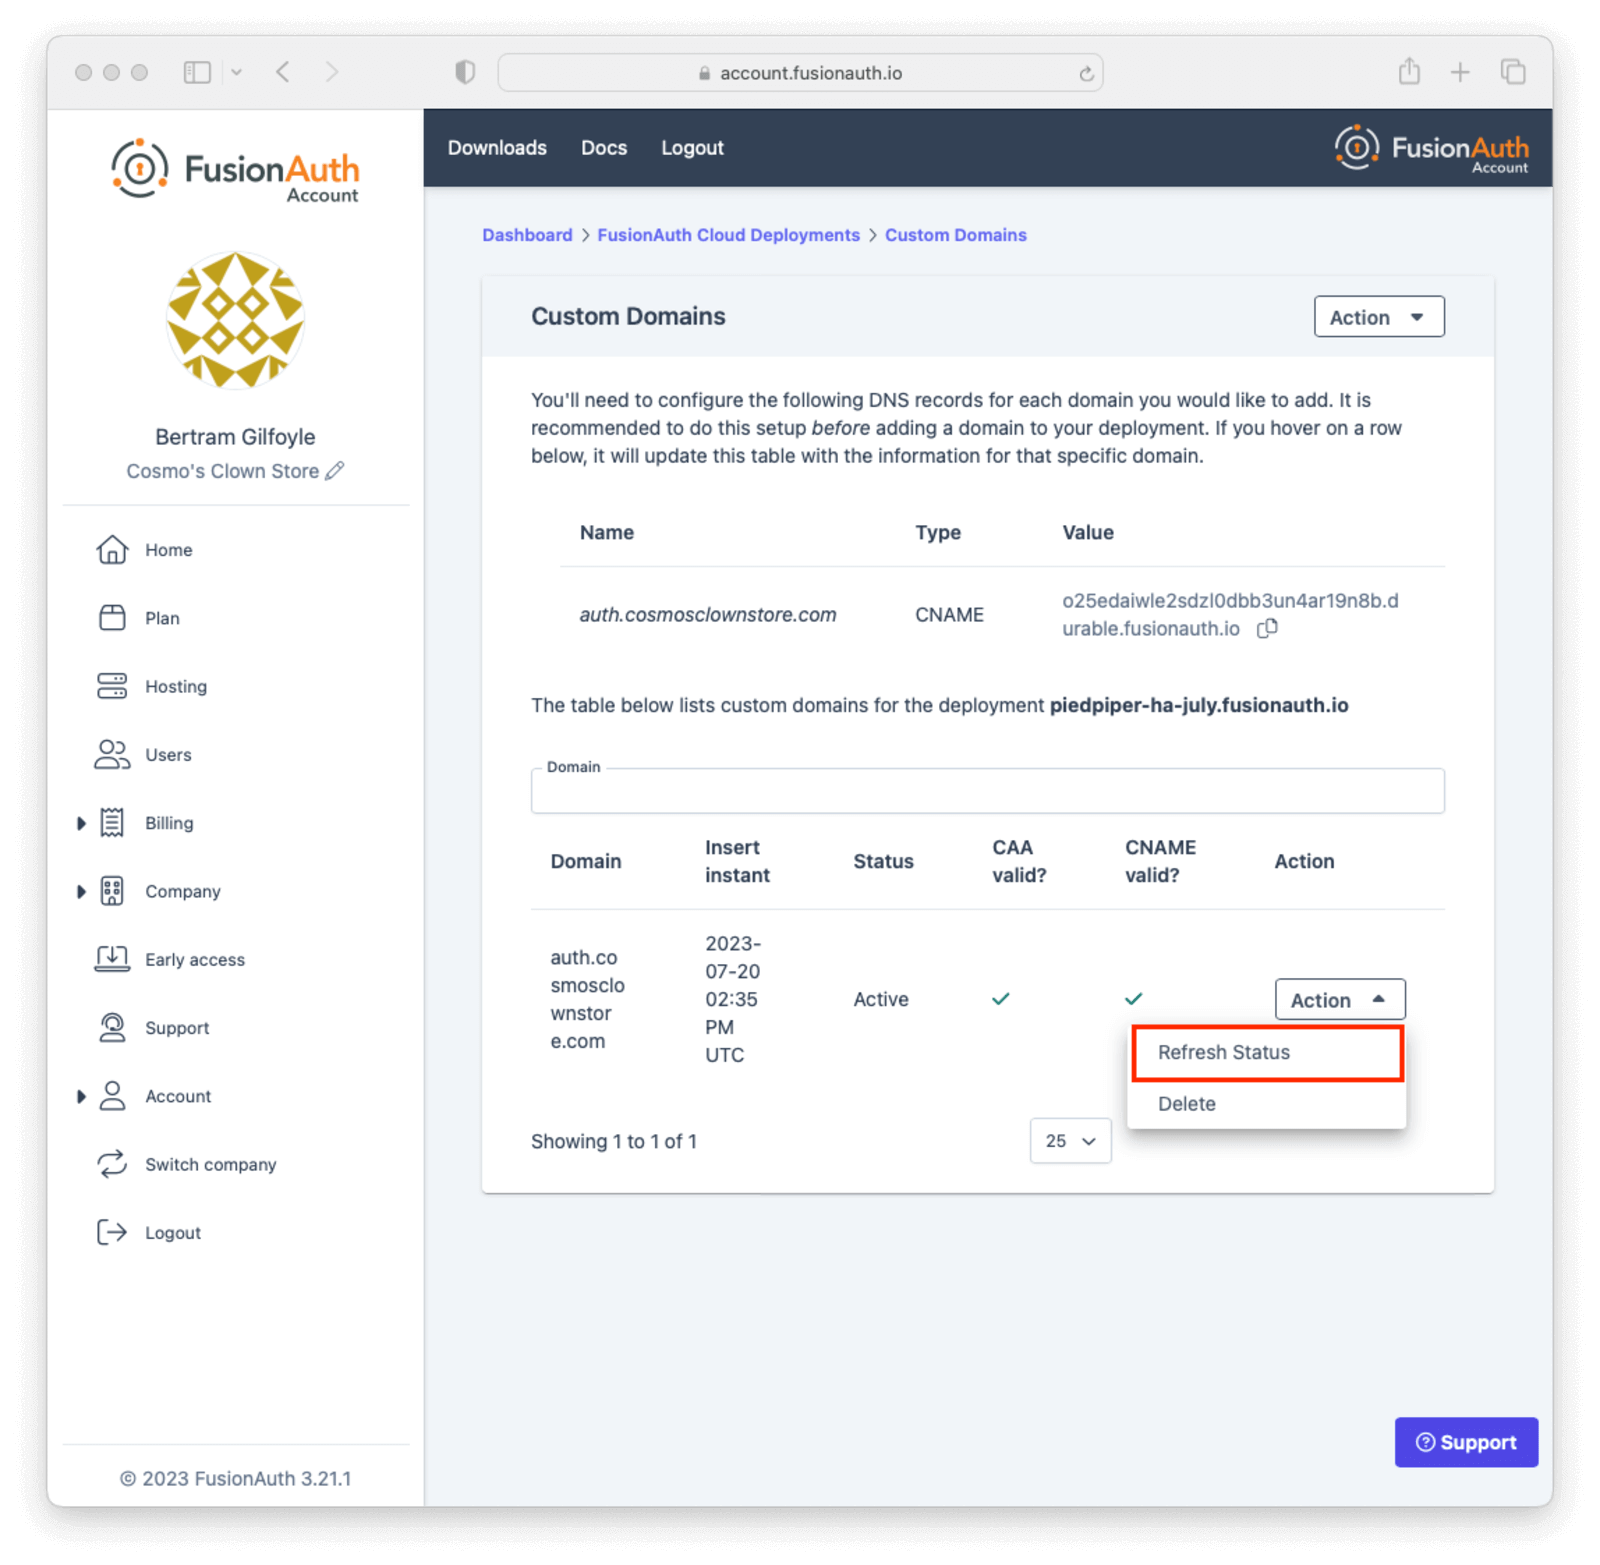
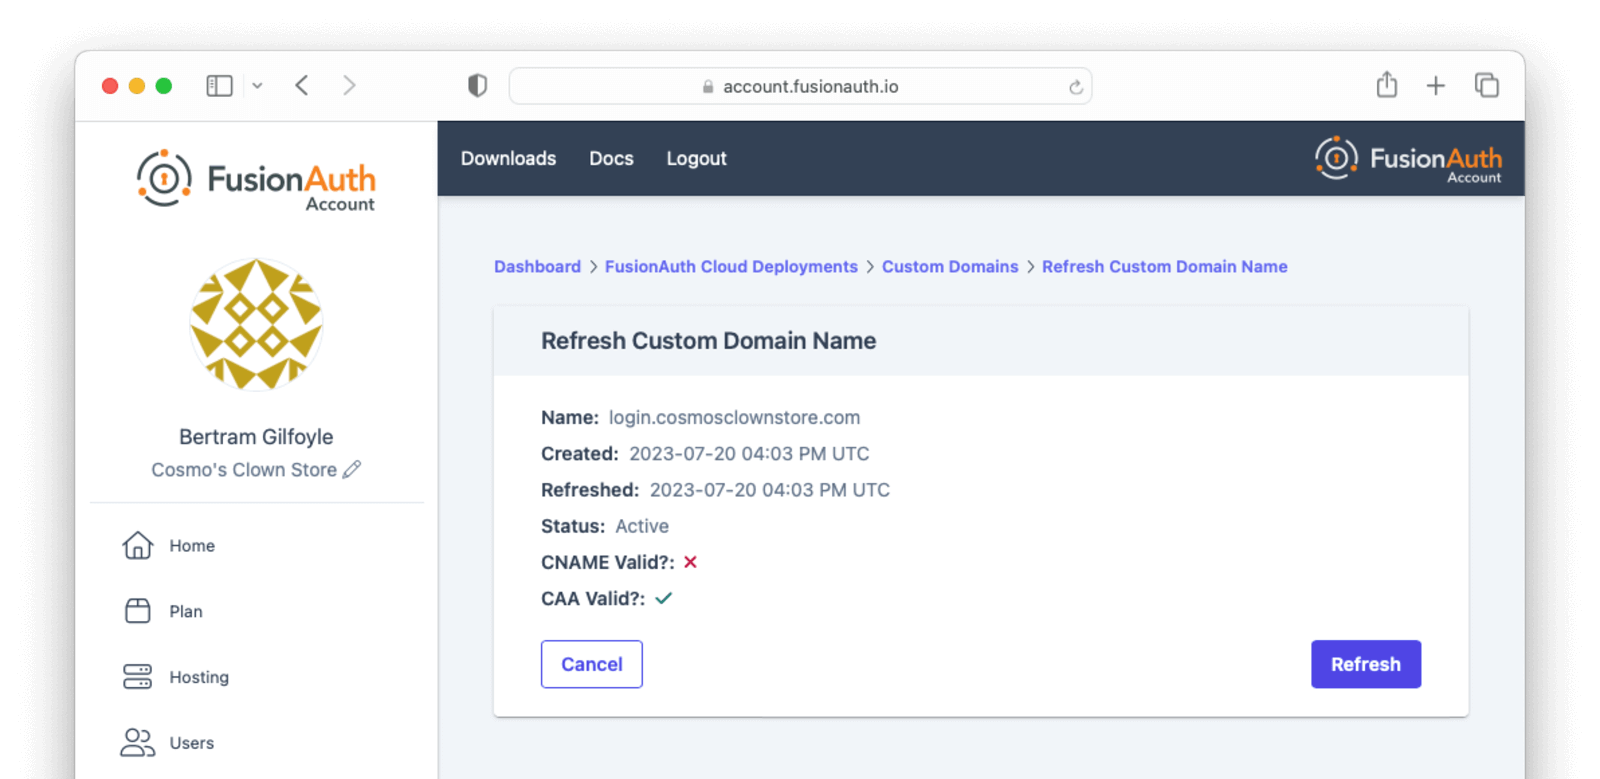
Refresh the DNS validation status of a custom domain by selecting Refresh Status from the Action menu for the domain and clicking the Refresh button on the next page.
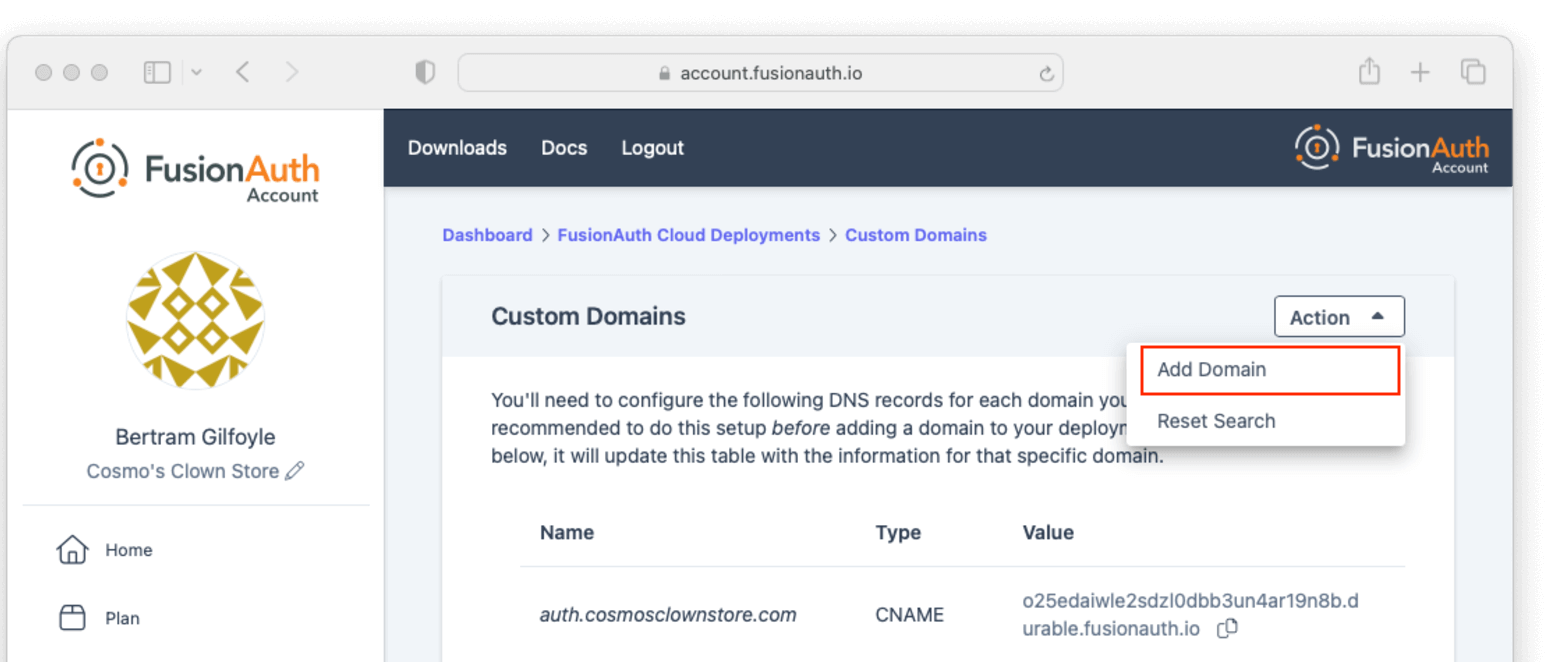
Adding a Domain#
Add a custom domain to your deployment by clicking the Add Domain button in the Action menu at the top of the listing page.
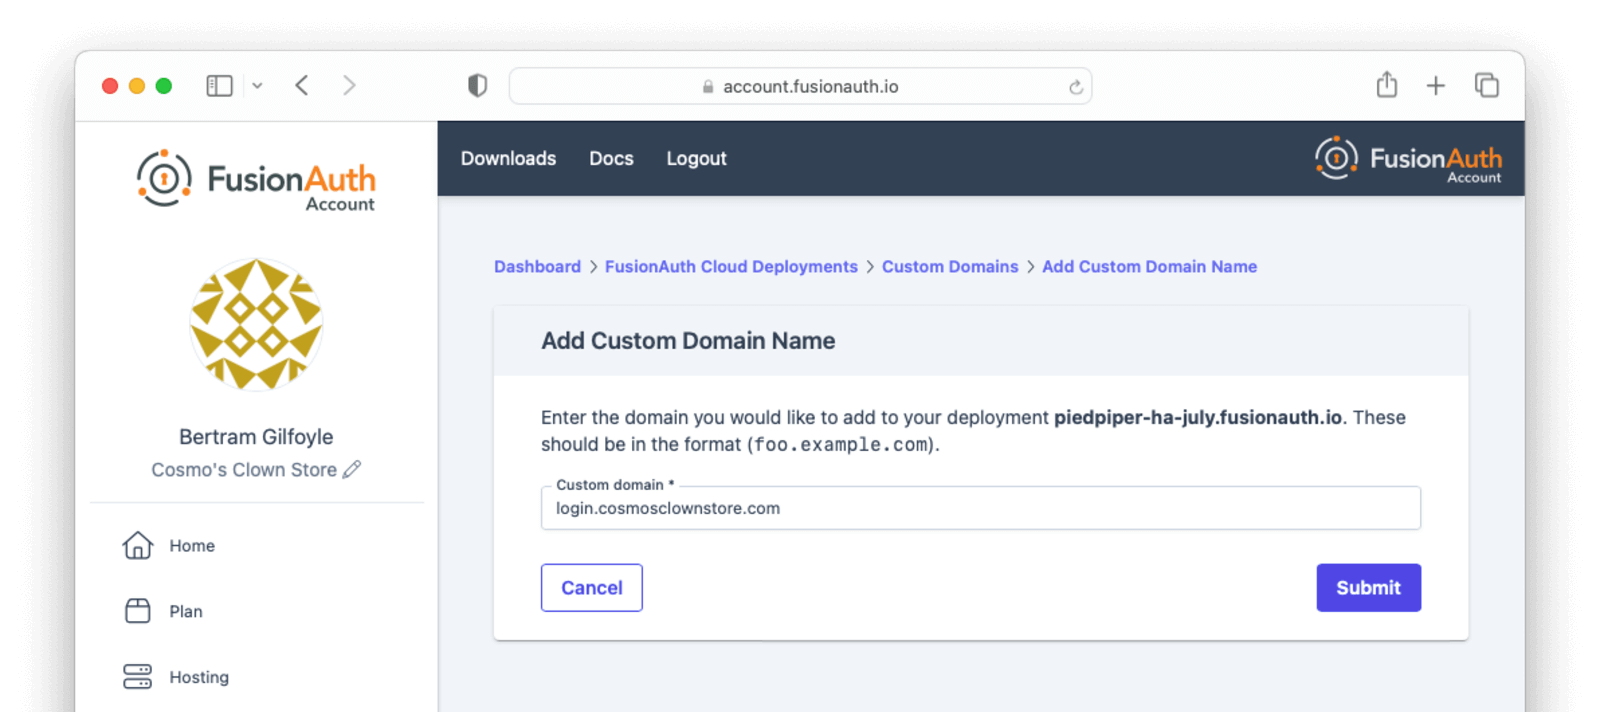
Before adding a custom domain, you must create a CNAME record targeting the durable URL for your deployment. Additionally, if your domain has a CAA record, it must allow the Amazon certificate authority to issue certificates for your domain by including at least one of the following domains - amazon.com, amazontrust.com, awstrust.com, or amazonaws.com.
On the next page, enter the new custom domain and submit the form.
You will be redirected back to the custom domain listing page, where you can see the provisioning state and DNS validation status for the new domain.
Since the DNS CNAME was created ahead of time, your new custom domain should already be validated and working. If it's not showing as validated, you can use the Refresh Status button in the Action menu to re-validate the custom domain when DNS changes have propagated.
A custom domain added in the account management portal will still work properly without refreshing the status as long as the DNS CNAME record exists. The validation indicators and status refresh are meant to provide additional feedback for configuring and troubleshooting a new custom domain.
Deleting a Domain#
If your deployment contains a custom domain that is no longer in use, you can remove it by selecting Delete in the Action menu for the domain.
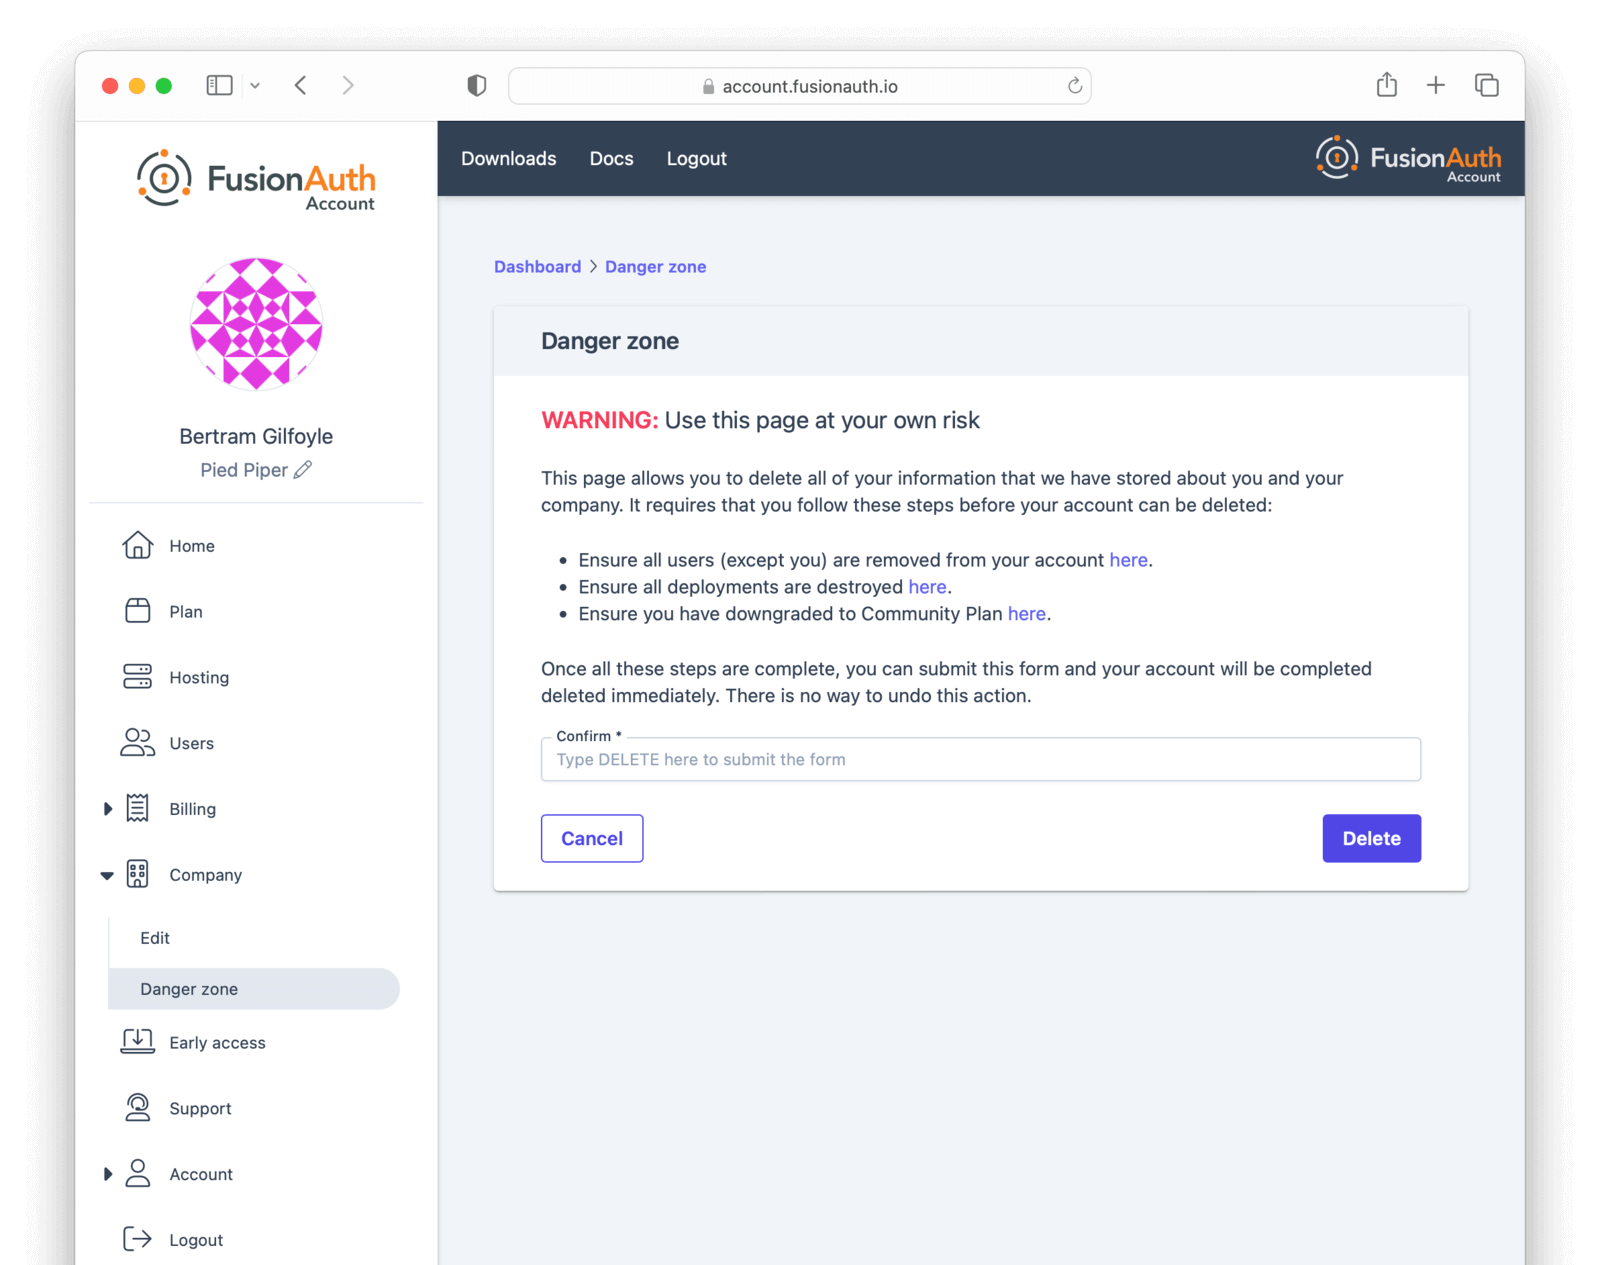
Confirm that the domain you want to delete is shown on the page, enter DELETE in the form field to confirm the operation, and submit the form.
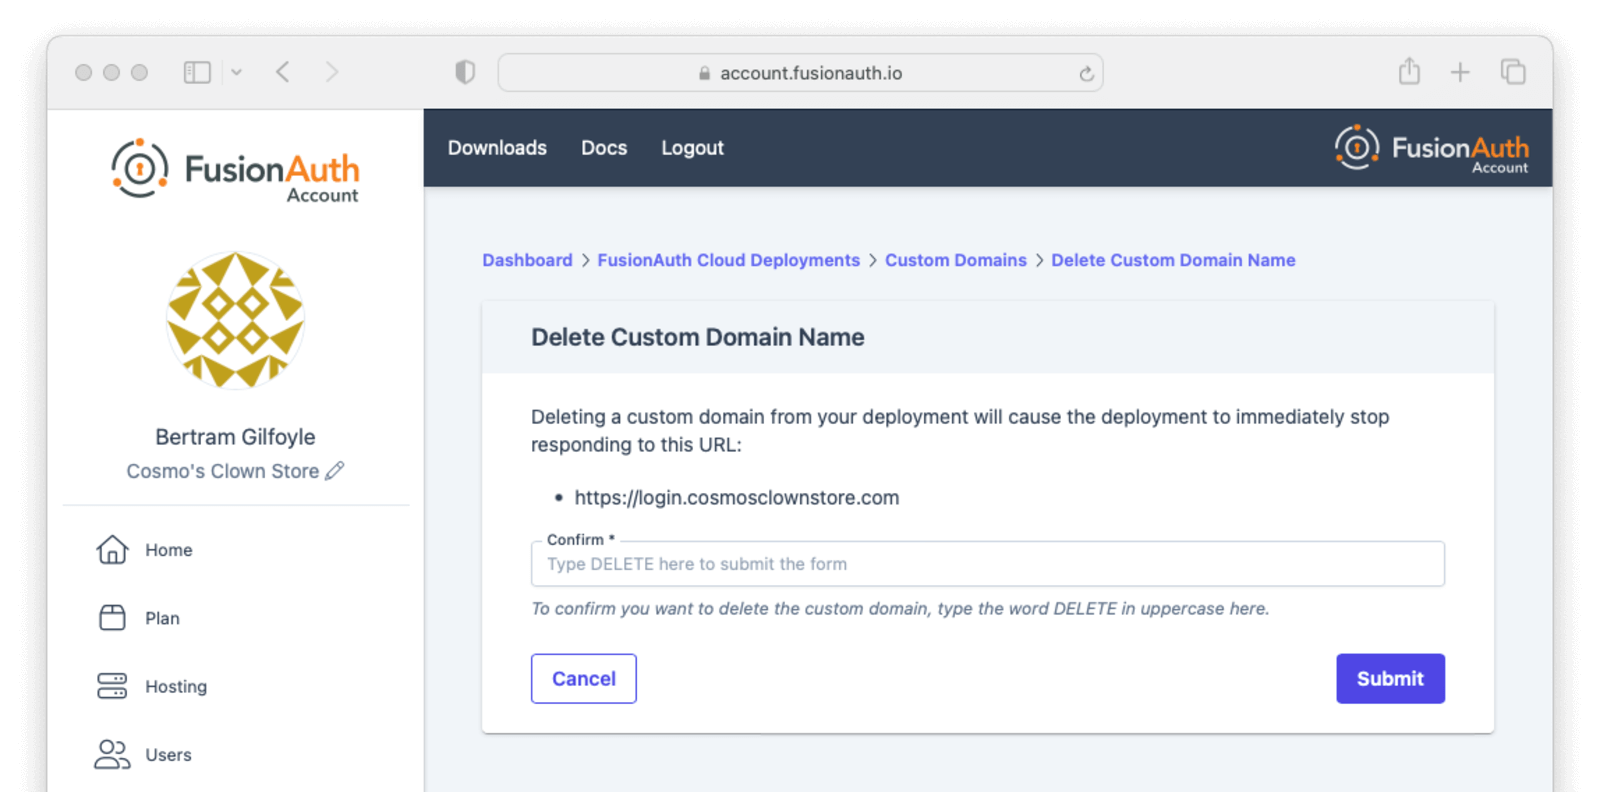
You will be redirected back to the custom domain listing page, which continues to display the deleted domain with the Destroying status while FusionAuth Cloud cleans up the supporting infrastructure.
The deleted custom domain will continue to operate normally until the certificate for that domain expires. To prevent traffic for that custom domain being routed to your FusionAuth deployment, remove the DNS CNAME record that was created when adding the domain.
Unlimited Domains Transition (Enterprise HA Only)#
When unlimited domains are first enabled for a deployment, that deployment enters a transition state that lasts 30 to 60 minutes.
This allows time to perform any necessary DNS changes for existing custom domains to prevent domain resolution errors when completing the cutover to Unlimited Custom Domains. During this transition, other deployment actions such as upgrading or destroying the deployment are unavailable.
You need to update existing custom domain DNS records pointing to the deployment's *.fusionauth.io domain name to refer to the Durable FusionAuth CNAME. Once you have updated the DNS records, you can complete the cutover to Unlimited Custom Domains from the account management portal by selecting Cutover Custom URL(s) from the Action menu at the top of the custom domains listing page and completing the form on the next page. If a deployment does not have any existing custom domains when unlimited domains are enabled, it can be cut over immediately.

Legacy Custom Domains (For Older Deployments)#
If you are on a supported deployment and want a custom domain name such as auth.piedpiper.com, it is entirely self service.
The number of custom domain names you can have depends on the type of deployment.
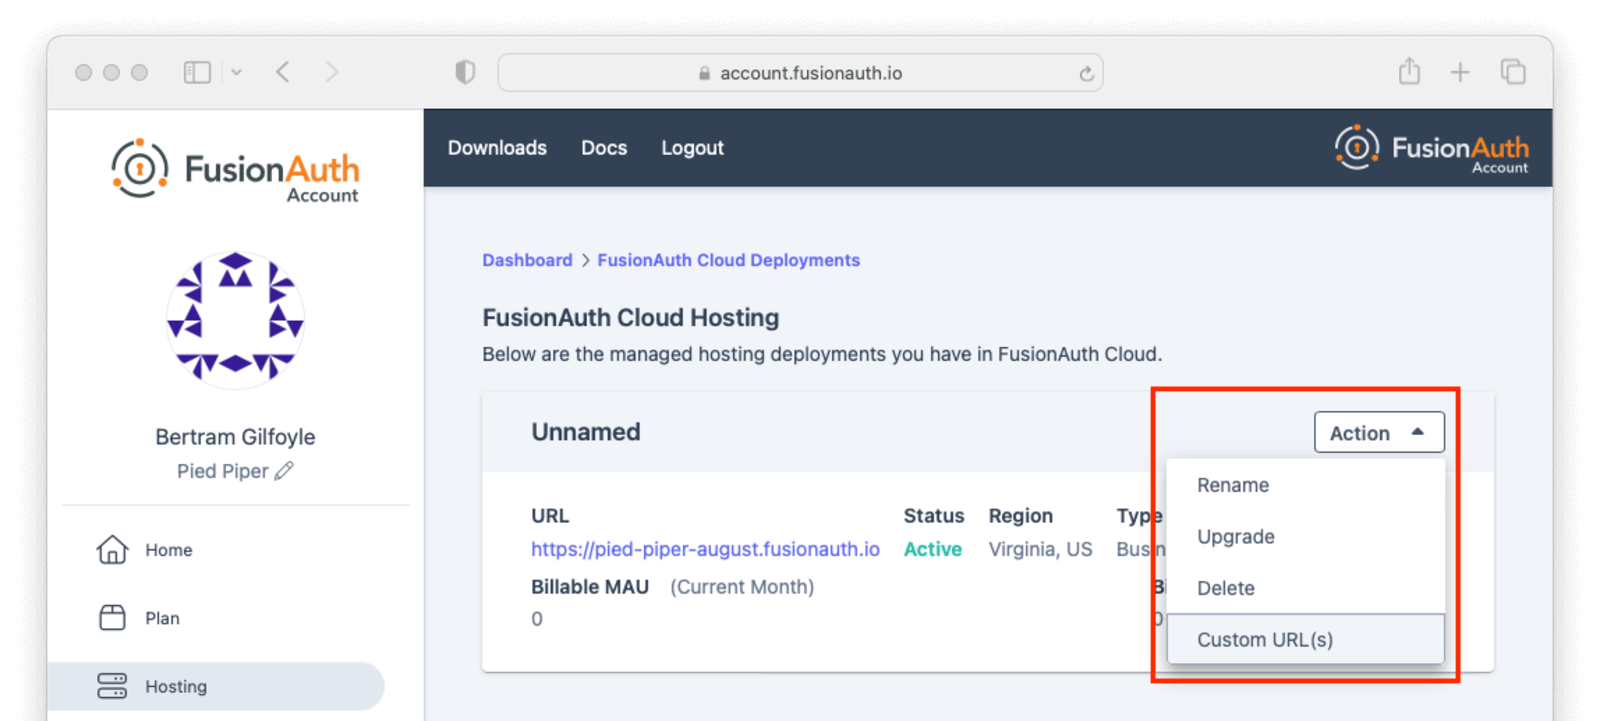
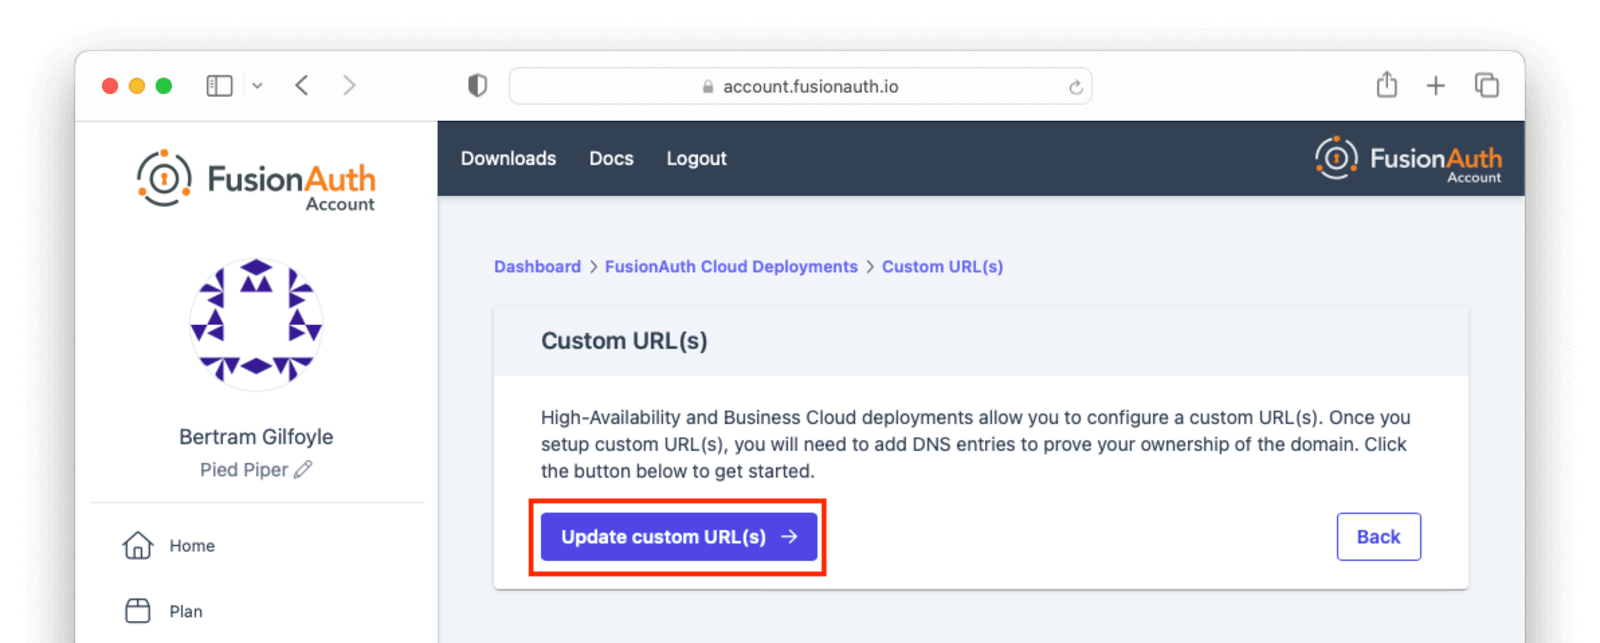
First, log in to your account portal. Navigate to Hosting . Then, choose the Action dropdown and select Custom URL(s) .
If you have existing custom URLs, you'll see them here. To add one, click Update custom URL(s) .
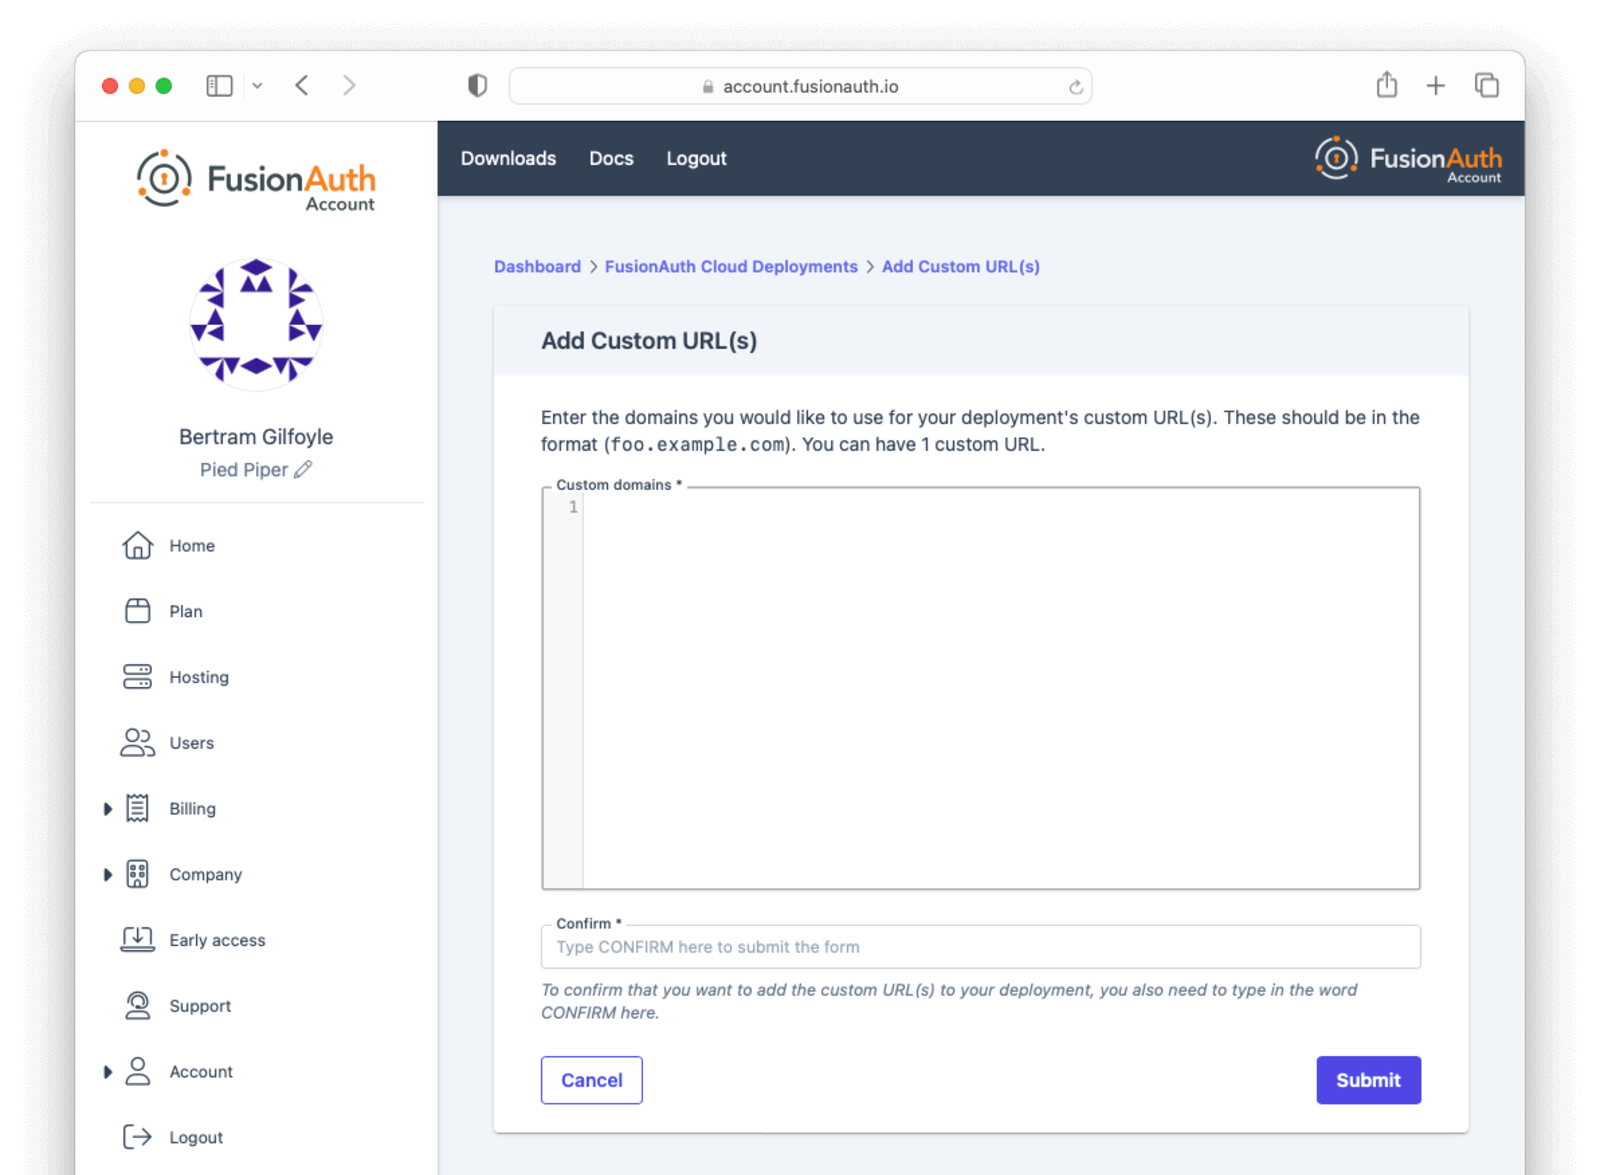
Add the domain names to Custom domains field; for example, auth.piedpiper.com.
Confirm you want the change by entering the text CONFIRM in the Confirm text field.
Then click Submit .
You'll be sent to a verification screen. This screen will update as the proper DNS records and other infrastructure are created.
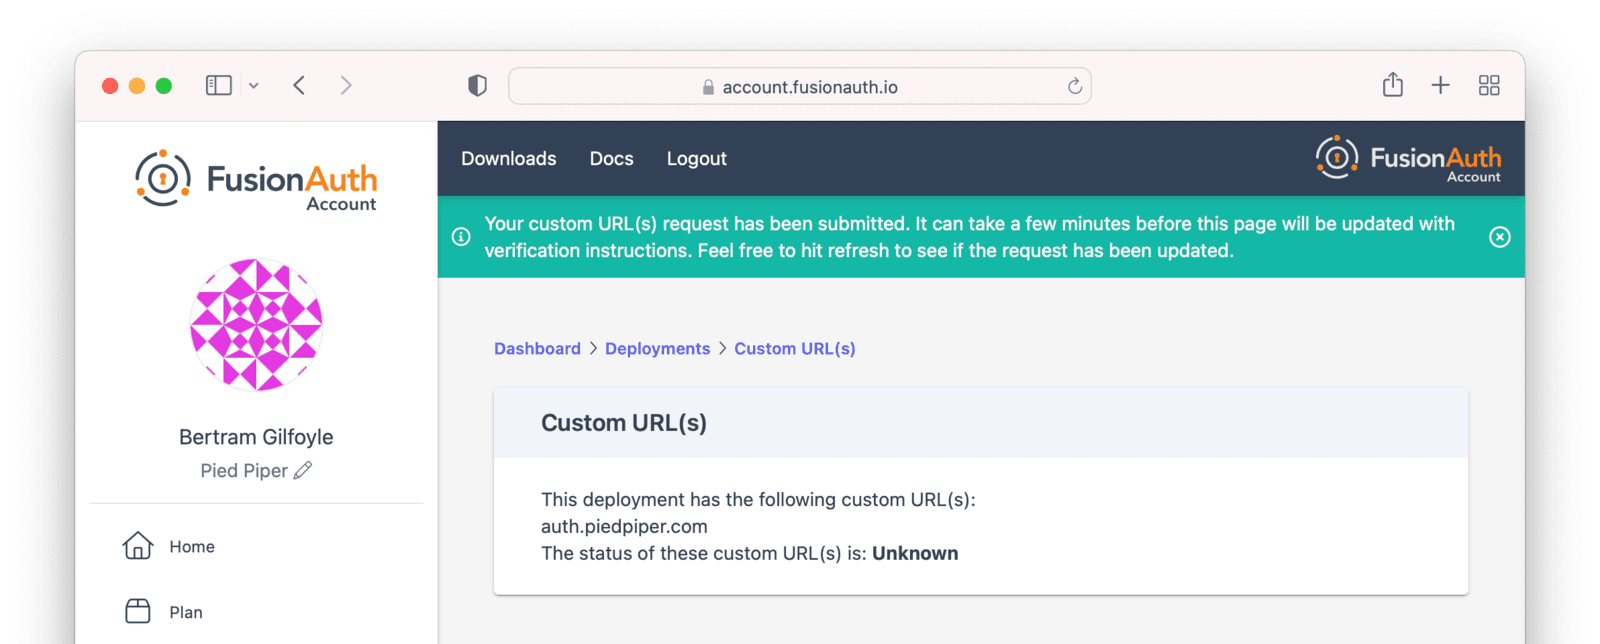
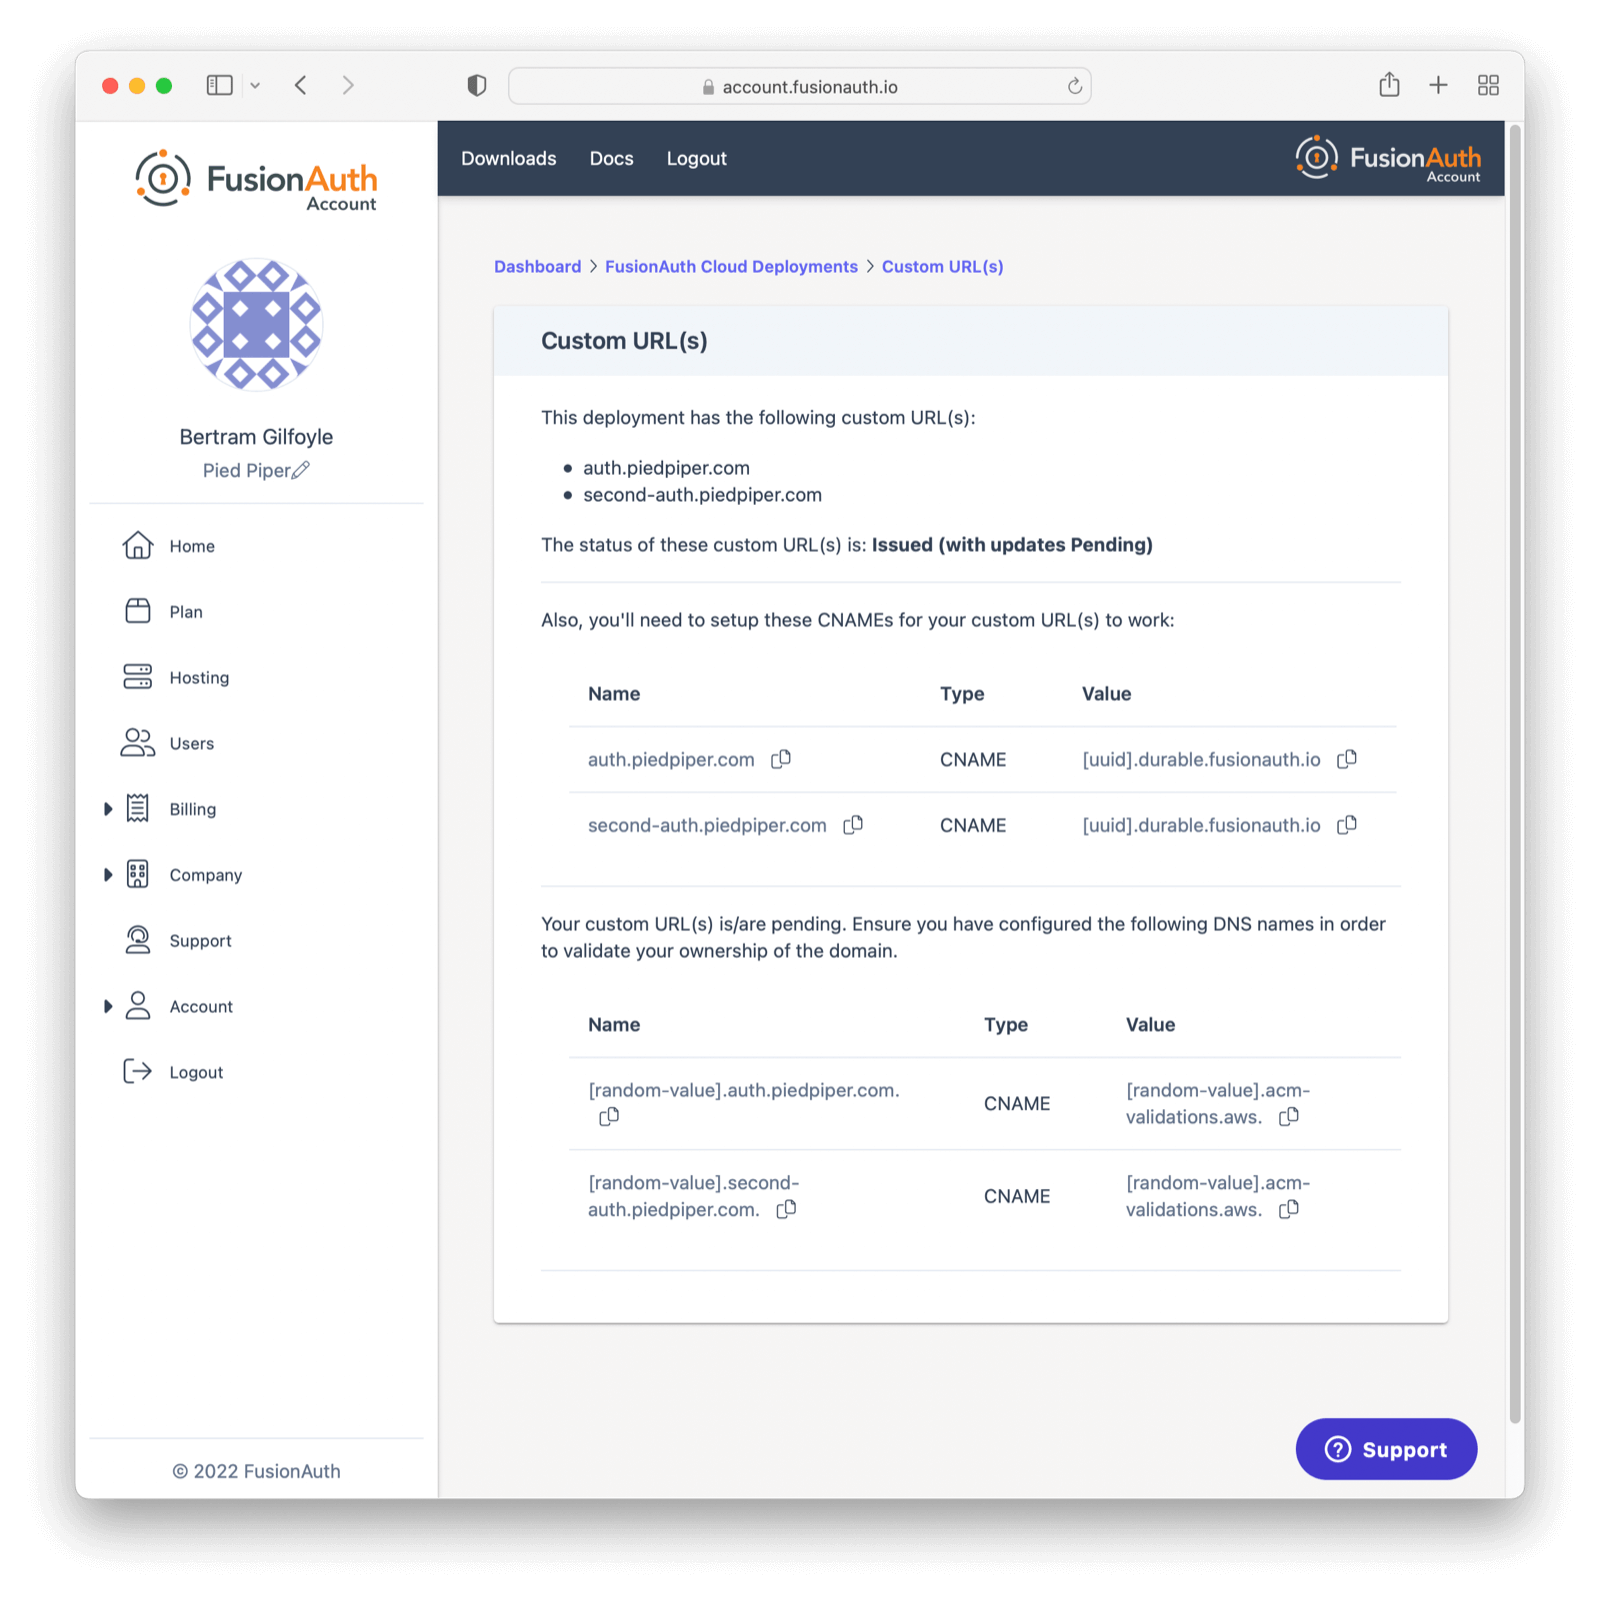
After a few minutes, you'll be shown a set of records that you have to add to your DNS. Once validated, the status will move to Issued. No further action is required at this point.

Updating with Existing Custom Domain(s)#
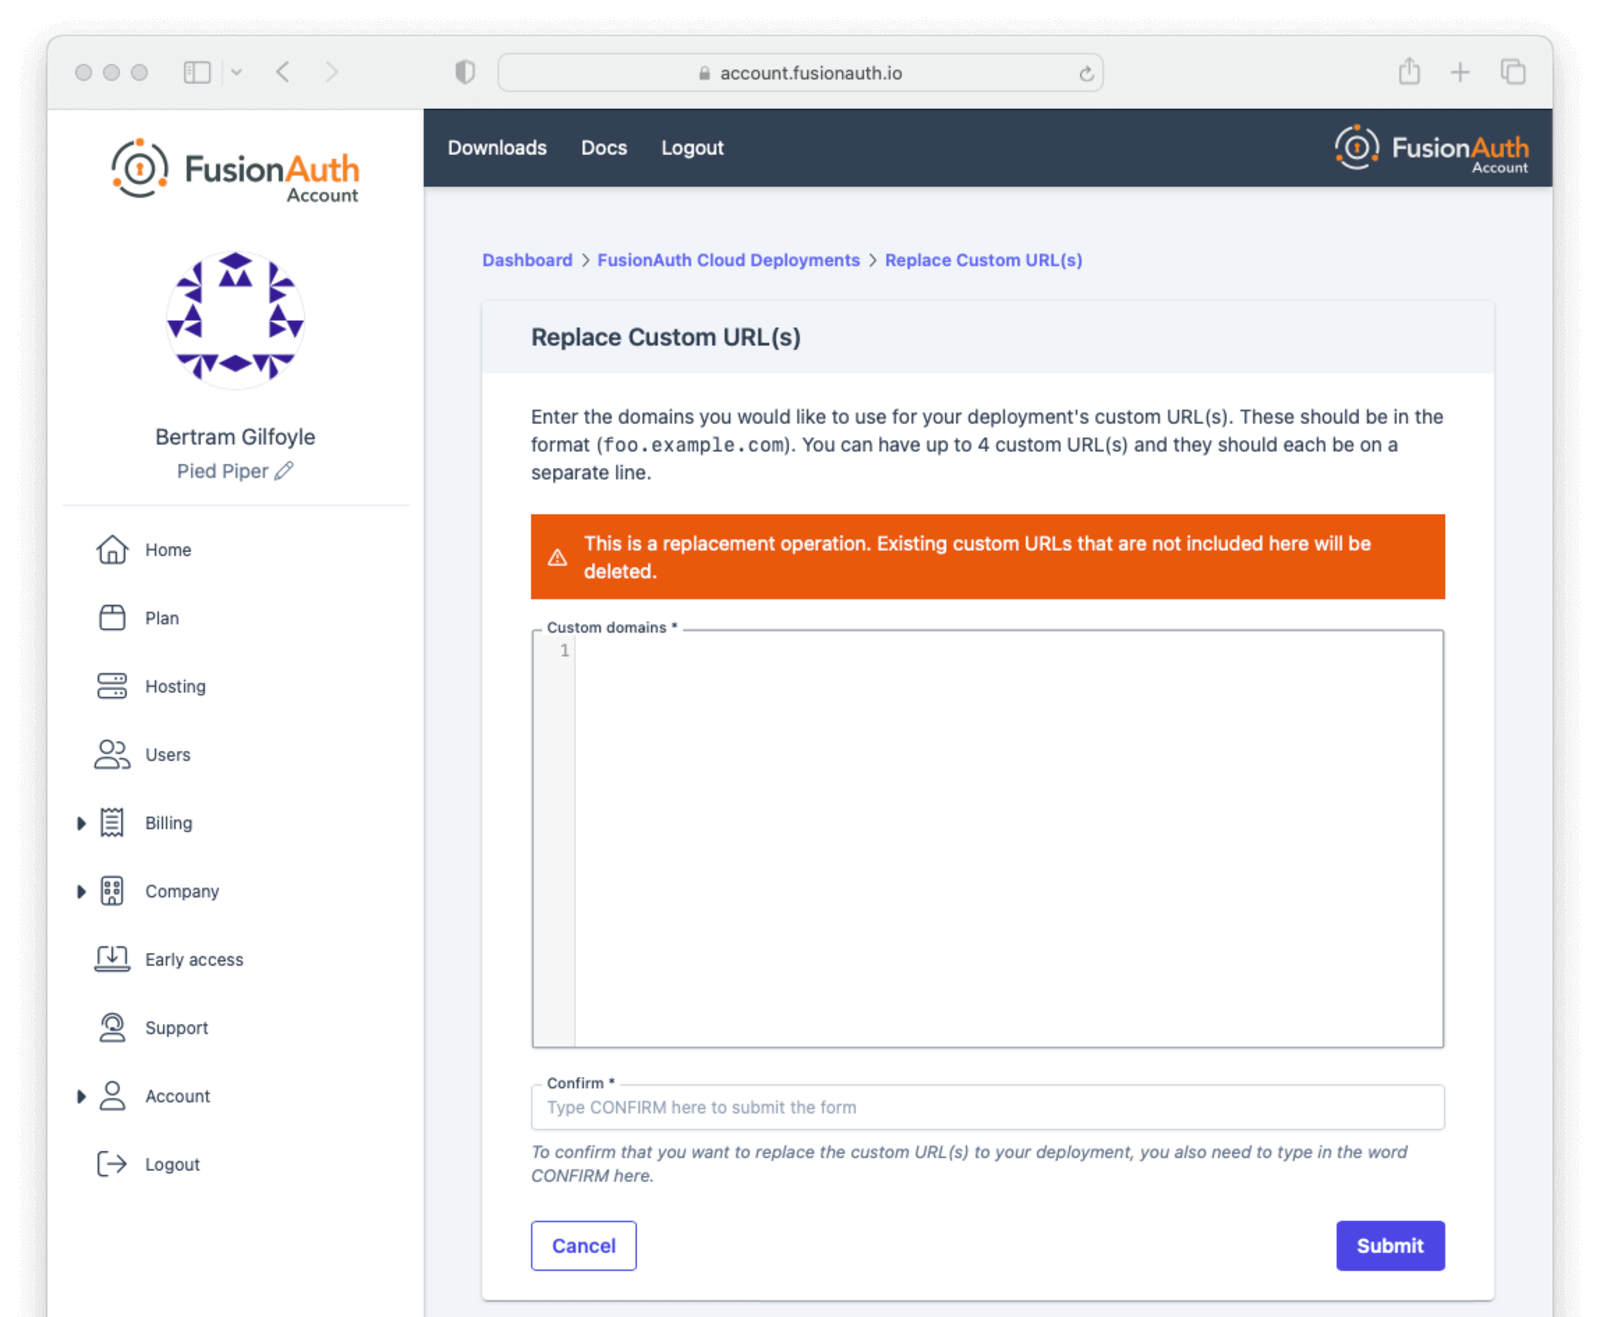
It is common to have one custom domain already associated with your deployment, such as auth.piedpiper.com, and need to add another domain, such as second-auth.piedpiper.com, without affecting the first domain. The ability to add multiple domains is only available on HA Cloud deployments.
You can update the custom domains for your deployment by navigating to the same page where you first added them. Note that updating the custom domains for a deployment is a replacement operation. Any domains not included in the form will be deleted.
Setting up auth.piedpiper.com created two records in your DNS provider:
- A Validation Record CNAME - adding this CNAME to your DNS authorizes FusionAuth Cloud to use
auth.piedpiper.com
[random-value].auth.piedpiper.com. CNAME [random-value].acm-validations.aws.
- A Vanity URL CNAME - this CNAME will actually route traffic from
https://auth.piedpiper.comto your FusionAuth deployment,https://piedpiperdeployment.fusionauth.io
auth.piedpiper.com CNAME [uuid].durable.fusionauth.io or auth.piedpiper.com CNAME piedpiperdeployment.fusionauth.io
FusionAuth Cloud will display these same two records, as well as additional sets of two records for each custom domain requested.
Best practice is to:
- Add the vanity URL CNAMEs.
- Wait for DNS propagation to occur.
- Add the validation record CNAMEs.
This ensures users will always be able to access your FusionAuth deployment at the original auth.piedpiper.com domain, even as you add subsequent custom domains (second-auth.piedpiper.com, for instance). Until the changes are confirmed in DNS, the state will remain Issued with Updated Pending. Once the DNS records are added and verification is complete, the status will return to Issued.
What is a Durable FusionAuth CNAME?#
If you have an existing custom domain, you might have an existing vanity URL with a CNAME similar to this: auth.piedpiper.com CNAME piedpiper-deployment-prod.fusionauth.io
You may notice FusionAuth Cloud now supports a [uuid].durable.fusionauth.io CNAME where [uuid] is a UUID such as 3ffe6da1-e6f5-4be4-96e0-5dabdf42fd68. This durable URL will not change and is functionally equivalent to the above vanity URL. Using this updated CNAME will enable use of Disaster Recovery services should you require them at a later point.
auth.piedpiper.com CNAME [uuid].durable.fusionauth.io
Using a Proxy with FusionAuth Cloud#
If you are using a proxy in front of your FusionAuth Cloud instance, there are a few requirements to be aware of.
The latest FusionAuth Cloud instances use Server Name Indication (SNI) to negotiate TLS connections. Ensure your proxy supports SNI for its connection back to your FusionAuth Cloud deployment.
In order for FusionAuth to provision TLS certificates for your custom domains, your proxy must handle ACM HTTP validation requests made over port 80. Configure a redirect rule so that an HTTP request with a path matching ^/\.well-known/pki-validation/[0-9a-f]{32}\.txt$ is redirected to https://validation.us-east-1.acm-validations.aws/121700706967/ with the original request path appended.
For example, if your custom domain is auth.example.com, a request to:
http://auth.example.com/.well-known/pki-validation/abc123def456abc123def456abc123de.txtshould be redirected to:
https://validation.us-east-1.acm-validations.aws/121700706967/.well-known/pki-validation/abc123def456abc123def456abc123de.txtAdditionally, ensure you have configured DDoS and other protections correctly. FusionAuth Cloud's built-in protection depends in part on receiving correct client IP addresses; a proxy may mask or modify those addresses and render this protection less effective.
For general proxy configuration, including required headers, see the FusionAuth and Proxies documentation.
Accessing User Data#
If you need to export user data from FusionAuth Cloud, because you are migrating away from FusionAuth or setting up a production instance in your data center, open a support ticket. Your data is yours!
A support request is required because data exports contain sensitive fields, like password hashes. The FusionAuth team will work with you to find a safe data transfer mechanism.
If you need to download user data regularly for analytics or other purposes, consider using the User API or a webhook to track ongoing account creation. Be aware that performing such operations as downloading all users in your account can impact performance; if possible, pull a subset of users, such as those who have been created in the last week.
If these solutions do not meet your needs and you have an Enterprise plan, open a support ticket to discuss options for regular data exports.
If you need your user data because you are migrating off of FusionAuth Cloud, it's yours and we'll get it to you. This applies to any level of hosting and plan.
If you need your data exported regularly for any other reason, this is only available to organizations on Enterprise plans.
In either case, please open a support ticket to discuss options.
Restoring From Backup#
Certain FusionAuth Cloud tiers include regular backups. If you need to restore your user database from a backup, open a support ticket with the details.
You can restore to any point in time in the last three days. In the ticket, provide the date and time and timezone to which you'd like to restore your database.
Support#
You can view support options by navigating to the Support tab:
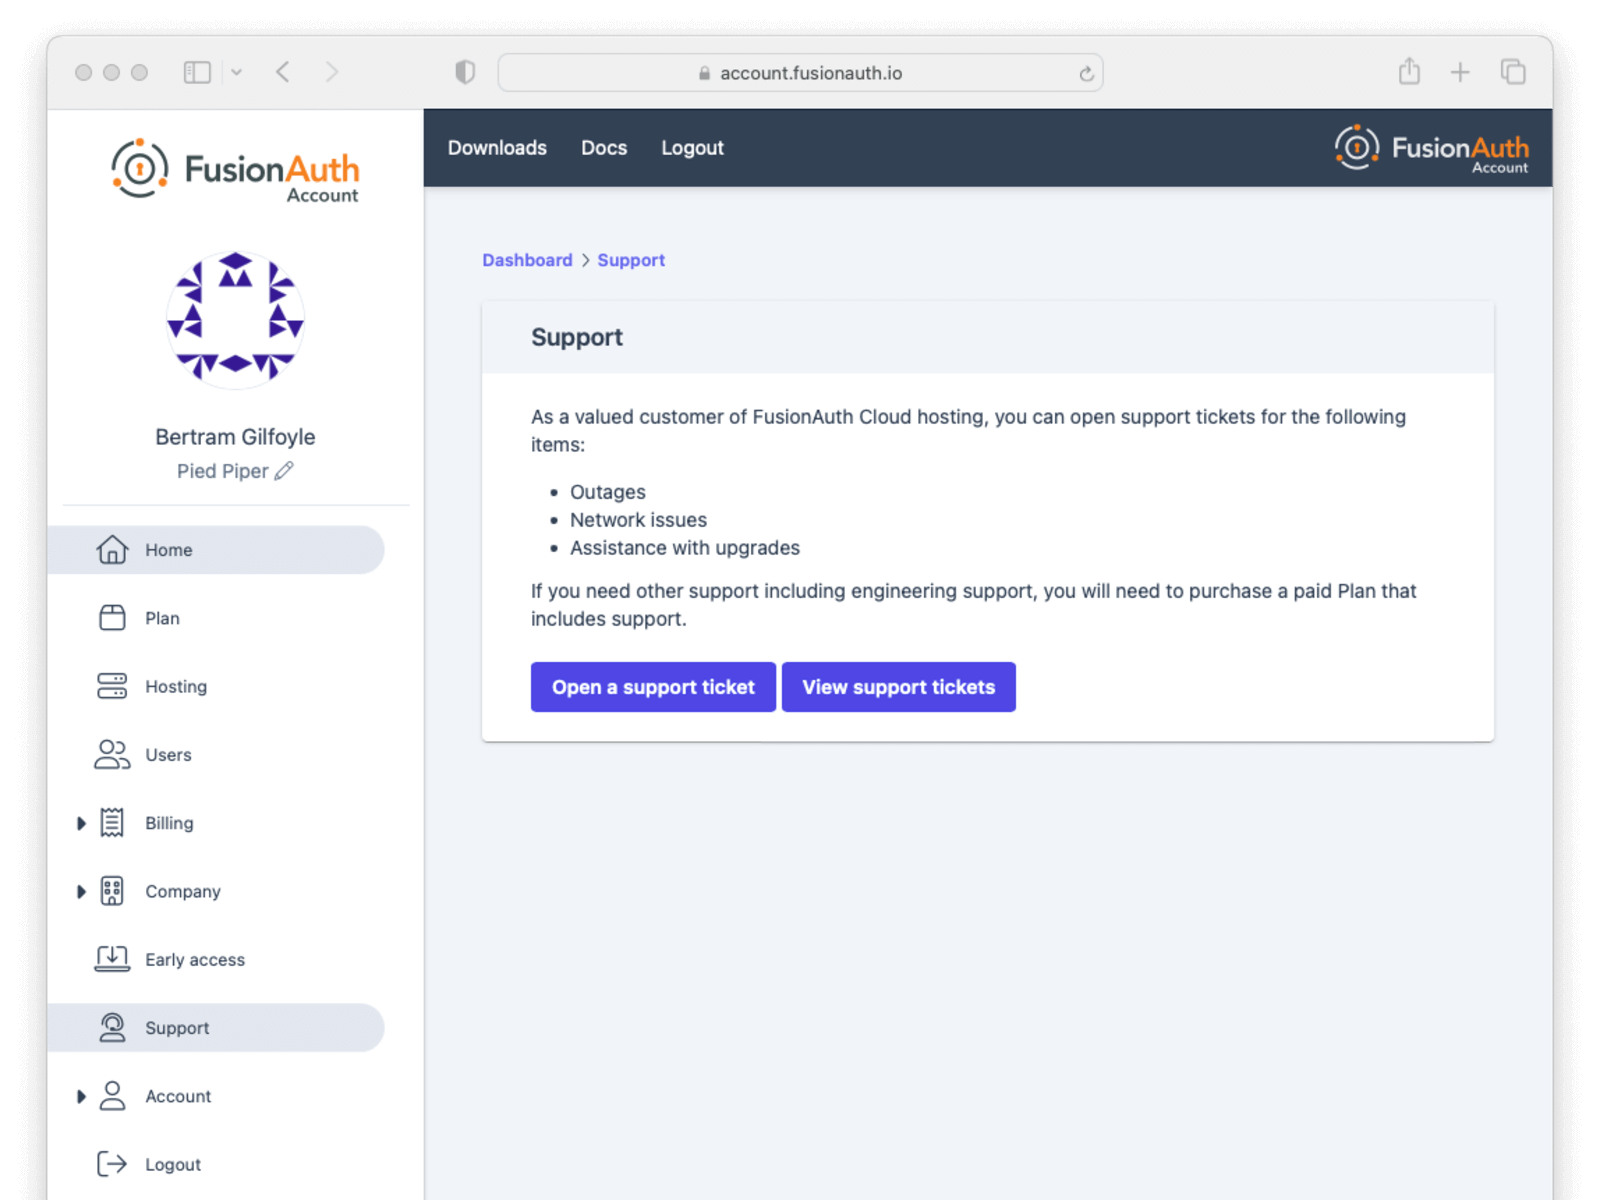
Support for FusionAuth Cloud is limited in scope. Support can only help with issues related to running your FusionAuth Cloud deployments. Some examples:
- "My FusionAuth Cloud instance is down" - supported
- "Please restore my FusionAuth Cloud instance from backup" - supported
- "I need help integrating FusionAuth into my Express/Rails/Django/Spring/etc application" - not supported
- "How do I set up a webhook to sync my user data with an external system?" - not supported
Support from the engineering team for integrating with FusionAuth can be purchased separately.
If you have out of scope questions and have not purchased a support contract, you can find community support in the forums and documentation.
CAPTCHA and Rate Limits#
FusionAuth Cloud has a number of protections in place to prevent a DoS attack and keep your services running smoothly. If you receive 429 response codes or the following message appears, this would indicate the end user, test, or application is making requests in excess of what is considered typical.
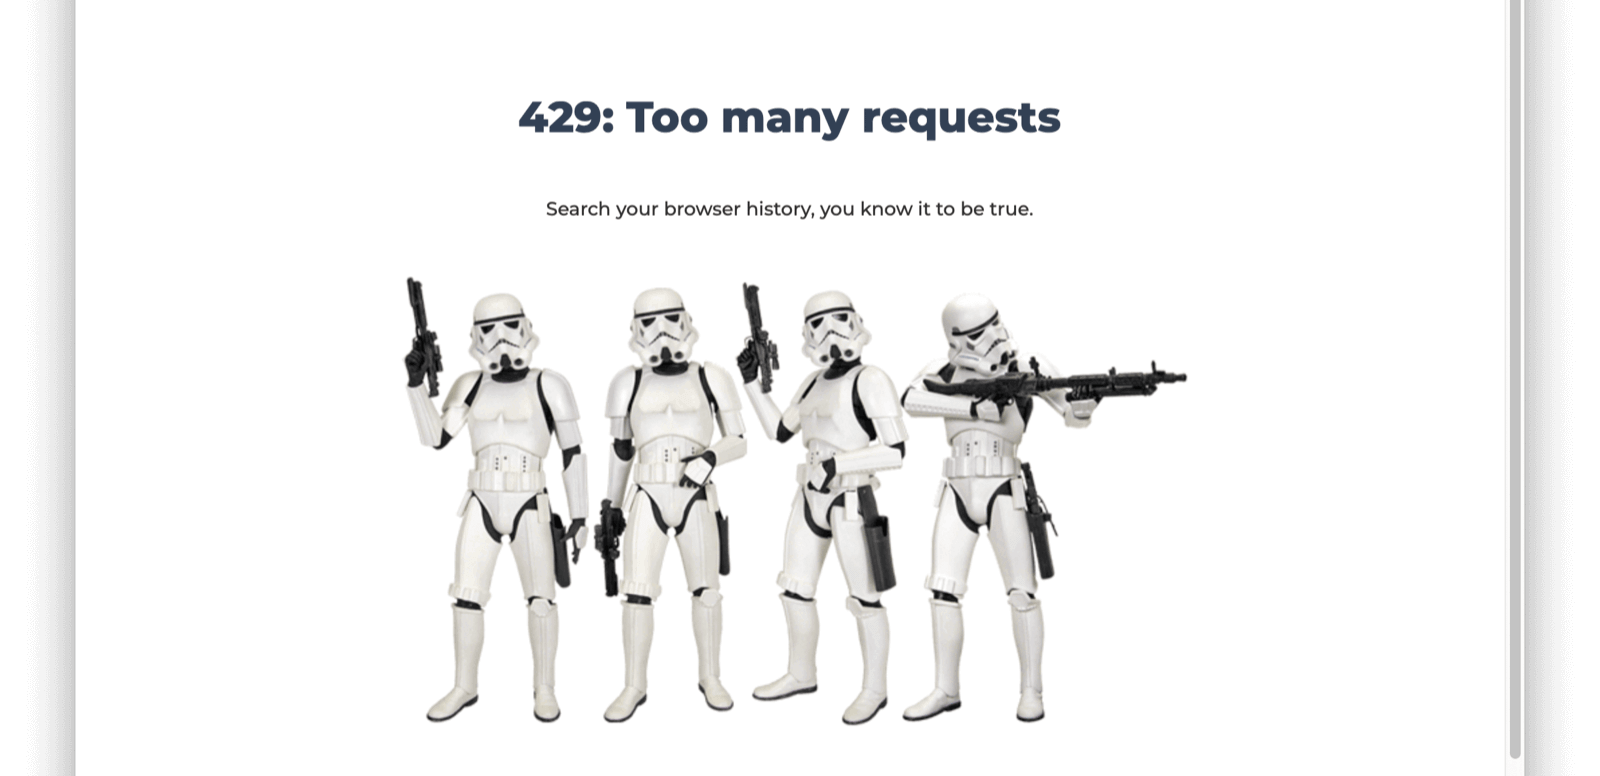
Prior to this message you may receive one of the following CAPTCHA challenges, or a similar one.
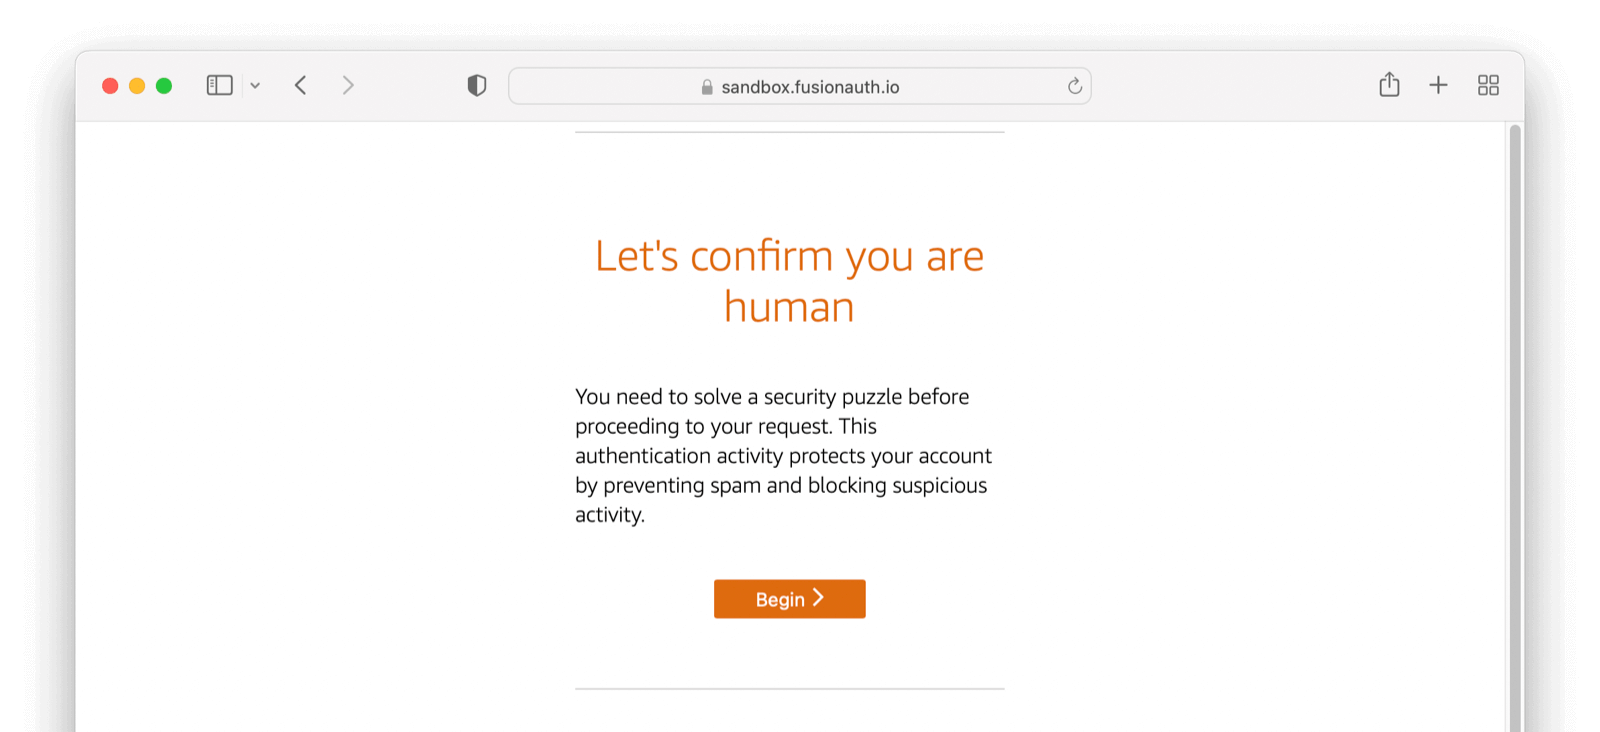

To prevent either scenario please limit the number of requests you are making over a given time period or open a support ticket to add your static production IP addresses to the FusionAuth Cloud allow list as needed.
The criteria for adding an IP address to the FusionAuth Cloud allow list:
- It is static.
- It is owned by your company, not shared with other companies/resources, such as a CDN.
- It is associated with a production server (not a developer's laptop).
If the IP addresses meet these conditions, log a support request. The turnaround time for an allow list change is two to three business days.
If you no longer need an IP address on the allow list, please log a support ticket to remove it.
If you encounter a CAPTCHA during manual testing, ensure you have local browser caching enabled. Using browser developer tools to disable caching often leads to CAPTCHA presentation. Consult the documentation for your browser to learn more.
The CAPTCHA described here is separate from the CAPTCHA configured using Advanced Threat Detection and can only be managed by the FusionAuth team.
Custom FusionAuth Cloud Features#
If managed FusionAuth hosting does not meet your needs, contact us with more details.
We're happy to discuss custom deployment architectures or configurations. If you need any of these:
- Longer retention of database backups.
- Static deployment IP addresses for adding to a firewall allow/deny list.
- Deployments capable of handling more requests per second (custom-built FusionAuth configurations have handled 2,000 requests per second).
- Custom deployments for disaster recovery, compliance, or other reasons.
Please contact us to learn more about these options.
SLAs and Availability#
We know that availability of your auth system is critical. Below are some of the steps FusionAuth takes to ensure that FusionAuth Cloud systems are available.
For all deployments:
- All components are monitored via external software systems as well as internal metrics gathering systems.
- The application architecture is not exotic, reducing risk. This is a three tier web application, which is a well understood architecture.
- Third party security researchers can submit security issues via a bug bounty program.
- The FusionAuth software and infrastructure is pentested on a regular basis.
- Major changes, such as FusionAuth upgrades or operating system upgrades, are scripted and rollout timing is controlled by the customer.
- Modifications to the underlying product are tested extensively, including load testing where appropriate.
- Automated rulesets provide protection against DDoS.
- A world class cloud provider's managed services for system components are used where appropriate.
- Network firewalls are automatically configured on deployment to set up "least privileged" access to each architectural component.
For high availability/HA deployments:
- Each deployment has redundant components. This includes, but is not limited to, the DNS system, load balancer, and the compute nodes running FusionAuth.
- Each deployment's relational database is set up in a primary/secondary configuration. If the primary becomes unavailable the secondary will "stand up" and the instance will continue to be available. This is also known as "full database replication".
- Each set of components is run in separate geographic availability zones, geographically separated. This prevents disasters from affecting all components.
- The FusionAuth engineering team will consult on product implementation and can offer "best practices" advice to further ensure system stability.
- We size the instance properly for expected traffic, in consultation with the customer.
You can find more information about service level agreements (SLAs) in the FusionAuth license and license FAQ, including uptime numbers and definitions of downtime.
For all deployments which include backups (HA and Business Cloud), the default backup retention is 3 days.
Deployment IP Addresses#
Depending on your security posture, defense in depth requirements, and application architecture, you may need the IP addresses or hostnames of the instances in your FusionAuth Cloud deployment.
There are any number of reasons you might need this information, including:
- Adding the values to the allow list for your SMTP service.
- Punching a hole in a firewall to allow FusionAuth webhooks to be delivered.
- Updating a network access control list to enable access to an on-premises LDAP directory with a connector.
- Any other outbound connection from a FusionAuth deployment.
To get the IP addresses for your deployment, please open a support ticket. Include the name of the deployment for which you need the outbound IP addresses.
Provided IP addresses should not be used for HTTP requests such as API calls; they won't respond to such requests.
This information should be used only to allow outbound traffic from FusionAuth deployments through firewalls and other network control layers.
In addition to using these IP addresses, consider custom headers, TLS transport and client certificates to ensure that outbound traffic is appropriately secured.
Load Testing#
You can load test FusionAuth to determine if its performance will meet your calculated needs. The FusionAuth team tests the performance of FusionAuth regularly, but every situation is different and running your own load tests on your instance provides useful information.
You may use your own load testing tool. Any tool which can make HTTP requests, such as gatling or JMeter, will work.
There is an open source project which provides some useful scripts for load testing. This is a specialized library and primarily used for internal purposes, so use at your own risk. Scenarios currently supported include:
- Creating tenants
- Creating applications
- Registering users for applications
- Logging users in using the Login API
- A full Authorization Code grant
General Tips#
Performance bottlenecks are typically the database or the CPU nodes, depending on sizing of each of these components and primary functionality tested. For example, both logins and creating users use a lot of CPU due to password hashing. Make sure each of these components are monitored and sized appropriately.
If testing a multi-node system behind a load balancer, ensure that you have disabled sticky sessions, as they are not required for FusionAuth functionality.
Load Testing With FusionAuth Cloud#
Load testing is an important part of evaluating FusionAuth. However, it is important to load test in an environment that replicates your expected production environment. This means that if you are planning to use an HA cloud deployment for production, you should load test against that type of environment.
When you are load testing against FusionAuth Cloud instances:
- Please open a support ticket to let us know when you are planning to load test. We monitor CPU usage and other metrics and it can be helpful for us to know when you are planning to stress test your instance.
- Store configuration as scripts which you can apply to your FusionAuth instance. This allows you to easily stand up and tear down different deployments to see what meets your needs.
- If you have a plan with support, please open a support ticket if you'd like additional support or guidance on sizing or testing.
Please don't use a FusionAuth Cloud Basic deployment to load test. Instances on this tier of FusionAuth Cloud run on a single compute node, so the node is running FusionAuth, Elasticsearch and a PostgreSQL database. The node is therefore very resource constrained, and attempting to run load tests on this type of system is not recommended. The numbers you get from this type of test will not be valuable to you in planning your production deployment.
Testing on a Business Cloud or High-Availability Cloud plan will provide more useful results. If you cannot achieve your target request per second with a standard setup, you can create a deployment with larger node sizes. You can spin up a deployment, apply your configuration, perform load testing, and tear it down. You'll only be charged for the time the instance is running.
Account Deletion#
To delete your account, take the following steps, in this order:
- Log into your account.
- Delete all deployments.
- Switch your account to the Community plan.
- Delete your company.
FusionAuth requires that customers delete their own deployments using the account portal.
FusionAuth is not able to cancel accounts with deployments that could potentially contain critical user data.
To remove your deployments, please log into your account and navigate to the Hosting tab. Once you see your deployment, you can click the Action button and select Delete . After a deployment is destroyed, you won't be charged for this instance going forward. Any previous usage outside of a free trial will be billed.
Then, switch your plan type to the Community plan. After the current billing cycle is done, you won't be charged; plans are billed monthly.
After deleting your deployments and changing your plan, your account will not be charged after the current billing cycle, unless you start up another instance or change your plan to something else. It is inactive and can be deleted if you desire.
It is perfectly acceptable to leave your account in this condition, especially in the case where you may be doing future work with FusionAuth. However, if data practices or company policies mandate, you may also remove your account from FusionAuth Cloud. Removing a company and its data is not reversible. To delete the company, navigate to Company -> Danger Zone and follow the instructions there.
If you cannot delete the company following these instructions, you may have an account which requires FusionAuth team assistance. This occurs if your FusionAuth plan is invoiced, for example.
In this case, please contact your account team for further instructions. A support ticket may also be required to remove your company.
Limits#
FusionAuth Cloud has the same limitations as self-hosted FusionAuth.
Since it is a managed service, there are additional limitations as well:
- No access is provided to the server on which your deployment is running. This includes access to the database, Elasticsearch, or ssh. You can access your data via FusionAuth API or the admin UI. To install a password hashing plugin, please open a support ticket.
- There is no API to manage FusionAuth Cloud deployments.
- You cannot modify any of the FusionAuth configuration options.
- You cannot self-service downgrade the version of a FusionAuth Cloud deployment. For example, you cannot change the version from
1.35.0to1.34.0.- If you have a deployment with backups, you can roll back by restoring from backup.
- You cannot run a Kickstart file on a FusionAuth Cloud deployment.
- There is no support for proxy customization to add, for example, tenant routing. To accomplish such goals, add your own proxy layer such as CloudFlare, with FusionAuth Cloud as an origin. Make sure you configure the trusted proxies.
- You cannot modify
X-Forwarded-PortorX-Forwarded-Proto. For example, you can't proxy a FusionAuth Cloud instance to make it appear as if it was running athttp://localhostor another non-TLS endpoint.
- You cannot modify
- Use of port 25 is not allowed. To connect to an SMTP server such as Mailgun or SES, use a different port.
- If you are on FusionAuth Cloud and you find that some requests are failing with a
429status code, you are being rate limited. This isn't intentional, but an automated part of our infrastructure to ensure FusionAuth Cloud performance and security. Learn more here, including how to avoid rate limiting for certain servers. - If you want to run Advanced Threat Detection, an Enterprise feature, you'll need a cloud deployment with sufficient memory. It must be a Large or X-Large.
- With HA and other multi-node deployments, requests are passed through a load balancer. When making requests to node specific metrics endpoints such as
/api/statusor/api/prometheus/metricseach request may return different results because the response is specific to the service node responding to the request. Using these endpoints to monitor a deployment is not recommended. - You may not modify the Elasticsearch settings or view the Elasticsearch index directly. Among other things, this means that you can't use some of the troubleshooting steps available to users self-hosting FusionAuth.
- OpenTelemetry data is not available on FusionAuth Cloud deployments.
- There is a limit of 1000 indexed fields. These include user.data,
registration.dataand standard indexed fields likeemail. - In certain cases, only current log files are available for download under System -> Logs . If you need all log files, including those previously rotated, please open a support ticket.