Docker
This page explains how to install FusionAuth using Docker.
The instructions below require the following prerequisites:
- Docker 23 or later
- On macOS and Windows, one of the following container management tools:
- OrbStack (to use Orbstack for
docker composecommands after install, rundocker context use orbstack) - Podman (in the commands below, replace
dockerwithpodman) - Docker desktop
- OrbStack (to use Orbstack for
For Kubernetes install instructions, see Install with Kubernetes. For OpenShift and other community-supported environments, see the FusionAuth Contrib GitHub repo.
For more FusionAuth Docker images, see fusionauth on Docker Hub.
Docker Compose#
Use the steps below to install FusionAuth using Docker Compose using the configuration files in the fusionauth-containers repository. For an in-depth example, see the FusionAuth Docker Compose example repository.
-
Download the
docker-compose.ymland.envfiles:curl -o docker-compose.yml https://raw.githubusercontent.com/FusionAuth/fusionauth-containers/main/docker/fusionauth/docker-compose.ymldocker-compose.yml
services:
  #
  # Required services (database and FusionAuth)
  #

  # Postgresql is the default database. You can swap this out for MySQL if you prefer.
  db:
    image: postgres:16.0-bookworm
    environment:
      PGDATA: /var/lib/postgresql/data/pgdata
      POSTGRES_USER: ${POSTGRES_USER}
      POSTGRES_PASSWORD: ${POSTGRES_PASSWORD}
    healthcheck:
      test: [ "CMD-SHELL", "pg_isready -U postgres" ]
      interval: 5s
      timeout: 5s
      retries: 5
    restart: unless-stopped
    volumes:
      - db_data:/var/lib/postgresql/data

  # This is the main FusionAuth application.
  fusionauth:
    image: fusionauth/fusionauth-app:latest
    depends_on:
      db:
        condition: service_healthy
      search:
        condition: service_healthy
    environment:
      DATABASE_URL: jdbc:postgresql://db:5432/fusionauth
      DATABASE_ROOT_USERNAME: ${POSTGRES_USER}
      DATABASE_ROOT_PASSWORD: ${POSTGRES_PASSWORD}
      DATABASE_USERNAME: ${DATABASE_USER}
      DATABASE_PASSWORD: ${DATABASE_PASSWORD}
      FUSIONAUTH_APP_KICKSTART_FILE: ${FUSIONAUTH_APP_KICKSTART_FILE}
      FUSIONAUTH_APP_MEMORY: ${FUSIONAUTH_APP_MEMORY}
      FUSIONAUTH_APP_RUNTIME_MODE: ${FUSIONAUTH_APP_RUNTIME_MODE}
      FUSIONAUTH_APP_URL: http://fusionauth:9011
      SEARCH_SERVERS: http://search:9200
      SEARCH_TYPE: ${FUSIONAUTH_SEARCH_TYPE}
      FUSIONAUTH_APP_INSTALLATION_SOURCE: fusionauth-containers
    healthcheck:
      test: curl --silent --fail http://localhost:9011/api/status -o /dev/null -w "%{http_code}"
      interval: 5s
      timeout: 5s
      retries: 5
    restart: unless-stopped
    ports:
      - 9011:9011
    volumes:
      - fusionauth_config:/usr/local/fusionauth/config
      - ${FUSIONAUTH_LOCAL_KICKSTART_DIRECTORY}:/usr/local/fusionauth/kickstart
      - ${FUSIONAUTH_LOCAL_PLUGIN_DIRECTORY}:/usr/local/fusionauth/plugins

  # Open Search isn't technically required, but the `fusionauth` service currently depends on it, so we start it here.
  # You can change the search engine backend to `database` in the `.env` file if you would prefer to use that.
  # Then you can remove the search dependency above and disable this service.
  search:
    image: opensearchproject/opensearch:2.11.0
    environment:
      cluster.name: fusionauth
      discovery.type: single-node
      node.name: search
      plugins.security.disabled: "true"
      bootstrap.memory_lock: "true"
      OPENSEARCH_JAVA_OPTS: ${OPENSEARCH_JAVA_OPTS}
    healthcheck:
      interval: 10s
      retries: 80
      test: curl --write-out 'HTTP %{http_code}' --fail --silent --output /dev/null http://localhost:9200/
    restart: unless-stopped
    ulimits:
      memlock:
        soft: -1
        hard: -1
      nofile:
        soft: 65536
        hard: 65536
    ports:
      - 9200:9200 # REST API
      - 9600:9600 # Performance Analyzer
    volumes:
      - search_data:/usr/share/opensearch/data

  #
  # Optional services
  #

  # Caddy can be used as a proxy to FusionAuth.
  caddy:
    image: caddy
    profiles:
      - caddy
    depends_on:
      - fusionauth
    restart: unless-stopped
    ports:
      - "80:80"
      - "443:443"
    volumes:
      - ./Caddyfile:/etc/caddy/Caddyfile
      - caddy_data:/data
      - caddy_config:/config

  # Mailcatcher is a nice SMTP server that can be used for development and testing. You'll need to configure FusionAuth
  # to use Mailcatcher (or use a Kickstart file that points the SMTP configuration to localhost:1025).
  mailcatcher:
    image: sj26/mailcatcher
    profiles:
      - mailcatcher
    ports:
      - "1025:1025"
      - "1080:1080"
    healthcheck:
      interval: 10s
      retries: 80
      test: wget -q -O /dev/null http://mailcatcher:1080/

  # Zookeeper is needed for Kafka
  zookeeper:
    image: confluentinc/cp-zookeeper:latest
    profiles:
      - kafka
    environment:
      ZOOKEEPER_CLIENT_PORT: 2181
      ZOOKEEPER_TICK_TIME: 2000
    ports:
      - 2181:2181

  # Kafka can be used for Webhooks rather than HTTP. You'll need to configure FusionAuth to use Kafka (or use a
  # Kickstart file that enables Kafka).
  kafka:
    image: confluentinc/cp-kafka:latest
    profiles:
      - kafka
    depends_on:
      - zookeeper
    ports:
      - 9092:9092
    environment:
      KAFKA_BROKER_ID: 1
      KAFKA_ZOOKEEPER_CONNECT: zookeeper:2181
      KAFKA_ADVERTISED_LISTENERS: PLAINTEXT://kafka:9092
      KAFKA_LISTENER_SECURITY_PROTOCOL_MAP: PLAINTEXT:PLAINTEXT
      KAFKA_INTER_BROKER_LISTENER_NAME: PLAINTEXT
      KAFKA_OFFSETS_TOPIC_REPLICATION_FACTOR: 1

  # Cleanspeak provides filtering of usernames and profile data to prevent profanity and other unwanted content. You'll
  # need a Cleanspeak license to enable this service.
  cleanspeak:
    image: cleanspeak/cleanspeak-app:latest
    profiles:
      - cleanspeak
    depends_on:
      db:
        condition: service_healthy
      search:
        condition: service_healthy
    environment:
      DATABASE_URL: jdbc:postgresql://db:5432/cleanspeak
      DATABASE_ROOT_USERNAME: ${POSTGRES_USER}
      DATABASE_ROOT_PASSWORD: ${POSTGRES_PASSWORD}
      DATABASE_USERNAME: ${DATABASE_USER}
      DATABASE_PASSWORD: ${DATABASE_PASSWORD}
      CLEANSPEAK_APP_MEMORY: ${CLEANSPEAK_APP_MEMORY}
      LICENSE_ID: ${CLEANSPEAK_LICENSE_ID}
      SEARCH_SERVERS: http://search:9200
    restart: unless-stopped
    ports:
      - 8001:8001
    volumes:
      - cs_config:/usr/local/cleanspeak/config

  # OpenTelemetry can be used to collect metrics from FusionAuth and push them to Prometheus or other systems. You might need
  # to configure OpenTelemetry by editing the opentelementy-collector-config.yml file.
  opentelemetry:
    image: otel/opentelemetry-collector
    profiles:
      - opentelemetry
    depends_on:
      - fusionauth
    ports:
      - 8889:8889
      - 4318:4318
    volumes:
      - ${OPENTELEMETRY_COLLECTOR_CONFIG_FILE}:/etc/opentelemetry/collector-config.yml
    command: [ "--config=/etc/opentelemetry/collector-config.yml" ]

  # Prometheus can be used to monitor FusionAuth and can be used with OpenTelemetry or directly. Depending on the way you want to
  # use Prometheus, you might need to change the PROMETHEUS_CONFIG_FILE variable to point to a different configuration file or
  # edit the configuration files as needed.
  prometheus:
    image: prom/prometheus
    profiles:
      - prometheus
    depends_on:
      - fusionauth
    ports:
      - 9090:9090
    volumes:
      - ${PROMETHEUS_CONFIG_FILE}:/etc/prometheus/prometheus.yml
      - ${PROMETHEUS_RULES_FILE}:/etc/prometheus/rules.yml
      - prometheus_data:/prometheus

  # Alertmanager can be used in conjunction with Prometheus to handle errors that are collected.
  alertmanager:
    image: prom/alertmanager:v0.28.1
    profiles:
      - alertmanager
    depends_on:
      - prometheus
    ports:
      - 9093:9093
    volumes:
      - ${ALERTMANAGER_CONFIG_FILE}:/etc/alertmanager/alertmanager-config.yml

volumes:
  caddy_config:
  caddy_data:
  cs_config:
  db_data:
  fusionauth_config:
  prometheus_data:
  search_data:
curl -o .env https://raw.githubusercontent.com/FusionAuth/fusionauth-containers/main/docker/fusionauth/.env.env
ALERTMANAGER_CONFIG_FILE=./monitoring/alertmanager-config.yml CLEANSPEAK_APP_MEMORY=512M CLEANSPEAK_LICENSE_ID=insert-license-id-here DATABASE_USER=fusionauth DATABASE_PASSWORD=hkaLBM3RVnyYeYeqE3WI1w2e4Avpy0Wd5O3s3 FUSIONAUTH_APP_KICKSTART_FILE=/usr/local/fusionauth/kickstart/kickstart.json FUSIONAUTH_APP_MEMORY=512M FUSIONAUTH_APP_RUNTIME_MODE=development FUSIONAUTH_LOCAL_KICKSTART_DIRECTORY=./kickstart FUSIONAUTH_LOCAL_PLUGIN_DIRECTORY=./plugins FUSIONAUTH_SEARCH_TYPE=elasticsearch OPENSEARCH_JAVA_OPTS="-Xms512m -Xmx512m" OPENTELEMETRY_COLLECTOR_CONFIG_FILE=./monitoring/opentelemetry-collector-config.yml POSTGRES_USER=postgres POSTGRES_PASSWORD=postgres PROMETHEUS_CONFIG_FILE=./monitoring/prometheus-config.yml PROMETHEUS_RULES_FILE=./monitoring/prometheus-rules.yml -
Modify
DATABASE_PASSWORDand ensure thePOSTGRES_USERandPOSTGRES_PASSWORDvalues are correct. You may also override any of these values using environment variables. -
Start the FusionAuth docker container:
docker compose up -d -
Visit http://localhost:9011 to access the Admin UI.
-
Congratulations, you have a working instance of FusionAuth! To set up login for an application, see our First Time Setup guide.
Docker Services#
This example configuration includes the following services:
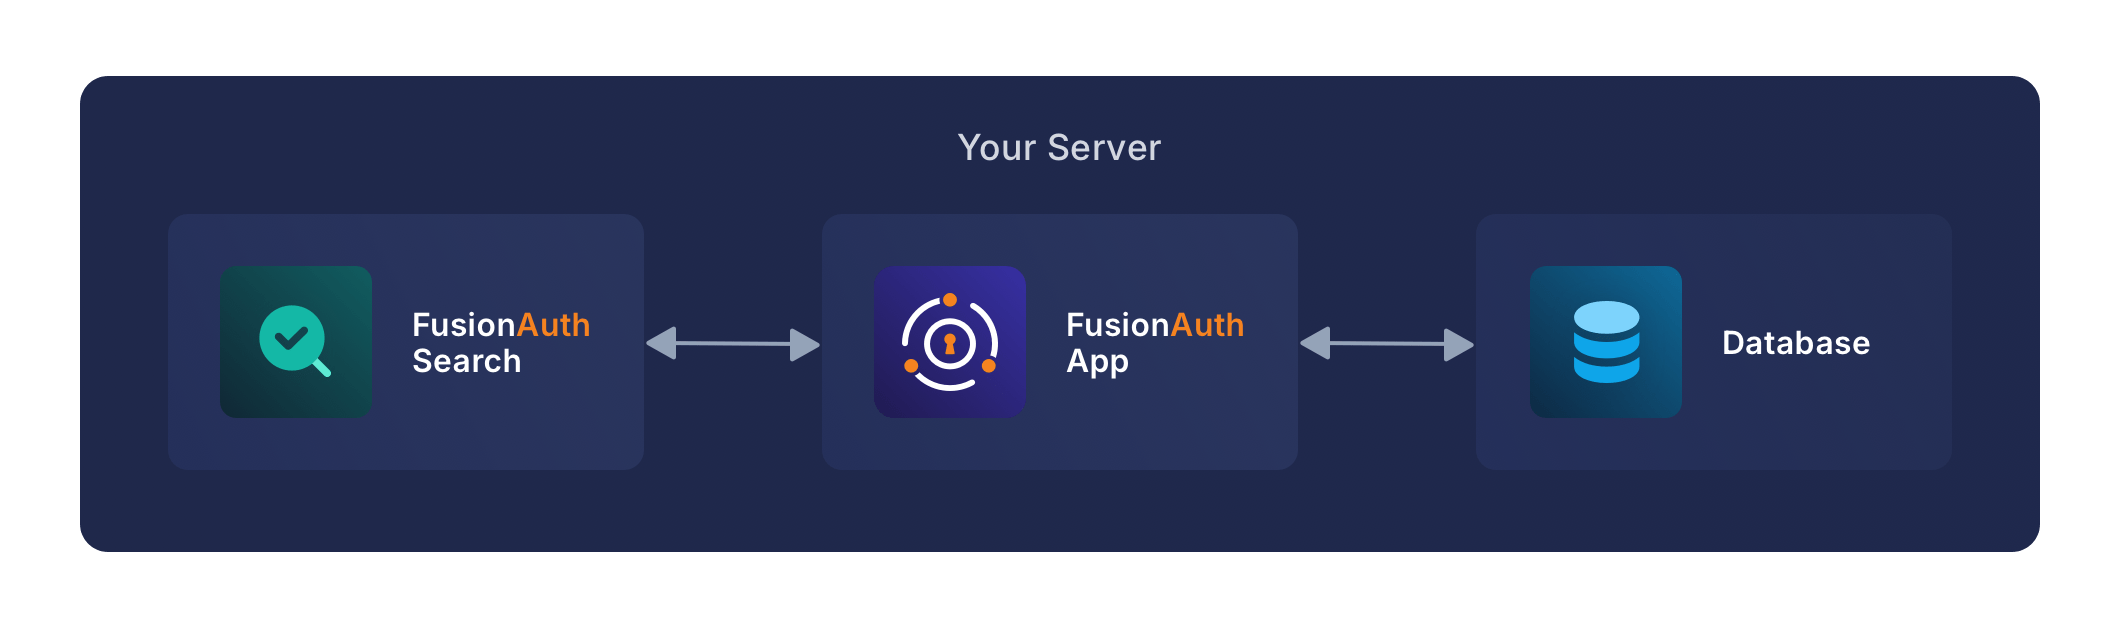
FusionAuth Service#
This is the service that runs the FusionAuth application.
Review the Configuration documentation to customize your deployment. The best way to configure FusionAuth when using Docker is to use environment variables as documented in that link.
By default, this configuration exposes port 9011 to your host machine.
Database Service#
The database service provides a PostgreSQL database for use by FusionAuth.
Either set the POSTGRES_PASSWORD environment variable in the db service section, or, more ideally, set the value in the host environment and only reference it in the docker-compose.yml file.
By default this database is not accessible outside of the Docker Compose containers.
Search Service#
The search service provides a searchable index of users and field data.
Custom Docker Images#
If you want to build your own image starting with our base image, start with the fusionauth/fusionauth-app image. Just as the FusionAuth Docker image is based on an Ubuntu container image, you can build a Docker file which is based on the fusionauth/fusionauth-app:latest image. This can be useful if you want to permanently add a password hashing plugin, configuration file, or other customization to the image.
Here's a Dockerfile which extends the latest FusionAuth image:
Example Dockerfile for building fusionauth-app including a plugin
FROM maven AS build
WORKDIR /app
RUN git init . &&\
  git remote add -t \* -f origin https://github.com/FusionAuth/fusionauth-example-password-encryptor.git &&\
  git checkout master &&\
  mvn compile package

FROM fusionauth/fusionauth-app:latest
COPY --chown=fusionauth:fusionauth --from=build /app/target/fusionauth-example-password-encryptor*.jar /usr/local/fusionauth/plugins/
Here's an example docker compose YAML file which uses this new image:
Example docker-compose.yml for building fusionauth-app including a plugin
version: '3'

services:
  db:
    image: postgres:16.0-bookworm
    environment:
      PGDATA: /var/lib/postgresql/data/pgdata
      POSTGRES_USER: ${POSTGRES_USER}
      POSTGRES_PASSWORD: ${POSTGRES_PASSWORD}
    healthcheck:
      test: [ "CMD-SHELL", "pg_isready -U postgres" ]
      interval: 5s
      timeout: 5s
      retries: 5
    networks:
      - db_net
    restart: unless-stopped
    volumes:
      - db_data:/var/lib/postgresql/data

  search:
    image: opensearchproject/opensearch:2.11.0
    environment:
      cluster.name: fusionauth
      discovery.type: single-node
      node.name: search
      plugins.security.disabled: true
      bootstrap.memory_lock: true
      OPENSEARCH_JAVA_OPTS: ${OPENSEARCH_JAVA_OPTS}
    healthcheck:
      interval: 10s
      retries: 80
      test: curl --write-out 'HTTP %{http_code}' --fail --silent --output /dev/null http://localhost:9200/
    restart: unless-stopped
    ulimits:
      memlock:
        soft: -1
        hard: -1
      nofile:
        soft: 65536
        hard: 65536
    ports:
      - 9200:9200 # REST API
      - 9600:9600 # Performance Analyzer
    volumes:
      - search_data:/usr/share/opensearch/data
    networks:
      - search_net

  fusionauth:
    #image: fusionauth/fusionauth-app:latest
    build: ./fusionauth-app
    depends_on:
      db:
        condition: service_healthy
      search:
        condition: service_healthy
    environment:
      DATABASE_URL: jdbc:postgresql://db:5432/fusionauth
      DATABASE_ROOT_USERNAME: ${POSTGRES_USER}
      DATABASE_ROOT_PASSWORD: ${POSTGRES_PASSWORD}
      DATABASE_USERNAME: ${DATABASE_USERNAME}
      DATABASE_PASSWORD: ${DATABASE_PASSWORD}
      FUSIONAUTH_APP_MEMORY: ${FUSIONAUTH_APP_MEMORY}
      FUSIONAUTH_APP_RUNTIME_MODE: ${FUSIONAUTH_APP_RUNTIME_MODE}
      FUSIONAUTH_APP_URL: http://fusionauth:9011
      SEARCH_SERVERS: http://search:9200
      SEARCH_TYPE: elasticsearch
      FUSIONAUTH_APP_KICKSTART_FILE: ${FUSIONAUTH_APP_KICKSTART_FILE}
      FUSIONAUTH_APP_INSTALLATION_SOURCE: fusionauth-example-docker-compose
    networks:
      - db_net
      - search_net
    restart: unless-stopped
    ports:
      - 9011:9011
    volumes:
      - fusionauth_config:/usr/local/fusionauth/config
      - ./kickstart:/usr/local/fusionauth/kickstart

networks:
  db_net:
    driver: bridge
  search_net:
    driver: bridge

volumes:
  db_data:
  fusionauth_config:
  search_data:
With this example, you can use docker compose build to only run the build steps in the referenced Dockerfile. This will create you a custom Docker image which is consequentially used in the creation of the container in Docker Compose when running docker compose up -d. Alternatively you can run only docker compose up -d which will automatically take care of the build as well if not present.
By default the build process will cache a lot of the steps, to force a fresh build you can run docker compose build --pull --no-cache instead.
Here's the FusionAuth application Dockerfile as a reference which builds the fusionauth/fusionauth-app base image.
The FusionAuth Docker file
#
# FusionAuth App Dockerfile
#
# Build:
#   > docker pull ubuntu:noble
#   > docker buildx build --platform=linux/arm64 -t fusionauth/fusionauth-app:1.67.1 .
#   > docker buildx build --platform=linux/arm64 -t fusionauth/fusionauth-app:latest .
#
# Note: Substitute your target platform architecture. The above example is targetting a 64-bit ARM platform.
#       To target an Intel based platform use --platform=linux/amd64.
#       By default, the build will fetch the fusionauth artifact from the public download location. If you have a local copy of the artifact,
#       place it in the same directory as this Dockerfile and name it fusionauth-app-<version>.zip. The build will detect the local file and
#       use it instead of downloading it.
#
# Run:
#  > docker run -p 9011:9011 -it fusionauth/fusionauth-app
#
# Publish:
#   > docker push fusionauth/fusionauth-app:1.67.1
#   > docker push fusionauth/fusionauth-app:latest
#

###### Setup the java and fusionauth-app base #####################################################
FROM --platform=$BUILDPLATFORM ubuntu:noble AS build

ARG BUILDARCH
ARG BUILDPLATFORM
ARG FUSIONAUTH_VERSION=1.67.1
ARG JDK_MODULES=java.base,java.compiler,java.desktop,java.instrument,java.logging,java.management,java.naming,java.net.http,java.rmi,java.security.jgss,java.security.sasl,java.sql,java.xml.crypto,jdk.attach,jdk.crypto.ec,jdk.dynalink,jdk.jcmd,jdk.jdi,jdk.localedata,jdk.jpackage,jdk.unsupported,jdk.zipfs
ARG TARGETPLATFORM
ARG TARGETARCH
RUN printf "Building on ${BUILDPLATFORM} for ${TARGETPLATFORM} (${TARGETARCH})."
RUN --mount=type=bind,target=/ctx apt-get update \
    && apt-get install -y curl jq unzip \
    && JAVA_VERSION="$(jq -r '.version' /ctx/java.json)" \
    && JAVA_MAJOR=$(echo "${JAVA_VERSION}" | cut -d. -f1) \
    && echo "Using Java version ${JAVA_VERSION}" \
    && JAVA_VERSION_URL="jdk-$(echo "${JAVA_VERSION}" | sed 's/_/%2B/g')" \
    && BUILD_JAVA_SUM="$(jq -r '.checksums["'"${BUILDARCH}"'"]' /ctx/java.json)" \
    && BUILD_JAVA_URL="https://github.com/adoptium/temurin${JAVA_MAJOR}-binaries/releases/download/${JAVA_VERSION_URL}/OpenJDK${JAVA_MAJOR}U-jdk_$(echo "${BUILDPLATFORM}" | sed 's|linux/||;s|arm64|aarch64|;s|amd64|x64|')_linux_hotspot_${JAVA_VERSION}.tar.gz" \
    && JAVA_SUM="$(jq -r '.checksums["'"${TARGETARCH}"'"]' /ctx/java.json)" \
    && JAVA_URL="https://github.com/adoptium/temurin${JAVA_MAJOR}-binaries/releases/download/${JAVA_VERSION_URL}/OpenJDK${JAVA_MAJOR}U-jdk_$(echo "${TARGETARCH}" | sed 's|arm64|aarch64|;s|amd64|x64|')_linux_hotspot_${JAVA_VERSION}.tar.gz" \
    && mkdir -p /tmp/openjdk \
    && mkdir -p /tmp/build/openjdk \
    && curl -LfsSo /tmp/build/openjdk.tar.gz "${BUILD_JAVA_URL}" \
    && echo "${BUILD_JAVA_SUM} */tmp/build/openjdk.tar.gz" | sha256sum -c - \
    && curl -LfsSo /tmp/openjdk.tar.gz "${JAVA_URL}" \
    && echo "${JAVA_SUM} */tmp/openjdk.tar.gz" | sha256sum -c - \
    && cd /tmp/build/openjdk \
    && tar -xf /tmp/build/openjdk.tar.gz --strip-components=1 \
    && cd /tmp/openjdk \
    && tar -xf /tmp/openjdk.tar.gz --strip-components=1 \
    && /tmp/build/openjdk/bin/jlink --compress=2 \
           --module-path /tmp/openjdk/jmods/ \
           --add-modules ${JDK_MODULES} \
           --output /opt/openjdk \
    && if [ -f /ctx/fusionauth-app-${FUSIONAUTH_VERSION}.zip ]; then \
           cp /ctx/fusionauth-app-${FUSIONAUTH_VERSION}.zip /tmp/fusionauth-app.zip; \
       else \
           curl -LfsSo /tmp/fusionauth-app.zip https://files.fusionauth.io/products/fusionauth/${FUSIONAUTH_VERSION}/fusionauth-app-${FUSIONAUTH_VERSION}.zip; \
       fi \
    && mkdir -p /usr/local/fusionauth/fusionauth-app \
    && unzip -nq /tmp/fusionauth-app.zip -d /usr/local/fusionauth \
    && JAVA_DEB_VERSION="$(echo "${JAVA_VERSION}" | sed 's/_/+/')-99" \
    && DEB_TARGETARCH="${TARGETARCH}" \
    && if [ "${TARGETARCH}" = "ppc64le" ]; then DEB_TARGETARCH="ppc64el"; fi \
    && mkdir -p /tmp/jdk-shim/DEBIAN \
    && printf "Package: openjdk-${JAVA_MAJOR}-jdk\nSource: openjdk-${JAVA_MAJOR}\nVersion: ${JAVA_DEB_VERSION}\nArchitecture: ${DEB_TARGETARCH}\nMaintainer: Eclipse Adoptium <temurin@adoptium.net>\nDescription: Eclipse Temurin JDK ${JAVA_MAJOR} (security metadata shim)\n" \
           > /tmp/jdk-shim/DEBIAN/control \
    && dpkg-deb --build /tmp/jdk-shim /tmp/jdk-shim.deb \
    && rm -rf /tmp/jdk-shim

###### Use Ubuntu latest and only copy in what we need to reduce the layer size ###################
FROM ubuntu:noble
RUN apt-get update \
    && apt-get -y install --no-install-recommends curl \
    && apt-get -y upgrade \
    # Automatically apply security updates that are currently available \
    && apt-get -s dist-upgrade | grep "^Inst" | \
           grep -i securi | awk -F " " {'print $2'} | \
           xargs apt-get install -y \
    && apt-get -y clean \
    && rm -rf /var/lib/apt/lists \
    && useradd --shell /usr/sbin/nologin -d /usr/local/fusionauth -U fusionauth
COPY --chown=fusionauth:fusionauth --from=build /opt/openjdk /opt/openjdk
COPY --chown=fusionauth:fusionauth --from=build /usr/local/fusionauth /usr/local/fusionauth
COPY --from=build /tmp/jdk-shim.deb /tmp/jdk-shim.deb

RUN mkdir -p /usr/local/fusionauth/logs \
    && chown fusionauth:fusionauth /usr/local/fusionauth/logs \
    && dpkg -i /tmp/jdk-shim.deb \
    && rm /tmp/jdk-shim.deb

###### Start FusionAuth App #######################################################################
LABEL description="Create an image running FusionAuth App. Installs FusionAuth App"
LABEL maintainer="FusionAuth <dev@fusionauth.io>"
EXPOSE 9011
USER fusionauth
ENV FUSIONAUTH_USE_GLOBAL_JAVA=1
ENV JAVA_HOME=/opt/openjdk
ENV PATH=$PATH:$JAVA_HOME/bin
CMD ["/usr/local/fusionauth/fusionauth-app/bin/start.sh"]
Here is additional Docker documentation.
Kickstart#
Using Docker with Kickstart is a powerful combination. Using these technologies together lets you:
- Configure and share development environments
- Create replicable bug reports
- Spin up auth instances with a well known, versioned set of data for continuous integration and testing
All the normal limitations of Kickstart apply (the Kickstart will not run if the database has already been set up with an API key, for example).
To use Kickstart, you'll need to tweak your Docker Compose files. Before you begin, you'll need a valid kickstart.json file (the kickstart.json name is just a convention). Check out the Kickstart documentation for more information on writing a kickstart.json.
Once you have a valid kickstart.json file, create a subdirectory in the location of your docker-compose.yml file. It can be named anything; this documentation will use a directory called kickstart. Next, you'll mount this directory and set the FUSIONAUTH_APP_KICKSTART_FILE variable in the docker-compose.yml file.
Here are the steps to do so:
- In the
volumes:section of thefusionauthservice, add- ./kickstart:/usr/local/fusionauth/kickstart. - Modify
.envand add the Kickstart configuration variable:FUSIONAUTH_APP_KICKSTART_FILE=/usr/local/fusionauth/kickstart/kickstart.json. This path should be what the Docker container expects, not the path on the host. - Configure
docker-compose.ymlto pass the environment variable set by.envto the container. Do this by addingFUSIONAUTH_APP_KICKSTART_FILE: ${FUSIONAUTH_APP_KICKSTART_FILE}to theenvironmentsection of thefusionauthservice. docker compose up -d
The following is an example docker-compose.yml file configuring FusionAuth to run the commands in a kickstart.json at startup.
Example docker-compose.yml for running Kickstart
version: '3'

services:
  db:
    image: postgres:16.0-bookworm
    environment:
      PGDATA: /var/lib/postgresql/data/pgdata
      POSTGRES_USER: ${POSTGRES_USER}
      POSTGRES_PASSWORD: ${POSTGRES_PASSWORD}
    healthcheck:
      test: [ "CMD-SHELL", "pg_isready -U postgres" ]
      interval: 5s
      timeout: 5s
      retries: 5
    networks:
      - db_net
    restart: unless-stopped
    volumes:
      - db_data:/var/lib/postgresql/data

  search:
    image: opensearchproject/opensearch:2.11.0
    environment:
      cluster.name: fusionauth
      discovery.type: single-node
      node.name: search
      plugins.security.disabled: true
      bootstrap.memory_lock: true
      OPENSEARCH_JAVA_OPTS: ${OPENSEARCH_JAVA_OPTS}
    healthcheck:
      interval: 10s
      retries: 80
      test: curl --write-out 'HTTP %{http_code}' --fail --silent --output /dev/null http://localhost:9200/
    restart: unless-stopped
    ulimits:
      memlock:
        soft: -1
        hard: -1
      nofile:
        soft: 65536
        hard: 65536
    ports:
      - 9200:9200 # REST API
      - 9600:9600 # Performance Analyzer
    volumes:
      - search_data:/usr/share/opensearch/data
    networks:
      - search_net

  fusionauth:
    image: fusionauth/fusionauth-app:latest
    depends_on:
      db:
        condition: service_healthy
      search:
        condition: service_healthy
    environment:
      DATABASE_URL: jdbc:postgresql://db:5432/fusionauth
      DATABASE_ROOT_USERNAME: ${POSTGRES_USER}
      DATABASE_ROOT_PASSWORD: ${POSTGRES_PASSWORD}
      DATABASE_USERNAME: ${DATABASE_USERNAME}
      DATABASE_PASSWORD: ${DATABASE_PASSWORD}
      FUSIONAUTH_APP_MEMORY: ${FUSIONAUTH_APP_MEMORY}
      FUSIONAUTH_APP_RUNTIME_MODE: ${FUSIONAUTH_APP_RUNTIME_MODE}
      FUSIONAUTH_APP_URL: http://fusionauth:9011
      SEARCH_SERVERS: http://search:9200
      SEARCH_TYPE: elasticsearch
      FUSIONAUTH_APP_KICKSTART_FILE: ${FUSIONAUTH_APP_KICKSTART_FILE}
      FUSIONAUTH_APP_INSTALLATION_SOURCE: fusionauth-example-docker-compose
    networks:
      - db_net
      - search_net
    restart: unless-stopped
    ports:
      - 9011:9011
    volumes:
      - fusionauth_config:/usr/local/fusionauth/config
      - ./kickstart:/usr/local/fusionauth/kickstart

networks:
  db_net:
    driver: bridge
  search_net:
    driver: bridge

volumes:
  db_data:
  fusionauth_config:
  search_data:
After running docker compose up -d you should see a line similar to the one below in the logs. These logs can be accessed using this command: docker compose logs -f fusionauth:
FusionAuth log messages indicating Kickstart has succeeded
io.fusionauth.api.service.system.kickstart.KickstartRunner - SummaryThis indicates that Kickstart completed and provides a summary of the configuration changes made by it.
You may also want to check out the Isolated Docker Setups if you want the ability to rapidly stand up different versions and configurations of FusionAuth.
If you want to test changes to your Kickstart file, you'll need to delete your volumes each time. Kickstart won't run except on a brand new install. If there is any data in the database, it won't proceed.
This will delete all data in your docker instance.
Deleting the volumes
docker compose down -vPlugins#
Instead of building a custom docker image, you can directly mount a directory containing a plugin to your Docker container.
Here are the steps to do so:
- In the
volumes:section of thefusionauthservice, add- ./plugins:/usr/local/fusionauth/plugins. - Copy your plugin jar file, created by following the instructions, to your
pluginsdirectory on the host. docker compose up -d
The following is an example docker-compose.yml file configuring FusionAuth to scan for plugins at startup.
Example docker-compose.yml for installing a plugin
version: '3'

services:
  db:
    image: postgres:16.0-bookworm
    environment:
      PGDATA: /var/lib/postgresql/data/pgdata
      POSTGRES_USER: ${POSTGRES_USER}
      POSTGRES_PASSWORD: ${POSTGRES_PASSWORD}
    healthcheck:
      test: [ "CMD-SHELL", "pg_isready -U postgres" ]
      interval: 5s
      timeout: 5s
      retries: 5
    networks:
      - db_net
    restart: unless-stopped
    volumes:
      - db_data:/var/lib/postgresql/data

  search:
    image: opensearchproject/opensearch:2.11.0
    environment:
      cluster.name: fusionauth
      discovery.type: single-node
      node.name: search
      plugins.security.disabled: true
      bootstrap.memory_lock: true
      OPENSEARCH_JAVA_OPTS: ${OPENSEARCH_JAVA_OPTS}
    healthcheck:
      interval: 10s
      retries: 80
      test: curl --write-out 'HTTP %{http_code}' --fail --silent --output /dev/null http://localhost:9200/
    restart: unless-stopped
    ulimits:
      memlock:
        soft: -1
        hard: -1
      nofile:
        soft: 65536
        hard: 65536
    ports:
      - 9200:9200 # REST API
      - 9600:9600 # Performance Analyzer
    volumes:
      - search_data:/usr/share/opensearch/data
    networks:
      - search_net

  fusionauth:
    image: fusionauth/fusionauth-app:latest
    depends_on:
      db:
        condition: service_healthy
      search:
        condition: service_healthy
      maven:
        condition: service_completed_successfully
    environment:
      DATABASE_URL: jdbc:postgresql://db:5432/fusionauth
      DATABASE_ROOT_USERNAME: ${POSTGRES_USER}
      DATABASE_ROOT_PASSWORD: ${POSTGRES_PASSWORD}
      DATABASE_USERNAME: ${DATABASE_USERNAME}
      DATABASE_PASSWORD: ${DATABASE_PASSWORD}
      FUSIONAUTH_APP_MEMORY: ${FUSIONAUTH_APP_MEMORY}
      FUSIONAUTH_APP_RUNTIME_MODE: ${FUSIONAUTH_APP_RUNTIME_MODE}
      FUSIONAUTH_APP_URL: http://fusionauth:9011
      SEARCH_SERVERS: http://search:9200
      SEARCH_TYPE: elasticsearch
      FUSIONAUTH_APP_KICKSTART_FILE: ${FUSIONAUTH_APP_KICKSTART_FILE}
      FUSIONAUTH_APP_INSTALLATION_SOURCE: fusionauth-example-docker-compose
    networks:
      - db_net
      - search_net
    restart: unless-stopped
    ports:
      - 9011:9011
    volumes:
      - fusionauth_config:/usr/local/fusionauth/config
      - ./kickstart:/usr/local/fusionauth/kickstart
      - ./plugins:/usr/local/fusionauth/plugins

  maven:
    image: maven
    command:
      - /bin/sh
      - -c
      - |
        git init .
        git remote add -t \* -f origin https://github.com/FusionAuth/fusionauth-example-password-encryptor.git
        git checkout master
        mvn compile package
        cp target/fusionauth-example-password-encryptor*.jar output/
        chown 1000:1000 output/*
    volumes:
      - maven_cache:/root/.m2
      - plugin_source:/app
      - ./plugins:/app/output
    working_dir: /app

networks:
  db_net:
    driver: bridge
  search_net:
    driver: bridge

volumes:
  db_data:
  fusionauth_config:
  search_data:
  maven_cache:
  plugin_source:
After running docker compose up -d you should see a line like this in the logs, which you can access using the command docker compose logs -f fusionauth:
FusionAuth log messages indicating a plugin has been successfully installed
INFO  io.fusionauth.api.plugin.guice.PluginModule - Installing plugin [com.mycompany.fusionauth.plugins.guice.MyExampleFusionAuthPluginModule]
INFO  io.fusionauth.api.plugin.guice.PluginModule - Plugin successfully installed
Such output indicates that the plugin has been installed and can be used.
Accessing the Host Machine#
The default FusionAuth Docker configuration sets up the network using the bridge configuration. This means that all the hosts defined by docker-compose.yml can access each other. However, it means that any applications running on your host machine cannot be accessed by FusionAuth using localhost.
This is typically only an issue when FusionAuth is accessing resources outside of the Docker network to, for example, send email or request a webhook. For example, if an application is running locally and you want FusionAuth, running in Docker, to send a webhook payload to it, configuring FusionAuth to send the webhook to localhost won't work. localhost in the Docker container refers to the Docker container itself, not the host machine.
In this situation, do one of the following:
- Run a container with your application in Docker, and use the appropriate network domain name.
- Install FusionAuth on the host machine and use
localhost. - Use an alias address,
host.docker.internal, as the hostname instead oflocalhost.- For macOS and Windows hosts, you can use
host.docker.internalwithout any additional configuration. - For Linux hosts, add the following lines to your
docker-compose.yml.
- For macOS and Windows hosts, you can use
extra_hosts:
  - "host.docker.internal:host-gateway"
Modifying the FusionAuth service in docker-compose.yml to use other Docker networking schemes such as host may work, but isn't fully tested or supported.
OpenSearch Production Deployment Configuration#
Production runtime requirements and configuration for OpenSearch will drastically differ from the Docker Compose examples as the examples are configured without any security or redundancy.
Please review the Installing OpenSearch documentation for further details around production deployment.
Elasticsearch Production Deployment Configuration#
Elasticsearch has a few runtime requirements that may not be met by default on your host platform. Please review the Elasticsearch Docker production mode guide for more information.
For example if startup is failing and you see the following in the logs, you will need to increase vm.max_map_count on your host VM.
The log message when max_map_count is too low
2018-11-22T12:32:06.779828954Z Nov 22, 2018 12:32:06.779 PM ERROR c.inversoft.maintenance.search.ElasticsearchSilentConfigurationWorkflowTask
  - Silent configuration was unable to complete search configuration. Entering maintenance mode. State [SERVER_DOWN]

2018-11-22T13:00:05.346558595Z ERROR: [2] bootstrap checks failed
2018-11-22T13:00:05.346600195Z [1]: memory locking requested for elasticsearch process but memory is not locked
2018-11-22T13:00:05.346606495Z [2]: max virtual memory areas vm.max_map_count [65530] is too low, increase to at least [262144]Mailcatcher#
In development environments, consider running MailCatcher, which provides a local SMTP server. This allows FusionAuth to send transactional emails for account verification, password reset, and more.
Example docker-compose.yml with mailcatcher
version: '3'
services:
db:
image: postgres:16.0-bookworm
environment:
PGDATA: /var/lib/postgresql/data/pgdata
POSTGRES_USER: ${POSTGRES_USER}
POSTGRES_PASSWORD: ${POSTGRES_PASSWORD}
healthcheck:
test: [ "CMD-SHELL", "pg_isready -U postgres" ]
interval: 5s
timeout: 5s
retries: 5
networks:
- db_net
restart: unless-stopped
volumes:
- db_data:/var/lib/postgresql/data
search:
image: opensearchproject/opensearch:2.11.0
environment:
cluster.name: fusionauth
discovery.type: single-node
node.name: search
plugins.security.disabled: true
bootstrap.memory_lock: true
OPENSEARCH_JAVA_OPTS: ${OPENSEARCH_JAVA_OPTS}
healthcheck:
interval: 10s
retries: 80
test: curl --write-out 'HTTP %{http_code}' --fail --silent --output /dev/null http://localhost:9200/
restart: unless-stopped
ulimits:
memlock:
soft: -1
hard: -1
nofile:
soft: 65536
hard: 65536
ports:
- 9200:9200 # REST API
- 9600:9600 # Performance Analyzer
volumes:
- search_data:/usr/share/opensearch/data
networks:
- search_net
mailcatcher:
image: sj26/mailcatcher
ports:
- "1025:1025"
- "1080:1080"
healthcheck:
interval: 10s
retries: 80
test: wget -q -O /dev/null http://mailcatcher:1080/
networks:
- mailcatcher_net
fusionauth:
image: fusionauth/fusionauth-app:latest
depends_on:
db:
condition: service_healthy
search:
condition: service_healthy
mailcatcher:
condition: service_healthy
environment:
DATABASE_URL: jdbc:postgresql://db:5432/fusionauth
DATABASE_ROOT_USERNAME: ${POSTGRES_USER}
DATABASE_ROOT_PASSWORD: ${POSTGRES_PASSWORD}
DATABASE_USERNAME: ${DATABASE_USERNAME}
DATABASE_PASSWORD: ${DATABASE_PASSWORD}
FUSIONAUTH_APP_MEMORY: ${FUSIONAUTH_APP_MEMORY}
FUSIONAUTH_APP_RUNTIME_MODE: ${FUSIONAUTH_APP_RUNTIME_MODE}
FUSIONAUTH_APP_URL: http://fusionauth:9011
SEARCH_SERVERS: http://search:9200
SEARCH_TYPE: elasticsearch
FUSIONAUTH_APP_KICKSTART_FILE: ${FUSIONAUTH_APP_KICKSTART_FILE}
FUSIONAUTH_APP_INSTALLATION_SOURCE: fusionauth-example-docker-compose
networks:
- db_net
- search_net
- mailcatcher_net
restart: unless-stopped
ports:
- 9011:9011
volumes:
- fusionauth_config:/usr/local/fusionauth/config
- ./kickstart:/usr/local/fusionauth/kickstart
networks:
db_net:
driver: bridge
search_net:
driver: bridge
mailcatcher_net:
driver: bridge
volumes:
db_data:
fusionauth_config:
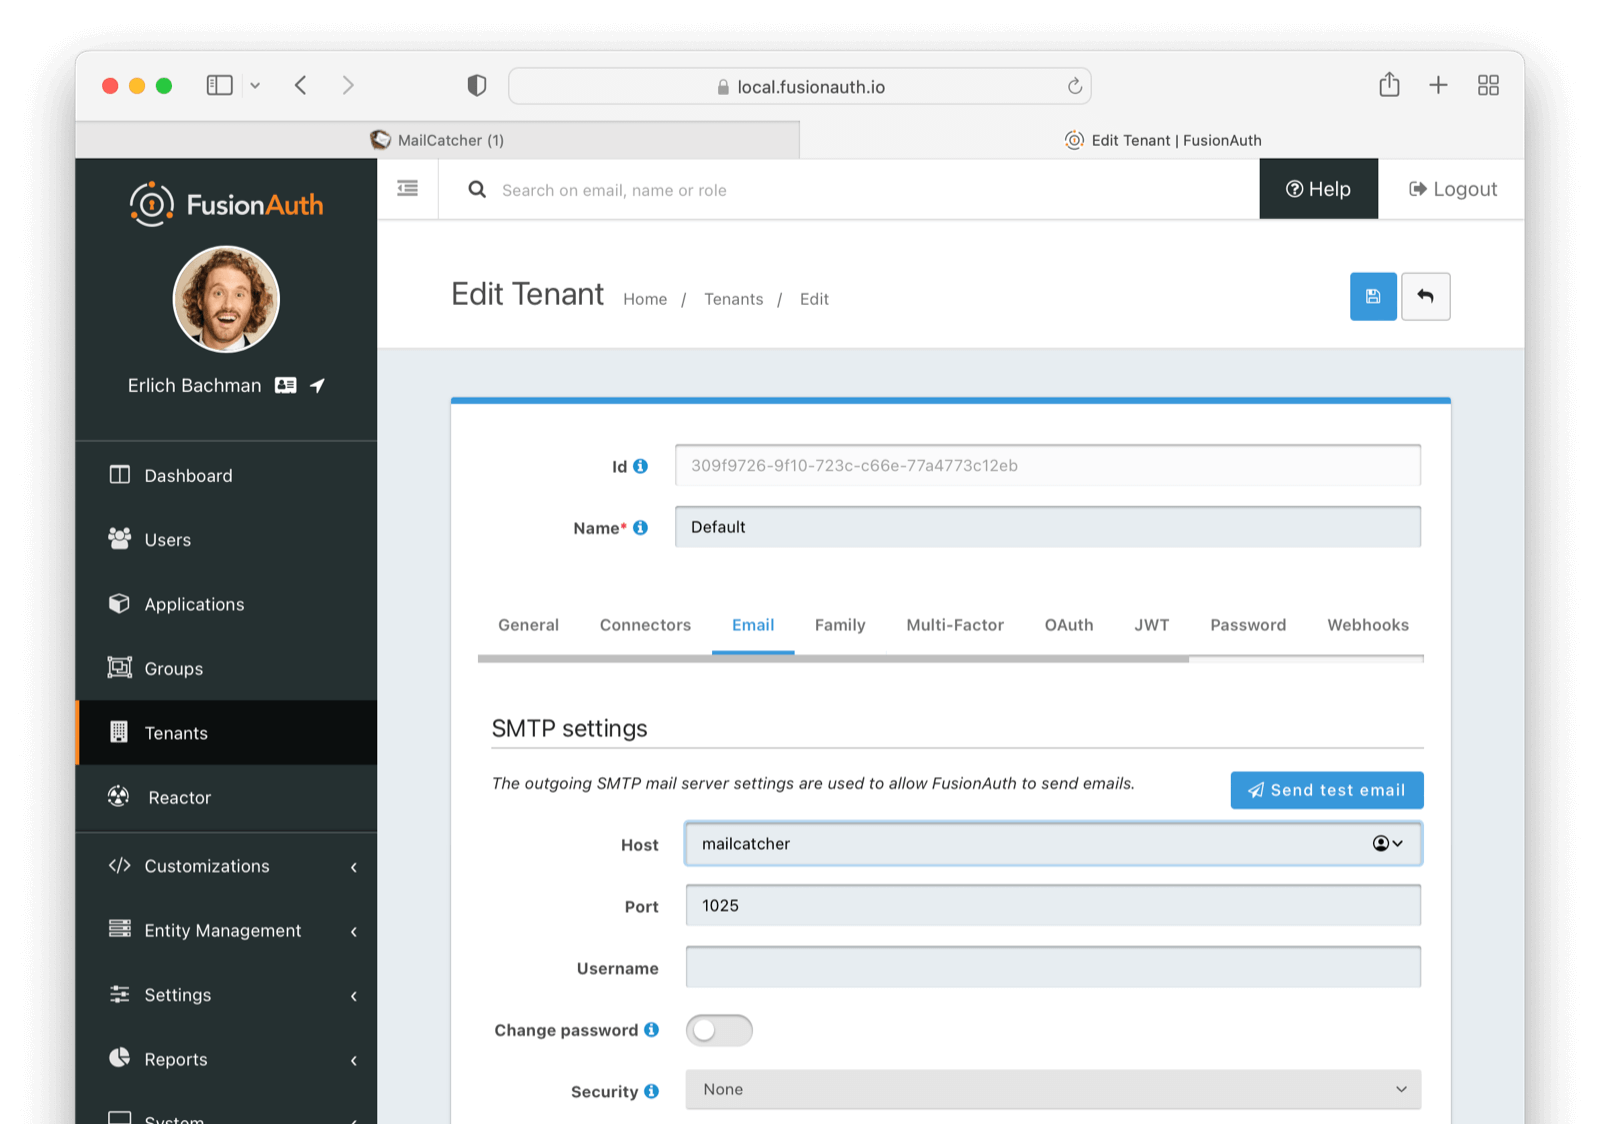
search_data:Below is a functional configuration on the tenant email tab based on the above configuration file:
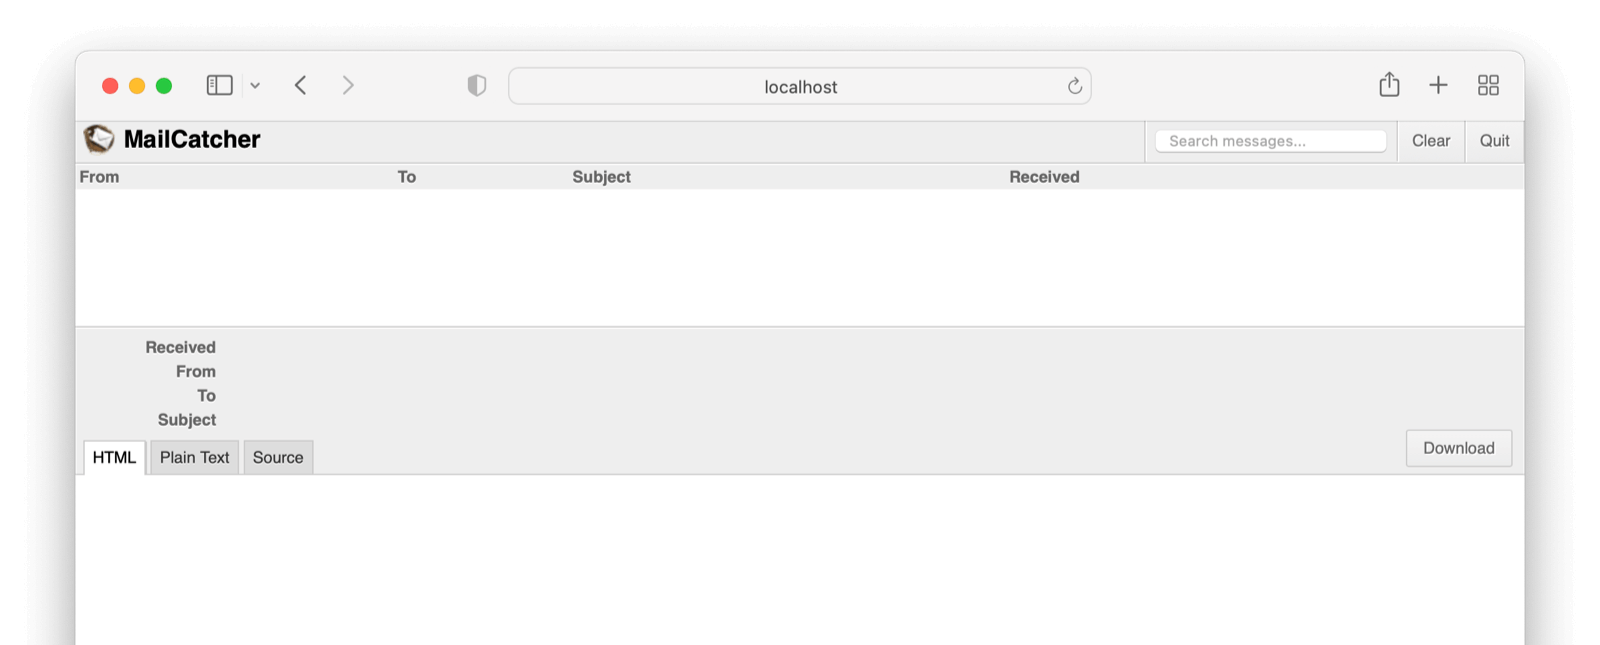
This a view of the Mailcatcher client.
Limitations#
Due to Oracle licensing restrictions, the docker images published on Docker Hub do not contain the necessary software to connect to a MySQL database.
If you wish to use MySQL, you'll need to build a custom container that includes the MySQL Connector JAR file. Here is an example container definition that uses the FusionAuth image as a base layer and adds the MySQL connector.
Example Dockerfile which downloads the MySQL connector
#
# FusionAuth App Dockerfile including the MySQL connector
#
# Note:
# -----------------------------------------------------------------------------
# The MySQL JDBC connector is not bundled with FusionAuth due to the GPL
# license terms under which Oracle publishes this software.
#
# Because of this restriction, you will need to build a docker image for your
# use that contains the MySQL JDBC connector in order to connect to a MySQL
# database at runtime.

# Source: https://github.com/mysql/mysql-connector-j
# License: https://github.com/mysql/mysql-connector-j/blob/release/8.0/LICENSE
# Homepage: https://dev.mysql.com/doc/connector-j/8.0/en/
#
# If you choose to build a Docker image containing this connector, ensure you
# are aware and in compliance with the license under which the MySQL JDBC connector
# is provided.
#
# This file is provided as an example only.
# -----------------------------------------------------------------------------
#
# Build:
#   > docker build -t fusionauth/fusionauth-app-mysql:1.67.1 .
#   > docker build -t fusionauth/fusionauth-app-mysql:latest .
#
# Run:
#  > docker run -p 9011:9011 -it fusionauth/fusionauth-app-mysql
#

FROM fusionauth/fusionauth-app:1.67.1
ADD --chown=fusionauth:fusionauth https://search.maven.org/remotecontent?filepath=com/mysql/mysql-connector-j/9.0.0/mysql-connector-j-9.0.0.jar /usr/local/fusionauth/fusionauth-app/lib