Troubleshooting
If any problems arise or if you are unable to access FusionAuth, consult the FusionAuth log files. In most cases, API errors will be written out to the fusionauth-app.log file, but for some installations such as Docker, the errors will be sent to stdout.
If you need further assistance, please ask a question in the FusionAuth forum or open an issue on GitHub if you have found a bug (please provide replication steps).
If you have a paid plan that includes technical support, you may open a support request from your FusionAuth Account page. Learn more about purchasing support.
Logs#
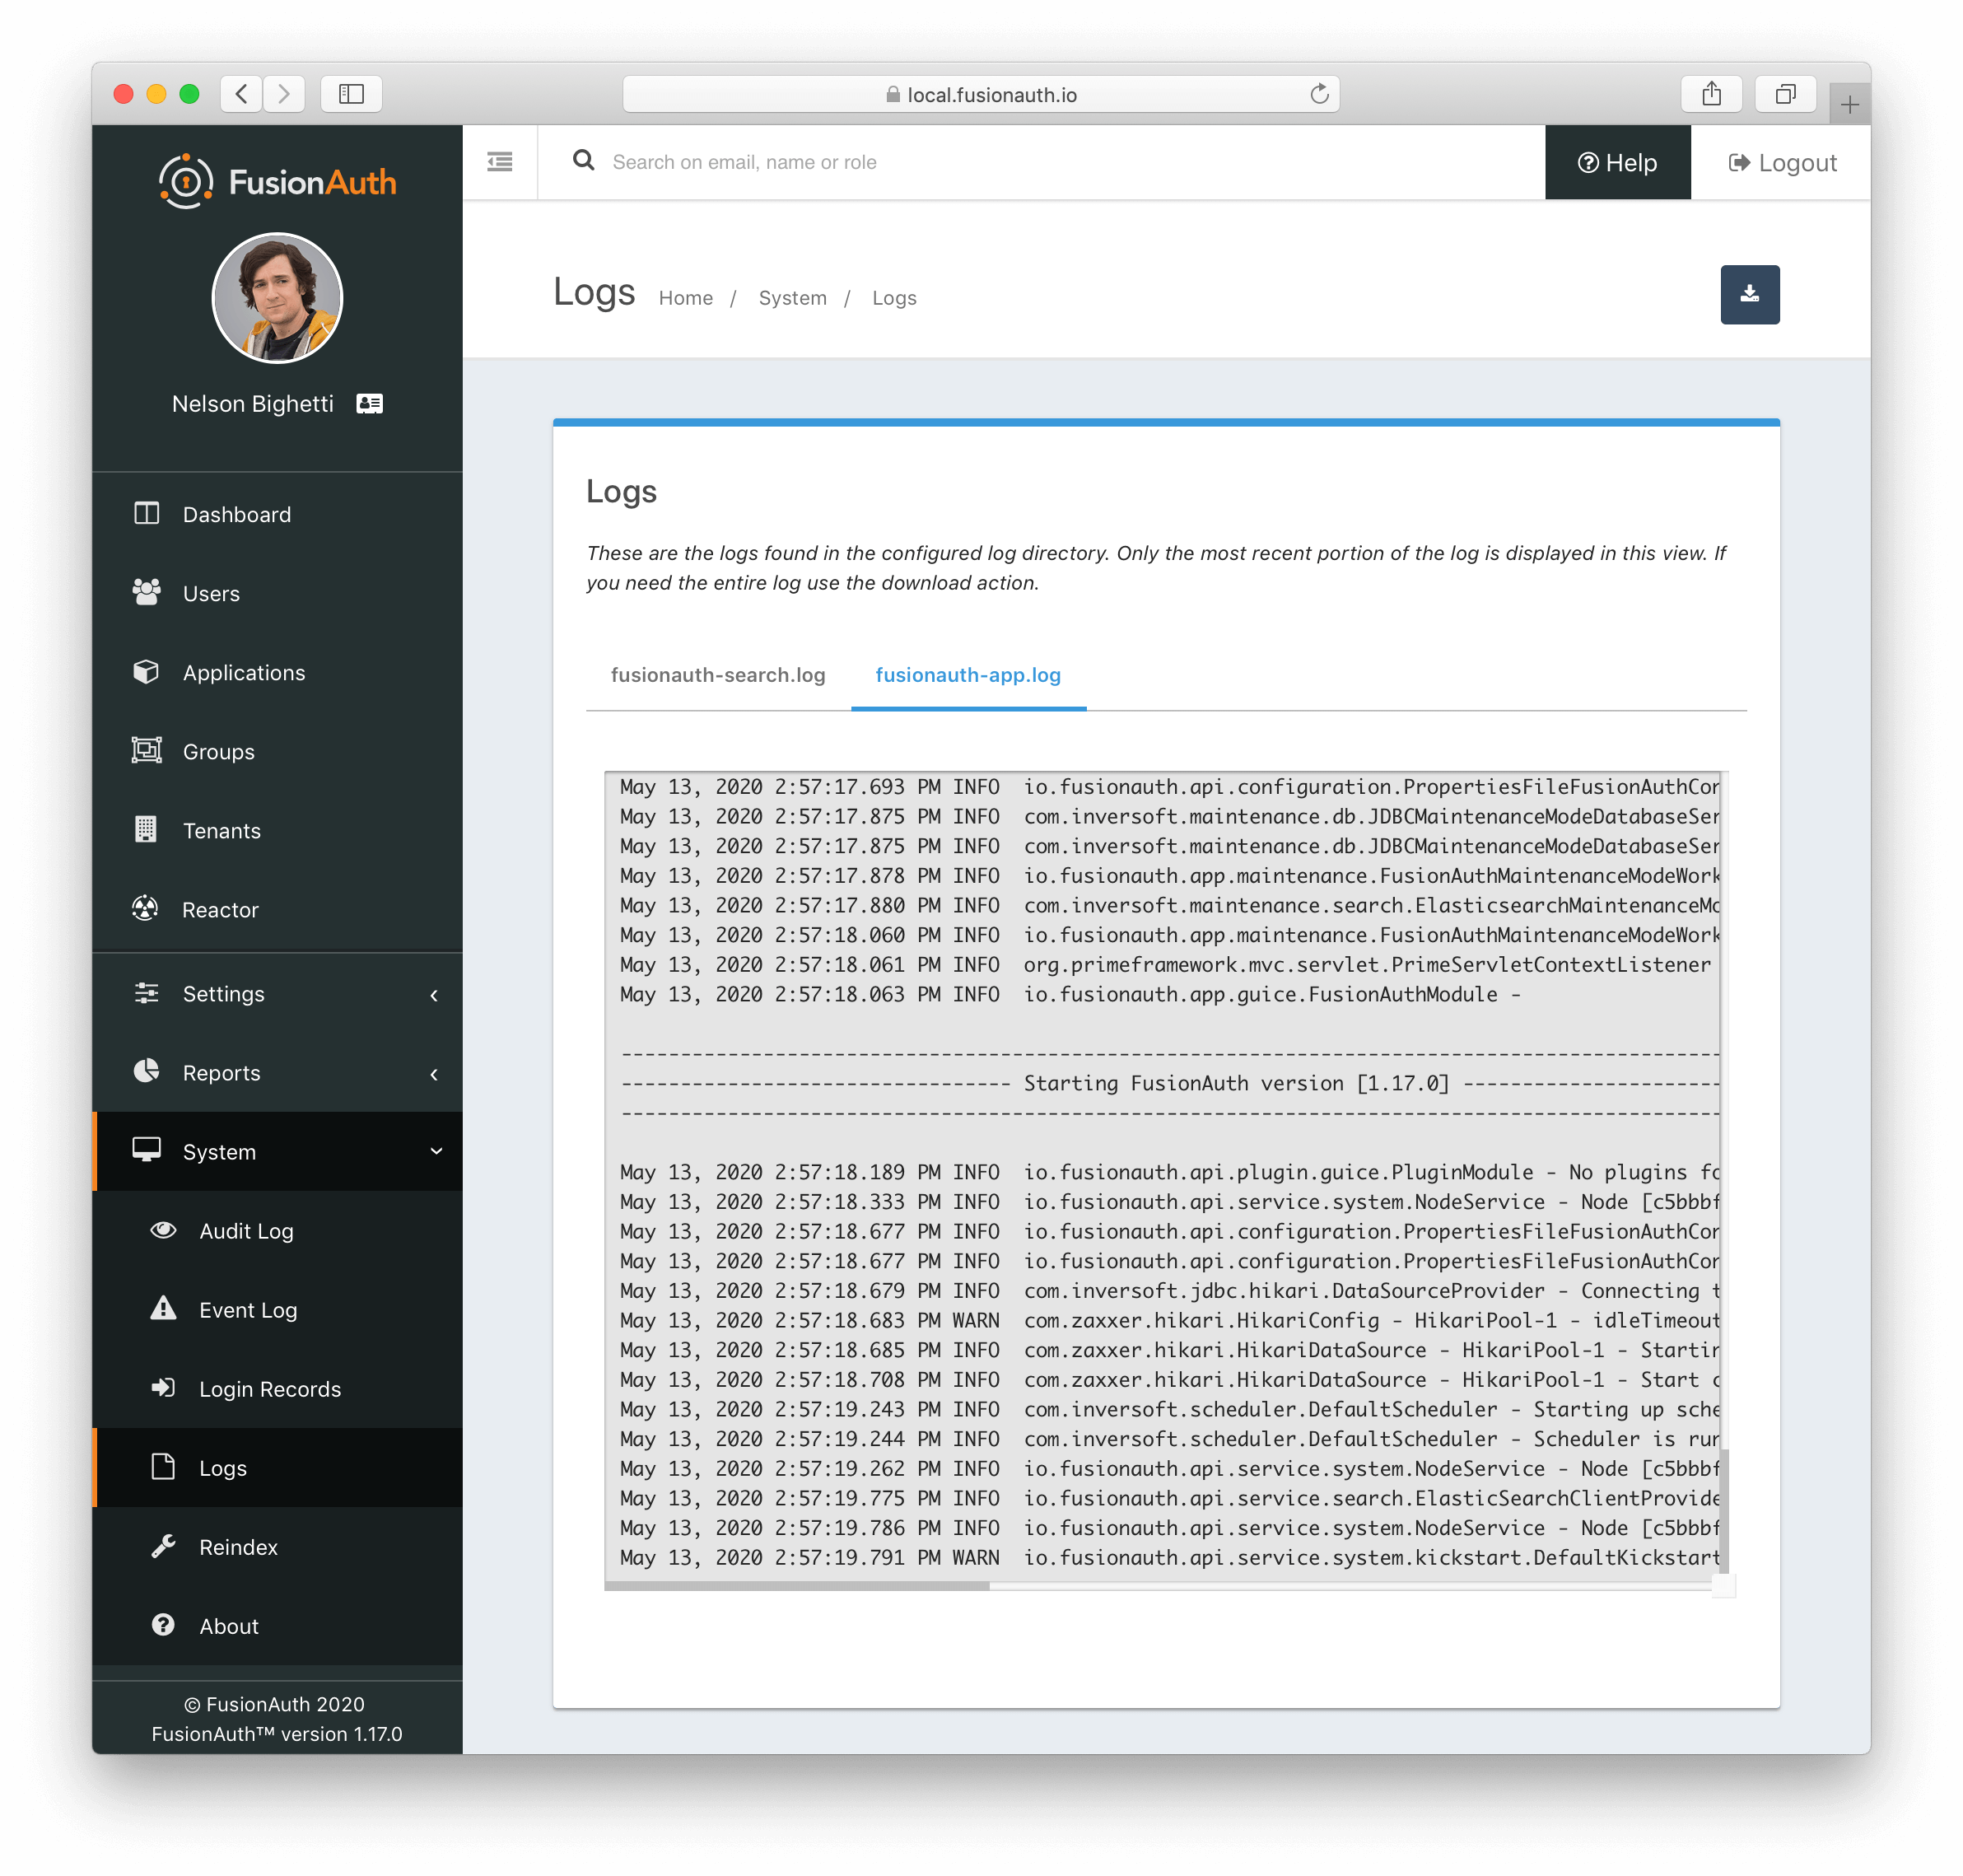
System Log UI#
The system logs may be reviewed in the FusionAuth admin UI by navigating to System -> Logs . This feature was added in version 1.16.0. This UI will only render logs for systems that write their logs out to disk. Deployments that write logs to stdout, such is the case with Docker, will not be able to review logs through this interface.
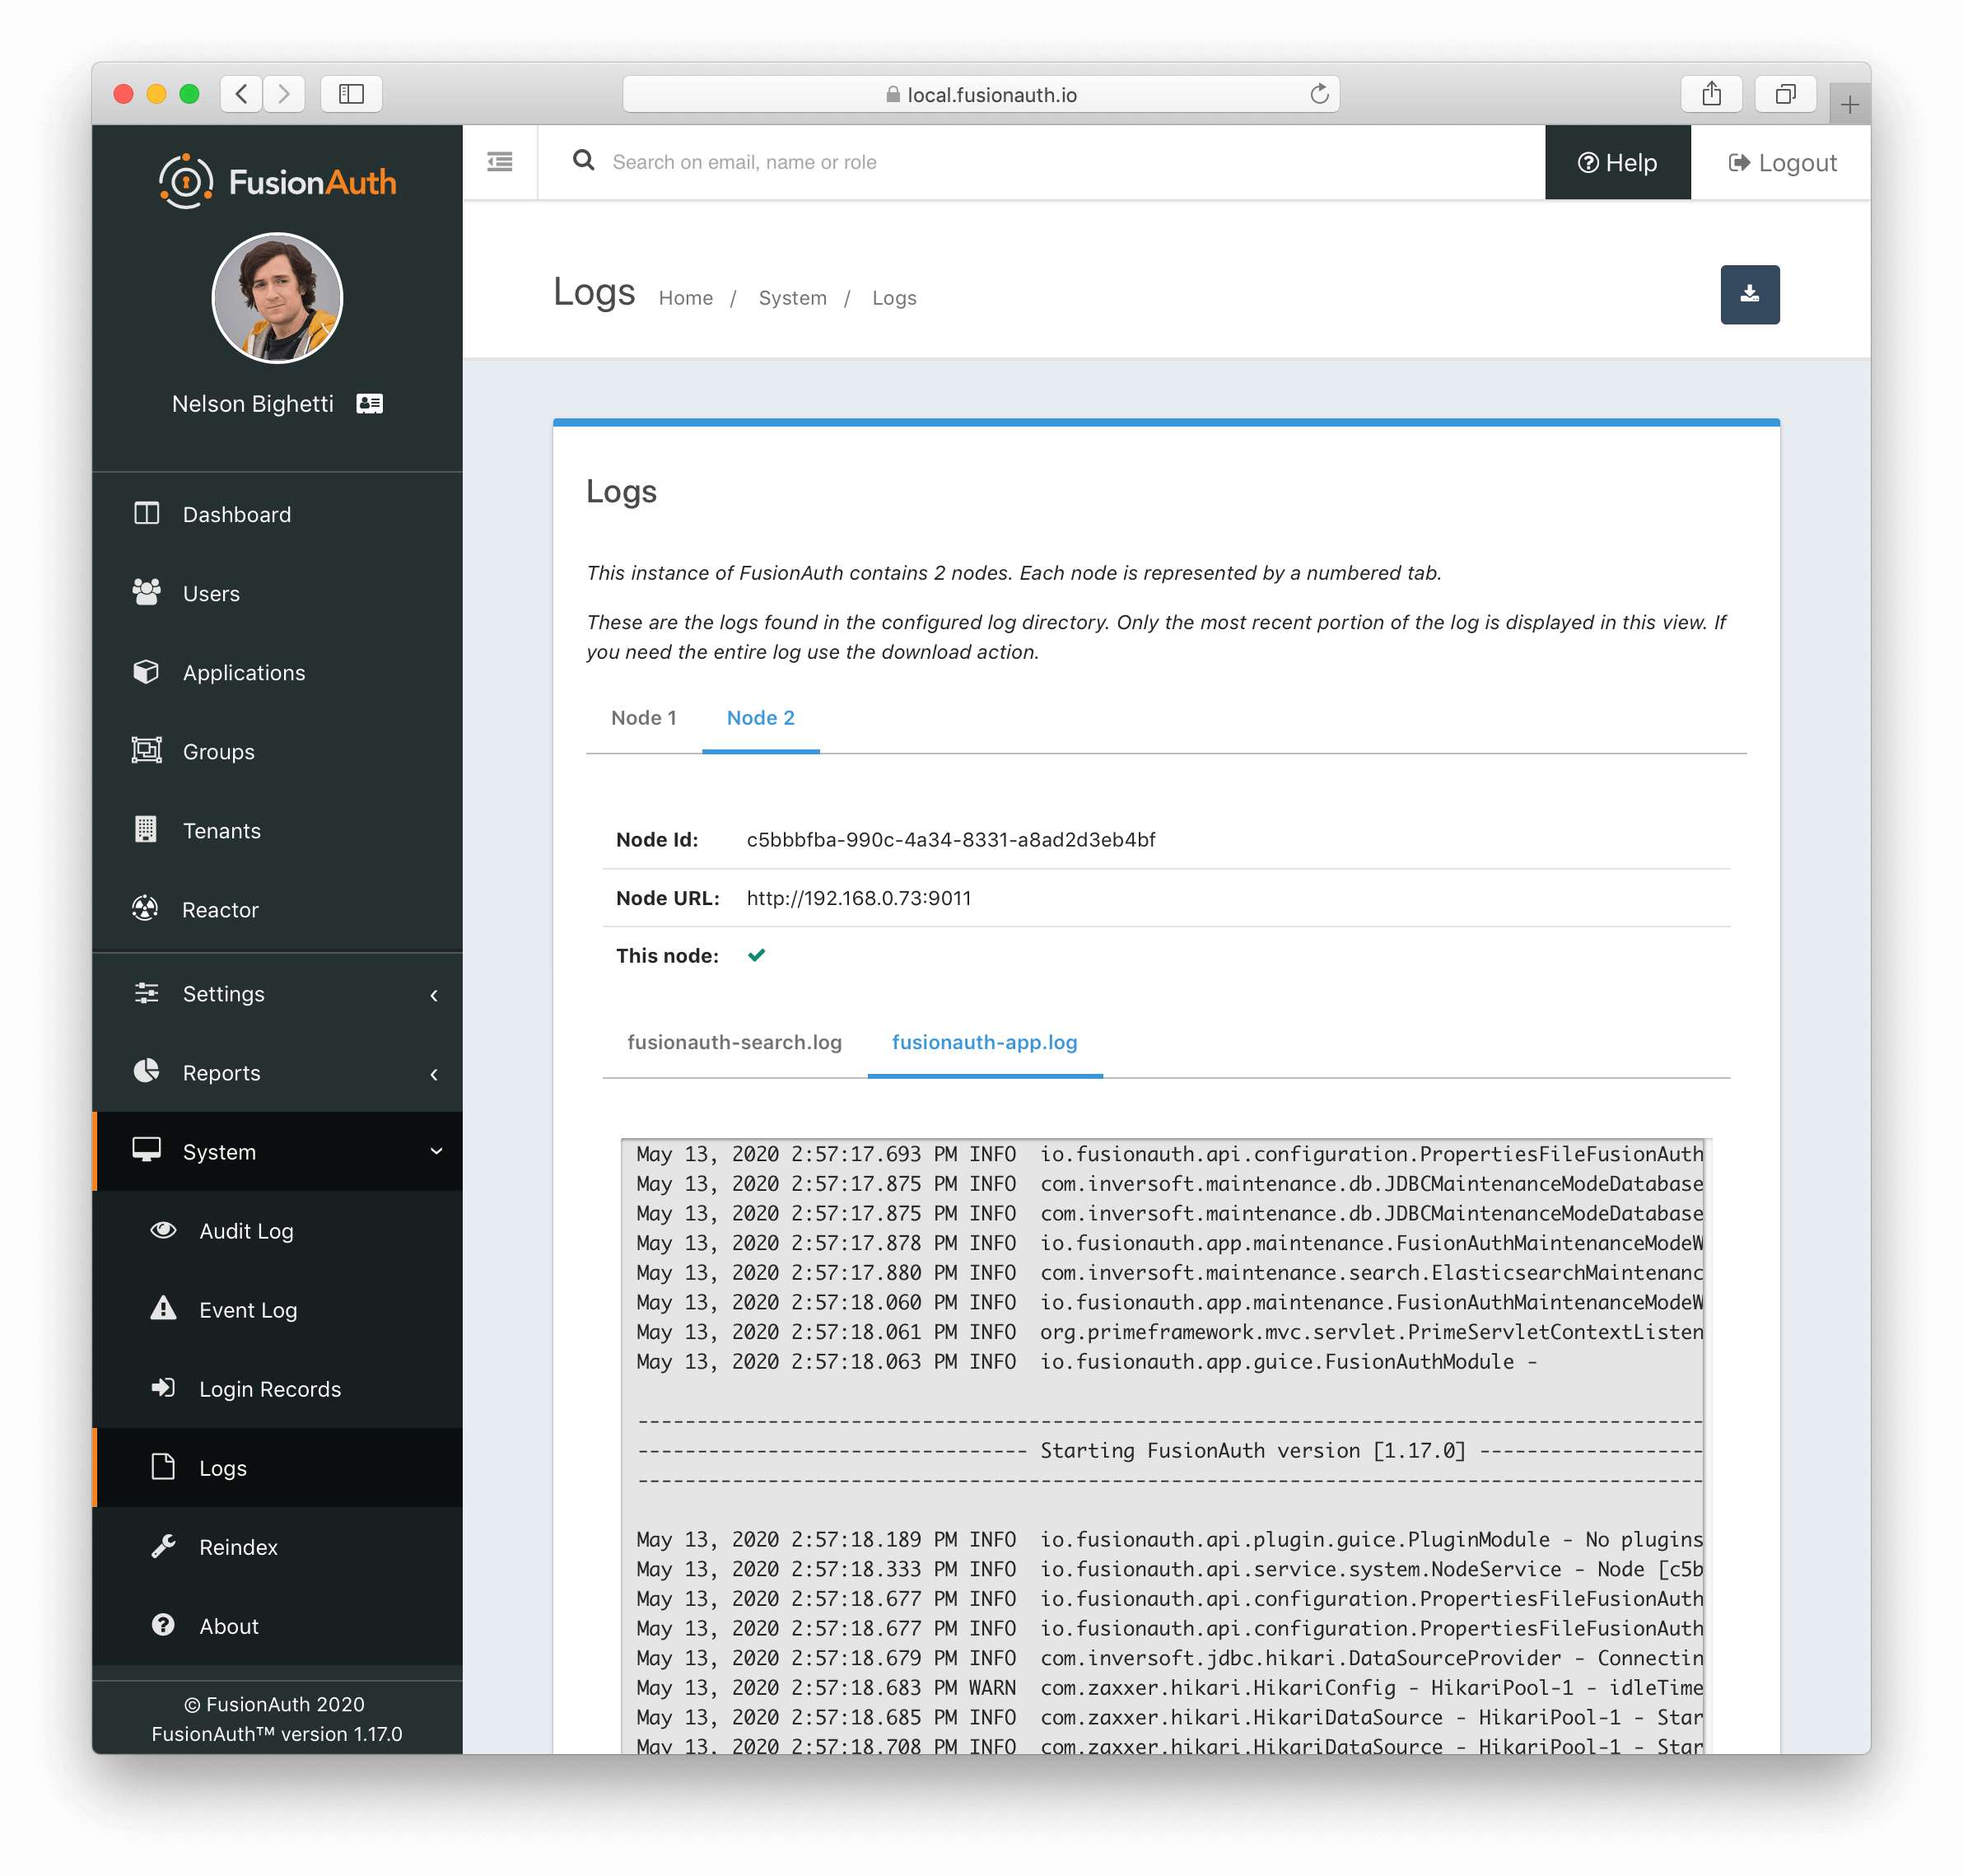
The system log UI organizes and renders the most recent 64KB of all logs for all nodes in the deployment. If you need the entire log, use the download action in the upper-right hand corner of the UI to download a zip of all logs.
System Logs in FusionAuth Cloud#
When accessing the system log UI on a FusionAuth Cloud deployment, be aware of the following limitations:
fusionauth-search.logfiles logs may not be availablefusionauth-app.logfiles may be limited to the last start of each node
If you are a FusionAuth Cloud customer and require access to logs that are unavailable in the UI, you may open a support request from your FusionAuth Account page.
Filesystem Logs#
Alternatively, the logs may be accessed directly. The following are the default locations for each of the FusionAuth log files. You may or may not have all of the FusionAuth services installed for your system, so you may not have all of the following logs on your server.
Linux and macOS
/usr/local/fusionauth/logs/fusionauth-app.log
/usr/local/fusionauth/logs/fusionauth-search.log
These paths assume the suggested product location of \fusionauth. This path may be different on your system depending on where you unpacked the zip files.
Windows
\fusionauth\logs\fusionauth-app.log
\fusionauth\logs\fusionauth-search.log
Note that if you started Windows via Fast Path, the fusionauth-app.log file will not be created. Instead, the services are running interactively and all logging is written to stdout.
Event Log#
Available since 1.6.0
The event log is a FusionAuth message store designed to capture different types of events that may be necessary to communicate to a FusionAuth developer or admin user.
The event log may contain helpful details to indicate the cause of the failure, or a failure condition you need to be aware of in FusionAuth. See System -> Event Log to view this log.
While not limited to, generally speaking, the event log will contain events or errors related to external systems or asynchronous issues that are difficult to communicate to the API caller or the FusionAuth admin at runtime. While not intended to be an exhaustive list, examples of these types of errors are:
- SMTP connection issues
- Lambda invocation errors
- External identity provider failures or configuration issues
- Failure to deliver a webhook event
Enabling Debugging#
Functionality specific#
Many features have additional debugging that can be enabled via the administrative user interface or the API. These features include, but are not limited to:
- Application OAuth configuration
- Identity Providers
- Application SAML IdP configuration
- Connectors
If you are having issues with certain functionality, look for a Enable debug logging checkbox in the user interface. If present, set it to true.
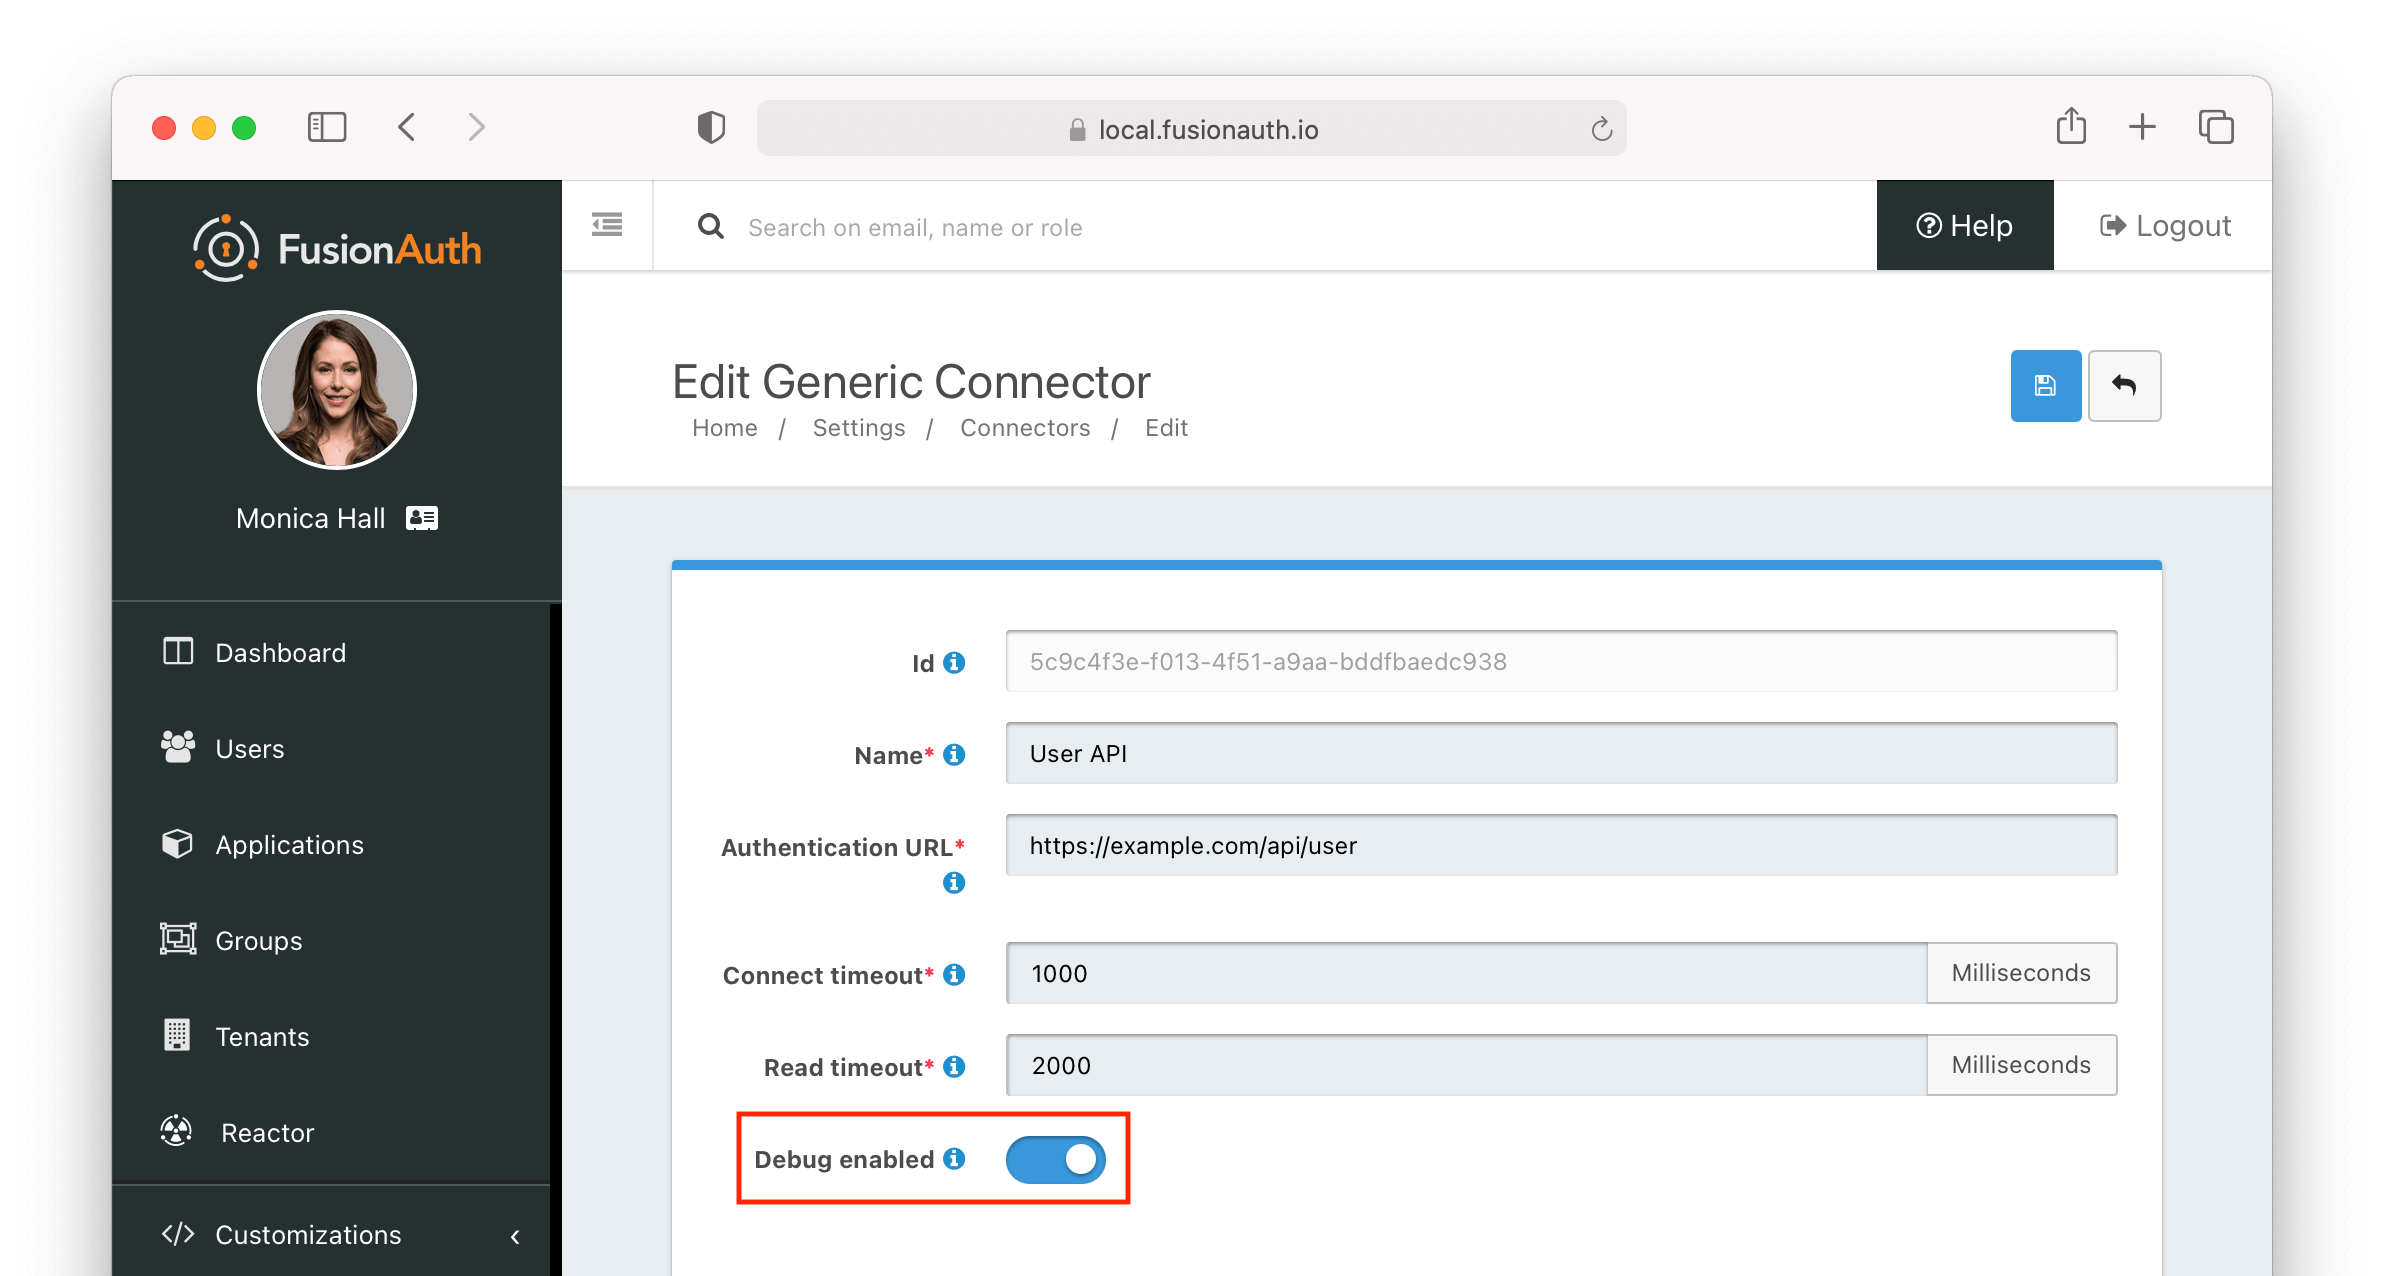
The additional debugging information will be written to the Event Log. You can find in the administrative user interface by navigating to System -> Event Log .
Enabling JMX#
JMX is an API that allows deeper insight and monitoring of Java applications, including FusionAuth. To use JMX, you'll need to include a few modules:
jdk.management.agentjdk.httpserverif you are using the JMX HTTP adapter
These should be part of a recent, standard Java install. However, if you are using the Docker image, which is built with jlink, you'll need to build a new image with these modules. There's a GitHub issue about adding these modules to the FusionAuth image.
When the above modules are available to your Java runtime, configure JMX by passing additional arguments to FusionAuth using any of the supported configuration options such as adding a fusionauth-app.additional-java-args entry to the fusionauth.properties file.
Troubleshooting Email#
FusionAuth sends a lot of email, for forgotten passwords, passwordless login and other features.
Troubleshooting email delivery is difficult. There are many factors affecting it. However, there are steps you can take to narrow down the problem.
Send A Test Email#
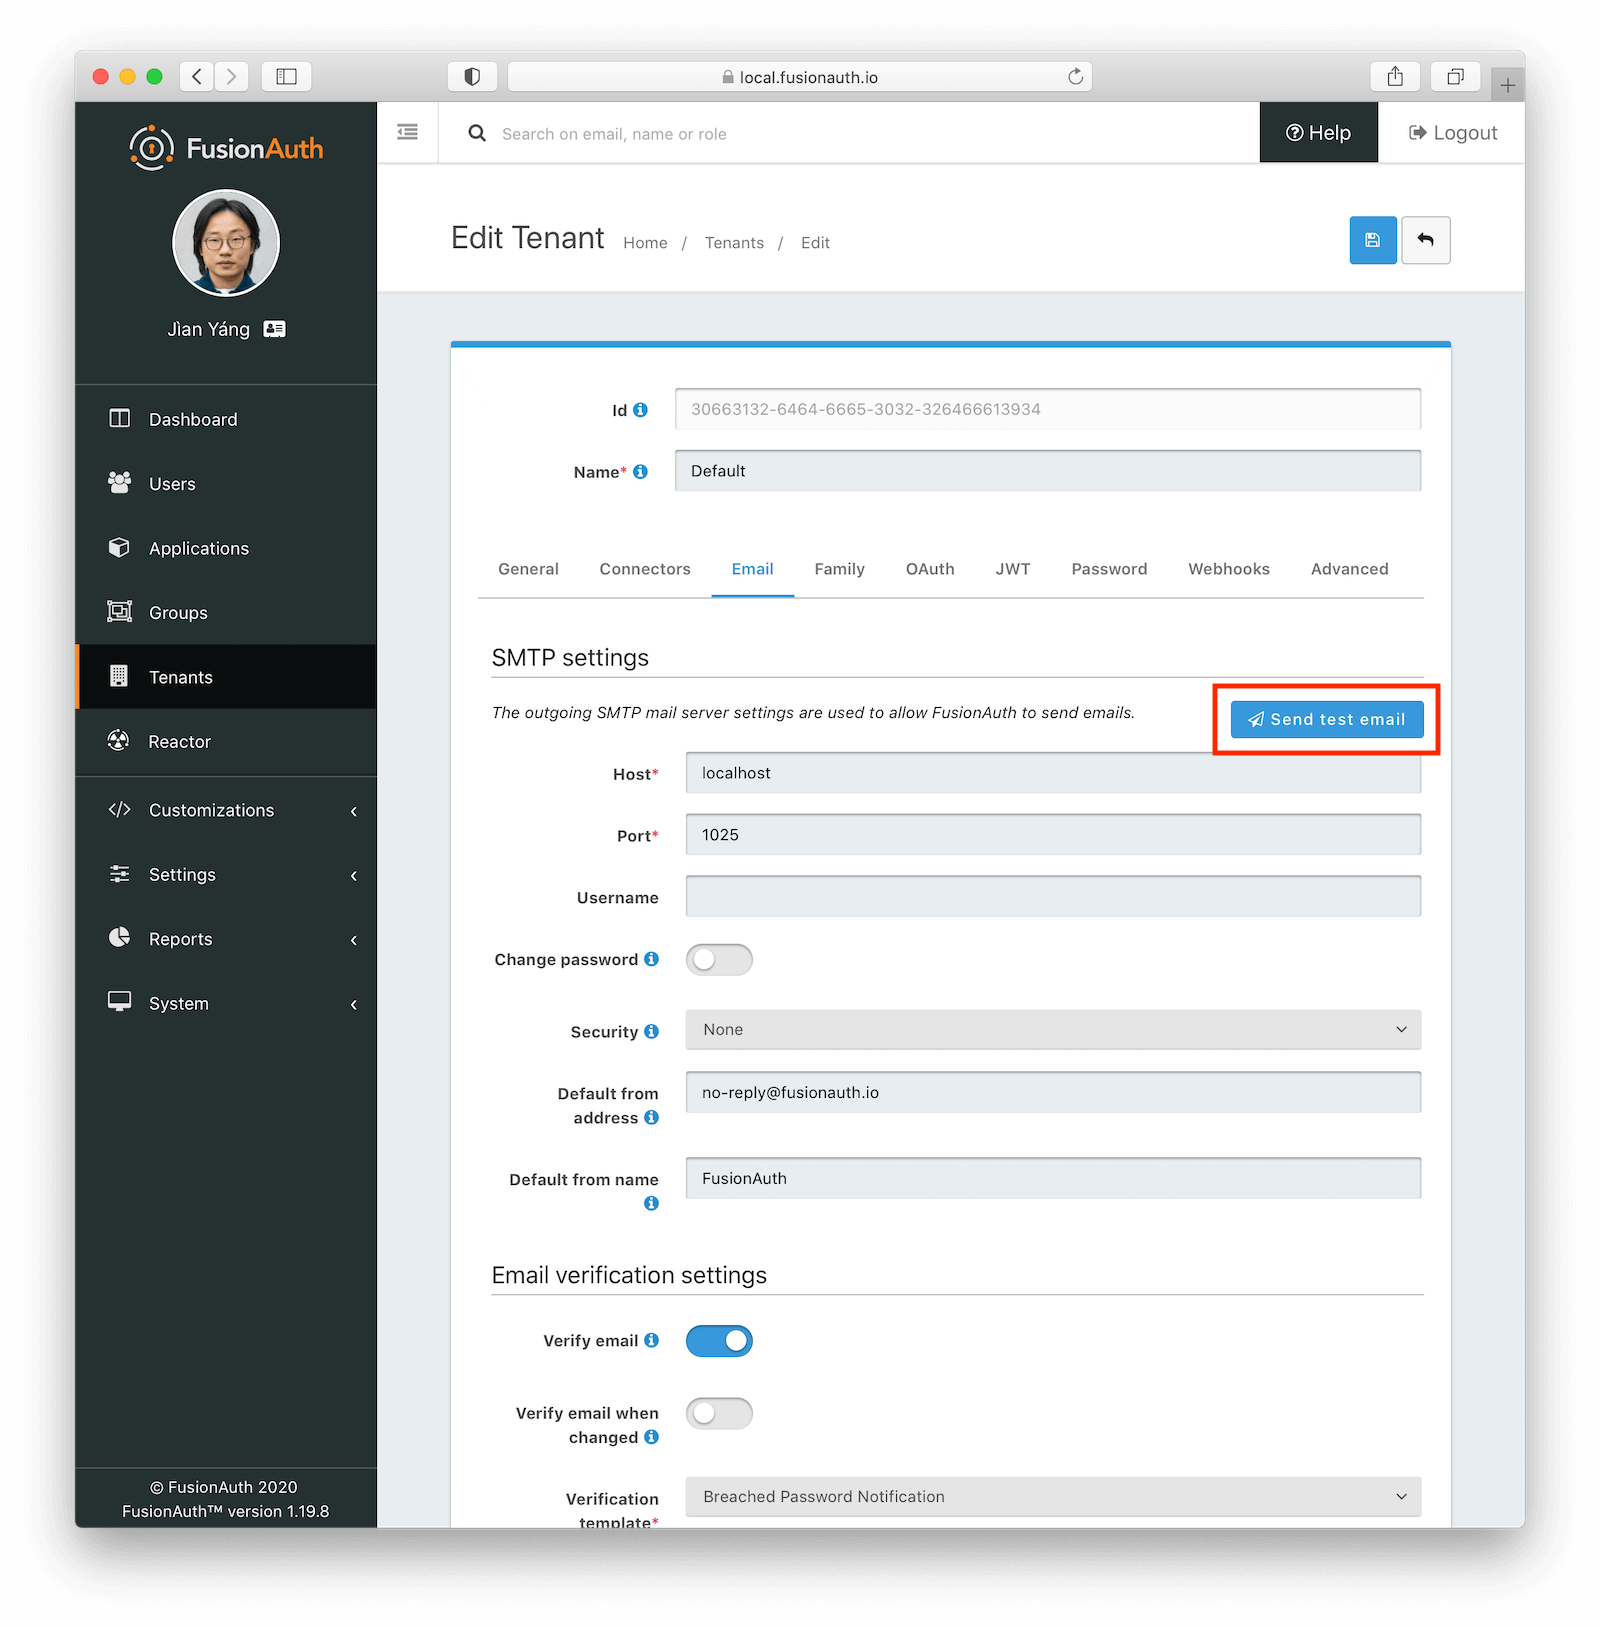
The Send Test Email button has been available since 1.16.0
The first step is to ensure that you can send a test email. Navigate to Tenants -> Your Tenant -> Edit -> Email and send a test email. If it is received, FusionAuth can send emails via SMTP.
If sending a test email fails, a tool such as SWAKS can help debug SMTP issues. Using this tool removes FusionAuth from the equation.
Further Investigation#
If the test email succeeds, but you aren't receiving other emails, investigate further by following these steps:
- Send emails to different addresses at different providers and check the spam folder.
- Make sure that you are firing the event that you expect to send email correctly. For instance, if you are looking for email verification of users, make sure that is enabled.
- Test with a different FusionAuth function. Sending a password reset email is easy to do from the user details screen.
- Make sure the email template is correct, or use a default template.
Additionally, confirm that the template content matches up with the template type. Otherwise template variables will be missing. If this occurs, you may see a message like this in the Event Log.
Render Errors
---------------
html : freemarker.core.InvalidReferenceException: The following has evaluated to null or missing:
##> changePasswordId  [in nameless template at line 5, column 59]
SMTP Logging#
To enable SMTP logging prior to 1.37.0 follow these steps:
- Enable debugging by navigating to Tenants -> Your Tenant -> Edit -> Advanced -> SMTP Settings -> Additional properties and add
mail.debug=true. - Save the tenant.
- Send an email.
- View the system logs by navigating to System -> Logs .
- Select
fusionauth-app.logand you will see verbose SMTP output.
To enable SMTP logging for version 1.37.0 or later follow these steps:
- Enable debugging by navigating to Tenants -> Your Tenant -> Edit -> Email -> Debug .
- Save the tenant.
- Send an email.
- View the Event Logs by navigating to System -> Event Logs .
- Select the Event Log that starts with
"Email debug information".
Doing this logs the full SMTP conversation, which can be verbose. You should remove this setting when you have finished troubleshooting.
Troubleshooting Identity Provider Configuration#
A common pattern is to set up as the login method for the FusionAuth application. This lets you keep all your users in the system, and have FusionAuth delegate auth decisions to it. However, if your Identity Provider isn't configured correctly, you can end up in a dead end, unable to log in. This might happen if the following occurs:
- You set up as the authentication method for your FusionAuth admin application.
- You set the Managed domains to your domain. For example,
example.com. - All added users have the same
example.comdomain. - You accidentally misconfigure and break authentication.
- Then you log out of the FusionAuth administrative user interface.
You won't be able to log in to the FusionAuth admin application to correct the misconfiguration. You've locked down the FusionAuth admin application so that only users with example.com email domains can access it, but because of the misconfiguration, there is no account with a valid login.
This is a problem, but not an insurmountable one. Your options depend on when you discover the issue. If you are beginning your configuration, you can avoid this scenario. Follow these steps:
- Don't set any value of Managed domains before you have tested the configuration.
- Test authentication in a different or incognito browser window, ensuring that an admin user account is always accessible to modify configuration.
- Add an admin user account with a domain not in the Managed domains setting. Ensure this user is registered with the FusionAuth admin application and has the
adminrole. - Set up an API key. Navigate to Settings -> API Keys to do so and make sure it has privileges to create users and registrations. This will open up options in the future to reset settings without using the administrative user interface.
If you are currently locked out of your FusionAuth application, you have fewer options:
- If you have a known username and password that are not delegated to (perhaps the initial account created when you set up FusionAuth) proceed to the FusionAuth admin login page. Append
&showPasswordField=trueto the end of the login URL. This will force the UI to show the password field. - If you have an API key with appropriate privileges, you can modify the configuration without using the administrative user interface. Add an admin user with a different email domain and sign into the admin interface to correct your configuration. Here's how you might do so (
3c219e58-ed0e-4b18-ad48-f4f92793ae32is the FusionAuth application Id):
Adding a New Admin User With a Different Domain
curl -XPOST -H "Authorization: $API_KEY" -H "Content-Type: application/json" \
-d '{
	"user": {
		"email": "user@differentdomain.com",
		"password": "password"
	},
	"registration": {
		"applicationId": "3c219e58-ed0e-4b18-ad48-f4f92793ae32",
		"roles": ["admin"]
	}
}' \
https://login.piedpiper.com/api/user/registration
If you have neither an API key nor a known user, you can restore from a database backup, modify the database directly if you have access, or re-install FusionAuth.
Troubleshooting Email and Registration Verification#
Links Emailed to Users Don't Function As Expected#
Users cannot verify their application registration or verify their email. The link or code does not work (it is expired or there is some other error).
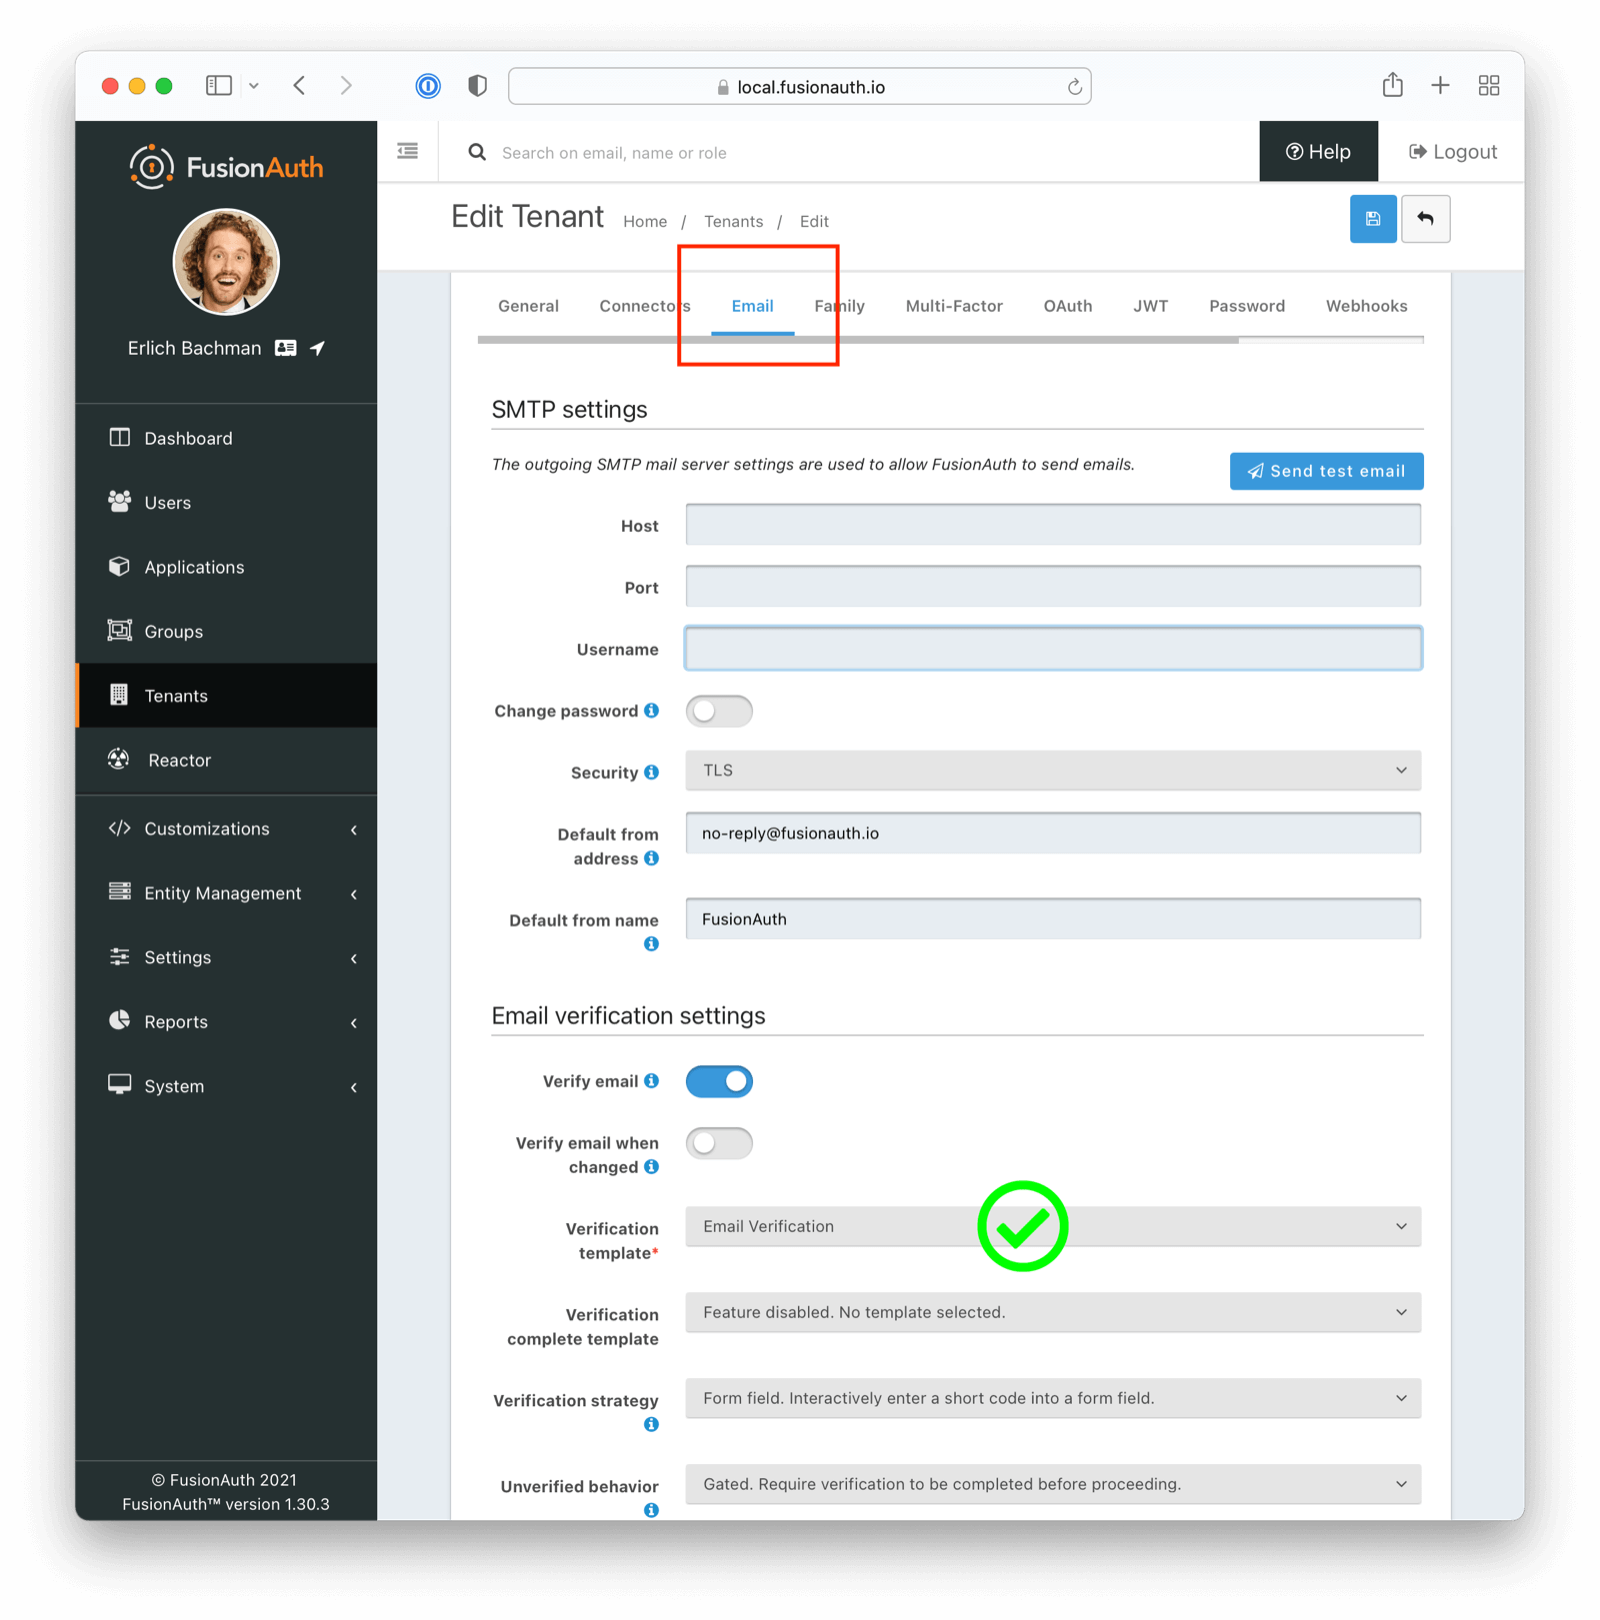
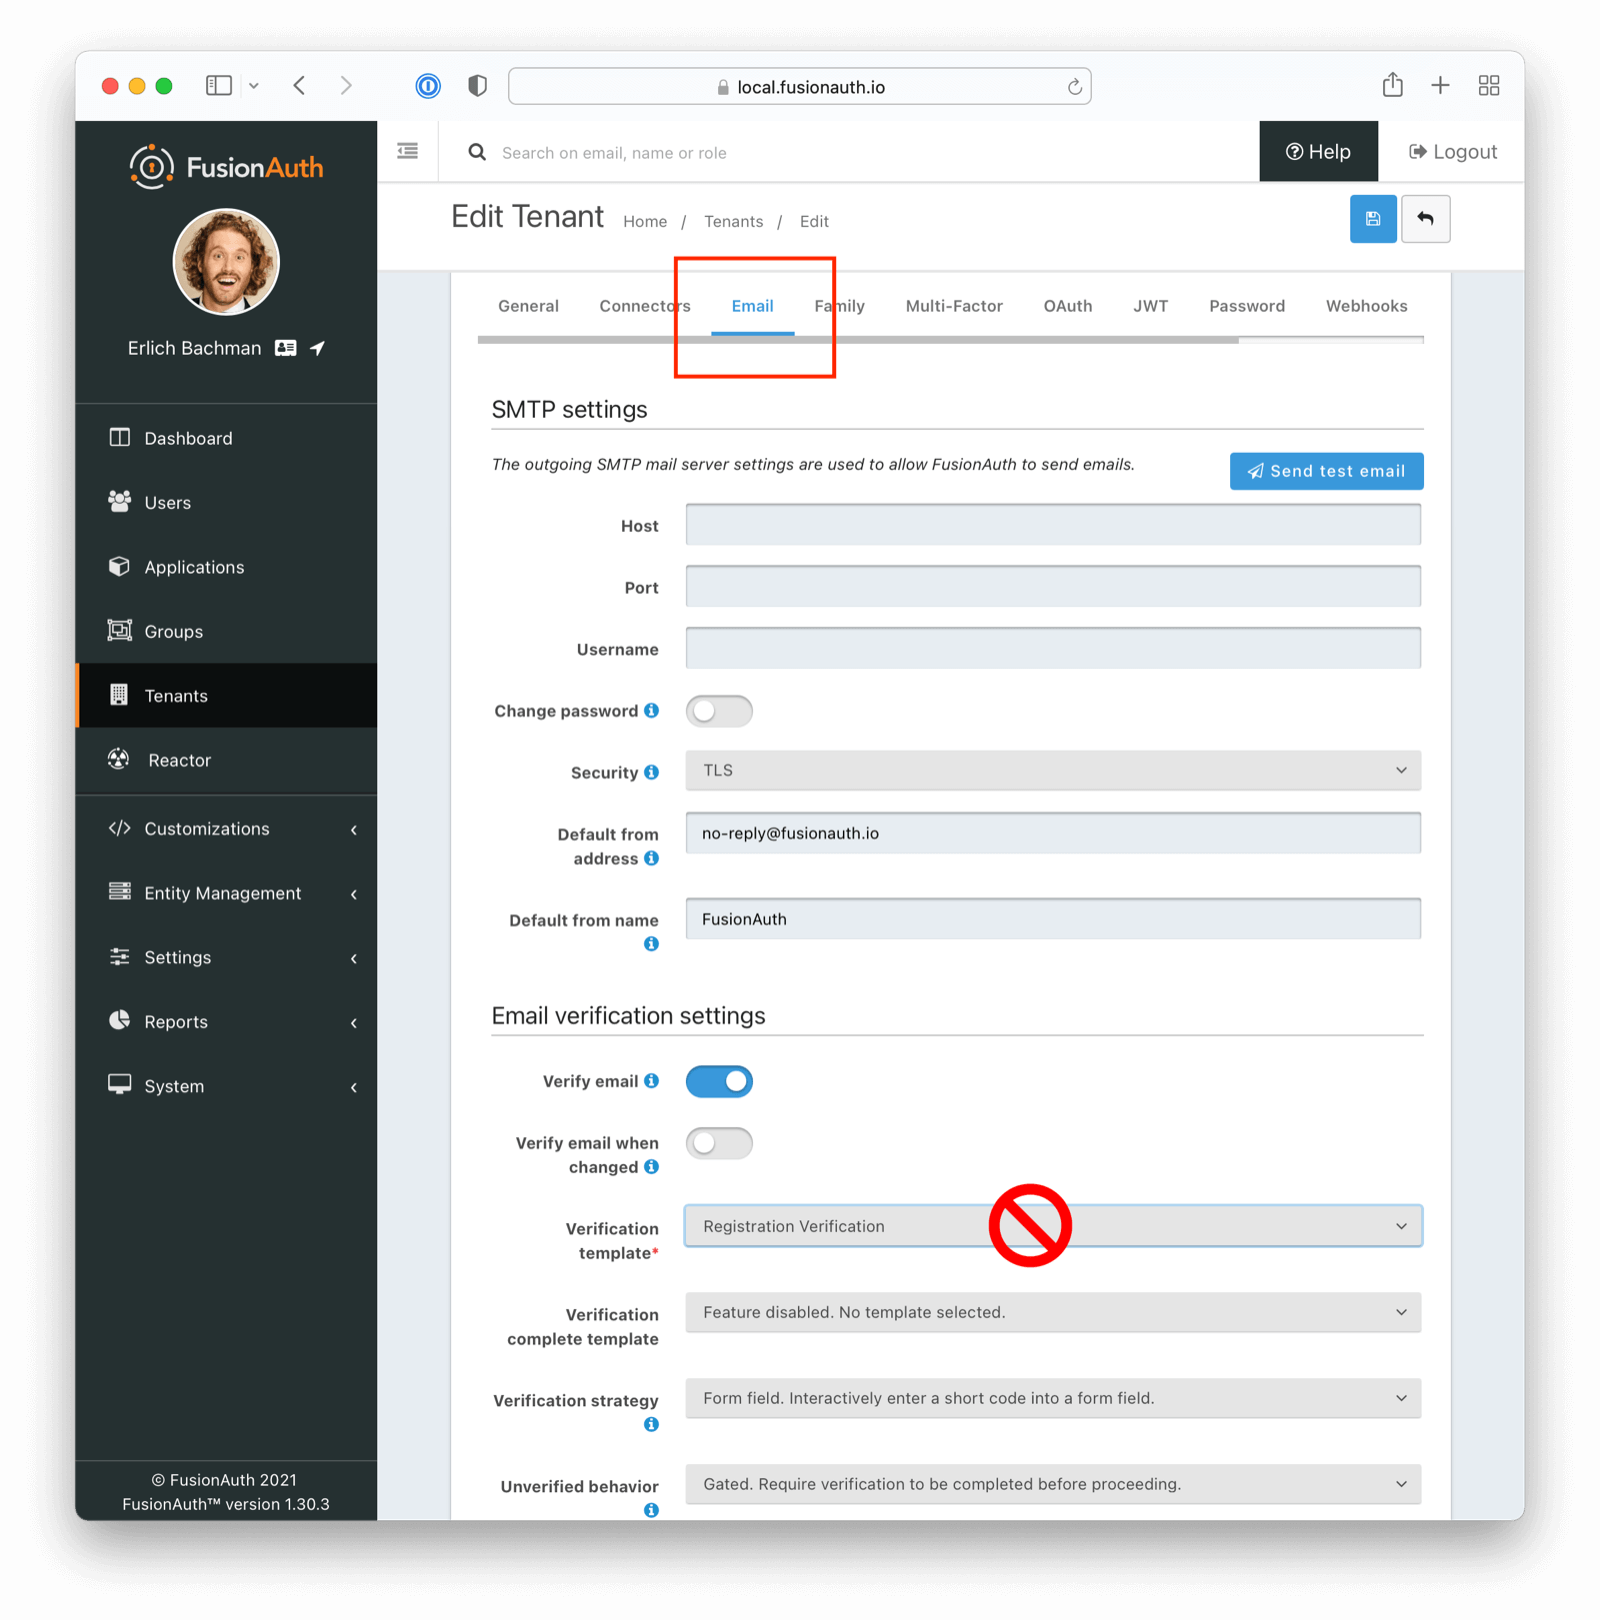
Check the Email Template#
Ensure you have selected the correct email template.
For Email Verification
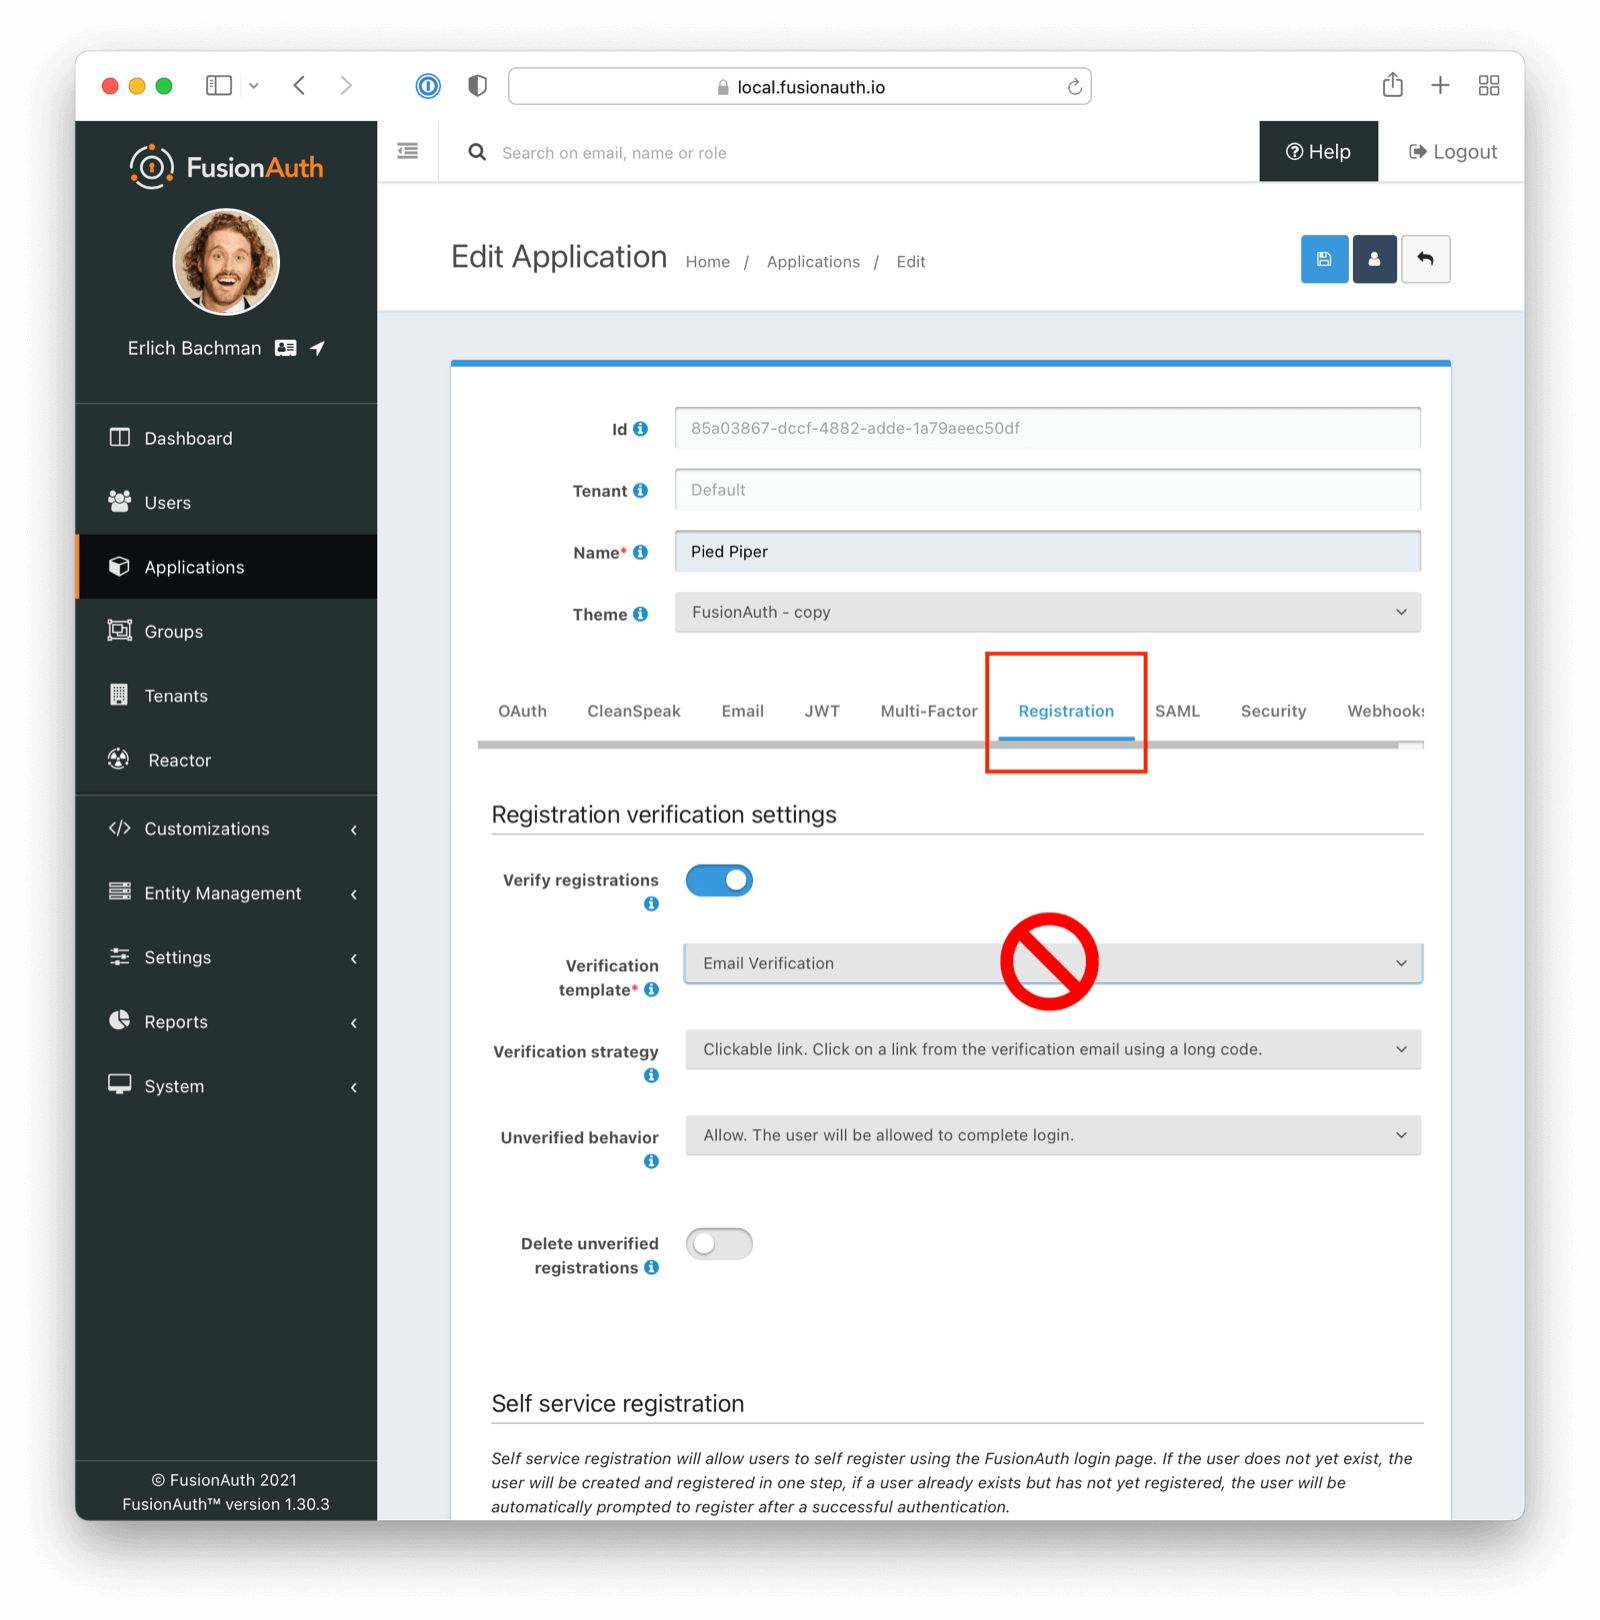
If attempting to verify email addresses, ensure you have selected the appropriate template (Email Verification as opposed to Registration Verification in this instance)
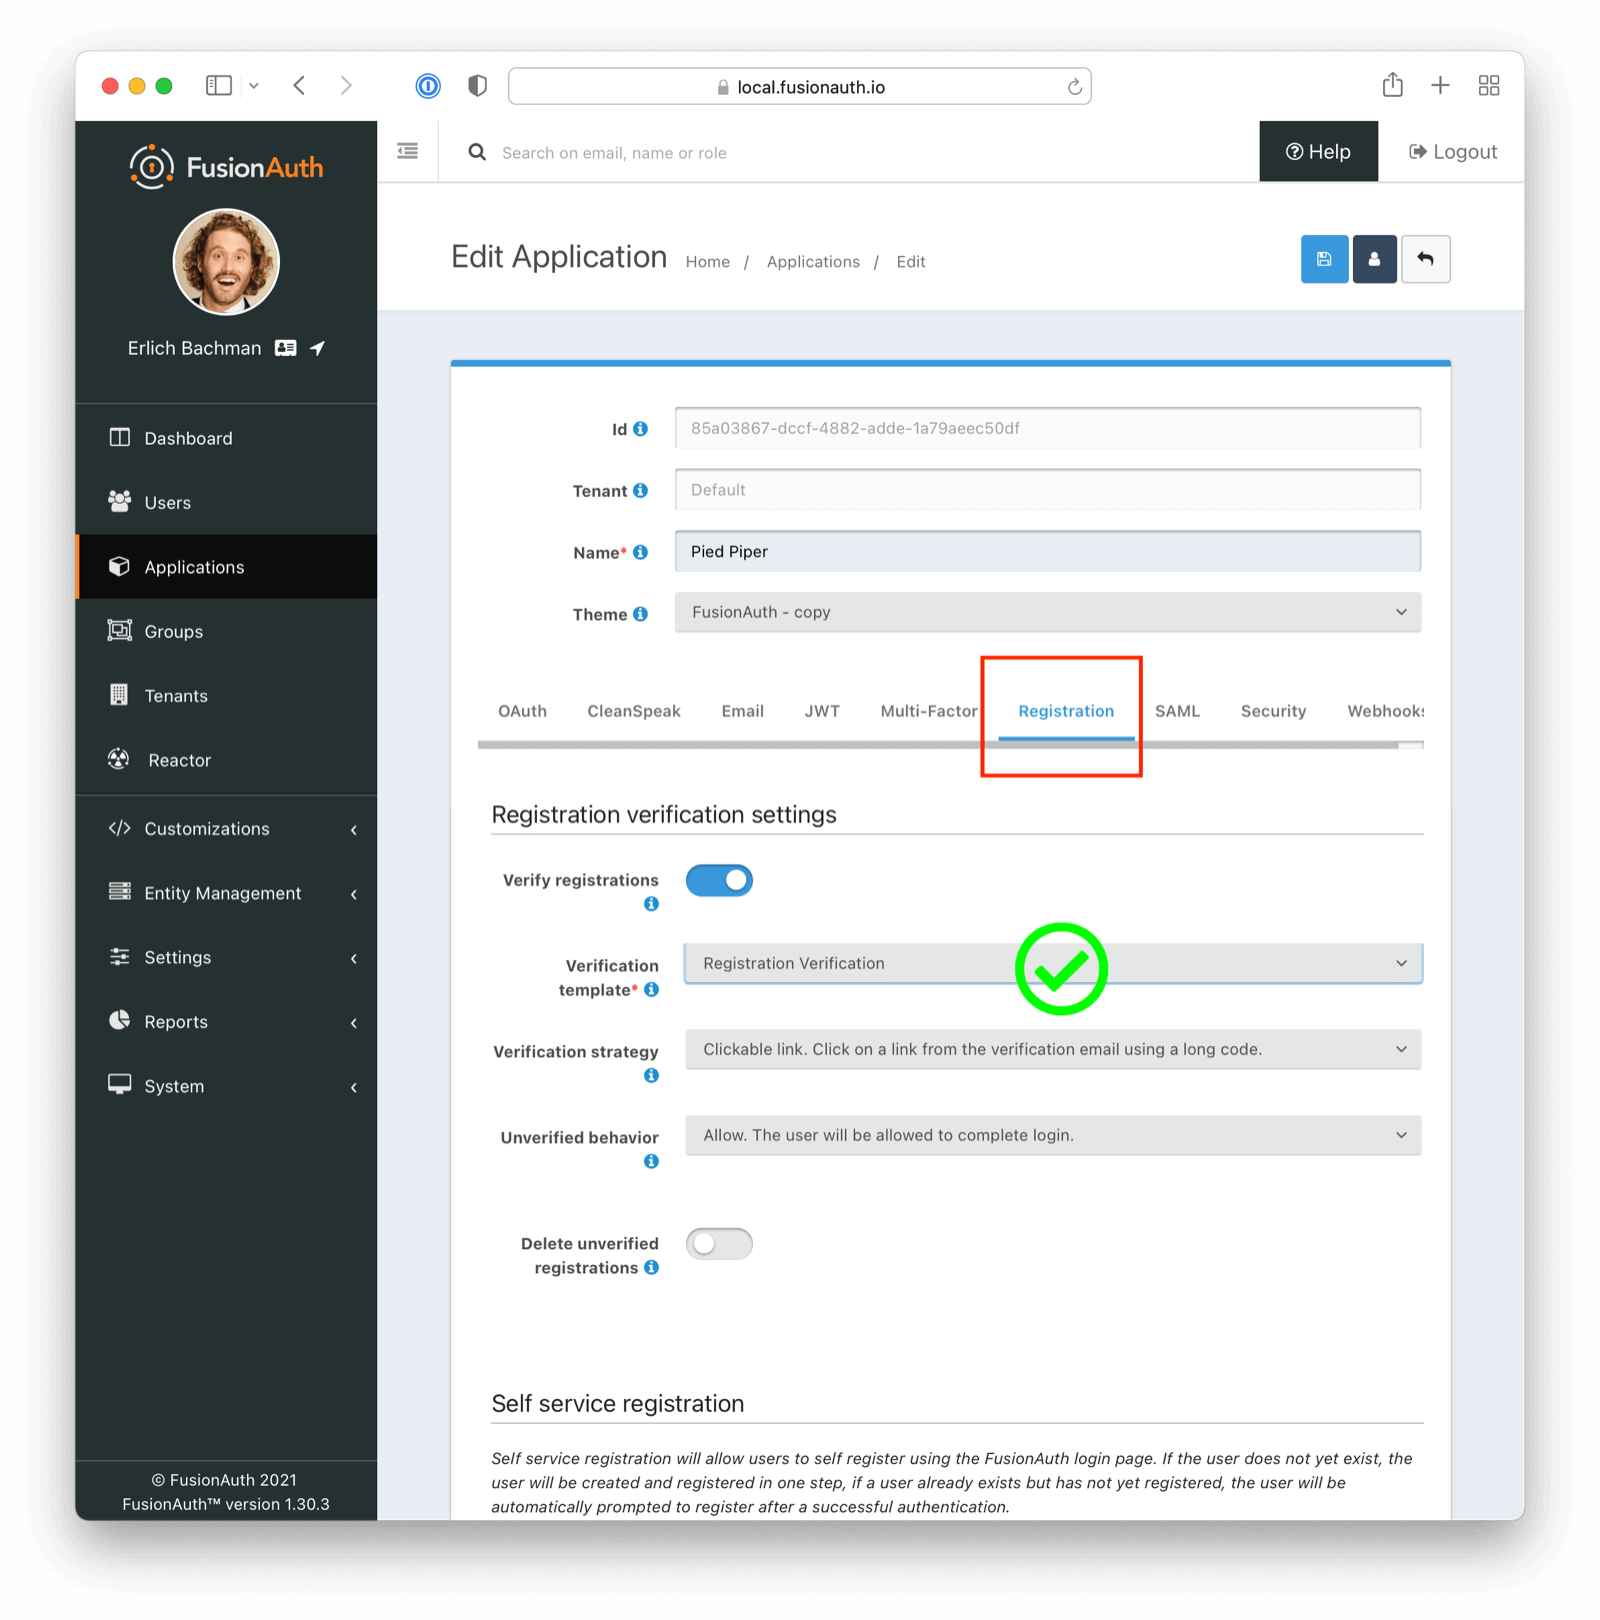
For Application Registration
If attempting to verify application registration, ensure you have selected the appropriate template (Registration Verification as opposed to Email Verification in this instance)
Check External Identifier Timeouts#
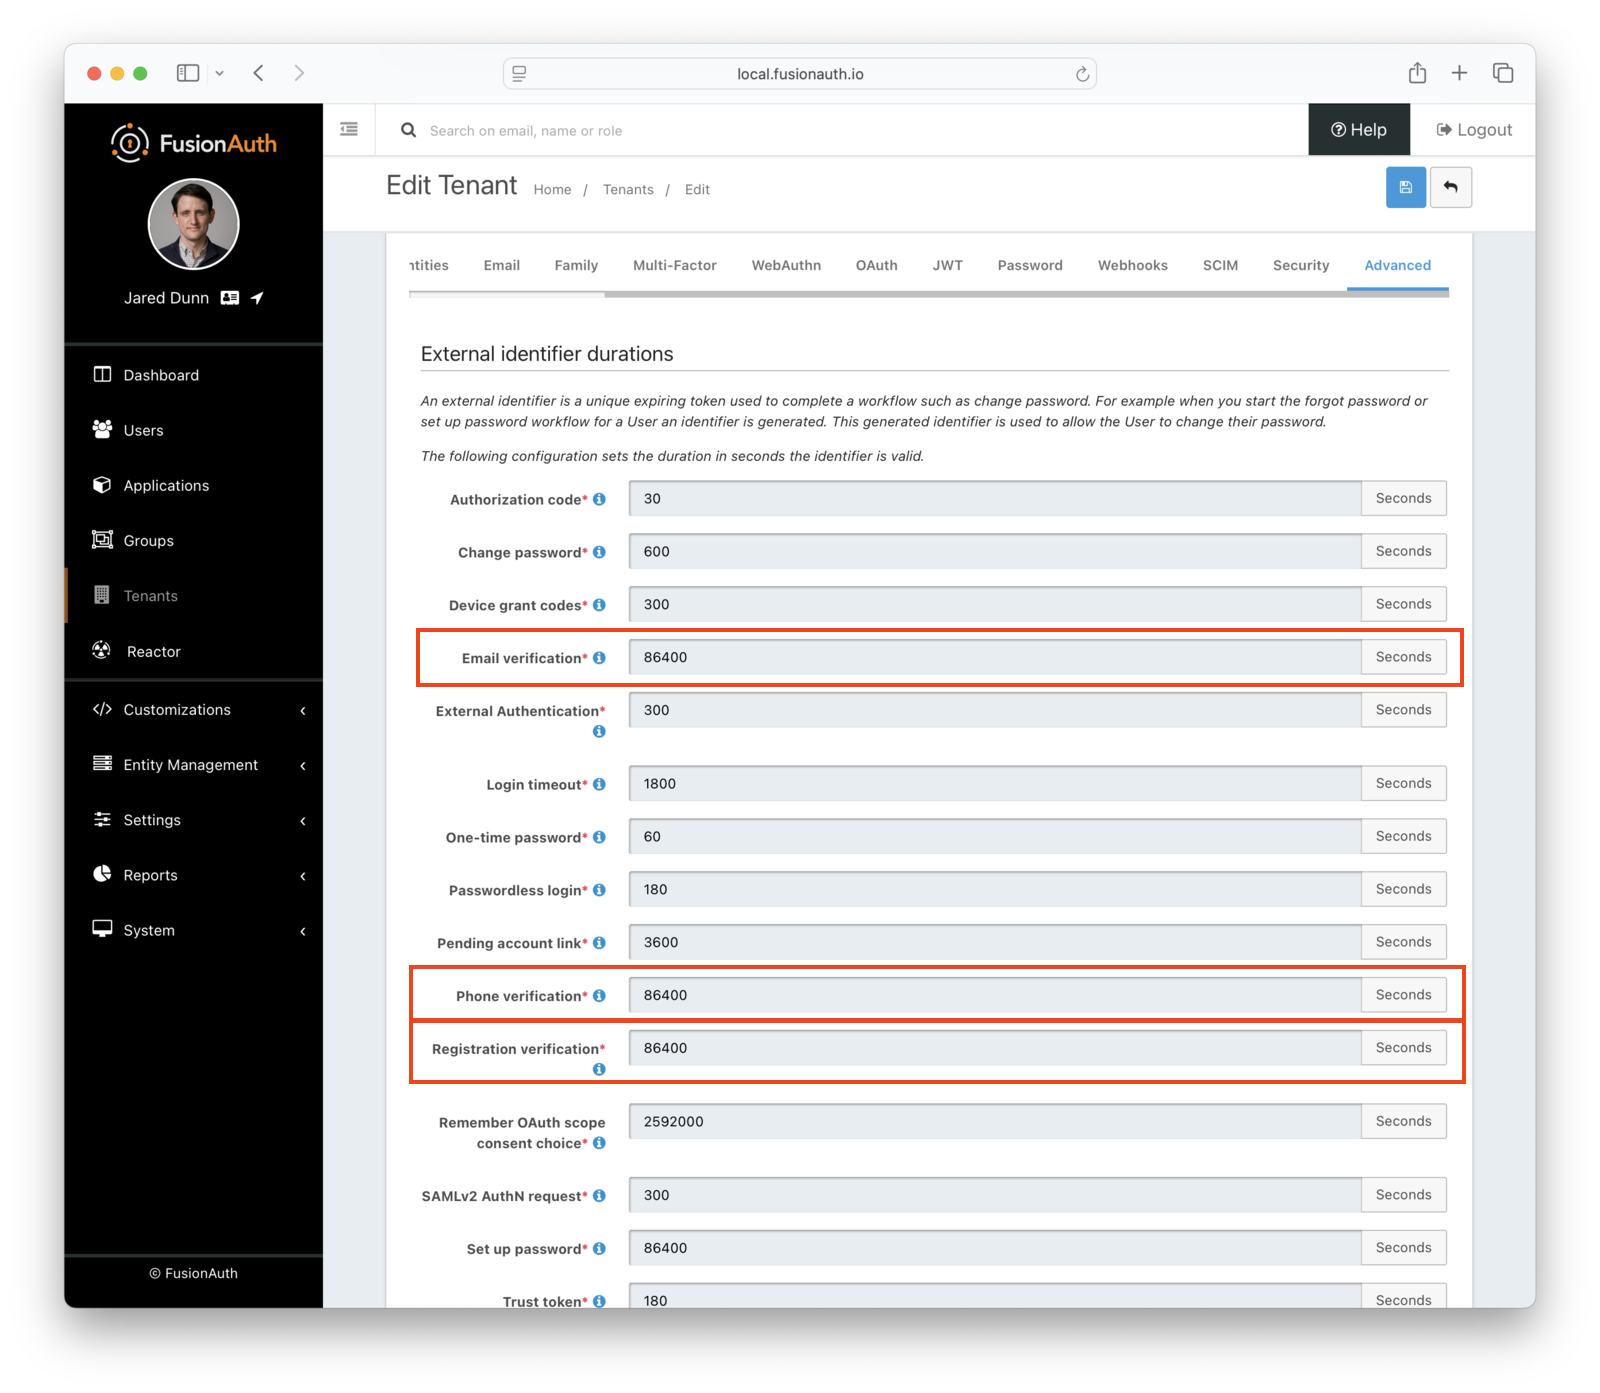
Ensure your external identifier timeouts are appropriate. Reasonable defaults are set, but they can be adjusted (Tenants -> Advanced Tab -> External identifier durations ), with particular attention paid to Email Verification, Phone Verification, and Registration Verification durations.
SAML and Apple Identity Providers#
SAML and Apple Identity Providers will not work without the proper CORS configuration. If CORS is misconfigured, you will see a 403 status code during the login process in the browser network console.
When setting up a SAML Identity Provider in FusionAuth, ensure you have configured CORS correctly.
When setting up an Apple Identity Provider in FusionAuth, ensure you have configured CORS correctly.
To further debug CORS issues:
- Enable debugging by navigating to Settings -> System -> CORS , selecting Enable debug logging, and saving the settings.
- Attempt to log in again using the provider.
- Review the Event Log for relevant messages. See System -> Event Log to view this log.
After debugging is complete, ensure you disable CORS debugging to avoid spamming the Event Log with unnecessary information. Disable debugging by navigating to Settings -> System -> CORS , deselecting Enable debug logging, and saving the settings.
Troubleshooting Themes#
Theme Errors Preventing Login#
If you have modified a custom theme and it is causing errors preventing you from logging in to FusionAuth or the admin UI, you can override the use of the UI templates. This will render a form allowing you to log in. To do this:
- Open your browser and access your FusionAuth admin UI.
- This will redirect you to the broken
/oauth2/authorizepage. - Click in your browser's address bar and scroll to the end.
- Add the String
&bypassTheme=trueto the end of the URL and hit the Enter key.
This should render the default login page that ships with FusionAuth and allow you to log in and fix errors.
Default Theme Used Incorrectly#
Anytime a request is made to a themed page and FusionAuth is unable to identify the tenant, the default tenant will be used. This includes, but is not limited to:
- The root page
/when aclient_idortenantIdis not provided. - Any themed pages such as
/password/forgotwhen aclient_idis not provided. - Edge case error conditions where FusionAuth doesn't have context to determine the application or tenant.
If you see the default theme unexpectedly, ensure you are passing required parameters, such as the tenantId or client_id, to the page so that it can determine the applicable application or tenant. These parameters allow FusionAuth to determine the correct theme to display.
Theme Will Not Retain Change(s)#
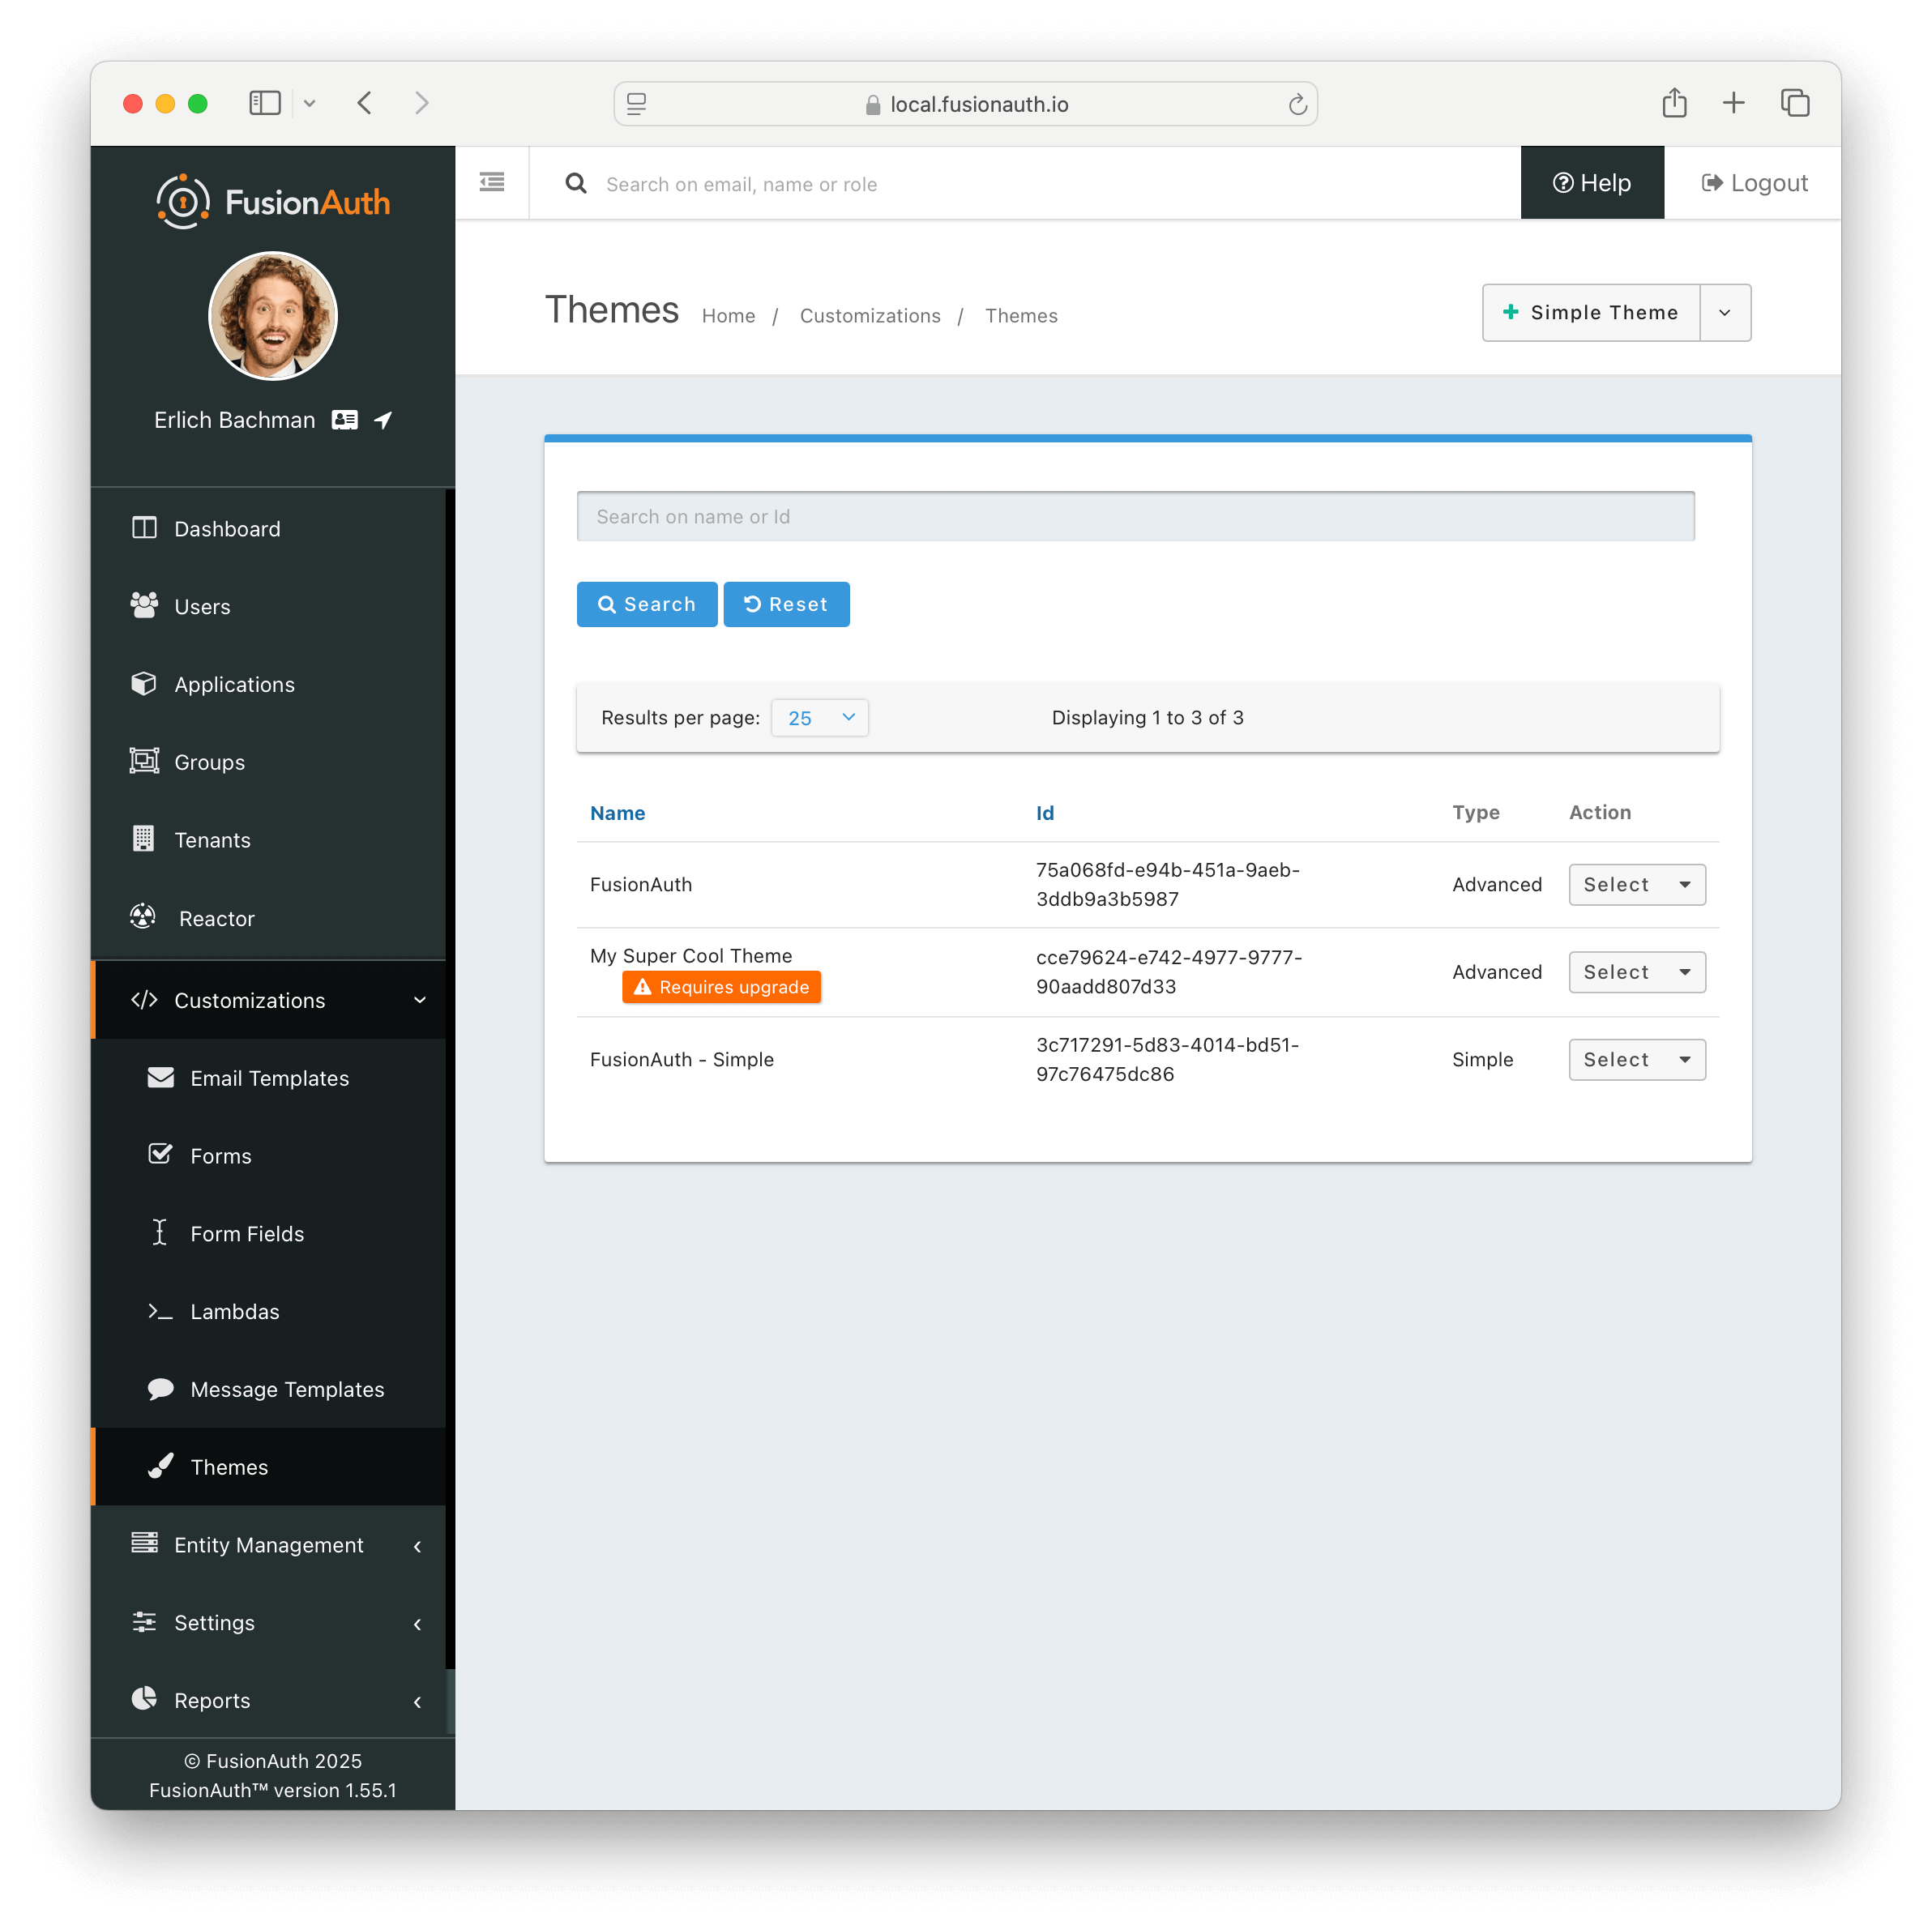
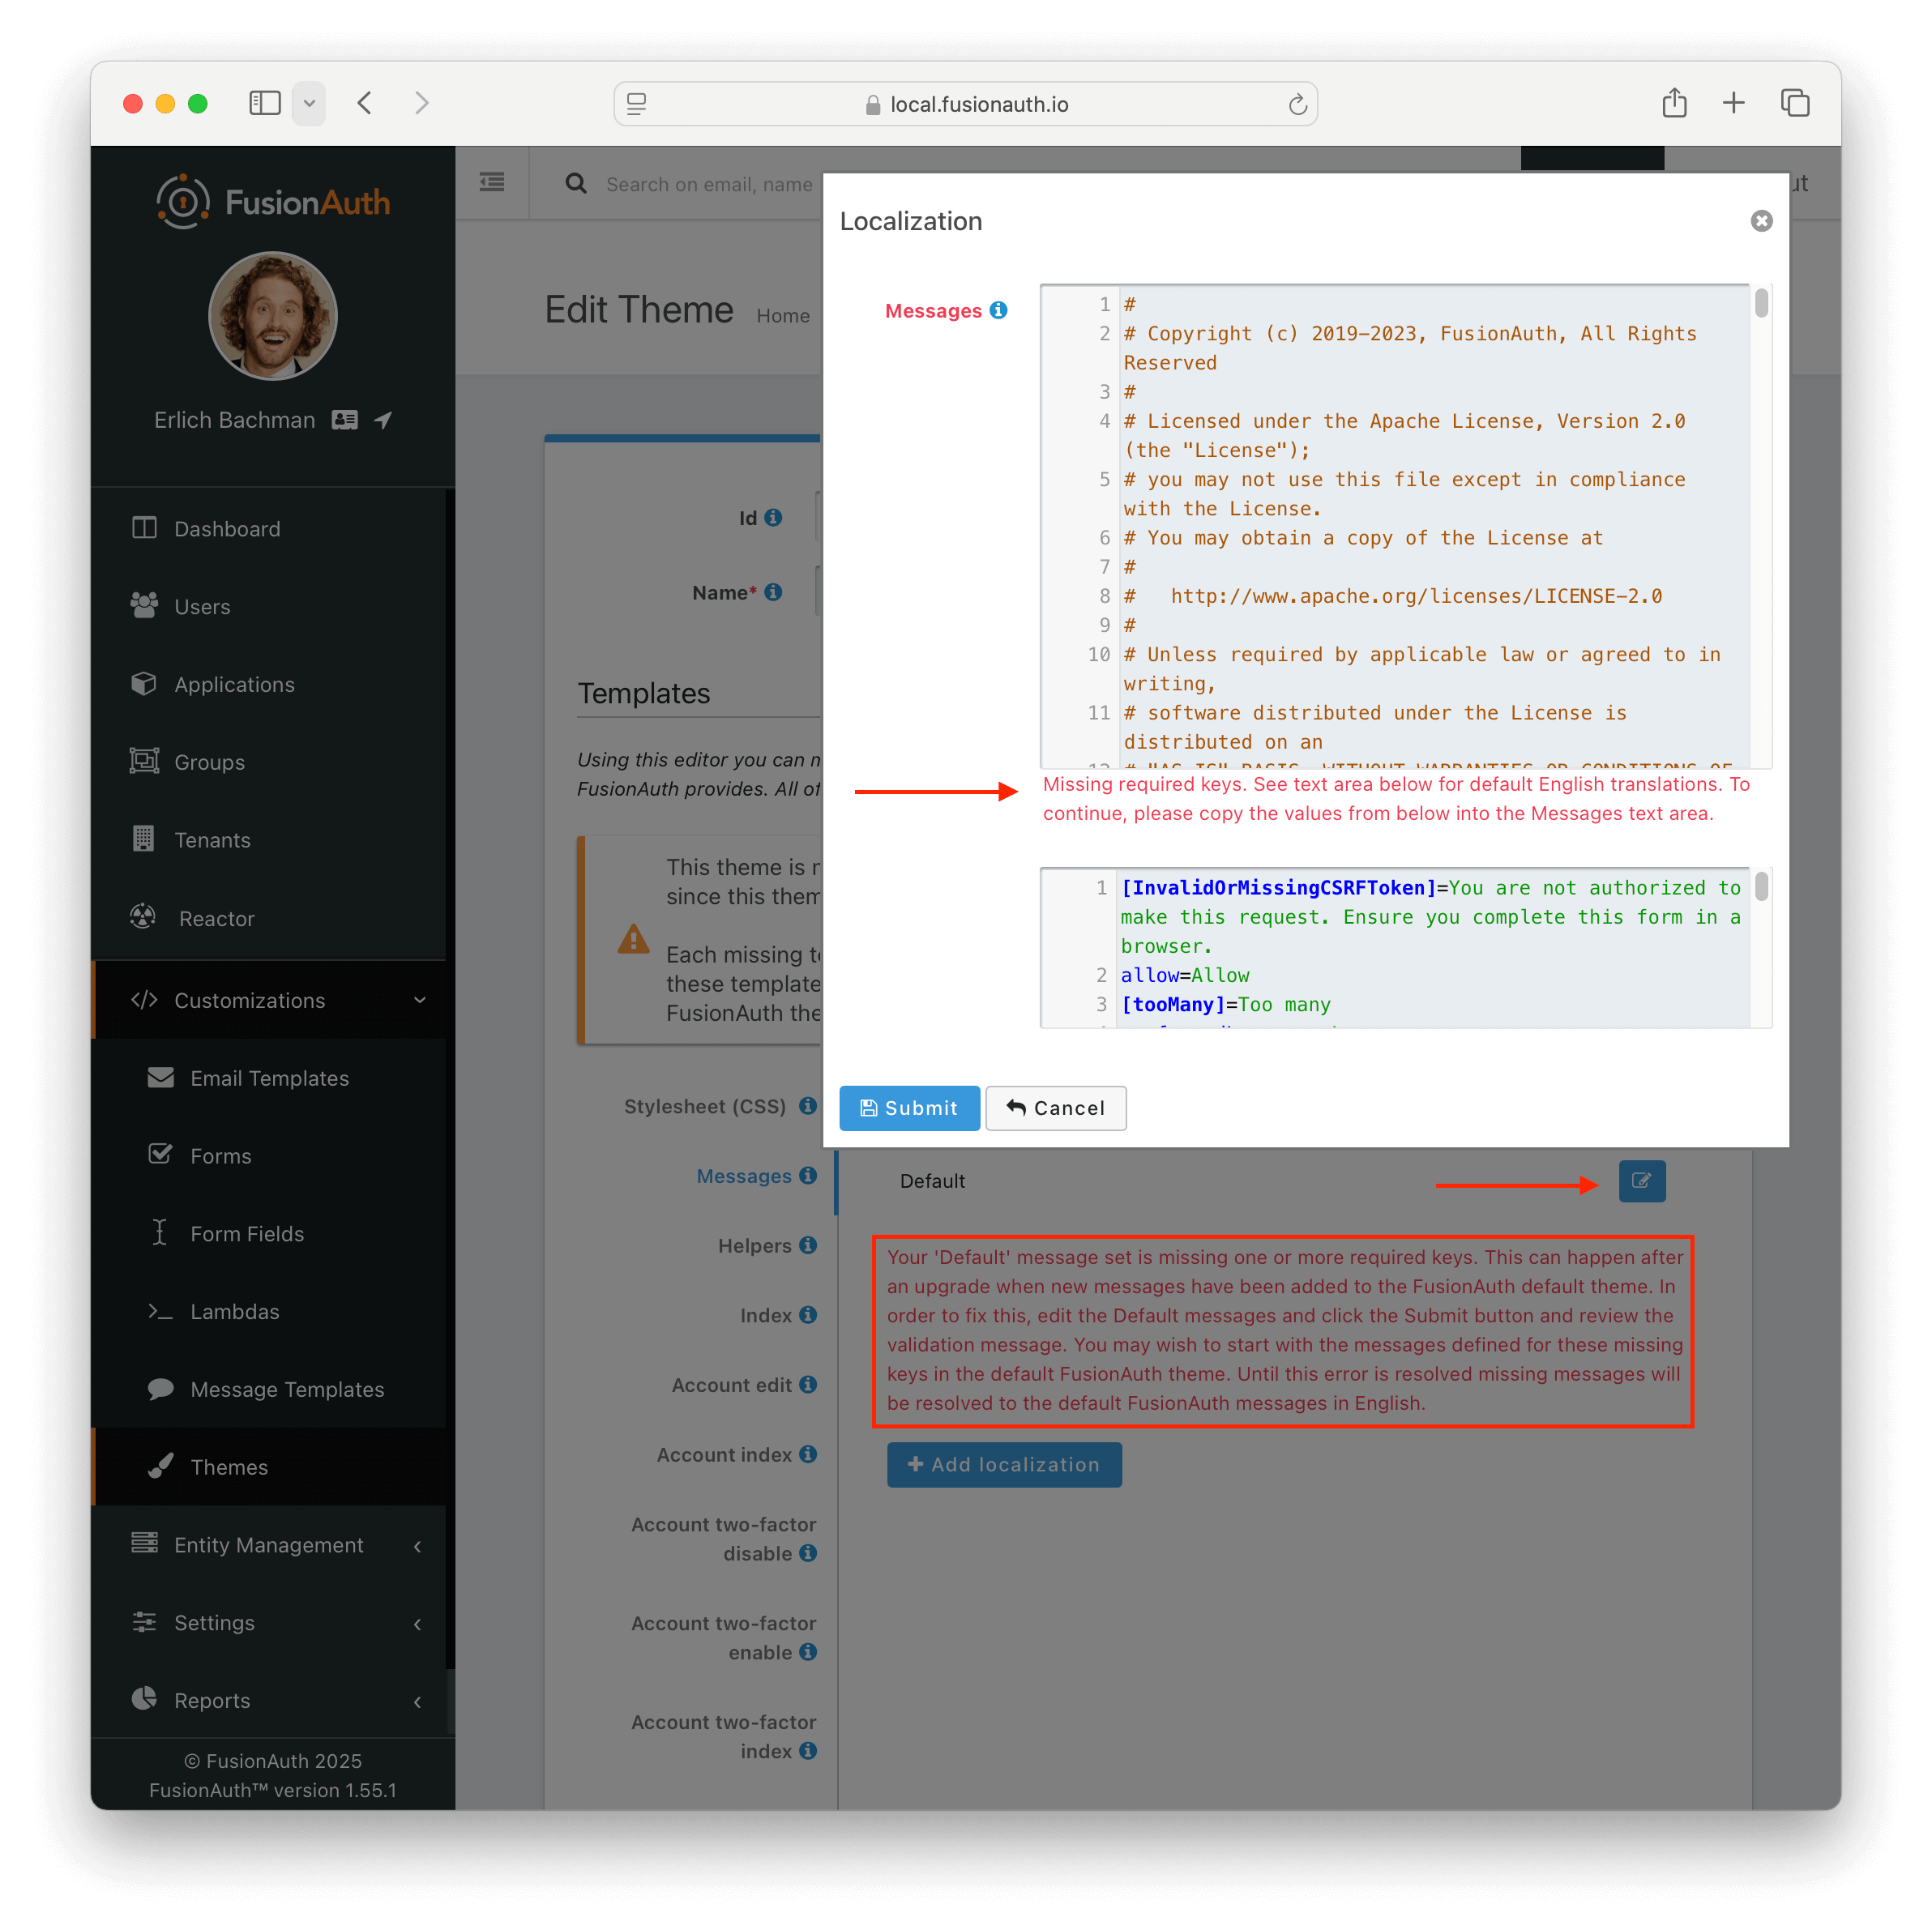
If you have upgraded your version of FusionAuth and are using Advanced Theming, you may need to upgrade each theme.
On theme "save" in the UI, an orange icon will indicate specific pages needing attention and changes. You can click on each page, copy in the new theme, and start customizing.
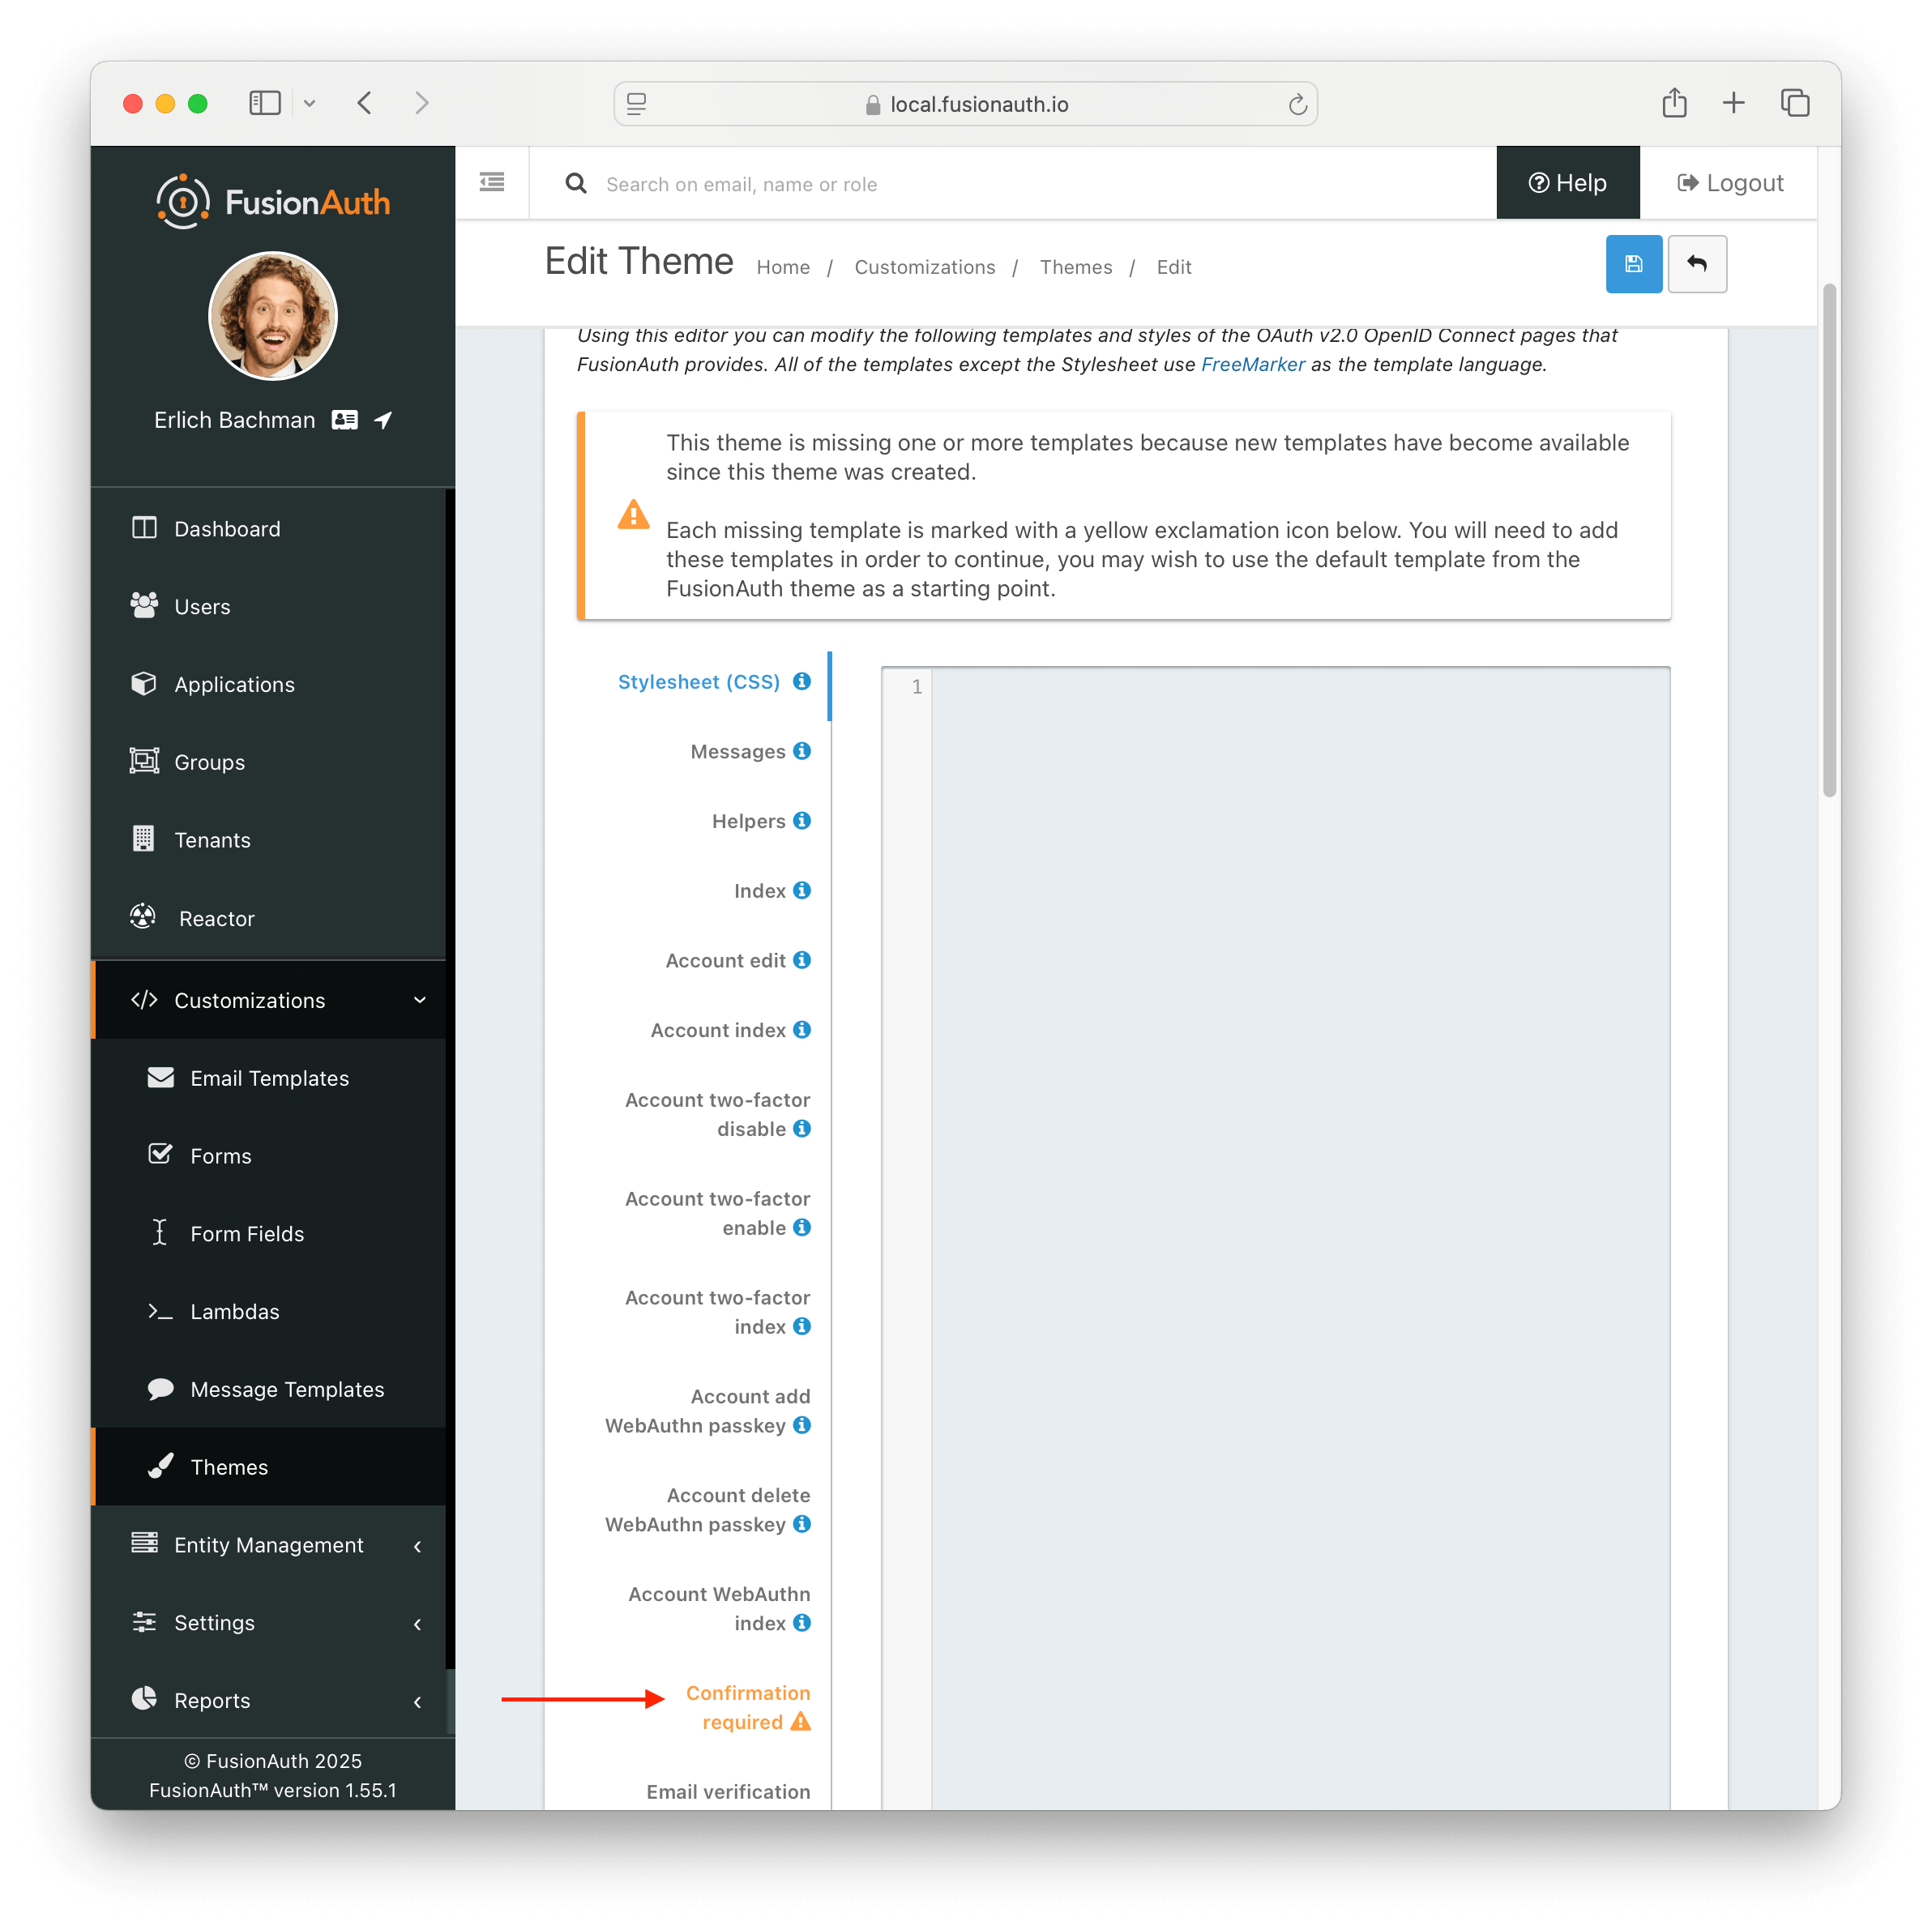
Additionally, in the messages bundle a validation notice will indicate the message keys to be added to support the newer FusionAuth version.
For more information about upgrading themes, see Upgrade an Advanced Theme.
Troubleshooting Two-Factor Authentication#
If you are receiving an invalid code for your two-factor authentication and you are using a time based one time password (TOTP) application such as Google Authenticator or Authy, confirm that the system time is correct on the server.
The TOTP two-factor auth system is time dependent and if there is any slippage between the system time of the client and the system time of the server, the generated code will not be correct. This is also known as "clock skew".
The fix is to ensure that the FusionAuth server has the correct system time. How exactly do that depends on the type of system; please consult your operating system documentation.
Troubleshooting Database Connections#
If you find that FusionAuth is unable to connect to the database, ensure you can use a command line client connection to successfully make a connection using the same port and credentials.
Some MySQL services such as Microsoft Azure may require a specific version of TLS to connect successfully. At the time of writing this note, the MySQL connector will not attempt to utilize TLSv1.2 by default, so when connecting to a service that requires this version you will need to explicitly request this version of TLS on the connection string. For example, appending this enabledTLSProtocols=TLSv1.2 to the connection string will allow you to successfully connect to an Azure managed MySQL database. See MySQL Connector : Connecting Securely Using SSL for additional information.
Troubleshooting Performance#
If you are not seeing the logins per second you'd expect from FusionAuth, you can take some steps to troubleshoot the issue. Generally speaking the primary bottleneck for logins per second is CPU. Hashing the password is intentionally slow. FusionAuth will not be able to perform more logins per second than your CPU can handle. The database is the other likely bottleneck.
One way to identify if the password hashing is the bottleneck in load tests is to reduce the hash strength. See Tenants -> Edit -> Password -> Cryptographic hash settings . Set this to Salted MD5 with a factor of 1 and then enable Re-hash on login. This will cause each user to have their password re-hashed the next time they log in to use MD5. Salted MD5 is not a good password hashing strategy for several reasons, but is useful to test whether your system is CPU bound. Make sure you switch back after testing is done.
If you can still get a lower number of logins per second than you'd expect with this configuration, then the database is likely the bottleneck and you should update your system to use a database with more resources and load test that system.
If the MD5 configuration allows you to achieve much higher logins per second, then the CPU is your bottleneck. If you are CPU bound, the only way to get more logins per second is to horizontally scale (add more nodes) or vertically scale (use larger CPUs with each node).
Troubleshooting Kickstart#
Kickstart is not running#
If your Kickstart file doesn't run on your instance, here are some troubleshooting steps to take.
- Ensure you have provided a Kickstart JSON file via the appropriate configuration parameter.
- Make sure the file is valid JSON, using a linter.
- If the file references any other files (such as email templates), ensure they exist as well.
- Kickstart will not run if it sees any users, API keys, or applications in the FusionAuth database. This is to prevent data loss. If you can log in to the FusionAuth administrative user interface, Kickstart will not run.
Additionally, Kickstart takes time to run, depending on how many API calls you make and what kind of API calls they are. If you are starting up an instance with Kickstart and you visit the FusionAuth administrative user interface in your browser, you may see the Setup Wizard briefly while Kickstart is running. After Kickstart finishes, you should not see the Setup Wizard. This may require a browser refresh.
Different entity types or templates exist in kickstarted instances of FusionAuth than clean installs#
FusionAuth provides default lambda functions to support IDPs and SCIM, and these lambdas are present in any FusionAuth instance, whether or not it was kickstarted.
FusionAuth provides the following entity types, email templates, and message templates by default. A kickstarted FusionAuth instance will not contain these, as the intent is to have a kickstarted instance to be as much of a "clean slate" as possible, and to give you full control of its configuration.
Entity Types#
- [FusionAuth Default] SCIM Client
- [FusionAuth Default] SCIM Server
Email Templates#
- [FusionAuth Default] Breached Password Notification
- [FusionAuth Default] Confirm Child Account
- [FusionAuth Default] COPPA Notice
- [FusionAuth Default] COPPA Notice Reminder
- [FusionAuth Default] Email Verification
- [FusionAuth Default] Forgot Password
- [FusionAuth Default] Parent Registration
- [FusionAuth Default] Passwordless Login
- [FusionAuth Default] Registration Verification
- [FusionAuth Default] Set up Password
- [FusionAuth Default] Threat Detected
- [FusionAuth Default] Two-Factor Authentication
- [FusionAuth Default] Two-Factor Authentication Method Added
- [FusionAuth Default] Two-Factor Authentication Method Removed
Message Templates#
- [FusionAuth Default] Phone Forgot Password
- [FusionAuth Default] Phone Passwordless Login
- [FusionAuth Default] Phone Set up Password
- [FusionAuth Default] Phone Threat Detected
- [FusionAuth Default] Phone Two-Factor Add
- [FusionAuth Default] Phone Two-Factor Remove
- [FusionAuth Default] Phone Verification
The Default Two-Factor Request message template is present in both kickstarted and clean installs of FusionAuth.
Troubleshooting Self Service Account Management#
Not able to get your account management page up and running? Below are common issues and how to fix them.
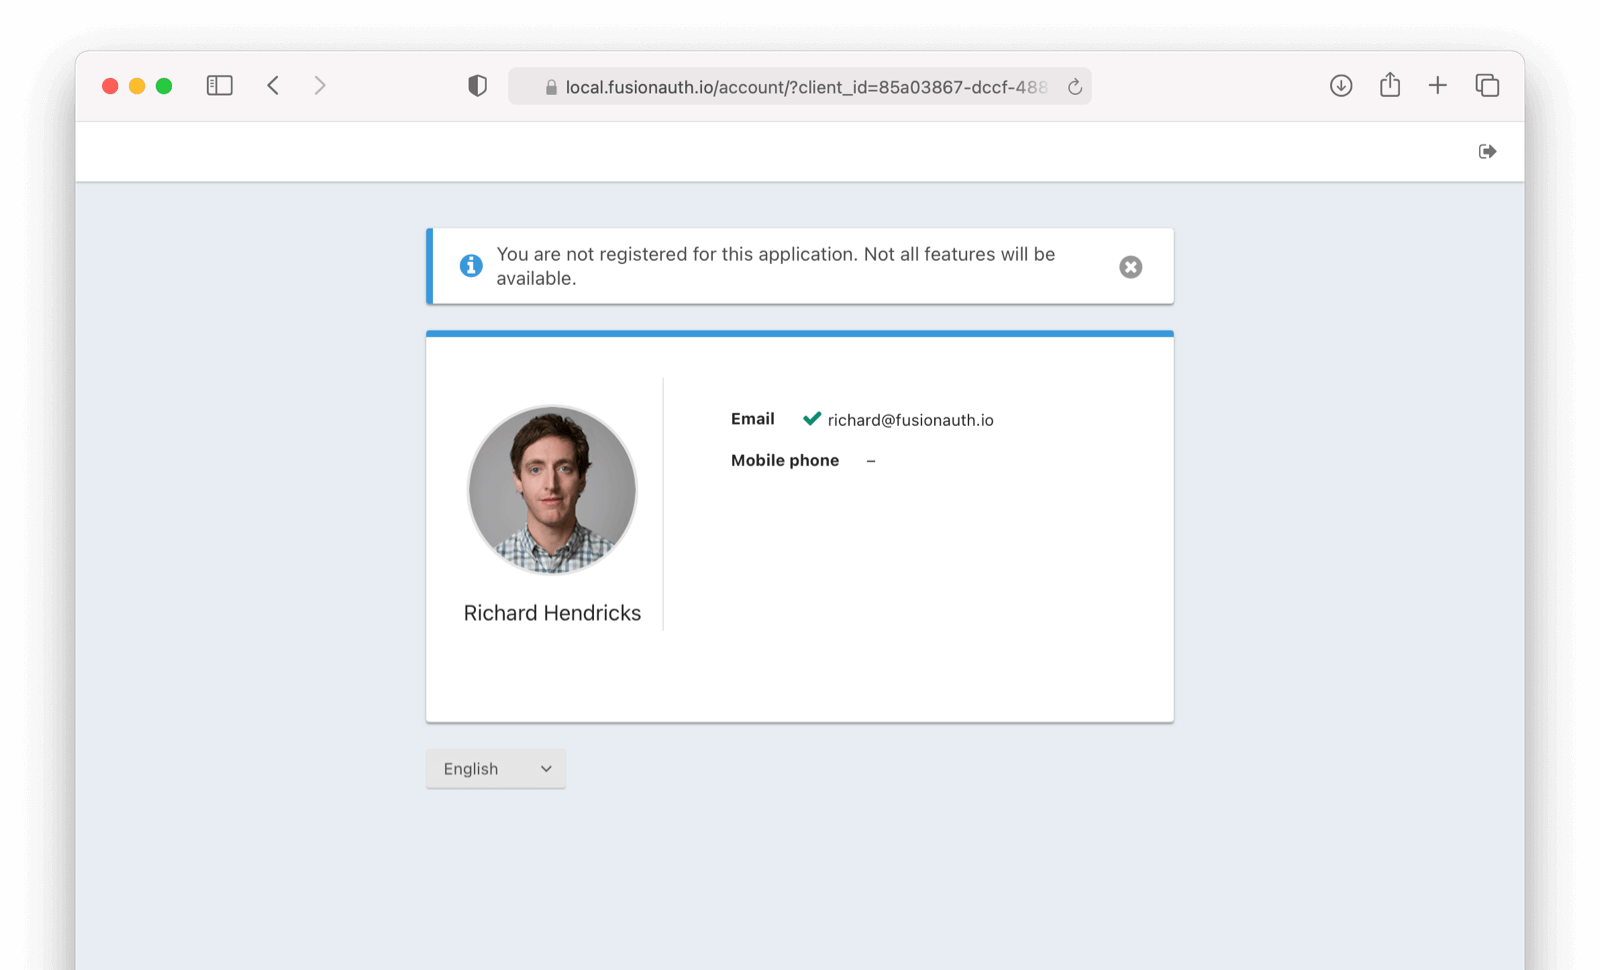
Not Registered#
Please note, if you are not registered for an application, you will not be able to manage your account information from these self service account management.
From the admin UI click on Users -> Manage -> Registrations Tab -> Add registration -> Add User . Another option is to be programmatically added to the application through an API call.
Registered But Configuration Needed#
If you see this, you have to select a form to use.
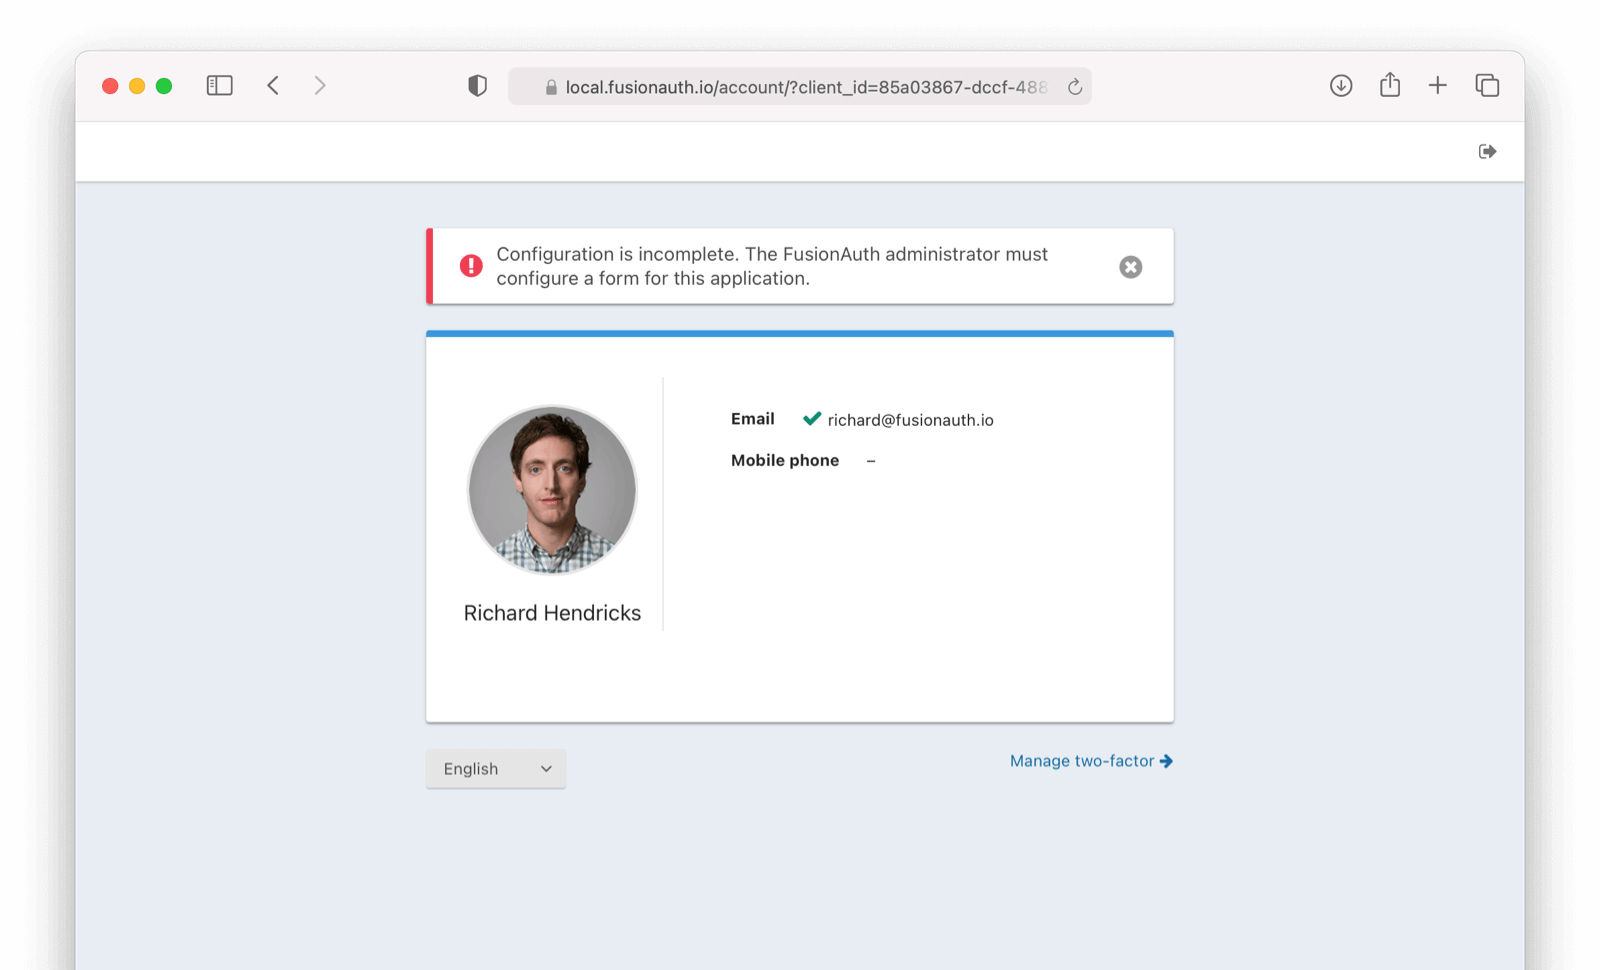
To set a self service form, click under Applications -> Edit Application -> Registration
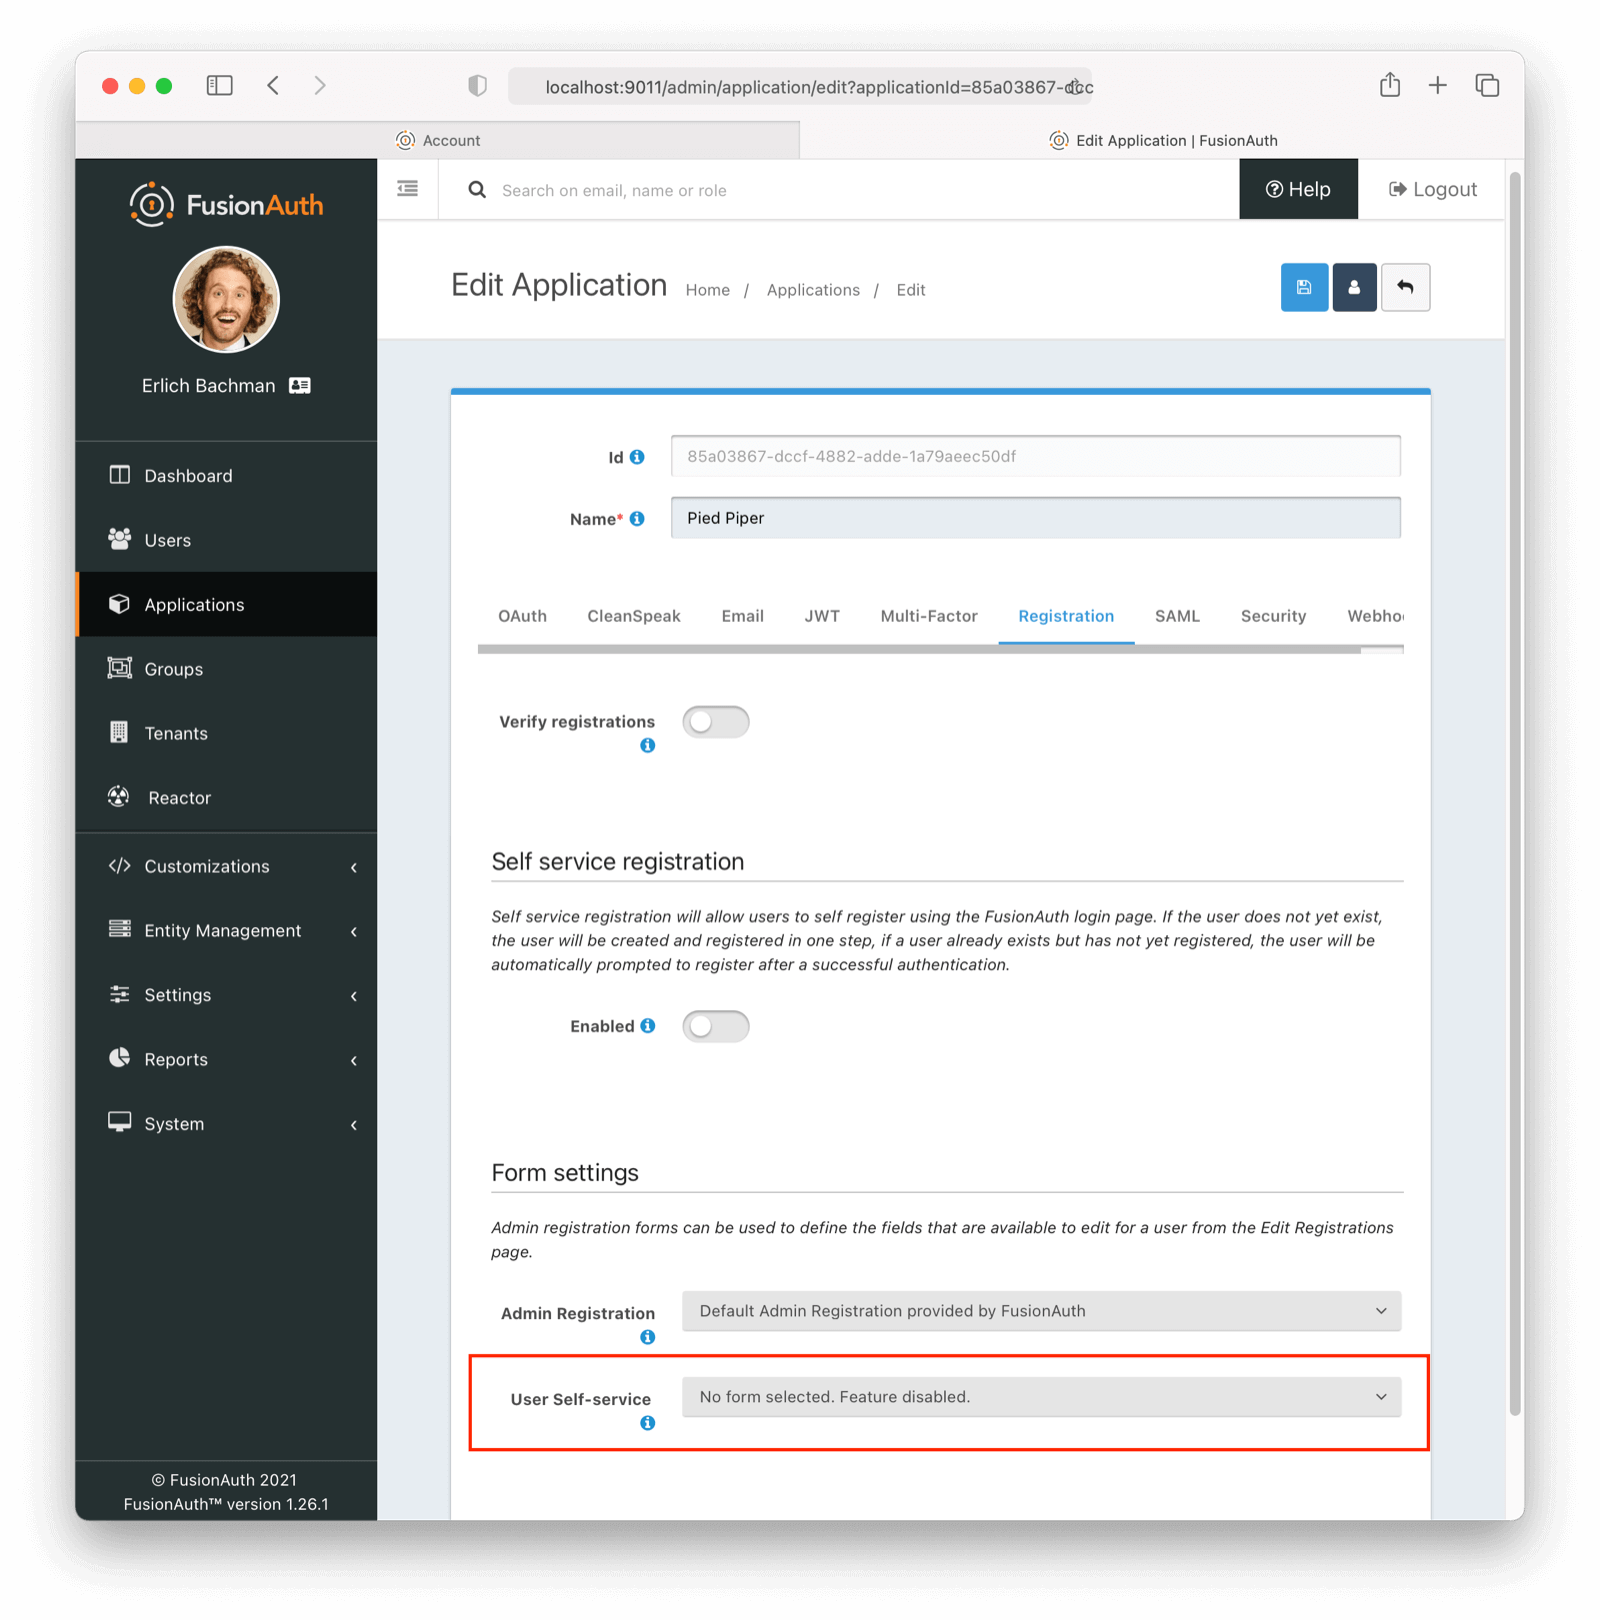
Select the form you would like to use. A default form is shipped with FusionAuth.
Troubleshooting Install with RPMs#
Please review the procedure outlined below if attempting to perform a clean install or upgrade using RPM's and have experienced a failure that you have been unable to resolve. Please only consider these steps after other attempts have been unsuccessful.
This will completely remove FusionAuth App and FusionAuth Search from your server. Proceed with caution.
It is always recommended you back up the database before performing an upgrade or troubleshooting steps outlined here.
The following steps will produce a clean installation preserving:
- The FusionAuth config file found in
/usr/local/fusionauth/config/fusionauth.properties - The Elasticsearch index found in
/usr/local/fusionauth/data
Below assumes both fusionauth-app and fusionauth-search will be uninstalled and reinstalled together. If you are not using fusionauth-search, you may ignore the steps related to this service.
Manual Removal Steps#
- Remove the RPM package for
fusionauth-searchandfusionauth-app
sudo rpm -e fusionauth-searchsudo rpm -e fusionauth-app
- Manually delete anything leftover from RPM
sudo rm -rf /usr/local/fusionauth/fusionauth-search/sudo rm -rf /usr/local/fusionauth/fusionauth-app/sudo rm -rf /usr/local/fusionauth/bin/
- After removal, the following directories will remain:
/usr/local/fusionauth/config//usr/local/fusionauth/data/- In some cases this directory may not exist/usr/local/fusionauth/java/- While safe to delete, it is not necessary.
- Reinstall
fusionauth-appandfusionauth-search.
- Download the desired version of
fusionauth-appandfusionauth-search- Direct download.
sudo rpm -i <file_to_be_installed>.rpm
Troubleshooting User Import#
If you are importing password hashes, ensure you provide only the hash in the password import field. For some formats, you'll need to separate out the hash and the salt when using the Import API. If you do not, the import will succeed, but the user will not be able to log in, as the hash will not be correct.
For example, a bcrypt value of $2a$10$N9qo8uLOickgx2ZMRZoMyeIjZAgcfl7p92ldGxad68LJZdL17lhWy would be split out to the following import fields:
factor:10salt:N9qo8uLOickgx2ZMRZoMyepassword:IjZAgcfl7p92ldGxad68LJZdL17lhWy
Learn more about the bcrypt hash format.
Troubleshooting Application Startup#
If you receive a message similar to this one in your system log:
ERROR io.fusionauth.api.service.system.NodeService - Node [c98263dc-7f12-4879-93c1-f1a634912a51] cannot be added. The runtime mode is [Development] and this node in [Production] mode.This means that your nodes are in different runtime modes. This will not work and may cause undetermined behavior. All nodes of a FusionAuth cluster must be running in the same mode, either Production or Development.
To resolve this issue, take the following steps:
- Stop all existing nodes, whether they are running as containers or processes.
- Review configuration to confirm that all nodes are configured with the same runtime mode.
- Restart the nodes.
Troubleshooting API Calls#
When your API call isn't working, taking the following steps can help you troubleshoot it.
Use the REST API directly. While the client libraries are useful abstractions, removing them helps narrow down the issues. Curl or wget are great choices.
When using a command line tool like curl, make sure you set the headers appropriately. These headers are commonly forgotten:
Authorization: the API key in most cases. Review the API Authentication documentation for more information.Content-type: this is almost alwaysapplication/jsonfor any call which is not aGETrequest. This header can be omitted for aGETrequest. If you don't specify this header when making a non-GETAPI call, you will see an unexpected error.X-FusionAuth-TenantId: only required when you have two or more tenants and the tenant cannot be inferred from the request or API key. However, you can always provide this header.
Additionally, it can be helpful to copy and paste the JSON body from the documentation for the call you are trying to debug.
If you are seeing a 401 error, confirm that the API key has the required permissions. Test with a 'super user' key to ensure you have the headers and body correct.
Ensure you are making requests to the correct host and that your proxy, if using one, passes API requests correctly. When troubleshooting, call the FusionAuth instance directly if possible. This removes the proxy, yet another possible source of issues.
Troubleshooting FusionAuth Cloud API Calls#
If you are on FusionAuth Cloud and you find that some requests are failing, you may be being rate limited.
This isn't intentional, but an automated part of our infrastructure to ensure FusionAuth Cloud performance and security.
If you are rate limited but need these requests to occur, please open a support ticket with details.
Troubleshooting Custom Password Hashing Plugins#
If your plugin is not installed, ensure:
- You added the binding with a unique name to a Guice module.
- The jar file is valid and contains both the Guice module and the implementation of the
PasswordEncryptorclass. - The plugin jar file is in the top level
pluginsdirectory (the peer to thebinandconfigdirectories). This directory may need to be created. - The jar file and the
pluginsdirectory are accessible to the FusionAuth instance.
If you have verified the plugin is installed via the administrative user interface or log messages, but a user with a known password cannot login successfully:
- Ensure that users are imported using the correct name in the encryptionScheme field. Review other settings such as the factor as well.
- Add tests to double check that you are hashing the passwords in the way you expect.
Troubleshooting Proxies#
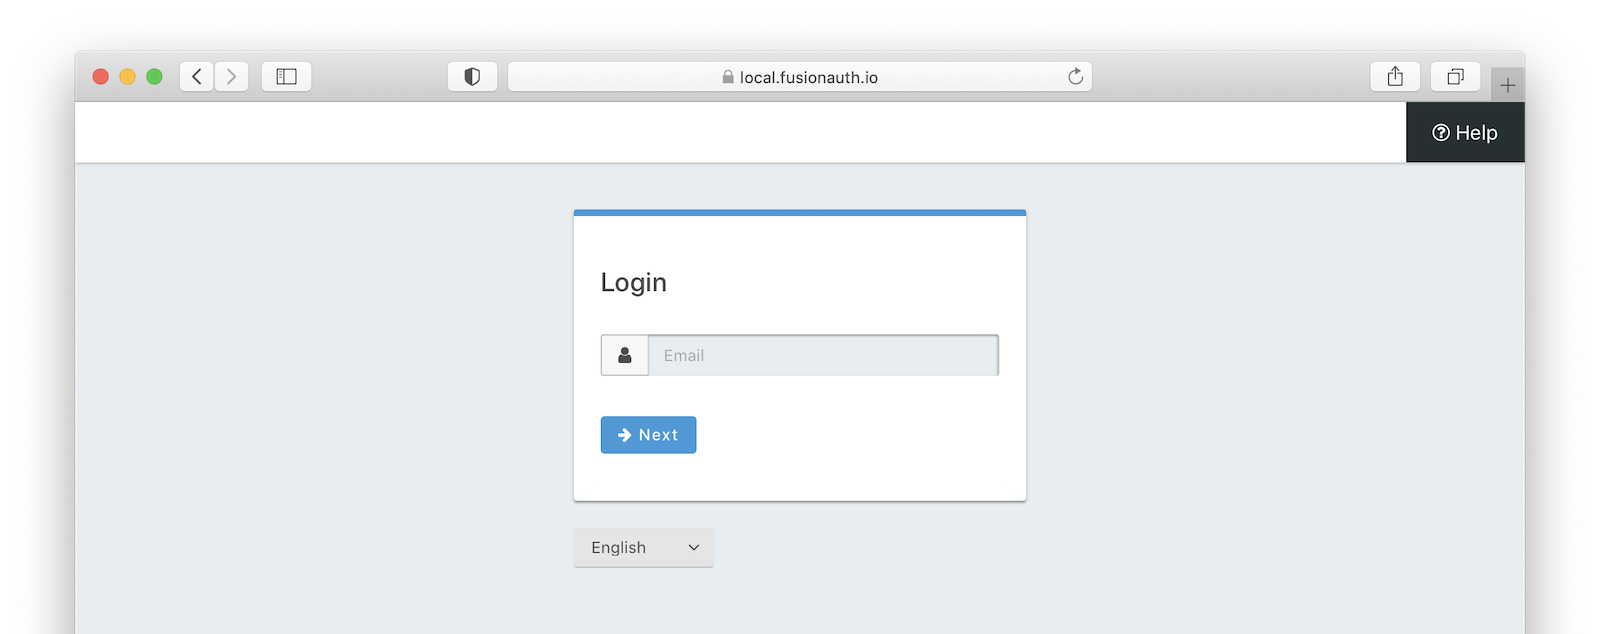
If you see the below error when you are trying to log in, ensure that all your headers are set correctly.
Common Proxy Error Message
Something doesn't seem right. You have been logged out of FusionAuth. If you were attempting to log in please click 'Return to Login' to retry.If you are using FusionAuth Cloud, ensure that you have added the hostname of the proxy to which the initial request has been made to your list of custom domains.
For additional troubleshooting, it is helpful to remove any proxies one at a time and try to log in. This can help narrow down the source of the problem.
When you log into the FusionAuth administrative user interface, you may receive additional troubleshooting information. If you see the below image, this indicates you need to configure the headers for FusionAuth to operate correctly.
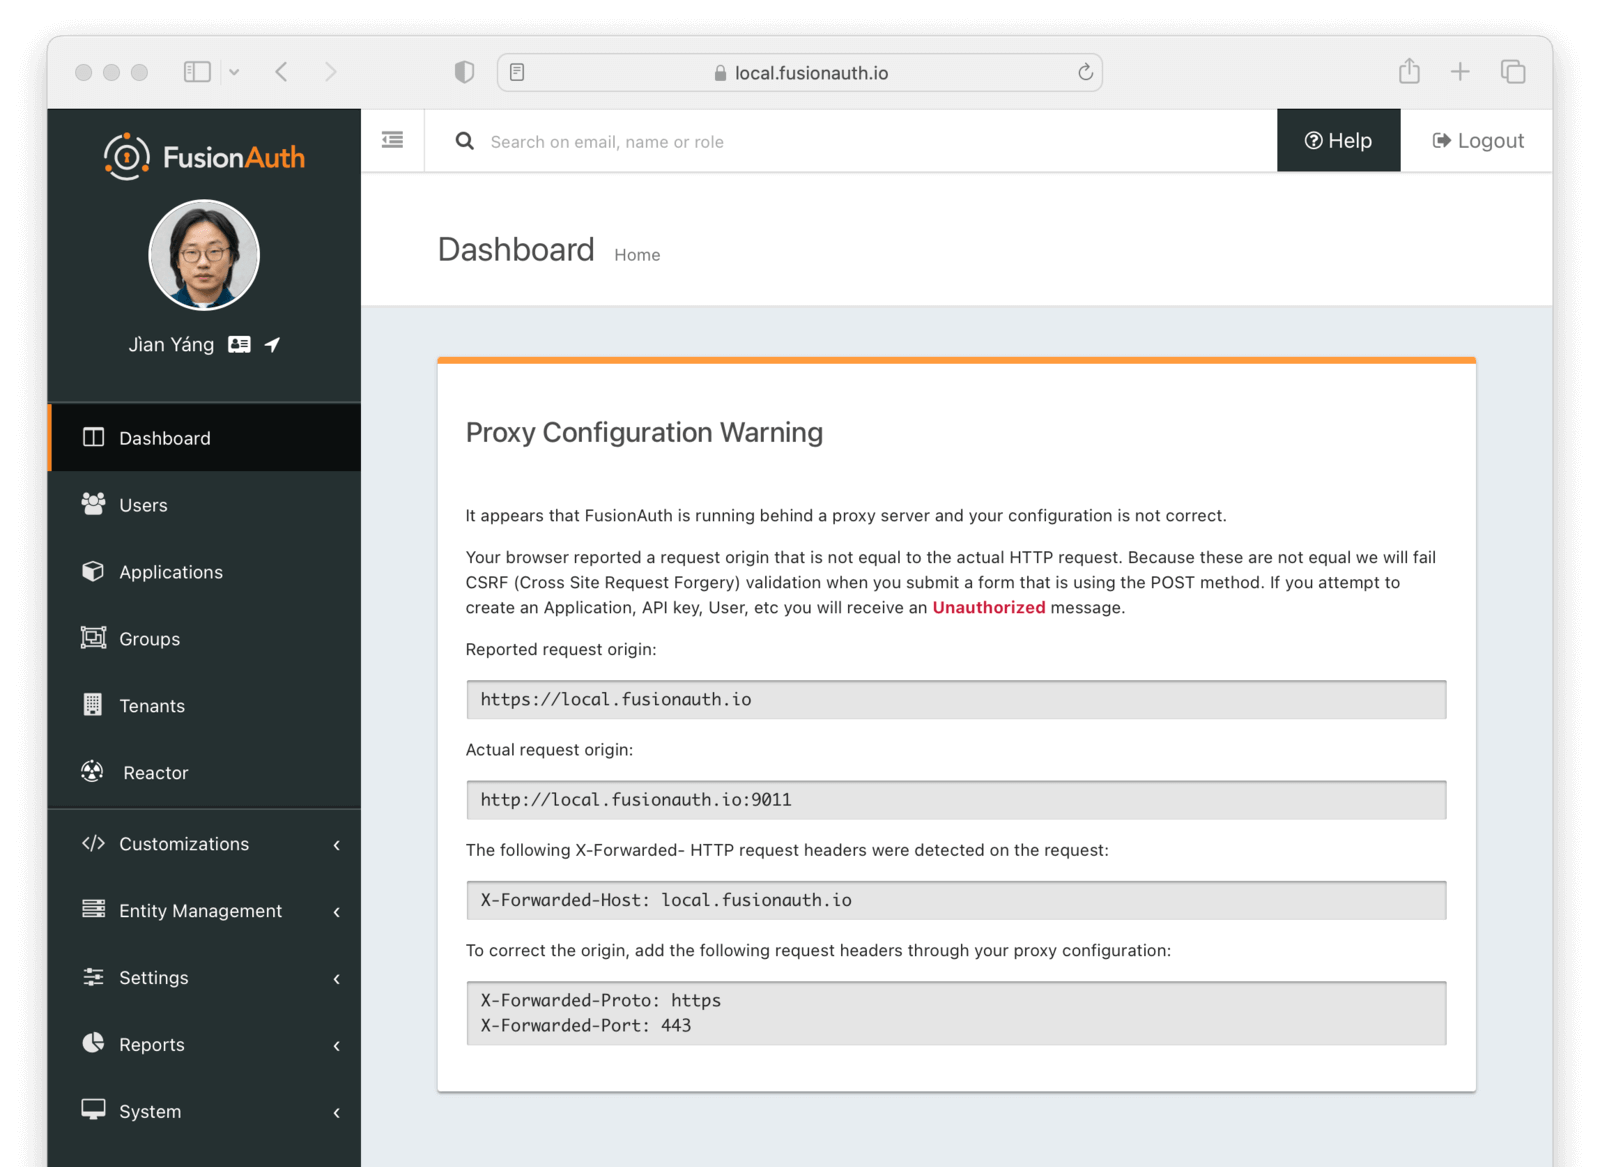
The specific errors you see may be different based on the particular headers you are missing.
Troubleshooting Kafka Integrations#
Kafka is a powerful but complicated piece of software and you'll need Kafka expertise to run a production Kafka setup to consume all of your FusionAuth events. If you get stuck integrating Kafka, try the following.
Troubleshooting the FusionAuth-Side of the Integration#
- Check that you included a topic when adding the integration.
- Check that you saved the integration after configuring and testing it.
- Check the FusionAuth logs for errors relating to Kafka.
- If you're using Docker Compose, check that you've correctly mapped the ports for both Kafka and Zookeeper and correctly configured a Docker network so that FusionAuth can connect to Kafka.
Troubleshooting your Kafka Installation#
It can be useful to run quick commands directly against your Kafka cluster to create topics and log events. You can download a version of Kafka from the official Kafka website and extract it to your local machine. This will give you some utility scripts to directly interact with your Kafka cluster.
If you're using a Docker Compose setup locally, add an entry to your hosts file to map kafka to 127.0.0.1.
127.0.0.1 kafkaYou can then create a topic (for example, fa-events) that you can use in FusionAuth by running the following.
bin/kafka-topics.sh --create --topic fa-events --bootstrap-server kafka:9092You can set a consumer to watch for new events with the following command. If everything is correctly set up, you'll see events streamed to this consumer and logged to your shell as you carry out actions in FusionAuth.
bin/kafka-console-consumer.sh --topic fa-events --from-beginning --bootstrap-server kafka:9092Or if you need to talk to a remote Kafka cluster, you can create a file locally called consumer.properties with credentials for your remote cluster.
bootstrap.servers=pkc-6ojv2.us-west4.gcp.confluent.cloud:9092
client.dns.lookup=use_all_dns_ips
sasl.jaas.config=org.apache.kafka.common.security.plain.PlainLoginModule   required username='ZN6LJ5UHSXWLW2LR'   password='M9T8b75OPspFAS37Do5Baq7jIS+hi7h7bY8MRrfVff5lz8xeCweaRTO8GD3nKXUD';
sasl.mechanism=PLAIN
security.protocol=SASL_SSL
session.timeout.ms=45000
And then run the scripts above passing in the file with the --consumer.config flag and the remote bootstrap server. For example, use the following to see events posted to your fa-events topic in a remote cluster.
bin/kafka-console-consumer.sh --bootstrap-server pkc-6ojv2.us-west4.gcp.confluent.cloud:9092 --consumer.config consumer.properties --topic fa-eventsTroubleshooting User Search With Elasticsearch#
When you are troubleshooting Elasticsearch queries, running them against the Elasticsearch server is helpful.
If you are running in FusionAuth Cloud, you cannot access Elasticsearch in the manner described here.
When running FusionAuth locally in Docker, you can expose the Elasticsearch port by adding the following lines to your docker-compose.yml file and restarting.
Exposing Elasticsearch Ports
# ... other stuff
  search:
# ... other stuff
    ports:
      - 9200:9200
Once you've opened up the port, you can query Elasticsearch directly. Here's an example of a single field query.
Example Of Querying Elasticsearch Directly
curl -X GET "localhost:9200/_search?pretty" -H 'Content-Type: application/json' -d'
{
  "query": {
    "match": {
      "data.Company": {
        "query": "PiedPiper"
      }
    }
  }
}'
When you run this curl command, you'll get back results similar to below.
Results Of Querying Elasticsearch Directly
{
  "took" : 6,
  "timed_out" : false,
  "_shards" : {
    "total" : 10,
    "successful" : 10,
    "skipped" : 0,
    "failed" : 0
  },
  "hits" : {
    "total" : {
      "value" : 3,
      "relation" : "eq"
    },
    "max_score" : 2.0,
    "hits" : [
      {
        "_index" : "fusionauth_user",
        "_type" : "_doc",
        "_id" : "00000000-0000-0000-0000-000000000003",
        "_score" : 2.0
      },
      {
        "_index" : "fusionauth_user",
        "_type" : "_doc",
        "_id" : "00000000-0000-0000-0000-000000000006",
        "_score" : 2.0
      },
      {
        "_index" : "fusionauth_user",
        "_type" : "_doc",
        "_id" : "00000000-0000-0000-0000-000000000005",
        "_score" : 2.0
      }
    ]
  }
}
When debugging, examine the hits.hits array. The _id value corresponds to the user Id that matched your query. If the content or number of users returned are different than expected, modify the query.
Exposing A Local Instance To The Internet#
FusionAuth lets you develop locally with a full featured auth system. To do so, install FusionAuth using one of the options, such as Homebrew or a .deb file.
There are situations where you want to expose your local FusionAuth instance to the internet. Some examples include:
- debugging an integration with an external system
- trying to show your custom themes to a developer on your team in a different office
- verifying the behavior of cookies over a secure connection without setting up certificates
- testing your login pages on a different device such as a phone or tablet
To help with these situations, use ngrok. This tool exposes your local FusionAuth instance and gives it a publicly accessible URL.
To set up ngrok, do the following:
- download and install
ngrok(free registration required) - start your FusionAuth instance
- run
ngrok:ngrok http --request-header-add 'X-Forwarded-Port:443' 9011
You need the request header argument to avoid proxy issues from FusionAuth.
You'll then see a screen similar to this.
ngrok                                                           (Ctrl+C to quit)

Add Okta or Azure to protect your ngrok dashboard with SSO: https://ngrok.com/dashSSO

Session Status                online
Session Expires               1 hour, 59 minutes
Terms of Service              https://ngrok.com/tos
Version                       3.1.0
Region                        United States (us)
Latency                       58ms
Web Interface                 http://127.0.0.1:4040
Forwarding                    https://627d-131-226-35-36.ngrok.io -> http://localhost:9011

Connections                   ttl     opn     rt1     rt5     p50     p90
                              0       0       0.00    0.00    0.00    0.00
If you are exposing a local web application as well as FusionAuth using ngrok, make sure you update your Authorized redirect URLs in the Application configuration.
Troubleshooting Multi-Factor Authentication#
If using the email MFA method and your emails don't get sent, ensure you have configured your SMTP settings correctly. See the Email Troubleshooting section for more.
If using the phone MFA method and your SMS/voice messages don't get sent, ensure that you have tested the messenger configuration, enabled debugging, and reviewed the event log.
If you have enabled MFA on a user but are not prompted for MFA in the login process, ensure the MFA method associated with the user is enabled on the tenant.
Common Errors#
Access Denied#
If you see an Access Denied error in your browser while using the FusionAuth UI, this could be caused by a misconfigured CDN or proxy. This error often produces a 4xx error code such as a 403. To fix this issue, ensure that your CDN, proxy, or gateway does not prevent traffic from flowing directly to FusionAuth. FusionAuth can handle all HTTP traffic and any network handling between the browser and FusionAuth should be as simple as possible.
FusionAuth Stops Unexpectedly#
If you are running FusionAuth on a server with limited memory, it may stop unexpectedly. This can also happen when many other applications are competing for memory on the server. Make sure you verify you are running with the minimum requirements specified in the system requirements.
When FusionAuth is killed because of an out-of-memory issue (OOM), it dies with no explanation in the FusionAuth logs. You might see lines like this in server system logs (typically under /var/log/):
Dec 30 12:00:38 vps kernel: Out of memory: Kill process 30047 (java) score 98 or sacrifice childThe OOM killer will begin killing services once the kernel runs out of memory. The solution will be to allocate less memory to FusionAuth or to increase the amount of RAM available.
You can do the former with the fusionauth-app.memory setting. See the configuration reference for more details.
You may do the latter by running a larger server or running fewer competing applications. In particular, applications used by FusionAuth such as Elasticsearch or the database may be moved off to external servers.
FusionAuth Docker Containers Stop Unexpectedly#
The same memory issues can happen with Docker. If you are running FusionAuth in a container you may see a log line like this, where fusionauth_1 is the name of the container:
fusionauth_1 exited with code 137The remedy is to increase the amount of memory available to the FusionAuth docker container using the FUSIONAUTH_APP_MEMORY environment variable. Or, if the Elasticsearch container is failing, the FUSIONAUTH_SEARCH_MEMORY variable.
You also may need to increase the amount of memory for the docker environment where the containers run. How to do this varies based on how you are running Docker; please consult that software's documentation.
MapperParsingException#
If you are using the Elasticsearch search engine, attributes in the user.data, registration.data, and entity.data fields are indexed. The data fields can contain arbitrary JSON objects.
If your user search is failing mysteriously and you see an error like this one in your system logs:
org.elasticsearch.index.mapper.MapperParsingException: failed to parse field [data.field] of type [text] in document with id 'b8f1ad7d-def0-48d1-a983-aeabf0122b90'. Preview of field's value: '{bar=123}'or
org.elasticsearch.index.mapper.MapperParsingException: Could not dynamically add mapping for field [field.email]. Existing mapping for [data.field] must be of type object but found [text].This means that the type of a field in one of the data fields was changed.
In this case, data.field was originally text, but the request causing this error message was trying to put an object into that attribute.
This can interfere with user imports, searches and more.
The schema is reset every time you issue a reindex command so manual fixes will not be persisted.
You have two options. You can fix your data so that each custom field has a consistent data type. Or you can instruct Elasticsearch to ignore fields that don't match the data type it expects.
Fixing Your Data#
To fix your data, follow these steps:
- Understand how the field types changed.
- Find the user's Id.
- Modify the problematic data fields via the User API to remove the mismatched fields.
Unfortunately, you often can't search for the user by email, username, or other characteristics using the User Search API. If you have the user's Id, which may be available in the error messages, you can use that. Searching by UUID doesn't use Elasticsearch. You can also try to search for all emails, using a queryString of email:* if you don't have too many users. Another option is to change to the database search engine to find the user. You can switch back to Elasticsearch after you have corrected the data field.
If you have a support contract, please open a ticket and we'll help you out. If not, please back up your FusionAuth database and test the fix thoroughly in a staging environment before applying it to your production instance.
Suppose you had a data field called customPermissions which was a string on some users and an object on others. Below is a script which converts the type of customPermissions from string to an object for all users.
Script to convert mismatched data fields
import FusionAuthClient from "@fusionauth/typescript-client"
const client = new FusionAuthClient('YOUR_API_KEY', 'https://yourinstance.fusionauth.io')

const response = await client.searchUsersByQuery( request: {queryString: "email:*"}) // or whatever other query gets you a list of users
for (let i = 0; i < response.data.users.length; i++) {
  const user = response.data.users[i];
  if (typeof user.data.customPermissions === "string") {
     const body = {
               user: { data: { customPermissions: JSON.parse(user.data.customPermissions) } }
     }
     await client.patchUser(user.id, { request: body })
  }
}
The complexity of the fix depends on how you find affected users and how far apart the data fields in their type. For instance, the above would be more complicated if customPermissions were sometimes a string, sometimes an object, sometimes an integer, and sometimes were missing.
If you can't fix your data, you can instruct Elasticsearch to ignore mismatches.
Ignore Fields With a Mismatched Data Type#
This option is only available to self-hosted FusionAuth instances.
It is not available in FusionAuth Cloud.
You can configure Elasticsearch to ignore fields that don't match their expected data type. This is done with the ignore_malformed parameter.
You can apply this to the FusionAuth Elasticsearch indices.
Whenever you reindex, this setting will be lost, so ensure you can reapply it, via a post reindex build step.
There's an open issue to expose this configuration from within FusionAuth.
When fields are mismatched, you won't be able to search on the ones that have been ignored.
In the example above, when data.field is an object, you won't be able to search on that, because Elasticsearch ignores it.
However, the data will be safely stored in FusionAuth.
Elasticsearch is only used for searching, not for data storage.
The below video outlines this approach in more detail.